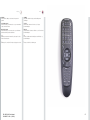
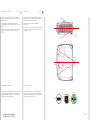
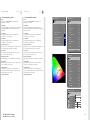
1
USER MANUAL
dnx
DS+305/DS+305 User Manual
020-000057-01 Rev. 1 (06/08)
• DS+305
• DS+305W
user’s guide
Benutzer Handbuch
guide d’utilisateur
guía del usario
manuale d’uso
bruksanvisning
TABLE OF CONTENTS
english
INTRODUCTION. . . . . . . . . . . . . . . . . . . . . . . . . . . . . . . . . . . . . . . . . . . . . . . . . . . . . . . . . . . . . . . . . . . . . . . . 4
SAFETY & WARNINGS. . . . . . . . . . . . . . . . . . . . . . . . . . . . . . . . . . . . . . . . . . . . . . . . . . . . . . . . . . . . . . . . . . . 6
WARNING SYMBOLS. . . . . . . . . . . . . . . . . . . . . . . . . . . . . . . . . . . . . . . . . . . . . . . . . . . . . . . . . . . . . . . . . 12
SUPPLIED MATERIAL. . . . . . . . . . . . . . . . . . . . . . . . . . . . . . . . . . . . . . . . . . . . . . . . . . . . . . . . . . . . . . . . . . . 14
OVERVIEW. . . . . . . . . . . . . . . . . . . . . . . . . . . . . . . . . . . . . . . . . . . . . . . . . . . . . . . . . . . . . . . . . . . . . . . . . . . 16
KEYPAD . . . . . . . . . . . . . . . . . . . . . . . . . . . . . . . . . . . . . . . . . . . . . . . . . . . . . . . . . . . . . . . . . . . . . . . . . . . . 18
INDICATORS . . . . . . . . . . . . . . . . . . . . . . . . . . . . . . . . . . . . . . . . . . . . . . . . . . . . . . . . . . . . . . . . . . . . . . . . . 20
INDICATOR LIGHT . . . . . . . . . . . . . . . . . . . . . . . . . . . . . . . . . . . . . . . . . . . . . . . . . . . . . . . . . . . . . . . . . . . 20
PERMANENT BLUE LIGHT . . . . . . . . . . . . . . . . . . . . . . . . . . . . . . . . . . . . . . . . . . . . . . . . . . . . . . . . . . . . 20
PERMANENT ORANGE LIGHT. . . . . . . . . . . . . . . . . . . . . . . . . . . . . . . . . . . . . . . . . . . . . . . . . . . . . . . . . . 20
FLASHING ORANGE LIGHT . . . . . . . . . . . . . . . . . . . . . . . . . . . . . . . . . . . . . . . . . . . . . . . . . . . . . . . . . . . . 20
FLASHING RED LIGHT. . . . . . . . . . . . . . . . . . . . . . . . . . . . . . . . . . . . . . . . . . . . . . . . . . . . . . . . . . . . . . . . 20
PERMANENT RED LIGHT. . . . . . . . . . . . . . . . . . . . . . . . . . . . . . . . . . . . . . . . . . . . . . . . . . . . . . . . . . . . . . 20
NO LIGHT. . . . . . . . . . . . . . . . . . . . . . . . . . . . . . . . . . . . . . . . . . . . . . . . . . . . . . . . . . . . . . . . . . . . . . . . . . 20
REMOTE CONTROL. . . . . . . . . . . . . . . . . . . . . . . . . . . . . . . . . . . . . . . . . . . . . . . . . . . . . . . . . . . . . . . . . . . . 22
CONNECTOR PANEL. . . . . . . . . . . . . . . . . . . . . . . . . . . . . . . . . . . . . . . . . . . . . . . . . . . . . . . . . . . . . . . . . . . 28
SET UP. . . . . . . . . . . . . . . . . . . . . . . . . . . . . . . . . . . . . . . . . . . . . . . . . . . . . . . . . . . . . . . . . . . . . . . . . . . . . . 30
VIDEO. . . . . . . . . . . . . . . . . . . . . . . . . . . . . . . . . . . . . . . . . . . . . . . . . . . . . . . . . . . . . . . . . . . . . . . . . . . . . 30
COMPUTER. . . . . . . . . . . . . . . . . . . . . . . . . . . . . . . . . . . . . . . . . . . . . . . . . . . . . . . . . . . . . . . . . . . . . . . . 30
IMAGE ADJUSTMENTS . . . . . . . . . . . . . . . . . . . . . . . . . . . . . . . . . . . . . . . . . . . . . . . . . . . . . . . . . . . . . . . . . 32
PIN CODE . . . . . . . . . . . . . . . . . . . . . . . . . . . . . . . . . . . . . . . . . . . . . . . . . . . . . . . . . . . . . . . . . . . . . . . . . . . 32
CEILING MOUNT . . . . . . . . . . . . . . . . . . . . . . . . . . . . . . . . . . . . . . . . . . . . . . . . . . . . . . . . . . . . . . . . . . . . . . 34
VERTICAL OPERATION. . . . . . . . . . . . . . . . . . . . . . . . . . . . . . . . . . . . . . . . . . . . . . . . . . . . . . . . . . . . . . . . . . 34
USING THE PROJECTOR. . . . . . . . . . . . . . . . . . . . . . . . . . . . . . . . . . . . . . . . . . . . . . . . . . . . . . . . . . . . . . . . 36
RS 232 AND LAN CONTROL . . . . . . . . . . . . . . . . . . . . . . . . . . . . . . . . . . . . . . . . . . . . . . . . . . . . . . . . . . . 38
TIMER . . . . . . . . . . . . . . . . . . . . . . . . . . . . . . . . . . . . . . . . . . . . . . . . . . . . . . . . . . . . . . . . . . . . . . . . . . . . 40
IMAGE CALIBRATION AND CORRECTION. . . . . . . . . . . . . . . . . . . . . . . . . . . . . . . . . . . . . . . . . . . . . . . . . 42
MENU SYSTEM . . . . . . . . . . . . . . . . . . . . . . . . . . . . . . . . . . . . . . . . . . . . . . . . . . . . . . . . . . . . . . . . . . . . . . . 44
OVERVIEW. . . . . . . . . . . . . . . . . . . . . . . . . . . . . . . . . . . . . . . . . . . . . . . . . . . . . . . . . . . . . . . . . . . . . . . . . 44
TOP MENU. . . . . . . . . . . . . . . . . . . . . . . . . . . . . . . . . . . . . . . . . . . . . . . . . . . . . . . . . . . . . . . . . . . . . . . . . 44
NAVIGATING THE MENU SYSTEM. . . . . . . . . . . . . . . . . . . . . . . . . . . . . . . . . . . . . . . . . . . . . . . . . . . . . . . 44
PICTURE MENU. . . . . . . . . . . . . . . . . . . . . . . . . . . . . . . . . . . . . . . . . . . . . . . . . . . . . . . . . . . . . . . . . . . . . 46
COLOR MANAGEMENT SUB MENU. . . . . . . . . . . . . . . . . . . . . . . . . . . . . . . . . . . . . . . . . . . . . . . . . . . . . . 50
ADVANCED SUB MENU. . . . . . . . . . . . . . . . . . . . . . . . . . . . . . . . . . . . . . . . . . . . . . . . . . . . . . . . . . . . . . . 52
ENHANCEMENTS SUB MENU. . . . . . . . . . . . . . . . . . . . . . . . . . . . . . . . . . . . . . . . . . . . . . . . . . . . . . . . . . 54
INSTALLATION SUB MENU. . . . . . . . . . . . . . . . . . . . . . . . . . . . . . . . . . . . . . . . . . . . . . . . . . . . . . . . . . . . . 56
LAMP SUB MENU . . . . . . . . . . . . . . . . . . . . . . . . . . . . . . . . . . . . . . . . . . . . . . . . . . . . . . . . . . . . . . . . . . . 58
SETTINGS SUB MENU. . . . . . . . . . . . . . . . . . . . . . . . . . . . . . . . . . . . . . . . . . . . . . . . . . . . . . . . . . . . . . . . 60
PROFILES SUB MENU. . . . . . . . . . . . . . . . . . . . . . . . . . . . . . . . . . . . . . . . . . . . . . . . . . . . . . . . . . . . . . . . 64
LANGUAGES SUB MENU. . . . . . . . . . . . . . . . . . . . . . . . . . . . . . . . . . . . . . . . . . . . . . . . . . . . . . . . . . . . . . 64
STATUS SUB MENU. . . . . . . . . . . . . . . . . . . . . . . . . . . . . . . . . . . . . . . . . . . . . . . . . . . . . . . . . . . . . . . . . . 66
TROUBLE SHOOTING . . . . . . . . . . . . . . . . . . . . . . . . . . . . . . . . . . . . . . . . . . . . . . . . . . . . . . . . . . . . . . . . . . 68
NO IMAGE . . . . . . . . . . . . . . . . . . . . . . . . . . . . . . . . . . . . . . . . . . . . . . . . . . . . . . . . . . . . . . . . . . . . . . . . . 68
DARK IMAGE. . . . . . . . . . . . . . . . . . . . . . . . . . . . . . . . . . . . . . . . . . . . . . . . . . . . . . . . . . . . . . . . . . . . . . . 68
FLICKERING IMAGE. . . . . . . . . . . . . . . . . . . . . . . . . . . . . . . . . . . . . . . . . . . . . . . . . . . . . . . . . . . . . . . . . . 68
UNSHARP IMAGE. . . . . . . . . . . . . . . . . . . . . . . . . . . . . . . . . . . . . . . . . . . . . . . . . . . . . . . . . . . . . . . . . . . . 68
MAINTENANCE . . . . . . . . . . . . . . . . . . . . . . . . . . . . . . . . . . . . . . . . . . . . . . . . . . . . . . . . . . . . . . . . . . . . . . . 70
HEAVY DUTY AND CONTINOUS USE. . . . . . . . . . . . . . . . . . . . . . . . . . . . . . . . . . . . . . . . . . . . . . . . . . . . . 70
SERVICE INFORMATION . . . . . . . . . . . . . . . . . . . . . . . . . . . . . . . . . . . . . . . . . . . . . . . . . . . . . . . . . . . . . . . . 70
LAMP CHANGE . . . . . . . . . . . . . . . . . . . . . . . . . . . . . . . . . . . . . . . . . . . . . . . . . . . . . . . . . . . . . . . . . . . . . . . 72
TECHNICAL DATA . . . . . . . . . . . . . . . . . . . . . . . . . . . . . . . . . . . . . . . . . . . . . . . . . . . . . . . . . . . . . . . . . . . . . 74
DECLARATIONS. . . . . . . . . . . . . . . . . . . . . . . . . . . . . . . . . . . . . . . . . . . . . . . . . . . . . . . . . . . . . . . . . . . . . . . 78
2
INHALTSVERZEICHNIS
deutsch
EINLEITUNG. . . . . . . . . . . . . . . . . . . . . . . . . . . . . . . . . . . . . . . . . . . . . . . . . . . . . . . . . . . . . . . . . . . . . . . . . . . 4
SICHERHEIT UND WARNHINWEISE. . . . . . . . . . . . . . . . . . . . . . . . . . . . . . . . . . . . . . . . . . . . . . . . . . . . . . . . . 6
WARNSYMBOLE . . . . . . . . . . . . . . . . . . . . . . . . . . . . . . . . . . . . . . . . . . . . . . . . . . . . . . . . . . . . . . . . . . . . 12
LIEFERUMFANG . . . . . . . . . . . . . . . . . . . . . . . . . . . . . . . . . . . . . . . . . . . . . . . . . . . . . . . . . . . . . . . . . . . . . . 14
ÜBERSICHT. . . . . . . . . . . . . . . . . . . . . . . . . . . . . . . . . . . . . . . . . . . . . . . . . . . . . . . . . . . . . . . . . . . . . . . . . . 16
TASTENFELD. . . . . . . . . . . . . . . . . . . . . . . . . . . . . . . . . . . . . . . . . . . . . . . . . . . . . . . . . . . . . . . . . . . . . . . . . 18
STROMVERSORGUNG. . . . . . . . . . . . . . . . . . . . . . . . . . . . . . . . . . . . . . . . . . . . . . . . . . . . . . . . . . . . . . . . 18
AUTO. . . . . . . . . . . . . . . . . . . . . . . . . . . . . . . . . . . . . . . . . . . . . . . . . . . . . . . . . . . . . . . . . . . . . . . . . . . . . 18
MENÜ. . . . . . . . . . . . . . . . . . . . . . . . . . . . . . . . . . . . . . . . . . . . . . . . . . . . . . . . . . . . . . . . . . . . . . . . . . . . . 18
PFEILTASTEN. . . . . . . . . . . . . . . . . . . . . . . . . . . . . . . . . . . . . . . . . . . . . . . . . . . . . . . . . . . . . . . . . . . . . . . 18
OK. . . . . . . . . . . . . . . . . . . . . . . . . . . . . . . . . . . . . . . . . . . . . . . . . . . . . . . . . . . . . . . . . . . . . . . . . . . . . . . 18
0-9. . . . . . . . . . . . . . . . . . . . . . . . . . . . . . . . . . . . . . . . . . . . . . . . . . . . . . . . . . . . . . . . . . . . . . . . . . . . . . . 18
SRC. . . . . . . . . . . . . . . . . . . . . . . . . . . . . . . . . . . . . . . . . . . . . . . . . . . . . . . . . . . . . . . . . . . . . . . . . . . . . . 18
KST . . . . . . . . . . . . . . . . . . . . . . . . . . . . . . . . . . . . . . . . . . . . . . . . . . . . . . . . . . . . . . . . . . . . . . . . . . . . . . 18
LEUCHTANZEIGEN. . . . . . . . . . . . . . . . . . . . . . . . . . . . . . . . . . . . . . . . . . . . . . . . . . . . . . . . . . . . . . . . . . . . . 20
LEUCHTANZEIGEN. . . . . . . . . . . . . . . . . . . . . . . . . . . . . . . . . . . . . . . . . . . . . . . . . . . . . . . . . . . . . . . . . . . 20
PERMANENT BLAUES LICHT. . . . . . . . . . . . . . . . . . . . . . . . . . . . . . . . . . . . . . . . . . . . . . . . . . . . . . . . . . . 20
PERMANENT ORANGES LICHT. . . . . . . . . . . . . . . . . . . . . . . . . . . . . . . . . . . . . . . . . . . . . . . . . . . . . . . . . 20
BLINKENDES ORANGES LICHT. . . . . . . . . . . . . . . . . . . . . . . . . . . . . . . . . . . . . . . . . . . . . . . . . . . . . . . . . 20
BLINKENDES ROTES LICHT. . . . . . . . . . . . . . . . . . . . . . . . . . . . . . . . . . . . . . . . . . . . . . . . . . . . . . . . . . . . 20
PERMANENT ROTES LICHT. . . . . . . . . . . . . . . . . . . . . . . . . . . . . . . . . . . . . . . . . . . . . . . . . . . . . . . . . . . . 20
KEIN LICHT . . . . . . . . . . . . . . . . . . . . . . . . . . . . . . . . . . . . . . . . . . . . . . . . . . . . . . . . . . . . . . . . . . . . . . . . 20
FERNBEDIENUNG . . . . . . . . . . . . . . . . . . . . . . . . . . . . . . . . . . . . . . . . . . . . . . . . . . . . . . . . . . . . . . . . . . . . . 22
FERNBEDIENUNG . . . . . . . . . . . . . . . . . . . . . . . . . . . . . . . . . . . . . . . . . . . . . . . . . . . . . . . . . . . . . . . . . . . . . 24
ANSCHLUSSBEREICH . . . . . . . . . . . . . . . . . . . . . . . . . . . . . . . . . . . . . . . . . . . . . . . . . . . . . . . . . . . . . . . . . 28
EINRICHTUNG. . . . . . . . . . . . . . . . . . . . . . . . . . . . . . . . . . . . . . . . . . . . . . . . . . . . . . . . . . . . . . . . . . . . . . 30
VIDEO-EINRICHTUNG . . . . . . . . . . . . . . . . . . . . . . . . . . . . . . . . . . . . . . . . . . . . . . . . . . . . . . . . . . . . . . . . 30
EINRICHTEN DES RECHNERS. . . . . . . . . . . . . . . . . . . . . . . . . . . . . . . . . . . . . . . . . . . . . . . . . . . . . . . . . . 30
BILDEINSTELLUNGEN . . . . . . . . . . . . . . . . . . . . . . . . . . . . . . . . . . . . . . . . . . . . . . . . . . . . . . . . . . . . . . . . . . 32
PIN CODE . . . . . . . . . . . . . . . . . . . . . . . . . . . . . . . . . . . . . . . . . . . . . . . . . . . . . . . . . . . . . . . . . . . . . . . . . . . 32
DECKENMONTAGE . . . . . . . . . . . . . . . . . . . . . . . . . . . . . . . . . . . . . . . . . . . . . . . . . . . . . . . . . . . . . . . . . . . . 34
VERTIKALER BETRIEB. . . . . . . . . . . . . . . . . . . . . . . . . . . . . . . . . . . . . . . . . . . . . . . . . . . . . . . . . . . . . . . . . . 34
EINSATZ DES PROJEKTORS. . . . . . . . . . . . . . . . . . . . . . . . . . . . . . . . . . . . . . . . . . . . . . . . . . . . . . . . . . . . . 36
RS 232 UND LAN STEUERUNG. . . . . . . . . . . . . . . . . . . . . . . . . . . . . . . . . . . . . . . . . . . . . . . . . . . . . . . . . 38
TIMER . . . . . . . . . . . . . . . . . . . . . . . . . . . . . . . . . . . . . . . . . . . . . . . . . . . . . . . . . . . . . . . . . . . . . . . . . . . . 40
BILDKALIBRIERUNG UND -KORREKTUR. . . . . . . . . . . . . . . . . . . . . . . . . . . . . . . . . . . . . . . . . . . . . . . . . . 42
MENÜSYSTEM. . . . . . . . . . . . . . . . . . . . . . . . . . . . . . . . . . . . . . . . . . . . . . . . . . . . . . . . . . . . . . . . . . . . . . . . 44
HAUPTMENÜ. . . . . . . . . . . . . . . . . . . . . . . . . . . . . . . . . . . . . . . . . . . . . . . . . . . . . . . . . . . . . . . . . . . . . . . 44
REALCOLOR SUB MENU. . . . . . . . . . . . . . . . . . . . . . . . . . . . . . . . . . . . . . . . . . . . . . . . . . . . . . . . . . . . . . 50
UNTERMENÜ ERWEITERT. . . . . . . . . . . . . . . . . . . . . . . . . . . . . . . . . . . . . . . . . . . . . . . . . . . . . . . . . . . . . 56
UNTERMENÜ SETUP. . . . . . . . . . . . . . . . . . . . . . . . . . . . . . . . . . . . . . . . . . . . . . . . . . . . . . . . . . . . . . . . . 60
UNTERMENÜ DIENSTPROGRAMME . . . . . . . . . . . . . . . . . . . . . . . . . . . . . . . . . . . . . . . . . . . . . . . . . . . . . 64
UNTERMENÜ DIENSTPROGRAMME . . . . . . . . . . . . . . . . . . . . . . . . . . . . . . . . . . . . . . . . . . . . . . . . . . . . . 64
PROBLEMBEHEBUNG . . . . . . . . . . . . . . . . . . . . . . . . . . . . . . . . . . . . . . . . . . . . . . . . . . . . . . . . . . . . . . . . . 68
KEIN BILD. . . . . . . . . . . . . . . . . . . . . . . . . . . . . . . . . . . . . . . . . . . . . . . . . . . . . . . . . . . . . . . . . . . . . . . . . . 68
DUNKLES BILD . . . . . . . . . . . . . . . . . . . . . . . . . . . . . . . . . . . . . . . . . . . . . . . . . . . . . . . . . . . . . . . . . . . . . 68
FLIMMERNDES BILD . . . . . . . . . . . . . . . . . . . . . . . . . . . . . . . . . . . . . . . . . . . . . . . . . . . . . . . . . . . . . . . . . 68
UNSCHARFES BILD. . . . . . . . . . . . . . . . . . . . . . . . . . . . . . . . . . . . . . . . . . . . . . . . . . . . . . . . . . . . . . . . . . 68
INSTANDHALTUNG . . . . . . . . . . . . . . . . . . . . . . . . . . . . . . . . . . . . . . . . . . . . . . . . . . . . . . . . . . . . . . . . . . . . 70
EINSATZ UNTER HOHER BEANSPRUCHUNG UND DAUERBETRIEB . . . . . . . . . . . . . . . . . . . . . . . . . . . . 70
WARTUNGSANGABEN. . . . . . . . . . . . . . . . . . . . . . . . . . . . . . . . . . . . . . . . . . . . . . . . . . . . . . . . . . . . . . . . . . 70
AUSTAUSCHEN DER LAMPE . . . . . . . . . . . . . . . . . . . . . . . . . . . . . . . . . . . . . . . . . . . . . . . . . . . . . . . . . . . . 72
TECHNISCHE DATEN. . . . . . . . . . . . . . . . . . . . . . . . . . . . . . . . . . . . . . . . . . . . . . . . . . . . . . . . . . . . . . . . . . . 74
ERKLÄRUNGEN. . . . . . . . . . . . . . . . . . . . . . . . . . . . . . . . . . . . . . . . . . . . . . . . . . . . . . . . . . . . . . . . . . . . . . . 78
TABLE DES MATIERES
francais
INTRODUCTION. . . . . . . . . . . . . . . . . . . . . . . . . . . . . . . . . . . . . . . . . . . . . . . . . . . . . . . . . . . . . . . . . . . . . . . . 4
SÉCURITÉ & MISES EN GARD. . . . . . . . . . . . . . . . . . . . . . . . . . . . . . . . . . . . . . . . . . . . . . . . . . . . . . . . . . . . . 6
SYMBOLES D’AVERTISSEMENT . . . . . . . . . . . . . . . . . . . . . . . . . . . . . . . . . . . . . . . . . . . . . . . . . . . . . . . . 12
MATERIEL FOURNIS. . . . . . . . . . . . . . . . . . . . . . . . . . . . . . . . . . . . . . . . . . . . . . . . . . . . . . . . . . . . . . . . . . . . 14
VUE D’ENSEMBLE. . . . . . . . . . . . . . . . . . . . . . . . . . . . . . . . . . . . . . . . . . . . . . . . . . . . . . . . . . . . . . . . . . . . . 16
CLAVIER. . . . . . . . . . . . . . . . . . . . . . . . . . . . . . . . . . . . . . . . . . . . . . . . . . . . . . . . . . . . . . . . . . . . . . . . . . . . . 18
INDICATEURS. . . . . . . . . . . . . . . . . . . . . . . . . . . . . . . . . . . . . . . . . . . . . . . . . . . . . . . . . . . . . . . . . . . . . . . . . 20
INDICATEUR. . . . . . . . . . . . . . . . . . . . . . . . . . . . . . . . . . . . . . . . . . . . . . . . . . . . . . . . . . . . . . . . . . . . . . . . 20
LUMIERE BLEUE PERMANENTE . . . . . . . . . . . . . . . . . . . . . . . . . . . . . . . . . . . . . . . . . . . . . . . . . . . . . . . . 20
LUMIERE ORANGE PERMANENTE. . . . . . . . . . . . . . . . . . . . . . . . . . . . . . . . . . . . . . . . . . . . . . . . . . . . . . . 20
LUMIERE ORANGE CLIGNOTANTE . . . . . . . . . . . . . . . . . . . . . . . . . . . . . . . . . . . . . . . . . . . . . . . . . . . . . . 20
LUMIERE ROUGE CLIGNOTANTE. . . . . . . . . . . . . . . . . . . . . . . . . . . . . . . . . . . . . . . . . . . . . . . . . . . . . . . . 20
LUMIERE PERMANENTE ROUGE. . . . . . . . . . . . . . . . . . . . . . . . . . . . . . . . . . . . . . . . . . . . . . . . . . . . . . . . 20
PAS DE LUMIERE. . . . . . . . . . . . . . . . . . . . . . . . . . . . . . . . . . . . . . . . . . . . . . . . . . . . . . . . . . . . . . . . . . . . 20
TELECOMMANDE . . . . . . . . . . . . . . . . . . . . . . . . . . . . . . . . . . . . . . . . . . . . . . . . . . . . . . . . . . . . . . . . . . . . . 22
PANNEAU DE RACCORDEMENT. . . . . . . . . . . . . . . . . . . . . . . . . . . . . . . . . . . . . . . . . . . . . . . . . . . . . . . . . . 28
INSTALLATION . . . . . . . . . . . . . . . . . . . . . . . . . . . . . . . . . . . . . . . . . . . . . . . . . . . . . . . . . . . . . . . . . . . . . . . 30
INSTALLATION VIDEO. . . . . . . . . . . . . . . . . . . . . . . . . . . . . . . . . . . . . . . . . . . . . . . . . . . . . . . . . . . . . . . . . 30
INSTALLATION DE L’ORDINATEUR. . . . . . . . . . . . . . . . . . . . . . . . . . . . . . . . . . . . . . . . . . . . . . . . . . . . . . . 30
REGLAGES DE L’IMAGE. . . . . . . . . . . . . . . . . . . . . . . . . . . . . . . . . . . . . . . . . . . . . . . . . . . . . . . . . . . . . . . . . 32
CODE PIN . . . . . . . . . . . . . . . . . . . . . . . . . . . . . . . . . . . . . . . . . . . . . . . . . . . . . . . . . . . . . . . . . . . . . . . . . . . 32
MONTAGE AU PLAFOND. . . . . . . . . . . . . . . . . . . . . . . . . . . . . . . . . . . . . . . . . . . . . . . . . . . . . . . . . . . . . . . . 34
UTILISATION VERTICALE. . . . . . . . . . . . . . . . . . . . . . . . . . . . . . . . . . . . . . . . . . . . . . . . . . . . . . . . . . . . . . . . 34
UTILISATION DU PROJECTEUR. . . . . . . . . . . . . . . . . . . . . . . . . . . . . . . . . . . . . . . . . . . . . . . . . . . . . . . . . . . 36
CONTRÔLE RS 232 ET LAN. . . . . . . . . . . . . . . . . . . . . . . . . . . . . . . . . . . . . . . . . . . . . . . . . . . . . . . . . . . . 38
HORLOGE . . . . . . . . . . . . . . . . . . . . . . . . . . . . . . . . . . . . . . . . . . . . . . . . . . . . . . . . . . . . . . . . . . . . . . . . . 40
CALIBRAGE DE L’IMAGE ET CORRECTION. . . . . . . . . . . . . . . . . . . . . . . . . . . . . . . . . . . . . . . . . . . . . . . . 42
SYSTEME MENU . . . . . . . . . . . . . . . . . . . . . . . . . . . . . . . . . . . . . . . . . . . . . . . . . . . . . . . . . . . . . . . . . . . . . . 44
MENU PRINCIPAL . . . . . . . . . . . . . . . . . . . . . . . . . . . . . . . . . . . . . . . . . . . . . . . . . . . . . . . . . . . . . . . . . . . 44
SOUS MENU IMAGE. . . . . . . . . . . . . . . . . . . . . . . . . . . . . . . . . . . . . . . . . . . . . . . . . . . . . . . . . . . . . . . . . . 46
REALCOLOR SUB MENU. . . . . . . . . . . . . . . . . . . . . . . . . . . . . . . . . . . . . . . . . . . . . . . . . . . . . . . . . . . . . . 50
SOUS MENU AVANCE . . . . . . . . . . . . . . . . . . . . . . . . . . . . . . . . . . . . . . . . . . . . . . . . . . . . . . . . . . . . . . . . 56
SOUS MENU SET UP. . . . . . . . . . . . . . . . . . . . . . . . . . . . . . . . . . . . . . . . . . . . . . . . . . . . . . . . . . . . . . . . . 60
SOUS MENU UTILITAIRE . . . . . . . . . . . . . . . . . . . . . . . . . . . . . . . . . . . . . . . . . . . . . . . . . . . . . . . . . . . . . . 64
SOUS MENU UTILITAIRE . . . . . . . . . . . . . . . . . . . . . . . . . . . . . . . . . . . . . . . . . . . . . . . . . . . . . . . . . . . . . . 64
DÉPANNAGE . . . . . . . . . . . . . . . . . . . . . . . . . . . . . . . . . . . . . . . . . . . . . . . . . . . . . . . . . . . . . . . . . . . . . . . . . 68
PAS D’IMAGE. . . . . . . . . . . . . . . . . . . . . . . . . . . . . . . . . . . . . . . . . . . . . . . . . . . . . . . . . . . . . . . . . . . . . . . 68
IMAGE SOMBRE . . . . . . . . . . . . . . . . . . . . . . . . . . . . . . . . . . . . . . . . . . . . . . . . . . . . . . . . . . . . . . . . . . . . 68
IMAGE OSCILLANTE . . . . . . . . . . . . . . . . . . . . . . . . . . . . . . . . . . . . . . . . . . . . . . . . . . . . . . . . . . . . . . . . . 68
IMAGE PAS NETTE. . . . . . . . . . . . . . . . . . . . . . . . . . . . . . . . . . . . . . . . . . . . . . . . . . . . . . . . . . . . . . . . . . . 68
ENTRETIEN . . . . . . . . . . . . . . . . . . . . . . . . . . . . . . . . . . . . . . . . . . . . . . . . . . . . . . . . . . . . . . . . . . . . . . . . . . 70
USAGE INDUSTRIEL ET USAGE CONTINU. . . . . . . . . . . . . . . . . . . . . . . . . . . . . . . . . . . . . . . . . . . . . . . . . 70
INFORMATION SUR LE SERVICE. . . . . . . . . . . . . . . . . . . . . . . . . . . . . . . . . . . . . . . . . . . . . . . . . . . . . . . . . . 70
CHANGEMENT DE LAMPE. . . . . . . . . . . . . . . . . . . . . . . . . . . . . . . . . . . . . . . . . . . . . . . . . . . . . . . . . . . . . . . 72
DONNÉES TECHNIQUES. . . . . . . . . . . . . . . . . . . . . . . . . . . . . . . . . . . . . . . . . . . . . . . . . . . . . . . . . . . . . . . . 74
DÉCLARATIONS. . . . . . . . . . . . . . . . . . . . . . . . . . . . . . . . . . . . . . . . . . . . . . . . . . . . . . . . . . . . . . . . . . . . . . . 78
DS+305/DS+305 User Manual
020-000057-01 Rev. 1 (06/08)
ÍNDICE DE CONTENIDOS
español
ÍNDICE DE CONTENIDOS. . . . . . . . . . . . . . . . . . . . . . . . . . . . . . . . . . . . . . . . . . . . . . . . . . . . . . . . . . . . . . . . . 3
INTRODUCCIÓN. . . . . . . . . . . . . . . . . . . . . . . . . . . . . . . . . . . . . . . . . . . . . . . . . . . . . . . . . . . . . . . . . . . . . . . . 5
SEGURIDAD Y ADVERTENCIAS. . . . . . . . . . . . . . . . . . . . . . . . . . . . . . . . . . . . . . . . . . . . . . . . . . . . . . . . . . . . 7
SÍMBOLOS DE ADVERTENCIA. . . . . . . . . . . . . . . . . . . . . . . . . . . . . . . . . . . . . . . . . . . . . . . . . . . . . . . . . . 12
MATERIAL ENTREGADO . . . . . . . . . . . . . . . . . . . . . . . . . . . . . . . . . . . . . . . . . . . . . . . . . . . . . . . . . . . . . . . . 14
DESCRIPCIÓN GENERAL. . . . . . . . . . . . . . . . . . . . . . . . . . . . . . . . . . . . . . . . . . . . . . . . . . . . . . . . . . . . . . . . 16
TECLADO. . . . . . . . . . . . . . . . . . . . . . . . . . . . . . . . . . . . . . . . . . . . . . . . . . . . . . . . . . . . . . . . . . . . . . . . . . . . 19
INDICADORES. . . . . . . . . . . . . . . . . . . . . . . . . . . . . . . . . . . . . . . . . . . . . . . . . . . . . . . . . . . . . . . . . . . . . . . . 20
INDICADOR . . . . . . . . . . . . . . . . . . . . . . . . . . . . . . . . . . . . . . . . . . . . . . . . . . . . . . . . . . . . . . . . . . . . . . . . 20
LUZ AZUL PERMANENTE. . . . . . . . . . . . . . . . . . . . . . . . . . . . . . . . . . . . . . . . . . . . . . . . . . . . . . . . . . . . . . 20
LUZ NARANJA PERMANENTE. . . . . . . . . . . . . . . . . . . . . . . . . . . . . . . . . . . . . . . . . . . . . . . . . . . . . . . . . . 20
LUZ NARANJA INTERMITENTE. . . . . . . . . . . . . . . . . . . . . . . . . . . . . . . . . . . . . . . . . . . . . . . . . . . . . . . . . . 20
LUZ ROJA INTERMITENTE. . . . . . . . . . . . . . . . . . . . . . . . . . . . . . . . . . . . . . . . . . . . . . . . . . . . . . . . . . . . . 20
LUZ ROJA FIJA. . . . . . . . . . . . . . . . . . . . . . . . . . . . . . . . . . . . . . . . . . . . . . . . . . . . . . . . . . . . . . . . . . . . . . 20
NO HAY LUZ. . . . . . . . . . . . . . . . . . . . . . . . . . . . . . . . . . . . . . . . . . . . . . . . . . . . . . . . . . . . . . . . . . . . . . . . 20
MANDO A DISTANCIA . . . . . . . . . . . . . . . . . . . . . . . . . . . . . . . . . . . . . . . . . . . . . . . . . . . . . . . . . . . . . . . . . . 22
PANEL DE CONEXIONES. . . . . . . . . . . . . . . . . . . . . . . . . . . . . . . . . . . . . . . . . . . . . . . . . . . . . . . . . . . . . . . . 28
INSTALACIÓN . . . . . . . . . . . . . . . . . . . . . . . . . . . . . . . . . . . . . . . . . . . . . . . . . . . . . . . . . . . . . . . . . . . . . . . . 30
INSTALACIÓN DEL VÍDEO . . . . . . . . . . . . . . . . . . . . . . . . . . . . . . . . . . . . . . . . . . . . . . . . . . . . . . . . . . . . . 30
INSTALACIÓN DEL ORDENADOR. . . . . . . . . . . . . . . . . . . . . . . . . . . . . . . . . . . . . . . . . . . . . . . . . . . . . . . . 30
AJUSTES DE IMAGEN . . . . . . . . . . . . . . . . . . . . . . . . . . . . . . . . . . . . . . . . . . . . . . . . . . . . . . . . . . . . . . . . . . 32
CÓDIGO PIN. . . . . . . . . . . . . . . . . . . . . . . . . . . . . . . . . . . . . . . . . . . . . . . . . . . . . . . . . . . . . . . . . . . . . . . . . . 32
MONTAJE EN EL TECHO. . . . . . . . . . . . . . . . . . . . . . . . . . . . . . . . . . . . . . . . . . . . . . . . . . . . . . . . . . . . . . . . 34
FUNCIONAMIENTO VERTICAL. . . . . . . . . . . . . . . . . . . . . . . . . . . . . . . . . . . . . . . . . . . . . . . . . . . . . . . . . . . . 34
UTILIZACIÓN DEL PROYECTOR. . . . . . . . . . . . . . . . . . . . . . . . . . . . . . . . . . . . . . . . . . . . . . . . . . . . . . . . . . . 37
CONTROL RS 232 y LAN. . . . . . . . . . . . . . . . . . . . . . . . . . . . . . . . . . . . . . . . . . . . . . . . . . . . . . . . . . . . . . 38
TEMPORIZADOR . . . . . . . . . . . . . . . . . . . . . . . . . . . . . . . . . . . . . . . . . . . . . . . . . . . . . . . . . . . . . . . . . . . . 40
CALIBRACIÓN Y CORRECCIÓN DE LA IMAGEN . . . . . . . . . . . . . . . . . . . . . . . . . . . . . . . . . . . . . . . . . . . . 43
SISTEMA DE MENÚS. . . . . . . . . . . . . . . . . . . . . . . . . . . . . . . . . . . . . . . . . . . . . . . . . . . . . . . . . . . . . . . . . . . 44
MENÚ PRINCIPAL . . . . . . . . . . . . . . . . . . . . . . . . . . . . . . . . . . . . . . . . . . . . . . . . . . . . . . . . . . . . . . . . . . . 44
SUBMENÚ IMAGEN. . . . . . . . . . . . . . . . . . . . . . . . . . . . . . . . . . . . . . . . . . . . . . . . . . . . . . . . . . . . . . . . . . 46
REALCOLOR SUB MENU. . . . . . . . . . . . . . . . . . . . . . . . . . . . . . . . . . . . . . . . . . . . . . . . . . . . . . . . . . . . . . 50
SISTEMA DE MENÚS. . . . . . . . . . . . . . . . . . . . . . . . . . . . . . . . . . . . . . . . . . . . . . . . . . . . . . . . . . . . . . . . . . . 54
SUBMENÚ AVANZADO. . . . . . . . . . . . . . . . . . . . . . . . . . . . . . . . . . . . . . . . . . . . . . . . . . . . . . . . . . . . . . . . 56
SUBMENÚ INSTALACIÓN. . . . . . . . . . . . . . . . . . . . . . . . . . . . . . . . . . . . . . . . . . . . . . . . . . . . . . . . . . . . . . 60
SUBMENÚ UTILIDADES. . . . . . . . . . . . . . . . . . . . . . . . . . . . . . . . . . . . . . . . . . . . . . . . . . . . . . . . . . . . . . . 64
SUBMENÚ LANGUAGES . . . . . . . . . . . . . . . . . . . . . . . . . . . . . . . . . . . . . . . . . . . . . . . . . . . . . . . . . . . . . . 64
SOLUCIÓN DE PROBLEMAS. . . . . . . . . . . . . . . . . . . . . . . . . . . . . . . . . . . . . . . . . . . . . . . . . . . . . . . . . . . . . 69
NO HAY IMAGEN. . . . . . . . . . . . . . . . . . . . . . . . . . . . . . . . . . . . . . . . . . . . . . . . . . . . . . . . . . . . . . . . . . . . 69
IMAGEN OSCURA . . . . . . . . . . . . . . . . . . . . . . . . . . . . . . . . . . . . . . . . . . . . . . . . . . . . . . . . . . . . . . . . . . . 69
PARPADEO DE IMAGEN. . . . . . . . . . . . . . . . . . . . . . . . . . . . . . . . . . . . . . . . . . . . . . . . . . . . . . . . . . . . . . . 69
IMAGEN POCO NÍTIDA. . . . . . . . . . . . . . . . . . . . . . . . . . . . . . . . . . . . . . . . . . . . . . . . . . . . . . . . . . . . . . . . 69
MANTENIMIENTO. . . . . . . . . . . . . . . . . . . . . . . . . . . . . . . . . . . . . . . . . . . . . . . . . . . . . . . . . . . . . . . . . . . . . . 71
USO CONTINUO Y GRAN RENDIMIENTO. . . . . . . . . . . . . . . . . . . . . . . . . . . . . . . . . . . . . . . . . . . . . . . . . . 71
INFORMACIÓN DE SERVICIO TÉCNICO. . . . . . . . . . . . . . . . . . . . . . . . . . . . . . . . . . . . . . . . . . . . . . . . . . . . . 71
CAMBIO DE LÁMPARA . . . . . . . . . . . . . . . . . . . . . . . . . . . . . . . . . . . . . . . . . . . . . . . . . . . . . . . . . . . . . . . . . 72
DATOS TÉCNICOS. . . . . . . . . . . . . . . . . . . . . . . . . . . . . . . . . . . . . . . . . . . . . . . . . . . . . . . . . . . . . . . . . . . . . 74
DECLARAZIONES. . . . . . . . . . . . . . . . . . . . . . . . . . . . . . . . . . . . . . . . . . . . . . . . . . . . . . . . . . . . . . . . . . . . . . 79
DS+305/DS+305 User Manual
020-000057-01 Rev. 1 (06/08)
INDICE
italiano
INDICE. . . . . . . . . . . . . . . . . . . . . . . . . . . . . . . . . . . . . . . . . . . . . . . . . . . . . . . . . . . . . . . . . . . . . . . . . . . . . . . 3
INTRODUZIONE. . . . . . . . . . . . . . . . . . . . . . . . . . . . . . . . . . . . . . . . . . . . . . . . . . . . . . . . . . . . . . . . . . . . . . . . 5
SICUREZZA E AVVERTENZE . . . . . . . . . . . . . . . . . . . . . . . . . . . . . . . . . . . . . . . . . . . . . . . . . . . . . . . . . . . . . . 7
SIMBOLI DI AVVERTENZA . . . . . . . . . . . . . . . . . . . . . . . . . . . . . . . . . . . . . . . . . . . . . . . . . . . . . . . . . . . . . 13
MATERIALE IN DOTAZIONE . . . . . . . . . . . . . . . . . . . . . . . . . . . . . . . . . . . . . . . . . . . . . . . . . . . . . . . . . . . . . . 15
PANORAMICA . . . . . . . . . . . . . . . . . . . . . . . . . . . . . . . . . . . . . . . . . . . . . . . . . . . . . . . . . . . . . . . . . . . . . . . . 17
TASTIERINO . . . . . . . . . . . . . . . . . . . . . . . . . . . . . . . . . . . . . . . . . . . . . . . . . . . . . . . . . . . . . . . . . . . . . . . . . 19
INDICATORI. . . . . . . . . . . . . . . . . . . . . . . . . . . . . . . . . . . . . . . . . . . . . . . . . . . . . . . . . . . . . . . . . . . . . . . . . . 21
INDICATORE. . . . . . . . . . . . . . . . . . . . . . . . . . . . . . . . . . . . . . . . . . . . . . . . . . . . . . . . . . . . . . . . . . . . . . . . 21
SPIA BLU FISSA. . . . . . . . . . . . . . . . . . . . . . . . . . . . . . . . . . . . . . . . . . . . . . . . . . . . . . . . . . . . . . . . . . . . . 21
SPIA ARANCIO FISSA. . . . . . . . . . . . . . . . . . . . . . . . . . . . . . . . . . . . . . . . . . . . . . . . . . . . . . . . . . . . . . . . . 21
SPIA ARANCIO LAMPEGGIANTE. . . . . . . . . . . . . . . . . . . . . . . . . . . . . . . . . . . . . . . . . . . . . . . . . . . . . . . . 21
SPIA ROSSA LAMPEGGIANTE. . . . . . . . . . . . . . . . . . . . . . . . . . . . . . . . . . . . . . . . . . . . . . . . . . . . . . . . . . 21
SPIA ROSSA FISSA . . . . . . . . . . . . . . . . . . . . . . . . . . . . . . . . . . . . . . . . . . . . . . . . . . . . . . . . . . . . . . . . . . 21
NESSUNA SPIA . . . . . . . . . . . . . . . . . . . . . . . . . . . . . . . . . . . . . . . . . . . . . . . . . . . . . . . . . . . . . . . . . . . . . 21
TELECOMANDO. . . . . . . . . . . . . . . . . . . . . . . . . . . . . . . . . . . . . . . . . . . . . . . . . . . . . . . . . . . . . . . . . . . . . . . 23
PANNELLO DEI CONNETTORI. . . . . . . . . . . . . . . . . . . . . . . . . . . . . . . . . . . . . . . . . . . . . . . . . . . . . . . . . . . . 29
CONFIGURAZIONE. . . . . . . . . . . . . . . . . . . . . . . . . . . . . . . . . . . . . . . . . . . . . . . . . . . . . . . . . . . . . . . . . . . . . 31
CONFIGURAZIONE DEL VIDEO . . . . . . . . . . . . . . . . . . . . . . . . . . . . . . . . . . . . . . . . . . . . . . . . . . . . . . . . . 31
CONFIGURAZIONE DEL COMPUTER. . . . . . . . . . . . . . . . . . . . . . . . . . . . . . . . . . . . . . . . . . . . . . . . . . . . . 31
REGOLAZIONI DELL’IMMAGINE. . . . . . . . . . . . . . . . . . . . . . . . . . . . . . . . . . . . . . . . . . . . . . . . . . . . . . . . . . . 33
CODICE PIN. . . . . . . . . . . . . . . . . . . . . . . . . . . . . . . . . . . . . . . . . . . . . . . . . . . . . . . . . . . . . . . . . . . . . . . . . . 33
MONTAGGIO A SOFFITTO. . . . . . . . . . . . . . . . . . . . . . . . . . . . . . . . . . . . . . . . . . . . . . . . . . . . . . . . . . . . . . . 35
FUNZIONAMENTO VERTICALE. . . . . . . . . . . . . . . . . . . . . . . . . . . . . . . . . . . . . . . . . . . . . . . . . . . . . . . . . . . . 35
UTILIZZO DEL PROIETTORE. . . . . . . . . . . . . . . . . . . . . . . . . . . . . . . . . . . . . . . . . . . . . . . . . . . . . . . . . . . . . . 37
CONTROLLO LAN ED RS. . . . . . . . . . . . . . . . . . . . . . . . . . . . . . . . . . . . . . . . . . . . . . . . . . . . . . . . . . . . . . 39
TIMER . . . . . . . . . . . . . . . . . . . . . . . . . . . . . . . . . . . . . . . . . . . . . . . . . . . . . . . . . . . . . . . . . . . . . . . . . . . . 41
CALIBRAZIONE E CORREZIONE DELL’IMMAGINE. . . . . . . . . . . . . . . . . . . . . . . . . . . . . . . . . . . . . . . . . . . 43
SISTEMA DEI MENU. . . . . . . . . . . . . . . . . . . . . . . . . . . . . . . . . . . . . . . . . . . . . . . . . . . . . . . . . . . . . . . . . . . . 45
MENU PRINCIPALE . . . . . . . . . . . . . . . . . . . . . . . . . . . . . . . . . . . . . . . . . . . . . . . . . . . . . . . . . . . . . . . . . . 45
SOTTOMENU IMMAGINE. . . . . . . . . . . . . . . . . . . . . . . . . . . . . . . . . . . . . . . . . . . . . . . . . . . . . . . . . . . . . . 47
REALCOLOR SUB MENU. . . . . . . . . . . . . . . . . . . . . . . . . . . . . . . . . . . . . . . . . . . . . . . . . . . . . . . . . . . . . . 51
SOTTOMENU ADVANCED (AVANZATO) . . . . . . . . . . . . . . . . . . . . . . . . . . . . . . . . . . . . . . . . . . . . . . . . . . . 57
SOTTOMENU SET UP (CONFIGURAZIONE). . . . . . . . . . . . . . . . . . . . . . . . . . . . . . . . . . . . . . . . . . . . . . . . 61
SOTTOMENU UTILITIES (Utilità) . . . . . . . . . . . . . . . . . . . . . . . . . . . . . . . . . . . . . . . . . . . . . . . . . . . . . . . . . 65
SOTTOMENU UTILITIES (Utilità) . . . . . . . . . . . . . . . . . . . . . . . . . . . . . . . . . . . . . . . . . . . . . . . . . . . . . . . . . 65
RISOLUZIONE DEI PROBLEMI. . . . . . . . . . . . . . . . . . . . . . . . . . . . . . . . . . . . . . . . . . . . . . . . . . . . . . . . . . . . 69
NESSUNA IMMAGINE. . . . . . . . . . . . . . . . . . . . . . . . . . . . . . . . . . . . . . . . . . . . . . . . . . . . . . . . . . . . . . . . . 69
IMMAGINE SCURA. . . . . . . . . . . . . . . . . . . . . . . . . . . . . . . . . . . . . . . . . . . . . . . . . . . . . . . . . . . . . . . . . . . 69
IMMAGINE TREMOLANTE . . . . . . . . . . . . . . . . . . . . . . . . . . . . . . . . . . . . . . . . . . . . . . . . . . . . . . . . . . . . . 69
IMMAGINE SFOCATA. . . . . . . . . . . . . . . . . . . . . . . . . . . . . . . . . . . . . . . . . . . . . . . . . . . . . . . . . . . . . . . . . 69
MANUTENZIONE . . . . . . . . . . . . . . . . . . . . . . . . . . . . . . . . . . . . . . . . . . . . . . . . . . . . . . . . . . . . . . . . . . . . . . 71
INFORMAZIONI SULL’ASSISTENZA . . . . . . . . . . . . . . . . . . . . . . . . . . . . . . . . . . . . . . . . . . . . . . . . . . . . . . . . 71
SOSTITUZIONE DELLE LAMPADE . . . . . . . . . . . . . . . . . . . . . . . . . . . . . . . . . . . . . . . . . . . . . . . . . . . . . . . . . 73
DATI TECNICI. . . . . . . . . . . . . . . . . . . . . . . . . . . . . . . . . . . . . . . . . . . . . . . . . . . . . . . . . . . . . . . . . . . . . . . . . 75
DICIARAZIONI. . . . . . . . . . . . . . . . . . . . . . . . . . . . . . . . . . . . . . . . . . . . . . . . . . . . . . . . . . . . . . . . . . . . . . . . . 79
FCC. . . . . . . . . . . . . . . . . . . . . . . . . . . . . . . . . . . . . . . . . . . . . . . . . . . . . . . . . . . . . . . . . . . . . . . . . . . . . . 79
CANADA. . . . . . . . . . . . . . . . . . . . . . . . . . . . . . . . . . . . . . . . . . . . . . . . . . . . . . . . . . . . . . . . . . . . . . . . . . . 79
INNHOLDSFORTEGNELSE
norsk
INNHOLDSFORTEGNELSE. . . . . . . . . . . . . . . . . . . . . . . . . . . . . . . . . . . . . . . . . . . . . . . . . . . . . . . . . . . . . . . . 3
INTRODUKSJON . . . . . . . . . . . . . . . . . . . . . . . . . . . . . . . . . . . . . . . . . . . . . . . . . . . . . . . . . . . . . . . . . . . . . . . 5
SIKKERHET OG ADVARSLER. . . . . . . . . . . . . . . . . . . . . . . . . . . . . . . . . . . . . . . . . . . . . . . . . . . . . . . . . . . . . . 7
SIKKERHET . . . . . . . . . . . . . . . . . . . . . . . . . . . . . . . . . . . . . . . . . . . . . . . . . . . . . . . . . . . . . . . . . . . . . . . . . 7
ADVARSEL. . . . . . . . . . . . . . . . . . . . . . . . . . . . . . . . . . . . . . . . . . . . . . . . . . . . . . . . . . . . . . . . . . . . . . . . . . 7
SIKKERHET OG ADVARSLER. . . . . . . . . . . . . . . . . . . . . . . . . . . . . . . . . . . . . . . . . . . . . . . . . . . . . . . . . . . . . . 9
SYMBOLER . . . . . . . . . . . . . . . . . . . . . . . . . . . . . . . . . . . . . . . . . . . . . . . . . . . . . . . . . . . . . . . . . . . . . . . . 13
LEVERT UTSTYR . . . . . . . . . . . . . . . . . . . . . . . . . . . . . . . . . . . . . . . . . . . . . . . . . . . . . . . . . . . . . . . . . . . . . . 15
OVERSIKT . . . . . . . . . . . . . . . . . . . . . . . . . . . . . . . . . . . . . . . . . . . . . . . . . . . . . . . . . . . . . . . . . . . . . . . . . . . 17
TASTATUR . . . . . . . . . . . . . . . . . . . . . . . . . . . . . . . . . . . . . . . . . . . . . . . . . . . . . . . . . . . . . . . . . . . . . . . . . . . 19
INDIKATORER . . . . . . . . . . . . . . . . . . . . . . . . . . . . . . . . . . . . . . . . . . . . . . . . . . . . . . . . . . . . . . . . . . . . . . . . 21
INDIKATOR. . . . . . . . . . . . . . . . . . . . . . . . . . . . . . . . . . . . . . . . . . . . . . . . . . . . . . . . . . . . . . . . . . . . . . . . . 21
PERMANENT BLÅTT . . . . . . . . . . . . . . . . . . . . . . . . . . . . . . . . . . . . . . . . . . . . . . . . . . . . . . . . . . . . . . . . . 21
PERMANENT GULT . . . . . . . . . . . . . . . . . . . . . . . . . . . . . . . . . . . . . . . . . . . . . . . . . . . . . . . . . . . . . . . . . . 21
BLINKENDE GULT . . . . . . . . . . . . . . . . . . . . . . . . . . . . . . . . . . . . . . . . . . . . . . . . . . . . . . . . . . . . . . . . . . . 21
BLINKENDE RØDT. . . . . . . . . . . . . . . . . . . . . . . . . . . . . . . . . . . . . . . . . . . . . . . . . . . . . . . . . . . . . . . . . . . 21
PERMANENT RØDT. . . . . . . . . . . . . . . . . . . . . . . . . . . . . . . . . . . . . . . . . . . . . . . . . . . . . . . . . . . . . . . . . . 21
INTET LYS . . . . . . . . . . . . . . . . . . . . . . . . . . . . . . . . . . . . . . . . . . . . . . . . . . . . . . . . . . . . . . . . . . . . . . . . . 21
FJERNKONTROLL. . . . . . . . . . . . . . . . . . . . . . . . . . . . . . . . . . . . . . . . . . . . . . . . . . . . . . . . . . . . . . . . . . . . . 23
KONTAKTPANEL . . . . . . . . . . . . . . . . . . . . . . . . . . . . . . . . . . . . . . . . . . . . . . . . . . . . . . . . . . . . . . . . . . . . . . 29
OPPSETT. . . . . . . . . . . . . . . . . . . . . . . . . . . . . . . . . . . . . . . . . . . . . . . . . . . . . . . . . . . . . . . . . . . . . . . . . . . . 31
VIDEO-OPPSETT . . . . . . . . . . . . . . . . . . . . . . . . . . . . . . . . . . . . . . . . . . . . . . . . . . . . . . . . . . . . . . . . . . . . 31
DATA-OPPSETT. . . . . . . . . . . . . . . . . . . . . . . . . . . . . . . . . . . . . . . . . . . . . . . . . . . . . . . . . . . . . . . . . . . . . 31
BILDEINNSTILLINGER . . . . . . . . . . . . . . . . . . . . . . . . . . . . . . . . . . . . . . . . . . . . . . . . . . . . . . . . . . . . . . . . . . 33
PIN KODE. . . . . . . . . . . . . . . . . . . . . . . . . . . . . . . . . . . . . . . . . . . . . . . . . . . . . . . . . . . . . . . . . . . . . . . . . . . . 33
TAKMONTASJE . . . . . . . . . . . . . . . . . . . . . . . . . . . . . . . . . . . . . . . . . . . . . . . . . . . . . . . . . . . . . . . . . . . . . . . 35
STÅENDE PLASSERING. . . . . . . . . . . . . . . . . . . . . . . . . . . . . . . . . . . . . . . . . . . . . . . . . . . . . . . . . . . . . . . . . 35
BRUK AV PROJEKTOREN . . . . . . . . . . . . . . . . . . . . . . . . . . . . . . . . . . . . . . . . . . . . . . . . . . . . . . . . . . . . . . . 37
RS232 OG LAN STYRING. . . . . . . . . . . . . . . . . . . . . . . . . . . . . . . . . . . . . . . . . . . . . . . . . . . . . . . . . . . . . . 39
TIMER . . . . . . . . . . . . . . . . . . . . . . . . . . . . . . . . . . . . . . . . . . . . . . . . . . . . . . . . . . . . . . . . . . . . . . . . . . . . 41
KALIBRERING OG KORRIGERING AV BILDE . . . . . . . . . . . . . . . . . . . . . . . . . . . . . . . . . . . . . . . . . . . . . . . 43
MENYSYSTEM. . . . . . . . . . . . . . . . . . . . . . . . . . . . . . . . . . . . . . . . . . . . . . . . . . . . . . . . . . . . . . . . . . . . . . . . 45
TOPPMENY . . . . . . . . . . . . . . . . . . . . . . . . . . . . . . . . . . . . . . . . . . . . . . . . . . . . . . . . . . . . . . . . . . . . . . . . 45
BILDE UNDERMENY. . . . . . . . . . . . . . . . . . . . . . . . . . . . . . . . . . . . . . . . . . . . . . . . . . . . . . . . . . . . . . . . . . 47
REALCOLOR SUB MENU. . . . . . . . . . . . . . . . . . . . . . . . . . . . . . . . . . . . . . . . . . . . . . . . . . . . . . . . . . . . . . 51
AVANSERT UNDERMENY. . . . . . . . . . . . . . . . . . . . . . . . . . . . . . . . . . . . . . . . . . . . . . . . . . . . . . . . . . . . . . 57
OPPSETT UNDERMENY. . . . . . . . . . . . . . . . . . . . . . . . . . . . . . . . . . . . . . . . . . . . . . . . . . . . . . . . . . . . . . . 61
VERKTØY UNDERMENY. . . . . . . . . . . . . . . . . . . . . . . . . . . . . . . . . . . . . . . . . . . . . . . . . . . . . . . . . . . . . . . 65
SPRÅK UNDERMENY. . . . . . . . . . . . . . . . . . . . . . . . . . . . . . . . . . . . . . . . . . . . . . . . . . . . . . . . . . . . . . . . . 65
STATUS UNDERMENY. . . . . . . . . . . . . . . . . . . . . . . . . . . . . . . . . . . . . . . . . . . . . . . . . . . . . . . . . . . . . . . . 67
FEILFINNING . . . . . . . . . . . . . . . . . . . . . . . . . . . . . . . . . . . . . . . . . . . . . . . . . . . . . . . . . . . . . . . . . . . . . . . . . 69
INTET BILDE. . . . . . . . . . . . . . . . . . . . . . . . . . . . . . . . . . . . . . . . . . . . . . . . . . . . . . . . . . . . . . . . . . . . . . . . 69
MØRKT BILDE . . . . . . . . . . . . . . . . . . . . . . . . . . . . . . . . . . . . . . . . . . . . . . . . . . . . . . . . . . . . . . . . . . . . . . 69
FLIMRENDE BILDE. . . . . . . . . . . . . . . . . . . . . . . . . . . . . . . . . . . . . . . . . . . . . . . . . . . . . . . . . . . . . . . . . . . 69
USKARPT BILDE . . . . . . . . . . . . . . . . . . . . . . . . . . . . . . . . . . . . . . . . . . . . . . . . . . . . . . . . . . . . . . . . . . . . 69
VEDLIKEHOLD. . . . . . . . . . . . . . . . . . . . . . . . . . . . . . . . . . . . . . . . . . . . . . . . . . . . . . . . . . . . . . . . . . . . . . . . 71
TUNG OG KONTINUERLIG BRUK. . . . . . . . . . . . . . . . . . . . . . . . . . . . . . . . . . . . . . . . . . . . . . . . . . . . . . . . 71
SERVICE INFORMASJON. . . . . . . . . . . . . . . . . . . . . . . . . . . . . . . . . . . . . . . . . . . . . . . . . . . . . . . . . . . . . . . . 71
LAMPEBYTTE. . . . . . . . . . . . . . . . . . . . . . . . . . . . . . . . . . . . . . . . . . . . . . . . . . . . . . . . . . . . . . . . . . . . . . . . . 73
TEKNISKE DATA. . . . . . . . . . . . . . . . . . . . . . . . . . . . . . . . . . . . . . . . . . . . . . . . . . . . . . . . . . . . . . . . . . . . . . . 75
GODKJENNINGER. . . . . . . . . . . . . . . . . . . . . . . . . . . . . . . . . . . . . . . . . . . . . . . . . . . . . . . . . . . . . . . . . . . . . 79
3
INTRODUCTION
english
EINLEITUNG
deutsch
This digital projector is designed with the latest state-of-the-art technologies in
illumination, imaging, optics, electronics, thermal and industrial design in order to
serve traditional as well as novel imaging applications across a variety of markets,
offering features such as:
Dieser digitale Projektor wurde mit den neuesten Beleuchtungs-, Bild-,
Optik-, Elektronik-, thermischen - und industriellen Technologien konstruiert,
um sowohl für herkömmliche als auch für neuartige Bildanwendungen auf
einer Vielzahl von Märkten zu dienen. Er bietet u.A. folgende Merkmale:
• SXGA+ 1400x1050 or HD720 1280x720 pixel DLP™ technology
• SXGA+ 1400x1050 oder HD720 1280x720-Pixel DLP™-Technologie
• SINGLE CHIP DMD™ with DarkChip™ technology by Texas Instruments®
• DMD™-EINZELCHIP mit DarkChip™-Technologie von Texas
Instruments®
• BrilliantColor™ technologly for saturated and accurate colours
• 10-BIT COLOR RESOLUTION for perfect grey scale reproduction
• HIGH CONTRAST for vibrant colors and deep blacks
• HIGH RESOLUTION for unprecedented detail
• HIGH BRIGHTNESS for larger screens
• DEEP BLACKS for maximum dynamics
• RealColor COLOR CALIBRATION for precise images
• REAL TIME CLOCK for timing control
• REDUCED IMAGE NOISE through high end signal processing
• Pixelworks DNX™ Technology video de-interlacing and processing
• ECO MODE for reduced power consumption and lower audible noise
• BrilliantColor™
• 10-BIT
• HOHER KONTRAST für lebendige Farben und tiefes Schwarz
• HOHE AUFLÖSUNG für noch nie gehabte Detailtreue
• STARKE HELLIGKEIT für größere Bildschirme
• TIEFE SCHWARZDARSTELLUNGEN für eine maximale Dynamik
• RealColor FARBKALIBRIERUNG für präzise Bilddarstellung
• ECHTZEITUHR für die Zeitkontrolle
• GERINGERES BILDRAUSCHEN Dank High-End-Signalverarbeitung
• Pixelworks DNX™ Technology video de-interlacing und prozessing
• VARIABLE LAMP POWER for alignment of multi-screen configurations
• SPARMODUS mit verringertem Stromverbrauch und geringeren hörbaren
Geräuschen
• LONG LIFE LAMP
• VARIABLE LAMPENSTÄRKE zur Ausrichtung auf mehreren Bildschirmen
• STYLISH AND COMPACT MAGNESIUM DESIGN to fit most applications,
installed or movable
• LANGLEBIGE LAMPE
• SIX VIDEO and GRAPHICS INPUTS for virtually any video and data source
• HDMI ver. 1.3 input
• STILVOLLES UND KOMPAKTES MAGNESIUMDESIGN, das für die
meisten Anwendungen – als Festinstallation oder bewegliche Einrichtungpasst.
INTRODUCTION
francais
Ce projecteur numérique est conçu avec les dernières technologies de pointe en
terme d’éclairage, d’imagerie, de systèmes optiques, électroniques, thermiques et
de design industriel afin de servir aussi bien les nouvelles applications d’imagerie
que les traditionnelles à travers une variété de marché, offrant des caractéristiques
comme :
• Technologie SXGA+ 1400x1050 ouHD720 1280x720 pixel DLP™
• UNE PUCE DMD™ UNIQUE avec une technologie DarkChip3™ de TexasInstruments®
• BrilliantColor™
• 10-BIT
• CONTRASTE ELEVE pour des couleurs vibrantes et des noirs profonds
• HAUTE RÉSOLUTION pour un détail sans précédent
• HAUTE LUMINOSITÉ pour de plus grands écrans
• NOIRS PROFONDS pour des dynamiques maximales
• CALIBRAGE DE LA COULEUR pour des images précises
• VERITABLE HORLOGE pour le contrôle du temps
• BRUIT D’IMAGE REDUIT par le traitement élevé des signaux de fin
• Traitement et entrelacement Vidéo Pixelworks DNX™ Technology
• MODE ÉCO pour réduire la consommation d’énergie et baisser le bruit audible
• PUISSANCE DE LAMPE VARIABLE pour les configurations d’alignement des
multi-écrans
• LAMPE À LONGUE DURÉE DE VIE
• CONCEPTION ELEGANTE ET COMPACTE EN MAGNESIUM pour convenir à la
plupart des applications, fixes ou mobiles
• LAN, RS232 and USB ports for control and monitoring
• SECHS VIDEO- und GRAPHIKEINGÄNGE für praktische jede Video- und
Datenquelle
• CINQ ENTRÉES VIDEO et GRAPHIQUES adaptées à presque toutes les
sources vidéo et sources de données
The specifications and functionality of the product may change without prior
notice.
• HDMI ver. 1.3 eingang
• HDMI ver. 1.3 entrée
• LAN-, RS232- und USB-Anschlüsse zur Steuerung und Überwachung
• Ports LAN, RS232 ET USB pour la commande et la surveillance
Die Spezifizierungen und Funktionalität des Produktes können ohne
Vorankündigung geändert werden.
Les caractéristiques et la fonctionnalité de l’appareil peuvent être modifiées
sans avis préalable.
4
DS+305/DS+305 User Manual
020-000057-01 Rev. 1 (06/08)
INTRODUCCIÓN
español
Este proyector digital ha sido diseñado con las más avanzadas tecnologías en
iluminación, imagen, óptica, electrónica, diseño térmico e industrial para que sirva
tanto en aplicaciones de imagen tradicionales como noveles en una variedad de
mercados, ofreciendo funciones como:
• Tecnología DLP™ con resolución SXGA (1400 x 1050) o HD720 (1280 x 720)
• Chip único DMD™ con tecnología DarkChip™ de Texas Instruments®
• BrilliantColor™
• 10-BIT
• ALTO CONTRASTE para colores vibrantes y negros profundos
• ALTA RESOLUCIÓN para un detalle sin precedentes
• ALTO NIVEL DE BRILLO para pantallas más grandes
• NEGROS PROFUNDOS para una máxima dinámica
• CALIBRACIÓN DEL COLOR para imágenes precisas
• RELOJ EN TIEMPO REAL para un control temporizado
• RUIDO DE IMAGEN REDUCIDO mediante un procesado de señales de gama
alta
• Procesado de vídeo y desentrelazado de Pixelworks DNX™ Technology
• MODO ECO para un menor consumo de energía y menor ruido audible
• POTENCIA VARIABLE DE LA LÁMPARA para la alineación de configuraciones
de múltiples pantallas
• LÁMPARA DE LARGA DURACIÓN (hasta 4000 horas) en modo ECO de baja
potencia
• DISEÑO MODERNO Y COMPACTO DE ALEACIÓN DE MAGNESIO para
adaptarse a la mayoría de las aplicaciones, instaladas o móviles
• CINCO ENTRADAS de VÍDEO y GRÁFICOS para casi cualquier fuente de vídeo
y datos
• HDMI ver. 1.3 input
• Puertos LAN, RS232 y USB para control y supervisión
Las especificaciones y funcionalidad del producto pueden variar sin previo
aviso.
DS+305/DS+305 User Manual
020-000057-01 Rev. 1 (06/08)
INTRODUZIONE
italiano
Questo proiettore digitale è stato progettato con i più recenti ritrovati tecnologici
disponibili per illuminazione, acquisizione di immagini, obiettivi, elettronica,
design termico e industriale e può essere utilizzato con le applicazioni d’immagini
tradizionali, nonché quelle innovative, in una varietà di settori. Offre funzioni
come, ad esempio:
• Tecnologia SXGA+ 1400x1050 or HD720 1280x720 pixel DLP™
• Tecnologia SINGLE CHIP DMD™ con DarkChip™ di Texas Instruments®
• BrilliantColor™
• 10-BIT
• ELEVATO CONTRASTO per colori vibranti e neri profondi
• ELEVATA RISOLUZIONE per dettagli senza precedenti
• ELEVATA LUMINOSITÀ per schermi più grandi
• NERI PROFONDI per il massimo della dinamica
• CALIBRAZIONE DEL COLORE per immagini definite
• ORA IN TEMPO REALE per controllare il tempo
• RIDOTTA INTERFERENZA DELLE IMMAGINI tramite un’alta elaborazione del
segnale finale
INTRODUKSJON
norsk
Denne digitale projektoren er konstruert med de nyeste teknologiske løsninger
innen belysning, bildebehandling, optikk, elektronikk, termikk og industridesign for
å betjene både nye og tradisjonelle anvendelser i ulike markeder, med et vell av
egenskaper som:
• SXGA+ 1400x1050 eller HD720 1280x720 bildepunkter DLP™ teknologi
• 1-CHIP DMD™ med DarkChip™ teknologi fra Texas Instruments®
• BrilliantColor™ teknologi for øket fargemetning og fremstilling
• 10-BIT
• HØY KONTRAST for klare farver og godt svartnivå
• HØY OPPLØSNING for uovertruffne detaljer
• HØY LYSSTYRKE for store skjermer
• DYP SVART for maksimal dynamikk
• FARGEKALIBRERING for presise bilder
• REALTIDSKLOKKE for tidsstyring
• REDUSERT BILDESTØY ved hjelp av avansert signalbehandling
• Pixelworks DNX™ Technology videobehandling
• Disinterlacciamento ed elaborazione video Pixelworks DNX™ Technology
• ECO-MODUS for redusert strømforbruk og lavere støy
• MODALITÀ ECO per ridurre il consumo di energia e diminuire il rumore
percepito
• VARIABEL LAMPESTYRKE for tilpasning av flere projektorer i sømløse
applikasjoner
• POTENZA VARIABILE DELLA LAMPADA per l’allineamento di configurazioni
su più schermi
• LAMPE MED LANG LEVETID
• LAMPADA A LUNGA DURATA
• DESIGN IN MAGNESIO ELEGANTE E COMPATTO adatto a quasi tutte le
applicazioni, fisse o portatili
• SEI INGRESSI VIDEO e GRAFICA per, virtualmente, qualsiasi sorgente dati e
video
• STILIG OG KOMPAKT DESIGN passer inn i de fleste situasjoner, installert eller
flyttbar.
• SEKS VIDEO og GRAFIKK INNGANGER dekker de fleste video- og datakilder
• LAN, RS232 og USB porter for styring og oppfølging
Produktets spesifikasjoner og ytelse kan endres uten forutgående varsel.
• HDMI ver. 1.3 input
• Porte LAN, RS232 e USB per il controllo e il monitoraggio
Le caratteristiche tecniche e le funzioni del prodotto sono soggette a
variazioni senza preavviso.
5
SAFETY & WARNINGS
english
This user guide contains important information about safety precautions and the set-up and use of
the projector. Please read the manual carefully before you operate the projector.
SAFETY
This device complies with relevant safety regulations for data processing equipment for use in an
office environment. Before using the projector for the first time, please read the safety instructions
thoroughly.
WARNING
Use only the cables and cords supplied with the projector or original replacement cables. Using
other cables or cords may lead to malfunction and permanent damage of the unit.
Always use 3-prong / grounded power cord to ensure proper grounding of the unit. Never use 2prong power cords, as this is dangerous and could lead to electrical shock.
Never open the unit. The projector contains no user serviceable parts. Refer all repairs to qualified
personnel only. Make sure that no objects enter into the vents and openings of the set.
Do not spill any liquids on the projector or into the vents or openings of the unit.
Always remove lens cap before switching on the projector. If the lens cap is not removed, it may
melt due to the high energy light emitted through the lens. Melting the lens cap may permanently
damage the surface of the projection lens.
Do not look into the projection lens when the projector is switched on. The strong light may
permanently damage sight. Do not look into the laser beam when activated on the remote control.
Laser light may permanently damage sight.
Do not point laser beam on people.
Only place the projector on a stable surface, or mount it securely using an approved ceiling-mount.
Do not drop the projector.
Always operate the projector horizontally, within the range of the adjustable rear feet. Operating the
unit in other positions may reduce lamp life significantly, and may lead to overheating, resulting in
malfunctioning.
SICHERHEIT UND WARNHINWEISE
deutsch
Ce guide d’utilisation contient des informations importantes sur les précautions de sécurité,
d’installation et d’utilisation du projecteur. Veuillez lire attentivement le manuel avant de mettre en
marche le projecteur.
SICHERHEIT
SÉCURITÉ
Dieses Gerät erfüllt die relevanten Sicherheitsbestimmungen für Datenverarbeitungsgeräte
zum Einsatz in Büros. Vor erstmaliger Verwendung des Projektors lesen Sie bitte die
Sicherheitshinweise aufmerksam durch.
Cet appareil est conforme aux normes de sécurité relatives à l’utilisation en bureaux des appareils
de traitement de données. Avant la première utilisation du projecteur, veuillez lire entièrement les
consignes de sécurité.
WARNUNG
MISE EN GARDE
Verwenden Sie ausschließlich Kabel, die mit dem Projektor geliefert wurden bzw.
Originalersatzkabel. Die Verwendung von anderen Kabeln kann zu Funktionsfehlern oder
dauerhafter Beschädigung des Geräts führen.
Utilisez uniquement les câbles et les cordons fournis avec le projecteur ou des câbles de
remplacement d’origine. L’utilisation de câbles ou de cordons différents peut entraîner un mauvais
fonctionnement et des dégâts irréversibles sur l’appareil.
Verwenden Sie immer ein 3-poliges / geerdetes Stromkabel, um die sichere Erdung des Gerätes
zu gewährleisten. Verwenden Sie auf keinen Fall 2-polige Kabel, da diese gefährlich sind und
einen Stromschlag verursachen können.
Utilisez toujours un cordon d’alimentation 3 broches avec prise de terre pour garantir une mise
à la terre correcte de l’appareil. N’utilisez jamais des cordons d’alimentation 2 broches, ceci est
dangereux et peut entraîner une décharge électrique.
Öffnen Sie das Gerät niemals. Der Projektor enthält keine Teile, die vom Benutzer gewartet
werden müssen. Reparaturarbeiten dürfen nur von qualifiziertem Personal vorgenommen werden.
Versichern Sie sich, dass keine Gegenstände in das Gebläse oder die Öffnungen des Geräts
gelangen.
N’ouvrez jamais l’appareil. Le projecteur ne contient pas de pièces accessibles par l’utilisateur.
Adressez-vous à du personnel qualifié pour toutes les réparations. Assurez-vous qu’aucun objet
n’entre par les orifices et les ouvertures du poste.
Schütten Sie keine Flüssigkeiten über den Projektor oder in das Gebläse bzw. die Öffnungen des
Geräts.
Nehmen Sie immer die Deckel von den Linsen, bevor Sie den Projektor einschalten. Werden
die Deckel nicht von den Linsen genommen, können sie auf Grund des durch die Linsen
abgegebene Licht mit hohem Energiegehalt schmelzen. Schmelzen die Deckel, kann die
Oberfläche der Projektionslinsen dauerhaft beschädigt werden.
Schauen Sie nicht in die Projektionslinsen, wenn der Projektor eingeschaltet ist. Das starke
Licht könnte die Augen dauerhaft schädigen. Schauen Sie nicht in den Laserstrahl, wenn die
Fernbedienung betätigt wird. Das Laserlicht könnte die Augen dauerhaft schädigen.
Richten Sie den Laserstrahl nicht auf Menschen.
Stellen Sie den Projektor nur auf einer stabilen Fläche auf oder hängen Sie ihn sicher unter
Verwendung einer Deckenhalterung auf.
Minimum safety distance to any side of the unit is 50 cm / 20” in any direction.
Lassen Sie den Projektor nicht herunterfallen.
CAUTION! Hot air is exhausted from the rear vent. Do not place objects that
are sensitive to heat nearer than 50cm / 20” to the exhaust vent.
Betreiben Sie den Projektor immer horizontal, innerhalb des Bereichs der regulierbaren Hinterfüße.
Wird das Gerät in einer anderen Stellung betrieben, kann die Lebensdauer der Lampe deutlich
verkürzt werden, und es können Überhitzungen auftreten, die zu Betriebsstörungen führen.
Ne renversez aucun liquide sur le projecteur ou dans les orifices ou les ouvertures de l’appareil.
Enlevez toujours le cache-optique avant la mise en marche du projecteur. Si le cache-optique
n’est pas enlevé, il peut fondre à cause de la forte puissance de la lumière émise à travers la
lentille. La fonte du cache-optique peut endommager la surface de l’objectif de projection de façon
irréversible.
Ne regardez pas dans l’objectif de projection quand le projecteur est en marche. La puissance
de la lumière peut endommager la vue de façon irréversible. Ne regardez pas dans le faisceau
laser lorsqu’il est activé sur la télécommande. La lumière laser peut endommager la vue de façon
irréversible.
Ne braquez pas le faisceau laser vers quelqu’un.
Placez-le projecteur uniquement sur une surface stable ou installez-le soigneusement en utilisant un
montage plafond certifié.
Ne faites pas tomber le projecteur.
Faites toujours fonctionner le projecteur à l’horizontale, dans la limite des pieds arrière réglables.
Faire fonctionner l’appareil dans d’autres positions peut réduire la durée de vie de la lampe de façon
significative, et peut entraîner une surchauffe résultant d’un mauvais fonctionnement.
Lassen Sie immer den Luftfluss durch den Projektor strömen. Die Belüftungsöffnungen dürfen nie
versperrt werden. Decken Sie das Gerät nie ab, wenn es in Betrieb ist. Halten Sie ausreichend
Abstand zu Wänden und Decken, um zu vermieden, dass sich das Gerät überhitzen kann.
Laissez toujours suffisamment de place autour du projecteur pour permettre la circulation de l’air.
Ne bouchez jamais les prises d’air. Ne couvrez jamais l’appareil de quelque façon que ce soit
pendant le fonctionnement. Prévoyez une distance suffisante jusqu’aux murs et jusqu’au plafond
pour éviter une surchauffe.
Der Mindestsicherheitsabstand an allen Seiten des Geräts beträgt 50 cm / 20 Zoll in jede
Richtung.
La distance minimale de sécurité de chaque côté de l’appareil est de 50 cm/20 pouces dans
n’importe quelle direction.
VORSICHT! Aus den hinteren Belüftungsöffnungen strömt heiße Luft. Legen
Sie keine wärmeempfindlichen Gegenstände näher als 50 cm / 20 Zoll an
die Luftaustrittsöffnungen.
ATTENTION! L’orifice arrière dégage de l’air chaud. Ne placez pas d’objets sensibles à
la chaleur à moins de 50 cm/20» des orifices de ventilation.
Der Projektor ist nur für die Verwendung in geschlossenen Räumen konzipiert. Verwenden Sie das
Gerät niemals im Freien.
6
francais
Dieses Benutzerhandbuch enthält wichtige Angaben zur Sicherheit und Vorsichtsmaßnahmen so
wie die Einrichtung und Verwendung des Projektors. Lesen Sie das Handbuch bitte aufmerksam,
bevor Sie den Projektor in Betrieb nehmen.
Always allow ample airflow through the projector. Never block any of the air vents. Never cover the
unit in any way while running. Allow for sufficient distance to walls and ceilings to avoid overheating.
The projector is designed for indoor use only. Never operate the unit outdoors.
SÉCURITÉ & MISES EN GARD
Le projecteur est conçu pour un usage intérieur uniquement. Ne faites jamais fonctionner l’appareil
en extérieur.
DS+305/DS+305 User Manual
020-000057-01 Rev. 1 (06/08)
SEGURIDAD Y ADVERTENCIAS
español
SICUREZZA E AVVERTENZE
italiano
SIKKERHET OG ADVARSLER
norsk
Esta guía de usuario contiene información importante acerca de las precauciones de seguridad
y la instalación y el uso del proyector. Lea detenidamente el manual antes de poner en marcha el
proyector.
La presente guida d’uso contiene informazioni importanti sulle precauzioni di sicurezza,
l’impostazione e l’uso del proiettore e va letta con attenzione prima di utilizzare il dispositivo.
Denne bruksanvisningen inneholder viktig informasjon om sikkerhetsforanstaltninger, innstilling og
bruk av projektoren. Vennligst les bruksanvisningen nøye før du bruker projektoren.
SEGURIDAD
SICUREZZA
SIKKERHET
Il presente dispositivo è conforme alle norme di sicurezza per le apparecchiature di elaborazione
dati uso ufficio. Prima di adoperare il proiettore per la prima volta, leggere con attenzione le
istruzioni sulla sicurezza.
Denne projektoren er testet og godkjent i forhold til gjeldende sikkerhetsregler for bruk innendørs i
kontormiljø. Vennligst les bruksanvisningen før du benytter projektoren første gang.
Este aparato cumple las normas de seguridad correspondientes a equipos de proceso de
datos para su uso en un entorno de oficinas. Antes de usar el proyector por primera vez, lea
detenidamente las instrucciones de seguridad.
ADVERTENCIA
Utilice únicamente los cables y conectores suministrados con el proyector o piezas de recambio
originales. El uso de otros cables o conectores puede ocasionar un mal funcionamiento y el daño
permanente del aparato.
Utilice siempre un cable de alimentación de 3 clavijas puesto a tierra para garantizar una correcta
conexión a tierra del aparato. No utilice nunca cables de alimentación de 2 clavijas ya que resulta
peligroso y podría ocasionar una descarga eléctrica.
No abra nunca el aparato. El proyector no contiene ninguna pieza que pueda ser reparada por el
usuario. Para cualquier reparación, diríjase a un servicio técnico cualificado. Asegúrese de que no
entren objetos por las ranuras de ventilación o las aberturas del aparato.
No derrame líquidos sobre el proyector ni en las ranuras de ventilación o las aberturas del aparato.
Antes de encender el proyector, quite siempre la tapa del objetivo. En caso contrario, éste puede
fundirse a causa de la gran energía de la luz emitida a través del objetivo. Si la tapa se funde, la
superficie del objetivo puede quedar dañada de forma permanente.
No mire al objetivo con el proyector encendido. Una luz demasiado fuerte puede ocasionar daños
permanentes a la vista. No mire al rayo láser cuando lo active con el mando a distancia. El rayo
láser puede ocasionar daños permanentes a la vista.
AVVERTENZA
ADVARSEL
Usare solo i cavi e il cablaggio forniti con il proiettore oppure cavi di ricambio originali. L’uso di
cavi o cablaggio diversi può causare guasti e danneggiare l’unità in modo permanente.
Benytt kun kabler og ledninger som leveres med projektoren eller originale erstatninger. Bruk av
uegnede eller feil kabler kan føre til feilsituasjoner og permanent skade på enheten.
Utilizzare sempre un cavo di alimentazione tripolare e con messa a terra, per garantire la corretta
messa a terra dell’unità. Non adoperare mai cavi di alimentazione bipolari onde evitare il rischio di
scosse elettriche.
Benytt alltid jordet strømledning. Ujordet ledning skal ikke benyttes. Bruk av ujordet nettledning er
farlig og kan føre til elektrisk støt.
Non aprire mai l’unità. Il proiettore non contiene componenti da sottoporre a manutenzione.
Affidare le riparazioni esclusivamente al personale qualificato. Attenzione a non far penetrare alcun
oggetto nelle prese d’aria e nelle aperture dell’apparecchio.
Non versare liquidi sul proiettore né nelle prese d’aria o aperture dell’unità.
Togliere sempre il copriobiettivo prima di accendere il proiettore, onde evitare il rischio che venga
fuso dalle radiazioni luminose ad alta potenza che fuoriescono dall’obiettivo. La fusione del
copriobiettivo può danneggiare in modo permanente la superficie degli obiettivi.
Non guardare l’obiettivo quando il proiettore è acceso: la forte luce può causare danni permanenti
alla vista. Non fissare il raggio laser quando viene attivato sul telecomando. I raggi laser possono
causare danni permanenti alla vista.
Non dirigere il raggio laser sulle persone.
Enheten må aldri åpnes av bruker. Den inneholder ingen deler som kan repareres av bruker. All
service skal utføres av kvalifisert personell.
Sørg for at fremmede objekter ikke kommer inn i ventilasjonsåpningene.
Ikke søl væsker på projektoren eller inn i ventilasjonsåpningene.
Linselokket skal alltid fjernes før projektoren skrus på. Hvis linselokket ikke fjernes, kan det smelte
på grunn av det sterke lyset. Et smeltet linselokk kan skade projeksjonslinsen permanent.
Ikke se inn i projeksjonslinsen når projektoren er på. Det sterke lyset kan skade synet permanent.
Ikke se inn i laserstrålen fra fjernkontrollen. Laserlys kan skade synet permanent. Ikke pek med
laserlyset på andre mennesker.
Plasser projektoren på et stabilt underlag, eller monter den ved hjelp av et godkjent takfeste.
Ikke mist projektoren.
No apunte el rayo láser hacia las personas.
Collocare il proiettore su una superficie stabile oppure montarlo saldamente usando una staffa
omologata per fissarlo al soffitto.
Coloque el proyector únicamente sobre una superficie estable o sujételo firmemente mediante un
montaje de techo homologado.
Non far cadere il proiettore.
Anvend projektoren horisontalt, innenfor det justerbare området til føttene. Dersom projektoren
anvendes i andre vinkler, kan lampelevetiden reduseres kraftig, og enheten kan gå varm, noe som
kan føre til feil.
Il proiettore va utilizzato sempre in orizzontale, entro il raggio d’azione dei piedi posteriori regolabili.
L’utilizzo dell’unità in posizioni diverse può ridurre sensibilmente la durata delle lampada e può
causare il surriscaldamento, con conseguenti guasti.
Sørg alltid for tilstrekkelig lufttilførsel for å sikre god kjøling. Ventilasjonsåpningene må ikke tildekkes.
Enheten må aldri dekkes til når den er på. Sørg for tilstrekkelig avstand til vegger og tak. Minimum
anbefalt avstand er 50 cm i alle retninger.
Consentire sempre un flusso d’aria abbondante attraverso il proiettore. Non ostruire mai le
prese d’aria. Non coprire mai l’unità mentre è in uso. Per evitare il surriscaldamento, lasciare una
distanza sufficiente da pareti e soffitto.
FORSIKTIG! Varm luft blåses ut av den bakre ventilasjonsåpningen. Ikke
plasser varmefølsomme objekter i nærheten av åpningen. Minimum anbefalt
avstand er 50 cm.
Evite la caída del proyector.
Utilice siempre el proyector en posición horizontal y dentro del radio de las patas traseras
regulables. La utilización del aparato en otras posiciones puede reducir significativamente la vida útil
de la lámpara y producir un sobrecalentamiento que ocasione un mal funcionamiento.
Deje en todo momento un espacio amplio para que el aire fluya por el proyector. No tape
nunca ninguna de las ranuras de ventilación. Tampoco debe cubrir en modo alguno el aparato
mientras esté funcionando. Deje una distancia suficiente con las paredes y el techo para evitar un
sobrecalentamiento.
La distancia mínima de seguridad a los lados del aparato es de 50 cm (20 pulgadas) en cualquier
dirección.
¡PRECAUCIÓN! De la ranura de ventilación trasera sale aire caliente. No coloque objetos
sensibles al calor a menos de 50cm (20 pulgadas) de la ranura de escape.
La distanza di sicurezza minima da qualsiasi lato dell’unità è di 50 cm / 20” in qualsiasi direzione.
Projektoren er konstruert for innendørs bruk. Enheten skal ikke brukes utendørs.
ATTENZIONE: dallo sfiato posteriore fuoriesce aria bollente. Gli oggetti
termosensibili vanno collocati a una distanza minima di 50 cm / 20” dallo
sfiato.
Il proiettore può essere utilizzato esclusivamente in ambienti chiusi e non all’aperto.
El proyector está diseñado para uso exclusivo en interiores. No utilice nunca el aparato en el
exterior.
DS+305/DS+305 User Manual
020-000057-01 Rev. 1 (06/08)
7
SAFETY & WARNINGS
english
SICHERHEIT UND WARNHINWEISE
deutsch
SÉCURITÉ & MISES EN GARD
francais
Do not operate the projector outside its temperature and humidity specifications, as this may result
in overheating and malfunctioning.
Verwenden Sie den Projektor nie außerhalb der vorgegebenen Temperatur- und
Feuchtigkeitswerte, da dies zu einer Überhitzung und Betriebsstörung führen kann.
Ne faites pas fonctionner le projecteur en dehors de ses caractéristiques de température et
d’humidité, ceci peut entraîner une surchauffe et un mauvais fonctionnement.
Only connect the projector to signal sources and voltages as described in the technical
specification. Connecting to unspecified signal sources or voltages may lead to malfunction and
permanent damage of the unit.
Schließen Sie den Projektor nur an Signalquellen und Spannungen an, wie in den technischen
Daten angegeben. Bei Anschluss an nicht geeignete Signalquellen oder Spannungen kann es zu
Funktionsfehlern oder dauerhafter Beschädigung des Geräts kommen.
Raccordez juste le projecteur aux sources de signal et aux voltages comme indiqué dans les
caractéristiques techniques. Se connecter aux sources de signal ou aux voltages non indiqués peut
entraîner un mauvais fonctionnement et des dégâts irréversibles sur l’appareil.
Allow the unit to cool down for 60 minutes before lamp change.
Lassen Sie das Gerät 60 Minuten lang abkühlen, bevor Sie die Lampe auswechseln.
Laissez refroidir l’appareil 60 minutes avant de changer la lampe.
INFORMATION AND WARNING ABOUT POTENTIAL HEALTH ISSUES
RELATED TO MERCURY VAPOR.
ANGABEN UND WARNHINWEISE ZU EVENTUELLEN
GESUNDHEITSGEFÄHRDUNGEN IM ZUSAMMENHANG MIT
QUECKSILBERDAMPF.
INFORMATION ET AVERTISSEMENT SUR LES QUESTIONS DE SANTÉ
POTENTIELLES DUES AUX VAPEURS DE MERCURE.
This projector uses a very powerful UHP™ lamp for illumination to produce an extremely bright
image.
This technology is similar to other high-pressure discharge lamps that are extensively used in cars,
street lights and other lighting appliances today. These lamps, like fluorescent lighting, contain small
amounts of mercury. The amount of mercury present in a lamp is far below the limits of danger set
by the authorities. It is very important that lamps containing mercury are treated properly to minimize
potential health hazards.
The UHP™ lamp, like any other high brightness projector lamp, is under high-pressure when
operating. While the lamp and the projector are carefully designed to minimize the probability of
lamp rupture, the lamp may break while operating and small amounts of mercury vapor may be
emitted from the projector. The probability of rupture increases when the lamp reaches its nominal
life. It is therefore highly recommended that the lamp is replaced when the rated lifetime is reached.
As a general precaution, secure good ventilation in the room when operating the projector. If lamp
rupture occurs, evacuate the room and secure good ventilation. Children and pregnant women in
particular should leave the room.
When replacing a worn lamp, dispose of the used lamp carefully by proper recycling.
Mercury is a naturally occurring, stable metallic element that may pose a safety risk to people under
certain conditions. According to the Public Health Statement for Mercury published by the Agency
for Toxic Substances and Disease Registry (“ATSDR”, part of the United States Public Health
Service), the brain, central nervous system and kidneys are sensitive to the effects of mercury,
and permanent damage can occur at sufficiently high levels of exposure. Acute exposure to high
concentrations of mercury vapor can cause conditions such as lung and airway irritation, tightness
in the chest, a burning sensation in the lungs, coughing, nausea, vomiting and diarrhea. Children
and fetuses are particularly sensitive to the harmful effects of metallic mercury to the nervous
system.
Seek medical attention if any of the above symptoms are experienced or if other unusual conditions
are experienced following lamp rupture.
In diesem Projektor wird eine leistungsstarke UHP™-Lampe zur Beleuchtung eingesetzt, die ein
extrem helles Bild erzeugt.
Diese Technologie ist ähnlich wie andere Hochdruckentladungslampen, sie heute häufig in
Pkws, Straßenlampen und anderen Leuchtkörpern verwendet werden. Diese Lampen enthalten,
gleich wie Neonröhren, geringe Quecksilbermengen. Die in den Lampen vorhandenen
Quecksilbermengen liegen weit unter den von den Behörden festgelegten Gefahrengrenzen. Es
ist von großer Wichtigkeit, dass Lampen mit Quecksilbergehalt sachgemäß behandelt werden,
um eventuelle gesundheitliche Gefährdungen zu minimieren.
Die UHP™-Lampe steht während dem Betrieb, ähnlich anderen sehr hellen Projektorlampen,
unter hohem Druck. Obwohl die Lampe und der Projektor sachgemäß konstruiert wurden, um
die Wahrscheinlichkeit eines Lampenbruches zu minimieren, kann die Lampe während dem
Betrieb zerbersten und geringe Mengen Quecksilberdampf aus dem Projektor strömen. Die
Wahrscheinlichkeit des Bruches nimmt mit Erreichen der Lebensdauer der Lampe zu. Deshalb
wird dringend empfohlen, die Lampe auszuwechseln, wenn sie das angegebenen Lebensalter
erreicht hat.
Als allgemeine Vorsichtsmaßnahme ist während des Betriebs des Projektors eine gute Belüftung
des Raumes sicher zu stellen. Sollte die Lampe bersten, sollte der Raum geräumt und eine
gute Belüftung sicher gestellt werden. Insbesondere Kinder und Schwangere sollten den Raum
verlassen.
Nach Auswechseln einer verbrauchten Lampe muss die verbrauchte Lampe sachgerecht
entsorgt und wiederverwertet werden.
Quecksilber ist ein in der Natur vorkommendes, stabiles Metallelement, das unter bestimmten
Umständen ein Sicherheitsrisiko für den Menschen darstellen kann. Gemäß der Erklärung
zur öffentlichen Sicherheit des Quecksilbers, die von der Agentur für toxische Substanzen
und Krankheitsregister („ATSDR“, als Bestandteil des öffentlichen Gesundheitssystems
der USA) veröffentlicht wurde, reagieren das Gehirn, das zentrale Nervensystem und
die Nieren empfindlich auf die Belastung durch Quecksilber; so können bei ausreichend
hohen Belastungsniveaus dauerhafte Schäden auftreten. Bei akuter Belastung durch hohe
Quecksilberdampfkonzentrationen können Zustände wie Reizung der Lungen und Atemwege,
Brustdruck, Brenngefühle in den Lungen, Husten, Übelkeit, Erbrechen und Durchfall auftreten.
Kinder und Ungeborene sind besonders empfindlich auf die schädlichen Wirkungen des
Quecksilbermetalls auf das Nervensystem.
Ce projecteur utilise une lampe UHP™ très puissante pour fournir un éclairage afin de produire une
image extrêmement lumineuse.
Cette technologie est semblable à d’autres lampes à décharge haute pression énormément
utilisées dans les voitures, les éclairages de rues et autres appareils d’éclairage aujourd’hui.
Ces lampes, comme les éclairages fluorescents, contiennent des petites quantités de mercure.
La quantité de mercure présente dans une lampe est bien au-dessous des limites de danger
posées par les autorités. Il est très important que les lampes contenant du mercure soient traitées
correctement pour réduire au maximum les risques potentiels sur la santé.
La lampe UHP™ comme n’importe quelle autre lampe haute luminosité de projecteur, est sous
haute tension en mode fonctionnement. Bien que la lampe et le projecteur soient soigneusement
conçus pour réduire au maximum les risques de rupture de la lampe, la lampe peut se briser
pendant le fonctionnement et de petites quantités de mercure peuvent se dégager du projecteur.
Les risques de rupture augmentent quand la lampe atteint sa durée de vie théorique. Il est donc
vivement recommandé de remplacer la lampe quand la durée de vie estimée est atteinte.
Par précaution, assurez une bonne ventilation dans la salle pendant le fonctionnement du
projecteur. Si une rupture de la lampe se produit, évacuez la salle et assurez une bonne ventilation.
Les enfants et les femmes enceintes en particulier doivent quitter la salle.
Quand vous remplacez une lampe usagée, éliminez-la soigneusement via un circuit de recyclage
adapté.
Le mercure est présent à l’état naturel, c’est un élément métallique stable qui peut présenter un
risque pour des personnes dans certaines conditions. Selon la Déclaration de Santé Publique
relative au Mercure publiée par l’Agence des Substances Toxiques et du Registre de Maladie
section du Service de Santé Publique des Etats-Unis), le cerveau, le système nerveux central et
les reins sont sensibles aux effets du mercure, et une lésion irréversible peut apparaître à des taux
d’exposition suffisamment élevés. Une vive exposition à des concentrations élevées de vapeur de
mercure peut entraîner des maladies comme une irritation des poumons et des voies respiratoires,
une oppression au niveau de la poitrine, des sensations de brûlure dans les poumons, toux,
nausées, vomissements et diarrhée. Les enfants et les fœtus sont particulièrement sensibles aux
effets nocifs du mercure métallique sur le système nerveux.
Demandez une assistance médicale si vous ressentez un des symptômes énumérés ci-dessus ou
si d’autres maladies inhabituelles sont ressenties suite à une rupture de la lampe.
Suchen Sie einen Arzt auf, wenn eines der o.g. Symptome auftritt oder andere ungewöhnliche
Zustände nach Bersten einer Lampe eintreten.
8
DS+305/DS+305 User Manual
020-000057-01 Rev. 1 (06/08)
SEGURIDAD Y ADVERTENCIAS
español
SICUREZZA E AVVERTENZE
italiano
SIKKERHET OG ADVARSLER
norsk
No haga funcionar el proyector fuera de sus especificaciones de temperatura y humedad, ya que
podría producir un sobrecalentamiento y ocasionar un mal funcionamiento.
Per non causare surriscaldamenti e guasti, non utilizzare il proiettore se la temperatura e
l’umidità sono difformi da quanto riportato nei dati tecnici.
Projektoren skal ikke benyttes utenfor de spesifiserte maksimumsverdier for tempeartur og fuktighet,
siden dette kan føre til overoppheting og feilfunksjon.
Conecte el proyector únicamente a las fuentes de señal y tensiones descritas en las
especificaciones técnicas. La conexión a fuentes de señal o tensiones distintas de las
especificadas puede ocasionar un mal funcionamiento y el daño permanente del aparato.
Il proiettore va collegato solo alle tensioni e sorgenti di segnale descritte nei dati tecnici. Il
collegamento a sorgenti di segnale o tensioni diverse può causare guasti e danni permanenti
all’unità.
Projektoren må kun tilkobles signalkilder og spenninger som beskrevet i den tekniske
spesifikasjonen. Forbindelse til ukjente signalkilder eller spenninger kan føre til feil og permanent
skade på enheten.
Deje que el aparato se enfríe durante 60 minutos antes de cambiar la lámpara.
Prima di sostituire le lampade, attendere 60 minuti per lasciare raffreddare l’unità.
La enheten kjøles ned i 60 minutter før lampeskifte.
INFORMACIÓN Y ADVERTENCIAS SOBRE POSIBLES PROBLEMAS DE
SALUD RELACIONADOS CON LOS VAPORES DE MERCURIO.
INFORMAZIONI E AVVERTENZE SUI POTENZIALI RISCHI SANITARI
CORRELATI AI VAPORI DI MERCURIO.
INFORMASJON OG ADVARSEL OM MULIGE HELSESKADER I
FORBINDELSE MED KVIKKSØLVDAMP
Este proyector utiliza una lámpara UHP™ muy potente para que la iluminación produzca una
imagen extremadamente brillante.
Per produrre immagini estremamente luminose, questo proiettore fa uso di una potentissima
lampada UHP™.
Projektoren benytter en meget sterk UHP™ lampe til belysning, noe som gir et ekstremt lyssterkt
bilde.
Este tecnología es similar a la de otras lámparas de descarga luminosa de alta presión ampliamente
utilizadas hoy en día en automóviles, farolas y otros dispositivos de alumbrado. Estas lámparas,
al igual que los tubos fluorescentes, contienen pequeñas cantidades de mercurio. La cantidad
de mercurio presente en una lámpara está muy por debajo de los límites de riesgo establecidos
por las autoridades. Es muy importante que las lámparas que contienen mercurio sean tratadas
adecuadamente para minimizar posibles riesgos para la salud.
Questa tecnologia è simile a quella di altre lampade a scarica ad alta tensione oggi molto diffuse
su automobili, illuminazione stradale ed altre applicazioni. Queste lampade, al pari delle luci
fluorescenti, contengono esigue quantità di mercurio. La quantità di mercurio presente in una
lampada è di gran lunga al di sotto dei limiti minimi imposti dalle autorità. Per ridurre al minimo i
potenziali rischi per la salute, è fondamentale trattare correttamente le lampade che contengono
mercurio.
Denne teknologien tilsvarer andre høytrykks utladningslamper som benyttes i biler, gatelys o.l. Disse
lampene, lik lysstoffrør og sparepærer, inneholder små mengder kvikksølv som ligger langt under
de faregrenser som er satt av myndighetene. Det er svært viktig at lamper som innehoder kvikksølv
håndteres korrekt for å minimalisere mulig helsefare.
La lámpara UHP™, al igual que cualquier otra lámpara de proyector de gran luminosidad, funciona
a alta presión. Si bien la lámpara y el proyector han sido diseñados cuidadosamente para minimizar
la probabilidad de rotura de la lámpara, ésta puede romperse durante el funcionamiento y el
proyector puede emitir vapores de mercurio en pequeñas cantidades. La probabilidad de ruptura
aumenta a medida que la lámpara concluye su vida útil. Por lo tanto, se recomienda especialmente
sustituir la lámpara cuando se estime que ha concluido su vida útil.
La lampada UHP™, come qualsiasi altra lampada per proiettore ad alta luminosità, funziona ad
alta pressione. Sebbene lampada e proiettore siano stati progettati accuratamente per ridurre al
minimo il rischio di rottura della lampada, ciò può accadere durante l’uso, causando la fuoriuscita
di piccole quantità di vapori di mercurio dal proiettore. Le probabilità di rottura aumentano quando
la lampada raggiunge il termine della durata di servizio. Pertanto si consiglia vivamente di sostituire
la lampada quando raggiunge il termine della sua durata nominale.
Como precaución general, asegure una buena ventilación de la habitación cuando el proyector esté
funcionando. Si se produce una ruptura de la lámpara, evacue la habitación y procure una buena
ventilación. Particularmente, los niños y las mujeres embarazadas deben abandonar la habitación.
Come precauzione generica, ventilare adeguatamente gli ambienti quando si utilizza il proiettore.
Se la lampada si rompe, allontanare tutti i presenti dall’ambiente e ventilarlo a fondo. In particolare,
allontanare bambini e donne in gravidanza.
Cuando sustituya una lámpara gastada, deseche la lámpara usada siguiendo las indicaciones de
reciclaje adecuadas.
Quando si sostituisce una lampada usata, questa va smaltita a norma di legge.
El mercurio es un elemento metálico estable de origen natural que puede suponer un riesgo para
la seguridad de las personas en determinadas circunstancias. Según el resumen de salud pública
sobre el mercurio publicado por la “ATSDR” (Agencia para Sustancias Tóxicas y el Registro de
Enfermedades, que forma parte del Servicio de Salud Pública de los Estados Unidos), el cerebro,
el sistema nervioso central y los riñones son sensibles a los efectos del mercurio, y la exposición a
unos niveles suficientemente altos puede ocasionar lesiones permanentes. La exposición intensa
a altas concentraciones de vapor de mercurio puede producir irritación pulmonar y de las vías
respiratorias, presión en el pecho, sensación de quemazón en los pulmones, tos, náusea, vómitos
y diarrea. Los niños y los nonatos son especialmente sensibles a los efectos dañinos del mercurio
metálico sobre el sistema nervioso.
Consulte a un médico si experimenta cualquiera de estos síntomas u otros síntomas no habituales
tras la ruptura de una lámpara.
Il mercurio è un elemento metallico stabile che esiste in natura e che in talune condizioni può
costituire un rischio per la sicurezza degli uomini. Secondo la pubblicazione Public Health
Statement for Mercury edita dall’agenzia per le sostanze tossiche ATSDR (Agency for Toxic
Substances and Disease Registry, parte del servizio sanitario nazionale degli USA), il cervello,
il sistema nervoso centrale e i reni sono sensibili agli effetti del mercurio e l’esposizione a livelli
sufficientemente alti, può causare lesioni permanenti. L’esposizione acuta ad alte concentrazioni
di vapori di mercurio può causare, ad esempio, irritazioni ai polmoni e alle vie respiratorie, senso
di costrizione al petto, sensazione di bruciore ai polmoni, tosse, nausea, vomito e diarrea.
Bambini e feti sono particolarmente sensibili agli effetti dannosi del mercurio metallico sul sistema
nervoso.
UHP™ lampen, som andre lyssterke projektorlamper, opererer under høyt trykk når de er i
bruk. Selv om både lampen og projektoren er konstruert for å minimere sannsynligheten for
lampe-eksplosjon, kan det hende at lampen ryker når den er i bruk. I så fall kan små mengder
kvikksølvdamp lekke ut av projektoren. Sannsynligheten for at lampen kan ryke øker etter hvert som
lampen eldes. Det anbefales derfor sterkt å bytte lampen når lampen har nådd sin nominelle levetid.
Som en generell anbefaling bør rommet som projektoren benyttes i være godt ventilert. Hvis lampen
ryker, bør rommet evakueres og luftes. Barn og gravide kvinner bør spesielt forlate rommet.
Når lampen byttes, må den brukte lampen resirkuleres som farlig avfall og ikke kastes i ordinær
søppel.
Kvikksølv er et naturlig forekommende, stabilt metallisk stoff som kan medføre helserisiko under
visse forhold. I følge det offentlige utsagnet for kvikksølv, som er utgitt av ‘Agency for Toxic
Substances and Disease Registry’ (“ATSDR”, en del av De Forente Staters folkehelsetjeneste),
er hjernen, sentralnervesystemet og nyrene følsomme for kvikksølv, og de kan skades
permanent dersom de eksponeres for større doser. Akutt overeksponering kan føre til lunge- og
luftveisirritasjoner, brystsmerter, brennende følelse i lungene, hosting, kvalme, oppkast og diarré.
Barn og fostre er spesielt følsomme for skadelige følger av metallisk kvikksølv i nervesystemet.
Søk medisinsk støtte hvis man opplever noen av de ovennevnte symptomer, eller hvis man opplever
andre uventede symptomer etter en lampe-eksplosjon.
In caso di manifestazione di uno dei sintomi di cui sopra, o se si avvertono altri sintomi anomali in
seguito alla rottura della lampada, consultare un medico.
recogida de residuos de equipos eléctricos y electrónicos.
DS+305/DS+305 User Manual
020-000057-01 Rev. 1 (06/08)
9
SAFETY & WARNINGS
english
SICHERHEIT UND WARNHINWEISE
deutsch
SÉCURITÉ & MISES EN GARD
francais
SEGURIDAD Y ADVERTENCIAS
español
WEEE INFORMATION
WEEE-ANGABEN
INFORMATION WEEE
INFORMACIÓN WEEE
This product conforms to all requirements of the EU Directive on waste
electrical and electronic equipment (WEEE). This product shall be
recycled properly. It can be disassembled to facilitate proper recycling
of it’s individual parts. This product is using projection lamps that shall
be recycled properly. Consult your dealer or relevant public authority
regarding drop-off points for collection of WEEE.
Dieses Produkt erfüllt alle Auflagen aus der EU-Richtlinie für
Elektro- und Elektronik-Altgeräte (WEEE). Dieses Produkt kann
sachgemäß recycelt werden. Es kann zerlegt werden, um die
Einzelteile ordnungsgemäß zu recyceln. Dieses Produkt verwendet
Projektorlampen, die sachgemäß recycelt werden müssen. Fragen Sie
Ihren Händler oder die zuständigen Behörden nach Entsorgungsstellen
für Elektro- und Elektronik-Altgeräte.
Cet appareil est conforme à la Directive EU relative au recyclage
des équipements électriques et électroniques (WEEE). Cet appareil
doit être recyclé correctement. Il peut être démonté pour faciliter
le recyclage de chaque pièce séparément. Cet appareil utilise des
lampes de projection qui doivent être recyclées correctement.
Consultez votre revendeur ou les autorités publiques compétentes
concernant les points de collecte WEEE.
WARNUNG
MISE EN GARDE
Este producto cumple todos los requisitos de la Directiva de la UE
sobre residuos de equipos eléctricos y electrónicos. Este producto
debe reciclarse adecuadamente. Puede desmontarse para facilitar
el adecuado reciclado de cada una de sus piezas. Este producto
usa lámparas de proyección que deben reciclarse adecuadamente.
Consulte a su distribuidor o al organismo público pertinente acerca de
los puntos limpios para la recogida de residuos de equipos eléctricos y
electrónicos.
Dieses Produkt kann Chemikalien, wie z. B. Blei, enthalten, von denen
im Staat Kalifornien bekannt ist, dass sie angeborene Schäden oder
andere Fortpflanzungsschäden verursachen. Sachgemäß recyceln und
nicht mit dem gewöhnlichen Abfall entsorgen!
Cet appareil contient des produits chimiques, câble compris, connus
de l’Etat de Californie pour entraîner des malformations ou des maux
reproductifs. Recyclez correctement ; ne les jetez pas dans une
déchetterie quelconque!
WARNUNG ZUR FERNBEDIENUNG
AVERTISSEMENT POUR LA TÉLÉCOMMANDE
Produkt mit Laserstrahlung der Klasse II; Wellenlänge 670 nm;
maximale Leistungsabgabe 1 mW.
Appareil de classe II à radiation laser; longueur d’onde 670 nm; sortie
maximale 1mW.
Die Fernbedienung erfüllt die zutreffenden Auflagen der Normen 21
CFR 1040.10 und 1040.11.
La télécommande est conforme aux critères en vigueur des normes
21 CFR 1040.10 et 1040.11.
Die Fernbedienung erfüllt die zutreffenden Auflagen der EN 60.825-1:
1994 + A11
La télécommande est conforme aux critères en vigueur des normes
EN 60 825-1: 1994 + A11
WARNING
This product contains chemicals, including lead, known to the State of
California to cause birth defects or other reproductive harm. Recycle
properly, do not dispose of in ordinary waste!
REMOTE CONTROL WARNING
Laser radiation class II product; wavelength 670nm; maximum output
1mW.
Remote control complies with applicable requirements of 21 CFR
1040.10 and 1040.11.
Remote control complies with applicable requirements of EN 60 825-1:
1994 + A11
ADVERTENCIA
Este producto contiene sustancias químicas, incluyendo plomo,
que según le consta al Estado de California, ocasionan defectos de
nacimiento u otros daños de índole reproductiva. ¡Siga las indicaciones
de reciclado adecuadas, no deseche el producto con los residuos
habituales!
ADVERTENCIA SOBRE EL MANDO A DISTANCIA
Producto con radiación lasérica de clase II; longitud de onda 670nm;
potencia de salida máxima 1mW.
El mando a distancia cumple los requisitos aplicables de 21 CFR
1040.10 y 1040.11.
El mando a distancia cumple los requisitos aplicables de EN 60 825-1:
1994 + A11
10
DS+305/DS+305 User Manual
020-000057-01 Rev. 1 (06/08)
SICUREZZA E AVVERTENZE
italiano
SIKKERHET OG ADVARSLER
norsk
INFORMAZIONI SU WEEE
WEEE INFORMASJON
Questo dispositivo è conforme a tutti i requisiti della direttiva UE (WEEE)
sullo smaltimento di apparecchiature elettriche ed elettroniche. Questo
prodotto deve essere riciclato correttamente e può essere smontato
per agevolare il riciclaggio dei singoli componenti. Anche le lampade
di proiezione utilizzate su questo apparecchio devono essere riciclate
correttamente. Per informazioni sui punti di raccolta WEEE, consultare il
rivenditore o l’autorità preposta.
Dette produktet tilfredsstiller alle krav i EU direktivet 2002/96/EC
somgjelder brukt elektrisk og elektronisk utstyr. Dette produktet skal
resirkuleres forsvarlig. Det kan demonteres slik at de enkelte deler kan
resirkuleres forsvarlig. Dette produktet benytter projeksjonslampe som
skal resirkuleres forsvarlig.
AVVERTENZA
Questo prodotto contiene sostanze chimiche, incluso il piombo, che
lo Stato della California riconosce all’origine di difetti prenatali o altre
anomalie genetiche. Riciclare correttamente, non buttare con i rifiuti
ordinari.
AVVERTENZA PER IL TELECOMANDO
ADVARSEL
Dette produktet inneholder kjemikalier, inkludert bly, som kan forårsake
fødselsskader og andre forplantningsskader. Sørg for korrekt
resirkulering. Kast ikke lamper eller andre deler i vanlig søppel.
ADVARSEL FJERNKONTROLL
Laser stråling klasse II med bølgelengde 670nm og maksimalt 1mW
utstrålt effekt.
Prodotto laser di classe II, lunghezza d’onda di 670 nm; uscita massima
di 1 mW.
Fjernkontrollen er konform med relevante krav i 21 CFR 1040.10 og
1040.11.
Il telecomando è conforme ai pertinenti requisiti di legge 21 CFR
1040.10 e 1040.11.
Fjernkontrollen er konform med relevante krav i EN 60 825-1:1994
+ A11.
Il telecomando è conforme ai pertinenti requisiti di legge EN 60 825-1:
1994 + A11
DS+305/DS+305 User Manual
020-000057-01 Rev. 1 (06/08)
11
SAFETY & WARNINGS
english
SICHERHEIT UND WARNHINWEISE
deutsch
SÉCURITÉ & MISES EN GARD
francais
SEGURIDAD Y ADVERTENCIAS
español
WARNING SYMBOLS
WARNSYMBOLE
SYMBOLES D’AVERTISSEMENT
SÍMBOLOS DE ADVERTENCIA
READ USER GUIDE
Attention! Read the user guide for further information!
LESEN SIE DAS BENUTZERHANDBUCH
Vorsicht! Nähere Angaben finden Sie im
Benutzerhandbuch!
LISEZ LE GUIDE D’UTILISATION
Attention! Lisez le guide d’utilisation pour plus
d’information!
LEA LA GUÍA DEL USUARIO
¡Atención! ¡Lea la guía del usuario para obtener más
información!
DANGEROUS VOLTAGE
Danger! High voltage inside the product!
GEFÄHRLICHE SPANNUNG
Gefahr! Hohe Spannung im Inneren des Geräts!
VOLTAGE DANGEREUX
Danger! Voltage élevé dans l’appareil!
TENSIÓN PELIGROSA
¡Peligro! ¡Alta tensión en el interior del producto!
HOT
Warning! Hot surfaces!
HEISS
Warnung! Heiße Flächen!
CHAUD
Avertissement Surfaces chaudes!
CALIENTE
¡Advertencia! ¡Superficies calientes!
WAIT
Warning! Wait until cooled down!
WARTEN
Warnung! Abkühlen lassen!
ATTENDEZ
Avertissement Attendez jusqu’au refroidissement!
ESPERE
¡Advertencia! ¡Espere hasta que se enfríe!
MERCURY
Warning! Lamp contains mercury! Recycle properly, do not
dispose of in ordinary waste!
QUECKSILBER
Warnung! Die Lampe enthält Quecksilber! Sachgemäß
recyceln, und nicht mit dem gewöhnlichen Abfall
entsorgen!
MERCURE
Avertissement La lampe contient du mercure! Recyclez
correctement, n’éliminez pas dans une déchetterie
quelconque!
MERCURIO
¡Advertencia! ¡La lámpara contiene mercurio! ¡Siga las
indicaciones de reciclado adecuadas, no deseche el
producto con los residuos habituales!
UV
Warning! UV radiation inside the product!
UV
Warnung! UV-Strahlung im Inneren des Geräts!
UV
Avertissement Radiation UV à l’intérieur de l’appareil!
UV
¡Advertencia! ¡Radiación UV en el interior del producto!
RECYCLE
Warning! Recycle properly, do not dispose of in ordinary
waste!
RECYCELN
Warnung! Sachgemäß recyceln und nicht mit dem
gewöhnlichen Abfall entsorgen!
RECYCLEZ
Avertissement Recy clez correctement, ne les jetez pas
dans une déchetterie quelconque!
RECICLADO
¡Advertencia! ¡Siga las indicaciones de reciclado adecuadas,
no deseche el producto con los residuos habituales!
NO TELEPHONE
Warning! Do not connect to telephone lines!
KEIN TELEFON
Warnung! Nicht an Telefonleitungen anschließen!
PAS DE TELEPHONE
Avertissement Ne vous connectez pas aux lignes
téléphoniques!
NO USE EL TELÉFONO
¡Advertencia! ¡No lo conecte a las líneas telefónicas!
12
DS+305/DS+305 User Manual
020-000057-01 Rev. 1 (06/08)
SICUREZZA E AVVERTENZE
italiano
SIKKERHET OG ADVARSLER
norsk
SIMBOLI DI AVVERTENZA
SYMBOLER
LEGGERE LA GUIDA D’USO
Attenzione! Per maggiori informazioni, leggere la guida
d’uso.
LES BRUKSANVISNINGEN
Les bruksanvisningen for mere informasjon!
TENSIONE PERICOLOSA
Pericolo. Alta tensione all’int erno del prodotto.
HØYSPENNING
Fare! Høyspenning inne i enheten!
CALDO
Avvertenza: superfici calde.
VARM
Advarsel! Varme flater!
ATTENDERE
Avvertenza: attendere il raffreddamento.
VENT
Advarsel! Vent til enheten er avkjølt!
MERCURIO
Avvertenza: la lampada contiene mercurio. Riciclarla
correttamente e non buttare tra i rifiuti ordinari.
KVIKKSØLV
Advarsel! Lampen inneholder kvikksølv! Resirkuler som
spesialavfall. Må ikke kastes i vanlig avfall!
UV
Avvertenza: radiazioni UV all’interno del prodotto.
UV
Advarsel! Ultrafiolett (UV) stråling inne i enheten!
RICICLAGGIO
Avvertenza: riciclare correttamente, non buttare con i rifiuti
ordinari.
RESIRKULER
Advarsel! Resirkuler som spesialavfall. Må ikke kastes i
vanlig avfall!
NESSUN TELEFONO
Avvertenza: non collegare alle linee telefoniche.
IKKE TELEFON
Advarsel! Må ikke kobles til telefonlinje!
DS+305/DS+305 User Manual
020-000057-01 Rev. 1 (06/08)
13
SUPPLIED MATERIAL
english
LIEFERUMFANG
deutsch
MATERIEL FOURNIS
francais
MATERIAL ENTREGADO
español
Projector
Projektor
Projecteur
Proyector
Remote control with batteries
Fernbedienung mit Batterien
Télécommande avec piles
Mando a distancia con pilas
User guide
Benutzerhandbuch
Guide d’utilisation
Guía del usuario
Bag (optional)
Tasche (optional)
Sac (optional)
Bolsa (optional)
Cables (optional)
Kabel (optional)
Câbles (optional)
Cables (optional)
Power Cord
(country dependent)
Stromkabel
(je nach Land)
Cordon d’alimentation
(dépendant du pays)
Cable de alimentación
(en función del país)
Before Set up and Use
Unpack the supplied parts and familiarise yourself with the
various components.
Vor der Einrichtung und Verwendung
Packen Sie die gelieferten Teile aus und lernen Sie die
verschiedenen Komponenten kennen.
Avant toute installation et utilisation
Déballez les pièces fournies et familiarisez-vous avec les
différents composants
Antes de la instalación y el uso.
Desembale las piezas entregadas y familiarícese con los
distintos componentes.
14
DS+305/DS+305 User Manual
020-000057-01 Rev. 1 (06/08)
MATERIALE IN DOTAZIONE
italiano
LEVERT UTSTYR
Proiettore
Projektor
Telecomando con batterie
Fjernkontroll med batterier
Guida d’uso
Bruksanvisning
Borsa (optional)
Veske (optional)
Cavi (optional)
Kabler (optional)
norsk
Cavo di alimentazione
(in base al paese)
Strømkabel
(avhengig av land)
Preliminari all’impostazione e all’uso
Disimballare le parti fornite e prendere dimestichezza con i
vari componenti.
Før oppkobling og bruk
Pakk ut og gjør deg kjent med alle deler før du kobler opp
og bruker utstyret.
DS+305/DS+305 User Manual
020-000057-01 Rev. 1 (06/08)
DVI
VGA
A-V
USB
15
OVERVIEW
english
ÜBERSICHT
deutsch
VUE D’ENSEMBLE
francais
DESCRIPCIÓN GENERAL
A Lens
A Linse
A Lentille
A Objetivo
B IR sensor
B Infrarotsensor
B Capteur IR
B Sensor IR
C Ventilation
C Belüftung
C Ventilation
C Ventilación
D Foot release
D Fußfreigabe
D Dégagement de pred
D Disparador de pato
E Power connector
E Stromanschluss
E Raccord d’alimentation
E Conector de alimentación
F Keypad
F Tastenfeld
F Clavier
F Teclado
G Connector panel
G Anschlüsse
G Panneau de raccordement
G Panel de conexiones
H Lens shift
H Linsenverschiebung
H Changement de lentilles
H Desplazamiento del objetivo
I
I
I
I
Adjustable feet
Regulierbare Füße
Pieds réglables
Patas regulables
J Security lock
J Sicherheitsverriegelung
J Fermeture sécurisée
J Cierre de seguridad
K Ceiling mount
K Deckenmontage
K Montage au plafond
K Montaje en el techo
16
español
DS+305/DS+305 User Manual
020-000057-01 Rev. 1 (06/08)
PANORAMICA
italiano
OVERSIKT
A Obiettivo
A Linse
B Sensore IR
B IR mottaker
C Ventilazione
C Ventilasjon
D Sbloccagio piedio
D Fotutløser
E Connettore di alimentazione
E Strømkontakt
F Tastierino
F Tastatur
G Pannello dei connettori
G Kontaktpanel
H Cambio obiettivo
H Linseskift
I
I
Piedini di regolazione
norsk
Justerbare føtter
J Blocco di sicurezza
J Sikkerhetslås
K Montaggio a soffitto
K Takfeste
D
C
A
B
H
F
C
J
C
E
G
B
C
I
B
K
D
DS+305/DS+305 User Manual
020-000057-01 Rev. 1 (06/08)
C
17
KEYPAD
english
deutsch
CLAVIER
francais
The keypad is illuminated for operation in dark environments. Several keys have
multiple functions.
Das Tastenfeld ist für seine Betätigung bei Dunkelheit beleuchtet. Mehrere Tasten
sind Mehrfachfunktionen zugewiesen.
Le clavier est lumineux pour utilisation dans un lieu sombre. Plusieurs touches ont
des fonctions multiples.
POWER
Switches the projector between on and standby modes. Press firmly (1 sec) to
switch on. Press firmly (1 sec) twice to switch off.
STROMVERSORGUNG
Schaltet den Projektor zwischen an und den Standby-Betriebsarten um. Fest (1
Sek. lang) drücken, um das Gerät einzuschalten. Zweimal (1 Sek. lang) drücken,
um das Gerät auszuschalten.
PUISSANCE
Alternez le projecteur entre les modes on et veille. Appuyez fermement (1 sec)
pour allumer. Appuyez 2 fois fermement (1 sec) pour éteindre.
AUTO
Adjusting the projector to display a correct image, including position, width, height
and overall stability.
MENU
Activates the menu system. Use the four arrow keys to navigate and «OK» to
activate.
ARROW KEYS
Use the arrow keys to navigate the menu system, or to control speaker sound
volume or source selection when not in the menu
OK
Confirm menu option when menu system is activated.
0-9
These keys are used for PIN code entry.
SRC
Use these keys to select active source.
KST
Engage digital keystone correction when not in menu mode. Use arrow keys to
adjust.
18
TASTENFELD
18
AUTO
Einstellung des Projektors, damit das Bild korrekt angezeigt wird; dazu gehören
die Position,Breite, Höhe, Kontrast, Helligkeit und allgemeine Stabilität.
MENÜ
Öffnet das Menüsystem. Mit den vier Pfeiltasten können Sie die verschiedenen
Elemente erreichen und «OK» bestätigen.
PFEILTASTEN
Mit Hilfe der Pfeiltasten können Sie sich durch das Menüsystem bewegen oder
das Volumen der Lautsprecher steuern bzw. die Auswahl der Quelle vornehmen,
wenn Sie sich nicht im Menü befinden.
AUTO
Réglage du projecteur pour donner une image correcte, en ce qui concerne la
position, la largeur, la hauteur et la stabilité d’ensemble.
MENU
Active le menu. Utilisez les quatre touches flèche pour naviguer et OK pour activer.
TOUCHES FLECHE
Utilisez les touches flèches pour parcourir le menu, pour contrôler le volume
sonore du haut-parleur ou la source quand vous n’êtes pas dans le menu
OK
Confirme l’option du menu quand le menu est activé.
OK
Bestätigt eine Menüoption, wenn das Menüsystem aktiviert ist.
0-9
Ces touches sont utilisées pour le code d’entrée PIN.
0-9
Diese Tasten dienen zur Eingabe des PIN-Codes.
SRC
Utilisez ces touches pour sélectionner la source active.
SRC
Mit diesen Tasten wird die aktive Quelle angewählt.
KST
Lancez la correction digitale du trapèze quand vous n’êtes pas en mode menu.
Utilisez les touches flèches pour régler.
KST
Aktiviert die digitale Trapezentzerrung, wenn nicht das Menü aufgerufen wurde.
Die Einstellung erfolgt über die Pfeiltasten.
DS+305/DS+305 User Manual
020-000057-01 Rev. 1 (06/08)
TECLADO
español
TASTIERINO
italiano
TASTATUR
norsk
El teclado está iluminado para el funcionamiento en entornos oscuros. Varias de
las teclas tienen múltiples funciones.
Il tastierino è illuminato per consentirne l’uso in ambienti bui. Diversi tasti hanno
più funzioni.
Tastaturet er belyst for å kunne benyttes i mørke. De fleste tastene har flere
funksjoner.
POWER
Conmuta el proyector entre los modos de encendido y espera. Pulse firmemente
(1 seg.) para encenderlo. Pulse firmemente (1 seg.) dos veces para apagarlo.
ACCENSIONE
Passa il proiettore dalla modalità di accensione a quella di standby. Premere con
fermezza (1 secondo) per accendere. Premere due volte (1 sec) per spegnere.
POWER
Skrur projektoren på og av (stand-by). Hold tasten inne en kort periode (1 sekund)
for å skru på. For å skru av må tasten trykkes inn to ganger.
AUTO
Ajusta el proyector para mostrar una imagen correcta, incluyendo posición,
anchura, altura y estabilidad general.
AUTO
Consente di regolare il proiettore per visualizzare l’immagine in modo corretto,
incluso posizione, larghezza, altezza e stabilità generale.
AUTO
Justerer projektoren slik at den viser et riktig bilde med hensyn til posisjon, bredde,
høyde og bildestabilitet.
MENU
Activa el sistema de menús. Use las cuatro teclas de dirección para navegar y
«OK» para activarlas.
MENU
Attiva il sistema dei menu. Utilizzare i quattro tasti con le frecce per navigare e
“OK” per confermare.
MENY
Aktiviserer menysystemet. Bruk de fire piltastene og ‘OK’ for å navigere.
TECLAS DE DIRECCIÓN
Use las teclas de dirección para navegar por el sistema de menús, o para
controlar el volumen de sonido del altavoz o la selección de fuente cuando no se
encuentre en el menú.
TASTI FRECCIA
Usare i tasti freccia per navigare nel sistema dei menu o per controllare il volume
dell’altoparlante o la selezione della sorgente quando non si è nel menu.
OK
Confirma la opción del menú cuando está activado el sistema de menús.
0-9
Estas teclas se utilizan para la introducción del código PIN.
SRC
Use estas teclas para seleccionar la fuente activa.
KST
Active la corrección de la distorsión trapezoidal digital cuando no se encuentre en
el modo de menú. Use las teclas de dirección para efectuar el ajuste.
DS+305/DS+305 User Manual
020-000057-01 Rev. 1 (06/08)
OK
Consente di confermare l’opzione di menu quando è attivo il sistema dei menu.
0-9
Utilizzare questi tasti per inserire il codice PIN.
SRC
Utilizzare questi tasti per selezionare la sorgente attiva.
KST
Attiva la correzione digitale della deformazione trapezoidale quando non si è
nella modalità menu. Per regolare, utilizzare i tasti con le frecce.
PILTASTER
Bruk piltastene for å navigere i menyen, eller for å styre høyttalervolum eller
kildevalg når du ikke er i menyen
OK
Bekreft valg i meny eller gå tilbake i meny.
0-9
Tastene benyttes for PIN kode.
SRC
Trykk på disse tastene for å velge kilde.
KST
Trykk på denne tasten for å velge ’keystone’ korrigering når du ikke er i menyen.
Trykk deretter på piltastene for å korrigere bildet.
19
19
INDICATORS
english
LEUCHTANZEIGEN
deutsch
INDICATEURS
francais
INDICADORES
español
INDICATOR LIGHT
LEUCHTANZEIGEN
INDICATEUR
INDICADOR
The light next to the power key indicates the overall system
status by blue, orange and red colors.
Die Leuchte neben dem Ein-Aus-Schalter zeigt in blau,
orange bzw. rot den allgemeinen Zustand des Geräts an.
La luz junto a la tecla de encendido indica el estado general
del sistema mediante los colores azul, naranja y rojo.
PERMANENT BLUE LIGHT
PERMANENT BLAUES LICHT
Le voyant lumineux à coté de la touche power indique
l’état général du système par des couleurs bleu, orange
et rouge.
The projector is turned on and in normal operation.
Der Projektor ist angeschaltet und befindet sich im
normalen Betrieb.
LUMIERE BLEUE PERMANENTE
El proyector está encendido y funciona con normalidad.
PERMANENT ORANGES LICHT
LUMIERE ORANGE PERMANENTE
Das Gerät befindet sich im Standby-Betrieb; es sind keine
Quellen angeschlossen oder die angeschlossene Quelle
bzw. Quellen sind nicht aktiv oder ausgeschaltet, so
dass die Stromsparfunktion (DPMS) aktiviert wurde. Die
Stromsparfunktion kann im SETUP-Untermenü DPMS an
oder aus aktiviert bzw. deaktiviert werden.
L’appareil est en mode veille ; il n’y a pas de source
connectée, ou la source connectée est inactive ou éteinte,
activant ainsi la fonction économie d’énergie (DPMS).
Vous pouvez activer ou désactiver la fonction économie
d’énergie dans le sous-menu SET UP, DPMS sur ON ou
OFF.
BLINKENDES ORANGES LICHT
LUMIERE ORANGE CLIGNOTANTE
Bitte warten. Das gelbe Licht blinkt eine gewisse Zeit
nachdem das Stromkabel angeschlossen wurde (10 - 15
Sek.), sowie eine gewisse Zeit nach dem Umschalten
in den Standby-Betrieb, während die Lampe abkühlt
(ungefähr 45 Sek.). Der Projektor kann nicht wieder
eingeschaltet werden, solange die Leuchtanzeige nicht
wieder auf permanent gelb gewechselt hat.
Veuillez patienter. La lumière jaune clignote pendant
quelques secondes après avoir connecté le cordon
d’alimentation (10-15 sec), et après la mise en veille tant
que la lampe refroidi (approximativement 45 sec.). Le
projecteur ne peut pas être rallumé tant que la lumière
jaune n’est pas permanente.
BLINKENDES ROTES LICHT
Le projecteur est en surchauffe. Eteignez immédiatement
Vérifiez si les arrivées d’air ne sont pas bouchées ou si la
température ambiante est au-delà des caractéristiques.
Le projecteur ne peut être redémarré que si le cordon
d’alimentation est débranché puis rebranché. Si le
projecteur continu de clignoter rouge, vous devez
retourner l’appareil au service après-vente.
PERMANENT ORANGE LIGHT
The unit is in standby mode; no source(s) connected, or the
source(s) connected are inactive or switched off, thereby
activating the powersave function (DPMS). You may enable
or disable the power save function in the SET UP sub menu,
DPMS on or off.
FLASHING ORANGE LIGHT
Please wait. The yellow light will flash a period after power
cord is connected (10-15 sec.), and a period after going to
standby mode while lamp is cooling down (approximately
45 sec.). The projector may not be turned on again until the
light has turned to permanent yellow.
FLASHING RED LIGHT
Projector is overheated. Turn off immediately! Check if
air inlets are covered or if ambient temperature is outside
specifications. The projector can not be restarted unless the
power cord is disconnected and reconnected again. If the
projector continues to flash red, you will need to return the
unit for service.
Lamp life has expired. Please change projection lamp
immediately. Failing to change lamp may lead to lamp
explosion.
Der Projektor ist überhitzt. Sofort ausschalten! Prüfen
Sie, ob die Belüftungsöffnungen verdeckt sind oder die
Raumtemperatur die vorgegebenen Werte übersteigt. Der
Projektor kann nicht eingeschaltet werden, außer das
Stromkabel wird abgezogen und erneut eingesteckt. Blinkt
der Projektor immer noch rot, so muss er zur Reparatur
gegeben werden.
NO LIGHT
PERMANENT ROTES LICHT
Power is not connected to the projector.
Die Lebensdauer der Lampe ist abgelaufen. Tauschen Sie
die Projektorlampe bitte umgehend aus. Wird die Lampe
nicht ausgetauscht, kann dies zu einer Explosion der
Lampe führen.
PERMANENT RED LIGHT
KEIN LICHT
Le projecteur est allumé et fonctionne normalement.
LUMIERE ROUGE CLIGNOTANTE
LUMIERE PERMANENTE ROUGE
La durée de vie de la lampe est dépassée. Veuillez
changer la lampe de projection immédiatement. Ne pas
changer la lampe peut entraîner l’explosion de la lampe.
PAS DE LUMIERE
Le projecteur n’est pas alimenté.
LUZ AZUL PERMANENTE
LUZ NARANJA PERMANENTE
El aparato está en modo de espera; no hay ninguna fuente
conectada, o si la hay está inactiva o apagada y, por
tanto, se activa la función de ahorro de energía (DPMS).
Puede activar o desactivar la función de ahorro de energía
en el submenú INSTALACIÓN, seleccionando DPMS On
(activado) u Off (desactivado).
LUZ NARANJA INTERMITENTE
Por favor, espere. La luz amarilla parpadeará durante 10
o 15 segundos tras conectarse el cable de alimentación
y durante 45 segundos, aproximadamente, después de
entrar en modo de espera mientras la lámpara se enfría. No
se puede encender el proyector de nuevo hasta que la luz
amarilla se quede fija.
LUZ ROJA INTERMITENTE
El proyector se ha sobrecalentado. ¡Apáguelo
inmediatamente! Compruebe si las entradas de aire
están tapadas o si la temperatura ambiente supera la
especificada. El proyector no puede encenderse de nuevo
si no se desenchufa y se vuelve a enchufar el cable de
alimentación. Si la luz roja del proyector sigue parpadeando,
tendrá que llevar el aparato para que lo reparen.
LUZ ROJA FIJA
La vida útil de la lámpara ha concluido. Cambie la lámpara
de proyección inmediatamente. Si no se cambia la lámpara,
podría estallar.
NO HAY LUZ
La alimentación no está conectada al proyector.
Die Stromversorgung des Projektors ist nicht hergestellt.
20
DS+305/DS+305 User Manual
020-000057-01 Rev. 1 (06/08)
INDICATORI
italiano
INDIKATORER
norsk
INDICATORE
INDIKATOR
La spia accanto al tasto di accensione indica lo stato
generale del sistema con il blu, l’arancio e il rosso.
Lampen ved siden av av/på tasten viser overordnet status
for projektoren med blå, gul og rød farge.
SPIA BLU FISSA
PERMANENT BLÅTT
Proiettore acceso e in funzionamento normale.
Projektoren er på og i normal drift.
SPIA ARANCIO FISSA
PERMANENT GULT
Unità in modalità standby; nessuna sorgente collegata,
oppure le sorgenti collegate non sono attive o sono spente,
attivando perciò la funzione di risparmio energetico (DPMS).
La funzione di risparmio energetico può essere attivata o
disattivata nel sottomenu SET UP (Impostazione), DPMS on
oppure off.
Enheten er av (i hvilemodus eller ‘stand-by’) fordi ingen
kilder er tilkoblet, eller de tilkoblede kildene er ikke aktive
eller de er skrudd av, slik at strømsparingsfunksjonen
(DPMS) er aktivert. Strømsparingsfunksjonen kan skrus av
eller på gjennom menysystemet i OPPSETT undermenyen,
DPMS av eller på.
SPIA ARANCIO LAMPEGGIANTE
BLINKENDE GULT
Attendere. La spia arancio lampeggia per un certo periodo
di tempo (10-15 secondi) dopo il collegamento del cavo
di alimentazione e, per circa 45 secondi dopo il passaggio
alla modalità standby, mentre la lampada si raffredda. Il
proiettore può essere riacceso solo quando la spia arancio
ritorna sul fisso.
Vennligst vent. Det gule lyset vil blinke en periode etter
at nettledningen er koblet til (10-15 sekunder), og en
periode etter at enheten skrus av, mens lampen kjøles ned
(omtrent 45 sekunder). Projektoren kan skrus på igjen når
lyset skifter til permanent gult.
SPIA ROSSA LAMPEGGIANTE
Projektoren er overopphetet! Skru av umiddelbart!
Sjekk at ventilasjonsåpningene ikke er tildekket og at
ikke omgivelsestemperaturen er høyere enn spesifisert.
Projektoren kan ikke skrus på igjen før nettledningen
kobles ut og inn igjen. Hvis projektoren fortsetter å blinke
rødt, må enheten sendes til reparasjon.
Il proiettore si è surriscaldato: spegnerlo immediatamente.
Controllare se le prese di aria sono ostruite o se la
temperatura ambiente ha superato i valori di specifica. Il
proiettore può essere riacceso solo dopo avere scollegato
e ricollegato il cavo di alimentazione. Se la spia rossa del
proiettore continua a lampeggiare, sarà necessario rendere
l’unità perché venga sottoposta a manutenzione.
SPIA ROSSA FISSA
La lampada ha raggiunto il tempo limite. Sostituire
immediatamente la lampada di proiezione. La mancata
sostituzione della lampada può causarne l’esplosione.
NESSUNA SPIA
BLINKENDE RØDT
POWER
POWER
STATUS
STATUS
PERMANENT RØDT
Lampen er utbrukt eller tenner ikke, eller lampedøren er
åpen. Vennligst skift lampe. Dersom lampen er utbrukt og
ikke byttes, kan den eksplodere.
INTET LYS
Projektoren er ikke tilkoblet strøm
Il proiettore non è collegato all’alimentazione.
DS+305/DS+305 User Manual
020-000057-01 Rev. 1 (06/08)
21
REMOTE CONTROL
english
The remote control allows flexible access to the projector
settings, either through direct keys, or through the menu
system. The remote control is backlit for use in dark
environments. It also has a datajack that allows for wired
connection to the projector. When the wire is connected,
the IR (infra-red) beam and internal batteries are switched
off. The remote control may also be used to control
presentations by mimicing mouse functionality (LEFT, RIGHT
keys and arrow keys).
The remote control can be operated either in ‘broadcast
mode’, or ‘individual mode’. When several projectors are in
use in an installation, individual control may be convenient.
Individual control is available either by wired remote control,
using the data-jack, or by using an individual number code.
For individual control, first set the individual RC ID code
using the projector menu system, see the MISC sub menu.
Then, to select a specific projector to control, first press the
‘*’ button in the lower keypad area, then the code as set in
the target projector. A code can be in the range ‘0’..’255’.
‘0’ is reserved for broadcast. To select another target,
repeat the process by pressing ‘*’ and a new code. To exit
individual control, press ‘*’’*’ twice or press ‘*’ and ‘0’.
POWER
Switches the projector between on and standby modes.
AUTO
Adjusting the projector to display a correct image, including
position, width, height and overall stability.
INFO
Displays source and projector status on screen.
BACKLIGHT
Switches the backlight on and off. The backlight will switch
off automatically after ten seconds.
BRIGHT
Adjusts image brightness.
CONTRAST
Adjusts image contrast.
COLOR
Adjusts color saturation of the image.
FERNBEDIENUNG
deutsch
Die Fernbedienung bietet einen flexiblen Zugriff auf die
Projektoreinstellungen, entweder über die Direkttasten
oder über das Menüsystem. Die Fernbedienung ist
für ihre Verwendung bei Dunkelheit beleuchtet. Sie
verfügt daneben über eine Datenbuchse, über die eine
Kabelverbindung zum Projektor möglich ist. Ist das Kabel
angeschlossen, werden der IR-Strahl (Infrarot) und die
internen Batterien abgeschaltet. Die Fernbedienung
kann auch zur Steuerung von Präsentationen verwendet
werden, wobei die Mausfunktionen nachgeahmt wird
(links, rechts Tasten und Pfeiltasten).
Die Fernbedienung kann im ‚Rundsende-‘ oder
im ‚Einzelbetrieb‘ eingesetzt werden. Werden in
einer Montage mehrere Projektoren verwendet, ist
möglicherweise die Einzelsteuerung angebrachter. Die
Einzelsteuerung erfolgt entweder über die über die
Datenbuchse verkabelte Fernbedienung oder mit Hilfe
eines individuellen Zahlencodes. Zur Einzelsteuerung
muss an erster Stelle im Menüsystem des Projektors, im
Untermenü MISC, der individuelle RC-ID-Code festgelegt
werden. Zur Auswahl eines konkreten Projektors wird
zuerst die Taste ‚*‘ auf dem unteren Tastenfeld betätigt
und dann der für den Zielprojektor festgelegte Code
eingegeben. Ein Code kann im Bereich von ‚0‘..‘255‘
liegen. ‚0‘ ist für den Rundsendebetrieb reserviert. Um
ein anderes Ziel zu wählen, wiederholen Sie den Vorgang
durch Betätigen der Taste ‚*‘ und Eingabe eines neuen
Codes. Um die Einzelsteuerung zu verlassen, drücken Sie
zweimal auf ‚*‘‘*‘ oder auf ‚*‘ und ‚0‘.
POWER
Schaltet den Projektor zwischen an und den StandbyBetriebsarten um.
AUTO
Einstellung des Projektors, damit das Bild korrekt
angezeigt wird; dazu gehören die Position, Breite, Höhe
und allgemeine Stabilität.
TELECOMMANDE
francais
La télécommande permet un accès flexible aux réglages
du projecteur, avec une des touches directes ou avec
le menu. La télécommande est rétro-éclairée pour
être utilisée dans un endroit sombre. Elle possède
aussi une prise jack qui prend en compte la connexion
branchée du projecteur. Quand le fil est connecté, le
faisceau Infra Rouge et les piles internes sont éteintes.
La télécommande peut aussi être utilisée pour contrôler
des présentations en réduisant les fonctions de la souris
(touches GAUCHE, DROITE et touches flèches).
La télécommande peut fonctionner aussi bien en
‘mode diffusion générale’ qu’en ‘mode individuel’
Quand plusieurs projecteurs sont utilisés dans une
installation, la commande individuelle peut être pratique
La commande individuelle est disponible avec n’importe
quelle télécommande reliée, en utilisant la prise jack
ou un code individuel. Pour la commande individuelle,
installez d’abord le code individuel RC ID dans le menu
du projecteur, au sous-menu MISC. Puis, pour choisir un
projecteur précis à commander, appuyez d’abord sur le
bouton ‘*’ dans le bas du clavier, puis reportez le code
dans la cible du projecteur. Un code peut être compris
entre ‘0’ et ‘255’. ’0’ est réservé à la diffusion générale
Pour choisir une autre cible, répétez l’opération en
appuyant sur ‘*’ et avec un nouveau code. Pour sortir de
la commande individuelle, appuyez ‘*’*’ 2 fois ou ‘*’ et ‘0’.
POWER
Alterne le projecteur entre les modes on et veille.
AUTO
Réglage du projecteur pour donner une image correcte,
en ce qui concerne la position, la largeur, la hauteur et la
stabilité d’ensemble.
MANDO A DISTANCIA
español
El mando a distancia permite un acceso flexible a los ajustes
del proyector, bien a través de las teclas directas o del sistema
de menús. El mando a distancia tiene una luz de fondo para
su uso en entornos oscuros. También tiene un conector de
datos para la conexión cableada al proyector. Cuando el cable
está conectado, el rayo IR (infrarrojo) y las pilas internas se
desactivan. El mando a distancia también se puede utilizar
para controlar presentaciones imitando la funcionalidad del
ratón (teclas IZQUIERDA, DERECHA y teclas de dirección).
El mando a distancia puede funcionar en “modo de
radiodifusión”, o en “modo individual”. Cuando en una
instalación hay varios proyectores en uso, el control individual
puede resultar más cómodo. El control individual está disponible
bien mediante un mando a distancia con cable, utilizando el
conector de datos, o mediante un código numérico individual.
Para el control individual, primero ajuste el código de ID del
mando a distancia (RC ID) utilizando el sistema de menús del
proyector, consulte el submenú MISC (MISCELÁNEA). Luego,
para seleccionar un proyector concreto para controlarlo,
primero pulse el botón ‘*’ en la parte inferior del teclado,
luego introduzca el código fijado para el proyector elegido. El
código puede variar entre “0” y “255”. El “0” está reservado
para la radiodifusión. Para seleccionar otro proyector, repita el
proceso pulsando ‘*’ y un nuevo código. Para salir del control
individual, pulse ‘*’’*’ dos veces o pulse ‘*’ y “0”.
POWER
Conmuta el proyector entre los modos de encendido y
espera.
AUTO
Ajusta el proyector para mostrar una imagen correcta,
incluyendo posición, anchura, altura y estabilidad general.
INFO
Affiche sur l’écran les états de la source et du projecteur.
INFO
Muestra el estado de la fuente y del proyector en la pantalla.
BACKLIGHT
Allume ou éteint le contre-jour. Le contre-jour s’éteint
automatiquement après 10 secondes
BACKLIGHT
Enciende y apaga la luz de fondo. La luz de fondo se
apagará automáticamente al cabo de diez segundos.
BRIGHT
Ajuste la luminosité de l’image.
BRIGHT
Ajusta el brillo de la imagen.
BRIGHT
Passt die Helligkeit des Bildes an.
CONTRAST
Ajuste le contraste de l’image.
CONTRAST
Ajusta el contraste de la imagen.
CONTRAST
Passt den Kontrast des Bildes an.
COLOR
Ajuste la saturation de couleur de l’image.
INFO
Auf dem Display werden die Quelle und der
Projektorstatus angezeigt.
BACKLIGHT
Schaltet die Hintergrundbeleuchtung an bzw. aus. Die
Hintergrundbeleuchtung schaltet nach zehn Sekunden
automatisch ab.
COLOR
Ajusta la saturación del color de la imagen.
COLOR
Passt die Farbsättigung des Bildes an.
22
DS+305/DS+305 User Manual
020-000057-01 Rev. 1 (06/08)
TELECOMANDO
italiano
Il telecomando consente l’accesso flessibile alle
impostazioni del proiettore, tramite i tasti oppure il sistema
dei menu. Il telecomando è retroilluminato e può essere
utilizzato in condizioni di scarsa luminosità. È provvisto
anche di un jack dati che consente di collegarlo al proiettore
mediante un filo. Quando il filo è attaccato, il fascio IR
(infrarossi) e le batterie interne sono spenti. Il telecomando
può essere utilizzato anche per controllare le presentazioni,
e in questo caso va utilizzato come se fosse un mouse (tasti
SINISTRA e DESTRA e tasti con le frecce).
Il telecomando può essere azionato in “modalità
trasmissione” oppure in “modalità singola”. Quando si
utilizzando diversi proiettori in un’installazione, può essere
conveniente controllarli uno per uno. Il controllo individuale
è disponibile mediante telecomando col filo, tramite il jack
dati oppure usando un codice numerico individuale. Per
il controllo individuale, impostare prima il codice ID RC
individuale usando il sistema dei menu del proiettore; vedere
il sottomenu MISC (Varie). Poi, per selezionare uno specifico
proiettore da controllare, premere prima il pulsante “*”
nell’area inferiore del tastierino e poi il codice impostato nel
proiettore di destinazione. Il codice può essere compreso tra
“0” e “255”. “0” è riservato alle trasmissioni. Per selezionare
una destinazione diversa, ripetere il processo premendo
“*” e un nuovo codice. Per uscire dal controllo individuale,
premere due volte “*””*” oppure premere “*” e “0”.
POWER
Passa il proiettore dalla modalità di accensione a quella di
standby.
AUTO
Consente di regolare il proiettore per visualizzare l’immagine
in modo corretto, incluso posizione, larghezza, altezza e
stabilità generale.
INFO
Visualizza a schermo lo stato del proiettore e la sorgente.
BACKLIGHT
Accende e spegne la retroilluminazione. La retroilluminazione
si spegne automaticamente dopo dieci secondi.
BRIGHT
Regola la luminosità dell’immagine.
CONTRAST
Regola il contrasto dell’immagine.
COLOR
Regola la saturazione del colore dell’immagine.
DS+305/DS+305 User Manual
020-000057-01 Rev. 1 (06/08)
FJERNKONTROLL
norsk
Fjernkontrollen gir tilgang til projektorens innstillinger,
enten gjennom direkte-taster eller via menysystemet.
Fjernkontrollen har baklys slik at tastene kan leses i
mørke. Den har også en kontakt som muliggjør tilkobling
til projektoren ved hjelp av ledning. Når ledningen
er tilkoblet, vil IR (infrarød) strålen og batteriene bli
koblet ut. Fjernkontrollen kan også benyttes for å styre
presentasjoner ved hjelp av LEFT, RIGHT og piltastene, gitt
at projektor og PC er forbundet ved hjelp av USB kabel.
Fjernkontrollen kan benyttes for å styre alle projektorer
innenfor rekkevidde samtidig, eller den kan styre individuelt
valgte projektorer. Når flere projektorer inngår i en
installasjon kan det være hensiktsmessig å styre dem
individuelt. Individuell styring er mulig enten ved hjelp av
ledning eller ved å benytte individuell fjernkontrollkode.
For styring med individuell fjernkontrollkode (RC ID kode)
må RC ID koden settes i projektorens menysystem i
VERKTØY undermenyen. Velg deretter projektor med
fjernkontrollen ved å trykke på ‘*’ tasten på den nedre
delen av tastaturet, deretter koden som er satt i menyen.
Koden kan være i området ‘0’..’255’. ‘0’ betyr ‘alle’. For å
styre en annen enhet, trykk ‘*’ igjen og deretter ny kode.
For å avslutte individuell styring, trykk ‘*’’*’ to ganger, eller
trykk ‘*’ og ‘0’.
POWER
Skrur projektoren på og av (hvilemodus).
AUTO
Justerer projektoren til å vise et korrekt bilde, inkludert
posisjon, bredde, høyde, kontrast, lysstyrke og stabilitet.
INFO
Viser informasjon om projektoren og tilkoblet kilde.
BACKLIGHT
Skrur baklyset på og av. Baklyset skrur seg av automatisk
etter 10 sekunder.
BRIGHT
Justerer lysstyrken i bildet.
CONTRAST
Justerer kontrasten i bildet.
COLOR
Justerer fargemetningen i bildet.
23
REMOTE CONTROL
english
C-VIDEO
Selects the composite video input as signal source.
S-VIDEO
Selects the super video input as signal source.
YPbPr
Selects component video input.
DVI-I
Selects the DVI input.
HDMI
Selects the HDMI input.
VGA
Selects the VGA input.
BLACK
Toggles the projected image on and off. The lamp is not
shut off.
STILL
Toggle function, locking the projected image on and off.
TIME
Displays date and time. Set the date and time in the MENU
system, SETTINGS sub menu.
KEYSTONE
Press KEYSTONE to activate the electronic trapezoid
correction, adjust with arrow keys.
ASPECT
Cycles through the aspect ratios available with the current
source.
MENU
Toggles the menu system on and off, and navigates one
step backward in the menu system.
ARROW KEYS
Use the arrow keys to navigate in the menu system and
other adjustments.
OK
Press OK to confirm selected option in menu.
24
FERNBEDIENUNG
deutsch
TELECOMMANDE
francais
MANDO A DISTANCIA
español
C-VIDEO
Wählt den Videokomponenten-Eingang als aktive
Signalquelle.
C-VIDEO
Sélectionne l’entrée composite vidéo comme signal
source.
C-VIDEO
Selecciona la entrada de vídeo compuesto como fuente de
señales.
S-VIDEO
Wählt den Super-Video-Eingang als aktive Signalquelle.
S-VIDEO
Sélectionne l’entrée super vidéo comme signal source.
YPbPr
Wählt den Signalkomponenten-Eingang.
YPbPr
Sélectionne l’entrée composant vidéo.
S-VIDEO
Selecciona la entrada de súper vídeo como fuente de
señales.
DVI-I
Wählt den DVI-I-Eingang.
DVI-I
Sélectionne l’entrée DVI-I.
HDMI
Wählt den HDMI-Eingang.
HDMI
Sélectionne l’entrée HDMI.
VGA
Wählt den VGA-Eingang.
VGA
Sélectionne l’entrée VGA.
BLACK
Schaltet das Projektorbild an bzw. aus. Die Lampe wird
nicht ausgeschaltet.
BLACK
Bascule l’image projetée sur on et off. La lampe n’est pas
éteinte.
STILL
Umschaltfunktion; blendet das Projektorbild ein bzw. aus.
STILL
Fonction bascule, pour verrouiller ou déverrouiller l’image
projetée.
TIME
Blendet das Datum und die Uhrzeit ein. Die Einstellung
von Datum und Uhrzeit erfolgt im MENÜ-System, im
Untermenü EINSTELLUNGEN.
TIME
Affiche la date et l’heure. Règle la date et l’heure dans le
MENU système, sous-menu PARAMÈTRES.
KEYSTONE
bla bla bla
KEYSTONE
bla bla bla
ASPECT
Durchläuft die verschiedenen verfügbaren
Darstellungsverhältnisse für die gegenwärtige Quelle.
ASPECT
Parcourt les formats d’image disponibles avec la source
courante.
MENÜ
Öffnet bzw. schließt das Menüsystem.
MENU
Bascule le menu sur ON et OFF.
PFEILTASTEN
Mit Hilfe der Pfeiltasten können Sie sich durch das
Menüsystem bewegen und andere Einstellungen
vornehmen.
TOUCHES FLECHE
Utilisez les touches flèches pour parcourir le menu système
et les autres réglages.
OK
Drücken Sie auf OK, um die gewählte Option in einem
Menü zu bestätigen.
OK
Appuyez sur OK pour confirmer l’option sélectionnée dans
le menu.
LASER
Active le pointeur laser intégré. ATTENTION! Ne pas
braquer le faisceau laser vers quelqu’un. Ne pas regarder
fixement dans le laser faisceau.
YPbPr
Selecciona la entrada de vídeo componente.
DVI-I
Selecciona la entrada DVI.
HDMI
Selecciona la entrada DVI.
VGA
Selecciona la entrada VGA.
BLACK
Activa la imagen proyectada. La lámpara no se apaga.
STILL
Función de bloqueo y desbloqueo de la imagen proyectada.
TIME
Muestra la fecha y la hora. Fije la fecha y la hora en el
submenú AJUSTES del sistema de MENÚS.
KEYSTONE
bla bla bla
ASPECT
Realiza un ciclo de las relaciones de anchura-altura
disponibles con la fuente actual.
MENU
Activa y desactiva el sistema de menús.
TECLAS DE DIRECCIÓN
Use las teclas de dirección para navegar por el sistema de
menús y otros ajustes.
OK
Pulse OK para confirmar la opción de menú seleccionada.
LASER
Activa el puntero láser integrado. ¡PRECAUCIÓN! No apunte
el rayo láser hacia las personas. No mire al rayo láser.
DS+305/DS+305 User Manual
020-000057-01 Rev. 1 (06/08)
TELECOMANDO
italiano
C-VIDEO
Seleziona l’ingresso video composite come sorgente di
segnale.
S-VIDEO
Seleziona l’ingresso super video come sorgente di segnale.
YPbPr
Seleziona l’ingresso video componente.
DVI-I
Seleziona l’ingresso DVI-I.
HDMI
Seleziona l’ingresso HDMI.
VGA
Seleziona l’ingresso VGA.
BLACK
Attiva/disattiva l’immagine proiettata. La lampada non è
spenta.
STILL (Fermo)
Funzione di attivazione/disattivazione che blocca e sblocca
l’immagine proiettata.
TIME (Orario)
Visualizza data e ora. La data e l’ora possono
essere impostate nel sistema dei MENU, sottomenu
IMPOSTAZIONI (Varie).
FJERNKONTROLL
norsk
C-VIDEO
Velger kompositt video som kilde.
S-VIDEO
Velger super video som kilde.
YPbPr
Velger komponent video som kilde.
DVI-I
Velger DVI-I som kilde.
HDMI
Velger HDMI som kilde.
VGA
Velger VGA som kilde.
BLACK
Skrur bildet av og på. Lampen skrus ikke av.
STILL
Skifter mellom å fryse og bevege bildet.
TIME
Viser dato og tid. Sett dato og tid i menysystemet i
undermenyen INNSTILLINGER.
KEYSTONE
Velg KEYSTONE for å aktivisere elektronisk
trapeskorreksjon, og justér med piltastene.
KEYSTONE
bla bla bla
ASPECT
Skifter mellom de ulike bildeformatene som er tilgjengelige.
ASPECT (Aspetto)
Scorre i formati d’immagine disponibili con la sorgente
corrente.
MENU
Skrur menyen på og av. går ett steg tilbake i menyen.
MENU
Attiva / disattiva il sistema dei menu.
TASTI FRECCIA
Utilizzare le frecce per navigare nel sistema dei menu
ed eseguire altre regolazioni.
OK
Premere OK per confermare l’opzione selezionata nel menu.
LASER
Attiva il puntatore laser incorporato. ATTENZIONE: non
dirigere il fascio laser sulle persone. Non fissare il fascio
laser.
DS+305/DS+305 User Manual
020-000057-01 Rev. 1 (06/08)
PILTASTER
Bruk piltastene til å navigere i menyen og til andre
innstillinger.
OK
Trykk OK for å bekrefte menyvalg.
LASER
Aktiviserer den innebygde laser-perkeren. FORSIKTIG!
Ikke pek på folk med laser-pekeren. Ikke stirr inn i lyset fra
laserpekeren.
25
english
LASER
Activates the built-in laser pointer. CAUTION! Do not point
laser beam at people. Do not stare into laser beam.
GAMMA
Press GM+ or GM- to select between gamma settings.
STORE
Press STORE, then one digit 0-9, to store user setting in
memory.
RECALL
Press RECALL, then one digit 0-9, to recall user setting from
memory.
0-9
Used for various numeric functions such as PIN code and
user memory.
* (ASTERISK)
Used for RC ID control. See the explanation above.
deutsch
LASER
Schaltete den integrierten Laserpointer an. VORSICHT!
Nicht den Laserstrahl nicht auf Menschen richten. Nicht in
den Laserstrahl blicken
GAMMA
Drücken Sie auf GM+ bzw. GM-, um durch die
verschiedenen Gamma-Einstellungen zu gehen.
francais
español
GAMMA
Appuyez sur GM+ ou GM – pour choisir les réglages
GAMMA.
GAMMA
Pulse GM+ o GM- para seleccionar entre los ajustes de
gamma.
STORE
Appuyez sur STORE, puis sur une touche numérique de 0 à
9, pour garder le réglage de l’utilisateur
en mémoire.
STORE
Pulse STORE y luego un dígito del 0 al 9 para guardar la
selección del usuario en la memoria.
STORE
Drücken Sie auf STORE und danach eine Zahl von 0 - 9,
um die Benutzereinstellungen im Speicher zu hinterlegen.
RECALL
Appuyez sur RECALL, puis sur une touche numérique de 0
à 9, pour rappeler le réglage
de l’utilisateur de la mémoire.
RECALL
Drücken Sie auf RECALL und danach eine Zahl von
0 - 9, um die Benutzereinstellungen aus dem Speicher
abzurufen.
0-9
Utilisé pour les différentes fonctions numériques comme le
code PIN et la mémoire de l’utilisateur.
0-9
Dienen für verschiedenen nummerische Funktionen, wie z.
B. die PIN-Codeeingabe oder den Benutzerspeicher.
*
Utilisé pour le contrôle RC ID. Voir le légende ci-dessus.
RECALL
Pulse RECALL y luego un dígito del 0 al 9 para recuperar la
selección del usuario de la memoria.
0-9
Se utilizan para distintas funciones numéricas como el
código PIN y la memoria del usuario.
*
Se usa para el control de ID del mando a distancia. Véase la
explicación más arriba.
*
Dient zur RC-ID-Steuerung. Nähere Erläuterungen finden
Sie oben.
26
DS+305/DS+305 User Manual
020-000057-01 Rev. 1 (06/08)
norsk
italiano
GAMMA
Premere GM+ o GM- per selezionare le impostazioni
gamma.
GAMMA
Trykk GM+ eller GM- for velge mellom ulike gammainnstillinger.
STORE (Memorizza)
Premere STORE e poi un numero da 0 a 9 per memorizzare
le impostazioni dell’utente.
STORE
Trykk STORE, deretter et siffer fra 0-9, for å lagre
brukerinnstillinger.
RECALL (Richiama)
Premere RECALL e poi un numero da 0 a 9 per richiamare
dalla memoria l’impostazione dell’utente.
RECALL
Trykk på RECALL, deretter et siffer fra 0-9, for å hente fram
brukerinnstillinger.
0-9
Utilizzati per varie funzioni numeriche, ad esempio il codice
PIN e la memoria utente.
0-9
Benyttes til ulike numeriske funksjoner som PIN kode og
brukerinnstillinger.
*
Utilizzato per il controllo RC ID. Vedere la spiegazione in alto.
*
Benyttes for RCID. Se forklaring over.
DS+305/DS+305 User Manual
020-000057-01 Rev. 1 (06/08)
27
CONNECTOR PANEL
english
ANSCHLUSSBEREICH
deutsch
PANNEAU DE RACCORDEMENT
francais
A C-VIDEO: Used for standard video quality.
A C-VIDEO: Wird bei Standardvideoqualität verwendet.
A C-VIDEO: Utilisé pour une qualité vidéo standard.
B S-VIDEO: Used for improved quality video.
B S-VIDEO: Wird bei verbesserte Videoqualität
verwendet.
B S-VIDEO: Utilisé pour une qualité vidéo améliorée.
C YPbPr: Used for high quality video reproduction.
D DVI-D - Digital RGB: For a low noise computer and
video image.
E VGA – Analog RGB: The standard analog computer
graphics interface.
F HDMI – digital RGB: for low noise computer and video
images.
G RS 232 control: Allows for wired remote control and
monitoring of many projector functions used in installation
environments.
H 12V Trigger: For controlling externally connected devices.
I
USB - interface: Allows for computer mouse control.
J LAN: Provides access to control and monitoring over a
Local Area Network.
K Mains power connector: Use only three-prong/
grounded power cord.
L RC: Allows connection of external IR receiver or wired
remote control.
C YPbPr: Wird zur hochwertigen Videowidergabe
verwendet.
D DVI-D – RGB digital: Für ein Computer- und Videobild
mit niedrigem Rauschen.
E VGA – RGB analog: Dies ist die standardgemäße
analoge Grafikschnittstelle des Computers.
F HDMI – RGB digital: Für ein Computer- und Videobild
mit niedrigem Rauschen.
G RS 232-Steuerung: Ermöglicht die Verkabelung
der Fernbedienung und Überwachung von zahlreichen
Projektorfunktionen, die bei fester Installation verwendet
werden.
D DVI-D – RGB numérique: Pour une image vidéo et un
ordinateur peu bruyant
E VGA – RGB analogique: Les interfaces graphiques
d’un ordinateur analogique standard.
F HDMI – RGB numérique: Pour une image vidéo et un
ordinateur peu bruyant.
G Câble RS 232: Permets la liaison entre la
télécommande et les fonctions de surveillance de plusieurs
projecteurs utilisés pendant l’installation.
H 12V Trigger:
H 12V Trigger:
I USB – interface: Tient compte de la commande de la
souris de l’ordinateur.
I USB-Schnittstelle: Ermöglicht die Steuerung mit einer
Computermaus.
J LAN: Permet l’accès à la commande et à la surveillance
d’un Réseau Local.
J LAN: Ermöglicht den Zugriff auf die Steuerung und die
Überwachung über ein lokales Netzwerk.
K Connecteur de secteur: Utilisez seulement une prise 3
broches avec prise de terre cordon d’alimentation.
K Stromanschluss: Verwenden Sie ausschließlich
dreipolige / geerdete Stromkabel.
L RC: Permet la connexion d’un récepteur infra rouge
externe ou d’une télécommande reliée.
L RC: Ermöglicht den Anschluss eines externen IREmpfängers oder verkabelten Fernbedienung.
28
C YPbPr: Utilisé pour une qualité vidéo supérieure
PANEL DE CONEXIONES
español
A C-VIDEO: Se usa para conseguir una calidad de vídeo
estándar.
B S-VIDEO: Se usa para mejorar la calidad de vídeo.
C YPbPr: Se usa para lograr una reproducción de vídeo de alta calidad.
D DVI-D – RGB digital: Para una imagen de vídeo y
ordenador con poco ruido.
E VGA – RGB analógica: La interfaz gráfica analógica
estándar para ordenador.
F HDMI – RGB digital: Para una imagen de vídeo y
ordenador con poco ruido.
G Control RS 232: Permite usar un mando a distancia con
cable y controlar numerosas funciones del proyector usadas
en entornos de instalación.
H 12V Trigger:
I USB - interfaz: Permite el control mediante el ratón del
|ordenador.
J LAN: Proporciona acceso para controlar y supervisar una
red de área local (LAN)
K Conector de alimentación a la red: Use únicamente un
cable de alimentación de tres clavijas puesto a tierra.
L RC: permite la conexión de un receptor IR externo o
mando a distancia con cable.
DS+305/DS+305 User Manual
020-000057-01 Rev. 1 (06/08)
PANNELLO DEI CONNETTORI
italiano
KONTAKTPANEL
norsk
A C-VIDEO: utilizzato per una qualità video standard.
A C-VIDEO: Benyttes for standard videokvalitet.
B S-VIDEO: utilizzato per una migliore qualità video.
B S-VIDEO: Benyttes for bedret videokvalitet.
C YPbPr: utilizzato per una riproduzione video di alta
qualità.
C YPbPr: Benyttes til høykvalitets video.
D DVI-I – RGB digitale e analogica: per immagini video e
computerizzate con disturbi minimi (eller standard VGA)
E VGA – RGB analogica: l’interfaccia grafica analogica
standard per computer.
F HDMI – Digital RGB: per immagini video e
computerizzate con disturbi minimi.
G Controllo RS 232: consente il monitoraggio e il
controllo a distanza, via cavo, di molte funzioni del proiettore
usate negli ambienti di installazione.
D DVI-I – Digital eller analog RGB: Sikrer et bilde med
meget lav støy, eller kan kobles til standard VGA.
E VGA – analog RGB: Standard analog grafikk-tilkobling.
L
B
C
F
D
J
F HDMI – Digital RGB: Sikrer et bilde med meget lav
støy.
G RS 232 styring: Muliggjør styring og monitorering av de
ulike funksjonene til projektoren i installasjoner.
H 12V Trigger: For styring av eksternt tilkoblet utstyr.
I
USB: For styring og oppgradering.
H 12V Trigger:
J LAN: For styring over lokalnettverk (LAN).
I USB – interfaccia: consente di collegare il mouse del
computer.
K Nettkontakt: Benytt kun jordet ledning.
J LAN: consente l’accesso al controllo e al
monitoraggio tramite una Local Area Network.
I
L RC: For fjernstyring via kabel.
K Connettore alimentazione di rete: utilizzare solo cavi di
alimentazione tripolari / con messa a terra.
L RC: consente di collegare un ricevitore IR esterno o un
telecomando via cavo.
H
DS+305/DS+305 User Manual
020-000057-01 Rev. 1 (06/08)
K
A
G
E
29
SET UP
english
EINRICHTUNG
deutsch
INSTALLATION
francais
INSTALACIÓN
español
VIDEO
VIDEO-EINRICHTUNG
INSTALLATION VIDEO
INSTALACIÓN DEL VÍDEO
Before setting-up, switch off all equipment.
Bevor Sie mit der Einrichtung beginnen, müssen alle
Geräte ausgeschaltet sein.
Avant l’installation, éteignez tout le système.
Antes de la instalación, apague todo el equipo.
Trois sources vidéo peuvent être connectées, par les
entrées YPbPr (composante), S-VIDEO (super vidéo) et
C-VIDEO (composite vidéo).
Se pueden conectar tres fuentes de vídeo mediante las
entradas YPbPr (componente), S-VIDEO (súper vídeo) y CVIDEO (vídeo compuesto).
La composante fourni des images plus détaillées. Le
composite vidéo donne des images moins détaillées.
El componente mostrará imágenes más detalladas. El vídeo
compuesto proporciona imágenes con menos detalle.
En plus, l’entrée DVI-D peut être utilisée avec les sources
vidéo (lecteur DVD équipé d’un HDCP conforme au
connecteur DVI ou HDMI) pour une connexion numérique
pure.
Además, se puede usar la entrada DVI-D con las fuentes
de vídeo (reproductor DVD equipado con un conector DVI o
HDMI conforme con HDCP) para una conexión digital pura.
Several analogue video sources may be connected,
using the YPbPr (component), S-VIDEO (super video) and
C-VIDEO (composite video) inputs.
Component will display more detailed images. Composite
video yields images with less detail.
In addition, the HDMI and DVI-I inputs can be used with
video sources (for instance DVD players fitted with an
HDCP compliant DVI or HDMI connectors) for a pure digital
connection.
Connect the power cord.
Es können über die Anschlüsse YPbPr (Komponente), SVIDEO (Super-Video) und C-VIDEO (Video-Mischsignal) bis
zu drei Videoquellen angeschlossen werden.
Komponente erzeugt Bilder mit höherer Detailtreue. Das
Videomischsignal erzeugt Bilder mit einer geringeren
Detailtreue.
Daneben kann der DVI-D-Eingang für Videoquellen
(DVD-Geräte mit einem zu HDCP kompatiblen DVI- bzw.
HDMI-Anschluss) mit rein digitalem Anschluss verwendet
werden.
Branchez le cordon d’alimentation.
Conecte el cable de alimentación.
Schließen Sie das Stromkabel an.
COMPUTER
EINRICHTEN DES RECHNERS
INSTALLATION DE L’ORDINATEUR
INSTALACIÓN DEL ORDENADOR
Before setting-up, switch off all equipment.
Bevor Sie mit der Einrichtung beginnen, müssen alle
Geräte ausgeschaltet sein.
Avant l’installation, éteignez tout le système.
Antes de la instalación, apague todo el equipo.
Le projecteur peut être connecté à 4 sources
informatiques en même temps, en utilisant les entrées
VGA et DVI-I/HDMI.
El proyector puede estar conectado al mismo tiempo a dos
fuentes de ordenador mediante la entradas VGA y DVI.
The projector may be connected to four computer sources
simultaneously, using the DVI-I, VGA, and HDMI inputs.
The VGA interface is analog and may cause some noise in
the projected image, depending on the signal quality from
the graphics card in the computer.
The DVI (Digital Visual Interface) and HDMI interfaces are alldigital and will yield a projected images with very low noise.
Connect the RS232 or LAN interface to allow for control of
the projector.
Connect the power cord.
Der Projektor kann über die Eingänge VGA und DVI-I/
HDMI an bis zu vier Rechner gleichzeitig angeschlossen
werden.
Die VGA-Schnittstelle ist analog und kann je nach
Signalqualität der Graphikkarte des Rechners zu einem
gewissen Rauschen in den projizierten Bildern führen.
Die DVI-(Digital Visual Interface)-Schnittstelle ist
vollkommen digital und erreicht ein projiziertes Bild mit
sehr geringem Rauschen.
Stellen Sie die Verbindung über die RS232- bzw. LANSchnittstelle her, um den Projektor steuern zu können.
Schließen Sie das Stromkabel an.
30
L’interface VGA est analogique et peut occasionner du
bruit dans l’image projetée, dépendant de la qualité du
signal émis par la carte graphique de l’ordinateur.
L’interface DVI (Digital Visual Interface) et HDMI est
entièrement numérique et donne une image projetée avec
très peu de bruit.
Branchez le câble RS 232 ou l’interface LAN pour tenir
compte du contrôle du projecteur.
La interfaz VGA es analógica y puede producir algo de ruido
en la imagen proyectada, dependiendo de la calidad de la
señal procedente de la tarjeta gráfica del ordenador.
La interfaz DVI (Digital Visual Interface) es totalmente digital
y proporciona una imagen proyectada con muy poco ruido.
Conecte la interfaz RS232 o LAN para permitir el control del
proyector.
Conecte el cable de alimentación.
Branchez le cordon d’alimentation.
DS+305/DS+305 User Manual
020-000057-01 Rev. 1 (06/08)
CONFIGURAZIONE
italiano
OPPSETT
norsk
CONFIGURAZIONE DEL VIDEO
VIDEO-OPPSETT
Prima della configurazione, spegnere tutte le apparecchiature.
Skru av alt utstyr før du kobler opp.
È possibile collegare tre sorgenti video, utilizzando gli ingressi
YPbPr (componente), S-VIDEO (super video) e C-VIDEO
(video composito).
Flere analoge videokilder kan kobles til ved hjelp av
YPbPr (komponent), S-VIDEO (super video) og C-VIDEO
(kompositt video) innganger.
La sorgente componente visualizza immagini più dettagliate. Il
video composito mostra immagini con meno dettagli.
Komponent- og RGB video gir mer detaljerte bilder.
Kompositt video gir bilder med mindre detalj.
L’ingresso DVI-D, inoltre, può essere usato con le sorgenti
video (lettore DVD provvisto di connettore HDMI o DVI
compatibile HDCP) per una connessione digitale pura.
I tillegg kan DVI-I og HDMI inngangen benyttes med
videokilder som har DVI eller HDMI utganger for et fulldigitalt, stabilt bilde. DVI-D inngangen er kompatibel med
HDCP.
Collegare il cavo di alimentazione.
Plugg inn nettkabelen.
CONFIGURAZIONE DEL COMPUTER
DATA-OPPSETT
Prima della configurazione, spegnere tutte le
apparecchiature.
Skru av alt utstyr før du kobler opp.
Il proiettore può essere collegato simultaneamente a due
computer sorgente, tramite gli ingressi VGA e DVI.
L’interfaccia VGA è analogica e può causare disturbi
dell’immagine proiettata, in base alla qualità del segnale
proveniente dalla scheda grafica del computer.
L’interfaccia DVI (Digital Visual Interface) è tutta digitale e
proietta un’immagine con disturbi minimi.
Per controllare il proiettore, collegare l’interfaccia RS232 o
LAN.
Projektoren kan kobles til fire datakilder ved hjelp av VGA
og DVI-I/HDMI.
VGA inngangen er analog og kan årsake noe ustabilitet i
bildet, avhengig av kvaliteten på signalene fra grafikkilden.
DVI (Digital Visual Interface) og HDMI inngangenen er heldigitale og gir et meget stabilt og støyfritt bilde.
RS232 eller LAN (lokalnettverk) kan kobles til for å styre og
monitorere projektoren.
Koble til nettledningen.
Collegare il cavo di alimentazione.
DS+305/DS+305 User Manual
020-000057-01 Rev. 1 (06/08)
31
IMAGE ADJUSTMENTS
english
Position the projector on a level surface, preferably pointing
straight on to the projection screen. Place it at a suitable
distance within the throw range of the zoom lens.
A ZOOM the image for the right size. Reposition the
projector if the desired image size is not achievable. ZOOM is
not available on some lenses.
BILDEINSTELLUNGEN
deutsch
Stellen Sie den Projektor auf eine ebene Fläche,
vorzugsweise so, dass er gerade auf den
Projektionsbildschirm blickt. Stellen Sie ihn in
einer angemessenen Entfernung innerhalb des
Projektionsbereichs der Zoom-Linsen auf.
REGLAGES DE L’IMAGE
francais
Placez le projecteur sur une surface plane, de préférence
face à l’écran de projection. Placez-le à une distance
convenable de l’objectif zoom.
A ZOOM l’image jusqu’à la bonne taille. Réorientez
le projecteur si vous n’obtenez pas la taille de l’image
souhaitée.
B FOCUS the image properly.
A Bringen Sie das Bild mit Hilfe des ZOOMS auf die
richtige Größe. Stellen Sie den Projektor gegebenenfalls
um, wenn nicht die gewünschte Bildgröße erzielt wird.
C Level the image by adjusting the rear feet.
B Stellen Sie das Bild scharf.
C Nivelez l’image en réglant les pieds arrières.
D To adjust the image vertically on the screen, turn the
vertical adjustment knob on top of the unit.
C Nivellieren Sie das Bild durch Verstellen der hinteren
Standfüße.
D Pour ajuster l’image verticalement sur l’écran, tournez le
bouton de réglage vertical sur le dessus de l’appareil.
D Um das Bild vertikal auf dem Bildschirm zu verschieben,
drehen Sie den Knopf für die Vertikaleinstellung oben auf
dem Gerät.
E En plus vous devez relâchez les pieds avant.
E in addition you may release the front foot
If the front foot is ejected, you may compensate for the
‘keystone’ effect by pressing the ‘KST’ key on the keypad
and adjust with the arrow keys.
E Außerdem können Sie den vorderen Standfuß
entriegeln.
B Mise au point de l’image correcte.
Si les pieds avant sont éjectés, vous compenserez l’effet
‘clé de voûte’ en appuyant sur la touche ‘KST’ du clavier
et ajustez avec les touches flèche.
AJUSTES DE IMAGEN
español
Coloque el proyector sobre una superficie llana,
preferiblemente apuntando directamente a la pantalla de
proyección. Colóquelo a una distancia adecuada dentro del
campo de proyección del objetivo zoom.
A AMPLÍE o REDUZCA la imagen al tamaño adecuado.
Cambie el proyector de posición si no puede obtener el
tamaño de imagen deseado.
B ENFOQUE la imagen adecuadamente.
C Nivele la imagen regulando las patas traseras.
D Para ajustar la imagen verticalmente en la pantalla, gire el
mando de ajuste vertical ubicado encima del aparato.
E También puede liberar la pata delantera.
Si quita la pata delantera, puede compensar el efecto de
“distorsión trapezoidal” pulsando la tecla “KST” del teclado
y realizando el ajuste con las teclas de dirección.
Ist der vordere Stützfuß ausgefahren, können Sie den
„Trapezeffekt“ durch Drücken der Taste ‘KST’ auf dem
Tastenfeld ausgleichen und mit den Pfeiltasten einstellen.
PIN CODE
PIN CODE
CODE PIN
CÓDIGO PIN
The projector may be controlled by a PIN (Personal Identity
Number) code. The PIN code is 4 digits, and if the PIN code
is activated, you must enter the correct code to unlock the
projector.
Der Projektor kann über eine PIN (Personal Identity
Number; persönliche Kennnummer) gesteuert werden. Die
PIN besteht aus 4 Zahlen; wird eine PIN aktiviert, müssen
Sie den richtigen Code eingeben, um den Projektor
betriebsbereit zu schalten.
Le projecteur peut être commandé par un code PIN
(Numéro Personnel d’Identité) Le code PIN contient 4
chiffres, et si le code PIN est activé, vous devez émettre le
bon code pour déverrouiller le projecteur.
El proyector se puede controlar mediante un código PIN
(Personal Identity Number-Número de identidad personal).
El código PIN tiene 4 dígitos y si se activa debe introducir el
código correcto para desbloquear el proyector.
Pour activer le code PIN, regardez dans le sous-menu
UTILITIES.
Para activar el código PIN, vaya al submenú UTILIDADES.
To activate the PIN code, see the SETTINGS > PIN CODE
sub menu.
If an incorrect PIN code is entered, you may try again two
times. If you fail three times in a row, a PUK (unlock) code is
needed. The PUK code is supplied with the product.
If you also fail three times with the PUK code, the projector
locks up permanently, and can only be unlocked by a
special service unlock code.
To access this code, you will need to contact your dealer or
a service station. The service unlock code will be generated
based on a secure, encrypted number that is produced by
the projector itself. The projector will produce a new number
every time.
32
Zu Angaben zur PIN beachten Sie bitte das Untermenü
DIENSTPROGRAMME.
Wird eine falsche PIN eingegeben, stehen zwei weitere
Versuche zur Verfügung. Wird der Code drei Mal
hintereinander falsch eingegeben, benötigen Sie den PUKCode (Freigabe). Der PUK-Code wird mit dem Produkt
geliefert.
Wird auch der PUK-Code dreimal falsch eingegeben, wird
der Projektor permanent blockiert und kann nur mit einem
speziellen Freigabecode des Kundendienstes wieder
betriebsbereit geschaltet werden.
Um diesen Code zu erhalten, müssen Sie sich mit ihrem
Händler oder Kundendienst in Verbindung setzen. Der
Freigabecode des Kundendienstes wird auf der Grundlage
einer sicheren, verschlüsselten Nummer erzeugt, die vom
Projektor selber generiert wird. Der Projektor generiert
jedes Mal eine neue Nummer.
Si vous émettez un mauvais code PIN, vous pouvez tenter
deux autres fois. Si vous vous tromper trois fois de suite,
un code PUK (déverrouille) est nécessaire. Le code PUK
est fourni avec l’appareil.
Si vous vous trompez 3 fois de suite aussi avec le code
PUK, le projecteur se bloque définitivement, et peut être
débloqué uniquement par le code de déblocage d’un
service spécial.
Pour accéder à ce code, vous devez prendre contact
avec votre revendeur ou un service après-vente. Le code
de déblocage du service est basé sur un numéro sûr,
chiffré et produit par le projecteur lui-même. Le projecteur
produit un nouveau numéro à chaque fois.
Si se introduce un código PIN erróneo, puede volver a
intentarlo dos veces. Si se equivoca tres veces seguidas,
necesitará un código PUK (desbloqueo). El código PUK se
suministra con el producto.
Si también se equivoca tres veces con el código PUK, el
proyector quedará bloqueado permanentemente y sólo
podrá ser desbloqueado por un código de desbloqueo de
servicio especial.
Para acceder a este código deberá ponerse en contacto
son su distribuidor o el servicio técnico. El código de
desbloqueo de servicio se genera en base a un número
cifrado seguro que es producido por el propio proyector. El
proyector producirá un nuevo número en cada ocasión.
DS+305/DS+305 User Manual
020-000057-01 Rev. 1 (06/08)
REGOLAZIONI DELL’IMMAGINE
italiano
Collocare il proiettore su una superficie orizzontale,
preferibilmente direzionato direttamente verso lo schermo
di proiezione. Il proiettore deve essere alla giusta distanza,
entro il raggio d’azione dell’obiettivo zoom.
A ZOOMare l’immagine fino a ottenere il formato corretto.
Se non si riesce a ottenere la dimensione giusta, spostare il
proiettore. Mettere a fuoco l’immagine.
B Per raddrizzare l’immagine, agire sui piedini posteriori.
C Per regolare l’immagine in verticale sullo schermo, girare
la manopola della regolazione verticale in cima all’unità.
D Si può, inoltre, allentare il piedino anteriore.
BILDEINNSTILLINGER
norsk
Plasser projektoren på et plant underlag, helst slik at den
peker rett på skjermen, i en avstand som passer innenfor
zoom-området for linsen.
B
A
A Juster bildestørrelsen med ZOOM, eventuelt flytt
projektoren slik at ønsket bildestørrelse oppnås. ZOOM er
ikke tilgjengelig med alle linser.
B Fokuser bildet slik at det blir skarpt. Observer nær- og
fjerngrensene til objektivert
C Juster føttene for å rette opp bildet.
D Bildet kan flyttes vertikal ved hjelp av dreieskiven på
toppen av enheten.
Se il piedino anteriore fuoriesce, la deformazione
trapezoidale può essere compensata premendo il tasto
«KST» sul tastierino e utilizzando i tasti con le frecce per
regolare.
E Bildet kan løftes ytterligere ved å justere foten foran.
CODICE PIN
PIN KODE
Dersom foten foran er ute, kan bildefortegning eler
’keystone’ effekten kompenseres ved å trykke på ’KST’
knappen og deretter piltastene.
C
D
Il proiettore può essere controllato mediante un codice
PIN (Personal Identity Number, numero d’identificazione
personale). Il codice PIN è formato da quattro cifre e, se
attivato, blocca il proiettore finché non si specifica il codice
giusto.
Per attivare il codice PIN, vedere il sottomenu UTILITIES
(Utilità).
Se si specifica un codice PIN errato, è possibile fare altri
due tentativi. Se si sbaglia per tre volte di seguito, diventa
necessario un codice PUK (di sblocco). Il codice PUK è
fornito con il prodotto.
Se si sbaglia per tre volte anche il codice PUK, il proiettore
si blocca in modo permanente e può essere sbloccato solo
mediante uno speciale codice di sblocco di servizio.
Per accedere a questo codice è necessario rivolgersi al
concessionario o a una stazione di assistenza. Il codice
di sblocco di servizio viene generato in base a un numero
sicuro, criptato, prodotto dal proiettore stesso. Il proiettore
produce ogni volta un numero nuovo.
DS+305/DS+305 User Manual
020-000057-01 Rev. 1 (06/08)
Projektoren kan låses ved hjelp av en PIN (Personal
Identity Number) kode. PIN koden består av 4 siffer.
Dersom PIN kode er aktivert, må en korrekt kode tastes
for å låse opp enheten.
PIN kode aktiviseres i INNSTILLINGER > PIN KODE
undermenyen.
Feil PIN kode kan tastes 3 ganger på rad. Etter tredje
gang låses enheten og en PUK kode må tastes inn for å
låse opp projektoren. PUK koden følger med projektoren
og må tas vare på.
Dersom også feil PUK kode tastest inn 3 ganger, vil
projektoren gå i baklås. En service kode må da tastes inn
for å åpne projektoren.
Service koden får du fra din leverandør eller service.
Service koden genereres på grunnlag av en unik, kryptert
kode som projektoren selv frambringer. En ny kode
genereres hver gang for sikkerhets skyld.
E
33
CEILING MOUNT
english
The projector can be ceiling mounted using an approved
UL tested/ listed ceiling mount fixture, with a capacity of
minimum 12 kg / 26 lbs.
For ceiling mount use M4 screws that penetrate maximum
5 mm (0.19 in) into the projector body.
For proper ventilation the minimum distance from ceiling /
rear wall should be: 30 / 50 cm (12 / 20 in).
DECKENMONTAGE
deutsch
Der Projektor kann mit der nach UL getesteten
/ zugelassenen Montagehalterung mit einer
Mindesttragfähigkeit von 12 kg / 26 Pfund an der Decke
montiert werden.
Verwenden Sie zur Deckenmontage M4-Schrauben,
die maximal 5 mm (0,19 Zoll) in den Projektorkörper
eindringen.
Um eine korrekte Belüftung zu gewährleisten, muss der
Mindestabstand zur Decke / Rückwand wie folgt sein:
30 / 50 cm (12/ 20 Zoll).
MONTAGE AU PLAFOND
francais
MONTAJE EN EL TECHO
español
Le projecteur peut être monté au plafond en utilisant une
installation UL testée/classée approuvée pour montage
plafond, avec une capacité minimale de 12 kg / 26 lbs.
El proyector se puede montar en el techo utilizando un
anclaje para techo catalogado, homologado y aprobado por
UL, con una capacidad mínima de 12 kg (26 libras).
Pour le montage au plafond, utilisez des vis M4 qui
pénètrent au maximum à 5 mm (0.19 in) dans le boîtier du
projecteur.
Para el montaje en el techo use tornillos M4 que penetran
un máximo de 5 mm (0,6 pulgadas) en el cuerpo del
proyector.
Pour une ventilation correcte, la distance minimale entre le
plafond et le mur arrière doit être : de 30 / 50 cm
(12 / 20 in).
Para una ventilación adecuada, la distancia mínima del
techo/la pared posterior debe ser de: 30/50 cm
(12/20 pulgadas).
VERTICAL OPERATION
VERTIKALER BETRIEB
UTILISATION VERTICALE
FUNCIONAMIENTO VERTICAL
The projector can be operated either horizontally (landscape)
or vertically (portrait). Restrictions apply to offset angles. Do
not operate the unit at angles greater than +/- 20º, as this
will greatly reduce lamp life time.
Der Projektor kann zum Betrieb entweder horizontal
(Querformat) oder vertikal (Portrait) stehen. Bei den
Verschiebungswinkeln treten gewisse Einschränkungen
auf. Das Gerät darf nicht in einem Winkel von mehr als +/20º betrieben werden, da in diesem Fall die Lebensdauer
der Lampe deutlich verringert wird.
Le projecteur peut être utilisé aussi bien à l’horizontale
(paysage) qu’à la verticale (portrait). Les restrictions
s’appliquent aux angles décalés. Ne faites pas fonctionner
l’unité à des angles supérieurs à +/- 20º car cela peut
réduire la durée de vie de la lampe de façon significative.
El proyector se puede utilizar horizontalmente (panorámica)
o verticalmente (retrato). Las restricciones son aplicables
a los ángulos de desviación. No haga funcionar la unidad
en ángulos superiores a +/- 20º, ya que esto reducirá
notablemente la duración de la lámpara.
34
DS+305/DS+305 User Manual
020-000057-01 Rev. 1 (06/08)
MONTAGGIO A SOFFITTO
italiano
TAKMONTASJE
norsk
Il proiettore può essere montato a soffitto, utilizzando un
supporto di montaggio omologato UL, con capacità di
minimo 12 kg / 26 lbs.
Projektoren kan festes i taket ved hjelp av et godkjent
takfeste. Benytt en anerkjent leverandør av takfester.
Takfestest må tåle minimum 12 kg last.
Per il montaggio a soffitto, utilizzare delle viti M4
introducendole per massimo 5 mm (0,19») nel corpo del
proiettore.
Benytt M4 skruer som skrus 5 mm (max) inn i
skruefestene.
Per ottenere una ventilazione corretta, la distanza minima
dalla parete posteriore / dal soffitto è di: 30/ 50 cm
(12/ 20”).
For å sikre god ventilasjon anbefales en minste avstand
til vegg på 50 cm og tak på 30 cm. Sørg uansett for at
ventilasjonen er god.
± 20°
± 20°
FUNZIONAMENTO VERTICALE
STÅENDE PLASSERING
Il proiettore può essere adoperato in orizzontale o verticale.
Si applicano dei limiti agli angoli di offset. Non azionare
l’unità con angolazioni superiori a +/- 20º, per non ridurre
sensibilmente la durata della lampada.
Projektoren kan plasseres enten horisontalt (flatt) eller
vertikalt (stående) innenfor angitte vinkler. Enheten må
ikke plasseres i vinkler større enn +/- 20º, siden dette vil
redusere lampelevetiden vesentlig.
360º
±20º
DS+305/DS+305 User Manual
020-000057-01 Rev. 1 (06/08)
±20º
35
USING THE PROJECTOR
english
After setting-up, switch on all equipment. The projector can be controlled by the
keypad, by the remote control or using the RS232 or LAN interfaces. To switch the
projector on, firmly press the POWER button on the keypad or the remote control.
The STATUS indicator will turn from yellow to blue when the unit is switched on.
If the STATUS indicator is flashing yellow, please wait until it turns permanent
yellow. Issue the PIN code if activated.
When only one source is connected, the projector will auto-detect that source. If
more sources are connected, the projector will search for the next active source
according to the following list, provided that SOURCE SCAN is activated in the
SETTINGS sub menu (see description of menu system):
• HDMI
• VGA
• DVI-D / DVI-A
• C-video
• S-Video
• YPbPr (Component)
Toggle between the sources by pressing the SRC buttons on the keypad or the
direct source selection keys on the remote control. Only sources that are active will
be displayed.
If no source is active, searching messages will appear on the screen. If no source
is active for a long time, the projector will go in standby mode if DPMS (Display
Power Management Signalling) is enabled in the SETTINGS sub menu.
The STATUS indicator will turn from blue to flashing orange, then orange. The
projector will be switched back on if at least one source is (re)activated. The
power-down function can be disabled in the menu.
See DPMS in the SETTINGS sub menu.
To switch the projector off, firmly press the POWER button on the keypad or
the remote control twice (to confirm that you really want to switch off the unit).
The STATUS indicator will turn from blue to flashing orange, then orange when
completely switched off. You may not switch the unit on while the STATUS
indicator is flashing orange. Please wait until the indicator is permanent orange.
36
EINSATZ DES PROJEKTORS
deutsch
Nach der Einrichtung, müssen alle Geräte eingeschaltet werden. Der Projektor
kann über das Tastenfeld, die Fernbedienung oder die RS232- bzw. LANSchnittstellen gesteuert werden. Zum Einschalten des Projektors, drücken
Sie fest auf die Taste STROMVERSORGUNG auf dem Tastenfeld oder der
Fernbedienung. Die Anzeige STATUS schaltet von Gelb auf Blau, sobald das
Gerät angeschaltet ist.
Blinkt die Anzeige STATUS gelb, müssen Sie warten, bis sie kontinuierliche gelb
leuchtet. Geben Sie den PIN-Code ein, falls dieser aktiviert ist.
Ist nur eine Quelle angeschlossen, so erkennt der Projektor diese automatisch.
Sind mehrere Quellen angeschlossen, sucht der Projektor die folgende aktive
Quelle nach der nachstehenden Liste, vorausgesetzt die Option QUELLEN
SCANNEN ist im Untermenü EINSTELLUNGEN eingestellt (siehe die
Beschreibung des Menüsystems):
• HDMI
• VGA
• DVI-D / DVI-A
• C-Video
• S-Video
• YPbPr (Komponente)
Schalten Sie mit Hilfe der Taste SRC auf dem Tastenfeld bzw. der Fernbedienung
zwischen den verschiedenen Quellen um. Es werden nur aktive Quellen
angezeigt.
Ist keine Quelle aktiv, so erscheinen auf dem Bildschirm Suchmeldungen. Ist
längere Zeit keine Quelle aktiv, schaltet der Projektor in den Standby-Betrieb
um, vorausgesetzt die Option DPMS (Stromsparbetrieb) ist im Untermenü
EINSTELLUNGEN auf EIN gestellt.
Die Anzeige STATUS schaltet von Blau auf blinkend Gelb und dann auf Gelb.
Der Projektor schaltet wieder zurück, wenn zumindest eine Quelle (erneut)
aktiviert wird. Die Abschaltefunktion kann im Menü deaktiviert werden.
Siehe DPMS im Untermenü EINSTELLUNGEN.
Zum Ausschalten des Projektors, drücken Sie fest zwei Mal auf die Taste
STROMVERSORGUNG auf dem Tastenfeld oder der Fernbedienung (um zu
bestätigen, dass Sie das Gerät wirklich ausschalten möchten). Die Anzeige
STATUS schaltet von Blau auf blinkend Gelb und dann auf Gelb, wenn das Gerät
ausgeschaltet wird. Das Gerät kann nicht wieder eingeschaltet werden, solange
die Anzeige STATUS gelb blinkt. Warten Sie bitte, bis die Anzeige kontinuierlich
gelb leuchtet.
UTILISATION DU PROJECTEUR
francais
Après l’installation, allumez tout le système. Le projecteur peut être commandé
par le clavier, par la télécommande ou par les interfaces RS 232 ou LAN. Pour
allumer le projecteur, appuyez fermement sur le bouton POWER du clavier ou de
la télécommande. L’indicateur d’ETAT passe du jaune au bleu quand l’appareil est
allumé.
Si l’indicateur d’ETAT clignote jaune, patientez jusqu’à ce qu’il devienne
permanent. Tapez le code PIN s’il est activé.
Quand une seule source est connectée, le projecteur détecte automatiquement
cette source. Si plusieurs sources sont connectées, le projecteur cherche la
prochaine source active selon la liste suivante, à condition que BALAYAGES DE
SOURCES soit sur ON dans le sous-menu PARAMÈTRES (voir la description du
menu) :
• HDMI
• VGA
• DVI-D / DVI-A
• C-Vidéo
• S-Vidéo
• YPbPr (Composante)
Choisissez parmi les sources en appuyant sur les boutons SRC du clavier ou sur
les touches de sélection directe des sources sur la télécommande. Seules les
sources actives sont affichées.
Si aucune source n’est active, recherchez dans les messages qui apparaissent
sur l’écran. Si aucune source n’est active pendant longtemps, le projecteur se
met en mode veille si DPMS (économie d’énergie) est sur ON dans le sous-menu
PARAMÈTRES.
L’indicateur d’ETAT passe du bleu au clignotant jaune, puis au jaune permanent.
Le projecteur est rallumé si au moins une source est (ré) activée. La fonction horstension peut être désactivée dans le menu.
Regardez DPMS dans le sous-menu PARAMÈTRES.
Pour éteindre le projecteur, appuyez fermement deux fois (pour confirmer que
vous voulez vraiment éteindre l’appareil) sur le bouton POWER du clavier ou de
la télécommande. L’indicateur d‘ETAT passe du bleu au clignotant jaune, puis
au jaune quand il est éteint. Vous ne pouvez pas allumer l’appareil tant que
l’indicateur d’ETAT clignote jaune. Attendez que l’indicateur soit jaune permanent.
DS+305/DS+305 User Manual
020-000057-01 Rev. 1 (06/08)
UTILIZACIÓN DEL PROYECTOR
español
UTILIZZO DEL PROIETTORE
italiano
BRUK AV PROJEKTOREN
norsk
Después de la instalación, encienda todo el equipo. El proyector se puede
controlar mediante el teclado, el mando a distancia o utilizando las interfaces
RS232 o LAN. Para encender el proyector, pulse con firmeza el botón POWER
del teclado o del mando a distancia. El indicador de ESTADO pasará de amarillo a
azul cuando se encienda el aparato.
Completata la configurazione, accendere tutte le apparecchiature. Il proiettore
può essere controllato con il tastierino, con il telecomando oppure utilizzando
le interfacce LAN o RS232. Per accendere il proiettore, spingere con decisione
il pulsante di accensione POWER sul tastierino o sul telecomando. Si illumina
l’indicatore di STATO che quando viene accesa l’unità passa da giallo a verde.
Si el indicador de ESTADO está amarillo intermitente, espere a que se quede en
amarillo fijo. Introduzca el código PIN si está activado.
Se l’indicatore di STATO è giallo lampeggiante, attendere che si stabilizzi sul
giallo fisso. Se è stato attivato, inserire il codice PIN.
Cuando sólo hay una fuente conectada, el proyector detectará esa fuente
automáticamente. Si hay más fuentes conectadas, el proyector buscará
la siguiente fuente activa de la lista indicada a continuación, siempre que
EXPLORACIÓN FUENTE esté activado en el submenú AJUSTES (véase la
descripción del sistema de menús):
Se è collegata una sola sorgente, il proiettore la rileva automaticamente. Se sono
collegate più sorgenti, il proiettore cerca la sorgente attiva successiva in base
all’elenco seguente, a condizione che nel sottomenu IMPOSTAZIONI sia attivata
SCANSIONE SORGENTE; per informazioni consultare la descrizione del sistema
dei menu:
• HDMI
• HDMI
• VGA
• VGA
• VGA
• DVI-D / DVI-A
• DVI-D / DVI-A
• DVI-D / DVI-A
• C-video
• C-Video
• C-Video
• S-video
• S-Video
• S-Video
• YPbPr (komponent)
• YPbPr (Componente)
• YPbPr (componente)
Seleccione las fuentes pulsando los botones SRC del teclado o las teclas de
selección de fuente directa del mando a distancia. Sólo se mostrarán las fuentes
que estén activas.
Selezionare la sorgente premendo i pulsanti SRC (Sorgente) sul tastierino o i tasti
di selezione diretta della sorgente sul telecomando. Sono visibili solo le sorgenti
attive.
Velg kilde ved å trykke på SRC knappene på tastaturet eller direktevalg tastene på
fjernkontrollen. Kun aktive kilder vises.
Si no hay ninguna fuente activa, la pantalla indicará que se están buscando
mensajes. Si no hay ninguna fuente activa durante mucho tiempo, el proyector
entrará en modo de espera si en el submenú AJUSTES se ha puesto DPMS
(ahorro de energía) en ON.
Se non ci sono sorgenti attive, sullo schermo vengono visualizzati dei messaggi
di ricerca. Quando non si attiva alcuna sorgente per molto tempo, il proiettore
passa in modalità standby se la funzione DPMS (risparmio energetico) è
impostata su ON nel sottomenu IMPOSTAZIONI.
El indicador de ESTADO pasará de azul a amarillo intermitente y luego a amarillo.
Se volverá a encender el proyector si se (re)activa al menos una fuente. La función
de apagado puede desactivarse en el menú.
La spia di STATO passa da verde a giallo lampeggiante e poi a giallo. Il
proiettore viene riacceso se viene (ri)attivata almeno una sorgente. La funzione
di spegnimento può essere disabilitata tramite menu.
Véase DPMS en el submenú AJUSTES.
Vedere DPMS nel sottomenu IMPOSTAZIONI.
Para apagar el proyector, pulse firmemente dos veces el botón POWER del
teclado o del mando a distancia (para confirmar que realmente desea apagar el
aparato). El indicador de ESTADO pasará de azul a amarillo intermitente y luego
a amarillo al apagarse. No se puede encender el aparato cuando el indicador de
ESTADO está amarillo intermitente. Espere a que se quede en amarillo fijo.
Per spegnere il proiettore, spingere con decisione il pulsante POWER sul
tastierino o sul telecomando per due volte (per confermare che si desidera
effettivamente spegnere l’unità). La spia di STATO passa da blu a giallo
lampeggiante e poi a giallo quando il proiettore viene spento. L’unità non può
essere riaccesa se la spia di stato è giallo lampeggiante; attendere che la spia si
stabilizzi sul giallo fisso.
DS+305/DS+305 User Manual
020-000057-01 Rev. 1 (06/08)
Etter oppkobling skrus alt utstyret på. Projektoren kan styres fra tastaturet, med
fjernkontrollen eller over RS232 eller LAN. Skru på projektoren ved å trykke
bestemt på POWER tasten, enten på tastaturet eller fjernkontrollen. STATUS
indikatoren vil skifte fra gult til blått når enheten skrus på.
Vent hvis STATUS indikatoren blinker gult. Tast inn PIN koden dersom den er
aktivisert.
Når kun en aktiv kilde er tilkoblet, vil denne kilden automatisk kobles opp.
Dersom flere aktive kilder er koblet til, vil projektoren søke seg fram basert på
nedenstående liste, gitt at KILDESØK er aktivisert i INNSTILLINGER undermenyen
(se bekrivelse av menysystemet):
• HDMI
Hvis ingen kilder er aktive, vil søkemelding komme opp på skjermen. Hvis ingen
aktiv kilde er tilkoblet over lengre tid, vil projektoren gå i hvilemodus dersom DPMS
(strømsparing) er satt på i INNSTILLINGER undermenyen.
STATUS indikatoren vil skifte fra blått til blinkende gult, deretter gult. Projektoren vil
skru seg på igjen dersom minst en kilde (re)aktiveres. Strømsparing kan skrus på
og av i menyen, se INNSTILLINGER undermenyen.
For å skru projektoren av, trykk bestemt på POWER knappen på tastaturet eller
fjernkontrollen to ganger (for å sikre mot at enheten skrus av utilsiktet). STATUS
indikatoren skifter fra blått til blinkende gult, deretter fast gult når enheten er
skrudd av.
Enheten kan ikke skrus på når STATUS indikatoren blinker gult. Vennligst vent til
lyset blir fast gult.
37
USING THE PROJECTOR
english
EINSATZ DES PROJEKTORS
deutsch
UTILISATION DU PROJECTEUR
francais
UTILIZACIÓN DEL PROYECTOR
español
RS 232 AND LAN CONTROL
RS 232 UND LAN STEUERUNG
CONTRÔLE RS 232 ET LAN
CONTROL RS 232 y LAN
RS 232
You may control and monitor the projector remotely through the serial
RS232 control interface.
RS 232
Es besteht die Möglichkeit, den Projektor über die serielle RS232Schnittstelle auf Distanz zu steuern und überwachen.
RS 232
Vous pouvez commander et surveiller le projecteur à distance avec
une interface de commande série RS 232.
RS 232
Puede controlar y supervisar el proyector a distancia a través de la
interfaz de control serie RS232.
Two RS232 protocols are employed. A simple instruction set (SIS)
ASCII protocol gives access to the most frequently used commands.
In addition, a binary protocol is available where each command is a
series of 32 bytes in one packet. The protocols allow for both SET and
GET operations. To utilize GET operations the host needs a routine for
receiving and interpreting incoming packets. SET operations are used
to force the projector into different modes, like setting brightness and
contrast, switching between sources, etc. A separate document “RS232 and LAN communication protocol and command set” is available
that describes the communications parameters and operational codes
in detail.
Es werden zwei RS232-Protokolle verwendet. Ein einfacher
Befehlssatz (SIS) in Form eines ASCII-Protokolls ermöglicht den
Zugriff auf die am häufigsten verwendeten Befehle. Daneben stehe
ein binäres Protokoll zur Verfügung, bei dem jeder Befehl eine
32 Bytes lange Reihe in einem Paket ist. Die Protokolle lassen
sowohl Einstellungs- als auch Empfangsoperationen zu. Für den
Einsatz von Empfangsoperationen benötigt der Host eine Routine
für den Empfang und Interpretation der eingehenden Pakete. Die
Einstellungsoperationen werden verwendet, um den Projektor in
verschiedene Betriebsarten zu forcieren, wie z.B. die Einstellung
der Helligkeit und des Kontrast, die Umschaltung zwischen Quellen
usw. In einem separaten Dokument unter dem Titel „RS-232und LAN-Kommunikationsprotokoll und Befehlssatz” werden
die Kommunikationsparameter und Dienstcodes im Einzelnen
beschrieben.
Deux protocoles RS 232 sont employés. Une simple instruction
d’installation (SIS) ASCII du protocole donne accès à la plupart des
commandes fréquemment utilisées. En plus, un protocole binaire est
disponible où chaque commande est une série de 32 octets dans
un seul paquet. Les protocoles permettent les utilisations SET et
GET pour les deux. Pour utiliser les fonctionnements GET, le serveur
a besoin d’un sous-programme pour la réception et l’interprétation
des paquets qui arrivent. Les utilisations SET sont utilisées pour
faire entrer de force le projecteur dans différents modes, comme les
réglages de luminosité et de contraste, le changement de sources,
etc. Un document séparé “protocole de communication RS-232 et
LAN et réglages de commande” est disponible et décrit en detail les
paramètres de communication et les codes de fonctionnement.
Se utilizan dos protocolos RS232. Un juego de instrucciones sencillas
del protocolo ASCII le da acceso a los comandos utilizados con más
frecuencia. Además, dispone de un protocolo binario en el que cada
comando es una serie de 32 bytes en un paquete. Los protocolos
permiten las operaciones SET y GET. Para utilizar las operaciones
GET, la unidad principal (host) necesita una rutina para recibir e
interpretar los paquetes entrantes. Las operaciones SET se utilizan
para poner el proyector en modos diferentes, como el ajuste de brillo
y contraste, el cambio entre fuentes, etc. Hay un documento aparte
disponible (“RS-232 and LAN communication protocol and command
set”) que describe en detalle los parámetros de comunicaciones y
códigos operativos.
LAN
Der Projektor kann als Alternative zur RS232-Schnittstelle über
den LAN-Anschluss gesteuert und überwacht werden. Die LANSteuerung ist entweder über eine eingebettete Webseite mit den am
häufigsten verwendeten Befehlen oder den gleichen Befehlssatz wie
für RS232 möglich und bietet umfassenden Zugriff auf die gesamte
Systemsteuerung.
LAN
Le projecteur peut être commandé et surveillé avec la liaison LAN
comme une alternative à la liaison RS 232. La commande LAN
est disponible sur une page web intégrée pour les commandes
les plus fréquemment utilisées ou en utilisant le même réglage de
commande que pour RS 232 pour un plein accès aux commandes
de tout le système.
LAN
El proyector se puede controlar y supervisar mediante el conector
LAN como alternativa a RS232. El control LAN está disponible bien
mediante una página Web intercalada para los comandos utilizados
más frecuentemente o utilizando el mismo juego de comandos de
RS232 para un acceso completo a todos los controles del sistema.
HINWEIS! DER PROJEKTOR IST MIT EINER
STANDARDGEMÄSSEN IP-ADRESSE KONFIGURIERT.
IN DEN SYSTEMANGABEN, ZU ERREICHEN ÜBER DAS
MENÜSYSTEM ODER DIE FERNBEDIENUNG, FINDEN SIE DIE
AKTUELLE IP-ADRESSE.
NOTE ! LE PROJECTEUR EST CONFIGURÉ AVEC
UNE ADRESSE IP PAR DÉFAUT. REPORTEZ-VOUS À
L’INFORMATION DU SYSTÈME DANS LE MENU OU SUR LA
TÉLÉCOMMANDE POUR L’ADRESSE IP ACTUELLE.
When using the RS232 interface, make sure that the baudrate is set
correctly. Baudrate can be set in the INSTALLATION menu, and can
be toggled between 4800, 9600, and 19200 bps.
LAN
The projector can be controlled and monitored through the LAN
connector as an alternative to RS232. LAN control is available
either through an embedded web page for the most frequently used
commands or using the same command set as for RS232 for full
access to all system controls.
NOTE! THE PROJECTOR IS CONFIGURED WITH A DEFAULT
IP ADDRESS. SEE THE SYSTEM INFORMATION AVAILABLE
THROUGH THE MENU SYSTEM OR REMOTE CONTROL FOR
THE ACTUAL IP-ADDRESS.
Detailed descriptions of configuration, use and command set is
described in a separate document “RS-232 and LAN communication
protocol and command set”. You may consider using the LAN
interface as a means of theft detection. When the projector is
removed, the LAN will be disconnected; this may be detected over the
local area network and could be used to trigger an alarm.
38
Eine detaillierte Beschreibung der Konfiguration, Verwendung
und des Befehlssatzes finden Sie in einem separaten Dokument
unter dem Titel „RS-232- und LAN-Kommunikationsprotokoll und
Befehlssatz”. Als Mittel zur Diebstahlserkennung kann die LANSchnittstelle eingesetzt werden. Wird der Projektor abgebaut, wird
das LAN getrennt; dies kann über das lokale Netzwerk erkannt und
zum Auslösen eines Alarms verwendet werden.
Les descriptions détaillées de configuration, réglage d’utilisation et
de commande sont décrites sur un document à part « protocole
de communication RS 232 et LAN et de réglage de commande ».
Considérez l’utilisation de l’interface LAN comme moyen de
détection anti-vol. Quand le projecteur est supprimé, l’interface
LAN est déconnectée ; celle-ci peut être détectée sur le réseau local
et peut être utilisée comme déclencheur d’alarme.
¡NOTA! EL PROYECTOR ESTÁ CONFIGURADO CON UNA
DIRECCIÓN IP PREDETERMINADA. VÉASE LA DIRECCIÓN IP
ACTUAL EN LA INFORMACIÓN DEL SISTEMA ACCESIBLE A
TRAVÉS DEL SISTEMA DE MENÚS O EL MANDO A DISTANCIA.
Las descripciones detalladas de configuración, uso y juego de
comandos se ofrecen en un documento aparte (“RS-232 and LAN
communication protocol and command set”). Puede considerar el
uso de la interfaz de LAN como medio de detección de robo. Si el
proyector se sustrae, la LAN se desconectará; esto se puede detectar
a través de la red de área local y se puede utilizar para disparar una
alarma.
DS+305/DS+305 User Manual
020-000057-01 Rev. 1 (06/08)
UTILIZZO DEL PROIETTORE
italiano
BRUK AV PROJEKTOREN
norsk
CONTROLLO LAN ED RS
RS232 OG LAN STYRING
RS 232
È possibile controllare e monitorare il proiettore a distanza tramite
l’interfaccia di controllo seriale RS232.
RS232
Projektoren kan styres med serielt RS232 grensesnitt. To ulike
styringsprotokoller er tilgjengelige. En forenklet ASCII versjon (SIS,
Simple Instruction Set) gir tilgang til det mest brukte funksjonene.
I tillegg fins en binær-protokoll derr hver kommando består av 32
byte i en pakke. Protokollene tillater både SET og GET operasjoner.
For å kunne benytte GET operasjoner, må verten ha en rutine som
kan motta og forstå innkommende pakker. SET operasjoner styrer
projektorens ulike funksjoner, som lysstyrke, kontrast, kildevalg etc.
Et eget dokument “RS-232 and LAN communication protocol and
command set” som beskriver kommunikasjonsparametrene i detalj
er tilgjengelig.
Sono utilizzati due protocolli RS232. Un protocollo ASCII (SIS) con un
gruppo di istruzioni semplici dà accesso ai comandi usati più spesso.
In aggiunta, è disponibile un protocollo binario in cui ogni comando
è una serie di 32 byte in un pacchetto. I protocolli consentono
operazioni di tipo SET e GET. Per usare le operazioni GET, l’host
richiede una routine per ricevere e interpretare i pacchetti in arrivo. Le
operazioni SET consentono di forzare il proiettore in modalità diverse,
ad esempio d’impostare luminosità e contrasto, attivare le sorgenti
disponibili ecc. È disponibile un documento separato “RS-232 and
LAN communication protocol and command set” (Serie di comandi e
protocollo di comunicazione LAN e rs-232) che descrive in dettaglio i
parametri di comunicazione e i codici operativi.
Når styring via RS232 er i bruk må baudrate settes til korrekt verdi.
Dette settes i INNSTILLINGER menyen, og mulige verdier er 4800,
9600 og 19200 bps.
back
set date and time
timer
PIN code
network
factory reset
service
remote control ID
DPMS timeout
30 minutes
backlight timeout
30 seconds
menu timeout
30 seconds
splash
baudrate
LAN
In alternativa all’RS232, il proiettore può essere controllato e
monitorato tramite il connettore LAN. Il controllo LAN è disponibile sia
tramite una pagina Web incorporata per i comandi usati più spesso
oppure utilizzando lo stesso gruppo di comandi di RS232 per avere
l’accesso a tutti i comandi del sistema.
NOTA: IL PROIETTORE È CONFIGURATO CON UN INDIRIZZO
IP PREDEFINITO. PER INFORMAZIONI SULL’INDIRIZZO
IP CORRENTE, VEDERE LE INFORMAZIONI DI SISTEMA,
DISPONIBILI TRAMITE IL SISTEMA DEI MENU O IL
TELECOMANDO.
Una descrizione dettagliata della configurazione, l’uso e il gruppo di
comandi è riportata in un documento separato, intitolato “RS-232 and
LAN communication protocol and command set”. L’interfaccia LAN
può essere utilizzata come antifurto. Quando si rimuove il proiettore,
la LAN viene scollegata; questa disconnessione può essere rilevata
tramite la Local Area Network e configurata per far scattare un allarme.
DS+305/DS+305 User Manual
020-000057-01 Rev. 1 (06/08)
LAN
Projektoren kan styres over LAN som et alternativ til RS232. LAN
styring er tilgjengelig enten gjennom den innebygde web-siden eller
ved hjelp av samme styringer som for RS232.
BEMERK! PROJEKTOREN ER SATT OPP MED EN STADARD
IP-ADRESSE. SJEKK SYSTEMINFORMASJONEN SOM ER
TILGJENGELIG VED HJELP AV FJERNKONTROLLEN ELLER I
MENYEN FOR Å FINNE DEN GYLDIGE IP-ADRESSEN.
Et eget dokument “RS-232 and LAN communication protocol
andcommand set” som beskriver kommunikasjonsparametrene
i detalj er tilgjengelig. LAN grensesnittet kan benyttes som
tyverisikring. Dersom enheten fjernes, blir LAN forbindelsen koblet
fra. Dette kan da registreres over nettverket slik at en alarm kan
settes i gang.
broadcast
DPMS
black
19200
network
back
DHCP enabled)
IP address
subnet mask
default gateway
TCP/UDP port
192.168.1.90
255.255.255.0
192.168.1.1
1025
Device Discovery
MAC address
00-0D-34-A0-FF-18
39
USING THE PROJECTOR
english
EINSATZ DES PROJEKTORS
deutsch
UTILISATION DU PROJECTEUR
francais
UTILIZACIÓN DEL PROYECTOR
español
TIMER
TIMER
HORLOGE
TEMPORIZADOR
The projector features a real-time clock that enables timing control.
This means that the projector can be programmed to switch on
and off at certain pre-set times during a weekly cycle. To allow for a
flexible schedule, 10 ‘programs’ are available. With each program, you
can define the switch on or switch off time for a single day (Monday
to Sunday), all work days (Monday through Friday), or week-end
(Saturday and Sunday). One, several or all programs can be active
at the same time as desired. In this way, a flexible scheme can be
established. Observe the 24 hour time format. For more information,
see the SETTINGS > TIMER menu.
Der Projektor ist mit einer Echtzeituhr ausgerüstet, über die eine
Zeitsteuerung möglich ist. Das bedeutet, dass der Projektor so
programmiert werden kann, dass er sich in einem wöchentlichen
Zyklus zu bestimmten vorgegebenen Zeiten ein- bzw. ausschaltet.
Für eine flexible Planung stehen 10 ‘Programme’ zur Verfügung.
In jedem Programm kann die Ein- und Ausschaltzeit für einen
Tag (Montag bis Sonntag), alle Werketage (Montag bis Freitag)
oder das Wochenende (Sam- und Sonntag) festgelegt werden.
Eines, mehrere oder alle Programme können je nach Belieben
gleichzeitig aktiv sein. So kann eine flexible Einstellung erfolgen.
Beachten Sie das 24-Stundenformat der Uhr. Nähere Angaben zur
Einstellung der Programme finden Sie im MENÜ-System, Untermenü
EINSTELLUNGEN > TIMER.
Le projecteur dispose d’une véritable horloge qui active le contrôle
du temps. Cela signifie qu’on peut programmer le projecteur pour
s’allumer ou pour s’éteindre à un certain moment pré-réglé sur une
semaine. Pour permettre un horaire flexible, 10’programmes’ sont
disponibles. Avec chaque programme, vous pouvez définir l’heure
d’allumage ou d’extinction pour un jour (du lundi au dimanche),
pour les jours de travail (lundi au vendredi), ou le week-end (samedi
et dimanche). Un seul, plusieurs ou tous les programmes peuvent
être activés en même temps à volonté. De cette façon, un système
flexible peut être établi. Observez le format 24H. Reportez-vous au
MENU système, sous-menu PARAMÈTRES > MINUTERIE, pour
plus de détails sur la manière de définir les programmes.
El proyector incluye un reloj en tiempo real que permite un control
temporizado. Esto significa que el proyector se puede programar
para que se encienda y apague a horas prefijadas durante un ciclo
semanal. Para permitir una programación flexible, hay 10 “programas”
disponibles. Con cada programa, puede definir la hora de encendido o
apagado para un sólo día (lunes a domingo), todos los días laborables
(lunes a viernes), o el fin de semana (sábado y domingo). Uno, varios
o todos los programas pueden estar activos al mismo tiempo, según
se desee. De este modo se puede establecer un esquema flexible.
Respete el formato de 24 horas. Consulte la TEMPORIZADOR en
el submenú AJUSTES del sistema de MENÚS, para obtener más
información sobre cómo definir los programas.
L’exemple suivant illustre un cas où le projecteur s’allume à 08:00
et s’éteint à 20:00 les jours de semaine (du lundi au vendredi). Le
week-end (samedi et dimanche), il s’allume à 10:00 et s’éteint à
18:00. La source VGA est utilisée. Pour cela, 4 programmes sont
nécessaires, 2 pour l’allumage et 2 pour l’extinction.
El ejemplo siguiente ilustra un caso donde el proyector se enciende
a las 08:00 de la mañana y se apaga a las 20:00 horas los días
laborables (lunes a viernes). Los fines de semana (sábados y
domingos), se enciende a las 10:00 horas y se apaga a las 18:00
horas. Se utiliza VGA como fuente. Para esto se necesitan cuatro
programas, 2 para el encendido y 2 para el apagado.
The following example illustrates a case where the projector turns
on at 08:00 in the morning (8 am) and switches off at 20:00 (8 pm)
on weekdays (Monday through Friday). Weekends (Saturdays and
Sundays), it turns on at 10:00 (10 am) and off at 18:00 (6 pm). VGA is
used as the source. For this, four programs are needed, 2 for on and
two for off.
40
Das nachstehende Beispiel zeigt einen Fall, bei dem der Projektor
an den Werktagen (Montag bis Freitag) um 08:00 morgens ein- und
um 20:00) ausgeschaltet wird. An den Wochenenden (Sam- und
Sonntag) wird er um 10:00 ein- und um 18:00 ausgeschaltet. Als
Quelle wird VGA verwendet. Dazu sind vier Programme erforderlich,
2 zum Ein- und 2 zum Ausschalten.
DS+305/DS+305 User Manual
020-000057-01 Rev. 1 (06/08)
UTILIZZO DEL PROIETTORE
italiano
BRUK AV PROJEKTOREN
norsk
TIMER
TIMER
Il proiettore dispone di un orologio in tempo reale che consente di
controllare l’orario. In pratica il proiettore può essere programmato per
accendersi/spegnersi ad orari preimpostati di un ciclo settimanale. I
dieci programmi disponibili consentono una programmazione flessibile.
Con ogni programma è possibile definire l’orario di accensione o
spegnimento per un singolo giorno (da lunedì a domenica), su tutti
i giorni feriali (da lunedì a venerdì) o festivi (sabati e domeniche). È
possibile attivare contemporaneamente più/tutti i programmi, come
si desidera. In questo modo si può stabilire uno schema flessibile.
Utilizzare il formato a 24 ore. Per maggiori dettagli su come definire
i programmi, fare riferimento al sistema dei MENU, sottomenu
IMPOSTAZIONI (Varie), TIMER (Configurazione del timer).
Projektoren inneholder en sanntids-klokke som kan benyttes til
tidsstyring. Dette betyr at projektoren kan programmeres til å skru
seg av og på etter et valgt skjema. 10 programmer er tilgjengelige.
Hvert program definerer om prosjektøren for eksempel skal skru seg
av eller på, og når dette skal skje, enten basert på enkelt ukedag
(mandag til søndag), alle arbeidsdager (mandag til fredag) eller helg
(lørdag og søndag). Ett, flere eller alle programmer kan være aktive
samtidig etter ønske. Timeren benytter 24-timers format. For mere
detaljer, se menysystemet i INNSTILLINGER > TIMER.
L’esempio successivo illustra un caso in cui il proiettore di accende
alle 08:00 e si spegne alle 20:00, nei giorni feriali (da lunedì a venerdì).
Nel fine-settimana (sabati e domeniche), si accende alle 10:00 e si
spegne alle 18:00. La sorgente utilizzata è VGA. Per questo tipo di
impostazione, sono necessaria quattro programmi, due di accensione
e due di spegnimento.
Følgende eksempel viser et tilfelle der projektoren skrus på klokka
08:00 om morgenen og skrus av klokken 20:00 om kvelden alle
arbeidsdager. I helgen skrus den på klokken 10:00 og av klokken
18:00. VGA inngangen benyttes som kilde. Fire programmer trengs,
to for å skru på, to for å skru av.
timer
back
1
program number
weekday(s)
execute time
action
start-up source
status
monday - friday
08 : 00
power on
VGA
enabled
film 1
timer
back
program number
weekday(s)
execute time
action
start-up source
status
timer
2
monday - friday
20 : 00
power off
VGA
enabled
film 1
back
program number
weekday(s)
execute time
action
start-up source
status
timer
3
saturday - sunday
10 : 00
power on
VGA
enabled
film 1
back
program number
weekday(s)
execute time
action
start-up source
status
set date and time
4
saturday - sunday
18 : 00
power off
VGA
enabled
film 1
back
date
dd.mm.yyyy
time
hh:mm:ss
day of week
DS+305/DS+305 User Manual
020-000057-01 Rev. 1 (06/08)
monday
41
USING THE PROJECTOR
english
EINSATZ DES PROJEKTORS
deutsch
UTILISATION DU PROJECTEUR
francais
IMAGE CALIBRATION AND CORRECTION
BILDKALIBRIERUNG UND -KORREKTUR
CALIBRAGE DE L’IMAGE ET CORRECTION
Some applications require very precise color reproduction of the images. In
addition, depending on application, different color standards are applied. When
preparing for correct color reproduction, both the source and the projector must
be considered.
Einige Anwendungen benötigen eine sehr präzise farbliche Wiedergabe der
Bilder. Außerdem werden, je nach Anwendung, verschiedene Farbstandards
eingesetzt. Bei der Vorbereitung der korrekten Farbwiedergabe muss sowohl die
Quelle als auch der Projektor berücksichtigt werden.
Certaines applications demandent une reproduction précise de la couleur des
images. En plus, selon l’application, des standards de différentes couleurs sont
appliqués. Pour préparer une reproduction de couleur correcte, vous devez tenir
compte de la source et du projecteur.
The projector offers several ways to calibrate colors, as well as correction of the
input signal.
Der Projektor bietet verschiedene Möglichkeiten der Farbkalibrierung so wie der
Korrektur des Eingangssignals.
Le projecteur offre plusieurs manières de calibrage de couleurs, aussi bien que la
correction du signal d’entrée.
The source may need correction because it is usually not calibrated from the
factory, which leads to higher or lower signal levels than nominal. In addition,
R, G and B may be slightly different (not balanced), adding a tint to the image.
Correcting the input signal means adjusting the gain (contrast) and offset
(brightness) of R, G and B individually. This is in addition to the normal brightness
and contrast controls.
Die Quelle muss gegebenenfalls korrigiert werden, weil sie unkalibriert vom
Hersteller kommt, was zu einem höheren oder niedrigeren Signalpegel als
normal führt. Außerdem können R, G und B geringfügig voneinander abweichen
(unausgeglichen sein), wodurch das Bild einen Farbstich erhält. Korrektur des
Eingangssignals bedeutet die einzelne Anpassung des Gewinns (Kontrasts) und
der Verschiebung (Helligkeit) von R, G und B. Diese Einstellung erfolgt zusätzlich
zur normalen Helligkeits- und Kontrasteinstellung.
La source doit être corrigée car elle n’est pas réglée en usine, ce qui entraîne
des niveaux de signal trop hauts ou trop bas. En plus, R, G et B peuvent être
légèrement différents (non équilibrés), ajoutant une nuance à l’image. Corriger le
signal d’entrée signifie ajuster le gain (contraste) et offset (luminosité) de R, G et
B individuellement. Ceci est en plus des contrôles normaux de luminosité et de
contraste.
The projector may also need calibration regardless of the source signal, because
there may be slight differences in optical coatings, as well as the spectral
distribution of individual lamps, which can even change over time. Calibrating the
projector can be done in different ways, either by changing the color temperature,
by defining the x and y color coordinates or by R, G and B adjustment.
See the MENU system, PICTURE sub menu, for details on how to correct and
calibrate.
42
Der Projektor muss auch unabhängig vom Quellensignal kalibriert werden, da
geringfügige Unterschiede bei der optischen Beschichtung oder der spektralen
Verteilung der einzelnen Lampen vorliegen können, die sich mit der Zeit sogar
verändern können. Die Kalibrierung des Projektors kann auf verschiedene
Weisen erfolgen, d. h. durch Ändern der Farbtemperatur, durch Bestimmen der
Farbkoordinaten x und y oder durch Einstellen von R, G und B.
Nähere Angaben zur korrekten Kalibrierung finden Sie im MENÜ-System,
Untermenü BILD.
Le projecteur peut aussi nécessiter un réglage quel que soit le signal source, car
il peut y avoir de légères différences sur les surfaces optiques, ainsi que dans
le spectre de chaque lampe, qui change souvent avec le temps. Le réglage du
projecteur peut être fait de plusieurs façons : en changeant la température de la
couleur, en définissant les coordonnées x et y de la couleur ou en ajustant R, G et
B.
Reportez-vous au MENU système, sous-menu IMAGE, pour des détails sur la
manière de corriger et de régler.
DS+305/DS+305 User Manual
020-000057-01 Rev. 1 (06/08)
UTILIZACIÓN DEL PROYECTOR
español
UTILIZZO DEL PROIETTORE
italiano
BRUK AV PROJEKTOREN
norsk
CALIBRACIÓN Y CORRECCIÓN DE LA IMAGEN
CALIBRAZIONE E CORREZIONE DELL’IMMAGINE
KALIBRERING OG KORRIGERING AV BILDE
Algunas aplicaciones exigen una reproducción muy precisa del color de las
imágenes. Además, dependiendo de la aplicación, se aplican estándares de color
diferentes. Cuando prepare una reproducción de color correcta, tenga en cuenta
tanto la fuente como el proyector.
Alcune applicazioni richiedono immagini con una riproduzione cromatica
estremamente accurata. In base all’applicazione, inoltre, vengono applicati
standard di colore diversi. Quando si prepara una riproduzione cromatica
corretta, è necessario considerare sia la sorgente sia il proiettore.
Enkelte anvendelser krever presis gjengivelse av fargene i bildet. I tillegg kan ulike
farvestandarder være i bruk, avhengig av kildemateriale. Både kilde og projektor
må hensyntas når riktig fargegjengivelse skal vurderes.
El proyector ofrece varias maneras de calibrar los colores, así como de corregir la
señal de entrada.
Il proiettore dispone di svariati metodi per calibrare i colori e per correggere il
segnale in ingresso.
Es posible que la fuente requiera una corrección porque normalmente no se ha
calibrado en fábrica, lo que conduce a niveles de señal superiores o inferiores al
nominal. Además, R, G y B (rojo, verde y azul) pueden ser ligeramente diferentes
(no equilibrados), añadiendo un matiz a la imagen. Corregir la señal de entrada
significa ajustar la ganancia (contraste) y la desviación (brillo) de R, G y B
individualmente. Esto es adicional a los controles normales de brillo y contraste.
Può essere necessario correggere la sorgente che, di solito, non è tarata in
fabbrica e quindi ha dei livelli di segnale più alti o più bassi rispetto ai valori
nominali. È, inoltre, possibile che R, G e B siano leggermente diversi (non
bilanciati), conferendo perciò una tonalità particolare all’immagine. Correggere il
segnale in ingresso significa regolare guadagno (contrasto) e offset (luminosità)
di R, G e B singolarmente. Queste regolazioni sono supplementari rispetto ai
normali controlli di luminosità e contrasto.
El proyector también puede necesitar una calibración independientemente de la
señal de origen, porque pueden existir ligeras diferencias en los revestimientos
ópticos, así como en la distribución espectral de las lámparas individuales, que
incluso puede cambiar con el tiempo. La calibración del proyector se puede
realizar de diferentes maneras, bien cambiando la temperatura de color, definiendo
las coordenados de color x e y o mediante el ajuste de R, G y B.
Consulte el submenú IMAGEN del sistema de MENÚS para obtener más
información sobre los modos de corregir y calibrar.
DS+305/DS+305 User Manual
020-000057-01 Rev. 1 (06/08)
Può essere necessario calibrare li proiettore a prescindere dal segnale
sorgente, visto che possono esistere lievi differenze nel rivestimento ottico e
nella distribuzione spettrale delle singole lampade, che può persino variare con
il tempo. La calibrazione del proiettore può essere eseguita in diversi modi,
cambiando la temperatura del colore, definendo le coordinate x e y del colore
oppure regolando R, G e B.
Projektoren gir ulike muligheter for å kalibrere farger, i tillegg til å kunne korrigere
inngangssignalet
Kilden kan trenge korrigering siden den vanligvis ikke er kaliberert fra fabrikk,
noe som kan føre til sterkere eller svakere signaler en nromalt. I tillegg kan
primærfargene R, G og B (rød, grønn og blå) være i ubalanse, slik at bildet kan få
et fargestikk. For å korrigere for dette, kan forsterkning (gain, kontrast) og offset
(lysstyrke) korrigeres individuelt for R, G og B. Dette kommer i tillegg til vanlig
styring av konstrast og lysstyrke.
Projektoren kan også trenge kalibrering uavhengig av kildesignal, siden det kan
være små variasjoner i optiske egenskaper i tillegg til variasjoner i spektrumet
fra projeksjonslampene, noe som i tillegg kan variere over tid. Projektoren kan
kalibreres på ulike vis, enten ved å definere ønsket farvetemperatur, ved å sette
fargekoordinatene for x og y, eller ved å justere R, G og B.
Se menysystemet, BILDE undermeny, for flere detaljer.
Per maggiori dettagli sui metodi di correzione e calibrazione, fare riferimento al
sistema dei MENU, sottomenu IMMAGINE.
43
MENU SYSTEM
english
MENÜSYSTEM
deutsch
SYSTEME MENU
francais
SISTEMA DE MENÚS
español
The menu system gives access to a multitude of image and
system controls. The menu system is structured through a
top menu and several sub menus. The sub menus may vary
depending on the actual source selected. Some functions
are not available with some sources.
Das Menüsystem ermöglicht den Zugriff auf eine Vielzahl
von Bild- und Systemsteuerungen. Das Menüsystem ist in
ein Hauptmenü und mehrere Untermenüs gegliedert. Die
Untermenüs sind je nach gegenwärtig gewählter Quelle
unterschiedlich. Einige Funktionen stehen bei bestimmten
Quellen nicht zur Verfügung.
Le système menu donne accès à une multitude de
commandes d’image et de système. Le menu système
est structuré en un menu principal et en plusieurs sous
menus. Les sous menus peuvent varier selon la source
actuelle sélectionnée. Certaines fonctions ne sont pas
disponibles avec certaines sources.
Mediante el sistema de menús se puede acceder a infinidad
de controles del sistema y de imágenes. El sistema de
menús está estructurado en un menú principal y varios
submenús. Los submenús pueden variar dependiendo
de la fuente seleccionada. Algunas funciones no están
disponibles con determinadas fuentes.
When accessing the menu system, you will enter at the
position you left last time you were using the menu system.
Gehen Sie in das Menüsystem, gelangen Sie an die Stelle,
an der Sie das Menüsystem zuletzt verlassen haben.
Al acceder al sistema de menús, lo hará en la misma
posición que la última vez que salió del mismo.
Press the MENU key and navigate using the arrow keys on
the keypad or the arrow keys on the remote control
Drücken Sie auf MENÜ und navigieren Sie mit Hilfe der
Pfeiltasten auf dem Tastenfeld oder der Fernbedienung.
En accédant au système menu, vous entrez sur la position
où vous avez quitté la dernière fois que vous avez utilisé le
menu système.
TOP MENU
HAUPTMENÜ
OVERVIEW
Appuyez sur la touche MENU et parcourez en utilisant les
touches flèche sur le clavier ou sur la télécommande.
MENU PRINCIPAL
Pulse la tecla MENU y navegue utilizando las teclas de
dirección del teclado o del mando a distancia
MENÚ PRINCIPAL
picture
Basic and advanced picture controls.
Bild
Die wichtigsten Bildeinstellungen.
installation
System controls and information.
Installation
Allgemeine Setup des Projektors.
settings
Settings that affect how the projector behaves or interacts
with third party devices, such as networks and control
systems
Einstellungen
paramètres
Profile
profils
perfiles
profiles
Pre-stored, and user defined settings.
langue
Sprache
idioma
language
Selects menu language.
Verschiedenes
Systeminformationen.
image
Commandes de base de l’image.
installation
imagen
instalación
ajustes
statut
estado
status
System information.
NAVIGATING THE MENU SYSTEM
NAVIGATING THE MENU SYSTEM
NAVIGATING THE MENU SYSTEM
NAVIGATING THE MENU SYSTEM
The menu system can be navigated through the on board
keypad, or via the remote control.
The menu system can be navigated through the on board
keypad, or via the remote control.
The menu system can be navigated through the on board
keypad, or via the remote control.
The menu system can be navigated through the on board
keypad, or via the remote control.
menu
Invokes the menu, or returns to the previous level, and exits
the menu when at top level.
menu
Invokes the menu, or returns to the previous level, and
exits the menu when at top level.
menu
Invokes the menu, or returns to the previous level, and
exits the menu when at top level.
menu
Invokes the menu, or returns to the previous level, and exits
the menu when at top level.
OK
Selects desired function, toggles checkboxes, or enters sub
menus. Pressing OK on a directly adjustable function such
as “brigthness” minimises the menu system, and invokes a
mini adjustment dialog box. Pressing OK again returns to
the full menu system
OK
Selects desired function, toggles checkboxes, or enters
sub menus. Pressing OK on a directly adjustable function
such as “brigthness” minimises the menu system, and
invokes a mini adjustment dialog box. Pressing OK again
returns to the full menu system
OK
Selects desired function, toggles checkboxes, or enters
sub menus. Pressing OK on a directly adjustable function
such as “brigthness” minimises the menu system, and
invokes a mini adjustment dialog box. Pressing OK again
returns to the full menu system
OK
Selects desired function, toggles checkboxes, or enters sub
menus. Pressing OK on a directly adjustable function such
as “brigthness” minimises the menu system, and invokes a
mini adjustment dialog box. Pressing OK again returns to
the full menu system
up/down arrows
Navigates up or down in menu.
up/down arrows
Navigates up or down in menu.
up/down arrows
Navigates up or down in menu.
up/down arrows
Navigates up or down in menu.
left / right arrows
Moves between top level menus. Changes, or toggles
adjustable values. Enters or exits sub menus.
left / right arrows
Moves between top level menus. Changes, or toggles
adjustable values. Enters or exits sub menus.
left / right arrows
Moves between top level menus. Changes, or toggles
adjustable values. Enters or exits sub menus.
left / right arrows
Moves between top level menus. Changes, or toggles
adjustable values. Enters or exits sub menus.
44
DS+305/DS+305 User Manual
020-000057-01 Rev. 1 (06/08)
SISTEMA DEI MENU
italiano
MENYSYSTEM
norsk
Quando si accede al sistema dei menu, si accede all’ultima
posizione attiva l’ultima volta che è stato utilizzato il sistema.
Når du går inn i menysystemet, vil du komme inn på
samme sted du gikk ut forrige gang.
Premere il tasto MENU e navigare con i tasti freccia del
tastierino oppure del telecomando
Trykk på MENY tasten og naviger ved hjelp av piltastene
og OK knappen på tastaturet eller fjernkontrollen.
MENU PRINCIPALE
HOVEDMENY
immagine
Comandi di base per le immagini.
bilde
Grunnleggende bildeinnstillinger.
installazione
installasjon
Systemkontroll og generelt oppsett.
impostazioni
innstillinger
Projektoroppførsel.
profili
profiler
Forhåndslagrede og egendefinerte systemprofiler.
lingua
språk
Velge språk på menysystemet.
stato
status
Systeminformasjon.
NAVIGATING THE MENU SYSTEM
NAVIGERING I MENYSYSTEMET
The menu system can be navigated through the on board
keypad, or via the remote control.
Navigering i menysystemet kan gjøres fra tastaturet på
projektoren, eller fra fjernkontrollen.
menu
Invokes the menu, or returns to the previous level, and exits
the menu when at top level.
menu
menytasten åpner menyen, tar deg et skritt tilbake/opp,
eller avslutter menyen når du er i hovedmenyen.
OK
Selects desired function, toggles checkboxes, or enters sub
menus. Pressing OK on a directly adjustable function such
as “brigthness” minimises the menu system, and invokes a
mini adjustment dialog box. Pressing OK again returns to
the full menu system
OK
Velger ønsket funksjon, merker check-bokser, eller
går inn i undermenyer. Ved å trykke OK på en direkte
justérbar funksjon som f.eks “lysstyrke”, vil menysystemet
minimeres, og sette opp en minimalisert justeringsdialog.
Trykk OK for å returnere til menyen.
up/down arrows
Navigates up or down in menu.
piltaster opp / ned
Navigerer oppover og nedover i menyen.
left / right arrows
Moves between top level menus. Changes, or toggles
adjustable values. Enters or exits sub menus.
piltaster venstre / høyre
beveger seg mellom hovedmenynivåer, endrer og merker
just´rbare verdier, eller entrer og returnerer undermenyer.
DS+305/DS+305 User Manual
020-000057-01 Rev. 1 (06/08)
picture
installation
settings
4
AUTO
0
MENU
1
2
SRC
3
profiles
language
status
5
8
SRC
9
OK
KST
6
7
M
EN
U
Menysystemet gir mulighet for en mengde ulike styringer
og funksjoner. Menysystemet er formet med et toppnivå
og ulike undermenyer. Undermenyene kan variere
avhengig av tilkoblet kilde. Visse funksjoner er ikke
tilgjengelige for enkelte kilder.
EN
M
Il sistema dei menu consente di accedere a svariati comandi
di sistema e immagini. Questo sistema si compone di un
menu principale e svariati sottomenu che possono variare
in base alla sorgente selezionata. Non tutte le funzioni sono
disponibili con tutte le sorgenti.
U
OK
45
MENU SYSTEM
english
MENÜSYSTEM
deutsch
SYSTEME MENU
francais
SISTEMA DE MENÚS
español
PICTURE MENU
UNTERMENÜ BILD
SOUS MENU IMAGE
SUBMENÚ IMAGEN
The picture menu contains basic and advanced settings and
adjustments for detailed picture enhancement control. All
adjustments are local, ie specific to each single source being
displayed, and are stored in memory as such. All picture
settings are automatically stored relative to the source, and
recalled upon reconnection.
helligkeit
Passt die Helligkeit des Bildes an. Je höher die Einstellung,
desto heller das Bild. Eine niedrigere Einstellung reduziert
die Helligkeit des Bildes.
luminosité
Ajuste la luminosité de l’image. Un réglage supérieur
augmente la luminosité, un réglage inférieur diminue la
luminosité de l’image.
brillo
Ajusta el brillo de la imagen. Con un valor más alto el brillo
de la imagen aumenta, mientras que disminuye con uno
más bajo.
kontrast
Regelt den Kontrast des Bildes. Eine hohe Einstellung
führt zu einem ‚härteren‘ Bild mit großen Unterschieden
zwischen den Schattierungen, während eine niedrige
Einstellung ein ‚weicheres‘ Bild mit weniger Unterschieden
zwischen den Schattierungen zur Folge hat.
contraste
Commande le contraste de l’image Un réglage supérieur
donnera une image ‘plus dure’ avec de grandes
différences entre les nuances, tandis qu’un réglage
faible donnera une image’ plus douce’ avec moins de
différences entre les nuances.
contraste
Controla el contraste de la imagen. Con un valor más alto se
obtendrá una imagen “más dura” con las tonalidades más
diferenciadas, mientras que un valor más bajo producirá
una imagen “más suave” con menos diferencia entre
tonalidades.
farbe
Passt die Farbsättigung an. Eine höhere Einstellung
erzeugt eine stärkere Färbung, während eine niedrigere
Einstellung zu blasseren Farben führt.
couleur
Ajuste la saturation des couleurs. Un réglage supérieur
donnera des couleurs plus vives, tandis qu’un réglage
inférieur donnera des couleurs plus pâles.
color
Regula la saturación del color. Un valor más alto dará
colores fuertes mientras uno más bajo dará colores más
pálidos.
farbstich
Passt den NTSC-Farbstich an. Findet nur beim
Videostandard NTSC (Amerika) Anwendung. Eine höhere
Einstellung erzeugt eine rötlichere Färbung, während eine
niedrigere Einstellung zu eher grünlichen Farben führt.
teinte
Ajuste la teinte NTSC des couleurs. Seulement en
vigueur pour le standard vidéo NTSC (Américain). Un
réglage supérieur donnera des coloris plus rougeâtres,
tandis qu’un réglage inférieur donnera des couleurs plus
verdâtres.
tinta
Regula los matices de color de NTSC. Sólo es aplicable
al estándar de vídeo (estadounidense) NTSC. Un valor
más alto producirá una combinación de colores más rojiza
mientras uno más bajo hará los colores más verdosos.
brightness
Adjusts the image brightness. A higher setting will increase
the brightness, a lower setting will decrease the brightness
of the image.
contrast
Controls the contrast of the image. A higher setting will yield
a ‘harder’ image with larger difference between shades,
while a low setting will produce a ‘softer’ image with less
difference between shades.
color
Adjusts the color saturation. A higher setting will produce
stronger coloring, while a lower setting will yield paler colors.
hue
Adjusts the NTSC color tint. Applicable to the NTSC video
standard only. A higher setting will yield a more reddish color
scheme, while a lower setting will turn colors more greenish.
sharpness
Controls the image sharpness. A higher setting will yield a
harder image, with less filtering. In video applications, this
may produce more noise in the projected image. A lower
setting will soften the image, looking more smeared out, and
reducing the overall noise.
aspect
Selects image format. An image may be displayed in various
aspect ratios. This function is used when displaying source
formats that differ from the projectors native display format.
Options include “fill aspect ratio” (default – follows the
source input aspect ratio), “fill all” (streches or compresses
input aspect ratio to fill the projector resolution), “fill 16:9”
(adapts the input aspect ratio to fill a 16:9 window),
“letterbox to 16:9” (adapts the input to fill a center 16:9 box),
and “letterbox subtitle to 16:9” (adapts the input aspect
ratio to fill a 16:9 window, and moves it up to give room for
subtitles).
schärfe
Regelt die Bildschärfe. Eine höhere Einstellung
erzeugt ein härteres Bild mit geringerem Filter. Bei
Videoanwendungen kann dies dazu führen, dass im
projizierten Bild ein stärkeres Rauschen erzeugt wird. Eine
niedrigere Einstellung macht das Bild weicher, so dass es
verschwommener aussieht und das allgemeine Rauschen
verringert wird.
darstellung
Bestimmt das Bildformat. Ein Bild kann mit verschiedenen
Darstellungsverhältnissen projiziert werden. Diese Funktion
wird verwendet, wenn Quellenformate projiziert werden,
die vom ursprünglichen Anzeigeformat des Projektors
abweichen.
nuance
Commande la nuance des couleurs.
netteté
Commande la netteté de l’image. Un réglage supérieur
donnera une image plus dure, avec moins de filtrage.
Pour des applications vidéo, ceci peut produire une image
projetée plus bruyante. Un réglage inférieur adoucira
l’image, semblant plus étalée, et réduisant le bruit
d’ensemble.
L’appareil
fige l’image.
aspect
Sélectionne le format de l’image Une image peut être
affichée dans différents formats. Cette fonction est utilisée
quand les formats de la source d’affichage diffèrent du
format naturel de l’affichage des projecteurs.
tonalidad
Controla la tonalidad de los colores.
nitidez
Controla la nitidez de la imagen. Un valor más alto
producirá una imagen más dura, con menos filtrado. En las
aplicaciones de vídeo, esto puede hacer que en la imagen
proyectada haya más ruido. Un valor más bajo suavizará
la imagen, haciéndola más borrosa y reduciendo el ruido
general.
imagen fija
congela la imagen mostrada.
formato
Selecciona el formato de la imagen. Una imagen se puede
ver en diversas relaciones anchura-altura. Esta función se
utiliza cuando se visualizan formatos de fuentes que difieren
del formato de visualización original del proyector.
BrilliantColor™ boost
Adjusts the effect of Texas Instruments® BrilliantColor™
colour processing from 0 to 10. “10” gives full colour boost.
BrilliantColor™ mode
Options include “off”, “on”, “dynamic” (enhances contrasting
images), “bright D65” (retains D65 white point and boosts
brightness), “saturated D65” (retains D65 white point and
boosts colours) and “saturated 7500K” (sets white to 7500K
and boosts colours). All settings are not avaiable on all
models.
46
DS+305/DS+305 User Manual
020-000057-01 Rev. 1 (06/08)
SISTEMA DEI MENU
italiano
MENYSYSTEM
norsk
SOTTOMENU IMMAGINE
BILDE UNDERMENY
lluminosità
Consente di regolare la luminosità dell’immagine. Un
valore maggiore aumenta la luminosità; un valore minore la
diminuisce.
lysstyrke
Justerer lysstyrken i bildet. En høy verdi gir et lysere bilde,
en lav verdi mørkere.
contrasto
Consente di controllare il contrasto dell’immagine.
Un valore maggiore produce un’immagine più «forte»,
aumentando il contrasto tra le ombre, mentre un valore
inferiore «ammorbidisce» l’immagine, con le ombre meno
contrastanti.
kontrast
Styrer kontrasten i bildet. En høy verdi gir et ‘hardt’ bilde
med større forskjeller, mens en lav verdi gir et ‘mykere’
bilde med mindre forskjeller.
picture
farge
Justerer fargemetningen. En høy verdi gir sterkere farger,
mens en lav verdi gir blassere farger.
back
fargetone
Styrer fargetonen. Høy verdi gir rødlig bilde, mens lav verdi
gir grønnere farger.
color
tonalità
Consente di regolare la tinta dei colori NTSC. Applicabile
solo allo standard video NTSC (americano). Un valore
maggiore determina uno schema cromatico più rosso,
mentre un valore minore rende più verdi i colori.
skarphet
Styrer bildeskarpheten. Høyere verdi gir et hardere og
skarpere bilde med mindre filtrering. I video kan dette gi
mere støy i bildet. Lavere verdi vil gi et dusere, mere filtrert
bilde med mindre støy.
aspect
sfumatura
Consente di controllare la sfumatura dei colori.
frys
Fryser bildet
nitidezza
Consente di controllare la nitidezza dell’immagine.
Un’impostazione maggiore produce un’immagine più
“dura”, con un filtraggio inferiore. Nelle applicazioni video,
un’impostazione di questo tipo può causare più distorsioni
nell’immagine proiettata. Un valore inferiore ammorbidisce
l’immagine che appare più sbiadita, riducendo il rumore
generale.
aspect
Velger bildeformat. Bildet kan vises i ulike formater.
Funksjonen benyttes når bildeformatet er annerledes en
projektorens grunnformat.
colore
Consente di regolare la saturazione del colore. Un valore
maggiore produce colori più intensi, un valore minore
determina colori più pallidi.
installation
brightness
50
contrast
50
settings
profiles
language
status
hue
sharpness
BrilliantColorTM boost
fill aspect ratio
0
BrilliantColorTM mode
RealColor
gamma
film 1
advanced
enhancements
picture reset
source information
standard
Definerer hvilken fargestandard som skal benyttes for
komponent video (YPbPr) slik at det vises med de rette
farger.
fermo
Blocca l’immagine visualizzata.
formato
Consente di selezionare il formato dell’immagine.
Un’immagine può essere visualizzata in diversi formati.
Questa funzione viene usata quando si visualizza un formato
di visualizzazione sorgente diverso da quello originario dei
proiettori.
DS+305/DS+305 User Manual
020-000057-01 Rev. 1 (06/08)
47
MENU SYSTEM
english
MENÜSYSTEM
deutsch
SYSTEME MENU
francais
SISTEMA DE MENÚS
español
gamma
The source image is adapted to characteristics typical to
certain applications. This enables an optimized display of
images, depending on whether the source material is film
based, video, computer etc.
gamma
The source image is adapted to characteristics typical to
certain applications. This enables an optimized display of
images, depending on whether the source material is film
based, video, computer etc.
gamma
The source image is adapted to characteristics typical to
certain applications. This enables an optimized display of
images, depending on whether the source material is film
based, video, computer etc.
gamma
The source image is adapted to characteristics typical to
certain applications. This enables an optimized display of
images, depending on whether the source material is film
based, video, computer etc.
color management
Accesses the colour management sub menu, see the color
management submenu for more information.
color management
Accesses the colour management sub menu, see the
color management submenu for more information.
color management
Accesses the colour management sub menu, see the
color management submenu for more information.
color management
Accesses the colour management sub menu, see the color
management submenu for more information.
advanced
Enters the advanced settings sub menu.
advanced
Enters the advanced settings sub menu.
advanced
Enters the advanced settings sub menu.
advanced
Enters the advanced settings sub menu.
enhancements
Enters the enhancement settings sub menu.
enhancements
Enters the enhancement settings sub menu.
enhancements
Enters the enhancement settings sub menu.
enhancements
Enters the enhancement settings sub menu.
picture reset
Resets all source specific settings, such as brightness,
contrast and format settings. Picture reset does not affect
global settings such as installation specific valuses.
picture reset
Resets all source specific settings, such as brightness,
contrast and format settings. Picture reset does not affect
global settings such as installation specific valuses.
picture reset
Resets all source specific settings, such as brightness,
contrast and format settings. Picture reset does not affect
global settings such as installation specific valuses.
picture reset
Resets all source specific settings, such as brightness,
contrast and format settings. Picture reset does not affect
global settings such as installation specific valuses.
source information
Displays information about the source currently being
displayed.
source information
Displays information about the source currently being
displayed.
source information
Displays information about the source currently being
displayed.
source information
Displays information about the source currently being
displayed.
48
DS+305/DS+305 User Manual
020-000057-01 Rev. 1 (06/08)
SISTEMA DEI MENU
italiano
MENYSYSTEM
norsk
gamma
The source image is adapted to characteristics typical to
certain applications. This enables an optimized display of
images, depending on whether the source material is film
based, video, computer etc.
gamma
Kilden blir tilpasset karakteristikker typisk for gitte
bruksområder. Dette muliggjør optimaliserte bilder
avhenging av hva man ønsker å vise, uavhengig om det er
data- eller filmbasert.
color management
Accesses the colour management sub menu, see the color
management submenu for more information.
color management
Entrer color management undermenyen, se RealColor for
mer informasjon.
advanced
Enters the advanced settings sub menu.
advanced
Entrer undermenyen for avanserte innstillinger.
brightness
50
enhancements
Enters the enhancement settings sub menu.
enhancements
Entrer undermenyen for bildeforbedringer.
contrast
50
picture reset
Resets all source specific settings, such as brightness,
contrast and format settings. Picture reset does not affect
global settings such as installation specific valuses.
picture reset
Nullstiller alle innstillinger som er kildespesifikke, som
lysstyrke, kontrast, og formatinformasjon. Picture Reset
påvirker ikke globale innstillinger som takmontering,
hue
source information
Displays information about the source currently being
displayed.
source information
Displays information about the source currently being
displayed.
BrilliantColorTM mode
picture
installation
settings
profiles
language
status
back
color
sharpness
aspect
BrilliantColorTM boost
fill aspect ratio
0
color management
gamma
film 1
advanced
enhancements
picture reset
source information
DS+305/DS+305 User Manual
020-000057-01 Rev. 1 (06/08)
49
MENU SYSTEM
english
MENÜSYSTEM
deutsch
SYSTEME MENU
francais
SISTEMA DE MENÚS
español
COLOR MANAGEMENT SUB MENU
COLOR MANAGEMENT SUB MENU
COLOR MANAGEMENT SUB MENU
COLOR MANAGEMENT SUB MENU
Color management provides an easy-to-use method to
achieve perfect colours, grey scale, and colour matching
between projectors. Each projector is characterized as it
leaves the factory to ensure correctly displayed images.
mode
Selects COLOR MANAGEMENT mode between off,
temperature, coordinate.
mode
Selects COLOR MANAGEMENT mode between off,
temperature, coordinate.
mode
Selects COLOR MANAGEMENT mode between off,
temperature, coordinate.
temperature
Sets projected image colour temperature to a value
between 3200 and 9300 degrees Kelvin when temperature
is set under mode.
temperature
Sets projected image colour temperature to a value
between 3200 and 9300 degrees Kelvin when temperature
is set under mode.
temperature
Sets projected image colour temperature to a value between
3200 and 9300 degrees Kelvin when temperature is set
under mode.
x-coordinate
Sets projected image white point x-coordinate when
“coordinates” is set under mode.
x-coordinate
Sets projected image white point x-coordinate when
“coordinates” is set under mode.
x-coordinate
Sets projected image white point x-coordinate when
“coordinates” is set under mode.
y-coordinate
Sets projected image white point y-coordinate when
“coordinates” is set under mode.
y-coordinate
Sets projected image white point y-coordinate when
“coordinates” is set under mode.
y-coordinate
Sets projected image white point y-coordinate when
“coordinates” is set under mode.
desired coords mode
Allows the user to set a desired output colour gamut, used
for colour matching and accurate colour display.
desired coords mode
Allows the user to set a desired output colour gamut, used
for colour matching and accurate colour display.
desired coords mode
Allows the user to set a desired output colour gamut, used
for colour matching and accurate colour display.
reset to D65
Resets the projected image white point to D65 (x=0.312,
y=0.329) for true video white colours.
reset to D65
Resets the projected image white point to D65 (x=0.312,
y=0.329) for true video white colours.
reset to D65
Resets the projected image white point to D65 (x=0.312,
y=0.329) for true video white colours.
balance gains enable
Automatically balances R, G, and B values to equal values.
balance gains enable
Automatically balances R, G, and B values to equal values.
balance gains enable
Automatically balances R, G, and B values to equal values.
desired values
When desired coords mode is set to on, the desired
output colour coordinates can be set here.
desired values
When desired coords mode is set to on, the desired
output colour coordinates can be set here.
desired values
When desired coords mode is set to on, the desired output
colour coordinates can be set here.
measured values
The projector’s measured colour coordinates that are
used to calculate the desired output coordinates. Custom
measured values can be entered.
measured values
The projector’s measured colour coordinates that are
used to calculate the desired output coordinates. Custom
measured values can be entered.
measured values
The projector’s measured colour coordinates that are
used to calculate the desired output coordinates. Custom
measured values can be entered.
display customization
display customization
display customization
mode
Selects color management mode between off, temperature,
coordinate.
temperature
Sets projected image colour temperature to a value between
3200 and 9300 degrees Kelvin when temperature is set
under mode.
x-coordinate
Sets projected image white point x-coordinate when
“coordinates” is set under mode.
y-coordinate
Sets projected image white point y-coordinate when
“coordinates” is set under mode.
desired coords mode
Allows the user to set a desired output colour gamut, used
for colour matching and accurate colour display.
reset to D65
Resets the projected image white point to D65 (x=0.312,
y=0.329) for true video white colours.
balance gains enable
Automatically balances R, G, B, C, M, and Y intencity values
so they are correct relative to white.
desired values
When desired coords mode is set to on, the desired output
colour coordinates can be set here.
measured values
The projector’s measured colour coordinates that are
used to calculate the desired output coordinates. Custom
measured values can be entered.
display customization
Changes the R, G, and B drive output from the display.
50
DS+305/DS+305 User Manual
020-000057-01 Rev. 1 (06/08)
SISTEMA DEI MENU
italiano
MENYSYSTEM
norsk
COLOR MANAGEMENT SUB MENU
COLOR MANAGEMENT SUB MENU
mode
Selects COLOR MANAGEMENT mode between off,
temperature, coordinate.
mode
Selects COLOR MANAGEMENT mode between off,
temperature, coordinate.
temperature
Sets projected image colour temperature to a value between
3200 and 9300 degrees Kelvin when temperature is set
under mode.
temperature
Sets projected image colour temperature to a value
between 3200 and 9300 degrees Kelvin when temperature
is set under mode.
x-coordinate
Sets projected image white point x-coordinate when
“coordinates” is set under mode.
x-coordinate
Sets projected image white point x-coordinate when
“coordinates” is set under mode.
desired coords mode
y-coordinate
Sets projected image white point y-coordinate when
“coordinates” is set under mode.
y-coordinate
Sets projected image white point y-coordinate when
“coordinates” is set under mode.
desired coords mode
Allows the user to set a desired output colour gamut, used
for colour matching and accurate colour display.
desired coords mode
Allows the user to set a desired output colour gamut, used
for colour matching and accurate colour display.
reset to D65
Resets the projected image white point to D65 (x=0.312,
y=0.329) for true video white colours.
reset to D65
Resets the projected image white point to D65 (x=0.312,
y=0.329) for true video white colours.
balance gains enable
Automatically balances R, G, and B values to equal values.
balance gains enable
Automatically balances R, G, and B values to equal values.
desired values
When desired coords mode is set to on, the desired output
colour coordinates can be set here.
desired values
When desired coords mode is set to on, the desired
output colour coordinates can be set here.
measured values
The projector’s measured colour coordinates that are
used to calculate the desired output coordinates. Custom
measured values can be entered.
measured values
The projector’s measured colour coordinates that are
used to calculate the desired output coordinates. Custom
measured values can be entered.
display customization
display customization
measured values
color management
back
back
not corrected
red x
0.600
temperature
6500K
red y
0.300
x-coordinate
0.312
red luminance
0.137
y-coordinate
0.329
green x
0.300
off
green y
0.550
reset to D65
green luminance
0.785
balanced gains enable
blue x
0.140
desired values
blue y
0.070
measured values
blue luminance
0.102
display customization
white x
0.225
white y
0.357
white luminance
0.316
mode
desired values
back
red x
0.600
red y
0.300
red gain
0.137
green x
0.300
green y
0.550
green gain
0.785
blue x
0.140
blue y
0.070
blue gain
0.102
white x
0.225
white y
0.357
white gain
0.316
display customization
back
red offset
0
green offset
0
blue offset
DS+305/DS+305 User Manual
020-000057-01 Rev. 1 (06/08)
0
red gain
100
green gain
100
blue gain
100
51
MENU SYSTEM
english
MENÜSYSTEM
deutsch
SYSTEME MENU
francais
SISTEMA DE MENÚS
español
ADVANCED SUB MENU
The advanced sub menu contains less used, and more
spesific picture adjustment settings.
horizontal position
Shifts the image sideways.
vertical position
Shifts the image up and down.
phase
Adjust for stable image. A jittery image may appear with
certain VGA sources. You may also press the AUTO button
on the keypad or remote control to optimize.
frequency
Adjust image width. An incorrect setting may produce
vertical, unstable bands in the image, and parts of the image
may not be displayed on screen. Push the AUTO button to
find a correct setting, or manually adjust the frequency until
the vertical bands disappear. Frequency adjusts the pixel
clock sampling frequency.
IRE setup
sets black level for NTSC video input sources.
digital level
Sets the dynamic range for the digital inputs to video or
range; 16 – 234 or 0 – 255.
digital color space
Sets digital colour space to RGB or YUV.
source correction
Optimises input signal for processing. Use this to correct
for source signal level inaccuracies. Source correction
gives access to AD calibration, a process that can only
be performed with analogue RGB sources, and must
be performed with a specific input test image. For more
information, please contact yout dealer, or visit our web site.
52
DS+305/DS+305 User Manual
020-000057-01 Rev. 1 (06/08)
SISTEMA DEI MENU
italiano
MENYSYSTEM
norsk
source correction
advanced
back
back
horizontal position
vertical position
phase
frequency
267
31
red offset
0
green offset
0
blue offset
8
1312
0
red gain
100
green gain
100
digital level
blue gain
100
digital color space
AD calibration
IRE setup
7.5 IRE
source correction
!
using this function without the correct input signal may result in reduced image quality
yes
DS+305/DS+305 User Manual
020-000057-01 Rev. 1 (06/08)
no
53
MENU SYSTEM
english
MENÜSYSTEM
deutsch
SYSTEME MENU
francais
SISTEMA DE MENÚS
español
ENHANCEMENTS SUB MENU
The enhancements sub menu contains a range of picture
enhancement settings for video displays.
DLTI (Digital Luminance Transient Improvement) level
Use this function to increase visible image sharpness for
video.
DCTI (Digital Chroma Transient Improvement) level
Use this function to increase visible colour sharpness in
video images.
3D comb filter
This filter reduces dot crawl in composite video signals.
2D peaking
adaptive noise reduction
This filter adapts to the source material, and reduces noise
in motion video.
CEH (Colour Enhancement) red
CEH (Colour Enhancement) blue
CEH (Colour Enhancement) green
CEH (Colour Enhancement) yellow
CEH (Colour Enhancement) fleshtone
The Colour Enhancement filters enhance individual colours
by analyzing the image, and allowing gain (contrast) to the
colour selected. Fleshtone adjustment enhances the gain
setting for a range of colours that are typical flesh tones.
dynamic contrast enhancement
Dynamically adjusts and adapts image contrast.
dynamic contrast level
Dynamically adjusts and adapts image contrast.
horizontal deblocking
A 2D filter that analyzes each frame for jaggies and blocking,
and reduces so called MPEG blocking artefacts typical with
DVD and other compressed video formats.
54
DS+305/DS+305 User Manual
020-000057-01 Rev. 1 (06/08)
SISTEMA DEI MENU
italiano
MENYSYSTEM
norsk
enhancements
back
DLTI level
6
DCTI level
6
3D comb filter
2D peaking
0
adaptive noise reduction
CEH red
1
CEH blue
1
CEH green
1
CEH yellow
1
CEH fleshtone
1
dynamic contrast enhancement
dynamic contrast level
horizontal deblocking
DS+305/DS+305 User Manual
020-000057-01 Rev. 1 (06/08)
on
18
off
55
MENU SYSTEM
english
MENÜSYSTEM
deutsch
SYSTEME MENU
francais
SISTEMA DE MENÚS
español
INSTALLATION SUB MENU
UNTERMENÜ ERWEITERT
SOUS MENU AVANCE
SUBMENÚ AVANZADO
The installation sub menu provides easy access to global
system settings, including ceiling mount and rear projection
settings, analogue source sync termination settings, and
keystone. These settings will affect all sources connected,
and are system specific, rather than source specific.
farbeinstellungen
Die Farbtemperatur und Farbkoordinaten können nach
Belieben kalibriert werden.
gestion de la couleur
La température de la couleur et les coordonnées de la
couleur peuvent être réglées à volonté.
gestión del color
La temperatura de color y las coordenadas de color se
pueden calibrar según se desee.
modus
Auswahl zwischen Nicht korrigiert, Temperatur oder
individuelle Farbeinstellung. Die Einstellung Nicht korrigiert
zeigt die geräteeigene Farbtemperatur des Projektors.
mode
Sélectionnez non corrigé, température ou couleur
personnalisée. Le réglage non corrigé affiche la
température de couleur d’origine du projecteur.
modo
Selecciona no corregido, temperatura o color personalizado.
El ajuste no corregido muestra la temperatura de color
original del proyector.
temperatur
Auswahl der Farbtemperatur in 100 Kelvin-Schritten von 3
200 – 9 200 K entlang der Kurve des ‘schwarzen Körpers’
der CIE-Farbtafel.
température
Sélectionnez la température de la couleur par paliers de
100° Kelvin de 3200 à 9200 °K le long de la «courbe de
corps noir » du tableau de couleur CIE.
temperatura
Selecciona la temperatura de color en paso de 100 Kelvin
desde 3200 a 9200 K a lo largo de la “curva del cuerpo
negro” del muestrario de colores CIE.
individuelle farbeinstellung
Ermöglicht es dem Anwender, die Farbtemperatur
entweder über die Einstellung im RGB-Bereich oder dem
x-,y-Raum zu verändern.
couleur personnalisée
Permet à l’utilisateur de contrôler la température de la
couleur au moyen de plusieurs réglages dans le domaine
RGB ou l’espace x, y.
color personalizado
Permite al usuario controlar la temperatura de color bien
mediante ajustes en el dominio RGB o el espacio x,y.
RGB
Ermöglicht die individuelle Korrektur des R-, G- and BGewinns.
RGB
Permet la correction individuelle des gains R, G et B.
image orientatation
Set the image orientation to reflect the installation setting.
Select between “desktop front”, “desktop rear”, “ceiling
front” and “ceiling rear” modes. The image will be flipped
and reversed accordingly.
source scan
When enabled, the projector automatically searches for
available sources on all input terminals, and displays the
image from the first one available with a valid input signal.
Source scan is on by dafault.
RGB video
The component video input (fig. XX) can be configuted to
receive RGB and composite sync (using the composite
video input as a fourth connector).
IR enable
Enables or disables IR receivers. Disable if the projector
is being used with a control system, if the projector
experiences strange behaviour (due to stray IR light in some
environments), or the remote control is not needed. IR
enable is on by default.
OSD enble
Enables or disables the OSD (On Screen Display) dialogues.
Possible settings include “on”, “off”, or “only warnings”. The
latter will display system warnings, such as overheating,
lamp life expiry, other other critical information. “off” disables
all warnings and messages. OSD enable is set to “on” by
default.
test image
Displays a test image frame that is easy to use when setting
up and determining screen size, and position. Options
include “4:3”, “16:9”, “1.85:1”, “2.35:1”, and a combination
of all of the above.
56
koordinaten (x, y)
Bestimmt den x- und y-Farbraum direkt. Es besteht auch
die Möglichkeit, die D65-Standardkoordinaten wieder
herzustellen.
quellenanschluss
Diese Funktion ermöglicht die Korrektur des
Eingangssignals im RGB-Raum. Bei einigen Quellen
muss möglicherweise der Gewinn (Kontrast) und/
oder die Verschiebung (Helligkeit) des R- G- und BAusgangssignals korrigiert werden. Der Gewinn (Kontrasts)
und die Verschiebung (Helligkeit) von R, G und B können
jeweils einzeln eingestellt werden.
videoformat
Wahl zwischen manueller oder automatischer Erkennung
des TV-Standards.
videotyp
Auswahl unter den Videotypen, DVD bzw. VCR.
Normalerweise wird die DVD-Einstellung verwendet, bei
der gut definierte Videobilder erzeugt werden.
coordonnée(x,y)
Règle directement les coordonnées x et y de l’espace des
couleurs. Vous pouvez aussi réinitialiser les coordonnées
standards D65.
correction de la source
Cette fonction permet la correction du signal entrant
dans l’espace RGB. Certaines sources peuvent émettre
des signaux R, G et B qui nécessitent une correction du
gain (contraste) et/ou du offset (luminosité). Vous pouvez
ajuster le gain (contraste) et l’offset (luminosité) pour R, G
et B individuellement.
format vidéo
Choisissez entre la détection manuelle ou automatique du
standard TV.
type vidéo
Choisissez parmi les types vidéo DVD et VCR. Le réglage
DVD est utilisé en général et donne des images vidéos
bien définies.
RGB
Permite corregir la ganancia de R, G y B individualmente.
coordenada (x,y)
Ajusta directamente las coordenadas de espacio de color
x e y. También puede restablecer las coordenadas D65
estándar.
corrección de la fuente
Esta función permite corregir la señal entrante en el espacio
RGB. Algunas fuentes pueden emitir señales R, G y B que
requieren una corrección de la ganancia (contraste) y/o la
desviación (brillo). Puede ajustar la ganancia (contraste) y la
desviación (brillo) de R, G y B individualmente.
formato de vídeo
Selecciona entre la detección manual o automática del
estándar de TV.
tipo de vídeo
Selecciona entre los tipos de vídeo; DVD y VCR.
Normalmente se utiliza la configuración de DVD que
producirá imágenes de vídeo bien definidas.
DS+305/DS+305 User Manual
020-000057-01 Rev. 1 (06/08)
SISTEMA DEI MENU
italiano
MENYSYSTEM
norsk
SOTTOMENU ADVANCED (AVANZATO)
AVANSERT UNDERMENY
color management (gestione colori)
Le coordinate di colore e temperatura del colore possono
essere calibrate come si preferisce.
color management
Fargetemperatur og –koordinater kan justeres etter ønske.
mode (modalità)
Selezionare il colore personalizzato o la temperatura
non corretti. L’impostazione non corretta visualizza la
temperatura colore originaria del proiettore.
temperature (temperatura)
La temperatura del colore può essere impostata in
incrementi di 100 Kelvin, da 3200 a 9200 K, lungo la “curva
nera” del grafico a colori CIE.
custom color (colore personalizzato)
Consente all’utente di controllare la temperatura del colore
mediante regolazioni nel dominio RGB o nello spazio x, y.
RGB
Consente di correggere singolarmente il guadagno di R, G
e B.
coordinate (x,y) (coordinate - x, y)
Consente d’impostare direttamente le coordinate x e y di
spazio colore. È possibile anche ripristinare le coordinate
D65 standard.
source correction (correzione sorgente)
Questa funzione consente di correggere il segnale in
ingresso nello spazio RGB. Alcune sorgenti possono
generare dei segnali R, G e B in uscita che richiedono la
correzione di guadagno (contrasto) e/o offset (luminosità).
Guadagno (contrasto) e offset (luminosità) di R, G e B
possono essere regolati singolarmente.
video format (formato video)
Consente di selezionare tra il rilevamento manuale o
automatico dello standard TV.
modus
Velg mellom ikke-korrigert, temperatur eller
brukerdefinert farge. Ikke-korrigert viser projektorens
grunnfargertemperatur Velg fargetemperatur i steg på
100K fra 3200K til 9200K langs ’black body’ kurven på
CIE fargekartet.
brukerdefinert
Styrer fargetemperaturen ved å justere RGB eller x og y
koordinater
RGB
Justerer individuell forsterkning av R, G og B. koordinat
(x,y). Setter x og y koordinaten direkte. Du kan også
nullstille koordinaten til D65 standarden.
picture
installation
settings
profiles
language
status
back
image orientation
desktop front
source scan
RGB video
on
ir enable
OSD enable
only warnings
test image
off
kilde korreksjon
Her kan RGB signalene fra kilden korrigeres om
nødvendig. Du kan justere forsterkning (kontrast) og offset
(lysstyrke) for R, G og B individuelt.
sync termination VGA
vertical keystone
0
video format
Velg mellom automatisk eller manuell deteksjon av TV
standard.
sync level
8
sync termination DVI-A
lamp
video type
Velg mellom DVD og VHS type. VHS gir ofte et ustabilt
signal. DVD gir klarest bilde.
wide setup
Aktiverer bredformat (1680x1050 oppløsning, 16:10
format) for VGA og DVI.
video type (tipo video)
Consente di selezionare il tipo video DVD o VCR.
L’impostazione DVD è quella usata di solito e genera
immagini video ben definite.
DS+305/DS+305 User Manual
020-000057-01 Rev. 1 (06/08)
57
english
deutsch
francais
español
sync termination VGA
This function allows correction of the incoming signal in
the RGB space. Some sources may output R, G and B
signals that need correction of gain (contrast) and/or offset
(brightness). You may adjust gain (contrast) and offset
(brightness) for R, G and B individually.
sync termination DVI-A
Select between manual or auto detection of TV standard.
vertical keystone
vertical keystone correction electronically compensates for
the trapezoidal image created when the projector is tilted,
and is no longer perpendicular to the wall or screen surface.
Instead of electronic keystone correction, it is adviced that
optical lens shift is used, if possible.
sync level
Sets the minimum voltage level of the inout synchronization
signal needed for setting up an image.
Caution! Setting a level that is out of range will cause the
image to disappear!
lamp
The lamp menu gives the user access to enabling economy
mode, manually adjusting the lamp power output from 80 100%, and resetting the lamp usage hours counter.
Caution! Only perform when replacing lamp with a new one
of the model!
LAMP SUB MENU
eco mode
Switch eco mode (low power and long life) on or off. When
on, lamp power may not be adjusted. When off, lamp power
may be adjusted.
lamp power
Adjust lamp power when not in eco mode.
estimated remaining
The estimated remaining lamp life at the current lamp power.
58
DS+305/DS+305 User Manual
020-000057-01 Rev. 1 (06/08)
italiano
norsk
picture
installation
settings
profiles
language
status
back
image orientation
desktop front
source scan
RGB video
on
ir enable
OSD enable
only warnings
test image
off
sync termination VGA
sync termination DVI-A
vertical keystone
0
sync level
8
lamp
lamp
back
eco mode
lamp power
reset lamp timer
reset lamp time
!
are you sure?
this should only be done when changing the lamp
yes
DS+305/DS+305 User Manual
020-000057-01 Rev. 1 (06/08)
no
59
MENU SYSTEM
english
MENÜSYSTEM
deutsch
SYSTEME MENU
francais
SISTEMA DE MENÚS
español
SETTINGS SUB MENU
UNTERMENÜ SETUP
SOUS MENU SET UP
SUBMENÚ INSTALACIÓN
The settings sub menu contains settings that are system
specific, and source independent, such as networking,
and third party equipment interaction, display power
management, PIN code and security settings, amongst
other things.
Vertikale Trapezeinstellung
Legt die vertikale Korrektur des Keystone-Effekts fest.
Gleicht die geometrische Verzerrung des projizierten Bildes
aus, die durch die Neigung des Projektors zur Projektion
an einer höheren Stelle an der Wand entsteht.
trapèze V
Ajuste la correction verticale du trapèze. Compense
la distorsion géométrique de l’image projetée due à
l’inclinaison du projecteur pour projeter plus haut sur le
mur.
distorsión trapezoidal V
Corrige la distorsión trapezoidal vertical. Compensa la
distorsión geométrica de la imagen proyectada que se
produce al inclinar el proyector para que apunte hacia un
sitio más alto de la pared.
set date and time
Set system date and time for the projector to utilise timer
and programming options.
Horizontale Trapezeinstellung
Legt die horizontale Korrektur des Keystone-Effekts fest.
Gleicht die geometrische Verzerrung des projizierten Bildes
aus, die durch die Projektion in einem seitlichen Winkel
zum Bildschirm entsteht.
trapèze H
Ajuste la correction horizontale du trapèze. Compense
la distorsion géométrique de l’image projetée due à la
projection de l’image à un angle des cotés de l’écran.
distorsión trapezoidal H
Corrige la distorsión trapezoidal horizontal. Compensa la
distorsión geométrica de la imagen proyectada que se
produce al proyectar la imagen hacia un lado de la pantalla.
DPMS
Active ou désactive le DPMS (Indicateur de gestion de
puissance d’affichage). Quand DPMS est sur ON, le
projecteur s’éteint selon la puissance ou la déconnexion
de la source du signal. Le projecteur se rallume quand la
source du signal est réactivée.
DPMS
Activa/desactiva la DPMS (Señalización para la gestión de
la energía de visualización). Cuando la DPMS está activada,
el proyector se apagará después de desconectar o apagar
la fuente de señales. El proyector se volverá a encender
cuando se reactive la fuente de señales.
balayage de la source
Allume ou éteint le balayage de la source. Avec le
balayage de source activé, le projecteur cherche une autre
source si la source actuelle est déconnectée ou éteinte.
Avec le balayage de source désactivé, le projecteur reste
sur l’entrée de la source sélectionnée même si celle-ci est
éteinte ou déconnectée.
búsqueda de fuentes
Activa o desactiva la búsqueda de fuentes. Con esta función
activada, el proyector buscará otra fuente en caso de que
la fuente actual esté desconectada o apagada. Si la función
de búsqueda de fuentes está desactivada, el proyector
seguirá con la entrada de fuente seleccionada aunque la
fuente esté apagada o desconectada.
orientation
Choisissez parmi les modes façade de bureau, arrière
de bureau, façade plafond et arrière de plafond. L’image
saute et se renverse en conséquence.
orientación
Selecciona entre los modos de sobremesa delantera,
sobremesa trasera, techo delantero o techo trasero. La
imagen basculará o se invertirá según el caso.
OSD
Choisissez où vous souhaitez avoir l’affichage sur l’écran.
OSD
Selecciona donde quiere la visualización en pantalla.
langue
Choisissez parmi les langues.
idioma
Selecciona el idioma.
Vidéo RGB
Sélectionne vidéo RGB sur l’entrée du composant vidéo
(YPbPr). Nécessite une synchronisation du composite
connecté à l’entrée vidéo composite.
Vídeo RGB
Selecciona el vídeo RGB en la entrada del vídeo
componente (YPbPr). Requiere una señal de sincronización
compuesta conectada a la entrada de vídeo compuesto.
Taux baud RS232
Choisissez taux de baud pour assurer une bonne
transmission. Généralement si vous utilisez de longs
câbles courants vous devez régler les taux de baud les
plus faibles.
velocidad de transmisión RS232
Selecciona la velocidad de transmisión para garantizar una
buena transmisión. Los recorridos de cable más largos
normalmente requieren fijar unas velocidades de transmisión
más bajas.
Date and time are easiest set with the remote control. Select
either date or time, press “OK” on the remote control, and
the first digit will be highlighted. Change value with the up
/ down arrow keys, and move between values with the left
/ right arrow keys. Press OK when done. Day of week is
automatically set when a date is set.
timer
The projector can be programmed to power up or down
at any time desired, using the timer option. See example
on pages 40 - 41. Configure “program number” (1-10),
“weekday(s)”, “execute time”, and “start up source” (the
input the projector defaults to when starting up) , and enable
or disable the programme.
Select the value to be edited, and change the value with the
left / rigth arrow keys.
For “execute time”, press “OK”, change value with the up /
down arrow keys, move between values with the left / right
arrow keys.
PIN code
The projector can be secured and locked with a 4-digit PIN
(Personal Identification Number) code, similarly to mobile
phones and other electronic equipment. To enable PIN
code protection, a valid, four-digit code must be entered.
Press “OK” to select the code, enter new PIN code via the
numeric pad on the keypad or remote control. Please note
that entered numbers are masked. To disable PIN code, or
change it, follow the same procedure as above.
When PIN code is enabled, the user is prompted to enter
the code when powering up the projector. The user has
three attempts. See PIN code security on page 30 - 31 for
more information.
network
The projector features a built-in network connector for asset
management and control over IP. The network menu allows
enabling DHCP in order to automatically be assigned an
IP when connected, or setting a static IP address, subnet
mask, and default gateway.
DPMS
Aktiviert / deaktiviert DPMS (Energiemanagementsignal
des Bildschirms). Ist DPMS aktiviert, schaltet der Projektor
nach Abschalten bzw. Ausstecken der Signalquelle
aus. Der Projektor schaltet sich wieder ein, sobald die
Signalquelle erneut aktiviert wird.
Quellensuche
Schaltet die Quellensuche an bzw. aus. Ist die
Quellensuche aktiviert, sucht der Projektor eine andere
Quelle, sobald die gegenwärtige Quelle ausgesteckt
bzw. abgeschaltet wird. Ist die Quellensuche deaktiviert,
verbleibt der Projektor bei dem gewählten Quelleneingang,
selbst wenn die Quelle ausgesteckt bzw. abgeschaltet
wird.
Ausrichtung
Wählt zwischen Tischaufbau vorne, Tischaufbau hinten,
Deckenmontage vorne und Deckenmontage hinten. Das
Bild wird entsprechend umgekehrt oder gedreht.
OSD
Dient zur Bestimmung, wo die Bildschirmführung
angezeigt werden soll.
Sprache
Auswahl unter verschiedenen Sprachen.
RGB-Video
Wählt RGB-Video für den Komponentenvideo-Eingang
(YPbPr). Dazu muss die Komponentensynchronisierung an
den Farbbildeingang angeschlossen sein.
RS232-Baudrate
Auswahl der Baudrate, um eine ordnungsgemäße
Übertragung sicher zu stellen. Bei längeren Kabeln ist
normalerweise eine niedrigere Baudrate erforderlich.
Highlight the setting to be changed, press “OK”, and change
the values with the up / down arrow keys. Move beteween
values with the left / right arrow keys.
60
DS+305/DS+305 User Manual
020-000057-01 Rev. 1 (06/08)
SISTEMA DEI MENU
italiano
MENYSYSTEM
norsk
SOTTOMENU SET UP (CONFIGURAZIONE)
OPPSETT UNDERMENY
keystone V (trapezio V)
Consente di correggere l’effetto trapezio verticale.
Compensa la deformazione geometrica che si produce
quando il proiettore viene inclinato per proiettare l’immagine
più in alto sulla parete.
keystone V
Justerer kompensasjon av vertikal bildefortegning, som
skyldes at bildet projiseres med vinkel vertikalt (oppover/
nedover) på veggen.
keystone H (trapezio H)
Consente di correggere l’effetto trapezio orizzontale.
Compensa la deformazione geometrica che si produce
quando il proiettore viene inclinato lateralmente per
proiettare l’immagine con un’angolazione laterale rispetto
allo schermo.
DPMS
Attiva / disattiva il DPMS (Display Power Management
Signalling). Quando il DPMS è attivo, il proiettore si spegne
in seguito allo spegnimento o allo scollegamento della
sorgente del segnale. Il proiettore si riaccende quando viene
riattivata la sorgente del segnale.
source scan (ricerca sorgente)
Consente di attivare e disattivare la ricerca della sorgente.
Se la ricerca della sorgente è attiva, il proiettore cerca
un’altra sorgente se quella corrente è scollegata o spenta.
Con la ricerca sorgente disattiva, il proiettore rimane
sull’ingresso selezionato anche se la sorgente è spenta o
scollegata.
orientation (orientamento)
Consente di selezionare tra le modalità desktop frontale,
desktop posteriore, soffitto frontale e soffitto posteriore.
L’immagine viene spostata e orientata in base alla modalità
prescelta.
OSD
Consente di selezionare il punto in cui visualizzare l’OSD (On
Screen Display).
language (lingua)
Consente di selezionare una lingua.
RGB video (video RGB)
Seleziona RGB video sull’ingresso video componente
(YPbPr). È necessario che la sincronizzazione composita sia
connessa all’ingresso video composito.
RS232 baud rate (velocità di baud RS232)
La velocità di baud va selezionata per garantire la qualità
della trasmissione. Di solito la lunghezza del cavo è
inversamente proporzionale al valore di baud.
keystone H
Justerer kompensasjon av horisontal bildefortegning, som
skyldes at bildet projiseres skjevt horisontalt (sideveis) på
veggen.
DPMS
Skrur strømsparing (DPMS, Display Power Management
Signalling) på og av. Når DPMS er på, skrur projektoren
seg på og av, styrt av tilkoblede kilder og hvorvidt de er
aktive eller passive.
kildesøk
Skrur kildesøk på og av. Når kildesøk er på, søker
projektoren etter neste aktive kilde dersom nåværende
kilde skrus av eller kobles fra. Dersom kildesøk er av, vil
projektoren ikke søke etter nye kilder, men beholde valgt
kilde selv om denne skrus av eller kobles fra.
retning
Velg mellom bord (ned-opp) eller takmontasje (opp-ned)
og front (rettvendt) eller bak-projeksjon (speilvendt).
OSD
Skrur visning av meny og annen informasjon på og av.
picture
installation
settings
profiles
language
status
back
set date and time
timer
PIN code
network
factory reset
service
remote control ID
broadcast
DPMS
DPMS timeout
30 minutes
backlight timeout
30 seconds
menu timeout
30 seconds
splash
black
baudrate
19200
språk
Velg ønsket språk
RGB video
Velger RGB video på komponent inngangene (YPbPr).
Krever kompositt synk signal tilkoblet kompositt video
(C-VIDEO) inngangen.
RS232 baudrate
Velg ønsket baudrate (overføringshastighet). En lav rate
kan være nødvendig ved bruk av lange kabler.
set date and time
back
date
dd.mm.yyyy
time
hh:mm:ss
day of week
monday
network
back
DHCP enabled)
IP address
subnet mask
default gateway
TCP/UDP port
192.168.1.90
255.255.255.0
192.168.1.1
1025
Device Discovery
MAC address
DS+305/DS+305 User Manual
020-000057-01 Rev. 1 (06/08)
00-0D-34-A0-FF-18
61
english
deutsch
francais
español
factory reset
Factory reset erases all memorised source and system
settings, and sets all back to default values.
service
Service enters the service menu. This is available to
authorised service personnel only. Entering the service menu
without proper knowledge may permanentely damage the
projector.
remote control ID
The projector can be set up to have a unique ID, so that
it only responds to remote controls transmitting the same
ID. Up to 99 units can be handled without interfering with
eachother, using the same remote. By default, the projector
is set to respond to any one remote control, thus is set to
“broadcast”. To change, and set a unique ID, select, and
change the value with the left / right arrow keys.
To set the remote control to broadcast to a specific ID, press
the asterisk key (“*”), and enter a number that corresponds
with the projector you wish to control using the numeric
keypad. When pressing the asterisk key towards a projector,
it will respond with its unique ID, and prompt the user to
enter a matching one.
DPMS
Enable or disable the DPMS (Display Power Management
Signalling). When enabled, the projector will automatically
switch to standby mode after a specified time if there is no
valid source present at its inputs. When a valid source is
reconnected, the projector will start up again.
DPMS timeout
DPMS can be set from 1 – 180 minutes. Default is 30
minutes.
backlight timeout
Set the amount of time before the backlight for the on-board
keypad fades out after use. Default is 30 seconds.
menu timeout
Set the amount of time before the menu automatically goes
away if not used. Default is 30 seconds.
splash
Select the splash screen to be displayed if no valid source is
connected. Options include black, grey, and white.
baudrate
Set the baudrate at which the projector communicates over
RS232. Options include 4800, 9600, and 19200 bps. See
separate documentation for details on RS232 and LAN
communications.
62
DS+305/DS+305 User Manual
020-000057-01 Rev. 1 (06/08)
italiano
norsk
picture
installation
settings
profiles
language
status
back
set date and time
timer
PIN code
network
factory reset
service
remote control ID
broadcast
DPMS
DPMS timeout
30 minutes
backlight timeout
30 seconds
menu timeout
30 seconds
splash
baudrate
DS+305/DS+305 User Manual
020-000057-01 Rev. 1 (06/08)
black
19200
63
MENU SYSTEM
english
MENÜSYSTEM
deutsch
SYSTEME MENU
francais
SISTEMA DE MENÚS
español
PROFILES SUB MENU
UNTERMENÜ DIENSTPROGRAMME
SOUS MENU UTILITAIRE
SUBMENÚ UTILIDADES
The profiles sub menu contains predefined and user saved
projector setup profiles, so that a specific setting or desired
projection mode quickly can be reinstated.
Systemangaben
Zeigt die Angaben über die Quelle und den
Projektorstatus.
information système
Affiche l’information de l’état de la source et du projecteur.
información del sistema
Muestra información sobre el estado de la fuente y el
proyector.
store settings
Displays information about the source and projector status.
OSD
Schaltet die Bildschirmführung während der Quellensuche
an (Display) bzw. aus (verborgen).
recall settings
Turn the On Screen Display on (display) or off (hide) during
source scan.
OSD
Allume (affichage) ou éteint (cache) l’affichage pendant le
balayage de la source.
OSD
Activa (muestra) o desactiva (oculta) la visualización durante
la búsqueda de fuentes.
LANGUAGES SUB MENU
UNTERMENÜ DIENSTPROGRAMME
SOUS MENU UTILITAIRE
SUBMENÚ LANGUAGES
The profiles sub menu contains predefined and user saved
projector setup profiles, so that a specific setting or desired
projection mode quickly can be reinstated.
Systemangaben
Zeigt die Angaben über die Quelle und den
Projektorstatus.
information système
Affiche l’information de l’état de la source et du projecteur.
información del sistema
Muestra información sobre el estado de la fuente y el
proyector.
store settings
Displays information about the source and projector status.
OSD
Schaltet die Bildschirmführung während der Quellensuche
an (Display) bzw. aus (verborgen).
recall settings
Turn the On Screen Display on (display) or off (hide) during
source scan.
64
OSD
Allume (affichage) ou éteint (cache) l’affichage pendant le
balayage de la source.
OSD
Activa (muestra) o desactiva (oculta) la visualización durante
la búsqueda de fuentes.
DS+305/DS+305 User Manual
020-000057-01 Rev. 1 (06/08)
SISTEMA DEI MENU
italiano
MENYSYSTEM
norsk
SOTTOMENU UTILITIES (Utilità)
VERKTØY UNDERMENY
system information (informazioni di sistema)
Visualizza informazioni sullo stato del proiettore e la
sorgente.
systeminformasjon
Viser informasjon om tilkoblet kilde og projektorstatus.
OSD
Consente di attivare (visualizzare) lo schermo OSD (On
Screen Display) o disattivarlo (nasconderlo) durante la
ricerca delle sorgenti.
OSD
Skrur skjermvisning (on screen display) på og av.
picture
installation
settings
profiles
language
status
language
status
back
store settings
recall settings
SOTTOMENU UTILITIES (Utilità)
SPRÅK UNDERMENY
system information (informazioni di sistema)
Visualizza informazioni sullo stato del proiettore e la
sorgente.
Velg språk for menysystemet og OSD meldinger og
advarsler.
OSD
Consente di attivare (visualizzare) lo schermo OSD (On
Screen Display) o disattivarlo (nasconderlo) durante la
ricerca delle sorgenti.
picture
installation
settings
profiles
back
english
français
Deutsch
español
norsk
svensk
Русский
한국어
日本語
?体中文
繁體中文
português
italiano
DS+305/DS+305 User Manual
020-000057-01 Rev. 1 (06/08)
65
MENU SYSTEM
english
MENÜSYSTEM
deutsch
SYSTEME MENU
francais
SISTEMA DE MENÚS
español
STATUS SUB MENU
The status sub menu can be invoked through the menu
system, or directly from the “INFO” key on the remote
control. It gives direct, and easy to understand information
on system and connected source status.
66
DS+305/DS+305 User Manual
020-000057-01 Rev. 1 (06/08)
SISTEMA DEI MENU
italiano
MENYSYSTEM
norsk
STATUS UNDERMENY
Status undermenyen gir enkel og oversiktlig tilgang til
informasjon om systemet, og tilkoblet kilde.
picture
installation
settings
profiles
language
status
back
source information
model name
F20 sx+
part number
101-1200-08
serial number
manufactured (y)
manufactured (w)
software version
lamp remaining
072000201
2007
20
001-0134-01
2957 hrs
lamp time
31 hrs
total operating
31 hrs
lamp power
MAC address
IP address
subnet mask
default gateway
TCP/UDP port
DS+305/DS+305 User Manual
020-000057-01 Rev. 1 (06/08)
00-0D-8A-43-2A-0B
192.168.1.90
255.255.255.0
198.162.1.1
1025
67
TROUBLE SHOOTING
english
PROBLEMBEHEBUNG
deutsch
DÉPANNAGE
francais
NO IMAGE
KEIN BILD
PAS D’IMAGE
No connection:
Check if all connections are properly made.
Keine Verbindung:
Prüfen Sie, ob alle Verbindungen korrekt hergestellt wurden.
Pas de connexion:
Vérifiez si toutes les branchements sont correctes.
Source off:
Check if the equipment is powered on.
Quelle aus:
Prüfen Sie, ob das Gerät eingeschaltet ist.
Source éteinte:
Vérifiez si l’appareil est sous tension.
Lamp dead:
The lamp may need replacement.
Lampe brennt nicht:
Die Lampe muss ausgewechselt werden. Prüfen Sie die LEBENSDAUER DER
LAMPE im Untermenü DIENSTPROGRAMME.
Lampe éteinte:
La lampe a besoin d’être changée. Vérifiez le temps d’utilisation de la lampe dans
le sous-menu UTILITAIRE.
Quelle im Ruhezustand:
Nehmen Sie die Quelle in Betrieb, damit sie ein Bild anzeigt und aktiviert.
Source en veille:
Enclenchez la source pour afficher et activer l’image.
Externer Notebook-Bildschirm:
Bei den verschiedenen Notebook-Rechnern werden unterschiedliche
Tastekombinationen verwendet, um den externen Graphikanschluss zu
aktivieren.
Ecran à agenda électronique externe:
Différents agendas d’ordinateur utilisent des combinaisons de frappes pour activer
le port graphique externe.
Source hibernated:
Engage the source to display and activate image.
Notebook external screen:
Different notebook PC’s use different combinations of keystrokes to enable the
external graphics port.
Source scan off:
Check SOURCE SCAN in the INSTALLATION sub menu. If setting is OFF, the
projector will not search for the next active source, but will remain with the current
source selected.
Lens cap:
Check that the lens cap is off!
Quellensuche aus:
Überprüfen Sie die QUELLENSUCHE im Untermenü SETUP. Ist diese auf AUS
gestellt, sucht der Projektor nicht die nächste aktive Quelle, sondern bleibt bei
der gegenwärtig ausgewählten Quelle.
Linsendeckel:
Prüfen Sie, ob der Linsendeckel abgenommen ist.
Balayage de la source éteint:
Vérifiez SOURCE SCAN dans le sous menu SET UP. Si le réglage est sur OFF, le
projecteur ne cherche pas la prochaine source active, mais reste sur la source
actuellement sélectionnée.
Cache optique:
Vérifiez si le cache optique est enlevé !
DARK IMAGE
DUNKLES BILD
IMAGE SOMBRE
Old, worn lamp:
The lamp may need replacement. Check the lam life time in the STATUS sub
menu.
Alte; verbrauchte Lampe: Die Lampe muss ausgewechselt werden. Überprüfen
Sie die LEBENSDAUER DER LAMPE im Untermenü DIENSTPROGRAMME.
Lampe ancienne, défectueuse:La lampe a besoin d’être changée. Vérifiez la
durée de la lampe dans le sous-menu UTILITAIRE
Geringe Einstellung für HELLIGKEIT und KONTRAST:
Gehen Sie mit der Fernbedienung oder dem Menüsystem in das Untermenü
BILD, um den KONTRAST und die HELLIGKEIT einzustellen.
Réglages de faible LUMINOSITÉ et CONTRASTE:
Utilisez la télécommande ou le menu système, sous menu PICTURE pour ajuster la
LUMINOSITÉ et le CONTRASTE.
FLICKERING IMAGE
FLIMMERNDES BILD
IMAGE OSCILLANTE
Bad lamp:
Replace the lamp. Check the LAMP TIME in the STATUS sub menu.
Defekte Lampe:
Wechseln Sie die Lampe aus. Überprüfen Sie die LEBENSDAUER DER LAMPE
im Untermenü DIENSTPROGRAMME.
La lampe est mauvaise:
Remplacez la lampe. Vérifiez la durée de la lampe dans le sous-menu UTILITAIRE
UNSHARP IMAGE
UNSCHARFES BILD
IMAGE PAS NETTE
Lens not focused:
Focus the lens properly. Keystone correction may have been activated
inadvertently: Parts of the image is compressed that affects the display of fine-line
graphics, text and other images of high resolution.
Linsen nicht scharf gestellt:
Stellen Sie die Linsen ordnungsgemäß Bild scharf. Möglicherweise wurde die
Trapezverzerrungskorrektur unabsichtlich aktiviert: Teile des Bildes werden
komprimiert, so dass die Anzeige der Graphiken mit dünnen Linien, Texte und
anderer hoch auflösender Bilder beeinträchtigt wird.
Lentille non réglée:
Réglez correctement la lentille. La correction du trapèze a pu être activée par
inadvertance: Des parties d’image sont compressées, ce qui affecte l’affichage
des traits fins des graphiques, de texte et de d’autres images haute résolution.
Low brightness or contrast settings:
Use the remote control or the menu system, PICTURE sub menu for CONTRAST
and BRIGHTNESS adjustment.
Source resolution is different from projectors native resolution:
The projector will automatically scale and resize the input format to its native
resolution. Use a different scaling factor in the PICTURE sub menu, ASPECT
RATIO. You may also adjust the SHARPNESS.
68
Die Auflösung der Quelle stimmt nicht mit der des Projektors überein:
Der Projektor wandelt das Eingangsformat automatisch in die Skala und Größe
der internen Auflösung um. Verwenden Sie einen anderen Skalenfaktor im BILDUntermenü DARSTELLUNG. Evtl. muss die SCHÄRFE nachgestellt werden.
La résolution de la source est différente selon la résolution initiale des
projecteurs:
Le projecteur réduit et redimensionne automatiquement le format d’entrée de ses
résolutions initiales. Utilisez un facteur de réduction différent dans le sous menu
PICTURE, ASPECT. Vous pouvez aussi ajuster la NETTETÉ.
DS+305/DS+305 User Manual
020-000057-01 Rev. 1 (06/08)
SOLUCIÓN DE PROBLEMAS
español
RISOLUZIONE DEI PROBLEMI
italiano
FEILFINNING
norsk
NO HAY IMAGEN
NESSUNA IMMAGINE
INTET BILDE
No hay conexión:
Compruebe que todas las conexiones están bien realizadas.
Nessuna connessione:
controllare se i collegamenti sono stati eseguiti correttamente.
Ingen forbindelse:
Sjekk at alle forbindelser er i orden.
Fuente desactivada:
Compruebe si el equipo está encendido.
Sorgente spenta:
controllare se l’apparecchiatura è alimentata.
Kilde av:
Sjekk om utstyret er skrudd på.
Lámpara inactiva:
Es posible que haya que sustituir la lámpara. Compruebe la VIDA ÚTIL DE LA
LÁMPARA en el submenú UTILIDADES.
Lampada spenta:
può essere necessario sostituire la lampada. Controllare LAMP TIME (Durata
lampada) nel sottomenu UTILITIES (Utilità).
Død lampe:
Lampen må kanskje byttes. Sjekk lampetiden.
Fuente en hibernación.
Conecte la fuente para visualizar y activar la imagen.
Sorgente sospesa:
impegnare la sorgente per visualizzare e attivare l’immagine.
Pantalla externa del portátil:
Los distintos PC portátiles usan distintas combinaciones de teclas para habilitar el
puerto de gráficos externo.
Schermo esterno notebook:
dei PC notebook diversi usano diverse combinazioni di tasti per abilitare la porta
grafica esterna.
Búsqueda de fuentes desactivada:
Compruebe la búsqueda de fuentes en el submenú INSTALACIÓN. Si está
seleccionado OFF, el proyector no buscará la siguiente fuente activa y seguirá con
la fuente actualmente seleccionada.
Ricerca sorgente disattiva:
controllare SOURCE SCAN (Ricerca sorgente) nel sottomenu SET UP
(Configurazione). Se è su OFF, il proiettore non cerca la sorgente attiva
successiva e rimane selezionata la sorgente corrente.
Tapa del objetivo:
compruebe que ha quitado la tapa.
Copriobiettivo:
controllare se è stato levato il copriobiettivo.
IMAGEN OSCURA
IMMAGINE SCURA
MØRKT BILDE
Lámpara vieja y gastada:
Es posible que haya que sustituir la lámpara. Compruebe la VIDA ÚTIL DE LA
LÁMPARA en el submenú UTILIDADES.
Lampada vecchia e consumata:
può essere necessario sostituire la lampada. Controllare LAMPTIME (Durata
lampada) nel sottomenu UTILITIES (Utilità).
Gammel, slitt lampe:
Sjekk om lampen er gammel og trenger å byttes. Sjekk lampetiden under INFO.
Ajustes de BRILLO y CONTRASTE bajos:
Use el mando a distancia o el submenú IMAGEN del sistema de menús para
ajustar el CONTRASTE y el BRILLO.
Luminosità e contrasto impostati su valori bassi:
utilizzare il telecomando o li sistema dei menu, sottomenu PICTURE (Immagine)
per regolare contrasto e luminosità.
PARPADEO DE IMAGEN
IMMAGINE TREMOLANTE
FLIMRENDE BILDE
Lámpara deficiente: Sustituya la lámpara. Compruebe la VIDA ÚTIL DE LA
LÁMPARA en el submenú UTILIDADES.
Lampada guasta:
sostituire la lampada. Controllare LAMP TIME (Durata lampada) nel sottomenu
UTILITIES (Utilità).
Dårlig lampe:
Bytt lampe. Sjekk lampelevetid.
IMAGEN POCO NÍTIDA
IMMAGINE SFOCATA
USKARPT BILDE
Objetivo no enfocado:
Enfoque el objetivo correctamente. Es posible que sin darse cuenta haya activado
la corrección de la distorsión trapezoidal: partes de la imagen se han comprimido
afectando la visualización de gráficos de líneas finas, texto y otras imágenes de
alta resolución.
Obiettivo non a fuoco:
mettere a fuoco correttamente l’obiettivo. Forse è stata attivata accidentalmente
la correzione trapezio. Questa correzione comprime delle parti dell’immagine,
modificando la rappresentazione di grafica, testi e altri elementi ad alta
risoluzione.
Linsen ikke fokusert: Fokuser linsen. Keystone korreksjon (korreksjon av
fortegning) kan være aktiv. Finere detaljer i bildet, som linjer og liten tekst, kan da
bli komprimert og forstyrret.
La resolución de la fuente difiere de la resolución original de los proyectores:
El proyector reajustará automáticamente el tamaño del formato de entrada a su
resolución original. Use un factor de reajuste distinto en el apartado FORMATO del
submenú IMAGEN. También puede ajustar la NITIDEZ.
La risoluzione sorgente è diversa dalla risoluzione originale dei proiettori:
il proiettore ridimensiona automaticamente il formato d’ingresso, portandolo
alla risoluzione originale. Utilizzare il fattore di scala nel sottomenu PICTURE
(Immagine), ASPECT (Formato). È possibile regolare anche la nitidezza .
DS+305/DS+305 User Manual
020-000057-01 Rev. 1 (06/08)
Kilde i hvilemodus:
Aktiver kilden.
Bærbar PC skjermutgang:
Bærbare PC’er benytter ulike tastkombinasjoner for å aktivere grafikkutgangen
(CRT/LCD).
Kildesøk av:
Sjekk om kildesøk er på i OPPSETT menyen. Hvis kildesøk er av, vil projektoren
ikke søke etter andre kilder.
Linselokk:
sjekk om linselokket er fjernet.
Lavt innstilt lysstyrke eller kontrast:
Trykk AUTO eller juster i BILDE undermenyen.
Kildens oppløsning er forskjellig fra projektorens grunnoppløsning:
Projektoren skalerer automatisk for å tilpasse bildet. Velg eventuelt en annen
skaleringsfaktor som passer bedre i BILDE undermenyen. Juster eventuelt
skarphet og/eller DNR i menyen.
69
MAINTENANCE
english
The projector may from time to time need cleaning. Never open the unit, as this will
void any warranties. Refer service and repair to qualified personnel only.
The projector is using lamps that have a limited life time. Please refer to the LAMP
CHANGE section below for further details.
Only the exterior of the unit may be cleaned. Use a damp cloth. Make sure no
liquids enter the inside of the projector Vacuum clean all the air vents (A) regularly
to maintain sufficient air flow.
The projection lens (B) is sensitive to scratches. Use lens cleaning tissue, available
at all photographic stores when cleaning the projection lens. Use lens cap when
not in use.
HEAVY DUTY AND CONTINOUS USE
The projector contains moving parts (such as cooling fans) that have limited lifeexpectancies. When the projector has been used for 8 000 hours, and when the
unit is used in mission-critical applications, it is recommended that the projector is
given preventive maintenance by a qualified service person. This will help ensure
long term stable operation.
INSTANDHALTUNG
deutsch
ENTRETIEN
francais
Der Projektor muss gelegentlich gereinigt werden. Öffnen Sie das Gerät nie,
denn dadurch erlischt jegliche Garantie. Reparatur- und Wartungsarbeiten sollten
nur von qualifiziertem Personal vorgenommen werden.
Le projecteur nécessite un nettoyage de temps en temps. N’ouvrez jamais
l’appareil, ceci peut annuler la garantie. Adressez-vous au service après-vente et
faites réparer uniquement par quelqu’un de qualifié.
Im Projektor werden Lampen mit einer begrenzten Lebensdauer eingesetzt.
Lesen Sie bitte im Abschnitt AUSTAUSCH DER LAMPE unten nach, um nähere
Angaben zu erhalten.
Le projecteur utilise des lampes qui ont une durée de vie limitée. Référez-vous à la
partie CHANGEMENT DE LA LAMPE pour plus de détails.
Das Gerät darf nur außen gereinigt werden. Nehmen Sie dazu ein feuchtes Tuch.
Versichern Sie sich, dass keine Flüssigkeiten in das Projektorinnere gelangen.
Reinigen Sie alle Belüftungsöffnungen (A) regelmäßig mit einem Staubsauger, um
einen ausreichenden Luftfluss zu gewährleisten.
Die Projektionslinse (B) kann zerkratzt werden. Verwenden Sie zur Reinigung der
Projektionslinse ein in allen Fotogeschäften erhältliches Linsenreinigungstuch.
Setzen Sie den Linsendeckel auf, wenn das Gerät nicht benutzt wird.
EINSATZ UNTER HOHER BEANSPRUCHUNG UND DAUERBETRIEB
Der Projektor enthält bewegliche Teile (wie z.B. den Kühlungsventilator) mit einer
beschränkten Lebenserwartung. Nach 8 000 Betriebsstunden des Projektors,
und wenn das Gerät für kritische Anwendungen eingesetzt wird, sollte der
Projektor von einem qualifizierten Servicetechniker einer vorbeugenden Wartung
unterzogen werden. Die hilft, einen langen störungsfreien Betrieb sicherzustellen.
Seul l’extérieur de l’appareil peut être nettoyé. Utilisez un chiffon humide. Assurezvous qu’aucun liquide ne pénètre à l’intérieur du projecteur. Aspirez régulièrement
tous les orifices de ventilation (A) pour maintenir suffisamment de circuit d’air.
L’objectif de projection (B) est sensible aux rayures. Utilisez un chiffon nettoyant
pour objectif, disponible dans tous les magasins photo, pour nettoyer l’objectif de
projection. Mettez le cache optique quand vous ne l’utilisez pas.
USAGE INDUSTRIEL ET USAGE CONTINU
Le projecteur contient des pièces amovibles (comme les ventilateurs de
refroidissement) qui ont une durée de vie estimée limitée Après 8 000 heures
d’utilisation du projecteur, et quand l’appareil est utilisé en fonctionnements
critiques, il est recommandé de confier le projecteur à quelqu’un de qualifié pour
faire un entretien préventif. Celui-ci garantit un fonctionnement stable à long terme.
SERVICE INFORMATION
WARTUNGSANGABEN
INFORMATION SUR LE SERVICE
This product contains no user serviceable parts. If the product fails to function as
expected, please first check that all connections are properly made, and that the
power cord is properly connected. Please check that the projector as well as the
video and computer sources are all switched on. Cables and cords may break
over time. Try to change cables and cords, in case there is a bad or intermittent
connection. Check if the circuit breaker or fuse of your mains is intact. In the event
of product failure, please contact your reseller. You should prepare a description
of the symptoms of failure you experience. Please also state product number and
serial number as printed on the label on the bottom of the projector.
Dieses Produkt enthält keine Teile, die vom Benutzer gewartet werden müssen.
Sollte das Produkt nicht erwartungsgemäß funktionieren, prüfen Sie bitte
zuerst, ob alle Anschlüsse korrekt hergestellt sind, und ob das Stromkabel
richtig eingesteckt ist. Prüfen Sie, ob der Projektor und die Video- bzw.
Computerquellen eingeschaltet sind. Die Kabel können mit der Zeit defekt
werden. Versuchen Sie, die Kabel auszutauschen, wenn eine mangelhafte oder
aussetzende Verbindung auftritt. Prüfen Sie, ob der Leistungsschalter bzw.
die Sicherung der Stromversorgung in Ordnung ist. Sollte das Produkt nicht
funktionieren, setzen Sie sich bitte mit dem Händler in Verbindung. Bereiten Sie
eine Beschreibung der vorgefallenen Defektsymptome vor. Geben Sie bitte auch
die Nummer und Seriennummer vom Etikett an der Unterseite des Projektors an.
Cet appareil ne contient aucune pièce utile pour l’utilisateur. Si cet appareil ne
fonctionne pas comme prévu, vérifiez d’abord que toutes les connexions sont
correctes, et que le cordon d’alimentation est branché correctement. Vérifiez que
le projecteur ainsi que les sources vidéo et informatique sont toutes activées. Les
câbles et les cordons peuvent s’endommager avec le temps. Essayez de changer
les câbles et les cordons, s’il y a une mauvaise connexion ou une connexion
intermittente. Vérifiez si le circuit est endommagé ou si le fusible du secteur
est intact. Si le problème persiste, contactez votre revendeur. Préparez une
description des symptômes d’échec que vous avez testé. Relevez aussi le numéro
de l’appareil et le numéro de série imprimé sur l’étiquette sur le fond du projecteur.
SERVICE PERSONNEL INFORMATION
WARNING
Use UV radiation eye and skin protection during servicing.
INFORMATIONEN FÜR DAS WARTUNGSPERSONAL
WARNUNG
Verwenden Sie während der Servicearbeiten einen Augen- und Hautschutz
gegen UV-Strahlen
INFORMATION POUR LE PERSONNEL D’ENTRETIEN
MISE EN GARDE
Protégez les yeux et la peau des radiations UV pendant l’entretien
70
DS+305/DS+305 User Manual
020-000057-01 Rev. 1 (06/08)
MANTENIMIENTO
español
MANUTENZIONE
italiano
VEDLIKEHOLD
norsk
De vez en cuando el proyector necesita una limpieza. Nunca abra el aparato
ya que esto anulará cualquier garantía. Para cualquier reparación, diríjase a un
servicio técnico cualificado.
Di tanto in tanto può essere necessario pulire il proiettore. Non aprire mai
l’unità, per non invalidare le eventuali garanzie. Gli interventi di riparazione e
manutenzione vanno affidati esclusivamente a personale qualificato.
Projektoren kan fra tid til annen trenge rengjøring. Enheten må aldri åpnes av
bruker, noe som vil ugyldiggjøre garantien. All reparasjon og service må utføres av
kyndig personell.
El proyector usa lámparas con una duración limitada. Consulte más adelante la
sección CAMBIO DE LÁMPARA para obtener más detalles.
Il proiettore fa uso di lampada che hanno una durata limitata. Per maggiori
dettagli, fare riferimento alla sezione SOSTITUZIONE DELLE LAMPADE.
Projektoren benytter lamper med begrenset levetid. Vennligst sjekk rutinen for
lampeskifte for mer informasjon.
Sólo se puede limpiar el exterior del aparato. Utilice un paño húmedo. Asegúrese
de que no entra ningún líquido en el proyector. Limpie todas las ranuras de
ventilación (A) periódicamente con un aspirador para mantener un flujo de aire
suficiente.
È possibile pulire solo l’esterno dell’unità. Usare un panno umido. Fare
attenzione a non fare penetrare liquidi all’interno del proiettore. Con un
aspirapolvere, pulire regolarmente tutte le prese d’aria (A), per assicurare un
flusso d’aria adeguato.
Projektoren kan kun rengjøres utvendig av brukeren. Bruk en lett fuktet klut. Ikke
søl væske inn i projektoren. Støvsug alle ventilasjonsåpninger (A) jevnlig for å sikre
god kjøling.
El objetivo de proyección (B) es sensible a los arañazos. Para limpiar el objetivo
use toallitas especiales disponibles en cualquier tienda de fotos. Coloque la tapa
del objetivo mientras no use el aparato.
L’obiettivo di proiezione (B) può riportare dei graffi. Per pulirlo, utilizzare un
apposito panno pulito, disponibile presso qualsiasi negozio specializzato
in articoli fotografici. Quando non si utilizza il proiettore, mettere sempre in
posizione il copriobiettivo.
USO CONTINUO Y GRAN RENDIMIENTO
Projeksjonslinsen (B) er følsom for oppskraping. Bruk linsepapir som kan kjøpes i
fotoforretninger ved rengjøring av linsen. Sett på linselokket når projektoren ikke er
i bruk.
TUNG OG KONTINUERLIG BRUK
Projektoren innholder bevegelige deler (bl.a. vifter) som har begrenset levetid. Når
projektoren er kjørt i 8000 timer anbefales derfor planmessig preventivt vedlikehold
av kvalifisert personell dersom den benyttes i kritiske applikasjoner. Dette vil bidra
til å sikre lang total levetid.
El proyector contiene piezas móviles (como ventiladores de refrigeración) con unas
limitadas expectativas de vida útil. Cuando el uso del proyector alcance las 8.000
horas, o cuando se utiliza el aparato en aplicaciones críticas, se recomienda que
un técnico cualificado proporcione un mantenimiento preventivo al proyector. Esto
ayudará a garantizar un funcionamiento estable a largo plazo. enga precaución al
quitar dicho módulo.
SERVIZIO GRAVOSO E USO COSTANTE
Il proiettore contiene delle parti mobili (ad esempio le ventole di raffreddamento)
che hanno durata limitata. Dopo 8.000 ore di utilizzo e quando il proiettore viene
adoperato in applicazioni critiche, si suggerisce di sottoporlo a un intervento di
manutenzione preventiva da parte di un tecnico qualificato. In questo modo si
hanno maggiori garanzie di funzionamento stabile nel tempo.
INFORMACIÓN DE SERVICIO TÉCNICO
INFORMAZIONI SULL’ASSISTENZA
SERVICE INFORMASJON
Este producto no contiene ninguna pieza que pueda ser reparada por el usuario.
En caso de que el producto no funcione como es debido, primero asegúrese
de que todas las conexiones están correctas y que el cable de alimentación
está enchufado. Compruebe que el proyector así como las fuentes de vídeo y
ordenador están encendidas. Los cables y cordones pueden dañarse con el
tiempo. Pruebe a cambiar los cables en caso de una conexión mala o intermitente.
Compruebe si el disyuntor o el fusible de la red eléctrica está intacto. En caso
de un producto deficiente, póngase en contacto con su distribuidor. Prepare
una descripción de los síntomas que ha observado. Indique también el número
del producto y el número de serie impresos en la etiqueta de la parte inferior del
proyector.
Questo prodotto non contiene componenti che richiedono assistenza da parte
dell’utente. Se il prodotto non funziona come previsto, controllare prima se
tutti gli attacchi sono stati realizzati correttamente e se il cavo di alimentazione
è collegato bene. Verificare che proiettore e sorgenti video e computer siano
tutti accesi. Nel tempo cavi e cablaggio possono rompersi. Provare a sostituirli
in caso di connessione intermittente o cattiva. Controllare se l’interruttore o il
fusibile di rete sono intatti. In caso di guasto del prodotto, rivolgersi al rivenditore.
Preparare una descrizione dei sintomi del guasto. Indicare anche il numero del
prodotto e il numero di serie stampato sull’etichetta alla base del proiettore.
Produktet inneholder ingen deler som kan repareres av brukeren. Hvis projektoren
ikke fungere som det skal, vennligst sjekk alle tilkoblinger, og at alle ledninger
er uskadet og i orden. Vennligst sjekk også at enheten og alle kilder er skrudd
på. Ledninger kan over tid ryke som følge av slitasje. Bytt eventuelt ledninger
som er ødelagt. Sjekk også om sikringen for strømkursen som projektoren er
tilkoblet er i orden.I ilfelle enheten fortsatt ikke fungerer, vennligst kontakt din
forhandler. Vennligst beskriv feilsymptomene. Vennligst oppgi produktnummer og
serienummer. Se merket på siden av projektoren.
INFORMACIÓN PARA EL PERSONAL DE SERVICIO TÉCNICO
ADVERTENCIA
Durante la reparación, use protección para los ojos y la piel contra la radiación UV
INFORMAZIONI PER IL PERSONALE ADDETTO ALL’ASSISTENZA
AVVERTENZA
Durante gli interventi, proteggere la pelle e gli occhi utilizzando schermi anti-UVA
INFORMASJON TIL SERVICEPERSONALE
ADVARSEL!
Benytt UV beskyttende briller og beskytt huden under service.
DS+305/DS+305 User Manual
020-000057-01 Rev. 1 (06/08)
71
LAMP CHANGE
english
The INDICATOR on the keypad will turn red when lamp life
expires. Change the lamp when lifetime expires. Always
replace lamp with the same type and rating.
Always disconnect the power cord and wait until the
projector has cooled down (60 minutes) before opening the
lamp cover.
WARNING
Be careful not to touch the protective glass when replacing
the lamp house, this may cause the protective glass to
overheat and break while in use.
WARNING
Be extremely careful when removing the lamp module. In the
unlikely event that the bulb ruptures, small glass fragments
may come loose. The lamp module is designed to contain
these fragments, but use caution when removing the lamp
module.
AUSTAUSCHEN DER LAMPE
deutsch
Die ANZEIGE auf dem Tastenfeld schaltet auf Rot, sobald
die Lebensdauer der Lampe abgelaufen ist. Tauschen Sie
die Lampe aus, wenn ihre Lebensdauer abgelaufen ist.
Ersetzen Sie die Lampe immer durch eine vom gleiche Typ
und der gleichen Stärke.
Ziehen Sie immer das Stromkabel aus der Steckdose und
warten Sie, bis der Projektor ausgekühlt ist (60 Minuten),
bevor Sie die Lampenabdeckung öffnen.
WARNUNG
Berühren Sie beim Austauschen des Lampengehäuses
nicht das Schutzglas, da dadurch das Schutzglas
überhitzt werden und während dem Betrieb brechen kann.
B Remove the front cover.
WARNUNG
Gehen Sie beim Austausch des Lampenmoduls mit
äußerster Vorsicht vor. Im unwahrscheinlichen Fall, dass
die Birne zerbricht, können kleine Glassplitter entstehen.
Das Lampenmodul ist so konzipiert, dass es diese Splitter
auffängt. Beim Ausbau des Lampenmoduls ist aber
Vorsicht gefordert.
C Un-screw the three mounting screws.
A Öffnen Sie die Schraube der vorderen Abdeckung.
D Release the handle and pull the lamp out.
B Nehmen Sie die vordere Abdeckung ab.
A Release the front cover screw.
Replace with a new lamp in reverse order.
E Insert a new lamp. Observe the guide pins.
C Drehen Sie die drei Befestigungsschrauben heraus.
D Lösen Sie den Griff und ziehen Sie die Lampe heraus.
F Fix the three mounting screws firmly. Do not use excess
force.
Ersetzen Sie sie durch eine neue Lampe; verfahren Sie
dazu in der umgekehrten Reihenfolge.
G Re-position the handle.
E Setzen Sie eine neue Lampe ein. Beachten Sie die
Führungsstifte.
H Replace the front cover.
I Fix the front cover screw carefully, but do not use excess
force.
F Drehen Sie die drei Befestigungsschrauben hinein. Nicht
zu viel Kraft ansetzen.
francais
CAMBIO DE LÁMPARA
español
L’indicateur sur le clavier passe au rouge quand la durée
de vie de la lampe expire. Changez la lampe quand la
durée de vie expire. Remplacez toujours la lampe par une
autre de même type et de même voltage.
El INDICADOR del teclado cambiará a rojo cuando se
cumpla la vida útil de la lámpara. Cambie la lámpara cuando
termine su vida útil. Sustituya siempre la lámpara por otra de
la misma clase y potencia nominal.
Débranchez toujours le câble d’alimentation et attendez
que le projecteur refroidisse (60 minutes) avant d’ouvrir le
couvercle de la lampe.
Desenchufe siempre el cable de alimentación y espere a
que el proyector se enfríe (60 minutos) antes de abrir la tapa
de la lámpara.
MISE EN GARDE
Faites attention de ne pas toucher le verre protecteur
en remettant la lampe dans son logement, ceci peut
provoquer la surchauffe du verre protecteur et le briser
pendant qu’il est en fonctionnement.
ADVERTENCIA
Procure no tocar el cristal protector cuando sustituya el
módulo de la lámpara ya que puede hacer que el cristal se
recaliente y se rompa durante el uso.
MISE EN GARDE
Faites très attention en enlevant le module de la lampe.
Dans le cas improbable de rupture de l’ampoule, il
peut y avoir des débris de verre. Le module lampe est
conçu pour contenir ces débris, mais faites attention en
l’enlevant.
A Relâchez la vis du couvercle avant.
B Enlever le couvercle avant.
C Dévissez les trois vis de montage.
D Relâchez la poignée et sortir la lampe.
Remplacez la par une nouvelle lampe en répétant les
étapes dans l’ordre inverse.
E Insérez une nouvelle lampe Observez les fiches guide.
F Serrez fermement les trois vis de montage. Ne pas
serrer de façon excessive.
G Remettez la poignée.
G Setzen Sie den Griff wieder ein.
H Remettez le couvercle avant.
H Setzen Sie die vordere Abdeckung wieder auf.
I Vissez soigneusement le couvercle avant, mais ne
serrez pas de façon excessive.
I Drehen Sie vorsichtig die Schraube der vorderen
Abdeckung hinein, aber nicht zu fest.
72
CHANGEMENT DE LAMPE
ADVERTENCIA
Ponga especial cuidado al quitar el módulo de la lámpara.
En el caso poco probable de que la bombilla se rompa,
pueden desprenderse pequeños fragmentos de cristal. El
módulo de la lámpara está diseñado para contener estos
fragmentos pero tenga precaución al quitar dicho módulo.
A Afloje el tornillo de la tapa delantera.
B Quite la tapa delantera.
C Desatornillo los tres tornillos de montaje.
D Quite el mango y saque la lámpara.
Sustituya por una nueva lámpara invirtiendo los pasos
anteriores.
E Coloque una lámpara nueva. Observe los pasadores guía.
F Ajuste firmemente los tres tornillos de montaje. No aplique
una fuerza excesiva.
G Vuelva a colocar el mango.
H Vuelva a colocar la tapa delantera.
I Fije con cuidado el tornillo de la tapa delantera, pero no
use una fuerza excesiva.
DS+305/DS+305 User Manual
020-000057-01 Rev. 1 (06/08)
POWER
POWER
SOSTITUZIONE DELLE LAMPADE
italiano
LAMPEBYTTE
norsk
Quando la durata della lampada termina, l’indicatore sul
tastierino diventa rosso. Sostituire le lampade scadute.
Sostituirle sempre con lampade uguali per tipo e potenza.
Indikatoren ved tastaturet lyser rødt når lampen har nådd
sin nominelle levetid. Bytt lampen når levetiden er ute. Bytt
alltid til samme lampe type og -effekt.
Staccare sempre il cavo di alimentazione e attendere il
raffreddamento del proiettore (60 minuti) prima di aprire il
coperchio della lampada.
Koble fra strømledningen og sørg for at lampen kjøles ned
før den byttes.
AVVERTENZA
Quando si reinstalla l’alloggiamento della lampada, fare
attenzione a non toccare il vetro protettivo per evitare che
quest’ultimo si surriscaldi e si rompa durante l’uso.
AVVERTENZA
Fare molta attenzione quando si rimuove il modulo della
lampada. Nell’improbabile evento che la lampadina si
rompa, fare attenzione ai frammenti di vetro. Il modulo della
lampada è stato disegnato per contenere questi frammenti,
ma fare attenzione quando lo si rimuove.
A
POWER
POWERPOWER
STATUS
ADVARSEL!
STATUS
STATUS
Ikke berør beskyttelsesglasset på den nye lampen, siden
B
POWER
STATUS
dette kan sette flekker som brenner fast og som kan føre til
overoppheting av lampen slik at den ødelegges.
ADVARSEL!
Vær særdeles forsiktog i forbindelse med lampebytte.
I tilfelle lampen ryker, kan små glasspartikler løsne.
Lampeholderen er konstruert for å holde på slike pertikler,
men vær allikevel forsiktig når du fjerner lampen.
A Løsne skruen til lampelokket foran
D
D
E
F
G
H
I
C
POWER
A Rimuovere la vite del coperchio anteriore.
B Åpne lampelokket.
B Rimuovere il coperchio anteriore.
C Løsne de tre låseskruene ved å skru mot urviseren.
C Svitare le tre viti di montaggio.
D Frigjør bøylen og trekk lampen ut.
D Sbloccare la maniglia ed estrarre la lampada.
Bytt lampe i motsatt rekkefølge.
Sostituire con una lampada nuova, procedendo in ordine
inverso.
E Sett inn ny lampe forsiktig. Observer styrepinnene.
E Inserire una lampada nuova. Osservare i perni guida.
STATUS
STATUS
STATUS
POWER
STATUS
F skru de tre låseskruene godt fast med urviseren. Ikke
overdriv!
F Fissare saldamente le tre viti di montaggio. Non stringere
eccessivamente.
G Fell inn bøylen.
G Rimettere in posizione la maniglia.
I
H Sett på lampelokket.
Skru fast lampelokket med urviseren.
H Reinstallare il coperchio anteriore.
I Fissare con cautela la vite del coperchio anteriore, ma
senza utilizzare troppa forza.
POWER
STATUS
DS+305/DS+305 User Manual
020-000057-01 Rev. 1 (06/08)
73
english
TECHNICAL DATA
TECHNISCHE DATEN
deutsch
DONNÉES TECHNIQUES
francais
DATOS TÉCNICOS
español
CONNECTORS / STECKER / CONNECTEURS / CONECTADORES / CONNETTORI / KONTAKTER
S-Video
G/Y
Computer DVI-I
Computer VGA
RS-232
RC
LAN
4 PIN MINI DIN FEMALE
PHONO/RCA
FEMALE
DVI-I
15 HIGH DENSITY
DSUB FEMALE
9 PIN DSUB FEMALE
3,5mm stereo
mini jack
RJ 45
1 GND
STEM GREEN: G/Y
1 TMDS Data 2-
1 Analog R in
1 NC
TIP: 5V DC
1TX+
2 GND
SHIELD: GND
2 TMDS Data 2+
2 Analog G in
2 RXD
RING: SIGNAL
2TX-
3 Luma
3 TMDS Data 2/4 Shield
3 Analog B in
3 TXD
STEM: GND
3RX+
4 Chroma
4 Not used
4 AGND
4 NC
5 Not used
5 AGND
5 GND
TRIGGER
5GND
6 DDC Clock
6 Analog R GND in
6 NC
6RX-
7 DDC Data
7 Analog G GND in
7 NC
3,5mm stereo
mini jack
8 Analog Vertical Sync
8 Analog B GND in
8 NC
9 TMDS Data 1-
9 Reserved
10 TMDS Data 1+
10 Sync GND in
11 TMDS Data 1/3 Shield
11 AGND
C-Video
B/Pb
PHONO/RCA FEMALE
PHONO/RCA FEMALE
STEM YELLOW:
STEM BLUE: B/Pb
12 Not used
12 DDC/SDA
Composite
SHIELD: GND
13 Not used
13 H Sync in
1 TMDS Data 2 +
14 +5V Power
14 V Sync in
2 TMDS Data 2 Shield
15 DDC/SCL
3 TMDS Data 2 -
SHIELD: GND
R/Pr
PHONO/RCA FEMALE
4GND
7GND
8GND
HDMI
HDMI
C1 Analog Red
4 TMDS Data 1 +
C2 Analog Blue
5 TMDS Data 1 Shield
C3 Analog Green
6 TMDS Data 1 -
C4 Analog Horiz. Sync
7 TMDS Data 0 +
C5 Analog GND Return
8 TMDS Data 0 Shield
USB
DIGITAL USB
STEM RED: R/Pr
9 TMDS Data 0 -
1 VCC
SHIELD: GND
10 TMDS Clock +
2 -Data
11 TMDS Clock Shield
3 +Data
12 TMDS Clock -
4 GND
13 CEC
14 Not Used
15 DDC Clock
16 DDC Data
17 Ground
18 +5V Power
19 Hot Plug Connect
20 Shell
74
74
DS+305/DS+305 User Manual
020-000057-01 Rev. 1 (06/08)
DATI TECNICI
TEKNISKE DATA
italiano
norsk
SXGA+
Image width
ft
m
4.50
15.0
6.00
5.50
4.00
20.0
Screen diagonal
m
ft
7.50
25.0
7.00
18.0
6.50
12.5
5.00
16.0
3.50
0.8
2:
1
4.50
1
s
len
gle
an
78
ns
om
1.
-2
3.50
:1
12.0
4.50
15.0
4.00
3.00
le
10.0
3.50
zo
2.00
2.50
1.50
5.00
0:
1.0
ea
wid
ra
3
.2
wi
7.5
5.50
4.00
de
ult
2.50
20.0
14.0
ns
le e
10.0
ng
3.00
6.00
5.0
8.0
2.00
3.00
10.0
2.50
6.0
2.00
1.50
1.00
4.0
2.5
1.50
5.0
1.00
1.00
0.50
0.50
0
0
0
0
1.00
2.00
3.00
4.00
5.00
6.00
7.00
8.00
9.00
10.00 m
0
3.30
6.60
9.90
13.20
16.50
19.80
23.10
26.40
29.70
33 .00 ft
2.0
0.50
0
0
0
Projection distance
DS+305/DS+305 User Manual
020-000057-01 Rev. 1 (06/08)
75
english
TECHNICAL DATA
TECHNISCHE DATEN
deutsch
DONNÉES TECHNIQUES
francais
DATOS TÉCNICOS
español
720 HD
Image width
ft
m
4.50
15.0
6.00
5.50
4.00
20.0
Screen diagonal
m
ft
7.50
25.0
7.00
18.0
6.50
12.5
5.00
16.0
3.50
4.50
0:
1
5.50
0.9
4.00
len
s
10.0
an
0:
1.1
43
ng
le
len
s
ult
7.5
3.50
fd
ea
2.00
om
zo
wi
1.50
5.00
12.0
4.50
15.0
1
de
wi
ra
2.50
20.0
14.0
gle
3.00
6.00
s
len
95
1.
.
-2
:1
4.00
3.00
10.0
3.50
2.50
5.0
8.0
2.00
3.00
10.0
2.50
6.0
2.00
1.50
1.00
4.0
2.5
1.50
5.0
1.00
1.00
0.50
0.50
0
0
0
0
1.00
2.00
3.00
4.00
5.00
6.00
7.00
8.00
9.00
10.00 m
0
3.30
6.60
9.90
13.20
16.50
19.80
23.10
26.40
29.70
33 .00 ft
2.0
0.50
0
0
0
Projection distance
76
DS+305/DS+305 User Manual
020-000057-01 Rev. 1 (06/08)
DATI TECNICI
DS+305/DS+305 User Manual
020-000057-01 Rev. 1 (06/08)
italiano
TEKNISKE DATA
norsk
77
DECLARATIONS
english
ERKLÄRUNGEN
deutsch
DÉCLARATIONS
francais
FCC
FCC
FCC
FCC regulations provide that changes or modifications not expressly approved by the party
responsible manufacturer could void your authority to operate the equipment.
Die FCC-Bestimmungen besagen, dass nicht ausdrücklich vom Hersteller genehmigte
Änderungen oder Modifizierungen die Betriebsgenehmigung für das Gerät ungültig machen
können.
Les réglementations FCC prévoient que les changements ou les modifications non homologuées
par le fabricant peuvent annuler votre garantie sur l’appareil.
This device complies with part 15 of the FCC Rules. Operation is subject to the following two
conditions:
(1) This device may not cause harmful interference, and
(2) this device must accept any interference received, including interference that may cause
undesired operation.
Note: This equipment has been tested and found to comply with the limits for a Class B digital
device, pursuant to part 15 of the FCC Rules. These limits are designed to provide reasonable
protection against harmful interference in a residential installation. This equipment generates,
uses and can radiate radio frequency energy and, if not installed and used in accordance with
the instructions, may cause harmful interference to radio communications. However, there is no
guarantee that interference will not occur in a particular installation. If this equipment does cause
harmful interference to radio or television reception, which can be determined by turning the
equipment off and on, the user is encouraged to try to correct the interference by one or more of
the following measures:
Reorient or relocate the receiving antenna.
Increase the separation between the equipment and receiver.
Connect the equipment into an outlet on a circuit different from that to which the receiver is
connected.
Dieses Gerät erfüllt die Auflagen aus Teil 15 der FCC-Bestimmungen. Der Betrieb ist an folgende
zwei Bedingungen gebunden:
(1) Das Gerät darf keine schädlichen Interferenzen erzeugen und
(2) das Gerät muss alle eingehenden Interferenzen annehmen, inklusive Interferenzen, die zu
einem unerwünschten Betrieb führen.
Hinweis: Dieses Gerät wurde getestet und es konnte nachgewiesen werden, dass es den
Einschränkungen eines digitalen Geräts der Klasse B gemäß Teil 15 der FCC-Bestimmungen
genügt. Diese Grenzwerte wurden ermittelt, um einen angemessenen Schutz gegen schädliche
Interferenzen bei Installation in einem Wohnhaus zu bieten. Dieses Gerät erzeugt, verwendet und
kann Radifrequenz-Energie ausstrahlen, und, wenn es nicht gemäß den Anleitungen installiert
und betrieben wird, kann es für die Radiokommunikationen beeinträchtigende Interferenzen
verursachen. Es besteht aber keine Garantie, dass bei einer bestimmten Installation keine
Interferenzen auftreten. Verursacht dieses Gerät schädliche Interferenzen für den Radio- bzw.
Fernsehempfang, was durch Ein- und Ausschalten des Geräts bestätigt werden kann, muss der
Anwender versuchen, die Interferenzen durch eine oder mehrere der nachstehenden Maßnahmen
zu beheben:
Neuausrichtung oder Umstellen der Empfangsantenne.
Vergrößern des Abstands zwischen dem Gerät und dem Empfänger.
Consult the dealer or an experienced radio/TV technician for help.
Anschluss des Geräts an eine Buchse an einem anderen Kreis als den Empfänger.
Changes or modifications made to this device which are not expressly approved by the party
responsible for compliance could void the user’s authority to operate the equipment.
Anfrage beim Händler oder einem erfahrenen Radio-/Fernsehtechniker.
CANADA
Veränderungen oder Modifikationen am Gerät, die nicht ausdrücklich von der für das Gerät
verantwortlichen Partei genehmigt wurden, können die Betriebsgenehmigung für das Gerät
ungültig werden lassen.
This Class B digital apparatus complies with Canadian ICES-003. / Cet appareil numérique de la
classe B est conforme à la norme NMB- 003 du Canada.
Cet appareil est conforme à la section 15 des règlements FCC. Le fonctionnement est soumis aux
deux conditions suivantes :
(1) Cet appareil ne peut pas causer d’interférence novice, et
(2) cet appareil peut accepter n’importe qu’elle interférence reçue, même celles qui pourrait causer
un mauvais fonctionnement.
Remarque : Cet appareil a été testé et déclaré conforme aux limitations des dispositifs numériques
de Classe B, conformément à la section 15 des règlements FCC. Ces limites sont fixées pour
assurer une protection raisonnable contre une interférence novice dans une résidence Cet appareil
produit, utilise, et peut émettre de l’énergie radiofréquence et, s’il n’est pas installé et utilisé
conformément aux instructions, il peut produire une interférence nocive aux radiocommunications.
Néanmoins, il n’est pas garanti qu’une interface ai lieu dans un installation particulière. Si cet
appareil cause une nouvelle interférence à la réception radio ou télévision, qui peut être déterminée
en allumant et en éteignant l’appareil, l’utilisateur peut essayer de corriger l’interférence à l’aide
d’une ou de plusieurs mesures suivantes :
Réorientez ou déplacez l’antenne réceptrice.
Augmentez la distance qui sépare l’appareil et le récepteur.
Connectez l’appareil à un réseau sur un circuit différent de celui où le récepteur est connecté.
Consultez le revendeur ou un technicien radio/TV.
Les changements ou les modifications faites à cet appareil et non homologués par le fabricant peut
annuler la garantie de l’utilisateur pour le fonctionnement de l’appareil.
CANADA
Cet appareil numérique de classe B est conforme à la norme ICES-003 du Canada.
KANADA
Dieses digitale Gerät der Klasse B erfüllt die kanadischen Bestimmungen nach ICES-003. / Cet
appareil numérique de la classe B est conforme à la norme NMB- 003 du Canada.
78
DS+305/DS+305 User Manual
020-000057-01 Rev. 1 (06/08)
DECLARAZIONES
español
DICIARAZIONI
italiano
GODKJENNINGER
norsk
FCC
FCC
FCC
Las normas FCC especifican que los cambios o modificaciones no aprobados expresamente por el
fabricante responsable pueden anular su permiso para utilizar el equipo.
In conformità delle normative FCC, cambiamenti o modifiche non espressamente approvati dal
fabbricante possono annullare il diritto all’utilizzo del dispositivo.
FCC reglene forutsetter, at endringer på utstyret som ikke uttrykkelig er godkjent av den ansvarlige
utstyrsprodusenten, kan gjøre at du ikke kan bruke utstyret.
Este dispositivo cumple con la parte 15 de las normas FCC. El funcionamiento está sujeto a las
dos condiciones siguientes:
Questa apparecchiatura è conforme alla sezione 15 della normativa FCC. Il suo uso è soggetto
alle due condizioni seguenti:
Denne enheten følger FCC reglene del 15. Bruk av utstyret forutsetter at følgende to betingelser er
oppfylt:
(1) Este dispositivo no puede causar interferencias perjudiciales, y
(2) este dispositivo debe aceptar cualquier interferencia recibida, incluidas las interferencias que
puedan causar un funcionamiento no deseado.
(1) Il dispositivo non deve causare interferenze nocive e
(2) il dispositivo è in grado di accettare qualsiasi interferenza, incluso quelle che possono causare
conseguenze non desiderate.
(1) Enheten skal ikke genrere skadelige forstyrrelser, og
(2) enheten må tåle alle forstyrrelser den påføres, inkludert forstyrrelser som kan forårsake uønsket
funksjonalitet.
Nota: Este equipo ha sido probado y cumple con los límites para un dispositivo digital de Clase B
conforme a la Parte 15 de las normas FCC. Estos límites se han establecido para proporcionar una
protección razonable contra interferencias perjudiciales en una instalación residencial. Este equipo
genera, usa y emite radiofrecuencias y, si no se instala y se utiliza siguiendo las instrucciones,
puede causar interferencias perjudiciales en las comunicaciones por radio. Sin embargo, no existen
garantías de que no se vayan a producir interferencias en una instalación determinada. Si este
equipo causa interferencias perjudiciales en la recepción de radio o televisión, lo que se puede
determinar apagando y encendiendo el equipo, se recomienda al usuario que intente corregir la
interferencia mediante una o más de las siguientes medidas:
Nota: questo dispositivo è stato testato e si è rilevato conforme ai limiti di un dispositivo digitale
di classe B, in conformità della sezione 15 delle norme FCC. Tali limiti sono stati stabiliti per
offrire una giusta protezione contro le interferenze nocive in un’installazione residenziale. Questa
apparecchiatura genera, utilizza e può irradiare energia a radio frequenza e se non installata e
utilizzata secondo le istruzioni può provocare interferenze dannose alle comunicazioni radio.
Sussiste, tuttavia, la possibilità che in specifiche installazioni vengano generate dette interferenze.
Se questa apparecchiatura provoca interferenze alla ricezione radio o televisiva, fatto che può
essere stabilito accendendo e spegnendo l’apparecchiatura, si raccomanda di correggere
l’interferenza in uno dei seguenti modi:
Bemerk : Dette utstyret er testet og funnet å holde seg inenfor grenseverdiene for et klasse B digitalt
apparat, i følge del 15 av FCC reglene, Disse reglene er utformet for å sikre en rimelig beskyttelse
mot skadelige forstyrrelser ved hjemmebruk. Dette utstyret genererer, benytter og kan stråle energi i
radiofrekvensområdet og, hvis det ikke er installert eller brukes som foreskrevet i bruksanvisningen,
kan det føre til skadelige forstyrrelser av radiokommunikasjon. Det er allikevel ingen garanti for at
forstyrrelser ikke vil oppstå i en gitt installasjon. Hvis dette utstyret genererer skadelige forstyrrelser
av radio- eller fjernsynsmottak, noe som kan avklares ved å skru utstyret av og på, oppfordres
brukeren til å rette opp forstyrrelsene ved en eller flere av følgende tiltak:
Reorientar o cambiar de lugar la antena receptora.
Riorientare o spostare l’antenna ricevente.
Øk avstanden mellom utstyret og mottakeren.
Aumentar la separación entre el equipo y el receptor.
Aumentare la separazione tra l’apparecchiatura e il ricevitore.
Koble utstyret til en annen kurs enn mottakeren.
Conectar el equipo a una toma de corriente de un circuito diferente al que está conectado el
receptor.
Collegare l’apparecchiatura in una presa che si trova su un circuito diverso da quello in cui è
connesso il ricevitore
Undersøk med forhandleren eller en erfaren radio/TV tekniker for å få hjelp.
Consultar al distribuidor o a un técnico de radio y TV experimentado para obtener ayuda.
Consultare il rivenditore o un tecnico radiotelevisivo esperto.
Endringer på utstyret som ikke uttrykkelig er godkjent av leverandøren som er ansvarlig for at
enheten følger de nevnte reglene kan gjøre at brukeren ikke kan benytte utstyret.
Los cambios o modificaciones realizados en este dispositivo que no hayan sido aprobados
expresamente por el fabricante responsable del cumplimiento pueden anular el permiso del usuario
para utilizar el equipo.
I cambiamenti o le modifiche apportati al dispositivo senza esplicita approvazione dall’ente
responsabile della compatibilità possono annullare il diritto all’utilizzo dell’apparecchiatura.
CANADA
CANADÁ
Este aparato digital de clase B cumple con la norma canadiense ICES-003. This Class B digital
apparatus complies with Canadian ICES-003. / Cet appareil numérique de la classe B est conforme
à la norme NMB- 003 du Canada.
DS+305/DS+305 User Manual
020-000057-01 Rev. 1 (06/08)
Snu eller flytt mottakerantennen.
Dette klasse B digitale apparatet følger reglene Canadian ICES-003.
CANADA
This Class B digital apparatus complies with Canadian ICES-003. / Cet appareil numérique de la
classe B est conforme à la norme NMB- 003 du Canada.
79
C O M P A T I B L E
All brands and trade names are the property of their respective owners. Specifications subject to change without prior notice.
All values are typical and may vary. Please visit our website for latest specifications and product updates.
DS+305/DS+305 User Manual
020-000057-01 Rev. 1 (06/08)
*601-xxxx-xx*
dnx
C O M P A T I B L E
user’s guide
Benutzer Handbuch
guide d’utilisateur
guía del usario
manuale d’uso
bruksanvisning