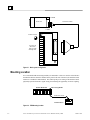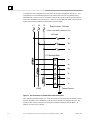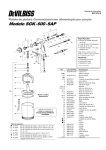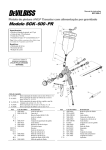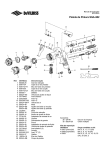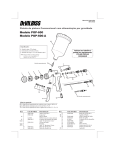
1
GE Intelligent Platforms Programmable Control Products Power Transducer for the Series 90-30 PLC User's Manual GFK-1734A April 2010 GFL-002 Warnings, Cautions, and Notes as Used in this Publication Warning Warning notices are used in this publication to emphasize that hazardous voltages, currents, temperatures, or other conditions that could cause personal injury exist in this equipment or may be associated with its use. In situations where inattention could cause either personal injury or damage to equipment, a Warning notice is used. Caution Caution notices are used where equipment might be damaged if care is not taken. Note: Notes merely call attention to information that is especially significant to understanding and operating the equipment. This document is based on information available at the time of its publication. While efforts have been made to be accurate, the information contained herein does not purport to cover all details or variations in hardware or software, nor to provide for every possible contingency in connection with installation, operation, or maintenance. Features may be described herein which are not present in all hardware and software systems. GE Intelligent Platforms assumes no obligation of notice to holders of this document with respect to changes subsequently made. GE Intelligent Platforms makes no representation or warranty, expressed, implied, or statutory with respect to, and assumes no responsibility for the accuracy, completeness, sufficiency, or usefulness of the information contained herein. No warranties of merchantability or fitness for purpose shall apply. * indicates a trademark of GE Intelligent Platforms, Inc. and/or its affiliates. All other trademarks are the property of their respective owners. ©Copyright 2009 GE Intelligent Platforms, Inc. All Rights Reserved Contact Information If you purchased this product through an Authorized Channel Partner, please contact the seller directly. General Contact Information Online technical support and GlobalCare http://www.ge-ip.com/support 1H2 Additional information http://www.ge-ip.com/ 3H Solution Provider [email protected] 4H Technical Support If you have technical problems that cannot be resolved with the information in this guide, please contact us by telephone or email, or on the web at www.ge-ip.com/support 5H Americas Online Technical Support www.ge-ip.com/support 6H7 Phone 1-800-433-2682 International Americas Direct Dial 1-780-420-2010 (if toll free 800 option is unavailable) Technical Support Email [email protected] 8H9 Customer Care Email Primary language of support [email protected] 10H English Europe, the Middle East, and Africa Online Technical Support www.ge-ip.com/support 12H3 Phone +800-1-433-2682 EMEA Direct Dial +352-26-722-780 (if toll free 800 option is unavailable or if dialing from a mobile telephone) Technical Support Email [email protected] 14H5 Customer Care Email Primary languages of support [email protected] 16H7 English, French, German, Italian, Czech, Spanish Asia Pacific Online Technical Support www.ge-ip.com/support Phone 18H9 +86-400-820-8208 +86-21-3217-4826 (India, Indonesia, and Pakistan) Technical Support Email [email protected] (China) 20H1 [email protected] (Japan) 2H3 [email protected] (remaining Asia customers) 24H5 Customer Care Email [email protected] 26H7 [email protected] (China) 28H Preface Content of This Manual This manual describes the Series 90-30 Power Transducer (PTM) - an intelligent system for measuring electrical power consumption or for monitoring voltages between an electrical generator and associated power grid. Chapter 1. PTM Description and Specifications: This chapter presents physical details such as dimensions and indicator light information as well as a specifications table. Chapter 2. Configuration and Data Transfer: Discusses configuration, operation modes, and automatic data transfers via %I, %Q, %AI, %AQ memory. Chapter 3. Installation: Contains mounting and wiring instructions and diagrams. Appendix A. Ladder Logic Example: Example of ladder logic used to send parameter data to the PTM. Appendix B. IC693PTM340/341 Interface Cables: Data sheet for interface cables. Appendix C. Glossary of Terms and Acronyms: Definitions of terms and acronyms found in this manual. Related Publications GFK-0356P (or later version) GFK-0467 GFK-1734A Series 90-30 PLC Installation and Hardware Manual Series 90-30/20/Micro PLC CPU Instruction Set Reference Manual v Preface vi Power Transducer for the Series 90-30 PLC User's Manual–January 2000 GFK-1734A Contents Chapter 1 PTM Description and Specifications .................................................................1-1 Product Overview....................................................................................................... 1-1 Features and Applications .......................................................................................... 1-1 PTM Product Ordering Information........................................................................... 1-2 Difference Between IC693PTM100 and IC693PTM101........................................... 1-2 Operating Modes ........................................................................................................ 1-2 Power Monitor Mode ......................................................................................... 1-2 Synchro Monitor Mode ...................................................................................... 1-3 Processing Module ..................................................................................................... 1-3 Interface Board ........................................................................................................... 1-3 Data Reported to the PLC for Power & General Monitoring Purposes ..................... 1-3 Common Functions (All configurations) ........................................................... 1-3 Power Synchronization Functions...................................................................... 1-4 Power Monitoring Functions.............................................................................. 1-4 Series 90-30 PLC Compatibility ................................................................................ 1-4 Specifications ............................................................................................................. 1-5 Processing Module Power Requirements........................................................... 1-5 Measurement Specifications .............................................................................. 1-5 MONITOR Mode............................................................................................... 1-5 SYNCHRO Mode: ............................................................................................. 1-5 Table 1-2, Continued.......................................................................................... 1-6 Measurement Accuracy...................................................................................... 1-6 Interface Board Input Terminal Ratings............................................................. 1-6 PTM Measurement Ranges ................................................................................ 1-6 Measurement Data Scaling................................................................................. 1-6 Automatic Data Exchange PLC Memory Requirement ..................................... 1-6 Data Exchange Time Between PLC & PTM...................................................... 1-6 Table 1-2, Continued.......................................................................................... 1-7 Operating Environment ...................................................................................... 1-7 Agency Approvals and Listings ......................................................................... 1-7 Power Measurement Configurations .................................................................. 1-7 Protection Feature .............................................................................................. 1-7 Figures and Dimensions ............................................................................................. 1-8 Processing Module .................................................................................................... 1-8 Interface Board.......................................................................................................... 1-8 IC693CBL340/341 Cables ........................................................................................ 1-9 Processing Module’s LED Indicators......................................................................... 1-9 User-Supplied Equipment Requirements ................................................................. 1-10 Chapter 2 Configuration and Data Transfer ......................................................................2-1 Overview........................................................................................................................... 2-1 Configuration .................................................................................................................... 2-1 Power Monitor Mode ........................................................................................................ 2-2 Synchro Monitor Mode..................................................................................................... 2-2 Parameter Data.................................................................................................................. 2-2 PLC - PTM Communication Protocol .............................................................................. 2-2 Data required from PLC.....................................................................................2-3 GFK-1734A vii Contents %Q Bits............................................................................................................................. 2-3 %AQ Parameter Transfer Words ...................................................................................... 2-5 Data Reported to the PLC for Power Monitoring Purposes ...........................2-7 %AI Words in 3-Phase Power Monitor Mode .................................................................. 2-8 %AI Words in 3-Wire Single-Phase Power Monitor Mode.............................................. 2-9 Data reported to the PLC for Synchronization Monitoring ............................................ 2-10 %AI Words in Synchro Monitor Mode........................................................................... 2-11 Interpretation of Reported Results .................................................................................. 2-12 Relative Reporting Mode ......................................................................................... 2-12 Absolute Reporting Mode ........................................................................................ 2-13 Phase n# Power ........................................................................................................ 2-13 Active and Reactive Total Energy (%AI Words 21 - 24)......................................... 2-13 Handling %AI Word Rollover ......................................................................... 2-14 Maintaining Your Data .................................................................................... 2-14 Sliding Average (3-Phase) 15-Minute Power Demand (%AI Words 19 and 20)..... 2-15 Total Power Factor (%AI Word 17) ......................................................................... 2-15 Parameters Common to Both Reporting Modes ............................................................. 2-16 %I Status flags returned by the PTM .............................................................................. 2-17 Chapter 3 Installation ...........................................................................................................3-1 General Wiring Notes ....................................................................................................... 3-1 Mounting Location............................................................................................................ 3-2 Safety Cautions ................................................................................................................. 3-3 Interface Board Frame Ground Connection ............................................................... 3-3 General Safety Warnings............................................................................................ 3-3 Wiring Diagrams .................................................................................................3-4 Appendix A Ladder Logic Example....................................................................................... A-1 Appendix B IC693PTM340/341 PTM Interface Cables....................................................... B-1 Appendix C Glossary of Terms and Acronyms..................................................................... C-1 viii Power Transducer for the Series 90-30 PLC User's Manual–January 2000 GFK-1734A Contents Figure 1-1. Series 90-30 PTM Processing Module........................................................................................ 1-8 Figure 1-2. PTM Interface Circuit Board ...................................................................................................... 1-8 Figure 1-3. IC693CBL340/341 PTM Cables................................................................................................ 1-9 Figure 3-1. Basic system configuration ........................................................................................................ 3-2 Figure 3-2. PTM Mounting Location ........................................................................................................... 3-2 Figure 3-3. Connections for 120/240 VAC system with CTs...................................................................... 3-4 Figure 3-4. User Connection Diagram, WYE 3-Phase 4-Wire system......................................................... 3-5 Figure 3-5. User Connections for 120/208 3-Phase 3-Wire Delta system.................................................... 3-6 Figure 3-6. Connection to 3-Phase 4-Wire system with 3 PTs..................................................................... 3-7 Figure 3-7. Configuration for 3-Phase 3-Wire Delta system with 2 PTs...................................................... 3-8 Figure 3-8. Wye Synchro/Power Monitor connection.................................................................................. 3-9 Figure 3-9. Delta Synchro/Power Monitor connection............................................................................... 3-10 Figure B-1. Figure IC693CBL340/341 PTM Interface Cables .................................................................. B-1 Figure B-2. PTM Component Mounting and Cable Connection................................................................. B-2 GFK-1734A Contentsi ix Contents Table 1-1. PTM Catalog Numbers................................................................................................................ 1-2 Table 1-2. Specifications .............................................................................................................................. 1-5 Table 1-3. Faults Relating to Processing Module’s Fault LED .................................................................... 1-9 Table 2-1. %Q Command Status Bits sent to PTM ...................................................................................... 2-3 Table 2-2. Missing Voltages/ Currents Reconstruction Dependencies ........................................................ 2-4 Table 2-3. %AQ Parameter Number/Value sent to PTM ............................................................................. 2-5 Table 2-4. Parameter Numbers (Sent to PTM via Second %AQ Word) ...................................................... 2-6 Table 2-5. %AI Word Feedback Data from the PTM in 3-Phase Power Monitor Mode ............................. 2-8 Table 2-6. %AI Feedback Data from the PTM in Single-Phase Power Monitor Mode ............................... 2-9 Table 2-7. %AI Feedback Data from the PTM in Synchro Monitor Mode ................................................ 2-11 Table 2-8. Relative Reporting Mode Reference Values ............................................................................. 2-12 Table 2-9. Absolute Reporting Units.......................................................................................................... 2-13 Table 2-10. Theoretical Worst Case Rollover Times ................................................................................. 2-14 Table 2-11. Parameters Common to Relative and Absolute Modes........................................................... 2-16 Table 2-12. %I Status Bits from the PTM .................................................................................................. 2-17 x Power Transducer for the Series 90-30 PLC User's Manual–January 2000 GFK-1734A Chapter PTM Description and Specifications 1 Product Overview The Series 90-30 Power Transducer (PTM) is an intelligent system for measuring electrical power consumption or for monitoring voltages between an electrical generator and the electrical power grid. The PTM module is not intended to provide a protective relay function or be used for energy billing purposes. The PTM connects to user-supplied current and potential transformers, which furnish the input signals the PTM uses to calculate its data. The Processing module, which mounts in a Series 90-30 PLC, transfers the data it gathers to the PLC where it can be used for a wide variety of purposes. The PTM can be used with a wye or delta type three-phase power system or with a single-phase power system. The PTM consists of three parts, which are all included under one catalog number: • Processing Module – a module that mounts in a Series 90-30 Rack. • Interface Board – a panel-mounted circuit board. This board interfaces between the Processing module and the input transformers (current and potential). • Interface cable – connects the Processing module to the Interface board. Processing Module Interface Board Features and Applications • Uses standard, user-supplied current and potential transformers as its input devices • Accurately measures RMS voltage and current, power, power factor, frequency, energy, and total 3-phase 15-minute power demand • GFK-1734A Interface Cable Data reporting applications Series 90-30 is a trademark of GE Intelligent Platforms North America 1-1 1 • Fault monitoring applications • Generator control features for generator to power grid synchronizing applications • Demand penalty cost reduction/load shedding applications • The Processing module mounts in a standard Series 90-30 baseplate slot. The matching Interface board is DIN-rail mounted. It is compatible with standard GE PLC programming software. • The generic design of the PTM has one 3-phase voltage input, one 1-phase voltage input, one 3-phase current input and one single phase neutral-current input. The module digitizes these inputs and analyzes them to calculate all of the generator synchronization and power monitoring data. PTM Product Ordering Information The Processing module and its Interface board are considered to be a matched set and, therefore, are not sold separately. The two PTM cables, however, may be ordered as separate items. There are four catalog numbers in the PTM product line: Table 1-1. PTM Catalog Numbers IC693PTM100 Contains the Processing module, its matched Interface board, and the 19” (0.5 meter) interface cable IC693PTM101 Contains the Processing module, its matched Interface board, and the 39” (1 meter) interface cable. IC693CBL340 19” (0.5-meter) interface cable. IC693CBL341 39” (1-meter) interface cable Difference Between IC693PTM100 and IC693PTM101 The only difference between the IC693PTM100 and IC693PTM101 is in the length of interface cable supplied with each system. The PTM100 comes with a 19” (0.5 meter) cable, and the PTM101 comes with a 39” (1 meter) cable. Operating Modes The PTM operates in one of the two following modes, which are selectable by a %Q bit in the user’s PLC application program: Power Monitor Mode In this mode, the PTM samples AC voltage and current and calculates the RMS values of these waveforms. There are several sub-modes that are selected via %Q bits in the PLC ladder logic program. These are: 1. 1-2 Single Mode. This sub-mode has two options: Power Transducer for the Series 90-30 PLC User's Manual – January 2000 GFK-1734A 1 2. • Three single phases • One 3-wire single phase (120/240) 3-Phase Mode. In this sub-mode, complex power, complex energy consumption, and power factor are calculated. This sub-mode has two options: • Wye • Delta. Synchro Monitor Mode In this mode, the PTM samples three AC voltages (produced by a generator) and one voltage from the power grid. The module then provides information on the voltages, frequencies and relative phase. Processing Module The PLC CPU controls the PTM Processing module by sending it several %Q bits and %AQ words during each PLC sweep. These %Q bits and %AQ words represent commands such as Enabled/Disabled, Power/Synchro Mode, Display Mode, and Gain values. In return, the Processing module provides information to the PLC CPU by sending it several %I bits and %AI words each PLC sweep. The information sent by the Processing module includes voltage, current, power, and phase values, as well as discrete fault status. Interface Board The PTM Interface board has one 3-phase voltage and one 3-phase current input, one 1-phase neutral current input and one additional 1-phase voltage input. The Interface Board has 8 separate input terminals for these voltage and current inputs. Its terminal block accepts the 10AWG size wire commonly used in power utility applications. The Interface board uses a DB-25 connector and is connected to the Processing module via one of the IC693CBL340/341 shielded cables. The Interface board translates the 0 to 5 A current transformer (CT) signals and the 120V potential transformer (PT) signals to 0 to 1 VAC signals for use by the Processing module. The Interface board is not equipped with CT shorting-bars. These must be provided separately by the user. Data Reported to the PLC for Power & General Monitoring Purposes Common Functions (All configurations) • Module Status Word • Fault Condition Reporting Power Synchronization Functions • GFK-1734A Data calculation rate: 20ms @ 50hz, 16.67 ms @ 60Hz. Chapter 1 PTM Description and Specifications 1-3 1 • Data latency of less than 5ms plus ½ of line frequency period • RMS voltage of phase A grid (in volts x 10) • RMS voltage of phase A, B, and C generator (in volts x 10) • Phase angle between phase A grid and phase A generator (in degrees x 10) • Frequency of phase A grid and phase A generator (in Hz x 100) Power Monitoring Functions • Data calculation rate for monitoring functions: 20ms @ 50hz, 16.67 ms @ 60Hz • RMS voltages of phase A, B, and C (in volts x 10) • DC component of measured RMS voltages (in volts x 10) • RMS currents of phase A, B, C, and Neutral (in Amperes x 1000) • Real and reactive power reported per phase and total in Watts, Volt-Amperes-Reactive • Real and reactive total energy consumption in Watt-Seconds and Volt-Amperes-ReactiveSeconds (updated once per second), re-settable by the user • Total power factor • Average real and reactive power consumption (sliding 15 minute window updated once per second) • Line frequency (in Hz x 100) Series 90-30 PLC Compatibility The PTM is compatible with all Series 90-30 CPUs. The Processing module may be installed in any type of Series 90-30 baseplate (CPU, Expansion, or Remote). There are no restrictions as to the maximum number of Processing modules per PLC system, or per PLC baseplate, as long as the PLC power supply has sufficient capacity and there is sufficient %I, %Q, %AI, and %AQ memory available. However, as noted in Chapter 3, “Installation,” it is beneficial to keep the Interface module power wiring physically separated from PLC signal wiring in order to reduce noise coupling; this can have a bearing on which baseplate slots to choose when mounting Processing modules. Warning DO NOT TOUCH the connectors or wiring after powering up the PTM system. Hazardous voltages exist, and death or injury may result. The PTM Interface board frame ground connection must always be installed and must be installed before any other wiring is attached. To reduce risk of electric shock, always open or disconnect all circuits connected to the PTM Interface board from the power distribution system before installing or servicing current-sensing transformers used with the the Interface board. 1-4 Power Transducer for the Series 90-30 PLC User's Manual – January 2000 GFK-1734A 1 Specifications Table 1-2. Specifications Processing Module Power Requirements Backplane Power Consumption 5V @ 400mA max. (from 90-30 backplane) Total Power Dissipation: 4W max. Isolation from Backplane 1500V Measurement Specifications MONITOR Mode 1 x 3-phase voltage (PT): Impedance: >200k ohms Range: 10 -- 150 VAC RMS (120VAC nominal) Frequency: 35-70 Hz 1 x 3-phase current (CT) and neutral current Impedance: <50mΩ Range: 0 – 7.5A RMS (5A nominal) Frequency: 35-70 Hz SYNCHRO Mode: 1 x 3-phase voltage + 1 x 1-phase voltage (generator + grid) Impedance: >200k ohms Range: 10 -- 150 VAC RMS (120VAC nominal) Frequency: 35-70 Hz 180O Phase: +/1 x 3-phase current + 1 neutral current GFK-1734A Impedance: <50mΩ Range: 0 – 7.5A RMS (5A nominal) Frequency: 35-70 Hz Chapter 1 PTM Description and Specifications 1-5 1 Table 1-2, Continued Measurement Accuracy Voltage 0.2% Current 0.2% kW, kVAR, kVA 0.4% kWH, kVARH, kVAH 0.4% Power factor 1% Frequency 0.05 Hz Phase 1.0O Resolution 14-bit A/D converter Interface Board Input Terminal Ratings Current 15 Amps maximum Voltage 150 volts maximum. PTM Measurement Ranges Voltage inputs 10 to 150Vrms (120Vrms nominal) Current inputs 0 to 7.5 Amps. rms (5A rms nominal) Frequency 35Hz to 70Hz Measurement Data Scaling All data is scaled to range from 0 to 32,767 (left justified) or in engineering units (user selected). Automatic Data Exchange PLC Memory Requirement %I 16 bits %Q 16 bits %AI 25 words %AQ 2 words Data Exchange Time Between PLC & PTM A complete data exchange between the PTM and PLC occurs during each PLC scan. 1-6 Power Transducer for the Series 90-30 PLC User's Manual – January 2000 GFK-1734A 1 Table 1-2, Continued Operating Environment Enclosure Mounting Required Operating Temperature 0 to 55oC Storage Temperature -40 to 85oC Humidity 5 to 95% non-condensing Vibration 3.5mm, 5-9Hz: 1G @9 to 150Hz Mechanical Shock 15 G’s for 11ms Agency Approvals and Listings • CE Mark • CISPR 11 • UL/CUL • ANSI C37.90A-1989 Power Measurement Configurations • 3-phase WYE • 3-phase delta • 3 independent phases • 120/240 3-wire connection Protection Feature Watchdog circuitry continuously checks that the PTM is following its normal pattern of operation. GFK-1734A Chapter 1 PTM Description and Specifications 1-7 1 Figures and Dimensions Dimensions shown in inches with mm in parentheses. Processing Module (136mm) (35.6mm) (136mm) Figure 1-1. Series 90-30 PTM Processing Module Interface Board 2.250 (57.2mm) (113mm) (77.5mm) Figure 1-2. PTM Interface Circuit Board 1-8 Power Transducer for the Series 90-30 PLC User's Manual – January 2000 GFK-1734A 1 IC693CBL340/341 Cables The PTM cables come in two sizes: • IC693CBL340 is 19 inches (0.5 meter) long • IC693CBL341 is 39 inches (1 meter) long Figure 1-3. IC693CBL340/341 PTM Cables Processing Module’s LED Indicators PTM F R R (Running) – This Green LED indicates: • ON = Backplane power present and module functioning OK. • FLASHING = module failure • OFF = Backplane power missing or module defective F (Fault) – This red LED, when OFF, indicates that there are no interface faults. When ON, either steady or flashing, it indicates that one or more of the three possible faults listed below is present (each of these faults has a corresponding %I bit – see Chapter 2 for details). If this LED flashes or blinks, it may indicate an intermittent fault condition. For example, if an AC input voltage level were varying above and below the limit value, the LED would turn ON and OFF correspondingly. Table 1-3. Faults Relating to Processing Module’s Fault LED GFK-1734A Fault Possible Causes Fault Bit Phase A not present Blown fuse, poor or missing connection (6th %I bit) Over-range condition on one or more inputs Input voltage or current values too high (7th %I bit) Phase polarity fault Most likely due to a wiring change (8th %I bit) Chapter 1 PTM Description and Specifications 1-9 1 User-Supplied Equipment Requirements The user must supply the following components depending upon the application. This equipment includes: 1-10 • Current transformers • Potential transformers • 1 Amp fuses for each of the voltage leads connected to the PTM Interface module. • 1 Amp fuse for the common or return line for the voltage lead on the Interface module. • A CT shorting block for each current transformer (CT) connection used on the PTM Interface module when used with external CTs. • Branch circuit fuses or breakers rated at 15 Amps if the PTM is used to monitor a small load directly with no additional CTs. Power Transducer for the Series 90-30 PLC User's Manual – January 2000 GFK-1734A Chapter Configuration and Data Transfer 2 Overview The PTM Processing module, which mounts in the PLC baseplate, must be configured as a “Foreign” module on the Series 90-30 PLC configuration software screen. The %Q bits and %AQ words are used to transfer required commands and parameter data from the PLC to the PTM that determine such things as operating mode, gain, offsets, etc. This data will usually be sent in the first few rungs of the ladder program since the PTM will not be functional until it receives this data. In return, the PTM writes data to the PLC’s %I and %AI memory that is used in the PLC for calculating and reporting PTM measurements. Configuration These are the three basic steps to configure a PTM Processing module in a Series 90-30 PLC: 1. Determine the PLC baseplate slot that the Processing module will be installed in. The section “Mounting Location” in Chapter 3 offers guidelines that are designed to improve safety and reduce noise coupling. 2. In the PLC configuration software, select the slot determined in Step 1 and configure that slot as a “Foreign” module. 3. On the Foreign module configuration screen, configure the following memory allocations. You will have to configure both the starting memory location (address) as well as the size for each type. Type Size %I 16 bits %Q 16 bits %AI 25 words %AQ 2 words Note that there are no additional parameters to set. Items such as operating modes, gains, and measurement options are selected using %Q and %AQ memory data transfers from the PLC ladder program. GFK-1734A 2-1 2 Power Monitor Mode Measurement Modes: • 3 Single Phase Systems: (1 PT & 1 CT for each phase) • 3 WIRE Single Phase System 120/240 (2 PTs & 2 CTs) • 4 WIRE WYE: • • 3 PTs, 3 CTs plus Neutral CT (optional) • 2 PTs, 2 CTs (for balanced loads) 3 WIRE DELTA: 2 PTs, 2 CTs Synchro Monitor Mode Measurement Mode (one basic mode only): • Three generator PTs (two optional) and one grid voltage PT Parameter Data The Gain and Offset parameters for the PTM Processing module are specified on the Processing module label, located on the side of the module. In addition, there are eight channel gains specified for the PTM Interface module. The user programs these ten values in the appropriate PLC memory locations so it can in turn send them to the PTM. An example program showing how to do this is contained in Appendix A. The constants are typed into specific %R registers and the PLC program sends them sequentially to the PTM via the two %AQ registers configured for the PTM. PLC - PTM Communication Protocol Data is exchanged between the PLC and the PTM modules with every PLC scan and they are organized in 16 %I bits, 25 %AI registers, 16 %Q bits, and 2 %AQ registers. 2-2 Power Transducer for the Series 90-30 PLC User's Manual – January 2000 GFK-1734A 2 Data required from PLC %Q Bits The configuration data received from the PLC unit consists of 16 %Q bits and 2 %AQ words. The following table shows the structure of the %Q bits. To determine exact memory locations for these bits, determine the starting address for the PTM’s %Q memory (this is assigned when the PTM is configured, as described in “Configuration” earlier in this chapter), then match the bit to the applicable memory location. For example, if the starting %Q address was configured to be %Q0016, then the 1st bit in the table below would be %Q0016, the 2nd bit would be %Q0017, the 3rd bit would be %Q0018, etc. Table 2-1. %Q Command Status Bits sent to PTM %Q Discrete Data Sent from Processing Module to the PLC Bit Description 1st PTM Operation: 0 = Disabled, 1 = Enabled 2nd PTM Mode: 0 = Power Monitor, 1 = Synchro Monitor 3rd Power Monitor Mode: 0 = Single Mode, 1 = 3-Phase Mode 4th Single Mode: 0 = 3 single phases , 1 = 3-wire single phase (120/240) 3-Phase Mode: 0 = WYE, 1 = DELTA GFK-1734A 5th Display Mode: 0 = Relative, 1 = Absolute 6th Spare 7th Spare 8th Spare 9th PTGA (Grid Phase A) : 0 = not used, 1 = used 10th CTN (Neutral) : 0 = not used, 1 = used 11th PTA : 0 = not used, 1 = used 12th CTA : 0 = not used, 1 = used 13th PTB : 0 = not used, 1 = used 14th CTB : 0 = not used, 1 = used 15th PTC : 0 = not used, 1 = used 16th CTC : 0 = not used, 1 = used Chapter 2 Configuration and Data Transfer 2-3 2 Bit1: PTM Operation: When enabled, the PTM unit performs its measurements. It should be disabled just after powering on the PLC until the PTM unit is fully configured or briefly when the unit is reconfigured. Clearing this bit will reset the accumulated real and reactive powers. When enabled, the PTM begins operation if the A-phase voltage is present (VA for Power Monitoring, or VGA for Synchro Mode). Bit2: PTM Mode: This bit determines the PTM operational mode. If this flag bit is cleared, the PTM runs in Power Monitor Mode. In Power Monitor Mode, the PTGA should not be used and the PTA, PTB and PTC measure the Phase Voltages of the Grid. If the PTM Mode flag bit is set to 1, the PTM runs in Synchro Monitor Mode. In Synchro Monitor Mode the PTGA must measure the Phase A Voltage of the Grid and the PTA, PTB and PTC measure the Generator Phase Voltages. PTB and PTC are optional in this mode (with the appropriate %Q bits reset). Bit3: Power Monitor Mode: Determines relation among the phases. If cleared, the phases are considered to be independent (i.e. single), otherwise they are considered to belong to one 3-phase system. Bit4: Single / 3-phase Mode: If Power Monitor Mode is set as Single Mode and this flag bit is cleared, the monitored system is considered as 3 single phase system. If the flag bit is set, the monitored system is considered as one 3-WIRE single-phase (120/240) system. If Power Monitor Mode is set as 3-phase, this flag bit indicates WYE or DELTA connection of the phases. Bit5: Display Mode: If Display Mode flag bit is cleared, the reported values of the measured variables (Voltage, Current, and Power) should be interpreted as the fractional, relative values. If this flag bit is set to 1, the reported values represent the actual values in Volts, Amperes, Watts, etc. Bits9-16: PTn / CTn: If the flag bit is set it indicates that the voltage/current is measured and the PTM unit can use it. If cleared, the variable is not measured and the PTM unit will try to reconstruct this missing variable via sampling from the other measured variables. The following explains which variable in which system configuration can be reconstructed: Table 2-2. Missing Voltages/ Currents Reconstruction Dependencies 2-4 Variable Configuration Neutral Current 3-phase WYE if all phase currents are measured Neutral Current 3-WIRE single phase system if both section currents are measured Phase Current/Voltage 3-phase balanced WYE system if other two phase variables are measured Phase Current/Voltage 3-phase balanced/unbalanced DELTA system if other two phase variables are measured Power Transducer for the Series 90-30 PLC User's Manual – January 2000 GFK-1734A 2 %AQ Parameter Transfer Words The two %AQ words are intended for parameter transfer from the PLC to the PTM. The Parameter Number word identifies which Parameter number, listed in the Parameters table below, is to be sent to the PTM. The following table shows the structure of the %AQ words. To determine exact memory locations for these words, determine the starting address for the PTM’s %AQ memory (this is assigned when the PTM is configured, as described in “Configuration” earlier in this chapter), then match the word to the applicable memory location. For example, if the starting %AQ address was configured to be %AQ0016, then the 1st word in the table below would be %AQ0016, and the 2nd word would be %AQ0017. Table 2-3. %AQ Parameter Number/Value sent to PTM %AQ Word Data Sent From Processing Module to PLC %AQ Word Description 1st Parameter Number 2nd Parameter Value The parameter values and their parameter numbers are detailed in Table 2-4. . The Parameters 1 to 10 must be sent to the PTM after the PLC powers up in order to establish essential PTM operating values. Since only one parameter can be sent per PLC scan, the entire set of 11 parameters requires 11 scans. GFK-1734A Chapter 2 Configuration and Data Transfer 2-5 2 Table 2-4. Parameter Numbers (Sent to PTM via Second %AQ Word) Parameters Parameter Number Description 1 PTM Offset 2 PTM ain 3 Channel 1 Gain, VGA 4 Channel 2 Gain, IN 5 Channel 3 Gain, VA 6 Channel 4 Gain, IA 7 Channel 5 Gain, VB 8 Channel 6 Gain, IB 9 Channel 7 Gain, VC 10 Channel 8 Gain, IC 11 Zero / Diagnostic Address G Word1: PTM Offset: The value found on the PTM label. Should not be modified. Word2: PTM Gain: The value found on the PTM label. Should not be modified. Words 3-10: Channel #n Gain: The value found on the label of the PTM Interface Module. If necessary, it can be modified. Valid range is between –32768 and +32767. A value of – 32768 (0x8000) corresponds to the gain of –2, a value of –16384 (0xC000) corresponds to the gain of –1. A value of 0 corresponds to the gain of 0, a value of +16384 (0x4000) corresponds to the gain of +1 and a value of +32767 (0x7FFF) corresponds to the gain of +2. The default value is close to +16384 (0x4000), i.e. the default gain is close to +1. Note that these gains affect the input signals and cannot be used as scale factors for PTs or CTs. Scale factors for PTs and CTs must be applied in the PLC program. Word 11: Zero / Diagnostic Address: A zero value sent to the PTM unit will return the Firmware Version as a content of the 25th %AI word (see %AI tables later in this chapter). Non-zero values are reserved for manufacturing diagnostic purposes. 2-6 Power Transducer for the Series 90-30 PLC User's Manual – January 2000 GFK-1734A 2 Data Reported to the PLC for Power Monitoring Purposes The units reported depend on the whether the Relative or Absolute Reporting mode is selected. See the section “Interpretation of Reported Results” later in this chapter for details. GFK-1734A • Status Bits • RMS value of Phase or Line-to-Line voltages • DC Component of Phase or Line-to-Line voltages • RMS value of Phase Current • Phase Power • RMS value of Neutral Current • Total 3-phase Power Factor • Line Frequency • Total 3-phase 15-minute Power Demand • Total energy Chapter 2 Configuration and Data Transfer 2-7 2 %AI Words in 3-Phase Power Monitor Mode The data reported to the PLC by the PTM unit running in the 3-Phase (or 3 x single phase) Power Monitor Mode is detailed in the following table. To determine exact memory addresses for these %AI words, first determine the starting address for the PTM’s %AI memory (this is assigned when the PTM is configured, as described in “Configuration” earlier in this chapter), then match the word to the applicable memory location. For example, if the starting %AI address was configured to be %AI0016, then the 1st word in the table below would be %AI0016, the 2nd word would be %AI0017, the 3rd word would be %AI0018, etc. Table 2-5. %AI Word Feedback Data from the PTM in 3-Phase Power Monitor Mode %AI DataSent from Processing Module to PLC in 3-Phase Power Monitor Mode %AI Word 2-8 Description 1st Phase A Voltage - RMS value 2nd Phase A Voltage - DC component 3rd Phase A Current - RMS value 4th Phase A Active Power 5th Phase A Reactive Power 6th Phase B Voltage - RMS value 7th Phase B Voltage - DC component 8th Phase B Current - RMS value 9th Phase B Active Power 10th Phase B Reactive Power 11th Phase C Voltage - RMS value 12th Phase C Voltage - DC component 13th Phase C Current - RMS value 14th Phase C Active Power 15th Phase C Reactive Power 16th Neutral Current - RMS value 17th Total (3-Phase) Power Factor 18th Line Frequency 19th Sliding-average (3-Phase) 15-minute Active Power Demand 20th Sliding-average (3-Phase) 15-minute Reactive Power Demand 21st Total (3-Phase) Active Energy - LSW 22nd Total (3-Phase) Active Energy - MSW 23rd Total (3-Phase) Reactive Energy - LSW 24th Total (3-Phase) Reactive Energy - MSW 25th Firmware Version / Diagnostic Value Power Transducer for the Series 90-30 PLC User's Manual – January 2000 GFK-1734A 2 %AI Words in 3-Wire Single-Phase Power Monitor Mode The data reported to the PLC by the PTM unit running in 3-wire, Single-Phase (120/240) Power Monitor Mode is detailed in the following table. To determine exact memory addresses for these %AI words, first determine the starting address for the PTM’s %AI memory (this is assigned when the PTM is configured, as described in “Configuration” earlier in this chapter), then match the word to the applicable memory location. For example, if the starting %AI address was configured to be %AI0016, then the 1st word in the table below would be %AI0016, the 2nd word would be %AI0017, the 3rd word would be %AI0018, etc. Table 2-6. %AI Feedback Data from the PTM in Single-Phase Power Monitor Mode %AI Word Data Sent from Processing Module to PLC in Single-Phase Power Monitor Mode %AI Word Offset 1st Section A Voltage – RMS value 2nd Section A Voltage – DC component 3rd Section A Current – RMS value 4th Section A Active Power 5th Section A Reactive Power 6th Section B Voltage – RMS value 7th Section B Voltage – DC component 8th Section B Current – RMS value 9th Section B Active Power 10th Section B Reactive Power 11th – 15th GFK-1734A Description Unused 16th Neutral Current – RMS value 17th Total Power Factor 18th Line Frequency 19th Sliding-average 15-minute Active Power Demand 20th Sliding average 15-minute Reactive Power Demand 21st Total (accumulated) Active Energy - Least Significant Word 22nd Total (accumulated) Active Energy - Most Significant Word 23rd Total (accumulated) Reactive Energy - Least Significant Word 24th Total (accumulated) Reactive Energy - Most Significant Word 25th Firmware Version / Diagnostic Value Chapter 2 Configuration and Data Transfer 2-9 2 Data reported to the PLC for Synchronization Monitoring The units reported depend on the whether the Relative or Absolute Reporting mode is selected. See the section “Interpretation of Reported Results” later in this chapter for details. 2-10 • Status Bits • RMS value of Phase A Grid Line Voltage • RMS value of Phase A Generator Voltage • RMS value of Phase B Generator Voltage • RMS value of Phase C Generator Voltage • Phase Shift between Grid Line and Generator Voltages • Generator Frequency • Grid Line Frequency Power Transducer for the Series 90-30 PLC User's Manual – January 2000 GFK-1734A 2 %AI Words in Synchro Monitor Mode The data reported to the PLC by the PTM unit running in Synchro Monitor Mode is detailed in the following table. To determine exact memory address for these %AI words, determine the starting address for the PTM’s %AI memory (this is assigned when the PTM is configured, as described in “Configuration” earlier in this chapter), then match the word to the applicable memory location. For example, if the starting %AI address was configured to be %AI0016, then the 1st word in the table below would be %AI0016, the 2nd word would be %AI0017, the 3rd word would be %AI0018, etc. Table 2-7. %AI Feedback Data from the PTM in Synchro Monitor Mode %AI Word Data Sent from Processing Module to PLC in Single-Phase Power Monitor Mode %AI Word 1st RMS value of Phase A Grid Line Voltage 2nd RMS value of Phase A Generator Voltage 3rd RMS value of Phase B Generator Voltage 4th RMS value of Phase C Generator Voltage 5th Phase Shift between Grid Line and Generator Voltages 6th Generator Frequency 7th Grid Line Frequency 8th – 24th 25th GFK-1734A Description Unused Firmware Version / Diagnostic Value Chapter 2 Configuration and Data Transfer 2-11 2 Interpretation of Reported Results Many reported values can be configured as relative values with respect to reference values, or they can represent those physical variables directly in Volts, Amperes, Watts, etc. If the Display Mode %Q flag bit (fifth bit) is set to logic 0, the results are reported as relative values. If this flag bit is set high, the results are reported as absolute values. Relative Reporting Mode The reported values in this mode must be interpreted as the signed fractional values. The maximum positive value of 32767 (0x7FFF) corresponds to the fractional value of 0.999969482 which can be rounded to +1.0. Similarly, the maximum negative value of -32768 (0x8000) represents a fractional value of -1.0. A value of 16384 (0x4000) represents +0.5, -16384 (0xC000) represents -0.5, etc. The following equation shows the relationships between a 16-bit integer and a fractional value in decimal format. The Integer Value is a reported value by the PTM unit: Fractional Value = Reported Integer Value / 32768 The following table contains the reference values required for the interpretation of reported results. Also see the section “Parameters Common to Both Reporting Modes” later in this chapter. Table 2-8. Relative Reporting Mode Reference Values Relative Reporting Mode Reference (Maximum) Values Peak Values REFERENCE VOLTAGE – VREF 200 V REFERENCE CURRENT – IREF 10 A REFERENCE ACTIVE POWER – PREF 2000 W REFERENCE REACTIVE POWER – QREF 2000 VAR REFERENCE 3-PHASE ACTIVE POWER – PtREF 6000 W REFERENCE 3-PHASE REACTIVE POWER – QtREF 6000 VAR REFERENCE 2-SECTION ACTIVE POWER – PtREF 4000 W REFERENCE 2-SECTION REACTIVE POWER – QtREF 4000 VAR REFERENCE ACTIVE ENERGY – EPtREF PtREF * sec REFERENCE REACTIVE ENERGY – EQtREF QtREF * sec REFERENCE TOTAL POWER FACTOR 1.000 Caution Applying higher voltages than 150 V RMS or higher currents than 7 A RMS to the PTM Interface board could lead to erroneous results accompanied by appropriate fault status bit (Input Signal Range) set to 1 and the red LED flashing or steady on. 2-12 Power Transducer for the Series 90-30 PLC User's Manual – January 2000 GFK-1734A 2 The actual value of Voltage (Current, Power, and Energy) is calculated as: Actual Value = Fractional Value ∗ Reference Value or, in one combined equation: Actual Value = Reported Integer Value / 32768 ∗ Reference Value Absolute Reporting Mode In this mode all the reported Voltages, Currents, Powers, etc. represent actual values of the measured physical variables. Since the units reported are integer values (decimal values are not supported) the Units column in the following table shows what a reported value of one (1) represents. Also see the section “Parameters Common to Both Reporting Modes” later in this chapter. Table 2-9. Absolute Reporting Units Absolute Reporting Mode Units Units VOLTAGE [V] 1 = 0.1 V CURRENT [I] 1 = 0.001 A ACTIVE POWER [P] 1=1W REACTIVE POWER [Q] 1 = 1 VAR ACTIVE ENERGY [EPt] 1 = 1 Wsec REACTIVE ENERGY [EQt] 1 = 1 VARsec TOTAL POWER FACTOR 1 = 0.001 Phase n# Power • The Phase #n Active Power has a positive sign for consumed power and a negative sign for generated power. • The Phase #n Reactive Power has a positive sign for capacitive loads and a negative sign for inductive loads. Active and Reactive Total Energy (%AI Words 21 - 24) Total Active Energy is reported in %AI Words 21/22 and Total Reactive Energy is reported in %AI words 23/24. Each of these double-integer words contains a running total of power consumed in Watt-seconds. The average power measured during the last 1-second time period is added to this total every second. To calculate the value of energy in kWh units, this value must be divided by a constant of 3.6*106 (3,600,000) in the PLC ladder program. These double-integer %AI words can accumulate a maximum value of 2,147,483,647, after which they roll over to zero. The next table GFK-1734A Chapter 2 Configuration and Data Transfer 2-13 2 shows the worst case times (minimum time) for this rollover to occur, based upon a continuous power consumption at the maximum values shown in Table 2-8. Table 2-10. Theoretical Worst Case Rollover Times Theoretical Worst Case Rollover Times Non-Sinusoidal Waveform Sinusoidal Waveform Absolute Reporting Mode 99 hours 198 hours Relative Reporting Mode 18 hours 36 hours Mode In a practical application, the actual rollover times could be considerably longer. We recommend you include a rollover time consideration in your design process to ensure that you don’t lose any data. There are many possible ways to handle the rollover issue. The next paragraph discusses one of these. Handling %AI Word Rollover Divide the value received from the PTM in the %AI double-integer word register by 3.6*106 (3,600,000) to convert the data to kWh, as noted above. At fixed intervals, before the rollover occurs, add this scaled value (the output of the divide instruction) to a separate PLC double-integer register, then immediately reset (set to a value of zero) the PTM’s %AI words 21 – 24. The reset is done by changing the PTM Operation bit (the first %Q bit) from logic 1 to logic 0 for one PLC scan only (you can use a transition coil to accomplish this). Note that this action only resets %AI words 21 – 24. The values in the other %AI words are retained. Since the value obtained from the divide operation is relatively small, data would accumulate in the separate PLC register for a relatively long time before rolling over. Additional ladder logic could be used to capture a total for a specific period of time, such as for a one-month period. Note that for CPUs (models 311-341) that do not support floating-point (real) math instructions, the Divide Instruction does not retain a remainder - it rounds down to the nearest whole number, which means that a fraction of one kWh would be lost from the total. The more frequently the reset is performed, the greater the impact that this cumulative error would have on the total. If greater accuracy with those CPUs is desired, a Modulo divide instruction, which outputs only the remainder of a divide operation, could be used to supplement the Divide instruction. CPUs (models 350-364) that support floating-point math retain the remainder from a division operation, so this would not be an issue if using one of them. Maintaining Your Data Memory in the PTM module is volatile. However, the %AI words used to transfer data from the PTM are battery-backed RAM memory (unless you are using a battery-less scheme). To avoid loss of data, it is important to ensure that the backup battery is in good condition. The life of an installed backup battery is approximately one year (shelf life is five years). Note that if the PLC is powered down, the data stored in the PTM will be reset to zero. When power is restored, you should have a way of dealing with this. For example, you probably wouldn’t want to write the zero value from the PTM into the register that was accumulating the Total Energy value. So you would need some ladder logic to sense this and capture your total in a separate register. For general information on protecting Series 90-30 PLC data, refer to Chapter 6, “Memory Backup and Backup 2-14 Power Transducer for the Series 90-30 PLC User's Manual – January 2000 GFK-1734A 2 Battery” in the Series 90-30 PLC Installation and Hardware Manual, GFK-0356P (or later version). Sliding Average (3-Phase) 15-Minute Power Demand (%AI Words 19 and 20) %AI word 19 is for Active power and %AI word 20 is for Reactive power. These two %AI words maintain a sliding 15-minute average power consumption value. This value is useful for utilizing load shedding to minimize the cost of demand usage charged by your electric utility. This value is maintained even if the PTM’s Operation bit (the first %Q bit) is turned off (Disabled). Total Power Factor (%AI Word 17) Total Power Factor is a fractional value expressed as an integer. A positive power factor represents power consumed and a negative power factor indicates power generated. Values closer to zero represent poorer power factors; values closer to one represent better power factors. A value of one is the ideal power factor. Power factor is often expressed as a percentage, with a power factor of one being equal to 100 percent. The reported value ranges from –1000 to +1000. The actual value range is –1.000 to +1.000. For example, a reported value of +874 would equal an actual power factor of +0.874 (87.4%); a reported value of 1000 would equal an actual power factor of +1.000 (100.0%) GFK-1734A Chapter 2 Configuration and Data Transfer 2-15 2 Parameters Common to Both Reporting Modes In either Relative or Absolute modes the reported values in the table below represent actual values of the measured physical variables. Since the units reported are integer values (decimal values are not supported) the Units column in the following table shows what a reported value of one (1) represents. Table 2-11. Parameters Common to Relative and Absolute Modes Relative and Absolute Reporting Mode Units Units LINE (GENERATOR) FREQUENCY 1 = .01 Hz PHASE SHIFT 1 = 0.1 degree Line (Generator) Frequency is an integer value directly representing the frequency in 0.01 Hz units. If the Generator frequency is below 30 Hz, a zero value is reported. If the Line frequency is below 30 Hz, all the reported values (except the total energy – in Power Monitor Mode) are reported as zeros. For example, a reported value of 5947 would equal an actual frequency of 59.47 Hz. Phase Shift (between Bus Line and Generator Voltage) is an integer value directly representing a phase shift in 0.1-degree units. For example, a reported value of 17 would equal an actual phase shift of 1.7 degrees. 2-16 Power Transducer for the Series 90-30 PLC User's Manual – January 2000 GFK-1734A 2 %I Status flags returned by the PTM The 16 %I Status Bits returned to the PLC contain important flags, detailed in the following table. Table 2-12. %I Status Bits from the PTM %I Status Bits Sent from Processing Module to PLC %I BIT Value 1st PTM Operating Normally 2nd – 5th Spares – not used at this time 6th Input Signal Range: 0 – valid, 1 - not valid* 7th Phase A Voltage: 0 – present, 1 - not present* 8th Phase Polarity: 9th VGA : 0 – valid, 1 – not valid 10th IN : 0 – valid, 1 – not valid 11th VA : 0 – valid, 1 – not valid 12th IA : 0 – valid, 1 – not valid 13th VB : 0 – valid, 1 – not valid 14th IB : 0 – valid, 1 – not valid 15th VC: 0 – valid, 1 – not valid 16th IC : 0 – valid, 1 – not valid 0 – valid, 1 - not valid* * If the 6th, 7th, or 8th bits are logic 1, the Fault LED will turn ON 1st Bit: PTM Operating Normally: This is the “Heart Beat” bit and it is toggled by the PTM unit every scan. This can used by the PLC program to determine if the PTM is operating correctly. 6th Bit: Input Signal Range: If flag bit is set, some input variable (voltage or current) exceeds the Reference Value. This may also occur if the channel gain constants are incorrectly set. 7th Bit: Phase A Voltage: If this flag bit is set, the Phase A Voltage (VA in Power Monitor Mode or VGA in Synchro Monitor Mode) is not applied or is below 30 Hz in frequency. The PTM unit can not execute any calculations under these conditions. All the reported values (except the total energy – in Power Monitor Mode) are reported as zeros. 8th Bit: Phase Polarity: If flag bit is set, the Phase Active Powers in the 3-phase system have mixed signs which is an indication that either one of the voltage or current of one phase is incorrectly connected in reverse. 9th –16th Bits: Vn / In: If one of these status bits is set, the applicable variable is not being measured or cannot be reconstructed. This indicates that the associated value returned by the PTM is invalid and should not be used. For example, when in Delta Mode, the neutral current cannot be reconstructed from the phase currents; thus the 10th Bit would be set to logic one to indicate the value of IN (neutral current) is invalid (in Delta Mode, the neutral current does not exist). GFK-1734A Chapter 2 Configuration and Data Transfer 2-17 Chapter Installation 3 The PTM passes the requirements of CE mark testing when mounted in a metal cabinet. The metal cabinet reduces emissions by both the module and the PLC that interfaces to it. Field wiring to the PTM consists of the connection cable between the PTM Interface board and the PTM Processing module, the leads to user potential and current transformers and frame ground connections from the Interface board to the chassis. No CT shorting bars are provided on the PTM Interface board and must be supplied by the user. The maximum length of the PTM Interface Cable is one meter with shorter lengths recommended. In all installations, the use of potential transformers is recommended and will provide complete isolation for all signals connected to the PTM Interface board. The signals on the PTM Interface board are scaled down to 1VAC for processing by the PTM processor module. General Wiring Notes In the following connection diagrams, the line connections are labeled L1, L2, and L3. When the user wires the Interface board into a system, the decision must be made which line will correspond to which phase. Usually, L1 will correspond to phase A, L2 with phase B, and L3 with phase C. Once the user decides how they will connect the system together, the labels L1, L2 and L3 can be changed to A, B, and C according to how the user wishes. Then the diagrams can be followed and the connections made. Since phase rotation in not important to the PTM, the user is free to select any one of six connection possibilities for the wiring. The Interface board can accommodate wire sizes up to 10AWG. Copper wires and ferrules are recommended for Interface board connections, but aluminum wiring can be used if necessary. To use aluminum wire, the wire must be stripped, burnished, then immediately dipped into a non-acid and non-alkali material, such as neutral Vaseline before connection. Connections should be torqued to 0.5 to 0.6 Nm (7.3 to 8.8 ft-lb). Note that the Interface board’s voltage common terminal is allowed to differ from ground potential up to 90VAC or 130V peak. Warning When the module is used to measure a 3-Phase Delta system or several independent systems, potential transformers must be used for voltage isolation and scaling purposes. When connecting the Interface board directly between a branch circuit and a small load, the over current rating of the branch circuit must be 15 Amps or less. Please refer to the diagrams following. GFK-1734A 3-1 3 PTMPM 90-30 PLC Connection Cable PTMIM Frame Ground Fgnd Vg In+ InTo User PTs with fuses and CTs with shorting bars Va Ia+ IaVb Ib+ IbVc Ic+ IcCOM. Figure 3-1. Basic system configuration Mounting Location It is recommended that Processing module(s) be mounted in a slot at or near the end of the PLC and that the Interface board be mounted to the panel to the side of the PLC (the Interface board mounts on a standard 35 mm DIN-rail). This will keep the power wiring to the Interface board physically separated from PLC signal wiring, thus reducing the opportunity for noise coupling. Series 90-30 PLC Processing Module PTM IC693CBL340/341 PTM Cable Interface Board Figure 3-2. PTM Mounting Location 3-2 Power Transducer for the Series 90-30 PLC User's Manual – January 2000 GFK-1734A 3 Safety Cautions Interface Board Frame Ground Connection The basic system configuration consists of the Series 90-30 PLC, the PTM Processing module, and the PTM Interface board. A special interface cable is used to connect the Processing module to the Interface board. The Interface board must have frame ground connected. The frame ground will ensure that the metal safety cover over the components on the Interface board is safely at ground potential. In the diagrams following, specific wiring configurations are detailed. Make sure that the safety features detailed in the drawings are included in your installation. Failure to do so could result in personal injury or death and equipment damage. General Safety Warnings WARNING: DO NOT TOUCH the connectors or wiring after powering up the PTM system. Hazardous voltages exist, and death or injury may result. FUSES on input and output leads for the Potential Transformers (PTs) are mandatory. CURRENT TRANSFORMER (CT) shorting bars are mandatory. The Interface board frame ground connection must always be installed, and must be installed before any other wiring is attached. GFK-1734A Chapter 3 Installation 3-3 3 Wiring Diagrams Warning Be sure you read and understand all safety-related information in this manual before attempting to wire or use the PTM. L1 N L2 Branch circuit, 15A max. (When used without additional CTs) Va COM Vb 1A Fuses CT Shorting Block CTs Ia+ IaIb+ IbLOAD Frame Ground Figure 3-3. Connections for 120/240 VAC system with CTs The connections given in the figure above detail the installation for a typical North American 120/240 volt AC 3-Wire Single Phase connection. The neutral is connected to a ground point, usually at the main power distribution panel. Extra mandatory equipment includes protection fuses for the voltages and a CT shorting block. These will allow replacement of the PTM Interface board with the system still energized. To replace the Interface board, the fuses are removed and the CTs shorted. Then the connections on the Interface board can be removed safely. The Processing module can be replaced simply by powering off the PLC and replacing the module. This can be done without disturbing the wiring field wiring on the Interface board. Operation of the Interface board at rated currents can be done without CTs but this configuration is not recommended (Currents will necessarily have line potential thus additional safety concerns must be carefully addressed). 3-4 Power Transducer for the Series 90-30 PLC User's Manual – January 2000 GFK-1734A 3 L1 L2 L3 N Branch circuit, 15A max. (When used without additional CTs) Va Vb Vc COM 1A Fuses CTs CT Shorting Block Ia+ IaIb+ IbIc+ IcIn+ In- LOAD Frame Ground Figure 3-4. User Connection Diagram, WYE 3-Phase 4-Wire system The connections detailed in Figure 3-4. show the situation where a 3-Phase 120/208V system is being monitored. Isolation PTs are not required but are recommended as an additional safety measure. The neutral must be connected to a ground point and this is usually at the main power distribution panel. GFK-1734A Chapter 3 Installation 3-5 3 As with the previous configuration, the unit can be wired in this configuration without CTs. This configuration is not recommended again since the current leads will be at line potential raising additional safety concerns. The CT used on the neutral is not necessary and only provides the user with a direct measurement of neutral current. If this CT is not included, the PTM will calculate the neutral current from the addition of all the three line current inputs. L1 L2 L3 Branch circuit, 15A max. (When used without additional CTs) 1A Fuses Va Vb Vc CT Shorting Block Ia+ IaIb+ IbCTs Ic+ Ic- LOAD Frame Ground Figure 3-5. User Connections for 120/208 3-Phase 3-Wire Delta system The connections detailed in Figure 3-5. show how a delta load is connected to the Interface board. Note that the PTM sees the installation as a WYE system (and must be configured as such). The Interface board circuitry itself forms an independent common neutral for all of the phases. In addition, one of the CTs is optional. 3-6 Power Transducer for the Series 90-30 PLC User's Manual – January 2000 GFK-1734A 3 L1 L2 L3 N PTs 1A Fuses Va Vb Vc COM Frame Ground Ia+ IaIb+ IbIc+ IcIn+ CTs InFrame Ground LOAD CT Shorting Block Figure 3-6. Connection to 3-Phase 4-Wire system with 3 PTs In Figure 3-6, the connections for a typical 3-phase, 4-wire system are shown. The PTs are selected to take the nominal line voltage down to the nominal 120VAC that can be processed by the Interface board/PTM processing module system. Note that the additional scaling for each CT and PT must be applied to all the results given by the PTM through the 90-30 PLC. The primaries and secondaries of each potential transformer should be fused for maximum protection. A fuse failure is an indication of wiring problems within the system. GFK-1734A Chapter 3 Installation 3-7 3 L1 L2 L3 PTs 1A Fuses on secondary Va Frame Ground COM Vb Ia+ CTs IaIb+ Ib- LOAD Frame Ground CT Shorting Block Figure 3-7. Configuration for 3-Phase 3-Wire Delta system with 2 PTs The system detailed in Figure 3-7. shows two PTs being used in an open delta configuration connected to the Interface board. Note that in this mode (selected through the 90-30 configuration parameters) the line to line voltage must be scaled down to the level of 120VAC nominal. The third voltage and current are reconstructed from the other two by the Processing module. These must be indicated as not installed by the user. All additional scaling factors must be applied to the values being returned by the PTM by the 90-30 PLC program. For safety considerations, both the primaries and secondaries of the potential transformers must be fused. . A fuse failure is an indication of wiring problems within the system. Note that in this configuration, the phasing of the potential transformers is slightly different. 3-8 Power Transducer for the Series 90-30 PLC User's Manual – January 2000 GFK-1734A 3 Breaker Generator CTs G GRID Connections L1 L2 L3 N Frame Ground Ia+ IaIb+ IbIc+ IcCT Shorting Block PTs Va Vb Vc Vga COM 1A Fuses on secondary Frame Ground Figure 3-8. Wye Synchro/Power Monitor connection In Figure 3-8. above, the PTM is connected between two systems, the Grid and Generator subsystems. The PTM is selected to be in the Synchro Monitor mode when the breaker is open and the two systems are not running in synchronization. When the PLC program determines that the voltages and phases match between Phase A voltage on the grid and Phase A voltage on the generator, then the PLC can safely close the breaker. When the PTM is used only in the Synchronization Monitoring mode, only the two PTs associated with Phase A of the generator and Phase A of the grid are required. Also included in Figure 3-8. are the additional connections to phase B and C generator voltages and all line currents. After the breaker is closed, the PTM mode can be changed to monitor the power produced by the generator. GFK-1734A Chapter 3 Installation 3-9 3 Breaker Generator CTs G GRID Connections L1 L2 L3 Frame Ground Ia+ IaIb+ IbCT Shorting Block Va Vb PTs Vga COM 1A Fuses on secondary Frame Ground Figure 3-9. Delta Synchro/Power Monitor connection In Figure 3-9. another possible generator connection method is pictured. In this arrangement, the system is connected as a Delta system and once the breaker is closed, the system can go into measuring power using the two watt-meter method described earlier. The PTs used must scale the voltages down to the 120VAC nominal voltage required by the PTM. All scale factors present due to the PTs and CTs must be applied to the readings returned to the PLC by the PTM. Fuses on the potential transformer primaries and secondaries are required. A fuse failure is an indication of wiring problems within the system. 3-10 Power Transducer for the Series 90-30 PLC User's Manual – January 2000 GFK-1734A Appendix Ladder Logic Example A Note: This example was created with Logicmater programming software. It contains the logic necessary to transfer Parameter data to the PTM via the two %AQ words. See Chapter 2 for a discussion of these Parameters and %AQ words. (***************************************************************************) (* Program: PTM *) (* *) (* PLC PROGRAM ENVIRONMENT HIGHEST REFERENCE USED *) (* ----------------------------------------------------------- *) (* INPUT (%I): 512 INPUT: NONE *) (* OUTPUT (%Q): 512 OUTPUT: NONE *) (* INTERNAL (%M): 1024 INTERNAL: NONE *) (* GLOBAL DATA (%G): 1280 GLOBAL DATA: NONE *) (* TEMPORARY (%T): 256 TEMPORARY: NONE *) (* REGISTER (%R): 1024 REGISTER: %R0013 *) (* ANALOG INPUT (%AI): 64 ANALOG INPUT: NONE *) (* ANALOG OUTPUT (%AQ): 32 ANALOG OUTPUT: %AQ013 *) (* *) (* PROGRAM SIZE (BYTES): 224 *) (* *) (***************************************************************************) GFK-1734A A-1 A Program: PTM 12-04-98 08:07 C:\PROGRAM\LM90\PTM GE SERIES 90-30/90-20/MICRO (v6.01) Power Transducer Module Page 2 (***************************************************************************) (* *) (* BLOCK: _MAIN *) (* *) (* *) (* BLOCK SIZE (BYTES): 213 *) (* DECLARATIONS (ENTRIES): 70 *) (* *) (* *) (* HIGHEST REFERENCE USED *) (* ----------------------------*) (* *) (* INPUT (%I): NONE *) (* OUTPUT (%Q): NONE *) (* INTERNAL (%M): NONE *) (* GLOBAL DATA (%G): NONE *) (* TEMPORARY (%T): NONE *) (* REGISTER (%R): %R0013 *) (* ANALOG INPUT (%AI): NONE *) (* ANALOG OUTPUT (%AQ): %AQ013 *) (* *) (***************************************************************************) A-2 Power Transducer for the Series 90-30 PLC User's Manual – January 2000 GFK-1734A A Program: PTM 12-04-98 |[ | |[ C:\PROGRAM\LM90\PTM 08:07 START OF LD GE SERIES 90-30/90-20/MICRO (v6.01) Power Transducer Module PROGRAM PTM V A R I A B L E GFK-1734A ] VARIABLE DECLARATIONS REFERENCE --------%I0001 %I0002 %I0003 %I0004 %I0005 %I0006 %I0007 %I0008 %I0009 %I0010 %I0011 %I0012 %I0013 %I0014 %I0015 %Q0001 %Q0002 %Q0003 %Q0004 %Q0005 %Q0006 %Q0007 %Q0008 %Q0009 %Q0010 %Q0011 %Q0012 %Q0013 %Q0014 %Q0015 %Q0016 %R0001 %R0002 %R0003 %R0004 %R0005 %R0006 %R0007 %R0008 %R0009 %R0010 %R0011 %R0012 %AI0001 %AI0002 %AI0003 Block: _MAIN 3 (* *) ] D E C L A R A T I O N NICKNAME -------PTM-TOG PTM-ERR SPARE1 SPARE2 SPARE3 MAX-SMP VA-MISS PWR-INV VAG-INV IN-INV VAB-INV IA-INV VBC-INV IB-INV VCA-INV PTM-ENA PTM-MD MEAS-MD PH-MODE DI-MODE SPARE8 SPARE9 SPARE10 PTAG-EN CTN-EN PTA-EN CTA-EN PTB-EN CTB-EN PTC-EN CTC-EN OFFSPTM OFF-PTM GAINPTM CH1-PTM CH2-PTM CH3-PTM CH4-PTM CH5-PTM CH6-PTM CH7-PTM CH8-PTM DIAGADD VARMS VA-DC IARMS Appendix A Ladder Logic Example Page T A B L E REFERENCE DESCRIPTION -------------------------------PTM Operating Normally Flag PTM Error Flag Spare Spare Spare Samples exceeded MAX value Phase A Voltage missing Phase Powers have different sign Vag: 0-valid,1-invalid In: 0-valid,1-invalid Va/ab: 0-valid,1-invalid Ia: 0-valid,1-invalid Vb/bc: 0-valid,1-invalid Ib: 0-valid,1-invalid Vc/ca: 0-valid,1-invalid PTM Op.: 0-disabled, 1-enabled PTM Mode: 0-Power,1-Synchro Measurement Mode: 0-single,1-3Ph Single:0=3,1=1, 3PH:0=Y,1=Delta Display Mode: 0-Relative, 1=Absolute Spare Spare Spare PT Gen. Phase A: 0=NA, 1=USED CT Neutral: 0=NA, 1=USED PTa/ab: 0=NA, 1=USED CTa: 0=NA, 1=USED PTb/bc: 0=NA, 1=USED CTb: 0=NA, 1=USED PTc/ca: 0=NA, 1=USED CTc: 0=NA, 1=USED PTM parameter table offset PTM OFFSET parameter PTM Module Gain PTM Channel 1 PTMIM gain PTM Channel 2 PTMIM gain PTM Channel 3 PTMIM gain PTM Channel 4 PTMIM gain PTM Channel 5 PTMIM gain PTM Channel 6 PTMIM gain PTM Channel 7 PTMIM gain PTM Channel 8 PTMIM gain Diagnostic Address Phase A Voltage RMS Phase A DC Component Phase A Current RMS A-3 A Program: PTM 12-04-98 08:07 %AI0004 %AI0005 %AI0006 %AI0007 %AI0008 %AI0009 %AI0010 %AI0011 %AI0012 %AI0013 %AI0014 %AI0015 %AI0016 %AI0017 %AI0018 %AI0019 %AI0020 %AI0021 %AI0022 %AI0023 %AI0024 %AQ001 %AQ002 A-4 C:\PROGRAM\LM90\PTM GE SERIES 90-30/90-20/MICRO (v6.01) Power Transducer Module PAWATTS PAVARS VBRMS VB-DC IBRMS PBWATTS PBVARS VCRMS VC-DC ICRMS PCWATTS PCVARS INRMS PF-TOT LFREQ APD-15M RPD-15M LSW-ENA MSW-ENA LSW-ENR MSW-ENR POINTER VALUE Block: _MAIN Page 4 Phase A Active Power Phase A Reactive Power Phase B Voltage RMS Phase B DC Component Phase B Current RMS Phase B Active Power Phase B Reactive Power Phase C Voltage RMS Phase C DC Component Phase C Current RMS Phase C Active Power Phase C Reactive Power Neutral Current RMS Total 3-Phase Power Factor Line Frequency Tot. 3-Ph 15min. Active PwrDmd Tot. 3-Ph 15min. Reactive PwrDmd Tot. 3-Ph Active Energy Tot. 3-Ph Active Energy Tot. 3-Ph Reactive Energy Tot. 3-Ph Reactive Energy Parameter pointer Paramter value Power Transducer for the Series 90-30 PLC User's Manual – January 2000 GFK-1734A A Program: PTM 12-04-98 08:07 C:\PROGRAM\LM90\PTM GE SERIES 90-30/90-20/MICRO (v6.01) Power Transducer Block: _MAIN Page 5 | << RUNG 4 STEP #0001 >> | |FST_SCN |%S0001 +-----+ +--] [---+MOVE_+| | INT | | | | | | | PTM par | | | ameter | | | table o | | | ffset | | | OFFSPTM | CONST -+IN Q+-%R0001 | +00001 | LEN | | |00001| | | | | +-----+ | | #0001 LD %S0001 | #0002 FUNC 37 MOVIN | P1: +00001 | P2: 00001 | P3: %R0001 | | << RUNG 5 STEP #0003 >> | |ALW_ON |%S0007 +-----+ +--] [---+MOVE_+| | INT | | | | |PTM par | | |ameter | | Paramet |table o | | er |ffset | | pointer |OFFSPTM | | POINTER |%R0001 -+IN Q+-%AQ001 | | LEN | | |00001| | | | | +-----+ | | #0003 LD %S0007 | #0004 FUNC 37 MOVIN | P1: %R0001 | P2: 00001 | P3: %AQ001 | REFERENCE %S0007 %S0001 %R0001 %AQ001 GFK-1734A NICKNAME ALW_ON FST_SCN OFFSPTM POINTER REFERENCE DESCRIPTION PTM parameter table offset Parameter pointer Appendix A Ladder Logic Example A-5 A Program: PTM 12-04-98 08:07 C:\PROGRAM\LM90\PTM GE SERIES 90-30/90-20/MICRO (v6.01) Power Transducer Module Block: _MAIN Page 6 | << RUNG 6 STEP #0005 >> | |ALW_ON |%S0007 +-----+ +--] [---+ARRAY+| |MOVE_| | | WORD| |PTM | | |OFFSET | | |paramet | | Paramte |er | | r value |OFF-PTM | | VALUE |%R0002 -+SR DS+-%AQ002 | | LEN | | |00012| |PTM par | | |ameter | | |table o | | |ffset | | |OFFSPTM | | |%R0001 -+SNX | | | | | CONST -+DNX | | 00001 | | | | | | CONST -+N | | 00001 +-----+ | | #0005 LD %S0007 | #0006 FUNC | P1: %R0002 | P2: %R0001 | P3: 00001 | P4: 00001 | P5: 00012 | P6: %AQ002 | REFERENCE %S0007 %R0002 %R0001 %AQ002 A-6 NICKNAME ALW_ON OFF-PTM OFFSPTM VALUE REFERENCE DESCRIPTION PTM OFFSET parameter PTM parameter table offset Paramter value Power Transducer for the Series 90-30 PLC User's Manual – January 2000 GFK-1734A A Program: PTM 12-04-98 08:07 C:\PROGRAM\LM90\PTM GE SERIES 90-30/90-20/MICRO (v6.01) Power Transducer Module Block: _MAIN Page 7 | << RUNG 7 STEP #0007 >> | |ALW_ON |%S0007 +-----+ +-----+ +--] [---+ ADD_+-----------------+ GE_ | | | INT | | INT | | | | | | |PTM par | | PTM par PTM par | | |ameter | | ameter ameter | | |table o | | table o table o | | |ffset | | ffset ffset | | |OFFSPTM | | OFFSPTM OFFSPTM | | +-----+ |%R0001 -+I1 Q+-%R0001 %R0001 -+I1 Q+---------+MOVE_+| | | | | | INT | | | | | | | | | | | | | | | PTM par | | | | | | | ameter | | | | | | | table o | | | | | | | ffset | | | | | | | OFFSPTM | CONST -+I2 | CONST -+I2 | CONST -+IN Q+-%R0001 | +00001 +-----+ +00012 +-----+ +00001 | LEN | | |00001| | | | | +-----+ | | #0007 LD %S0007 | #0008 FUNC 60 ADD | P1: %R0001 | P2: +00001 | P3: %R0001 | #0009 FUNC 55 GE | P1: %R0001 | P2: +00012 | #0010 FUNC 37 MOVIN | P1: +00001 | P2: 00001 | P3: %R0001 | |[ END OF PROGRAM LOGIC ] | | #0011 END OF PROGRAM | GFK-1734A Appendix A Ladder Logic Example A-7 Appendix IC693PTM340/341 PTM Interface Cables B These cables connect the PTM Processing module to the PTM Interface board. The only difference between the two cables is their lengths: • IC693CBL340 is 19 inches (0.5 meter) long • IC693CBL341 is 39 inches (1 meter) long Figure B-1. Figure IC693CBL340/341 PTM Interface Cables GFK-1734A B-1 B Series 90-30 PLC Processing Module PTM IC693CBL340/341 PTM Cable Interface Board Figure B-2. PTM Component Mounting and Cable Connection Warning The PTM Interface board connects to hazardous voltages. Before installing, testing, or troubleshooting this board, you should refer to the complete instructions in this manual. Failure to follow the guidelines in the PTM User’s Manual may result in personal injury, equipment damage, or both. PTM Products Ordering Information The Processing module and its Interface board are considered to be a matched set. Therefore, they are not sold separately. The two cables, however, may be ordered as separate items. There are four catalog numbers in the PTM product line: B-2 • IC693PTM100 – This contains the Processing module, its matched Interface board, and the 19” (0.5 meter) interface cable. • IC693PTM101 – This contains the Processing module, its matched Interface board, and the 39” (1 meter) interface cable. • IC693CBL340 – The 19” (0.5 meter) interface cable. • IC693CBL341 – The 39” (1 meter) interface cable. Power Transducer for the Series 90-30 PLC User's Manual – January 2000 GFK-1734A B Checking the IC693CBL340/341 Cables The following information is supplied for the purpose of troubleshooting only (making continuity checks of the cable). These cables have straight through connections (pin 1 connects to pin 1, pin 2 connects to pin 2, etc.), although some pins have no connections. One end is connected to a male, all plastic DB-25 connector. The other end is connected to a female, all plastic DB-25 connector. The cable is a twisted-pair type, connected to minimize noise and crosstalk between signals. Warning These cables connect to a circuit board that has hazardous voltages present. These cables are carefully made to ensure the safety of the user and associated equipment. Therefore, we recommend you use only factory-built cables. Connector Pin Number (Either End) GFK-1734A Signal Name and Function 1 VG+, Voltage Generator positive lead 2 IN+, Current Neutral positive lead 3 VA+, Voltage phase A positive lead 4 IA+, Current phase A positive lead 5 No Connection 6 VB+, Voltage phase B positive lead 7 IB+, Current phase B positive lead 8 VC+, Voltage phase C positive lead 9 IC+, Current phase C positive lead 10 Cable shield 11 No Connection 12 Frame Ground 13 No Connection 14 VG–, Voltage Generator negative lead 15 IN–, Current Neutral negative lead 16 VA–, Voltage phase A negative lead 17 IA–, Current phase A negative lead 18 No Connection 19 VB–, Voltage phase B negative lead 20 IB–, Current phase B negative lead 21 VC–, Voltage phase C negative lead 22 IC–, Current phase C negative lead 23 No Connection 24 No Connection 25 Frame Ground Appendix B IC693PTM340/341 PTM Interface Cables B-3 Appendix Glossary of Terms and Acronyms C GFK-1734A A/D Analog to digital. Refers to converting an analog signal to a digital form that can be used by a PLC or other digital microprocessor-based system. ANSI American National Standards Institute Apparent power The product of rms voltage and rms current in a circuit, with no consideration for phase angle. CE mark European compliance mark of the European Union. Generally required for products sold in Europe. CISPR11 International Special Committee on Radio Interference. Standard 11 pertains to industrial equipment CT Current transformer Current transformer An instrument transformer used for measuring electrical current. The conductor to be measured is passed through the current transformer’s center (one or more times), and serves as the transformer’s primary winding. Or, if the transformer has a built-in primary winding, it is connected in series with the conductor to be measured. A built-in secondary winding produces a relatively low current proportional to the primary current. This secondary current is used for the measurement. delta A 3-phase circuit which, when drawn, resembles a triangle or the Greek letter delta (∆). DIN-rail A standard size mounting rail, measuring 35 x 7.5 mm. The DIN-rail is usually mounted to a panel and is often long enough to hold several devices. The devices that mount to a DIN-rail snap on and off the rail and do not require any additional mounting hardware G Unit of acceleration equal to the acceleration of gravity, which is approximately 32 feet (9.8 meters) per second per second. grid In power terminology, refers to a network for distributing power. C-1 C C-2 integers A set of numbers composed of all positive and negative whole numbers, including zero. Fractional and decimal numbers are excluded. k Abbreviation for kilo (see kilo) kilo A prefix equal to a value of 1000 kvah Kilovolt-amperes per hour kvar Kilovar. 1000 vars (see var) kvarh Kilovars per hour kWh Kilowatt hour. Unit of electrical energy equal to 1000 Watt-hours. Phase angle An angular measurement of the difference in time occurrence between corresponding points on two waveforms. In a reactive circuit, there will be a finite phase angle between voltage and current waveforms. In a purely resistive circuit, the phase angle is equal to zero, indicating that real power is equal to apparent power. PLC Programmable Logic Controller. The PTM works with a GE Series 90-30 PLC. Potential transformer An instrument transformer used for measuring electrical potential (voltage). Its primary winding connects to the voltage to be measured. Its secondary winding produces a stepped-down voltage proportional to the primary voltage. The secondary voltage is used for the measurement. Power factor Ratio of real or active power to apparent power in an AC circuit PT Potential transformer PTM Power Transducer. This abbreviation is based upon the group of three letters in the product’s catalog number, such as IC693PTM100. Reactive A circuit having either or both inductive or capacitive effects, in which these effects are high in comparison to resistive effects in the circuit. Reactive power The component of apparent power that does not go into producing real work. It is generally considered to be lost or wasted power, usually dissipated in the form of unwanted heat. Real power The component of apparent power that goes into producing real work. It is equal to volt-amperes multiplied by the power factor. It is expressed in watts or kilo-watts. rms Root-mean-square. Also know as “effective” value. It refers to the value of an alternating current that will give the same heating effect as a corresponding direct current. UL Underwriter’s Laboratories. The UL mark indicates that a product has passed Underwriter’s Laboratories tests. Power Transducer for the Series 90-30 PLC User's Manual – January 2000 GFK-1734A C GFK-1734A UL/CUL A dual United States-Canadian listing mark of Underwriter’s Laboratories. May also be C-UL US VA Volt-ampere. Unit of apparent electrical power. var Volt-ampere reactive. Unit of reactive electrical power. Watt-hour Unit of electrical energy equal to consuming (or converting) power at the rate of one watt per hour. Equal to 3600 joules. Wh Watt-hour wye A 3-phase circuit which, when drawn, resembles the letter Y. Appendix C Glossary of Terms and Acronyms C-3 Index compatibility, 1-4 % %AI words table, 2-11 %AQ Words parameters, 2-5 table, 2-5 %I bits status bits, 2-17 table, 2-17 %Q bits table, 2-3 A Absolute reporting mode, 2-13 D Data maintaining, 2-14 reported to PLC, 1-3 scaling, 1-6 Definitions terms and acronyms, C-1 Demand value sliding average, 2-15 Diagrams wiring, 3-4 Dimensions cable, 1-9 Interface borad, 1-8 Processing module, 1-8 Absolute reporting mode E units table, 2-13 Accuracy measurement, 1-6 Energy formulas, 2-13 Environment Actual value Agency total use reported, 2-13 operating, 1-7 approvals/listings, 1-7 Approvals/listings agency, 1-7 B Backplane isolation, 1-5 Baseplate compatibility, 1-4 C Cabinet mounting, 3-1 Cables picture, 1-9, B-1 PTM interface, B-1 Catalog numbers of PTM products, 1-2 Communication protocol, 2-2 Compatibility with CPUs and baseplates, 1-4 Configuration %AI words, 2-8, 2-9, 2-11 %AQ words, 2-5 %I bits, 2-17 %Q bits, 2-3 parameter data, 2-2 Configurations power measurement list, 1-7 CPU GFK-1734A F Fault LED indicator on PTMPM, 1-9 G Generator line frequency, 2-16 Grounding Interface board, 3-3 H Humidity rating, 1-7 I IC693CBL340/341 checking, B-3 connecting, B-2 data sheet, B-1 lengths, B-1 ordering information, B-2 picture, 1-9, B-1 pin-out list, B-3 Installation line phasing, 3-1 mounting location, 3-2 safety considerations, 3-3 wiring diagrams, 3-4 Index-1 Index Interface board dimensions, 1-8 picture, 1-8 Isolation backplane, 1-5 L Ladder logic example, A-1 LED dimensions, 1-8 picture, 1-8 power requirements, 1-5 Product list PTM products, 1-2 Programming ladder logic example, A-1 Protection features, 1-7 PTM cable picture, 1-9 Processing module, 1-9 M Maximum input values, 2-12 Measurement accuracy, 1-6 ranges, 1-6 R Relative reporting mode, 2-12 table, 2-12 Reported results interpretation, 2-12 Mechanical shock Resolution Memory Rollover rating, 1-7 PLC requirement, 1-6 measurement, 1-6 %AI word, 2-14 Mode 3-phase power monitor, 2-8 3-wire 1-phase power monitor, 2-9 absolute reporting, 2-13 power monitor, 1-2, 2-2 relative reporting, 2-12 synchro monitor, 1-3, 2-2, 2-11 Modes S Safety installation, 3-3 warnings, 3-3 Scaling measurement data, 1-6 operating, 1-2 Scan time data, 2-7, 2-10 Specifications, 1-5 cabinet, 3-1 Interface board dimensions, 1-8 location, 3-2 Status Monitoring Mounting data exchange, 1-6 measurement, 1-5 %I bits, 2-17 Synchro Monitor mode, 2-2, 2-11 P Parameter data, 2-2 Parameters for %AQ words table, 2-6 Peak input values, 2-12 Phase power, 2-13 Phase shift between generator and bus, 2-16 Power factor data, 2-15 Power Monitor Temperature operating and storage, 1-7 V Vibration rating, 1-7 W mode, 2-2 mode, 3-phase, 2-8 mode, 3-wire 1-phase, 2-9 Wiring Processing module, 1-5 Wiring diagram Power requirements Processing module Index-2 T notes, 3-1 120/208 3-phase, 3-wire delta, 3-6 Power Transducer for the Series 90-30 PLC User's Manual–January 2000 GFK-1734A Index 120/240 single phase, 3-4 3-phase, 3-wire delts with 2 PTs, 3-8 3-phase, 4-wire with 3 PTs, 3-7 delta synchro power monitor, 3-10 wye synchro power monitor, 3-9 wye, 3-phase, 4-wire, 3-5 Wiring diagrams, 3-4 GFK-1734A Index Index-3