1
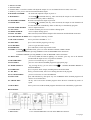
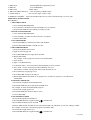
24CH DMX DIMMER CONSOLE
INTRODUCTION:
Congratulations on purchasing your new dimmer console. It is a microprocessor
controlled system that is fully DMX-512 and MIDI compatible. The dimmer console
is a 24 channel DMX-512 and standard MIDI controller. 48 sets of program can be
programmed in 4 pages and the total steps can not be more than 4500. We strongly
recommend that you take time to read this manual fully before you attempt to use the
controller. we are sure that it is the most advanced unit for its size and price and it
will provide you easy operation and tremendous control power.
SPECIFICATIONS:
POWER INPUT--------------------------------------------------------------DC12V-18V 500mA
DMX OUTPUT--------------------------------------------------------------3Pin FEMALE XLR
MIDI SINGLE-------------------------------------------------------------------- --------5Pin DIN
FUSE(internal)-----------------------------------------------------------F0.5A 250V 5X20mm
DIMENSION--------------------------------------------------------------------482X264X85MM
ADAPTOR----------------------------------------------------AC~230V 50Hz DC 12V 500Ma
(AC~120V 60Hz DC 12V 500Ma)
WEIGHT---------------------------------------------------------------------------------------4.8KG
CONTROLLER DESCRIPTION:
1. PRESET A LEDS
2. CHANNEL SLIDERS 1-12: these sliders will adjust the output of 1 to 12 channel from 0 to 100% or 0 to 255.
3. Flash Key 1-12: press to activate maximum channel output
1 of 1 pages
4. PRESET B LEDS
5. SCENES LEDS
6. Channel sliders 13-24: these sliders will adjust the output of 13 to 24 channel from 0 to 100% or 0 to 255.
7. Flash key 13-24: press to activate maximum channel output.
8. MASTER A SLIDER:
the slider will adjust the output of preset A..
9. BLIND KEY:
in CHASE
SCENES this key, when activated, the output of each channel will
be controlled only by slider or flash key
10. MASTER B SLIDER:
the slider will adjust the output of preset B.
11. HOME KEY:
in CHASE
SCENES, this key, when activated, the output of each channel will
be come back from controlled by slider or flash key to controlled by program.
12. FADE TIME SLIDER:
move to adjust fade time.
13. TAP SYNC:
in AUTO CHASE, press it twice to define chasing speed.
14. SPEED SLIDER:
move to adjust chasing speed.
15. FULL ON KEY:
when activated, whole channel output will be maximum and disable BLACK OUT.
16. AUDIO LEVEL SLIDER: move to adjust the sensitivity of audio
17. BLACK OUT KEY:
the key will force all DMX to"0".
18. STEP KEY:
press it once and the program go one step
19. AUDIO KEY:
press it to get into audio control.
20. HOLD KEY:
press and hold it, whole output will be hold.
21. PARK: in CHASE
SCENES mode, press it to select SINGLE CHASE or MIX CHASE.
in DOUBLE PRESET, pressing PARK B is same as MASTER B at the maximum.
in SINGLE PRESET, pressing PARK A is same as MASTER A at the maximum.
22. REC EXIT:
exit record, When the LED is lighting, it is in KILL, press any one of all channel
FLASH and all output is zero except the one channel.
23. RECORD KEY:
press it to record the step of program.
24. PAGE KEY:
press it to select desired SCENE program in appropriate page.
25. MODE SELECT:
By pressing the key you can select CHASE
SCENES DOUBLE RESET or
SINGLE PRESET.
26. DARK KEY:
press it to pause whole output, including FULL ON and FLASH.
27. ALL REV:
the key, when activated, will reverse chasing direction of all program.
28. 0% OR 0-255 KEY:
press it to select 0% or 0-255 on DISPLAY.
29. REV ONE:
press and hold the key, then press any one of PRESET B the SCENE program will
chase in reversed direction.
30. CHASE REV:
the key will reversed the SCENE program chase direction controlled by slider of
speed .
31. BEAT REV:
the key will reversed the SCENE program chase direction controlled by regular beat.
REAR PANEL
1. POWER INPUT:
2. MIDI THRU:
DC-12-18V 500mA .
Use to transmit MIDI data received on the MIDI IN connector.
2 of 2 pages
3. MIDI OUT:
transmit MIDI data originated by itself
4. MIDI IN:
received MIDI data.
5. DMX OUT:
DMX output.
6. DMX POLARITY SELECT: select the polarity of DMX output.
7. AUDIO INPUT:
line in music single. 100mV-1Vpp.
8. REMOTE CONTROL: FULL ON and BLACK OUT are remote controlled using 1-4”stereo jack.
OPERATING INSTRUCTION:
RECORDING:
1. RECORD ENABLE
1) Press and hold RECORD KEY.
2) Press FL ASH 1 FLASH 5 FLASH 6 FLASH 8 keys in sequence.
3) Release RECORD the led is lighting, recording is ready.
2. ERASE ALL PROGRAMS
1) Press and hold RECORD KEY.
2) Press FLASH 1 FLASH 3 FLASH 2 FLAS 3 in sequence.
3) Release RECORD.
3. CLEAR MEMORY
1) Press RECORD key, and then press REC CLEAR KEY.
2) Release RECORD and REC CLEAR at a time.
4. RECORD PROGRAM.
1) Set desired channel and record it.
2) Light the relevant page led.
3) Press RECORD then press appropriate FLASH.
4) Release RECORD.
For example: create a program, record it in the 28th SCENE.
1) clear memory.
2) light t 1-24 SINGLE LED
3) set channel slider 1-24 to min position and MASTER A to max, position.
4) move slider 1 to max. Position press RECORD then move it to
min Position. Continue moving other sliders until all sliders are set.
5) Press PAGE key to light page 3 led.
6) Press RECORD, then press FLASH 16
7) Release RECORD and FLASH 16, the program of 1-24 full on in sequence is recorded in the
28th SCENE.
5. DELETE A PROGRAM
1) Press PAGE to light the desired PAGE LED.
2) Press RECORD, then press appropriate FLASH twice.
For example: to delete the 40th SCENE program.
1) Press PAGE to light page 4 led.
2) Press RECORD, then press FLASH 16 twice.
3) release RECORD.
6. SCENE EDIT ENABLE
1) Press PAGE light desired PAGE led.
2) Press MODE SELECT to light CHASE
SCENES led.
3) Press EDIT and desired scene FLACH.
4) Release EDIT and the FLASH, the relevant SCENE LED is lit and others go out. Now editing is enable.
For example: to make the 11th SCENE program enter EDIT mode.
1) Press PAGE to light PAGE 1 led.
2) Press MODE SELECT to light CHASE
SCENES led.
3 of 3 pages
3) Press EDIT and FLASH 23.
4) Release EDIT and FLASH 23.
7. EXIT EDIT MODE
1) Press RECORD, then press EXIT.
2) Release RECORD and EXIT.
8. DELETE STEP
1) In EDIT mode, press STEP to execute the program till the step to be deleted.
2) Press DELETE The step is deleted and the next step is executed.
9. ADD STEP
1) In EDIT mode, record the step to be inserted.
2) Press STEP to execute the program till the sep you want to insert before.
10. MODIFY STEP
1) In EDIT mode. Press STEP to execute the program till the step to be modify.
2) Press UP or DOWN and desired FLASH, the output will show on display, you feel in is ok, release
FLASH.
11. CHANGE SHOWING MODE OF DIMMER Press and hold RECORD, then press 0% or 0-255 KEY.
12. SELECT AND RUN PROGRAM.
1) Press MODE SELECT to light CHASE
SCENES led.
2) Press PAGE to light the desired page led.
3) Move MASTER B slider to max.Position.
4) Move desired scene channel slider to min then move it up, the program is selected and executed.
13. RUN A PROGRAM WITH REGULAR BEAT
1) Press AUDIO to extinguish AUDIO led.
2) Press PARK to light MIX MODE LED.
3) Select to run the scene program.
4) Move the SPEED slider or press TAP SYNC twice to define beat time.
5) Press REC SPEED and the desired FLASH KEY, Then program will be executed with the beat time.
14. RUN A PROGRAM WITH SPEED SLIDER.
1) Press AUDIO to extinguish AUDIO led.
2) Press PARK to light MIX MODE led.
3) Select to run the scene program.
4) Move SPEED slider to SHOW MODE position.
5) Press REC SPEED, then press the appropriate FLASH.
For example: run the 14th SCENE program with the speed of 1 steps per second, then set it to be
controlled by speed slider.
1) Press MODE SELECT to light CHASE
SCENES LED.
2) Press AUDIO to extinguish its led.
3) Press PARK to light MIX MODE LED.
4) Move all channel sliders to min Position.
5) Move MASTER B slider to max Position.
6) Press PAGE to light PAGE 2 LED.
7) Move the 14th channel slider to max Position.
8) Move SPEED slider until 1.00 appear in display SPEED LED is lit .
9) Press REC SPEED and FLASH 14, then release both keys, the 14th SCENE program is set to run 1 step
per second.
10) Move SPEED slider to SHOW MODE position, Press REC SPEED and the 14th FLASH, then the 14th
SCENE program is set to be controlled by SPEED slider, move SPEED slider until 0. 10 appears on
display, the 14th program will run with 10 steps per second.
15. SPEED SETTING
4 of 4 pages
A: SLOWEST SPEED SLIDER SETTING (5 MM)
1) Press and hold RECORD
2) Press the 5th FLASH KEY 3 times, then release RECORD.
3) The 5 MIN LED is lit, which means that 5 MIN SPEED slider is done.
B: SLOWEST SPEED SLIDER SETTING (10MIN)
1) Press and hold RECORD
2) Press the 10th FLASH KEY 3 times, then release RECORD.
3) The 10MIN LED is lit which means that 10 MIN SPEED slider is dine
16. MIDI IN SETTING
1) Press and hold RECORD.
2) Press 1th FLASH KEY 3 times then release RECORD, when CHI appears on display, you can select
MIDI IN channel 1th FLASH to 16th FLASH.
3) After you press desired FLASH, the appropriate channel led is lit.
4) Press RECORD and EXIT to withdraw MIDI IN setting.
17. MIDI OUT SETTING
1) Press and hold RECORD
2) Press 2 th FLASH KEY 3 times, then release RECORD, When CHO appears on display, you can select
MIDI IN channel from 1th FLASH to 16th FLASH.
3) After you press desired FLASH, the appropriate channel led is lit.
4) Press RECORD and EXIT to withdraw MIDI OUT setting.
18. RECEIVE FILE DUMP
1) Press and hold RECORD.
2) Press 3th FLASH KEY 3 times, then release RECORD, when IN appears on display to receive file dump.
3) All other operations are void when receiving file dump. it Will Withdraw receiving file dump
automatically when receiving is over or mistakes is occurred. Power on after power off also pause
receiving file dump.
19. SEND FILE DUMP
1) Press and hold RECORD.
2) Press 4ht FLASH KEY 3 times, then release RECORD, when OUT appears on display, it is ready to
receive file dump.
3) All other operations are void when receiving file dump. lt Will Withdraw sending file dump automatically
when sending is over or mistakes is occurred. Power on after power off also pause receiving file dump.
20. DETAILED DESCRIPTION
1) FADE TIME: The period output varies from full dimmer to zero or from zero dimmer to full dimmer.
2) SINGLE MODE: SCENE program is executed one by one and the NO. is showing on display. its speed is
controlled by SPEED slider.
3) MIX MODE: All selected program are executed synchronously, each is allowed to have respective
chasing speed
4) When CHASE
SCENES LED is lit, you can select scene program using PRESET B channel sliders.
BLIND one of PRESET B channels, the appropriate channel slider together with MASTER A slider
control its output, and the maximum dimmer of the program is maintained until you HOME the channel.
5) FADE TIME & SPEED TIME INDICATIONS
A: when time is more than 1 minute, the indication includes two dots.
For example: 1 minute past 15 second, indicate 1. 15.
Half past 4 minute, indicate 4. 30.
10 minute, indicate 10.0.
B: when time is less than 1 minute, the indication one dot only.
For example: 11. 5 second, indicate 11. 5
1.2 second, indicate 1.2
5 of 5 pages
0.55 second, indicate 0.55
6) transmit and receive file
A: open loop mode:
TRANSMITTER
RECEIVER
MIDI OUT
MIDI IN
B: closed loop mode:
TRANSMITTER
RECEIVER
MIDI OUT MIDI IN
MIDI OUT MIDI IN
NOTE: when sending file dump in open loop mode, you should set
Up receiving mode for the receiver, otherwise receiving is disable.
7) When the power voltage is too low, the display show LOP, now you should check whether the power is
OK It is normal that LOP is appeared for a short while just after power is turned on.
20. MIDI RUN
1)If MIDI data is not received within 10 minutes, the channel and program turned on by MIDI will be
cleared.
2) When sending or receiving file dump, the device ID is 55H All information (include System
Exclusive)is sent or received in file dump. You can send SCENE program to storage or another unit, you
can also receive SCENE program from storage or another unit.
3) this unit sends or receives NOTE information, relevant functions is as follows:
NOTE NUMBER
VELOCITY
FUNCTION
22-69
PROGRAM MASTER
TURN ON /OFF PROGRAM 1-48
70-93
94
95
96
97
98
99
100
101
CHANNEL DIMMER
TURN ON/OFF CHANNEL 1-24
FULL ON
DARK
HOLD
TURN ON/OFF AUDIO CHASE
CHASE
SCENES
DOUBLE
PRESET MODE
SINGLE
PRESET MODE
STEP CHANGE
6 of 6 pages
102
BLACK OUT
7 of 7 pages