1
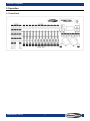
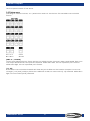
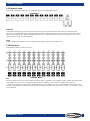
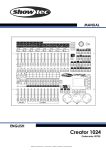
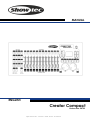
MANUAL ENGLISH Creator Compact Ordercode: 50729 Highlite International B.V. – Vestastraat 2 – 6468 EX – Kerkrade – the Netherlands Creator Compact Table of contents 1. Overview .........................................................................................................................................................................2 1.1 Specifications ..........................................................................................................................................................2 2. Installation .......................................................................................................................................................................3 2.1 Unpack .....................................................................................................................................................................3 2.2 Safety instructions ...................................................................................................................................................3 3 Operation ........................................................................................................................................................................7 3.1 Front Panel ...............................................................................................................................................................7 3.2 Fixture area ..............................................................................................................................................................8 3.3 Playback area .........................................................................................................................................................9 3.4 Slider area: ...............................................................................................................................................................9 3.5 Control area: .........................................................................................................................................................10 3.6 Glossaries ................................................................................................................................................................11 4 Channel Setup ..............................................................................................................................................................12 4.1 Channel types .......................................................................................................................................................12 4.2 Setup .......................................................................................................................................................................13 5 Fixture Control ...............................................................................................................................................................14 5.1 Fixture control in Programming Mode ..............................................................................................................14 4.2 Fixture control in Running Mode ........................................................................................................................14 6 Shape Generator .........................................................................................................................................................15 6.1 Load a shape ........................................................................................................................................................15 6.2 Edit a shape ...........................................................................................................................................................15 6.3 Delete a shape .....................................................................................................................................................15 6.4 Playback Parameters ..........................................................................................................................................16 7 Scene ..............................................................................................................................................................................17 7.1 Create.....................................................................................................................................................................17 7.2 Include scene ........................................................................................................................................................17 7.3 Copy .......................................................................................................................................................................17 7.4 Delete .....................................................................................................................................................................17 7.5 Time .........................................................................................................................................................................18 7.6 Running ...................................................................................................................................................................18 8. Chase ............................................................................................................................................................................19 8.1 Create.....................................................................................................................................................................19 8.2 Delete a step .........................................................................................................................................................19 8.3 Time of step ............................................................................................................................................................19 8.4 Include a step .......................................................................................................................................................20 8.5 Global time ............................................................................................................................................................20 8.6 Delete a scene .....................................................................................................................................................20 8.7 Copy a chase .......................................................................................................................................................20 Ordercode: 50729 1 Creator Compact 8.8 Run ...........................................................................................................................................................................20 9. Setup ..............................................................................................................................................................................21 9.1 Wipe Playback ......................................................................................................................................................21 9.2 Wipe All ...................................................................................................................................................................21 9.3 Switch display language .....................................................................................................................................21 9.4 Save & Load ..........................................................................................................................................................21 10 Maintenance ..............................................................................................................................................................22 11 Q/A ...............................................................................................................................................................................22 1. Overview With preset shape effects of pan/tilt circle, RGB rainbow and dimming wave, Creator Compact DMX controller can control up to 32 units of 12-channel fixtures. 12 playbacks and 5 preset shapes can be play simultaneously. And sliders can be used to activate playbacks and adjust the intensity of the dimmer channel in the playbacks. 1.1 Specifications DMX channel Fixture Channels for each fixture Playback Playbacks to run simultaneously Chase step Time control of playbacks Shape for each scene/Step Playback and dimmer by slider Interlocked playback Shape generator Shapes to run simultaneously Channel type setup Real time blackout Power supply Power consumption Ordercode: 50729 768 32 24 60 12 120 Fade in/out, LTP slope 5 Yes Yes Shapes of Dimmer, Pan/Tilt and RGB 5 Yes. For shape enabling Yes 9V/12V DC adapter 12 Watt 2 Creator Compact 2. Installation FOR YOUR OWN SAFETY, PLEASE READ THIS USER MANUAL CAREFULLY BEFORE YOUR INITIAL START-UP! 2.1 Unpack Immediately upon receiving this product, carefully unpack the carton and check the contents to ensure that all parts are present, and have been received in good condition. Notify the dealer immediately and retain packing material for inspection if any parts appear damaged from shipping or the carton itself shows signs of mishandling. Save the carton and all packing materials. In the event that a fixture must be returned to the factory, it is important that the fixture be returned in the original factory box and packing. Your shipment includes: Creator Compact Power cable User manual Optional Accessories Goose-neck lamp (ordercode: 60722) 2.2 Safety instructions CAUTION! Keep this device away from rain and moisture! Unplug mains lead before opening the housing! Every person involved with the installation, operation and maintenance of this device has to: be qualified follow the instructions of this manual CAUTION! Be careful with your operations. With a dangerous voltage you can suffer a dangerous electric shock when touching the wires! Before your initial start-up, please make sure that there is no damage caused by transportation. Should there be any, consult your dealer and do not use the device. To maintain perfect condition and to ensure a safe operation, it is absolutely necessary for the user to follow the safety instructions and warning notes written in this manual. Please consider that damages caused by manual modifications to the device are not subject to warranty. Ordercode: 50729 3 Creator Compact This device contains no user-serviceable parts. Refer servicing to qualified technicians only. IMPORTANT: The manufacturer will not accept liability for any resulting damages caused by the non-observance of this manual or any unauthorized modification to the device. Never let the power-cord come into contact with other cables! Handle the power-cord and all connections with the mains with particular caution! Never remove warning or informative labels from the unit. Do not open the device and do not modify the device. Never use anything to cover the ground contact. Never leave any cables lying around. Do not insert objects into air vents. Do not connect this device to a dimmerpack. Do not switch the device on and off in short intervals, as this would reduce the device’s life. Do not shake the device. Avoid brute force when installing or operating the device. Never use the device during thunderstorms, unplug the device immediately. Only use device indoor, avoid contact with water or other liquids. Do not touch the device’s housing bare-handed during its operation (housing becomes hot). Only operate the device after having familiarized with its functions. Avoid flames and do not put close to flammable liquids or gases. Always keep case closed while operating. Always allow free air space of at least 50 cm around the unit for ventilation. Always disconnect power from the mains, when device is not used or before cleaning! Only handle the power-cord by the plug. Never pull out the plug by tugging the power-cord. Make sure that the device is not exposed to extreme heat, moisture or dust. Make sure that the available voltage is not higher than stated on the rear panel. Make sure that the power-cord is never crimped or damaged. Check the device and the powercord from time to time. If the external cable is damaged, it has to be replaced by a qualified technician. If the glass is obviously damaged, it has to be replaced. So that its functions are not impaired, due to cracks or deep scratches. If device is dropped or struck, disconnect mains power supply immediately. Have a qualified engineer inspect for safety before operating. If the device has been exposed to drastic temperature fluctuation (e.g. after transportation), do not switch it on immediately. The arising condensation water might damage your device. Leave the device switched off until it has reached room temperature. If your Showtec device fails to work properly, discontinue use immediately. Pack the unit securely (preferably in the original packing material), and return it to your Showtec dealer for service. For adult use only. Lighteffect must be installed out of the reach of children. Never leave the unit running unattended. For replacement use fuses of same type and rating only. Allow time to cool down, before replacing lamp. The user is responsible for correct positioning and operating of the Creator Compact. The manufacturer will not accept liability for damages caused by the misuse or incorrect installation of this device. This device falls under protection class I. Therefore it is essential to connect the yellow/green conductor to earth. During the initial start-up some smoke or smell may arise. This is a normal process and does not necessarily mean that the device is defective. Repairs, servicing and electric connection must be carried out by a qualified technician. WARRANTY: Till one year after date of purchase. Ordercode: 50729 4 Creator Compact Operating Determinations This device is not designed for permanent operation. Consistent operation breaks will ensure that the device will serve you for a long time without defects. The minimum distance between light-output and the illuminated surface must be more than 0.5 meter. The maximum ambient temperature ta = 45°C must never be exceeded. The relative humidity must not exceed 50 % with an ambient temperature of 45° C. If this device is operated in any other way, than the one described in this manual, the product may suffer damages and the warranty becomes void. Any other operation may lead to dangers like short-circuit, burns, electric shock, crash etc. You endanger your own safety and the safety of others! Improper installation can cause serious damage to people and property ! Connection with the mains Connect the device to the mains with the power-plug. Always pay attention, that the right color cable is connected to the right place. International L N EU Cable BROWN BLUE YELLOW/GREEN UK Cable RED BLACK GREEN US Cable YELLOW/COPPER SILVER GREEN Make sure that the device is always connected properly to the earth! Improper installation can cause serious damage to people and property! Ordercode: 50729 5 Pin FASE NUL EARTH Creator Compact Return Procedure Returned merchandise must be sent prepaid and in the original packing, call tags will not be issued. Package must be clearly labeled with a Return Authorization Number (RMA number). Products returned without an RMA number will be refused. Highlite will not accept the returned goods or any responsibility. Call Highlite 0031-455667723 or mail [email protected] and request an RMA prior to shipping the fixture. Be prepared to provide the model number, serial number and a brief description of the cause for the return. Be sure to properly pack fixture, any shipping damage resulting from inadequate packaging is the customer’s responsibility. Highlite reserves the right to use its own discretion to repair or replace product(s). As a suggestion, proper UPS packing or double-boxing is always a safe method to use. Note: If you are given an RMA number, please include the following information on a piece of paper inside the box: 1) Your name 2) Your address 3) Your phone number 4) A brief description of the symptoms Claims The client has the obligation to check the delivered goods immediately upon delivery for any shortcomings and/or visible defects, or perform this check after our announcement that the goods are at their disposal. Damage incurred in shipping is the responsibility of the shipper; therefore the damage must be reported to the carrier upon receipt of merchandise. It is the customer's responsibility to notify and submit claims with the shipper in the event that a fixture is damaged due to shipping. Transportation damage has to be reported to us within one day after receipt of the delivery. Any return shipment has to be made post-paid at all times. Return shipments must be accompanied with a letter defining the reason for return shipment. Non-prepaid return shipments will be refused, unless otherwise agreed in writing. Complaints against us must be made known in writing or by fax within 10 working days after receipt of the invoice. After this period complaints will not be handled anymore. Complaints will only then be considered if the client has so far complied with all parts of the agreement, regardless of the agreement of which the obligation is resulting. Ordercode: 50729 6 Creator Compact 3 Operation 3.1 Front Panel Ordercode: 50729 7 Creator Compact The front panel consists of four areas: 3.2 Fixture area including 16 <Fixture> buttons, <A ○|● B> button and <13 - 24> button. This controller can control 32 fixtures. [DMX A ○|● DMX B] Output port selection button. There are two port within Creator Compact, DMX A and DMX B. Each port can output 384 channels, and operate 16 fixtures. While LED is dark, we can operate A port’s fixtures. While LED is light, we can operate B port’s fixtures. [13 - 24] Each fixture can control 24 channels. But there are just 12 sliders on the Creator Compact. So we can change t [1-12] and [13-24] by this button. While LED is dark, we can control [1-12] channels. While LED is light, we can control [13-24] channels. Ordercode: 50729 8 Creator Compact 3.3 Playback area including 12 playback buttons, 2 page buttons and a 2-bit LED screen. Playback In Programming Mode (<Run> button inactivated), the <Playback> buttons are to implement the functions of storing, deleting, editing, including and copying following the operations from the Control area. In Running Mode, press a <Playback> button to flash scenes or chases, or stop/go chases step. While chase is stop, the LED will flash. Page There 5 playback pages in this controller. Each page can store 12 playbacks. 3.4 Slider area: including 12 sliders and Run button. Run Swap program and run mode. While the LED is dark, controller is in program mode. While the LED is light, controller is in run mode. In Programming Mode, the sliders can be used to adjust the channel values once a fixture is selected. In Running Mode, Raise slider up to run the playback. And pull it down to close the playback. When the playback is running, the slider can be used to adjust the intensity of the http Channel. Ordercode: 50729 9 Creator Compact 3.5 Control area: including an LCD display, some functions buttons and two wheels. Blackout Black out, controller outputs 0 for each channel. While this function is enabling, the LED will flash. Shape Operate shapes. After patch the channel type, we can use the shape to do better work. Scene Store Scenes or chase steps. Chase Unfold and operate chases. Delete Delete scenes, chases, chase steps and shape. Time Set times for scenes, chases, chase steps. Patch Set channels’ type. Setup Operate controller setups. Wheel A Modify data in some menu base on information. In program mode, it is used to control fixtures’ tilt in most menus. Wheel B Modify data in some menu base on information. In program mode, it is used to control fixtures’ Pan in most menus. USB For storing/recalling data. Ordercode: 50729 10 Creator Compact 3.6 Glossaries HTP: The type of the channels with the highest output (highest takes precedence), normally for dimmer channels. LTP: The type of the channels with the latest output (latest takes precedence), for non-dimmer channels. Fade in: The intensity of the light changes from dark to bright. Fade out: The intensity of the light changes from bright to dark. Scene: A single stage look programmed onto a Playback button or fader. Also known as MEMORY, STATE, CUE, LOOK. Chase: A sequence of one or more pre recorded steps which automatically run one after the other. Chase Steps: Individual cues within a Chase. See above. Playback: Area of the system that can replay recorded Scenes or Chases using Playback Faders. Record by fixture: This is the normal mode of the Creator Compact. It means that when you record a cue, all attributes of every fixture that you have changed are recorded in the cue. So if you change only the position of a fixture, the colour, gobo, intensity and all other attributes of that fixture are recorded as wall. This is useful because you know that when you recall the cue, it will look exactly as it did when you saved it. However, it can be slightly inflexible if you want to combine cues. Record by channel: This means that only attributes you have changed are recorded in the cue. So if you change the position of a fixture, only the position is recorded. When you recall the cue, the colour, gobo etc will remain as they were last set. This means you can use a cue to change the position of some fixtures while leaving the colour set from a previous cue, allowing more variety when you are running a show. It is a powerful feature but you can easily get yourself into trouble with it, so you need to be sure which attributes you need to record and which you want to “show through”. When you’re learning, it’s best to have some cues “recorded by fixture” which turn on the fixtures in a known state, then have some colour cues to modify just the colour, or some gobo cues to set the gobo, or other attributes. Ordercode: 50729 11 Creator Compact 4 Channel Setup 4.1 Channel types Instant: An LTP channel without fade time. When running playbacks, data will keep unchanging during LTP fading and will be output after the LTP fade time. Dimmer: Dimmer channel (HTP channel). Preset shapes can be loaded after setup. Pan: Pan channel, a LTP channel with fade time. Preset shapes can be loaded after setup. Pan F: Pan Fine channel, a LTP channel with fade time. Preset shapes can be loaded after setup. Tilt: Tilt channel, a LTP channel with fade time. Preset shapes can be loaded after setup. Tilt F: Tilt Fine channel, a LTP channel with fade time. Preset shapes can be loaded after setup. Red: Red channel, a LTP channel with fade time. Preset shapes can be loaded after setup. Green: Green channel, a LTP channel with fade time. Preset shapes can be loaded after setup. Blue: Blue channel, a LTP channel with fade time. Preset shapes can be loaded after setup. Color1: Color 1 channel, a LTP channel without fade time. Preset shapes can be loaded after setup. Color2: Color 2 channel, a LTP channel without fade time. Preset shapes can be loaded after setup. Gobo 1: Gobo 1 channel, a LTP channel without fade time. Preset shapes can be loaded after setup. Gobo 2: Gobo 2 channel, a LTP channel without fade time. Preset shapes can be loaded after setup. Go 1 R: Gobo 1 Rotate channel, a LTP channel with fade time. Preset shapes can be loaded after setup. Go 2 R: Gobo 2 Rotate channel, a LTP channel with fade time. Preset shapes can be loaded after setup. Iris: Iris channel, a LTP channel with fade time. Preset shapes can be loaded after setup. Focus: Focus Rotate channel, a LTP channel with fade time. Preset shapes can be loaded after setup. Fade: A LTP channel with fade time. When running playbacks, the output will be linearly changed from the current value to the set value while the LTP fade time is going. Ordercode: 50729 12 Creator Compact 4.2 Setup 1) 2) 3) 4) In Programming Mode (the <Run> button should be inactivated), open the main menu, then press <Patch > to enter the Patch Setup. Under Patching menu, select the desired fixtures. The channel types of the 1st selected fixture’s 12 channels will be shown in the LCD screen. When at 24CH mode, press Page 1 on the left-bottom corner for CH1-12 and Page 2 for CH13-24. The first line of the display indicates the number of the channels, which are the first channel of other lines. Move the sliders to set the channel types. The LCD will show the changes in real time. Each channel type can be set only one in each fixture, except “Instan” and “Fade”. If you patch one type to many channels in a fixture, controller will set the type to the last number of the channels, others will be set as “Instan”. Pay more attention in 13-24 channels. 5) Once the setup is finished, press <Enter> to save and exit; Or, press <Exit> to exit without saving. LCD Display: Ordercode: 50729 13 Creator Compact 5 Fixture Control 5.1 Fixture control in Programming Mode Set the controller to Programming Mode (inactivate the <Run> button). Select/de-select a single fixture: Press a <Fixture> button, if the LED indicator is on, the fixture is selected. Otherwise, it is de-selected. Select/de-select a series of fixtures: Holding down the <Fixture> button for the first fixture in the range, then pressing the <Fixture> button for the last fixture. Change channel value: Once a fixture is selected, the 12 channels data of the 1st selected fixture will be shown in the LCD screen. When at 24CH mode, press Page 1 on the left-bottom corner for CH1-12 and Page 2 for CH13-24. LCD display: Move the sliders to adjust the outputs. The LCD will show the values in real time. The values by the sliders will be stored in the programmer with the highest priority to output. Those channels that have been set will be shown in blue with a white background in the LCD. Clear the programming status of a single channel: In the 1st level menu, press <Clear> and move the channel slider, then, the channel of the selected fixture is cleared from programmer. Clear the programming status of a fixture: In the 1st level menu, press <Clear> and the desired <Fixture> button, then, the fixture is cleared from programmer. Clear all the data in the programming cache: In the 1st level menu, press <Clear> twice, all the data in the programmer will be cleared. Blackout: Press <Blackout> to activate its LED indicator flashing, then, all the channels will output 0; Press <Blackout> again to inactivate its LED indicator, then, the output will recovered. USE Wheel to control Pan/Tilt: Patch the channel to [T] or [P], then selects the fixture. Now you can control P/T witch Wheel A and Wheel B. 4.2 Fixture control in Running Mode In Running Mode, press a desired <Fixture> button, the dimmer channels of the fixture will be output at the maximum values. Ordercode: 50729 14 Creator Compact 6 Shape Generator Shape generator is a powerful function which allows you to easily complete a complicated programming job. It can make the pan/tilt run in circle, square or spiral shapes, the intensity channel in wave-like dimming and RGB in rainbow effects, etc. In the Creator Compact, 5 shapes can be output simultaneously, but, only 1 can be edited. To use Shape Generator, enter the Programming Mode first (inactivate the <Run> button). 6.1 Load a shape 1) 2) 3) 4) 5) 6) Patch the channel type first. Press <Shape >, then select [Playback a Shape] and press <Enter> to enter the Shape menu. Tilt/Pan Shape Dimmer Shpae RGB/CMY Shape Color Shape Gobo Shape Focus Shape Iris Shape Select the desired fixtures to apply shapes to. Press Up/Down to select a desired option for application. Press <Enter> to confirm and enter to the submenu. Press Up/Down to select a desired option for application. Press <Enter> to select. Modify the corresponding channels of the fixture to create your effect. 6.2 Edit a shape 1) 2) 3) 4) Play shapes (see Section 5.1). If you want to edit some shapes you have played, select [Edit Shapes]. Use Up/Down button to highlight the shapes you want select or de-select, then use <Enter> to mark. The shapes you select will mark with “*”. If the shape is the one you have played the last and ever used [Edit Shapes] function, jump this step. Select “Shape Parameters” in the Shape menu and Press <Enter>. Press <Enter> to change the directions of the shape. Press Up/Down to select the Size and Speed or Repeat and Spread. Roll Wheel A/B to modify. Size: The amplitude. Speed: The running speed of the shape. Repeat: Repeats pattern after repeat number of fixtures. Spread: How the instruments are spread across the pattern, 0=even spread. 6.3 Delete a shape Select [Delete Shapes] in the Shape menu. Use Up/Down button to highlight the shapes you want select or de-select, then use <Enter> to mark. The shapes you select will mark with “*”. Press Delete> button to complete delete. Ordercode: 50729 15 Creator Compact 6.4 Playback Parameters This option lets you set parameters for a shape stored in a playback / scene. When a scene fades in, you can determine whether the shape should start at full size and speed instantly, (Static) or whether the shape speed and/or size should fade in as well (Timed). If the memory mode is set to 0, the size and speed settings are ignored. 1) In Shape Menu, Press <E>. 2) Press the <Playback> button of the playback you want to set parameters for. 3) <A> set the size to Static or Timed. 4) <B> set the speed to Static or Timed. 5) <C> allows you to remove the offset caused by a shape when it is stopped. When you turn off a memory with a shape, the fixtures will be offset by the last state of the shape. Setting this option to “Removed” causes the fixture to return to its programmed settings. Setting this option to “Remains” leaves the shape offset in place. Ordercode: 50729 16 Creator Compact 7 Scene There are many functions in the controller to create a complicated lighting effect; and, the most fundamental part is a scene, in which you can store a “look” you have created using your light. There are 60 playbacks on 5 pages, each page with 12, which can be used to store scenes and chases. In Running Mode, the sliders and the <Playback> buttons are used to control playbacks; In Programming Mode, the buttons in the <Playback> area are for editing. 7.1 Create 1) 2) 3) 4) 5) In programming mode(inactivate the <Run> button), Clear the programmer, then program the fixtures. A scene can record a shape. Press <Scene>, the LED indicators of the <Playback> buttons without any playback stored in will keep flashing; those stored with scenes will keep always on; and, those stored with chases will be off. Select record by channel or record by fixture Record by fixture: When you change any channel of a fixture, all the other channels are placed in the Programmer as well. You will get exactly the result you expected when you recall the scene, but you can’t combine scenes containing the same fixtures, because the new memory will just override the old one. Record by Channel: Only the channel you change is placed in the programmer. This means you can save scenes which only contain position information, then recall them with other scenes to set colours, gobos etc. This is much more flexible but requires more programming initially, because you need several memories to get a result Select a desired mode (see Section 6.5); Press an empty <Playback> button to store. If you press a <Playback> button stored with a scene, then, press <Enter> to overwrite. 7.2 Include scene 1) 2) In Programming Mode (inactivate the <Run> button), press a <Playback> button stored with scene. Press <Enter> to include. 7.3 Copy 1) 2) In Programming Mode (inactivate the <Run> button), press a <Playback> button stored with a scene. Press an empty <Playback> button to copy. 7.4 Delete 1) 2) In Programming Mode (inactivate the <Run> button), press <Delete> to enter the Delete menu. Press a desired <Playback> button to delete, press it again to confirm. Ordercode: 50729 17 Creator Compact 7.5 Time Press <Time>, then, press a desired <Playback> button for editing. You can set a fade in and fade out time independently for every memory. The playback fades only affect HTP (intensity) channels. There is a separate LTP timer which allows you to set movement times. LTP channels which were set to “I” during Patching ignore LTP fade times. The effect of the times is shown in the following picture. The times you enter are also affected by the scene mode: Mode 0 – No timing information is used. The HTP channels faded with the 0-100% position with playback faders. Mode 1 –Channels fade as set by the HTP and LTP fade times (except Instant LTP channels). If you enter times for a Mode 0 memory, it will automatically change to Mode 1. If HTP times are set to zero, the HTP levels will fade with the fader Mode 2 –HTP channels fade as set by the HTP times, or with the fader if times are set to zero. LTP channels are controlled by the fader position (except Instant channels). Set the LTP fade time to 0 to use this mode. 7.6 Running Set the live mode as the running mode; Raise fader, the corresponding scene on the current page will be output. Hold a <Playback> button, the selected scene will be output, and release the button will close the playback. The running scenes will be highlighted in the LCD, “S” is scene, “C” is Chase. Ordercode: 50729 18 Creator Compact 8. Chase A sequence of one or more pre recorded steps programmed using the CHASE button. It can be replayed automatically if desired. Sometimes known as SEQUENCE, STACK or Linked Cues. The chase can include 120 steps in this console. 8.1 Create 1) 2) 3) In Level 1 of Programming Mode (inactivate the <Run> button), press <Chase>. In the Playback area, the LED indicators of the <Playback> buttons stored none playback will keep flashing, which stored with chase will keep always on, and, which stored with scene will be off. Press a desired button, in which you want to edit or create a chase, and enter to chase editing menu. Now, the LED screen in the Playback area shows the current page number under editing. Press Playback Up/Down to turn the pages. LCD display: “01” follow “Chase” indicates the current playback NO. to edit. “[000]” is the total step number of the current chase. Press <Chase> to exit the editing of multi-step scene. Once a step is programmed, press <Scene> to save step. Move the cursor to Line 2 to select “Record by Channel” or “Record by Fixture”. See [6.1]. To save the last step, move the cursor to Line 3 and press <Enter> to save. Or, press an off <Playback> button to store. To insert (the new step will be inserted as the previous step to the selected position) or overwrite, select the desired position, then, move the cursor to Line 2 and press <Enter> to overwrite an existing step or move the cursor to Line 3 and press <Enter> to insert. 4) 5) 6) 8.2 Delete a step In the menu of editing chase, press <Delete> to enter to the Delete menu. Then, press the <Playback> button to delete the desired step, and press <Enter> to confirm delete. 8.3 Time of step In the menu of editing chase, press <Time>, then, press the <Playback> button of the desired step to edit time. Edit the step with the Menu Up/Down buttons and Wheel A/B; Press <Enter> to confirm. Time options include: [Wait Fade In] – The wait time before an HTP channel fading in [Wait Fade Out] –The wait time before an HTP channel fading out [Fade In] –The fade in time of an HTP channel [Fade Out] – The fade out time of an HTP channel [LTP Slope] – The fading time of an LTP channel [Link] – Connections between Chase Steps enabling them to run on form one to another automatically. [LTP Wait] – The wait time before an LTP channel fading [Simple Step] – The global time of using multi-step scene [Complex Step] – The special time for its own Ordercode: 50729 19 Creator Compact 8.4 Include a step In the menu of editing chase, press the <Playback> button of the desired step to include the step data. 8.5 Global time In Level 1 menu, press <Time>, then, press the desired chase for editing. Use the Menu Up/Down buttons to select option and Wheel A/B to change value; Press <Enter> to confirm. 8.6 Delete a scene In Level 1 of Programming Mode, press <Delete>, then, press the <Playback> button of the desired scene twice to delete it. 8.7 Copy a chase In Level 1 of Programming Mode, press the <Playback> button of the desired chase to copy, then, press another <Playback> button to paste. 8.8 Run Set the controller to Running Mode. Raise the fader, the corresponding chase on the current page will be output. If Chase triggered by fader Press the corresponding <Playback> button, the chase will pause or play. If current step is link off, the chase will pause until press the corresponding <Playback> button. While the chase is pause, the LED of the corresponding <Playback> button will flash. If Chase is not triggered Hold the <Playback> button, the chase will playback. And after release, chase will close. Ordercode: 50729 20 Creator Compact 9. Setup In program mode, press <Setup> to enter the step menu. 9.1 Wipe Playback Wipe the playback data in the controller; but, the patching will remain. 9.2 Wipe All Wipe all the data in the controller. 9.3 Switch display language EN/DE/FR are available in the Creator Compact. 9.4 Save & Load Input U-Disk Save: use Wheel B to change character, up and down to move the curse. Then press <Enter> to save. Load: select data you have save, then press <Enter> to load data. Ordercode: 50729 21 Creator Compact 10 Maintenance The operator has to make sure that safety-relating and machine-technical installations are to be inspected by an expert after every year in the course of an acceptance test. The operator has to make sure that safety-relating and machine-technical installations are to be inspected by a skilled person once a year. The following points have to be considered during the inspection: 1) 2) 3) 4) All screws used for installing the device or parts of the device have to be tightly connected and must not be corroded. There may not be any deformations on housings, fixations and installation spots. Mechanically moving parts like axles, eyes and others may not show any traces of wearing. The electric power supply cables must not show any damages or material fatigue. The Showtec Creator Compact requires almost no maintenance. However, you should keep the unit clean. Disconnect the mains power supply, and then wipe the cover with a damp cloth. Do not immerse in liquid. Do not use alcohol or solvents. Keep connections clean. Disconnect electric power, and then wipe the DMX and audio connections with a damp cloth. Make sure connections are thoroughly dry before linking equipment or supplying electric power. 11 Q/A Q: Way the dimmer level does not adjust by the playback slider, and turn to 0 after Clear? A: Has the dimmer channel been configured? If not, the dimmer channel will not adjust by playback slider and turn to 0 after double click <Clear> button. To configure the dimmer channel: Enter Program Mode. Press <Patch> to enter Patch Menu. Select a desired fixture and push the slider of the dimmer channel till its value in the screen shows [Dimmer]. Q: I don’t need dimmer data save in a playback A: In playback editing, after the dimmer slider is set to a desired brightness, if you don’t want to save the dimmer in the data, you can follow the below steps to remove the dimmer channel from the playback: Enter Program Mode. Select the desired fixture. Press <Clear> to enter Clear Menu. Push the dimmer channel to any position. Press <Exit> to exit. Now, you can see that the dimmer channel is not ON in the screen. After, keep on your playback editing and select “Record by Channel” when saving the playback. Then, the dimmer will not be included. Ordercode: 50729 22 Ordercode: 50731 23