1
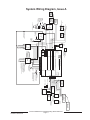
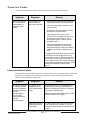
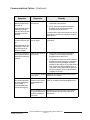
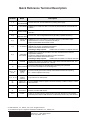
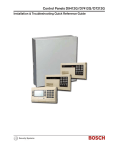
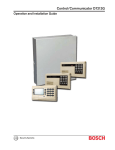
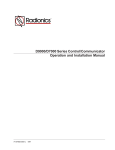
R
A
D
I
O
N
I
C
S
D7212 Control/Communicator
Installation and Troubleshooting Quick Reference
Introduction
This reference contains the very basic information a trained installer needs to install and
troubleshoot a D7212 system. See the D7212 Operation and Installation Manual (74-06913-000)
for a complete description of the D7212 and detailed installation instructions.
Installing Optional Modules?
Do not use the instructions packaged with the D128 Phone Line Switcher, D8125 POPEX
Module, D8128A OctoPOPIT Module, D8129 OctoRelay Module, or D811 Arm Status Relay
Module.
The D7212 Operation and Installation Manual (74-06913-000) contains instructions for installing
these modules.
Basic Troubleshooting ......................................... 2
Command 5 7 Toggles Default Idle Text .......... 2
Command 5 9 Shows Firmware Revision ........ 2
Problems with Points ........................................ 3
System Wiring Diagram, Issue A ......................... 6
Troubleshooting Continued ................................. 8
Problems with Points
(Continued from page 5) ................................... 8
Problems with Command Centers .................... 8
Problems Programming the Panel .................... 9
Phone Line Trouble ........................................ 10
Communications Failure ................................. 10
Quick Reference Terminal Description ............. 12
74-06914-000-A 8/93
D7212 Installation and Troubleshooting Quick Reference
Page 1
© 1993 Radionics
Basic Troubleshooting
Command 5 7 Toggles Default Idle Text
Command 5 7 allows technicians who might not be familiar with the custom idle text to confirm
whether an area is armed, ready to arm, or not ready to arm. The default idle text displays are:
AREA # IS ON
AREA # IS OFF
Follow the procedure below to toggle between custom and default idle text.
1. Ensure the command center is at idle text.
2. Press COMMAND 5 7.
3. The display will change to default idle text for 5 seconds and then revert to its original
idle text.
Command 5 9 Shows Firmware Revision
Command 5 9 displays the revision of firmware currently installed in the panel.
1. Ensure the command center is at idle text.
2. Press COMMAND 5 9.
3. The current revision of firmware displays (7212 REV # # - # # ) for 5 seconds and
returns to idle text.
74-06914-000-A 8/93
D7212 Installation and Troubleshooting Quick Reference
Page 2
© 1993 Radionics
Problems with Points
Symptom
Diagnosis
Remedy
Point appears as
missing at command
centers and in reports
to the receiver.
POPIT is not
connected or
incorrectly connected
to the data expansion
loop.
Disconnect the EOL resitor from the loop
output of the POPIT. You should measure 8 to
13 VDC, constant.
Sensor loop switch (1
to 8) is turned off on
OctoPOPIT.
If the sensor loop switch on an OctoPOPIT is
turned off for a programmed point, the point
reports as missing.
Switch 12 ON for more Connect only one OctoPOPIT with switch 12
than one OctoPOPIT
ON to ZONEX.
connected to ZONEX.
If ZONEX is connected to a D8125, turn switch
Switch 12 ON for
12 OFF for all OctoPOPITs connected to that
OctoPOPIT
terminal.
connected to same
ZONEX as a D8125.
POPIT is not
Verify that the switches on the POPIT are set
programmed correctly. for the missing POPIT number. Switches set
incorrectly can cause both missing and extra
POPITs.
Points intermittently
appear as missing.
Points are erratic.
74-06914-000-A 8/93
Problem with data
expansion loop.
See Problems with Data Expansion Loop.
Debounce Count
parameter set at 1. If
an off-board point is in
transition between
normal and faulted
conditions as the
panel scans it, it
appears as missing.
Radionics recommends that the Debounce
Count be left at the default of 2.
Decreasing the Debounce Count to 1 may
cause points to appear as missing. Increasing
the Debounce may cause missed alarms.
D7212 Installation and Troubleshooting Quick Reference
Page 3
© 1993 Radionics
Problems with Points (Continued)
Symptom
One or more points
remain in trouble or
alarm with
all devices connected
to the sensor loops
normal.
Faulted points do not
generate alarms or
troubles as
programmed.
Panel transmitts PT
BUS TROUBLE
reports. Erroneous
alarm and/or trouble
reports may follow PT
BUS TROUBLE
report. Erroneous
alarm and/or trouble
events for off-board
points appear at
command centers.
Diagnosis
The sensor loop is
open, shorted, or
grounded.
Opens,shorts, or
grounds cause
troubles or alarms
depending on point
programming.
Remove the sensor loop from the D7212 or
POPIT and meter it for continuity. There
should be no more than 100Ω resistance, plus
the value of the end of line resistor on the
wires. If you meter less resistance than the
value of the end of line resistor, check the
wiring for shorts.
With the wires for the loop removed, meter
them for continuity to ground. A ground before
the end of line resistor on an on-board point's
sensor loop is interpreted as a short. A ground
on a sensor loop for a POPIT point is
interpreted as an open.
Command 47 pressed The D7212 ignores input from all points in the
at the time the alarm
same area programmed for sensor reset during
or trouble was
sensor reset (Command 47).
generated.
Two points are
programmed with the
same address.
Points programmed with the same address do
not function correctly. Check to be certain that
you have not duplicated point addresses.
Short on D8125
POPEX module’s Data
Expansion Loop or
short on D7212’s
ZONEX data terminals
(27 & 28).
A short on the Data Expansion Loop or the
ZONEX data terminals generates a PT BUS
TROUBLE report.
While the short remains, the panel responds as
though the sensor loop for each point
connected to the POPEX module was
shorted.
Check wiring for shorts.
A POPIT has its
switches set
incorrectly and it’s
sensor loop is
shorted.
74-06914-000-A 8/93
Remedy
Check to be certain all POPIT switches are set
correctly.
D7212 Installation and Troubleshooting Quick Reference
Page 4
© 1993 Radionics
System Wiring Diagram, Issue A
D126
BATTERY
12V 7Ah
D122 DUAL
BATTERY HARNESS
+
-
+
D126
BATTERY
12V 7Ah
J3
P
P
S
S
16 VAC
40 VA
60 HZ
TRANSFORMER
D1640
Low Battery
PHONE
LED
ON WHEN
COMMUNICATING
OFF WHEN IDLE
LOOP B
GROUND
START
Requires
Relay
#D136
In J5
RED
D7212
Digital Alarm Communicator Transmitter
Reference Manual #74-06144-000 figure #19 For Wiring Diagram
Reference Document #73-06143-000 for Compatible Smoke Detectors
6 7 5 8 9
1
2
3 D129
4
1 0 11 1 2 1 3
17-05823-000
Operation Monitor
Pulses When Normal
Flickers When Ringing
Solid When Held In Reset
GRN
P
P
S
P
S
P
UP TO EIGHT
SUPERVISED
D1255/D720
ARMING STATION
P
P
+
D8125 POPEX
AUX POWER TO TERMINAL 3
GND TO TERMINAL 9
TYPICAL INITIATING DEVICES ARE
DOOR CONTACTS NO/NC, FLOOR
MATS, MOTION SENSORS, GLASS
BREAK DETECTORS, ETC.
(FOR TYPICAL BURGLAR
ALARM APPLICATIONS)
D105 FL
EOL DEVICE
EXP
PORT
PROG
CONN
28
27
32
31
30
29
Reset Pin
Disable All Except Battery
Charging And Local Programming
SUITABLE FOR VALVE TAMPER
AND OTHER TYPES OF
EXTINGUISHING SYSTEM
SUPERVISION.
D105 FL EOL
DEVICE
11 12 13 14 15 16 17 18 19 20 21 22
D8004
TRANSFORMER
ENCLOSURE
REQUIRED FOR FIRE
INSTALLATIONS.
YEL
LEDs Off When Normal
Charging Status
P
MODEL No.
D161
TELCO
CORD
LINE SNIFFER SELECT
Loop Start
Ground Start
1
2
3
4
5
6
7
8
9
10
RED
S
P
P
S
PARALLEL
PRINTER
CONNECT UP
TO SIX
OCTORELAYS
UP TO 40
D8127 U/T
POPITS
D9131 PARALLEL
PRINTER
INTERFACE
D8128A OCTOPOPITS
UP TO FIVE MAIXIMUM
DATA
AUX
GND
P
S
- +
D125
- +
4
3
31
ZX
S
P
D126
BATTERY
12V 7Ah
D192A
-
AUX
PWR
ALARM TRIG
COM
IN
CKT
SUPV
ALARM
+
D128
TO RJ31X FOR
PRIMARY
PHONE LINE
TO RJ31X FOR
SECONDARY
PHONE LINE
P
D129 PROVIDES OPTIONAL
WATERFLOW ALARM RETARD
FEATURE. NOT SUITABLE FOR
2-WIRE SMOKE DETECTORS.
NOTE: USE ZERO RETARD EXCEPT
FOR WATERFLOW.
GND
AUX
OUT
IN
S
P
AS
REQUIRED
D8132
BATTERY
CHARGER
D126
BATTERY
12V 7Ah
LISTED
AUDIBLE
SIGNALING
DEVICES
RATED AT 10.2
TO 13.8 VDC
(DO NOT USE
VIBRATING
TYPE HORNS)
ECL DEVICE 15-03130-001
S
1 10 3 4 2
or
5
= SUPERVISED
P = POWER LIMITED
S
L
O
O
P
A
© 1993 Radionics
D7212 Installation and Troubleshooting Quick Reference
Page 5
74-06914-000-A 8/93
NCI #215
Troubleshooting Continued
Problems with Points (Continued from page 5)
Symptom
Diagnosis
All off-board points are Short on Aux Power,
MISSING.
terminal 3.
Remedy
Terminal 3 shares a common circuit breaker.
Check wiring and devices connected to this
terminal for shorts or grounds.
Problems with Command Centers
Symptom
Diagnosis
Remedy
Command centers
show erratic behavior.
A supervised address
has been entered in
more than one
command center.
Entering a supervised address in more than
one command center causes erratic behavior.
One or more of the
keys is stuck under
the faceplate
Press each of the keys on the command
center to be certain none of them is stuck.
Data connections
(yellow and green
wires) on one or more
command centers are
reversed, or only one
wire is connected.
Check to be sure that the yellow and green
data wires are correctly connected at all
command centers.
For example, the pip
that confirms you
pressed a key
"echoes" or the back
lighting flashes off and
on.
NO AUTHORITY
displays at command
center when you enter
your passcode to
perform a function.
Use a supervised address in one command
center only.
Check the User Interface section of the program to be sure the
function is enabled for Authority Level assigned to the passcode in the
Passcode Work sheet section of the program.
Check the Passcode Worksheet section of the program to be certain
the passcode is assigned to the area where you are attempting to
perform the function.
Check the Passcode Worksheet section of the program to see if the
passcode is restricted by a user window.
Check the Area Parameters section of the program to be certain the
area you are attempting to perform the function in is turned on.
74-06914-000-A 8/93
D7212 Installation and Troubleshooting Quick Reference
Page 6
© 1993 Radionics
Problems Programming the Panel
Before attempting to program the D7212, you should be familiar with the basic operation of the
D5200 programmer. See the D5200 Operation Manual (74-06176-000). If you still experience
problems, check for the symptoms below.
Symptom
The programmer
displays
PLUG IN 7212 when
you press SEND or
RECV.
Diagnosis
Remedy
The programmer is not 1. Verify that the data/power cord is plugged
correctly connected to
into the COMMUNICATOR port on the
the D7212.
D5200.
2. Verify that the data/power cord is plugged
securely into the D5200 programmer.
3. Check each conductor in the data/power
cord for continuity.
After plugging in the
programmer, the
panel transmits SDI
trouble reports for
supervised SDI
devices (command
centers, printer
interface modules,
etc.). All SDI devices
stop operating.
74-06914-000-A 8/93
AC induction through
the on-board point
sensor loops, the
DATA BUS, or the
ZONEX BUS.
1. Verify a proper earth ground at terminal 10.
You haven’t entered
the D7212 handler
within 30 seconds of
plugging in the
programmer.
Enter the D7212 handler within 30 seconds of
plugging in the programmer.
2
Disconnect on-board point sensor loops,
the DATA BUS (terminals 30, 31), and the
ZONEX BUS (terminals 27,28).
Once the SDI reports are generated, entering
the handler or disconnecting the programmer
returns the SDI devices to normal operation.
D7212 Installation and Troubleshooting Quick Reference
Page 7
© 1993 Radionics
Phone Line Trouble
Phone line problems can result in the D7212 going into Communications Failure.
Symptom
Diagnosis
Remedy
SERVC PH LINE #1
(or 2 if two lines are
used) appears in
command center
display.
D7212's phone line
monitor detects a
phone line as faulted.
1. Verify that the telephone cord is correctly
connected to the RJ31X and the D7212.
2. Verify the Ground Start Jumper is in the
correct position.
3. If using a ground start phone line, verify
D136 relay is in socket K6/J5.
4. Verify that the RJ31X jack is wired
correctly. The incoming phone line must
be wired to terminals 4 and 5. The inhouse phone system must be wired to
terminals 1 and 8.
5. Verify that all telephones are on-hook.
Leaving a telephone on hold after the
other party hangs up creates an off-hook
condition. Verify that no phones are on
hold.
If completing the steps above does not restore
the phone line, meter the phone lines. You
should meter at least 7.5 VDC when the line is
idle (on-hook). You should meter at least 13
mA of current when the line is active (off-hook).
If your readings are below the minimum values,
contact your telephone company repair
service.
Communications Failure
Follow the Phone Line Trouble procedure to verify that there is no problem with the phone lines
at the D7212 installation. If the phone lines are good, monitor the lines (preferably at the
receiver) for the symptoms listed below.
Symptom
Diagnosis
Remedy
The receiver answers
the call and provides
an initial “handshake”
acknowledgment, but
does not
acknowledge the
D7212's report
transmission with a
“kiss-off”
acknowledgment .
The receiver is not
compatible with the
D7212's transmission
format.
Verify that the receiver is compatible with the
format the D7212 is using (either BFSK or
Modem II). See Phone in the D7212 Program
Entry Guide (74-06915-000).
Modem II requires D6500 MPU and Line Card
EPROM revision 6.00 or higher.
Noisy phone lines are
interfering with report
transmission.
74-06914-000-A 8/93
Try making a voice call to the receiver on the
line to verify the noisy condition. It may be
necessary to have the phone company check
the lines.
D7212 Installation and Troubleshooting Quick Reference
Page 8
© 1993 Radionics
Communications Failure (Continued)
Symptom
Diagnosis
The line rings but the
D6500 receiver does
not pick up.
Line is not ringing at
the receiver.
1. Verify that the lines are correctly
connected to the receiver.
2. Verify that correct prefixes and phone
numbers for the receiver have been
programmed into the D7212.
RING indicator on line
card does not light.
Can not hear ring with
headset at receiver
location.
The line rings but the
receiver does not pick
up.
Remedy
If completing the steps above does not correct
the problem, contact your telephone company
repair service.
Line card in receiver
may be faulty.
Review receiver manuals for trouble shooting
procedures.
Calls are not reaching
the receiver.
1. Verify that correct prefixes and phone
numbers for the receiver have been
programmed into the D7212.
RING indicator on line
card lights. Can hear
ring with test set at
receiver location.
The D7212 reaches a
busy signal for all ten
attempts to reach the
receiver.
2. Verify that the phone lines are not shorted
between the phone company's equipment
and the receiver by placing a call to the
number for the receiver. If you hear the line
ring, but the ring detector doesn't light, or
if you hear a busy signal and the green on
line (OL) indicator is not lit, call the phone
company for service.
The receiver's call load Additional line cards and phone lines may be
is too great.
needed for the receiver.
The receiver answers
the call and provides
an acknowledgment
tone, but the
communicator does
not transmit reports.
The receiver is not
producing the correct
acknowledgement
tone.
Verify that the receiver is producing a 1400 Hz,
2300 Hz, or Modem II acknowledgment tone.
The D136 relay in J10 Insert the D136 relay in socket J10 correctly.
for ground start phone See the Relays section of this manual for
systems is inserted
instructions.
incorrectly.
74-06914-000-A 8/93
D7212 Installation and Troubleshooting Quick Reference
Page 9
© 1993 Radionics
Quick Reference Terminal Description
Terminal
Name
Description
1, 2
CLASS 2
TRANSFORMER
3
+ AUX POWER
4
BATTERY
NEGATIVE ONLY
Connect 12V, 7Ah rechargeable lead acid type battery’s negative terminal (-) to
terminal 4.
5 (+)
BATTERY
POSITIVE ONLY
Connect 12V, 7Ah rechargeable lead acid type battery’s positive terminal (+).
6 (+)
+ STEADY OR
PULSED
Supplies up to 2 A at 10.0 VDC to 13.9 VDC for steady or pulsed alarm output.
Use terminal 9 for common. Programmed as Relay A.
Shares circuit breaker with terminals 7 and 8.
7 (+)
+ ALTERNATE
Supplies up to 2 A at 10.0 VDC to 13.9 VDC for steady or pulsed alarm output. Use
terminal 9 for common. Programmed as Relay B.
Shares circuit breaker with terminals 6 and 8.
D136 Plug-in Relay required:
Install a D136 in socket K3 for output at terminal 7.
8 (+)
+ SWITCHED
AUX POWER
Supplies up to 1.4 Amps at 10.0 VDC to 13.9 VDC. Use terminal 9 for common.
Programmed as Relay C
Continuous output interrupted by CMD 47 or alarm verification.
Shares circuit breaker with terminals 6 and 7.
D136 Plug-in Relay required:
Install a D136 in socket K1 for output at terminal 8.
9
COMMON
10
EARTH GROUND
11, 13, 14,
16, 17, 19,
20, 22
ON-BOARD
POINTS
(Inputs)
Connect normally open and/or normally closed detection devices to loop wiring.
1 kΩ resistor required at end of loop.
12, 15, 18, 21
ON-BOARD
POINTS
(Common)
Loop returns for on-board points.
27
28
ZONEX IN 1
ZONEX OUT 1
29 (-)
COMMON
30
31
DATA BUS B
DATA BUS A
32 (+)
POWER +
Connect 16.5 VAC, 40 VA transformer for primary power supply.
Supplies up to 1.4A at 10.0 VDC to 13.9 VDC to powered devices. Use terminal 9 for
common.
Terminal 9 is common for Auxiliary Power, Alarm Power, Alternate Alarm Power, and
Switched Aux Power (terminals 3, 6, 7, and 8).
Connect to earth ground. A cold water pipe or grounding rod is preferred.
Do not connect to telephone or electrical ground.
Connect ZONEX module for points 9 to 48 and Octorelay modules for relays 1 to 48 to
these terminals.
Common terminal for SDI devices
Terminals 30 and 31 are a two wire bus that drives the command centers, printer
interface, and other SDI devices.
Power for command centers, printer interface and other SDI devices. This separate
protected power output for SDI devices is not affected by shorts on any other terminal.
© 1992 Radionics, Inc., Salinas, CA, U.S.A. All rights reserved.
™ The Radionics logo is a registered trademark of Radionics, Inc., Salinas, CA.
Radionics, Inc., 1800 Abbott Street
Salinas, CA, 93901, U.S.A.