1
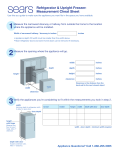
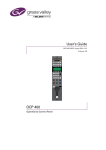
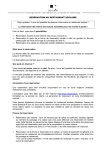
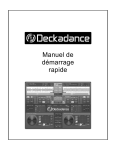
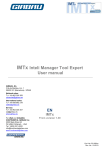
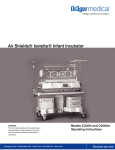
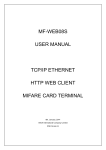
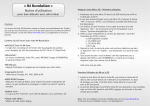
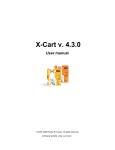
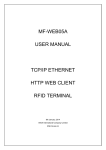
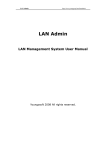
M3 DS REAL USER MANUAL
Index:
1……………………………………………………………….Getting Started
2……………………………………………………………….What’s Included
2……………………………………………………………….Main Menu
3……………………………………………………………….Running A Game
4……………………………………………………………….Game Saves
4……………………………………………………………….Cheat System
5……………………………………………………………….Running Homebrews
6……………………………………………………………….Boot Slot Option
7……………………………………………………………….Running GBA Games
8……………………………………………………………….Setting Options
9……………………………………………………………….Ski nning
Getting Started
Before using the M3 DS Real it is best to get the latest firmware installed first. Take the
system folder from the CD (or from the http://www.m3adapter.com/) and drag it onto the
card. This system folder contains all the files needed for running of the card. Create a folder
name “NDS” on the root of your M3 DS Real, this is where your games will be stored. Slot-2
Device are not require in order to run the M3 DS Real. Slot-2 device from these bundle solely
act as an additional add on for your gaming experience. You may insert these Slot-2 devices
according to your needs. These Slot-2 Bundle also allow you to connect to the internet via Wifi connection.
What’s Included
The M3 DS Real Box Contain:
•
•
•
•
•
A
A
A
A
A
setup Disc
M3 DS Real Cartridge
T-Flash Reader
M3 Ds Real Holder case
Rumble Pack Device
In the
•
•
•
•
•
•
GBA Expansion Pack Bundle Includes:
A setup Disc
A M3 DS Real Cartridge
A T-Flash Reader
A M3 Ds Real Holder case
A Rumble Device
A GBA expansion Device
In the
•
•
•
•
•
Rumble Ram Pack Bundle Includes:
A setup Disc
A M3 DS Real Cartridge
A T-Flash Reader
A M3 Ds Real Holder case
A Rumble Ram Device
Please be sure you are inserting your MicroSD Correctly
Main Menu
The Main Menu consist 7 options. Refer to the list below for their functions.
Games
My Card
Boot Slot
Media
PDA
Setting
GBA Function
From the Main Menu you are also adjust the screen brightness. On the Bottom Left corner
there is a ‘sun’ symbol, simply tab it with your DS pen to adjust the screen brightness. You
may also Press Y to change the brightness.
To check your firmware version, tab the Top Right corner from the main menu.
Running Games
To run games tab on the game icon, or press A while the game icon is highlighted.
There will be a screen with a list of games; these are the games you have stored in the “nds”
folder. You may also choose other directory where you have stored your games. Simply tab
on the Folder Icon in the Game Menu located in the bottom left corner. It will ask you which
directory you wish to load. To run a game simply tab on the game or press A on the
highlighted game. If you wish to insert the Rumble Device or the Rumble Ram Device please
insert it before you turn on your NDS, and make sure that your game is Rumble Ready. The
Rumble Device or the Rumble Ram Device will only rumble if the game is compatible. Once
you have selected your game, you will see a menu with these options:
Cheat Switch
Softreset Key
SlowMotion Switch
SlowMotion Level
From here you may activate any option you wish. After selecting the options tab “start” on
the bottom left or scroll down with your D-pad until you highlight the start button then press A
to start the game.
Game Saves
The Default saves for M3 DS Real ends with the extension “.0”. The M3 DS Real also has a
built in saves backup system. Simply Press Select when a game is highlighted on the
game menu and a list of 5 options will appear.
Default -> 1
Default -> 2
1 -> Default
2 -> Default
Blank
For example if you wish to backup your default .0 saves onto .1 save you would select the first
option then press A. It will ask if you want to "Replace Save" click "OK" wait for a few
second then you'll see "Backup Save Ok!" To Erase your default save press “Blank” you will
be asked “The save data of “Default” will be erased?” Tab “OK” to proceed.
Cheat System
A few simple steps can activate Action Replay Codes. Cheats can also be downloaded from
our website. Or you may wish to create your own cheat file. After having a cheat file you will
have to drag the cheat file onto your M3 DS Real. You may create a folder name “cheats” to
store your cheat files, which will become easier to find later on.
After you have drag the cheat database file onto your M3 DS Real, simply select this cheat file
on the game menu. You notice when you select a game it will open up to a list of options.
Select File...
Cheat Switch
Softreset Key
SlowMotion Switch
SlowMotion Level
At this point tab on "select file" locate where your cheat file is stored. Once you find your
cheat file tab it twice. A pop up will prompt Cheat Config it will ask you "Cheat file has been
changed, Overwrite the '.gmc' config file?" Tab "ok" After that press on your Right D-Pad you
will see the list of cheats available for the specific game you entered. Here just scroll and
press A to select the cheats you desire. After selecting the cheats press Left on the D-pad
then scroll to Start or tab Start to start the game with cheats.
At the bottom right corner you will see a message “[ Y ]- Download Play” In order to start
Download Play you need to start the game with the “Y” button instead of the “start” button.
Real Time Save
Enable RTS feature:
=====================
Just make sure the "RT Save(L+R+SL)" or "RT Save(L+R+Y)" option at "RTS/soft reset" pulldown menu of the game configuration menu has been selected. (There is only 1 save file for a
game by default. If users want to have more than one save file for the game, please press
"select" when highlighting the game at the game list menu and Select the "create is1" or
"create is2" option. In addition, if the capacity of the TF card is not enough for creating file,
users may also delete selected files in the "My Card" menu.)
Basic operation:
================
Just press "L+R+SL" or "L+R+Y" to activate RTS menu during game play.
Operation keys:
--------------[up/down] = select
[A] = confirm
[B] = Exit and return to game
Function of the items:
---------------------SAVE (save the game status from memory to default save file .is0)
LOAD (load the game status from default save file .is0 to memory)
SAVE BACKUP1 (save the game status from memory to save file .is1)
LOAD BACKUP1 (load the game status from save file .is1 to memory)
SAVE BACKUP2 (save the game status from memory to save file .is2)
SAVE BACKUP2 (load the game status from save file .is2 to memory)
MAIN MENU (Go back to the M3R main menu = soft reset)
Useful information:
Due to the restrictions of the system of nds, it's not easy to make it perfect. However, the
load/save function is stable and we tested over 3000 of games, about 95% of games are able
to use RTS function and all the status of those games can be restored and let me continue to
play the game without so many problems so the overall performance of the RTS function is
satisfied. To help users to use the RTC function smoothly, users may need to note the
followings:
1. Please do not activate the RTS menu at the beginning of game boot up such as logo graphic
is loading or showing. It's because the initial process of the game is usually still progress.
2. Please do not activate the RTS menu during which the data is being loaded or saved.
3. The graphic of a few games may not be able to restore perfectly upon loading back the
save file data into memory; we suggest users may re-try to restore the game (load) at another
moment. Usually, if users save the game at gameplay, please try loading back during
gameplay and not from the main menu. Another example, if users save the game at the 3D
state, we suggest loading the data back at the 3D state too.
4. The sound of a few games may temporary break upon loading back the save file data, we
suggest closing the cover of the NDS for a second then re-opening it again. Usually, it will be
able to recover without any problem in most cases.
Running Homebrew
Homebrew are run from the root of the M3 DS Real. You may also run Homebrew from a
subfolder. To see these files tab on My Card this is a file explorer where you can see all your
files on your M3 DS Real. Scroll down until you find the Homebrew that you wish to run.
Once you have the Homebrew highlight Press A to run it. You will be prompt with two icons:
Slot-1 or Slot-2 Select which device you would like to run the homebrew. If you have a Slot-2
device you may select Slot-2 to run the homebrew.
Boot Slot Option
This is the option where you choose which slot you wish to run. Slot-1 for NDS Cart, Slot-2 for
Gba Cart.
Running GBA Games
To run GBA Games from M3 DS Real, first make sure you have a Slot-2 device or the GBA Ram
Pack Device inserted. Now turn on your DS once the M3 DS Real Main Menu appears tab on
the GBA Icon, or scroll down with your D-pad and press A to enter the GBA Function. Once
you enter the GBA Option you will see a list of games. From here simply select the game that
you wish to run Press A or tab on the game to load the game.
Setting Options
Here you can set the Boot Menu On or Off and change the Skins for the M3 DS Real. Boot
Menu On means when you turn on your NDS it will go to the default NDS setting screen. Boot
Menu Off means when you turn on your NDS it will automatically boot M3 DS Real. Skins are
stored under ‘Skins’ in the System folder. Once you have the skins in the ‘skins’ folder you
may change the skin to the one you desire. You may also change your language from the
setting menu.
Skinning
You may wish to create your own Skins for the M3 DS Real with your favorite Image Editor.
All images must be in .bmp format. The dimension for the top and bottom screen image is
256x192 pixel.
Top background is named “TOP_DESKTOP” Bottom Background is named “DESKTOP”
Important note the Top background currently only support 8bit BMP. While the Bottom
background can be 24bit BMP.
Picture 1.1
Picture 1.1 Legends:
1. TOP_BAR
2. TOP_LINE
3. ABOUT_ON
4. MAIN_GAME_ON
5. MAIN_GBA_ON
6. MAIN_MYCARD_ON
7. MAIN_BOOT_ON
8. MAIN_MEDIA_ON
9. MAIN_PDA_ON
10. MAIN_SETTING_ON
11. BOTTOM_BAR
Picture 1.2
Picture 1.2 Legends:
1. MENU_BAR
2. MENU_LIST
Picture 1.3
Picture 1.3 Legends:
1. TABS_1
2. BUTTON_START_OFF
Picture 1.4
Picture 1.4 Legends:
1. TABS_2
2. SCROLL_BAR
3. OPTION_P_REJECT
4. OPTION_P_SELECT
Picture 1.5
Picture 1.5 Legends:
1. FOLDER
2. DS_FILE
When you see a image file that has “ON” or “OFF” within their names this indicates that these
images can have a Rollover Effect. For Example: With the “start” while it is unused it will be
“BUTTON_START_OFF” when you press on it it will become “BUTTON_START_ON” In which
case it means you will have to create 2 image in order for the RollOver Effect to work.
BUTTON_START_OFF
BUTTON_START_ON
The following Icons are capable of creating a 9 images animation effect.
MAIN_GAME_ON / MAIN_GAME_OFF
MAIN_MYCARD_ON / MAIN_MYCARD_OFF
MAIN_BOOT_ON / MAIN_BOOT_OFF
MAIN_MEDIA_ON / MAIN_MEDIA_OFF
MAIN_PDA_ON / MAIN_PDA_OFF
MAIN_SETTING_ON / MAIN_SETTING_OFF
MAIN_GBA_ON / MAIN_GBA_OFF
After creating 9 images for the animation name it as follows:
Example: MAIN_GAME_ON0.BMP, MAIN_GAME_ON1.BMP, MAIN_GAME_ON2.BMP,
MAIN_GAME_ON3.BMP,…….MAIN_GAME_ON9.BMP.
You may have less then 9 images just be sure to name them correctly. Maximum number of
images use in the animation effect is 9.
Once you have the whole skin created put all the images into a folder call Skin1, Skin2, Skin3,
or Skin4. This Skin folder will have to go under the system folder.
Features and functions may vary depending on the version of the firmware.