1
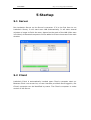
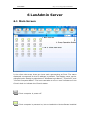
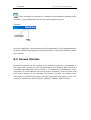
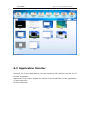
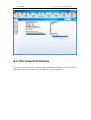
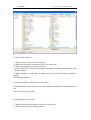
LAN Admin
http://www.youngzsoft.net/lanadmin/
LAN Admin
LAN Management System User Manual
Youngzsoft 2008 All rights reserved.
LAN Admin
http://www.youngzsoft.net/lanadmin/
1 Content
1
2
3
4
5
6
7
Content...................................................................................................................................2
Introduction..........................................................................................................................3
System Requirements.......................................................................................................4
Installation ............................................................................................................................5
Startup....................................................................................................................................6
5.1
Server .....................................................................................................................6
5.2
Client .......................................................................................................................6
LanAdmin Server ................................................................................................................7
6.1
Main Screen ..........................................................................................................7
6.2
Screen Monitor ....................................................................................................8
6.3
Application Monitor ............................................................................................9
6.4
File Collect/Distribute......................................................................................10
6.5
System Management ......................................................................................12
6.6
Desktop Share ...................................................................................................12
6.7
Screen Record....................................................................................................15
6.8
Settings ................................................................................................................16
Contact .................................................................................................................................18
LAN Admin
http://www.youngzsoft.net/lanadmin/
2 Introduction
LanAdmin is a powerful management solution for office LAN administration. It
provides a set of tools, which enables LAN administrator to manage and monitor
the users over the LAN more easily. As an LAN administrator, you can use it to
manage the LAN, teach your workmates and monitor remote PCs’ activities.
Main Features:
Screen Monitor: Monitoring remote PCs (snapshot high-resolution DVD
quality video / PowerPoint presentation / Flash animation) by an on-screen
selector (provides 5 sizes output from 32 x 24 thumbnail to 512 x 384
window) with
- Full screen switch
- Remote control
Application Monitor: Real-time running software applications monitoring
with multiple views
- Active software application name display view, with “Terminate” function
- All running software applications icon display view, with “Full path display”,
“Terminate one” and“Terminate all” functions
Screen Show: Projecting the local computer’s screen to remote computers.
It is a great training helper.
Remote Control: Enabling you to work on a remote computer in real time
as if you were using its own keyboard and mouse locally.
File Fetching / Distributing:
- Real-time browsing remote PC directories
- Sending files to ALL remote PCs
- Sending with instant open files to remote PCs
- Fetching folders / files from remote PCs
Screen record: Recording the screen and audio of the local and remote
computer and saving in wmv format.
Remote POWER ON/OFF, LOG-ON, LOG-OFF, RESTART PCs
100% User-friendly GUI. Easy to use. 100% Unicode compliant.
LAN Admin
http://www.youngzsoft.net/lanadmin/
3 System Requirements
Supported Operating Systems
.. Microsoft Windows 2000 with Service Pack 4 or above
.. Microsoft Windows XP Service Pack 2 or above
.. Microsoft Windows Server 2003
.. Microsoft Windows Vista
Applications
.. Windows Media Player 9 or above
.. Internet Explorer 6.0 or above
Server Computer
.. CPU: Pentium (III) 300MHz (Recommend Pentium (IV) or higher)
.. RAM: 256MB or higher recommended
.. HDD: 1.5GB of available hard disk space
.. Server Software Size: 36MB
.. Recommend display resolution
Single Monitor setting: 1,024x768 or 1,280x1,024
Dual Monitor Setting: Primary Monitor – 1,024x768 or 1,280x1,024
Extension Monitor – 1,024x768 or 1,280x1,024
.. Network Interface Card
Networking Requirements
.. At least ONE network connection
.. TCP/IP Protocols
.. Each computer must have a unique IP address and in the LAN. Consult with
the Network Administrator to verify that the IP addresses you intended to use
will not interfere with other system components. Set the same subnet mask for
all computers. IP address assignment of computer is both supported the static
and dynamic (DHCP) methods.
.. LAN Card: 100/1000 Mbps & supports Wake-on-LAN feature.
.. Switch: 100/1000 Mbps; * IGMP filter support recommended
http://www.youngzsoft.net/lanadmin/
LAN Admin
4 Installation
The installation processes of LanAdmin Server and LanAdmin Client are the
same.
1. Follow the on-screen instructions to install LanAdmin. Please note that you
have to accept the End-User License Agreement in order to use the software.
2. To install LanAdmin Server, select server in the dialog after welcome dialog.
To install LanAdmin client, select client.
3. Next, the system installs the mirror driver on the computer. While this is
being done, the screen flickers. This is normal.
4. Installation is now complete.
5. Runs LanAdmin Server it will prompt user to and input the license serial
number. If you get a valid serial number inputted, next time run LanAdmin
Server, the maximum number clients number will be displayed on the title bar of
the main window
LAN Admin
http://www.youngzsoft.net/lanadmin/
5 Startup
5.1 Server
Run LanAdmin Server on the Server’s computer. If it is the first time to run
LanAdmin Server, It will start scan LAN automatically. It will take several
minutes or longer to finish the scan, depend on the scale of the LAN. After scan
is finished, all detected computers will be added to Client view area of the main
window.
5.2 Client
LanAdmin Client is automatically invoked upon Client’s computer start up.
Because Client runs as service, no user interface provided. Once logged in, the
Client’s computer can be identified by name. The Client’s computer is under
control of the Server.
http://www.youngzsoft.net/lanadmin/
LAN Admin
6 LanAdmin Server
6.1 Main Screen
In the client view area, there are icons each representing a Client. The name
displayed corresponds to the IP address by default. The display name can be
changed under Setting by selections of “Windows Login Name”, “Client’s IP”, and
“Client’s Computer Name”. The icons can take on one or more indicators on the
Client’s desk to indicate the Client’s status:
Client computer is power off
Client computer is powered on, but no LanAdmin client software installed
LAN Admin
http://www.youngzsoft.net/lanadmin/
Client computer is powered on, LanAdmin client software installed in this
computer. It has established connection with LanAdmin Server.
Title Bar:
Minimize, Maximize, Close buttons are Self-explanatory. Click Language button
to select a different language versions of LanAdmin. Click Help button to load a
user manual.
6.2 Screen Monitor
Enables the user to see the screens of the Clients’ computers in thumbnails at
the same time. Cannot be used simultaneously with Desktop Share functions
(include screen show and remote control). Thumbnails are refreshed for every
3 seconds. To use a different monitoring screen resolution, click the arrow, and
then click a setting. As you increase the number of pixels, you display more
information of monitoring screens, but the information decreases in size. The
resolution options are 32x24, 64x48, 128x 96, 256x192 and 512x384.
LAN Admin
http://www.youngzsoft.net/lanadmin/
6.3 Application Monitor
Shows a list of the applications /current browsing URL that are current on all
Clients’ computers.
Right-click on the list to display the options to terminate the current application
on any particular
Client’s computer.
LAN Admin
http://www.youngzsoft.net/lanadmin/
6.4 File Collect/Distribute
The uses of the two file list boxes are akin to Windows Explorer. The two icons at
the top of each file list box are “Up One Level” and “Refresh”.
LAN Admin
http://www.youngzsoft.net/lanadmin/
To send a file to Client
1. Select the file in the Server’s list box.
2. Select the Client to receive the file in the Client list.
3. Select the path in the Client’s list box.
4. Click “Send”. If it is desired to open the file upon successful transmission, click
“Send & Open”.
5. When transfer is complete, a dialog will pop up on the Client’s computer
listing
the files transferred.
An alternate way to send a file to the Client:
Select the path in the Client’s list box, and drag the desired file from the Server’s
list
box to the Client’s list box.
To obtain a file from Client
1. Select the Client who has the file in the Client list.
2. Select the file in the Client’s list box.
LAN Admin
http://www.youngzsoft.net/lanadmin/
3. Select the path in the Server’s list box.
4. Click “Receive”.
5. The file is saved in the Server’s computer under the folder with the Client’s
name. If the folder does not yet exist, it is automatically created.
An alternate way to receive a file from the Client:
Locate the file in the Client’s list box, and then select a directory in the Server’s
list
box. Next drag the file into the Server’s list box.
When a group of Clients is selected instead of one single Client before transfer,
sending a file causes the file to be copied to the same path of the relevant
Clients’ computers. Similarly, the Receive command obtains the file of the same
name under the same path from the relevant Client’s computers and stores
them under folders of their respective names. The drag-and-drop method works
in the same way when sending or receiving with respect to multiple Client
computers.
6.5 System Management
Power On, Power Off, Restart Windows, Remote Login, Remote Logoff,
Disconnect
Self-explanatory. Select the client and click the command to execute the
namesake functions.
6.6 Desktop Share
6.6.1 Screen Show
Select the Screen Show function under the Desktop share menu, server’s screen
will be sent to all clients’ computers. A toolbar will auto hide on the Server’s
screen middle top edge. At the same time, the Server’s screen is displayed on all
LAN Admin
http://www.youngzsoft.net/lanadmin/
Clients’ screens. When user’s mouse moves near the screen middle top edge,
the toolbar will appears
Auto Hide
This is a toggle button. Once clicked, the toolbar will be fixed on the top edge of
screen. Clicked again, the toolbar will be auto hide when mouse move out of it.
Pause
Pauses the screen show When Pause is activated, the Clients’ screens are frozen
and the Server’s screen is not displayed until Pause is deactivated.
The default screen will be displayed in full window. In window mode
broadcasting, Server screen and Client screen neatly fit each other in Client
computer screens, e.g. the upper half of the screen displaying the Server’s
screen and the lower half of the screen displaying the program in use. Clients
can adjust the size and position of the Server’s projection window screen and
place it on the desktop according to their own desire.
Close
Quits Server broadcast mode and returns control of the Client’s computer to the
Client.
6.6.2 Remote Control
You can use remote control to display the desktop of remote computer on the
LAN Admin
http://www.youngzsoft.net/lanadmin/
screen of your PC computer. It allows you to use your mouse and keyboard to
control software is running on the remote computer. It means that you can work
on a remote PC as if you were sitting in front of usual computer. Unlike Windows
remote desktop, the Server and Client share the same session. It means that
the Client has control of the mouse cursor only when the Server does not move
his mouse. In addition, a toolbar appears at the middle top edge of the screen to
provide for various functions.
Auto Hide
This is a toggle button. Once clicked, the toolbar will be fixed on the top edge of
screen. Clicked again, the toolbar will be auto hide when mouse move out of it.
Send Ctrl-Alt-Del
On Windows 2000 system, it requires user to press Ctrl-Alt-Del key to invoke
the logon dialog. But when user presses Ctrl-Alt-Del key during remote control,
It will invoke the task manager on the local desktop, so to avoid this problem,
we provide a button to send Ctrl-Alt-Del key to remote client system.
Close
Quits remote control mode and returns control of the Client’s computer to the
Client.
LAN Admin
http://www.youngzsoft.net/lanadmin/
6.7 Screen Record
6.7.1 Local Screen Record
Records the screen and the audio of the Server’s computer and saves it in .wmv
format.
“Record” button to start screen capturing. Select a directory and input name
where you would like to screen recorded to be saved. “Pause” button to
temporarily pausing record. “Stop” button to finish screen recording.
6.7.2 Remote Screen Record
LAN Admin
http://www.youngzsoft.net/lanadmin/
6.8 Settings
6.8.1 View Setting
Position displays the option to lock the position of the Client icons.
Wallpaper enables background display for the class layout.
Client Icon Name Display Option defines the naming format of icon displays.
LAN Admin
http://www.youngzsoft.net/lanadmin/
6.8.2 Net Type Setting
Choose High Speed LAN for a stable, wired LAN, such as 100M or GigaByte
Ethernet.
Choose Low Speed LAN for a wireless LAN or 10M Ethernet.
http://www.youngzsoft.net/lanadmin/
LAN Admin
7 Contact
LAN Admin
Youngzsoft
[email protected]
http://www.youngzsoft.net/lanadmin/