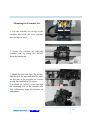
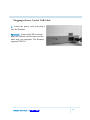
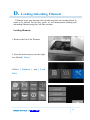
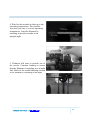
1
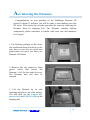
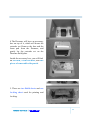
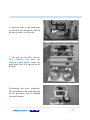
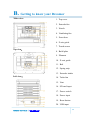
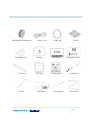
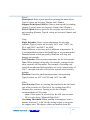
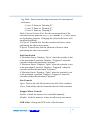
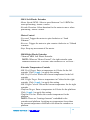
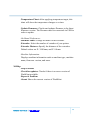
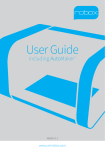
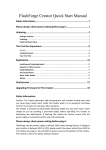
User Guide
Dreamer Desktop 3D Printer
Dreamer User Guide | www.ff3dp.com
1
Dreamer User Guide | www.ff3dp.com
2
CONTENTS
WELCOME TO FLASHFORGE DREAMER
A. How to use this manual
B. The FlashForge Experience and Promise
C. Understanding 3D Printing in 3 Minutes
Chapter 1. SETTING UP THE DREAMER
A. Getting to know your Dreamer
B. Unboxing the Dreamer
C. Hardware assembly
C1. Changing voltage on Dreamer power supply
C2. Mounting the extruder set
C3. Installing filament
C4. Plugging in power cord & USB cable
D. Loading/unloading filament
D1. Loading filament
D2. Unloading filament
E. Leveling the build plate
Chapter 2. A THOROUGH LOOK AT THE FLASHPRINT SOFTWARE
A. Overview of the functions
Chapter 3. MAKING YOUR FIRST PRINT
A. Overview
B. Single & dual-extrusion print
B1. Single-extrusion print
B2. Dual-extrusion print
C. Methods of printing
C1. Printing from USB
C2. Printing from SD card
C3. Printing from Wi-Fi
C4. Printing with support
Chapter 4. ADDITIONAL INFORMATION
A. Getting support
Dreamer User Guide | www.ff3dp.com
3
WELCOME TO
FLASHFORGE DREAMER
A. How to use this manual
B. The FlashForge Experience & Promise
C. The 3D printing process
Dreamer User Guide | www.ff3dp.com
Dreamer User Guide | www.ff3dp.com
4
4
A. How to use this manual
This user manual is divided into four chapter for ease of navigation
and will use examples based on Microsoft Windows 7 operating system.
The first chapter lays out the guide on setting up the Dreamer and
preparing for its first print. You will learn the ins and outs of FlashPrint
software in the second chapter. The third portion is the actual printing and
covers the procedures for various methods of printing and techniques.
The last chapter includes information regarding obtaining support.
PRECAUTION:
Prior to powering on the Dreamer, make sure the power supply switch is set
to 115V if you are located in the United States and Canada. For other
countries, please refer to your country’s AC output voltage. Failure to do so
will damage the mainboard . For instructions on how to do this, please refer
to page 14.
Please make sure to read this section carefully prior to setting up
and operating the Dreamer.
· The Dreamer is very sensitive to static electricity, so please make sure
you contact a grounded object before operating the machine.
· Before repairing or making any alterations to the Dreamer, it is essential
that the machine is turned off, and the power cord is unplugged.
· The Dreamer operates at a very high temperature; allow the nozzle,
extruded plastic and heating plate to cool before touching.
· Certain types of plastic filament may give off a slight odor when
heated. Because of this, the Dreamer should always operate in a
well-ventilated area.
· Do not leave the Dreamer unattended when in operation.
Dreamer User Guide | www.ff3dp.com
5
B.The Flashforge Experience and Promise
The Flashforge Experience
Congratulations on your purchase of the Flashforge Dreamer 3D
desktop printer. You may already had prior experience with other
Flashforge products or know the technology behind 3D printing. However,
we still recommend that you read this manual as it contains important
information helpful to getting the best experience out of the Dreamer. By
following the user manual thoroughly and correctly, you will be able to
make your first print in no time. If you’d like to go over the fundamentals
of 3D printing and how it works, please read page 7.
The Flashforge Promise
Our team is composed of geeks and makers who are passionate about
3D printing and want to share this new technology with the world. We
understand the importance of product and service support, especially the
challenges that a new technology may bring along. With FLASHFORGE,
you can always expect a close, personal service from our team of experts.
At FLASHFORGE, we understand that 3D printing is a new
technology to many individuals. Our aim is to educate and guide you
through the entire process of 3D printing. With 3D printing, there are no
limits — you can go as far as your imagination takes you. With the
Dreamer, dreams are no longer simply just imaginations. They can
become physical realities that you can hold, touch, and feel. It is amazing
to see a 3D printer turn an idea into real life, layer by layer, and we are
delighted to have you on-board with us to experience this phenomenon!
Dreamer User Guide | www.ff3dp.com
6
C.Understanding 3D Printing in 3 Minutes
What is 3D Printing?
Simply put, 3D printing is transforming three-dimensional models into
physical objects that you can hold and touch. It is also called additive
manufacturing because the 3D model is created by “adding” layers upon
layers of material until the object is fully formed.
The Technique
Fused filament fabrication is the most common method of 3D printing.
It is also the method that the Dreamer uses. It works by melting plastic
material called filament onto a print surface using high temperature. The
filament solidifies after it cools down, which happens instantaneously
after it is extruded from the print head. 3D objects are formed with the
filament laying down multiple layers.
3D Printing Process
3D printing involves three steps: 1.) 3D model design, 2.) Slicing and
exporting the 3D model, and 3.) Making the print
1. Designing the 3D Model: Currently, there are three ways of creating a
3D model.
Designing From Scratch. You can use free CAD (computer aided
design) software such as Google Sketchup, Tinkercad, and Blender to
design your very own 3D model. Or grab a copy of one of the
commercial 3D design software such as AutoCAD, Maya, or Rhino3D.
3D Scanners. An alternative method to creating a 3D model is to scan
an object. 3D scanners work by digitizing a physical object, collecting its
geometric data, and saving it to a file on your PC. There are also apps that
can turn a mobile device into a 3D scanner.
Dreamer User Guide | www.ff3dp.com
7
From the Cloud. The most popular way of obtaining a 3D
model is to download it from websites that allow users to upload
3D models that they designed.
2. Slicing and Exporting the 3D Model:
A slicing software is required to process and interpret the 3D model
into the language that 3D printers can understand. The FlashPrint is the
slicing software used for the FlashForge Dreamer.
FlashPrint will slice the 3D model into numerous layers and output it
as a .g file, which is the format read by the Dreamer. The file is then
transferred to the Dreamer by USB cable, SD card, or Wi-Fi.
3. Making the Print:
Once the output file has been transferred to the Dreamer, it will start to
turn the 3D model into a physical object by laying down layers of
filament.
Dreamer User Guide | www.ff3dp.com
8
Chapter 1.
SETTING UP
THE DREAMER
A. Unboxing the Dreamer
B. Getting to know your Dreamer
C. Hardware assembly
D. Loading/unloading filament
E. Leveling the build plate
Dreamer User Guide | www.ff3dp.com
Dreamer User Guide | www.ff3dp.com
9
9
A.Unboxing the Dreamer
Congratulations on your purchase of the Flashforge Dreamer 3D
printer! In about 15 minutes, you will be ready to start making your first
3D object. This section lays out the procedure for correctly removing the
Dreamer from its shipping box. The Dreamer contains delicate
components; please remember to handle with extra care and attention.
Let’s begin!
1. Put Dreamer package on the clean,
tidy workbench,using a knife to cut the
tape ,then you can see two quick start
guide,which will guide you know our
Dreamer 3D Printer.
2. Remove the top protective foam
pieces, which also houses the
Dreamer ’s lid. Set this aside for now.
The Dreamer unit will then be
exposed.
3. Lift the Dreamer by its side
openings and place it on a flat surface.
You will then see the Expert Kit,
power cord, and USB 2.0 cable in the
shipping box.
Dreamer User Guide | www.ff3dp.com
10
4.The Dreamer will have an accessory
box on top of it, which will house the
extruder set. Remove the box and the
foam pad from the Dreamer, and
gently lay the extruder set on the
Dreamer build plate.
Inside the accessory box, you will find
an SD card, a side fan duct, and two
pieces of removable side panels.
5. There are two Build sheets and one
leveling sheet used for printing and
leveling.
Dreamer User Guide | www.ff3dp.com
11
6. Hold the sides of the build plate
as shown in the illustration, and lift
up slowly until it is at the top.
7. You will see one ABS and one
PLA filament roll and two
filament spool holder under the
build plate once it is moved out of
the way.
8.Unboxing has been completed.
The illustration to the right includes
all the accessories that is included
with the Dreamer.
Dreamer User Guide | www.ff3dp.com
12
B. Getting to know your Dreamer
Main view:
1. Top cover
2. Extruder fan
3. Nozzle
4. Ventilating fan
5. Front door
6. Z axis guide
7. Touch screen
Top view:
8. Build plate
9. Filament
10. X axis guide
11. Belt
12. Spring strip
13. Extruder intake
Left view:
14. Turbo fan
15. Vent
16. SD card input
17. Power switch
18. Power input
19. Reset button
20. USB input
Dreamer User Guide | www.ff3dp.com
13
ABS and PLA filament(2)
Fan Baffle Cap
Tweezers
Scraper
Power Cord
USB Cord
Kit Box
Build Sheet
SD Card
Leveling Sheet
Screw Box
Dreamer User Guide | www.ff3dp.com
Carving Knife
Vent(2)
Quick State Guide
Screwdriver
Sensor line
14
C. Hardware Assembly
The Dreamer comes pre-assembled and is almost ready-to-print (ARP).
All you need to do is set the appropriate voltage, mount the extruder set,
and install the filament. It will only take between 5 to 10 minutes before
you can fire up the Dreamer and prepare for your first 3D print!
PRECAUTION:
FlashForge Dreamer uses a switching power supply with 115V/230V.
Prior to installing the hardware, it is critical to check the AC output
voltage of your home or workplace. The power supply should be
switched to reflect your AC output voltage. Failure to do so will cause
severe damage to the Dreamer. Please follow the steps below to switch to
the correct voltage.
For the United States and Canada, the correct voltage to use is 115V.
For most European countries, use 230V. Please double-check as
FLASHFORGE will not be responsible for damages as a result of
improper care.
Dreamer User Guide | www.ff3dp.com
15
Mounting the Extruder Set
1. Lay the extruder set on top of the
extruder seat with the two extruder
fans facing the front.
2. Secure the extruder set onto the
extruder seat by using two M3x12
from the bottom up.
3. Install the side fan duct. To do this,
find the side fan duct and attach it onto
the left side of the extruder set. Secure
it with the supplied M3x8 screw.
Tip: place the M3x12 screw through
the mounting hole of the extruder seat
first. Afterwards, align the extruder set
and tighten.
Dreamer User Guide | www.ff3dp.com
16
Installing Filament
1. Lock the filament in place by
securing it with the filament spool
holder and turning it counterclockwise.
2. Feed the filament through the
filament guide tube. Attach the guide
tube onto the two filament guide tube
brackets.
3.Stick the build sheet to the build
plate after installing filament, as
picture shows.
Dreamer User Guide | www.ff3dp.com
17
Plugging in Power Cord & USB Cable
1. Locate the power cord, and plug it
into the Dreamer.
Optional: Locate the USB cord and
plug one end into the Dreamer and the
other into your computer. The Dreamer
supports USB 2.0.
Dreamer User Guide | www.ff3dp.com
18
D. Loading/unloading Filament
Filament must pass through the extruder and into the heating block in
order to be melted. In this user guide, we will demonstrate loading and
unloading filament using the left side extruder.
Loading filament:
1. Remove the lid of the Dreamer
2. From the main menu, press the right
icon labeled [ Tools ].
3.Select [ Filament ] and [ Load
Left ].
Dreamer User Guide | www.ff3dp.com
19
4. Wait for the extruder to heat up to the
operating temperature. The extruder
will alert you once it is at the operating
temperature. Load the filament by
inserting it into the extruder at an
upright angle.
5. Filament will start to extrude out of
the nozzle. Continue loading to ensure
that the filament is extruding in a straight
line. Refer to the troubleshooting section
if the filament is extruding at an angle.
Dreamer User Guide | www.ff3dp.com
20
Unloading filament:
1. Remove the lid of the Dreamer
2. From the main menu, press the right
icon labeled [ Tools ].
3.Select
[ Filament ] and [Unload
Left ].
4. Wait for the extruder to heat up to the
operating temperature. The extruder
will alert you once it is at the operating
temperature. Unload the filament by
gently guiding it out of the extruder.
Dreamer User Guide | www.ff3dp.com
21
E. Leveling the Build Plate
A correctly leveled build plate will almost always guarantee a quality
3D object. When printed objects have issues, the first step to diagnose is
to check and double-check to make sure the build plate is leveled. A
general rule of thumb is to leave a gap that is the thickness of a piece of
paper. However, for printing finer objects (150 micron and lower), please
use a feeler gauge to level the build plate as it requires a lesser gap
between the nozzle and the build plate.
The Dreamer utilizes a three-point leveling system for its build plate.
At the bottom of the build plate, there is one spring-loaded screw in the
front and two in the back. Tightening the screw will create a bigger gap
between the build plate and the nozzle while loosening it will create
lesser gap.
1. From the main menu, select
[Tools] and [Level]. The extruder
and the build plate will begin to
move to the starting position.
Dreamer User Guide | www.ff3dp.com
22
2. Take out the leveling sheet
(QR-Code for leveling video can be
scanned)
3. Once the extruder and build plate
stops moving, slide the piece of paper
continuously back and forth between
the nozzle and the build plate. And
simultaneously adjust the screw just
enough so that the paper causes a
slight friction.
4. Press [ NEXT ] and wait for the
extruder to move to the second
position. Slide the paper back and
forth again, and adjust the screw to
create the same amount of friction as
the previous step.
5. Press [ NEXT ] again and repeat
the same leveling technique.
Dreamer User Guide | www.ff3dp.com
23
5. Press [ NEXT ]. The nozzle will
move to the center of the build plate.
Slide the paper through to make sure
there is a slight friction. Slowly adjust
all the screws by the same amount if
there is no friction or too much
friction.
6. Press [ FINISH ] once you have
finished this.
Dreamer User Guide | www.ff3dp.com
24
Chapter2.
A THOROUGH LOOK AT THE
FLASHPRINT SOFTWARE
A. Overview of the function
Dreamer User Guide | www.ff3dp.com
Dreamer User Guide | www.ff3dp.com
25
25
A. Overview of the function
FlashPrint is an application with advanced functions that integrates
seamlessly with the Dreamer to make it print like a dream. It is an
all-in-one solution, with functions such as controlling the Dreamer
remotely, printing over Wi-Fi, and having separate, customizable, settings
for the left and right extruders. The team at FlashForge is consistently
updating FlashPrint to include additional functions that work seamlessly
with the Dreamer.
Main Functions/Icons:
A. Load
B. Print
C. Look
D. Move
E. Rotate
F.Scale
G.Extruder
Menu Functions
H. File
I. Edit
J. Print
K. View
L. Tool
M. Help
Dreamer User Guide | www.ff3dp.com
26
Explanation of the Functions
A. Load: Loads an “stl” format file to FlashPrint. The object will appear
on the screen after a successful load.
B. Print: Prints the object as it appears on the screen. Different printing
methods are available (see the part on “Initial Print”). Clicking
on this will prompt slicing settings where you will be able to
adjust print speed, print material, and more.
C. Look: Allows user to view the object on the platform. Press and hold
the left mouse button to pan the view. Press and hold the right
mouse button to rotate the view.
D. Move: Allows user to move objects around the virtual build platform.
The coordinates (0,0,0) indicate the middle of the platform.
Changing the x, y, and z numbers will result in displacement of
the object:
· Increasing x value = moving object to the right
· Decreasing x value = moving object to the left
· Increasing y value = moving object to the back
· Decreasing y value = moving object to the front
· Increasing z value = moving object to the up
· Decreasing z value = moving object to the down
NOTE: Moving the object up or down (z-axis) may result in the object not being set on
the platform hence fail to print. Always make sure to put the object on the platform before
printing.
· On Platform: Brings the object to the platform and make sure it
prints successfully.
· Center: Brings the object to the middle of the platform.
· Reset: Reset all the position displacement changes have been
made to the object.
Dreamer User Guide | www.ff3dp.com
27
E. Rotate: Allows user to rotate the object respect to x, y, and z axis.
· Reset: Resets all the position changes that have been made to
the object.
F. Scale: Allows user to scale the object to a different size. You can
scale the object either by the actual dimension of the object or by
percentage.
· Uniform scaling: When this option is checked, changing one
of x, y and z axis values will change all three. This is to ensure
the shape of the object is not affected by changing its size.
(NOTE: Unchecking this box and changing one of the axis values will result in
changing the shape of the object).
· Maximum: Automatically scale the object to the maximum size
that the printer can print.
G. Extruder: Allow users to choose which extruder they would like to
print the object. Object that print with either extruders would
show in the corresponding color.
H. File:
· Load: Loads the “stl” file to the program, the object will appear
on the screen after a successful load.
· Save Scene: Saves the file as it appears on the screen.
· Example: Sample 3D designs included in FlashPrint that users
can print from.
· Recent Files: Files that are currently loaded will be shown here.
· Preference:
· Language: Allows users to choose language
for the software.
Languages that are available now are English, Chinese
Simplify, Chinese Traditional, and Japanese.
· Checks for update after start: This option allows FlashPrint to
check for update. If an update is available, it will prompt users
to update the software version.
· Quit: Exit the software.
Dreamer User Guide | www.ff3dp.com
28
I. Edit:
· Undo: Undo the last step of modification to the file.
· Redo: Redo an “Undo.”
· Select All: Selects all the objects on the build plate.
· Duplicate: Copy and paste the selected object.
· Delete: Delete the selected object.
J. Print:
· Connect: Allow users to connect the Dreamer to FlashPrint by
either USB or Wi-Fi.
· Disconnect: Disconnects a connection. This option will be grayed
out when there is no connection established.
· Print: Prints the object as it appears on the platform.
· Preview: When this box is checked, a summary will be shown
after slicing. It shows the length the filament will be used, the
estimated time, and the total layers (on the left) for the print
job. User can also scroll the bar on the left hand side of the
screen to see the partial object by layers.
· Print When Slice Done: Printing will automatically start after
FlashPrint finishes slicing the model.
· Slice Engine: The engine used to slice the object. Slicing
engines currently available are Slic3r and Skeinforge. Certain
options/functions are only available for the specific slicing
engine.
· Machine Type: Choose the number of extruders to print with.
Selecting FlashForge Dreamer will print with both extruders
while FlashForge Dreamer Single will print with one extruder.
(NOTE:When choosing FlashForge Dreamer Single, make sure that the
extruder you selected has filament pre-loaded.)
· Material Right: Choose the material that will be used for the
right extruder.
Dreamer User Guide | www.ff3dp.com
29
· Material Left: Choose the material that will be used for the left
extruder.
· Supports: Enable/disable support for the object. (Note: Excessive
overhang usually requires support to print successfully.)
· Resolution: Presets values for layer thickness, infill, and speed.
These values can be modified at “More Options.”
· Wall (Available for Slic3r): Builds a wall around the object with the
same height.
· Raft (Available for Skeinforge): Builds a raft under the 3D object.
· Skirt: Builds a single layer wall/outline around the object.
· More Options:
· Layers
· Layer Height: Smaller number means higher resolution.
typical values are between 0.1 and 0.5 (100 to 500 microns).
Use 0.5 for fast prototypes and 0.1 for fine details.
· First Layer Height (Available for Slic3r): Enter the layer
height of the first layer. A small value of layer height requires a
more precise leveling in order for the filament to stick.
Sometimes it is difficult to accomplish. By adjusting the first
layer height, it allows user to print a fine object with a higher
success rate.
· Number of Shells: Enter the number of layers that surrounding
the object. Typical values are between 1 and 5.
· Infill
· Fill Density: Enter the density value of the object. 0% means
completely hollow and 100% means completely solid. Typical
values are between 3% and 50%.
· Fill Pattern: Select the pattern for printing the infill. Available
patterns are line, rectangle, and hexagon.
Dreamer User Guide | www.ff3dp.com
30
· Speed
· Print Speed: Enter a print speed for printing the main object.
Typical values are between 30mm/s and 120mm/s.
· Support Print Speed (Slic3r): Enter a print speed for printing
support. Typical values are between 30mm/s and 120mm/s.
· Travel Speed: Enter a speed for the extruder travel when it is
not extruding filament. Typical values are between 30mm/s and
120mm/s.
· Temp
· Right Extruder: Enter a print temperature for the right
extruder. Typical values are between 180˚C and 200˚C for
PLA, and 200˚C and 240˚C for ABS.
Note: Different colors may melt at different temperatures. It
is recommended to print with FlashForge or its recommended
filament brands as sub-par quality filaments will clog and
damage the extruder.
· Left Extruder: Enter a print temperature for the left extruder.
Note: When printing using only one extruder, settings for the
other extruder will not matter. For example, if printing only
with left extruder and both extruders are set to a temperature of
220˚C, the right extruder will not heat up at all when actually
printing.
· Platform: Enter the platform temperature when printing.
Typical values are 50˚C for PLA and 110˚C for ABS.
· Other
· Turn Fan On: There is a cooling fan attached to the left hand
side of the extruder set. This fan is for cooling down PLA
filament after extrusion. Turning on the fan is highly
recommended for PLA prints.
· Auto: if this option is selected, the fan will turn on when
PLA is selected at “Material Right/Left.”
· Overhang Threshold: When printing with support, enter a
number between 0˚ to 90˚ for the slicing engine to recognize
the support area. The degree values are measure from the
Dreamer User Guide | www.ff3dp.com
31
horizontal to the tangent line of the curve.
· Exterior Support Only (Available for Skeinforge): When this
option is checked, only exterior support will be built. For
example, when printing letter “O,” supports will be considered
as interior support and when printing a letter “F,” supports will
be consider exterior support.
· Restore Defaults: Reset all the changes to system default.
· Save Configuration: Save all the settings on this page. When slice
another object, it will load these saved settings.
K. View: Gives users 7 different directions to view the object.
· Show Model Outline: Displays an outline of all the objects.
· Show Steep Overhang: Displays steep overhang that possibly
needs support when printing.
L. Tools (only available when Dreamer is connected to FlashPrint via USB)
· Control Panel
· Homing
· Homing X: Move the extruder set to the right side until it
triggers the x-axis sensor and stop.
· Homing Y: Move the extruder to the back until it triggers the
y-axis sensor and stop.
· Homing Z: Move the build plate up until it triggers the z-axis
sensor and stop.
· Homing All: Perform homing for x, y, and z.
· Jog Mode
· Move the extruders and the platform to the direction of the
arrow buttons indicated. Pressing the button once will move
the extruders/platform by the increment selected at the dropdown menu.
· Stop: When the extruders/platform is moving, this button will
stop this movement immediately.
Dreamer User Guide | www.ff3dp.com
32
· Jog Mode: Select from the drop down menu for increment of
each move.
· Center X: Same as “Homing X.”
· Center Y: Same as “Homing Y.”
· Center Z: Same as “Homing Z.”
· Make Current Position Zero: Set the current position of the
extruders and the platform as (0, 0, 0). (NOTE: X, Y, and Z boxes
are for display purposes. Changing the value in the boxes will
not affect anything.)
· X/Y Speed: Controls how fast the extruders will move when
performing the above movements.
· Z Speed: Controls how fast the platform will move when
performing the above movements.
· End-Stop Switch
· X Maximum Status: Displays “Open” when the extruder is not
at the maximum X position. Displays “Triggered” when the
extruder reaches the maximum x position.
· Y Maximum Status: Displays “Open” when the extruder is not
at the maximum Y position. Displays “Triggered” when the
extruder reaches the maximum Y position.
· Z Minimum Status: Displays “Open” when the extruder is not
at the minimum z position. Displays “Triggered” when the
extruder reaches the minimum Z position.
· Fan Controls
· Open: Turn on the side fan located at the left of the extruders.
· Close: Turn off the side fan located at the left of the extruders.
· Stepper Motor Controls
· Enable: Unlock the motor to be controlled manually.
· Disable: Lock the motor so it does not allow any movement.
· LED Color: Change the LED color of the Dreamer.
Dreamer User Guide | www.ff3dp.com
33
· MK 8 Left Plastic Extruder
· Motor Speed (RPM): Select a speed between 2 to 10 RPM for
when performing “Motor Control.”
· Extrude Duration: Select duration for the motor to move when
performing “Motor Control.”
· Motor Control
· Forward: Trigger the motor to spin clockwise as “Load
Filament.”
· Reverse: Trigger the motor to spin counter-clockwise as “Unload
Filament.”
· Stop: Stop any movement of the motor.
· MK8 Right Plastic Extruder
· *Same as MK8 Left Plastic Extruder.
NOTE: When on “Motor Control”, the right extruder spins
counterclockwise for “Forward” and clockwise for “Reverse”.
· Extruder Temperature Controls
· MK 8 Left Target: Enter a temperature in Celsius for the left
extruder. Click [ Apply ] to apply this setting.
· MK 8 Left Current: Shows the current temperature for the left
extruder.
· MK 8 Right Target: Enter a temperature in Celsius for the right
extruder. Click [ Apply ] to apply this setting.
· MK 8 Right Current: Shows the current temperature for the right
extruder.
· Platform Target: Enter a temperature in Celsius for the platform.
Click [ Apply ] to apply this setting.
· Platform Current: Shows the current temperature for the
platform.
NOTE: There are “heating elements” embedded in the
extruders and platform. Applying any temperature lower than
the current temperature would not cool down the extruders or
platform.
Dreamer User Guide | www.ff3dp.com
34
· Temperature Chart: After applying temperature target, this
chart will show the temperature changes over time.
· Update Firmware: Checks and updates Dreamer to the latest
firmware version. The Dreamer must be connected via USB in
order to update.
· On Board Preferences:
· Machine Name: Change the name of the Dreamer.
· Extruder: Select the number of extruder of your printer.
· Extruder Distance: Specify the distance of the extruders.
Default values are X: 34.00mm, and Y: 0.0mm.
· Machine Information:
Displays machine information such as machine type, machine
name, firmware version, and more.
M.Help
· Help Contents
· Check for updates: Checks if there is a newer version of
FlashPrint available.
· Report A Problem
· About: Shows the current version of FlashPrint.
Dreamer User Guide | www.ff3dp.com
35
CHAPTER 3
MAKING YOUR
FIRST PRINT
A. Overview
B. Single & dual-extrusion print
C. Methods of printing.
Dreamer User Guide | www.ff3dp.com
Dreamer User Guide | www.ff3dp.com
36
36
A. Overview
This chapter will provide a step-by-step guide on turning a 3D model
into a physical reality. Before proceeding, it is recommended that you go
over prior chapters on loading/unloading filament, leveling the build plate,
and the functions and capabilities of FlashPrint.
There are two modes of printing: single-extrusion and dual-extrusion.
With single extrusion, you can choose the print head to use for making
the print. Dual extrusion is useful if you want to print dual colors or
complex models that require supporting material.
There are three connection methods in order to print using the Dreamer.
All methods, which include USB, SD card, and Wi-Fi are covered in this
chapter.
Dreamer User Guide | www.ff3dp.com
37
B. Single & dual-extrusion print
Single-Extrusion Print
1. Open FlashPrint by double-clicking on the icon.
2. Click on [ Load ] and choose an .stl file from hard drive.
3. The object will then be shown on the screen.
4. Click on the object and then click on [ Extruder ], select [ Use left
extruder ]. *Left extruder will be used for illustration purposes.
5. Now the 3D model is ready to be created. Proceed to part C of this
chapter (page 47) to select your connectivity method for printing.
Dual-Extrusion Print
1. Open FlashPrint by double-clicking on the icon.
2. Press [ Load ] and choose an .stl file from hard drive.
3. The object will then be shown on the screen.
4. Press [ Load ] and choose another (or the same) file from hard drive.
5. Click on the object and then click on [ Extruder ], select [ Use left
extruder ].
NOTE: one object is turned to green, that indicates it will be print wit the left
extruder.
6. Now the 3D model is ready to be created. Proceed to part C to select
your connectivity method for printing.
Dreamer User Guide | www.ff3dp.com
38
C. Methods of printing
Printing from USB
1. Connect Dreamer to the computer using the included USB 2.0 cable.
2. Turn on the Dreamer. Make sure the build plate is leveled and filament
is loaded to the left extruder. Please refer to page 22 for leveling the
build plate and pages 19 and 21 for loading and unloading filament.
3. Select [ Print ] from menu bar, then select [ Connect ].
4. Click on [ Rescan ], then [ Connect ].
5. Now the printer is connected with FlashPrint. A status box at the lower
right corner will show the temperature of both extruders and the
platform.
6. Press [ Print ] icon, and a printing options screen will appear. Make
sure that “ABS” is selected under Material Left. Advanced settings
can be set under [ More Options ] icon. Check the box “Print When
Slice Done” and click [ OK ].
7. Save the file at any location, and the object will start slicing
8. After the object is done slicing, it will automatically upload the gcode
to the Dreamer.
9. After the gcode is done uploading, the printer will go into a preheat
phase . The Dreamer will begin printing once it has finished
preheating.
Dreamer User Guide | www.ff3dp.com
39
Printing from SD Card
1. Press [ Print ], and a printing options screen will show up.
2. Make sure that the “Material Left” is selected as “ABS.” Advanced
settings can be set under [ More Options ] icon.
3. Click [ OK ], and save the gcode file in the SD card.
4. FlashPrint will begin slicing the 3D model.
5. After the object is done slicing, take the SD card from the computer.
Insert it into the SD card slot on the Dreamer.
6. Turn on the Dreamer. Make sure the build plate is leveled (page 22)
and filament is loaded on the left extruder (page 19).
7. Press [ Print ] and then press the middle SD Card icon.
8. A list of file(s) will show up, press the file that you would like to print,
then press [ Yes ].
9. The printer will now enter preheating phase and will start printing
once it finishes preheating
Dreamer User Guide | www.ff3dp.com
40
Printing from Wi-Fi
1. Turn on Dreamer. Make sure the build plate is leveled (page 22) and
filament is loaded on the left extruder (page 19).
2. Turn on Wi-Fi on the Dreamer. To do this, press [ Tools ],
[ Setting ], [ WIFI ], and [ WIFI ON].
3. A connection called
“USR-WIFI232-G2” can be found
on the list of available
networks. Connect to this network.
4. Open your Internet browser. Type in
“10.10.100.254” and hit [ Enter ]
on your keyboard. Enter the
username and password to login. The
default username and password are
both “admin.” The control panel
will appear after a successful login.
Dreamer User Guide | www.ff3dp.com
41
5. Click on [ Work Mode ] and choose
“AP+STA mode” and save it.
6. Click on [ STA Setting ], select
a working network, enter the
corresponding password and save.
7. Restart the interface, close the page,
turn off the Dreamer, disconnect from
the network, and wait for 10 seconds.
8. Turn the Dreamer back on and
connect to the Dreamer network. In
FlashPrint, choose [ Print ] from menu
and select [ Connect ].
9. Under “Connection Mode”, select
Wi-Fi, and enter the “IP Address,
Port” as shown on printer LCD screen.
Then, click [ Connect ].
Dreamer User Guide | www.ff3dp.com
42
10. Now the Dreamer is connected with FlashPrint. A status box at the
lower right corner will show the temperature of both extruders and the
Platform.
11. In FlashPrint, click [ Print ]. A printing options screen will appear
Make sure that “ABS” is selected under “Material Left.”
Advanced settings can be set by clicking on [ More Options ].
12. Check the box of “Print When Slice Done,” and hit [ OK ].
13. Save the file at any location, and the object will start slicing.
14. After the object is done slicing, it will automatically upload the gcode
to the Dreamer.
15. After the gcode is done uploading, the printer will go into a preheat
phase. The Dreamer will start printing once preheating is finished.
NOTE: Printing from SD card is unavailable when WIFI is ON.
Printing with Support
1. If the 3D model has excessive over-hang, then support will be needed.
2. In the Slice options screen, select from “Supports” the left or right
extruder.
3. Click [ OK ] to begin slicing.
Dreamer User Guide | www.ff3dp.com
43
CHAPTER 4
ADDITIONAL
INFORMATION
A. Getting support
B. Appendix
Dreamer User Guide | www.ff3dp.com
Dreamer User Guide | www.ff3dp.com
44
44
A. Getting support
Our team of knowledgeable staff is on standby and ready to help you
overcome any challenges you may have with your Dreamer. If your issue
or question is not covered in the user manual, you can check our
knowledge base or contact us by e-mail or phone. We also have a very
active FlashForge community group on Google with a wealth of
information and very helpful members.
There are solutions and instructions to common issues that can be found
in our knowledge base. Have a look first as most basic questions are
answered there.
http://www.ff3dp.com
The FlashForge Google Group is a community forum made up of fellow
FlashForge users who share tips and tricks and help each other in
overcoming challenges with 3D printing. The forum can be accessed at
the following link:
https://groups.google.com/d/forum/flashforge
The FlashForge support team can be reached by e-mail or phone between
the hours of 8:00 a.m. to 5:00 p.m. PST Monday through Saturday. In
case you contact us during after-hours, your inquiry will be answered the
following business day.
E-Mail: [email protected]
Tel: 0579-82273989
Address: No.518 Xiangyuan Road, Jinhua, China.
*When contacting support, please have your serial number ready.
The serial number is a bar code on the back of your Dreamer
Dreamer User Guide | www.ff3dp.com
45
B. Appendix
Parameter table
Name
Dreamer
Extruder Number
2
Technique
Fused Deposition Modeling (FDM)
Screen
3.5’’ color IPS Touch Screen
Build Size
230×150×140mm
Layer Thickness
0.1 - 0.5mm
Build Precision
±0.2mm
Located Precision
Z axis 0.0025mm; XY axis 0.011mm
Filament Diameter
1.75mm
Nozzle Diameter
0.4mm
Current Speed
24CC/Hour
software
FlashPrint
Support Formats
stl、obj
OS
Windows
Mac OS
Printer Size
485×400×335mm
Weight
11Kg
Input Voltage
100-240V, 50-60Hz, 300W
Data Transmission
USB、SD card、wifi
Dreamer User Guide | www.ff3dp.com
46