1
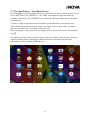
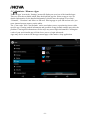
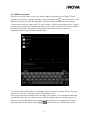
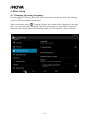
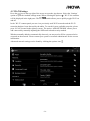
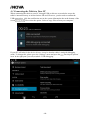
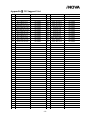
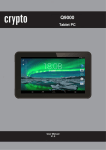
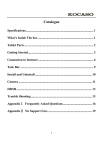
Catalogue
General Notices for Use ................................................................................................II
Disclaimer ....................................................................................................................II
Box Contents ................................................................................................................II
1. Product Basics ..................................................................................................... - 1 1.1 Buttons and Connections ................................................................................... - 1 1.2 Start Up and Shut Down .................................................................................... - 1 2. Introduction to Google Android 4.4 ...................................................................... - 2 2.1 The Desktop .................................................................................................... - 2 2.2 The App Drawer – Top Right Corner .................................................................. - 3 2.3 Google Search / Voice Search – Top Left Corner ................................................. - 4 2.5 Status Information Area – Bottom Right Corner .................................................. - 5 3. General Operation ............................................................................................... - 5 3.1 Battery Status / Charging Your Tablet ................................................................ - 5 3.2 Installing Apps ................................................................................................. - 5 3.3 Administer / Remove Apps................................................................................ - 6 3.4 Add an Account ............................................................................................... - 7 4. Basic Setup .......................................................................................................... - 8 4.1 Changing Operating Language ........................................................................... - 8 4.2 Wi-Fi Settings .................................................................................................. - 9 4.3 Connecting the Tablet to Your PC .................................................................... - 10 AppendixⅠ Frequently Asked Questions ............................................................... - 11 AppendixⅡ 3G Support List ................................................................................. - 13 -
I
General Notices for Use
—This product is a highly advanced electronic device. Disassembly, customization or
repairs without the appropriate knowledge and pre-cautions can lead to dangerous situations
with chance on damaging the product and serious self-injuries.
—Avoid use in extreme conditions such as high and low temperatures, high humidity or
moist environments, and around magnetic fields. Also avoid long-term exposure to sunlight.
—Only use manufacturer permitted accessories to avoid damage to the product and
possible warranty loss.
—Please follow the relevant local environmental regulations to deal with obsolete
machines and accessories.
—Use a protective case to avoid extreme physical shocks to the device (i.e. dropping).
Disclaimer
—The screenshots are for Android reference only. They may be made on a device with a
different resolution or hardware configuration than yours and therefore can be slightly
different that the final product.
—The manufacturer takes no responsibility for loss of information or data caused by
hardware or software failure. The user is responsible for performing timely backups of
important data.
—All information and images used in this user manual are provided ‘as is’ and are subject
to change without notice.
—The manufacturer accepts no liability for the information offered in this document.
Box Contents
—Android Tablet PC
—Device Charger (DC / 5V – 1.5A)
—Instruction Manual
—USB Cable
—OTG Cable
—Earbuds
—Stylus Pen
—Screen Protector
—Carrying Pouch
II
1. Product Basics
1.1 Buttons and Connections
1
Power
2
Headphone Jack
3
Micro USB
4
Speaker
5
Volume +/-
6
TF Slot
7
Mic
8
Camera
1.2 Start Up and Shut Down
To start your device, press and hold the ‘Power Button’ until the screen lights up.
To shut down your device, press and hold the ‘Power Button’ until the following dialog
popup appears.
-1-
2. Introduction to Google Android 4.4
1
Indicator Icons
2
Open the search bar
3
Scroll left or right to the other panels
4
5
Access the application list and widget screen
Task Bar
2.1 The Desktop
The main area of interest will be the desktop itself. Here you will place shortcuts to Apps or
Widgets – a visual application that can display real-time information. There may be some preinstalled icons and widgets on your tablet.
To change the desktop background image of your tablet return to your desktop by pressing the
‘HOME’
icon. Press and hold an open space on the desktop (don’t press an icon) - until a
popup appears named ‘Select wallpaper from’. In the list may appear multiple options to
select an image or animated image of choice. The option ‘Live Wallpapers’ will show the preinstalled animated desktop images. Other options such as a ‘Super-HD Player’, ‘Gallery’ or
‘Wallpapers’ allow you to select (widescreen) photos, downloaded images or other images;
depending on the features of that specific application.
To place a widget or app shortcut on the desktop, touch and hold the icon until the App
drawer fades and the desktop appears. Move your finger to the location where you want to
place the icon and release your touch to place the icon.
To move or delete icons and widgets from your desktop, touch and hold the icon until a grid
appears. Move the icon to the new location or drag it to the ‘Remove’ bar on the top of the
screen to remove it. Releasing the touch screen will confirm your action.
-2-
2.2 The App Drawer – Top Right Corner
Press the
icon in the top right of the screen to open the App drawer. Here you have access
to two tabs; ‘APPS’ and ‘WIDGETS’. The ‘APPS’ tab displays all applications that are
available on the tablet. The ‘WIDGETS’ tab contains the optional widgets that can be added
to the desktop.
To place a widget or app shortcut on the desktop, touch and hold the icon until the App
drawer fades and the desktop appears. Move your finger to the location where you want to
place the icon and release your touch to place the icon.
When using apps or other parts of the operating system you often will see the ‘Extra options’
icon .
Pressing this icon will open a secondary menu with more options. Functions like opening an
advanced settings menu, switching to a different account or refreshing the displayed
information are often ‘hidden’ behind this icon.
-3-
2.3 Google Search / Voice Search – Top Left Corner
By clicking the ‘Google Search’ / Microphone button you can quickly type or speak keywords
of your search. The search application will automatically determine whether the keyword(s)
apply to an application or a web search. In the latter case a web browser will be opened and
the results of your query will be displayed on the Google search engine.
Note that both the ‘Google Search’ function as well as the ‘Voice Search’ requires the tablet
to have access to the internet (via Wi-Fi).
2.4 Navigation Icons – Bottom Left Corner
On the left side you will find three icons: use the navigation icons ‘HOME’
or
‘RETURN’
to close the App drawer and return to your desktop. The ‘RECENT
ACTIVITY’ icon
will show an overview of the active and recently opened applications.
Click on the small displayed preview to open that application.
Recent Activity Preview
-4-
2.5 Status Information Area – Bottom Right Corner
The bottom icon bar will show the some system information (i.e.
) in the bottom
right corner. The contents of this area can change if installed applications place additional
information here. Pressing it will open a small overlay menu displaying the date/time
information, the tablet’s current network status, the battery status and a shortcut icon to
another quick menu where some things like ‘Airplane Mode’, ‘Wi-Fi On/Off’, the screen
brightness and other options can be set or toggled. Also this quick menu contains a shortcut to
the ‘Settings’ menu. Simply clicking elsewhere on the screen will close this menu.
3. General Operation
3.1 Battery Status / Charging Your Tablet
The current battery status will be always displayed in the lower right of the screen in the
system information bar. The battery icon will change accordingly to the battery status.
When connected to the DC charger, the status area on the bottom bar will display the
charging icon. Note the lightning symbol inside the battery icon.
3.2 Installing Apps
You can install your own Apps by opening the Apps shop. This button can be found in the
‘App drawer’. The Apps shop is located on the top right of the screen. Note that not all
applications may function properly for your tablet. Some are made especially for small screen
devices such as phones.
-5-
3.3 Administer / Remove Apps
The
‘Apps’ item in the ‘Settings’ menu will display an overview of the installed apps.
There are four tabs available which filter the displayed app list. Select an app to view its
detailed information. In the detailed information you also have the options ‘Force Stop’,
‘Uninstall’, ‘Clear data’ and ‘Move to SD card’. Moving apps to your SD card can save you
some internal storage memory on the tablet.
The ‘Clear cache’ and ‘Clear defaults’ can be used when you are experiencing issues with a
specific app. Clearing cached information and (possible wrong) default settings may solve the
problem. Clearing this information will also wipe any stored login information. Clearing the
cache of your social media app will also force you to re-login afterwards.
Apps may also be removed in the apps content page of the market / shop application.
-6-
3.4 Add an Account
The best way to fully make use of your Android tablet is by linking your Google / Gmail
account to your device. Open the ‘Settings’ menu and choose the
‘Accounts & sync’ item.
Without any added accounts the right pane will display nothing. Instead select the option
‘Add account’ in the top right corner. To add a Google / Gmail account please select ‘Google’
in the pop-up and follow the instructions on the screen. After entering your Google username
and password you have the option to automatically back-up your apps, settings (i.e.
bookmarks and Wi-Fi passwords) and other data.
You can also add a POP3, IMAP or Exchange email account by selecting ‘Email’. The popup option ‘Corporate’ will setup a ‘Microsoft Exchange’ link.
Your system or network administrator can supply you with the server information and login
credentials. Follow the steps displayed on-screen to complete the account linking process.
After you successfully linked your account(s) with the tablet you can toggle the automatic
synchronization on and off by using the
switch next to the ‘Add account’ option.
-7-
4. Basic Setup
4.1 Changing Operating Language
Press the
icon in the top right of the screen to open the App drawer. Select the ‘Settings’
option to open the Android settings menu.
When selecting the option
‘Language & input’ the contents will be displayed in the right
pane. Now open the option ‘Language’ and choose a language for your tablet to operate in.
This pane also displays the keyboard settings which you can customize, enable or disable.
-8-
4.2 Wi-Fi Settings
Press the
icon in the top right of the screen to open the App drawer. Select the ‘Settings’
option to open the Android settings menu. When selecting the option
‘Wi-Fi’ the contents
will be displayed in the right pane. The
switch allows you to quickly toggle Wi-Fi on
and off.
In the ‘Wi-Fi’ content panel you can view previously used Wi-Fi networks and the Wi-Fi
networks that have been detected by the tablet. To search for new available networks; please
press ‘SCAN’ located in the right top corner. The option ‘ADD NETWORK’ allows you to
add a network by manually inputting the SSID network and security method.
Whether manually added or automatically detected, you may need to fill in a password to be
accepted on the network. Please contact your system or network administrator for the correct
information.
Advanced network settings can be found by clicking the options icon
-9-
.
4.3 Connecting the Tablet to Your PC
When connecting the tablet to your PC through USB, no drivers are needed to access the
tablet’s internal memory or inserted micro SD card. However, you do need to confirm the
USB connection: click the notification area in the system information bar at the bottom of the
screen
. Now select the option ‘Select to copy files to/from your computer’.
If your PC still asks for the device drivers, it may be that the tablet is Android debugging
mode. To change this, please go to the ‘Settings’ menu and open the
‘Developers options’
item. In the right pane you can (un)check ‘USB debugging’.
- 10 -
AppendixⅠ Frequently Asked Questions
Q: Why won't my device turn on?
Make sure your tablet has been charged for at least four hours prior to use. When
plugging in the cable, make sure you are not accidentally plugging it into the headphone jack.
Also, the power button is on the side (for tablets) and not the one on the front of the
touchscreen. The button on the front is for navigation.
Q: Why does my unit have scratches/bubbles on the screen?
These units ship with a very fine plastic film to protect the item in transit. This film is
intended to be removed prior to use. Sometimes this takes a strong fingernail or some similar
item to peel it off.
Q: Should I perform a Firmware Update?
Not necessarily. This is actually intended if obscure issues with the tablet occur. Unless
you are having issues with the tablet which a Factory Data Reset has not resolved, it is not
advised that you perform this step.
However, if you are sure you wish to attempt this procedure, please visit the following
link for available firmware downloads and the instructions on how to perform the update:
http://register.inova888.com/firmware.html
Q: Why don't I see a firmware version for my model?
We are always working on providing the latest and best firmware for all of our devices.
If you don't see your specific model listed, please check back soon.
Q: I don't remember my password, what can I do?
If you have previously added a Google account, you may be prompted for a password
reminder if you fail the security 4 or 5 times. Otherwise, please refer to Should I perform a
Firmware Update?
Q: How long should my battery last after charging?
As for battery life, this depends on which model tablet you use. Our Android 4.4 tablet
usually average around 2-4 hours. However, that is totally relative to factors such as how
bright the screen is during use, how often it is using the wireless connection, what background
processes are running, if you are using a Live Wallpaper, and more. It is very difficult to
estimate the duration of a full charge in consideration of these issues. If this seems like
abnormally poor performance, just let us know.
- 11 -
Q: Why does my screen not respond properly when I use the touchscreen?
This may be a couple of different things. If this only occurs when charging from a power
supply, this may be due to noise from the power source not being adequately filtered out. You
may wish to give the unit a full charge and then disconnect from power for use, or, if possible,
charge with a USB cable instead. Otherwise, your screen calibration may be off. To correct
this, check for Settings->Touchpad Calibration to see if you can recalibrate this to resolve the
issue.
Q: Why is my tablet stuck at boot up, and the Android screen will not go away?
Please see above: Should I perform a Firmware Update?
- 12 -
AppendixⅡ 3G Support List
NO.
3G Model
1
HUAWEI E367
2
HUAWEI K3520
3
HUAWEI E153
4
HUAWEI E171
5
HUAWEI E173Cs-1
6
HUAWEI E1750
7
HUAWEI E1752Cu
8
HUAWEI E1756
9
HUAWEI E1762
10
HUAWEI E177
11
HUAWEI E180
12
HUAWEI E1820
13
HUAWEI E182E
14
HUAWEI E220
15
HUAWEI E261
16
HUAWEI E303
17
HUAWEI E303F
18
HUAWEI E353
19
HUAWEI K3770
20
HUAWEI T1731
21
HUAWEI E1550
22
HUAWEI E1552
23
HUAWEI E156G
24
HUAWEI E158
25
HUAWEI E160
26
HUAWEI E1612
27
HUAWEI E1630
28
HUAWEI E166
29
HUAWEI E169
30
HUAWEI E1692
31
HUAWEI E169u
32
HUAWEI E172
33
HUAWEI E173
34
HUAWEI E1752
35
HUAWEI E176
36
HUAWEI E1780
37
HUAWEI E1782
38
HUAWEI E1786
39
HUAWEI E226
40
HUAWEI E230
41
HUAWEI E270
42
HUAWEI E272
43
HUAWEI E510
44
HUAWEI K3715
45
HUAWEI K3765
Cellphone Model
WCDMA
WCDMA
WCDMA
WCDMA
WCDMA
WCDMA
WCDMA
WCDMA
WCDMA
WCDMA
WCDMA
WCDMA
WCDMA
WCDMA
WCDMA
WCDMA
WCDMA
WCDMA
WCDMA
WCDMA
WCDMA
WCDMA
WCDMA
WCDMA
WCDMA
WCDMA
WCDMA
WCDMA
WCDMA
WCDMA
WCDMA
WCDMA
WCDMA
WCDMA
WCDMA
WCDMA
WCDMA
WCDMA
WCDMA
WCDMA
WCDMA
WCDMA
WCDMA
WCDMA
WCDMA
NO.
46
47
48
49
50
51
52
53
54
55
56
57
58
59
60
61
62
63
64
65
66
67
68
69
70
71
72
73
74
75
76
77
78
79
80
81
82
83
84
85
86
87
88
89
90
91
- 13 -
3G Model
HUAWEI UMG181
ZTE-MF193
ZTE K3765-Z
ZTE K3770-Z
ZTE K3772-Z
ZTE MF170
ZTE MF180
ZTE MF190
ZTE MF626
ZTE MF631
ZTE MF633BP+
ZTE MF668A
ZTE WU-872
ZTE MF100
ZTE MF110
ZTE MF627
ZTE MF628
ZTE MF633
ZTE MF636
ZTE MF637
HUAWEI EC122
HUAWEI EC1261
HUAWEI EC156
HUAWEI EC169
HUAWEI EC176
HUAWEI EC1260
HUAWEI EC1270
HUAWEI EC167
HUAWEI EC189
ZTE AC582
ZTE AC583
ZTE MC5716
ZTE AC2736
ZTE AC2746
ZTE AC2766
ZTE AC560
ZTE AC580
ZTE AC581
ZTE AC590
ZTE AC8710
ZTE-T A351+
HUAWEI ET127
HUAWEI ET128-2
HUAWEI ET188
ZTE A355
HUAWEI ET128
Cellphone Model
WCDMA
WCDMA
WCDMA
WCDMA
WCDMA
WCDMA
WCDMA
WCDMA
WCDMA
WCDMA
WCDMA
WCDMA
WCDMA
WCDMA
WCDMA
WCDMA
WCDMA
WCDMA
WCDMA
WCDMA
CDMA2000
CDMA2000
CDMA2000
CDMA2000
CDMA2000
CDMA2000
CDMA2000
CDMA2000
CDMA2000
CDMA2000
CDMA2000
CDMA2000
CDMA2000
CDMA2000
CDMA2000
CDMA2000
CDMA2000
CDMA2000
CDMA2000
CDMA2000
TD-SCDMA
TD-SCDMA
TD-SCDMA
TD-SCDMA
TD-SCDMA
TD-SCDMA