1
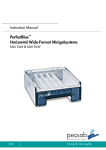
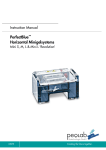
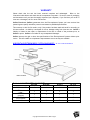
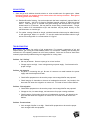
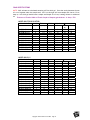
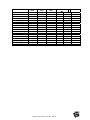
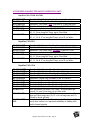
Table of Contents
Cover Page ………………………………………………...........…........... CP
TOC ……………………………………………………………….…........... TOC
Title Page/Contact Info…………………………………………..…........... 1
Warranty/Component Illustration……………………………….…........... 2
Packing Lists……………………………………………………...…........... 2
Environmental Conditions/Safety Precautions……………......…........... 3
Instructions For Use
Introduction……………………………………………….............…...........4
Safety Precautions…………………………………...................…........... 4
General Care & Cleaning………………………………….........…........... 5
Specifications……………………………………………………………….. 6
Casting The Gel…………………………………………………………….. 6
Operation……………………………………………………………………. 7
Visualization………………………………………………….………………8
Troubleshooting…………………………………………………………….. 8
References………………………………………………………………….. 9
Appendix
Agarose Preparation Notes……………………………………………….. 10
Comb Specifications……………………………………………………….. 12
Accessories…………………………………………………………………. 14
Notes………………………………………………………………………….15
Copyright Galileo Bioscience™ 2004 – TOC
HORIZONTAL ELECTROPHORESIS
SYSTEM
USER’S MANUAL
rev. 0904
THIS MANUAL APPLIES TO THE FOLLOWING GALILEO BIOSCIENCE
RAPIDCAST™ HORIZONTAL ELECTROPHORESIS SYSTEMS:
80-0708, 80-0708L, 80-0911, 80-1214
WARNING
THESE UNITS ARE CAPABLE OF DELIVERING POTENTIALLY LETHAL VOLTAGE WHEN CONNECTED TO A
POWER SUPPLY AND ARE TO BE OPERATED ONLY BY QUALIFIED TECHNICALLY TRAINED PERSONNEL.
PLEASE READ THE ENTIRE OPERATOR’S MANUAL THOROUGHLY BEFORE OPERATING THIS UNIT.
Galileo Bioscience
P. O. Box 390566
Cambridge, MA 02139
Toll Free: 877-481-9175
Tel: 781-481-9175
Fax: 781-481-9214
www.galileobioscience.com
Copyright Galileo Bioscience™ 2004 – Page 1
WARRANTY
Please check that the unit has been received complete and undamaged.
Refer to the
illustration/table below and check that all components are present. Be sure to save all packaging
and documents until you have thoroughly inspected your shipment, if you find that your order is
incorrect or damaged, call for return instructions.
Galileo Bioscience (Galileo) guarantees that the Electrophoresis System you have received has
passed rigorous quality assurance protocols and meets its published specification.
This warranty is valid for 36 months, only if the product has been used and cared for according to
this user manual. No liability is accepted for loss or damage arising from incorrect use. Galileo’s
liability is limited to the repair or replacement of the unit or refund of the purchase price, at
Galileo’s option. Galileo is not liable for any consequential damages.
Galileo reserves the right to alter the specifications of the Electrophoresis Systems without prior
notice. This will enable us to implement improvements as soon as they are available.
HORIZONTAL ELECTROPHORESIS SYSTEM COMPONENTS –
80-1214 SYSTEM SHOWN BELOW
Combs
Gel Tray
Lid
Buffer Chamber
Table A – INCLUDED SYSTEM COMPONENTS
80-0708
80-0708L
80-0911
80-1214
BUFFER CHAMBER
1
1
1
1
COVER (W/POWER
1
1
1
1
1
1
1
1
0
1
0
0
2
2
2
2
CORDS)
GEL TRAY
(GASKETED)
GEL TRAY
(NON-GASKETED)
COMBS
Copyright Galileo Bioscience™ 2004 – Page 2
ENVIRONMENTAL CONDITIONS FOR USE
¾
This unit is intended for indoor use only
¾
This unit can be operated safely at an altitude of 2,000 m
¾
The normal operating temperature range is between 4ºC and 65ºC
¾
Maximum relative humidity 80% for temperatures up to 31ºC decreasing linearly to 50%
relative humidity at 40ºC
SAFETY PRECAUTIONS
Please read the User Manual carefully before using the Horizontal Electrophoresis Unit. This manual
contains important operating and safety information. Our electrophoresis units are designed to
perform flawlessly for years in the most demanding laboratories. Please take the time to read the
manual to ensure that you understand the safety and operating instructions to ensure the
successful use of the unit. Alterations could cause serious injury to the user or the system.
Power to the unit is supplied by an external power supply. The power supply must meet safety
standards for IEC 1010-1 regulations and must be ground isolated and incorporate a no load
detecting circuit.
Power is supplied to the gel through the cover of the system providing a safety interlock to the
user. Users should not attempt to operate this unit without the safety inter-locked cover in place.
∆
Always disconnect the unit from the power supply before removing cover to avoid the risk
of personal shock.
∆
Running Conditions should not exceed the maximum operating voltage or current.
∆
Do Not fill the Buffer Chamber with running buffer above the maximum fill line.
∆
Always disconnect the unit from the power supply when you want to move the unit or add
running buffer.
∆
Use this apparatus only for its intended purpose as described in this manual. Do not use this
product if the power cords are damaged or if any of its surfaces are cracked.
Copyright Galileo Bioscience™ 2004 – Page 3
GALILEO RAPIDCAST™
HORIZONTAL
INSTRUCTIONS FOR USE
INTRODUCTION
Thank you for your purchase of a Galileo RapidCast™ Horizontal mini-gel electrophoresis system!
The Galileo RapidCast™ horizontal electrophoresis devices allow quick separation and analysis of
nucleic acids on an agarose gel. Gels can be cast in a variety of ways:
¾
¾
¾
¾
Use the gasketed trays directly in the buffer chamber
Use multiple gasketed trays in optional casting trough
Tape ends of trays
Use one of the optional Adjustable Casting Platforms
The UV transparent gel trays are available with a variety of comb slot configurations. Combs are
available in 1.0mm and 1.5mm thickness as well as a variety of tooth configurations to
accommodate varying numbers of samples and sample volumes
Outstanding Features Ensure Trouble-Free Use
¾ Robust Acrylic Construction Stands up to Daily Usage Without Breakage, Warping or
Leakage
¾ All Galileo Bioscience Horizontal Electrophoresis Systems Are Hand Fabricated, Providing
Unmatched Durability For Years Of Daily Use
¾ Systems Meet or Exceed All Safety Requirements For The IEC1010-1 Standards
¾ Units Accommodate Gasketed Gel Trays, Allowing Casting Of Gels In The Buffer Chamber
Without Tape, Dams or External Casting Stands.
USING HORIZONTAL GEL ELECTROPHORESIS UNITS
SAFETY PRECAUTIONS
∆
READ all instructions before using the unit
∆
ALWAYS turn off power supply FIRST then disconnect the power cords. Always have
electrophoresis unit disconnected from their power supply before removing the safety cover.
∆
DO NOT exceed the maximum operating voltage or current (see TABLE B)
∆
DO NOT operate electrophoresis units in metal trays.
∆
DO NOT fill the unit with running buffer above the maximum Fill Line
∆
DO NOT move the unit when it is running
∆ CAUTION: During electrophoresis very low quantities of various gases are produced
at the electrodes. The type of gas produced depends on the composition of the buffer
employed. To disperse these gases make sure that the unit is run in a well-ventilated
area.
Copyright Galileo Bioscience™ 2004 – Page 4
GENERAL CARE & CLEANING
WARNING !!
Acrylic is not resistant to aromatic or halogenated hydrocarbons, ketones or esters. Organic
solvents cause acrylic to “craze” or crack. Do not use ethanol or other organic solvents to
clean your unit. Do not autoclave, bake or microwave your unit.
∆
Before using, clean and dry the unit. Clean with DISTILLED WATER ONLY; dry parts with
clean, lint free lab wipes or, preferably, air dry. Use care when cleaning or drying the unit
near the platinum wire. The connectors should be clean and dry before usage or storage.
∆
Do not use abrasive creams or scourers.
∆
Do not use cleaning brushes in the electrode area
∆
A thorough rinse with distilled water is all that is generally required to clean the unit after
use. A mild detergent may also be used. Acrylic can also be exposed to a mild bleach
solution (10:1). In addition RNAse removal products are also safe for acrylic.
See Page
GEL TRAY
All Galileo gel trays are made from UV transmissible acrylic, which allows a stained agarose gel to
be viewed directly in the tray on a transilluminator. An incorporated fluorescent ruler aids in the
calculation of relative mobility of DNA fragments.
NOTE: care should be taken to avoid pouring freshly melted agarose directly into the gel tray, as
this may damage the tray. Always allow agarose to cool to 60oC before pouring into the tray.
COMBS
Combs for the Galileo Horizontal Electrophoresis Systems are available in thickness of 1.0mm and
1.5mm. Please see Appendix – Comb Specifications in the rear of this manual for details of combs
available for each device. Comb spines are acrylic and teeth are polycarbonate. Combs designated
“MT” are compatible for use with a multi-channel pipettor. Each comb is labeled with thickness,
number of teeth and catalog number.
BUFFER TANK
The buffer tank holds the buffer and gel tray. Current is passed from the power supply through the
leads to the cover connectors, through the platinum wires and into the buffer and from there into
the gel. The cover has incorporated safety rings that prevent human contact with the electrode
connections to prevent electrical shock if the power supply is accidentally not turned off prior to
removing the lid. Users should not attempt to operate the system without the lid in place. The
electrode banana plugs are color-coded red and black to ensure that the gel is placed in the
correct orientation in the tank [almost all electrophoretic separations of biomolecules run from
the black electrode (negative) to the red electrode (positive)]. The connection between the
banana plug and the electrode wire is sealed with a proprietary composite that eliminates
corrosion of the connection. The electrode wires are 0.254mm platinum and are secured to the
inner walls of the tank. Care should be taken not to damage the electrodes when cleaning the
unit.
Copyright Galileo Bioscience™ 2004 – Page 5
SPECIFICATIONS
Table B – GENERAL SPECIFICATIONS
Gel Dimensions
System
Dimensions
(cm, L x W x H)
Tray
Configuration
Comb thickness
Comb
configurations
80-0708
7x8cm (gasketed)
7x10cm (flush)
80-0708L
7x8cm (gasketed)
7x10cm (flush)
80-0911
9x11cm
(gasketed)
17.6 x 12 x 9.5
17.6 x 12 x 9.5
22 x 15 x 9.5
80-1214
12x14cm
(gasketed)
12x14cm (flush)
24.5 x 18 x 9.5
2 comb slots
2 comb slots
2 comb slots
2, 4, 12 comb slots
5, 6, 8, 10 and 12
wells & Prep Comb
Voltage Limit
Max. Buffer
volume
150 volts
400 mls
1.0mm or 1.5mm polycarbonate
5, 6, 8, 10 and 12
5, 8, 10, 12, 14,
wells & Prep Comb
MT9, MT18 wells
& Prep Comb
150 volts
150 volts
400 mls
600 mls
8, 16, 20, 24, MT9,
MT12, MT25 wells
& Prep Comb
150 volts
800 mls
CASTING THE GEL
1. Place the gel tray on a flat, level surface. It is important to pour the agarose gel on a level
surface to prevent uneven migration of samples through the gel. If casting tape is to be used,
tightly secure the tape over the open ends of the tray. If using a gasketed tray place the tray
into the chamber of the device so that the gasketed ends press against the walls of the buffer
chamber. Make sure that the gel tray is pressed all the way down and rests on the unit’s gel
tray platform.
1.1. If the optional Adjustable Casting Platform is to be used, ensure that the platform is
level using the three point leveling system and place the tray into the casting platform
with the open ends facing the gasket. Position the center hole of the sliding arm of the
caster over the correct hole in the base and insert the cam into the hole in the arm and
through to the hole in the platform with the cam pin facing the tray. Rotating the cam pin
180o will force the tray forward and bring both gaskets into position on either side of the
tray. If the tray is correctly positioned with the gaskets, it should not move when gently
pushed from the side.
2. Prepare agarose for use in the device. Refer to the Agarose Preparation Table in the
Appendix for type and quantity of agarose needed (be sure to reference the manufacturers’
instructions for any specific requirements for the agarose being used).
3. Weigh out the appropriate amount of agarose and empty into an Erlenmeyer flask. Add buffer
to flask. TBE or TAE buffer are the most widely used buffer choices for DNA separations (see
Appendix for buffer formulations). Heat agarose in microwave until all powder has gone into
solution. Swirl flask to be sure all agarose has dissolved.
4. IMPORTANT: to avoid damage to UVT tray, always cool agarose to 60°C before pouring into
tray. Any bubbles that form while pouring may be popped with a small glass pipette or the
edge of the comb. Place combs into the comb slots on the gel tray being careful not to create
bubbles along the teeth of the comb. If the entire gel length is required for separation, place
one comb in the first comb slot on the tray. To separate more samples on one gel, use both
comb slots on the tray. Allow gel to solidify for 30 minutes.
Copyright Galileo Bioscience™ 2004 – Page 6
OPERATION
1. Once the agarose has solidified, carefully remove the casting tape from the gel tray or the gel
tray from the casting platform. If a gasketed tray is used, carefully lift the tray out of the
chamber, turn it 90o and replace it into the chamber. Remove casting comb(s) slowly to
prevent any tearing of the wells.
NOTE: If a high percentage agarose gel is cast it may be difficult to remove the
casting comb from the tray. If resistance is felt when removing the casting comb,
place the gel tray into the buffer tank and add buffer before removing the casting
comb
Place the tray onto the platform of the tank. Be sure the gel tray is placed in the proper
orientation in the tank; the first comb slot should be closest to the black (cathode) electrode.
The banana plugs on the tank are color coded to help ensure proper orientation.
2. Pour the buffer into the tank. Refer to the Appendix for buffer preparation. The level of buffer
should cover the gel by at least 2-3mm. Check SPECIFICATIONS (page 6 of this manual) for
buffer volume guidelines. A fill line is located on the outside wall of the tank for easy
reference. Too little buffer may cause the gel to dry out during the run, while excess buffer
may slow DNA migration in the gel.
3. Dilute sample with appropriate volume of 10X Loading Buffer (see Appendix for formula). Load
samples.
A dark acrylic Well Visualization Guide is included with each Horizontal
Electrophoresis System to allow a clear view of the wells when loading samples. To use, simply
slide the Well Visualization Guide under the tank, below the platform. To load samples, angle
pipette tip into the well and slowly underlay sample into the well. Take care not to push
pipette tip through the bottom of the sample well as this will result in significant well-to-well
leakage of samples
4. Slide the cover onto the electrophoresis buffer tank, insuring complete connection of the
tank’s banana plugs to the female connector ends of the power cords that are fixed to the
cover. The cover acts as a safety inter-lock to prevent accidental shock during operation.
5. Attach the power cords to the power supply. Turn on the power supply and set to the
appropriate voltage level and begin electrophoresis.
Recommended running conditions are 5 volts/cm of inter-electrode distance:
Table C – RECOMMENDED RUN CONDITIONS
Model
Inter-electrode Distance
80-0708, 80-0708L
18 cm
80-0911
19 cm
80-1214
22.5 cm
Voltage
90V or 110volts constant
95V or 110 volts constant
112.5V or 110 volts constant
6. Run the gel for the appropriate amount of time for the specific sample being analyzed or until
the dye front has migrated to approximately 5mm from the end of the gel. Turn off power
supply and detach the power cords. Slide the cover back to remove. Lift the gel tray out of
the buffer tank and proceed with visualization.
7. It is important to rinse the tank with distilled water after every use to keep it clean. It is
recommended to allow the tank to air dry, rather than drying with a wipe or towel, to avoid
damage to the electrode wires.
Copyright Galileo Bioscience™ 2004 – Page 7
VISUALIZATION
1. Stain the gel with ethidium bromide solution or other suitable stain for agarose gels. Note:
Ethidium bromide is a mutagen and can cause serious skin and eye irritation. Wear gloves
and safety glasses when handling.
1.1. Ethidium Bromide Staining: Once electrophoresis has been completed, prepare 200ml of
staining solution. Add 10µl of 10mg/ml ethidium bromide solution to 200ml de-ionized
water. Soak the gel for 15 minutes with gentle shaking and then de-stain in fresh deionized water for 15 minutes. Gel may then be viewed using a transilluminator. The gel
tray is made of UV transmissible acrylic and therefore may be placed directly on the
transilluminator to view the gel.
1.2. For quicker viewing of bands on the gel, ethidium bromide solution may be added directly
to the agarose gel before it is poured. To use this method add ethidium solution to gel
and to the running buffer in a concentration of 0.5µg/ml.
TROUBLESHOOTING
Many factors may affect the quality of gel preparations. For example, preparation of gel and
sample buffers, gel casting and tank assembly and/or run conditions. Reading and following the
instructions in this operating manual can solve most problems. Below we list some of those most
commonly experienced problems along with suggestions for solving them.
Problem: Gel “Smiling”
¾ Gel may be uneven. Be sure to pour gel on a level surface.
¾
Voltage may be too high. Lower voltage setting on power supply. See Instructions for
proper voltage.
Problem: No migration
¾ No power is contacting the gel. Be sure all contacts are made between the power
supply and the electrophoresis tank.
¾
Check buffer preparation to be sure the proper ionic strength buffer was prepared.
¾
Check integrity of electrodes to be sure no breakage has occurred. Any breaks in the
electrode will cause slow migration or none at all. If a break is found contact Galileo.
Problem: Slow migration
¾
Check buffer preparation to be sure the proper ionic strength buffer was prepared.
¾
Voltage too low, increase voltage, see Instructions for proper running conditions.
¾
Check integrity of electrodes to be sure no breakage has occurred. Any breaks in the
electrode will cause slow migration or none at all. If a break is found contact the
Galileo.
Problem: Excessive heat
¾
Ionic strength of buffer is too high. Check buffer preparation to be sure the proper
ionic strength buffer was prepared.
Copyright Galileo Bioscience™ 2004 – Page 8
¾
Voltage is too high, decrease the voltage; see Table C for proper running conditions.
Problem: One side of gel running slower
¾
Gel may be uneven. Be sure to pour gel on a level surface.
¾
Check integrity of electrodes to be sure no breakage has occurred. Any breaks in the
electrode may cause uneven migration or none at all. If a break is found contact
Galileo.
Problem: No bands visible
¾
Be sure gel was placed in the electrophoresis tank in the proper orientation. If
orientation or polarity is reversed, the samples will migrate off the gel.
¾
If DNA marker was used and is present on the gel check the integrity of the sample.
¾
Shorten run time. Gel should be stopped when the dye front has migrated to
approximately 5mm from the end of the gel.
Additional sources for Reference
Maniatis T., E. F. Fritsch and J. Sambrook. Molecular Cloning: A Laboratory Manual, Cold Spring
Harbor Laboratory, Cold Spring Harbor, NY.
Short Protocols in Molecular Biology – A Compendium of Methods from Current Protocols in
Molecular Biology, Edited by Frederick M. Ausubel, et. al.
Adams, D., and R. Ogden, Electrophoresis in Agarose amd Acrylamide Gels, Methods in
Enzymology, Vol. 152 (1987) Academic Press, Inc.
Fotador, U., Simultaneous Use of Standard and Low-Melting Agarose for the Separation and
Isolation of DNA by Electrophoresis, BioTechniques, Vol. 10, No. 2, (1991)
Boots, S., Gel Electrophoresis of DNA, Analytical Chemistry, Vol. 61, No. 8, April 15, 1989
Copyright Galileo Bioscience™ 2004 – Page 9
APPENDIX
AGAROSE PREPARATION NOTES
Preparation & Properties of TAE and TBE Electrophoresis Buffer Systems:
These buffers are used because they both have a basic pH that gives the phosphate group of the
DNA a net negative charge allowing migration of the DNA toward the positive (red) anode in the gel
unit.
TAE – Tris-Acetate with EDTA ( 40 mM Tris-Base, 40 mM Acetic Acid, 1 mM EDTA)
50X Stock Solution, pH ~8.5
242g Tris-Base
57.1 ml Glacial Acetic Acid
100 ml 0.5M EDTA (pH 8.0)
Distilled Water to 1 Liter Final Volume
1X Working Solution
40mM Tris-Acetate
1mM EDTA
TBE - Tris Borate with EDTA (89 mM Tris Base, 89mM Boric Acid, 2 mM EDTA)
10X Stock Solution
108g Tris Base
55g Boric Acid
20 ml 0.5M EDTA (pH 8.0)
Distilled Water to 1 Liter Volume
DO NOT ADJUST pH
1X Working Solution
89mM Tris Base
89mM Boric Acid
2mM EDTA
Suggested Uses & Comments
TAE Buffer
Use when DNA is to be recovered (i.e by low melting agarose gels)
Use for electrophoresis of large (>20kb) DNA fragments
Applications requiring high resolution
Under conditions with low ionic strength and low buffering capacity – recirculation may be necessary for long runs (>4 hours)
TBE Buffer
Use for electrophoresis of small (<1kb) DNA fragments
Better resolution of small (<1lb) DNA fragments
Decreased DNA mobility
High ionic strength and high buffering capacity – no re-circulation needed for
extended run times.
TBE Buffer reacts with the agarose making smaller pores and a tighter matrix. This reduces
broadening of the DNA bands for sharper resolutions.
Copyright Galileo Bioscience™ 2004 – Page 10
Agarose:
Required volume of gel: gel width x gel length x gel thickness
Gel size (cm)
7 x 8 cm
7 x 8 cm
7 x 8 cm
7 x 10 cm
7 x 10 cm
7 x 10 cm
9 x 11 cm
9 x 11 cm
9 x 11 cm
12 x 14 cm
12 x 14 cm
12 x 14 cm
x
Gel thickness (cm)
=
0.25 cm
0.50 cm
0.75 cm
0.25 cm
0.50 cm
0.75 cm
0.25 cm
0.50 cm
0.75 cm
0.25 cm
0.50 cm
0.75 cm
Gel Volume (ml)
14.0 ml
28.0 ml
42.0 ml
17.5 ml
35.0 ml
52.5 ml
24.8 ml
49.5 ml
74.2 ml
42.0 ml
84.0 ml
126.0 ml
Agarose percentage and separation of DNA-fragments
Percentage (w/v)
0.3
0.5
0.7
1.0
1.2
1.5
2.0
3.0
Agarose (g)
0.15
0.25
0.35
0.50
0.60
0.75
1.00
1.50
Buffer (ml)
50
50
50
50
50
50
50
50
Separation Range (kb)
5-60
1-30
0.8-12
0.5-10
0.3-7
0.2-4
0.1-3
<0.1
Agarose Gel Loading Buffer
Samples are prepared and combined with gel loading buffer before being loaded into the prepared
gel. Sample buffer usually contains similar components to the running buffer, dyes for visibility,
and glycerol to provide some weight to the samples. This increased sample density and color
allows easy visualization of the samples and ensures samples load evenly into the wells and do not
float out during loading. Dyes also migrate toward the anode end of the electrophoresis chamber
at predictable rates allowing the gel run to be monitored.
The most commonly used loading buffer is glycerol, bromophenol blue, and xylene cyanol.
6x loading buffer for agarose gels:
0.25% bromophenol blue
0.25% xylene cyanol FF
30% glycerole in water
Copyright Galileo Bioscience™ 2004 – Page 11
COMB SPECIFICATIONS
NOTE: Well volumes are calculated assuming a 0.5cm thick gel. Since the comb placement leaves
0.2 cm of agarose under the sample well, a 0.5 cm thick gel will have sample well that is 0.3 cm
deep (a 1 cm thick gel would leave a sample well depth of 0.8 cm). Loading Volume is calculated
as:
Thickness of Tooth x Width of Tooth x Depth of Sample (gel thickness – 0.2cm) x 75%
MODEL 80-0708 & 80-0708L
Galileo Comb ID
Number Thickness
teeth
(mm)
Width
(mm)
80-0708-C5-1.0
80-0708-C6-1.0
80-0708-C8-1.0
80-0708-C10-1.0
80-0708-C12-1.0
5
6
8
10
12
1.0
1.0
1.0
1.0
1.0
11.3
9.1
6.4
4.7
3.7
80-0708-C5-1.5
80-0708-C6-1.5
80-0708-C8-1.5
80-0708-C10-1.5
80-0708-C12-1.5
80-0708-PREP
5
6
8
10
12
2
1.5
1.5
1.5
1.5
1.5
1.5
11.3
9.1
6.4
4.7
3.7
57/4.7
Thickness
(mm)
Width
(mm)
Well volume (µl)
0.5cm
0.75c
m
25
47
20
38
14
26
11
19
8
15
38
31
22
16
12
193/16
1.0cm
68
55
38
28
22
70
56
40
29
23
353/29
102
82
58
42
33
513/42
Well volume (µl)
0.5cm
0.75cm
1.0cm
MODEL 80-0911
Galileo Comb ID
Number
teeth
80-0911-C5-1.0
80-0911-C8-1.0
80-0911-C10-1.0
80-0911-C12-1.0
80-0911-C14-1.0
80-0911-CMT9-1.0
80-0911-CMT18-1.0
5
8
10
12
14
9
18
1.0
1.0
1.0
1.0
1.0
1.0
1.0
15.4
9.0
6.8
5.4
3.7
7.2
2.7
25
20
14
11
8
16
6
47
38
26
19
15
30
11
68
55
38
28
22
43
16
80-0911-C5-1.5
80-0911-C6-1.5
80-0911-C8-1.5
80-0911-C10-1.5
80-0911-C12-1.5
80-0911-C14-1.5
80-0911-CMT9-1.5
80-0911-CMT18-1.5
80-0911-PREP
5
6
8
10
12
14
9
18
2
1.5
1.5
1.5
1.5
1.5
1.5
1.5
1.5
1.5
11.3
9.1
6.4
4.7
3.7
38
31
22
16
12
70
56
40
29
23
102
82
58
42
33
7.2
2.7
57/4.7
24
9
193/16
45
17
353/29
65
24
513/42
Copyright Galileo Bioscience™ 2004 – Page 12
Galileo Comb ID
No. of
teeth
Thickness
(mm)
Width
(mm)
80-1214-C8-1.0
80-1214-C16-1.0
80-1214-C20-1.0
80-1214-C25-1.0
80-1214-CMT9-1.0
80-1214-CMT12-1.0
80-1214-CMT25-1.0
8
16
20
24
9MT
12MT
25MT
1.0
1.0
1.0
1.0
1.0
1.0
1.0
12.5
5.4
3.9
3.0
7.2
7.2
2.7
80-1214-C8-1.5
80-1214-C16-1.5
80-1214-C20-1.5
80-1214-C24-1.5
80-1214-CMT9-1.5
80-1214-CMT12-1.5
80-1214-CMT25-1.5
80-1214-PREP
80-1214-WALL
8
16
20
24
9MT
12MT
25MT
Prep Comb
Wall Comb
1.5
1.5
1.5
1.5
1.5
1.5
1.5
1.5
1.5
12.5
5.4
3.9
3.0
7.2
7.2
2.7
106.2/4.7
Copyright Galileo Bioscience™ 2004 – Page 13
Well volume
(µl)
0.5cm
0.75cm
28
52
12
22
9
16
7
12
16
30
16
30
6
11
42
18
13
10
24
24
9
358/15
77
33
24
19
45
45
17
657/29
1.0cm
75
32
23
18
43
43
16
113
49
35
27
65
65
24
956/42-
ACCESSORIES AVAILABLE FOR GALILEO HORIZONTAL UNITS
RapidCast™ 80-0708 & 80-0708L
80-0708-RCGT
80-0708-LGT
80-0708-RCGC
80-0708-RCPK
80-0708-GSK
80-MADJ-CST
80-WADJ-CST
RapidCast™ Gel Tray for 7cmW x 8cmL gels, 2 comb slots
Flush-Cut Gel Tray for 7cmW x 10cmL gels, 2 comb slots
RapidCast™ Gel Caster, only, will hold (1-3) 80-0708-RCGT
RapidCast™ Gel Caster Pack, includes (3) 80-0708-RCGT
Replacement Gaskets for 80-0708-RCGT (2)
Mini-Adjustable Horizontal Gel Caster, can be used with 8,
10, 11, 14 cm Long Gel Trays, up to 12cm Wide
Wide–Adjustable Horizontal Gel Caster, can be used with 8,
10, 11, 14, & 17 cm Long Gel Trays, up to 23 cm Wide
RapidCast™ 80-0911
80-0911-RCGT
80-0911-RCGC
80-0911-RCPK
80-0911-GSK
80-MADJ-CST
80-WADJ-CST
RapidCast™ Gel Tray for 9cmW x 11cmL gels, 2 comb slots
RapidCast™ Gel Caster, only, will hold (1-3) 80-0911-RCGT
RapidCast™ Gel Caster Pack, includes (3) 80-0911-RCGT
Replacement Gaskets for 80-0911-RCGT (2)
Mini-Adjustable Horizontal Gel Caster, can be used with 8,
10, 11, 14 cm Long Gel Trays, up to 12cm Wide
Wide–Adjustable Horizontal Gel Caster, can be used with 8,
10, 11, 14, & 17 cm Long Gel Trays, up to 23 cm Wide
RapidCast™ 80-1214
80-1214-RCGT2
80-1214-RCGT4
80-1214-RCGT12
80-1214-RCGC
80-1214-RCPK
80-1214-GSK
80-1214-UVT2
80-1214-UVT4
80-1214-UVT12
80-MADJ-CST
80-WADJ-CST
80-1214-MT25SLG
RapidCast™ Gel Tray for 12cmW x 14cmL gels, 2 comb slots
RapidCast™ Gel Tray for 12cmW x 14cmL gels, 4 comb slots
RapidCast™ Gel Tray for 12cmW x 14cmL gels, 12 comb slots
RapidCast™ Caster only, holds (3) Gasketed 12 x 14 cm trays
RapidCast™ Caster Pack includes (3) 80-1214-RCGT2
Replacement Gasket, Pair
Flush Cut Gel Tray for 12cmW x 14cmL gels, 2 comb slots
Flush Cut Gel Tray for 12cmW x 14cmL gels, 4 comb slots
Flush Cut Gel Tray for 12cmW x 14cmL gels, 12 comb slots
Mini Adjustable Horizontal Gel Caster, accommodates gel
trays 8, 10, and 14 cm long, up to 12cm wide
Maxi Adjustable Horizontal Gel Caster, accommodates (3)
8cm and 10cm long trays, (2) 12 x 14 cm long trays and (1)
23cmW x 14cmL gel tray
Sample Loading Guide for 25 tooth comb (12 x 2) plus 1, 2X
micro-titer format, for improved reliability of loading with
multi-channel pipette
Copyright Galileo Bioscience™ 2004 – Page 14
Copyright Galileo Bioscience™ 2004 – Page 15
Copyright Galileo Bioscience™ 2004 – Page 16


![KeyView [4823353_1.wpd]](http://vs1.manualzilla.com/store/data/005667242_1-589c8deb81b55e7c0d34a0d078158765-150x150.png)