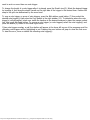
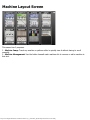
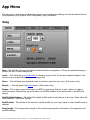
1
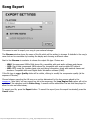
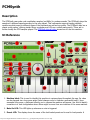
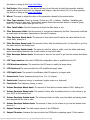
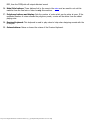
User's manual
Table of contents
App Overview
Navigation
Creating a song
Control Automation (Recording)
Exporting your songs
Machine Reference
SubSynth
PCMSynth
BassLine
BeatBox
Mixer
Effects
Sequencer
http://www.singlecellsoftware.com/docs/caustic/v2_1_0/index.html[16/01/2013 8:33:14 AM]
App overview
Caustic is a music creation tool that uses various synthesizers, samplers and effects to create songs.
Limitless combinations of instruments and sounds means Caustic can be used to create music of various
styles, even though the app's main focus is electronic music. Caustic is modelled after a rack-mount cabinet
where devices are stacked and connected in order to produce sound.
Quick Glossary
Here's a quick list of words you'll see throughout this manual and their meaning in the context of this app:
Machine: A device which either produces or modifies sound. Caustic's rack consists of a maximum of 6
"dynamic" machines, plus 3 permanent machines: the effects rack, the mixer and the sequencer.
Long-press: This action is done by pressing and holding the control for a second or two, until the
extended action is performed.
http://www.singlecellsoftware.com/docs/caustic/v2_1_0/overview.htm[16/01/2013 8:33:15 AM]
Navigation
There are three main components to Caustic's user interface (UI). The rack scrollbar, the control panel
and the machine view.
To switch between machines in the machine view, touch then scroll up/down with the rack scrollbar.
Alternatively, you can press the Machine Button on the left side of the control panel to bring up the
Machine Layout screen. Touching any one of the machines in this screen will quickly jump to this machine.
The app's main menu can be accessed by pressing the menu button in the control panel at any time. If
your device has a menu button, this will also show the menu when pressed (Android only).
To control playback, use the Play and Stop buttons in the Control Panel. Pressing twice on the stop
button rewinds the playback cursor to the beginning of the loop if loop cursors are set in the Sequencer, or
back to the start of the song if no loop cursors are set. Pressing a third time will bring the playback cursor
to the beginning if a loop is set.
http://www.singlecellsoftware.com/docs/caustic/v2_1_0/navigation.htm[16/01/2013 8:33:17 AM]
Creating a song
These are the basic steps to creating a song in Caustic. Be sure to watch the Caustic 2.1 Overview video
which also shows how to do this in a live demonstration.
The steps
1. Start by creating a new song. Press the Menu button in the Control Panel and select "New" from the
Song tab in theapp menu.
2. While in the app menu, select the tempo for your song using the BPM controls.
3. Choose the machines you want to use by pressing the Machine Layout button in the lower-left of the
screen. This will bring up the Machine Layout screen which lets you add/remove machines. Note that
machines can be added/removed at any time, but any work done in these machines will be lost if they
are removed.
4. Flip the bottom switch to Pattern by swiping it to the left. Press the Play button in the bottom
Control Panel. Then, for each machine in your rack, create note or trigger patterns for them using
their respective pattern editor.
5. If desired, add effects to your machine in the Effects Rack.
6. Flip the bottom switch to Song by swiping itt o the right. Go to the Sequencer and assemble your
patterns. (See instructions in Sequencer page)
7. Once your patterns are placed to create your song, record automation for any controls you wish to
have change dynamically throughout the length of the song.
8. When your are satisfied with the song, press the Menu button in the Control Panel to bring up the
app menu, select the "Song" tab then select "Export". This will show the Song Export screen.
9. Rinse, repeat, enjoy.
http://www.singlecellsoftware.com/docs/caustic/v2_1_0/song_creation.htm[16/01/2013 8:33:18 AM]
Automation
Automation is a term for the recording and playback of controls in Caustic. To watch a video tutorial on
automation, press here.
To record automation, you must already have a song created in the Sequencer.
Make sure the bottom toggle switch int the Control Panel is in Song mode, press the Play button, followed
by the Record button to arm recording. Next, record movements on a knob while the song is playing. An
orange box will appear around the control to indicate it has been automated. If these is no orange box
around the control, then this control cannot be automated.
When done recording movements for this control, press Stop 3 times to rewind the song to the beginning
and repeat the process for any other controls you wish to automate.
To remove automation from a control, make sure playback is stopped then press Record. Long-press the
control for which to clear automation. This will bring up a confirmation screen.
http://www.singlecellsoftware.com/docs/caustic/v2_1_0/automation.htm[16/01/2013 8:33:18 AM]
Song Export
This screen is used to export your song to your external storage.
The filename window shows the name of the file which will be written to storage. It defaults to the song's
name but can be overridden by touching the display and choosing a different name.
Next to the filename is a selector to choose the output file type. Choices are:
.WAV: Uncompressed 44KHz 16bit stereo file, compatible with most audio software and players.
.OGG: Ogg-Vorbis compressed 44KHz stereo file, compatible with most portable MP3 players.
.MID: MIDI music file, contains basic note and timing information, along with machine names and
structure. Compatible with most Digital Audio Worstation software (DAW).
If the file type is .ogg a Quality slider will be visible, offering to modify the compression quality (at the
expense of file size).
Choose between exporting the full song or a portion determined by the loop cursors placed in the
sequencer. Note that if no loop cursors are set in the sequencer, the Loop Region Only option will not be
available. If the selection is set to Entire Song, 2 seconds will be added after the last note has played to
allow for note and effect decay.
To export your file, press the Export button. To cancel the export (once the export has started) press the
Cancel button.
http://www.singlecellsoftware.com/docs/caustic/v2_1_0/song_export.htm[16/01/2013 8:33:20 AM]
Subsynth
Description
The Subsynth is a virtual analog synthesizer which produces sound by subtractive synthesis. It's called
subtractive because you start with oscillators creating a sound that's rich in harmonics, and then you sculpt
the sound with filters and LFOs to create the desired output sound. The subsynth overview video shows
how this is done.
UI Reference
1. Machine label: This is used to identify this machine in various places throughout the app. Its value
can be changed via a long-press action (label changes color to indicate a successful touch). Upon
successful long-press, a keyboard offering you to rename the machine will appear. Use this to identify
a machine in a rack configuration where there might be more than one instance of the same machine.
2. Note On LED: This LED lights up whenever a note is triggered.
3. Preset LCD: This display shows the name of the last loaded preset and is used to load presets. A
preset is a saved file that contains the positions of all knobs and controls. To load a preset, touch the
http://www.singlecellsoftware.com/docs/caustic/v2_1_0/subsynth.htm[16/01/2013 8:33:23 AM]
preset LCD. This will bring up a File Browser with a list of saved presets to choose from.
4. Save Preset button: This button allows you to save your own presets to disk for use later. Pressing
this button will bring up a keyboard allowing you to name your preset. Presets are stored on the
external storage in /caustic/presets/subsynth.
5. Oscillator 1 Waveform selector: Touch to change, 6 waveforms to choose from. Long-press to
bring up the custom waveform screen
6. Mix knob: Controls the volume balance between Oscillator 1 and Oscillator 2.
7. FM knob: Controls how much frequency modulation is applied to Oscillator 1 using Oscillator 2 as the
modulator.
8. Bend Amount knob: The amount of portamento (bend) applied to each new note.
9. Oscillator 2 Waveform selector: Touch to change, 6 waveforms to choose from, plus silence to
turn off. Long-press to bring up the custom waveform screen
10. Phase knob: The phase shift applied to the signal before it is mixed in with Oscillator 1.
11. Octave knob: Coarse frequency tuning for Oscillator 2, from -3 to +3 octaves.
12. Semis knob: Frequency tuning for Oscillator 2, in semitones (regular notes on a keyboard)
13. Cents knob: Fine frequency tuning for Oscillator 2, in cents. Used to create de-tune effects.
14. Filter Type selector: Touch to change. Choices are: Off - LowPass - HighPass - BandPass plus
inverted versions of each one. The inverted version affects the envelope section. Instead of going
from 0 to 1, invert makes them go from 1 to 0
15. Filter Cutoff slider: Sets the frequency at which the filter starts to cut.
16. Filter Resonance slider: Sets the amount of resonance produced by the filter. Resonance is defined
by small peaks at harmonic frequencies to the cutoff frequency.
17. Filter Keyboard tracking knob: Controls the amount of filtering done based on the keyboard note
played. Full keyboard tracking cuts off more the lower the note played.
18. Filter Envelope Attack knob: The amount of time before cutoff reaches the value defined by the
cutoff slider, stating at 0
19. Filter Envelope Decay knob: The amount of time, after the attack period, for the cutoff to go from
the slider value to the sustain level.
20. Filter Envelope Sustain knob: The value for cutoff at which to settle, once the attack and decay
period have elapsed and the note is held, relative to the cutoff slider.
21. Filter Envelope Release knob: The amount of time for the cutoff to go from the sustain level down
to 0.
22. LFO 1 Target selector: Sets which susbsynth configuration value is modified by LFO 1.
23. LFO 1 Waveform selector: The waveform LFO 1 uses to modify its target value.
24. LFO 1 Rate knob The speed at which LFO 1 modifies its target value.
http://www.singlecellsoftware.com/docs/caustic/v2_1_0/subsynth.htm[16/01/2013 8:33:23 AM]
25. LFO 1 Depth knob: The amount of modification LFO 1 apply to its target value.
26. LFO 2 Target selector: Sets which susbsynth configuration value is modified by LFO 2. (Cannot be
the same as LFO1)
27. LFO 2 Rate knob The speed at which LFO 2 modifies its target value.
28. LFO 2 Depth knob: The amount of modification LFO 2 apply to its target value.
29. Volume Envelope Attack knob: The amount of time before volume reaches 100%, stating at 0
30. Volume Envelope Decay knob: The amount of time, after the attack period, for the volume to go
from 100% to the sustain level.
31. Volume Envelope Sustain knob: The volume at which to settle, once the attack and decay period
have elapsed and the note is held.
32. Volume Envelope Release knob: The amount of time for the volume to go from the sustain level
down to 0.
33. Output Volume knob: The final output volume of the subsynth.
34. Output VU meter: Indicates the level at which the subsynth is outputing signal. If this reaches RED,
then the subsynth will output distorted sound.
35. Mute/Solo buttons: These buttons link to the ones in the mixer and are used to cut out this
machine from the final mix or listen to only this machine.
36. Polyphony buttons and display: Sets the number of notes which can be active at once. If the
requested number of notes exceeds the polyphony count, a voice will be stolen from the oldest
playing note.
37. Preview Keyboard: This keyboard is used to play notes to help when designing sounds with the
subsynth.
38. Octave buttons: Raises or lowers the octave of the Preview Keyboard.
http://www.singlecellsoftware.com/docs/caustic/v2_1_0/subsynth.htm[16/01/2013 8:33:23 AM]
PCMSynth
Description
The PCMSynth uses pulse code modulation samples (ex:WAVs) to produce sounds. The PCMSynth plays the
sample at a different speed according to the note played. This instruments supports loading multiple
waveforms which maps to different areas of the keyboards as well as loop points. The PCMSynth also has a
classic synth section, offering similar filters, envelopes and LFOs as a virtual analog synth. These act to
further modify the PCM samples played. The PCMSynth tutorial video shows how to use this machine.
UI Reference
1. Machine label: This is used to identify this machine in various places throughout the app. Its value
can be changed via a long-press action (label changes color to indicate a successful touch). Upon
successful long-press, a keyboard offering you to rename the machine will appear. Use this to identify
a machine in a rack configuration where there might be more than one instance of the same machine.
2. Note On LED: This LED lights up whenever a note is triggered.
3. Preset LCD: This display shows the name of the last loaded preset and is used to load presets. A
http://www.singlecellsoftware.com/docs/caustic/v2_1_0/pcmsynth.htm[16/01/2013 8:33:27 AM]
preset is a saved file that contains the positions of all knobs as well as samples used. To load a
preset, touch the preset LCD. This will bring up a list of saved presets to choose from.
4. Save Preset button: This button allows you to save your own presets to disk for use later. Pressing
this button will bring up a keyboard allowing you to name your preset. Presets are stored on the
external storage in /caustic/presets/pcmsynth.
5. Sampler Information Panel: This displays context-aware information depending on which of the
sampler panel buttons is currently selected, as well as a quick view of the current sample's settings.
(See buttons below for more information)
6. Sample Button: When selected, this allows the user to scroll between loaded samples using the
wheel(15) to change which sample is currently selected.
To load a new sample, long-press this button to bring up a file browser and select a WAV sample. To
delete a sample, see Level button below. Caustic supports mono or stereo, 16bit samples at any
sampling rate.
7. Level Button: When selected, this allows the user to set the volume level on the currently selected
sample using the wheel(15). This control can also be used to remove a sample. If the level is set to
0% a prompt will pop up asking to confirm sample deletion.
8. Tune Button: When selected, this allows the user to fine-tune the sample's playback frequency using
the wheel(15) to control the correction, from -50 cents to +50 cents.
9. Root Key: When selected, this allows the user to set which key represents the sample's base tuning.
Use the wheel (15) to set the key or long-press the Root Key button then press the desired key on
the preview keyboard (38). For example, if the WAV sample used was of a G5 note, then the rootkey
should be set to G5 in order to ensure correctly tuned playback.
10. Low Key: When selected, this allows the user to set the lowest note which should use the currently
selected sample for playback, using the wheel (15) or by long-pressing the Low Key button then
pressing the desired key on the preview keyboard (38). This is mostly useful in multi-sample
instruments where each sample maps correctly to a particular range of notes.
11. High Key: When selected, this allows the user to set the highest note which should use the currently
selected sample for playback, using the wheel (15) or by long-pressing the Low Key button then
pressing the desired key on the preview keyboard (38). This is mostly useful in multi-sample
instruments where each sample maps correctly to a particular range of notes.
12. Mode Button: When selected, this allows the user to set the playback mode of the currently selected
sample, using the wheel to toggle between modes.
The different modes are:
Play Once: (default) Plays the full sample each time a note is played
Note On/Off: Plays the sample as long as the note is held
Loop Forward Plays the sample starting at the Loop Start Point(13) until it reaches the Loop
End Point (14), at which point it loops around to the Start Loop Point again, and does this until
the note is released.
Loop Forward-Back Plays the sample starting at the Loop Start Point(13) until it reaches the
Loop End Point (14), at which point it start playing in reverse until it reaches the Start Loop
Point again, and does this until the note is released.
Intro + Loop Fwd Same looping behavior as "Loop Forward" except playback always starts at
the beginning of the sample when the note is first played.
Intro + Loop FwdBack Same looping behavior as "Loop Forward-Back" except playback
always starts at the beginning of the sample when the note is first played.
13. Start Button: When selected, this allows the user to set the point at which the currently selected
sample will use as its start point for playback and looping, using the wheel (15) or by long-pressing
http://www.singlecellsoftware.com/docs/caustic/v2_1_0/pcmsynth.htm[16/01/2013 8:33:27 AM]
this button to bring up the Loop Point Editor
14. End Button: When selected, this allows the user to set the point at which the currently selected
sample will use as its end point for playback and looping, using the wheel (15) or by long-pressing
this button to bring up the Loop Point Editor
15. Wheel: This used to adjust the value of the parameter selected by the active button.
16. Filter Type selector: Touch to change. Choices are: Off - LowPass - HighPass - BandPass plus
inverted versions of each one. The inverted version affects the envelope section. Instead of going
from 0 to 1, invert makes them go from 1 to 0
17. Filter Cutoff slider: Sets the frequency at which the filter starts to cut.
18. Filter Resonance slider: Sets the amount of resonance produced by the filter. Resonance is defined
by small peaks at harmonic frequencies to the cutoff frequency.
19. Filter Envelope Attack knob: The amount of time before cutoff reaches the value defined by the
cutoff slider, stating at 0
20. Filter Envelope Decay knob: The amount of time, after the attack period, for the cutoff to go from
the slider value to the sustain level.
21. Filter Envelope Sustain knob: The value for cutoff at which to settle, once the attack and decay
period have elapsed and the note is held, relative to the cutoff slider.
22. Filter Envelope Release knob: The amount of time for the cutoff to go from the sustain level down
to 0.
23. LFO Target selector: Sets which PCMSynth configuration value is modified by the LFO.
24. LFO Waveform selector: The waveform the LFO uses to modify its target value.
25. LFO Rate knob The speed at which the LFO modifies its target value.
26. LFO Depth knob: The amount of modification theLFO applies to its target value.
27. Octave knob: Coarse frequency tuning, from -3 to +3 octaves.
28. Semis knob: Frequency tuning, in semitones (regular notes on a keyboard)
29. Cents knob: Fine frequency tuning, in cents.
30. Volume Envelope Attack knob: The amount of time before volume reaches 100%, stating at 0
31. Volume Envelope Decay knob: The amount of time, after the attack period, for the volume to go
from 100% to the sustain level.
32. Volume Envelope Sustain knob: The volume at which to settle, once the attack and decay period
have elapsed and the note is held.
33. Volume Envelope Release knob: The amount of time for the volume to go from the sustain level
down to 0.
34. Output Volume knob: The final output volume of the PCMSynth.
35. Output VU meter: Indicated the level at which the PCMSynth is outputing signal. If this reaches
http://www.singlecellsoftware.com/docs/caustic/v2_1_0/pcmsynth.htm[16/01/2013 8:33:27 AM]
RED, then the PCMSynth will output distorted sound.
36. Mute/Solo buttons: These buttons link to the ones in the mixer and are used to cut out this
machine from the final mix or listen to only this machine.
37. Polyphony buttons and display: Sets the number of notes which can be active at once. If the
requested number of notes exceeds the polyphony count, a voice will be stolen from the oldest
playing note.
38. Preview Keyboard: This keyboard is used to play notes to help when designing sounds with the
PCMSynth.
39. Octave buttons: Raises or lowers the octave of the Preview Keyboard.
http://www.singlecellsoftware.com/docs/caustic/v2_1_0/pcmsynth.htm[16/01/2013 8:33:27 AM]
Bassline
Description
The Bassline is a monophonic lead synthesizer loosely modelled after the legendary Roland TB-303. It
consists of a single oscillator(2 waveforms) running through an envelope-modulated resonant filter, with
LFO and Distortion effect. The bassline tutorial video shows how it works.
UI Reference
1. Machine label: This is used to identify this machine in various places throughout the app. Its value
can be changed via a long-press action (label changes color to indicate a successful touch). Upon
successful long-press, a keyboard offering you to rename the machine will appear. Use this to identify
a machine in a rack configuration where there might be more than one instance of the same machine.
2. Preset LCD: This display shows the name of the last loaded preset and is used to load presets. A
preset is a saved file that contains the positions of all knobs and controls. To load a preset, touch the
preset LCD. This will bring up a File Browser with a list of saved presets to choose from.
3. Save Preset button: This button allows you to save your own presets to disk for use later. Pressing
http://www.singlecellsoftware.com/docs/caustic/v2_1_0/bassline.htm[16/01/2013 8:33:30 AM]
this button will bring up a keyboard allowing you to name your preset. Presets are stored on the
external storage in /caustic/presets/bassline.
4. Waveform selector: Touch to change, 2 waveforms to choose from; Sawtooth and Square
5. Pulse Width knob: When the waveform selector(3) is on square wave, this knob will control the
duty cycle of the square wave. From 1% to 50%. Note: this control has no effect on the
sawtooth waveform.
6. Tune knob: Frequency tuning for the oscillator, in semitones. +1/-1 octave.
7. Cutoff knob: Sets the frequency at which the filter starts to cut.
8. Resonance knob: Sets the amount of resonance produced by the filter. Resonance is defined by
small peaks at harmonic frequencies to the cutoff frequency.
9. Envelope Modulation knob: Controls the amount of filter change during each note's lifetime.
10. Decay knob: Controls the lifetime of each note.
11. Accent knob: Controls the volume added to notes with the Accent(15) modifier.
12. Output Volume knob: The final output volume of the bassline.
13. Output VU meter: Indicates the level at which the bassline is outputing signal. If this reaches RED,
then the bassline will output distorted sound.
14. Low Frequency Oscillator Target: Sets which bassline configuration value is modified by the LFO
(Pulse width, Filter Cutoff or Volume)
15. LFO Rate knob The speed at which the LFO modifies its target value.
16. LFO Depth knob: The amount of modification the LFO apply to its target value.
17. LFO Phase knob: Sets the timing for the sine wave used to modulate the LFO target. This is a offset
sync value relative to the song's tempo.
18. Distortion Program Knob: Sets which distortion program is active (Off, OverDrive, Saturation,
Foldback, Fuzz)
19. Distortion Pre gain knob: Pre-amplification used to send signal past the chosen program's
threshold.
20. Distortion Amount knob: The amount of distortion applied to signal above the threshold.
21. Distortion Post gain knob Post-amplification used to compensate the distortion algorithm's output
volume.
22. Note On LED: This LED lights up whenever a note is triggered.
23. Mute/Solo buttons: These buttons link to the ones in the mixer and are used to cut out this
machine from the final mix or listen to only this machine.
24. Preview Keyboard: This keyboard is used to play notes to help when designing sounds with the
bassline.
25. Octave buttons: Raises or lowers the octave of the Preview Keyboard.
http://www.singlecellsoftware.com/docs/caustic/v2_1_0/bassline.htm[16/01/2013 8:33:30 AM]
http://www.singlecellsoftware.com/docs/caustic/v2_1_0/bassline.htm[16/01/2013 8:33:30 AM]
BeatBox
Description
The BeatBox is a sample-based drum computer. It features 8 stereo output channels. Here is a tutorial
video showing how to use it.
UI Reference
1. Machine label: This is used to identify this machine in various places throughout the app. Its value
can be changed via a long-press action (label changes color to indicate a successful touch). Upon
successful long-press, a keyboard offering you to rename the machine will appear. Use this to identify
a machine in a rack configuration where there might be more than one instance of the same machine.
2. Preset LCD: This display shows the name of the last loaded preset and is used to load presets. A
preset is a saved file that contains a link to all samples used as well as the positions of every knob.
To load a preset, touch the preset LCD. This will bring up a list of saved presets to choose from.
3. Save Preset button: This button allows you to save your own presets to disk for use later. Pressing
this button will bring up a keyboard allowing you to name your preset. Presets are stored on the
http://www.singlecellsoftware.com/docs/caustic/v2_1_0/beatbox.htm[16/01/2013 8:33:32 AM]
external storage in /caustic/presets/beatbox. Note that you must have the referenced samples
present on your external storage to save a preset.
4. Kit Options button: This button brings ups the BeatBox Kit Options screen.
5. Mute/Solo buttons: These buttons link to the ones in the mixer and are used to cut out this
machine from the final mix or listen to only this machine.
6. Output Volume knob: The final output volume of the BeatBox.
7. Output VU meter: Indicates the level at which the BeatBox is outputing signal. If this reaches RED,
then the BeatBox will output distorted sound.
8. Channel Mute/Solo buttons: These buttons are used to cut out this channel from within the
BeatBox's output mix or listen to only this channel.
9. Sample Name LCD: Displays the name of the loaded sample.
10. Sample Load button: Press this button to replace or load a sample into this channel. Pressing this
will bring up a File Browser to choose your sample.
11. Tuning knob: Controls the pitch of the sample.
12. Punch knob: Controls how quickly the sample fades in. Can be used to remove the aggressive attack
spike on most percussions.
13. Decay knob: Controls how quickly the sample fades out.
14. Pan knob: Controls the position of this channel in stereo space.
15. Volume knob: The mix volume for this channel.
16. Preview Play button: Press to hear the sample as it will sound when triggered through the pattern
editor.
http://www.singlecellsoftware.com/docs/caustic/v2_1_0/beatbox.htm[16/01/2013 8:33:32 AM]
Mixer
The mixer is where the signal from each machine gets added (or "mixed") into the final audio result you
hear. There are 7 "strips" in the mixer, one for each dynamic machine in the rack and one for the master
section. The master section contains two global effects: Delay and Reverb.
Each strip has the following controls which affect the sound signal coming from the machine (once it has
passed through the insert effects):
1. EQ Knobs (Bass, Mid, High): These are equalizer controls that affect the tone of the audio signal,
each component can either be amplified or cut.
2. Global Effects Send Knobs: These control how much of the machine's audio signal is sent into each
global effect for processing.
3. Stereo Knobs: The Pan knob controls the placement of the machine's audio signal in the output
stereo panorama.
The Width knob controls a small delay between left and right ear, this gives the impression that the
sound is captured from a stereo source. The greater the Width value, the more stereo separation in
the sound.
4. Mute/Solo Buttons: Mute stops this machine's audio from going into the output mix. Solo mutes
out every machine except the Solo'ed one.
5. Volume Knob: Controls this machine's final volume that will be mixed into the output. This also
affects the amount of signal sent to the Global Effects.
6. VU meter: Indicates the level at which this machine is outputing signal. If this reaches RED, then
this machine will output distorted sound into the final mix.
7. Strip Identifier Label: Shows the name of the machine connected to this strip.
http://www.singlecellsoftware.com/docs/caustic/v2_1_0/mixer.htm[16/01/2013 8:33:35 AM]
The "Master" strip contains controls for the two global effects, plus a control section for the final output.
8. Delay Time Knob: Sets the time between echoes for the global Delay effect.
9. Delay Feedback Knob: Sets the amount of output signal going back into the global Delay effect.
(i.e. This sets the decay time on the effect)
10. Delay Stereo Button: Toggles the global Delay effect from mono to ping-pong stereo
11. Reverb Size Knob: Sets the simulated room size for the global Reverb effect. (i.e. The decay time
on the effect).
12. Reverb Damping Knob: Sets the speed at which the high frequencies are filtered out (i.e. simulates
the room's physical characteristics)
13. Reverb Stereo Button: Toggles the global Reverb effect from mono to split-stereo.
14. Master EQ Knobs (Bass, Mid, High): These are equalizer controls that affect the tone of the final
mixed audio signal, each component can either be amplified or cut.
15. Master Volume Knob: Controls the final volume that will be passed to the sound card.
16. Master VU meter: Indicates the level at which Caustic is outputing signal. If this reaches RED, then
Caustic will output distorted sound to the sound card.
http://www.singlecellsoftware.com/docs/caustic/v2_1_0/mixer.htm[16/01/2013 8:33:35 AM]
Effects
The effects rack is where you can place various insert effects to further shape the sound of each machine.
You can place up to 2 insert effects per machine, plus 2 inserts for the master mix. The signal direction is
top to bottom, meaning the machine's audio come into the topmost effect (if present) then gets sent into
the bottom-most insert effect (if present) and then into the mixer's input strip for that machine.
To place a new effect, touch inside an empty slot and effect selection popup will ask you which effect you
want to place. To remove an effect, touch the "X" in the lower right-hand corner of the effect.
There are currently 8 insert effects which can be placed:
Distortion
Program: The algorithm used to distort the sound. Choices are Overdrive (tube
amp), Saturation (Soft-knee limiter), Fuzz (Hard-knee limiter), Foldback (folds the
signal onto itself)
Pre: Pre-amplification used to send signal past the chosen program's threshold.
Amount: The amount of distortion applied to signal above the threshold.
Post: Post-amplification used to compensate the distortion algorithm's output
volume.
BitCrusher
http://www.singlecellsoftware.com/docs/caustic/v2_1_0/effects.htm[16/01/2013 8:33:40 AM]
Depth: The bit depth, from 0 to 16 bits
Rate: The sampling rate, from 1Hz to 44KHz
Jitter: The amount of randomness on the Rate control
Wet: The ratio of modified signal to original signal, from 0% to 100%
Compressor
Threshold: The volume at which the compressor will start modifiying the signal.
Ratio: The amount of reduction applied to signal over the threshold
Attack: The time it takes to reach full compression once signal over threshold has
been detected.
Release: The time it rakes to shut down compression after the signal has gone
below the threshold.
SideChain: The signal used as a trigger to the compressor. Default is the current
machine channel but it can be changed to any input line in the mixer (1-6)
Flanger
Depth: The sweep width in frequency range.
Rate: The speed at which the effect sweeps the frequency range.
Feedback: The amount of output signal that is fed back into the input for
processing.
Wet: The ratio of modified signal to original signal, from 0% to 100%
Chorus
Depth: The detune width in frequency range.
Rate: The speed at which the effect sweeps the detune amount.
http://www.singlecellsoftware.com/docs/caustic/v2_1_0/effects.htm[16/01/2013 8:33:40 AM]
Wet: The ratio of modified signal to original signal, from 0% to 100%
Phaser
Depth: The sweep width in frequency range.
Rate: The speed at which the comb filter sweeps the frequency range.
Feedback: The amount of output signal that is fed back into the input for
processing.
Auto-Wah
Speed: The reaction time for the filter to go from OFF to ON.
Depth: The maximum amount of cutoff applied to the incoming signal.
Cutoff: The cutoff frequency for the internal band-pass filter.
Resonance: The resonance amount for the internal band-pass filter.
Wet: The ratio of modified signal to original signal, from 0% to 100%
Parametric
EQ
Freq: The frequency at which to apply the equalization.
Gain: The volume gain to apply around the selected frequency (boost or cut).
http://www.singlecellsoftware.com/docs/caustic/v2_1_0/effects.htm[16/01/2013 8:33:40 AM]
Bandwidth: The size of the surrounding frequencies that will be affected by the
equalization.
http://www.singlecellsoftware.com/docs/caustic/v2_1_0/effects.htm[16/01/2013 8:33:40 AM]
Sequencer
This is where patterns and notes are put together to create a song. Make sure the toggle switch in the
Control Panel is in Song mode to use the sequencer.
The sequencer has two views, which work at the same time to trigger notes, a pattern view and a piano roll
view. Use the View(1) button in the upper-left corner to change views.
To place notes or patterns, press the pencil icon(2). To stretch a note or pattern, press the stretch icon(3),
to pan inside the main sequencer window(10), press the pan icon(4) and drag the view or use the
horizontal scrollbar (13) at any time.
At the bottom of the sequencer is the timeline(12). This shows a measure count as well as any loop points
that are set. To create a loop, touch and drag towards the left inside the timeline. To clear a loop, drag
right so that the loop cursors end up in the same position and release.
To set the plackback start position, touch once in the timeline at the desired start location.
To insert patterns in between existing patterns blocks, first place the playback cursor at the desired insert
time. Then long press inside the timeline at this time until a popup is shown. Select the number of
measures to insert and press ok.
To trim patterns and delete the empty space left by the deleted patterns, first create a loop cursor selection
in the timeline around the patterns to delete, then long-press inside the loop area in the timeline. A
confirmation popup will be displayed. When the sequencer is playing, a black line will show the current play
position.
http://www.singlecellsoftware.com/docs/caustic/v2_1_0/sequencer.htm[16/01/2013 8:33:47 AM]
To have the sequencer automatically scroll to follow a playing song, press the Follow (13) button.
Pattern View
Use the zoom magnifiers(5) to scale the view, zooming in pattern view only affects what you see.
Inside the main sequencer window(10) there are 6 rows, one for each machine.
To trigger a pattern to play, make sure the pencil icon(2) is selected and touch a grid square for the
desired machine at the desired measure. A pattern selection popup will by shown. Select the desired
pattern and press OK. To move a placed pattern block, make sure the pencil icon(2) is selected, then touch
and drag the block to the new time location. To move multiple blocks at a time, press the selection sidebar
mode button (6) then press the multi icon in the right sidebar(11). From there, select each block by
touching it once. Selected blocks will be highlighted in orange. Then touch-drag any of the selected blocks
to move all blocks to the desired time. Multi-select applies for most basic operations in pattern view where
you want to work on more than one pattern block.
To have a pattern repeat over multiple measures, press the Stretch icon(3). Select the desired block by
touching it, then drag the stretch handle on the right side of the block to the correct end measure.
To copy a pattern block or group of blocks, press the Edit sidebar mode button (7) then select the desired
block(s) then press the Copy button in the right sidebar (11). To determine where the block(s) will get
pasted, touch once inside the timeline at the desired measure to place the orange vertical line, then press
the Paste button. To remove a block (or blocks) select the block(s) and press the delete (X) button in the
lower-right corner.
If two pattern blocks overlap, a red Error button will appear in the lower-left corner of the sequencer and
the offending patterns will be highlighted in red. Pressing the error button will jump to show the first error.
To clear the error, move or delete the offending block(s).
Tip: Touching any of the machine icons on the left-hand side(9) will jump to that machine.
Piano roll View
The piano roll view can be used to add notes that are longer than 8 measures or create non-repeating note
sequences.
It is very similar to the Pattern editor except that it spans over the entire song instead of just a few
measures. Touch the display in the upper right to select which piano roll machine to work with. (Note that
some machines cannot place notes in piano roll view)
Use the zoom magnifiers(5) to scale the view, zooming in piano roll view sets the default new note length.
To scroll the keyboard up and down in octaves, touch and drag up/down in the side keyboard (9, not
shown). Hold a note in the side keyboard to hear a preview of it in the linked machine.
To add a note trigger, make sure the pencil icon(2) is selected and touch a grid square for the desired note
at the desired time. (The initial length of the new note will be determined by the zoom level.) To move a
placed note trigger, make sure the pencil icon(2) is selected, then touch and drag the trigger to the new
time or note. To move multiple triggers at a time, press the selection sidebar mode button (6) then press
the multi icon in the right sidebar(11). From there, select each trigger by touching it once. Selected
triggers will be highlighted in orange. Then touch-drag any of the selected triggers to move all trigger to
the desired time or note offset. Multi-select applies for most basic operations in piano roll view where you
http://www.singlecellsoftware.com/docs/caustic/v2_1_0/sequencer.htm[16/01/2013 8:33:47 AM]
want to work on more than one note trigger.
To change the length of a note trigger after it is placed, press the Stretch icon(3). Select the desired trigger
by touching it, then drag the stretch handle on the right side of the trigger to the desired time. Position will
snap to the grid size determined by the zoom level.
To copy a note trigger or group of note triggers, press the Edit sidebar mode button (7) then select the
desired note trigger(s) then press the Copy button in the right sidebar (11). To determine where the note
trigger(s) will get pasted, touch once inside the timeline at the desired measure to place the orange vertical
line, then press the Paste button. To remove a note trigger (or note triggers) select the note trigger(s) and
press the delete (X) button in the lower-right corner.
If two note triggers overlap, a red Error button will appear in the lower-left corner of the sequencer and the
offending note triggers will be highlighted in red. Pressing the error button will jump to show the first error.
To clear the error, move or delete the offending note trigger(s).
http://www.singlecellsoftware.com/docs/caustic/v2_1_0/sequencer.htm[16/01/2013 8:33:47 AM]
Machine Layout Screen
This screen has 2 purposes.
1 - Machine Jump: Touch any machine or pattern editor to quickly view it without having to scroll
manually.
2 - Machine Management: Use the button beneath each machine slot to remove or add a machine in
that slot.
http://www.singlecellsoftware.com/docs/caustic/v2_1_0/machine_layout.htm[16/01/2013 8:33:50 AM]
App Menu
The app menu is broken up into 5 sections which can be accessed by selecting one the the tabs at the top:
Song Operations, App Options, MIDI configuration, Help, and About.
Song
New - This will clear the rack and load the default machine configuration. If there are unsaved changes, a
prompt will offer to save changes first.
Load... - This will bring up a File Browser to choose a song to load. If there are unsaved changes to the
current song, a prompt will offer to save changes first.
Save... - This will bring up a keyboard screen to choose a name for your song. (Full version only)
Export... - This will launch the Export screen. (Full version only)
Tempo - This is where you set the tempo (in BPM) for your song. Use the + and - buttons to raise or
lower the tempo. Alternatively, tap a few times on the BPM indicator at the desired rate to set BPM (tap
tempo).
Shuffle Mode Buttons - This will set the global shuffle mode for all patterns in the song. Select either 8th
notes (March) or 16th notes (Swing).
Shuffle Knob - This will dial in the amount of global shuffle for your song, based on which shuffle mode is
selected.
Song Length - This measures the length of the current song using the information in the sequencer and
the BPM settings.
http://www.singlecellsoftware.com/docs/caustic/v2_1_0/menu.htm[16/01/2013 8:33:55 AM]
Latency - This calculates the device's audio output latency based on the size of the minimum output buffer
allowed (Caustic uses the minimum available size for lowest latency). This does not take into account the
device's touchscreen latency or additional internal buffering.
Options
Screen Wake Lock - When selected, this option will prevent your device from "sleeping" after a period of
inactivity. This is useful when you are listening to your song and haven't touched the screen in a while but
don't want the device to sleep and cut off the audio.
Sound New Notes - When selected, this option will make each new note placed in pattern editors and
sequencer trigger a sound, based on the note that's placed or moved.
Internal Latency - This sets the size of the internal processing buffer. Lowering this value makes key
touch events get processed quicker and can help VU meters update faster, at the expense of higher CPU
load.
Song End Mode - This sets the playback behavior for the sequencer when the song is done playing.
Allow Screen Rotation - When selected, this option allows the app to display multiple machines when
the device is held vertically (portrait mode).
Keyboard Key Size - This sets the size of the keys in the preview keyboard displayed on each machine.
Piano Roll Key Size - This sets the size of the keys in the pattern editor and sequencer piano rolls.
Control Panel Position - This sets the placement of the control panel, either at the top or bottom of the
screen.
MIDI
http://www.singlecellsoftware.com/docs/caustic/v2_1_0/menu.htm[16/01/2013 8:33:55 AM]
Disabled - MIDI input device ignored.
On-screen instrument - MIDI input device will control the machine that's visible on screen (or at the top
in portrait mode).
One channel per instrument - MIDI input device's channel (Ch.) assignment will determine which
machine it controls. E.g.: Channel 1 = machine in slot 1, Channel 2 = machine in slot 2, etc.
Using a MIDI controller in Caustic (Android Only)
(See demo video)
In order to use a MIDI device for input, you must be running Android OS v3.2 (Honeycomb MR2) or later
and have a device which supports USB host mode. You will also need a USB MIDI controller that
supports driver-less use on PC and a USB on-the-go cable to connect it.
When MIDI support is enabled (See below), start Caustic then connect the controller to your device. An
Android popup should appear requesting permission for Caustic to access the USB device. Select "Allow" in
order to use the controller with Caustic.
http://www.singlecellsoftware.com/docs/caustic/v2_1_0/menu.htm[16/01/2013 8:33:55 AM]
Pattern Editor
Description
This editor is used in all machines to create note patterns. Each pattern can span 1, 2, 4 or 8 measures and
can contain notes from C1 to C8
Creating a pattern
Select an empty pattern slot using the bank(1) and pattern(2) buttons. To change the number of
measures in the pattern, long-press the pattern button to bring up the pattern options screen.
To create a note trigger, touch inside the main piano roll window(9) at the desired note and time. The
initial size of the note will depend on the grid size. Use the Grid(3) button to toggle grid sizes. The default
grid size limit is 16th notes but this can be extended up to 64th notes using the pattern options screen,
accessible by long-pressing the pattern button.
Once placed, a note's length can be modified by selecting the Size(4) button and dragging the small
handle which appears next to the selected note. New notes cannot be placed when the Size button is
active. To adjust the position of a note trigger, touch and drag it to the desired position. (Size button must
not be active)
To scroll the piano roll up and down in octaves, touch and drag up/down in the side keyboard(8). Hold a
note in the side keyboard(8) to hear a preview of it in the linked machine.
If the pattern spans more than one measure or the grid is zoomed in past 16th notes, a horizontal scroll
bar will appear to allow for quick navigation in the time axis.
The right-hand side panel will change depending on what mode is selected.
http://www.singlecellsoftware.com/docs/caustic/v2_1_0/synth_pattern_editor.htm[16/01/2013 8:33:59 AM]
To select a note trigger, simply touch it. Double-tap a note to quickly delete it. See below for selecting
multiples notes.
To edit the selected notes' properties, press the Note mode button (6). To change selected note velocity
(volume), use the velocity slider(10) to adjust velocity from 5% to 100%. When the velocity slider is
active, an indicator above the slider will show the current velocity value. The note trigger in the piano roll
window will also reflect velocity by changing its opacity. Some machines offer additional note options like
accent and glide. Accent gives note triggers an extra volume boost and glide will bend between note values
without re-triggering the volume envelope.
To select multiple notes, press the Select mode button (6). All selects all notes in the pattern, and
None clears the selection. The number of selected notes will appear in the select button's selection icon.
To use lasso select, press the Lasso button then touch/drag to form a selection around the notes you wish
to select. Lasso selection is reset after each selection so press it each time you wish to create a new
selection. In case the pattern spans more than one measure, drag the selection to the edge of the screen
and the pattern will automatically scroll.
To use time select, press the Time button then drag to form a selection on the time grid for the notes you
wish to select. Time selection is reset after each selection so press it each time you wish to create a new
selection. In case the pattern spans more than one measure, drag the selection to the edge of the screen
and the pattern will automatically scroll.
To copy or paste selected notes, press the Edit mode button (7). The Copy button will place the
selected notes into the app's clipboard. notes can then be pasted into the same pattern, another pattern, or
another machine's pattern (if the notes are within that machine's range) using the Paste button. When
copying into the same pattern, the newly pasted notes will appear on top of the original ones. Drag any of
the selected notes to move them inside the pattern to their new position. In case the pattern spans more
than one measure, dragging the selected notes to the edge of the screen will cause the pattern to scroll
automatically.
To remove selected note triggers, select them using one of the selection tools, then press the Delete (X)
button(11) in the lower-right corner.
http://www.singlecellsoftware.com/docs/caustic/v2_1_0/synth_pattern_editor.htm[16/01/2013 8:33:59 AM]
File Browser
This screen is used to select a file from a list of files available on your external storage. The type of files
listed is set by the machine that launched it to ensure all files shown can be loaded.
The large middle windows shows a list of files and folders. Folders are marked as yellow. Selecting a folder
will drill into that folder and list the files present there. The special ".." folder represents the parent folder to
the current one. Pressing this will go up to the parent folder and list the files present there.
To navigate the list, touch/drag inside the list to scroll, or drag the scroll cursor on the right-hand side for
quicker movement.
Some file types can be previewed and will offer a Preview button to do so. Press the button to hear the
file played.
The Get More... button (Android Only) in the bottom left-had corner will launch a market search for
content packs compatible with Caustic. New thrid-party content is added weekly so it's good to check often.
When you have selected the file you want to load, double-tap it or press the Load button.
http://www.singlecellsoftware.com/docs/caustic/v2_1_0/file_browser.htm[16/01/2013 8:34:01 AM]
Custom Waveform Editor
This editor lets you draw your own waveform for use in an oscillator. To draw a waveform, touch and draw
inside the main window, the display will update in real-time.
To start from one of the basic waveforms, touch the icon for the desired waveform at the top of the
window. The display will reset to this waveform and can be edited from there.
You can apply noise to the waveform by pressing the Apply button inside the Noise group box. Use the
Density and Amount knobs to respectively control the distribution and amplitude of the noise. Pressing
the Apply button multiple times (or holding it) will continue to add noise.
You can smooth out your waveform by pressing the Apply button inside the Smoothing group box. Use
the Amount knob to control the amount of smoothing applied on each pass. Pressing the Apply button
multiple times (or holding it) will continue to smooth out the waveform..
When you are satisfied with the waveform, press the Done button to return to the machine that launched
the editor.
http://www.singlecellsoftware.com/docs/caustic/v2_1_0/custom_waveform.htm[16/01/2013 8:34:04 AM]
Loop Point Editor
This editor lets you fine-tune the loop points in a sample for use in the PCMSynth.
The large topmost window shows a full view of the waveform while the bottom corner windows show
zoomed views at the start and end points respectively. The bottom-middle view is a stiched preview to help
line up your waveform for looping. It also contains min/max level indicators which help choose a loop point
that wont "pop".
Use the Play and Stop buttons at the bottom to start/stop the sample's playback. The playback mode can
be changed using the lower left set of buttons.
Drag the green cursor in the top window to coarse-tune the position of the loop's start point. Drag the red
cursor in the top window to coarse-tune the position of the loop's end point.
To fine-tune the loop points, touch and drag in each of the bottom corner windows to find a suitable loop
point, using the bottom-middle preview as a guide. For a loop with no pops, choose a set of loop points
where the preview window shows no discontinuities between the two sides of the waveform and has very
little differences in level indicators (as shown in the example above).
When you are satisfied with the loop points, press the back arrow in the lower-right corner to return to the
machine that launched the editor.
http://www.singlecellsoftware.com/docs/caustic/v2_1_0/looppoint_editor.htm[16/01/2013 8:34:07 AM]
BeatBox Kit Settings
This screen is used to create mute groups.
Mute groups
Mute groups are used to cut out one channel when another channels starts playing. This is classically used
on HiHats where it is impossible for an open hat to sound at the same time as a closed hat. There are 4
independent mute groups, which can contain any number of channels. Every time a channel starts playing
it will mute out all channels which share the same mute group.
http://www.singlecellsoftware.com/docs/caustic/v2_1_0/beatbox_options.htm[16/01/2013 8:34:09 AM]