1
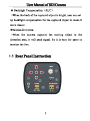
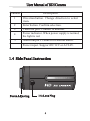
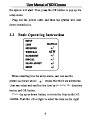
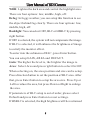
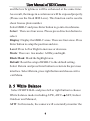
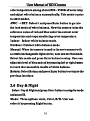
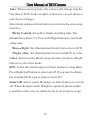
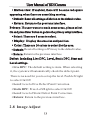
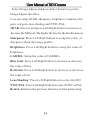
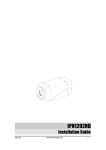
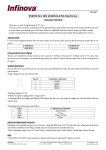
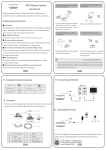
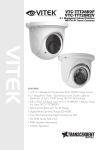
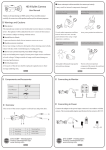
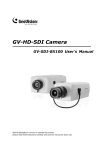
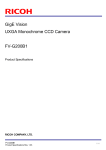
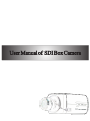
User Manual of SDI Box Camera
Thank you for purchasing our product.
This Manual is only applicable to SDI box
cameras. There may be several technically
incorrect places or printing errors in this
manual. The updates will be added into the
new version of this manual. We will readily
improve or update the products or
procedures described in the manual. The
content is subject to change without notice.
User Manual of SDI Camera
e
product please read
p
e
a
e
o
o
e
o
e
e
p
e
o
b
User Manual of SDI Camera
d
e
p
a
o
e
e
o
g
to
e
b
p
a
o
e
e
p
d
A
User Manual of SDI Camera
1
Introduction ......................................................1
1.1 Package Content ................................................1
1.2 Main Features ...................................................1
1.3 Rear Panel Instruction .........................................3
1.4 Side Panel Instruction ........................................4
2
Operation Instruction ........................................5
2.1 Power On/Off .....................................................5
2.2 Basic Operating Instruction .................................6
2.3 Lens Setup ........................................................7
2.4 Exposure ...........................................................7
2.5 White Balance ...................................................9
2.6 Day&Night .......................................................10
2.7 Special ..............................................................12
2.8 Image Adjust .....................................................13
2.9 Reset .................................................................15
3
Specification ........................................................15
User Manual of SDI Camera
1
1080P
i
CMOS sensor of Panasonic and support 1080P real-time
image capture and transmission with SDI video output
port.
Terminal block Mounting block
6
R
1080P real-time image with high definition and good
color reproduction. The sensibility is up to 0.001LUX
due to the installation of the high quality of the built-in
removable optical filter.
User Manual of SDI Camera
HD-SDI video output
.
User Manual of SDI Camera
Rear Panel Instruction
User Manual of SDI Camera
Number
Description
1
Direction button. Change direction to select
item.
Enter button. Confirm selection.
Video out port. Connect to monitor.
Power indicator. When power supply is normal,
the light is red.
Alarm out port. Connect to external alarm.
2
3
4
5
Power input. Support DC12V or AC24V.
1.4 Side Panel Instruction
R
Focus Adjusting
Iris Lens Plug
6
User Manual of SDI Camera
4
2
3
1
1
2
3
4
DC
DampDamp+
Driver +
Driver-
1. Focus Adjusting: When it still fails to realize focusing after
having confirmed the correct lens interface, the back focus
adjustment may be required. Operate the following steps:
tighten the lens firstly and then loose the fixed back focus ring;
rotate the lens slowly until the video image turns to be clear,
and finally tighten and lock the back focus ring.
2. Iris Lens Plug: The camera provides an iris lens plug in
negative pattern with four square holes and the definition of
pins is shown above. The interface of DC drive auto iris adopts
four pins: Damp+, Damp-, Drive+, Drive-.
User Manual of SDI Camera
SETUP
LENS
MANUAL
EXPOSURE
WHITE BAL
ATW
DAY&NIGHT
SPECIAL
IMAGE ADJUST
RESET
pressing the
Press
User Manual of SDI Camera
enter
Support manual IRIS and DC lens. Please setup according to
the use of lens.
User can select the lens type by pressing right button.
2.4 Exposure
Exposure setup includes: Shutter, AGC, Sens-up, WDR,
Defog and Backlight.
Shutter: Options include auto, 1/3, 1/60, FLK, 1/250,1/500,
1/1000, x 2.
AGC: When the light is insufficient, press Left/Right button
to setup its level. The default level is 6. Please increase or
decrease the level as required.
Sens-up: Extend the exposure time of camera. The higher
the time is, the lower the frame is. The shadow will be longer
under the dark condition. Please select times by pressing
right button as needed.
User Manual of SDI Camera
WDR: Lighten the dark area and control the highlight area.
There are four options: low, middle, high, off.
Defog: In foggy weather, you can setup this function to see
the object behind fog clearly. There are four options: low,
middle, high, off.
Backlight: You can select OFF, BLC or HSBLC by pressing
right button.
If OFF is selected, the system will not compensate the image.
If BLC is selected, it will enhance the brightness of image
to satisfy the monitor effect.
To enter into the submenu of BLC, press Enter button.
You can setup GAIN, AREA and DEFAUT.
Gain: The higher the level is, the brighter the image is.
Area: Select Area and press right button to select On/Off.
When selecting on, the area position and size can be setup.
Press direction button to set the position of BLC area. After
that, press Enter button to setup the area size. Press Up or
Left to reduce the area, but press Down or Right to enlarge
the area.
If parameters of BLC setup is out of order, please select
Default and press Enter button to reset settings.
If HSBLC is selected, the high brightness will be restrained
User Manual of SDI Camera
and the low brightness will be enhanced at the same time.
As a result, the image in a certain area will be exposed properly.
(Please use the fixed IRIS Lens). This function can be used to
shoot license plate number.
Select HSBLC and press Enter button to go into its submenu.
Select: There are four areas. Please press direction button to
select.
Display: Display the HSBLC areas. There are four areas. Press
Enter button to setup the position and size.
Level: Press Left or Right to increase or decrease.
Mode: There are two modes: All Day and night.
Black Mask: Mask the highlight area.
Default: Reset the setup of HSBLC to the default setting.
Select Return and press Enter button to return to the previous
interface. Select Return, press right button and choose exit to
exit Menu.
2.5 White Balance
Select WHITE BAL and press left or right button to choose
White balance mode including ATW, AWC
SET, Indoor
Outdoor and Manual ,
ATW: In this mode, the camera will constantly monitor the
User Manual of SDI Camera
color temperature among about 2500~ 9500K of color temp
and adjust white balance automatically. This mode is prior
to other modes.
AWC → SET: Select it and press Enter button to go into
the lock mode of white balance. Now the camera locks the
reference value of red and blue under the current color
temperature and stops monitoring color temperature.
Indoor: Indoor white balance mode.
Outdoor: Outdoor white balance mode.
Manual: When the camera is used in the environment with
a certain unchangeable light source, user can use this mode.
Select this mode and press Enter button to setup. User can
adjust the level of blue and red by pressing left or right button
to reach the reasonable results of white balance.
Return: Select Return and press Enter button to return to the
previous interface.
2.6 Day & Night
Select Day & Night and press Enter button to setup its mode
and smart IR.
Mode: Three options: Auto, Color, B/W. User can
select it by pressing Right button.
User Manual of SDI Camera
Auto: When selecting Auto, the camera will change into the
Daytime or B/W mode at night so that user can get the best
and clearest images.
Select Auto and press Enter button to enter into the auto setup
interface.
•Delay Control: Setup Day-Night switching time. The
default delay time is 5s. Press Left/Right button to control the
delay time.
• Day Night: Set illumination limits from color to B/W.
• Night Day: Set illumination limits from B/W to color.
Color: Return to the Mode setup interface and press Right
button to select this mode.
B/W: Select this mode and press Enter button to setup Burst.
Press Right/Left button to select on/off. If you want to obtain
the standard B/W signal, please select off.
Smart IR: Select smart IR and press Enter button to set On/
off. When the object with IR light is captured, please enable
it and then enter into its submenu for level and area setup.
User Manual of SDI Camera
2.7 Special
Press right/left button to setup language, camera title, motion,
privacy and defect.
Language: There are three languages: English, CHT and
CHS.
Camera title: Select it and press Enter button to select On/Off.
When selecting “On”, the title edition and the position
selection of the title is effective.
User can press the direction button to self-define the camera
name. After selecting the single letter, number or symbol,
please press Enter button to go into the camera title position
setup. User can press the direction button to set up.
Mirror: Mirror the current image. There are three kinds of
mirror: Rotate, Mirror and Flip.
Motion: Select Motion and press Left/Right button to select
On/Off. Select On and press Enter button to set up motion.
• Select: There are three areas to set up.
• Display: Press Right/Left button to select On/Off. Select
on and press Enter button to set its size and position.
• Sensitivity: Press Left or Right button to adjust the sensitivity
of the detection area.
User Manual of SDI Camera
• Motion view: If enabled, there will be some red square
appearing when there are something moving.
• Default: Reset all settings of Motion to the default value.
• Return: Return to the previous interface.
Privacy: If a user wants to mask some areas, please select
On and press Enter button to go into the privacy setup interface.
• Select: There are 8 areas to select.
• Display: Display the area size and position.
• Color: There are 16 colors to select for the area.
• Default: Reset all settings of Privacy to the default value.
• Return: Return to the previous interface.
Defect: Including Live DPC, Level, Static DPC, Start and
Level settings.
• Live DPC: The default setting is Auto. When selecting
it, the system will automatically check the defect point.
There is no need for you to set up the level. Push left/right
to select On/Off.
• Level: Level of live Defect Point Correction.
• Static DPC: Press Left/Right to select On/Off.
• Level: Level of Static Defect Point Correction.
• Return: Return to the previous interface.
2.8 Image Adjust
User Manual of SDI Camera
Select Image Adjust and press Enter button to go into
Image Adjust interface.
User can setup 3D NR, sharpness, brightness, Gamma, blue
gain, red gain, lens shading and NTSC/PAL.
3D NR: Select it and press Left/Right button to increase or
decrease the NR level. The higher the level is, the less the noise is.
Sharpness: Press Left/Right button to setup the value of
sharpness about the image profile.
Brightness: Press Left/Right button to setup the value of
brightness.
GAMMA: Setup the value of GAMMA.
Blue Gain: Press Left/Right button to increase or decrease
the value of blue.
Red Gain: Press Left/Right button to increase or decrease
the value of red.
Lens Shading: Press Left/Right button to select On/Off.
NTSC/PAL: Press Left/Right button to select NTSC or PAL.
Return: Return to the previous interface or Exit menu setup.
User Manual of SDI Camera
2.9 Reset
This function is reset all setups to the default status. If
parameters of the camera are out of order and the camera
cannot display images, user may use this function to reset
all setups. Please select Reset and press Enter button to go
into its setup interface. Then select Factory and press Enter
button to reset all settings to the default factory settings.
Additionally, user can also check up the version of the camera
here.
Select Return to return to the menu setup interface. Press
Left/Right button to select Exit to exit the menu setup interface
and return to the live interface. The system will automatically
save the settings.
Note: If you shut down your device but don’t exit the menu
setup interface, all settings set above will not be saved.
User Manual of SDI Camera
HD SDI Box Camera
Model
Camera
Advance
Video
Port
Sensor
1/3"CMOS
Pixel
2010(H)x 1092(V)
Shutter
1/60s~1/67500s
Min illumination
0.01LUX
Resolution
1000TVLines
Lens driver
DC driver
Lens port
White balance
ATW, indoor, outdoor, manual, etc
C/CS port
Day&Night
S/N ratio
ICR
3D NR
Support
BLC
BLC/HLC, Area, Level, Off setup
Image adjust
Sharpness, brightness, etc
>50dB
WDR
100dB
Mirror
Rotate, mirror, flip
Lens shading
Support
Size
1080P(1920 x 1080)
Frame
30fps(60Hz),25fps(50Hz)
Video out
1-ch SDI (1.0Vp-P,75ohm)
Alarm out
Support
Power supply
DC12V
Temperature
Working
Humidity
environment
-10°C ~ 50°C
10%-90%
Dimension
W70mmxD145mmxH55mm
Weight
400g ( net weight )
User Manual of SDI Box Camera
450013000025 A1