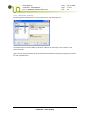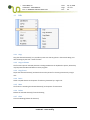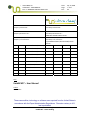
1
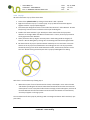
™ ULTRA DEEP LLC UmbiliCAD® ‐ USER MANUAL Doc. no. 00000‐INT‐UM‐KNT‐20071129‐1 Date: Page: Rev.: Apr 24, 2009 1 of 57 09 ™ ™ Company Contract No.: Ultra Deep Contract No.: Company Document No.: Ultra Deep Document No. : 00000‐INT‐UM‐KNT‐20071129‐01 Company`s file reference: Ultra Deep`s file reference: V:\22 PROJECTS\2007\18 UmbiliCAD\03 User Manual 09 24.04.09 Re‐issued for Use (v.1.0.1.64) JAA TRB KIE EM 08 03.11.08 Re‐issued for Use (v.1.0.1.63) TRB JAA KIE EM 07 08.09.08 Re‐issued for Use (v.1.0.1.59) TRB KIE KIE EM 06 01.05.08 Re‐issued for Use (v.1.0.1.45) TRB JAA KIE EM 05 25.04.08 Re‐issued for Use (v.1.0.1.43) TRB JAA KIE EM 04 02.04.08 Re‐issued for Use (v.1.0.1.40) TRB KNT KIE EM 03 26.03.08 Issued for Use (ver. 1.0.1.40) TRB KNT KIE EM 02 21.01.08 Issued for Use KNT JAA KIE EM 01 29.11.07 Draft KNT JAA KIE Prepared Checked Issue Date Reason for issue Approved Released Title: UmbiliCAD® – User Manual Author: Trond Bakke These commodities, technology or software were exported from the United States in accordance with the Export Administration Regulations. Diversion contrary to U.S. law is prohibited. © 2008‐2009 ULTRA DEEP LLC. All rights reserved. UmbiliCAD® ‐ Patent Pending ™ ULTRA DEEP LLC UmbiliCAD® ‐ USER MANUAL Doc. no. 00000‐INT‐UM‐KNT‐20071129‐1 Date: Page: Rev.: Apr 24, 2009 2 of 57 09 Table of Contents 1 2 3 Getting Started ................................................................................................................................ 5 1.1 General .................................................................................................................................... 5 1.2 Mouse ...................................................................................................................................... 5 1.3 Shortcut Keys ........................................................................................................................... 5 1.4 Dialog Boxes ............................................................................................................................ 6 File Handling and Database Editing ................................................................................................. 7 2.1 File‐menu ................................................................................................................................. 7 2.2 Edit‐menu ................................................................................................................................ 8 2.2.1 Edit Materials .................................................................................................................. 8 2.2.2 Edit Fluids /Contents ....................................................................................................... 9 Cross Section Example ................................................................................................................... 10 3.1 General .................................................................................................................................. 10 3.2 Drawing ................................................................................................................................. 11 3.2.1 Tube ............................................................................................................................... 11 3.2.2 Sheath ............................................................................................................................ 12 3.2.3 Copy Elements ............................................................................................................... 12 3.2.4 Lay‐Up ............................................................................................................................ 13 3.2.5 Add Void Filler ............................................................................................................... 14 3.2.6 Add Void Filler in Center ................................................................................................ 14 3.2.7 Move to Lay‐Up Void ..................................................................................................... 15 3.2.8 Drag to Lay‐Up Void ....................................................................................................... 16 3.2.9 Join Fillers ...................................................................................................................... 17 3.2.10 Tape ............................................................................................................................... 22 3.2.11 Strand ............................................................................................................................ 23 3.2.12 Lay‐Up With Center ....................................................................................................... 24 3.2.13 Separation Sheath ......................................................................................................... 25 3.2.14 Steel Wire Armor ........................................................................................................... 25 3.2.15 Outer Sheath ................................................................................................................. 26 3.3 Insert Textboxes and Calculations ......................................................................................... 27 3.3.1 Insert Arrows With Textboxes ....................................................................................... 27 3.3.2 Format Arrows and Textboxes ...................................................................................... 28 © 2008‐2009 ULTRA DEEP LLC. All rights reserved. UmbiliCAD® ‐ Patent Pending 4 ™ ULTRA DEEP LLC UmbiliCAD® ‐ USER MANUAL Doc. no. 00000‐INT‐UM‐KNT‐20071129‐1 Apr 24, 2009 3 of 57 09 3.3.3 Table of Results ............................................................................................................. 29 3.3.4 Capacity Curves ............................................................................................................. 30 3.3.5 Insert Top Tension/Curvature Envelope ....................................................................... 31 Functions ....................................................................................................................................... 34 4.1 Add Element .......................................................................................................................... 34 4.1.1 General .......................................................................................................................... 34 4.1.2 Add Tube ....................................................................................................................... 37 4.1.3 Add Sheath .................................................................................................................... 38 4.1.4 Add Armor ..................................................................................................................... 39 4.1.5 Add Strand ..................................................................................................................... 40 4.1.6 Add Tape ........................................................................................................................ 42 4.1.7 Add Void Filler ............................................................................................................... 43 4.1.8 Add Hose ....................................................................................................................... 43 4.1.9 Add Element From File… ............................................................................................... 45 4.2 Lay Up .................................................................................................................................... 45 4.2.1 Create Lay‐Up or Create Lay‐Up w/Center .................................................................... 45 4.2.2 Move to Center ............................................................................................................. 48 4.2.3 Move to Lay‐Up ............................................................................................................. 49 4.2.4 Move to Lay‐Up Void ..................................................................................................... 49 4.2.5 Drag to Lay‐Up Void ....................................................................................................... 49 4.3 Insert ...................................................................................................................................... 50 4.3.1 Insert Arrow Textbox ..................................................................................................... 50 4.3.2 Insert Table of Results ................................................................................................... 52 4.3.3 Capacity Curve ............................................................................................................... 52 4.4 Edit ......................................................................................................................................... 53 4.4.1 Copy ............................................................................................................................... 53 4.4.2 Copy as Picture .............................................................................................................. 53 4.4.3 Copy/Paste .................................................................................................................... 53 4.4.4 Paste .............................................................................................................................. 53 4.4.5 Move .............................................................................................................................. 53 4.4.6 Delete ............................................................................................................................ 53 4.4.7 Clear ............................................................................................................................... 53 © 2008‐2009 ULTRA DEEP LLC. All rights reserved. UmbiliCAD® ‐ Patent Pending Date: Page: Rev.: ™ 4.5 Left Align ........................................................................................................................ 54 4.5.2 Size Align ........................................................................................................................ 54 4.5.3 Vertical Spacing Align .................................................................................................... 54 4.7 Select ..................................................................................................................................... 54 Select Elements Under .................................................................................................. 54 Zoom ...................................................................................................................................... 54 4.7.1 Zoom All ......................................................................................................................... 54 4.7.2 Zoom Selection .............................................................................................................. 54 4.7.3 Zoom In .......................................................................................................................... 55 4.7.4 Zoom Out ....................................................................................................................... 55 4.8 Join Fillers .............................................................................................................................. 55 4.9 Properties .............................................................................................................................. 55 4.10 Tips & Tricks ........................................................................................................................... 55 Description and Methodology of Calculations .............................................................................. 56 5.1 Mechanical properties ........................................................................................................... 56 5.1.1 Outer Diameter ............................................................................................................. 56 5.1.2 Mass Empty ................................................................................................................... 56 5.1.3 Mass Filled ..................................................................................................................... 56 5.1.4 Mass Filled and Flooded ................................................................................................ 56 5.1.5 Submerged Weight Empty ............................................................................................ 56 5.1.6 Submerged Weight Filled .............................................................................................. 56 5.1.7 Submerged Weight Filled and Flooded ......................................................................... 56 5.1.8 Specific Weight Ratio .................................................................................................... 56 5.1.9 Subm. Weight. Dia. Ratio .............................................................................................. 56 5.1.10 Axial Stiffness ................................................................................................................. 56 5.1.11 Bending Stiffness ........................................................................................................... 57 5.1.12 Tension/Torsion Factor ................................................................................................. 57 Works Cited ................................................................................................................................... 57 © 2008‐2009 ULTRA DEEP LLC. All rights reserved. UmbiliCAD® ‐ Patent Pending Apr 24, 2009 4 of 57 09 Alignment .............................................................................................................................. 54 4.6.1 6 Date: Page: Rev.: 4.5.1 4.6 5 ULTRA DEEP LLC UmbiliCAD® ‐ USER MANUAL Doc. no. 00000‐INT‐UM‐KNT‐20071129‐1 ™ ULTRA DEEP LLC UmbiliCAD® ‐ USER MANUAL Doc. no. 00000‐INT‐UM‐KNT‐20071129‐1 Date: Page: Rev.: Apr 24, 2009 5 of 57 09 1 Getting Started 1.1 General 1. The current version of UmbiliCAD® uses SI‐units in the calculations, and the drawing has to be drawn in [mm] to get the correct output. 2. The decimal separator is ‘dot’, or the ‘period’‐character. 3. A selected element is shown with the dim original color. 4. A lay‐up is drawn with a red (magenta) marking of the inner and outer circle, but this marking will disappear on the printed drawing. 5. A selected lay‐up is shown with a thick blue inner and outer circle. 6. The drawing of a cross section in UmbiliCAD® contains all necessary information for calculation of weights, stiffnesses and stress in the elements during a load case. Hence, specifying all input parameters correctly during drawing is important. 7. In the following a right‐click is denoted ‘right‐click’ and a left‐click is denoted ‘click’. 1.2 Mouse 1. 2. 3. 4. 5. Right‐clicking in the drawing area will open the main menu. Clicking on an element will select it. Keep the ‘CTRL’‐key pressed while clicking on elements will select several elements. Double‐clicking on an element will open the ‘Input Dialog Box’. Scrolling the mouse wheel will zoom in and out at the pointer location. This function makes it easy to point and zoom in or out on the preferred element. 6. Keep the left button pressed while moving the mouse will make a selection rectangle. Every element with its center‐point within the rectangle will be selected. 1.3 1. 2. 3. 4. 5. 6. 7. Shortcut Keys U ‐ R ‐ C ‐ M ‐ S ‐ F ‐ Delete ‐ Undo Redo Copy/Paste Move Select all sub‐elements to an already selected element Add filler to lay‐up void Deletes selected element(s) © 2008‐2009 ULTRA DEEP LLC. All rights reserved. UmbiliCAD® ‐ Patent Pending ™ 1.4 ULTRA DEEP LLC UmbiliCAD® ‐ USER MANUAL Doc. no. 00000‐INT‐UM‐KNT‐20071129‐1 Date: Page: Rev.: Apr 24, 2009 6 of 57 09 Dialog Boxes When a new element is created, the properties are given in a dialog box. The dialog box of a new or already drawn element(s) can be opened in three different ways: 1. Right‐click, select ‘Add Element ‐> ’Tube’, ‘Sheath’, ‘Armour’, ’Tape’, ‘Strand’, or select ‘Lay‐Up ‐> ‘Create Lay‐Up’ or ‘Create Lay‐Up w/center’ 2. Select the element(s), right‐click and select ‘Properties’ 3. Double‐clicking on a separate element General: 1. The box can be treated like a standard ‘Windows‐window’, i.e. scroll, resize, close, maximize, minimize or move. 2. Double‐clicking on a number makes it ready for editing (outlined in blue). 3. The numbers shaded in grey are calculation results and cannot be edited directly. 4. Moving the cursor or pressing ’Enter’ after a change has been made will update the drawing. 5. After exiting a dialog box the applicable element is still selected and ready for the next process. 6. In the bottom of the dialog box a short description of the selected field/parameter is given. 7. The different sections in the box could be maximized/minimized by clicking on the small ‘+’ or ‘‐‘ sign in front of each section. You may exit a dialog box by pressing the ‘Tab’‐key followed by ‘Enter’, or click ‘OK’ or ‘Cancel’. © 2008‐2009 ULTRA DEEP LLC. All rights reserved. UmbiliCAD® ‐ Patent Pending ™ ULTRA DEEP LLC UmbiliCAD® ‐ USER MANUAL Doc. no. 00000‐INT‐UM‐KNT‐20071129‐1 Date: Page: Rev.: Apr 24, 2009 7 of 57 09 2 File Handling and Database Editing 2.1 Filemenu Create a new UmbiliCAD® drawing by selecting 'File ‐> New'. By clicking on the ‘File’ button in the upper left corner of the drawing window, the following menu appears. New ‘New’ opens a new UmbiliCAD®‐drawing. By clicking on the menu item several times, you can open multiple new UmbiliCAD®‐drawings. Each drawing will appear in its own window inside UmbiliCAD®. The active drawing will be highlighted by dark‐blue boarders and you can toggle between drawings by keeping the ‘CTRL’ –key pressed and clicking the ‘TAB’‐key. Open ‘Open’ calls a standard Windows ‘Open’ window and makes it possible to open previously saved UmbiliCAD®‐files (.ucd‐files). The ‘open’ window will start searching using the path where you last saved an UmbiliCAD®‐file. It is possible to open multiple UmbiliCAD®‐files in one session. The file name will be written in the top of each drawing. Save ‘Save’ saves your current active drawing. If the drawing is not previously saved, you will be requested to give the file a name and select where to save it. Save As ‘Save As’ saves the active drawing with your preferred name and at the location you select. If the file exists, you will be requested to replace the existing file. Exit ‘Exit’ exits the program if no changes were made to the open drawings. If there are any unsaved changes you will be requested to save before exiting. © 2008‐2009 ULTRA DEEP LLC. All rights reserved. UmbiliCAD® ‐ Patent Pending 2.2 ™ ULTRA DEEP LLC UmbiliCAD® ‐ USER MANUAL Doc. no. 00000‐INT‐UM‐KNT‐20071129‐1 Date: Page: Rev.: Apr 24, 2009 8 of 57 09 Editmenu 2.2.1 Edit Materials By selecting ‘Edit Materials’ a similar table like the one below appears. For each material in the list the different material properties are listed. By clicking on a material name, the properties appear in a dialog box to the right. In the dialog box the different values could be edited by double‐clicking on them and type the correct value. Materials could be added or removed with the buttons in the lower left corner. By clicking the ‘OK’ button the changes will be saved in the database. The user should establish his own Materials Database containing the appropriate values for each applicable material. © 2008‐2009 ULTRA DEEP LLC. All rights reserved. UmbiliCAD® ‐ Patent Pending Date: ™ ULTRA DEEP LLC UmbiliCAD® ‐ USER MANUAL Page: Doc. no. 00000‐INT‐UM‐KNT‐20071129‐1 Rev.: 2.2.2 Edit Fluids /Contents By selecting ‘Edit Fluids/Contents’ a similar table like the one below appears. Apr 24, 2009 9 of 57 09 The fluids/contents could be added, removed or edited in the same way as the materials in the previous section. Again, the user should establish his own Fluids/Contents Database containing the appropriate values for each applicable fluid. © 2008‐2009 ULTRA DEEP LLC. All rights reserved. UmbiliCAD® ‐ Patent Pending ™ ULTRA DEEP LLC UmbiliCAD® ‐ USER MANUAL Doc. no. 00000‐INT‐UM‐KNT‐20071129‐1 Date: Page: Rev.: Apr 24, 2009 10 of 57 09 3 Cross Section Example The following example is an arbitrary example of a cross‐section design and how to draw it with UmbiliCAD®. First‐time users are strongly urged to repeat the example at the same time as reading the manual since it is a good way of running through most of the basic functions in UmbiliCAD®. All functions are described in more detail in Section 4. If you have any trouble, press ‘U’ (Undo) and try again. 3.1 General Create a new UmbiliCAD® drawing by selecting File and New By right‐clicking in the drawing area you will see the main menu below. Here you will find all the different functions available for drawing with UmbiliCAD®. © 2008‐2009 ULTRA DEEP LLC. All rights reserved. UmbiliCAD® ‐ Patent Pending ™ 3.2 ULTRA DEEP LLC UmbiliCAD® ‐ USER MANUAL Doc. no. 00000‐INT‐UM‐KNT‐20071129‐1 Date: Page: Rev.: Apr 24, 2009 11 of 57 09 Drawing 3.2.1 Tube We shall start by creating one single steel tube. Right‐click, select ‘Add element ‐> Tube’, and you will get the ‘Tube Input Dialog Box’: 1. Double‐click on the number ’12.7’ or the field ‘Inner Diameter’, and you can edit the inner diameter of the tube. Simply type 25.4, press ‘Enter’, and the tube is modified (could be happening behind the dialog box). 2. By moving the pointer over the frame of the box and press the left button while moving the mouse, you can move the box wherever you want. 3. Double click the ‘Wall Thickness’‐field and type 2.5 to increase the wall thickness. The material properties could also be changed in the same way if necessary. 4. Click on ‘Void/Content Fluid’ and select content to be ‘MEG 50 %’ from the menu. Click the ‘OK’‐button in the lower left corner of the dialog box. 5. Click on the drawing area to complete the tube design. © 2008‐2009 ULTRA DEEP LLC. All rights reserved. UmbiliCAD® ‐ Patent Pending ™ ULTRA DEEP LLC UmbiliCAD® ‐ USER MANUAL Doc. no. 00000‐INT‐UM‐KNT‐20071129‐1 3.2.2 Sheath We shall now apply a polyethylene sheath onto the steel tube. Date: Page: Rev.: Apr 24, 2009 12 of 57 09 1. After exiting the ‘Tube Input Dialog Box’ the tube is still selected (shown with a dim grey color). If not, select the tube by clicking on it. 2. Right‐click and select ‘Add Element ‐> Sheath’ from the main menu. 3. A sheath on the tube and a ‘Sheath Input Dialog Box’ appears. 4. The sheath is as default 1.3 mm thick, yellow and made of MDPE. Double‐click ‘Sheath Thickness’, type 2.5 and press ‘Enter’. Click the ‘OK’‐button in the lower left corner of the dialog box. The tube looks like below. 5. Click on the drawing area 3.2.3 Copy Elements We shall copy the sheathed tube to a total of three tubes. 1. While the yellow sheath is selected, right‐click and select ‘Select ‐> Elements Under’ from the main menu. Both the steel tube and the sheath are shown with dim colors. 2. Right‐click and select ‘Edit ‐> Copy/Paste’ from the main menu (Alternatively press the ‘C’‐ key). Now a second selected tube is attached to the mouse pointer and could be dropped anywhere by a single click. 3. Immediately after dropping the second tube, right‐click and select ‘Copy/Paste’ again. 4. Drop the third tube next to the two others by a single click. You should now have three equal elements at the same line. 5. Right‐click and choose ‘Zoom ‐> All’ to get all three tubes visible in the drawing area. © 2008‐2009 ULTRA DEEP LLC. All rights reserved. UmbiliCAD® ‐ Patent Pending ™ ULTRA DEEP LLC UmbiliCAD® ‐ USER MANUAL Doc. no. 00000‐INT‐UM‐KNT‐20071129‐1 3.2.4 LayUp We shall now create a lay‐up of the three tubes. Date: Page: Rev.: Apr 24, 2009 13 of 57 09 1. Select all the yellow sheaths by clicking on them while ‘CTRL’ is pressed. 2. Right‐click and select ‘Lay‐Up ‐> Create Lay‐Up’. A lay‐up with the three tubes appears together with the ‘Lay‐Up Input Dialog Box’. 3. Scroll down the dialog box and click on the mode ‘Auto‐Inner Dia’. Select ‘Manual‐ To Outer Dia (Evenly)’ from the menu. Scroll back to the top of the dialog box. 4. Double‐click ‘Outer Diameter’, type 78 and press ‘Enter. Notice that the lay‐up outer diameter has changed. When the ‘Manual‐To Outer Dia’ is chosen, all the lay‐up elements will lay against the outer diameter. 5. Other parameters like lay‐angle or insertion point in the drawing could be changed, ref. Section 4. Exit the dialog box by clicking ‘OK’. The drawing shall look like the figure below. 6. Be aware that the lay‐up is a separate element marked by an inner and outer circle. Each element in the lay‐up is also marked with a surrounding pink circle. The lay‐up could be selected by clicking in one of the voids between the tubes, and the inner and outer circles turn blue. Double‐clicking instead reopens the ‘Lay‐Up Input Dialog Box’ for editing. NB! There is an alternative way of doing step 1. 1. Make three copies of one of the tube and its sheath, as described in 3.2.3. Select all tubes and sheaths by holding the left mouse button down outside off all the tubes and move the mouse pointer in such a way that the blue choose rectangle, which now appears, encloses all the tubes. Release the left mouse button and all the tubes and sheaths are now selected, since they all appear in a dim‐grey color. You can Delete one of the Lay‐Ups by selecting it with a rectangle and choose ‘Edit’‐> Delete (or just press ‘DEL’). © 2008‐2009 ULTRA DEEP LLC. All rights reserved. UmbiliCAD® ‐ Patent Pending ™ ULTRA DEEP LLC UmbiliCAD® ‐ USER MANUAL Doc. no. 00000‐INT‐UM‐KNT‐20071129‐1 3.2.5 Add Void Filler We shall add a filler element into one of the lay‐up voids. Date: Page: Rev.: Apr 24, 2009 14 of 57 09 1. De‐select all elements by a single click outside the lay‐up. 2. Left‐click somewhere in the void between two of the tubes, see figure below. Left‐click in the void 3. Select ‘Add Element ‐> Void Filler’ from the menu that appeared. A circular filler should appear in the upper right void. 4. Alternatively, void fillers can be added by left‐clicking somewhere in the void between two tubes and pressing the ‘F’‐key. NB! The cursor must remain in the clicked void when ‘F’ is pressed. A circular filler should appear in the upper right void. 3.2.6 Add Void Filler in Center A center void filler can be added as described in the previous section: 1. De‐select all elements by a single click outside the lay‐up. 2. Right‐click somewhere inside the void in the middle of the lay‐up. 3. Select ‘Add Element ‐> Void Filler’ from the menu that appeared. A circular filler should appear in the center of the bundle. 4. Alternatively, the center void filler can be added by left‐clicking in the center void and pressing the ‘F’‐key. NB! The cursor must remain in the center void when ‘F’ is pressed. A circular filler should appear in the center void. © 2008‐2009 ULTRA DEEP LLC. All rights reserved. UmbiliCAD® ‐ Patent Pending ™ ULTRA DEEP LLC UmbiliCAD® ‐ USER MANUAL Doc. no. 00000‐INT‐UM‐KNT‐20071129‐1 3.2.7 Move to LayUp Void We shall insert copies of the first filler into one of the other lay‐up voids. Date: Page: Rev.: Apr 24, 2009 15 of 57 09 1. Select the filler element in the upper right void, right‐click and select ‘Copy/Paste’ from the ‘Edit’ menu or simply press the ‘C‐key’. Drop the copy of the filler outside the lay‐up by clicking an arbitrary place. 2. Select the new filler, right‐click and select ‘Lay‐Up ‐> Move to Lay‐Up Void’. A dialog box will appear asking you to select two boundary elements. 3. Choose the two sheaths of the two tubes where you want to place the filler between. Do this in the order showed in the figure below. 4. Click on ‘Done’. The filler will now be moved to the right hand side of the arrow. © 2008‐2009 ULTRA DEEP LLC. All rights reserved. UmbiliCAD® ‐ Patent Pending Date: Apr 24, 2009 ™ ULTRA DEEP LLC UmbiliCAD® ‐ USER MANUAL Page: 16 of 57 Doc. no. 00000‐INT‐UM‐KNT‐20071129‐1 Rev.: 09 3.2.8 Drag to LayUp Void 1. Select one of the two filler elements, right‐click and select ‘Copy’ from the main menu. Drop the copy of the filler outside the lay‐up by clicking an arbitrary place. 2. Select the new filler, right‐click and select ‘Lay‐Up ‐> Drag to Lay‐Up Void’. 3. The filler is now attach to the mouse pointer and will move with it. 4. Move the filler between the tubes in the last empty void space in such a way that the filler touches both of the tubes. 5. When the filler touches both tubes, it will “snap” in place and you can place it there by clicking the left mouse button. The edge of both tubes will turn blue when the filler touches them and the filler will “snap” in place. 6. It is also possible to move one element to an already existing lay‐up layer. That function is described in chapter 4.2.3. © 2008‐2009 ULTRA DEEP LLC. All rights reserved. UmbiliCAD® ‐ Patent Pending ™ ULTRA DEEP LLC UmbiliCAD® ‐ USER MANUAL Doc. no. 00000‐INT‐UM‐KNT‐20071129‐1 3.2.9 Join Fillers We shall now make custom fillers by joining round fillers Date: Page: Rev.: Apr 24, 2009 17 of 57 09 1. Make new filler next to the filler in the upper right void first by left‐clicking in one of the voids next to the filler. Right click and choose ‘Add Element ‐> Void Filler from the menu or simply press the ‘F’‐key. Place new filler at the opposite side also. The cross section should appear as the figure under: 2. Keep ‘CTRL’ pressed and select the two new fillers and the large filler in the upper right void. Right click and select ‘Join Fillers’. The cross section should appear as the figure below. © 2008‐2009 ULTRA DEEP LLC. All rights reserved. UmbiliCAD® ‐ Patent Pending ™ ULTRA DEEP LLC UmbiliCAD® ‐ USER MANUAL Doc. no. 00000‐INT‐UM‐KNT‐20071129‐1 Date: Page: Rev.: Apr 24, 2009 18 of 57 09 The area inside this area + the part of the fillers outside will form the new custom filler 3. Press ‘Enter’. UmbiliCAD® will now make new custom filler which contains all the space inside the area enclosed by the red dots and black lines + the part of the fillers which are outside of the enclosed area. The cross section should appear as the figure below. © 2008‐2009 ULTRA DEEP LLC. All rights reserved. UmbiliCAD® ‐ Patent Pending ™ ULTRA DEEP LLC UmbiliCAD® ‐ USER MANUAL Doc. no. 00000‐INT‐UM‐KNT‐20071129‐1 Date: Page: Rev.: Apr 24, 2009 19 of 57 09 4. Follow step 1‐3 and make custom filler in the two other voids and the cross section should appear Occasionally the ‘Join Fillers’ function will not enclose the area we want it to when making a custom filler. In these cases it is possible to manually enclose the wanted area as we shall see in the next step. These new custom fillers are elements as all the other elements, and it is possible to change properties as material type or color. © 2008‐2009 ULTRA DEEP LLC. All rights reserved. UmbiliCAD® ‐ Patent Pending ™ ULTRA DEEP LLC UmbiliCAD® ‐ USER MANUAL Doc. no. 00000‐INT‐UM‐KNT‐20071129‐1 We shall now make custom filler in the lay‐up centre. Date: Page: Rev.: Apr 24, 2009 20 of 57 09 1. Delete the existing filler in the lay‐up center by selecting it and pressing the ‘Delete’‐key. 2. Make three new fillers in the voids outside the centre as shown in the cross‐section below. 3. Zoom in on the centre by left‐clicking on the centre and use the mouse scroll 4. Keep ‘CTRL’ pressed and select the three new fillers and right click and select ‘Join Fillers’. The drawing should now appear as below (here we have zoomed in on the center): © 2008‐2009 ULTRA DEEP LLC. All rights reserved. UmbiliCAD® ‐ Patent Pending ™ ULTRA DEEP LLC UmbiliCAD® ‐ USER MANUAL Doc. no. 00000‐INT‐UM‐KNT‐20071129‐1 Date: Page: Rev.: Apr 24, 2009 21 of 57 09 5. As we can see, the enclosed area will not make reasonable custom filler so we will have to manually set the outer boundary for the enclosed area. 6. Left click at the red dots in the order given in the figure below. When you have succeeded in selecting a dot, it will appear red and white hatched (as dot no. 6 below). Furthermore, as you click, you will see that new black lines connect the dots and you will finally get an enclosed area which looks more reasonable. 3 New lines which enclose the new area 2 4 5 1 6 7. Press ‘Enter’ and zoom out again. The cross section should appear as in the figure below: © 2008‐2009 ULTRA DEEP LLC. All rights reserved. UmbiliCAD® ‐ Patent Pending ™ ULTRA DEEP LLC UmbiliCAD® ‐ USER MANUAL Doc. no. 00000‐INT‐UM‐KNT‐20071129‐1 Date: Page: Rev.: Apr 24, 2009 22 of 57 09 3.2.10 Tape We shall now apply a tape wrapping around the lay‐up bundle. 1. While the lay‐up is selected (the center and OD have a blue color), right‐click and select ‘Add Element ‐>Tape’ and the ‘Tape Input Dialog Box’ will appear. The lay‐up is selected by clicking somewhere in the lay‐up void between the inner and outer diameter. 2. If you want, it is possible to change the tape properties such as overlap (% overlap), tape width, tape thickness and number of tape layers. In this example, do nothing. With the default tape element dimensions and material properties the tape layer thickness should be ≈ 0.3 mm (“Thickness of Tape Element” in the properties dialog box). 3. Exit the dialog box by clicking ‘OK’. The drawing should look like the figure below. © 2008‐2009 ULTRA DEEP LLC. All rights reserved. UmbiliCAD® ‐ Patent Pending ™ ULTRA DEEP LLC UmbiliCAD® ‐ USER MANUAL Doc. no. 00000‐INT‐UM‐KNT‐20071129‐1 Date: Page: Rev.: Apr 24, 2009 23 of 57 09 3.2.11 Strand We shall create an isolated conductor consisting of seven copper wires in a strand with a sheath outside. 1. Click outside the lay‐up somewhere, right‐click and select ‘Add Element ‐> Strand’. A small wire and the ‘Strand Input Dialog Box’ appear. 2. Double‐click on ‘Single Strand Outer Diameter’, replace the default value 1 with 3 and press ‘Enter’. A wire with OD of 3 mm is created at the place where you first clicked. 3. While the first wire is still selected, right‐click and select ‘Add Element ‐> Strand’ again six wires with the same diameter as the first appears in a laid up configuration around the first wire. Exit the dialog box by clicking ‘OK’. 4. Select the strand (both the central wire and the 6 surrounding wires) by clicking on them while ‘CTRL’ is pressed. Right‐click and select ‘Properties’ from the main menu. 5. Click on ‘Void/Content Fluid’ and select ‘Petroleum jelly’ from the menu. Exit the dialog box by clicking ‘OK’ and click somewhere on the drawing area. 6. You have now changed the voids in between the conductors such that they will be permanently filled with ‘Petroleum jelly’. 7. While the outer layer of conductors are selected, right‐click and select ‘Add Element ‐> Sheath’. Change the “sheath thickness” to 5 mm and the drawing color to black in the dialog box. Exit the dialog box by clicking ‘OK’. You should now have drawn an electrical cable like in the figure below. Click somewhere on the drawing area. © 2008‐2009 ULTRA DEEP LLC. All rights reserved. UmbiliCAD® ‐ Patent Pending ™ ULTRA DEEP LLC UmbiliCAD® ‐ USER MANUAL Doc. no. 00000‐INT‐UM‐KNT‐20071129‐1 Date: Page: Rev.: Apr 24, 2009 24 of 57 09 3.2.12 LayUp With Center We shall now lay‐up 12 cables like the one we created above around the bundle of three tubes. 1. 2. 3. 4. Select the black isolation of the cable, right‐click and select ‘Select ‐> Elements Under’ Right‐click, select ‘Copy/Paste’ and click to drop it to the drawing. Repeat step 2 until you have 12 electrical cables in your drawing. Keep ‘CTRL’ pressed and select the black isolation of all the 12 cables followed by selecting the tape outside the lay‐up of tubes. If you have problems selecting the tape, scroll the mouse wheel to zoom in. Right‐click, select ‘Lay Up‐> Create Lay‐Up w/center’. The last selected element is used as a center element in the lay‐up. Exit the dialog box by clicking ‘OK’. You should now have a drawing like in the figure below. NB! There is an alternative and easier way of doing step 4. 5. Press the undo key ‘u’ until you are back at the end of step 3. © 2008‐2009 ULTRA DEEP LLC. All rights reserved. UmbiliCAD® ‐ Patent Pending ™ ULTRA DEEP LLC UmbiliCAD® ‐ USER MANUAL Doc. no. 00000‐INT‐UM‐KNT‐20071129‐1 Date: Page: Rev.: Apr 24, 2009 25 of 57 09 6. Select the whole lay‐up of tubes and move it to the right of all the electrical cables. This can be done by using the selection rectangle by pressing the left mouse button followed by pressing the key ‘m’ to move the lay‐up. 7. Select all the 12 electrical cables and the lay‐up by holding the left mouse button down outside of all the tubes and move the mouse pointer in such a way that the blue selection rectangle, which now appears, encloses them all. Then right‐click and select ‘Lay Up‐> Create Lay‐Up w/center’ and you should have a drawing like the figure above. The function will choose the rightmost (the element with the largest ‘InsertionPointX’) as the center of the lay‐ up. As you can see from this example, when choosing element(s) which shall be a part of a lay‐up, it is possible to choose only the outermost element (as the tube sheath) or the whole element (the tube and the sheath). 3.2.13 Separation Sheath We shall apply a separation sheath over the lay‐up of cables. Click somewhere in the lay‐up void between the inner and outer diameter and blue color appear at the ID and OD of the lay‐up which indicate that it is selected. Then right‐click and select ‘Add Element ‐> Sheath’. Double‐click ‘Sheath Thickness’ and type a wall thickness of 3 mm. Exit the dialog box by clicking ‘OK’. 3.2.14 Steel Wire Armor We shall apply a layer of round steel armor wires outside the separation sheath. 1. While the separation sheath is still selected, right‐click and select ‘Add Element ‐> Armor’. A layer of round armor wires and the ‘Armor Input Dialog Box’ appear. 2. Double‐click ‘Wire Thickness’, type ‘5’ and press ‘Enter’ and you will see the number of wires change to 71. You may change the lay‐angle and other properties as you like. Details about the armor process are given in Section 4. Exit the dialog box by clicking ‘OK’. © 2008‐2009 ULTRA DEEP LLC. All rights reserved. UmbiliCAD® ‐ Patent Pending ™ ULTRA DEEP LLC UmbiliCAD® ‐ USER MANUAL Doc. no. 00000‐INT‐UM‐KNT‐20071129‐1 3.2.15 Outer Sheath We shall apply an outer sheath covering the layer of armor wires. Date: Page: Rev.: Apr 24, 2009 26 of 57 09 While the armor is still selected after the armoring process, right‐click and select ‘Add Element ‐> Sheath’. Double‐click ‘Sheath Thickness’ and type a thickness of 6 mm. Exit the dialog box by clicking ‘OK’ and click somewhere on the drawing area. You should now have a drawing like the one in the figure below. © 2008‐2009 ULTRA DEEP LLC. All rights reserved. UmbiliCAD® ‐ Patent Pending ™ 3.3 ULTRA DEEP LLC UmbiliCAD® ‐ USER MANUAL Doc. no. 00000‐INT‐UM‐KNT‐20071129‐1 Date: Page: Rev.: Apr 24, 2009 27 of 57 09 Insert Textboxes and Calculations 3.3.1 Insert Arrows With Textboxes We shall now insert arrows with descriptive text to three of the main elements in the cross section. 1. Click to select the rightmost tube in the cross section, right click and select ‘Insert ‐> Arrow Textbox’. An arrow appears where you clicked together with a textbox attached to the pointer. Click to drop the textbox where you prefer. 2. Double‐click on the textbox and the ‘Arrow Textbox Input Dialog Box’ appears. Here the font, the textbox and the arrow can be formatted. 3. Double‐click on the ‘Text’‐field under ‘Text Box Properties’ and type the text you want to be visible on the drawing, e.g. ‘Steel Tube, ID 25.4 x 2.5 mm’ in the box to the right. 4. Repeat step 1‐3 for an electrical cable with the wanted text, e.g. ‘Electrical cable’. 5. Repeat step 1‐3 for the armor with the wanted text, e.g. ‘Steel wire armor, OD 5.0 mm, 71 off’. You now have a drawing that looks something like the figure below. © 2008‐2009 ULTRA DEEP LLC. All rights reserved. UmbiliCAD® ‐ Patent Pending ™ ULTRA DEEP LLC UmbiliCAD® ‐ USER MANUAL Doc. no. 00000‐INT‐UM‐KNT‐20071129‐1 3.3.2 Format Arrows and Textboxes We shall now format the arrows and textboxes the way we want. Date: Page: Rev.: Apr 24, 2009 28 of 57 09 1. Click on a textbox to select it (appears dim on the screen). 2. Press ‘CTRL’ and select all the three textboxes. Choose ‘Alignment ‐> Left Align’ and all textboxes are now aligned after the uppermost box. If the dialog box does not appear, the mouse pointer is on top of one of the textboxes. Move it away from the text box and try again. 3. Press ‘CTRL’ and select all the three textboxes again, right‐click and select ‘Properties’. The input dialog box appears. If the dialog box does not appear, the mouse pointer is above one of the textboxes. Move it away from the text box and try again. 4. Click on the ‘Draw Border’‐field and select ‘False’ from the menu to remove the border line around the textbox. Click ‘OK’ to exit the dialog box. Further details about arrows and textboxes are given in Section 4. Now the drawing should look like the figure below. Steel Tube, ID 25.4 x 2.5 mm Electrical cable Steel wire armour, OD 5.0 mm 71 off © 2008‐2009 ULTRA DEEP LLC. All rights reserved. UmbiliCAD® ‐ Patent Pending Date: Apr 24, 2009 ™ ULTRA DEEP LLC UmbiliCAD® ‐ USER MANUAL Page: 29 of 57 Doc. no. 00000‐INT‐UM‐KNT‐20071129‐1 Rev.: 09 3.3.3 Table of Results This section shows you how to insert a ‘table of results’ into your drawing and how to copy everything as a picture, enabling you to paste the drawing into e.g. MS Word. 1. 2. 3. 4. Before you do this, open an empty word document. Select the outer sheath of the cross section, right‐click and select ‘Insert ‐> Table of Results’. Click to drop the table at a location below the cross section. Select the complete cross section and the table of results with the blue selection square, right‐click and select ‘Edit ‐> Copy as Picture’. 5. You now may paste the copied elements as a picture (metafile) into Microsoft Office Word file you just opened. 6. The drawing now looks like the one below. Note If you want more digits behind the comma for any of the numbers in the ‘Mechanical Properties’ box, simply click those numbers with the ‘CTRL’‐key pressed. Move the cursor away from © 2008‐2009 ULTRA DEEP LLC. All rights reserved. UmbiliCAD® ‐ Patent Pending Date: Apr 24, 2009 ™ ULTRA DEEP LLC UmbiliCAD® ‐ USER MANUAL Page: 30 of 57 Doc. no. 00000‐INT‐UM‐KNT‐20071129‐1 Rev.: 09 the text box, right‐click, and select ‘Properties’ in the dialog box that appears. Look for ‘Format String’ under the ‘Text Box Properties’ heading, and change the number in ‘f1’ to the number corresponding to your preferred choice of significant digits. E.g. changing ‘f1’ to ‘f3’ would change ‘1.0’ to ‘1.000’. 3.3.4 Capacity Curves This function makes capacity curves for the chosen elements and for all its sub‐element if it has any. A capacity curve shows the maximum curvature an element (and its sub‐elements) can have under different tension loads, before the element or one of its sub‐elements reach a predefined yield utilization limit. 1. Select the outer sheath of the cross section, right‐click and select ‘Insert ‐> Capacity Curve’. 2. A new window with two capacity curves will open. By default these two curves are labeled as ‘80% Utilization’ and ‘100% Utilization’. The curves are shown in the figure below. 3. Each element has two parameters which decide the shape of these curves. Go back to the drawing window and double‐click on one of the tubes in order to get the ’Tube Input Dialog Box’. The box is shown below with only the ‘Stress Calculation Properties’ visible. 4. By right clicking on the plot and choose ‘’Copy Plot to Clipboard’ the plot is copied as a picture. You can paste this into the drawing or into another application such as e.g. Microsoft Office Word. 5. By right clicking on the plot and choose ‘’Copy Plot to Clipboard’ the plot is copied as a picture. You can paste this into the drawing or into another application such as e.g. Microsoft Office Word. © 2008‐2009 ULTRA DEEP LLC. All rights reserved. UmbiliCAD® ‐ Patent Pending ™ ULTRA DEEP LLC UmbiliCAD® ‐ USER MANUAL Doc. no. 00000‐INT‐UM‐KNT‐20071129‐1 Date: Page: Rev.: Apr 24, 2009 31 of 57 09 6. This property has two fields: ‘Pressures’ and ‘Utilizations’. Pressure is the internal pressures (MPa) in the element (if possible). ‘Utilizations’ can have values between 0 – 1.0 and determines what yield utilization limit will be used in the capacity plot. If the utilization is set to 0.8, it means that the utilization limit used in the calculation is set to 80 % of the material yield limit (‘Yield Limit of Material’ in the material properties). Both fields have two semicolon separated values, where each pair is used in combination when calculating the capacity curve. E.g. 0.0 pressure at 100% (1.0) utilization, and 15 MPa pressure at 80%(0.8) utilization. By default ‘Pressures’ are set to 0.0 and 15.0 MPa and ‘Utilizations’ are set to 1.0 and 0.8. It is possible to change these values but the label of the two curves will, in the present version of UmbiliCAD, still be ’80 % Utilization’ and ‘100% Utilization’. 3.3.5 Insert Top Tension/Curvature Envelope This function calculates the maximum static top tension of a free hanging umbilical (at zero curvature) at a certain water depth and put it into the capacity plot. A Tension/Curvature envelope is also made. © 2008‐2009 ULTRA DEEP LLC. All rights reserved. UmbiliCAD® ‐ Patent Pending Date: Apr 24, 2009 ™ ULTRA DEEP LLC UmbiliCAD® ‐ USER MANUAL Page: 32 of 57 Doc. no. 00000‐INT‐UM‐KNT‐20071129‐1 Rev.: 09 1. By right clicking on the plot and choose ‘Insert Top Tension’, the following window will appear. 2. Change ‘Water depth ‘ (length of the in water free hanging static umbilical) to 600.0 m. This will change the ‘Nominal Top Tension’ (Tnom). The fields ‘Min DAF’ and ‘Max DAF’ decide the maximum (Tmax) and minimum (Tmin) in the tension/curvature envelop. 3. Definition of these are (here are 9.81 m/s^2 the gravity constant): 3.1. Tnom = SubW*d*9.81/1000 3.2. Tmax = Tnom*maxDaf 3.3. Tmin = Tnom*minDaf 3.4. CEmax = cf* Cmax 4. By clicking ‘Add Top Tension to Plot’, the added to the Capacity plot. The Capacity Plot should now look like: © 2008‐2009 ULTRA DEEP LLC. All rights reserved. UmbiliCAD® ‐ Patent Pending ™ ULTRA DEEP LLC UmbiliCAD® ‐ USER MANUAL Doc. no. 00000‐INT‐UM‐KNT‐20071129‐1 Date: Page: Rev.: Apr 24, 2009 33 of 57 09 Capacity Curve 280 Tension [kN] 240 200 160 120 80 40 0.0 0.0 0.04 0.08 0.12 0.16 Curvature [1/m] 0.2 100% Utilisation 80% Utilisation Nominal Top Tension at 600 m © 2008‐2009 ULTRA DEEP LLC. All rights reserved. UmbiliCAD® ‐ Patent Pending ™ ULTRA DEEP LLC UmbiliCAD® ‐ USER MANUAL Doc. no. 00000‐INT‐UM‐KNT‐20071129‐1 Date: Page: Rev.: Apr 24, 2009 34 of 57 09 4 Functions All the functions are available from the main menu by right‐clicking in the drawing area. 4.1 Add Element 4.1.1 General When a ‘Sheath’, ‘Armour’, ‘Strand’ or ‘Tape’ is added, it will be applied around the selected element. The general part of the dialog boxes for adding elements is shown below. This general part contains the sections ‘Material Properties’, ‘Material Properties (Content/Void)’, and ‘Misc’. The specific part of the dialog box for each element type is explained in the Sections 0 to 4.2.1. The numbers shaded in grey are for information only. © 2008‐2009 ULTRA DEEP LLC. All rights reserved. UmbiliCAD® ‐ Patent Pending ™ ULTRA DEEP LLC UmbiliCAD® ‐ USER MANUAL Doc. no. 00000‐INT‐UM‐KNT‐20071129‐1 Date: Page: Rev.: Apr 24, 2009 35 of 57 09 Material Properties Density of Material: The density of the selected material. Used in mass calculations. [kg/m3] E‐module of Material: Young’s modulus. Used in stiffness‐ and stress calculations. [MPa] Mass Element: Mass of element per meter length. For information only. [kg/m] Name of Material: Selected material from material database. Material properties could be changed for each element, but the changes will not be saved in the overall material database, ref. Section 2.2.1. The changes will be saved in the drawing‐file. Ultimate Limit of Material: Also called ‘breaking limit’. Used in capacity calculations. [MPa] Yield limit of Material: Limit where yield starts. Used in capacity calculations. [MPa] © 2008‐2009 ULTRA DEEP LLC. All rights reserved. UmbiliCAD® ‐ Patent Pending ™ ULTRA DEEP LLC UmbiliCAD® ‐ USER MANUAL Doc. no. 00000‐INT‐UM‐KNT‐20071129‐1 Material Properties (Content/Void) Date: Page: Rev.: Apr 24, 2009 36 of 57 09 Mass filled: Mass of element filled with content. For information only. [kg/m] Mass filled_flooded: Mass of element filled with content and voids flooded with seawater. For information only. [kg/m] Void/Content Density: Density of fluid in voids/tubes. Used in mass calculations. [kg/m3] Void /Content Fluid: Fluid selected from fluid database. Properties could be changed for each element, but the changes will not be saved in the overall fluid database, ref. Section 0. If selected different from ‘Seawater’, the element will be permanently filled with the fluid. Misc DrawingColor: Color of the element could be selected from a menu. InsertionPointX: Drawing x‐coordinates of the centroid of the element. InsertionPointY: Drawing y‐coordinates of the centroid of the element. Visible: Must be selected to ‘True’ (visible) or ‘False’ (invisible) from a menu. Stress Calculation Properties Pressures: Pressures is the internal pressures [MPa] in the element (if possible). The first value is used in the ‘100% Utilization’ curve and the second value is used in the ‘80% Utilization’ curve. Utilizations: Utilizations can have values between 0 – 1.0 and determines what yield utilization limit will be used in the capacity plot calculation. If the utilization is set to 0.8, it means that the utilization limit used in the calculation is set to 80 % of the material yield limit (‘Yield Limit of Material’ in the material properties). In this version of UmbiliCAD, the first value is used in the curve labeled ‘100% Utilisation’ and the second value is used in the curve labeled ‘80% Utilisation’. © 2008‐2009 ULTRA DEEP LLC. All rights reserved. UmbiliCAD® ‐ Patent Pending Date: Apr 24, 2009 ™ ULTRA DEEP LLC UmbiliCAD® ‐ USER MANUAL Page: 37 of 57 Doc. no. 00000‐INT‐UM‐KNT‐20071129‐1 Rev.: 09 4.1.2 Add Tube The tube is added at the location where clicked before the function is selected. ‘Add Element ‐> Sheath’ applies to the selected element in the drawing. Default material for tubes is set to be ‘Super Duplex’. The ‘Inner Diameter’ is the governing parameter, and ‘Outer Diameter’ or ‘Wall thickness’ is calculated based on the two other parameters. The dialog box like shown below appears when the element is created. Only the specific ‘Element Dimensions’ and ‘Element Properties’ are shown, the general sections as described in 4.1.1 are minimized. Element Dimensions Inner Diameter: Inner Diameter of the tube. The governing parameter for the element dimensions [mm] Outer Diameter: Outer Diameter of the tube. [mm] Wall Thickness: Wall thickness of the tube. [mm] Description of the element Element Properties Description: © 2008‐2009 ULTRA DEEP LLC. All rights reserved. UmbiliCAD® ‐ Patent Pending Date: ™ ULTRA DEEP LLC UmbiliCAD® ‐ USER MANUAL Page: Doc. no. 00000‐INT‐UM‐KNT‐20071129‐1 Rev.: 4.1.3 Add Sheath The function ‘Add Element ‐> Sheath’ applies to a selected element in the drawing. Apr 24, 2009 38 of 57 09 Default material for sheaths to ‘MDPE’. The ‘Inner Diameter’ is the governing parameter, and ‘Outer Diameter’ or ‘Sheath Thickness’ is calculated based on the two other parameters. The dialog box like shown below appears when the element is created. Only the specific ‘Element Dimensions’ and ‘Element Properties’ are shown, the general sections as described in 4.1.1 are minimized. Element Dimensions Inner Diameter: Outer Diameter: Inner Diameter of the sheath. The governing parameter for the element dimensions. [mm] Outer Diameter of the sheath [mm] Sheath Thickness: Wall thickness of the sheath [mm] Element Properties Description: Description of the element © 2008‐2009 ULTRA DEEP LLC. All rights reserved. UmbiliCAD® ‐ Patent Pending Date: Apr 24, 2009 ™ ULTRA DEEP LLC UmbiliCAD® ‐ USER MANUAL Page: 39 of 57 Doc. no. 00000‐INT‐UM‐KNT‐20071129‐1 Rev.: 09 4.1.4 Add Armor ‘Add Element ‐> Armor’ applies to the selected element in the drawing. Default material for armor is set to be ‘Galvanized Steel Wire’. If the ‘Void/Content Fluid’ is set to ‘Seawater’, the voids between the armor wires will be empty in the ‘Empty’ and ‘Filled’ mass and weight calculations and flooded with seawater in the ‘Flooded’ calculations. If the ‘Void/Content Fluid’ is set to something else than ‘Seawater’, the voids will be assumed to be permanently filled with the selected fluid during all mass and weight calculations, ref. Section 4.1.1. The dialog box like shown below appears when the element is created. Only the specific ‘Element Dimensions’ and ‘Element Properties’ are shown, the general sections as described in 4.1.1 are minimized. The same dialog applies for both flat and round armor wires. Element Dimensions Inner Diameter: The inner diameter of the layer of armor wires (The outer diameter of the selected element inside the armor wires). [mm] Outer Diameter: The Inner Diameter + 2*(Wire Thickness). [mm] Wire Thickness: Maximum thickness of flat wires (rounded corners), OD of round wires [mm] Wire Width: [mm] Maximum Width of flat wires (rounded corners). Dummy for round wires. © 2008‐2009 ULTRA DEEP LLC. All rights reserved. UmbiliCAD® ‐ Patent Pending ™ ULTRA DEEP LLC UmbiliCAD® ‐ USER MANUAL Doc. no. 00000‐INT‐UM‐KNT‐20071129‐1 Element Properties Date: Page: Rev.: Apr 24, 2009 40 of 57 09 Coverage: Relative coverage of armor wires related to the center pitch diameter of the elements. Connected to ‘Number of wires’. Description: Description Lay Length: Lay‐length. Connected to ‘Lay angle’. [mm] Lay Angle: Connected to ‘L’, lay‐length [deg] Number of wires: Connected to ‘Coverage’ Type: ‘Round’ or ‘Rectangular’ must be selected from menu. 4.1.5 Add Strand If no element(s) is selected, a single strand is added to the chosen position. The function also applies to a selected strand element, with a default of creating 6 strand wires around the selected strand. The outer diameter of each strand (‘Single Strand Outer Diameter)’ is the same as the center strand. If a strand with 6 wires is selected, the function adds another 12 wires around the first 6. If the 12 wires are selected, the function adds another 18, and so on. If the ‘Void/Content Fluid’ is set to ‘Seawater’, the voids between the strands will be empty in the ‘Empty’ and ‘Filled’ mass and weight calculations and flooded with seawater in the ‘Flooded’ calculations. If the ‘Void/Content Fluid’ is set to something else than ‘Seawater’, the voids will be assumed to be permanently filled with the selected fluid during all mass and weight calculations, ref. Section 4.1.1. The dialog box like shown below appears when the element is created. Only the specific ‘Element Dimensions’ and ‘Element Properties’ are shown, the general sections as described in 4.1.1 are minimized. © 2008‐2009 ULTRA DEEP LLC. All rights reserved. UmbiliCAD® ‐ Patent Pending ™ ULTRA DEEP LLC UmbiliCAD® ‐ USER MANUAL Doc. no. 00000‐INT‐UM‐KNT‐20071129‐1 Date: Page: Rev.: Apr 24, 2009 41 of 57 09 Element Dimensions Inner Diameter: Outer Diameter: The inner diameter of the layer of strand wires (The outer diameter of the selected element inside the strand wires). [mm] The Inner Diameter + 2*(Single Strand Outer Diameter). [mm] Single Strand Outer Diameter: Diameter of each strand wire. [mm] Element Properties Coverage: Relative coverage of strand wires related to the center pitch diameter of the elements. Connected to ‘N’, ‘Number of wires’. Description: Description Lay Length: Lay‐length. Connected to ‘Lay Angle’. [mm] Lay Angle: Connected to ‘Lay Length’. [deg] Number of elements: Number of wires. Connected to ‘Coverage’ © 2008‐2009 ULTRA DEEP LLC. All rights reserved. UmbiliCAD® ‐ Patent Pending Date: Apr 24, 2009 ™ ULTRA DEEP LLC UmbiliCAD® ‐ USER MANUAL Page: 42 of 57 Doc. no. 00000‐INT‐UM‐KNT‐20071129‐1 Rev.: 09 4.1.6 Add Tape ‘Add Element ‐> Tape’ applies to the selected element in the drawing. Default tape material is set to ‘MDPE’. Only the specific ‘Element Dimensions’ and ‘Element Properties’ are shown, the general sections as described in 4.1.1 are minimized. If the user tries to set elements dimension or properties to values which are not possible, they will change back to the original value. Element Dimensions Inner Diameter: The inner diameter of the element of tape(s). [mm] Outer Diameter: Tape Thickness: Thickness of a single tape. [mm] Tape Width: The Inner Diameter of tape element + 2*(Thickness of Tape Element). [mm] Width of a single tape. [mm] Thickness of Tape Element: Thickness of the whole tape element (with all layers). © 2008‐2009 ULTRA DEEP LLC. All rights reserved. UmbiliCAD® ‐ Patent Pending ™ ULTRA DEEP LLC UmbiliCAD® ‐ USER MANUAL Doc. no. 00000‐INT‐UM‐KNT‐20071129‐1 Element Properties Overlap(%): Date: Page: Rev.: Apr 24, 2009 43 of 57 09 How much a single tape wrapped around an element overlaps itself. When the overlap is negative, there is a gap between the tape in each round. Description: Description . Lay Length: Lay‐length. Connected to ‘Lay Angle’ and ‘Overlap’. [mm] Lay‐Angle: Lay‐Angle to the single tapes in the tape element. Connected to ‘Lay Length’ and ‘Overlap (%)’, [deg] Number of tape layers: Number of single tapes in the element. 4.1.7 Add Void Filler This function adds a filler in the void space where you have left clicked. More precisely the function finds the three closest element to the point where you have left clicked. These elements can also be the lay‐up inner or outer wall. Pressing the ‘F’‐key is the short cut to this function. For more detailed information look in chapter 0 and 3.2.6. 4.1.8 Add Hose The user can select between two standard hoses, 1/2” and 3/8”. The hose is added at the location where clicked before the function is selected. Default mechanical properties for the hose have been pre‐calculated. However, the user can give parameters for the properties shown below. It should be noted that the parameters such as max tension capacity and max elongation are dependent. If the input is given for max elongation, max tension is calculated and vice versa. This also applies to max curvature and minimum bend radius. Element Dimensions Inner Diameter: Inner Diameter of the hose. The governing parameter for the element dimensions [mm] Outer Diameter: Outer Diameter of the hose. [mm] Wall Thickness: Wall thickness of the hose. [mm] Axial Stiffness: Axial stiffness of hose element [MN] Bend Stiffnes: Description: Bending stiffness of hose element [kNm2] Description of the element Element Properties © 2008‐2009 ULTRA DEEP LLC. All rights reserved. UmbiliCAD® ‐ Patent Pending ™ ULTRA DEEP LLC UmbiliCAD® ‐ USER MANUAL Doc. no. 00000‐INT‐UM‐KNT‐20071129‐1 Max Curvature: Maximum allowed curvature [1/m] Max Elongation: Maximum allowed elongation [%] Max Tension Capacity: Maximum allowed axial load [kN] Min Bend Radius: Minimum bend radius of element [m] Torsion Stiffness: Torsion Stiffness of element [kNm2] Mass: Mass empty pr. Unit length [kg/m] © 2008‐2009 ULTRA DEEP LLC. All rights reserved. UmbiliCAD® ‐ Patent Pending Date: Page: Rev.: Apr 24, 2009 44 of 57 09 Date: Apr 24, 2009 ™ ULTRA DEEP LLC UmbiliCAD® ‐ USER MANUAL Page: 45 of 57 Doc. no. 00000‐INT‐UM‐KNT‐20071129‐1 Rev.: 09 4.1.9 Add Element From File… This function opens an ‘open file’ dialog box and makes it possible to add all elements in a previous stored drawing into the current drawing. 4.2 Lay Up 4.2.1 Create LayUp or Create LayUp w/Center The ‘Create Lay‐Up’ or ‘Create Lay‐Up w/center’ functions apply to all the selected elements. There must be 2 or more selected elements. The ‘Create Lay‐Up w/center’ function uses the last element selected or the rightmost element (the element with the largest ‘InsertionPointX’) of the elements selected, as a center element. All other selected elements are laid up around the center element. This center element could be a single element or another lay‐up. Generally, the order of the elements inside a Lay‐up is decided by the order you choose the elements to be a part of the lay‐up. The first element you choose will be ordered as number one, the second element will be ordered as number two etc. If you choose elements by marking them all with a blue rectangle, the leftmost element will be numbered as one, the second leftmost element will be numbered as two and the rightmost element will get the highest number. Element number one will be placed at the 0° position at a unit circle (3 o’clock). The other elements are placed in the clockwise © 2008‐2009 ULTRA DEEP LLC. All rights reserved. UmbiliCAD® ‐ Patent Pending Date: Apr 24, 2009 ™ ULTRA DEEP LLC UmbiliCAD® ‐ USER MANUAL Page: 46 of 57 Doc. no. 00000‐INT‐UM‐KNT‐20071129‐1 Rev.: 09 direction from element one. If there should be a center element, the element with the highest number (last chosen or the rightmost element) will be used as a center element. The figure below shows how this works. 1. Choose all elements with the select‐ rectangle. The order of the elements is shown under. 1 2 3 4 5 6 2. Choose function ‘Lay‐Up ‐> Create Lay‐Up w/center. 5 4 6 1 3 2 When you select the elements to be a part of a Lay‐Up, you can both select all the sub‐elements inside an element (example; a tube or a Lay‐Up with a sheath) or only the outermost element. The ‘Lay‐Up’ function will automatically include sub‐elements inside the selected elements. If the ‘Void/Content Fluid’ is set to ‘Seawater’, the voids will be empty in the ‘Empty’ and ‘Filled’ mass‐ and weight calculations and flooded with seawater in the ‘Flooded’ calculations. If the ‘Void/Content Fluid’ is set to something else than ‘Seawater’, the voids will be assumed to be permanently filled with the selected fluid during all mass and weight calculations, ref. Section 4.1.1. The dialog box like shown below appears when the element is created. Only the specific ‘Lay‐Up Dimensions’ and ‘Lay‐Up Properties’ are shown, the general sections as described in 4.1.1 are minimized. © 2008‐2009 ULTRA DEEP LLC. All rights reserved. UmbiliCAD® ‐ Patent Pending Date: Apr 24, 2009 ™ ULTRA DEEP LLC UmbiliCAD® ‐ USER MANUAL Page: 47 of 57 Doc. no. 00000‐INT‐UM‐KNT‐20071129‐1 Rev.: 09 For the ‘Lay‐Up Input Dialog Box’, a new field called ‘Mode’ is included compared to all the other input dialogs. By clicking in the ‘Mode’‐field, you are able to select different lay‐up modes in the menu. Lay‐Up Dimensions Inner Diameter: The inner diameter of the lay‐up. [mm] Outer Diameter: The outer diameter of the lay‐up. [mm] Lay‐Up Properties Lay Length: Lay‐length. Connected to ‘Lay Angle’. [mm] Lay Angle: Connected to lay‐length [deg] Re‐distribute lay‐up: Either ‘True’ or ‘False’. If set to ‘False’, you could possibly change the lay‐angle of the lay‐up without having the OD automatically updated. E.g. if you have a lay‐up with tubes and void fillers. ‘Re‐distribute lay‐ up’ should be set to ‘False’ if you want to update the lay‐angle. © 2008‐2009 ULTRA DEEP LLC. All rights reserved. UmbiliCAD® ‐ Patent Pending Mode ™ ULTRA DEEP LLC UmbiliCAD® ‐ USER MANUAL Doc. no. 00000‐INT‐UM‐KNT‐20071129‐1 Date: Page: Rev.: Apr 24, 2009 48 of 57 09 Mode: 5 different selectable choices in a menu: 1. ‘Auto – Inner Dia’ Default mode for ’Lay Up – Create Lay‐Up’. Automatically calculates the smallest inner diameter to be able to lay‐up the selected elements with the given lay‐angle (default 12 degrees). The ID or OD cannot be changed by the user. 2. ‘Auto – Outer Dia’ Automatically calculates the smallest outer diameter to be able to lay‐up the selected elements with the given lay‐angle (default 12 degrees). The ID or OD cannot be changed by the user. 3. ‘Manual – To Inner Dia (Partial)’ The ID of the lay‐up could manually be changed in the dialog box. The elements are distributed with all the excessive spacing between the elements in one place (Partial). 4. ‘Manual – To Outer Dia (Partial)’ The OD of the lay‐up could manually be changed in the dialog box. The elements are distributed with all the excessive spacing between the elements in one place (Partial). 5. ‘Manual – To Inner Dia (Evenly)’ Default mode for ‘Lay Up ‐> Create Lay‐Up w/center’. The ID of the lay‐up could manually be changed in the dialog box. The elements are distributed evenly with equal spacing between each element (Evenly). 6. ‘Manual – To Outer Dia (Evenly)’ The OD of the lay‐up could manually be changed in the dialog box. The elements are distributed evenly with equal spacing between each element (Evenly). 4.2.2 Move to Center With this function you can easily move an element to the center of a Lay‐Up. Select the element you want to move and choose ‘Lay‐Up‐> Move to center’. A dialog box like this will appear. Simply select the Lay‐Up you want to put the element inside by clicking somewhere in the void inside the Lay‐Up and click done. The element should now have been moved to the Lay‐Up center. © 2008‐2009 ULTRA DEEP LLC. All rights reserved. UmbiliCAD® ‐ Patent Pending Date: Apr 24, 2009 ™ ULTRA DEEP LLC UmbiliCAD® ‐ USER MANUAL Page: 49 of 57 Doc. no. 00000‐INT‐UM‐KNT‐20071129‐1 Rev.: 09 4.2.3 Move to LayUp This function moves a chosen element to the Lay‐Up helix. Select the whole element (with all sub‐ elements) and choose ‘Lay‐Up ‐> Move to Lay‐Up’. A dialog box like this will appear. Simply select the Lay‐Up you want to put the element inside by clicking somewhere in the void inside the Lay‐Up and click done. The element should now have been moved to the Lay‐Up helix. 4.2.4 Move to LayUp Void This function moves a selected element to the Lay‐Up void. You have to choose two boundary elements which the element should touch. A more detailed description is given in chapter 3.2.7. 4.2.5 Drag to LayUp Void This function makes it possible to manually move a selected element to the lay‐up void. When touching two elements, the element will snap automatically in place between them. If you try to place the element in such a way that it overlaps, a message box will appear which and ask if you really want to do that. © 2008‐2009 ULTRA DEEP LLC. All rights reserved. UmbiliCAD® ‐ Patent Pending 4.3 ™ ULTRA DEEP LLC UmbiliCAD® ‐ USER MANUAL Doc. no. 00000‐INT‐UM‐KNT‐20071129‐1 Date: Page: Rev.: Apr 24, 2009 50 of 57 09 Insert 4.3.1 Insert Arrow Textbox Click to select an element in the cross section, right click and select ‘Insert ‐> Arrow Textbox’. An arrow to the place you clicked appears together with a textbox attached to the pointer. Click to drop the textbox where you prefer. Each arrow is equipped with a handle to move the endpoint independent from the attached textbox. Each textbox is equipped with 8 handles, so it can be scaled by ‘hold‐and‐drag’ in all directions. When the pointer is inside the textbox and a four‐way arrow is visible, the textbox could be moved by ‘hold‐and‐drag’. You may format it by double‐clicking on it or select it, right‐click and select ‘Properties’. The following dialog box appears. © 2008‐2009 ULTRA DEEP LLC. All rights reserved. UmbiliCAD® ‐ Patent Pending ™ ULTRA DEEP LLC UmbiliCAD® ‐ USER MANUAL Doc. no. 00000‐INT‐UM‐KNT‐20071129‐1 Date: Page: Rev.: Apr 24, 2009 51 of 57 09 Font Properties Font: Font Color: The font, type and size could be selected from a menu. The font color could be selected from a menu. Position and Size Properties Height: The height of the textbox. Position X: X‐coordinate of the lower left corner of the textbox. Position Y: Y‐coordinate of the lower left corner of the textbox. Width: The width of the textbox. © 2008‐2009 ULTRA DEEP LLC. All rights reserved. UmbiliCAD® ‐ Patent Pending ™ ULTRA DEEP LLC UmbiliCAD® ‐ USER MANUAL Doc. no. 00000‐INT‐UM‐KNT‐20071129‐1 Text Box Properties Text: Date: Page: Rev.: Apr 24, 2009 52 of 57 09 The text that is visible in the drawing. Text Horizontal Alignment: Alignment could be selected in a menu. Text Vertical Alignment: Alignment could be selected in a menu. Visual Properties Arrow Size: The size of the arrowhead Draw Border: Must be selected as ‘True’ (Box border visible) or ‘False’ (Box border invisible). Fill Arrow: Must be selected as ‘True’ (Arrowhead filled) or ‘False’ (Arrowhead empty). Line Color: Color of the border around the textbox and the arrow, could be selected in a menu. Line Thickness: The thickness of the border around the textbox and the arrow. Marker Size: Size of the handles for resizing the textbox. 4.3.2 Insert Table of Results Start by selecting the outer element (typically outer sheath) of the cross section from which you want to calculate the results. The calculation will include all sub‐elements within the selected element. ‘Insert ‐> Table of Results’ creates a table of calculation results attached to the pointer so you can drop it where you wish by a single click on the mouse. Each field in the table could be formatted like a textbox. For further description of the different data in the table, see Section 5. Note that this function also can be used on single elements, for example a single tube. 4.3.3 Capacity Curve This function makes capacity curves for the chosen elements and for all its sub‐elements (if it has any). A capacity curve shows the maximum curvature an element (and its sub‐elements) can have under different axial loads, before the element or one of its sub‐elements reach a predefined yield limit. See Section 3.3.4 for more information. Note that this function can also be used on single elements. Calculation method is described in (UmbiliCAD Documentation). By right clicking the capacity curve, a menu which gives the user the opportunity to copy the plot, copy the plot data or insert a top tension /curvature envelope will appear. More details in 3.3.4 and 3.3.5. © 2008‐2009 ULTRA DEEP LLC. All rights reserved. UmbiliCAD® ‐ Patent Pending 4.4 ™ ULTRA DEEP LLC UmbiliCAD® ‐ USER MANUAL Doc. no. 00000‐INT‐UM‐KNT‐20071129‐1 Date: Page: Rev.: Apr 24, 2009 53 of 57 09 Edit 4.4.1 Copy Copy the selected element(s). It is possible to paste it to arbitrary places in the active drawing or to other drawings by the ‘Edit ‐> Paste’ function 4.4.2 Copy as Picture This function copies all selected elements including textboxes to the Clipboard as picture, where they may be pasted into Microsoft Office or other programs. 4.4.3 Copy/Paste Copies the selected element(s) and attach them to the pointer for arbitrary placement by a single click. 4.4.4 Paste Attach a copied element to the pointer for arbitrary placement by a single click 4.4.5 Move The function is attaching the selected element(s) to the pointer for movement. 4.4.6 Delete Deletes the selected element(s) from the drawing 4.4.7 Clear Clears the drawing (deletes all elements). © 2008‐2009 ULTRA DEEP LLC. All rights reserved. UmbiliCAD® ‐ Patent Pending 4.5 ™ ULTRA DEEP LLC UmbiliCAD® ‐ USER MANUAL Doc. no. 00000‐INT‐UM‐KNT‐20071129‐1 Date: Page: Rev.: Apr 24, 2009 54 of 57 09 Alignment This function is only possible to use if one or more text‐boxes are chosen. 4.5.1 Left Align Left align all the selected textboxes after the uppermost 4.5.2 Size Align Set the same size off all textboxes. 4.5.3 Vertical Spacing Align Remove any vertical space between textboxes. 4.6 Select 4.6.1 Select Elements Under ‘Select Elements Under’ selects all sub‐elements within the selected element. If you first select the outer sheath of a quad and choose ‘Select Elements Under’ from the main menu, all the elements surrounded by the sheath will be selected. Shortcut is ‘s’. 4.7 Zoom 4.7.1 Zoom All Zooms the drawing area such that all elements (except arrows and textboxes) are visible. 4.7.2 Zoom Selection Zooms into a selected element, such that the element fits in the drawing area. © 2008‐2009 ULTRA DEEP LLC. All rights reserved. UmbiliCAD® ‐ Patent Pending ™ ULTRA DEEP LLC UmbiliCAD® ‐ USER MANUAL Doc. no. 00000‐INT‐UM‐KNT‐20071129‐1 4.7.3 Zoom In Zooms in one step Date: Page: Rev.: Apr 24, 2009 55 of 57 09 4.7.4 Zoom Out Zooms out one step 4.8 Join Fillers This function joins fillers in order to make a custom filler. See section 3.2.9 for more information. 4.9 Properties Opens the ‘Input Dialog Box’ for the selected element(s), where all properties are listed and may be edited. 4.10 Tips & Tricks • Strand can also be used as filler element which could be put into the Lay‐Up with the ‘Move to Center’ or ‘Move to Lay‐Up Void’ function. Simply make a Strand with the desired diameter and change the material from the default ‘Cu’ material to e.g. MDPE or some other frequently used materials for filler. © 2008‐2009 ULTRA DEEP LLC. All rights reserved. UmbiliCAD® ‐ Patent Pending ™ ULTRA DEEP LLC UmbiliCAD® ‐ USER MANUAL Doc. no. 00000‐INT‐UM‐KNT‐20071129‐1 Date: Page: Rev.: Apr 24, 2009 56 of 57 09 5 Description and Methodology of Calculations 5.1 Mechanical properties Mechanical properties are listed in the table of results, see Section 4.3.2. The different fields in the table are: 5.1.1 Outer Diameter Outer diameter [mm] of the umbilical cross section. 5.1.2 Mass Empty Mass of the cross section with empty tubes [kg/m]. If lay‐up and armor voids content is set to sea water the voids are treated as empty or un‐flooded. 5.1.3 Mass Filled Mass of the cross section with tubes filled with specified fluid [kg/m]. The voids are treated as empty. 5.1.4 Mass Filled and Flooded Mass of the cross section with tubes filled with specified fluid [kg/m]. If lay‐up and armor voids content is set to sea water the voids are filled with seawater. 5.1.5 Submerged Weight Empty Weight of cross section submerged in seawater with empty tubes [kgf/m]. If lay‐up and armor voids content is set to sea water the voids are treated as empty. 5.1.6 Submerged Weight Filled Weight of the cross section with tubes filled with specified fluid [kgf/m]. 5.1.7 Submerged Weight Filled and Flooded Weight of cross section submerged in seawater with tubes filled with specified fluid [kgf/m]. If lay‐up and armor voids content is set to sea water the voids the voids are filled with seawater. 5.1.8 Specific Weight Ratio The ratio between the specific weight of filled and flooded cross section and specific weight of sea water. Defined as: S D W F S F f 5.1.9 Subm. Weight. Dia. Ratio Submerged weight to diameter ratio [kgf/m2]. Defined as: S W F F 5.1.10 Axial Stiffness Total axial stiffness (EA=E‐module x steel area) inside the umbilical [MN]. Calculation method is described in (UmbiliCAD Documentation, 2008). © 2008‐2009 ULTRA DEEP LLC. All rights reserved. UmbiliCAD® ‐ Patent Pending Date: Apr 24, 2009 ™ ULTRA DEEP LLC UmbiliCAD® ‐ USER MANUAL Page: 57 of 57 Doc. no. 00000‐INT‐UM‐KNT‐20071129‐1 Rev.: 09 5.1.11 Bending Stiffness Bending stiffness of the umbilical [kNm2]. Calculation method is described in (UmbiliCAD Documentation, 2008). 5.1.12 Tension/Torsion Factor Amount of torsion (degree) per meter umbilical and applied tension (kN) [degree/m/kN]. Rotation is positive in clockwise direction. An example: If the Tension/Torsion Factor is 0.021 degree/m/kN, applied tension is 180 kN, then rotation per meter is 0.021*180 = 3.78 degrer/m. 6 Works Cited UmbiliCAD Documentation. (2008). Ultra Deep LLC. © 2008‐2009 ULTRA DEEP LLC. All rights reserved. UmbiliCAD® ‐ Patent Pending