1
MIFOS USER
MANUAL
Copyright : The Contributors (see back)
Published : 2010-12-23
License : GPLv2+
Note : We offer no warranty if you follow this manual and something goes wrong. So be
careful!
TABLE OF CONTENTS
INTRODUCTION
1 Welcome to Mifos
2 How to set up Mifos overview
3 How to use this manual
4 How to log in and log out
5 How to change your password
6 How to navigate within Mifos
7 Data entry
2
3
4
5
6
7
10
ADMINISTRATION TASKS
8 How to set up MFI operations: Overview
9 How to create and view the office structure
10 How to work with offices
How to work with roles, permissions and system
11
users
12 How to define, change, apply fees
13 How to apply fees/charges
14 How to work with funds (define, view, assign)
15 How to work with user checklists
16 How to work with holidays
17 How to define accepted payment types
18 How to view organization settings
19 How to set rules for data display
How to view system information and manage a
20
Mifos shut down
12
13
14
17
22
25
26
28
31
33
34
35
43
HOW TO MANAGE PRODUCTS
21 How to set product rules and attributes
How to define new and change existing loan
22
products
23 How to manage the product mix
24 How to define and change new savings products
46
49
56
58
HOW TO MANAGE GROUPS, CENTERS, AND CLIENTS
25 Centers, groups, and clients overview
64
26 How to create a new center
27 How to create a new group
28 How to create a new client
29 How to change a meeting schedule for a center
How to view and change details of centers,
30
groups, and clients
How to change the status of centers, groups, and
31
clients
32 How to view performance history
33 How to attach and collect surveys
65
70
75
82
83
85
89
91
LOAN ACCOUNTS
34 Introduction to loan accounts
94
35 How to create a new loan account
100
How to change the status of (approve/close) loan
36
106
accounts
37 How to disburse (pay out) a loan
109
38 How to manage loan account details
112
39 How to make transactions for a loan account
113
40 How to track loan account history
117
SAVINGS ACCOUNTS
41 Introduction to savings accounts
42 How to create a new savings account
43 How to change the status of a savings account
44 How to manage savings account details
45 How to make transactions for a savings account
46 How to track savings account history
121
123
128
129
130
132
BULK TRANSACTION PROCESSING
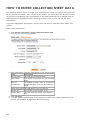
47 How to enter Collection Sheet data
48 How to create multiple loans (bulk loan creation)
How to approve multiple loans (bulk loan
49
approval)
50 How to import transactions
136
139
141
143
REPORTS
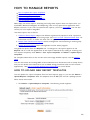
51 How to manage reports
145
52 How to run reports
53 How to manage administrative documents
54 How to attach administrative documents
149
151
153
SURVEYS
55 How to view and create surveys
56 How to manage collection of PPI data (India only)
57 How to attach and collect surveys
155
159
161
APPENDIX
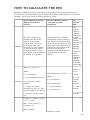
58 Rules for how to reschedule payment
59 How to calculate the EMI
60 Tips and Techniques
61 Glossary
62 Credits
164
165
167
168
173
INTRODUCTION
1. WELCOME TO MIFOS
2. HOW TO SET UP MIFOS OVERVIEW
3. HOW TO USE THIS MANUAL
4. HOW TO LOG IN AND LOG OUT
5. HOW TO CHANGE YOUR PASSWORD
6. HOW TO NAVIGATE WITHIN MIFOS
7. DATA ENTRY
1
WELCOME TO MIFOS
Important: Before reading this document, you must read the configuration guide and configure
your Mifos (Microfinance Open Source) system. Many of the choices you make within Mifos
depend on your configuration decisions, and some options may not appear or may be
unavailable to you, based on the configuration.
Mifos is a management information system (MIS) that can be accessed over a network using a
web browser. It is designed to give microfinance institutions (MFIs) a way to create and
maintain their structure, get information quickly about their operations and their clients, and
grow easily. We assume that users of this manual are familiar with the purpose of
microfinance (starting with helping people out of poverty by basing loans on ability to repay,
not just collateral) and the practices of at least one MFI, such as loans to groups, client training
in business and banking, and specific loan and savings account types.
This user manual applies to the current release, Mifos 1.5. It's an update of our previous user
manual (.doc) covering 1.0 functionality To see new features and functionality covered by the
scope of this new manual please see our features added since 1.0 on our download page.
With Mifos, you can do the following things:
Set up microfinance institution (MFI) operations from scratch
Maintain an MFI someone else created
Change settings for your MFI
Create and maintain a hierarchy of regions, branches, and centers within your MFI
Create roles and assign permissions required by users at your MFI to work on Mifos
Create users (such as loan officers) who can work with your MFI
Create groups and register clients who will receive MFI services
Create (and change) loan products
Create (and change) savings products
Create and maintain loan accounts
Pay out (disburse) loans
Collect repayments on loans
Collect and keep records for all fees paid
Create and maintain savings accounts
Collect deposits and pay withdrawals for savings accounts
Upload and create reports about MFI activity
Before reading the rest of this manual, be sure to read How to use this manual
2
HOW TO SETUP MIFOS: OVERVIEW
System recommendations
Latest release notes
Installation guide
Configuration guide
Deployment methodology
Maintenance and post-deployment planning
This manual contains information on the use of Mifos once it has been installed and configured.
For information on what needs to happen before you start to use Mifos, check the following
sections.
SYSTEM RECOMMENDATIONS
Before you install Mifos, you must read the system recommendations and be sure that your
system is suitable to run Mifos.
LATEST RELEASE NOTES
The release notes for each release of Mifos are here. Read them to find important information
about the latest release, including known issues.
INSTALLATION GUIDE
The installation guide gives you all the instructions you need to install Mifos.
CONFIGURATION GUIDE
The configuration guide includes instructions on all the operations that must occur before you
starting working with Mifos.
DEPLOYMENT METHODOLOGY
The deployment guide includes tips and advice for deploying Mifos independently through
community with support via our mailing lists..
MAINTENANCE AND POST-DEPLOYMENT PLANNING
The maintenance section of the Mifos knowledge base includes information on maintaining
Mifos and on planning for future releases.
3
HOW TO USE THIS MANUAL
Table of contents
Using links
Searching for information
Tips and techniques
Glossary
Document conventions
TABLE OF CONTENTS
To read any of the sections listed on the left, click the section name.
USING LINKS
Any text in blue is a link; click it to open a Web site. For example, the Mifos configuration guide
is stored on a Web site, and you may need to refer to it or change some of its details.
SEARCHING FOR INFORMATION
All information in this manual is indexed by Google. If you go to the Google.com site and type
words or phrases in the search box, this manual will be searched for those words or phrases.
TIPS AND TECHNIQUES
In this manual, we present several helpful tips that we and our users have found to make
operation of Mifos easier. You may find other helpful tips under the FAQ section of this
manual.
GLOSSARY
The glossary in this manual (see the appendix) explains some finance terms and some terms
that are used by MFIs for their work. It also includes definitions of terms used in Mifos.
DOCUMENT CONVENTIONS
These are the rules for how information is presented in this manual.
All names of items on the screen (UI elements) have initial capital letters. For example,
View Product Mix.
Any message from the Mifos software is surrounded by quotation marks, as in the
following:
“Please select the Product Type.”
“Please specify the Category Name.”
The names of commands and buttons that you click are shown in boldface type.
Items in Mifos that must be clicked in order to navigate to a particular spot look like
this:
Click Admin > Define New Holidays.
This means, click the Admin tab and, in the screen that appears, click Define New
Holidays.
4
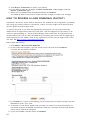
HOW TO LOG ON AND LOG OUT
1. Open a browser and navigate to the URL for Mifos (provided by your system
administrator)
2. The login screen appears
3. In the Username box, type the username provided for you on Mifos.
4. In the Password box, type the password provided for you, and click the Login button.
5. The main Mifos window appears.
Note: The first time you log on, Mifos will show a screen to change your password immediately
to one of your own choosing. See the How to change your password section for how to change
your password after this.
To log out, click the Logout button in the upper right corner of the screen.
5
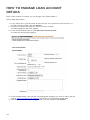
HOW TO CHANGE YOUR PASSWORD
1. In the upper right corner of the Mifos screen, click Your settings. A list of all current
settings appears.
2. Click Change password. The following screen appears:
3. In the Old Password box, type your current password.
4. In the New Password box, type the new password. It must be at least 6 characters long,
letters and/or numbers. It cannot be longer than 20 characters.
5. In the Confirm New Password box, type the new password again.
6. Click Submit.
6
HOW TO NAVIGATE WITHIN MIFOS
Tabs
Left navigation panel
Opening screen
Searching
Procedure steps
How to go back to a previous page
Editable and noneditable fields
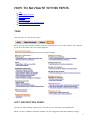
TABS
The tabs near the top of the screen
show you the main sections of Mifos. Click any of these to move to that section. For example,
if you click the Admin tab, this screen appears:
LEFT NAVIGATION PANEL
On the left, links marked "Quick Start" will take you to commonly used operations.
When you are in different sections of Mifos, the left navigation panel does different things:
7
While viewing the Admin tab, you can use this panel to search for clients and accounts.
While viewing the Clients & Accounts tab, you can use this panel to begin common
operations.
The left navigation panel is not used while viewing the Reports tab.
OPENING SCREEN
When you first login to Mifos, you see a screen that looks much like this:
SEARCHING
Any time you see a Search box, as in the illustration above, you can go directly to a client,
centre, group, or savings/loan account. Type the centre/group/client name, the system ID (for
a client, group, or center), client's government ID, or loan/savings account number, and click
Search. If there are more than one possible responses, a list appears, which might look like
the following;
In this case, click the correct one to view it.
PROCEDURE STEPS
8
Some procedures (like creating a loan account) have several steps. In those situations, a bar
across the screen tells you which step you are in. It might look like this:
HOW TO GO BACK TO A PREVIOUS PAGE
You can always press your browser's Back button to retrace your steps within Mifos.
You can also see the path you have taken near the top of the screen, just underneath the
tabs. (This path is sometimes called a "breadcrumb trail.")
Click anywhere on this path to return to that section.
EDITABLE AND NONEDITABLE FIELDS
Depending on the choices you made during configuration, and on your role within Mifos, you
may not be able to edit some fields. If you try to type something in these fields, you see an
error message like this:
In addition, some fields may appear gray or dim; this is another sign that you may not change
those fields.
9
DATA ENTRY
All data entry screens in the system behave in the same way. Note the following:
You can type data into a text field. A text field requires typing or scanning, as in the
amount and interest rate fields in the above page.
In a “pull-down list” or “drop-down list,” there is a predefined list of values; the user
must choose one from this list. In some cases the items on this list are based on user
entries; in other cases, they are configured by the MFI. For information on how to change
some of these values, see How To Define And Change Lookup Options
In some cases, when the data is selected, values that depend on it are displayed
automatically and cannot be changed.
Fields that require no data entry are dimmed.
Mandatory fields have a red asterisk (*) before the field name. The user must enter
data in this field before the form can be completed.
Where the form is longer than the screen, use the scroll bar to display more fields.
Use the keyboard to move from one field to another; after you have entered data in a
field, press Tab to move to the next field.
The data entry pages indicate the numbers of steps to be completed. The above section
of the create loan account screen, at the top, shows that the current step is the Loan
Account Information. You can click the previous step to go back to it.
10
ADMINISTRATION TASKS
8. HOW TO SET UP MFI OPERATIONS: OVERVIEW
9. HOW TO CREATE AND VIEW THE OFFICE
STRUCTURE
10. HOW TO WORK WITH OFFICES
11. HOW TO WORK WITH ROLES, PERMISSIONS AND
SYSTEM USERS
12. HOW TO DEFINE, CHANGE, APPLY FEES
13. HOW TO APPLY FEES/CHARGES
14. HOW TO WORK WITH FUNDS (DEFINE, VIEW,
ASSIGN)
15. HOW TO WORK WITH USER CHECKLISTS
16. HOW TO WORK WITH HOLIDAYS
17. HOW TO DEFINE ACCEPTED PAYMENT TYPES
18. HOW TO VIEW ORGANIZATION SETTINGS
19. HOW TO SET RULES FOR DATA DISPLAY
20. HOW TO VIEW SYSTEM INFORMATION AND
MANAGE A MIFOS SHUT DOWN
11
HOW TO SET UP MFI OPERATIONS:
OVERVIEW
If you are setting up the operations for a microfinance institution (MFI) for the first time, you
need to make decisions about its structure, its rules, its user members, and their roles. Some
of these decisions must be made immediately, and some will be needed only when the MFI
becomes more complex. Other decisions are completely optional.
In the process of configuring Mifos (see the Configuration guide), you or your administrator
made many other decisions, such as the language in which Mifos is displayed to you. If you are
looking for ways to control Mifos behavior and do not see them shown here, check the
configuration file again.
We recommend that you make the decisions in this order, if they apply to your situation:
1.
2.
3.
4.
5.
6.
7.
8.
9.
10.
11.
12.
12
Create any additional fields that you will need to create offices
Create and/or view an existing MFI structure, including all offices
Create roles and permissions for system users
Create system users
Create rules for data display (labels, lookup options, additional fields)
Define accepted payment types
Create fees
Create fund types
Set product categories
Create checklists (optional)
Create holidays
Define products (loans and savings accounts)
HOW TO SET OFFICE STRUCTURE
Your MFI can have as many as five levels of offices, which can be organized according to
geographical or functional divisions. All users and clients of the MFI must be attached to
offices.
Head office
Regional office
Subregional office
Area office
Branch office
The head office is the main or parent office for an MFI. Mifos automatically creates it, and
there can be only one in an MFI. During initial configuration (see the Configuration guide), you
must decide on specifications for at least one branch office; this is the level at which all client
interactions take place. You can also decide on specifications for the other three types of
offices, which are optional.
The following screenshot shows how to choose which levels of offices you want in Mifos.
INSERT SCREENSHOT HERE OF VIEW OFFICE HIERARCHY
Once you have decided how many levels of office to have and have configured them, you can
add more instances of each of them, if you have the appropriate permissions.
Once you have defined an office as a head office or branch office, you cannot change it to a
different office type, such as regional office, sub regional office, or area office. However, you
can change the offices of these three optional types to any other level except for the head
office level.
TIP: If you work in an area office or a head office and also want to offer services directly to
clients, you must create a "virtual branch office" and assign clients to it.
To view and update the existing office hierarchy, click Admin > View Office Hierarchy.
13
HOW TO WORK WITH OFFICES
How to view existing offices
How to define an office
How to change the details of offices
Once you understand the current hierarchy of offices, you can view existing offices, define
new ones (if you have the appropriate permissions), and change the specifications for existing
offices.
HOW TO VIEW EXISTING OFFICES
Click Admin > View Offices. You might see a screen like this:
If a level of office is checked (this is set during configuration, see How to Set Office Structure),
it is possible to create offices at that level.
Click the name of any office to see details about it, as shown below.
HOW TO DEFINE AN OFFICE
You can define an office two ways:
14
From the previous screen, you can click the Define new xxxx office link, where xxx is
the type of office.
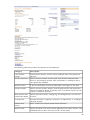
You can click Admin > Define New Office.
Either way, you see this screen next:
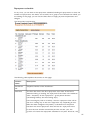
Enter information using the descriptions in the following table:
Box
Office details
Office name
Office short name
Office code
Office type
Parent office
Description
The name of the office
A short name for the office
The office code
Area Office, Branch Office,
etc.
The office that is a level higher
in the office hierarchy
Example
Kakakpura
knkp
Code 1
Area Office
Office 1
Office address
#224 Wheeler Road, NGEF
Layout,
Cooke Town, Bangalore,
Office address
Karnataka, India, 560090
+91 80 23456787
Additional information
Type additional custom
15
Custom field
information in fields 1-6. See
How to define and change
additional fields for information
on how to create custom
fields.
1. Click Preview to check your entries.
2. If you want to change anything, click Edit Office Information to return to the earlier
screen.
3. When the entries are correct, click Submit to save them. (If you want to discard all
information about this office, click Cancel.)
The new office appears in the display of offices you can see when you click Admin >
View Offices.
HOW TO CHANGE THE DETAILS OF OFFICES
1. From the details screen for a specific office, click Edit Office Information. Use the
table above for information on how to fill in new information for the office details.
2. Click Preview to review your changes. If you want to make further changes, click Edit
Office Information, make those changes, and click Preview again.
3. When you are satisfied with your changes, click Submit to save the changes.
16
HOW TO WORK WITH ROLES,
PERMISSIONS, AND SYSTEM USERS
Personnel hierarchies and office hierarchies
How to work with roles and permissions
How to work with system users
Before you create the system users (such as loan officers) who will deal directly with clients,
you must decide what their roles are and what permissions they will have. You must have
appropriate permissions to create roles.
Before beginning, note the following terms:
Activity: any system action that a user might perform, such as creating a new system
user
Permission: authorization to execute an activity
Role: a named set of permissions for a particular user
Data scope: a set of permissions for a role, determined by the user’s place in the
personnel hierarchy and in the office hierarchy
PERSONNEL HIERARCHIES AND OFFICE HIERARCHIES
The personnel hierarchy has two levels:
The Loan Officer has a data scope that is limited to his/her clients, which only she or he
is able to modify as appropriate. The Loan Officer is able to view clients assigned to
other Loan Officers but cannot modify the information for them. A Loan Officer can be
attached to only one branch. If necessary, you can create the same Loan Officer in a
different branch as the same user, but in the different branch this officer must have a
different system ID.
The Other level hierarchy has no restrictions and has unrestricted access subject to the
office hierarchy explained below.
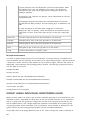
The following table illustrates how these two hierarchies are related.
User's office
hierarchy
Personnel
hierarchy
Permission
Applies to
branch B1
Applies to
Branch B2
Branch B1
Loan officer
Edit MFI and personal
information**
Yes*
No
Branch B2
Other
Edit MFI and personal
information**
Yes
No
Headquarters
Other
Edit MFI and personal
information**
Yes
Yes
Branch B2
Loan officer
Edit MFI and personal
information**
No
Yes*
*- Permissions apply only to centers, groups, and clients assigned to the loan officer
**- This is an example of a permission. See the full listing of possible permissions in Default
roles and their activities
17
HOW TO WORK WITH ROLES AND PERMISSIONS
Many system users can have the same role.
How to create a role
1. Click Admin > Manage Roles and Permissions.
If some roles are already defined, you might see a screen like this:
2. To define a new role, click the New Role link.
A screen with many types of possible permissions appears. A partial list looks like this:
3. In the Role Name box, type a name for this role (such as Loan Officer or Branch
Administrator). Note that loan officers can see information only on their clients.
4. If you want to give a role all personnel permissions, for example, check the Personnel
box. If you want to give the role only certain of these permissions, check them
18
individually.
5. When you are satisfied with the permissions you have assigned to this role, click
Submit.
How to change a role
1. Click Admin > Manage Roles and Permissions.
The list of defined roles appears.
2. Click a role to see the screen with all its permissions.
3. Check and uncheck boxes to make any changes.
4. When you are satisfied with the changes you have made, click Submit.
HOW TO WORK WITH SYSTEM USERS
When you create system users (the people who deal directly with clients), they are always
associated with an existing office. Make sure that you have created the office before you
create the system user. You must have appropriate permissions to create and change users.
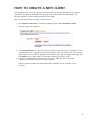
How to create a system user
1. Click Admin > Define New System User.
A list of existing offices appears, organized by type of office. It might look like the
following:
2. Click the office that the new system user will belong to.
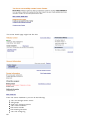
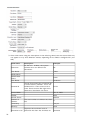
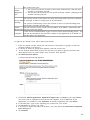
3. Enter user details as explained in the following table. All fields marked with a red
asterisk (*) are mandatory.
Field name
Office
Office
User details
First Name, Middle Name,
Second Last Name, Last
Name
National ID
Description
Example
The office the user is attached to.
Meru
User's full names
Kamalamma, Leela
Any form of authorized ID in your
country that can be used to identify
the person uniquely from the rest of
the population, such as a national ID,
passport number, etc. The user is
uniquely identified using the
combination of the government ID,
A440/2001
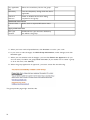
19
Name and Date of Birth.
Email
Date of Birth
Marital Status
Gender
Language Preferred
MFI Joining Date
Address
Address
Language preferred by the user
Address 1, Address 2, Address 3,
City/District, State, Country, Postal
Code, Telephone
12 Jan, 1970
Married
Female
Spanish
12 Dec, 2005
#154, Wheeler Road,
Cooke Town,
Bangalore, Karnataka
India
560045
Permissions
User Title
User Hierarchy
Roles
The user's title
CFO
Defines the user's data scope in the
Other
system
Select the authorized role(s) to assign Manager; Admin
to the user. The user can be assigned
more than one role.
Login Information
User name
The name must be unique in the entire kamalammal
system.
Password, Confirm password The password must be at least 6
*
characters.
Additional Information
Custom fields 1-6
Type additional custom information in
fields 1–6. See “How to define and
change additional fields” for information
on how to create custom fields. LINK
HERE
4. When you have filled out all appropriate fields, click Preview to review your work.
5. If you want to make changes, or if any error messages identify fields that you have not
specified, click Edit User Information, make those changes, and click Preview again.
6. When you are satisfied with all details, click Submit. (If you decide not to create a
system user at this time, click Cancel.)
You then see a message confirming the new user, including that user's system ID
number. It might look like this:
How to view existing system users
1. To see the details on any existing system user, click Admin > View System Users,
type the name of the user, and click the Search button.
20
2. All users with that name appear, identified by their office.
3. When you see the one you were searching for, click that name to see details on that
user.
How to change a system user
1. Search for details on a system user in any of the following ways:
In the Admin screen, type the system ID for the user in the box in the left navigation
panel, and click Search.
From Admin > View System Users, type the name of the user and click Search.
In the user details screen that results, click Edit User Information. (If you want to see
changes that have been made to this user before now, click View Change Log.)
If you want to make any notes about the user, click the Add Note button; type a note in
the Note box; click Preview to review the note; if you want to change the note, click Edit,
make the changes, and click Preview again; when you are satisfied with all the changes, click
Submit.
Make any changes necessary in the screen that appears, and click Submit.
21
HOW TO DEFINE AND CHANGE FEES
How to define a fee type
How to view existing fee types
How to change a fee
Your MFI can charge customer fees for the various services you offer. Reasons for charging a
fee can vary from one MFI to another.
Mifos gives flexibility to MFIs and branches to define fee instances to meet their requirements.
Examples of fee instances are a client creation fee, a training fee, and an account creation fee.
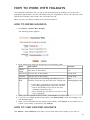
HOW TO DEFINE A FEE TYPE
1. Click Admin > Define New Fees.
You see a screen like the following:
2. Enter specifications using the descriptions in the following table:
Field
Description
Fee name Name for the fee
Example
Training
fee
Fee
applies to
Level of organization where this fee will apply
Center
Default
fee
Check if fee is charged to all
Check
How often the fee is assessed: Period (every month, for example) or
One Time.
22
One
Frequency
One Time.
If you select One Time, in the list below it, select the time at which this
fee will be charged. In the Amount box, type the amount of the fee
One
time
Use this if you want to calculate the fee as a fixed amount or a
percentage of another amount.
Calculate
fee as
If you have configured Mifos to use multiple currencies for loan
products, you can specify the currency for a fixed-amount loan fee.
A given fee can be applied multiple times to a customer account.
Interest is never charged on the fee amount.
The system will match the periodicity of the fee to the meeting
schedule or repayment schedule, depending on whether it’s a client fee
for example (tied to meeting schedule) or a loan fee (tied to repayment
schedule).
5 % of
loan
amount
Fees are computed automatically by the system.
GL Code
General ledger code that applies to this fee (these codes are set
during configuration)
3. When you have made all your decisions, click Preview to see a summary.
4. If you have skipped any required fields, you see an error message such as the following:
5. Fix any errors in the Define New Fees screen.
6. When you are satisfied with the fee, click Submit to save it. (If you decide not to create
a new fee at this time, click Cancel.)
HOW TO VIEW EXISTING FEE TYPES
Before creating any new fees, look at the existing fee types to see if the one you want
already exists.
Click Admin > View Fees.
You might see a screen like this:
23
HOW TO CHANGE A FEE
1.
2.
3.
4.
24
From the View Fees screen, click an existing fee to see its details.
Use the information above to decide how to change the details for this fee.
Click Preview to see a summary of the fee details.
When you are satisfied, click Submit to save the new fee.
HOW TO APPLY FEES/CHARGES
Your MFI can charge fees for any service, such as membership and loan processing. These fees
and charges can be collected from centers, groups, and clients. To apply charges, follow these
instructions:
1. If the fees are for the services provided to a center, group, or client, in any Search box,
type the name of the center, group, or client and click Search. In the list that appears,
click the link for the correct one. In the details page that appears, in the Account
Information and Center/Group/Client charges section, click View Details and then
Apply Charges.
2. If the fees are for a specific loan account, in any Search box, type the ID for the
account and click Search, or navigate to that account from the center/client/group
details page. Click the link that appears for that loan. In the details page that appears, in
the Transactions box in the upper right corner, click Apply Charges.
3. Click Apply Charges. A screen like the following appears:
4. In the Select Charge Type list, click the appropriate charge. If there is a set amount for
this charge, it appears in the Amount box.
5. In the Amount box, type the amount to apply.
6. Click Submit.
The charge now appears in the Upcoming Charges and the Recent Account Activity list. It
will appear in Transaction History when posted.
25
HOW TO WORK WITH FUNDS
How to view existing funds
How to define funds
How to edit fund names
A certain number of fund codes are included in Mifos. You can associate these codes with
specific named funds (such as funds made available by donors) that you use for loans and
other services.
HOW TO VIEW EXISTING FUNDS
1. Click Admin > View Funds.
2. A list of funds and their codes appears. It might look like this:
HOW TO DEFINE FUNDS
If you have the appropriate permissions, you can define a new fund and assign it a fund code.
This fund is then available when you create a loan product. You can also assign a new fund to
a loan account after it has been created.
1. Click Admin > Define New Fund. A screen like this appears:
2. Type the name of the fund.
3. In the list of fund codes, click the appropriate code.
4. Click Preview to review the details of the fund. If you want to change any details, click
Edit Fund Information, make the changes, and click Preview again.
5. When you are satisfied with the fund details, click Submit.
26
HOW TO EDIT FUND NAMES
1. From the Admin > View Funds screen, click the Edit button for the fund you want to
change.
2. In the Name box, type the new name for this fund. (You may not change the code for
this fund.)
3. When you have made changes, click Preview to review your changes.
4. If you want to make further changes, click Edit Fund Information, make those changes,
and click Preview again.
5. When you are satisfied with the changes to the fund, click Submit.
27
HOW TO WORK WITH USER CHECKLISTS
How to define a checklist
How to view existing checklists
How to change a checklist
Checklists are lists of things that should be done before an action is completed.
If you have the appropriate permissions, you can set up checklists that your users will see
every time they start an action, such as approving a loan. The checklist serves as a reminder
to the user to see that all processes are completed. Checklists are defined by the head office
and associated with certain states of customer records or accounts.
For example, if the head office defines a checklist for the state “Pending approval” of a loan
account, every time a user attempts to change the state of a loan account to “Pending
Approval” (no matter what the state of the loan application was up to this point), the checklist
appears.
The user can then go through the list and make sure that all items on the checklist have been
satisfied. Each state for clients, groups, and products can only have one checklist attached.
Note: You can change an existing checklist, but you may not delete it.
HOW TO DEFINE A CHECKLIST
1. Click Admin > Define New Checklist. (You can also click Admin > View Checklists
and click the Define a New Checklist from that screen.). The following screen appears.
2. Enter information about the checklist using the descriptions in the following table:
Field
28
Field
name
Name
Type
Description
Example
Type a unique name for the checklist
Chk
Delete
Member
Click the type of checklist you want to create from the list of
values. The list includes: Center, Group, Client, Loan, Savings.
Select the status that the checklist will be displayed for, if that
Displayed status is attached to the type above.
When
For example, if the checklist type is Clients and the status is
Moving
Pending Approval, the checklist is displayed whenever any client
Status To record status is changed to Pending Approval.
Items
Type the text for the checklist item and click Add>> to include
the item in the checklist below the item field. The text can
accept a maximum of 250 characters. The checklist can have any
number of check items defined for it.
All the listed check items will be considered mandatory and will
have to be checked before the status change can be accepted by
the system.
Client
Pending
Approval
The
member
has been
registered
Remove To remove a checklist item, click the item and click Remove
Selected Selected.
3. When you have finished typing all the items in the checklist, click Preview to review the
list.
4. If you want to change anything in the checklist, click Edit Checklist Information, make
the changes, and click Preview again.
5. When you are satisfied with the checklist, click Submit. (or click Cancel if you decide
not to create a checklist at this time)
HOW TO VIEW EXISTING CHECKLISTS
1. Click Admin > View Checklists.
If any checklists are defined, they appear, divided by type. The screen might look like
this:
29
2. To see the details of a checklist, click the link for that checklist.
HOW TO CHANGE A CHECKLIST
From the Admin > View Checklists screen, click the link for a checklist, and then click Edit
Checklist Information. Follow the instructions above to make and save changes.
30
HOW TO WORK WITH HOLIDAYS
The repayment schedules that you set up can be interrupted by holidays. If you have the
appropriate permissions, you can add holidays for your organization and set the rules for when
repayments ordinarily due on that due will actually be due.
Note: You may not delete a holiday once you have added it.
HOW TO DEFINE HOLIDAYS
1. Click Admin > Define New Holiday.
The following screen appears.
2. Enter information using the descriptions in the following table:
Field
Description
Example
Holiday
name
The name of the holiday
Tet
From Date The first day of the holiday
04-08-2010
To Date
05-08-2010
The last day of the holiday
Repayment If repayments are due during the holiday, how to
Rule
calculate when they are due afterward. Choices are:
Next
Meeting/Repayment
Same Day: no change to repayment schedule
Next Meeting/Repayment: payment due that
falls on this holiday is now due at the next
scheduled repayment date
Next Working day: payment is now due on the
next working day
3. When you have specified holiday details, click Preview to review them.
4. If you want to change details of the holiday, click Edit Holiday, make the changes, and
click Preview again.
5. When you are satisfied with the details of the holiday, click Submit. (If you decide not to
create a new holiday at this time, click Cancel.)
HOW TO VIEW EXISTING HOLIDAYS
Click Admin > View Holidays. From here, you can click Add a New Holiday if you want to
31
create a new one; follow the instructions above.
32
HOW TO DEFINE ACCEPTED PAYMENT
TYPES
For all kinds of payments (fees from clients/groups/centers, loan disbursements/repayments,
and savings withdrawal/deposits), you can specify what forms of payments you will accept. By
default, Mifos puts cash, cheque, and voucher as accepted choices. You could specify additional
payment types to choose from as well (click Admin > Define Lookup Options to do this).
Once you have defined them as lookup options, you can decide which ones are accepted at
present, and you can change these choices at any time.
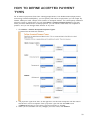
1. Click Admin > Define Accepted Payment Types.
A screen like the following appears:
2. The payment types that show in the right box are the ones accepted, and the ones in
the left box are not accepted. Click a payment type and use the Add>> and
<<Remove buttons to move that type from one box to another.
3. When you are satisfied with any changes you have made, click Submit.
33
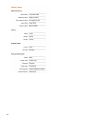
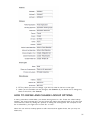
HOW TO VIEW ORGANIZATIONAL
SETTINGS
It can be helpful to see all of the settings for your organization on one screen. If you click
Admin > View Organizational Settings, you will see a screen something like this:
These are all the settings you specified during the configuration process. To change them,
return to the configuration guide and follow instructions.
34
HOW TO SET RULES FOR DATA DISPLAY
How
How
How
How
to define and change labels
to define and change lookup options
to specify that fields be mandatory and/or hidden
to define and change additional fields
HOW TO DEFINE AND CHANGE LABELS
When you or an administrator configured Mifos, you chose the language that the software
uses for its display. All the labels for fields, boxes, commands, etc., are in that language. In
addition, at any time you can change some of these labels to terms that are more familiar to
your users and clients. For example, you might call a Subregion a Division, or you might call a
Center a Centre. You might also define labels for office hierarchies and the names of account
statuses. If you change a label, every instance of that label in Mifos is also changed.
Follow these instructions to change labels:
1. Click Admin > Define Labels.
A screen appears showing all current labels, with a box to type any changes. The whole
screen (in two pieces) looks like this:
35
36
2. For any labels you want to change, type the new label in the box to the right.
3. When you are satisfied with the changes, click Submit. (If you decide not to change any
labels at this time, click Cancel.)
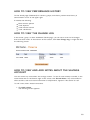
HOW TO DEFINE AND CHANGE LOOKUP OPTIONS
In many procedures within Mifos, you choose among items in a list. These are called "lookup
options." For some of these lists, you can control the items that appear there to fit your local
circumstances, either by adding new options or editing the existing ones. For example, in the
list of salutations, you might want to add "Sri" or "Rev."
Note: You can add new lookup options or edit the ones that appear there, but you may not
delete any.
37
Follow these instructions to change lookup options:
1. Click Admin > Define Lookup Options.
A screen appears showing all current lookup options for lists that you can change. This
screen (in two pieces) looks like this:
38
2. To add a lookup option, click that option and click Add.
A screen appears with an empty box for that option.
3. Type the new option and click Submit.
4. To edit a lookup option, click that option and click Edit.
A screen appears with a box showing the current option.
5. Type the changed option and click Submit.
HOW TO SPECIFY THAT FIELDS BE MANDATORY AND/OR
HIDDEN
For many of the fields in Mifos, if you have the appropriate permissions, you can decide
whether a field is mandatory (meaning that the procedure cannot be completed until this field
is filled in) and also whether a field is hidden. For example, if it is essential to fill in the purpose
of a loan before that loan is granted, you can mark the "Purpose of loan" field as mandatory.
If a field such as "Address 3" is unnecessary, you can mark it as hidden.
Note: Before marking a field as hidden, be sure that you will not need it later. MFI records that
were created when the field was hidden may be different from those that are created later
when the field is visible, and this can create problems.
Follow these instructions to make the specifications:
39
1. Click Admin > Define Mandatory/Hidden Fields.
A screen appears showing all fields for which you can make these specifications. These
are grouped:
Fields that are systemwide (they appear everywhere in Mifos)
Fields that are filled with information about clients and system users
Fields that are filled with information about groups
Fields that are used for loan accounts
The screen looks like this:
2. Check and uncheck the boxes according to your preferences.
3. When you are satisfied with your specifications, click Submit. (If you decide not to
change the status of any fields at this time, click Cancel.)
Note: If you make a field mandatory, it will always have an asterisk (*) next to it.
HOW TO DEFINE AND CHANGE ADDITIONAL FIELDS
40
You may find that you need additional fields in Mifos; for example, you might need to gather
additional information about a client’s business. If you have appropriate permissions, you can
create new fields and give them certain characteristics, such as making those fields
mandatory or assigning them default values. Not all properties of fields can be changed.
TIP: Consider adding additional fields if you want the information to be collected as part of the
regular MFI workflow. For example, perhaps you want the client’s mother’s name to be
included in any account application. If the information does not need to be collected each time,
but you would like to collect it periodically and save it for comparison (such as annual income),
consider putting this information in a survey. See "How to create a survey" for details.
Note: You can add new fields or edit the ones that appear there, but you may not delete any.
Follow these instructions to create new fields:
1. Click Admin > Define Additional Fields.
2. The following screen appears:
3. Enter information using the descriptions in the following table:
Field
Category
Label
Mandatory
Data Type
Default Value
Description
The category that fits this field.
The label that will appear for this field in Mifos.
If you want this field to be mandatory (meaning that
the procedure cannot be completed without filling in
this field), check this box.
Numeric or Text. If you click Numeric and the user
types text in this field, they will see an error message.
The value that will appear if the field if the user does
not alter it.
4. When you have made all specifications, click Preview.
5. Review the specifications; if you want to change them, click Edit Additional Field, make
the changes, and click Preview again.
6. When you are satisfied with all the specifications, click Submit. (If you decide not to add
an additional field at this time, click Cancel.)
You can also change these additional fields later. Click Admin > View Additional Fields, click
the group in which this field appears, and click Edit for the specific field you want to change.
41
Follow the instructions above to make your changes.
42
HOW TO VIEW SYSTEM INFORMATION AND
MANAGE A MIFOS SHUTDOWN
How to view system information
How to manage a Mifos shutdown
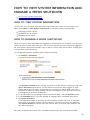
HOW TO VIEW SYSTEM INFORMATION
At any point, you can check the basic information about the system you are using to run
Mifos. Click Admin > View System Information to see items such as the following:
Operating system version
Application server version
Database server name
HOW TO MANAGE A MIFOS SHUTDOWN
When you need to shut down Mifos (for upgrades or maintenance, for example), you must give
users a chance to finish their work first, and you must prevent any new users from logging on.
For that reason, the process includes ways to see how many users are currently working and
to notify them of the shutdown.
To manage the shutdown of Mifos, follow these instructions:
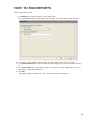
1. Click Admin > Shutdown.
A screen like the following appears:
The Shutdown Status shows whether a shutdown of the system is planned or not. The
Active Sessions section shows you the names of all system users logged on, their
branch office, and the action or page they are involved in in Mifos. When you start a
shutdown of Mifos, all active sessions will see a notification at the top of their screens
indicating that a shutdown is imminent.
2. To be sure that you are seeing all active sessions of Mifos, click the Refresh button.
3. In the Schedule In box, type the number of seconds' delay until Mifos shuts down.
4. Click Start Shutdown.
In the specified number of seconds, all active sessions of Mifos will have to complete
their work, and no new sessions can be started. If you need to cancel this operation,
click Cancel Shutdown. Active users will then be able to continue their sessions, and
new users can log on.
Now that all sessions have shut down, the Mifos administrator can stop the entire Mifos
43
application.
44
HOW TO MANAGE
PRODUCTS
21. HOW TO SET PRODUCT RULES AND ATTRIBUTES
22. HOW TO DEFINE NEW AND CHANGE EXISTING
LOAN PRODUCTS
23. HOW TO MANAGE THE PRODUCT MIX
24. HOW TO DEFINE AND CHANGE NEW SAVINGS
PRODUCTS
45
HOW TO SET PRODUCT RULES AND
ATTRIBUTES
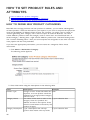
How to define new product categories
How to view and change existing product categories
How to view and change the lateness definition and the dormancy definition
HOW TO DEFINE NEW PRODUCT CATEGORIES
Most MFIs have savings products and loan products. In addition, you can define subcategories
of these products. These can be useful in your reports, if you want to compare the repayment
rates and profitability of different kinds of loans. For example, you might want to create an
"Income-generating loan" category that is used to report on loans for business. You could
create different products within this category such as "Farm loan" and "Food kiosk loan." A
second category, "Housing loan," might contain different products for "Standard housing loans"
and "Tsunami rebuilding loans." Then you could compare the categories to see which were the
most popular and the most profitable.
If you have the appropriate permissions, you can create new categories. Follow these
instructions:
1. Click Admin > Define New Category.
The following screen appears:
2. Enter information using the descriptions in the following table:
Field
Product Type
Category Name
Category Description
46
Description
Example
Savings or Loan. These hierarchies are Loan
separate, so a loan product cannot be
assigned to a savings product category,
and vice versa.
This name will be used to refer to the 3-year education loan
category when new products are
defined, and also in the reports where
data are summarized or filtered by the
product category.
Type a description that will help
3-year education loan
system users decide who to provide
the product for.
3. When you are finished, click Preview to review your work.
4. If you want to make changes to the category, click Edit Category Information, make
the changes, and click Preview again.
5. When you are satisfied with the details of the category, click Submit. (If you decide not
to add a new category at this time, click Cancel.)
HOW TO VIEW AND CHANGE EXISTING PRODUCT
CATEGORIES
1. Click Admin > View Product Categories.
A list of existing categories appears. It might look like this:
2. To see the details on any category, click its link. From the screen that appears, you can
click Edit Category Information to make changes, as in the procedure above.
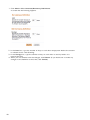
HOW TO VIEW AND CHANGE THE LATENESS DEFINITION
AND THE DORMANCY DEFINITION
If you have the appropriate permissions, you can decide how long to wait after nonpayment of
a loan before Mifos automatically changes a loan account's status from Active in Good
Standing to Active—Bad Standing. The default Lateness value is 10 days, and you can change
this value.
Mifos moves the account back to the Active in Good Standing status when the total amount
overdue has been paid (the complete principal overdue + interest overdue + fee overdue +
penalty overdue).
You can also decide how long, after a period of no deposits or withdrawals (dormancy) in a
savings account, to mark the account as On Hold. The default value is 30 days.
You can change these definitions again at any time.
Follow these instructions:
47
1. Click Admin >View Lateness/Dormancy Definitions.
A screen like the following appears:
2. In the Loan box, type the number of days to wait after nonpayment before the account
is marked Active—Bad Standing.
3. In the Savings box, type the number of days to wait after no activity before it is
marked On Hold.
4. When you are satisfied with the changes, click Submit. (If you decide not to make any
changes to the definition at this time, click Cancel.)
48
HOW TO DEFINE NEW LOAN PRODUCTS
How to use multicurrency features
In Mifos, a loan product is a type of loan account. A single MFI typically has several loan
products--for example, a 4-year housing loan, and a 2-year educational loan. The product
provides the terms and definitions of these different programs to the Mifos system. Loan
products are available to the whole MFI.
If a customer wants to borrow a 2-year educational loan, the MFI uses the 2-year educational
loan to create an account for the customer. The loan account is used to track transactions
related to the loan, which include interest, repayment, and any applicable charges. The loan
account is a specific instance of a loan product, with a specified interest rate and an account
number, and it is owned by a specified MFI customer.
For example, Rashmi and Shalini might both have loans for income-generating businesses. They
are separate accounts (they have different account numbers and different balances), but both
loans are instances of the same product (they were authorized by loan officers under the
same program and share common traits, such as the way that the proceeds are used, the
way interest is calculated, and the general ledger entries they are posted to). Although the
terms of a loan account are governed by the product definition, the loan officer may have
some flexibility to change interest rates and other attributes. Therefore, many of the
properties of a loan product define the minimum and maximum values that the user may
choose when an account of that type is opened.
The purpose of a product is as follows:
To offer MFI personnel a menu of choices of predefined services to offer clients, and the
range of legal parameters where variation is permitted.
To define a link to the accounting system, so that disbursements and receipts can be
credited to the proper general ledger account.
To provide a grouping of different accounts that should be combined for reporting
purposes. Before you can make individual loans, you must define a loan product. All
individual loans created from the same product have the same basic attributes.
Note: If you want to see the loan products that have already been created before you make a
new one, click Admin > View Loan Products and click any of the products displayed on that
screen.
Follow these instructions:
1. Click Admin > Define New Loan Product.
A screen appears with all the specifications for the product. The first part of the screen
looks like this:
49
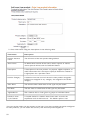
2. Enter information using the descriptions in the following table:
Field name
Description
Product instance
name
The full name of the loan product being defined.
Short name
An abbreviated version of the name, used in reports or menus
where space is limited, such as Collection Sheets.
Description
A description of the loan product: its purpose, eligible recipients, or
other information that will help an employee determine whether it
is appropriate for a particular client.
Product Category
A selection from the list of all the active loan product categories.
Products not assigned to any category are assigned to the Other
category.
Start Date
The full date after which loans of this type may be issued.
End Date
The last date on which loans of this type may be issued.
Applicable For
Click whether this is a loan given to groups or individual clients.
Include in Loan
Cycle Counter
A Yes/No choice for whether these loans count towards the
experience level of this borrower. The default option is Yes.
The next section deals with the amount of the loan. If you have multiple currencies configured
for loan products, you can select the currency that the loan product applies to.
50
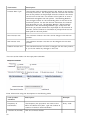
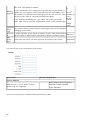
Enter information using the descriptions in the following table:
Field
Description
Example
Calculate Loan
Amount
The way the loan should be calculated:
Same for All Loans
Same for All Loans: The loan amount does
not vary, and the loan history is not taken
into consideration.
By Last Loan Amount: The loan amount
depends on the amount of the last loan this
client or group received. After a successfully
repaid loan, the amount of money available
for the next loan increases.
By Loan cycle: The loan amount depends on
the experience of the borrower (prompt or
late repayment, for example) with previous
loans. The larger the number of successfully
repaid loan cycles, the larger the amount of
money available for the loan.
Min Amount
The smallest amount that a loan of this
type may be granted for.
50
Max Amount
The largest amount that a loan of this type
may be granted for.
300
Default (Standard)
Amount
The typical amount that a loan of this type
may be granted for.
150
The next section deals with interest rates. The loan product sets up a range of interest rates;
a manager can specify a rate within this range for an individual loan instance.
Enter information using the descriptions in the following table:
51
Field name
Description
Interest Rate Type
The formula used to calculate interest due, based on the amount
of money borrowed. For example, the Flat rate sets the interest
due as the product of the principal times the interest rate times
the full term of the loan. The amount can be paid all at once or
distributed throughout the loan period. The Declining Balance
rate charges interest on the outstanding loan at the end of the
instalment period. As the loan amount decreases, the interest
due decreases as well. The Declining Balance—Equal Principal
Instalment is like the Declining Balance type, except that the
borrower pays equal instalments of principal for the duration of
the loan, and the interest is calculated on principal that has not
been paid for the loan period.
Max interest rate
The maximum interest rate that can be charged with this loan
product.
Min interest rate
The minimum interest rate that can be charged with this loan
product.
Default interest rate
The standard interest rate that is charged with this loan product,
if you do not make any changes to the rate.
The next section deals with the repayment schedule.
Enter information using the descriptions in the following table:
Loan product
attribute
Description
Example
Frequency of
Instalments
The frequency the payments are made to the
MFI. In the Recur Every Box, type the number of
weeks or months in each instalment.
Every week
Calculate # (number)
Click one of three choices:
52
of Instalments
Same for all loans : The number of instalments
does not vary.
By last loan amount : The number of
instalments depends on the amount of the last
loan this client or group received.
By loan cycle : The number of instalments
depends on the experience of the borrower
(prompt or late repayment, for example) with
previous loans.
Max # of
Instalments
The maximum number of instalments in which
the loan can be repaid.
20
Min # of Instalments
The minimum number of instalments in which
the loan can be repaid.
10
Default # of
instalments
The default value entered in the number of
instalments when defining a loan account. The
user will be able to change the instalments value
when defining a loan account based on this loan
product.
15
Grace Period Type
An initial grace period is the time between the
disbursal date of a loan and the collection of the
first regular payment.
Grace on All
Repayments
Click one of the following choices for the type of
extra time allowed for repayment:
None : No extra time is allowed.
Grace on All Repayments : The client is not
required to start repayment until the grace
period ends, and interest is not charged during
this period. That is, extra time is given for both
principal and interest.
Principal-only Grace : Extra time is allowed
only for the principal, not the interest of the
loan. The client must make regular interest
payments but is not required to make payments
against the principal during the grace period.
Grace Period
duration
(instalments)
This is the number of initial due dates at the
beginning of the loan when no payment is due.
The first payment would be due on the next
instalment date.
3 (first
payment due
at period 4)
Interest deducted at
disbursement
Applicable only for flat -interest loans. If
Interest Deducted at Disbursement” is clicked,
the grace period option will not be enabled for
such loan products. If this attribute is set to On
for a product instance, the first repayment date
is the same as the loan disbursement date.
Grace period is not applicable since the
repayment starts with loan disbursement.
Yes
53
Principal due on last
instalment
Check if interest is collected first and principal is
collected at the last instalment.
Yes
The next section deals with any fees that are attached to this loan.
1. In the box on the left are all fees currently defined in Mifos. The box on the right
contains any fees applied to this loan. Click any fee on the left and then click Add>> to
move it to the box on the right. You can add more than one fee to this loan product. To
remove the fee from this loan product, click it in the box on the right and then click
<<Remove.
The next section deals with accounting details for the loan product. These details are sent to
an external accounting application to keep track of the sources of funds and general ledger
processing (interest/principal).
1. In the box on the left are all funds currently defined in Mifos. The box on the right
contains any funds used as sources for this loan. Click any fund on the left and then click
Add>> to move it to the box on the right. You can add more than one fund to this loan
product. To remove the fund from this loan product, click it in the box on the right and
then click <<Remove.
2. The Product GL Code refers to general ledger codes set at the time of configuration.
Every transaction has a corresponding GL code for further financial tracking. To apply a
GL code to the interest for this loan product, click a code in the Interest list. To apply a
GL code to the principal for this loan product, click a code in the Principal list.
3. When you are done setting up the loan product, click Preview to review your work.
4. If you want to make changes. click Edit Loan Product Information and make changes.
5. When you are satisfied with all the details, click Submit. (If you decide not to create a
loan product at this time, click Cancel.)
HOW TO USE MULTICURRENCY FEATURES
If Mifos has been set up in configuration to handle more than one currency, then when you
define a new loan product, you can keep the default currency or specify an additional
currency. The same choice appears when you define new fees. All loan accounts created from
54
a loan product use the currency defined for that product.
When you create the new loan product, a currency field appears in the Loan Product Details
section, as shown here:
All fees associated with that loan product must also use the same currency.
When the user chooses a loan product to create a loan account from, the currency for that
product appears in the definition of the product.
55
HOW TO MANAGE THE PRODUCT MIX
If you have the appropriate permissions, you can decide which types of products a given client
or group can mix. In this way, you can restrict clients from having active loans or savings
accounts of different products at the same time.
For example, if you have three different loan products (A, B, and C), you can make a rule that
if a client has loan A, they can have loan B but not C.
To establish the mix of loans and savings products that you want to allow, follow these
instructions:
1. Click Admin > Define Products Mix.
The following screen appears:
2. Enter information using the descriptions in the following table:
Field
Description
Product Type
Savings or Loan
Product Name
Click a loan product or savings account product;
you can then restrict the types of other loans or
savings accounts that an individual client or group
can have in addition to this product.
Remove Not Allowed
Products
All other products in this category are by default
in the allowed section (to the right). To mark a
product so that it cannot be used by a client/group
at the same time as the Product Name you chose,
click that product and click the <<Remove button.
The product moves to the box on the left.
To cancel the restriction and allow a product to be
offered at the same time as the original Product
56
name you chose, click that product and click
Add>>.
That product moves to the box on the right.
3. When you have made your choices, click Preview to review your work.
4. A list of products that are allowed appears, follow by the list of products that are not
allowed in combination with the product you originally chose.
5. To change this product mix, click Edit Product Mix Information, make changes, and
click Preview again.
6. When you are satisfied with the product mix, click Submit. (If you decide not to make
any changes to the product mix at this time, click Cancel.)
To change an existing product mix, click Admin > View Product Mix, click the link for the
product you want to change, and click Edit Product Mix Information. Make your changes, and
click Submit when you are done.
57
HOW TO DEFINE AND CHANGE SAVINGS
PRODUCTS
How to change savings products
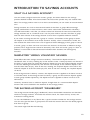
Before you can create individual savings accounts, you must define a savings product. All
savings accounts are created from these products and inherit their characteristics.
Savings products can be set up for mandatory or voluntary deposits. If the account holder
does not make any deposits to or withdrawals from the account in a certain period of time
(the default is 30 days), the account becomes dormant.
Note: If you want to see the savings products that have already been created before making
a new one, click Admin > View Savings Products and click any of the products displayed on
that screen. From that display, you can make changes to the existing savings products.
Follow these instructions:
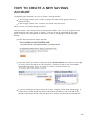
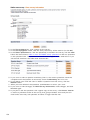
1. Click Admin > Define New Savings Product.
A screen appears with all the specifications for the product. The first part of the screen
looks like this:
I
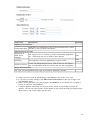
2. Enter information using the descriptions in the following table:
Field name
Description
Product instance The full name of the savings product being defined.
name
Short name
An abbreviated version of the name, used in reports or
menus where space is limited such as the Collection Sheet.
Description
A description of the savings product: its purpose, eligible
recipients, or other information that will help an employee
determine whether it is appropriate for a particular client.
Product
Category
A selection from the list of all the active savings product
categories.
58
Start Date
The full date after which products of this type may be
issued.
End Date
The last date on which products of this type may be issued.
Applicable For
Click whether this is an account given only to centers,
groups, or individual clients.
The next section sets rules for deposits and withdrawals.
3 Enter information using the descriptions in the following table:
Savings
Description
product
attribute
Type of deposits Click whether deposits are voluntary or
mandatory. A voluntary deposit means
that the client(s) or group(s) assigned this
product are not obliged to save; a
mandatory product means that savings
deposits must be made as defined in the
product.
Recommended Type the recommended value of each
amount for
deposit. If the type of deposit is
deposit
mandatory and the savings account
requires a monthly deposit, for example,
the client(s) or group(s) must make a
savings deposit on a monthly basis.
Recommended If you chose Groups in the Applicable For
Amount Applies list above, you can choose who the
to
recommended savings amount applies to:
the individual or the group. That is, the
group could be responsible for the deposit
amount, dividing it up among the clients in
the group, or each client could be
individually responsible for the deposit
amount.
In a center savings account, the
recommended amount always applies to
the client.
Max amount per Type the largest amount of money that
withdrawal
can be withdrawn from the account at
any given time.
Example
Mandatory
1000
Complete
Group
200
The next section deals with setting interest.
59
4 Enter information using the descriptions in the following table:
Savings product
attribute
Description
Interest rate
Type the applicable
interest rate.
Example
Balance Used for Interest Select the type of
Minimum Balance
Rate Calculation
balance that will be used
for interest: minimum
balance or average
balance. Compound
interest is the only
method supported as a
basis of calculating
interest. If you change
this setting, the change is
reflected in the open
accounts as soon as the
change is detected by
Mifos.
If the attribute is
modified, the interest
installments should be
recalculated.
Time Period for Interest
Rate Calculation
60
Enter the time period
Computation: A =
when the interest can be P(1+r/n)
calculated. 1 month
Where:
means that the interest Where:
rate will be calculated at P = principal amount
the end of every month. (initial amount)
r = annual rate of
interest (as a decimal)
A = amount of money
accumulated including
interest
n = number of times the
interest is compounded
per year
Frequency of Interest
Posting to Accounts
Type the frequency of
1 month = every month.
posting into the accounts Posting is always at the
(for example, interest is end of the period defined.
posted to the savings
accounts once a month).
Changes to this account
will affect future
transactions only.
The frequency of deposit
is inherited from the
client's meeting
frequency.
Min balance required for Enter the smallest
10
interest rate calculation balance that the account
must have before it can
accrue interest. If the
amount is lower than the
amount entered here,
interest will not be
applied.
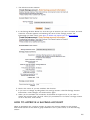
5. In the Accounting section, if you have general ledger codes for deposits and interest,
click those codes in each list.
6. When you have made all choices for this savings product, click Preview.
7. Review your choices. If you want to make changes, click Edit Savings Product
Information, make changes, and click Submit. (If you decide not to create a savings
product at this time, click Cancel.)
61
HOW TO CHANGE SAVINGS PRODUCTS
If you change savings products that are already in use, the changes affect all future savings
accounts created from those products, but they do not affect savings accounts that were
created before. Follow these instructions:
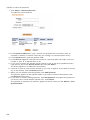
1. Click Admin > View Savings Products.
A screen appears like the following:
2. Click the link for the product you want to change.
3. In the screen that appears, review the terms of the product.
4. Click Edit Savings Product Information and proceed as in the procedure above, clicking
Submit when you are done.
62
HOW TO MANAGE GROUPS,
CENTERS, AND CLIENTS
25. CENTERS, GROUPS, AND CLIENTS OVERVIEW
26. HOW TO CREATE A NEW CENTER
27. HOW TO CREATE A NEW GROUP
28. HOW TO CREATE A NEW CLIENT
29. HOW TO CHANGE A MEETING SCHEDULE FOR A
CENTER
30. HOW TO VIEW AND CHANGE DETAILS OF CENTERS,
GROUPS, AND CLIENTS
31. HOW TO CHANGE THE STATUS OF CENTERS,
GROUPS, AND CLIENTS
32. HOW TO VIEW PERFORMANCE HISTORY
33. HOW TO ATTACH AND COLLECT SURVEYS
63
CENTERS, GROUPS, AND CLIENTS:
OVERVIEW
Below the level of the branch, your MFI can have centers and groups to organize and empower
clients. Usually, a single Loan Officer works in a center and has responsibility for several
groups. If there is a center, it determines the meeting schedule (if there is one) for all the
groups contained in it. (Otherwise, the branch does this.)
Groups include clients; they can sometimes act as a unit, as in the case where a group has a
savings or loan account, and all clients in that group contribute to it.
Clients can act on their own, with individual savings and loan accounts, or they can act as part
of a group.
64
HOW TO CREATE A NEW CENTER
A center is a collection of many groups. It is associated with a branch office. A center can
have a savings account, like a group or a client. Groups or clients associated with that center
can make deposits to and withdrawals from such an account, and the center can also pay fees
for accounts.
Follow these instructions:
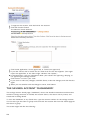
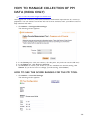
1. Click Clients & Accounts > Create New Center.
A screen appears that might look like this:
2. From the list of branches, click the branch that this center will be associated with.
A screen appears showing the branch office you chose. The first section might look like
this:
3. Enter information about the center using the descriptions in the following table:
Field
name
Description
Branch
The center's parent branch.
selected
Example
Branch 01
Center details
Name
The center's name (make sure that this is unique within the MFI).
Loan
The loan officer assigned to the center. Groups associated with this
officer
center inherit this value.
assigned
Click Schedule Meeting to set the number of times meetings are to be
held within a time period. Groups associated with this center inherit
Fina
Center
Sri Nagesh
The 12th
day of
every third
month
65
month
this value. Click Weeks or Months.
or
If you click Months, set a meeting for a specific day in each period or a
Meeting
specific day of a specific week in each period. If you click Weeks, type The 4th
schedule
the number of weeks between meetings, and in the list next to it, click Tuesday of
the day of the week on which the meeting takes place.
every
second
In the Location of Meeting box, type where the meeting is to take
month
place. Click save to save this schedule and return to the previous page.
Village
store
Collection
The type of collection sheet used for collecting payment from members
sheet
belonging to the center.
type
External A unique identifier of the center in another system. This will be used to
BRA-001
ID
link the center in Mifos system and center's details in another system.
MFI
Joining
Date
Date when the center was first approved and saved in the system.
01/02/2002
The next section is for the address of the center.
Field name
Description Example
Center Address
Address lines 1 -3, city, State, country,
Postal code and Telephone
#224, Wheeler Road, Bangalore,
Karnataka, INDIA, 560090
91 80 23456787
The next sections are for additional information and any fees.
66
Field name
Description
Example
Additional information
Customized fields
Fields that are configured by the system administrator to allow
the MFI to capture more information.
Administrative set fees
Application or
other fee (if
charged)
Fee charged to be a member, process membership application,
etc. These fees are set as default when defined.
2.50
Periodicity
The frequency the fee is applicable in a given period.
Onetime fee
Check to remove
A user can check this box if they wish to remove the default
fee. An unchecked check box means that the fee is applicable.
Apply additional fees
Fee Type, Amount Additional fee type and amounts defined by the MFI.
4. When you have made all specifications, click Preview and review your work.
5. If you want to make changes, click Edit Center Information, make the changes, and
click Preview again.
6. When you are satisfied with your changes, click Submit. (If you decide not to create a
center at this time, click Cancel.)
7. A screen appears confirming the creation of the center and providing a system ID
number. You can use this number to find details on the center (including its performance
data) quickly. The screen might look like this:
67
The center details page might look like this:
From the center dashboard, you can do the following:
View and change center status
Add groups
Open new savings accounts
View closed accounts
Edit center details
Edit meeting schedule
View the change log
68
View performance history
View and attach surveys
View and add notes
Check the appropriate chapters of this manual for information on each of these.
69
HOW TO CREATE A NEW GROUP
A group is a collection of clients that is assigned to a center or a branch (depending on the MFI
hierarchy). It inherits the loan officer and the meeting schedule (if any) from its parent center
or branch.
The group can act to borrow money and hold a savings account, as if it were an individual
client. It can also have an account for group fees (for membership, loan applications, and so
forth). A group can have positions such as President and Treasurer that are assigned to group
members.
Follow these instructions:
1. Click Clients & Accounts > Create New Group.
The following screen appears:
2. In the Center Name box, type the name of the center or branch that this group will
belong to, and click Search.
All centers with that name appear in a list.
3. Click the correct center.
A screen appears for group details, starting with this section:
4. Enter information using the descriptions in the following table:
70
Field Name
Description
Example
Group Name
The name of the group, which must be
unique.
Hope and Effort Group
Formed By
Type the name of the person who
facilitated the formation of the group.
Venkatesh V
Trained
Check the correct box for if a group has
been trained or not.
Yes
Trained On
The date the training was administered.
01/12/2002
External ID
Used to link Mifos group with another
system. This value represents the group
identifier in another system.
GRP-001
The next section is for the address of the group.
Field Name
Description
Example
Group address
Address 1-3, City, Stat, Country, Postal
Code, Telephone
#154, Wheeler Road, Cooke
Town
Bangalore, Karnataka, India
- 560045
+91 80 23549876
The next section is for additional information and fees.
Field Name
Description
Example
Administrative set fees
71
Any applicable
fee
Shows the mandatory fee for the group.
Periodicity
The time frequency during which the fee is
applicable.
Check to
Remove
Check to disable the fee from being
required for the group.
3:07
Additional Information
Custom fields 1 – Fields used to capture MFI custom data.
6
Apply additional fees
Fee type;
Amount
Additional fee types amounts defined by
the MFI for the group.
5. When you have made all specifications, click Preview to review your work.
6. If you want to make changes, click Edit Group Information, make changes, and click
Preview again.
7. When you are satisfied with all changes, you can click Submit for Approval or (if you
are not ready to submit the group) Save for Later. (If you decide not to create a group
at all at this time, click Cancel.)
8. When the group application is approved, you see a screen like the following:
The group details page might look like this:
72
From the group dashboard, you can do the following:
View and change group status
Add clients
Open new savings and loan accounts
View closed accounts
Edit group information
Edit center membership
Edit personal information
View summarized historical data
View the change log
View performance history
View and attach surveys
View and add notes
Check the appropriate chapters of this manual for information on each of these.
HOW TO REASSIGN A GROUP TO A NEW CENTER
73
If it ever becomes necessary, you can reassign a group so that it is now associated with a
different center. Follow these instructions:
1. From the Group Details page of the Group you'd like to re-assign, scroll down to middle
of this page and click Edit Center Membership. (If there is no center, and you are
reassigning the group to a new branch, click Edit Branch Membership.)
The Change Center Membership screen appears.
2. Type the name of the center you want this group to belong to and click Search.
3. The center name appears. Click its link.
4. Review a summary of your change and click Submit.
The group is now included on the page for that center.
Note: The meeting time and Loan Officer of the new center is inherited by the group and all its
members. Groups cannot be transferred unless all the active loan accounts are closed.
74
HOW TO CREATE A NEW CLIENT
The individual client can have savings accounts and borrow money according to the rules of
your MFI. If the client is associated with a group, that client inherits the loan officer, the
meeting schedule, and the meeting location of the group.
Follow these instructions to create a client account.
1. Click Clients & Accounts. In the left navigation panel, click Create New Client.
The following screen appears:
2. In the Group Name box, type the name of the group that this client is assigned to, and
click Proceed. A list of groups by that name appears; click the correct one. If the correct
group name is not on this list (perhaps you mistyped it?), type the group name again and
click Search to try again. When you see the correct group name, click it.
3. If group membership is not required for your client, click that link to proceed.
A screen for information about the client appears.
The first section contains personal information. All fields with an asterisk (*) are
required.
75
3. Enter information using the descriptions in the following table (note that some fields may
not appear or may have different choices, depending on how Mifos is configured for your
MFI):
Field name
Description
Example
Salutation
Mr, Mrs etc. In Mifos, the system
administrator can define more
salutations.
Mr.
First Name
Albert
Middle Name
Second Last
Name
Smith
Last Name
Anderson
National ID
Can be Government ID, or National ID,
or Social Security Number. This is not
editable after a client enters Active
state. Some external IDs might have
characters associated with them.
Date of Birth
Nov-11, 2005
Gender
Male
Marital Status
Number of
Children
76
N-001
Married
The total number of children the client
4
has.
Citizenship
Kenyan
Ethnicity
Arab
Captures the maximum level of
Education Level education the client has attained, for
Graduate
example, Graduate
Activities
The nature of the client's business
Self-owned business
Handicapped
If this field is present, check whether
there is a handicap or not.
No
Poverty Status
If this field is present, click the
appropriate status for the client, if
known.
Very poor
Income
If this field is present, click the
appropriate monthly income for the
client, if known.
200
Photograph
User can upload a photo, which will be
a part of the client details page. The
maximum size allowed is 30KB. Click
Choose File, browse your computer for C:\microfin\photos\smith01.gif
the photograph file, and double-click it
so that the filename appears next to
the box.
Spouse/Father
Name
Relationship,
First Name,
Names of the spouse or father.
Middle Name and
Second Last
Name and Last
Name
Jane Smith, Spouse
The next section is for the address of the group.
4. Enter information using the descriptions in the following table:
Field
name
Description
Example
Address
Address
Address 1-3, city, state, country,
postal code, Telephone
P.O Box 2223, Stanford, California,
94305, +1650-271-2450
The next section is for additional information about the client, if any is required.
77
5. Enter information based on the descriptions in the following table:
Field name
Description
Example
Additional Information
Custom Field 1 - 6
Custom data for the MFI.
The next section is for MFI-related information.
6. Enter information using the descriptions in the following table:
Field
name
Description
Example
MFI related information
Select the loan officer to be assigned to the client. This is
Recruited
applicable if you selected to assign the client directly to a branch;
by
otherwise the value is inherited from the group.
Loan
Officer 1
Define the meeting schedule. This field appears only if you assign
the client directly to the branch; otherwise, the meeting schedule is
Meeting
inherited from the group. A client can be created without a
Schedule
meeting schedule if there is no need for one. Such client's name
will not appear in the collection sheets.
External The client's unique identifier in another system that shares client
ID
details with Mifos.
E003
Trained
Has the client been trained?
Yes
Trained
On
The date when the client was trained.
Dec-12,
2005
The next section is for client fees.
78
7. Enter information using the descriptions in the following table:
Field
name
Description
Example
Administrative set fees
Any fees,
if
Any group or branch fees, such as membership application fees
applicable
Periodicity
The frequency the fee is applicable. Periodicity can be Once,
Daily, Weekly, Monthly, Yearly
8.85
One-time
fee
Check to
Check to remove the application fee.
Remove
Apply
additional
fees
Mifos allows the definition of three custom fee types. Click the
Fee Type;
Processing
applicable fee type from the list and type the amount of the fee
Amount
fee, 3.00
in the Amount box.
The next section is for savings accounts.
8. If you want to create a savings account for this client now, click the name of the savings
product from the Savings Name list. You can create up to three savings accounts.
9. When you have finished, click Preview to review your work.
10. If you want to make changes, click Edit MFI-related Information and make the
changes.
11. When you are satisfied with all the changes, click Submit for Approval. If you want to
submit this client later, click Save for Later; the account goes into a Partial Application
state, and you can build a custom report to find all client records in this state. (If you
decide not to create this client at all at this time, click Cancel.)
A screen appears that might look like this:
79
Note the system ID number for this client, so that you can use it to search for details about
that client later.
The client details (dashboard) page might look like this:
From the client dashboard, you can do the following:
View and change client status
Open new savings and loan accounts
View closed accounts
Edit MFI information
Edit or remove group membership
Edit personal information
View summarized historical data
View the change log
View performance history
View and attach surveys
View and add notes
Check the appropriate chapters of this manual for information on each of these.
80
81
HOW TO CHANGE A MEETING SCHEDULE
FOR A CENTER
Meeting schedules are set when you create a center. If you ever need to change the schedule,
follow these instructions:
1. Click Clients & Accounts
2. In the Search box, type the center name and click Search. In the list that appears, click
the link for the correct center
3. Click Edit Meeting Schedule
4. Change the schedule according to the instructions in How to create a center.
5. Meeting Schedule changes take effect the day after the changes are made. After
changing the meeting schedule, all associated clients and groups with that center will
have an updated meeting schedule the next day. If loan schedules are tied to meeting
schedules, loan repayment schedules will also be updated.
82
HOW TO VIEW AND CHANGE DETAILS FOR
CENTERS, GROUPS, AND CLIENTS
HOW TO EDIT DETAILS
You can change details about a center, group, or client at any time.
Follow these instructions:
1. From any search box, type the name of the center, group, or client, and click Search.
All entities with that name appear; click the correct one.
2. In the Center/Group/Client Information section, click Edit Center/Group/Client Details.
The screen that was filled out when the center, group, or client was created appears.
For information on what each field means, see "How to create a new center", "How to
create a new group" or "How to create a new client".
3. Make any changes and click Preview.
4. If you want to make changes, click the edit button, make changes, and click Submit.
HOW TO MAKE NOTES
In the center, group, or client dashboard (details page), you can record any notes in the Recent
Notes section. To see all notes, click See All Notes. Any notes created about the group,
centre, or client (in the account status or adjustments section, for example) appear here as
well.
To add a note, follow these instructions:
1. Click Add a Note.
The following screen appears:
2. In the Note box, type the note.
3. Click Preview to review your work. If you want to make changes, click Edit, make
changes, and click Submit.
The note now appears in the Recent Notes section.
HOW TO VIEW THE CHANGE LOG
In the center, group, or client dashboard (details page), you can see a record of all changes
83
that have been made. At the bottom of that screen, click View Change Log. It might look like
the following screen:
84
HOW TO CHANGE THE STATUS OF
CENTERS, GROUPS AND CLIENTS
Overview of status states for centers, groups, and clients
How to change the status of a center
How to change the status of groups and/or clients
OVERVIEW OF STATUS STATES FOR CENTERS, GROUPS,
AND CLIENTS
From the details page (dashboard) for centers, groups, and clients, you can change the status
from active to inactive, or vice versa. (Clients and groups can have other statuses as well.)
The procedure is the same for all three entities. A green square next to the center, group, or
client name means that it is active.
HOW TO CHANGE THE STATUS OF A CENTER
The following rules apply when a center becomes inactive:
Any periodic fee linked to the center record is not stopped.
Transactions can still be made.
A miscellaneous penalty or any amount that is due remains due.
The system will not allow users to apply any periodic fee type to the account except for
an upfront fee and any miscellaneous penalty fees.
Follow these instructions:
1. Click Clients & Accounts.
2. In the Search box, type the name of the center and click Search.
3. In the results box, click the name of the center you want.
The details page (dashboard) for that center appears.
4. Click Edit Center Status.
The Change status box appears. It might look like the following screen:
5. Click the button for the new status.
6. In the Note box, type a note explaining why this status is changing.
85
7. Click Preview to review your change.
8. If you want to make further changes, click Edit Status, make any changes, and click
Preview again.
HOW TO CHANGE THE STATUS OF GROUPS AND/OR
CLIENTS
The following table shows the various states that a client can be in:
State
Description
Assigned to the client if the record has been created, but data is incomplete or
Partial
the user does not want the status to be as “Pending Approval”, status can be
application
marked as “Partial Application”.
Pending
approval
Active
Cancel
On hold
This is an optional state and can be omitted during the initial system setup by the
MFI. Record contains all necessary data and is waiting for approval. Before and
after this point, there could be some offline processes, which might govern the
approval process. These processes can be specific to each MFI and will not impact
Mifos functionality.
A record can be saved in this state after the mandatory fields (according to the
attributes table) have been filled.
Client has been Approved and is eligible to open a savings account or apply for a
loan, or is eligible for other products offered by the MFI.
Every client has to have a loan officer to be active.
A
•
•
•
•
client application can be cancelled due to various reasons:
Client can withdraw the application
The application was rejected by an Officer of the MFI
The client is not eligible, as the client has been Blacklisted
A duplicate client record already exists, and thus one record is being cancelled.
This status means:
• No new accounts can be opened for the client.
• Interest in the client’s savings account will keep on accumulating, but no
withdrawals will be allowed. Deposits will be allowed.
• No new loans will be disbursed to the client, but repayments for current loans
will be as scheduled.
On Hold status of a client should be indicated on all the client’s accounts to
ensure that the client is unable to operate the accounts.
On Hold status can either be changed to Closed or Approved. The rules of the
respective status will then be applicable on the record.
Close
A client record can be closed to indicate that the client is not banking with the
branch anymore or a duplicate record for the client exists in the system. The
flags associated with this state are: Transferred, Duplicate Account, Blacklisted,
Left Program, and Other. Once closed, client can reapply again but the client
record has to follow the complete application procedure.
The following table shows the various states that a group can be in:
State
Partial
application
86
Description
If the record has been created, but data is incomplete or the user does not
want the status to be “pending approval”, the status can be marked as
“Partial Application”. Group creation status defaults to this status if
configured by the MFI.
configured by the MFI.
Pending
approval
This is an optional state and can be hidden by the MFI.during the initial
system setup and configuration. The status means that the record
contains all necessary data, and is waiting for approval pending any MFI
manual process.
When a group is created, this is the default status if the user does not
have access to 'approve' status.
Group has been approved and is eligible to open a savings account or apply
Active/Approved for a loan, or for other products offered by the MFI. To be Active, every
Group must have a loan officer assigned.
Cancel
A group application can be canceled due to various reasons, which include
withdrawal of the application; the application was rejected by an officer of
the MFI; the group is not eligible as it has been Blacklisted; or a duplicate
group record already exists and thus one record is being canceled.
If the group status is marked On hold, it will have the following implications:
On hold
Close
New accounts: No new accounts will be opened for the group.
Savings account: Interest in savings account will keep on accumulating
interest, but no withdrawals will be allowed. Deposits will be allowed.
Loans: No new loans will be disbursed to the group, but repayments
for current loans will be as scheduled.
“On Hold” status can either be changed to Closed or
Active/Approved. The rules of the respective status will then be
applicable on the record.
If a group is On Hold, clients and client accounts will not be affected.
A group record can be Closed to indicate that the group is not
banking with the branch anymore, or a duplicate record for the group
exists in the system. The flags associated with this state are:
Transferred, Duplicate Account, Left Program, Blacklisted, and Other.
A group cannot be closed if any client has 'on-hold' or 'active' status.
Once closed, group can reapply again, but the record creation has to
follow the complete application procedure again.
Every time the status of the group is changed to "closed", Mifos
system has to validate if all group accounts have been closed and all
individuals are either reassigned or closed.
Follow these instructions to change the status:
1. Click Clients & Accounts.
2. In the Search box, type the name of the group or client and click Search.
3. In the results box, click the name of the group or client you want.
The details page (dashboard) for that group or client appears.
4. Click Edit Group Status or Edit Client Status.
The Change status box appears. It might look like the following screen:
87
5. Click the button for the new status.
For a group, if you click Closed, click a reason from the list immediately below.
6. In the Note box, type a note explaining why this status is changing.
7. Click Preview to review your change.
8. If you want to make further changes, click Edit Status, make any changes, and click
Preview again.
88
HOW TO VIEW PERFORMANCE HISTORY
Performance history of a center
Performance history of a group
Performance history of a client
On the details page (dashboard) for centers, groups, and clients, performance history is
summarized in a box at the upper right.
PERFORMANCE HISTORY OF A CENTER
For a center, it includes the following:
Number of active clients: Total number of clients belonging to the center, irrespective of
the client status.
Number of active groups: Total number of groups belonging to the center, irrespective of
the group status.
Total loan portfolio: Total original value of all outstanding loans (including all groups' loans
and client loans). This does not include group-funded loan products.
Total savings: All the savings accounts of the center
PERFORMANCE HISTORY OF A GROUP
For a group, it includes the following:
Number of active clients: Total number of clients belonging to the group, irrespective of
the client status.
Amount of last group loan: Last largest group loan disbursed.
Average individual loan size: Sum of active loan amount for all client loan accounts /
Number of active client loan accounts
Total loan portfolio: Total original value of all outstanding loans (including group loans and
all client loans). This does not include group-funded loan products.
Portfolio at risk: The remaining balance of all outstanding loans that have one or more
installments of principal past due more than 30 days / total original value of all
outstanding loans. Principal amounts of loan product loans (not group-funded loan
product) excluding interest.
Total savings: All the savings accounts of the group.
Loan cycle per product: The number of times a loan product has been used for a loan
account. If the group has taken two agricultural loans and three cattle loans, for
example, the performance history displays the following: education loan=2, cattle
loan=3. The counter is incremented when a loan account is approved and decremented
for rescheduled loans or written-off loans.
PERFORMANCE HISTORY OF A CLIENT
For a client, it includes the following:
Loan cycle number: A loan cycle number is incremented when a new loan account is
89
opened for the client. Rescheduling or writing-off a loan decrements the loan cycle count.
Amount of last loan: The most recent loan with "closed-- obligations met" status.
Number of active loans: Loans with 'active in good standing' and 'active in bad standing'
statuses.
Delinquent portfolio: Amount of overdue loan principal / Total original value of all
outstanding loans. Loans with 'active in good standing', 'active in bad standing' statuses
and rescheduled loans are still 'overdue'.
Total savings: All the savings accounts of the client
Meetings attended
Meetings missed
Loan cycle per product: The number of times a loan product has been used for a loan
account. If the client has taken two agricultural loans and three cattle loans, for
example, the performance history displays the following: education loan=2, cattle
loan=3. The counter is incremented when a loan account is approved and decremented
for rescheduled loans or written-off loans.
This data is also viewable from the client and group dashboards, at the bottom, from the View
Summarized Historical Data link.
90
HOW TO ATTACH AND COLLECT SURVEYS
Surveys are ways for loan officers and others working in the branch to collect information
about groups and clients. These surveys can include demographic information (income, family
size, types of business) that might change over time, and they enable you to know your clients
and serve their needs better. The process of attaching surveys is the same for centers,
groups, and clients. The example used here is for a center.
Center workers can ask the survey questions directly from the computer screen, or they can
print a copy of the survey and take it directly to the client. If they use a paper copy of the
survey, they must enter the answers in the computer later.
To create a new survey, follow the instructions in How to create a new survey.
When you are ready to use the survey online (or to enter survey data from the printed copy),
follow these instructions.
1. In any Search box, type the name of a center, group, or client and click Search.
2. In the list that appears, click the link for the correct center, group, or client.
3. In the Center Details screen, click Attach a Survey.
A screen like the following appears:
4. In the Select Survey list, click the survey you want to enter data for and click
Continue. (You can see only the surveys that are available for this center.) The online
form of the survey might appear like this screen:
91
5. The default survey date is today's date. If you need to change this, type the day (XX),
month (XX), and year (XXXX) of the actual survey.
6. In the Surveyed By box, your name appears automatically. Type over this name if
someone else has asked these questions.
7. Click or type a response to each question. If the question is mandatory, you may not
finish the survey until the question is answered.
8. If you need to change answers, click Clear All to erase all of them.
9. When you have answered all questions, click Preview to review the answers.
10. If you want to make changes to the answers, click the Edit button, click Clear All to
erase the answers, click or type the correct answers, and click Submit.
11. In the Surveys box, the name and date of the survey now appear. To see details of that
survey, click the name of the survey.
92
LOAN ACCOUNTS
34. INTRODUCTION TO LOAN ACCOUNTS
35. HOW TO CREATE A NEW LOAN ACCOUNT
36. HOW TO CHANGE THE STATUS OF
(APPROVE/CLOSE) LOAN ACCOUNTS
37. HOW TO DISBURSE (PAY OUT) A LOAN
38. HOW TO MANAGE LOAN ACCOUNT DETAILS
39. HOW TO MAKE TRANSACTIONS FOR A LOAN
ACCOUNT
40. HOW TO TRACK LOAN ACCOUNT HISTORY
93
INTRODUCTION TO LOAN ACCOUNTS
What is a loan account?
Group loans versus client loans
The loan account "dashboard"
Loan account summary
Group loans individual monitoring (GLIM)
WHAT IS A LOAN ACCOUNT?
A single MFI typically has several loan products, for example, a 4-year housing loan, and a 2year educational loan. The product provides the terms and definitions of these different
programs to the Mifos system. Loan products are available to the whole MFI.
If a customer wants to have a 2-year educational loan, the MFI uses the 2-year educational
loan to create an account for the customer. The loan account is used to track transactions
related to the loan, which include interest, repayment, and any applicable charges. The loan
account is a specific instance of a loan product, with a specified interest rate and an account
number, and it is owned by a specified MFI customer.
GROUP LOANS VERSUS CLIENT LOANS
If your MFI is structured to have groups as well as clients, you have a choice of issuing group
loans or individual loans. With group loans, the group as a whole is responsible for repayment
and fees, and each individual in the group has a designated responsibility to pay their part of
the debt.
The benefits of the group include the following:
By vouching for other members of the group, the group does the work of checking the
creditworthiness of each individual in the group.
By co-signing the loan, the group provides insurance of payment by individuals.
The group provides reinforcement, esprit de corps, and encouragement to individuals to
bear their part of the debt responsibility.
THE LOAN ACCOUNT "DASHBOARD"
At any point, you can look at the details of a loan to find out its terms and its current status.
Such a dashboard might look like this:
94
The following table summarizes the sections of the dashboard:
Category
Description
Loan account
header
Loan account number, current status, disbursal date, and purpose of
the loan
Account summary
Shows the loan amount, amount paid, and the loan balance broken
down by the principal, interest, fees, and penalty. It includes a link to
the repayment schedule.
Recent activity
A list of transactions that have taken place with regard to the loan.
Account details
Shows the loan account details, which include interest and repayment
rules and collateral details. It includes a link to a section where you can
create a receipt for payment.
More account and
transaction details
Shows the status history, change log, and change history for the loan
account.
Transactions
Provides the links to applying a payment, an adjustment, or a charge to
the loan account.
Performance
history
Show various loan account performance indicators.
Recent notes
Shows the three most recent notes appended to the loan account, with
additional links to add a new note or view all the notes.
95
LOAN ACCOUNT SUMMARY
The section displays the original loan, the amount paid and the balance for the principal, the
loan interest, and the total fees and penalties on the loan account. These amounts are further
subdivided by the balances for the loan account, the amount paid, and the loan balance. Totals
for the original loan related amount, the amount paid, and the total loan balance appear as
well.
The summary might look like this:
The following table explains the entries shown on this page.
Original loan
Amount paid
Loan balance
Principal
The original loan
amount. This cannot be
updated once the
account has been
approved.
The amount paid
against the principal
up to the present
date.
Original loan minus the
amount paid.
Interest
A computed value
showing the interest due
from the loan account
based on the original
loan amount.
The total interest paid
up to the present
date.
The amount of interest
remaining on the loan.
Fees
The amount expected
from this account
according to the fee
types attached to the
account.
The amount paid
against fees and
miscellaneous fees up
to the present date.
The unpaid fee amount
expected from this
account.
Penalty
Zero at the start of the
loan.
The total penalty
amount paid up to the
present date.
Penalties charged but
not yet paid up to the
present date.
Total
The total of the amounts listed above.
96
The amount paid can
be greater than the
amount calculated in
the original loan if
interest can be
recalculated.
Repayment schedule
At any time, you can look at the repayment schedule (including all repayments to date, the
number of repayments, due dates, and so forth) for a group or an individual loan. While you
are looking at this page, you can use the links there to apply payment adjustments and
charges.
The page might look like this:
The following table explains the entries on this page:
Column
name
Description
Installment
No.
Sequence number of the installment.
Due Date
The first due date is the first repayment start date. If the loan is
disbursed during a meeting, the repayment Start Date is the disbursal
date + frequency of loan repayment + grace period duration
(considering holidays and nonworking days).
If the meeting day falls on a holiday, the new repayment date will be
the next working day or the next repayment day, depending on how
Mifos has been configured. No penalty is calculated for the period
between the actual repayment date and the new repayment date.
In case the loan duration extends beyond the current year, the
system will create the repayment schedule for all years. However, the
97
system assumes that the subsequent years have NO holidays. When
the holidays next year are defined in the system, the repayment
schedule for that year will be regenerated, taking into account the
Holidays specified.
If payment is not received, the penalty will be calculated from the new
rescheduled date.
Succeeding Installment Due Dates are calculated based on Previous
Installment Due Date, holidays, and nonworking days as defined by the
MFI.
In case of holidays, if the head office configures it to be Next
Repayment Day, no penalty will be calculated for that period. Penalty
calculation will start if the client does not pay on the next repayment
day.
Date Paid
The date when payment for the installment was received.
Principal
Principal paid or due, in the next payment or in the future.
Interest
Interest paid or due, in the next payment or in the future.
Fees
Fees paid or due, in the next payment or in the future.
Total
Total of the Interest + Principal + Fees.
Missed Installments
If a client or group misses payment for an installment, the same amount is included in the
next installment due. For example, if the client has to repay $100 (principal = $80 and interest
= $20) every month, and he or she defaults for the month of August, then for the month of
September, the installment due (including penalty) is $202. The following computation shows
how the $202 is arrived at:
Principal due $80
Interest due $20
Penalty due $2 (for the missed/defaulted installment)
Principal overdue $80 (for the missed/defaulted installment)
Interest overdue $20 (for the missed/defaulted installment)
Total amount due $202
Partial payments are accepted.
GROUP LOANS INDIVIDUAL MONITORING (GLIM)
Mifos currently offers two major types of loans, individual and group. In an individual loan, the
individual is totally responsible for repayment of the loan and for payment of any associated
fees. In a group loan, the group has a single loan account, and the group is the primary unit
that the MFI interacts with; a single repayment schedule is maintained for the entire group.
The group provides credit worthiness to all its members; if one member is delinquent in the
group, then all the contracting group members are also considered delinquent.
If your MFI wants to do things differently-that is, if it wants to keep the credit worthiness of
98
each individual in a group loan separate-it can use GLIM (group loans individual monitoring),
which calculates performance history separately for each individual participating in a group
loan.
With a GLIM loan, the group is still the primary unit that participates in transactions, but the
performance history of each contracting member is calculated in a slightly different way when
compared to how it is calculated for a regular group loan.
In a GLIM loan, all transactions (disbursals, payments, adjustments, bulk entry, and so forth)
take place at the group level. The only major difference between GLIM and the usual group
loans is that the initial loan account creation specifies the amounts given to each individual,
the purposes for these amounts, and the way these loans affect the calculation of individual
performance metrics.
Note: At the time of configuration, you must decide whether your group loans will be standard
or will use GLIM. Once set, this option cannot be changed after deploying Mifos.
99
HOW TO CREATE A NEW LOAN ACCOUNT
Loan schedule independent of meeting (LSIM)
You can create individual loans for clients and for groups. All the loan products defined by your
MFI are available for use, and you can adjust the amount of these loans in the ranges set for
those products. You can also define and adjust the interest rate for each loan, choose options
for the payment schedule, set a grace period (extra time for repayment), set fees in addition
to the loan repayment, choose the fund that this loan comes from, and associate the loan
with your general ledger codes.
Note: If you want to make several loans at the same time to clients or groups, see How to
create multiple loans (bulk loan creation).
Loans can be held by clients and groups. To create a new loan for one of these, you must
navigate to the details page for that customer. You can do this in several ways:
From the Home screen search function
From the Quick Start left navigation list (click Open New Loan Account)
From the Clients & Accounts left navigation panel (click Create Loan Account)
100
From the Clients & Accounts main panel (click a Branch Office from the list on the right to
narrow down the search for the customer)
All these methods ask for the name, system ID, or account number for a group or client.
When you type this information and click Search, you see a list of all possible choices for your
search information. Click the correct one, or (if you don't see the customer you were
expecting) try retyping the search information carefully and then click Search again.
Once you see the details page for a customer (group or client), the procedure is the same. This
example shows how to create a loan for a client.
Note : By default, repayments are due on center meeting dates. If you have specified an LSIM
arrangement during configuration, you will see a box in which you can specify a repayment day
that is different from the meeting day of the client's center. See Loan schedule independent of
meeting for information about LSIM.
A screen shows details about this client's information and history with your MFI.
101
1. In the Account Information section, find the Open New Account line and click the
Savings link.
2. The following screen appears:
The list includes all loan products that are available to this account owner. If the account
owner is a client, the loan products listed are restricted to those applicable to Clients in
the product definition and products applicable to groups are not listed. In addition, the
list includes only those products with a repayment frequency that is a multiple of the
client's meeting frequency. That is, a client who has a meeting frequency of every third
or sixth or ninth week (a multiple of 3) is eligible for loan instances that have a
repayment frequency of weeks in a multiple of 3. A client whose meeting frequency is
the last Monday of every 2 months is eligible for loan instances that have a repayment
frequency of months in a multiple of 2. (This condition does not apply to clients who
have no scheduled meetings.) If you attempt to change a meeting schedule so that it
violates any of the above conditions, the change will not be possible.
Note: The only loans that appear on this list have a status of Eligible for New Accounts.
102
There are no built-in restrictions on the number of loans that a client/group can have.
Your MFI is responsible for the approval of any loan, and for the mix of loan products
that any client or group is allowed to have. See How to manage the product mix" for
information.
3. In the Loan Product Name list, click the type of loan you want to create, and click
Continue.
4. Enter information using the descriptions in the following table (note that these fields may
vary somewhat, depending on the details of the loan product itself):
Field name
Amount
Interest Rate
Description
Example
The loan amount for the client, limited to the
100.00
minimum and maximum amounts shown in brackets.
Applicable interest rate, limited to the minimum and 18
maximum values shown in brackets. If a default field
was defined for the product, this field shows the
default interest rate value.
The rate field can be zero but cannot be left blank.
You may not change the interest rate once the loan
has been paid out to the client.
No. of Installments The number of installments in which the loan will be 12
repaid, limited to the values shown in brackets.
Disbursement Date The date when the loan is likely to be disbursed (paid 02/07/2006
out). If the client/group has a meeting date, the date
must be one of the meeting dates.
This date will be used as a Loan Start Date to
generate the repayment schedule. This field can be
updated with the Actual disbursement when the loan
is actually disbursed to the client. ?? This date can be
in the past. The repayment schedule will be
regenerated when this date is updated.
If a client has no meeting date, this date will not be
checked against the meeting date schedule.
History information about the date change will not be
available except in the change log.
Grace Period for
Payments
You may not change this date after the account is
set to "active in good standing" status.
Type how long to wait for late repayment: that is,
how many installments.
If the loan product specifies "No grace" or if interest
is automatically deducted at the time of disbursal,
this field cannot be used.
You can extend or reduce the length of the grace
period if the grace period has not yet expired.
Source of Funds
Purpose of Loan
The grace period starts as of the day the loan is
disbursed to the client.
Click the applicable source of funds for the loan as
defined by the MFI.
Click the purpose of the loan.
Tsunami
103
Business work
activities
Collateral type
Collateral notes
External ID
The type of activity the client is engaged in.
Farming
The type of collateral the client has provided for the Type 1
loan.
Explanatory notes about the collateral type applicable Land title deed
to the loan.
verified by
loan officer
If this loan has an ID number from some other
system, type it here.
Enter any additional information required by your MFI
in the custom fields.
Additional
information:
Custom fields
Administrative Set Apply any set fees for this loan, as defined by your
Fees
MFI.
If you want to change the default fee amount for any
fee displayed, type the amount in the box. If you
want to remove this fee, check the Check to
Remove Box.
Additional Fee type Apply up to a maximum of 3 different fee types, as
defined by your MFI.
5. Click Continue.
6. A screen appears summarizing the loan repayment installments. The screen you see
might look like this:
The list of installments shows the following:
The number of installments
The due date for each installment
The principal for the loan at each installment
The interest at each installment
Any fee charged at the time of the installment
The total amount of money due for each installment
104
7 Click Preview to review all the loan information. If you want to make changes in the loan,
click Edit Account Information, make the changes, and click Preview again.
8 When you are satisfied with all changes, click Submit for Approval (or, if you want to wait
to submit this loan, click Save for Later). (If you decide not to create the loan at all at this
time, click Cancel.)
A screen confirming the loan appears; it might look like this:
LOAN SCHEDULE INDEPENDENT OF MEETING (LSIM)
If your MFI intends to collect loan payments on nonmeeting days, it can set up this LSIM
system to adjust the repayment schedule.
During the configuration process, the Allow Payments on Nonmeeting Days setting is turned
on.
Then, in Mifos, you see the following differences when you create a loan:
· Ordinarily, the default disbursal date is the next meeting date. If LSIM is activated, however,
you can change this date to something else. However, this disbursal date must be in the
future.
· You can also change the default repayment day to a nonmeeting day (in the Repayment Day
field), but it must occur at the same frequency as meeting days (that is, if the meeting
occurs once a month, the repayment day must be once a month). You may not change the
frequency of repayments.
Mifos calculates the repayment schedule, including grace periods, based on these dates.
105
HOW TO CHANGE THE STATUS OF
(APPROVE, CLOSE) LOAN ACCOUNTS
HOW TO APPROVE OR CLOSE A SINGLE LOAN ACCOUNT
Before loans can be disbursed, they must be approved by someone with the appropriate
permissions. The same procedure is used to cancel loan applications.
The following table explains the meanings of the statuses that a loan can have. When you
configure Mifos, you can decide which of these statuses is available for use. See the
Configuration guide for information.
Status
Description
Save the loan account in this status when:
The information entered is not complete; or
Is required by the MFI as part of the loan approval process; or
Partial
Application Want to save it with this status for the time being.
Most loan account attributes can be modified when the account is in this status.
Pending
Approval
Approved
Disbursed
to LO
Active in
good
standing
Use the Save for later button when saving the loan account
This is an optional status showing that loan account information is complete
information. This status allows the MFI to execute offline process with regard to
the loan account before approving it in the system.
The loan account can be cancelled when it is in this status.
Use the Submit for Approval button when saving the loan account
The loan amount and repayment schedule have been approved by the MFI. All
loan account parameters including the interest amount, loan term and funding
source of the account are frozen and cannot be changed at this state
The loan account can be cancelled when it is in this status.
This is an optional state showing that the loan amount has been disbursed to the
loan officer of the customer.
The loan account can be cancelled when it is this status.
1. Can be changed to this status once the loan has been disbursed to the
customer.
2. The Actual disbursement date can be entered at this point and the loan
account grace period starts counting where applicable.
3. This status confirms that the loan has been issued to the client.
A loan can be rescheduled if the MFI allows rescheduling. The current loan
account has to be closed with the status marked as Closed- Rescheduled, and a
new loan account must be created; it can have the same or different conditions
and rules compared to the previous loan.
Closed The system will not link the old and new accounts.
Rescheduled
Transactions can still be applied to accounts in this status, but the user will be
given a warning before proceeding.
In performance reporting and other reporting, this loan will not be counted as
106
part of the loan cycle.
1. The system moves the account to this state automatically when the loan
Closed amount is completely paid off.
Obligations
2. The account can be moved to this status manually without validating if the
met
amount has been paid off.
The system moves to this status any time the loan account terms are violated,
Active- Bad for example, if there is nonpayment of an installment.
standing
The system automatically moves the account to Active in Good Standing once
the amount overdue has been paid.
ClosedThe loan account can be written off if the MFI or Loan Officer determines that
Written Off the loan cannot be repaid.
A loan can be cancelled before it gets to Active and in Good Standing status. The
Cancelled loan can be cancelled if the customer withdraws the application or an officer of
the MFI rejects the application.
To approve (or cancel) a loan, follow these instructions:
1. From any Search screen, search for the borrower name (client or group), or the loan
account number if you know it.
2. In the list of clients or groups that appears, click the correct one.
3. In the Account Information section, find the loan you need to approve (all loans that
need approval have a yellow square next to them). Click that link.
4. Click Edit Account Status.
A screen like the following appears:
5. Click either Partial Application, Application Approved, or Cancel. If you click Cancel,
you must click an explanation from the list that appears, such as Rejected. If the
application was withdrawn, click Withdraw. If neither explanation fits, click Other.
6. In the Note box, type a note explaining any reasons for your action.
7. Click Preview to review your work.
8. If a survey is required for this loan product, you must check the Client has Completed
Loan Survey box.
9. Click Submit.
107
The loan now appears on the details page with a green square, showing that it is approved.
HOW TO APPROVE MULTIPLE ACCOUNTS
See How to approve multiple loans (bulk loan approval) under bulk transactions.
108
HOW TO DISBURSE (PAY OUT) A LOAN
How to reverse a loan disbursal (payout)
How to redo a loan disbursal (payout)
You can disburse (pay out) a loan to the borrower starting on the day specified in the loan
account. When you search for the loan, the date of disbursal appears near the top of the
screen for this particular loan:
Follow these instructions:
1. In the loan account screen for the client or group, in the upper right corner, click
Disburse Loan.
A screen like the following appears:
2. Enter information using the descriptions in the following table:
Field
Disbursal Date
Receipt ID
Description
The date the loan is being paid out
If you are providing receipts, the
identification of this receipt
Receipt Date
The date the receipt was provided to
the borrower
Loan Amount
The total amount of the loan
Mode of
Cash, cheque, voucher, or a custom
payment
mode set by your MFI
Payment Details Amount of any loan fee
Mode of
If there is a loan fee, the way it is
Payment
paid: cash, cheque, voucher, or a
custom mode set by your MFI
Example
19/01/2010
#40500
19/022010
3434.0
Cash
109
3. Click Review Transaction to review your choices.
4. If you need to make any changes, click Edit Transaction, make changes, and click
Review Transaction again.
5. When you are satisfied with the disbursal details, click Submit.
The disbursal date in the account status summary changes to reflect your changes.
HOW TO REVERSE A LOAN DISBURSAL (PAYOUT)
Sometimes, data entry errors result in loans that are created for the wrong client, or perhaps
the wrong type of loan product is created for a client. The error might not be detected until
several repayments have been made.
To correct this error, if you have the appropriate permissions, you can reverse the loan
disbursal and all repayments made up to this point. This can happen only if the loan is in an
"Active in good standing" or "Active in bad standing" state. (Afterward, if repayments have
already been made, you can redo the disbursal by recreating the correct loan and applying all
those repayments to it. Make a note of any repayments, so that you can apply them to the
new loan. See How to redo a loan disbursal (payout)
Follow these instructions:
1. Click Admin > Reverse Loan Disbursal.
2. In the screen that appears, type the account ID for the loan and click Search.
A screen like the following appears:
3. In the Note box, type a note explaining why this loan payout is being reversed, and click
Preview to review your work.
4. A summary of this action appears. Be sure that you intend to reverse this payout, as
the action reverses all financial transactions made up to this date, and the loan account
status will be marked as cancelled.
5. If you are satisfied with this action, click Submit.
110
The loan account is now marked cancelled. This action is recorded in account notes and
adjustment notes, and the change is logged in account activity. The cancelled loan is not
included in loan counts for any reports.
HOW TO REDO A LOAN DISBURSAL (PAYOUT)
If you have the appropriate permissions, you can redo the payout (disbursal) of a loan that
was previously reversed. You can apply any repayments for the erroneous loan to the new
loan.
Follow these instructions:
1. Click Admin > Redo Loan Disbursal.
2. In the screen that appears, in the Name box, type the client or group who holds the
loan account and click Search .
3. All clients/groups with that name appear. Click the link for the correct one.
4. In the screen that appears, in the Loan (Instance) Name list, click the type of loan
product that you want to replace the incorrect one and click Continue.
5. In the screen that appears, make your choices about the terms of the loan. For
instructions, see How to create a loan account. Note that the disbursal date must be
earlier than today's date.
6. Click Continue.
A screen appears for redoing and reviewing the repayment installments.
7. For each installment, the Actual Payment Date and the Actual Amount Paid are already
filled and can be changed. Update the appropriate values in each repayment.
8. Click Preview to review your work.
9. If you need to make changes, click Edit Loan Account Information, make changes, and
click Preview again.
10. When you are satisfied with the new loan, click Submit.
A confirmation page appears.
111
HOW TO MANAGE LOAN ACCOUNT
DETAILS
Once a loan account is created, you can change a few details about it.
Follow these instructions:
1. In any search box, type the name of the borrower, the system ID of the borrower, or
the loan account number and click Search.
2. In the list of results that appears, click the correct account.
The details page for that loan appears.
3. In the Account Details section, click Edit Account Information.
A screen like the following appears:
4. In the available fields, type and click the appropriate changes you want to make. Use the
table in "How to create a loan account" for details on the meaning of each field.
5. Click Preview to review your changes. When you are satisfied, click Submit.
112
HOW TO MAKE TRANSACTIONS FOR A
LOAN ACCOUNT
How
How
How
How
How
to apply payments
to apply adjustments
to repay a loan
to apply charges and fees
to remove recurring account fees
Regardless of whether the loan is held by a client or a group, the process of making
transactions is the same.
In any Search box, type the name of the client or the group (or the number of the loan
account, if you know it). If you type the client or group name, a list appears with all clients and
groups having that name. Click the link for the correct one and, from the details page that
appears, click the link for the correct loan account.
Then follow these instructions for the transaction that you want to make.
HOW TO APPLY PAYMENTS
1. In the Transactions box at the upper right of the screen, click Apply Payments.
A screen like the following appears:
2. Enter information using the descriptions in the following table:
Field
Description
Date of
This shows today's date. If you need to change this date
Transaction because the payment took place at another time, type the day
(XX), month (XX), and year (XXXX) of the payment.
Amount
The amount of the payment. If the borrower is making only a
partial payment, type the amount of this payment.
Mode of
Payment
The way the payment was made.
113
Receipt ID
The number of the receipt, if you use one.
Receipt
Date
Date the receipt was issued, if you used one.
3. When you are done, click Review Transaction to review your work.
For information on uploading administrative documents that you can use for payment
transactions, see "How to manage administrative documents." You can get information on
entering information on several accounts at the same time; see "How to enter collection sheet
data."
HOW TO APPLY ADJUSTMENTS
Sometimes errors occur when payments for a loan are recorded. If you need to cancel the full
amount of the last repayment, you can do this by making an "adjustment." If you need to
cancel several repayments, you must do each one separately.
When you have made an adjustment, Mifos divides the cancelled payment into principal,
interest, and fees, and makes adjustments in each of these categories to the total amount
still due for the loan.
Follow these instructions:
1. In the Transactions box at the upper right of the screen, click Apply Adjustment.
Note: If no payments have been made up to the present for this loan, this button does
not appear.
A screen like the following appears, showing the last payment made:
2. Check the Check to Revert the Last Payment box.
3. In the Notes box, type information describing why you made this adjustment.
4. When you have made the adjustment, click Review Adjustment to review your work
and click Submit.
HOW TO REPAY A LOAN
You can repay the entire remaining loan balance at once using the Repay Loan link. After
following these instructions, the status of the loan will change to "Closed - Obligation Met".
1. In the Transactions box at the upper right of the screen, click Repay Loan.
114
A screen like the following appears:
2. Enter information using the descriptions in the following table:
Field
Description
Mode of Payment
The way the payment was made
Receipt ID
A number for the receipt, if you use one.
Receipt Date
The date the receipt was issued, if you use one.
3. When you are done, click Review Transaction to review your work.
4. If you want to make changes, click Edit Transaction, make any changes, and click
Review Transaction again.
5. When you are satisfied with all changes, click Submit.
HOW TO APPLY CHARGES AND FEES
If you want to apply fees or penalties directly to the loan, following these instructions.
1. In the Transactions box at the upper right of the screen, click Apply Charges.
A screen like the following appears:
2. Enter information using the descriptions in the following table:
Field
Description
Select
Charge
Click the appropriate charge or fee. These are loan fees that
have been created or you can select Misc Fee or Misc Penalty
115
type
Amount
The amount to apply. If there is a set amount for this charge, it
appears in the Amount box; type over this to change it.
3. Click Submit.
The charge now appears in the Upcoming Charges and the Recent Account Activity list.
It will appear in Transaction History when posted.
Note the following:
In addition to the penalty calculated for delayed repayment, the user can apply a "Misc
penalty" amount to the account. If a Misc Penalty amount is applied to the account, the
same will be included in the next payment due for the account.
If the penalty rate is changed in between two payments, the old penalty rate should be
taken for calculation until the date the change was made.
A penalty is not calculated until the day after the due date.
HOW TO REMOVE RECURRING ACCOUNT FEES
In the Recurring Account Fees section, near the bottom of the account details screen, a list of
recurring account fees associated with the account are listed. Click Remove for the fee you
wish to remove. The fee is now gone from the Account Details section and is no longer
associated with the loan account.
116
HOW TO TRACK LOAN ACCOUNT HISTORY
(TRANSACTIONS, PERFORMANCE)
How
How
How
How
How
How
to view
to view
to view
to view
to view
to view
the history of all transactions
status history
performance history
missed installments
change log
and add notes about the loan
HOW TO VIEW THE HISTORY OF ALL TRANSACTIONS
1. At the bottom of the screen, click View Transaction History.
A screen like the following appears (only part of the screen shows here):
This screen shows the following:
All transactions
ID number of Transaction
Transaction Type
General ledger code
Amount of debit of credit
Client or group name
Date posted
User who posted the transaction
Any notes on adjustments
HOW TO VIEW STATUS HISTORY
At any point, you can see the history of a loan: the original application, whether it was
approved, and whether it is active, in good standing, or closed. You can use this information to
track the progress of the loan and the efficiency of the loan officer or the MFI approval
process itself.
117
At the bottom of the screen, click View Status History.
A screen like the following appears:
HOW TO VIEW PERFORMANCE HISTORY
The box in the upper right corner summarizes the performance of the client or group for this
loan. It includes the following:
Number of payments: The total number of payments/installments that have been made
successfully
Number of missed payments: The total number of payments/installments that are
missed and are in arrears
Days in arrears: The number of days the loan account is behind on payment (that is, the
number of days overdue)
Loan maturity date: The date on which the loan matures and the outstanding loan
balance is due
HOW TO VIEW MISSED INSTALLMENTS
If an installment payment is missed, it is displayed in the overdue information, and the Total
Amount Due includes the missed installment. For example, if a client has to repay $100
(principal = $80 and Interest = $20) every month, and she defaults for the month of August,
then for the month of September, the following amounts are displayed in the Next Payment
details:
Principal Due= $80
Interest Due = $20
Penalty Due = $2 (for the missed/defaulted installment)
Principal Overdue= $80 (for the missed/defaulted installment)
Interest Overdue = $20 (for the missed/defaulted installment)
Total Amount Due= $202
HOW TO VIEW THE CHANGE LOG
Any changes that have been made to loan details are contained in the change log. These might
include
Account information changes
Addition/removal of fee types
118
Addition of notes and change in collateral notes
Status changes: includes changes that were made by the user and the system.
However, changes related to transactions (such as payment of principal, interest, fees, and
penalties) are not logged.
At the bottom of the screen, click View Change Log to see these. The log might look like this:
To return to the center details page, click Back to Details Page.
HOW TO VIEW AND ADD NOTES ABOUT THE LOAN
You can record any notes about the loan. To see all notes already recorded, in the recent
Notes box at the bottom right of the screen, click See All Notes. Any notes added in other
sections, such as account information or adjustments, appear in this section as well.
To add a note, follow these instructions:
1. Click Add a Note.
The following screen appears:
2. In the Note box, type the note.
3. Click Preview to review your work. If you want to make changes, click Edit, make
changes, and click Submit.
The note now appears in the Recent Notes section.
119
SAVINGS ACCOUNTS
41. INTRODUCTION TO SAVINGS ACCOUNTS
42. HOW TO CREATE A NEW SAVINGS ACCOUNT
43. HOW TO CHANGE THE STATUS OF A SAVINGS
ACCOUNT
44. HOW TO MANAGE SAVINGS ACCOUNT DETAILS
45. HOW TO MAKE TRANSACTIONS FOR A SAVINGS
ACCOUNT
46. HOW TO TRACK SAVINGS ACCOUNT HISTORY
120
INTRODUCTION TO SAVINGS ACCOUNTS
WHAT IS A SAVINGS ACCOUNT?
You can create savings accounts for centers, groups, and clients based on the savings
products defined in Mifos. All accounts inherit the rules of the product they are created from.
Note: The savings product must be in an Active state before you can create an account based
on it.
Savings accounts are vital to the economic health of the client or group. MFIs encourage
regular contributions to these accounts, and in some cases make contributions mandatory.
Your MFI could make a rule that you cannot create loan accounts for borrowers unless their
savings accounts are at a minimum level. You may also make a rule that the client or group
does not earn interest if the savings account is lower than a specified minimum amount.
If you create a savings account for a group or a center, all members of the group or center
can deposit to and withdraw from these accounts. Usually, when a transaction is made, the
user chooses the client name from a list of approved clients belonging to that group or centre.
A center, group, or client can have more than one account, of the same or different savings
products, but a single account cannot be shared by more than one center, group, or client. In
addition, no conversion is allowed between individual client accounts and center/group
accounts.
MANDATORY VERSUS VOLUNTARY SAVINGS
Some MFIs make their savings accounts mandatory. The minimum deposit amount is
considered "due" at every meeting day of the account owner. Partial payments are allowed. If
the client or group does not make this minimum deposit on time, the required deposit amount
at the next meeting is increased by that amount. For example, if the minimum deposit is 50,
and the client does not pay, then at the next meeting, the required deposit will be 100. If the
minimum deposit is 50 and the client pays 25, then at the next meeting, the required deposit
will be 75.
If the savings account is held by a center, the deposit amount is applied to all clients in Active
or On Hold states. If the savings account is held by a group, and the minimum deposit applies
to each group member separately, the deposit amount is applied to clients in Active or On
Hold states.
Voluntary accounts have no minimum deposit, though there is a "recommended deposit"
amount that can be included in the definition of the savings product.
THE SAVINGS ACCOUNT "DASHBOARD"
The savings account details page ("dashboard") shows the detailed transactions and functions
related to savings accounts. It includes the account status, the recent activity status, and
transaction tracking details.
To view the dashboard, in any Search box, type the account number for the savings account.
You can also type the client or group name and click the account link from the details page for
that client or group.
The screen might look like the following:
121
The dashboard might include the following items:
Category
Description
Savings account Savings account number, current status, balance, and
header
amount due at next meeting (if account is mandatory)
Recent Activity A list of transactions that have taken place with
regard to the account.
Account Details Shows the savings account details, which include
recommended or mandatory amount for deposit, type
of deposit, maximum amount allowed per withdrawal,
and interest rate.
More account Shows the status history, change log, and change
and transaction history for the loan account.
details
Transactions
Provides the links to making a deposit, withdrawal, or
adjustment, or closing the savings account.
Performance
Show various account performance indicators, such as
history
total deposits, withdrawals, and interest.
Recent Notes Shows the three most recent notes appended to the
account, with additional links to add a new note or
view all the notes.
122
HOW TO CREATE A NEW SAVINGS
ACCOUNT
The following are necessary for you to create a savings account:
If the savings account is for a client or group, the client and/or group must be in
Approved state.
If the savings account is for a center, the center must be Active.
Note: You may not delete savings accounts.
You can create a new account from several places in Mifos. One way is to navigate to the
details page for that client, group, or center. You can do this by searching for the client,
group, or center from the Search on the Home screen or navigating to the details page
directly
From the Home screen search function
From the Clients & Accounts main panel (click a Branch Office from the list on the right
to narrow down the search for the customer) Continue to click on the Loan Officer,
then finding the client, group, or center to create a savings account for.
If you are creating a savings account for a client, navigate to the client details page. A
screen shows details about this client's information and history with your MFI. In the
Account Information section, find the Open new account line and click the Savings link.
123
Another way to create savings accounts is from the quick links in Mifos.
From the Quick Start left navigation list (click Open New Savings Account)
From the Clients & Accounts left navigation panel (click Create Savings Account)
All these methods ask for the name, system ID, or account number for a center, group, or
client. When you type this information and click Search, you see a list of all possible choices
for your search information. Click the correct one, or (if you don't see the customer you were
expecting) try retyping the search information carefully and then click Search again.
Once you have selected the customer you are creating the account for, the procedure is the
same.
124
1. The following screen appears:
2. In the Savings Product Name list, click the type of account you want to create, and click
Continue. A screen appears summarizing the terms of the savings product. For
information on these terms, see "How to define and change new savings products"
3. Review the terms. If you are satisfied, click Preview.
4. If you want to change anything about this savings account, click Edit Savings Account
Information, make changes, and click Preview again.
5. When you are satisfied with all details, click Submit for Approval (or, if you want to
submit this account later, Save for Later). (If you decide not to create a savings account
at all at this time, click Cancel.)
HOW TO APPROVE A SAVINGS ACCOUNT
When an application for a savings account is made, the account appears in the Account
Information section of the client or group dashboard with a yellow circle, as in the following
screen:
125
To approve the account, click the link for the account.
Click Edit Account Status.
The following screen appears:
Click Partial Application, Active (approved), or Cancel (not approved).
If you click Cancel, click a reason for our action from the list that appears. (You might
reject the application, or the client might withdraw the request.)
In the Notes box, type any information about your reasons for approving, delaying, or
not approving the savings account.
Click Preview to review your work.
If you want to make any changes, click Edit Status, make the changes, and click Preview
again.
When you are satisfied with the change in status, click Submit.
THE SAVINGS ACCOUNT "DASHBOARD"
The savings account details page ("dashboard") shows the detailed transactions and functions
related to savings accounts. It includes the account status, the recent activity status, and
transaction tracking details.
To view the dashboard, in any Search box, type the account number for the savings account.
You can also type the client or group name and click the account link from the details page for
that client or group.
The screen might look like the following:
126
The dashboard might include the following items:
Category
Description
Savings account
header
Savings account number, current status, balance, and amount due at
next meeting (if account is mandatory)
Recent Activity
A list of transactions that have taken place with regard to the account.
Account Details
Shows the savings account details, which include recommended or
mandatory amount for deposit, type of deposit, maximum amount
allowed per withdrawal, and interest rate.
More account and
transaction details
Shows the status history, change log, and change history for the loan
account.
Transactions
Provides the links to making a deposit, withdrawal, or adjustment, or
closing the savings account.
Performance
history
Show various account performance indicators, such as total deposits,
withdrawals, and interest.
Recent Notes
Shows the three most recent notes appended to the account, with
additional links to add a new note or view all the notes.
127
HOW TO CHANGE THE STATUS OF A
SAVINGS ACCOUNT
You can change the status of a savings account depending on what status it is in.
The following table shows the descriptions of all the statuses a savings account can have.
Depending on how your MFI is configured and in what status the savings account is in, you may
not see all of these status choices.
Status
Description
Partial
If the record has been created but data is incomplete, or if
Application the user does not want the status to be pending approval,
status can be marked as Partial Application. More data
can be added, or the record can be edited in this state.
Pending The record contains all necessary data and is waiting for
Approval approval. Before and after this point, there could be some
offline processes, which might govern the approval
process. These processes can be specific to each MFI and
will not have an impact on Mifos functionality.
Approved/ The savings account has been approved. After this, the
Active
customer can start transacting and operating their savings
account.
Inactive In case there are no transactions in the savings account
for a certain number of days (the default is 30), the state
is automatically changed to Inactive. If a transaction is
made, the state will changes to Approved/ Active.
Cancel
A savings application can be cancelled for various reasons:
The customer can withdraw the application
The application was rejected the MFI
Because the customer is blacklisted, they are not
eligible.
Closed
1.
2.
3.
4.
5.
6.
128
The savings account is closed and archived.
From the account dashboard, click Edit Account Status.
In the Status section, click the Status you would like the Account to change to.
In the Notes box, type a reason for the change in status.
Click Preview to review the change.
If you want to make changes, click Edit Status, make changes, and click Preview again.
When you are satisfied with the changes, click Submit.
The account dashboard shows the new status.
HOW TO MANAGE SAVINGS ACCOUNT
DETAILS
You can make changes to the recommended deposit amount. If your MFI has defined additional
fields, you can change those in this section as well.
1. From the savings account dashboard, click Edit Account information.
The following screen appears:
2. Make any changes to the account.
3. Click Preview to review them.
4. When you are satisfied with the changes, click Submit.
129
HOW TO MAKE TRANSACTIONS FOR A
SAVINGS ACCOUNT
How to make deposits to or withdrawals from a savings account
How to make adjustments to a savings deposit
HOW TO MAKE DEPOSITS TO OR WITHDRAWALS FROM A
SAVINGS ACCOUNT
1. Click Make Deposit/Withdrawal.
A screen like the following appears:
2. Enter information using the decriptions in the following table:
Field
Date of
Transaction
Payment Type
Enter Amount
Mode of
Payment
Receipt ID
Receipt Date
Description
Example
The date of this deposit or
03/04/2010
withdrawal
Deposit or withdrawal
Deposit
The amount of deposit or
200
withdrawal
The way the money will be
Cash
transferred
The number of the receipt, if
00034
you use one
The date the receipt was issued, 03/04/2010
if you use one
3. When you are done, click Review Transaction to review your work.
4. If you want to make changes, click Edit Transaction, make any changes, and click
Review Transaction again.
5. When you are satisfied with all changes, click Submit.
HOW TO MAKE ADJUSTMENTS TO A SAVINGS DEPOSIT
Sometimes errors occur when savings accounts transactions are recorded. If you need to
cancel the full amount of the last deposit or withdrawal, you can do this by making an
"adjustment." If you need to cancel several transactions, you must do each one separately.
130
Follow these instructions:
1. From the Transactions box at the upper right of the screen, click Apply Adjustment.
A screen like the following appears, showing the last payment made:
2. In the Correct Amount, type the accurate deposit or withdrawal amount.
3. In the Notes box, type information describing why you made this adjustment.
4. When you have made the adjustment, click Review Adjustment to review your work,
and click Submit.
Adjustments appear in performance tracking, summarized historical data, and the change log.
131
HOW TO TRACK SAVINGS ACCOUNT
HISTORY (TRANSACTIONS, PERFORMANCE)
How
How
How
How
How
to view
to view
to view
to view
to view
the history of all transactions
status history
performance history
the change log
and add notes about the savings account
HOW TO VIEW THE HISTORY OF ALL TRANSACTIONS
1. At the bottom of the screen, click View Transaction History.
A screen like the following appears (only part of the screen shows here):
This screen shows the following:
Date of transaction
Payment ID
Transaction ID
Type of transaction
General ledger code
Amount of debit or credit
Client or group name
Date posted
User who posted the transaction
Adjustment notes, if any
HOW TO VIEW STATUS HISTORY
At any point, you can see the history of a savings account: the original application, whether it
was approved, and its current status.
At the bottom of the screen, click View Status History.
A screen like the following appears:
132
HOW TO VIEW PERFORMANCE HISTORY
On the details page (dashboard) for centers, groups, and clients, performance history is
summarized in a box at the upper right.
It includes the following:
Date account opened
Total deposits
Total interest earned
Total withdrawals
HOW TO VIEW THE CHANGE LOG
In the center, group, or client dashboard (details page), you can see a record of all changes
that have been made. At the bottom of that screen, click View Change Log. It might look like
the following screen:
HOW TO VIEW AND ADD NOTES ABOUT THE SAVINGS
ACCOUNT
You can record any notes about the savings account. To see all notes already recorded, in the
recent Notes box at the bottom right of the screen, click See All Notes. Any notes added in
other sections, such as account information or adjustments, appear in this section as well.
To add a note, follow these instructions:
1. Click Add a Note.
The following screen appears:
133
2. In the Note box, type the note.
3. Click Preview to review your work. If you want to make changes, click Edit, make
changes, and click Submit.
The note now appears in the Recent Notes section.
134
BULK TRANSACTION
PROCESSING
47. HOW TO ENTER COLLECTION SHEET DATA
48. HOW TO CREATE MULTIPLE LOANS (BULK LOAN
CREATION)
49. HOW TO APPROVE MULTIPLE LOANS (BULK LOAN
APPROVAL)
50. HOW TO IMPORT TRANSACTIONS
135
HOW TO ENTER COLLECTION SHEET DATA
The collection sheet is set up to make your collections easy. After you type in the information
for the branch, loan officer, date, and mode of payment, you see a form that already includes
all payments and deposits that are expected on that date. Fields that have changed (such as
missed payments and absences from meetings) display in red, so that you can see them
immediately.
If you have appropriate permissions, you can enter the data for collections from clients and
groups.
Follow these instructions:
1. Click Clients & Accounts > Enter Collection Sheet Data.
A screen like the following appears:
2. Enter information using the descriptions in the following table:
Field
Description
Branch office
The appropriate branch office
Loan officer
Loan officer of accounts for this collection
sheet
Date of
The default is today's date. If you need to
Transaction
change the date, type over the existing
dates.
Mode of Payment The appropriate type of payment
Receipt ID
The number of the receipt, if any
Receipt Date
The date that the receipt was issued, if
any.
3. Click Continue.
4. A screen appears summarizing all the accounts at this branch whose collections fall on
the day you specified. It might look like the following:
136
5. Notice the following fields:
Under Due/Collections, the short names of each loan and/or savings product appear.
Under them are the amounts due for this collection period. For loan accounts, this is
the amount of the payment due. For savings accounts, this is the deposit due.
Under Issues/Withdrawals, the short names of each loan and/or savings product appear.
Under them are the amounts expected for withdrawal if it is a savings account, or
disbursal if it is a loan account.
Check all data for today's collection. If the amounts match the amounts already in the
boxes, you do not need to type anything. Type new amounts only if these have changed. In
the Due/Collections section, type any money you collect. In the Issues/Withdrawals
section, type any money that is being withdrawn or paid out (disbursed) for loans. The
numbers in the Total Collections, Total Issues/Withdrawals, and Net Cash sections
update accordingly.
137
In the Attn list, click the appropriate code for client/group attendance.
Code
Description
P
Present
A
Absent
AA
Approved
absence
L
late
When you have typed all collection data, click Preview to review your work.
All values that you changed from their expected amount appear in red.
If you need to make changes, click Edit Data, make the changes, and click Preview
again.
When you are satisfied with the collection data, click Submit.
138
HOW TO CREATE MULTIPLE LOANS (BULK
LOAN CREATION)
You can create loans of the same type at the same time for many clients and groups within
the same center. You might want to do this, for example, if there were a natural disaster in a
village and many clients needed household improvement loans at the same time. It takes only
one process to create the loans; you can also approve them in one step. Clients or groups
must be active at the time you create these loans. You can specify the following:
Which client or group will receive the loan
The amount of the loan
The purpose of the loan
Follow these instructions:
1. From the Clients & Accounts Tasks list in the left navigation pane, click Create
Multiple Loan Accounts.
The following screen appears:
2. In the Branch Office, Loan Officer, Center, and Loan Product Name lists, click the
appropriate values.
3. Click Search.
4. All client and groups in this center who are assigned to the loan officer appear in a list.
5. In the checkbox at the far left of the list, check those clients and groups who will receive
the loan.
6. Enter information using the descriptions in the following table:
Field
Loan
Amount
Purpose of
Loan
Description
Example
The amount of the loan for each client 200
or group. The default loan amount is in
the box; the range for this type of loan
appears on the right.
The appropriate purpose for each client Education
or group.
139
7. When you are satisfied with the loans, click Submit for Approval (or, if you want to
submit this loan later, click Save for Later). (If you decide not to create multiple loans at
all at this time, click Cancel.)
A screen appears confirming the creation of the loans. It might look like this:
Loans are then subject to approval. See How to approve multiple loans for information
on how to approve this application.
Note: To disburse (pay out) these loans, and to see when they are ready to disburse, read
How to disburse (pay out) a loan.
140
HOW TO APPROVE MULTIPLE LOANS (BULK
LOAN APPROVAL)
You can approve loans one at a time for each individual client (see How to change the status
(approve, close) loan accounts ), or you can approve them all at once. To do the latter, follow
these instructions:
1. Click Clients & Accounts.
2. In the left navigation pane, at the bottom, click Change Account Status.
A screen like the following appears:
3. Enter information using the descriptions in the following table:
Field
Description
Example
Branch
The branch where these
Suarez
loans are created
Loan Officer The loan officer in charge of Sally Magalong
these loans
Type
Loan category
Emergency
loan 1
Current
Click Application Pending.
Status
4. Click Search.
A list like the following appears:
141
5. At the top of the list, next to the Current Status column heading, check the box to
select all pending loans at the same time.
6. At the bottom of the list, in the New Status list, click Approved.
7. In the Note box, type any information explaining the circumstances of this approval
action.
8. Click Submit.
A confirmation box appears like the following:
The loan now appears in the dashboard for each client with a green square indicating that it
has been approved.
142
HOW TO IMPORT TRANSACTIONS
If you have appropriate permissions, and if your MFI is set up for this action, you can import
transactions from another system.
Follow these instructions:
1. Click Admin > Import Transactions.
A screen like the following appears:
2. In the Import Format list, click the format of the transaction information.
3. In the Select Import File section, click Choose File to browse your files, and doubleclick the one you want to import.
4. The filename appears on the screen.
5. Click Review to review your choice. Check with your MFI for further instructions.
143
REPORTS
51. HOW TO MANAGE REPORTS
52. HOW TO RUN REPORTS
53. HOW TO MANAGE ADMINISTRATIVE DOCUMENTS
54. HOW TO ATTACH ADMINISTRATIVE DOCUMENTS
144
HOW TO MANAGE REPORTS
How
How
How
How
How
to upload new report templates
to view report templates
to change report templates
to define a new report category
to create a report
Mifos ships with three reports. Accessing and using these reports does not require that you
install BIRT (Business Intelligence and Reporting Tools, a free, open-source application from
Eclipse). However, if you want to customize the reports, you must install BIRT. You can also
create your own reports using BIRT.
The three reports are as follows:
1. Collection Sheet Report: Helps Loan Officers organize and prepare for their repayment
collection meetings with clients and groups. See “How to enter Collection Sheet data” for
information on how to collect the data that will appear in this report.
2. Branch Cash Confirmation Report: Assists management and accounting in tracking daily
cash inflows and outflows.
3. Branch Progress Report: Helps management monitor office progress.
You generate reports from the Reports tab. To change how the reports appear on the
Reports tab or to edit the appearance of the reports themselves (by editing or creating your
own reports templates), click Admin > View report templates and Admin > Upload report
templates.
For complete information on the current state and usage of Mifos reports, see the reports
guide.
You can also create and manage BIRT-created administrative documents such a receipt forms,
and you can decide when these forms are available during procedures (such as loan account
applications). See How to manage administrative documents for more details.
HOW TO UPLOAD NEW REPORT TEMPLATES
You can upload new report templates from the View Reports page, or you can click Admin >
Upload Reports Templates. Note: All templates must be BIRT files with the .rptdesign format.
Follow these instructions:
1. Click Admin > Upload Reports Template. The following screen appears:
145
2. Enter information using the descriptions in the following table:
Field
Description
Report Title
Title for the report.
Report
Category
Select Report
Template
The kind of report this is (use the categories that you or your
administrator set up during configuration).
Click Choose File, browse your computer to find the report template
file, and double-click it.
3. The filename now appears in this section. If you have chosen a non-BIRT file, you will see
the following error message: "Please choose a Birt report to upload>>"
4. Click Preview to review your work and (if you like) render the actual report template.
5. If you want to make changes, click the Edit button, make changes, and click Preview
again. To change report information, see the "How to change report templates"
procedure below.
6. When you are satisfied with the template, click Submit.
HOW TO VIEW REPORT TEMPLATES
Mifos includes three standard reports that are already uploaded into BIRT, the standard
reporting tool for Mifos. To see other report templates, click Admin > View Reports
Templates. The list of templates might look like the following:
HOW TO CHANGE REPORT TEMPLATES
You can change certain things about existing uploaded report templates within Mifos:
Title
Category
Report Status (active or inactive: inactive reports do not appear on the Report page)
Template
Follow these instructions:
146
1. From the list of report templates, click the Edit button next to the report template.
A screen like the following appears:
2. Enter information using the descriptions in the following table:
Field
Description
Report Title
Change the title here.
Report Category Change the category here.
Report Status
Active or Inactive.
Select Report
Template
Click Choose File, browse your computer for a BIRT file, and doubleclick it. The new filename appears.
3. Click Preview to review your work.
4. If you want to make changes, click the Edit button, make changes, and click Preview
again.
5. When you are satisfied with your changes, click Submit.
If you want to make further changes to the reports, you need to download them (click the
Download button), make changes within BIRT, and upload them again.
HOW TO DEFINE A NEW REPORT CATEGORY
You can divide the reports available in Mifos into categories. Default categories are as follows:
Report Category
Examples
Client detail
Collection Sheet report, General ledger, Membership IDs
Performance
Financial indicators, Program performance indicators
Center
Daily Activity Summary
Loan Product Detail Loan Disbursement
Status
Loan portfolio aging
Analysis
Branch cash confirmation report, Branch progress report
Miscellaneous
These categories can be edited.
Follow these instructions:
147
1. Click Admin > Define New Report Category. The following screen appears:
2. In the Category Name box, type the name you want for this category and click
Preview to review your work.
3. If you want to make changes, click Edit Category Information, make changes, and click
Preview again.
4. When you are satisfied with the category, click Submit.
The category now appears when you click Admin > View Reports Category. It also
appears when you click the Reports tab to see all available reports.
HOW TO CREATE A REPORT
You can design and build your own report templates using either Java or SQL. First, however,
you need to download the BIRT software. For step-by-step instructions on how to build a
report template in BIRT, see http://www.mifos.org/developers/wiki/HowToCreateBIRTReport.
148
HOW TO RUN REPORTS
Follow these instructions:
1. Click Reports and then click any of the report links.
If you clicked Branch Progress Report, for example, you might see a screen like this:
2. All reports ask for different information. For this report, follow the next steps:
3. In the Select Branch list, click the branch whose progress you want to see a summary
of.
4. In the Enter Date box, type the day (XX), month (XX), and year (XXXX) that you want
the report to give information for.
5. Click OK.
The report appears in PDF form. You can then download it and print it.
149
150
HOW TO MANAGE ADMINISTRATIVE
DOCUMENTS
How to upload administrative documents
How to view and edit administrative documents
HOW TO UPLOAD ADMINISTRATIVE DOCUMENTS
1. Click Admin > Upload admin documents.
This screen appears:
2. Enter information using the descriptions in the following table:
Field
Description
Example
Administrative
The title for this document
Voucher
Document title
receipt
Account Type
Savings or Loan
Savings
Show When Status The status during which this
Active
document will be available to the
user to print. Click the status and
click Add>>. The document can
be available in more than one
status.
Select Administrative Click Choose File, browse your
Document
computer for a BIRT-created
administrative document, and
double-click it. Its name appears
next to the box.
3. Click Preview to review your choices.
4. If you want to make changes, click Edit document information, make changes, and
click Submit again.
5. When you are satisfied with your choices, click Submit.
HOW TO VIEW AND EDIT ADMINISTRATIVE DOCUMENTS
151
To view the entire list of administrative documents that have already been uploaded, click
View admin documents. If you want to edit the basic fields of the document, as in the table
above, click Edit, make changes, and click Preview and then Submit. If you want to change
the layout or the data fields, click Download, make changes in BIRT, and upload the document
to Mifos again.
152
HOW TO ATTACH ADMINISTRATIVE
DOCUMENTS
MFIs can use BIRT, the same reporting tool used to create reports at the head office level, to
create a set of administrative documents that can be attached to specific loan and savings
accounts and printed as needed. The following might be available as administrative documents:
a voucher, payment book, disbursal receipt, and payment receipt.
HOW TO ATTACH A PAYMENT RECEIPT TO A LOAN
PAYMENT
See How to manage administrative documents for instructions on how to upload
administrative documents. After doing so, assume that an Administrative Document called
"Payment Receipt" has already been uploaded to Mifos.
Follow these instructions:
1. In any Search box, type the borrower name, borrower system ID, or loan account
number and click Search.
2. In the list that appears, click the correct information and navigate to the loan account
details page.
3. In the Account Details section, under Administrative Documents, click Payment Receipt.
The receipt appears, showing the amount paid.
4. Print this receipt for the borrower.
153
SURVEYS
55. HOW TO VIEW AND CREATE SURVEYS
56. HOW TO MANAGE COLLECTION OF PPI DATA (INDIA
ONLY)
57. HOW TO ATTACH AND COLLECT SURVEYS
154
HOW TO VIEW AND CREATE SURVEYS
How to create a new survey
How to view and define survey questions
Surveys are ways for loan officers and others working in the center to collect information
about groups and clients. These surveys can include demographic information (income, family
size, types of business) that might change over time, and they enable you to know your clients
and serve their needs better.
Group members can ask the survey questions directly from the computer screen, or they can
print a copy of the survey and take it directly to the client. If they use a paper copy of the
survey, they must enter the answers in the computer later.
You can look at surveys that have already been created, to see if you want to create a new
one. To see existing surveys, click Admin > View Surveys. You might see a screen like the
following:
Click any of the surveys to see details about it.
HOW TO CREATE A NEW SURVEY
Follow the instructions:
1. Click Admin > Define New Survey.
A screen like the following appears:
155
2. In the Survey Name box, type a name for the survey.
3. In the Survey Applies To list, click the entity the survey will be used for (or click All).
4. In the Select Questions list, click the question(s) to include in the survey and click Add.
Follow the instructions in How to view and define survey questions to add new questions
to this question bank. The question name and content appear in the table below. If you
add several questions, the table might look like this:
5. If you want to make a question mandatory (that is, the current procedure cannot be
completed until the question is answered), check the Mandatory box in its row.
6. If you change your mind and want to delete a question from the survey, click the
Delete button.
7. When you have added all the questions, click Preview to review your work.
8. If you want to make changes, click Edit Survey Information, make changes, and click
Preview again.
9. If you plan to ask the questions with a paper copy of the survey, click Printer Version
to create a printable version of the survey that group members will actually have in
their hands when they ask questions of clients. It might look like this:
156
10. You can print this version now.
11. When you are satisfied with the structure of the survey (and the way it looks in the
printer version, if you choose to do this), click Submit.
You now see a message confirming the creation of a new survey.
Note that you cannot change a survey once you have created it. However, you can create as
many surveys as you like.
HOW TO VIEW AND DEFINE SURVEY QUESTIONS
If others have created survey questions, and you want to see the survey questions that are
already available, click Admin > View Question Bank. A list of question titles appears; click
any title to see its contents and to make changes to it.
The answers to questions have several kinds of formats (you must choose one):
•
Text
•
Single-select (answer must be one of the options presented)
•
Number
•
Date
•
Multi-select (the answer can be one or more of the options presented)
If none of these questions is exactly what you want, follow these instructions to create a new
157
question or series of questions:
1. Click Admin > Define Questions.
The following screen appears:
2. In the Question Name box, type a title for this question that will make it easy for
someone to identify its content when they are reusing it to create another survey.
3. In the Question box, type the question itself.
4. In the Answer Type list, click the kind of answer value that Mifos will accept, such as a
number, a date, or a selection from a list.
5. If you want to specify the specific answer choices to put in the list of possible answers,
type the first one in the Answer Choice box and click Add>>.
The choice appears in a table below this section.
6. Continue to type as many answer choices as you want to appear. If you need to remove
any of the choices, click the Remove button.
7. When you are satisfied with the question, click Add Question.
The question appears in the question table. If you need to remove this question, click
the Remove button for it.
8. If you want to continue adding questions, click Add Question and repeat this process. If
you do not want to add another question now, click Submit.
The question or questions you add now appear on the list when you click Admin > View
Question Bank.
158
HOW TO MANAGE COLLECTION OF PPI
DATA (INDIA ONLY)
How to see the score ranges for the PPI tool
The Progress out of Poverty Index (PPI) measures the financial improvement of a country's
population. You can choose to activate this tool so that statistics from your MFI are used to
help calculate this index.
1. Click Admin > Configure PPI settings.
The following screen appears:
2. In the Country list, click your country. (At this point, only India can use the PPI tool.)
3. In the Status box, click Active or Inactive.
4. Click Preview to review your choice. If you are satisfied with the PPI setting, click
Submit. (If you do not want to change your PPI setting, click Cancel.)
HOW TO SEE THE SCORE RANGES FOR THE PPI TOOL
1. Click Admin > View PPI Settings.
The following screen appears:
159
2. Use this list to evaluate the financial health of a country. From here, you can click the
Edit PPI Tool Configuration link to activate or inactivate the tool, as in the previous
procedure.
160
HOW TO ATTACH AND COLLECT SURVEYS
Surveys are ways for loan officers and others working in the branch to collect information
about groups and clients. These surveys can include demographic information (income, family
size, types of business) that might change over time, and they enable you to know your clients
and serve their needs better. The process of attaching surveys is the same for centers,
groups, and clients. The example used here is for a center.
Center workers can ask the survey questions directly from the computer screen, or they can
print a copy of the survey and take it directly to the client. If they use a paper copy of the
survey, they must enter the answers in the computer later.
To create a new survey, follow the instructions in How to create a new survey.
When you are ready to use the survey online (or to enter survey data from the printed copy),
follow these instructions.
1. In any Search box, type the name of a center, group, or client and click Search.
2. In the list that appears, click the link for the correct center, group, or client.
3. In the Center Details screen, click Attach a Survey.
A screen like the following appears:
4. In the Select Survey list, click the survey you want to enter data for and click
Continue. (You can see only the surveys that are available for this center.) The online
form of the survey might appear like this screen:
161
5. The default survey date is today's date. If you need to change this, type the day (XX),
month (XX), and year (XXXX) of the actual survey.
6. In the Surveyed By box, your name appears automatically. Type over this name if
someone else has asked these questions.
7. Click or type a response to each question. If the question is mandatory, you may not
finish the survey until the question is answered.
8. If you need to change answers, click Clear All to erase all of them.
9. When you have answered all questions, click Preview to review the answers.
10. If you want to make changes to the answers, click the Edit button, click Clear All to
erase the answers, click or type the correct answers, and click Submit.
11. In the Surveys box, the name and date of the survey now appear. To see details of that
survey, click the name of the survey.
162
APPENDIX
58. RULES FOR HOW TO RESCHEDULE PAYMENT
59. HOW TO CALCULATE THE EMI
60. TIPS AND TECHNIQUES
61. GLOSSARY
62. CREDITS
163
RULES FOR HOW TO RESCHEDULE
REPAYMENT
1. If the client did not make the payment for an installment:
a. For flat-interest loans, in next installment, "Penalty + Payment1 + Payment2"
b. For declining-balance loans, the next installment will be recalculated to include the
missed installment. (There is no concept of payment 1 and payment 2 in this case.)
2. If the repayment day falls on a holiday and repayment is set to the next repayment, the
client must pay two installments on the next repayment day. No penalty will be
calculated for that period.
3. A penalty for failing to pay an installment is calculated only for the affected installment
period. The same approach is applied to subsequent installments.
4. The grace period can be modified:
a. For a loan account whose grace period has not ended.
b. Only for future installments if the grace period has ended.
5. If client does not have any meeting date, then repayment start date is the actual
disbursement date + repayment frequency + grace period.
164
HOW TO CALCULATE THE EMI
EMI (Equated Monthly Installment) is the amount payable to the lending institution every
month, till the loan is paid back in full. It consists of a portion of the interest as well as the
principal. This is what is due at each installment of a loan.
Declining Balance Interest
(EMI of Principal and
Interest)
Definition
Interest is computed at
periodic intervals on the
amount of the original
principal that has not yet
been repaid. Since the
borrower only pays interest
on that amount of original
principal that has not yet
been repaid, interest paid will
be smaller every period.
Declining Balance Interest
with equal principal
installment
The exception from the EMI
computed in the first column is
that interest is calculated using
equal principal installments. The
client pays equal installments of
principal for the duration of the
loan, and the interest is
calculated on principal that has
not been paid for the loan
period.
EMI = i*P / [1- (1+i)^-n]
r = Rate of interest per year
Formula
n = Term of the loan in
periods
l = Length of a period
(fraction of a year, i.e., 1/12 =
1 month, 14/360 = bi-weekly.)
Flat
interest
refers to
charging
interest on
the full
original loan
amount,
rather than
on the
declining
balance.
This is the
most
common
calculation
used in
Grameen
Style MFIs
(most MFIs).
Interest =
P*r*n
Where,
P = Loan amount
Flat
Interest
Rate
Formula Interest = (P-Pp) * r * n
Where,
P = loan amount
Pp= Principal paid
r = rate of interest
n = term of loan
Where
P = loan
amountInitial
amount
r = rate of
interest
n = term of
the loan
i = Interest rate per period
(r*l)
P=1000, r = 5/100, l = 6/12 n
= 2, i = 0.025
EMI = 0.025 * 1000 / [1(1+0.025)^-2]
EMI = $518.83
Principal = 15,000
165
The way to apply payments is
as follows:
Examples
Int. Rate = 25 %
Calculate interest in the
principal due: If balance =
$1000, and i = 0.025, interest
is $25
No of payments = 25
Calculate the amount to
principal which is the monthly
payment minus the interest
due: $518.83 - $25 = $493.83
Principal = 15,000/25 = 600
Calculate the principal
remaining, which is the
previous principal remaining
minus the amount applied to
principal: $1000 - $493.83 =
$506.17 (remaining balance)
Once next payment is
received, repeat steps 1 to 3.
Note: Due to rounding of
computed values, it could
potentially be off by a
maximum of N number of
pennies after the full term of
the loan. It will never be short
if we round up, rather,
principal could end up with a
few more pennies.
166
Principal = 15,000
Payment schedule (Every 2
weeks) = 14 days
For Installment 1:
Total due = Principal + Interest
= 600 + 143.83 = 743.83
For Installment 2:
Interest = (15000600)*.25*14/365 = 140
Total due = 600 + 140 = 740
Continue calculating for
remaining installments
P=100, r =
3/100 per
month, n =
4
Interest =
100 *(3/100)
* 4 = 12
Monthly
payments
of 112 / 4 =
84
TIPS AND TECHNIQUES
PRINTING REPORTS WITH A DOT-MATRIX PRINTER
Problem
BIRT reports do not print out clearly on a dot matrix printer.
Solution
Use the Arial font or another sans-serif font. These fonts print better on dot matrix printers,
which have lower print resolution than inkjet or laser printers.
CALCULATING FLAT INTEREST RATES
Problem
You may have a loan product with a flat interest rate, but Mifos requires you to enter the
interest rates as APR.
Solution
Use the following formula. It will calculate the value you need to enter for the loan repayment
schedule.
Formula
To calculate the yearly APR, use the following formula:
APR = (Interest Amount * Period of Calculation [360 or 365]) / (Principal *
Number of Weeks * 7)
Here is an example, using the following values:
Calculation period = 365 days
Interest amount = 40%
Principal = $200
Number of weeks = 24
APR = (40 * 365) / (200 * 24 * 7) = .43452 (43.452%)
Notes
You can schedule meetings every month or every two weeks. If you schedule meetings every
two weeks, there may be some months that have three meetings and three payments.
For accuracy, you must configure Mifos for at least three extra decimal places of precision.
See the accounting settings in the configuration guide.
167
GLOSSARY
Accepted Payment Types. [HowToDefineAcceptedPaymentTypes] Forms of payment
accepted by an MFI. The default choices are cash, check/cheque, and voucher.
Account Status History. The account history shows listing of loan status changes with the
first entry being the first status assigned to the loan when it was created. The information can
be used to track the progress of the loan, the efficiency of the loan officer or MFI approval
process. [not found]
Account. [Howtocreateanewloanaccount][WhatIsASavingsAccount] Savings account or loan
account with an individual client or group.
Activity. A function provided in the Mifos software that a user can perform.
Adjustments. [HowToViewAndWorkWithGroupDetails] Changes made to an account other
than normal disbursements and payments. This can include rescheduling missed installments
and ??
Administrative Document. A document that can be attached to a specific loan or savings
account and printed as needed. The administrative documents that ship with Mifos include a
voucher, payment book, disbursal receipt, and payment receipt.
Administrator. A user role giving permission to view and modify the structure of the MFI,
product definitions, and other internal settings.
Attributes. [HowToSetProductRulesAndAttributes] The attributes of a product include
currency, interest rate, and repayment schedule.
BIRT. [HowToCreateReports] (Business Intelligence and Reporting Tools) is Free/Libre/Open
Source Software for generating reports. See http://www.eclipse.org/birt/phoenix/.
Blacklist. A list of people that have been barred from getting loans.
Branch or Branch Office. The level at which all client interactions take place.
Bulk Loan, Bulk Loan Approval, Bulk Loan Creation. A bulk loan is several loans that can
be created or approved all at once.
Category. [HowToSetProductRulesAndAttributes] A named group of products.
Center or Kendra. [CentersGroupsAndClientsOverview][HowToCreateANewCenter] In an MFI
hierarchy, a collection of multiple groups. In India, this is called a Kendra.
Change Log. [Common tasks]
The changes made to any of the following items on the accounts page will be logged in the
change log:
Account information changes
Addition/removal of fee types
Addition of notes and change in collateral notes
Status changes: includes changes that were made by the user and the system.
Checklist. [HowToWorkWithUserChecklists] Checklists specify what steps must be completed
before changing the status of accounts or customer records can proceed. Each time a user
attempts to change the status of an account or customer record, the Checklist defined for
that state change is shown to the user. The user can read through the checklist and make
sure all the requirements are met. These checklists will be associated with all workflows for
accounts and client records but are not automated. Checklist types include Center, Group,
168
Client, Loan, Savings.
Client. [Common tasks] To create a client you need to choose to attach a client to a branch
or group and enter the client details. The following steps provide more details on the how to
create a client. The individual client can have savings accounts and borrow money according to
the rules of your MFI. [HowToCreateANewClient]
Collection Sheet, Collection Sheet Report. [HowToEnterCollectionSheetData] The collection
sheet Web form shows all payments expected on that day, and situations requiring attention,
including missed payments and missed meetings.
Custom Fields, Additional Fields. Mifos provides custom fields that enable MFIs to capture
additional information for customized processing. The custom fields can be used by the MFI to
capture different sets of information. The fields can be used to capture text, date or numeric
data. The system allows the system administrator to make the custom fields mandatory and
to change the labels for such fields. [not found]
Dashboard. [HowToViewPerformanceHistory] Information page in Mifos for centers, groups,
and clients.
Details Page. [HowToViewPerformanceHistory] Information page in Mifos for centers, groups,
and clients.
Disbursal/Disbursement. Paying out a loan. [Commontasks]
Dormancy. [Common tasks] How long, after a period of no activity (dormancy) in a savings
account, to mark the account as "On hold." The default is 30 days.
[HowToSetProductRulesAndAttributes]
EMI. Equated Monthly Installment: this is the amount payable to the MFI every month until the
loan is paid back in full. it consists of a portion of the interest as well as the principal. See the
Appendix for a discussion of how to compute this installment. [HowToCalculateTheEMI]
Fee Types. [HowToSetUpYourOrganizationPreferences] Different fee types can be defined at
the head office by authorized users. The user must have Can define fee type permission in
order to define a fee type.
Fees or Charges. MFIs can charge their customer fee for the various services offered.
Reasons for charging a fee can vary from one MFI to another. Mifos system gives the flexibility
to MFIs and branches to define fee types to meet their requirements. Examples of fee types
can be client creation fee, training fee, or account creation fee.
[HowToSetUpYourOrganizationPreferences]
Fund Code. [HowToWorkWithFunds] A predefined numeric code for identifying funds.
Fund Type. [Common tasks] Name for group of sources of funds
Fund. [HowToWorkWithFunds] A source of money used to make loans or carry out other MFI
functions. Examples are donor funds and deposits. Mifos provides a set of fund codes that
Administrators can name as appropriate.
Gl Code. [HowToDefineNewLoanProducts] General Ledger code
GLIM. Group loans, individual monitoring. In a GLIM loan, all transactions (disbursals, payments,
adjustments, bulk entry, and so forth) take place at the group level. The only major difference
between GLIM and the usual group loans is that the initial loan account creation specifies the
amounts given to each individual, the purposes for these amounts, and the way these loans
affect the calculation of individual performance metrics. See also: Group loan.
Group. A collection of clients working together, that is assigned to a center or a branch. The
169
group can act together to borrow money and hold a savings account.
[HowToCreateANewGroup]
Group Loan . [Common tasks] Loan to a member of a group, where the entire group takes
responsibility for managing the loan, and making sure that the borrower repays it.
Group Loan. In a group loan, the group has a single loan account, and the group is the primary
unit that the MFI interacts with; a single repayment schedule is maintained for the entire
group. The group as a whole is responsible for repayment and fees, and each individual in the
group has a designated responsibility to pay their part of the debt. See also: GLIM, Individual
lending.
Hierarchy, MFI. The structure of offices in an MFI is an inverted tree, with the central office
at the top, and up to four levels below it. The system uses the office hierarchy to structure
management, control, and reporting on microfinance transactions. Also called office hierarchy.
HO. Head Office
Holiday. [Common tasks] Periods of time when no payment is due. Each holiday has an
associated repayment rule, such as Next Working Day.
Individual Lending. A loan made to an individual person. See also: Group loan.
Kendra. See Center.
Label. [HowToSetRulesForDataDisplay] Variable text in the user interface, changeable by
administrators. These are in Unicode, and can be in any language.
Lateness. [Common tasks] An attribute of a loan product, specifying how long to wait after
nonpayment of a loan before the account is marked "In arrears".
[HowToSetProductRulesAndAttributes]
Loan Account. [Howtocreateanewloanaccount] Account with an individual or group to take out
and repay a loan.
Loan Cycle Counter. A count of how many times a new loan account has been opened for
the client. Rescheduling or writing-off a loan decrements the loan cycle count.
Loan Cycle. A client's loan cycle begins when a new loan account is opened. It closes when the
loan is fully repaid.
Loan Officer. User role for personnel permitted to act on client loan accounts.
Lookup Options. [HowToSetUpAnMFI] In the mifos UI, a dropdown list of items to choose
from.
LSIM. [Howtocreateanewloanaccount] Loan schedule independent of meeting: allows loan
payments to be collected on nonmeeting days.
Management Information System (MIS). Software for aggregating and analyzing information
from a business, designed to answer essential management questions. [Welcome]
MFI Hierarchy. See hierarchy, MFI
MFI Principles. [HowToCreateANewClient] The essential information that clients should know
about the purposes and practices of a microfinance institution.
Microfinance Institution (MFI). Bank or NGO engaged in microfinance. [Welcome]
Microfinance. Making small loans to poor people without collateral, based on their ability to
repay from a new or expanded business. Begun by Muhammad Yunus, founder of Grameen
170
Bank. [Welcome]
Mifos. Microfinance Open Source software. Web-based software for microfinance
institutions. [Welcome]
Minimum Balance. The required minimum amount of money that must be kept at all times in
a savings account.
National ID . [HowToWorkWithRolesPermissionsAndSystemUsers] Government ID, national ID,
or social security number. Also called UID.
NGO. A nonprofit corporation or other organization for some public good, which is not an
agency of a government or a treaty organization (such as the UN), or a for-profit business.
The legal basis for such organizations differs significantly in various countries. [not found]
Notes. The following section of the loan account dashboard shows the Recent Notes of a loan
account. It shows various notes that have been appended to the loan account. The loan
dashboard shows the 3 most recent notes. A note must be added when the user is changing
the status of the account. The user can also add a note when need arises by using the Add
note link. [Commontasks]
Office. [HowToCreateAndorViewTheOfficeStructure] Any part of an MFI hierarchy In Mifos,
typically based on a geographic area or functional division, with users and clients assigned to
it. An MFI can have five levels of offices:
Area office, an optional level of office, used if subregions must be further subdivided.
The Mifos structure does not support further divisions.
Branch office, the level at which all client interactions take place. At least one branch
office must be defined.
Head office, the mandatory main or parent office for an MFI. Head offices do not offer
client services directly, but can do so through a virtual branch office.
Regional office, an optional level of office, used if the MFI covers a wide area that must
be divided into smaller parts.
Subregional office, an optional level of office, used if regions must be further subdivided.
On-The-Fly. [not found] Calculations that can be performed at any time, without waiting for
any batch process to complete. In particular, calculations made and displayed immediately on
a Web form from entered data.
Performance History. [Common tasks] A summary of essential information on centers,
groups, or clients.
Personnel Hierarchy. [HowToWorkWithRolesPermissionsAndSystemUsers] Loan officers,
with restricted permissions, and Others, with unlimited permissions within their offices.
PPI . [Common tasks] [HowToSetUpYourOrganizationPreferences] The Progress Out Of Poverty
Index is used in India, to measure the financial improvement of a country's population.
Product. An MFI product is a type of loan or savings account, with an individual name and with
various defined rules and attributes.
Redo Disbursal. [Common tasks] When a payment has been recorded and then reversed, this
function allows it to be recorded again.
Repayment Rule. [HowToSetUpYourOrganizationPreferences] For a loan product, the way to
generate a repayment schedule, and the requirements on borrowers in order to receive that
type of loan.
Repayment Schedule. [Common tasks] For any loan, the dates and amounts of money to be
repaid.
171
Reporting Engine. [not found] Software for generating reports from a description of the data
required and the calculations to be performed. In Mifos, this is the BIRT engine.
Role. [Common tasks] A named set of permissions enabling users to perform a set of
activities. Examples are Administrator (able to reconfigure a Mifos installation and define or
redefine products) or Loan Officer (with full control over the accounts of their own clients,
and the ability to view but not modify other accounts), Data Entry (able to enter transactions,
but not otherwise modify client accounts).
Savings Account. An individual deposit account.
Survey. [Common tasks] Surveys are ways for loan officers and others working in the center
to collect information about groups and clients for analysis and reporting.
[HowToViewAndWorkWithCenterDetails]
System User. A person who works with clients, such as a Loan Officer.
User. A person authorized to use Mifos. Users are limited to performing the activities that are
associated with a defined role.
Virtual Branch Office. [HowToCreateAndorViewTheOfficeStructure] A branch office defined
within the head office, if that head office is to offer services directly to clients.
172
LICENSE
All chapters copyright of the authors (see below). Unless otherwise stated all chapters in this
manual licensed with GNU General Public License version 2
This documentation is free documentation; you can redistribute it and/or modify it under the
terms of the GNU General Public License as published by the Free Software Foundation; either
version 2 of the License, or (at your option) any later version.
This documentation is distributed in the hope that it will be useful, but WITHOUT ANY
WARRANTY; without even the implied warranty of MERCHANTABILITY or FITNESS FOR A
PARTICULAR PURPOSE. See the GNU General Public License for more details.
You should have received a copy of the GNU General Public License along with this
documentation; if not, write to the Free Software Foundation, Inc., 51 Franklin Street, Fifth
Floor, Boston, MA 02110-1301, USA.
AUTHORS
Centers, groups, and clients overview
© Mike Dash 2010
Modifications:
Adam Monsen 2010
anita Anderson 2010
Ed Cable 2010
Sonia Lyris 2010
Credits
© adam hyde 2006, 2007
Modifications:
Adam Monsen 2010
Data entry
© Mike Dash 2010
Modifications:
Adam Monsen 2010
anita Anderson 2010
Kris Mani 2010
Glossary
© Edward Cherlin 2010
Modifications:
Adam Monsen 2010
anita Anderson 2010
Ed Cable 2010
Mike Dash 2010
How to apply fees/charges
© Mike Dash 2010
Modifications:
Adam Monsen 2010
anita Anderson 2010
Ed Cable 2010
Kris Mani 2010
Van Mittal-Henkle 2010
How to approve multiple loans (bulk loan approval)
173
© Ed Cable 2010
Modifications:
Adam Feuer 2010
anita Anderson 2010
Kay Chau 2010
Mike Dash 2010
Tracy Mehoke 2010
How to attach administrative documents
© Ed Cable 2010
Modifications:
Adam Feuer 2010
Adam Monsen 2010
anita Anderson 2010
Kay Chau 2010
Sonia Lyris 2010
How to attach and collect surveys
© Ed Cable 2010
Modifications:
Adam Monsen 2010
anita Anderson 2010
Mike Dash 2010
Tracy Mehoke 2010
How to calculate the EMI
© anita Anderson 2010
Modifications:
Adam Monsen 2010
Kay Chau 2010
Kris Mani 2010
Sonia Lyris 2010
How to change the status of (approve/close) loan accounts
© Mike Dash 2010
Modifications:
Adam Feuer 2010
Adam Monsen 2010
Clytie Siddall 2010
Ed Cable 2010
Kay Chau 2010
How to change your password
© Mike Dash 2010
Modifications:
Adam Monsen 2010
Kris Mani 2010
How to change the status of centers, groups, and clients
© Mike Dash 2010
Modifications:
Adam Monsen 2010
anita Anderson 2010
Ed Cable 2010
How to create a new center
© anita Anderson 2010
Modifications:
174
Adam Monsen 2010
Ed Cable 2010
Kay Chau 2010
Mike Dash 2010
Sonia Lyris 2010
How to create a new client
© anita Anderson 2010
Modifications:
Adam Monsen 2010
Clytie Siddall 2010
Ed Cable 2010
Mike Dash 2010
How to create a new group
© anita Anderson 2010
Modifications:
Adam Monsen 2010
Ed Cable 2010
Sonia Lyris 2010
How to create a new savings account
© anita Anderson 2010
Modifications:
Adam Monsen 2010
Ed Cable 2010
Edward Cherlin 2010
Kay Chau 2010
How to create and view the office structure
© anita Anderson 2010
Modifications:
Adam Monsen 2010
Clytie Siddall 2010
Ed Cable 2010
Kay Chau 2010
Mike Dash 2010
How to create multiple loans (bulk loan creation)
© anita Anderson 2010
Modifications:
Adam Monsen 2010
Clytie Siddall 2010
Ed Cable 2010
Kay Chau 2010
Mike Dash 2010
Tracy Mehoke 2010
How to define accepted payment types
© Mike Dash 2010
Modifications:
Adam Feuer 2010
Adam Monsen 2010
Tracy Mehoke 2010
How to define, change, apply fees
© Mike Dash 2010
Modifications:
175
Adam Monsen 2010
anita Anderson 2010
Ed Cable 2010
Kris Mani 2010
Tracy Mehoke 2010
How to define new and change existing loan products
© anita Anderson 2010
Modifications:
Adam Feuer 2010
Adam Monsen 2010
Clytie Siddall 2010
Ed Cable 2010
Kay Chau 2010
How to define and change new savings products
© anita Anderson 2010
Modifications:
Adam Feuer 2010
Adam Monsen 2010
Ed Cable 2010
Kay Chau 2010
How to attach and collect surveys
© anita Anderson 2010
Modifications:
Adam Monsen 2010
Clytie Siddall 2010
Ed Cable 2010
Kay Chau 2010
How to disburse (pay out) a loan
© Mike Dash 2010
Modifications:
Adam Feuer 2010
Adam Monsen 2010
Clytie Siddall 2010
Ed Cable 2010
Kay Chau 2010
How to enter Collection Sheet data
© anita Anderson 2010
Modifications:
Adam Feuer 2010
Adam Monsen 2010
Ed Cable 2010
Kay Chau 2010
Mike Dash 2010
Tracy Mehoke 2010
How to import transactions
© anita Anderson 2010
Modifications:
Adam Monsen 2010
Ed Cable 2010
Mike Dash 2010
How to log in and log out
176
© Mike Dash 2010
Modifications:
Adam Monsen 2010
Edward Cherlin 2010
Kay Chau 2010
Kris Mani 2010
How to make transactions for a loan account
© Ed Cable 2010
Modifications:
Adam Monsen 2010
anita Anderson 2010
Clytie Siddall 2010
Kay Chau 2010
How to manage loan account details
© anita Anderson 2010
Modifications:
Adam Monsen 2010
Ed Cable 2010
Kay Chau 2010
How to manage the product mix
© anita Anderson 2010
Modifications:
Adam Monsen 2010
Ed Cable 2010
Van Mittal-Henkle 2010
How to navigate within Mifos
© anita Anderson 2010
Modifications:
Adam Monsen 2010
Ed Cable 2010
Kay Chau 2010
Mike Dash 2010
How to run reports
© Ed Cable 2010
Modifications:
Adam Monsen 2010
anita Anderson 2010
How to set product rules and attributes
© anita Anderson 2010
Modifications:
Adam Monsen 2010
Ed Cable 2010
Kay Chau 2010
Tracy Mehoke 2010
How to set rules for data display
© anita Anderson 2010
Modifications:
Adam Monsen 2010
Ed Cable 2010
Kay Chau 2010
Van Mittal-Henkle 2010
177
How to set up MFI operations: Overview
© Mike Dash 2010
Modifications:
Adam Monsen 2010
Kris Mani 2010
How to set up Mifos overview
© Mike Dash 2010
Modifications:
Adam Monsen 2010
Ed Cable 2010
Kay Chau 2010
Kris Mani 2010
How to view organization settings
© anita Anderson 2010
Modifications:
Adam Feuer 2010
Adam Monsen 2010
Kay Chau 2010
How to track loan account history
© Ed Cable 2010
Modifications:
anita Anderson 2010
Clytie Siddall 2010
Kay Chau 2010
How to track savings account history
© Ed Cable 2010
Modifications:
Adam Feuer 2010
anita Anderson 2010
Clytie Siddall 2010
Kay Chau 2010
Mike Dash 2010
How to manage administrative documents
© anita Anderson 2010
Modifications:
Adam Feuer 2010
Adam Monsen 2010
Ed Cable 2010
Kay Chau 2010
Sonia Lyris 2010
How to use this manual
© Mike Dash 2010
Modifications:
Adam Monsen 2010
Ed Cable 2010
Kay Chau 2010
Kris Mani 2010
How to view and change details of centers, groups, and clients
© anita Anderson 2010
Modifications:
178
Adam Monsen 2010
Ed Cable 2010
Sonia Lyris 2010
How to view performance history
© Mike Dash 2010
Modifications:
Adam Monsen 2010
anita Anderson 2010
Ed Cable 2010
How to view system information and manage a Mifos shut down
© anita Anderson 2010
Modifications:
Adam Monsen 2010
Ed Cable 2010
Kay Chau 2010
How to work with funds (define, view, assign)
© Mike Dash 2010
Modifications:
Adam Monsen 2010
Ed Cable 2010
Kris Mani 2010
Tracy Mehoke 2010
How to work with offices
© Mike Dash 2010
Modifications:
Adam Feuer 2010
Adam Monsen 2010
Ed Cable 2010
Kay Chau 2010
Kris Mani 2010
Tracy Mehoke 2010
How to work with roles, permissions and system users
© anita Anderson 2010
Modifications:
Adam Feuer 2010
Adam Monsen 2010
Ed Cable 2010
Kris Mani 2010
Tracy Mehoke 2010
How to work with user checklists
© Mike Dash 2010
Modifications:
Adam Monsen 2010
anita Anderson 2010
Ed Cable 2010
Kris Mani 2010
Tracy Mehoke 2010
How to change a meeting schedule for a center
© Mike Dash 2010
Modifications:
Adam Monsen 2010
179
Ed Cable 2010
Kay Chau 2010
Sonia Lyris 2010
How to change the status of a savings account
© Mike Dash 2010
Modifications:
Adam Feuer 2010
Adam Monsen 2010
Ed Cable 2010
Kay Chau 2010
How to create a new loan account
© anita Anderson 2010
Modifications:
Adam Feuer 2010
Adam Monsen 2010
Clytie Siddall 2010
Ed Cable 2010
How to make transactions for a savings account
© Mike Dash 2010
Modifications:
Adam Monsen 2010
Clytie Siddall 2010
Ed Cable 2010
Kay Chau 2010
How to manage savings account details
© Mike Dash 2010
Modifications:
Adam Monsen 2010
anita Anderson 2010
Clytie Siddall 2010
Ed Cable 2010
Kay Chau 2010
How to manage reports
© Mike Dash 2010
Modifications:
Adam Monsen 2010
Ajay Kumar 2010
anita Anderson 2010
Ed Cable 2010
Kay Chau 2010
How to view and create surveys
© Mike Dash 2010
Modifications:
Adam Monsen 2010
anita Anderson 2010
Ed Cable 2010
Kay Chau 2010
Tracy Mehoke 2010
How to work with holidays
© Mike Dash 2010
Modifications:
180
Adam Monsen 2010
Ed Cable 2010
Forest Monsen 2010
Kr Pierce 2010
How to manage collection of PPI data (India only)
© Mike Dash 2010
Modifications:
Adam Monsen 2010
anita Anderson 2010
Ed Cable 2010
Tracy Mehoke 2010
Introduction to loan accounts
© Adam Monsen 2010
Modifications:
anita Anderson 2010
Clytie Siddall 2010
Ed Cable 2010
Introduction to savings accounts
© Ed Cable 2010
Modifications:
Adam Monsen 2010
Kay Chau 2010
Mike Dash 2010
Rules for how to reschedule payment
© Mike Dash 2010
Modifications:
Adam Monsen 2010
anita Anderson 2010
Clytie Siddall 2010
Kay Chau 2010
Tips and Techniques
© Mike Dash 2010
Welcome to Mifos
© Mike Dash 2010
Modifications:
Adam Monsen 2010
Ed Cable 2010
Edward Cherlin 2010
Kay Chau 2010
Kris Mani 2010
Free manuals for free software
181
GENERAL PUBLIC LICENSE
Version 2, June 1991
Copyright (C) 1989, 1991 Free Software Foundation, Inc.
51 Franklin Street, Fifth Floor, Boston, MA 02110-1301, USA
Everyone is permitted to copy and distribute verbatim copies
of this license document, but changing it is not allowed.
Preamble
The licenses for most software are designed to take away your freedom to share and change
it. By contrast, the GNU General Public License is intended to guarantee your freedom to
share and change free software--to make sure the software is free for all its users. This
General Public License applies to most of the Free Software Foundation's software and to any
other program whose authors commit to using it. (Some other Free Software Foundation
software is covered by the GNU Lesser General Public License instead.) You can apply it to
your programs, too.
When we speak of free software, we are referring to freedom, not price. Our General Public
Licenses are designed to make sure that you have the freedom to distribute copies of free
software (and charge for this service if you wish), that you receive source code or can get it if
you want it, that you can change the software or use pieces of it in new free programs; and
that you know you can do these things.
To protect your rights, we need to make restrictions that forbid anyone to deny you these
rights or to ask you to surrender the rights. These restrictions translate to certain
responsibilities for you if you distribute copies of the software, or if you modify it.
For example, if you distribute copies of such a program, whether gratis or for a fee, you must
give the recipients all the rights that you have. You must make sure that they, too, receive or
can get the source code. And you must show them these terms so they know their rights.
We protect your rights with two steps: (1) copyright the software, and (2) offer you this license
which gives you legal permission to copy, distribute and/or modify the software.
Also, for each author's protection and ours, we want to make certain that everyone
understands that there is no warranty for this free software. If the software is modified by
someone else and passed on, we want its recipients to know that what they have is not the
original, so that any problems introduced by others will not reflect on the original authors'
reputations.
Finally, any free program is threatened constantly by software patents. We wish to avoid the
danger that redistributors of a free program will individually obtain patent licenses, in effect
making the program proprietary. To prevent this, we have made it clear that any patent must
be licensed for everyone's free use or not licensed at all.
The precise terms and conditions for copying, distribution and modification follow.
TERMS AND CONDITIONS FOR COPYING, DISTRIBUTION AND MODIFICATION
0. This License applies to any program or other work which contains a notice placed by the
copyright holder saying it may be distributed under the terms of this General Public License.
The "Program", below, refers to any such program or work, and a "work based on the
Program" means either the Program or any derivative work under copyright law: that is to
say, a work containing the Program or a portion of it, either verbatim or with modifications
and/or translated into another language. (Hereinafter, translation is included without limitation
in the term "modification".) Each licensee is addressed as "you".
182
Activities other than copying, distribution and modification are not covered by this License;
they are outside its scope. The act of running the Program is not restricted, and the output
from the Program is covered only if its contents constitute a work based on the Program
(independent of having been made by running the Program). Whether that is true depends on
what the Program does.
1. You may copy and distribute verbatim copies of the Program's source code as you receive
it, in any medium, provided that you conspicuously and appropriately publish on each copy an
appropriate copyright notice and disclaimer of warranty; keep intact all the notices that refer
to this License and to the absence of any warranty; and give any other recipients of the
Program a copy of this License along with the Program.
You may charge a fee for the physical act of transferring a copy, and you may at your option
offer warranty protection in exchange for a fee.
2. You may modify your copy or copies of the Program or any portion of it, thus forming a
work based on the Program, and copy and distribute such modifications or work under the
terms of Section 1 above, provided that you also meet all of these conditions:
a) You must cause the modified files to carry prominent notices stating that you
changed the files and the date of any change.
b) You must cause any work that you distribute or publish, that in whole or in part
contains or is derived from the Program or any part thereof, to be licensed as a whole
at no charge to all third parties under the terms of this License.
c) If the modified program normally reads commands interactively when run, you must
cause it, when started running for such interactive use in the most ordinary way, to
print or display an announcement including an appropriate copyright notice and a notice
that there is no warranty (or else, saying that you provide a warranty) and that users
may redistribute the program under these conditions, and telling the user how to view a
copy of this License. (Exception: if the Program itself is interactive but does not normally
print such an announcement, your work based on the Program is not required to print
an announcement.)
These requirements apply to the modified work as a whole. If identifiable sections of that work
are not derived from the Program, and can be reasonably considered independent and
separate works in themselves, then this License, and its terms, do not apply to those sections
when you distribute them as separate works. But when you distribute the same sections as
part of a whole which is a work based on the Program, the distribution of the whole must be
on the terms of this License, whose permissions for other licensees extend to the entire
whole, and thus to each and every part regardless of who wrote it.
Thus, it is not the intent of this section to claim rights or contest your rights to work written
entirely by you; rather, the intent is to exercise the right to control the distribution of
derivative or collective works based on the Program.
In addition, mere aggregation of another work not based on the Program with the Program (or
with a work based on the Program) on a volume of a storage or distribution medium does not
bring the other work under the scope of this License.
3. You may copy and distribute the Program (or a work based on it, under Section 2) in object
code or executable form under the terms of Sections 1 and 2 above provided that you also do
one of the following:
a) Accompany it with the complete corresponding machine-readable source code, which
183
must be distributed under the terms of Sections 1 and 2 above on a medium customarily
used for software interchange; or,
b) Accompany it with a written offer, valid for at least three years, to give any third
party, for a charge no more than your cost of physically performing source distribution,
a complete machine-readable copy of the corresponding source code, to be distributed
under the terms of Sections 1 and 2 above on a medium customarily used for software
interchange; or,
c) Accompany it with the information you received as to the offer to distribute
corresponding source code. (This alternative is allowed only for noncommercial
distribution and only if you received the program in object code or executable form with
such an offer, in accord with Subsection b above.)
The source code for a work means the preferred form of the work for making modifications to
it. For an executable work, complete source code means all the source code for all modules it
contains, plus any associated interface definition files, plus the scripts used to control
compilation and installation of the executable. However, as a special exception, the source
code distributed need not include anything that is normally distributed (in either source or
binary form) with the major components (compiler, kernel, and so on) of the operating system
on which the executable runs, unless that component itself accompanies the executable.
If distribution of executable or object code is made by offering access to copy from a
designated place, then offering equivalent access to copy the source code from the same
place counts as distribution of the source code, even though third parties are not compelled to
copy the source along with the object code.
4. You may not copy, modify, sublicense, or distribute the Program except as expressly
provided under this License. Any attempt otherwise to copy, modify, sublicense or distribute
the Program is void, and will automatically terminate your rights under this License. However,
parties who have received copies, or rights, from you under this License will not have their
licenses terminated so long as such parties remain in full compliance.
5. You are not required to accept this License, since you have not signed it. However, nothing
else grants you permission to modify or distribute the Program or its derivative works. These
actions are prohibited by law if you do not accept this License. Therefore, by modifying or
distributing the Program (or any work based on the Program), you indicate your acceptance of
this License to do so, and all its terms and conditions for copying, distributing or modifying the
Program or works based on it.
6. Each time you redistribute the Program (or any work based on the Program), the recipient
automatically receives a license from the original licensor to copy, distribute or modify the
Program subject to these terms and conditions. You may not impose any further restrictions
on the recipients' exercise of the rights granted herein. You are not responsible for enforcing
compliance by third parties to this License.
7. If, as a consequence of a court judgment or allegation of patent infringement or for any
other reason (not limited to patent issues), conditions are imposed on you (whether by court
order, agreement or otherwise) that contradict the conditions of this License, they do not
excuse you from the conditions of this License. If you cannot distribute so as to satisfy
simultaneously your obligations under this License and any other pertinent obligations, then as
a consequence you may not distribute the Program at all. For example, if a patent license
would not permit royalty-free redistribution of the Program by all those who receive copies
directly or indirectly through you, then the only way you could satisfy both it and this License
would be to refrain entirely from distribution of the Program.
If any portion of this section is held invalid or unenforceable under any particular circumstance,
the balance of the section is intended to apply and the section as a whole is intended to apply
184
Thanks for reading!
Visit http://flossmanuals.net to make corrections or to find more manuals.