1
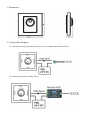
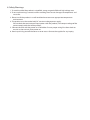
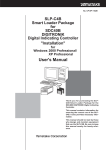
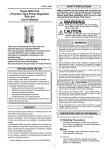
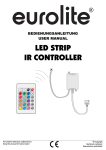
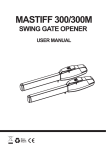
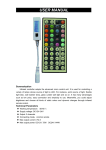
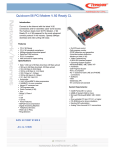
LED DMX & PWM Controller RGB - User Manual
Item no.: LC-006-001
1. Product Description
The controller is a simple LED controller sending DMX 512 signals and PWM signals. Thus, LEDs can
be driven directly or via DMX. The controller have color selection, brightness of color graduation rate
and the selection of predefined gradients to be set. The controller is suitable for any RGB LED light.
Mounting on delivered surface mount box.
2. Performance Parameter
Power Rating Controller
Output Signal
Product Dimensions (L x W x H in mm)
Weight
3x2A (72W/12V) od. (144w/24V)
DMX512
L 86 x W 86 x H 24 mm
75 g
3. Operations
1. On/Off Switch
Press the toggle and hold it down for about 3 seconds, the output will be turned off.
Rotating the toggle or pressing the toggle once resumes the output setting.
2. USITT DMX-512 Standard Signal
3. Built-in 10 patterns to control RGB fixtures, Assignable fade settin in Automode
4. Manually adjust RGB color saturation in Manual Mode
5. RGB indicator on the panel to view on the output state in a realtime
Two Modes as follows:
6a. AUTO MODE
Choosing PROGRAM menu will activate AUTOMODE automatically.
In this mode, the brightness and speed can be adjusted.
6b. MANUEL MODE
Select COLOR menu, totate the toggle to activate the manual mode and adjust the color manually
*via DMX-512: red color (1st channel), green color (2nd channel), blue color (3rd channel)
Four Menus as follows:
Pressing the toggle once will activate one menu. The indicated LED of chosen menu displays the fixed
color while the colors of the other three sides vary with the variety of output values.
Menu PROGRAM:
1. Rotate the toogle to the Menu PROGRAM and press the toggle short.
2. Rotate the toogle to select the desired program.
Program 1 + 2: The LED indicator shows at „Program“ the color red.
Program 3 + 4: The LED indicator shows at „Program“ the color green.
Program 5 + 6: The LED indicator shows at „Program“ the color blue.
Program 7 + 8: The LED indicator shows at „Program“ the color yellow.
Program 9 + 10: The LED indicator shows at „Program“ the color cyan.
Program Auto : The LED indicator shows at „Program“ the color white.
(Autoprogram is the sequential running of these 1 to 10 programs.)
Menu COLOR:
1. Rotate the toogle to the Menu COLOR and press the toggle short.
2. Rotate the toogle to adjust the color manually.
Menu BRIGHTNESS:
1. Rotate the toogle to the Menu BRIGHTNESS and press the toggle short.
2. Rotate the toggle to adjust the RGB brightness. When reaching the maximum/
minimum value, the LED indicator will flash repeatedly three times.
Menu SPEED.
1. Rotate the toogle to the Menu SPEED and press the toggle short.
2. Rotate the toggle to adjust the level of speed. The speed is from 0.4s to 50s. It
changes as 0.4s, 0.6s, 0.8s,1.0s,1.2s,....50s.
Adjusting the speed activates AUTOMODE automatically.
When reaching the maximum / minimum value, the LED indicator will flash
repeatedly three times.
4. Dimension
5. Conjunction Diagram
5a. Connection example directly to control LED Line via PWM Signal: (Master/Slave):
5b. Connection example via DMX Signal:
6. Safety Warnings:
1. To avoid installed the product in minefield, strong magnetic field and high voltage area.
2. To ensure the wiring is correct and firm avoiding short circuit damages to components and
cause fire.
3. Please install the product in a well ventilated area to ensure appropriate temperature
environment.
4. The product must be worked with DC constant voltage power supply.
Please check the consistence of input power with the product, if the output voltage of the
power comply with that of the product.
5. Connect the wire with the power on is forbidden. Ensure proper wiring first then check to
ensure no short-circuit, then power on.
6. Don‘t repair it by yourself whenever an error occur. Contact the supplier for any inquiry.