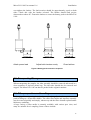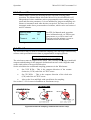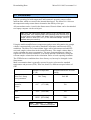
1
MicroVol-1100
Low Flow-rate
Air Sampler
User Manual
Version: 1.6
www.ecotech.com
MicroVol-1100 User manual 1.6
Front Matter
Manufacturers statement
Thank you for selecting the MicroVol-1100 Low flow-rate Air Sampler. The
MicroVol-1100 is designed primarily as a stand alone portable particulate sampler and
should give many years of trouble free service if installed, used and maintained
correctly. By following the guidelines contained in this manual and with the
implementation of a good quality-assurance program, the user can obtain accurate and
reliable particulate concentration data. Please ensure that you read the safety and
warranty details as they contain important information for the user. If, after reading
this manual you have any questions or you are still unsure or unclear on any part of
the NUT-1000 then please do not hesitate to contact Ecotech.
Ecotech also welcomes any improvements that you feel would make this a more
useable and helpful product then please send your suggestions to us here at Ecotech.
Please help the environment and recycle the
pages of this manual when finished using it.
Notice
The information contained in this manual is subject to change without notice. Ecotech
reserves the right to make changes to equipment construction, design, specifications
and /or procedures without notice.
Copyright © 2007. All rights reserved. Reproduction of this manual, in any form, is
prohibited without the written consent of Ecotech Pty Ltd.
i
Front Matter
MicroVol-1100 User manual 1.6
WARNING
Safety requirements
ii
•
To reduce the risk of personal injury caused by electrical shock, follow all
safety notices and warnings in this documentation.
•
If the equipment is used for purposes not specified by Ecotech, the protection
provided by this equipment may be impaired.
•
Replacement of any part should only be carried out by qualified personnel,
only using parts specified by Ecotech. Always disconnect power source before
removing or replacing any components.
MicroVol-1100 User manual 1.6
Front Matter
Factory service/warranty
This product has been manufactured with care and attention.
The product is subject to a 12-month warranty on parts and labour. The warranty
period commences when the product is shipped from the factory. Consumable items
are not covered by this warranty.
To ensure that we process your factory repairs and returned goods efficiently and
expeditiously, we need your help. Before you ship any equipment to our factory,
please call your local Ecotech service response centre (or distributor) to obtain a
return authorisation number.
When you call please be prepared to provide the following information:
1. your name, telephone number and Facsimile number
2. Your company name
3. The model number or a description of each item
4. The serial number of each item, if applicable
5. A description of the problem or the reason you are returning the equipment
(eg, sales return, warranty return, etc)
If you are required to return the equipment an accompanying document with:
1. Your name, number and Facsimile number
2. Your company name with return shipment
3. The model number or a description of each item
4. The serial number of each item, if applicable
A description of the problem/reason you are returning the equipment
iii
Front Matter
MicroVol-1100 User manual 1.6
Claims for Damaged Shipments and Shipping
Discrepancies
Damaged shipments
1. Inspect all instruments thoroughly on receipt. Check materials in the
container(s) against the enclosed packing list. If the contents are damaged
and/or the instrument fails to operate properly, notify the carrier and Ecotech
immediately.
2. The following documents are necessary to support claims:
a.
b.
c.
d.
Original freight bill and bill lading
Original invoice or photocopy of original invoice
Copy of packing list
Photographs of damaged equipment and container
You may want to keep a copy of these documents for your records also.
Refer to the instrument name, model number, serial number, sales order
number, and your purchase order number on all claims. Upon receipt of a
claim, we will advice you of the disposition of your equipment for repair or
replacement.
Shipping Discrepancies
Check all containers against the packing list immediately on receipt. If a shortage or
other discrepancy is found, notify the carrier and Ecotech immediately. We will not be
responsible for shortages against the packing list unless they are reported promptly.
iv
MicroVol-1100 User manual 1.6
Front Matter
Manual Revision History
Ecotech Manual ID:
Manual PN:
Current Revision:
Date released:
Description:
MAN 0040
ECO-MIC1100MAN
1.6
May 2007
User Manual for the MicroVol-1100
This manual is a newly created document for use of the MicroVol-1100 low flow-rate
air sampler.
Edition
Date
Summary
Affected
Pages
1.0
November
2000
Release
All
1.1
December
2000
Menu structure flow chart added
28
1.1a
June 2001
Battery charger part number
changed
53
1.2
April
2003
Wind Direction Sensor drawing
added
38, 35
Protection mode notes added
28,33
Flow-rate notes added
7-9, 13
Minor details
32, 34, 35
V1.13 software changes –
trigger input
2.4.2,
4.5.4.3
Size Select function
4.5.4
1.3
November
2003
1.4
February
2006
Updated Downloader
information and USB-RS232
adapter information
46-49
1.5
June 2006
General updates
various
1.6
January
2007
New company details added,
Manual redesigned
All,
v
Front Matter
MicroVol-1100 User manual 1.6
Table of Contents
1
INTRODUCTION............................................................................................................ 1
1.1
1.2
1.2.1
1.2.2
1.2.3
1.2.4
1.2.5
1.2.6
1.2.7
1.3
1.4
1.4.1
1.4.2
1.5
1.5.1
1.5.2
2
INSTALLATION ........................................................................................................... 10
2.1
2.1.1
2.1.2
2.2
2.3
2.4
2.4.1
2.4.2
2.5
2.6
2.6.1
2.6.2
2.6.3
2.6.4
3
CONNECTING EQUIPMENT TO THE WIND SPEED AND DIRECTION INPUT PLUG .......10
CONNECTING A WIND SENSOR OR RAIN-GAUGE ..........................................................10
CONNECTING AN EXTERNAL TRIGGER FOR REMOTE ACTIVATION ..............................11
INSTALLING THE MICROVOL-1100 FOR INDOOR SAMPLING ......................................11
INSTALLING THE MICROVOL-1100 FOR OUTSIDE SAMPLING.....................................11
CONNECTING POWER ....................................................................................................12
MAINS POWER ADAPTOR ..............................................................................................12
CONNECTING POWER – BATTERY PACK OPTION ..........................................................12
TRANSPORTING/STORAGE ............................................................................................13
FILTER PREPARATION AND HANDLING .........................................................................13
PRE-COLLECTION EQUILIBRATION ...............................................................................14
FILTER EXCHANGE .......................................................................................................14
POST COLLECTION EQUILIBRATION .............................................................................15
FINAL WEIGHING ..........................................................................................................15
OPERATION.................................................................................................................. 17
3.1
3.2
3.2.1
3.2.2
3.3
3.4
3.4.1
3.4.2
3.4.3
3.4.4
3.5
vi
DESCRIPTION ...................................................................................................................1
SPECIFICATIONS ..............................................................................................................3
FLOW CONTROL .............................................................................................................3
INLET ASSEMBLY ...........................................................................................................3
OPERATING ENVIVONMENT ............................................................................................3
CONSTRUCTION AND DIMENSIONS.................................................................................3
POWER ............................................................................................................................4
ACCESSORIES .................................................................................................................4
BATTERY PACK OPTION .................................................................................................4
NOMENCLATURE..............................................................................................................5
BACKGROUND/ THEORY ..................................................................................................6
PARTICULATE SAMPLING ...............................................................................................6
PRINCIPLE OF OPERATION OF SIZE SELECTIVE INLETS ...................................................7
INSTRUMENT DESCRIPTION .............................................................................................8
INLET TUBE.....................................................................................................................9
FILTER HOLDER / IMPACTOR ASSEMBLY ........................................................................9
HOW THE MICROVOL THINKS ......................................................................................18
GENERAL OPERATIONAL INFORMATION ......................................................................17
MENU OPERATION ........................................................................................................19
CHANGING MENU SETTINGS ........................................................................................20
MAIN SCREEN .................................................................................................................21
MENUS AND SCREENS ....................................................................................................22
STATUS SCREEN ...........................................................................................................23
SETUP MENU ................................................................................................................24
MANUAL MENU............................................................................................................30
HIDDEN MENU..............................................................................................................45
WIND SENSOR ................................................................................................................30
MicroVol-1100 User manual 1.6
3.6
4
4.1
4.2
4.3
4.4
5
Front Matter
RAIN GAUGE ..................................................................................................................31
CALIBRATION ............................................................................................................. 33
TEMPERATURE SENSOR CALIBRATION ........................................................................33
BAROMETRIC PRESSURE SENSOR CALIBRATION ........................................................33
FLOW RATE CALIBRATION ...........................................................................................33
PROCEDURE FOR RE-CALIBRATING THE MICROVOL-1100: .......................................34
COLLECTING DATA .................................................................................................. 36
5.1 USING MICROVOL DOWNLOADER SOFTWARE ............................................................36
5.2 COMMUNICATING WITH THE MICROVOL (ALTERNATIVE METHOD) ........................39
5.3 CALCULATIONS ..............................................................................................................40
5.3.1 SAMPLE VOLUME .........................................................................................................41
5.3.2 MASS CONCENTRATION CALCULATION........................................................................41
6
MAINTENANCE ........................................................................................................... 42
6.1 MAINTENANCE TOOLS ...................................................................................................42
6.2 MAINTENANCE SCHEDULE ............................................................................................42
6.3 MAINTENANCE PROCEDURES ........................................................................................42
6.3.1 CLEANING THE INLET COMPONENTS ............................................................................42
6.3.2 IMPACTOR ASSEMBLY ..................................................................................................43
6.3.3 PUMP MAINTENANCE....................................................................................................44
7
TROUBLESHOOTING ................................................................................................ 47
8
INSTRUCTIONS FOR ACCESSORIES AND OPTIONS ........................................ 49
8.1
8.2
8.3
8.4
8.5
8.6
8.7
BATTERY PACK ..............................................................................................................49
CHARGING THE BATTERY PACK ...................................................................................49
DISPOSING OF OLD BATTERIES .....................................................................................49
BATTERY CHARGER WITH TIMER, 100-250V MODEL .................................................50
BATTERY CHARGER, BASIC 240V MODEL ...................................................................50
DUAL-STAGE FILTER HOLDER (OPTION) ......................................................................51
PM2.5 NOZZLE ADAPTOR (OPTION) .............................................................................51
APPENDIX A SPARE PARTS AND ACCESSORIES LIST ......................................... 53
APPENDIX B MICROVOL-1100 LOG-BOOK ................................................................. 54
vii
Front Matter
MicroVol-1100 User manual 1.6
List of Figures
Figure 1 MicroVol-1100 Inlet Assembly..................................................................................... 7
Figure 2 MicroVol-1100 components layout.............................................................................. 8
Figure 3 External Trigger Output ............................................................................................. 11
Figure 4 Mains power adaptor................................................................................................. 12
Figure 5 Battery pack connection sequence ........................................................................... 13
Figure 6 MicroVol-1100 control panel (cover removed) .......................................................... 17
Figure 7 Main screen pump on................................................................................................ 21
Figure 8 Main screen pump off................................................................................................ 21
Figure 9 Main menu................................................................................................................. 21
Figure 10 Status Screen.......................................................................................................... 23
Figure 11 Setup Menu ............................................................................................................. 24
Figure 12 Filter Blocked........................................................................................................... 25
Figure 13 Main screen pump off ......................................................................................... 25
Figure 14 Start Date Menu ...................................................................................................... 25
Figure 15 End Date Menu ....................................................................................................... 25
Figure 16 Daily Menu .............................................................................................................. 26
Figure 17 Weekly Menu........................................................................................................... 26
Figure 18 Wind Menu .............................................................................................................. 27
Figure 19 Trigger Setup Menu................................................................................................. 27
Figure 20 Logger setup Menu ................................................................................................. 29
Figure 21 Clock Menu ............................................................................................................. 29
Figure 22 Manual Mode........................................................................................................... 30
Figure 23 Hidden Menu ........................................................................................................... 45
Figure 24 Conditional sampling, wind direction sensor setup. ................................................ 30
Figure 25 Properties screen ................................................................................................... 37
Figure 26 Output screen......................................................................................................... 38
Figure 27 MicroVol-1100 Underside........................................................................................ 39
Figure 28 Replacing the pump ............................................................................................... 44
Figure 29 Dual stage filter holder ............................................................................................ 51
Figure 30 Views of the PM2.5 nozzle adaptor (pencil shows scale)......................................... 51
Figure 31 PM2.5 Nozzle components and assembly................................................................ 52
viii
MicroVol-1100 User manual 1.6
Introduction
Introduction
11
1.1 Description
The MicroVol-1100 Particulate Sampler provides a flexible platform for sampling of
PM10, PM2.5 or TSP particulate and for monitoring basic meteorological parameters.
Incorporating a pump, filter holder and flow control circuit, the sampler is
microprocessor based and features internal data logging of flow and meteorological
parameters.
The MicroVol-1100 constantly monitors the 'mass flow rate' of air passing through
the filter and pump. This mass flow is computed with the ambient pressure and
temperature sensor measurements to calculate the volumetric flow rate (e.g. 3L/min).
variation in pump vacuum is The pump is a linear diaphragm pump and the correct
flow rate is maintained by varying the amplitude of diaphragm movement, this
changes the vacuum created by the pump, more vacuum for more filter loading.
The MicroVol-1100 incorporates Active Volumetric flow control which mediates
pump speed and air velocity to guarantee a constant sampling flow-rate no matter the
filter loading of restrictions in place.
The MicroVol-1100 is designed to operate from a 12 VDC power supply. It can be
powered from a variety of different sources, including the AC mains power adaptor,
an optional battery pack, or solar panel and battery combination.
The MicroVol-1100 incorporates ambient temperature, pressure and humidity sensors,
which are used to automatically maintain a constant volumetric flow-rate of typically
3 litres per minute (l/min) through a 47mm-diameter circular filter.
The MicroVol-1100 includes the facility to monitor wind speed and direction, using
an optional external wind sensor. Wind speed and direction data are averaged and
stored in internal memory, and may be used as triggers for conditional sampling.
The MicroVol-1100 also incorporates a time clock and programmable timer enabling
multiple time based sampling programs to be configured.
The MicroVol-1100 internal data logger stores time based data averages at user
selectable intervals. The data includes date and time stamp, flow-rate, total sample
volume, average temperature, barometric pressure, and either wind speed and wind
direction or rain-fall information. Data values stored in the MicroVol may be
downloaded via the RS-232C Serial port.
The MicroVol-1100 is extremely quiet allowing it to be used at indoor sampling
locations to assess human exposure to particulate matter (PM), and is housed in a
weatherproof enclosure for outdoor sampling in a range of environments.
Some typical sampling applications include:
•
Sample collection at surface mines
•
Fence line sampling
•
Saturation sampling to determine gradients in PM concentration
•
Indoor air quality studies for health and safety
•
Locations where mains power is unavailable
1
Introduction
MicroVol-1100 User manual 1.6
Sampler features
•
Active volumetric flow control
•
Internal data logging
•
Sampler setup via four-line LCD display and keypad
•
Sampling procedure can be programmed through specific time
periods from the hour, the day and the day of week, as well as the
calendar dates it will run between
•
Conditional sampling based on wind speed and direction
•
Ultra-efficient, long life pump designed for flow rates of 1 to 4.5
l/min 1
•
Low power consumption
•
Optional solar panel and battery operation.
•
Auto pump shut-down when voltage is low to protect battery
•
Light-weight rugged weather-proof construction and low noise
operation suits indoor and outdoor operation
•
Precision flow controller ensures flow-rate control within 1% of setpoint
•
PM10 & TSP Sampling inlet (standard), PM2.5 inlet adaptor (optional
extra), includes rain cap and insect mesh for outdoor use
•
Optional dual-stage filter pack can collect particulate matter and
gaseous compounds on separate filters:
Example: First stage collects fine particulate,
inorganic anion concentrates or acidic particulate;
Second stage collects non-reactive gases.
1
2
The PM10 Inlet must operate at flow rate of 3.0 l/min to achieve the specified cut-point
MicroVol-1100 User manual 1.6
Introduction
1.2 Specifications
1.2.1 Flow Control
Volumetric flow-rate range 1 :
Flow accuracy:
Flow repeatability:
1 – 4.5 l/min
2% of reading
0.5% of reading
1.2.2 Inlet Assembly
Inlet Assembly material:
Size Selective Inlets:
PM2.5 adaptor (option)
Cut-point:
Filter holder material:
Filter element:
Anodised aluminium
PM10 (standard), TSP (pending)
50% cut-point at 3 l/min volumetric
flow-rate
Polycarbonate
∅47mm Polypropylene-ringed
circular filter (various materials
and pore sizes available)
1.2.3 Operating environment
Ambient temperature range:
Temperature accuracy:
Barometric pressure range:
Barometric Pressure accuracy:
0 to +45°C
±1°C
600-900 mm Hg (Torr)
(800-1200 hPa)
±4 mm Hg (Torr)
Note: Avoid corrosive, salty, or excessively
humid environments where possible.
1.2.4 Construction and Dimensions
Housing:
Case dimensions:
Sample tube length:
Inlet height (approx.):
Weight:
PVC plastic, with rubber feet and
weatherproof cap
300 mm (height) x 170 mm (diameter)
500mm (1000mm option or other
lengths available)
600mm (standard)
3.75 kg with mains power adaptor
8.15kg with battery pack option
3
Introduction
MicroVol-1100 User manual 1.6
1.2.5 Power
Operating Voltage:
Power consumption (typ.):
Power consumption (max.):
Power consumption (standby):
Power connector:
Power sources:
Low voltage cut out:
11-15 VDC (12VDC nominal)
2.5 – 3 watts (210 mA @ 12 VDC)
Using clean Teflon filter with support
ring, 2um pore size, 3l/min
6 watts (500 mA @ 12 VDC)
0.6W (50 mA @ 12 VDC)
2.5mm DC connector
Centre (+), outside (-)
Mains power adaptor (standard)
Battery pack (optional)
Solar panel battery charger (optional)
At 11VDC, auto reset @ 12VDC
(adjustable)
1.2.6 Accessories
Standard:
PM10 Size Selective inlet
Single filter holder
100-240VAC to 12 VDC power pack
Optional:
Double filter holders
Battery pack for 24 hour sampling
Solar Panel & regulator
PM2.5 Inlet Adaptors
1.2.7 Battery Pack option
Nominal Voltage:
Nominal capacity:
Operation capacity:
Fuse:
12VDC
12Ah at 20hr discharge rate of 600mA
At least 24 hours, up to 48 hours
depending on filter loading, filter
material and flow-rate (using a fully
charged battery)
3.15A, M205 type (20x5mm)
Charge retention (shelf life) at 20°C:
1 month
97%
3 months
91%
6 months
85%
4
MicroVol-1100 User manual 1.6
Introduction
Life expectancy vs depth of discharge (d.o.d.):
100% d.o.d.
250 cycles (approx.)
50% d.o.d.
550 cycles (approx.)
30% d.o.d.
1500 cycles (approx.)
Battery charger type:
12V sealed lead-acid battery charger
Charging voltage:
14.4 – 15.0 VDC
Max. charge current:
2.5A
Charger connection:
Waterproof connector with cover,
dotted pin (+)
Features:
Clips to underside of MicroVol
Weather-proof construction
Dimensions:
185mm (height) x 170mm (diameter)
1.3 Nomenclature
SSI: Size Selective Inlet, used to sample particulates of a given Equivalent
Aerodynamic Diameter (PM10, PM2.5).
TSP: The TSP (Total Suspended Particulate) includes all suspended particulate
matter.
PM10: The PM10 includes all particulates of an Equivalent Aerodynamic Diameter
(EAD) of 10 microns or less.
PM2.5: The PM2.5 includes all particulates of an Equivalent Aerodynamic Diameter
(EAD) of 2.5 microns or less.
PPM: Parts Per Million
5
Introduction
MicroVol-1100 User manual 1.6
1.4 Background/ Theory
1.4.1 Particulate Sampling
The MicroVol is designed primarily as a particulate sampler. The MicroVol pump and
flow controller draws a sample of air through a specially prepared filter. The filter
collects the airborne particles for analysis. The MicroVol controls the flow-rate and
records the volume of air that has been sampled.
The airborne suspended particles are collected on a pre-weighed filter over a predetermined period. After the sampling period is complete, the filter is removed and reweighed to determine the concentration and/or composition of suspended particulate.
Concentration results are typically expressed in micrograms per cubic metre (µg/m3)
of air sampled at standard temperature and pressure conditions.
Acceptable levels have been established to govern the amount of airborne particulate
of a particular size and composition that may pose a health hazard to humans.
The MicroVol-1100 utilises a size-selective inlet to restrict the sampled particulate to
being that of a designated size or smaller.
6
•
A PM10 sample inlet restricts the collected particulate to that with an
aerodynamic equivalent diameter (AED) of 10 microns or less.
•
A PM2.5 sample inlet similarly restricts the collected particulate to
that with an aerodynamic equivalent diameter (AED) of 2.5 microns
or less.
•
A TSP (Total Suspended Particulate) sample inlet, ideally, samples
all suspended particulate matter. However, it should prevent
unusually large particles and insects from being collected on the
filter element.
MicroVol-1100 User manual 1.6
Introduction
1.4.2 Principle of operation of size selective inlets
Figure 1 MicroVol-1100 Inlet Assembly
The MicroVol-1100 inlet has been developed, tested and calibrated by the Australian
CSIRO Division of Atmospheric Research.
The size-selective inlet is of the impaction type. Ambient air enters the Inlet
Assembly via a rain cap and Stainless Steel insect mesh screen that prevent
contamination of the sample by precipitation and large debris. The air is funnelled
through an acceleration nozzle where it is directed towards a flat impaction plate that
sharply diverts the airstream. Particles larger than the size cut-point tend to be heavier
and hit the impaction plate where they are trapped. Smaller particles remain airborne
and continue into the sampler. The size cut-point is affected by airstream velocity /
flow-rate, acceleration nozzle diameter, and particle density, composition and shape.
Ambient air is drawn into the size-selective inlet at a constant flow-rate in order to
maintain the size cut-point. To achieve this, the MicroVol-1100 uses a volumetric
flow-rate controller. The flow rate must be set to 3.0 l/min to achieve the correct
particle size cut-point. This flow rate is the same for PM10 and PM2.5 measurements.
The standard inlet consists of a PM10 nozzle body, impactor plate, rain cap and
connecting tube with o-ring seals. The PM10 nozzle body incorporates a filter holder
shroud and insect screen. An optional nozzle insert is available for PM2.5
7
Introduction
MicroVol-1100 User manual 1.6
measurements. The impactor plate can be removed to closely approximate TSP
sampling.
1.5 Instrument description
Figure 2 MicroVol-1100 components layout
Note: All parts, especially the impactor
assembly, filter holder and inlet tube, must be
clean and completely dry before assembly.
8
MicroVol-1100 User manual 1.6
Introduction
Note: The impactor must be greased prior
to use – see Section 6.3.2 for details.
1.5.1 Inlet tube
The inlet tube is removed during transportation. Remove the seal caps from the inlet
tube. Put the seal caps in a safe place for future transport. Check that the insides of the
inlet components (aluminium inlet tube, filter holder and impactor assembly) are free
of packing foam. Make sure the tube is clean and dry internally before fitting it to the
sampler.
Insert one end of the tube into the orange push-in fitting near the base of the
MicroVol-1100. Once initial resistance is felt, push the inlet tube into the fitting a
further 5-10mm to make a gas-tight seal. Then clip the tube to the side of the
MicroVol-1100. Put one of the seal caps on the top of the tube until the filter holder /
impactor assembly is ready to be attached. Keep the caps for future transportation.
1.5.2 Filter holder/impactor assembly
Detach the blue filter holder from the metal impactor assembly. Disassemble the filter
holder; install a filter in the filter holder, then re-assemble the filter holder and
impactor assembly. The filter holder and impactor assembly fit together as shown in
Figure 1. Make sure that the parts are pushed together and sealed correctly.
Remove the cap from the upper inlet tube and install the filter holder/impactor
assembly on top of the tube. Once initial resistance is felt, push the assembly down
another 5-10mm to make a gas-tight seal on the sample tube.
9
Installation
22
MicroVol-1100 User manual 1.6
Installation
Important:
•
A clean 47mm filter should always be installed in the filter holder before
applying power.
•
Always operate the MicroVol-1100 with the rain cap installed on top of the
Inlet Assembly – refer to Figure 1.
•
Do not expose the MicroVol-1100 to excessive amounts of water splashing
or spray. Avoid excessively humid environments if possible.
•
Keep the MicroVol-1100 away from corrosive environments including salt
water.
2.1 Connecting Equipment to the Wind Speed and Direction
Input Plug
The Wind Speed and Direction Input Plug is a 6-pin connector located on the
underside of the MicroVol.
One of the following external devices may be connected to the Input Plug Note: It is
not possible to connect more than one of the following at any one time. The MicroVol
is easily configured to accept these inputs.
•
Wind speed/direction sensor
•
Remote external Trigger
•
Rain gauge
2.1.1 Connecting a Wind sensor or Rain-gauge
The wind speed and direction sensor and tipping bucket rain gauge are
optional accessories. The cables may be ordered separately, and can be
manufactured to any length specified. Either cable connects to the socket on
the underside of the MicroVol. A weatherproof cover is fitted to the socket to
exclude dirt and moisture. This cover should be removed only when a cable is
connected to the socket.
Mounting hardware is included. The wind sensor includes a 1.2m cross arm
and rotating adaptor for aligning the sensor to true North. The rain gauge
includes a bracket, which may be mounted to a 25-50mm pole (either vertical
or horizontal).
The MicroVol is factory configured for the wind sensor input (default
configuration). If a rain gauge is used, the configuration should be changed.
Refer to the Hidden Menu section for details of how to set up the MicroVol
for rain gauge or wind sensor input.
10
MicroVol-1100 User manual 1.6
Installation
2.1.2 Connecting an External Trigger for remote activation
Refer to section 3.3.2.3 for details on how to setup the Trigger menu for
remote activation.
The external trigger voltage must be between 0 and 5v. If using a contact
closure to trigger the MicroVol then the signal must be pulled up to +5v with a
4.7kOhm resistor. +5V Pullup, ground and Trigger input are available on the
external trigger cable.
Ensure the Trigger Signal to Trigger Ground voltage does not exceed 5V. To
prevent damage to the MicroVol, opto-isolated or relay contacts are
recommended to connect the triggering device to the MicroVol.
Refer to the cable diagram for further details.
Figure 3 External Trigger Output
2.2 Installing the MicroVol-1100 for indoor sampling
Attach the MicroVol-1100 to a power-outlet that will not be needed for other
purposes, so that the power supply to the Micro-Vol 1100 will not be disturbed.
The sampler should be located in a position that will allow it to collect a sample
representative of the area of interest, without being influenced by any non-typical
factors. The MicroVol-1100 may be placed on a table away from any source of
particulate accumulation such as a wall, corner of room, or near an exhaust or inlet. It
may be advisable to remove or switch the MicroVol off while vacuum cleaning is
taking place, as unusually high dust levels will be present. Consult the relevant local
standards for further information on siting air samplers.
2.3 Installing the MicroVol-1100 for outside sampling
Attach the MicroVol main tubular housing securely to a post, preferably elevated so
that rain can not splash up underneath the sampler. An outdoor mounting bracket kit
is available. The rechargeable battery pack (option) is recommended for use outdoors.
Note: The standard mains power adaptor, and the mains powered battery charger are
not weatherproof and are not suitable for use outdoors.
Although the MicroVol-1100 is housed in a weatherproof enclosure, it should be
protected from moisture as much as possible. Water must not be allowed to enter the
inlet, filter holder, or inlet tube. Inlet components must be dried before removing them
(ie. when changing filters). Do not change the filter in wet conditions or if there is
11
Installation
MicroVol-1100 User manual 1.6
moisture visible on the inlet components. Always cover the inlet tube when the
impactor assembly and filter holder are removed outdoors.
The sampler should be located in a position that will allow it to collect a sample
representative of the area of interest, without being influenced by any non-typical
factors. For outdoor use, keep the sampler away from obstacles such as trees, exhaust
and inlet ducts, edges of buildings, etc. Consult the relevant local standards for further
information on siting air samplers.
2.4 Connecting power
2.4.1 Mains power adaptor
Figure 4 Mains power adaptor
Attach the power connector to the underside of the MicroVol-1100. Switch on the
power to the mains adaptor at the wall-socket.
The Mains power adaptor has an IEC 320 2-pin connector. It may be necessary to
purchase an input lead to suit the local power point outlet configuration.
The Mains power adaptor operates on most AC power supplies, from 100-240V, and
either 50 or 60 Hz.
2.4.2 Connecting power – Battery pack option
If the battery pack is being used, first connect the power lead to the underside of the
MicroVol-1100. Then centre the MicroVol-1100 on top of the battery pack. The latch
tension may be adjusted if necessary by turning the threaded part of the latch. Do not
12
MicroVol-1100 User manual 1.6
Installation
over-tighten the latches. The latch tension should be approximately equal on both
sides. Check this with the latches released. The latches should both project
downwards at about 45°. Fasten the latches to secure the battery pack to the MicroVol
1100.
Attach power lead
Adjust latch tension evenly
Close latches
Figure 5 Battery pack connection sequence
2.5 Transporting/Storage
When transporting the sampler, the inlet assembly should be removed and stored in a
clean container or zip-lock plastic bag. The inlet tube should also be removed and
capped. The MicroVol-1100 can then be packed in the original container.
2.6 Filter preparation and handling
Exchanging filters is a simple task, the sampler being fitted with a quick-connect
push-in fitting on a 47mm filter holder. The entire filter holder and impactor assembly
may be removed quickly and simply, taken away and the filter element replaced under
laboratory conditions.
A large variety of filter media is currently available, with various pore sizes, and
many are suitable for air sampling. Some of these include:
13
Installation
MicroVol-1100 User manual 1.6
•
Stretched Teflon filters
•
Quartz glass-fibre filters
•
Fluoropore filters
•
Membra-fil filters
Select the type of filter that is most suitable for the particles that you are interested in
sampling, but do not use filters that are, or become, too restrictive, or the sampler will
be unable to maintain constant flow-rates. Filters with a sealing-ring around the outer
edge are recommended.
The filters should only be handled with clean, non-serrated tweezers, never with
fingers, and only at the edge.
Inspect each filter for defects such as pinholes, loose material, discolouration and nonuniformity. Discard any filters that are defective in any way.
2.6.1 Pre-collection equilibration
Place filters on a Petri dish, and label each dish with a filter number. The
filters need to equilibrate for at least 24 hours under precisely controlled
temperature and relative humidity conditions:
Relative humidity should be maintained at a constant level of 50%±10% with
a variability of less than 5% (Australian Standards 3580.9.6-1990)
Temperature should be maintained at a constant level of 20-25°C (Australian
Standards 3580.9.6-1990).
A 6-place microbalance with a resolution of better than 0.01mg is required.
Before initial weighing of the filters, turn the microbalance on for 1 hour to
allow them to stabilise.
Weigh each filter at least twice and record the average initial mass of each
filter, Wi. Always check the zero reading of the microbalance between each
reading.
Immediately after weighing, place each filter into either a filter holder, and
assemble the filter holder, or into a Petri dish with a lid. The sample travels
down through the filter holder, so ensure that the filter is installed with the
sample side up.
Record the relative humidity, temperature, date and time of the initial
weighing.
2.6.2 Filter exchange
Filter element exchange should ideally occur under laboratory conditions. Two
or more filter holders can be used on a rotating basis. Extra filter holders are
available as spare parts. Transport the filter holder (filter element installed) in
a press-seal anti-static plastic bag to the sampling site.
Whenever a filter is replaced, record the time, date, sampling times and dates.
This may be a good time to record the sample volume and corrected sample
volume, or download the data from the MicroVol. (See section 5)
14
MicroVol-1100 User manual 1.6
Installation
A log-book sample page can be found at the back of this manual.
2.6.3 Post Collection Equilibration
Carefully remove the filter elements from their holders and check them for
defects that may have occurred during sampling. The sample should be
reasonably even across the element. Localised dark spots could indicate
pinhole leaks. Filter holder support screens will produce a pattern on the filter.
If this is unacceptable due to the type of analysis being performed requiring a
steady filter loading, an optional woven wire screen support is available.
Place the filter element on its numbered Petri dish and cover the top of the
dish with a paper towel.
Record the relative humidity, temperature, date and time of the post collection
equilibration. The equilibration temperature and relative humidity should be as
close as possible to the initial equilibration conditions. Once again, each filter
should be allowed to equilibrate for at least 24 hours.
2.6.4 Final weighing
Use the same microbalance that was used in the initial weighing. Before
weighing the filters, turn the microbalance on for 1 hour to allow them to
stabilise.
Weigh each filter at least twice and record the average final mass of each
filter, Wf. Always check the zero reading of the microbalance between each
reading.
Immediately after weighing, place each filter into a Petri dish with lid, sample
side up, and record the time and dates that the sample was taken.
Record the relative humidity, temperature, date and time of the final weighing.
Refer to the Calculation section for method of determining mass
concentrations.
15
MicroVol-1100 User manual 1.6
33
Operation
Operation
Remove the cover from the top of the MicroVol-1100 and connect the power supply.
The MicroVol flow, temperature and barometric pressure sensors have been factory
calibrated. The flow-rate is set in the Setup menu and should normally be set to 3. The
size selective inlet particle cut-point will be most accurate when the flow-rate is set to
3.0 l/min. The size selective inlet was designed to operate at 3.0 l/min to ensure that
the MicroVol-1100 takes a sample of sufficient quantity while allowing sufficient
pump capacity for when the filter becomes loaded.
3.1 General operational information
4 line LCD display
6 function keypad
Figure 6 MicroVol-1100 control panel (cover removed)
The MicroVol-1100 is microprocessor based and features internal data logging
of flow and meteorological parameters.
The internal data logger stores time based records at user-selectable intervals.
The data includes Date and Time, flow-rate (volumetric), sample volume
(uncorrected and corrected to Standard Temperature and Pressure conditions),
average temperature, pressure, wind speed and wind direction or rainfall
information. Values stored in the sampler may be downloaded via the RS232C Serial port.
17
Operation
MicroVol-1100 User manual 1.6
The MicroVol-1100 includes an input connector for wind speed and direction.
These inputs are averaged and stored in the unit, and may be used as triggers
for conditional sampling (eg. sampling when the wind direction is within a
specified range). The MicroVol also incorporates a time clock and
programmable timer enabling multiple time based sampling programs to be
configured.
3.1.1 MicroVol Sampling Protocol
The MicroVol uses a number of logical (conditional) parameters to decide
when it should switch the sample pump on.
The pump will be energised when all conditional parameters are satisfied. The
conditional parameters can be summarised as follows:
•
Is the current date after the specified Start Date and Time?
•
Is the current date before the specified End Date and Time?
•
Is the current time within one of the programmed Daily
sampling times? (Between any of the 6 programmable On Time
/ Off Time periods)
•
Is the current Day Of Week a specified sampling day?
•
Is the wind speed and direction sensor data within the
programmed range?
•
Is the power supply voltage above the lower limit (typically
11V)?
If all of the conditional parameters are satisfied (All ‘YES’ values
displayed in the Status Menu), then the MicroVol sample pump will
operate, and a sample will be collected on the filter paper.
In order to make the MicroVol pump operate continuously, it is possible to set
the MicroVol with parameter values that ensure all conditions are satisfied for
long periods of time. The only exception is that of the Power supply voltage,
which should always be maintained at above 11VDC. To set the MicroVol1100 to run continuously, enter the Setup menu:
Select Setup menu, then Times menu:
•
Select Start Date: Enter a date that is before the current date.
Example: Set the Start Date as yesterdays date or earlier.
•
Select End Date: Enter a date in the distant future.
Example: Set the End Date as tomorrows date or later.
•
Select Daily:
24:00.
Set On Time 1 to 00:00, Set Off Time 1 to
•
Select Weekly:
Set all days to YES.
•
Set Days/cycle to 1
Select Setup menu, then Wind menu
18
MicroVol-1100 User manual 1.6
•
Set CCW W.Dir to 0
•
Set CW W.Dir to 360
•
Set LO W. Speed to 0
•
Set HI W. Speed to 100
Operation
The MicroVol’s data logger collects data even when the pump is not running. The
data is collected at regular intervals, called the averaging period. The averaging period
is set in the Logger Setup menu. The data that is logged is the average data value
during the averaging period, with the data being written to memory at the end of that
period.
Data from up to 150 averaging periods may be stored in the MicroVol. Once the data
logger memory is full, the MicroVol stops collecting data. The MicroVol begins
collecting data when the logger accumulator is cleared. When setting the averaging
period, keep this in mind. If you want to collect one day worth of data, it will be
necessary to set the Logger setup averaging period to at least 10 minutes. If the
averaging period is set to one hour, 150 hourly averages of data will be collected. This
equates to over 6 days worth of data.
Note: Data is also collected when
the MicroVol is in Manual mode.
3.1.2 Menu operation
The MicroVol is equipped with a six-function keypad.
The keys are:
Exit
Page up
Select
Enter
Up arrow
Down arrow
To enter the menu system press Select or Enter.
To move the cursor to a different menu item press the Up arrow or Down arrow.
If the current menu is larger than four items then the screen will scroll up or
down when necessary.
To select the menu item under the cursor press the Select or Enter key.
To exit to the previous menu press Page up.
To exit from the menu system press Exit.
19
Operation
MicroVol-1100 User manual 1.6
3.1.3 Changing Menu Settings
Each menu comprises a number of menu items. The menu item contains a
description on the left and an operand on the right. The operand types are:
Type:
Operand Text:
Floating-point (FP) number
Long floating-point number
Integer
Long integer
Text
Time
Date
6 characters max.
8 characters max.
3
8
6 characters max.
hh:mm:ss (24-hour format)
dd/mm/yyyy (day/month/year)
mm/dd/yyyy (optional format)
yyyy/mm/dd (optional format)
SUN, MON, TUE…
YES, NO
Day
YesNo
Submenu
When an editable menu operand is selected, the following functions are available.
To move the cursor left or right, use:
Page up or
Select
To change the character under the cursor press Up arrow or Down arrow.
Note: Some characters are fixed and can not be changed.
The order in which the characters appear is:
FP first character
-.0123456789
FP other characters
.0123456789
Integer
0123456789
Time/Date
0123456789
Text
!"#$%&'()*+,-./0123456789:;<=>?
@ABCDEFGHIJKLMNOPQRSTUVWXYZ[\]^_
Day
YesNo
'abcdefghijklmnopqrstuvwxyz
SUN MON TUE WED THU FRI SAT
YES, NO
To accept the edited value press Enter
To discard the edited value press Exit
20
MicroVol-1100 User manual 1.6
Operation
3.2 Main screen
The main screen will constantly show parameter such as date and time, and other
depending whether the pump is on or off (see Figure 7 and Figure 8). If the user
wishes to change the MicroVol’s settings pressing Enter of select will then open the
main menu as shown in Figure 9.
Pump On
Auto/Manual
20/09/05
Sampling
11:53:23
Flow
l/min 3.000
Temp.
C 22.90
Press
mmHg 763.4
Displays current operating mode & date
Displays current time
Displays current flow-rate
Displays current temperature
Displays current barometric pressure
Figure 7 Main screen pump on
OR Pump Off
Ecotech
MicroVol
20/09/2005
11:53:23
(A one-line status message is
displayed)
Displays current date
Displays current time
Displays status message stating
why pump is off.
Figure 8 Main screen pump off
To enter the menu system press Select or Enter.
Status
Setup
Manual
S/W version
V2.08x
To Status Screen
To Setup Menu
To Manual Menu
Displays software version information
Figure 9 Main menu
21
Operation
MicroVol-1100 User manual 1.6
3.3 Menus and screens
The MicroVol-1100 uses a menu system to organise the operating parameters and
settings. The layout of the menu system is straightforward and easy to learn.
Figure 10 Menu structure summary
22
MicroVol-1100 User manual 1.6
Operation
3.3.1 Status Screen
The Status Screen displays current MicroVol status information. The data can not be
changed from this screen. Sample volume and Corrected sample volume data is
updated every minute, all other data updates instantly. Corrected sample volume is
used to calculate particulate concentration and has been corrected to standard
Reference conditions.
Note: All YES/NO conditions must be met before sampling takes place in Automatic
sampling mode.
Flow
l/min
Tot. Vol.
l
Temp.
C
Press.
mmHg
Wind Sp.
m/s
Wind Dir.
deg
RH%
Cor.Volume
l
RunTime
min
Pwr Supply
V
M/S Ratio
Day of Week
Time OK?
Start Dt OK?
End Dt OK?
DayOWeek OK?
Wind OK?
Power OK?
3.000
708.02
22.90
763.4
12.980
128.34
50
650.33
890.00
11.921
0.5543
WED
YES
YES
YES
YES
YES
YES
Displays current volumetric flow-rate
Displays sample volume
Displays current ambient temperature
Displays current barometric pressure
Displays current wind speed
Displays current wind direction*
Displays Relative Humidityl
Displays sample volume corrected to STP**
Displays sampling duration (pump running)
Displays current power supply voltage
Displays pump load (0.000-2.000)
Displays current day of the week
Is current time/date combination active?
Is current date after timer start date?
Is current date before timer end date?
Is this an active sampling day?
Is wind condition (sector/speed) active?
Is power supply voltage in range?
Figure 11 Status Screen
* - if no sensor is installed, wind direction displays random data
** - Standard Temperature and Pressure, set in the Setup menu.
Note: Some parameters may be reset to zero by Clearing
Accumulated data in the Setup
Logger Setup Menu.
23
Operation
MicroVol-1100 User manual 1.6
3.3.2 Setup Menu
The Setup Menu contains a number of sub-menu items and some direct entry
parameters, where the user can program various parameters.
Times
Wind
Trigger
Logger Setup
Clock
Flow
l/min
Ref.Temp.
C
Ref. BP
mmHg
Size Select
Protection
3.0
0
760
YES
NO
To Times Menu
To Wind Menu
To Trigger Setup Menu
To Logger Setup Menu
To Clock Menu
Set sampler flow-rate, litres/minute
Set STP standard temperature, °C
Set STP standard pressure, mmHg
Sets SSI flow rate limits active
Set protection mode YES/NO
Figure 12 Setup Menu
Notes:
Flow:
Flow-rate should be set at 3.0 l/min when using size selective inlets. The
size selective inlet particle cut-point will be most accurate when the flowrate is set 3.0 l/min. Do not set the flow rate below 1.0 or above 4.5 l/min.
Ref. Temp. and Ref BP:
Ensure these are set to Standard Temperature and Pressure Conditions
(varies between different countries.)
Size Select function:
This function determines what happens when the filter blocks up and the
flow rate can no longer be maintained at the set value. Setting this
parameter to “YES” activates low flow-rate limits. As the filter loading
increases the MicroVol will use active volumetric control to stabilise flow
and continue sampling. In extreme cases where the flow rate drops below
the set flow rate for more than about 45 seconds, the FILTER BLOCKED
screen is displayed and the motor stops. This feature means that the
sample need not be discarded if a blocked filter causes the flow-rate to
drop below the required value for the Size Selective Inlet. The RunTime,
Total Volume and Corrected Volume will stop accumulating at this point.
If Size selection is not required, it can be de-activated by setting Size Select
parameter to NO. For example, TSP sampling can usually tolerate some
decrease in the flow-rate without invalidating the sample.
If this parameter is set to NO, the Filter Blocked screen will not appear until
the flow-rate drops to half of the set flow rate.
FILTER BLOCKED.
Replace filter
before Restart
24
Filter blocked screen
Press Exit or PageUp to resume
normal operation after replacing
the filter.
MicroVol-1100 User manual 1.6
Operation
Figure 13 Filter Blocked
3.3.2.1 Times Menu
The Times Menu contains programmable timer settings. Note that times
should be entered in 24-hour format. Days/Cycle is normally set to 1.
To Start Date Menu
To End Date Menu
To Daily Menu
To Weekly Menu
For regular sequence set this parameter
1
to 1. To set a timed sequence of a
Figure 14 Main screen pump off
different number of days, see
below.
Start Date
End Date
Daily
Weekly
Days/Cycle
It is possible to program a timer sequence that repeats after a fixed number
of days. An example is to program a 6-day sequence for EPA sampling by
setting the Days/Cycle parameter to 6. In this way, it is possible to program
the MicroVol-1100 to collect a sample on Friday, then the following
Thursday, then the following Wednesday, etc. which commences at the
programmed Start Date and will continue until the End Date is reached. All
conditions must be met for the sampling to commence, so make sure that the
Start Date, End Date, Daily and Weekly parameters have the parameters set
correctly. It is possible to program a six-day sequence, which never samples
on Sundays for example, by setting the Sunday parameter to NO in the
Weekly Menu.
Important Note: For an n-Days/Cycle sequence where n is 2 or
more, it is important to set the Start Date later than today’s date.
An internal counter is reset to zero when the Start Date is reached.
3.3.2.1.1 Start Date Menu
Start
Date
Time
20/09/2000
11.34.00
Set the start date for the timer program
Set the start time for the timer program
Figure 15 Start Date Menu
3.3.2.1.2 End Date Menu
End
Date
Time
27/09/2000
11.34.00
Set the end date for the timer program
Set the end time for the timer program
(Must be later than the Start Date/time)
Figure 16 End Date Menu
3.3.2.1.3 Daily Menu
25
Operation
MicroVol-1100 User manual 1.6
Up to six on and off periods can be programmed into the timer. If the current
time is within any of the six programmed periods, then the Time condition
will be satisfied. Note that times should be entered in 24-hour format.
On Time 1
Off Time 1
On Time 2
Off Time 2
On Time 3
Off Time 3
On Time 4
Off Time 4
On Time 5
Off Time 5
On Time 6
Off Time 6
09:00
17:00
00:00
00:00
00:00
00:00
00:00
00:00
00:00
00:00
00:00
00:00
Example shows 9am to 5pm program
Set On and off times the same for
all unused time periods.
Figure 17 Daily Menu
3.3.2.1.4 Weekly Menu
Sunday
Monday
Tuesday
Wednesday
Thursday
Friday
Saturday
NO
YES
YES
YES
YES
YES
NO
Set the sampling days
Example shows Monday to Friday
program, with no sampling on
Saturday or Sunday.
Figure 18 Weekly Menu
3.3.2.2 Wind Menu
Note: It is necessary to disable the Trigger function if
using the wind sensor to control the MicroVol. This is
achieved by setting the Trigger Lo and Hi parameters
to the same value, normally set them both to zero.
The Wind Menu contains wind sector and speed conditional sampling
parameters. When the wind direction angle has been greater than the
counter-clockwise wind direction, but less than the clockwise wind
direction, and has been greater than the Low wind speed limit but less than
the High wind speed limit, for between 60 and 80 seconds, the Wind
condition is satisfied. If all other conditions are satisfied (eg. programmable
26
MicroVol-1100 User manual 1.6
Operation
timer settings), then the MicroVol pump will operate and sampling will take
place. Once this condition is satisfied, the MicroVol will sample for at least
40 seconds. This time delay prevents rapid on/off cycling if the wind
condition is borderline. To over-ride wind conditional sampling, or if there is
no wind sensor connected, set the parameter values as shown so that the
wind conditions are always satisfied.
See section 2.1.1 for more information on wind sector set-up.
CCW W Dir
CW W Dir
LO W Speed
HI W Speed
0
360
0
100
Set Counter-clockwise wind direction (°)
Set Clock-wise wind direction (°)
Set Low wind speed limit (m/s)
Set High wind speed limit (m/s)
Figure 19 Wind Menu
3.3.2.3 Trigger Setup Menu
The Trigger menu appears as follows:
Trigger Lo
Trigger Hi
OFF Delay
ReTrigger
0
2.
01:00
NO?
Set trigger voltage range lower limit (V)
Set trigger voltage range upper limit (V)
Set sampling period in hours:minutes
Set retrigger mode YES/NO
Figure 20 Trigger Setup Menu
The trigger works in conjunction with other conditional parameters. Check
other Setup menu parameters to ensure they don’t interfere with the Trigger
program (for example Times and Wind settings.) Likewise, if external
triggering is not required, set the trigger parameters so that they do not
interfere with other programs. The external trigger can be disabled by setting
Trigger Lo and Trigger Hi to the same value (typically zero.) Setting OFF
Delay to 00:00 will behave as if it were set to 00:01 - it does not disable the
trigger function, and if triggered, the sampler will run for 1 minute. The
RunTime parameter will also increase by 1 minute in this situation.
Note: It is necessary to disable the Wind function if
using the Trigger function to control the MicroVol.
This is achieved by setting the wind direction range
from 0 to 360 and wind speed from 0 to 100 as
described in section 3.3.2.2.
The Trigger Menu contains parameters for specifying an external trigger to
start the MicroVol sampling period.
Example: a separate gas analyser might be used to trigger the MicroVol to
start sampling when the gas concentration reaches a certain alarm level. You
could also use a contact closure (switch or relay) to start and stop the
MicroVol.
27
Operation
MicroVol-1100 User manual 1.6
The data logging features and parameters in the Status menu continue to
function as normal. The triggering device must have either a contact closure
or logic output signal (0-5VDC). A cable will be required to connect the
triggering device to the MicroVol. For details of the electrical connections
refer to section 2.1.2.
28
•
External triggering uses the wind direction input connector and
internal circuitry to monitor the external trigger, so wind control and
external trigger cannot be used together.
•
The Trigger Lo and Trigger Hi parameters specify the voltages that
the external trigger voltage must be between to trigger the MicroVol.
If these voltages are the same then external triggering is disabled.
•
If the external trigger is a contact closure then Trigger Lo should be
0.5v and Trigger Hi should be 6v.
•
To trigger above a set voltage, set Trigger Lo to that switching
voltage and Trigger Hi to 6.
•
To trigger below a set voltage, set Trigger Lo to –1 and Trigger Hi to
that switching voltage.
•
The OFF Delay specifies the time in hours and minutes that the
Microvol continues to sample after triggering.
•
Unlike the wind sensor menu, the status of the trigger device is
checked ‘on the minute’ (when the seconds of the MicroVol clock
reach “00” seconds.)
•
The MicroVol switches on when a valid trigger is received. The
MicroVol will then sample for a set time duration, called the “OFF
Delay”. Trigger function uses a Trigger Time counter to count up to
the OFF Delay value.
•
A parameter called ReTrigger controls how the MicroVol deals with
repeated trigger signals during the active sampling period.
•
If the ReTrigger parameter is set to YES, then each time the
MicroVol clock reaches :00 seconds, the Trigger Time counter resets
to zero if the trigger condition is met, ie. The trigger operates from
the end of the last valid trigger signal.
•
If the ReTrigger parameter is set to NO then the OFF Delay operates
from the start of the trigger signal. The Trigger Time counter will
reset only if the trigger goes off for a :00 crossing (MicroVol clock
reads hh:mm:00), and then retriggers at a later :00 crossing. This
means that if the initial trigger is still active at the end of the OFF
Delay period, then the MicroVol will stop sampling until the trigger
goes off and then on.
MicroVol-1100 User manual 1.6
Operation
3.3.2.4 Logger Setup Menu
AvPeriod
min
Clear Accum
60
Set data averaging/storage period
Clears all stored data after confirming
Figure 21 Logger setup Menu
Note: After changing the Logger Setup Menu Averaging
period, disconnect the power from the base of the
MicroVol and then re-connect it. This will initialise the
MicroVol using the new averaging period settings.
3.3.2.5 Clock Menu
The Clock Menu sets the MicroVol clock. Note that times should be entered
in 24-hour format.
Date
20/09/2000
Set current date
Time
17:34:00
Set current time
Figure 22 Clock Menu
Note: After changing the Clock Menu Time and Date parameters,
disconnect the power from the base of the MicroVol and then re-connect
it. This will initialise the MicroVol using the new clock settings.
29
Operation
MicroVol-1100 User manual 1.6
3.3.3 Manual Menu
Manual mode is useful for checking the flow-rate and verifying pump
operation. The Manual Menu allows the MicroVol to be switched on or off
independent of other conditions such as programmable timer settings, wind
speed and direction parameters. It is not intended for long-term sampling as it
returns to Automatic mode after the time-out period. The time-out reverts to
Automatic mode after a preset number of minutes, which can be set between 1
and 227 minutes.
Manual Mode
Motor On
Timeout
YES
NO
min
1
Set YES for Manual mode operation
Once in Manual mode, set YES to turn
pump motor on, or NO to turn it off.
Timeout period in minutes, reverts to
Automatic mode after this time.
Figure 23 Manual Mode
3.4 Wind Sensor
The wind sensor may be used for conditional sampling. The data logger automatically
collects wind speed and direction data at programmable averaging periods.
Note: Wind direction data should be
ignored if the wind sensor is not installed.
The wind sensor must be aligned to true north. This is usually done using a hand-held
compass and adjusting for the magnetic declination from true north. Align the mark
on the wind sensor to the specified direction.
Set the wind direction conditional sampling parameters in the Wind menu:
•
Set CCW W.Dir - This is the compass direction of the counterclockwise (CCW) end of the ACTIVE sector.
•
Set CW W.Dir - This is the compass direction of the clock-wise
(CW) end of the ACTIVE sector.
•
Also set the Low and High wind speed limits for sampling.
See section 3.3.2.2 for more information on wind menu set-up.
Figure 24 Conditional sampling, wind direction sensor setup.
30
MicroVol-1100 User manual 1.6
Operation
3.5 Rain Gauge
The rain gauge can not be used for conditional sampling. The data logger
automatically collects rainfall data in a counter that is reset by clearing the
accumulator (Setup – Logger Setup menu.) The rainfall counter value is stored at the
programmable averaging periods. By looking at when the rainfall data increases, the
time that the rainfall occurred can be worked out.
The MicroVol data logger increments each time the rain-gauge bucket tips. The data
value increases until the data logger is reset using the Setup - Logger setup - Clear
Accumulator menu.
Note: Clearing the accumulator will clear all
data in the MicroVol-1100 internal data logger.
The rainfall units are “tips”, which refers to the number of times the rain gauge bucket
fills and empties. The units can not be changed. Multiply the data by the calibration
factor to convert to millimetres or inches of rainfall.
31
MicroVol-1100 User manual 1.6
44
Calibration
Calibration
Check the calibration at least every six months or when the flow-rate, barometric
pressure or temperature data is suspect.
Perform the calibration indoors, out of direct sunlight, especially when calibrating the
temperature sensor.
Refer to the calibration sheet for factory-calibrated values – these are different to the
default values.
To change any of the calibration coefficients, it will be necessary to access the Hidden
Menu. Refer to the Hidden Menu section for further information regarding the
calibration coefficients.
4.1 Temperature Sensor Calibration
1.
2.
3.
4.
5.
Record the temperature displayed by the MicroVol.
Record the actual temperature with a certified precision thermometer. If these
measurements are significantly different, continue with the calibration as
follows:
Calculate
Then:
Assign…
…the value of…
Temp coeff 1
(Temp coeff 1) ÷ x
Temp coeff 0
Do not change
Repeat steps 1-4 (if necessary) until the MicroVol temperature is close to the
actual temperature.
4.2 Barometric Pressure Sensor Calibration
1.
2.
3.
4.
Record the barometric pressure displayed by the MicroVol.
Record the actual barometric pressure with a certified pressure gauge or
barometer. If these measurements are significantly different, continue with the
calibration as follows:
Calculate the difference between the two values and adjust the barometric
pressure coefficient 0 (Pres. coeff0) by this value. If the MicroVol is reading
high, decrease the value of the coefficient 0, and vice versa. Do not adjust
coefficient 1 (Pres. coeff1).
Re-check the MicroVol barometric pressure reading.
4.3 Flow Rate Calibration
The MicroVol-1100 flow-controller is factory calibrated. Care should be taken to
keep moisture out of the inlet tube and the sampler should always be operated with a
filter installed. If this is done, the MicroVol should maintain its calibration accuracy
for extended periods (several years).
The flow-rate may be periodically checked using a bubble flow-meter. Do not use a
piston type flow-meter as the piston inertia affects the flow-rate and flow-control
system. An optional Flow-rate Checking kit is available for this purpose.
33
Calibration
MicroVol-1100 User manual 1.6
Take care when using the bubble flow-meter so that no liquid gets into the MicroVol.
Place the MicroVol and flow-meter on the same level (eg. on a bench), and connect
the flow-meter to the top of the inlet pipe using flexible tubing and push-in fittings.
If the flow-meter and MicroVol report different flow-rate readings, first check that
there are no leaks in the connecting tubes.
4.4 Procedure for re-calibrating the MicroVol-1100:
1.
Set the MicroVol flow rate to a particular value and record this value.
2.
Measure the actual flow-rate using a bubble flow-meter.
3.
Repeat steps 1 and 2 with a different flow-rate. Flow-rates of 2.0 litres/min
and 3.0 litres/min are recommended. Record the results in a table (see below). If the
MicroVol and actual values are significantly different, continue with the calibration.
The names in the table are those that will be used in the calculations that follow.
MicroVol flow-rate,
l/min
4.
Actual flow-rate, l/min
(measured with
bubble-meter)
SETFLOW1 = (eg. 2.0)
MEASUREFLOW1 =
SETFLOW2 = (eg. 3.0)
MEASUREFLOW2 =
Calculate (to four decimal places):
A=
MEASUREFLO W1 − MEASUREFLO W2
SETFLOW1 − SETFLOW2
and
B = MEASUREFLOW1 − A × SETFLOW1
5.
Then:
Assign…
…the value of…
Flow coeff 0new
(Flow coeff 0)existing × A + B
Flow coeff 1new
(Flow coeff 1)existing × A
Enter the new values for flow coefficients 0 & 1 at the hidden menu (refer to Hidden
Menu section).
34
Downloading Data
55
MicroVol-1100 User manual 1.6
Downloading data
The serial port is a 9-way female D-connector on the underside of the MicroVol
housing. A weatherproof cover is fitted to the connector to exclude dirt and moisture.
This cover should be removed only when a cable is connected to the port.
The serial port operates at 9600 baud, eight data bits, one stop bit, no parity. This
cannot be changed.
Data can be downloaded using the Windows-based Ecotech MicroVol Downloader
program supplied on the Utilities CD, or with the Ecotech WinCollect program.
Note: If using WinCollect, the MicroVol uses the same command protocol as a 9400
Data Logger, and WinCollect should be setup to communicate with a 9400.
The Serial port (RS-232C) is used for downloading data from the MicroVol. The
MicroVol port is a DB9 female connector on the underside of the sampler. This port
should be covered, using the cap supplied, when not in use, to keep out dust and
moisture. Connect a standard 9-pin serial cable to this port. Connect the other end of
the cable to your computer. If your computer has a 25 pin male serial port, you may
need to use a DB9 M / DB25 F adaptor or the appropriate 9-pin to 25-pin cable.
5.1 Using MicroVol Downloader software
The MicroVol Downloader software is supplied with the MicroVol on the Utilities
CD. The software may be installed on any PC type computer running Microsoft
Windows 95, Windows 98, or Windows 2000. It will not run under Windows 3.x.
A laptop computer is a practical way of downloading the data from a HiVol that is in
service in the field. If your laptop does not contain a serial port then a U.S.B. – serial
adaptor should be used. It is highly recommended that the easysync U.S.B. – serial
adaptor be used for this function as it has been widely tested with all Ecotech
products, works effectively and can be purchased from Ecotech.
To install the software:
•
Close any programs that are running on the computer (visible in the
Windows task-bar)
•
Put CD in the computers CD rom drive
•
A window will appear called Software Utilities.
•
Click on the Install software button
•
Within this new window select xVol Commuicator
•
Now follow the prompts and windows to install the program.
•
The downloader program will open automatically ready for use.
36
MicroVol-1100 User manual 1.6
Calibration
To run the MicroVol Downloader program:
•
Click on the “Start” button
•
Select “Programs”, then click on “MicroVolDownloader”
•
The program will run and a window will appear
•
The program is simple to use.
•
Enter the settings menu through the ‘properties’ under the Comm menu or
by clicking the following icon
•
In the “Output file:” box, type the directory pathname and filename for the
data file to be created
Figure 25 Properties screen
•
Next click on the Connection icon show in the column on the left hand side
in Figure 25. Select Com port from pulldown menu. Do not select a port that
says “(In Use)”
•
Click on “Collect Data” button
shown in Figure 26.
37
Downloading Data
MicroVol-1100 User manual 1.6
Figure 26 Output screen
•
The data will be collected. After a few seconds, a box will appear asking
whether you want to clear the data from the MicroVol memory. Select Yes
or No.
•
The data will appear on the screen.
• To close program, click on the ⌧ box (top right corner of the window)
The data will be stored in the directory and file specified. The data is separated by a
comma (called a delimiter). The data file may be imported into another program, such
as Microsoft Excel, by specifying that the data is delimited, using comma delimiters.
Using this method, the data will be formatted into individual cells.
The data is presented in the following format:
Report Date Time, Barometric Pressure (mmHg), Ambient Temperature (°C), Wind
speed (m/s), Wind direction (°), Sigma Theta (standard deviation for wind direction),
Rainfall (bucket tips), Flow-rate (l/min), Corrected accumulated sample volume
(standard litres), Uncorrected accumulated sample volume (litres)
Note: Wind direction data should be ignored if the wind sensor is not
installed.
Note: Wind direction average data will be zero if there has been no wind
speed data for the entire averaging period.
38
MicroVol-1100 User manual 1.6
Calibration
If the data file already exists, any further downloading of data will be appended to the
existing data in that file. If the data file does not exist, the MicroVol Downloader
software automatically creates the file.
Note: The Windows regional settings for time and date format should be
set the same on the computer used to download the data and the
computer used to process the data (if different computers are used.) The
settings are located in the Windows menu system under Start, Settings,
Control Panel, Regional Settings, Time and Date
5.2 Communicating with the MicroVol (alternative method)
An alternative (more complicated) way of downloading data is to use a terminal
emulator. Send ***EA command, then use terminal to download file using X-modem.
Using this method the data will be in hexadecimal format and will need to be
converted to ASCII format.
If required, it is possible to connect a modem to the MicroVol to collect data. It is also
possible to use a terminal program to communicate with the MicroVol via the Serial
port (RS-232C). This may be useful for remote interrogation or for connecting the
MicroVol to an external data logger.
Contact Ecotech for details.
Air inlet
Serial port RS-232C
Wind Speed
& Direction Input
plug
Temperature and Humidity
Sensor
Power Jack
Figure 27 MicroVol-1100 Underside
39
Downloading Data
MicroVol-1100 User manual 1.6
5.3 Calculations
The MicroVol-1100 flow-controller regulates the volumetric flow-rate of air when the
pump is operating. In-built temperature and barometric pressure sensors collect
ambient data, which are stored in the internal data logger. The MicroVol-1100 uses
the temperature and pressure data to determine the density of the gas.
All current data can be viewed in the Status menu. Historical data can be downloaded
to a laptop computer via the serial port.
Note: Once the internal data logger memory is full, the MicroVol stops
collecting data. If the sample pump is still operating when the memory is
full, then use the current data in the Status menu to read the uncorrected
sample volume in litres (Tot. Vol. l) or the Corrected sample volume in
standard litres (Cor.Volume l).
Using the ambient and Reference temperature and pressure information, the sample
volume is automatically corrected to Standard Temperature and Pressure (STP)
conditions. The MicroVol’s internal data logger stores both uncorrected and STP
corrected sample volume data in the internal memory. The sample volume data is
used to calculate the mass concentration. The mass concentration may either be
reported at STP corrected conditions, or at actual ambient conditions by using the
relevant sample volume data in the calculation. Refer to local reporting standards.
The STP Reference conditions have been factory set, but may be changed via the
Setup menu:
Mass concentration data is generally reported in μg/m3 referenced to standard
temperature and pressure (STP). There are, however, different accepted values of
STP:
Standard Temperature
°C (K)
MicroVol Setup
menu parameter
Standard Barometric Pressure
mmHg
Ref. Temp
Ref. BP
Australia,
Europe
0°C
(273.18K)
760
USA
25°C (298.18K)
760
Japan
20°C (273.18K)
760
Note: 760mmHg = 760Torr =
101.325kPa = 1 standard atmosphere
40
MicroVol-1100 User manual 1.6
Calibration
5.3.1 Sample Volume
The sample volume is automatically calculated and stored/updated in the MicroVol.
The sample volume is also automatically corrected to STP conditions and
stored/updated in the MicroVol.
5.3.2 Mass concentration calculation
Mass concentration (MC) is calculated using the formula:
W − Wi
MC = f
V
where
Wf
=
Final mass of filter element
Wi
=
Initial mass of filter element
V
=
Sample volume, either corrected or uncorrected
If the corrected sample volume is used, the units for the concentration are standard
μg/m3 referenced to standard temperature and pressure conditions (STP). If the
uncorrected sample volume is used, the units for the concentration are μg/m3.
41
Maintenance
66
MicroVol-1100 User manual 1.6
Maintenance
6.1 Maintenance tools
To perform general maintenance on the MicroVol-1100 the user will be required to
carry the following equipment:
Phillips screwdriver (to suit M4 and M3 screws)
Sside cutters or other cutting tool (for cable ties)
Spare cable ties (for securing tubes)
Flat terminal screwdriver (for removing cables from connectors)
Small shifting spanner or pliers (for holding hex fittings on flow sensor).
6.2 Maintenance schedule
Interval
(samples)*
Weekly
Weekly
If necessary
Item
Procedure
Page
Inlet components
Impactor
Pump
Clean
Assembly
Maintenance
42
43
44
* Suggested intervals for maintenance procedure may vary with sampling intensity and environmental
conditions.
6.3 Maintenance procedures
6.3.1 Cleaning the inlet components
A regular routine should be devised to ensure that the sampler is functioning
as it was designed to. This includes cleaning all surfaces that are exposed to
the sample.
Note: The flow sensor can be damaged by moisture. Make
sure that all water has been removed before reassembling
the components. Always dry the components thoroughly
with compressed air after cleaning.
The impactor assembly has a removable rain-cap and stainless-steel mesh
insect screen, which are easily removed for cleaning.
The inlet tube should be removed and cleaned if contamination has occurred.
Remove the tube from the sampler and clean and flush the tube with hot soapy
water and a bottlebrush.
The filter holder should also be kept clean and thoroughly dried before
installing a new filter. Transport the filter holder in a plastic zip-lock bag to
prevent contamination.
42
MicroVol-1100 User manual 1.6
Maintenance
6.3.2 Impactor assembly
The impactor assembly should be cleaned and re-greased at least every 10
sampling periods, and sooner if dirt is visible. Remove the impactor assembly
from the filter holder. Remove the rain cap. Remove the connecting tube and
impactor plate by pulling them apart. If necessary, the impactor plate and
connecting tube may be pushed out by inserting a rod down the inlet jet,
taking care not to scratch the jet, then pushing the impactor plate out of the
impactor assembly.
Wipe any dirt off the top of the impaction plates using a lint-free cloth. Wipe
the inside of the holes to remove all grease and dirt. All components should be
wiped initially with a soft clean cloth to remove grease and dirt. They should
then be cleaned using warm soapy water and rinsed a couple of times with
fresh hot water. Use compressed air to dry the components. Inspect the o-rings
for damage, and replace them if necessary. Always apply a trace of o-ring
grease to the o-rings before assembly or they will be damaged.
The impaction plate should be greased lightly in the centre, masking the outer
part of the disc so that the grease is only in the centre of the impaction plate –
covering an area about 10mm in diameter. Light petroleum grease such as
Vaseline can be used in many applications where particulate composition is
not being analysed. Otherwise, silicone grease such as Dow Corning Slipicone
release spray can be used. Dry the plate thoroughly with a clean lint-free cloth.
If necessary, store in a clean zip-lock bag until ready for use.
The acceleration nozzle orifice should be cleaned after approximately 1000
hours of use, depending on loading. Do not use anything sharp to clean the
passage - a soft brush or pipe cleaner and soap solution is sufficient.
Re-assembly
A light smear of silicone O-ring grease should be re-applied to the O-rings as
needed to ease assembly and disassembly. When re-assembling sections with
O-rings, take care to align the pieces well and to twist and slide them together
smoothly to avoid displacing or damaging the O-rings.
The impactor plate locates in the nozzle body, grease side towards the nozzle.
The inlet should be held upside-down during assembly. The adaptor tube
retains the impactor plate. Apply gentle pressure to the adaptor tube to seat it
against the impactor plate.
43
Maintenance
MicroVol-1100 User manual 1.6
6.3.3 Pump maintenance
The MicroVol-1100 pump is available as a spare part, and takes only about 10
minutes to replace. This may be required after a period of several years, due to
deterioration of the seals. Remove the sampler from the plastic tubular
housing. Remove the tube from the port on the side of the pump (see Figure
28), noting which port the pipe is connected to, and turn the sampler on to
check whether there is vacuum and pressure on the appropriate ports. If there
appears to be a problem, disconnect the pump terminals from the circuit board,
cut the ties that secure the pump and remove the pump from the sampler. Ease
the pump out of the rubber mounts. The pump should be exchanged - contact
Ecotech for spares details. Replace with a new pump and reassemble. Do not
over-tighten the cable ties that secure the pump. The pump needs to be free to
vibrate in the rubber mountings. The polarity of the pump wires is not
important.
The pump part number is listed in the Spare Parts section.
Remove plastic cable tie
Remove plastic hose
Remove plastic cable tie
Figure 28 Replacing the pump
44
MicroVol-1100 User manual 1.6
Maintenance
6.3.4 Hidden Menu
The Hidden Menu is used to set parameters at the factory. It is not usually necessary
to access the Hidden Menu.
To access the Hidden Menu, hold down the secret key (the first letter C in the
ECOTECH logo), then press the Select key at the same time.
Voltages
ID
Motor Freq.
Date Format
Flow coeff0
Flow coeff1
Temp coeff0
Temp coeff1
Pres. coeff0
Pres. coeff1
WS coeff0
WS coeff1
WD coeff0
WD coeff1
Min 12V
Default Prms
0=RG, 1=WS
Inst. Type
0
40.
1
-1.25
1.25
0.381
0.0192
73.
168.7
0
0.7989
0
79.2
12.
1
0
Diagnostics only
Enter a MicroVol identification number
Optimised at the factory – do not adjust!
0=mm/dd/yyyy (USA)
1=dd/mm/yyyy (common)
2=yyyy/mm/dd (Japan)
dd = day, mm = month, yyyy = year
Flow calibration coefficient 0
Flow calibration coefficient 1
Temperature calibration coefficient 0
Temperature calibration coefficient 1
Baro. pressure calibration coefficient 0
Baro. pressure calibration coefficient 1
Wind speed calibration coefficient 0
Wind speed calibration coefficient 1
Wind direction calibration coefficient 0
Wind direction calibration coefficient 1
Power up voltage*
Resets all hidden menu parameters!
Rain gauge or Wind sensor selection
Factory setting – do not adjust!
Figure 29 Hidden Menu
* Power down voltage is 90% of power up voltage value.
45
MicroVol-1100 User manual 1.6
77
Troubleshooting
Troubleshooting
The sampler is fitted with a number of features to protect it from internal damage.
Some of these features will prevent the sampler from performing as would normally
be expected.
Fuse:
A 2A fuse is soldered on the circuit board inside the MicroVol. Check the fuse
continuity with a multi-meter.
Low Voltage Automatic Shut-off:
Shuts down the pump automatically when supply voltage drops below 11V (nominal).
This feature protects the battery from damage. The MicroVol display and data
collection continues to operate until the battery voltage drops to about 5V, when the
microprocessor powers off.
Battery pack fuse:
A 3.15A (20x5mm) fuse is housed in a waterproof fuse holder on top of the optional
battery pack. Check the fuse continuity with a multi-meter.
Status Menu:
Gives a description of the current status of various parameters. The main screen also
has a single-line status description when the sampler pump is not running, which
gives an indication of why the pump is not running.
47
MicroVol-1100 User manual 1.6
88
Accessories and Options
Accessories and Options
8.1 Battery Pack
Caution:
•
The battery pack contains sealed lead-acid batteries, which produce small
quantities of flammable hydrogen gas.
•
Do not short-circuit the battery connections.
This option allows the sampler to operate in areas where mains power supply is not
available. The rechargeable battery pack will operate the MicroVol for 24-hours
before recharging is required.
For details on attaching the battery pack to the MicroVol-1100, see Section 2.4.2,
Assembling the MicroVol-1100.
Note: Always fully charge the battery pack after use. If the battery pack is not being
used for an extended period of time, remove the fuse and re-charge the battery
periodically (every 2 months recommended.)
The MicroVol turns the pump off automatically if the power supply (battery) voltage
drops below 11V (factory setting). The MicroVol continues to operate until the
battery discharges to about 5V, after a period of several days. Ideally, the battery
should be recharged well before this, as the battery may be damaged.
8.1.1 Charging the battery pack
The battery pack must be charged in a ventilated area. Connect the 12V batterycharger to the Charging Port on the side of the battery pack, via the black weatherproof connector. Do not attempt to charge the battery via the Power Connector.
The optional battery charger should be used to charge the battery pack. If a different
charger is used, it must be suitable for charging sealed-type 12-volt lead-acid
batteries. The charging current should be no more than 2.5 Amps. The charging time
will depend on the charging current. At 1 Amp charging current, the battery should be
allowed to charge for 8-12 hours, depending on the depth of discharge.
Place the protective cap over the charging socket when the charger is not connected.
8.1.2 Disposing of old batteries
The battery pack contains lead-acid batteries. After several hundred uses, battery
performance will decrease. Old batteries must be disposed of according to local
regulations. Most areas require that lead-acid batteries be recycled and have a facility
for battery disposal. Contact your local council for more information.
49
Accessories and Options
MicroVol-1100 User manual 1.6
8.1.3 Battery charger with timer, 100-250V Model
The universal battery charger is designed to recharge the MicroVol battery pack via
the charging connector. The battery charger automatically controls the charging cycle.
Features:
•
3-step charge controller
•
Universal supply input: 100-250VAC
•
Charge current is not affected by voltage fluctuations
•
3 stage charging cycle – coloured indicator shows status
•
IEC 320 2-pin connector
The charging cycle occurs in three stages. The light on the charger indicates which
stage is current.
Stage 1 Indicator red, battery charge state 0-80%
Initial boost mode, constant current charging at 2.3A until battery voltage
reaches 14.7V
Stage 2 Indicator yellow, battery charge state 80-100%
Timer mode, 14.7V maintained for approximately 2 hours
Stage 3 Indicator green, float mode
Battery is charged, charger maintains battery at 13.8V.
The battery charger should be switched off at the mains outlet when connecting and
disconnecting the battery.
The charging time will vary depending on the initial charge state of the battery. When
the indicator lamp is green, the battery is fully charged. The universal charger may be
connected continuously if required.
8.1.4 Battery Charger, basic 240V Model
The basic battery charger is designed to recharge the MicroVol battery pack via the
charging connector. The battery charger has a battery voltage selector switch for 6V
and 12V batteries. The MicroVol battery is a 12V battery, so the battery charger
switch must be set to 12V. Do not connect the charger when the switch is in the 6V
position or the battery and charger may be damaged. Switch the power off and unplug
the charger before connecting or disconnecting the battery and charger.
The battery charger should be switched off at the mains outlet when connecting and
disconnecting the battery.
The charging time will vary depending on the initial charge state of the battery. If the
battery is completely flat, the battery should be charged for 12 hours. The charger
may be left connected for up to 24 hours. Do not leave the charger permanently
connected to the battery.
50
MicroVol-1100 User manual 1.6
Accessories and Options
8.2 Dual-stage filter holder (option)
The upper filter holder has an open face for collecting particulate matter, while the
lower filter holder is without open face, used only for collecting gaseous compounds.
The filter holders are connected with a threaded coupling and can be separated easily.
Before re-connecting the filter holders, wrap Teflon thread sealer tape around the
threads in a clockwise direction (2 turns is sufficient.)
Figure 30 Dual stage filter holder
8.3 PM2.5 Nozzle Adaptor (option)
Figure 31 Views of the PM2.5 nozzle adaptor (pencil shows scale)
The PM2.5 nozzle adaptor is designed for sampling fine inhalable particulate matter
with an aerodynamic diameter of 2.5 microns and smaller. The PM2.5 nozzle adaptor
fits inside the impactor assembly, effectively reducing the nozzle diameter. An O-ring
seals and retains the PM2.5 nozzle adaptor. The PM2.5 nozzle adaptor is precision
machined to obtain the correct particle size cut-point. Extra care should be taken when
handling the adaptor, in order to prevent damage.
51
Accessories and Options
MicroVol-1100 User manual 1.6
To install or remove the adaptor, first separate the 47mm filter holder and impactor
assembly from the inlet tube. Disassemble the impactor assembly. Refer to Figure 1
Section 1.4.2 for details of how the parts a re assembled.
With the filter holder, connecting tube and impactor plate removed, carefully insert
(or remove) the PM2.5 nozzle adaptor in the nozzle body.
The nozzle body with the PM2.5 nozzle adaptor installed.
Figure 32 PM2.5 Nozzle components and assembly
Carefully reassemble the impactor assembly by inserting the greased impactor plate
(greased side towards nozzle), connecting tube, and filter holder with filter element
installed. Finally, re-attach the assembly to the inlet tube.
52
MicroVol-1100 User manual 1.6
Appendix
A
Appppeennddiixx A
AS
Sppaarree P
Paarrttss aanndd A
Acccceessssoorriieess LLiisstt
Parts
Part Number
Standard 47mm Filter Holder – open face
(Includes coupling and push in fitting)
P-ECO-MICRO10004-S
Second stage 47mm Filter Holder
Two threaded ports
(Includes female threaded coupling)
P-ECO-MICRO10005-S
Replacement Pump
P-ECO-MICRO10006-S
Replacement Flow sensor
P-ECO-MICRO10007-S
50x 47mm Filters 2.0um
P-ZRU-10-002322-0050
Battery pack
P-ECO-MICRO11001-O
Battery charger, 240V
P-ECO-MICRO10002-O
Battery charger with timer, 100-250V
P-ECO-MICRO11003
Solar panel 30W and accessories
P-ECO-MICRO10003-O
Long inlet tube
P-ECO-MICRO10007-O
Outdoor mounting bracket kit
P-ECO-MICRO10008-O
PM10 to PM2.5 Nozzle Adaptor
P-ECO-MICRO100025-O
Flow-rate checking kit
P-ECO-MICRO11010-O
Wind speed & direction sensor and mounting arm
Cable to suit wind sensor, specify length
Tipping bucket rain gauge and bracket
Cable to suit rain gauge, specify length
Trigger input cable, specify length
53
54
Sampling
Calibration Check
Comments
Calibration baro.
pressure / error
Calibration
temperature / error
Calibration flow-rates
(l/min)
Calibration
date / time
Calibration device /
ID number
Corrected volume
(litres)
Total volume
(litres)
Flow-rate
(l/min)
Elapsed RunTime
(minutes)
Sample end date /
time
Sample start date /
time
Filter number
or ID
Sampling location or
address
Operator’s name
Log-book entry date /
time
Appendix
MicroVol-1100 User manual 1.6
A
Appppeennddiixx B
Vooll--11110000 LLoogg--bbooookk
BM
MiiccrrooV