1
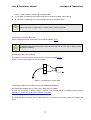
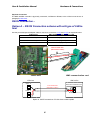
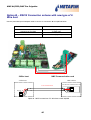
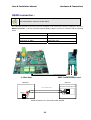
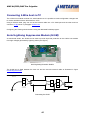
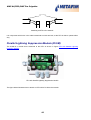
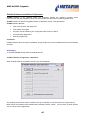
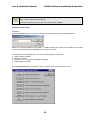
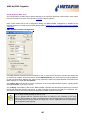
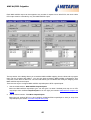
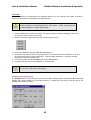
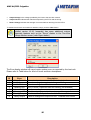
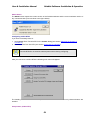
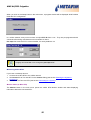
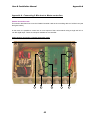
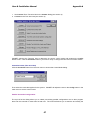
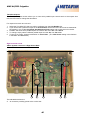
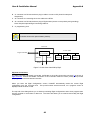
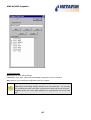
SingleNet – User Manual Application version: • PoleNET: V1.18 onwards • 2 - wire Host: V1.38 onwards • 2 – wire RTU: V1.16 onwards • NMC-64: V2.02.04 onwards • NMC Pro: V3.00.01 onwards Date of issue: 08th of February 2008 Publisher: Netafim TM (A.C.S.) Ltd. © Copyright 2003, Netafim No part of this publication may be reproduced, stored in an automated data file or made public in any form or by any means, whether electronic, mechanical, by photocopying, recording or in any other manner without prior written permission of the publisher. Although Netafim takes the greatest possible care both with its products and the associated manuals, there may be deficiencies in them. Netafim will not however accept responsibility for damage resulting from the use of Netafim products or damage resulting from the use of this manual. Netafim also reserves the right to make changes and improvements to its products or to the associated manuals without notice. Reproduced and edited with permission of Square One Laboratories Pty Ltd 1 SingleNet 2-Wire System Table Of Contents INTRODUCTION........................................................................................................................................................ 3 2-WIRE SYSTEM CONTROL MODES ............................................................................................................................ 3 COMPONENTS IN THE 2-WIRE SYSTEM ....................................................................................................................... 3 GETTING STARTED ................................................................................................................................................. 5 HARDWARE & CONNECTIONS............................................................................................................................. 6 SYSTEM STRUCTURE - 2-WIRE HOST CARD................................................................................................................ 6 RS232 CONNECTION –................................................................................................................................................ 9 OPTION A – RS232 CONNECTION SCHEME WITH OLD TYPE OF 2-WIRE HOST ............................................................. 9 OPTION B – RS232 CONNECTION SCHEME WITH NEW TYPE OF 2-WIRE HOST .......................................................... 10 RS485 CONNECTION –.............................................................................................................................................. 11 CONNECTING 2-WIRE HOST TO PC........................................................................................................................... 12 SERIAL LIGHTNING SUPPRESSION MODULE (SLSM)................................................................................................ 12 REMOTE TERMINAL UNIT (RTU) ............................................................................................................................. 13 PARALLEL LIGHTNING SUPPRESSION MODULE (PLSM) .......................................................................................... 14 ATTACHING RTU WITH A PLSM TO NETWORK........................................................................................... 15 POLENET SOFTWARE INSTALLATION & OPERATION .............................................................................. 16 INSTALLATION ......................................................................................................................................................... 16 UNINSTALLING ......................................................................................................................................................... 16 POLENET SOFTWARE CONFIGURATION - MAIN MENU .............................................................................................. 16 SELECTING THE SYSTEM TO CONNECT TO ................................................................................................................ 17 CONNECTING TO A SYSTEM ...................................................................................................................................... 18 CONFIGURING 2-WIRE HOSTS................................................................................................................................... 19 MONITORING 2-WIRE SYSTEMS ............................................................................................................................... 26 CONFIGURING 2-WIRE RTUS ................................................................................................................................... 31 MONITORING 2-WIRE RTUS .................................................................................................................................... 32 TESTING THE SYSTEM FOR PROPER OPERATION ........................................................................................................ 33 APPENDIX A - CONNECTING 2-WIRE HOST TO MASTER CONTROLLERS ........................................... 35 CONFIGURING TWO-WIRE HOSTS ................................................................................................................... 36 CONTROLLER BUTTON (TWO-WIRE HOST) ............................................................................................................... 37 APPENDIX B – VERSIONS & FIRMWARE UPGRADES .................................................................................. 46 SOFTWARE VERSIONS ............................................................................................................................................... 46 THIRD PARTY PRODUCTS ......................................................................................................................................... 46 RELATED DOCUMENTS ............................................................................................................................................. 46 UPGRADING 2-WIRE HOST ....................................................................................................................................... 46 UPGRADING RTUS ................................................................................................................................................... 48 2 User & Installation Manual Introduction Introduction The SingleNet system is a system that is designed to interface to various controllers and enable remote I/O terminals. The SingleNet system passes voltage and communication via a single 2-wire cable to a large number of Remote Terminal Units (RTUs) that can be widely spread throughout the field. This manual describes in details all steps required to install and configure the SingleNet 2-Wire System. Please read this manual fully before starting the installation. 2-Wire System Control Modes The 2-wire system can be interfaced to one of four different types of controllers: 1. NMC-64/PRO Controller 2. Parallel Controller (any controller that generates 24VAC or 12VDC outputs) 3. Elgal Irrigation controller 4. PLC / Controller that supports Modbus driver (Modbus Slave Mode). The control mode is used to decide which of these controllers is the Master controller and can set/read the state of system I/O’s. Components in the 2-Wire System The 2-wire system consists of hardware and software. The SingleNet PC software is called PoleNet and is used to install and configure the SingleNet 2-wire system as well as to analyze its behavior (see PoleNet Software Installation & Operation). The hardware network consists of three main components (as shown in figure Components in the 2-Wire network): Master controller (e.g. NMC- 64/Pro) 2-wire cable Slave controller (2-Wire host) RS-232 RTU(1) To PC Components in the 2-Wire network 3 RTU(2) RTU(3) SingleNet 2-Wire System Master Controller The master controller is the controller that “decides” the state of the I/O’s, type depends on the control mode of the system (see 2-Wire System Control Modes). Detailed descriptions of the different master controllers can be found in sections Connecting 2-Wire host to Master controller (NMC Mode) and Appendix A - Connecting 2-Wire host to Master controllers. Slave Controller (2-Wire host) The slave controller (2-Wire host) allows the master controller to access/control the Remote Terminal Units (RTUs). The 2-wire host module communicates with the master via an RS232 (where the master is NMC- 64/Pro), RS 485 cable or a separate connector (where the master is a parallel controller card). The 2-Wire host can also be connected to a PC via a RS-232 cable for installation and testing purposes. Remote Terminal Units (RTUs) The RTUs are low powered devices each consisting of two digital inputs and two digital DC latch outputs. These units interface to the 2-Wire host module via a single 2-Wired cable. Optional Components There are two other optional components that the system can consist of: A Serial Lightning Suppression Module (SLSM) and one or more Parallel Lightning Suppression Modules (PLSMs). The SLSM and the PLSMs provide improved suppression of high voltages generated by lightning strikes in the vicinity of the 2-wire host module and the RTUs, respectively. 4 User & Installation Manual Getting Started Getting Started This paragraph briefly explains how to get started with the SingleNet system. For further explanations please see the detailed instructions per section. Start with the physical connections for initial setup of the system. Later steps might depend on earlier ones; therefore it is essential to go through all the steps. The following chart may be used for assistance: Table description Hardware & Connections 2-Wire host NMC SLSM RTUs Follow the 2-Wire host sections for connecting the 2-Wire host: Connecting power to 2-Wire host Connecting 2-Wire host to RTUs Connecting 2-Wire host to Master controller Connecting 2-Wire host to PC If existent connect the Serial Lighting Suppression Module. Connect the RTUs to the SingleNet network and to the I/O devices. PLSM If existent connect the Parallel Lighting Suppression Modules. PoleNet Software Installation & Operation Install the PoleNet software PoleNet software installation Open the PoleNet software, the main menu will appear. PoleNet software configuration - Main Menu Set the device the PoleNet should connect to and define connection Selecting the System to Connect to port. Connecting to a System Check that you are able to connect to the 2-Wire host. Configuring 2-Wire hosts Select the Master Controller Mode and configure the connection between the Master controller and the 2-Wire host. Testing the systems operation Follow the instructions to verify that the system (NMC and SingleNet) is Testing the system for proper operation working properly 5 NMC-64/PRO/NMC Pro Irrigation Hardware & Connections System structure - 2-Wire Host Card A B C D E F G H I J K The indicated components are: A. J3 connector providing power to the 2-wire host. B. J4 connector is an Auxiliary RS-485 socket (also for compatibility with old style RS-232 Master controller connection mode). C. J7 connector is a RS-232 socket to plug in cable to connect a PC (Used for setup and diagnostics). D. LED 3 – Red flashes when input power at J3 is present. E. J6 connector is a RS-232 socket to plug in Master controller (note that software setting of this port should still be RS485). F. LK1 & LK2 for switching host communications port 2 from RS-485 on J5 to RS-232 on J6 when both are down (RS-485 when links plugged between the top and centre pins, and RS-232 between bottom and centre pins). G. J5 connector is a RS-485 socket to plug in Master controller. H. U27 regulator. Before inserting/removing the programming link (see J below) touch the tab on the right to discharge any personal static electricity to prevent permanent damage to the 2-Wire host! I. LED 1 – Red flashes with error code during fault conditions. 6 User & Installation Manual Hardware & Connections LED 2 – Green flashes slowly during normal operation. J. J1 Connector for attaching the programming link for firmware updates (see H above). K. J2 connector for attaching to the 2-wire network and to the protective earth. 2-Wire Host shown in figure above includes battery backup (optional). Connecting power to 2-Wire host Power is supplied to the 2-Wire host by the connector labeled J3 (A). Remember to disconnect the power connector when the unit is not in use, in order to avoid damaging the battery. Connecting 2-Wire host to RTUs The 2-Wire host is connected to the RTUs by the connector labeled J2 (F). Figure 1 shows how the cable is to be connected: 2 Wire cable 2 wire connector Earth Figure 1: Connecting the 2-wire cable Connecting 2-Wire host to Master controller (NMC-64/PRO Mode) This paragraph explains how to connect the 2-Wire host to the NMC. In case you are using a different Master controller (e.g. Parallel, Elgal or PoleNet) please refer to Appendix A - Connecting 2-Wire host to Master controllers. The NMC provides 64 outputs and 16 inputs that can be “connected” to use any of the RTU outputs and inputs. 7 NMC-64/PRO/NMC Pro Irrigation If non-linear mapping is enabled, it is possible to control multiple RTU outputs with each of the 64 outputs from the NMC controller, in effect providing up to 256 outputs. The figure below (2-Wire host system in NMC-64/PRO Controller mode) is a block diagram showing how the NMC-64/PRO controller interfaces to the 2-wire system: Host unit NMC-64/Pro Controller NMC-64: 64 outputs NMC-PRO: 256 outputs & 32 inputs 2-wire cable Slave controller (2-Wire host) RS-232 RS-232 RTU(0) RTU(1) To PC 2-Wire host system in NMC-64/PRO Controller mode 8 RTU(2) User & Installation Manual Hardware & Connections Physical Connection The NMC-64/PRO controller is physically connected, via RS232 or RS485, to the 2-Wire host as shown in paragraph 2-Wire host. RS232 connection – Option A – RS232 Connection scheme with old type of 2-Wire host Use the prescribed special adapter cable to connect to connectors J4 (C) and J5 (D) as explained below: 2-Wire host NMC-64/PRO, communication card Connector J4, pin B Rx (High row) Connector J5, pin B Tx (High row) Connector J5, GND Com (High row) 2-Wire shielded cable (Max distance 3 Meter) 2-Wire Host NMC communication card NMC-64/Pro 2-Wire host RS485 J4 A(1) 2-wire shielded cable (Max distance 3 Meter) B(1) GND RS485 J5 A(2) RS485/232 Communication card COM Tx Rx B(2) GND Option A - RS232 connections of 2-Wire host to NMC-64/PRO 9 NMC-64/PRO/NMC Pro Irrigation Option B – RS232 Connection scheme with new type of 2Wire host Use the prescribed special adapter cable to connect to connectors J6 as explained below: 2-Wire host NMC-64/PRO, communication card Connector J6, pin TXD Rx (High row) Connector J6, pin RXD Tx (High row) Connector J6, GND Com (High row) 2-Wire host NMC Communication card NMC-64/Pro 2-Wire host RS-485/232 Communication card 2-wire shielded cable COM RX TX RS232 J6 TXD RXD GND Option B - RS232 connections of 2-Wire host to NMC-64/PRO 10 User & Installation Manual Hardware & Connections RS485 connection – The communication card must be RS-485x2 The NMC-PRO controller is physically connected, via RS485, to the 2-Wire host as shown in paragraph 2-Wire host. RS485 connection - use the prescribed special adapter cable to connect to connector J5 as explained below: 2-Wire host NMC-PRO, communication card Connector J5, pin A A2 (High row) Connector J5, pin B B2 (High row) Connector J5, GND GND (High row) 2 - Wire Host NMC Communication card NMC-Pro 2-Wire host RS-485x2 Communication card 2-wire shielded cable GND A B RS485 J5 A(2) B(2) GND RS485 connection of 2-wire host to NMC-64/PRO 11 NMC-64/PRO/NMC Pro Irrigation Connecting 2-Wire host to PC The 2-Wire host module consists of a serial interface so it is possible to make configuration changes and to monitor activities of the 2-Wire host from a PC. Using a RS-232 cable, plug one end of the RS-232 cable into a PC COM port and the other end into connector J7 (B) shown in paragraph 2-Wire host. Configuring and Testing should be done using the dedicated PoleNet program. Serial Lightning Suppression Module (SLSM) As mentioned earlier, the SLSM can be used to provide improved protection to the 2-Wire host module from high voltages generated by lightning strikes (see figure ). Serial Lightning Protection Module The SLSM unit is fitted between the host unit and the two-wire network cable as illustrated in figure Connecting the SLSM. Host unit SLPM 2-wire connector 2-wire network Earth Earth Connecting the SLSM 12 User & Installation Manual Hardware & Connections Remote Terminal Unit (RTU) The Remote Terminal Unit consists of two valve outputs and two digital inputs (e.g. to connect a water meter). The internal view of an RTU is shown in figure Remote Terminal Unit. A B C D Remote Terminal Unit The sections indicated are as follows: A The 2-way connector is used to attach the RTU to the network (the 2-wire cable). B Two 3-way connectors are used to attach either two or three wire solenoids. Two wire solenoids use only the red and black terminals (leave the white terminal empty) and three wire solenoids use all three terminals. C Two voltage free contacts from water meters can be connected to this 4-way connector (Input1 and Input2 are marked on the PCB). D This RS-232 connector allows the RTU to be connected to a PC for configuration changes and firmware upgrades. When attaching valves and water meters (or any other input device) these devices and their cables must be completely isolated from earth. Figure Attaching RTU to the network shows how the 2-wire unit is attached to the 2-wire network. 13 NMC-64/PRO/NMC Pro Irrigation 2-wire network In Out Attaching an RTU to the network It is unimportant which wire in the cable is attached to which terminal, as the RTU is able to operate either way. Parallel Lightning Suppression Module (PLSM) The PLSM is a module that is attached to the RTU as shown in figure RTU with Parallel Lightning Protection Module. RTU with Parallel Lightning Suppression Module The figure below illustrates how to attach an RTU with a PLSM to the network: 14 User & Installation Manual Hardware & Connections PLSM 2-wire network In Earth Out Attaching RTU with a PLSM to network It is important to note that if a PLSM is used, the 2-way connector of the RTU (labeled A in Remote Terminal Unit (RTU) section) itself must not be connected. The number of these units (RTU+PLSM) that are required depends on how susceptible the area is to lightning. If the severity is low, PLSMs can be placed, for example, 10 units apart whereas if the area is more prone to lightning, every unit may have a PLSM attached (see figure Example of placing units with PLSMs. Low susceptibility to lightning High susceptibility to lightning Unit with PLSM Example of placing units with PLSMs 15 NMC-64/PRO Irrigation PoleNet Software Installation & Operation PoleNet software is the interface where the technician defines the Irrigation controller which communicates with the SingleNet 2-Wire Host and operates the field valves via the SingleNet RTUs. PoleNet software is used for SingleNet system Configuration, Setup, Test and Monitor. PoleNet software features: • Test communication with field units • Test outputs and inputs • Program, load and backup your configuration files (online or offline) • Communication diagnostics • RTU ID programming Installation PoleNet software does not require installation; simply double click on the PoleNet.exe file and the software will open. Uninstalling To uninstall PoleNet simply erase the PoleNet.exe file. PoleNet software configuration - Main Menu When PoleNet software is started the main menu should appear: The heading shows which system PoleNet is set up to interface to (Two-wire Host in the figure above). Most buttons are disabled until PoleNet starts interfacing with a system. The functions of these buttons vary to suit the current application. 16 User & Installation Manual PoleNet Software Installation & Operation Click the Comms button to set communication settings (See section Selecting the System to Connect to). After setting the correct COM port and system click the Connect button to start interfacing to the system (See section Connecting to a System). After the system has connected successfully all relevant buttons will be enabled. In case the system does not connect try checking you connections and COM port definitions. Selecting the System to Connect to Comms button PoleNet can connect to the following systems/devices via a PC serial (comms) port: • • Two-Wire Host Two-Wire RTU Once the connection is established (using the Connect button from the main menu, see section Connecting to a System), PoleNet will provide an interface to the system/device and enable to access the system’s settings and monitor the system’s status. To select the system to connect to, click the Comms button from the main menu. This will open the Comms Config screen: • Connect To - choose the system that PoleNet should interface to from the list of options. • Port - choose which serial RS-232 (Comm) Port you wish to use to connect to the system. Most PCs do not provide connections for more than two comm ports as standard. PoleNET v1.21 onwards also supports COM5 - COM8 to support users who add comm. port cards to their computers. • Modem Configuration – this section allows you to connect to an off-site target system using a modem. This option is only available if you mark the Use Modem Connection check box: • Phone No - type in the phone number of the off-site target system’s modem. • Init String – if required enter an initialization string for your modem (It may be necessary to configure your modem to suit the target system’s modem or to disable your call waiting). • Inactivity Timeout - specify an inactivity timeout (in seconds) to avoid tying up either phone line. • Port - specify the serial port connected to your modem 17 NMC-64/PRO Irrigation When you have finished entering your settings, return to the main menu and click the “Connect” button. This will check that your Comms settings work and will then allow you to start interfacing with the target system. Connecting to a System Before attempting to connect to a system, ensure that there is a serial cable connecting the system to the PC and that the system is turned on. Connect / Disconnect button When you click on the Connect button, PoleNet will attempt to communicate with the current system using the current comm port (as specified in the Comms dialog, see section Comms button - Selecting the System to Connect to). The clock symbol will spin during this lengthy process. If the Connect process is successful, PoleNet returns to the main menu, enables the main menu buttons, and the Connect button changes its function to Disconnect. The Disconnect button should only be used if you want to use the current comm port for some other purpose without exiting the PoleNet program. While you are disconnected from a system, most main menu buttons are disabled. 18 User & Installation Manual PoleNet Software Installation & Operation If the Two-wire Host is not connected, off-line editing of the mapping is still supported, for those control modes that use mapping. Select the "Controller" type and the "Cfg" option will be available. Configuring 2-Wire hosts Controller Click the Controller button from the main menu to access the Select Control Mode dialog box: Select the mode that applies for the system. PoleNet queries the 2-Wire host to determine its current control mode and renames the Config button to suit the set mode. The 2-Wire host can be interfaced to one of four different types of controllers: 1. 2. 3. 4. NMC-64/PRO controller Parallel Controller Modbus – PLC / Controller with Modbus capability. Elgal Irrigation controller Click the Controller button if you wish to verify or change the 2-Wire host control mode. 19 NMC-64/PRO Irrigation Config button (2-Wire host) The Config button provides set-up options relevant to the current 2-Wire host control mode. If the 2-Wire host control mode is incorrect, first use the Controller button to adjust it. Each control mode has its own Configuration dialog; the NMC-64/PRO configuration is detailed in the following sections. For other control modes please refer to Appendix A - Connecting 2-Wire host to Master controllers. NMC-64/PRO Controller Configuration The NMC-64/PRO Controller sends commands to one or more various devices to monitor their inputs and to control their outputs. All devices need a unique NMC-64/PRO ID, (we recommend you use the default 1 for the Two-wire Host), although the value is only important if there are multiple devices connected to the NMC-64/PRO on a serial RS-485 Network. The Comms Info must be set to suit the connection to the current NMC-64/PRO system. Ideally specify the highest Speed, if you have a choice. The Tx Delay is provided to cater for the NMC-64/PRO controller and other devices which may hold onto the RS-485 lines after sending commands, or which may take some time to be ready for a response: twowire host will wait for this brief time before responding to NMC-64/PRO commands. The Tx delay should generally be left on 6 mS. Only if it appears that the Two-wire Host does not respond to the controller (or the Host seems to send garbage, or other controlled devices stop working when the Two-wire Host is connected) and the comms speed and parity are correct, experiment with this parameter until the system works properly. 20 User & Installation Manual PoleNet Software Installation & Operation Many errors are brief and transient by nature. The 2-Wire host extends the life of errors so the NMC64/PRO has sufficient time to observe the errors. The Error Timeout determines how long errors are remembered (remain active) after the error condition ceases. NMC-64/PRO Two-wire Addressing Two-wire RTUs have 2 outputs and 2 inputs, so the Two-wire Host supports up to 256 inputs and 256 outputs if all 128 two-wire RTUs are connected. The NMC-64 supports 64 outputs (e.g. valves) The NMC-PRO supports 256 outputs (e.g. valves) and 32 digital inputs (e.g. water meters) The Two-wire Addressing section selects the mapping technique to be used. (Mapping determines which two-wire inputs and outputs are controlled by each of the NMC outputs and inputs). Simple Linear Mapping is very straightforward; it simply allocates a continuous block of 64 2-Wire outputs (and corresponding inputs) so there is a 1:1 correlation to the NMC outputs and inputs. Eg. If you are using the first 32 RTUs (Address Offset = 0), then: NMC-64/PRO address 1 = two-wire Unit 1, port 1, NMC-64/PRO address 2 = two-wire Unit 1, port 2, NMC-64/PRO address 3 = two-wire Unit 2, port 1, NMC-64/PRO address 4 = two-wire Unit 2, port 2, NMC-64/PRO address 5 = two-wire Unit 3, port 1, etc. You can map to a different set of two-wire RTUs by using the Address Offset: a value of 2 moves the NMC-64/PRO map up by 1 RTU (2 outputs), (ie. NMC-64/PRO #1 = Unit 2, port 1). We recommend you don’t use an odd-numbered Address Offset for the NMC-64 since the 64 NMC addresses will then map across 33 RTUs, only using half of the first and last RTUs. Use Address Offset = 0 for the NMC-PRO otherwise you will not be able to use all the NMC outputs. There is also merit In setting the Address Offset = (ID of first two-wire Unit – 1) * 2 because NMC address 1 will then correspond with the first two-wire port, however if you later add two-wire units with lower IDs you will have to change the Address Offset which will then require reprogramming the Host. NMC-64/PRO Non-Linear Address Mapping Use Non-Linear Mapping is used to enable more flexibility or if you would like NMC-64/PRO outputs to be able to control more than one two-wire output each. This is also a very useful system because you can change the mapping of one NMC-64/PRO address without affecting the mapping of any other NMC addresses - this lets you use the NMC-64/PRO to control & monitor different crops or fields at different times, without interrupting or changing the setup for the main part of your system. Click the Setup button to configure the non-linear mapping. 21 NMC-64/PRO Irrigation Each NMC-64/PRO output can be mapped to any number of outputs from 2-Wire RTUs, but each 2-Wire RTU output must be controlled by only one NMC-64/PRO output. The top section of the dialog allows you to read the NMC-64/PRO mapping from the Host and to program them into the controller after editing. You can also load pre-existing NMC-64/PRO configurations from computer or save them for later use. The lower half allows you to examine and modify the mapping of the NMC-64/PRO outputs and inputs. There are two ways to configure NMC-64/PRO outputs/Inputs to RTU outputs/Inputs: 1. Use the middle section - NMC-64/PRO Outputs/Inputs: Select an NMC-64/PRO output/Input (you can also give it a name if desired) and map it to a RTU output/input from the Free Outputs/Inputs list on the right (see section NMC-64/PRO Outputs and Inputs). 2. Use the bottom section - Two-Wire Outputs/Inputs: Select the unit number (RTU no.) and configure a NMC-64/PRO output/input to each (or one) of its outputs/inputs (see section Two-Wire Outputs and Inputs) 22 User & Installation Manual PoleNet Software Installation & Operation Updating the 2-Wire Host NMC-64/PRO Mapping Configuration Read fetches all the NMC-64/PRO mapping settings directly from the 2-Wire host. You then edit the settings and save them or program them back into the 2-Wire host. The two-wire host does not keep track of the Names for NMC outputs/inputs. Program programs the current NMC-64/PRO mapping settings into the two-wire host. This takes several seconds, so a Programming progress window is shown Configuration File New clears all mapping between the NMC-64/PRO addresses and two-wire RTUs, but it retains the Name settings for the NMC-64/PRO outputs and inputs. Load lets you fetch a previously Saved NMC-64/PRO configuration from the PC. Save stores a copy of the NMC-64/PRO map configuration on the PC, including the mapping of NMC addresses to RTUs ports and Names for NMC-64/PRO outputs & inputs. 2-Wire host supports 128 RTUs, so the Free Units and Unit Number lists are very long. To view only available units simply select Only Show Available/Used Units, PoleNet monitors the 2-Wire network (to see which RTUs it detects) and then only lists known RTUs. This makes setup quicker, easier and less prone to error, but it requires the 2-Wire system and 2-Wire RTUs to be largely operational. If you are setting up the NMC mapping before starting the system then you will not be able to use this option If a Unit is shown with brackets around it, then that RTU cannot be found on the system at the moment, but it has been mapped to the NMC-64/PRO. This may help you find invalid settings, although the RTU may have simply “dropped out” temporarily. NMC-64/PRO Outputs and Inputs This section lets you view and setup the mapping from the NMC-64/PRO’s point of view. You can Name each NMC Output (or Input), which should make it easier to verify, test and maintain the configuration. Then you setup how each NMC-64/PRO output (input) maps to the 2-Wire system. Each NMC-64/PRO output can control any number of outputs from 2-Wire RTUs. Inputs can only be configured direct - one-to-one. For each NMC-64/PRO output (or Input): 1. Select the NMC-64/PRO Output (or Input) number that you wish to configure. 2. If you wish, give it a suitable Name, describing its purpose and/or location, etc. 3. PoleNet shows the RTU ports Activated/Used by the NMC output/input. 4. PoleNet displays a list of Free RTU ports – ones not allocated to the NMC-64/PRO. 5. To allocate an RTU port to the NMC output /input, locate the desired RTU port in the Free list, then either highlight it and click the Left arrow button or just double-click it. It then moves to the Activated/Used list. 23 NMC-64/PRO Irrigation (For inputs, you must first remove the mapping to an RTU input before you can replace it with another). 6. To remove an RTU output from the list of Outputs Activated by the NMC-64/PRO output locate the unwanted output, then either highlight it and click the Right arrow button or just double-click it. It will move to the Free Outputs list. If you cannot find a particular RTU output/input in the relevant Free list then its RTU may not be detected at the moment - turn off the Only Show Available/Used Units option and see if the desired output/input is now in the list. If the RTU output/input is still not in the Free list then it must already be allocated to a NMC-64/PRO address - use the bottom Two-Wire Outputs/Inputs section to see how it is allocated. Two-Wire Outputs and Inputs This section lets you view and setup the mapping from the 2-Wire Host’s point of view, as an alternative to the NMC-64/PRO-based section above. For each 2-Wire Unit: 7. Select the 2-Wire RTU that you wish to configure from the Unit Number list. 8. If a desired RTU is not in the Unit Number list then the RTU cannot be detected at the moment - turn off Only Show Available/Used Units to access it. 9. PoleNet shows which NMC-64/PRO output is used for Out 1 and Out 2. 10. To change, choose the desired NMC-64/PRO port from the Out 1 or Out 2 lists. 11. To free up an RTU output/input, change its setting to <Not Used>. The <Not Used> setting is the first item in the Out 1 and Out 2 (In1 and In2) lists. Advanced button (2-Wire host) These advanced settings are critical settings and should not be changed by anyone not intimately acquainted with their effects. These settings determine how the two-wire host communicates with the twowire RTUs and also affect the amount of power that is available to the RTUs. Danger! Incorrect settings can have extremely serious negative consequences: • Complete loss of communication with some or all RTUs • Intermittent breakdowns of communication • Intermittent operation of distant RTUs (power failure, inability to drive outputs). 24 User & Installation Manual PoleNet Software Installation & Operation The 2-wire system provides power and serial communications on the same two wires. RTUs extract power from the 2-Wire network and wait for communications targeted at them and communicate with the Host only when asked. The power available to RTUs is decreased: • • • By the number of other RTUs sharing the same two wires, By distance from the host (due to losses in the wires and from closer RTUs), While there is communication on the 2-Wire network. There is usually little that can be done to change the location (and hence the distance) of RTUs, but you may be able to site the 2-Wire host in a central location and have multiple two-wire runs radiating out in a star pattern from the host. Once all RTUs are installed, the communication parameters must be set to ensure they all receive adequate power and have reliable communications to and from the host. Comm Slots is simply the number of communications slots per second. Increasing this number speeds up the rate of communications, reducing the average response time of the system, but it may make the communications unreliable and it reduces the amount of power available for distant RTUs. The bracketed value (64) is the standard setting. Comm Bit Width is the duration in microseconds of each serial bit. The bracketed value (82) is the standard setting. It must be set to ensure reliable communications are possible at all times with all RTUs. The unique characteristics of each installation imposes a lower limit on the bit width and this in turn sets an upper limit on the Comms Slots value. Clear Inputs after RTUs absent for a number of minutes (PoleNet V1.21 onwards). This setting is also only available for two-wire hosts from version 1.28 onwards, so it is greyed-out if earlier version two-wire hosts are used. Old versions of the two-wire host (prior to version 1.28), always report the last-known state of the inputs from RTUs, even if any RTUs become lost or are out of communication for a very long time. This new setting will clear the two-wire host’s copy of the inputs from any RTU after the RTU has been absent, unable to be contacted, for long periods of time, (up to 1 hour). This is generally preferable and safer than assuming that the inputs are still active. 25 NMC-64/PRO Irrigation Stagger Outputs – Delay between valves opening (PoleNet V1.35 onwards). • User specifies a time period (up to 255 seconds) • Two-wire host ensures that no more than 1 output may turn on and 1 output may turn off at any one time • This is followed by the stagger delay period during which no other outputs will be changed. • This process is repeated until no further output changes are pending. V1 V2 Shift 1 = 1+2+3+4 with no stagger delay V3 V4 V1 V2 Shift 1 = 1+2+3+4 with stagger delay V3 V4 V1 V2 Shift 1 = 1+2 V3 Shift 2 = 3+4 V4 With stagger delay Shift Start 1 Shift Change Shift 2 Stop Monitoring 2-Wire Systems If you have not already done so: 1. Set Connect To to Two-wire Host in the Comms dialog (see section Selecting the System to Connect to). 2. Connect to the Two-wire Host. 26 User & Installation Manual PoleNet Software Installation & Operation Monitor button (2-Wire host) The Monitor button in the main menu opens the Two-Wire Monitor window and starts displaying information about all connected RTUs. All RTUs that are communicating with the host are displayed and sorted by their Unit ID. The monitor window shows any RTU outputs that may be On (Out1 and Out2), and it also displays the number of transitions (changes) of each of the RTU inputs (In1 and In2). If the host loses contact with an RTU, it is removed from the monitor window until it is communicating again. PoleNet keeps track of these drop-outs and displays them in an extra column (Drops) of the monitor window. This column is normally hidden from view: to view it click the >> button in the bottom right corner. Click the << button to return to normal view. 27 NMC-64/PRO Irrigation Enhanced two-wire unit monitoring: PoleNet now has support for the Two-Wire Host’s new System Capture feature. To use this, wait until the Monitor window shows that all the connected RTUs are available, then click the Capture button. Captured units are always listed and are considered as essential parts of the system. Monitor window now has Totals at the top of the window showing, from left to right: • The number of Units displayed in the window, • The number of units with any outputs On, • The number of units Missing (Lost or not yet found), • The number of Extra units (available but not captured or not defined). a unit is defined if one or more of its IOs are explicitly mapped to IOs on the Host Controller, if supported by the host interface (eg. NMC) Colour-coding has been added to highlight active outputs and any “faults”. Green is used to show any active (On) outputs, (unless there is an error on the output, in which case it will show the last known state in Red). Red is used to show any faults, such as the unit being lost (or not yet found), or an output being in the wrong state. Blue is used to show any units which are not yet Captured or not yet Defined and helps locate problems with the system set-up. It identifies units which are connected (Captured) but whose IOs are not used (Defined), and units which are Defined (expected) but don’t exist or are faulty. Black is used for normal operation. 28 User & Installation Manual PoleNet Software Installation & Operation Test mode Test mode allows you to temporarily turn individual outputs on or off, overriding the system controller. It should only be used in the installation and testing process. Normal operation is suspended while in Test mode! controller requests to change outputs state! 2-Wire host ignores all 1. Click the Test button to enter Test mode – the button changes to display Testing to confirm and to remind you that you are in Test mode. 2. While in Test mode, right-click on any RTU to see a pop-up menu. 3. Click on the desired action (eg. Out1 On, Out1 Off, etc’). 4. Wait for the command to be sent to the desired RTU, for the RTU to turn the output on or off, and for the two-wire host to receive confirmation. This will usually take about 10 seconds, and will rarely require more than 30 seconds. 5. To exit Test mode, click the Testing button (or the Close button). 6. Two-wire host returns to normal operation 10 seconds later. Do not stay in Test mode unnecessarily! Voltages button (2-Wire host) The Voltages button in the main menu opens the Two-Wire Voltage Monitor window and starts displaying Voltage and Current statistics for the 2-Wire network. It reports the most recent value as well as the minimum and maximum values. 29 NMC-64/PRO Irrigation • Output Voltage is the voltage provided by the Host to the two-wire network. • Output Current indicates the drain/load imposed by the RTUs and the wiring. • Return Voltage indicates the strength of communications returning from the RTUs. To restart the minimum and maximum statistics, simply click the Clear button. PoleNet version V1.26 (onwards) has some additional system diagnostic features such as the “Errors” display in the Two-Wire Voltage Monitor screen (refer Figure below) The Error display window will report major system errors as reported by the host unit. Please refer to Table below for a list of errors and their descriptions. Fault ID 1 2 3 4 5 6 7 8 Error Over Current Vin Low Vin Fail Missing Unit (reserved) Unmapped IO Missing Output Faulty Output Description Excessive two-wire current. Possible short circuit Two-wire voltage is very low, in danger of failing. Two-wire voltage has failed. One (or more) Captured units are missing (not available) Tried to set an Output which is not mapped to any unit Tried to set the Output of a unit which is not available Failed to change the Output of a unit. Possible short circuit 30 User & Installation Manual PoleNet Software Installation & Operation About button The About button reports the current version of the PoleNet software and the current software version of any connected Units (Two-wire Host in the figure below). Configuring 2-Wire RTUs If you have not already done so: 1. Set Connect To to Two-wire RTU in the Comms dialog (see section Selecting the System to Connect to). 2. Connect to the Two-wire RTU (see section Connecting to a System). Two-wire RTUs do not need an external power source during configuring. After you connect to a 2-Wire RTU the following main menu will appear: The heading shows that PoleNet is set up to interface to Two-wire RTU and only relevant buttons are enabled. Setup button (2-Wire RTU) 31 NMC-64/PRO Irrigation When you click on the Setup button in the main menu, a progress window will be displayed while PoleNet reads the RTU configuration. In a 2-Wire network, every unit must have a unique RTU ID from 0-127. They are pre-programmed with consecutive IDs during manufacture so this is seldom an issue. Pre-empt fine-tunes the RTU’s comms handler, it is set by default to 18: It is highly recommended not to change the pre-empt value! Monitoring 2-Wire RTUs If you have not already done so: 1. Connect the 2-Wire RTU to the 2-Wire network. 3. Set Connect To to Two-wire RTU in the Comms dialog (see section Selecting the System to Connect to). 4. Connect to the Two-wire RTU (see section Connecting to a System). Monitor button (2-Wire RTU) The Monitor button in the main menu opens the 2-Wire RTU Monitor window and starts displaying information about the connected RTU. 32 User & Installation Manual • • • • PoleNet Software Installation & Operation Line Voltage is the voltage on the 2-Wire network. Charge Outputs are the voltages available for changing output state. The RTU has to build up a charge of at least 13V before it can change output state. For each input, the Input Count indicates the number of transitions (changes) of the relevant input. The state of both Outputs is also shown, 1 for On, 0 for Off. You can manually change (test) the outputs by clicking the relevant On or Off buttons. After a period of inactivity, PoleNet may lose contact with the RTU, although this may not become evident until you attempt to change an output. If so, you will receive the following message: Simply click the Connect button again to reconnect Testing the system for proper operation This section describes how to test the system (NMC-64/PRO + SingleNet system) for proper operation. This can only be done after installation is complete and all settings are believed to be correct. 12. Make sure that all units are connected and in operative mode. 13. If possible connect a PC to the 2-Wire host and open the PoleNet software (see sections Connecting 2-Wire host to PC, Selecting the System to Connect to and Connecting to a System). 14. Open the PoleNet Two-Wire Monitor screen. 15. Enter the NMC-64/PRO Test menu (menu 5. Test) 16. Enter the NMC-64/PRO Test Relays menu (menu 5.1 Relays) 17. Select an output (relay) configured to the SingleNet system and set it to Man. 18. Wait between 10 to 30 seconds to see whether the RTU output is physically turned On and the output status changes to On in the PoleNet Two-Wire Monitor screen. 33 NMC-64/PRO Irrigation An installation is completed if everything works properly If not you can try the following: • Manually turning an output On through the PoleNet software (see section Monitoring 2-Wire Systems > Test mode). If the output is turned On through the PoleNet software try rechecking your configuration definitions in the PoleNet. • Check valve connection, as mentioned above the output does not turn On if not connected to a valve. • Verify software versions (see section Software versions). If you are not able to operate the system contact an authorized Netafim dealer! 34 User & Installation Manual Appendix A Appendix A - Connecting 2-Wire host to Master controllers Parallel Controller mode This section describes how to use the Parallel Controller card as the controlling device of 2-Wire host (see the figure bellow). In this mode, it is possible to control one or more outputs of the 2-wire network using a single 24V AC or 12V DC digital input. There are 48 inputs available in the controller. 2-Wire System Controller in Parallel Controller mode A B D 35 C E NMC-64/PRO Irrigation The Indicated sections are: A. Connector providing power to the 2-Wire host. B. J7 connector is a RS-232 socket to plug in cable to connect a PC (Used for setup and diagnostics). C. J2 connector for connecting the 2-wire cable to the RTUs. D. Inputs of the Parallel Controller Board E. J1 programming Link. Controller shown with optional battery backup. Figure 2-Wire host in parallel Controller mode is a block diagram of how the parallel controller interfaces to the 2-wire system: Host unit Parallel Controller module 2-wire cable Slave controller 2-Wire host RTU(1) RTU(2) RTU(3) RS-232 48 x digital inputs To PC 2-Wire host system in Parallel Controller mode Physical Connection The system is generally shipped with the parallel controller board plugged in to the 2-Wire host module. The Parallel Connector inputs are labeled D in paragraph Parallel Controller mode. Every 24 inputs have a common connector and should be connected to the outputs of the Master controller. Configuring Two-wire Hosts If you have not already done so: 36 User & Installation Manual Appendix A 1. Set Connect To to Two-wire Host in the Comms dialog (see section 0) 2. Connect to the Two-wire Host (see section 0) PoleNET quesries the Two-wire host to determine its current control mode and renames the Config button to suit. Click the Controller button if you wish to verify or change the Two-wire host control mode. Controller button (Two-wire Host) Click the Controller button from the main menu to access the Control Mode dialog. Then select the mode that applies for the system. PoleNET will adjust the text on the Config button in the main menu to suit the control mode. Parallel Controller Configuration The top half of the dialog allows you to obtain pre-existing parallel configurations and to then program them into the controller or save them for later use. The lower half allows you to examine and modify the 37 NMC-64/PRO Irrigation parallel configuration. You can either use the Parallel Inputs section to select the relevant outputs for each input, or you can use the Two-Wire Outputs section to select the relevant input for each output. Configuration File New removes all links between inputs and outputs, although it retains the Name settings for the inputs. Load allows you to fetch a previously Saved parallel configuration from the computer. Save stores a copy of the parallel configuration onto the computer, including all connections between inputs and outputs and the Name settings for inputs. Updating the Two-wire Host Parallel Configuration Read fetches all the parallel settings directly from the two-wire host. You can then edit the settings and then save them or program them back into the two-wire host. Note: the two-wire host does not keep track of the Name settings for inputs.Program causes the current parallel settings to be programmed into the two-wire host. This takes several seconds, so a Programming progress window is shown 38 User & Installation Manual Appendix A Two-wire host systems support up to 128 two-wire RTUs so the lists of Free Outputs and Unit Numbers are very long. If you use the Only Show Available/Used Units option, then PoleNET monitors the two-wire network (to keep track of all the RTUs that it detects) and adjusts the outputs lists to only include known RTUs. This makes the setup quicker, easier and less prone to error, but it requires the two-wire system and all two-wire RTUs to be largely operational. If you are setting up the parallel interface before starting the system then you will not be able to use this option. If an Outputs list includes a Unit with brackets around it, then that RTU cannot be found on the system, even though it has been allocated. This can help you find invalid settings, although the RTU may have simply “dropped out” temporarily. Parallel Inputs The Parallel Inputs section allows you to view the outputs activated by each of the 48 available parallel inputs and to change their allocation. Each input can be connected to any number of outputs from twowire RTUs. (Each two-wire RTU output must be controlled by only one parallel input.) PoleNET allows you to give each input a Name which should make it easier to verify, test and maintain the configuration. For each parallel input: 1. 2. 3. 4. 5. Select the parallel Input Number that you wish to configure. If you wish, give it a suitable Name, describing its purpose and/or location, etc. PoleNET displays a list of the Outputs Activated when the input becomes active. PoleNET displays a list of Free Outputs – outputs not yet allocated to any input. To make the input activate another output, locate the desired output in the Free Outputs list, then either highlight it and click the Left arrow button or just double-click the desired output. It will move to the Outputs Activated list. 6. To remove an output from the list of Outputs Activated by the input, locate the unwanted output, then either highlight it and click the Right arrow button or just double-click the unwanted output. It will become a Free Output. If you cannot find a particular output in the list of Free Outputs then the output’s RTU may not be detected at the moment - turn off the Only Show Available/Used Units option and see if the output is now in the list. If the output is still not in the Free Outputs list then it must be allocated to another input - use the Two-Wire Outputs section to see which input it has been allocated to. 39 NMC-64/PRO Irrigation Two-Wire Outputs The Two-Wire Outputs section allows you to view which parallel input controls each of the outputs from two-wire RTUs and to change the allocations. For outputs from each two-wire unit: 1. Select the Two-Wire RTU that you wish to configure from the Unit Number list. 2. If you cannot find a particular output in the Unit Number list then the RTU cannot not be detected at the moment - turn off the Only Show Available/Used Units option and access the unit in the list. 3. PoleNET will show which parallel inputs are used for the Unit’s Out 1 and Out 2. 4. To change, simply select a different parallel input from the Out 1 or Out 2 lists. 5. To free up an output, change its allocation to <Not Used>. (The <Not Used> setting is the first item in the Out 1 and Out 2 lists.) Elgal controller mode 2-Wire System Controller in Elgal Slave Mode A B D The Indicated sections are: A. J3 connector providing power to the 2-wire host. 40 C E User & Installation Manual Appendix A B. J7 connector is a RS-232 socket to plug in cable to connect a PC (Used for setup and diagnostics). C. J2 connector for connecting the 2-wire cable to the RTUs. D. J5 connector is a RS-485 socket to plug to Elgal master (ensure correct polarity and grounding). Note: Requires optional Elgal connecting cable kit. E. J1 programming Link. Controller shown with optional battery backup. Host unit Elgal Controller 2-wire cable Slave controller (2-wire host) RS-485 RS-232 RTU(1) RTU(2) RTU(3) To PC Figure 2: 2-Wire host controlled by Elgal. Physical Connections The Elgal controller is physically connected, via RS485, to the 2-Wire host using connector D as shown in Elgal controller. Ensure the RS485 connection to the Controller observes correct polarity and provides proper ground connection between the units. When you enter the Elgal Configuration screen, PoleNET automatically reads the current Elgal configuration from the Two-wire Host. This process takes several seconds, so a progress screen is displayed while the Host is read. The top half of the dialog allows you to obtain pre-existing Elgal configurations and to then program them into the controller or save them for later use. The lower half allows you to examine and modify the Elgal configuration. 41 NMC-64/PRO Irrigation Configuration File New deletes all cards and all settings. Load allows you to fetch a previously Saved Elgal configuration from the computer. Save stores a copy of the Elgal configuration onto the computer. Updating the Two-wire Host Elgal Configuration Read fetches all the Elgal settings directly from the two-wire host. You can then edit the settings and then save them or program them back into the two-wire host. Program causes the current Elgal settings to be programmed into the two-wire host 42 User & Installation Manual Appendix A Both the Read and the Program can take many seconds, so a suitable progress window is shown while you wait Card Definitions The Card Definitions section allows you to view and change the Elgal cards emulated by the Two-wire Host, along with the mapping of Elgal cards’ I/O to Two-wire RTUs. The Two-wire Host can support up to 8 Elgal cards of various types: • • • Digital24 – with 24 relay outputs Digital – with 16 relay outputs and 8 digital inputs CRTU – with 64 RTU units, each with 2 digital outputs and 4 digital inputs Click on + symbols to view mapping details. Click on – symbols to close them up. Right-click on any item for a pop-up menu with a choice of available actions. The actual mapping of Elgal address to Two-wire network address is shown for each Elgal I/O. Unmapped Elgal I/Os are shown as “= ---“. In the figure below, the line 3-3-0 = 2W1:5:2 indicates that the function of Elgal card 3 (a CRTU card), Unit 3, digital output 0 is mapped to (implemented by) Two-wire network 1, RTU 5, digital output 2. In order to ensure that the Elgal controller can correctly communicate with the 2wire system, it must be configures with exactly the same card types in exactly the same slots as the two-wire host. 43 NMC-64/PRO Irrigation To change an Elgal card, right-click on the relevant card to access a pop-up menu, as shown above. Each pop-up item is detailed on the next page. Change Type replaces the current card with a different type of Elgal card. 44 User & Installation Manual Appendix A Delete removes the current Elgal card (replaces it with empty). Move allows you to move a card to a different position, retaining its network settings. Clear removes all the Two-wire RTU network allocations from the card. To change a specific Elgal I/O mapping, (eg. 3-3-1 = 2W1:30:2), right-click it and select Edit. PoleNET will display the current setting. PoleNET lists all possible RTU Units, whether or not they are connected to the two-wire host. PoleNET will not allow you to select RTU I/Os that have already been mapped to another Elgal input or output. (They are shown “greyed out”, as in the “1” above. 45 NMC-64 Irrigation Appendix B – Versions & Firmware Upgrades This chapter details software and documentation versions, and Software versions Product Name Version PoleNET software 1.18 onwards Two-Wire Host 1.38 onwards Two-wire RTU 1.16 onwards NMC-64/PRO V2.02.04 onwards NMC Pro V3.00.01 onwards Third Party Products Product Name Version Elgal - Galileo/Galileo 2000 OPN-FLD-E2.76:27616 Related Documents Document Name Description PoleNet Elgal Setup Commands and other information related to configuring the Elgal emulator in SmartPOLE / microPOLE. PoleNET User Manual User Manual describing all operation of the PoleNET software. PoleNET 2-wire system Modbus Spec Specification of the 2-wire host modbus interface. Detailed discussion of addresses is found here. Upgrading 2-Wire host Please refer to the picture in the Appendix relevant to your system when following these instructions: 46 Software Master Controller Relevant Appendix NMC (NMC-64/PRO slave) 2-Wire host Parallel Controller Elgal Parallel Controller mode Elgal controller mode Please follow these instructions completely and with great care! The 2-Wire host module can be damaged beyond repair due to errors and omissions if these instructions are not followed! 19. Disconnect power to the 2-Wire host module by removing the power connector J3 (A). 20. Connect the PC to the 2-Wire host module using a RS-232 cable connected to connector J7 (B). 21. Touch the aluminum tab of the regulator U27 in with your finger to discharge any static electricity that may have built up on your body. This is a critical step; Failure to comply can render 2-Wire host inoperable! 22. Place the programming link on the programming jumper J1. LNK (see section 2-Wire host) as shown in figure Placing the programming link. programming link programming jumper Placing the programming link 47 NMC-64 Irrigation 23. Reconnect power to the 2-Wire host module. 24. Execute the upgrade program from the PC. C:\>W2S127 –port com1 (127 is the version of the upgrade) 25. Disconnect power to the module. 26. Again, touch the aluminum tab of the regulator as in step 3. 27. Remove programming link. 28. Reconnect power. This completes the 2-Wire host firmware upgrade. Upgrading RTUs 29. In order to upgrade the software, connect an RS-232 cable from your PC COM port to the RS-232 socket in the RTU (Connector D in figure Remote Terminal Unit). 30. Execute the provided upgrade program from your PC: C:\>W2SRTU_v116 com1 (load version 1.16 from com1) This completes the RTU firmware upgrad 48