1
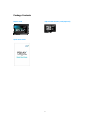
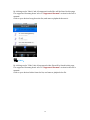
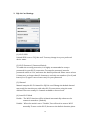
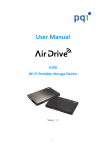
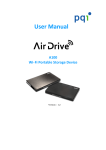
User’s Manual A200 WiFi microSD Adapter Version:1.0 Index Product Introduction .................................................................................................3 Package Contents ..........................................................................................................4 Quick Start Guide ..........................................................................................................4 Product Features ...........................................................................................................5 Supported Formats........................................................................................................5 System Requirements ...................................................................................................6 Knowing PQI Air card ....................................................................................................6 Install the dedicated app for PQI Air card: AirCard+....................................................7 Connects to PQI Air card ...............................................................................................9 Begin to use “AirCard+" App .................................................................................. 11 Image: ..................................................................................................11 Music:........................................................................................................13 Video:.....................................................................................................14 Settings: ....................................................................................................15 Reset ............................................................................................................................17 NCC/DGT......................................................................................................................19 FCC Compliance and Advisory Statement ..................................................................20 2 Product Introduction Congratulations! You have purchased the PQI Air card, a WiFi microSD adapter. Simply insert your microSD card in the PQI Air card, and turn your PQI Air card into a WiFi SD card. All you need to do is inserting the card in the camera, turning on the power, and starting to enjoy the convenience of wireless transmitting. Through the PQI Air card, you can access your digital content from your iPhone, iPad, iPod Touch, or any Android smart phone or tablet. Browse through the photos and videos in the camera, and share them with your friends or family instantly, and wirelessly. PQI Air card supports up to 3 connections simultaneously. Reminder: The WiFi transmission speed will vary with the WiFi environment, camera, distance to the device, or the number of connections at the same time. Suggestion: Please change the camera settings to extend the idle time. (For example: change the auto turn off or monitor off to longer time, or disable the auto off function. 3 Package Contents PQI Air Card PQI microSD memory card (Optional) Quick Start Guide 4 Product Features Plug and play, easy to use Browsing photos Music playback Video playback Supports WPA2 (Wi‐Fi Protected Access II) encryption Supports both iOS and Android devices Dedicated iOS app (AirCard+) available on App Store Dedicated Android app (AirCard+) available on Google Play Dedicated Kindle app (AirCard+) available on Kindle Store Sharing photos/videos/music wirelessly Flexible memory capacity, supports SDHC Card(4GB to 32GB) Supports up to 3 connections simultaneously Supported Formats The supported formats vary with the devices Supported formats on iOS: image: .jpg, .png audio: .mp3, .wav, .aif video: .mp4, .mov Supported formats on Android: image: .jpg, .png, bmp, .gif audio: .mp3, .mp4, .3gp, .wav, .ogg, .imy, .aif video: .mp4, .3gp 5 System Requirements Requirements to install AirCard+: iOS Device: Compatible with iPhone (3GS, 4, 4S), iPod touch, and iPad. Requires iOS 4.0 or later. Android Device: Compatible with Android device. Requires Android 2.1 or later. Knowing PQI Air card Before using the PQI Air card, insert a microSD memory card (SDHC: 4GB to 32GB) into your PQI Air card. Insert the PQI Air card into your digital camera. 6 Install the dedicated app for PQI Air card: AirCard+ “AirCard+” is a multimedia mobile application designed for PQI Air card. It is available on both iOS and Android devices. Using the app, you can access the contents stored in your digital camera. “AirCard+” categorizes the photos, music, and video files into different pages. With this feature, you can easily find the particular file you need. Install “AirCard+" app on iOS device 1. Launch the App Store on iOS device, and search for “AirCard+” or “PQI”. 2. Click on “AirCard+” from the search result to enter the detail page. Click on “Free” button on the detail page, and click on “Install App” to begin the installation. (Password for your Apple ID might be needed) 3. Once the installation is completed, the “AirCard+” shall be displayed on your device. Install “AirCard+" app on Android device 1. Launch the Google Play on Android device, and search for “AirCard+” or “PQI”. 2. Click on “AirCard+” from the search result to enter the detail page. Click on 7 “Free” button on the detail page, and click on “Download” to begin the installation. (Password for your Google account might be needed) 3. Once the installation is completed, the “AirCard+” shall be displayed on your device. 8 Connects to PQI Air card Please follow the steps below for iOS/Android devices: 1. Insert the PQI Air card (with microSD card) in your digital camera. 2. Turn on the power from the camera, and wait for about 25 seconds for the Wi‐Fi to initiate. 3. On the “Settings” page from your iOS/Android device, click on the “Wi‐Fi Setting”, and click on “PQI Air card” from the Wi‐Fi list to establish the connection. 4. Once the connection is completed, launch the “AirCard+” from your handheld device, and start to enjoy the convenient features of your PQI Air card. Please follow the steps below when using a web browser: 1. Insert the PQI Air card (with microSD card) in your digital camera. 2. Turn on the power from the camera, and wait for about 25 seconds for the Wi‐Fi to initiate. 3. Look for “PQI Air card” from your Wi‐Fi device, and establish the connection. 4. Once the connection is completed, launch a web browser from your device, and enter “192.168.1.1” on the address bar. 5. Once the page is loaded, you may browse or download the photos and videos that stored in your PQI Air card. 9 10 Begin to use “AirCard+" App Once your iOS/Android device connects to PQI Air card, you may begin to use the app “AirCard+” to browse the contents stored in the PQI Air card, and perform the convenient and friendly operations that the app provides. Reminder:Please make sure the file formats are supported by your iOS/Android devices. (Please refer to “Supported Formats” section in the user’s manual.) When entering the main page of “AirCard+”, the following functional pages will be displayed: Image: By clicking on the “Image” tab, all supported image files from PQI Air card will be displayed. For supported formats, please refer to “Supported Formats” section in the user’s manual. By click on a particular photo, it will enter the slide show mode for large image browsing. 11 Upload Photos By clicking on , the photo album on the device will be displayed. Select the desired photos, and upload the selected photos to PQI Air card. By clicking on , a function menu will be displayed. Refresh: To refresh the list of photos to synchronize with the PQI Air card. Select Images: To select images for further operations. (Save to album, email, or post to Facebook) Exit: To exit the application. Cancel: To cancel the operation. 12 By clicking on the button from the function menu, you may click on your desired photos, and save them in the photo album on your device, email the photos, or post them on your Facebook (Only when the PQI Air card connects to a Hotspot with Internet access). Music: 13 By clicking on the “Music” tab, all supported audio files will be listed in this page. For supported formats, please refer to “Supported Formats” section in the user’s manual. Click on your desired song from the list, and start to playback the music. Video: By clicking on the “Video” tab, all supported video files will be listed in this page. For supported formats, please refer to “Supported Formats” section in the user’s manual. Click on your desired video from the list, and start to playback the file. 14 Settings: The setting functions are listed below: 1. Hotspots Preset up to 3 sets of hotspot. Click on each “AP” column to enter the SSID and Password for the hotspot connection. When setting changes are completed, please click on “Save” button to save the changes. 15 2. PQI Air Card Settings (1) Wi‐Fi SSID Default SSID is set to “PQI Air card”. You may change it to your preferred device name. (2) Wi‐Fi Password / Password Switch To enable the security protection, it is highly recommended to setup a password for your Wi‐Fi connection. To setup the password, turn the password switch to “On”, and enter the desired password. Please enter at least 8 characters, no longer than 63 characters, and only use numbers (0 to 9) and letters (A to Z, upper case or lower case) for your password. (3) Channel Manual setup the Wi‐Fi channel for PQI Air card. Change the default channel may avoid the interference with other Wi‐Fi connections using the same channel. There are totally 11 channels available to choose from. (4) Auto Wi‐Fi Mode Enable:The Wi‐Fi function will be initiated automatically whenever the camera is turned on. (Default) Disable:When the mode is set to “Disable”, You will need to turn on Wi‐Fi manually. To turn on the Wi‐Fi, browse to the built‐in function photo 16 “Enable WiFi” from the camera, and delete that photo. Wait for about 25 seconds for the PQI Air card to turn the Wi‐Fi on. 3. “Save” button For all changes made in the Settings page, you will need to click on the “Save” button to save the changes. The changes will take effect when the camera is turned off and turned on next time. 4. “Connect to Hotspot” button By clicking on the “Connect to Hotspot” button, PQI Air card will try to connect to the hotspot based on the hotspot settings. PQI Air card will look for hotspots based on the following order: “AP#1”, “AP#2”, and then “AP#3”. When the first available hotspot is connected, PQI Air card will stop trying for the next hotspot. Please make sure you enter your desired hotspot on the top. You may also turn on the hotspot connection from your camera. Simply browse to the built‐in function photo “Connect to Hotspot” from the camera, and delete that photo. Wait for about 25 seconds for the PQI Air card to connect to the hotspot. Reset There might be some circumstances that you will need to reset your PQI Air card. To reset your PQI Air card, simply browse to the built‐in function photo “Factory Reset” from the camera, and delete that photo. Wait for about 10 seconds for the PQI Air card to reset to the factory default. 17 Important Reminder: When the PQI Air card is not working normally, or when you forgot your Wi‐Fi password, please reset the PQI Air card to restore the card back to factory default. You may also reset the PQI Air card from your computer (with a SD card reader). On your computer, browse to the “WSD00003.JPG” file under “/DCIM/199_WIFI”, and delete the file (Empty the trash can if using a Mac computer). Wait for about 10 seconds for the PQI Air card to reset to factory default. The reset will not delete the other files in your PQI Air card, and shouldn’t cause any data loss. 18 NCC/DGT 第十二條 型式認證合格之低功率射頻電機,非經許可,公司、商號或使用者均不得擅自變更頻率、加大功 率或變更原設計之特性及功能。 第十四條 低功率射頻電機之使用不得影響飛航安全及干擾合法通信;經發現有干擾現象時,應立即停用, 並改善至無干擾時方得繼續使用。 前項合法通信,指依電信法規定作業之無線電通信。 低功率射頻電機須忍受合法通信或工業、科學及醫療用電波輻射性電機設備之干擾。 19 FCC Compliance and Advisory Statement This device complies with Part 15 of the FCC rules. Operation is subject to the following two conditions: (1) this device may not cause harmful interference, and (2) this device must accept any interference received, including interference that may cause undesired operation. This equipment has been tested and found to comply with the limits for a Class B digital device, according to Part 15 of the FCC rules. These limits are designed to provide reasonable protection against harmful interference in a residential installation. This equipment generates, uses and can radiate radio frequency energy and if not installed and used in accordance with the instructions, may cause harmful interference to radio communications. However, there is no guarantee that interference will not occur in a particular installation. If this equipment does cause harmful interference to radio or television reception, which can be determined by turning the equipment off and on, the user is encouraged to try to correct the interference by one or more of the following measures: 1. Reorient the receiving antenna. 2. Increase the separation between the equipment and receiver. 3. Connect the equipment into an outlet on a circuit different from that to which the receiver is connected. 4. Consult the dealer or an experienced radio/TV technician for help. Any special accessories needed for compliance must be specified in the instruction manual. WARNING: A shielded‐type power cord is required in order to meet FCC emission limits and also to prevent interference to the nearby radio and television reception. It is essential that only the supplied power cord be used. Use only shielded cables to connect I/O devices to this equipment. CAUTION: Any changes or modifications not expressly approved by the party responsible for compliance could void your authority to operate the equipment. For product available in the USA/Canada market, only channel 1~11 can be operated. Selection of other channels is not possible. This device and its antenna(s) must not be co‐located or operation in conjunction with any other antenna or transmitter. FCC SAR Statement: Federal Communication Commission (FCC) Radiation Exposure Statement This EUT is compliance with SAR for general population/uncontrolled exposure limits in ANSI/IEEE C95.1‐1999 and had been tested in accordance with the measurement methods and procedures specified in OET Bulletin 65 Supplement C. This equipment should be installed and operated with minimum distance 1 cm between the radiator & your body. 20