1
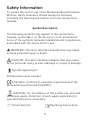
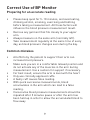
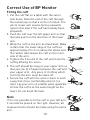
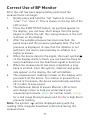
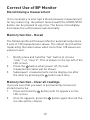
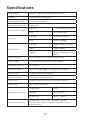
UPPER ARM STYLE
Blood Pressure Monitor
Model No.: BP386A
Instructions Manual
Table of Contents
Introduction2
Safety Information3
Know Your Monitor
6
Battery Installation7
Setting Your BP Monitor
8
Correct Use of BP Monitor
9
Common Mistakes9
Fitting the Cuff10
Taking a Measurement
11
Using the Memory
12
About Blood Pressure
13
Troubleshooting15
Care and Maintenance
16
Specifications17
Warranty Information18
1
Introduction
Your new digital blood pressure monitor uses the
oscillometric method of blood pressure measurement. This
means the monitor detects your blood’s movement through
your brachial artery and converts the movement into a
digital reading. An oscillometric monitor does not need a
stethoscope, and so is easy to use.
The Medescan automatic blood pressure monitor will
measure your systolic pressure, diastolic pressure and
pulse.
This blood pressure monitor is intended for use by an adult.
The intelligent inflation will reduce any discomfort
experienced due to over-inflation, and will shorten the
measurement time.
Each measurement is displayed on the backlit colour screen
then stored in one of the 2 x 120 memory sets.
Please read all instructions carefully before using your
Medescan Blood Pressure.
2
Safety Information
To ensure the correct use of the Medescan Blood Pressure
Monitor, safety measures should always be followed,
including the warning and caution list in the instructions
manual.
Symbol Description
The following symbols may appear in this instructions
manual, on the label, on the device or on it’s accessories.
Some of the symbols represent standards and compliances
associated with the device and it’s use.
WARNING: This alert identifies hazards that may cause
serious personal injury or death.
CAUTION: This alert identifies hazards that may cause
minor personal injury, product damage or property damage.
Type BF applied part
SN Specifies serial number
CE Mark: confirms to essential requirements of the
Medical Device Directive 93/42/EEC
DISPOSAL: Do not dispose of this product as unsorted
municipal waste. Collection of such waste separately for
special treatment is necessary.
Direct Current
Operating Instructions
3
Safety Information
Those who have arrythmia, diabetes, blood circulation or
applexy problems, please consult your doctor before using
the Medescan Blood Pressure Monitor
Contact your doctor for specific information about your
blood pressure. Self diagnosis and treatment which use
measured results may be dangerous. Follow the instructions
of your doctor or licensed healthcare professional.
Keep out of reach of children.
No modification of this equipment is allowed.
The cuff hose is a suffocation hazard.
The swallowing of small parts like packaging bag, battery,
battery cover etc. may cause suffocation.
Do not use dilution agents, alcohol or petrol to clean the
Medescan Blood Pressure Monitor.
Dropping The Medescan monitor or a heavy hit can
damage the unit
Remove batteries from battery compartment when not in
use for an extended period of time
Replace with new batteries when the unit displays a low
battery symbol
4
Safety Information
Do not mix the old with new batteries
Do not use a mobile phone near the blood pressure
monitor as it may result in operational failure
Do not use the Medescan Blood Pressure Monitor near
flammable gas (such as anesthetic gas, oxygen or hydrogen)
or flammable liquid such as alcohol are present.
WARNING:
Do not dispose of this product as unsorted
municipal waste. Collection of such waste
separately for special treatment is necessary.
Contact your local government for information regarding
the collection systems available. If electrical appliances are
disposed of in landfills or dumps, hazardous substances
can leak into the groundwater and get into the food chain,
damaging your health and well-being.
Classification:
1.
2.
3.
4.
5.
Internally powered equipment
Type BF applied part
Protection against ingress of water: IPX0
Not category AP / APG equipment
Mode of operation: Continuous operation
The user must check that the equipment functions safely
and see that it is in proper working condition before being
used.
5
Know your Monitor
Body
AC/DC socket
LCD display
Cuff socket
START / STOP
button
Setup button
Memory
button
Display
Systolic blood pressure
Diastolic blood pressure
User
Pulse
Irregular heart beat
Pulse rate
Time
Cuff Connection
The cuff supplied is M size, for upper arm circumference
22-32cm.
Insert the connector with cuff tube
into the hole which is on the left side
of the device as pictured.
6
Battery Installation
+
-
-
+
+
-
-
+
When battery power is low, this symbol will appear on the
LCD display. The batteries must be replaced to ensure
accurate measurement of blood pressure using the
Medescan monitor.
• Remove the battery cover
• Insert 4 x AA batteries into the
compartment ensuring each battery is
←
in the correct polarity direction.
Battery type and replacement
Please use 4 x identical AA 1.5V alkaline batteries. Do not
use batteries beyond their expiry date.
Please remove the batteries if you do not intend to use the
Medescan Blood Pressure Monitor for an extended period of
time.
Using optional AC adapter
• Insert the adapter plug into the hole on the backside of
the unit
• Insert the other side of the adapter into the outlet with
100-240V.
• To remove the AC adapter, disconnect the adapter plug
from the outlet first and then disconnect the cord from the
unit’s socket.
Adapter technical features
• Output voltage: 6V 5%
• Max. output current: At least 600 mA
• Output plug polarity: <+> inner
• External diameter: 5.5mm 0.1mm
• Internal diameter: 2.1mm 0.1mm
7
Setting your BP Monitor
Setting the time and date and unit of measure
1.
2.
3.
4.
5.
6.
7.
8.
9.
10.
11.
12.
13.
Press and hold the “SET” button located on the side
of your Medescan BP Monitor until the year appears
flashing.
Use M button to set the desired year
Press the “SET” key again to confirm the year and enter
into the month setting
Use M button to set the desired month
Press the “SET” key again to confirm the month and
enter into the day setting
Use M button to set the desired day
Press the “SET” key again to confirm the day and enter
into the time (hour) setting
Use M button to set the desired hour
Press the “SET” key again to confirm the hour and
enter into the time (minute) setting
Use M button to set the desired minute
Press the “SET” key again to confirm the minute and
enter into the unit of measure for your blood pressure
“Kpa”or “mmHg”
Use M button to set the desired unit of measure
Press the “SET” key again to complete your settings of
“Time”, “Date” and “Unit of measure”
Your Medescan Blood Pressure Monitor will now store the
time, date and measurement of blood pressure.
8
Correct Use of BP Monitor
Preparing for an accurate reading
•
•
•
•
Please keep quiet for 5- 10 minutes, and avoid eating,
drinking alcohol, smoking, exercising and bathing
before taking a measurement. All these factors will
influence the blood pressure measurement result.
Remove any garment that fits closely to your upper
arm.
Always measure on the same arm (normally left).
Take measurement regularly at the same time of every
day, as blood pressure changes even during the day.
Common mistakes
•
•
•
•
•
•
•
All efforts by the patient to support their arm can
increase blood pressure.
Make sure you are in a comfortable relaxed position and
do not activate any of the muscles in the arm during
measurement. Use a cushion for support if necessary.
For best result, ensure the arm is level with the heart
Only use clinically approved cuffs.
A faulty cuff causes false reading.
With quick successive measurements, blood
accumulates in the arm which can lead to a false
reading.
Consecutive blood pressure measurements should be
repeated after 5 minutes pause or after the arm has
been held up in order to allow the accumulated blood to
flow away
9
Correct Use of BP Monitor
Fitting the cuff
1.Put the cuff flat on a table with the velcro
side down. Pass the end of the cuff through
the metal loop so that a circle is formed. The
velcro closer will now be facing outwards
(ignore this step if the cuff has already been
prepared).
2.Push the cuff over the left upper arm so that
the tube points in the direction of the lower
arm.
3.Wrap the cuff on the arm as illustrated. Make
certain that the lower edge of the cuff lies
approximately 2 to 3 cm above the elbow and
the rubber tube leaves the cuff on the inner
side of the arm.
4.Tighten the free end of the cuff and close the
cuff by affixing the velcro.
5.The cuff should be snug on your upper arm so
that you can fit 2 fingers between the cuff and
your upper arm. Any piece of clothing which
restricts the arm must be taken off.
6.Secure the cuff with the velcro closer in such
a way that it lies comfortably and not too
tight. Lay your arm on a table( palm upwards)
so that the cuff is at the same height as the
heart. Do not bend the tube.
Note
If it is not possible to fit the cuff to your left arm,
it can also be placed on the right. However, all
measurements should be made using the same
arm.
10
2-3cm
Correct Use of BP Monitor
After the cuff has been appropriately positioned,the
measurement can begin:
1. Briefly press and hold the “Set” button to choose
“User 1” or “User 2”. This is shown on the top left of the
LCD screen
2. Press the START/STOP button, all symbols appear on
the display , you can hear short beeps then the pump
begins to inflate the cuff, the rising pressure in the cuff
is shown on the display.
3. After the suitable pressure has been reached, the
pump stops and the pressure gradually falls. The cuff
pressure is displayed. In case that the inflation is not
sufficient, the device automatically re-inflates to a
higher pressure.
4. When the device detects the signal, the heart symbol
on the display starts to flash, you can hear the beep for
every heartbeat once the heartbeat signal is detected.
5. When the measurement has been completed, a long
beep is emitted. Once the systolic, diastolic and pulse
rate appear on the display, the cuff will deflate.
6. The measurement readings remain on the display until
you switch off the device. If no button is pressed for a
period of 3 minutes, the device automatically switches
off in order to save power.
7. The Medescan Blood Pressure Monitor LCD screen
will change colour to help you understand your
measurement results. Green for normal result, Orange
for a mid range blood pressure and Red for a high blood
pressure reading
Note: The symbol
will be displayed along with the
reading if the irregular heartbeat is detected during the
measurement.
11
Correct Use of BP Monitor
Discontinuing a measurement
If it is necessary to interrupt a blood pressure measurement
for any reason (eg. the patient feels unwell) the START/STOP
button can be pressed at any time. The device immediately
decreases the cuff pressure automatically.
Memory function - Recall
The Medescan Blood Pressure Monitor automatically stores
2 sets of 120 measurement values. The oldest record will be
replaced by the latest value when more than 120 values are
used per user.
1.
2.
3.
Briefly press and hold the “Set” button to choose
“User 1” or “User 2”. This is shown on the top left of the
LCD screen
Press the M button when power off, the last
measurement value will be shown.
Subsequent measurements can be display one after
the other by pressing the M button each time.
Memory function - Clear all readings
If you are sure that you want to permanently remove all
stored memories.
1. Press and hold the M button until CL appears on the
LCD screen
2. Once CL appears, press the M button again then all the
records will be cleared.
12
About Blood Pressure
Blood pressure is the pressure exerted on the arteries.
The systolic blood pressure value represents the blood
pressure produced by the contraction of the heart muscle.
The diastolic blood pressure value represents the blood
pressure produced by the relaxation of the heart muscle.
Relaxation of the heart
muscle
Contraction of the
heart muscle
Blood returns to heart
Extrude blood
Pressure decreased in
blood vessel
Pressure increased in
blood vessel
Lower Pressure
Higher Pressure
13
About Blood Pressure
Classification of Blood Pressure for Adults (WHO)
Diastolic blood
pressure (mmHg)
110
Stage 2 Hypertension
100
Stage 1 Hypertension
90
Prehypertension
85
80
Normal blood pressure
Optimal blood
pressure
(target value)
120 130
Optimal BP
Stage 1 High BP
140 160
Normal BP
Stage 2 High BP
14
180
Systolic blood
pressure (mmHg)
Pre-High Blood Pressure
Severely High BP
Troubleshooting
Error Messages
Symbol
Cause
Correction
Weak signal
or pressure
change
suddenly
Ensure the cuff is correctly wrapped and positioned.
Remeasure
Strong
external
disturbance
Near a mobile phone or highly radiant device.
Measurement failed. Remove interferring device from
vicinity
Error appears
during
inflation
Wrap the cuff properly
Make sure the air plug is securely inserted into the unit
Remeasure
Abnormal
blood pressure
Relax for 30 minutes and repeat the measurement. If
unusual reading obtained 3 times, please contact your
doctor
Low Battery
Replace baterries with new ones
Problem
No power
Check
Cause and solution
Check the battery power
Replace batteries
Check batteries installed
correctly
Place batteries in correct
order and polarity
check the plug insert
insert into air socket tightly
check if plug is broken or
air leak
change to a new cuff
Err and stop working
check if there was body
movement or talking during
measurement
keep still and quiet during
measurement
Cuff Leak
check if cuff wrap is too
loose
wrap cuff tightly
check if cuff is broken
Replace with new cuff
No inflation
Please contact Medescan customer service if you have any other queries or are unable to
solve the problem. 1300 736 330
15
Care and Maintenance
• Keep the unit in the storage case
when not in use
• Clean the unit with soft dry cloth.
Do not use any abrasive or volatile
cleaners.
• Never immerse the unit or any
component in water
• Make sure the monitor is off prior to cleaning, a mixture of
distilled water and 10 percent bleach could be used.
• Using a spray bottle, moisten a soft cloth towel with the bleach
or detergent mix until it is fully saturated. Squeeze any excess
moisture from the cloth to avoid any dripping or potential
oversaturation of the cuff.
• Wipe all surfaces of the blood pressure monitor cuff thoroughly,
making sure to clean the inside and outside of the cuff. Be
cautious not to get any moisture in the main unit.
• Using a dry cloth, gently wipe away any excess moisture that
may remain on the blood pressure cuff. Lay the cuff flat in an
unrolled position and allow the cuff to air dry.
• Do not clean the body and cuff with
solvents, alcohol, petrol, etc.
• Do not wet the cuff or attempt to clean
the cuff with water.
Gaso line
Naphtha
Thinner
• Store the unit in a clean and dry
• location .
• Do not subject the unit to extreme hot
or cold temperature, humidity and
direct sunlight.
• Remove the batteries if the unit will
not be used in 3 months or longer.
←
+
-
-
+
+
-
-
+
• Not caring or maintaining the Medescan Blood Pressure Monitor as instructed
may void the warranty
16
Specifications
Description
Automatic upper arm blood pressure monitor
Display
3 Colour backlit LCD Display
Measuring Principle
Oscillometric method
Measuring localisation
Upper arm
Measurement range
Accuracy
LCD Indication
Pressure
0 - 299 mmHg (0-39.9 KPa)
Pulse
40-199 beats/min
Pressure
±3mmHg (±0.4kPa)
Pulse
±5% of reading
Pressure
3 digits display of mmHg
Pulse
3 digits display
Symbol
Memory/ Heartbeat/ Low
battery
Memory function
2 x 120 memory sets of measurement values
Power source
4 x AA alkaline battery DC. 6V or AC adapter
Automatic power off
In 3 minutes
Main unit weight
Main unit weight Approx. 417g( batteries included)
Main unit size
L138mm x W121mm x H90mm
Main unit lifetime
10,000 times under normal use
Battery life
Could be used for 300 times for normal condition
Accessories
Cuff, instruction manual
Operating environment
0
Temperature
5-40 C
Humidity
15% - 85% RH
Air pressure
86kPa - 106kPa
0
Storage environment
0
Temperature - 2 0 C - 55 C , Humidity : 10% 85%
Avoid extreme weather conditions and water during
transportation
17
Warranty Information
Statement
• The intended use: the unit is intended to be used by adults at
home or medical center to measure blood pressure and pulse
rate from the upper arm.
• The unit satisfies the requirements of EN 1060-1:1995+
A2:2009 Non-invasive sphygmomanometers, EN 1060-3:
1997+A2:2009 Non-invasive sphygmomanometers.
• Blood pressure measurements determined with this device
are equivalent to those obtained by a trained observer using
the cuff / stethoscope auscultatory method, within the limits
prescribed by the American National Standard, manual,
electronic, or automated sphygmomanometers.
Warranty Information
• The unit is guaranteed to be free of defects in workmanship
and materials under normal use for a period of Two Years
from the date listed on the purchase record.
• For repair under this warranty. Our customer service
center must be advised of the fault within the period of
the warranty. This warranty covers parts and labor only
under normal operations. Any defect resulting from
natural causes, eg. flood, hurricane etc, is not within this
guarantee. This guaranty does not cover damage incurred
by use of the unit not in accordance with the instructions,
accidental damage, or being tampered with or serviced by
unauthorized service agents.
• Monitor subjected to misuse, abuse, and neglect of
these manual content , non- instructional purposes;
unauthorized repair or modifications will be excluded from
this warranty
•
This device requires no calibration.
•
This device is not repairable and contains no
serviceable part
18
For customer inquires please write to:
[email protected] or call 1300 736 330
Please go to www.medescan.com.au
to find the latest copy of our User Manual.
The manufacturer reserves the right to alter the
specifications of the product without prior notification.
Copyright © 2010 TLC Diagnostics All Rights Reserved.
Medescan, a product of TLC Diagnostics.
TGA Approved ARTG 228211
TLC Diagnostics Pty Ltd
P.O. Box CP392, Condell Park, NSW 2200