1
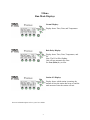
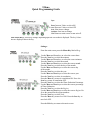
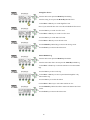
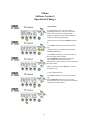
ULTIMO QUICK PROGRAMMING GUIDE 2900 Adams Street, Suite A-30 Riverside, CA 92504 (951) 352-3891 www.aquaconserve.com ©2005—2006 Aqua Conserve Print Date: 5/2/06 1 Ultimo Keyboard Guide Keys: More: Increase Value or select ON. Less: Decrease Value or select OFF. Next: Next item to change. Previous: Previous item to change. Exit: Return to main screen or turn unit off. Four Menu Keys: These keys change depending upon the screen that is displayed. The key’s function are shown on the display above the key. Secondary Functions of the Keys: More (Test): Pressing the More key, from the main screen, causes the controller to enter the 2 minute test mode. Press the More key to cycle through the following test options. Min Test Run Each stattion for two minutes. Auto Run All Run all programs (A, B, C, and D). Auto Run Prog A Run program A. Auto Run Prog B Run program B. Auto Run Prog C Run program C. Auto Run Prog D Run program D. 2 Press the Menu Key labeled Go to start the selected test. Press the Previous or Next keys to go to the previous or next station. Press the Exit key to return to the main screen. Less (Rain): Pressing the Less key, from the main screen, causes the controller to enter the Rain Delay screen. Press the More key to increase the number of days to delay watering. The delay can be from 1 to 5 days. Press the Less key to decrease the number of days. Zero, 0, days turns the rain delay off and resumes normal watering. Press the Next key to enter the changes and to return to the main screen For more information please refer to your User’s Guide. 22 Ultimo Run Mode Displays Normal Display: Display shows Time, Date, and Temperature. Rain Delay Display: Display shows Time, Date, Temperature, and D1. Note: The D1 will be flashing. Unit will not automatically water. See Less (Rain) key to clear. Station ON Display: Display shows which station is running, the amount of time the station has been on, and the total amount of time the station will run. For more information please refer to your User’s Guide. 3 Ultimo Quick Programming Guide Keys: More: Increase Value or select ON. Less: Decrease Value or select OFF. Next: Next item to change. Previous: Last item to change. Exit: Return to main screen or turn unit off. Four Menu Keys: These keys change depending upon the screen that is displayed. The key’s function are displayed above the key. Settings: From the main screen press the Menu Key labeled Setg. Use the More and Less keys to select the correct hour. Press the Next key to select the minutes. Use the More and Less keys to select the correct minutes. Press the Next key to select the month. Use the More and Less keys to select the correct month. Press the Next key to select the day of the month. Use the More and Less keys to select the correct day of the month. Press the Next key to select the year. Use the More and Less keys to select the correct year. Press the Next key to select Accumulation. Press the More key to turn Accumulation ON. Press the Less key to turn Accumulation OFF. Press the Next key to select the Water Reduction Percentage. Use the More and Less keys to select the correct percentage of Water Reduction. Press the Next key to select the Region. Use the More and Less keys to select the correct Region. Refer to the manual for the region numbers. Press the Next key to select Lock. Press the More key to turn Lock ON. Press the Less key to turn Lock OFF. Press the Exit key to return to the main screen. 4 Time to Water: From the main screen press the Menu Key labeled Prog. Use the More and Less keys to select the Program to enter the start times. Press the Next key to select the first start time hour. Use the More and Less keys to select the start hour. Press the Next key to select the first start time minutes. Use the More and Less keys to select the start minutes. Repeat the above steps for additional start times and for the other programs. Press the Exit key to return to the main screen. Set Watering Days: From the main screen press the Menu Key labeled Prog. From the program time screen press the Menu Key labeled Days. Use the More and Less keys to select the Program to enter the watering days. Press the Next key to select the watering days options. Use the More and Less keys to select the option. Options are Off, Odd Days, Even Days, Select Days, Skip # Days. Press the Next key to select days to not water. The S will flash, press the More key to water on Sunday or press the Less key to never water on Sunday. Note: The display will show a dash ‘-’ for days that will not water. Press the Next key to select the next day. If you have selected a watering days option of Select Days, two weeks are displayed. Each week can have different days turned on or off. The present week is always on top. Repeat the above steps for the remaining programs. Press the Exit key to return to the main screen. 5 Set Station Watering Time: From the main screen press the Menu Key labeled Stn. Use the More and Less keys to select the station to program. Press the Next key to set the program A run time for this station. Use the More and Less keys to set the run time in minutes. Important: Enter the summer run time minutes. The controller will automatically adjust the runtimes based on time of year and weather. Press the Next key to set the program B run time for this station. Press the Next key again to set the other programs runtimes. Repeat the above steps for each station. Press the Exit key to return to the main screen. The completes the basic programming of the controller. 2 Minute Test: From the main screen press the More key. Press the More key to cycle through the following test options. 2 Min Test Run each station for two minutes. Auto Run All Run all programs (A, B, C, and D). Auto Run Prog A Run program A. Auto Run Prog B Run program B. Auto Run Prog C Run program C. Auto Run Prog D Run program D. Press the Menu Key labeled Go to start the select test. Press the Previous or Next keys to go to the previous or next station. Press the Exit key to quit the test and return to the main screen. 6 Manual Mode: From the main screen press the Menu Key labeled Man. Manual Mode Options: Tst Run the 2 minute test. DlyRun For the next scheduled run time, run with the full summer run time minutes. Rem Use the Aqua Conserve Remote control adapter. Go Run the selected operation. Normal operation: Press the More or Less keys to select the station to manually run. Press the Next key to select the minutes. Press the More or Less keys to enter the number of minutes to manually run the station. Press the Next key to select additional stations to program for manual operation and repeat the above steps. Press the Menu Key labeled Go to run the stations. Tst: Press the Menu Key labeled Tst. Press the More key to cycle through the following test options. 2 Min Test Run each station for two minutes. Auto Run All Run all programs (A, B, C, and D). Auto Run Prog A Run program A. Auto Run Prog B Run program B. Auto Run Prog C Run program C. Auto Run Prog D Run program D. Press the Menu Key labeled Go to start the select test. Press the Previous or Next keys to go to the previous or next station. DlyRun: Press the Menu Key labeled DlyRun. Note: A ‘y’ after the program letter indicates that the next schedule run of that program will have each station turn on for the full summer minutes. Press the More key to change the indicator to y. Press the Less key to change the indicator to n. Press the Previous or Next keys to select the other programs. Press the Exit key to quit the present operation and return to the main screen. For more information please refer to your User’s Guide. 7 Ultimo Advanced Function Guide Keys: More: Increase Value or select ON. Less: Decrease Value or Select OFF. Next: Next item to change. Previous: Previous item to change. Exit: Return to main screen or turn unit off. Four Menu Keys: These keys change depending upon the screen that is displayed. The key’s function are shown on the display above the key. Establishment The Establishment feature allows you to add additional water for a set number of days. This allows you to add more water to help establish new landscaping. From the main screen press the Menu Key labeled Stn. From the Station Run Time screen press the Menu Key labeled Estab. Press the More or Less keys to select the station you wish to use the establishment feature. Press the Next key to select the percentage more water. Use the More or Less keys to select the percentage more water to add during the establishment period. Press the Next key to select the number of days. Use the More or Less keys to select the number of days to run the establishment feature. Note: After the selected number of days the station will revert back to normal operation. To return back to programming station press the Menu Key labeled RunTm. Press the Exit key to return to the main screen. 8 Master Valve / Pump Programming From the main screen press the Menu Key labeled Stn. From the Station Run Time screen press the Menu Key labeled MV’s. Use the More or Less keys to select the station. Press the Next key to select Master Valve 1, MV1. Press the More key to turn Master Valve 1 on when the selected station is on. MV1: ON Press the Less key to turn Master Valve 1 off when the selected station is on. MV1: OFF Repeat the above steps for each Master Valve and each Station. Press the Menu Key labeled RunTm to return to the Station Run Time screen. Press the Exit key to return to the main screen. Flow Meter Calibration From the main screen press the Menu Key labeled Setg. From the settings screens press the Menu Key labeled FloCal. Press the More or Less keys to adjust the calibration factor to match your flow meter. Refer to the Ultimo User’s Guide for common calibration factors. Press the Menu Key labeled Setg to return to the settings screen. Press the Exit key to return to the main screen. 9 Setting Flow Errors From the main screen press the Menu Key labeled Setg. From the Setting Screen press the Menu Key labeled FloErr. Use the More or Less keys to set the High flow error. Note: If you set the HI flow error to 0% this will disable all flow errors. Press the Next key to set the Low flow error. Use the More or Less keys to set the Low flow error. Press the Next key to set the Max Leak value Use the More or Less keys to set the leak value. Press the Menu Key labeled Setg to return to the Setting screen. Press the Exit key to return to the main screen. Station Runtime Log From the main screen press the Menu Key labeled Stn. From the Station Run Times screens press the Menu Key labeled Log. Use the More or Less keys to select the station to review the runtime logs. Press the Next key to move to the log. Use the More or Less keys to move up and down through the 7 day station runtime log. Press the Next key to reselect the station. Use the More or Less keys to select other stations to view. Press the Menu Key labeled RunTm to return to the Station Run Times screens. Press the Exit key to return to the main screen. 10 Flow Status From the main screen press the Menu Key labeled Stn. From the Station Run Time screen press the Menu Key labeled Flow. Use the More or Less keys to select the station to review the flow status. If there are flow errors they will be displayed in the status area. Once you have viewed the error it will be automatically cleared. Press the Next key go to the status area. Use the More or Less keys to change the status. Status options Learn Relearn the flow rate for the selected station DISABLE Do not monitor flow for the selected station Press the Next key to select additional stations to view or edit. Press the Menu Key labeled RunTm to return to the Station Run Time screen. Press the Exit key to return to the main screen. Please refer to the User’s Guide for additional information. 11 Ultimo Software Version 5 Operational Changes This addendum is only for Ultimo controllers running firmware version 5 12 Ultimo Software Version 5 Operational Changes IMPORTANT The regions have changed please use the following region numbers when programming the Ultimo. Regions Reg, 1: So. CA Inland to Desert Reg. 11: Phoenix, AZ Reg. 27: Las Cruses, NM Reg. 2: CA Low Desert Reg. 16: Reno, NV Reg. 31: Seattle, WA Reg. 3: CA Central Valley Reg. 17: Las Vegas, NV Reg. 41: Logan, UT Reg. 4: N CA Inland to Central Valley Reg. 21: Denver, CO Reg. 51: San Antonio, TX Reg. 5: CA High Desert Reg. 22: Northern, CO Reg. 52: Dallas / Ft. Worth, TX Reg. 6: CA Coastal Reg. 26: Albuquerque, NM How to determine the Ultimo Software Version From the main screen press the Exit key. On the “Stop watering” screen press the Menu Key labeled Yes. On the “Controller is turned off” screen the Ultimo software version is indicated on the 3rd line. To return to the main screen, and resume watering, press the Next key. IMPORTANT This addendum is only for Ultimo controllers running firmware version 5.00 or greater. 13 Ultimo Software Version 5 Operational Changes Stack / Overlap Modes The Stack mode allows the Ultimo to run each program sequentially, one after the other. The Overlap X mode allows the Ultimo to run the X number of program simultaneously, at the same time. Where X is 2, 3, 4, 5, or 6. IMPORTANT You must ensure that your irrigation system can support the number of stations that can be on at one time when you use the Overlap mode. From the main screen press the Menu Key labeled Prog. From the Program screen press the Menu Key labeled Stack. Use the More or Less keys to select the Stack or Overlap mode. Stacked Run one program at a time. Overlap 2 Run 2, two, programs at the same time. Overlap 3 Run 3, three, programs at the same time. Overlap 4 Run 4, four, programs at the same time. Overlap 5 Run 5, five, programs at the same time. Overlap 6 Run 6, six, programs at the same time. Press the Exit key to return to the main screen. 14 Ultimo Software Version 5 Operational Changes Cycle and Soak The Ultimo supports Cycle and Soak operation. The Cycle and Soak allows you to program the controller for a maximum run time and minimum soak time to reduce or eliminate run off on slopes and other difficult to irrigate landscapes. The Cycle time is the maximum time the controller will allow the irrigation valve to remain on at one time. The Soak time is the minimum time the controller keeps the irrigation valve off to allow the water to soak into the soil. During the soak time the controller will allow other stations to run. Example: Controller will turn on the valve for 13 minutes, the cycle is set for 5 minutes and the soak for 30 minutes. The controller will turn on the valve for 5 minutes, Cycle time. After 5 minutes the valve will be turned off for 30 minutes, Soak time. After the Soak time the controller will turn the valve on for 5 minutes, total of 10 minutes of watering time. After this Cycle time the controller enters a second Soak time. When the second Soak time is complete a final 3 minute cycle time is run., for a total watering time of 13 minutes. Note: If the final watering time is less then half of the cycle time the controller will reduce the next to last watering time to bring the final watering time up to half of the cycle time. From the main screen press the Menu Key labeled Stn. From the station screen press the Menu Key labeled Opt. Use the More or Less keys to select the station to program. Press the Next key to select the Cycle time. Use the More or Less keys to enter the Cycle time. Press the Next key to select the Soak time. Use the More or Less keys to enter the Soak time. Press the Next key 3, three, times to select a new station. Press the Exit key to return to the main screen. 15 Ultimo Software Version 5 Operational Changes Copy and Paste The Ultimo allows you to copy one station’s programming and paste it into one or more other stations. This will reduce the amount of time required to program an Ultimo when a number of stations have identical programming. From the main screen press the Menu Key labeled Stn. Use the More or Less keys to select the station to copy. From the station screen simultaneously press the Previous and Next keys. Use the More or Less keys to select the station to paste the copied runtime minutes. Press the Menu Key labeled Paste to paste the copied runtimes into the selected station. Repeat these two steps to paste the same information into other stations. When you are done press the Exit key to return to the Station screen. To copy a different station. Use the More or Less keys to select the station to copy. Press the Menu Key labeled Copy to copy the selected station. Note: The Copy Stn XX will change to indicate the selected station.. 16 Ultimo Software Version 5 Operational Changes Non-ET based Establishment The Ultimo includes two non-ET based programs for Establishment usage. This will allow you to run an Establishment cycle, with no ET or weather based time adjustments, for irrigating new plantings or over seeding. After a programmable number of days the controller will automatically revert back to ET based irrigation. From the main screen press the Menu Key labeled Stn. From the station screen press the Menu Key labeled Opt. Use the More or Less keys to select the station. Press the Next key 3, three, times to select the Progrm. Use the More or Less keys to select the program/s to run. Off No establishment for this station. E Run program E as the establishment program. F Run program F as the establishment program. E&F Run both E and F as the establishment programs Press the Next key to select the number of Days to run the non-ET programs. Use the More or Less keys to enter the number of days. Press the Next key to select a new station to program. Press the Exit key to return to the main screen. IMPORTANT After enabling the Non-ET establishment please set the station runtime in the Station screen. Set the E and or F programs in the Program screen. Failure to follow these steps could cause no watering of the landscape. 17 Ultimo Software Version 5 Operational Changes Display of Calculated Accumulation Percentage The Ultimo will display the calculated percentage of runtime for the present day. Note: Any programs displaying a “—” are not scheduled to run today. From the main screen press the Menu Key labeled Prog. From the Program screen press the Menu Key labeled Acc. Press the Exit key to return to the main screen. 18 Ultimo Software Version 5 Operational Changes Display Last Weeks Delays The Ultimo will display the last 7, seven, days schedules delays. From the main screen press the Previous key. The display will show the last 7, seven, days as follows. W Controller Irrigated (Watered). R Controller did not irrigate due to Rain Delay. F Controller did not irrigate due to Freezing temperature. Controller did not irrigate, not a scheduled day. Note The display can show a delay, either a R or F, even though it did irrigate. If the rain or freeze delay occurred after the unit irrigated it will display the R or F. Press the Exit key to return to the main screen. Station Running Display / Overlap Mode When the Ultimo is programmed to operate in overlap mode, multiple programs running at the same time. The unit will display all active programs on the display. Every 4, four, seconds the Active Station will update. Active Prog: Will display each program that is running. Active Station line will display the Program (A, B, C, D, E, or F) and the Station number followed by the number of minutes the station was on and the number of total minutes the station will run. In the example shown there are 2, two, programs running A and B. Program A is running station 01 which has been on for 002:32 minutes and will be on for 012:43 minutes total. For more information please refer to your User manual 19 Warranty Aqua Conserve, Inc., will repair or replace at no charge any Aqua Conserve Product that fails under normal use within three (3) years of the original purchase date. See complete warranty for details. For any warranty questions, please call: Toll Free (877) 922-2782 For Questions or Customer Service Contact: 2900 Adams Street, Suite A-30 Riverside, California 92504 Fax: (951) 352-4345 Visit us on the web: www.aquaconserve.com © 2005-2006 Print Date April 28, 2006 P/N Ultimo R5 Quick Ref & Updates 20