1
mirabyte
FrontFace for Touch Kiosks
User and Configuration Manual
Version 2.0.4
Copyright © 2012-2015 by mirabyte GmbH & Co. KG
2
FrontFace for Touch Kiosks - User Manual
Table of Contents
1 Introduction
.......................................................................................................................................... 4
2 Technical
..........................................................................................................................................
Overview
5
3 Step-by-Step
..........................................................................................................................................
Tutorial
6
4 Supported
..........................................................................................................................................
Media Formats
10
5 System
..........................................................................................................................................
Requirements
12
6 Kiosk
..........................................................................................................................................
Assistant
13
Main Menu
.................................................................................................................................. 15
Menu & Content
.................................................................................................................................. 16
Adding.................................................................................................................................
Content
17
Using Wallpaper
.................................................................................................................................
Images
19
Creating
.................................................................................................................................
Image Maps
19
Design .................................................................................................................................. 21
Settings .................................................................................................................................. 23
Deployment
.................................................................................................................................. 24
Preview .................................................................................................................................. 26
7 Tips..........................................................................................................................................
on Content Creation
27
How to use
..................................................................................................................................
Print2Screen
28
Custom
.................................................................................................................................
"Paper Formats"
28
Using PowerPoint
.................................................................................................................................. 32
Designing..................................................................................................................................
Wallaper Images
33
Creating ..................................................................................................................................
Animated Icons
34
Display Order
..................................................................................................................................
of Files
35
8 Advanced
..........................................................................................................................................
Features
36
Multi Language
..................................................................................................................................
Support and Localization
37
Multi Screen
..................................................................................................................................
Support
39
Using Plugins
.................................................................................................................................. 40
Clock, Date
..................................................................................................................................
and Countdown
41
Using Flash
..................................................................................................................................
and Silverlight
43
Integration
..................................................................................................................................
of 3rd Party Apps
44
Sharing Content
.................................................................................................................................. 45
Screen Saver
..................................................................................................................................
Integration
47
Kiosk PC..................................................................................................................................
Setup and Security
48
Proxy Server
..................................................................................................................................
Configuration
49
9 Software
..........................................................................................................................................
Deployment and Updates
50
10 License
..........................................................................................................................................
Activation
52
11 Troubleshooting
.......................................................................................................................................... 53
Copyright © 2012-2015 by mirabyte GmbH & Co. KG
Contents
3
12 Further
..........................................................................................................................................
Information and Help
54
Index
.............................................................................................................................................. 55
Copyright © 2012-2015 by mirabyte GmbH & Co. KG
4
1
FrontFace for Touch Kiosks - User Manual
Introduction
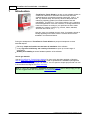
FrontFace for Touch Kiosks is an easy to use software solution to
create user interfaces for interactive touchscreens and kiosk
systems based on a Windows operating system (XP, Vista, 7, 8.1
and 10). Besides safety and security functions that protect the
underlying operating system from unauthorized access and
manipulation, FrontFace for Touch Kiosks allows you to customize
the visual appearance of the user interface, to arrange buttons and
hierarchical menus according to your preferences and to make
available any media or content (e.g. pictures, videos, websites,
XPS-/PDF documents, etc.).
Like this, users can navigate via touch input, for example, through a
visually appealing menu and access the contents and functions
available in an interactive fashion.
During the development of FrontFace for Touch Kiosks we put special emphasis on three
essential aspects:
Extremely simple and intuitive use and ease of installation of the software
A very high level of efficiency and a variety of functions to open up a broad range of
applications
Stability and reliability to ensure faultless operation of the software
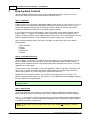
How to get started?
Visit the FrontFace for Touch Kiosks Website for some quick start video tutorials or follow the
Step-by-Step Setup Tutorial from this manual in order to get started.The installation package also
contains several sample projects you can refer to. You can open the sample projects with one click
from the Welcome Page of the Kiosk Assistant.
Hint: In case of any questions or problems, the mirabyte support team is always happy to help!
We also suggest users refer to the section "Troubleshooting".
Copyright © 2012-2015 by mirabyte GmbH & Co. KG
Technical Overview
2
5
Technical Overview
FrontFace for Touch Kiosks consists of two applications that are installed either on the same or
on different PCs:
FrontFace Kiosk Application (FrontFace Touch Kiosk.exe)
The actual kiosk application that will run on the kiosk PC.
FrontFace Kiosk Assistant (FrontFace Kiosk Assistant.exe)
A particular program to configure FrontFace for Touch Kiosks and to conveniently add and
organize content.
You can choose which components to install upon installation of FrontFace. In most cases users
will install both applications (choose installation type "Complete Installation").
Once installed on a PC, the Kiosk Assistant allows the user to customize the FrontFace Kiosk
Application according to their preferences before starting the application and using the PC as
kiosk PC. Users can also transfer the menu structure, contents and settings from one (kiosk) PC to
another (kiosk) PC, a process referred to as "Deployment", and they can organize and update
contents remotely via a network connection, over the Internet or offline by using a USB flash drive.
After installing the application, our Step-by-Step Tutorial will explain the next steps to create your
personal kiosk experience.
Copyright © 2012-2015 by mirabyte GmbH & Co. KG
6
3
FrontFace for Touch Kiosks - User Manual
Step-by-Step Tutorial
This tutorial explains step by step how to create a kiosk application with FrontFace for Touch
Kiosks and how then to use it on a kiosk terminal or touchscreen PC.
Step 1: Installation
Install FrontFace for Touch Kiosks with default settings, either directly on your kiosk PC or on your
normal work PC. Use the Windows Start Menu to start up the Kiosk Assistant. You can choose
whether the application will open the current project (which is empty on first start up) to edit or
whether you would like to import one of the sample projects provided.
If you choose to open one of the samples, a copy of the project chosen will be imported. Use the
function "New" > "Import" in the project menu of the Kiosk Assistant to reset the current
project to an empty project or import a different project at any time. You can also export the current
project to a different location on your computer and create a backup copy, for instance.
Once you have opened a project in the Kiosk Assistant, you will see the main menu and the
following items:
Menu & Content
Design
Settings
Deployment
Preview
Step 2: Create Menu Structure
Click on "Menu & Content" to customize the menu structure of your kiosk application. On the
left of the window you see a tree structure of your kiosk application's menu structure. Several
buttons can be created under each menu level that later will be displayed to the user of your kiosk
application on a "menu page".
To add a button on the home page of your kiosk application, select the top folder "Content" and
click on the "+" symbol in the menu bar above. Existing buttons can be edited and renamed by
double-clicking them or by clicking the "pencil" symbol in the menu bar.
Besides the color and text of a button, you can also set a symbol picture (icon) for each. For
buttons containing further buttons (i.e. sub-menus), you can additionally set the wallpaper image for
the menu page in the kiosk application.
Hint: First draft the menu structure with all sub-menus before you start adding content to
individual menus.
Step 3: Add Content
On the right-hand side of the window you can see the content (if added) that is assigned to the
button currently selected. This can be pictures, videos, XPS files, PDF files or a link to a website.
Use "+", "-" or the "pencil" symbol in the menu bar to add, edit and delete content. When assigning
a content file to a button, this content will later be displayed to the user when the respective button
is clicked or touched on a touchscreen.
Notice: A menu button can only contain further (sub-)menu buttons or content (e.g. pictures,
videos, etc.).
Copyright © 2012-2015 by mirabyte GmbH & Co. KG
Step-by-Step Tutorial
7
General rule:
If content has already been assigned to a button, you cannot add further (sub-)menu
buttons to it.
If additional buttons have been added as sub-menus to a button, you cannot add content to
this button.
Once you have assigned a content file to a button, different settings such as background color and
aspect ratio are available depending on the type of content. There are content types that allow you
to assign more than one file of the same type at the same time; this applies to PDF files, XPS files
and pictures, for instance. For all other content types, only one file can be assigned to a menu
button. Use this process to gradually add content to all buttons of your menu.
Step 4: Customize Design
In addition to the structure of the menu and the content, you can also customize the look of the
kiosk application in the "Design" menu with various so-called "Themes". A theme defines the
visual appearance of the buttons (e.g. "iPad Glossy Style" with glass buttons or a "Metro Style" with
simple tiles). It also defines the design of the toolbars and other visual elements on the application
screen.
For some themes, additional settings can be chosen such as the maximum number of buttons and
the font and text color on the buttons.
Step 5: Settings
In the "Settings" menu you can find numerous options for settings and customization, including
whether the closing down of the application should be PIN-protected, for example, whether a user is
authorized to print application content, and whether the integrated web browser should display
certain websites only (URL filter).
Tip: For each option a context-sensitive help text is displayed at the bottom left of the Kiosk
Assistant window that will explain the exact function and/or meaning of the setting.
Step 5: Preview
By using the "Preview" menu you can start the FrontFace Kiosk Application with the current
configuration and thus test it immediately.
Note: To end the preview, either press the F8 key or first click in the bottom left, then the bottom
right corner of the screen. This method also works on touchscreens by touching the respective
corners.
Copyright © 2012-2015 by mirabyte GmbH & Co. KG
8
FrontFace for Touch Kiosks - User Manual
Step 6: Deployment
After configuring the menu structure, content and settings using the Kiosk Assistant, you can start
final user interface with the program "FrontFace Kiosk.exe" (FrontFace Kiosk Application).
If your work PC is not the kiosk PC that will later run the kiosk application, you need to transfer
your project to the target PC (i.e. the kiosk PC) first. The following two options are available to
transfer your project:
1.) Import/Export function
Install FrontFace for Touch Kiosks on the kiosk PC. In order to transfer the project from your
work PC to your kiosk PC, you either need a storage device such as a USB stick, or both PCs
need to be able to access a shared network used for the data exchange. Select the "Export"
function in the project menu of the Kiosk Assistant on your work PC, then choose a new,
empty folder on the USB device or the network drive that you have previously created as target
location.
After the export, start the Kiosk Assistant on the kiosk PC and select "Open project..." on
the welcome page, then select the folder into which you have exported your project (from the
USB device or network drive). When your project has been imported, you can close the Kiosk
Assistant and start the FrontFace Kiosk Application ("FrontFace Kiosk.exe").
2.) Deployment function
If you would like to update and maintain the kiosk application from your work PC, using the
export/import function is comparatively laborious since the kiosk PC needs to be updated
manually every time, and updates cannot be made while it is running. In this case, the
deployment function is recommendable. It allows you to easily update a remote PC via network
share or the Internet. The "Deployment" menu offers three options:
o All-in-one (local installation)
This is the most common case when the PC on which you work with the Kiosk Assistant
is also the kiosk PC running the kiosk application. No deployment is required since the
project is already available on the PC and can be used immediately.
o Offline deployment (using a USB device)
This method is comparable to the import/export function, yet is does not require you to
carry out the import on the kiosk PC manually. Insert the USB device with the new data
into the PC while running and the kiosk application will update automatically. Then simply
eject the USB device and your kiosk PC is up to date.
o Online deployment (via network share)
Menu structure, content and settings will be deployed to the kiosk PC from your
management PC via network share of a local network. In order to use this method, the
Content Folder on the target (kiosk) PC must be made available through network share.
The Content Folder is usually located under "C:\Program Files (x86)\mirabyte
\FrontFace for Touch Kiosks\Content". You can, however, relocate the
Content Folder to any location by clicking "Content Folder" in the "Settings"
menu of the Kiosk Assistant.
To share the Content Folder on the kiosk PC, right-click the folder in Windows Explorer
and select "Properties" > "Sharing". Besides the users authorized to access this
share, you may also need to set the access authorization under "Security" in the
property dialog of the folder. You can now access, read and edit the Content Folder of the
kiosk PC from your work PC via network share (e.g. "\\Kiosk-PC\Content\").
Start the Kiosk Assistant on your desktop PC and select "Deployment" > "Online
Copyright © 2012-2015 by mirabyte GmbH & Co. KG
Step-by-Step Tutorial
9
Deployment". Add the previously created network share you can access from your PC
and click "Deployment".This allows you to update the target PC while in use (i.e. while it
is running the Kiosk Application).
Besides using a local network, deployment is also possible via the Internet. In this case a
cloud storage service such as Dropbox or OneDrive must be used as "temporary storage"
that carries out the replication of the files from one PC to the other. Further information is
available in the "Deployment" section.
Copyright © 2012-2015 by mirabyte GmbH & Co. KG
10
4
FrontFace for Touch Kiosks - User Manual
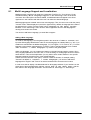
Supported Media Formats
FrontFace for Touch Kiosks supports numerous media and file formats and allows you to carry on
using a highest possible amount of your existing content and programs without time-consuming
changes.
Fig.: Supported file and content formats are shown in the "Add New Content" dialog.
The following formats are supported directly:
Media format
General:
Picture(s)
Video
Website / HTML
XPS
PDF
Print2Screen
Advanced:
Plugin
HTML files
Application
Description
Any pictures and photos in BMP, PNG and JPEG format.
WMV, MOV, MP4, AVI and all other formats supported by Windows Media
Player 10 and newer versions (also see System Requirements).
Display of any websites (HTML) fully supporting HTML5, CSS3 as well as
Flash and Silverlight.
XPS is Microsoft's e-paper format which can be directly exported from
Word, PowerPoint and Excel, for instance.
PDF is a common e-paper format which can be created with Adobe
Acrobat, amongst other programs.
Purpose-built e-paper format by FrontFace which can be created with
EVERY Windows application by means of a virtual printer driver provided
by FrontFace; also see Use Print2Screen.
With already existing or individually created plugins, users can easily add
any additional functions to FrontFace for Touch Kiosks; see Use Plugins.
Local (offline) HTML files (*.html, *.htm) and related files (CSS, JavaScript
or pictures).
Use this function to run any Windows application (EXE and CMD).
Copyright © 2012-2015 by mirabyte GmbH & Co. KG
Supported Media Formats
11
Automatic content scaling:
By means of intelligent algorithms and picture editing processes, all content of FrontFace for Touch
Kiosks will always be displayed in optimal size, independent of their resolution or the aspect ratio of
the target screen. Additionally, you can choose how contents will be scaled or adapted if they do
not exactly match the display format. The following scale/aspect ratio options are available for most
content types:
None
Proportional
Proportionally filling
Filling
Hint: For optimal display performance we recommend a resolution for pictures and videos that
does not significantly differ from the desired display size. This will avoid unnecessary
downscaling calculations, which allows a fluent display also on less powerful computers.
Copyright © 2012-2015 by mirabyte GmbH & Co. KG
12
5
FrontFace for Touch Kiosks - User Manual
System Requirements
FrontFace for Touch Kiosks can be installed and used on all Windows-operated PCs.
Supported Windows versions:
Windows XP (also Embedded* and PosReady*)
Windows Vista (32 and 64 Bit)
Windows 7 (32 and 64 Bit, also Embedded Standard*)
Windows 8.1 (32 and 64 Bit, also Embedded Standard*)
Windows 10 (32 and 64 Bit, also Embedded Standard*)
Run time requirements:
.NET Framework 4.0 (Full Profile) (will be installed automatically by the installation program if
necessary!)
If video playback is required, additional video codecs will have to be installed to replay
certain video formats. For this case we particularly recommend the LAVFilters codec pack.
If you use a proxy server to access the Internet (with the Kiosk Application as well as with
the Kiosk Assistant), you need to configure it as described in the paragraph Proxy Server
Configuration.
Other requirements for the Kiosk Assistant:
In order to use Print2Screen, the Kiosk Assistant must be installed on a PC running
Windows Vista, 7, 8.1 or 10.
Other requirements for the Kiosk Application:
If you would like to display Flash or Silverlight content, the respective plugins need to be
installed first (see Using Flash and Silverlight).
Hardware requirements:
There are no minimum requirements for hardware in order to use the software. A good
graphics card (e.g. by NVIDIA or ATI), however, will ensure a satisfying display
performance. The hardware required strongly depends on the intended use, whether
extensive multimedia features such as videos or fading effects will be used, for example, or
whether only static contents will be displayed.
Generally, the recommended working memory of the kiosk PC should be 1 GB at the very
least; better results are achieved with a memory of at least 2 GB.
FrontFace for Touch Kiosks supports 1-2 screen(s) with any resolution and orientation
(portrait/landscape) and supports single- and multi-touchscreens.
Automatic installation:
In addition to the regular, interactive installation via the Setup Assistant, you can also
navigate the setup pack by means of a commando line ("silent setup"). This allows users to
run several installations automatically with one deployment system. A detailed description of
the commando line syntax for the setup can be found in the chapter headed Software
Deployment and Updates.
Setup and backup of the kiosk PC for unsupervised non-stop operation:
The kiosk PC should be configured in such a way that a password is not required upon
booting and the Kiosk Application is started automatically. Screen savers and standby
functions should be disabled. These settings can be comfortably made with the separately
available, free FrontFace Lockdown Tool (also see "Kiosk PC Setup and Security").
*) Note on use of the EWF (Enhanced Write Filter) of Windows Embedded Standard:
If you are using Embedded versions of Windows, please make sure that the Enhanced Write
Filter (EWF) is deactivated when installing FrontFace. Also, the Content Folder should be moved
to a location that is not protected by the EWF. Once these adaptations have been made,
FrontFace is fully compatible with EWF.
Copyright © 2012-2015 by mirabyte GmbH & Co. KG
Kiosk Assistant
6
13
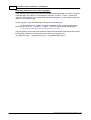
Kiosk Assistant
Use the Kiosk Assistant to configure the FrontFace Kiosk Application and to create your kiosk
interface (buttons menu with respective content).
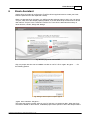
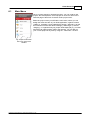
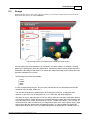
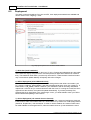
When you start the Kiosk Assistant, you will first see the welcome page on which you can open a
"Project", load one of the sample projects provided, or access various help resources such as this
user manual. "Project" in the context of FrontFace for Touch Kiosks describes the entirety of
menu structure, content, design and settings.
Fig.: Welcome page of the Kiosk Assistant
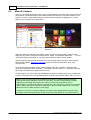
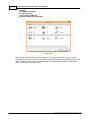
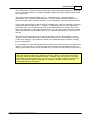
Only one project at a time can be installed or active on one PC. Click "Open Project..." for
the following options:
Fig.: Dialog in which to open or import a project
"Open the Current Project":
This opens the project currently active on your PC (the one you worked on last). When the Kiosk
Assistant is started for the first time, a standard project will be opened in which two sample buttons
Copyright © 2012-2015 by mirabyte GmbH & Co. KG
14
FrontFace for Touch Kiosks - User Manual
and contents are already created. These can be deleted or used as starting points for your own
menu.
"Import an Existing Project":
Use this option to import an existing project (from another location) to your PC and edit it. Please
note that the active project on your PC will be overwritten when another project is imported. We
thus recommend you to export your active project to a different location before any new import to
ensure no data is lost and you can continue working on it at a later point.
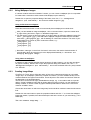
"Further Options..." > "Open a Content Folder":
This allows a user to directly edit the menu structure and content of this Content Folder, on a
remote PC that is connected via the network, for instance.
Sample projects:
The option "Sample projects" contains demo projects that show you all the options the
software offers and how a kiosk application can be designed using FrontFace.
Copyright © 2012-2015 by mirabyte GmbH & Co. KG
Kiosk Assistant
6.1
15
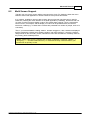
Main Menu
Once you have opened or imported a project, you can create a new
project, save and export the current project or close it to return to the
welcome page of the Kiosk Assistant via the project menu.
Below the project menu you will find the main menu, where you can
design the menu structure of your kiosk application, organize content
("Menu & Content") and customize the design ("Design") as well
as numerous functions with various settings ("Settings"). Choose
"Deploy" to organize how your project will be deployed (e.g. on other
kiosk PCs via network share, USB or the Internet). You can test run
your current project at any time by using the "Preview" function.
Fig.: Project menu and the
main menu of the Kiosk
Assistant
Copyright © 2012-2015 by mirabyte GmbH & Co. KG
16
6.2
FrontFace for Touch Kiosks - User Manual
Menu & Content
Here you can design the menu structure of your kiosk application and add content to the respective
menu buttons. The left-hand side of the window shows a tree structure of the menu buttons in your
interface. You can create several buttons on each level which will then be displayed in a "menu
page" by the FrontFace Kiosk Application.
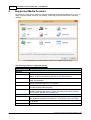
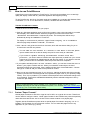
Fig.: Hierarchical view of the menu structure in the Kiosk Assistant and a view of the same menu on the Kiosk
Application
The menu buttons correspond to the folders in the file system of the so-called "Content Folder".
Right-click any button in the menu tree and choose "Open in Windows Explorer..." to find
out the menus physical location on your PC's drive and how it looks in the file system.
Use the symbols in the gray bar above the menu tree to easily add a new button, edit a selected
button, delete a button, add another language as well as move a selected button up or down
(change order).
On each level, several buttons can be created. Buttons under the "Content" label depict the
menu on the start page. Mark "Content", for example, and click on the "+" symbol in the menu
bar to add new buttons to the uppermost menu level.
For each button, you can set the color and labeling as well as a symbol picture (icon). Double-click
a button in the menu tree or use the edit symbol to customize its properties (label, color, icon, etc.).
Hint: In case you enter long words as label text for a button, it is likely that these words get
wrapped when being displayed in the Kiosk Application. A hyphen is automatically inserted
depending on the length of the word which does not respect any grammatical rules of
hyphenization. To prevent this problem you should pre-enter hyphens by yourself for long words.
These hyphens will only be visible in the application if they are really needed (e.g. in the button
label but not in the caption text of the menu page).
Example: If you write "Verysuper-longword", the word will be wrapped after the hyphen. But in
the title bar of the menu page where the text is also used it will appear as "Verysuperlongword".
Copyright © 2012-2015 by mirabyte GmbH & Co. KG
Kiosk Assistant
17
Fig.: Dialog showing options to add/edit a
menu button
If a button should contain sub-menus instead of content, this dialog also allows you to choose a
wallpaper (this is not possible for buttons with content since clicking on them will display the
appropriate content). Further information can be found in the section "Designing Wallpaper
Images".
If no color is set for a button, the color of its superordinate menu level will be "inherited".
Notice: A menu button can only contain further (sub-)menu buttons or content (e.g. pictures or
videos) at any one time. Only when you activate Multi Screen Support can menu buttons contain
(sub-)menu buttons as well as content.
General rule:
If content has already been assigned to a button, you cannot add further (sub-)menu
buttons to it.
If additional buttons have been added as sub-menus to a button, you cannot add content to
this button.
When you add a content file to a button, this content will later be displayed in the menu when the
user clicks the respective button. If a button contains further "sub-menu buttons" for additional
menu levels, content can only be assigned to the lowest level (i.e. content can only be added to
"end points" of the menu structure).
If content has already been assigned to a button, another content file cannot be added without
deleting previously assigned content first. Pictures, XPS files, PDF files and Print2Screen files are
exceptions to this rule; several files (yet only of the same type) can be added to one button and
"leafed through" one after another.
Hint: First draft the menu structure with all sub-menus before you start adding content to
individual menus.
6.2.1
Adding Content
In the right-hand side of the window you can see the content of a selected menu button. Use "+"
and "-" to add or delete content. The following file/content types can be added:
Picture(s) (as JPEG or PNG)
Videos
Websites
XPS files
Copyright © 2012-2015 by mirabyte GmbH & Co. KG
18
FrontFace for Touch Kiosks - User Manual
PDF files
Print2Screen printouts
FrontFace plugins
Local (offline) HTML files
Windows applications (EXE files)
Fig: Supported file and content formats are outlined in the "Add New
Content" dialog.
Once content has been added, it will be displayed on the right of the Kiosk Assistant window.
Depending on the type of content, further editing options will be offered such as background color,
picture heading or aspect ratio. The standard ratio for certain kinds of content can also be set
under "Settings" in the main menu.
Copyright © 2012-2015 by mirabyte GmbH & Co. KG
Kiosk Assistant
6.2.2
19
Using Wallpaper Images
If a button contains sub-menus instead of content, you can choose a wallpaper (this is not possible
for buttons with content since said content will be displayed upon selection).
Double-click to open the properties dialog of the button, then click "+" in "Background
Graphics (for sub-menus)" and choose a suitable image file (.jpg).
Using a slide show as wallpaper:
Follow the instructions below in order to have several pictures displayed as a slide show:
After you have added an image as wallpaper, click on the menu button, open the context menu
by right-clicking and select "Open in Windows Explorer...".
You will see the content of this menu button in the file system as well as the wallpaper image (file
name: "_wallpaper.jpg"). Now add further wallpaper images as JPEG files here and also
name them "_wallpaperX.jpg", with X standing for consecutive numbers. The order of your
images will thus be chosen by their consecutive number, e.g.:
_wallpaper1.jpg
_wallpaper2.jpg
_wallpaper3.jpg
...
Now select "Design" in the Kiosk Assistant's main menu, then set the desired number of
seconds after which the next picture is to be displayed automatically in "Interval for
Changing Wallpaper Image".
Using videos as wallpaper:
In addition to static images and slide shows (sequence of static images), you can also use videos
as graphic backdrop. Double-click to open the properties dialog of the button, then click "+" in
"Background Graphics (for sub-menus)" and choose a suitable video file (.wmv) instead
of a JPEG file.
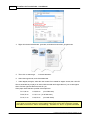
6.2.3
Creating Image Maps
FrontFace for Touch Kiosks offers the option of also using a background image as a so-called
"image map": On a wallpaper (JPEG file), invisible "hot zones" (i.e. touch-sensitive areas) can be
created instead of the regular menu buttons. These will point to sub-menus and are then visible as
an alternative to conventional buttons.
This function can be used to highly individualize the design, e.g. in accordance with a corporate
design. Create a wallpaper image with an image editing program on which your own buttons are
already created, or choose a motif as graphic backdrop that makes it obvious to the user that it
contains "clickable" areas.
Choose the menu button on which the image map function shall be used and create the sub-menus
first!
Double-click this menu button to open the properties window and click "+" to choose the wallpaper
image that should, if possible, have the same aspect ratio as the screen of your terminal (e.g. 16:9
landscape).
Then click "Enable Image Map...":
Copyright © 2012-2015 by mirabyte GmbH & Co. KG
20
FrontFace for Touch Kiosks - User Manual
Fig: FrontFace for Touch Kiosks' image map editor
You can now edit the image map and define the touch-sensitive areas as well as the conventional
buttons on the image, for which you can choose from the shapes "rectangle", "ellipsis" and
(conventional) "button". For "rectangle" and "ellipsis" size, direction and position can be customized
as follows:
In the menu "Add Element", click on the respective element to add it to your image and move,
re-size or rotate it using the anchor points. You can also combine all elements (via overlap) and use
them multiple times so nearly every shape can be "retraced".
With the third shape "button" you can add conventional menu buttons, whose position on the image
can be chosen freely (size and rotation, however, cannot be changed).
Then assign the target location (sub-menu) to a touch-sensitive area or freely placed button by
clicking "Functions" > "Set Target...". This will open a dialog window in which you can
choose already created (!) sub-menus as target location; several elements can be assigned to one
sub-menu. Once an element has been assigned to a sub-menu, its color changes from red to green
so you can easily see which elements have already been connected with a target location.
End the editing process of the image map by clicking "OK" and closing the dialog "Edit
Button" with a click on "OK".
A small symbol in the menu tree will show you which button uses an image map.
You can now test the image map and touch-sensitive areas in the "Preview". As soon as you
mouse over one of these areas, the cursor symbol will change from an arrow to a hand.
Copyright © 2012-2015 by mirabyte GmbH & Co. KG
Kiosk Assistant
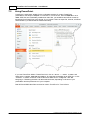
6.3
21
Design
Besides the structure of the menu and the contents, you can also customize the look of the kiosk
application with various so-called "Themes":
Fig.: Choosing a theme and customizing the designn of the kiosk interface
A theme defines the visual appearance of the buttons: The theme "Glass", for example, is loosely
based on the iPad's glossy style with glass buttons, whereas the "Metro" theme's simple tiles bears
similarities to the design of Windows 8. The theme also defines the design of the toolbars and other
interactive elements on the screen.
The following four themes are available:
Circle
Default
Glass
Metro
In each of these themes the type, font, text color and text size can be customized as well as the
overall text color (for titles, toolbar, etc.).
You can also set whether the button design can be blended out entirely, including the text if
required. In this case, only the assigned icon or icon and button text will be displayed.
The ideal icon size is 196x196 pixels. If you only want to show the icons without the button artwork,
you should choose the "Glass" theme since this theme places the caption text below the button and
not on the button's icon as the other themes do ("Circle", "Default" and "Metro"). So if you plan to
use these themes, make sure that your icon image leaves about 1/3 of the the space empty (at the
lower end) to allow the caption text to be displayed properly. It is also possible to integrate the
caption text directly as part of the icon image itself (entire size should also be 196x196 pixels). In
Copyright © 2012-2015 by mirabyte GmbH & Co. KG
22
FrontFace for Touch Kiosks - User Manual
that case you need to disable both the button artwork and the caption text of the buttons in the
Kiosk Assistant.
If you choose the "Circle" theme, you can also adapt the radius of the circle on which the buttons
are arranged and set a logo in .jpg format which will be displayed in the center of the circle.
Further individual themes can generally be added, yet this requires knowledge of programming. If
you are interested in this option, mirabyte's Support Team is happy to help.
For a higher level of customization, however, it often is not necessary to have an individual theme
designed. Individual designs can easily be created by using suitable background images with your
logo, for example, and by choosing button icons that match your design. You can even deactivate
the button artwork (the actual button graphic) completely. In this case, your icons should also
contain the button graphics (e.g. created in Photoshop). Like this, you can add your individual
button design without the need to have an individual theme created for you.
You can also match the graphics of your interface to your corporate identity by using the Image
Map function.
Copyright © 2012-2015 by mirabyte GmbH & Co. KG
Kiosk Assistant
6.4
23
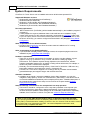
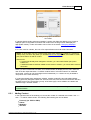
Settings
Click "Settings" in the main menu to access numerous further options for settings and
customization. It is advisable to go through the entire list once in order to gain an overview of all
available options.
Hint: For each option, a context-sensitive help text will be displayed in the bottom left of the Kiosk
Assistant's program window to explain the function and meaning of a setting.
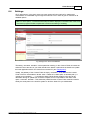
Fig.: Settings menu of the Kiosk Assistant
The setting "Content Folder" carries particular meaning: In the Content Folder all content as
well as the menu structure of your kiosk interface are stored. It also serves as interface to update
the kiosk application and/or its content from a remote PC (see "Deployment").
Usually, the pathway of the Content Folder is simply "Content", thus relates to the Content
Folder of the file "FrontFace Kiosk.exe". Instead of a relative path, an absolute path ("c:
\path\to\a\folder\...") can also be stated. While all other settings in this list can be
overwritten during an update from a remote computer, this is not possible for the value of the
option "Content Folder". This avoids the problem that the Content Folder must be located in
exactly the same place in the local file system on all of the kiosk PCs you administrate.
Copyright © 2012-2015 by mirabyte GmbH & Co. KG
24
6.5
FrontFace for Touch Kiosks - User Manual
Deployment
To transfer content and settings from your work PC, three deployment methods are available and
can be chosen in the "Deploy" menu:
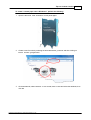
Fig.: Deployment options of the FrontFace Kiosk Assistant
1.) All-in-One (local installation)
All content and settings are located on the kiosk PC only. Changes and adjustments are also made
on the same PC only by using the Kiosk Assistant (the Kiosk Application needs to be closed for
this!). This method is useful when you have only one kiosk PC, create the basic interface/content
only once and then update relatively infrequently with minor changes.
2.) Offline Deployment (with USB thumb drive)
In order to use offline deployment, you need a USB storage device that will be connected to your
PC. Choose "Offline deployment" and select the appropriate drive, then click "Deploy". A
folder labeled "\TK_DATA\" will be created on your USB device and all necessary data will be
copied onto it. As soon as you connect this device with the kiosk PC running the FrontFace Kiosk
Application at this moment, the system will update automatically. If you have previously PIN
protected the Kiosk Application in the "Settings" menu, you will be asked to enter your PIN to
avoid unauthorized updating of the kiosk PC.
3.) Online Deployment (via network share or Internet)
If you choose online deployment, the structure of the menu, the content and settings are deployed
to the kiosk PC either over network share in a local network or by means of a cloud storage service
(OneDrive, Dropbox etc.) over the Internet. In order to use this method, the Content Folder has to
be made available on the target kiosk PC, either as network share or synchronized via the cloud.
Copyright © 2012-2015 by mirabyte GmbH & Co. KG
Kiosk Assistant
25
Then use the Kiosk Assistant to select the folder to be shared and initiate deployment to the target
PC from your local computer. This makes it possible to update the target PC whilst it is running the
Kiosk Application!
The Content Folder is usually located under "C:\Program Files (x86)\mirabyte
\FrontFace for Touch Kiosks\Content". You can relocate the Content Folder to any
location using the setting "Content Folder" in the "Settings" menu of the Kiosk Assistant.
To set up the Content Folder on the kiosk PC as a network share, right-click the folder in Windows
Explorer and select "Properties" > "Share". In addition to a group of users authorized to
access this share, you may also have to set up access authorization for this folder. This can be
done in the "Security" tab of the properties window. You can now access and edit the Content
Folder of the kiosk PC over the network share (e.g. "\\Kiosk-PC\Content\") from your local
work PC.
Now, start the Kiosk Assistant on your work PC and select "Online Deployment" from the
"Deploy" menu. Add the previously created network share that you can access from your work
PC and click "Deploy". This method, too, allows you to update the target PC whilst it is running
the Kiosk Application!
If you would like to use online deployment over the Internet, the Content Folder of your kiosk PC as
well as the Content Folder of your work PC have to be relocated to a cloud storage service (see
above), so the Content Folder can be replicated from your work PC to the kiosk PC over the cloud.
Notice: Whether you choose offline or online deployment, you will always be able to choose
which files should be transferred to update the kiosk PC; whether you would like to update the
menu and content as well as settings and design, or whether menu and content only or design
and settings only will be transferred is your choice. If you only make changes in content of the
menu, for example, the option "Only Menu & Content" should be chosen as this will
considerably speed up deployment.
Copyright © 2012-2015 by mirabyte GmbH & Co. KG
26
6.6
FrontFace for Touch Kiosks - User Manual
Preview
Use the "Preview" menu item to start FrontFace for Touch Kiosks with the current configuration
at any time and test it directly on your computer.
Hint: To end FrontFace for Touch Kiosks' preview mode, press F8 or first click in the bottom
left, then the bottom right corner of the screen. If you are using a touchscreen device, you can
also tap the bottom corners of the screen with your finger.
Copyright © 2012-2015 by mirabyte GmbH & Co. KG
Tips on Content Creation
7
27
Tips on Content Creation
FrontFace for Touch Kiosks offers you the freedom of using any application of your choice that
you are already familiar with to create and design content. Thus, you can use PowerPoint or Word,
for example, to create content for your kiosk terminal, as well as Open Office or entirely different
programs. The following pages will give you a few tips and tricks for the easy and efficient creation
of content.
Copyright © 2012-2015 by mirabyte GmbH & Co. KG
28
7.1
FrontFace for Touch Kiosks - User Manual
How to use Print2Screen
Print2Screen is an unique feature of FrontFace for Touch Kiosks that allows you to create high
quality HD display content with any Windows application that supports printing.
To use Print2Screen, the Kiosk Assistant needs to be installed on a computer with Windows Vista
or Windows 7, 8.1 ot 10. For the kiosk PC, however, Windows XP will be sufficient.
Transfer Print2Screen Content:
1. Start the Kiosk Assistant and open your project.
2. Open any Windows application such as Word and create or open a document which you would
like to display on the kiosk terminal. Select the program's print menu and ensure that
"FrontFace Print2Screen" is selected as printer. This virtual printer will be set up
automatically during the installation of FrontFace.
For display on 16:9 screens in particular, a paper format "Display 16:9" is available to
select as page setup instead of "DIN-A4", for instance.
3. Click "Print" and go back to the Kiosk Assistant, which will now show a dialog for you to
choose how to use this new printout:
You can "Add as new content to a button in the menu". In this case, please
input a suitable name to be able to identify the print file more easily at a later date.
If you choose to "Update existing Print2Screen content with this
printout", you need to select a Print2Screen object previously created from your current
project that you would like to update/overwrite with the new content. If you decide to use this
option, you will receive a confirmation when the process has been completed.
4. If you opted to add the printout "as new content" earlier, you can then choose the menu or
button in your project or add a new one. When you now add a content object, the list of
supported contents (such as image, video, website) will also show "Print2Screen". Choose
this type of content to add your most recent printout as content.
5. Now you can set a background color of your choice by marking the object and clicking the editsymbol in the menu bar. The background color replaces the paper color of your printout (usually
"white"). Thus, it is no problem if you create a full-faced printout which shows white margins due
to print settings. These will be substituted automatically with the selected background color by
FrontFace upon display.
Hint: A predefined paper format ("Display 16:9") optimized for display on 16:9 screens is
available especially for use with the Print2Screen printer. You can also define own "virtual" paper
formats (e.g. for 4:3 and other aspect ratios).
7.1.1
Custom "Paper Formats"
Normal paper formats such DIN-A4 or Legal do not fit 100% on a typical 16:9 screen. Therefore it
can be useful to configure custom, "virtual" paper formats for the Print2Screen printer that perfectly
match with the actual screen size or the size of the content container on a playlist page.
Together with the Print2Screen printer driver a special paper form named "Display 16:9" is
installed. This fits exactly for 16:9 full screen content. You can select this page format in any
application of your choice (e.g. Word).
Copyright © 2012-2015 by mirabyte GmbH & Co. KG
Tips on Content Creation
29
To create a custom paper size in Windows 7, perform the following:
1. Open the Devices and Printers control panel applet.
2. Create a new form size by selecting the Print2Screen printer and then clicking on
Print server properties.
3. On the Forms tab, select Create a new form; enter a name and select the attributes, then
click OK.
Copyright © 2012-2015 by mirabyte GmbH & Co. KG
30
FrontFace for Touch Kiosks - User Manual
4. Right-click the Print2Screen printer, and select its Printer properties.
5. Then click on Settings... in the tab General.
6. Select the Layout tab, and click Advanced.
7. Under Paper/Output, select the new custom form created for Paper Size, then click OK.
We recommend that you play a bit around with the width and height values of your custom paper
size to find the right size that is the best for you.
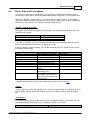
Some paper sizes that have proofed to be helpful are:
B: 17,65 cm
H: 30,00 cm
(16:9 fullscreen)
B: 29,70 cm
H: 16,71 cm (9:16 fullscreen)
B: 16,71 cm
H: 29,70 cm
(16:9 with ticker)
Notice: Also remember that FrontFace has a built-in, high-quality scaling algorithm that allows
you to show your print-outs in the correct aspect ratio on the screen with a minimum of empty
real-estate on the screen. Select "Stretching: Uniform to Fill" to get the best results
Copyright © 2012-2015 by mirabyte GmbH & Co. KG
Tips on Content Creation
in the options dialog of a Print2Screen content.
Copyright © 2012-2015 by mirabyte GmbH & Co. KG
31
32
7.2
FrontFace for Touch Kiosks - User Manual
Using PowerPoint
PowerPoint is particularly suitable for the comfortable creation of content. PowerPoint
presentations can easily be adapted in FrontFace for Touch Kiosks, either as XPS file or as a
video. XPS files are considerably smaller than video files, yet animations and effects cannot be
transferred from PowerPoint in this format. If you choose a video as export file, however, all effects
and animations you defined will be transferred entirely.
If you use PowerPoint 2009 or PowerPoint 2010, click on "File" > "Save & Send" and
either select "Create PDF/XPS Document" to export the presentation as an XPS file, or click
"Create a Video" and thus create a video as a WMV file for "Computer and HD
Displays". Rendering the video can take several minutes, depending on the size of your
presentation and the performance of your computer.
Both XPS and WMV video files can then be used in FrontFace for Touch Kiosks.
Copyright © 2012-2015 by mirabyte GmbH & Co. KG
Tips on Content Creation
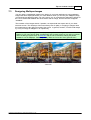
7.3
33
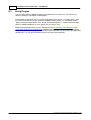
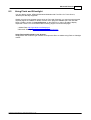
Designing Wallaper Images
You can make a considerable impact on the design of your kiosk application by using wallpaper
images that will be displayed behind your menu buttons. When you choose your wallpaper image,
you should ensure that the graphic you use is not too rich in contrast as this will make it difficult for
the user to differentiate between the menu buttons and the image, and the interface will appear
"unsettled".
The resolution of the images should, if possible, correspond with the aspect ratio of your kiosk
terminal's screen. This will help to avoid unnecessary loss of quality or cropping of margins when
the image's aspect ratio differs from that of the screen. In general, however, FrontFace will always
try to fit your image as wallpaper in an optimal way.
Hint: When you use photographs as wallpapers, they often are too high in contrast and the
buttons of your menu will not stand out particularly well. In these cases you can edit your photos
with free editing programs such as Paint.NET and the use of soft filters, making the photos
suitable for use as wallpaper. Particularly handy filters are "zoom blur" and "gaussian blur".
Fig.: A standard photo (original on the left) which was edited to be used as a wallpaper using the Paint.NET filter
"zoom blur".
Copyright © 2012-2015 by mirabyte GmbH & Co. KG
34
7.4
FrontFace for Touch Kiosks - User Manual
Creating Animated Icons
Usually, only static PNG images can be integrated in your menu interface as button icons, yet
sometimes it can be desirable to use animated images as button image. The following lines explain
how to create animated button graphics:
Prepare your animation as a sequence of individual PNG graphics (frames) whose order is
defined by the file names (e.g. "001_Frame.png", "002_Frame.png", etc.).
Gather these PNG files in one ZIP file and add to it a text file with the title
"descriptor.xml" and the following content:
<AnimatedImage>
<Interval>100</Interval>
</AnimatedImage>
The value 100 states the duration in milliseconds after which the next frame of the animation
will be shown (1000 = 1 second); by changing this value you can set your individual
animation speed.
Change the file ending of the ZIP file from ".zip" to ".ffai".
You will now be able to select this file as button icon like any regular PNG images.
Hint: A popular format for small animation is GIF; however, this format only supports images with
up to 256 colors. If you would like to use an animated GIF, we recommend you to export it with a
graphics program as single image sequence (frames) first, then convert it to *.ffai as described
above.
Copyright © 2012-2015 by mirabyte GmbH & Co. KG
Tips on Content Creation
7.5
35
Display Order of Files
The content type "Picture(s)" allows you to create a slide-show from photos and images easily and
quickly. Use the content type "Picture(s)", then select several photos you would like to display.
Users will then be able to "leaf through" these images in the kiosk application by means of the arrow
keys or by swiping on the touchscreen.
You can add a title for every image which will be shown as subtitle on the display of the kiosk
application.
To set the order in which the images will be displayed, click on the edit symbol "Rename
Content" in the upper menu bar and rename the images with consecutive numbers. An example:
01_A picture.jpg
02_Another picture.jpg
03_Graphic.jpg
The order is thus determined by the file names. The same applies, when you add various content in
PDF or XPS format to a menu interface.
Copyright © 2012-2015 by mirabyte GmbH & Co. KG
36
8
FrontFace for Touch Kiosks - User Manual
Advanced Features
FrontFace for Touch Kiosks offers a variety of advanced features and options which will be
described in the following chapters.
Copyright © 2012-2015 by mirabyte GmbH & Co. KG
Advanced Features
8.1
37
Multi Language Support and Localization
Multilingual menu interfaces can easily be created with FrontFace for Touch Kiosks. Firstly,
activate the setting "Multi Language Support" in the "Settings" menu of the Kiosk
Assistant. Once this option has been activated, an additional button will appear in the Kiosk
Application's user interface with which the user can select the desired language.
Multi language support is based around one main language. Thus, the menu tree under the (main)
"Content Folder" will be displayed in the Kiosk Application by default; the language then needs to
be assigned to the (main) "Content Folder" using "Language of the (Main) Content
Folder" in the "Settings" menu to let the Kiosk Application know in what language the
menu(s) and content were saved.
You can then add further language you would like to support.
Adding a New Language:
To create a new language, click the globe symbol in the menu bar of "Menu & Content" and
input the ISO language identification code for the new language as a button label (e.g. "de" if you
would like to add German as additional language, "en" for English, "fr" for French, etc.). For each
language a menu button representing the "Content" Folder of this language has to be created
under "Content" > "Other Languages" by means of the globe symbol.
Within one language, you can create menu buttons on the main level and assign content. Since
every language will have its own menu tree, it is not necessary for all language menus to have the
same structure. This can be helpful when you only wish to offer certain features in one specific
language instead of the entire menu of the default language.
Create the menu interface in the (main) "Content" Folder in German, for example, setting
"German" as default. In "Content" > "Other Languages" you can then add further
languages like "English" and "French" as well as localized menu structures and content.
In order to be able to display a localized title text for all language editions of your interface on the
home page of the kiosk application, add the "Title Text of the "Home" Page" with the
ISO code for each language used under "Localization Settings" in "Settings".
Copyright © 2012-2015 by mirabyte GmbH & Co. KG
38
FrontFace for Touch Kiosks - User Manual
Embedding Additional or Alternative Flag Images:
Once added, the Kiosk Application will show all available languages visually by means of graphics
of national flags. The graphics for the languages "German", "English", "French", "Italian" and
"Spanish" are already set. If you would like to add another language, you should also provide the
graphic for the respective flag.
To save a graphic, open Windows Explorer and go to the following path:
C:\Program Files (x68)\mirabyte\FrontFace for Touch Kiosks\User
Interfaces\(Circle | Default | Glass | Metro*)\Resources\Languages\
*) Here you need to select the file name of the design theme you are using!
Copy the graphics for the flag into this folder as PNG file and rename this file with the ISO code of
the language, followed by an underscore and the name of the language (e.g.
"en_English.png", "fr_Français.png", "nl_Nederlands.png").
Copyright © 2012-2015 by mirabyte GmbH & Co. KG
Advanced Features
8.2
39
Multi Screen Support
Typically only one (touch) screen will be connected to the kiosk PC, displaying either the menu
interface of the kiosk application or actual content such as pictures and videos.
It is, however, possible to use up to two screens, where one screen (touchscreen) is used for
interaction, showing the menu interface of the kiosk application (constantly), and the second one
(no touch function) serves to display content. This means that a projector can be connected as
second screen, for example, and the display of content can be operated with a touchscreen
terminal or a tablet (e.g. in cases where contents are presented to a number of people, such as in
a museum).
Thus, if you have activated the setting "Multi Screen Support", also contents are displayed
that are assigned to a button which already contains "sub-menu button(s)", since the content is
always shown on the secondary screen, whereas the menu with all buttons is constantly visible on
the primary (touch-enabled) screen.
Notice: Please make sure to configure both screens in Windows ("Control Panel" >
"Display" > "Screen Resolution") to "Extended Desktop" mode and define your
touchscreen as primary screen.
Copyright © 2012-2015 by mirabyte GmbH & Co. KG
40
8.3
FrontFace for Touch Kiosks - User Manual
Using Plugins
You can easily add any additional features and extensions to FrontFace for Touch Kiosks by
means of existing or individually created plugins.
A plugin always consists of one or more DLL files gathered in a ZIP file. To install a plugin, unzip
the content of the ZIP file into the FrontFace installation folder (usually "C:\Program Files
(x86)\mirabyte\FrontFace for Touch Kiosks\Plugins\"). Please note that a plugin
has to be installed separately on every (kiosk) PC you wish to use it.
Besides various plugins which you can download from the FrontFace product Website, a free
plugin SDK (Software Development Kit) is available with which you can create your own plugins
using the programming languages C# or VB.NET. More information can be found in the plugin SDK
manual which you can also download from the FrontFace product Website.
Copyright © 2012-2015 by mirabyte GmbH & Co. KG
Advanced Features
8.4
41
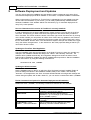
Clock, Date and Countdown
FrontFace for Touch Kiosks comes with a clock plugin that can either show a digital or analog
clock and the current date in various formats as well as a timer ("egg timer") or a countdown clock.
Add a new "Plugin" content object to your menu button and select "Clock". In the settings
dialog of the plugin you have to first select the "style" (Analog, Digital, Date, Timer or Countdown).
Depending on your selection you can then customize further settings:
"Analog"," Digital" and "Date":
The options "Time Format" and "Date Format" define the way how date and time values are being
displayed on the screen:
Default Date and Time Format*
T
d
Result on the Screen
5:25 pm
15-05-2015
*) The way how the date and time is formatted also depends on the language/locale that is set on
the PC. On a German PC the time will e.g. appear as "17:25".
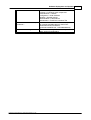
Instead of using the default formatting, you can also compose your own, custom format by using
the following format strings:
Format String
dddd
MMMM
yy
yyyy
HH
mm
d.
d. MMMM
HH:mm
dddd, dth of MMMM yy
Description
The full name of the weekday
The full name of the month
The year with two digits
The year with four digits
Hours with leading zero
Minutes with leading zero
The day of the month
The day and the full name of the
month
The hours and minutes, both
with leading zero
The date with the full name of
the weekday, the month and
day of the month and the year
with two digits
Result on the Screen
Wednesday
May
15
2015
09
03
15.
15. May
15:45
Wednesday, 15th of May 15
A detailed overview and description of all custom format strings can be found here.
"Timer":
A timer ("egg timer") allows you to define hours, minutes and seconds that are counted down every
time the plugin is shown. During the last three seconds, the remaining time is shown as blinking
text.
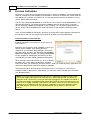
"Countdown":
A countdown lets you specify a date and time which indicates the end of the countdown. You can
also define how the remaining time of the countdown is shown on the screen.
Format String
Copyright © 2012-2015 by mirabyte GmbH & Co. KG
Result on the Screen
42
FrontFace for Touch Kiosks - User Manual
{0:00}T {1:00}S {2:00}M {3:00}S
{0:00} Days {1:00} Hours {2:00}
Minutes {3:00} Seconds
{0:00}d {1:00}h {2:00}m {3:00}s
{0:0} Days and {1:00} Hours und
{2:00} Minutes!
05T 10S 50M 29S
05 Days 10 Hours 50 Minutes 29 Seconds
05d 10h 50m 29s
5 Days and 10 Hours and 50 Minutes!
Copyright © 2012-2015 by mirabyte GmbH & Co. KG
Advanced Features
8.5
43
Using Flash and Silverlight
You can display regular, HTML5/CSS3-based Websites with FrontFace for Touch Kiosks;
JavaScript is also fully supported!
Should you wish to use browser plugins such as Flash and Silverlight, you need to ensure that the
required plugins are installed. If various versions of the plugin are available (as is the case with
Flash), install the version for Internet Explorer on the kiosk PC in order to be able to display
respective content. You can download the necessary plugins from these web pages:
Adobe Flash: http://get.adobe.com/flashplayer/
Microsoft Silverlight: http://www.microsoft.com/getsilverlight/
Using Flash and Silverlight in your browser:
Simply add a new content of type "website" and input the URL to a website using Flash or Silverlight
content.
Copyright © 2012-2015 by mirabyte GmbH & Co. KG
44
8.6
FrontFace for Touch Kiosks - User Manual
Integration of 3rd Party Apps
FrontFace for Touch Kiosks can also launch any (Windows) application on the kiosk terminal,
which allows you to integrate 3rd party functionality very easily.
Simply create a new button, select "Add New Content" and then choose the content type
"Application". Then you can enter the path to the application (EXE file) that you want to launch
when the button is clicked by the user.
Instead of just providing the path to an executable file you can also enter an entire command line.
Please make sure that you pad any paths with quotation marks if these do contain any blanks. You
can also use the placeholder %CURRENTPATH% to reference the path of the current button within
the content folder. You can open this folder by selecting a button from the menu tree and selecting
"Open in Windows Explorer" from the context menu (right-click).
E.g., in order to start the PowerPoint Viewer with a presentation in full screen mode that is stored
in the button's folder within the content folder, you have to enter this command line:
"C:\Program Files (x86)\Microsoft Office\Office14\PPTVIEW.EXE" /F "%
CURRENTPATH%\Example.pptx"
Warning: By executing external applications on the kiosk terminal you create a potential security
risk because the executed application may provide access to the underlying operating system
(e.g. via an open or save file dialog)!
Copyright © 2012-2015 by mirabyte GmbH & Co. KG
Advanced Features
8.7
45
Sharing Content
With FrontFace for Touch Kiosks, you can also offer users a feature that allows them to print and
share content via email.
Several settings can be adjusted under "Content Sharing Settings" in the "Settings"
menu.
Printing Content:
Activate the setting "Allow Content Printing" and the user will be able to click a printer
symbol in the toolbar of the kiosk application on the kiosk PC. The print job will automatically be
sent to the printer on the kiosk PC defined as default printer. Please ensure that users can
physically access the printer set as default.
To avoid various brief printing initiations and the resulting high number of printouts, you can input a
value for the setting "Protect Content Sharing Features from Abuse" defining the
number of seconds before a new print job can be sent. The user will receive a note about this.
Sharing Content by E-Mail:
Activate the setting "Allow Sending Content by E-Mail" and enter the email account from
which it will be sent. This requires the configuration of an SMTP e-mail account; all necessary
information can be obtained from your email provider or your system administrator.
Setting
E-Mail SMTP
Host
E-Mail SMTPPort
Use SSL for
E-Mail
E-Mail
Account
E-Mail
Password
E-Mail Sender
Address
E-Mail Subject
Description
Host name of the e-mail server (SMTP/Outbox)
Port of the e-mail server
Defines whether an SSL shall be used for connection to the SMTP server
Account name to log on to the SMTP server
Password to log on to the SMTP server
Address of the sender to be used when sending e-mails
Subject of the e-mail
You can enter a different subject for each supported language: Under "Key", input
the ISO code in the list (e.g. "de" for German), as "Value" put in the text of your
subject line in the respective language.
E-Mail Text
Text body of your message
Body
You can enter a different message text for each supported language: Under "Key",
input the ISO code in the list (e.g. "de" for German), under "Value" put in the text
body of your message in the respective language.
Protect
By inputting a value, you can prevent the user from engaging the "Share" function
Content
(print or e-mail) several times in succession within a short amount of time. Enter a
Sharing
value in seconds that the user needs to wait before he or she can click the
Features from function anew.
Abuse
Notice: Contents will be sent as an attachment if shared via e-mail, yet this option is not available
for videos. Websites will be shared as a URL in the text body of the e-mail; XPS documents will
be converted into JPEG files page by page, making it possible to also view content on devices
Copyright © 2012-2015 by mirabyte GmbH & Co. KG
46
FrontFace for Touch Kiosks - User Manual
not operated by Windows.
Copyright © 2012-2015 by mirabyte GmbH & Co. KG
Advanced Features
8.8
47
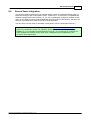
Screen Saver Integration
On interactive kiosk terminals it may be useful to display content or media automatically when no
interaction through a user is taking place ("idle"). FrontFace for Touch Kiosks is compatible with
Windows' regular screen saver function, i.e. you can conventionally configure a Windows screen
saver on your kiosk PC which will be initiated after a preset number of idle minutes, and which will
end upon new interaction to allow access to the kiosk application.
You can set up a screen saver in Windows' control panel in the tab "Personalization".
Hint: Use mirabyte's powerful Digital Signage Software "FrontFace for Public Displays" to
present any multimedia content in an appealing fashion. Besides a classic Digital Signage
Software (e.g. for information and advertisement screens), you can also set up FrontFace for
Public Displays as Windows screen saver, thus creating the perfect supplement to your
FrontFace Kiosk Application!
Copyright © 2012-2015 by mirabyte GmbH & Co. KG
48
8.9
FrontFace for Touch Kiosks - User Manual
Kiosk PC Setup and Security
As soon as the FrontFace Kiosk Application is running, direct access to the Windows system
(Explorer, task menu, etc.) is no longer possible, yet there is still the risk that a user gains
unauthorized access to the system by opening the Task Manager with the key combination CTRL
+ALT+DELETE. It is also worth considering to select automatic start-up of Windows as this will not
require you to enter a password.
The easiest option to make this and further useful settings on the kiosk PC is the use of the free
FrontFace Lockdown Tool (Lockdown.exe), which can be installed on an optional basis along
with FrontFace for Touch Kiosks, or can be downloaded separately from mirabyte's website (http://
www.mirabyte.com/go/fflockdown/) free of charge.
To use it with FrontFace for Touch Kiosks, start the FrontFace Lockdown Tool on the kiosk PC
and select the preconfigured profile "Interactive Kiosk Terminal" on the start page. Click
on "Load profile" and tick the button in the menu bar of the FrontFace Lockdown Tool.
Please make sure you have selected the correct user profile. We recommend you to create a
separate "Standard" user profile on Windows for the use of the FrontFace Kiosk Application.
Copyright © 2012-2015 by mirabyte GmbH & Co. KG
Advanced Features
8.10
49
Proxy Server Configuration
The FrontFace Kiosk Application contains several functions such as the display of websites and
the weather plugin, all of which, if in use, require access to the Internet. It may thus be necessary
for you to adjust the proxy configuration of the Kiosk Application if the kiosk PC can only access
the Internet via a proxy server in your IT infrastructure.
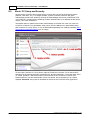
You can change proxy settings in the installation folder of the file "FrontFace
Kiosk.exe.config" with a regular text editor such as Notepad.
The following describes the settings relevant for proxy configuration:
Notice: If you use a proxy server, usually no additional settings need to be made since the proxy
configuration of the Internet Explorer is adapted to the kiosk PC by default, and it is sufficient to
configure the kiosk PC's Internet Explorer in a way that it can access the Internet via the proxy
server. Should access to the Internet not be possible with the FrontFace Kiosk Application under
these settings, you will have to explicitly configure the proxy as described below.
Explicit Proxy Configuration:
For advanced configuration of the proxy server, insert the following code in the
<configuration> tag of the "FrontFace Kiosk.exe.config" and personalize
accordingly:
<configuration>
...
<system.net>
<defaultProxy
enabled="true|false"
useDefaultCredentials="true|false">
<proxy
usesystemdefault="True|False"
proxyaddress="http://192.168.1.10:3128"
bypassonlocal="True|False"
/>
<bypasslist>
<add address="[a-z]+\.contoso\.com" />
</bypasslist>
</defaultProxy>
</system.net>
</configuration>
Here, you can enter the proxy server's URL, for example, create a bypass list and set the
authorization method to be used. For further details, please refer to the MSDN documentation.
Caution: Please note the capitalization of words like "True" and "False" (see above) and ensure
you enter a fully qualified URL (i.e. with protocol prefix and port as suffix)!
Copyright © 2012-2015 by mirabyte GmbH & Co. KG
50
9
FrontFace for Touch Kiosks - User Manual
Software Deployment and Updates
You can choose during the installation process whether certain components such as the Kiosk
Assistant and sample project shall be installed. In most cases, a complete installation is advisable.
When a new version of FrontFace for Touch Kiosks is released and you are entitled to use this
version within the framework of your license, you can easily update already installed software;
automatic installation of the software without user interaction (e.g. for automatic deployment on
many PCs) is also possible.
How can I determine which version of FrontFace is currently installed?
In order to determine the currently installed version, please close the current project in the Kiosk
Assistant. This will bring you back to the Welcome Page that is also shown when you start the
Kiosk Assistant. The version number is shown in the lower right corner of that screen. By clicking
on the version number you can perform an online check if there are any updates or new versions
available to be installed. In order to determine the version number of the Kiosk Application, select
the file "FrontFace Kiosk.exe" in the Windows file explorer and open the context menu (rightclick), then select "Properties". In the "Details" tab of the properties dialog of that file you
can find the version number.
Updating the FrontFace Kiosk Application:
Copy the installation pack with the new version on the kiosk PC and run it there; do not make any
changes in the installation assistant but always click "Next" and eventually "Finish". The
software will be updated automatically; all configuration settings and content as well as control
features will be maintained. Updates can also be installed without supervision: Start the installation
pack on the kiosk PC by using the following command line:
frontface-tk.exe /SILENT
Updating the Kiosk Assistant:
Run the installation pack on the PC on which the Kiosk Assistant is already installed. Retain all
previous settings and values in the installation assistant, always click "Next" and eventually
"Finish". As the application, the Kiosk Assistant will also maintain all configuration settings and
content during an update, and as with a kiosk PC, you can use the command line switch /SILENT.
Further Command Line Options for Automatic Deployment and Installation:
Besides the switch /SILENT, the following command line switches are also available:
Command Line Switch
/SP/VERYSILENT
/LANG=en
/COMPONENTS="core,
common, userinterfaces"
Description
Deactivates the "This will install... Do you wish to
continue?" request during start-up.
Deactivates all interactive elements during
installation, e.g. error dialogs. (to be used instead
of the /SILENT option!).
Sets language of the installation (de = German, en
= English)
List of components to be installed by the setup,
divided by commas. Possible values are:
Copyright © 2012-2015 by mirabyte GmbH & Co. KG
Software Deployment and Updates
/TASKS="autostarticon,
Firewall"
/LOG="installlog.txt"
Copyright © 2012-2015 by mirabyte GmbH & Co. KG
core = Kiosk application
common = Commonly used components
userinterfaces = Themes
configurator = Kiosk Assistant
samples = Sample projects
documentation = User manual
lockdowntool = FrontFace Lockdown Tool
List of installation tasks to be executed, separated
by commas (possible values for the list are:
autostarticon, Firewall,
print2screenDriver, createNetShare)
Determines that a log file is created to protocol all
setup actions for diagnostics.
51
52
10
FrontFace for Touch Kiosks - User Manual
License Activation
FrontFace for Touch Kiosks is licensed by kiosk PC (= kiosk PC installation). A license entitles the
holder to constant use of the software on this hardware. The Kiosk Assistant on the other hand can
be installed on any number of computers. If you have bought a license from FrontFace for Touch
Kiosks, please follow these steps:
You can only activate the full version of FrontFace for Touch Kiosks, not the test version. If you
have bought a license, you will also receive the installation pack for the full version. If the test
version is already installed and configured on your computer, you can easily update with the full
version. Simply run the installation pack of the full version on that computer; all settings will be
saved!
Once you have installed the full version, the Kiosk Assistant will no longer display the indication of
the test version and you can activate your license on the kiosk PC as described below:
License Activation on the kiosk PC:
Install the full version of FrontFace for Touch Kiosks on
your kiosk PC.
Important: This must be the "final" hardware on which you
wish to use the software. After starting the Kiosk
Application, an information dialog will open. Click on the
tab "Activate Licese" and write down the activation
code that is displayed. Request your personal license key
for this computer by following the instructions you have
received with your order (delivery/additional documents).
Once you have received the license key, click on "Enter
License Key" in the dialog containing the activation
instructions, enter your license key and click "Save". When you restart the Kiosk Application, the
reference to the test version should no longer be displayed.
The license key will be saved in the file "License.licx" in FrontFace for Touch Kiosks
installation folder on the kiosk PC. Alternatively, you can enter it there manually with a text editor
(e.g. Notepad.exe).
Notice: If you have acquired a license in the form of a USB dongle (portable license), simply
connect the dongle to the kiosk PC and start the Kiosk Application as usual; you will not be
required to enter a license key. As long as the dongle is plugged in, the software is activated. If
you have purchased a rental/SaaS license, please also ensure access to the Internet from your
kiosk PC since regular, automatic examination of the validity of the license by the software on a
mirabyte server is essential. This does not apply to hardware-connected or portable licenses
(with USB dongles)! The kiosk PC can also be operated entirely without connection to the
Internet.
Copyright © 2012-2015 by mirabyte GmbH & Co. KG
Troubleshooting
11
53
Troubleshooting
This chapter describes several typical problems, possible causes and suggested solutions. Further
up-to-date information can also be found in the mirabyte Knowledge Base!
Problem:
Cannot install the .NET 4 Framework on PCs operated with
Windows XP Embedded ("Unknown error").
Solution:
Before you can install the .NET 4 Framework with Windows XP
Embedded, you need to install the Windows Imaging Component
(WIC).
Problem:
You have entered the license key in the Kiosk Application, but
the message box that states that you are using an unlicensed
program is still being displayed.
Solution:
Make sure you have entered the license key correctly without
any typos.
An activation code is shown upon start-up of the Kiosk
Application. Compare this code with the middle section (between
the dashes) of your license key. If activation code and middle
section of your license key are not identical, the license key
cannot be used on this kiosk PC as it was issued for another
kiosk PC. Please contact technical support.
Problem:
You are using an intel HD graphic board and animations and
fading effects appear on screen in blocks or seem to be
delayed in certain areas of the screen (so-called tearing).
Solution:
Ensure that the most current driver for your graphic board is
installed.
Check whether the so-called "Aero Design" is activated for your
desktop in Windows display settings (window frames appear like
glass on Windows 7, in Windows 8.1 the Task Bar is
transparent). Only when this is activated the graphic board will
use the so-called vsync function correctly, which is designed to
prevent tearing. If, however, the design is set to "default", the
undesired tearing effect can occur under these circumstances.
Problem:
Solution:
"Sharing Content" function (print or share via e-mail) does
not work.
Printing does not work: Double-check whether the correct printer
is set as default in Windows Control Panel as FrontFace is only
able to print on the default printer.
Sharing via e-mail does not work: Please ensure that your SMTP
host, port and e-mail account are entered correctly in the
"Settings" menu. You may also have to unblock respective
ports in your firewall in order to facilitate communication with the
mail server via SMTP.
Copyright © 2012-2015 by mirabyte GmbH & Co. KG
54
12
FrontFace for Touch Kiosks - User Manual
Further Information and Help
This manual is designed to give you a quick and simple overview of the concepts and functions of
FrontFace for Touch Kiosks. Further documentation and information as well as free support is
available directly from mirabyte. Please visit http://www.mirabyte.com/ for contact details, or e-mail
[email protected]!
FrontFace for Touch Kiosks offers more options as become obvious on first view: Features of your
choice can be integrated and upgraded using the plugin interface, for example, particular hardware
such as web cams, RFID and card readers, thermal printers and payment systems can easily be
integrated. You can create entirely individual themes to match a customer's corporate identity, too!
mirabyte also offers supplementing support and advice services, whether you are looking
for a full service provider for your kiosk project or simply need a little support to implement it.
Copyright © 2012-2015 by mirabyte GmbH & Co. KG
Index
Dropbox
Index
-E-
-..NET Framework 4.0
12
-116:9 display
28
-44:3 display
24
28
-Aactivation 52
activation code 52
animated icons 34
animation 34
app 44
application 44
artwork 21
aspect ratio 28
-Bbeamer 39
button 16, 19, 21
-Cclock 41
cloud storage service 24
command line interface 50
configuration 23, 49
content 10, 16, 17, 27
content folder 23
countdown 41
-Ddate 41
deployment 24, 50
design 21
display order 35
Copyright © 2012-2015 by mirabyte GmbH & Co. KG
e-mail 45
error 53
EXE 17, 44
execute 44
export project 15
extension 40
-Ffiles 17
flags 37
Flash 10, 12, 43
formats 10
full version 52
-Ggraphics 21, 33
graphics adapter 12
-Hhelp 54
HTML 10, 17
hyphen 16
hyphenization 16
-Iicon 21
image 10, 17, 33, 35
image map 19
import project 13
information 54
installation 5, 50
Internet 24
Internet access 49
introduction 4
-KKiosk Application 5
Kiosk Assistant 5, 13
kiosk PC 4
55
56
FrontFace for Touch Kiosks - User Manual
-Llanguages 37
launch 44
license 52
license key 52
localization 37
lock down 48
Lockdown Tool 48
-Mmain menu 15
manual 6
media 10
menu 16
menu button 16
monitor 39
multi language support 37
multi screen support 39
-Nnetwork 24
new version 50
-OOneDrive 24
open project 13
operating system 12
options 23
order 35
overview 5
-Ppaper format 28
PDF 10, 17, 35
photo 10, 27, 35
picture 10, 17
plugin 17, 40, 41
PowerPoint 32
preview 26
Print2Screen 10, 12, 17, 27, 28
printing 28, 45
problem 53
project 13
project menu 15
projector 39
protect 48
protection 48
proxy server 49
-Qquick start manual
6
-Ssample project 13
screen 39
screen saver 47
SDK 40
security
48
service 54
settings 23, 49
setup 50
sharing content 45
Silverlight 12, 43
slide show 19, 27, 35
solutions 53
step-by-step 6
support 54
system requirements 12
-Ttext 10
theme 21
time 41
timer 41
troubleshooting
tutorial 6
53
-Uupdating 50
USB dongle 52
USB flash drive 24
-Vversion 50
video 10, 17, 19, 32
Copyright © 2012-2015 by mirabyte GmbH & Co. KG
Index
-Wwallpaper 19, 33
Website 10, 17
welcome page 13
Windows 12
Windows application
word wrap 16
wrap 16
17
-XXPS
10, 17, 28, 32, 35
Copyright © 2012-2015 by mirabyte GmbH & Co. KG
57