1
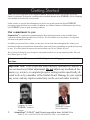
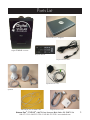
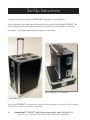
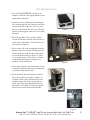
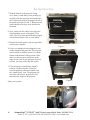
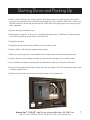
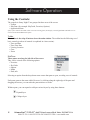
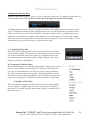
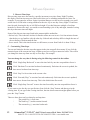
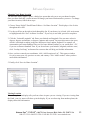
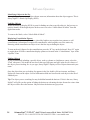
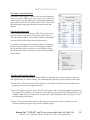
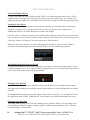
Digital
®
STARLAB
Setup and Operation Manual
Your Digital STARLAB® is entitled to FREE lifetime technical support. If you have any questions
not covered by this guide, or if you do not feel comfortable performing any of the recommended
operations, please do not hesitate to call us.
Science First®/ STARLAB®
86475 Gene Lasserre Blvd, Yulee, FL 32097 USA
800-799-8301 • 904-225-5558 • FAX 904-225-2228 • www.starlab.com
Getting Started
Thank you for your purchase of the Digital STARLAB® projection system. We welcome you to our
family of educators! We hope the versatility and excitement inherent in the STARLAB® will be delighting
your students and visitors for years to come.
In this section, we provide the information you need to set up and operate the Digital STARLAB®
projection system and dome successfully. In addition, we include a number of maintenance tips to keep
your STARLAB® system in peak operating condition.
Our commitment to you:
Science First® is committed to manufacturing the finest digital projection system available today
combined with the highest possible level of service. You can contact us for any reason - a real person
will answer the phone each time!
In addition to our team below (whom you may have met at trade shows throughout the country), our
mechanical engineer and production foreman have spent many hours assembling our products from soup
to nuts. If we don’t know the answer the exact moment you call, we’ll find it for you!
We are always looking for ways to improve our products and service in any manner possible. Have an
idea? Please give us a call!
It is recommended that you contact Starlab prior to setting up your system for the
first time.
Important Note: Your system has been carefully calibrated by Starlab. It
does not need any further adjustment. Do not adjust any mechanical fasteners (e.g. screws), or computer/projector settings unless specifically directed to do so by a member of the Starlab Team! Damage to your system
may occur, and any repairs needed may not be covered under warranty.
2
Nathaniel Bell,
Helmut Albrecht
Company Co-owner,
STARLAB® Customer
STARLAB® Technical
Service Specialist
Support
Science First®/ STARLAB® • 86475 Gene Lasserre Blvd, Yulee, FL 32097 USA
800-875-3214 • 904-225-5558 • FAX 904-225-2228 • www.starlab.com
Parts List
MacBook Pro Computer
Digital STARLAB® with lens
Projector Remote
Projector Power Cord
Speaker Power Cord
Speakers
Mini Display Port to HDMI Cable
Computer Power Cord
Science First®/ STARLAB® • 86475 Gene Lasserre Blvd, Yulee, FL 32097 USA
800-875-3214 • 904-225-5558 • FAX 904-225-2228 • www.starlab.com
3
Set-Up Instructions
The projection system for the Digital STARLAB® is shipped in a single flight case.
This case doubles as the stand and also holds all of the accessories for the Digital STARLAB® . We
have left plenty of extra room in the pockets for you to add your own equipment, if so desired.
See pages 5 - 6 for further instructions on using the case as a stand.
Digital STARLAB® Case in Stand Mode
Digital STARLAB® Case
Your Digital STARLAB® is entitled to free lifetime technical support. Our technical staff is standing
by to assist you with any problems you may have.
4
Science First®/ STARLAB® • 86475 Gene Lasserre Blvd, Yulee, FL 32097 USA
800-875-3214 • 904-225-5558 • FAX 904-225-2228 • www.starlab.com
Set-Up Instructions
1. Lay the Digital STARLAB® case flat on its
bumpers so that the telescoping handle is near
and parallel to the floor.
2. Open the case by pulling out and turning the
keys to disengage the four latches located two
on each long side of the case. To do so, pull
the key up and turn to the left. Once all of the
latches are disengaged, make sure to lay them
flat again.
3. Place the top (lid) of the case (the smaller
section) on the floor with the foam side down
in the center of the dome. This is the base of
the stand (see Figure 1).
4. Next, remove all of the components from the
bottom of the case starting with the projector.
Lift the projector from the sides where there
are spaces in the foam (see Figure 2). Place
it on a stable surface. Then remove all other
components including the computer, two
speakers, cables and remote.
Figure 1
Lift From Here
Digital STARLAB®
Speakers
Computer
Lift From Here
Cables and accessories
Figure 2
5. Once empty, flip the case bottom onto its side
so that the small latch hook on each long end
is parallel to and near the floor.
6. In this position, place the bottom section of
the case onto the top section (see Figure 3)
so that the wheel side of the bottom section
and the bumper side of the top section are
on the same end. Align the latch hook with
the latches (see Figure 4). Make sure that the
latches are securely fastened and laid flat.
Figure 3
Figure 4
Science First®/ STARLAB® • 86475 Gene Lasserre Blvd, Yulee, FL 32097 USA
800-875-3214 • 904-225-5558 • FAX 904-225-2228 • www.starlab.com
5
Set-Up Instructions
7. With the bottom of the projector facing
away from you and fisheye lens pointing up,
carefully slide the projector downwards onto
the 2 brackets located on the upper left side of
the stand (see Figures 6 and 7). Both projector
hooks should fit securely in the brackets on
the stand.
Brackets to hold projector
8. Next, connect all the cables to the projector.
Attach both the power cord and the VGA
cable. The VGA cable should then be plugged
into the Mini Display Port on your laptop.
9. Plug the included speakers into an open USB
port on your computer.
Figure 5
10. Once everything has been plugged in, turn
on the computer and projector. The projector
can be turned on with the remote or with the
button on the bottom of the projector. Note:
there is a master power switch next to the
input for the cord. If your projector does not
activate, you may need to flip this switch.
11. The final step is to load Starry Night™
software. Double click the “Projector”
icon. Immediately afterward, double click
the “Small Dome” icon. The program will
start after a brief boot- up period. It will
automatically output to the projector.
Projector
Brackets
Figure 6
Enjoy your system!
Figure 7
6
Science First®/ STARLAB® • 86475 Gene Lasserre Blvd, Yulee, FL 32097 USA
800-875-3214 • 904-225-5558 • FAX 904-225-2228 • www.starlab.com
Shutting Down and Packing Up
1. Hit the “power” button twice on the projector (in the button panel) or on the remote to turn off the
projector. It is important to leave the projector plugged in for a few minutes! This allows a fan to cool
the bulb. Failure to do this may decrease the life of the bulb. During this period, you can pack up the
other equipment.
2. Replace the cap on the fisheye lens.
3. Shut down the computer. To do so, close all applications then choose “Shut Down” under the Apple
icon on the menu bar at the top of the screen (far left).
4. Unplug the speakers.
5. Unplug the power strip from the wall then remove all of the cords.
6. Remove all the cords from the computer and projector.
7. Make sure you have plenty of room and there are no trip hazards when removing the projector.
8. Remove the projector by lifting it straight up off the brackets and place it on a stable surface.
9. Next, undo the two latches connecting the top and bottom of the case and lay the latches flat.
10. Remove the bottom and lay it flat with the foam side up. Replace all of the components in their slots
as shown in photo below.
11. Replace the top of the case and secure all four latches. Lay the latches flat.
Lift From Here
Digital STARLAB
Computer
®
Lift From Here
Speakers
Cables and accessories
Science First®/ STARLAB® • 86475 Gene Lasserre Blvd, Yulee, FL 32097 USA
800-875-3214 • 904-225-5558 • FAX 904-225-2228 • www.starlab.com
7
Software Operation
Using the Controls:
The controls in Starry Night™ are grouped in three areas of the screen:
• Toolbar
• Side Pane (for example: SkyGuide, Favorites, Options)
• Application Menu
If any of the controls described in this section are missing from your display, reinstall QuickTime and make sure to
choose the Recommended Install option.
Toolbar
The toolbar is the strip of buttons above the main window. The toolbar has the following set of
basic controls (each set of controls is explained in a later section):
• Time and Date
• Time Flow Rate
• Viewing Location
• Gaze
• Zoom
Side Panes
These panes are along the left side of the screen.
They can be viewed as the following options:
• Favorites
• SkyGuide
• Options
• Media
• Find, info
Selecting an option from the drop-down menu causes that pane to open, revealing a set of controls.
Each pane opens to the same width. However, by clicking along the right edge of the pane and
dragging the mouse, you can make the pane narrower or wider.
Within a pane, you can expand or collapse various layers by using these buttons:
Expand layer.
Collapse layer.
8
Science First®/ STARLAB® • 86475 Gene Lasserre Blvd, Yulee, FL 32097 USA
800-875-3214 • 904-225-5558 • FAX 904-225-2228 • www.starlab.com
Software Operation
SkyGuide Pane
The SkyGuide pane is different from the other panes. It functions a lot like a web browser and contains
its own set of buttons to help you navigate through the pages. The SkyGuide Pane has the following
controls:
Navigation
The navigation controls are located at the top of the SkyGuide pane.
Click “Back” to return to the page you last visited. Click again to move back through all
the pages you’ve seen.
Click “Forward” to go forward again through the same pages.
Click “Home” to go to the main SkyGuide page.
Click “Refresh” to reload the initial view in the sky window.
Click “Remove Slides” to remove all media playing on the dome.
Click “Table of Contents” to display a list of all topics and tours that SkyGuide offers.
Click “Page Forward” to move to the next page in SkyGuide.
Click “Page Back” to move to the previous page in SkyGuide.
Page Path
Each page includes a menu to help you remember the way you came. It indicates where you currently
are in SkyGuide.
Science First®/ STARLAB® • 86475 Gene Lasserre Blvd, Yulee, FL 32097 USA
800-875-3214 • 904-225-5558 • FAX 904-225-2228 • www.starlab.com
9
Software Operation
Application Menu
The menu runs across the top of the screen, above the toolbar. Clicking an item in the menu reveals additional options.
Changing Your Viewing Direction
By default, Starry Night™ always opens with your view facing south, looking slightly above the horizon. You can adjust this view to look in any direction. The default cursor icon in Starry Night™
is a hand. When you hold the mouse button down, the hand closes, as if it’s grabbing part of the sky.
If you hold the mouse button down and drag the mouse, your view shifts in the direction that you
moved the mouse.
Zenith and Nadir Markers
If you adjust your view to look high above the horizon, you might see a red marker. This marker
identifies the zenith, the point in the sky that is directly above your head. If your view is from
a point in space, you can also look straight down to see a marker for the nadir, the point directly
beneath your feet. If your view is from a spot on Earth or another planet, you can look only slightly
below the horizon and cannot see the nadir.
Gaze Control
The gaze display in the status bar shows the direction you’re looking.
• Altitude (Alt) measures the angle above the horizon in degrees. An altitude of zero degree means
you’re looking straight ahead; 90 degrees means you’re looking straight up.
• Azimuth (Az) indicates the direction you’re facing: zero degrees is north, 90 degrees is east, 180
degrees is south, and 270 degrees is west. You can also use the compass points marked along the
horizon to determine your viewing direction.
Location Scroller
The location scroller is another way of changing your location when your view is from high above
an object. The location scroller cursor looks like a compass with arrows radiating from four sides. If
you click and drag the cursor, you can move all around an object. This offers fantastic views of the
planets and solar system. For instance, if you’re high above the surface of Saturn, use the location
scroller to turn the planet and see the rings from every angle.
The location scroller can help you get a real sense of the three-dimensional relationships among
objects in our solar system and beyond. As you explore the tours in SkyGuide, the location scroller
appears automatically when appropriate. In these cases, you can click and drag the cursor to change
your perspective. To change the hand tool to the location scroller tool, hold down the Shift key and
drag the cursor, or select it from the cursor drag-down menu.
10
Science First®/ STARLAB® • 86475 Gene Lasserre Blvd, Yulee, FL 32097 USA
800-875-3214 • 904-225-5558 • FAX 904-225-2228 • www.starlab.com
Software Operation
Changing the Date and Time
When you open Starry Night™, you see a view of what you would see if you stepped outside at the current time and looked south. The date and time are in the upper left corner of the toolbar.
To change the date or time, click on the symbol. The date or time lights up and you can type in a new
value. To change the month, use the up and down arrow keys on your keyboard. If your mouse has a
wheel, you can use it as well. If Starry Night™ is showing a daytime scene, try changing the time to
nighttime. If you already see a night scene, change the time to the daytime. Clicking on the “am/pm”
next to the time will automatically switch between the two, a jump of 12 hours. For example, if is 9 in
the morning when you click this icon, it will become 9 at night.
A. Customizing Time Flow
By default, time in Starry Night™ advances at the same rate as real time.
If you run Starry Night™ for one hour, its time advances one hour (unless
you’re in one of the SkyGuide tours where we’ve adjusted the time rate
for a demonstration). As the time in Starry Night™ changes, the screen
changes to reflect the changing sky.
B. Changing the Time-flow Rate
Just as nature programs use time-lapse photography to show processes too
slow to see in real time, you can speed up or slow down time to get the
best view of an astronomical event. The rate of time’s flow is shown in
the Time Flow Rate section of the toolbar. Clicking the black area to the
left of the rate opens a menu that displays a list of possible time steps. The
steps are in two categories: multiples of real time and discrete time steps.
1. Multiples of Real Time
Time steps that are multiples of real time advance time in Starry Night™
at a rate equal to a multiple of the real rate of time flow. For example, a
time-step of 30x would cause the time in Starry Night™ to advance at 30
times the real rate.
Science First®/ STARLAB® • 86475 Gene Lasserre Blvd, Yulee, FL 32097 USA
800-875-3214 • 904-225-5558 • FAX 904-225-2228 • www.starlab.com
11
Software Operation
2. Discrete Time Steps
Discrete time steps move the time by a specific increment every time Starry Night™ updates
the display. Discrete time steps are often useful when you’re watching astronomical events. For
example, if you wanted to see how Jupiter’s position changes over the next few months, you could
set the time to 9 PM in the evening and then set the time step to one day. Starry Night™ would run
time forward, showing the sky at 9:00 PM each night. If you had chosen a multiple of real time
instead of a discrete time step, you would see an alternating cycle of day and night, instead of seeing
the sky at the same time each night.
Some of the discrete time steps listed in the menu might be unfamiliar:
• Sidereal day: This is the time it takes for Earth to rotate once on its axis. It is four minutes shorter
that the day we are familiar with, the solar day. Sidereal and solar days differ in length because of
the revolution of Earth around the Sun.
• Lunar month: This is the time between two full moons, as seen from Earth. It is about 29 days.
C. Customizing Time Steps
You are not limited to the time steps that appear in the time step pull-down menu. If you click the
numerical part of the current time step, it lights up and you can type a numerical value. This will let
you change the time step from one day to seven days, for example.
You can change the way time is flowing using the following controls in the toolbar.
Click “Single Step Backward” to move the time back by one time step and then freeze it.
Click “Backward” to run time backward continuously. Each time the screen is updated, the
time moves backward one time step.
Click “Stop” to freeze time at the current value.
Click “Forward (Play)” to run time forward continuously. Each time the screen is updated,
time moves forward one time step. This is the default time flow mode.
Click “Single Step Forward” to move the time forward by one time step and then freeze it.
If you want to view the sky at a specific time, first click the “Stop” button, and then type in the
viewing time. If you type in the viewing time first, the time shown onscreen might update before you
press the “Stop” button.
There are three short cut keys that play and stop time:
.
The period key (.) stops time
/
The slash key (/) means routine forward
,
The comma key (,) runs time backwards
12
Science First®/ STARLAB® • 86475 Gene Lasserre Blvd, Yulee, FL 32097 USA
800-875-3214 • 904-225-5558 • FAX 904-225-2228 • www.starlab.com
Software Operation
Changing Your Home Location
The first time Starry Night™ opens, a dialog box opens that asks you to set your home location.
Once you have done this, you do not need to change your home location unless you move. To change
your home location, follow these steps:
1. Choose “Starry Night™ Small Dome Edition > Set Home Location”. This displays a list of cities
throughout the world.
2. Use the scroll bar on the right to look through the list. If your home city is listed, click on its name
to highlight and click “Save As Home Location”. If your city is not listed, proceed to step three.
3. Click the “Latitude/Longitude” tab. Enter your latitude and longitude. You can enter values in
degrees; degrees and minutes; or degrees, minutes and seconds. You must also enter a time zone,
which is calculated according to the time difference from London, England. For example, all
communities on Eastern Standard Time are five hours behind London, so you would enter “-5h”,
if you are on Eastern Standard Time. If you do not know your latitude, longitude, and time zone,
click “Lookup Lat/Long” on Internet for resources that will help you find this information.
4. Once you have entered your coordinates, click “Add Location to List”. This opens a window
for you to enter your city, province or state, and country. Click “Add Location” when you have
entered this information.
5. Finally, click “Save As Home Location”.
Viewing Location
The viewing location display tells you from where in space you are viewing. If you are viewing from
the Earth, your city name will show up in the display. If you are observing from another planet, the
display shows this information.
Science First®/ STARLAB® • 86475 Gene Lasserre Blvd, Yulee, FL 32097 USA
800-875-3214 • 904-225-5558 • FAX 904-225-2228 • www.starlab.com
13
Software Operation
Identifying Objects in the Sky
If you point your cursor at any object shown onscreen, information about the object appears. This is
Starry Night™’s Heads-Up Display (HUD).
Labeling Objects
While the heads-up display (HUD) is great for finding out what a specific object is, the best way to
quickly identify all the bright objects on the screen is to select “Labels-Show all labels” from the
application menu.
To remove the labels, select “Labels-Hide all labels”.
Displaying Constellation Figures
For thousands of years, stargazers have joined the brighter stars together into patterns we call
constellations. Astronomers recognize 88 constellations, which together cover the entire sky.
Knowing which constellation an object is in is the first step to finding the object.
To turn on the stick figures for the constellations press the “K” key on the keyboard. Press “K” again
to toggle them off. More constellation display options are located in the “Constellations” layer of the
“Options” Pane.
Finding Objects
If you are interested in finding a specific object, such as a planet or a bright new comet, select the
“Find” side pane. Click inside the text box at the top of this pane and type in the first few letters of
the object you are looking for. As you type, Starry Night™ displays a list of objects that match your
name.
Once the object that you are looking for appears in the list, double-click on its name, and Starry
Night will centre on the object. Several information fields are listed beside each object in the list of
found objects.
Tip: The object you are searching for may be hidden beneath the horizon. If this is the case, Starry
Night™ will offer you the option of hiding the horizon or advancing the time forward to a time when
the object will be above the horizon. Objects below the horizon are greyed out.
14
Science First®/ STARLAB® • 86475 Gene Lasserre Blvd, Yulee, FL 32097 USA
800-875-3214 • 904-225-5558 • FAX 904-225-2228 • www.starlab.com
Software Operation
Searching a Specific Database
By default, Starry Night™ searches all of its object databases
when you use the “Find” pane. If you wish, you can choose to
search in only a specific database by clicking the magnifying
glass symbol on the left side of the textbox in the “Find” pane
and choosing the appropriate database from the menu that
appears.
Solar System Object List
If you clear the text box at the top of the “Find” pane, the list
of items found is replaced by a list of solar system objects.
Click the symbol to the left of an object’s name to expand the
list to include all other objects that orbit this object.
For example, clicking on this symbol for Jupiter will expand
the list to include Jupiter’s moons. Clicking again collapses
the list and hides Jupiter’s moons. You can double-click on
any object in this list to centre on the object in Starry Night™
main window.
Selecting and Centering Objects
You can open a contextual menu in Starry Night™ by pointing the cursor at any object in the sky
and right-clicking or control-clicking. The contextual menu provides options specific to that object.
Select/deselect: This selects or deselects the object. If an object is selected, its name and an arrow
pointing to the object will appear onscreen.
Center: This adjusts your view so the object is at the center of the screen and remains locked there as
time passes. This is handy if you want to watch a planet’s motion against the background stars, for
example. Note: If you are centered on an object and it falls beneath your horizon, your view will
be obstructed by the horizon.
Magnify: This zooms in on the object so that you get a close-up view. Objects within our solar
system and many deep-space objects have detailed images.
Science First®/ STARLAB® • 86475 Gene Lasserre Blvd, Yulee, FL 32097 USA
800-875-3214 • 904-225-5558 • FAX 904-225-2228 • www.starlab.com
15
Software Operation
Selecting Multiple Objects
To select more than one object, hold down the “Shift” key while selecting the next object. This is
a handy feature, allowing you to label only the objects you want on the screen. For example, you
might only want to display the constellation Orion, label the star Rigel and the deep sky object M42.
Zooming in On Objects
You’ve learned that you can zoom in on an object by opening its contextual menu and choosing
“Magnify”. Another way to get spectacular close up views of objects such as Saturn or the
Andromeda Galaxy is to use the buttons next to the zoom display.
Click the “plus” (+) button to zoom in closer and the minus button to zoom back out. If your mouse
has a scroll wheel, you can also use that to zoom in and out. The default zoom gives the largest view
of the sky, which is 190 degrees. You can zoom in up to 300,000 times!
When you zoom in on objects, you are not changing your location or your elevation. Think of
zooming as looking through a powerful telescope while your feet remain firmly planted.
Determining Distances Between Objects
To determine the distance between two objects as seen from your current viewing position, use the
“angular separation” tool. To use this tool, hold your hand cursor over an object until it turns into an
arrow. Then click on that object and drag to another.
Changing Your Horizon
By default, Starry Night™ shows a photo-realistic horizon. However, you might want to change
your horizon to something else, perhaps a photo-realistic horizon of your backyard that you created
yourself.
To change the horizon options, go to the Options Pane. Select “Local View > Local Horizon” from
the application menu. Under “Earth horizon” you will find a list of different horizons you can try.
Changing Your Elevation
You might want to place yourself at some distance above a planet’s surface. You can change your
elevation above an object’s surface in Starry Night™ with the elevation buttons in the “Viewing
Location Display” of the toolbar.
16
Science First®/ STARLAB® • 86475 Gene Lasserre Blvd, Yulee, FL 32097 USA
800-875-3214 • 904-225-5558 • FAX 904-225-2228 • www.starlab.com
Safety Features and Information
Safety Rules
In order to maximize the overall quality of your experience, ensure safety and make certain that the
system components are not damaged in any way, it’s important that you review and follow this safety
information when using the STARLAB® .
1. The STARLAB® should always be set up in an open space such as cafeteria, gym, multipurpose
room or large classroom. Do not set up on a stage. It is not designed for use where exits are
blocked or ceiling height is low.
2. Allow at least 18 inches above the dome for a sprinklered ceiling; allow at least 12 inches above
the dome for a ceiling with incandescent lighting; allow at least 6 inches above the dome for a
ceiling with fluorescent lighting.
3. When setting up the dome, be sure to avoid blocking the exit paths out of the room.
4. Never set up the STARLAB® dome near an open flame, incandescent lighting, radiators, space
heaters or other heat source. Never allow anyone who is smoking in or near the dome.
5. Students should never be left alone in the STARLAB®. The instructor should always be the first
one in and last one out of the dome.
6. When leaving the STARLAB® dome, the instructor should check to make sure there is no one
remaining in the entrance.
7. Always make sure there is a clear path out of the STARLAB® in the event of an emergency.
8. Safety rules and evacuation procedures should be reviewed with the students before the start of
each STARLAB® lesson.
9. Do not allow food or drink inside the STARLAB® dome as it could damage the equipment.
10. Do not set up the STARLAB® outdoors. It is not designed to be exposed to moisture and direct
sunlight, and even a gentle breeze could move the dome when it is inflated.
Safety Facts
• The STARLAB® dome has two means of egress:
1. Through the entrance tube and,
2. By lifting the side of the dome occupants can exit in seconds because the dome has no floor
• It requires 8 lbs of force to lift the side of the Standard Dome and 14 lbs of force to lift the side of
the Giant Dome.
• In the case of a power outage, it takes 42 minutes for the ceiling of the Giant Dome to settle to a
level of 6 feet from the ground.
• Air circulates through the dome continuously, with a complete fresh air exchange rate of every 6
minutes for the Standard Dome and 24 minutes for the Giant Dome.
• The STARLAB® Blower is UL rated.
Recommended Emergency Lighting Options
• Working flashlight
• Battery back-up UPS (uninterrupted power supply) rated at 180 watts
• Rechargeable lantern
• Photoluminescent exit sign
Science First®/ STARLAB® • 86475 Gene Lasserre Blvd, Yulee, FL 32097 USA
800-875-3214 • 904-225-5558 • FAX 904-225-2228 • www.starlab.com
17
Troubleshooting
It is recommended that you contact Starlab prior to setting up your system for
the first time.
What do I do if the system won’t come on?
1. Check to make sure all the cords are firmly plugged in.
• Note: there is a master power switch next to the input for the cord. If your projector does not
activate, you may need to flip this switch.
• When the computer has power, the end of the power cord will glow orange
2. Press the start-up buttons on the projector and computer
• The projector will display a white screen with the “infocus” name. It takes about 2 minutes for the bulb to warm up.
• If the computer has been completely powered down, it will take about 1 minute to boot.
3. If you are still experiencing problems, contact us.
What do I do if everything is on but the projector won’t display an image?
1. Make sure the VGA to Mini Display Port cord is fully engaged,
• This cord fits in the Firewire and Ethernet ports as well so be sure it is in the correct port!
2. It is possible the projector is looking for a signal in an unoccupied port. Press the “auto image”
or “source” buttons on your remote to tell the projector to try other ports.
3. Click the “live” button in the upper left hand corner of the Starry Night™ window. This allows
Starry Night™ to “talk” to the projector.
4. The computer has been programmed to detect the projector automatically. If you see the computer
screen flash blue, the computer has found the projector.
• If you see the screen flash blue but still have no image, reboot the projector. You can do this by
turning it off and then turning it on again.
• If you reboot the projector and still have no image, contact us..
What do I do if the Starry Night™ software won’t load?
1. It is possible, though unlikely, that the Starry Night™ software made a mistake upon loading.
• To mitigate this, close the program and reopen it.
2. If you have an image but no way to manipulate it, the likely cause is that the “Starry Night™” and
“Projector” windows are reversed.
• To fix it, close the program.
• When you reopen the program, double click on “Projector” first and “Starry Night™” second.
3. If you are still experiencing problems, contact us.
What do I do if my projection isn’t level?
The projector lens can be releveled. However, we strongly discourage attempting to do this by
yourself.
If you have any issues with a level horizon, it is highly recommended that you contact us
immediately.
18
Science First®/ STARLAB® • 86475 Gene Lasserre Blvd, Yulee, FL 32097 USA
800-875-3214 • 904-225-5558 • FAX 904-225-2228 • www.starlab.com
Troubleshooting
Important Note: Do not adjust any screws, bolts,
or settings unless specifically directed to do so by
a member of the Starab Team! Damage to your
system may occur!
What do I do if my projected image is “warped”?
1. The projector is designed to accommodate a varying amount of screen sizes. The aspect ratio for each
of these sizes is different.
• If your image is warped, the most likely explanation is that the wrong aspect ratio has been selected on the projector.
• To mitigate this, locate the “resize” button on your remote.
• Press the “resize” button until the image is no longer warped.
2. It is possible that your display windows are “mirrored”. This means the computer will output what you see on the screen to the projector, instead of splitting the images as it should.
• To undo this, find the small rectangular icon in the status bar at the top of your screen. Click
it to reveal display options.
• Select “Turn off mirroring”. The image should automatically revert. If not, reboot Starry
Night™.
3. If you are still experiencing problems, contact us.
What do I do if my image isn’t focused?
1. Your Digital STARLAB® is focused in the factory. However, rough handling in shipping can knock the
focus out of alignment,
• Caution: do not try to focus the lens before reading these instructions!
Permanent damage may occur!!
2. To focus, you will need the small hex driver which was included with your system.
• Locate the three small set screws roughly 1 inch (1”) down from the top of the lens.
• Gently loosen the screws. They are very short, so take care not to remove them completely. A few turns of the screwdriver will do.
• Twist the lens clockwise or counterclockwise until the desired focus is achieved.
• Tighten the set screws. Take care not to over tighten!
Your Digital STARLAB® is entitled to free lifetime technical support. If you have any questions not
covered by this guide, or if you do not feel comfortable performing any of the above operations, we
encourage you to call us. Our technical staff is standing by to assist you with any and all problems you
may have. Remember, there is no such thing as an unnecessary question!
19
Science First®/ STARLAB® • 86475 Gene Lasserre Blvd, Yulee, FL 32097 USA
800-875-3214 • 904-225-5558 • FAX 904-225-2228 • www.starlab.com