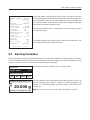
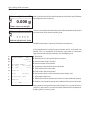
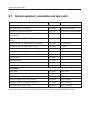
1
Operating Instructions Moisture Analyzer HB43-S Overview of your HB43-S Halogen Moisture Analyzer 2 1 Substance A 12 21 13 20 14 19 18 22 23 24 1 17 16 15 25 A Substance A 2:54 29 11 88 °C 8 28 -12.48 27 % MC 10 26 7 9 5 31 30 33 35 32 34 6 2 1 4 3 30 Display, controls and connections of your HB43-S No. Designation Info s. Section No. Designation Info s. Section 1 Display (example) all 28 Symbol for calculated result 2.4 2 Keypad all 29 Status display (“User Guide”) 2.4 3 Draft shield 2.3 30 Leveling screw 2.3 4 Sample chamber 2.3/6.1 31 Antitheft device socket 2.3 5 Heat shield 2.3 32 Power supply receptacle 2.3 6 Sample pan support 2.3/2.4 33 Power line fuse 6.2 7 Heating module 1.2/5.3 34 Fan 1.3 8 Inspection window and vent 5.3 35 RS232C interface connection 6.3/8.2 9 Level indicator (level) 2.3 10 Temperature sensor 6.1 11 Halogen lamp protective glass 6.1 12 Key «Menu» 4/5 13 Key «F» (Print) 4.4/5.1 14 Key «B» (for choosing method B) 4.3/4.4 15 Softkeys (context-dependent keys) 4.2 16 Key «Stop» (stop drying) 4.5 17 Key «Start» (start of drying) 5.5.8 18 Key «–>0/T<–» (Zero/Tare) 2.4 19 Key «A» (for choosing method A) 4.3/4.4 20 Key «A» (for exiting the menu or stopping drying) 4.2/4.5 21 Key «On/Off» 2.4/4.5 22 Active method (A or B) 4.3/4.5 23 Name of method 4.4.1 24 Display of drying time 2.4/4.4.8 25 Display of drying temperature 2.4/4.4.4 26 Display of drying result 2.4/4.5 27 Stability detector 7.1/7.2 Contents Contents 1 1.1 1.2 1.3 1.4 1.5 Getting to know your Moisture Analyzer 6 Introduction........................................................................................................................................ 6 What is the Halogen Moisture Analyzer used for................................................................................... 6 Safety has priority .............................................................................................................................. 8 Important information about these instructions ................................................................................. 10 Disposal........................................................................................................................................... 10 2 2.1 2.2 2.3 2.4 Your first measurement in next to no time 11 Unpacking and checking the standard equipment.............................................................................. 11 Selecting the location....................................................................................................................... 12 Setting up, leveling and connecting to power supply.......................................................................... 12 Your first measurement..................................................................................................................... 14 3 3.1 3.2 3.3 How to obtain the best results 19 Measurement principle of the Halogen Moisture Analyzer................................................................... 19 Notes on adjustment of the balance and the heating module............................................................. 20 Optimum sample preparation........................................................................................................... 21 4 4.1 4.2 4.3 4.4 4.4.1 4.4.2 4.4.3 4.4.4 4.4.5 4.4.6 4.4.7 4.4.8 4.4.9 4.4.10 4.4.11 4.4.12 4.4.13 4.4.14 4.5 4.6 Practical application of your Moisture Analyzer 22 The operating concept and methods................................................................................................. 22 The menu........................................................................................................................................ 23 Choosing and allocating methods from database.............................................................................. 23 Developing own methods and defining parameters............................................................................ 25 Specifying name of method.............................................................................................................. 25 Specifying target weight of sample.................................................................................................... 26 Selecting the drying program............................................................................................................ 27 Setting the drying temperature.......................................................................................................... 27 Timed temperature limit.................................................................................................................... 28 Selecting the switch-off criterion........................................................................................................ 29 Setting time interval for free switch-off criterion.................................................................................. 30 Setting drying time for timed switch-off.............................................................................................. 31 Selecting the display mode............................................................................................................... 31 Activating free factor......................................................................................................................... 33 Specifying free factor........................................................................................................................ 33 Choosing number of decimal places................................................................................................. 34 Saving new method and exiting menu............................................................................................... 34 Printing out records of methods........................................................................................................ 35 Performing a measurement............................................................................................................... 35 Information on the measurement record............................................................................................ 39 Contents 5 5.1 5.2 5.3 5.4 5.5 5.5.1 5.5.2 5.5.3 5.5.4 5.5.5 5.5.6 5.5.7 5.5.8 5.5.9 5.5.10 5.6 5.6.1 5.6.2 5.6.3 5.7 Basic settings of the instrument 40 Menu overview................................................................................................................................. 40 Adjusting the balance....................................................................................................................... 41 Adjusting the heating module........................................................................................................... 43 Selecting the dialog language........................................................................................................... 45 System settings................................................................................................................................ 46 Setting the time................................................................................................................................ 47 Entering the date.............................................................................................................................. 47 Choosing time format....................................................................................................................... 47 Choosing date format....................................................................................................................... 48 Setting display contrast..................................................................................................................... 48 Setting display brightness................................................................................................................. 48 How to activate the protection of menu settings ................................................................................ 49 Selecting the start mode for drying.................................................................................................... 49 Switching the printer on or off........................................................................................................... 50 Defining the print interval.................................................................................................................. 50 Interface settings.............................................................................................................................. 51 Setting the baud rate (data transmission speed)................................................................................ 51 Setting bit / parity............................................................................................................................. 52 Setting the data flow control (“handshake”)....................................................................................... 52 Resetting to the factory settings......................................................................................................... 53 6 6.1 6.2 6.3 Servicing and replacing individual parts 54 Cleaning the heating module and the sample chamber..................................................................... 54 Replacing the power line fuse........................................................................................................... 55 Connecting to an external printer...................................................................................................... 56 7 7.1 7.1.1 7.1.2 7.1.3 7.2 If problems arise on occasion 57 Error messages................................................................................................................................ 57 Input errors...................................................................................................................................... 57 Application errors............................................................................................................................. 57 Function errors................................................................................................................................. 58 What if...?........................................................................................................................................ 59 8 8.1 8.2 8.3 8.4 8.5 8.6 8.7 Further useful information 61 Notes on interpretation of the measurement results and the ideal sample weight................................ 61 RS232C interface............................................................................................................................. 61 Application Brochure........................................................................................................................ 62 Switch-off criterion “Weight loss per unit of time”............................................................................... 62 Technical data ................................................................................................................................. 64 MT-SICS Interface commands and functions...................................................................................... 67 Optional equipment, consumables and spare parts............................................................................ 68 9 Index 69 Getting to know your Moisture Analyzer 1 Getting to know your Moisture Analyzer Please read through this Section carefully, it contains important information for safe and economical operation of your Moisture Analyzer. 1.1 Introduction Thank you for deciding to purchase a Halogen Moisture Analyzer from METTLER TOLEDO – you have made a wise choice.Your Moisture Analyzer is fast and reliable. It offers a high level of operating convenience and useful functions to facilitate determination of the moisture content of your samples. Behind your instrument stands METTLER TOLEDO, a leading manufacturer of not only balances and scales for the lab and production, but also analytical measuring instruments. A customer service network covering the entire globe with well trained personnel is at your service at all times, whether you are choosing accessories or require guidance for a specific application to ensure optimum utilization of your instrument. To ensure you make full use of the possibilities offered by your Moisture Analyzer, we advise you to read through these operating instructions very carefully. 1.2 What is the Halogen Moisture Analyzer used for Your Halogen Moisture Analyzer is used for determining the moisture content of almost any substance.The instrument works on the thermogravimetric principle. At the start of the measurement the Moisture Analyzer determines the weight of the sample, the sample is then quickly heated by the integral halogen heating module and the moisture vaporizes. During the drying process the instrument continually measures the weight of the sample and displays the reduction in moisture. Once drying has been completed, the moisture or solids content of your sample is displayed as the final result. Of decisive importance in practice is the rate of heating and even heating of the surface of the sample. In comparison with conventional infrared heating or the drying oven method, for example, the halogen heating module of your instrument needs a shorter time to reach its maximum heating power. It also allows use of high temperatures, an additional factor in shortening the drying time. Uniform heating of the sample material ensures good repeatability of the drying results and makes it possible to use a smaller amount of sample. All parameters of a measurement (drying temperature, drying time, etc.) can be preselected. But your Moisture Analyzer offers many other possibilities. To avoid exceeding the scope of this introduction, only a few of these are listed here: Getting to know your Moisture Analyzer – The built-in database contains predefined drying methods for many products.You can easily adjust the parameters of the individual methods to suit your needs. – The drying process can be adjusted to suit the type of sample – You can choose between various types of result display – Your settings and the measurement results can be recorded – Your settings are protected even if there is a power failure – The RS232C data interface fitted as standard allows your moisture analyzer to communicate with an external printer or with a computer. This wealth of functions notwithstanding, your Moisture Analyzer is very simple to operate. The status display (User Guide) guides you step by step through the measurement cycle and you always know which particular stage in a measurement is currently being executed by the instrument and the next operating step. To exclude faulty handling in routine work, the keypad can be locked to prevent access to all but the elementary functions. The Moisture Analyzer conforms with all common standards and directives. It supports stipulations, work techniques and result records as demanded by all international quality assurance systems, e.g. GLP (Good Laboratory Practice), GMP (Good Manufacturing Practice). The instrument has a CE declaration of conformity and METTLER TOLEDO as the manufacturer has been awarded ISO 9001 and ISO 14001 certification. This provides you with the assurance that your capital investment is protected in the long term by a high product quality and a comprehensive service package (repairs, maintenance, servicing, adjustment service). Getting to know your Moisture Analyzer 1.3 Safety has priority Your Moisture Analyzer employs state of the art technology and meets the latest demands regarding instrument safety. This notwithstanding, improper operation can endanger personnel and cause damage to tangibles. For safe and dependable operation, please comply with the following instructions: – The Moisture Analyzer is used for determining the moisture in samples.Please use the instrument exclusively for this purpose. Any other type of use can endanger personnel and damage the instrument or other tangibles. – The Moisture Analyzer must not be operated in a hazardous environment and only under the ambient conditions specified in these instructions. – The Moisture Analyzer may be operated only by trained personnel who are familiar with the properties of the samples used and with the handling of the instrument. – Your Moisture Analyzer is supplied with a 3-pin power cable with an equipment grounding conductor. Only extension cables which meet the relevant standards and also have an equipment grounding conductor may be used. Intentional disconnection of the equipment grounding conductor is prohibited. Note: There are two versions of the instrument, 110 V and 230 V. The Halogen Moisture Analyzer works with heat! – Ensure sufficient free space around the instrument to avoid heat accumulation and overheating (approx. 1 m free space above the instrument). – The vent over the sample must never be covered, plugged, taped over or tampered with in any other way. This also applies to the fan on the back of the instrument. – Do not place any combustible materials on, under or next to the instrument when it is connected to the power supply, since the area around the heating module becomes hot. – Exercise caution when removing the sample. The sample itself, the sample chamber, the draft shield, and sample container (if used) may still be very hot. – Be very careful if you open the heating module during operation, because the circular heating module or its protective glass can be as hot as 400 °C! For this reason, only ever touch the handles provided on the heating module. – No modifications must be made within the heating module. It is particularly dangerous to bend any components or remove them, or to make any other changes. Getting to know your Moisture Analyzer Certain samples require special care! With certain types of samples, there is a possibility of danger to personnel or damage to tangibles through: Fire or explosion: – Flammable or explosive substances – Substances containing solvents – Substances which evolve flammable or explosive gases or vapors when heated. With such samples, work at a drying temperature that is low enough to prevent the formation of flames or an explosion and wear protective goggles. Should there be any uncertainty regarding the flammability of a sample, always work with a small amounts of sample (max. 1 gram). In such cases, never leave the instrument unattended! In cases of doubt, perform a careful risk analysis. Poisoning, burning: – Substances which contain toxic or caustic components. Such substances may be dried only in a fume cupboard. Corrosion: – Substances which evolve corrosive vapors when heated (e.g. acids). In the case of such substances, we advise you to work with small amounts of sample as the vapor can condense on cooler housing parts and cause corrosion. Please note that the user always takes responsibility and assumes liability for damage caused by use of the types of samples mentioned above! – Never make any modifications or constructional alterations to the instrument and use only original spare parts and optional equipment from METTLER TOLEDO. – Your Moisture Analyzer is a rugged precision instrument – but you should still treat it carefully; it will then thank you with many years of trouble-free operation. – Please comply with all notes and instructions in these operating instructions. Keep the instructions in a safe place where they are immediately to hand if any points are unclear. If you lose these instructions, please contact your METTLER TOLEDO dealer for an immediate replacement. Moisture determination applications must be optimized and validated by the user according to local regulations. Application-specific data provided by METTLER TOLEDO is intended for guidance only. Getting to know your Moisture Analyzer 10 1.4 Important information about these instructions These instructions guide you step by step through the operation of your Moisture Analyzer. The first two Sections help you put the instrument into operation quickly, safely and properly and perform your first measurement within a short space of time. In Sections 3 through 5 you become intimately acquainted with the wide range of functions of your Moisture Analyzer. During this learning phase, you will find the table of contents and the detailed index in Section 9 a valuable orientation aid. Sections 6 through 8 contain additional information on the maintenance of your instrument, troubleshooting and the available options. As soon as you are familiar with your Moisture Analyzer, you will find the illustrations at the beginning of these instructions and the associated references (in the key) useful for quick access. The following identifications and symbols are used in these instructions: – Key designations are shown enclosed by twin angle brackets «», e.g. «On/Off» or «F». – This symbol indicates safety and hazard instructions. If these are not complied with, injury to the user, damage to your instrument or other tangibles and malfunctions can result. – This symbol indicates additional information and directions which facilitate your handling of the instrument and contribute to proper and economical use. These instructions are also available in foreign languages. Should you require a set of instructions in a different language, please contact your METTLER TOLEDO dealer. You will find the address of your nearest dealer in the attached Declaration of Conformity 11780294. 1.5 Disposal In conformance with the European Directive 2002/96/EC on Waste Electrical and Electronic Equipment (WEEE) this device may not be disposed of in domestic waste. This also applies to countries outside the EU, per their specific requirements. Please dispose of this product in accordance with local regulations at the collecting point specified for electrical and electronic equipment. If you have any questions, please contact the responsible authority or the distributor from which you purchased this device. Should this device be passed on to other parties (for private or professional use), the content of this regulation must also be related. Thank you for your contribution to environmental protection. Your first measurement in next to no time 11 2 Your first measurement in next to no time In the Section you will learn how to put your new Moisture Analyzer into operation and obtain measurement results within a very short space of time. 2.1 Unpacking and checking the standard equipment Open the package and remove the instrument and the accessories. Check the completeness of the delivery. The following accessories are part of the standard equipment of your new Moisture Analyzer: – 80 aluminum sample pans – 1 sample pan support – 1 sample pan handler – 1 specimen sample (circular, absorbent glass fiber filter) – 1 draft shield – 1 power cable – 1 Operating instructions – 1 Application brochure “Methods of moisture content determination” – 1 List of predefined methods – 1 CE declaration of conformity (in separate brochure 11780294) Remove the wrapping from the instrument. Check the instrument for transport damage. Immediately inform your METTLER TOLEDO dealer if you have any complaints or parts are missing. Store all parts of the packaging. This packaging guarantees the best possible protection for the transport of your instrument. Your first measurement in next to no time 12 2.2 Selecting the location Your Moisture Analyzer is a precision instrument. An optimum location guarantees accuracy and dependability: – Firm, horizontal location as free from vibrations as possible – Avoid direct sunlight – No excessive temperature fluctuations – No powerful drafts – Surroundings as free from dust as possible – Enough space around the instrument to prevent build-up of heat – Sufficient distance from heat-sensitive materials in the vicinity of the instrument. 2.3 Setting up, leveling and connecting to power supply Exact horizontal positioning and stable installation are prerequisites for repeatable results. To compensate for small irregularities or inclinations (±2%) at the location, the instrument can be leveled. For exact horizontal positioning, the Moisture Analyzer has a level indicator (level) and 2 leveling screws. When the air bubble in the level indicator is exactly in the center, the instrument is standing perfectly horizontally.To level it, proceed as follows: Position your Moisture Analyzer at the selected location. Turn the two leveling screws until the air bubble is in the center of the level indicator. Note: The instrument should be releveled each time its location is changed. Your first measurement in next to no time 13 For protection against theft, your Halogen Moisture Analyzer is fitted with a socket for an antitheft device. Together with a lockable steel cable like those used to protect portable computers against theft, the socket can be used to secure the instrument. You can obtain a suitable antitheft cable from your METTLER TOLEDO dealer. Connect the instrument to the power supply. Warning: If the power cable supplied is not long enough, use only a 3-pin extension cable with equipment grounding conductor! Allow your instrument to warm up for 60 minutes. The instrument adapts itself to the ambient conditions during this time. For technical reasons, the halogen heating module is designed specifically for a particular line voltage (110 V AC or 230 V AC). A heating module is installed in the factory that is matched to the particular line voltage of the country of destination. If you are not sure whether the heating module built into your instrument is suitable for your local line voltage, check the voltage printed on the glass of the circular halogen lamp before you connect the Moisture Analyzer to the power supply! Connection to a line voltage that is too high can lead to blowing of the fuses, whereas a supply voltage that is too low will prolong the drying process. Please note that some parts of your instrument are always live when the instrument is connected to the power supply. Your first measurement in next to no time 14 First lay the heat shield in the sample chamber. Then place the draft shield (can only be mounted in one position) and after that the sample pan support in position. Turn the sample pan support until it engages. In the engaged position the rear arm of the sample pan support lies exactly along the length of the instrument. 2.4 Your first measurement After you have successfully put your new Moisture Analyzer into operation for the first time, you can immediately perform your first measurement. In doing so, you will become familiar with the instrument and the status display and at the same time perform a function check. Please use the specimen sample supplied for your first measurement. This sample is an absorbent glass fiber filter. For your first measurement the instrument is set to the factory settings and operates in the automatic mode, which guides you through the entire measurement procedure without you having to press a single key. You work with the predefined method “A”, which specifies all of the parameters for the drying process. Press the «On/Off» key to switch the instrument on. A Substance A – – – °C After it has been switched on, the instrument performs a self-test. Wait until the display shown opposite appears. 0.000 g Your Moisture Analyzer has a graphical status display (User Guide) which you will become acquainted with in this Section. The status display informs you continuously about the current status of the instrument and prompts you to execute the next operating step (shown flashing). Your first measurement in next to no time 15 Initial status with heating module closed. Open the heating module. Status: Ready for taring The status display flashes and prompts you to load the empty sample pan. Place the empty sample pan in the sample pan handler (this is possible without tilting the sample pan if you insert this in the pan handler from the side directly below the round flange). Place the sample pan handler in the draft shield. Ensure that the tongue of the pan handler fits exactly in the slot of the draft shield. The sample pan must lie flat in the pan holder. Note: We advise you to work with the sample pan handler at all times. The pan handler is ergonomic, safe and provides protection against possible burns due to the hot sample pan. Close the heating module. This automatically sets the balance installed in the Moisture Analyzer to zero. Status: Ready for weighing After taring, the status display flashes and prompts you to place the sample in the sample pan. A Substance A – + 2.6 ... 3.5 g 0.000 g The display shows the target weight for the sample that has been specified for the corresponding method (in this example for “substance A”). Rather than having any effect on the measurement process, this target weight just serves as a weighing-in guide. To obtain the best possible reproducibility of results, the sample quantity weighed in should lie within the target weight tolerances. Stability detector: The circle symbol to the left of the weight display represents the stability detector. It is only visible while the weighing result has yet to stabilize. As soon as it disappears the weighing result is stable (see also Sections 7.1 and 7.2). Your first measurement in next to no time 16 Open the heating module. Place the provided specimen sample in the sample pan. Wet the specimen sample with a few drops of water, so that the displayed weight is at least 0.5 grams (required minimum weight of sample). Note:The drying process cannot start until the minimum sample weight has been reached. Status: Ready for start The status display shows that the minimum sample weight has been reached and the instrument is ready for the drying process to start. Close the heating module and the instrument then automatically begins the drying and measuring process. Your first measurement in next to no time 17 Status: Drying and measurement You can follow the drying and measurement process on the display: – The status display uses rising bubbles to symbolize the drying process. A Substance A 2:54 88 °C % -12.48 MC A Substance A 4:48 105 °C -25.63 % MC – The current temperature in the heating module is displayed (above 50 °C) as well as the elapsed drying time and the current drying value. – If there is an external printer connected to your instrument,the measurement results will be printed out continually (at intervals of 30 seconds). When drying is complete, an audio signal sounds and the bottom section of the display is shown in inverse (white font on dark background). You can now read off the moisture content of your sample. The star symbol to the left of the measurement result indicates that the result is a calculated result. Open the heating module. Carefully remove the sample pan handler from the sample chamber. Warning: As the pan and sample may still be hot, you should let these cool down before removing the pan from the handler! The Moisture Analyzer warns you that it is still hot: take note of the temperature display, which is continuously updated after the heating is switched off at the end of the measurement process. The status display with the symbol opposite also shows that the instrument is still hot. This “Hot Mode”display disappears when the temperature falls below 50 °C or when you start the next cycle (in this case the status display indicates the next step). Your first measurement in next to no time 18 To remove the sample pan from the handler, lift the pan slightly from below and pull it sideways out of the handler (if you no longer need the sample and the pan, you can simply tilt the handler until the pan slides out). Press the «A» key to delete the measurement result from the display. The instrument is now ready for the next measurement. Congratulations! You have just performed your first measurement with your new Moisture Analyzer. In the following section you will find important information on the operating principle of your instrument,its adjustment and optimum preparation of your samples. How to obtain the best results 19 3 How to obtain the best results Following your first practical work with the Moisture Analyzer, in this Section you will find important information on how to obtain optimum results. You will discover what parameters influence the measurement process and how you can match the instrument optimally to your particular measurement task. 3.1 Measurement principle of the Halogen Moisture Analyzer Your instrument performs measurements based on the thermogravimetric principle, i.e. the moisture is determined from the weight loss of a sample dried by heating. 120 °C In principle, your instrument thus comprises two instruments: a precision balance and a heating module.In contrast to other thermogravimetric methods (drying oven, infrared, microwave), the Halogen Moisture Analyzer operates with a halogen heating module. This ensures fast heating of the sample and thus guarantees rapid availability of the measurement results. Irrespective of the measurement method, the quality of the measurement results stands or falls by the preparation of the sample and a correct choice of the important measurement parameters: – Sample size – Drying temperature – Switchoff mode – Drying time Inappropriate setting of these parameters can cause the results to be incorrect or misleading. For this reason, check that the results for each type of sample are what might reasonably be expected. You will find detailed information on the relationships between these parameters in the application brochure for moisture determination, enclosed to your instrument. In practice, however, not only the quality of the measurement results, but also the speed of the measurement process is important. Thanks to its drying principle (with the heat generated by a halogen radiator), the Halogen Moisture Analyzer is very fast. You can increase the speed even further through optimum setting of the instrument. The optimum drying temperature and the drying time are dependent on the nature and size of the sample and on the desired accuracy of the measurement results. These can be determined only by experiment. How to obtain the best results 20 3.2 Notes on adjustment of the balance and the heating module To obtain optimal results, when you install the Moisture Analyzer at the place where it will be used, you should use the METTLER TOLEDO adjustment set to adjust the heating module under the prevailing operating conditions (e.g. in a fume cupboard). This ensures that any differences from the factory adjustment that may result from the specific local conditions are corrected. You should adjust your Moisture Analyzer regularly (e.g. every six months) at the place where it is used and under the prevailing operating conditions. This may also be stipulated by your quality assurance system (e.g. GLP, GMP, ISO 9001). By adjusting the heating module you can ensure comparability with results from other instruments of the same design. This is done by using an appropriate thermometer, which is provided in the form of a temperature adjustment set with calibration certificate (see Section 8.7). This adjustment set comprises a black plate with a thermometer, which allows a reproducible adjustment of the heating module. The balance and the integral heating module in your instrument can be adjusted using the appropriate accessories (Section 8.7). A Moisture Analyzer is typically used in place of or in addition to the oven method. In an oven heat energy is transferred by the flow of air, which establishes an equilibrium between the sample temperature and the ambient temperature.This is not the case in a Moisture Analyzer. The actual sample temperature primarily depends on the specific absorption properties of the sample (“dark” samples absorb more heat), which can change during the measurement process. There can also be differences between the temperature at the surface of the sample and the temperature inside the sample. The heat output is therefore not dependent on the true sample temperature but instead is regulated by a temperature sensor underneath the halogen heating module. For the reasons explained above, the temperature setting on the instrument will therefore deviate from the true sample temperature. By regularly adjusting the heating module, you will ensure a consistent and reproducible heat output for the entire lifetime of your instrument. Note: METTLER TOLEDO offers an adjustment service – please contact your local dealer. If you replace the heating module, you must adjust it using the temperature adjustment set, which is available as an accessory. The procedure for adjusting the balance and heating module is described in Section 5. How to obtain the best results 21 3.3 Optimum sample preparation Preparation of the sample is decisive for the speed of the measurement process and the quality of the measurement results. Please note the following basic rules for the preparation of your sample: The amount of sample you select should be as small as possible and only as large as necessary Excessive amounts of sample require more time for drying and thus prolong the measurement process. If the amount of sample is too small, the measurement result may possibly not be representative. It is always the case that the greater the inhomogeneity of the sample, the larger the amount of sample needed to obtain a repeatable result (please see also the information in Section 8.1). Experience has shown a practical sample quantity go to be 3 – 5 g. You can use the target weights specified in the predefined methods as a reference for your own samples. Please note the supplied list of the predefined methods or look them up directly on the menu of your instrument (Section 4.4.2). Distribute the sample evenly over the sample pan You thus increase the surface area of the sample and facilitate heat absorption. The base of the pan should be evenly covered. For liquid, fat-containing, melting and highly reflecting samples, you should use the glass fiber filters HA-F1 available as optional equipment (see Section 8.7). This also applies to samples which form a skin on their surface when heated.The glass fiber filter ensures even and rapid heat distribution and prevents the formation of a skin impervious to moisture on the sample surface. You will find further information on the moisture determination, the importance of the parameters and the preparation of the samples in the Application Brochure “Methods of moisture content determination” dealing with moisture determination (see Section 8.3). Practical application of your Moisture Analyzer 22 4 Practical application of your Moisture Analyzer In this Section we introduce you to the wide range of setting possibilities of your Moisture Analyzer and offer information and tips for optimum setting of the parameters. 4.1 The operating concept and methods You already performed your first measurement in Section 2. This measurement was carried out using the factory settings. However, your instrument offers a number of setting possibilities to match the measurement process to your specific requirements. The operating concept of your Moisture Analyzer is based on methods. A method contains all of the parameters for a drying process. These include: – The name of the method – The target weight of the sample – The drying program – The drying temperature – The switch-off criterion – The type of display – A free factor (optional) Each of the two keys «A» and «B» on the keypad of your dryer can be allocated to one method. Pressing the required key loads all of the parameters of the corresponding method and drying is performed with the matching settings. The active method (“A” or “B”) and its name are shown on the top line of the display. Your Moisture Analyzer contains a database in which over 100 methods have already been predefined for different products. You can use one of the predefined methods directly, or adapt its parameters to your own requirements. You make these settings on the menu that we will introduce you to in the following sections. Practical application of your Moisture Analyzer 23 4.2 The menu You can choose methods from the menu and change their parameters. The menu also contains other options for carrying out adjustments and for the basic settings of your Moisture Analyzer. You will familiarize yourself with these functions and settings in Section 5. All menu settings are preserved even in the event of a power failure. Press the «Menu» key to display the menu. The menu options are shown in the top section of the display. The four fields at the bottom of the display contain the names of the “softkeys”, i.e. the keys whose function depends on the position on the menu.The four “softkeys” are immediately underneath the display. Method A Method B Weight adjust. Sel. Exit The option chosen from the menu is shown in inverse (white font on dark background). You can use the two arrow keys to select a different menu option by scrolling. If one of these two keys is no longer visible, you have reached the top or bottom of the list. When you want to exit the menu, choose «Exit» (you can also exit the menu at any time by pressing the «A» key). 4.3 Choosing and allocating methods from database One method is allocated to each key «A» and «B» on the keypad. You can therefore quickly switch between two methods as part of the daily routine. On the menu you can choose from a database the methods that are to be allocated to the two keys. Press the «Menu» key to display the menu. In the following example we assume you want to allocate a method to the «A» key. Ensure that “Method A” is highlighted, then press «Sel.» to display the method database. Method A Method B Sel. Exit 1600.02 Sodium tartrat 0000.0A Substance A 0000.0B Substance B Edit The database contains over 100 predefined methods, each of whose sets of parameters are designed to suit a particular product or group of products. The first four digits of the number of each method are based on the “NACE” code. “NACE” is a European Union system for classifying industrial sectors and product groups.The two digits after the dot are a consecutive numbering system.Further information on the“NACE code”and the preset parameters of the individual methods is to be found in the separate brochure supplied with your Practical application of your Moisture Analyzer 24 Moisture Analyzer.The two methods “Substance A” and “Substance B”contain standard parameters (basic settings). 1510.01 Egg yolk pow... Use the arrow keys to choose the required method and confirm with «ã». 1510.02 Poultry meat 1510.03 Beef meat Edit The next-higher menu level will then be displayed again. Press «Exit» to quit the menu. Method A Method B Sel. Exit You are now asked whether you want to save the change. Press «Yes» to save it. Choose «No» if you want to exit the menu without saving (in this case all of the changes you have made on the menu will be discarded). Save changes? No Yes A Poultry meat – – – °C 0.000 g ---METHOD PARAMETERS---METTLER TOLEDO HB43-S SNR 123456789 SW 1.00 --------METHOD A-------Name Poultry meat Method ID 1510.02 Target weight 3.000 g Drying program STD Temperature 160°C Switch-off mode 3 Display mode %MC Free factor Off If you have saved the new method allocation, the chosen method will then be made available when you press the «A» key. If none of the predefined methods meet your requirements, you can define your own methods as described in the next section. If a printer is connected to your Moisture Analyzer, you can press the «F» key to print out all of the parameters of the two methods allocated to the «A» and «B» keys. Notes on the parameters are to be found in the next section. Practical application of your Moisture Analyzer 25 4.4 Developing own methods and defining parameters If none of the existing methods in the database meets your requirements, you can develop you own and allocate them to the «A» or «B» key. You can achieve this by choosing one of the existing methods and changing its parameters. Important: Some methods are only saved until you allocate a new method to the corresponding key! Press the «Menu» key to display the menu. Method A Choose the key to which the new method is to be allocated (in the opposite example the «B» key). Then press «Sel.» to display the method database. Method B Weight adjust. Sel. Exit 1530.10 Tomato powd... 1530.11 Tomato juice 1530.12 Onion powder Edit Name Tomato juice Target weight Use the arrow keys to choose the method that is to form the basis of the new method. In order to minimize the number of changes you have to make, we recommend you choose a method whose parameters largely correspond to those of the new method to be developed. Press «Edit» to display the parameters of the method. Note: All of the ex works predefined methods have a number based on the “NACE code”. When you change the parameters of such a method, an (unnumbered) copy of it is automatically created, with the original remaining unchanged. Copies can be changed as required. The display shows a list of all of the parameters of the method: name, target weight, drying program, drying temperature, switch-off criterion, type of display and free factor. You will familiarize yourself with these parameters in the following sections. Edit 4.4.1 Specifying name of method Tomato juice abc... A... 1 2 Use the arrow key to choose the parameter “Name” and press «Edit». There are two keys available for changing the name of the method: 1 Choose this option if you want to change the existing name. 2 Deletes the existing name. Choose this option if you want to enter a completely new name. . Practical application of your Moisture Analyzer 26 Changing existing name The cursor is positioned on the last character of the existing name and the «<–» key remains visible for a few seconds. If you want to delete part of the existing name, press this key immediately and delete the required characters. The «<–» key disappears after a few seconds and is replaced with the «–>» key. You can now enter the first new character: scroll the list of characters upwards or downwards until the required character is displayed and press the «–>» key to move the cursor to the next position.The name of the method can be up to 20 characters long. d Tomato juic e f Entering new name The existing name is deleted and the cursor is on the first character of the new name. Scroll the list of characters upwards or downwards until the required first character of the new name is displayed and press the «–>» key to move the cursor to the next position. Choose the second character from the list of characters. The name of the method can be up to 20 characters long. % A B Name Tomato juice1 Target weight As soon as you have entered all of the name of the method, press «ã». The next-higher menu level will then be displayed again and you can recheck the name. In the opposite example the number“1” has been appended to the existing name. Edit 4.4.2 Specifying target weight of sample Use the arrow keys to choose the parameter “Target weight” and press «Edit». Name Target weight 3.000 g Drying program Edit Target weight – + 3.500 g Note:The target weight is just a guide to make it easier for you to weigh in the correct amount of the sample.Adherence to the target weight is not monitored. During weighing in, the target weight is displayed with a tolerance of 15% (e.g.“2.6 ... 3.5 g”).This tolerance is calculated by the Moisture Analyzer and cannot be changed by the user. The current target weight flashes.You can use the «+» and «–» keys to change the weight in 0.5 g increments. The minimum value is 0.5 g, the maximum 54.0 g. Confirm the new target weight with «ã». the next-higher menu level will then be displayed again and you can recheck the new target weight. Practical application of your Moisture Analyzer 27 4.4.3 Selecting the drying program Target weight Drying program Rapid Use the arrow keys to choose the parameter “Drying program” and press «Edit». Temperature Edit STD Drying program Rapid LP16 Three different drying programs enable you to match the drying characteristic perfectly to the sample used. Standard drying (“STD”): This drying program is suitable for most samples. The sample is heated to the drying temperature (set temperature) and held constant at this temperature. Rapid drying: This program is primarily suitable for samples with a moisture content over 30%. Following the start, the selected temperature is exceeded by 40% for 3 minutes to compensate the cooling due to vaporization and accelerate the drying process. The drying temperature is then lowered to the set value and maintained. LP16: This drying program corresponds to that of the earlier dryers, LP16 and LJ16. The chosen set temperature (see next section) corresponds to the final temperature of these models. If you choose this program, you cannot define any switch-off criterion (Section 4.4.6), the switch-off characteristic corresponds to that of the LP16/LJ16. This program is primarily suitable for users of the earlier dryers who want to achieve a drying characteristic as similar as possible with the HB43-S. Confirm the chosen drying program with «ã».The next-higher menu level will then be displayed again and you can recheck the drying program. 4.4.4 Setting the drying temperature Drying program Temperature 130 °C Switch-off mode Edit Use the arrow keys to choose the parameter “Temperature” and press «Edit». Practical application of your Moisture Analyzer 28 Temperature – 131 °C + The current drying temperature flashes. You can use the «+» and «–» keys to change the temperature in the range from 50 to 200 °C in 1 °C increments. Note: If you choose a drying temperature of over 160 °C, for reasons of backward compatibility with methods already developed for the Moisture Analyzer HB43, you can choose timed temperature reduction. Confirm the new drying temperature with «ã».The next-higher menu level with then be displayed again and you can recheck the new drying temperature. 4.4.5 Timed temperature limit Temperature Temp. reduction On Switch-off mode Use the arrow keys to choose the parameter “Temp. reduction” and press «Edit». The following two settings are available. Edit Temp. reduction This menu option is only available if you have chosen a drying temperature of over 160 °C. On Off On: This setting allows full backward compatibility with methods already developed for the HB43 with temperatures of over 160 °C. For temperatures over 160 °C temperature reduction occurs. The higher the temperature the less time it takes for the temperature to drop. The temperature is lowered continuously until after 1 hour it has reached 160 °C. The temperature of 160 °C is then maintained until the end of the measuring time. The diagram opposite shows the envelope of the temperature reduction. °C Off: The instrument heats to the chosen drying temperature (of over 160 °C) and maintains this temperature until the end of the measuring time. 200 160 10 Start 50 t (min.) Confirm the chosen setting with «ã». The next-higher menu level will then be displayed again. When working with temperatures over 180 °C we recommend that you always wait 2 - 3 minutes with open instrument lid between individual measurements, in order to ensure good reproducibility of the readings and avoid overheating of the instrument. To protect the instrument from overheating, it has an additional protective device: a temperature switch independent of the normal black temperature sensor over the sample is triggered when it detects exceptionally high temperatures. This situation could arise, for example, if the sample begins to burn or the heating module adjustment is defective. If this happens, the heating module is tripped out by a mechanical switch, and the instrument cannot be restarted. Reset the overload switch (see Section 7.2). Practical application of your Moisture Analyzer 29 4.4.6 Selecting the switch-off criterion This menu option is only available if you have chosen “LP16” as drying program (Section 4.4.3). Temp. reduction Switch-off mode 3 Display mode Use the arrow keys to choose the parameter “Switch-off mode” and press «Edit». A switch-off criterion defines when the instrument should end the drying. Switch-off criteria save you having to keep checking your watch and stopping the drying manually. The following settings can be selected for the switch-off criterion: Edit – “Weight loss per unit of time ” (5 settings) – “Free switch-off” – “Manual switch-off” – “Timed switch-off” Weight loss per unit of time 2 Switch-off mode 3 4 This switch-off criterion is based on a weight loss per unit of time. As soon as the mean weight loss is less than a preset value during a specified time, the instrument considers drying to be complete and automatically discontinues the measurement process. During the drying, the time display shows you how long the measurement process has been in progress.The switch-off criterion is inactive during the first 30 sec.You will find additional information in Section 8.4. The following 5 settings are available: 1 This setting is suitable for samples which dry very quickly (surface moisture) or for (relatively inaccurate) fast measurements to determine a trend. 2 This setting is suitable for quick drying samples. 3 This setting is suitable for most types of samples. 4 This setting is suitable for samples which dry moderately quickly. 5 This setting is suitable for samples which dry very slowly (trapped moisture, skin formation). Free switch-off criterion 5 Switch-off mode Free Manual If none of the five available “Weight loss per unit of time” switch-off criteria is suitable for your application, the Moisture Analyzer allows you to define a free switch-off criterion (1mg/20s to 1mg/180s).The free switch-off criterion is also based on the principle of weight loss per unit of time. As soon as this drops below the preset value, the measurement is automatically ended. If you have chosen this setting, an additional menu option for setting the time interval becomes available (see Section 4.4.7). Practical application of your Moisture Analyzer 30 Manual switch-off Free Switch-off mode Manual With this switch-off criterion the measurement process continues until you stop it with the «Stop» or «A» key. Timed Timed switch-off Manual Switch-off mode Timed With this switch-off criterion the measurement lasts until the preset drying time has elapsed (the time display provides you with continuous information on the drying time). If you have chosen this setting, an additional menu option for setting the drying time becomes available (see Section 4.4.8). Confirm the chosen switch-off criterion with «ã». If you have chosen the free switch-off criterion or the timed switch-off, you can now specify the time interval or the drying time as described in the following sections. 4.4.7 Setting time interval for free switch-off criterion This menu option is only available if you have chosen the free switch-off criterion (Section 4.4.6). Switch-off mode Time interval 20 s Display mode Use the arrow keys to choose the parameter “Time interval” and press «Edit». Edit Time interval – + 75 s The current time interval to which the weight loss of 1mg relates flashes. You can use the «+» and «–» keys to change the time interval within the range from 20 to 180 seconds in 1 second increments (factory setting: 20 seconds). Confirm the new time interval with «ã».The next-higher menu level will then be displayed again and you can recheck the time interval. Practical application of your Moisture Analyzer 31 4.4.8 Setting drying time for timed switch-off Switch-off mode Time 10 min This menu option is only available if you have chosen the timed switchoff (Section 4.4.6) as switch-off criterion. Use the arrow keys to choose the parameter “Time” and press «Edit». Display mode Edit Time – 15 min The current drying time flashes. You can use the «+» and «–» keys to change the drying time within the range from 1 to 480 minutes in 1 minute increments. Confirm the new drying time with «ã». The next-higher menu level will then be displayed again and you can recheck the drying time. + 4.4.9 Selecting the display mode Switch-off mode Display mode %MC Use the arrow keys to choose the parameter “Display mode” and press «Edit». Free factor Edit g Display mode %MC %DC Five different types of result display are available to you. The particular one chosen also determines which values are shown on the records printed out. You will find a description of all five types of display below. Practical application of your Moisture Analyzer 32 g: Weight in grams The weight of the sample is displayed (and printed out) in grams. During the drying the current weight is continuously displayed in grams. %MC: Moisture content The moisture content of the sample is displayed (and printed out) as a percentage of the wet weight (= ww = initial weight = 100%). This is the factory setting. When the results are printed out, the moisture content is designated “%MC” (Moisture Content) (e.g. –11.35 %MC) and shown as a negative value. During the drying the current measured value is continuously displayed in percent. WW 100% Before drying = MC [%] DW After drying MC [0…-100%] = – %DC: Dry content WW 100% Before drying = DC [%] DW After drying 100% = AM [%] = DW After drying Before drying *100% Wet weight WW The dry content of the sample is displayed (and printed out) as a percentage of the wet weight (= ww = initial weight = 100%).When the results are printed out, the dry content is designated “%DC” (Dry Content) (e.g. 88.65 %DC). During the drying the current measured value is continuously displayed in percent. Dry weight DW DC [100…0%] = %AM: ATRO moisture content WW Wet weight WW – Dry weight DW Wet weight WW * 100% The moisture content of the sample is displayed (and printed out) as a percentage of the dry weight ( = DW = final weight = 100%). When the results are printed out,the ATRO moisture content is designated“%AM”(ATRO Moisture Content) (e.g. –255.33 %AM) and shown as a negative value. During the drying the current measured value is continuously displayed in percent. AM [0…-1000%] = – Wet weight WW – Dry weight DW Dry weight DW *100% %AD: ATRO dry content (Wet weight) = AD [%] WW Before drying 100% After drying = DW The wet weight of the sample is displayed (and printed out) as a percentage of the dry weight (= DW = final weight = 100%). When the results are printed out, the ATRO dry content is designated “%AD” (ATRO Dry Content) (e.g. 312.56 %AD). During the drying the current measured value is continuously displayed in percent. AD [100…1000%] = Wet weight WW Dry weight DW *100% Practical application of your Moisture Analyzer 33 Comment on the ATRO display mode If the current measured value in the ATRO display mode is greater or less than the predefined limit value (i.e. greater than 999.99 %AD or less than –999.99 %AM), a warning beep sounds and the instrument automatically switches the display mode (from %AM to %MC and from %AD to %DC). A display in the ATRO mode is no longer possible in this case, even if you have started your drying operation in the %MC, %DC or “g” (grams) display mode. 4.4.10 Activating free factor Use the arrow keys to choose the parameter “Free factor” and press «Edit». The free factor is deactivated in the factory. Display mode Free factor Off Edit Off Free factor On The free factor allows conversion of the final result of a drying process. It can be used to compensate for systematic deviations from a reference result for example. Corrected final results only appear on the records printed out (not on the display) and are listed separately and without units. Switch the free factor on if you want to correct the final result. Confirm your setting with «ã».The next-higher menu level will then be displayed again, making available two additional menu options for defining the factor (see Sections 4.4.11 and 4.4.12). 4.4.11 Specifying free factor This menu option is only available if you have activated the free factor (Section 4.4.10). Free factor Factor 1.000 Output format The free factor is set to 1.000 in the factory. Press «Edit» to change this setting. Edit Factor – 1.048 + The current factor flashes. You can use the «+» and «–» keys to change the factor within the range from –10.000 to + 10.000 in increments of 0.001. Confirm the new factor with «ã». The next-higher menu level will then be displayed again and you can recheck the factor. Practical application of your Moisture Analyzer 34 4.4.12 Choosing number of decimal places Factor Output format X.XX Edit X.X Output format X.XX X.XXX This menu option is only available if you have activated the free factor (Section 4.4.10). The final result that has been calculated and corrected by the free factor is displayed to 2 decimal places (factory setting). Press «Edit» to change this setting. The current setting flashes. Use the arrow keys to choose whether you want to display the final result without (“X”), with one (“X.X”), two (“X.XX”) or three (“X.XXX”) decimal places. Confirm the new number of decimal places with «ã». The next-higher menu level will then be displayed again and you can recheck the setting. When choosing the output format, take account of the fact that the significance of the decimal places depends on the sample quantity weighed in and the chosen “free factor” ! 4.4.13 Saving new method and exiting menu Save changes? No Yes After you have defined all of the parameters of the new method, press the «ã» key repeatedly until you are asked whether you want to save the changes (each keystroke accesses the next-higher menu level). Note: Instead of the «ã» key you can also press the «A» key from any position on the menu. This exits the menu immediately. You will also be asked in this case whether you want to save the changes. Press «Yes» to save the changes or «No» to exit the menu without saving. Note: If you do not want to save the changes, instead of the «No» you can also press the «A» key. If you have saved the new method, it will be available to you when you press the corresponding key («A» or «B») . Important: Some methods are only saved until you allocate a new method to the corresponding key! Practical application of your Moisture Analyzer 35 4.4.14 Printing out records of methods ---METHOD PARAMETERS---METTLER TOLEDO HB43-S SNR 123456789 SW 1.00 --------METHOD B-------Name Tomato juice modified Target weight 3.000 g Drying program Rapid Temperature 130 °C Switch-off mode Free 1 mg / 38 s Display mode %MC Free factor On Factor 1.516 Output format X.XXX If from any position on the method definition menu you press the «F» key, the settings of the method are printed out. If you have made changes that have not yet been saved, you are asked whether you want to save them (the last set of parameters saved are always printed out). The Moisture Analyzer then reverts to the normal operating state. Note: Even outside the menu you can print out a record of the methods with the «F» key, provided there is no measurement being carried out. The sample record opposite is for a method defined by the user. ---29.01.2007---15:09--- 4.5 Performing a measurement You are now familiar with all the method parameters of your Moisture Analyzer and have defined your own methods for your samples.The instrument is now ready for the determination of the moisture content of your own samples. In this Section you will learn how to perform measurements, print out the measurement results and stop the measurement process. Switch the instrument on with «On/Off» key. Use the «A» or «B» key to choose the method you want to use to dry your sample. The status display (User Guide) symbolizes the initial status of the instrument when the heating module is closed. The instrument is set in the factory to operate in the automatic mode and you can perform the entire drying process without pressing any keys. You will find information on the manual mode in Section 5.5.8. Open the heating module. Practical application of your Moisture Analyzer 36 The status display (User Guide) now prompts you to load the empty sample pan. Position the empty sample pan in the sample pan handler. Place the sample pan handler in the draft shield. Ensure that the tongue of the sample pan handler lies exactly in the slot of the draft shield. The pan must lie flat in the pan holder. Note: We advise you to work with the sample pan handler at all times. The pan handler is ergonomic, safe and provides protection against burns due to the hot sample pan. Close the heating module. The built-in balance is then automatically set to zero. Following taring, the status display prompts you to add the sample to the sample pan. Open the heating module. Add the sample to the sample pan. Please ensure that the sample is distributed evenly to obtain good analysis results. The minimum sample weight required is 0.5 g. Please take acount of the displayed target weight for your sample when weighing in.To obtain the best possible reproducibility of results, the sample quantity weighed in should lie within the target weight tolerances. Practical application of your Moisture Analyzer 37 The status display indicates that you can now start the drying process. As soon as the sample has been put in, close the heating module and the instrument will automatically start the drying and measuring process. You can follow the measurement process on the display: the status display uses ascending bubbles to symbolize the drying process with the following values being continuously updated and displayed: B Tomato juice 1 2:54 – current temperature in the heating module 88 °C – elapsed time since the start of the measurement process – current result in the chosen display mode. -12.48 % MC Your instrument is set in the factory so that the current intermediate result is printed out every 30 seconds if a printer is connected. If you want to, you can switch off printing out of records or set manual printing (using the «F») key . You will find information on the settings for the printer in Section 5.5. You will find an explanation of the measurement record in the next Section. As soon as the switch-off criterion stipulated when defining the method is met (or the selected drying time has elapsed), a beep is given. A Tomato juice 1 4:48 105 °C % -25.63 MC You can now read the measurement off the display. You will find information on the interpretation of the measurement results in Section 8.1.The result and time display remain at their final values, whereas the temperature continues to be updated. Practical application of your Moisture Analyzer 38 Open the heating module. Carefully remove the sample pan handler from the sample chamber. Warning: Pan and sample may still be hot! Allow them to cool before you remove the pan from the handler! Press the «A» key to delete the final result and the time display (alternatively, you can also use the «Stop» or «–>0/T<–» keys). If you do not wish to perform another measurement, switch the instrument off with the «On/Off» key and close the drying unit. Stopping measurement You can manually stop the measurement process prematurely at any time by pressing the «Stop» key. After a measuring time of at least 30 seconds, the result will be displayed from the time when the process is stopped. If you stop the measurement process sooner, or terminate it with the «A» key or by opening the heating module, the measurement result will not be displayed, instead a message to the effect that the measurement has been stopped will appear. This message must be confirmed by pressing «OK». Practical application of your Moisture Analyzer 39 4.6 Information on the measurement record If your instrument is connected to a printer, and if the printer has been activated from the menu, the intermediate values will be printed out at the preselected intervals and the final result recorded on completion of the measurement. The following illustration shows a sample record. The record contains the following data: A B C D E F G H I J K L -MOISTURE DETERMINATIONMETTLER TOLEDO HB43-S SNR 12345678 SW 1.00 Name Tomato juice 1 modified Target weight 3.000 g Drying program STD Temperature 130 °C Switch-off mode 3 Display mode %MC Free factor On Factor 1.516 Output format X.XXX M Initial wt. 0.645 g N 0:30 1:00 1:30 2:00 2:30 3:00 3:30 4:00 O P Q R Total time Dry weight Result Adj. value S Sample ID: ............. T Comment: ............... min min min min min min min min -6.05 -14.26 -22.02 -29.30 -36.43 -43.10 -46.82 -47.13 %MC %MC %MC %MC %MC %MC %MC %MC 4:09 min 0.341 g -47.13 %MC -71.449 U Signature: ............. V ---29.01.2007---16:40--- >>>>>>>>MANUAL<<<<<<<<<< ---29.01.2007---18:09--- >>>>>>>>>>ABORT<<<<<<<<< ---29.01.2007---17:58--- A Record title B Manufacturer and designation of the instrument C Serial number of the instrument D Version number of the software E Chosen drying method F Indicates a method developed by the user G Target weight of the sample (weighing-in guide) H Selected drying program I Drying temperature (set temperature) J Selected switch-off criterion (or set drying time) K Selected display mode L Free factor activated (factor and output format specified) MSample weight at start of drying N Measured value at each print interval (the number of recorded measured values depends on the selected print interval and the measurement time) O Total time of drying P Indication of dry weight (final weight) Q Final result in the selected display mode R Converted final result (only if the free factor has been activated) S Line for entry of the sample ID T Line for entry for comments U Line for signature V Date and time at the end of the measurement Note: You will find information on the units of the results (% MC, % DC, % AM and % AD) in Section 4.4.8. Special events are recorded on the measurement record as follows: You have stopped a measuring cycle prematurely after a measuring time of at least 30 seconds manually with the «Stop» key. The final result is printed out, but the record is specially labeled to indicate that measurement was aborted. You have stopped a current measurement cycle after less than 30 seconds with the «Stop» key or in some other way (using the «A» key or opening the heating module). No final result is printed out and the record is labeled as shown opposite. Basic settings of the instrument 40 5 Basic settings of the instrument In this Section you will learn how to define the settings your instrument uses for operation. You will also learn how to adjust the built-in balance and the heating module. These settings and functions are available on the menu with which you have already become familiar in Section 4. 5.1 Menu overview Press the «Menu» key to call up the menu. The following menu options are available: You have already become familiar with the two menu options for allocating methods to the «A» und «B» keys in Section 4. Method A Press the arrow key to scroll the list of menu options. Method B Sel. Exit Method B Weight adjust. #1 Temperature adj. Start Exit Temperature adj. Language English System settings Edit Exit With the two menu options “Weight adjust.” and “Temperature adj.” you can adjust the integrated balance and the heating module (Sections 5.2 and 5.3). Note: The number shows the next adjustment. In the opposite example the integrated balance had not yet been adjusted. The menu option “Language” allows you to specify the language in which the Moisture Analyzer is to communicate with you (Section 5.4). The “System settings”contain basic settings for Moisture Analyzer operation (for example, date and time, pressure interval, etc.). You will find futher information in Section 5.5. The menu option “Interface” allows you to specify the communication parameters of the built-in RS232C interface (Section 5.6). System settings Interface The option “Factory reset” resets most of the menu settings to the factory settings (Section 5.7). Factory reset Sel. Exit Basic settings of the instrument 41 ----LIST OF SETTINGS---METTLER TOLEDO HB43-S SNR 123456789 SW 1.00 Language English System settings Time format 24:MM Date format DD.MM.YY Contrast 50 % Brightness 90 % Menu protection Off Start mode Auto Printout On Print interval 30 s Interface Baudrate 9600 Bit / Parity 8/No Handshake Xon/Xoff If you have chosen a menu option, by pressing the «F» key you can print out a corresponding record of the current settings. If you have made changes that have not yet been saved, you are asked whether you want to save them (the last set of parameters saved are always printed out). The Moisture Analyzer then reverts to the normal operating state. The opposite example shows a sample record with the language, system and interface settings. The following sections will acquaint you with the individual menu items. The order corresponds exactly to that in the menu. ---30.01.2007---15:27--- 5.2 Adjusting the balance With this menu item you can adjust the balance of your instrument. Consult Section 3.2 to learn when an adjustment is necessary. Before selecting the adjustment function, ensure that the sample pan is in position. Following a drying cycle, you should wait at least 30 minutes before undertaking an adjustment. Choose the menu option “Weight adjust.” and press «Start». Method B Weight adjust. #1 Temperature adj. Start Exit Balance adjustment #1 20.000 g Please put weight on pan You are prompted to put the requested adjustment weight of 20 grams on the pan (the adjustment weight is available as optional equipment, see Section 8.7). Place the requested adjustment weight in the middle of the sample pan. Note: You can use the «A» key to stop weight adjustment at any time. Basic settings of the instrument 42 Balance adjustment #1 After a short time you will be asked to remove the adjustment weight. Remove the weight from the sample pan. 0.000 g Please remove weight Balance adjustment #1 The instrument will provide brief confirmation of the completion of adjustment and then return to the normal operating state. ----Balance adjustment done The Moisture Analyzer is now ready for further measurements. If you have connected a printer to your instrument and this is activated (see Section 5.5.9), on completion of the balance adjustment an adjustment record will be automatically printed out with the following data: A Record title A B C D ---BALANCE ADJUSTMENT--METTLER TOLEDO HB43-S SNR 12345678 SW 1.00 E F G Adjustment number 1 Adj. date 29.01.2007 Adj. time 19:05 H Weight ID: ............. G Time of the balance adjustment I Weight H Line for entry of the number of the adjustment weight used J External adj. done K Signature: ............. 20.000 g ----------END----------- B Manufacturer and designation of the instrument C Serial number of the instrument D Version number of the software E Sequence number of the balance adjustment F Date of the balance adjustment I Adjustment weight used J Confirmation that the balance adjustment has been performed correctly K Field for signature of the person who performed the balance adjustment Please enter the number of the adjustment weight used, sign the record and store it in a safe place.This assures traceability, one of the basic requirements of every quality assurance system. Basic settings of the instrument 43 5.3 Adjusting the heating module With this menu item you can adjust the temperature control of the heating module. Consult Section 3.2 to learn when an adjustment of the heating module is necessary. We advise you to wait 30 minutes after a drying cycle before performing the adjustment. Choose the menu option “Temperature adj.” and press «Start». Weight adjust.. Temperature adj. #1 Language Start Exit Dryer unit adj. #1 You will be prompted to remove the pan holder from the sample chamber. 0:00 Remove pan holder C Remove the pan support. Dryer unit adj. 0:00 Insert adjustment kit C #1 You will be prompted to insert the adjustment set. Note: Your can press «C» to stop temperature adjustment at any time. Basic settings of the instrument 44 Insert the temperature adjustment set in the sample pan handler. Place the sample pan handler in the sample chamber. Note: The temperature adjustment set is available as optional equipment (see Section 8.7). Close the heating module to start the adjustment process, and the heating module adjustment will begin. Dryer unit adj. 5:35 #1 100 °C Heating to 100 °C... C Dryer unit adj. #1 15:00 100 °C Enter actual temp. 101 °C – + Dryer unit adj. #1 22:44 160 °C Heating to 160 °C... C The heating module is heated to a temperature of 100 °C. You can follow this process on the temperature display. The instrument now waits 15 minutes until the temperature adjustment set hows the correct temperature, a beep is then given. Read the temperature adjustment set through the inspection window of the heating module (the divisions correspond to 2 °C). Enter this temperature using the «+» and «–» keys.After entering the value,press «ã».The temperature must be entered within 10 minutes after the start of the beep, otherwise the adjustment process will be terminated and an error message output. As this adjustment is a two-point adjustment (adjustment of the temperature is defined by two points, namely 100 °C and 160 °C), the heating module now heats to the second temperature (160 °C) . Proceed exactly as you did for the first temperature. After you have confirmed your entry with «ã», the adjustment is at an end and the instrument automatically quits the menu and returns to the standby mode. When the adjustment is complete, you can open the heating module and remove the sample pan support and temperature adjustment set. Warning: As the temperature adjustment set can still be hot, allow them to cool down before you remove them from the handler. Basic settings of the instrument 45 If you have connected a printer to your instrument and activated it,(see Section 5.5.9),on completion of the heating module adjustment an adjustment record will be automatically printed out with the following data: A Record title A B C D -DRYER UNIT ADJUSTMENT-METTLER TOLEDO HB43-S SNR 12345678 SW 1.00 E Adjustment number F Temp. reference ID: .... G H I J Adj. date 29.01.2007 Adj. time 20:29 Temp. 100 °C: 101 °C Temp. 160 °C: 159 °C K Dryer unit adj. done I Target and actual temperature for the first adjustment point L Signature: ............. J Target and actual temperature for the second adjustment point 1 ----------END----------- B Manufacturer and designation of the instrument C Serial number of the instrument D Version number of the software E Sequence number of the heating module adjustment F Line for entry of the number of the temperature adjustment set used (serial number of temperature adjustment set is printed on dial) G Date of the heating module adjustment H Time of the heating module adjustment K Confirmation of the adjustment L Field for signature of the person who performed the heating module adjustment. Enter the number of the adjustment disk, sign the record and store it in a safe place. This assures traceability, one of the basic requirements of every quality assurance system. 5.4 Selecting the dialog language You can choose the language in which your instrument is to communicate with you. Choose the menu option “Language” and press «Edit». Temperature adj. Language English System settings Edit Exit Basic settings of the instrument 46 The following languages are available: Language English Deutsch – English – German (“Deutsch”) – French (“Français”) – Italian (“Italiano”) – Spanish (“Español”) – Portuguese (“Portuguese”) – Japanese (“Nihongo”) – Russian (“Russian”) Select the desired dialog language and then confirm your entry with «ã». Note: The instrument is preset to the language of the country of destina tion. 5.5 System settings You use this menu option to specify the basic settings for your instrument. Choose the menu option “System settings” and press «Sel.». Language System settings Interface Sel. Exit The display shows a list of all of the system settings.You will familiarize yourself with these settings in the following sections. Time 16.43 Date To change a setting, choose it with the arrow keys then press «Edit». With «ã» you return to the next-higher menu level. Edit Basic settings of the instrument 47 5.5.1 Setting the time Your Moisture Analyzer is fitted with a built-in clock. The current time and time (see next section) are printed out on each report. When you put your new instrument into operation for the first time (and at the changeover from summer to winter time), you should enter the current time, this setting is retained even if you disconnect your instrument from the power supply. From the System settings menu choose the option “Time” and press «Edit». Time – 17:12 You can use the «+» and «–» keys to set the time (in the chosen time format, see Section 5.5.3). Note: Pressing the key and holding it down adjusts the time in larger increments. Confirm the new time with «ã». The next-higher menu level will then be displayed again. + 5.5.2 Entering the date Entering the date is only necessary the first time you put your instrument into operation. The current date is printed out on each report. From the System settings menu choose the option “Date” and press «Edit». Date – 12.01.2007 You can use the «+» and «–» keys to set the date (in the chosen date format, see section 5.5.4). Note: Pressing the key and holding it down adjusts the date in larger increments. Confirm the new date with «ã». The next-higher menu level will then be displayed again. + 5.5.3 Choosing time format You can choose between different ways of displaying the time. 24:MM Time format 12:MM 24.MM From the System settings menu choose the option “Time format” and press «Edit». Use the arrow keys to choose the required time format: Setting 24:MM (factory setting) 12:MM 24.MM 12.MM Display (example) 16:42 4:42 PM 16.42 4.42 PM Confirm the new time format with «ã». The next-higher menu level will then be displayed again. Basic settings of the instrument 48 5.5.4 Choosing date format You can choose between the European (day.month.year = factory setting) and the American date format (month/day/year). Date format DD.MM.YY MM/DD/YY From the System settings menu choose the option “Date format” and press «Edit». Use the arrow keys to choose the required date format (“DD.MM.YY” = day.month.year,“MM/DD/YY” = month/day/year). Confirm the new time format with «ã». The next-higher menu level will then be displayed again. 5.5.5 Setting display contrast You can adjust the constrast of the display of your instrument to suit your needs. From the System settings menu choose the option “Contrast” and press «Edit». Contrast – 50 You can use the «+» and «–» keys to set the contrast (range: 0 – 100). Confirm the new setting with «ã». The next-higher menu level will then be displayed again. + 5.5.6 Setting display brightness You can adjust the brightness of the display of your instrument to suit your needs. From the System settings menu choose the option “Brightness” and press «Edit». Brightness – + 90 You can use the «+» and «–» keys to set the brightness (range: 0 – 100). Confirm the new setting with «ã». The next-higher menu level will then be displayed again. Basic settings of the instrument 49 5.5.7 How to activate the protection of menu settings You can protect the menu settings against being changed unintentionally. The instrument is set in the factory to allow the menu settings to be changed (menu protection deactivated). From the System settings menu choose the option “Menu protection” and press «Edit». Menu protection Off On If you wish to protect the settings against change, switch Menu protection on (“On”). Confirm the setting with «ã».The next-higher menu level will then be displayed again. After Menu protection has been switched on, all of the menu settings are locked and the display shows the padlock symbol (instead of the «Edit» key). You can now only change the Menu protection setting. 5.5.8 Selecting the start mode for drying You can select whether drying should be started automatically or manually. In the factory your instrument is already set to automatic drying. In automatic start mode the instrument tares, determines the initial (wet) weight and begins drying when the heating module is closed. This “SmartStart” function enables you to perform the entire drying process without pressing a single key. In manual start mode drying does not start automatically when the heating module is closed. When the «Start» key is pressed the initial (wet) weight, which is important for determining the moisture content, is recorded. This can be done with the heating module open or closed. Drying only begins when the heating module is subsequently closed. We recommend manual start mode for samples which contain highly volatile substances. In manual start mode you have time for further preparation of the sample (e.g. mixing the sample with silica sand, or distributing it evenly) because weight lost by evaporation during the preparation time is already recorded. In manual start mode you can even open the heating module while drying is taking place. If this is done, the drying process is not terminated (as it is in automatic mode) but only the heating is switched off until the heating module is closed again. Start mode Auto Manual From the System settings menu choose the option “Start mode” and press «Edit». Use the arrow key to choose the required operating mode. Confirm the setting with «ã».The next-higher menu level will then be displayed again. Basic settings of the instrument 50 5.5.9 Switching the printer on or off You can switch the external printer on or off. In the factory this item is switched on. Off Printout On From the System settings menu choose the option “Printout” and press «Edit». Switch the printer on or off with the arrow key. Confirm the setting with «ã».The next-higher menu level will then be displayed again. Note: The printer must be switched off if you want to connect the HB43-S to a computer via the serial interface. This prevents the HB43-S from sending characters to the computer in an uncontrolled manner. It permits data exchange to take place without interference using the MT-SICS interface commands (Section 8.5). When you switch the printer on, you must ensure that the interface settings on the menu of the instrument (Section 5.6) match those of the printer. When you have switched the printer on,an additional menu option is available, which will be explained in the following section. 5.5.10 Defining the print interval This setting option is only available if the printer is activated (see Section 5.5.9). The print interval determines the printout frequency of the intermediate results of an ongoing measurement. 30s Print interval 1min 5min From the System settings menu choose the option “Print interval” and press «Edit». Use the arrow keys to choose the required print interval. The three settings “30s” (factory setting), “1min” and “5min” allow automatic printout of the intermediate results at fixed intervals. This allows you to follow the drying process using the printed record. With the “Manual” setting there is no automatic printout. However, you can print out intermediate results at any time with the «F» key. Confirm the setting with «ã».The next-higher menu level will then be displayed again. Basic settings of the instrument 51 5.6 Interface settings A separate menu option is available for setting the communication parameters of the built-in serial RS232C interface. Choose the menu option “Interface” and press «Sel.». System settings Interface Factory reset Sel. Baudrate Exit 9600 Bit / Parity The display shows a list of all of the interface settings. You will familiarize yourself with these settings in the following sections. To change a setting, choose it with the arrow keys then press «Edit». With «ã» you return to the next-higher menu level. Edit 5.6.1 Setting the baud rate (data transmission speed) The data transmission speed (baud rate) determines speed of transmission across the serial interface. The unit is the baud (1 baud (bd) = 1 bit/second). 1200 Baudrate 2400 9600 From the Interface settings menu choose the option “Baud rate” and press «Edit». Use the arrow keys to choose the required data transmission speed. The following settings are available: 1200 bd, 2400 bd (factory setting), 9600 bd, and 19200 bd. Confirm the setting with «ã».The next-higher menu level will then be displayed again. Basic settings of the instrument 52 5.6.2 Setting bit / parity With this menu item you can set the character format for transmission across the serial interface. 7/No Bit / Parity 7/Even 7/Odd From the Interface settings menu choose the option “Bit / Parity” and press «Edit». Use the arrow keys to choose the required setting. The following settings are available: Setting 7/No 7/Even (factory setting) 7/Odd 8/No Effect 7 data bits, no parity 7 data bits, even parity 7 data bits, odd parity 8 data bits, no parity Note: For correct representation of special characters (umlauts, accents, etc.) on a printer you should use the setting “8/No”. Confirm the setting with «ã».The next-higher menu level will then be displayed again. 5.6.3 Setting the data flow control (“handshake”) With this menu option you can set data flow control (“handshake”). Handshake Off Xon/Xoff From the Interface settings menu choose the option “Handshake” and press «Edit». Use the arrow keys to choose the required setting. The following settings are available: Setting Off (factory setting) Xon/Xoff RTS/CTS Effect No data flow control Data flow control via software Data flow control via hardware Confirm the setting with «ã».The next-higher menu level will then be displayed again. Basic settings of the instrument 53 5.7 Resetting to the factory settings You have the option of resetting the basic settings of the instrument to the factory settings. Choose the menu option “Factory reset” and press «Start». You are asked whether you really want to activate the factory settings. Interface Factory reset Start Exit Warning: If you answer the question with “Yes” all of the individual settings will be replaced with the factory settings! However, time, date, dialog language, contrast, brightness and method parameters will not be reset. You can deliberately reset the method parameters by allocating a method from the method database to the corresponding method key. After being reset to the factory settings, the instrument automatically returns from the menu to the normal operating state. Servicing and replacing individual parts 54 6 Servicing and replacing individual parts In this Section you will learn how to keep your Moisture Analyzer in good condition and how to replace expendable parts. 6.1 Cleaning the heating module and the sample chamber To obtain precise measurement results, we recommend you to clean the temperature sensor and the protective glass of the halogen lamp regularly. Please note the following directions for cleaning your instrument: Disconnect the instrument from the power supply before cleaning. Open the heating module. The draft shield, sample pan support and heat shield can be removed for cleaning without tools. To dismantle the sample chamber you need a normal, commercially available screwdriver. Use a lint-free cloth for cleaning. Clean the exterior of the instrument with a mild cleaning agent. Although the housing is extremely rugged and resistant to solvents, never use abrasive cleaning agents or solvents! Ensure that no liquid enters the interior of the instrument. Servicing and replacing individual parts 55 3 2 4 To dismantle the heating module the four screws (1) must be unscrewed. A screwdriver is needed for this purpose (Torx T-20). Following this, the cover (2) of the heating module can be pulled off toward the back. 1 The gold-plated reflector (3) and the protective glass of the halogen lamp (4) can be pulled upward and out of the guide rails of the heating module. 5 Clean the reflector and the protective glass of the halogen lamp with a mild cleaning agent. Carefully remove any deposits from the black temperature sensor (5). HB Halog Avoid touching the round halogen lamp. If you have to remove any splashes, deposits, or spots of grease from the halogen lamp, it is advisable to use a weak organic solvent such as, for example ethanol. 43 en Moist ure Analy zer on off Star t Stop % O/T Men u Rese t After the temperature sensor has been cleaned, we recommend you adjust the heating module (see Section 5.3). 6.2 Replacing the power line fuse If the display of your instrument remains “dark” after switching on, this is most probably because the instrument's power line fuse is defective. To change the fuse, proceed as follows: Disconnect the instrument from the power supply. The power line fuse is located on the back of the instrument.Using a screwdriver, turn the fuse holder anticlockwise and pull it out of the instrument. Check the condition of the fuse. Replace a blown fuse with a fuse of the same type and with the same rated value (5 x 20 mm, T6.3 H 250 V). Do not use a fuse of a different type or rated value, or short out (bridge) the fuse, because this can put your safety at risk and damage the instrument! Servicing and replacing individual parts 56 6.3 Connecting to an external printer To prepare the printer for use, proceed as follows: Disconnect the instrument from the power supply. Connect the printer.The HB43-S is fitted with a 9-pin (f) socket for this purpose. The METTLER TOLEDO RS-P42 and RS-P26 plain paper printers are provided with suitable connection cables. Connect the instrument and the printer to the power supply. The following settings are recommended for optimum function (Moisture Analyzer and printer): Baud rate: 9600 Bits/parity: 8/No Handshake: Xon/Xoff Make sure the parameters of the printer and the HB43-S are set to the same values (see Sections 5.6.1 and 5.6.2, and the printer’s operating instructions). If your printer has several character sets (for example, RS-P26), choose the IBM/DOS set. If problems arise on occasion 57 7 If problems arise on occasion In this section you will learn how errors can appear during operation of your Moisture Analyzer and how you can rectify these errors. 7.1 Error messages Your instrument distinguishes between the three different types of errors explained in the following sections. 7.1.1 Input errors If you press a key that is not in use (for example, the «F» key with the printer switched off) or whose use is not permitted in the current operating state, your instrument will indicate this input error with a short beep. 7.1.2 Application errors An application error occurs when the instrument cannot perform a procedure or a corrective action is necessary as the limits of a value range have been violated or because a general operating error exists. Application errors are reported by your instrument with a beep. Furthermore, the message “E” (“Error”) appears in the display followed by the error number and error message text. Before you can continue working, you must delete the error message with «OK» or with the «A» key. You will find a list of all application errors below. Display Cause Remedy E1 Weight unstable No stability during taring or ad justment Ensure stable ambient conditions and an optimum location. Also take care that no part of the sample or the sample pan touch the draft shield or the sample pan handler. Highly volatile substances in the sample also prevent a stable weighing result being detected E2 Wrong adjustment weight Either no weight, or the wrong Repeat the adjustment process and load the weight, has been placed on the required adjustment weight sample pan during adjustment. This message is also displayed if you do not remove the weight when prompted to do so by your instrument. If problems arise on occasion 58 Display Cause Remedy E3 Sample weight too low Sample weight below 0.5 g Weigh in a sample of al least 0.5 g E4 Missing tare weight Sample pan has not been tared before the start of drying Tare sample pan E8 Temp. entry missing During adjustment of the heating module, the wait time of 10 minutes for entry of the temperature value has been exceeded Repeat heating module adjustment and enter temperature values before elapse of the wait time 7.1.3 Function errors Function errors indicate that a program or hardware error exists. In such a case, disconnect the instrument from the power supply. Should the error reappear after reconnection to the power supply, contact your METTLER TOLEDO dealer to arrange an appointment for diagnosis and repair. Note the error number in order to facilitate the work of the service engineer. Display Cause Remedy E9 Function error + code Undefined condition Pull out the power supply plug and allow the instrument to cool for at least 5 minutes. If this error occurs repeatedly, please contact your METTLER TOLEDO dealer and inform him of the displayed code E11 Adjustment data lost The heating module and balance adjustment data,and the method and menu settings, have been lost. Cause: Power interruption while being stored Readjust heating module and balance and reset. If problems arise on occasion 59 7.2 What if...? … the display remains “dark” after switching on? – no line voltage – power cable not connected – blown power line fuse – instrument faulty Ensure that the instrument is connected to the power supply and that power is actually supplied. Check the power line fuse of the instrument and replace if necessary (see Section 6.2). If the instrument still refuses to function, contact your METTLER TOLEDO dealer. … after switching on “0.000” flashes on the display? The sample pan holder is not installed. Install the sample pan holder. … the symbol of the stability detector is continuously lit up immediately after the start? As soon as the symbol of the stability detector fades, the weighing result is stable and is accepted as a “wet weight”. If the symbol does not fade, your instrument is probably at an unsuitable location (vibrations, shocks, powerful drafts, etc.). Seek a more suitable location. Samples containing readily volatile substances may never reach stability owing to continuous evaporation. In In this case you must select manual operating mode for the drying unit (see Section 5.5.8). … the printer that is connected does not print? Ensure that the printer is activated on the menu (see Section 5.5.9) and that the ribbon and paper are correctly installed. Check the transmission rate, bit/parity and handshake (see Section 5.6). … incorrect characters are printed? Change the bit/parity setting of your printer and HB43-S to “8/No”. Check to see if both instruments have the same baud rate setting and use the same character set (see Sections 5.6 and 6.3). … no drying time can be entered in the menu? Entry of the drying time is possible only if you have selected the switch-off criterion “Timed switch-off”, with all other switch-off criteria this input possibility is not available (see Sections 4.4.6. and 4.4.8). … Menu settings cannot be changed? You have protected the the menu settings against change (see Section 5.5.7). If problems arise on occasion 60 … the measurement takes too long? You have selected an unsuitable switch-off criterion (see Section 4.4.6). An excessive amount of sample can also be the cause of slow drying, likewise samples which tend to form a skin which hinders vaporization. Perform experiment at higher temperature. … the instrument does not heat following the start? The heating module is overheated and the thermal overload protection has responded. The instrument is equipped with thermal overload protection (bimetallic sensor) which switches off the heating element if overheating occurs. This can be caused, for example, by a burning sensor. Reset the overload protector: WARNING!: The instrument may still be hot! 1. Disconnect the instrument from the power supply. 2. Use a screwdriver to remove the cover. 3. Use a finger to reset the overload switch. 4. Replace the cover and reconnect the instrument to the power supply. Note: If this is not possible, there may be a fault (e.g. a faulty halogen heating module). In such a case, contact your METTLER TOLEDO dealer. After the temperature switch is reset or a heating module replaced (Section 6.1) we recommend that you readjust the heating module of your Halogen Moisture Analyzer (Section 5.3). … the measurement results are not repeatable? – The samples are not homogeneous, i.e. they have different compositions. The more inhomogeneous a sample, the larger the amount of sample needed to obtain a repeatable result. – You have selected a drying time that is too short (for the “Timed switch-off” criterion). Extend the drying time or select a suitable switch-off criterion “Weight loss per unit of time”. – The sample does not become completely dry (e.g. owing to skin formation). Dry the sample with the aid of glass fiber discs (see Section 3.3). – You have selected a temperature that is too high and the sample has oxidized. Lower the drying temperature. – The sample boils and the splashed drops continuously change the weight. Lower the drying temperature. – Insufficient heating power because the protective glass of the halogen lamp is dirty. Clean the protective glass of the halogen lamp (see Section 6.1). – The temperature sensor is contaminated or faulty. Clean the temperature sensor (see Section 6.1) or have it replaced by a service engineer. – The support on which the instrument is standing is not sufficiently stable. Use a stable support. – The surroundings are very unstable (vibrations etc.). Further useful information 61 8 Further useful information 8.1 Notes on interpretation of the measurement results and the ideal sample weight The accuracy of the measurement results depends on the wet weight and the original moisture of the sample. The relative accuracy of the measurement result improves with increasing wet weight. While the moisture of the sample is fixed, the weight of the sample can frequently be determined by the user. However, with increasing weight the drying process is lengthened. We thus advise you to select the weight of your sample to obtain the repeatability you require. The target weights specified in the predefined methods (Section 4) generally lead to adequate repeatability. You will find further information in the application brochure (Section 8.3). 8.2 RS232C interface So that your Moisture Analyzer can be connected to a peripheral device (e.g. printer or computer) it is fitted with an RS232C interface as standard. 9-pin socket DATA RxD TxD «HANDSHAKE» SGND IN OUT 5 1 9 6 To adapt the HB43-S to the peripheral device device the interface parameters can be set on the menu (see Section 5.6). The many ways in which the HB43-S Moisture Analyzer can document results can only be fully utilized if a printer is connected, for example the METTLER TOLEDO RS-P26 or RS-P42. The printed results are a decisive contribution to simplifying working procedures in accordance with GLP/GMP. For interface commands please refer to the “Reference Manual METTLER TOLEDO Standard Interface Command Set” 11781024, available from your METTLER TOLEDO dealer or downloadable from the Internet (www.mt.com/ moisture). More Information is found in Section 8.6. Further useful information 62 8.3 Application Brochure The application brochure for moisture determination from METTLER TOLEDO (order number: 11795011) contains a great deal of useful information for optimum utilization of your Moisture Analyzer. One brochure is included with your HB43-S. To order additional copies, please contact your METTLER TOLEDO dealer. Example methods and applications can be found at www.mt.com/moisture. Moisture determination applications must be optimized and validated by the user according to local regulations. Application-specific data provided by METTLER TOLEDO is intended for guidance only. 8.4 Switch-off criterion “Weight loss per unit of time” With the switch-off criterion “Weight loss per unit of time”, drying is automatically ended as soon as the mean weight loss (∆ g in mg) per unit of time (∆ t in seconds) drops below a preset value. 5 levels are preprogrammed in the factory, each with a fixed weight loss per unit of time. Furthermore, the switch-off criterion “Free” allows you to define the weight loss per unit of time yourself. The following applies to the individually selectable levels: ∆ g in mg ∆ t in seconds Switch-off criterion 1 1 mg 10 seconds Switch-off criterion 2 1 mg 20 seconds Switch-off criterion 3 1 mg 50 seconds Switch-off criterion 4 1 mg 90 seconds Switch-off criterion 5 1 mg 140 seconds Switch-off criterion “Free” 1 mg 20 seconds to 180 seconds The graph below exemplifies the mode of operation of the switch-off operation (not to scale). Further useful information 63 Weight of sample Weight of sample equal area = = Mean weight loss per unit of time ∆g ( ∆t ) ∆g ∆t (10 s) ∆g ∆t (50 s) ∆g ∆t (140 s) Switch-off criterion 1 Switch-off criterion 3 Switch-off criterion 5 Key: Switch-off criterion 1 (rapid availability of the result, suitable for determination of a trend) Switch-off criterion 3 (standard setting) Switch-off criterion 5 (suitable for precision measurement) Time Further useful information 64 8.5 Technical data Please note that the Moisture Analyzer will undergo continuous further development in the interest of the users. METTLER TOLEDO thus reserves the right to change all technical data at any time and without prior notification. Dryer Heating module: Halogen ring-shaped radiator Temperature range: 50–200 °C Temperature increment: 1 °C Heating module adjustment: with temperature adjustment set HA-TC or HA-TCC Balance Minimum sample weight: 0.5 g Maximum sample weight: 54 g Balance adjustment : with external weight, 20 g ± 0.1 mg Stability detector: with symbol in display Balance resolution: 1 mg Result resolution: 0.01% Repeatability (sd) with 2 g sample: 0.10% Repeatability (sd) with 10 g sample: 0.015% Data Time, date system clock, fail safe Operational settings: read-only memory, fail safe Switch-off criteria: 5 levels, manual, timed, free Drying programs: Standard drying, fast drying, LP16 mode Drying time: manual (unlimited), timer: 1 minute to 480 minutes Reset protection: by locking the menu settings Evaluation Display modes: 5 modes: moisture content (MC), dry content (DC), weight (g), ATRO moisture content (AM), ATRO dry content (AD) Records: Using external printer (optional) Further useful information 65 Hardware Audio signal: Provided Data interface: Built-in RS232C interface Inspection window: in heating module Leveling: 2 leveling screws and level indicator Display: Backlit matrix display Status display (User Guide): integrated in display Sample pan, ø: 90 mm Thermal overload protection: bimetallic-element switch in heating module Dimensions (w x h x d): 23 x 15 x 36 cm (see also following dimension diagram) Weight, ready to measure: 4.3 kg Admissible ambient conditions Use only in closed rooms Height above mean sea level: Up to 2000 m Temperature range: 5 °C to 40 °C Atmospheric humidity: 80% rh @ + 30 °C Warm-up time: At least 60 minutes after connecting the instrument to the power supply; when switched on from standby-mode, the instrument is ready for operation immediately. Voltage fluctuations: –15%+10% Overvoltage category: II Pollution degree: 2 Power load: Max. 450 W during drying process Current consumption: 4 A or 2 A, according to the heating module Power supply voltage: 100 V – 120 V or 200 V – 240 V, 50/60 Hz (the voltage is determined by the heating module) Power line fuse: 1 piece, 5 x 20 mm, T6.3 H 250 V Further useful information 66 100 147 335 Dimensions 19 319 360 CLASSIC Plus 224 205 195 164 390 Further useful information 67 8.6 MT-SICS Interface commands and functions Many of the instruments and scales used have to be capable of integration into a complex computer or data acquisition system.To enable you to integrate instruments into your system in a simple manner and utilize their capabilities to the full, most instrument functions are also available as appropriate commands via the data interface. All new METTLER TOLEDO instruments launched on the market support the standardized command set “METTLER TOLEDO Standard Interface Command Set” (MT-SICS). The commands available depend on the functionality of the instrument. Basic information on data interchange with the instrument The instrument receives commands from the system and acknowledges the command with an appropriate response. Command formats Commands sent to the instrument comprise one or more characters of the ASCII character set. Here, the following must be noted: • Enter commands only in uppercase. • The possible parameters of the command must be separated from one another and from the command name by a space (ASCII 32 dec., in this description represented as /). • The possible input for “text” is a sequence of characters of the 8-bit ASCII character set from 32 dec to 255 dec. • Each command must be terminated with CRLF (ASCII 13 dec., 10 dec.). The characters CRLF, which can be inputted using the Enter or Return key of most entry keypads, are not listed in this description, but it is essential they be included for communication with the instrument. Example: S – Send stable weight value Command S Send the current stable net weight value. Response S/S/WeightValue/Unit Current stable weight value. S/I Command not executable (instrument is currently executing another command, e.g. taring, or timeout as stability was not reached). S/+ Instrument in overload range. S/- Instrument in underload range. S Send a stable weight value. Example Command Response S/S/////30.000/g The current, stable weight value is 30.000 g. For the MT-SICS commands available for your instrument and further information please refer to the Reference Manual “MT-SICS for Moisture Analyzers 11781024” downloadable from the Internet under www.mt.com/moisture. Further useful information 68 8.7 Optional equipment, consumables and spare parts Designation Order No. Notes Adjustment weight 20 g (Class F1) 00158640 Adjustment of balance Temperature adjustment set, HA-TC 00214455 Adjustment of heating module Calibrated temperature adjustment set, HA-TCC (including test certificate) 00214528 Adjustment of heating module Recalibration from HA-TCC, HA-TCCRe (including test certificate) 00214534 Recalibration with certificate Reusable sample pan (steel, height: 6 mm), HA-DR1 00214462 Set of 3 pieces Reusable sample pan (steel, height: 15 mm) 00013954 1 piece Transport case 11113855 Sample pan handler, HA-PH 00214526 3 pieces Chemically resistant protective cover, HA-COVER 11113363 2 pieces Printer RS-P42 00229265 Connection cable 11101051 Printer RS-P26 12120788 Antitheft device 11600361 Optional equipment: Consumables: Printer paper 00072456 Set of 5 rolls Paper roll (self-adhesive) for printer 11600388 1 piece Ribbon (cassette, black) for printer 00065975 Set of 2 pieces Aluminum sample pan Ø 90 mm, HA-D90 00013865 Set of 80 pieces Reinforced aluminum sample pan Ø 90 mm 11113863 Set of 80 pieces Glass fiber filter (for liquids), HA-F1 00214464 Set of 100 pieces If you require other spare parts for your Moisture Analyzer, please contact your METTLER TOLEDO dealer. Index 69 9 Index A Accuracy 61 Adjusting the balance 41 Adjusting the heating module 43 Adjustment 20, 57 Adjustment process 44 Adjustment record 42, 45 Adjustment weight 41, 57, 68 Air bubble 12 Antitheft device 68 Application Brochure 21, 62 Application error 57 ATRO dry content 32 ATRO moisture content 32 Audio signal 65 B Balance adjustment 42 Baud rate 51, 59 Bimetallic sensor 60 Bit / parity 52, 59 Burning 9 C Chemically resistant protective cover 68 Cleaning 54 Cleaning agent 54, 55 Computer 50, 61 Connection cable 56, 68 Corrosion 9 D Data interface 65 Date 47, 64 Dialog language 45 Display 65 Display mode 31, 64 Disposal 10 Draft shield 36, 54, 57 Dry content 32 Drying 49 Drying and measurement 17 Drying process 61 Drying program 27, 64 Drying temperature 20, 27, 60 Drying time 19, 30, 59, 60, 64 Halogen Moisture Analyzer 6, 19 Handshake 59 Heat 8 Heat accumulation 8 Heating element 60 Heating module 6, 8, 13, 15, 17, 19, 20, 28, 35, 36, 37, 38, 43, 44, 49, 55, 60, 64 Heating module adjustment 28, 58, 64 Heat shield 54 E Initial status 15 Input errors 57 Inspection window 44, 65 Instrument safety 8 Interface 50, 51 Interface commands 67 ISO 14001 7 ISO 9001 7, 20 Error message 44, 57 Error number 57 Expendable material 68 Explosion 9 Extension cable 13 F Fire 9 Free space 8 Free switch-off criterion 29 Fuse 55 Fuse holder 55 G Glass fiber filter 14, 21, 68 GLP 20, 61 GMP 20, 61 Guide rails 55 H Halogen heating module 6 Halogen lamp 55 I L Level indicator 12 Leveling 12, 65 Leveling screws 12 Line voltage 13, 59 Liquid 54 Location 12, 57, 59 M Manual switch-off 29, 30 Measurement 11, 14, 22, 35, 60 Measurement parameters 19 Measurement principle 19 Measurement process 38 Index 70 Measurement record 37 Measurement result 61 Menu 40, 59, 61 Menu overview 40 Moisture 6, 19, 61 Moisture content 17, 27, 32 Moisture determination 62 MT-SICS 67 MT-SICS interface commands 50 O On/Off 35 Operating concept 22 Optional equipment 68 Overheating 8, 60 P Packaging 11 Padlock symbol 49 Pan holder 15, 36, 43 Paper 59 Paper roll 68 Parameter 35 Peripheral device 61 Personnel qualification 6 Poisoning 9 Power cable 8, 13, 59 Power line fuse 55, 59 Power supply 12, 13, 54, 58 Printed results 61 Printer 45, 50, 56, 59, 61, 64 Printer paper 68 Printer RS-P26 56, 68 Printer RS-P42 61, 68 Print interval 50 Protective glass 8, 54, 55, 60 Protect the settings 49 Q Quality assurance system 20, 42, 45 R Rapid drying 27 Ready for start 16 Ready for taring 15 Ready for weighing 15 Reconnection to the power supply 58 Reference Manual 61 Reflector 55 Repeatability 61, 64 Reset 18, 38, 57 Reset protection 64 Resetting the thermal overload protector 60 Reusable sample pan 68 Ribbon 59, 68 RS232C interface 61 S Sample 14, 21, 29, 35, 49, 61 Sample chamber 38, 43, 54 Sample pan 15, 21, 36, 57, 65, 68 Sample pan handler 15, 36, 38, 44, 57, 68 Sample pan support 54 Sample weight 58, 61 Self-test 14 Servicing 54 Setting up 12 Signal 57 SmartStart 49 Solvent 54, 55 Spare parts 68 Specimen sample 14, 16 Stability 57 Stability detector 59, 64 Standard equipment 11 Start 49, 59, 60 Start mode 49 Status display 14, 35, 65 Stop 30, 38, 39 Switch-off criterion 29, 30, 59, 62, 64 Switch-off criterion “Weight loss per unit of time” 60 Symbol of the stability detector 59 T Taring 57 Technical data 64 Temperature 37, 44, 60 Temperature adjustment set 20, 44, 64, 68 Temperature entry 58 Temperature increment 64 Temperature range 64 Temperature sensor 28, 54, 55, 60 Test measurement 20 Thermal overload switch 60 Thermogravimetric principle 6, 20 Thrmal overload protection 60 Time 64 Timed switch-off 29, 30, 59 Trained personnel 8 Transport case 68 Two-point adjustment 44 U Unpacking 11 User Guide 14, 35, 65 V Vapors 9 Vent 8 Index 71 W Weight 57 Weight in grams 32 Weight loss per unit of time 29, 62 To protect the future of your METTLER TOLEDO products: METTLER TOLEDO service assures you of the quality, measuring accuracy and value of METTLER TOLEDO products for years to come. Please request details of our favorable terms of service. Thank you. *P11780961* Subject to technical changes and to the availability of the accessories supplied with the instruments. © Mettler-Toledo AG 2007 11780961 Printed in Switzerland 0704/2.12 Mettler-Toledo AG, Laboratory & Weighing Technologies, CH-8606 Greifensee, Switzerland Phone +41-44-944 22 11, Fax +41-44-944 30 60, Internet: http://www.mt.com