1
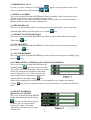
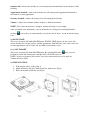
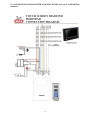
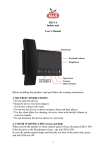
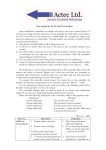
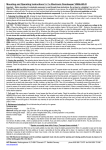
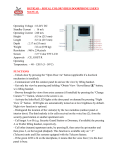
INDOOR UNIT
TOUCH SCREEN DIAMOND DGD07DAD
USER MANUAL
Please read carefully security instructions before starting to use the device.
SECURITY INSTRUCTIONS
* Do not open the device.
* Keep the device free from impacts.
* Avoid any contact with water.
* Do not use the device in dense moisture, dusty and dirty places.
* Use dry clean fabric for cleaning, do never clean with alcohol, thinner or corrosive liquids.
* Do not dismount the device unless it is necessary
1. TWO COLOR WARNING LEDS (Green and Red)
When you make a call or when the screen is ON, the green LED is ON. If you do not answer
incoming call, the red LED is ON.
2. TURN THE SCREEN ON
You can turn the screen ON with the ON/OFF button at top of the product.
3. ANSWER INCOMING CALL
The screen is automatically ON at an incoming call. You can see the origin of the call at top
left corner of the screen. If it comes from the Security,
screen, you can answer by touching
.
appears on the
If it comes from the Outdoor,
appears on the screen, you can answer by
touching .
In case of an incoming call, no button is active before you answer the call, except light
adjustment and door open buttons.
1
4. TERMINATE A CALL
As soon as a call is confirmed, Call Terminate
You can terminate the call by touching
appears at top left corner of the screen.
or
.
5. SELECT A CAMERA
The screen is turned ON with ON/OFF button, then by touching Camera icon on the screen
you can switch to other cameras connected to the system.
NOTE : In order to use Camera Selection function, an extra camera or a Camera Selection
Module should be connected to the outdoor panel.
6. OPEN DOORLOCK
The screen is automatically ON at an incoming call from Outdoor Panel. You can open the
doorlock while talking to outdoor panel or by touching
icon.
7. CONNECT TO OUTDOOR PANEL
The screen is turned ON with ON/OFF button. You can talk to Outdoor Panel by touching
icon.
Talk to Panel
8. CALL SECURITY
The screen is turned ON with ON/OFF button. You can talk to Security Guard by touching
Speed Dial – A
icon.
9. CALL DOORKEEPER
The screen is turned ON with ON/OFF button. You can talk to Doorkeeper by touching Speed
Dial – B
icon.
10. SCREEN LIGHT, CONTRAST AND COLOR ADJUSTMENTS
The screen is turned ON with ON/OFF button. By
touching Settings
icon, you can have the menu
(Fig.1)where you can adjust light, contrast and color
of the screen then make adjustments with arrow
icons at right and left sides. You can realize the
same operation after confirming a call from the
Outdoor Panel by touching Settings
icon.
After having completed your adjustments, you can manually save changes by touching
Settings
icon.
icon or they are automatically saved at the end of 30 sec. if you do not touch any
11. SELECT DOORBELL
MELODY and VOLUME
The screen is turned ON with ON/OFF
button. By touching Doorbell Settings
icon, you can have the menu (Fig.
2) where you can adjust doorbell
melody and volume then make
adjustments with arrow icons at right
and left sides.
2
Outdoor bell : Adjusts the melody of a call coming from Outdoor Panel at the entrance of the
building.
Appartment doorbell : Adjusts the melody of a call coming from Appartment Doorbell at
the entrance of your appartment.
Security doorbell : Adjusts the melody of a call coming from Security.
Volume : Adjusts the common volume of above 3 different doorbells.
NOTE : Every time the melody is changed, outdoor bell rings as an example.
After you finish your adjustments, you can manually save changes by touching Doorbell
Settings
icon.
icon or they are automatically saved at the end of 30 sec. if you do not touch any
12. BUSY STATE
The screen is turned ON with ON/OFF button. If BUSY LINE appears on the screen, this
means that the line is being used by another appartment. Until the busy state comes to an end,
no other appartment can be called, nor any other icon becomes active.
13. CALL TARGET
The screen is turned ON with ON/OFF button. By touching Functions
icon, you can
perform an action like turning the stairlights ON, call the Elevator, etc…
NOTE : In order to perform such actions, necessary connections have to be made by
Technical Service Staff.
14. INSTALLATION
1. Take out the rail by sliding (Fig-1)
2. Mark, drill holes and place dowels then fix with screws (Fig-2)
3. Place the monitor inside the rail (Fig-3).
3
15. CONNECTION DIAGRAM WITH A DIGITAL PANEL (only up to 16 DIAMOND
monitors).
4