1
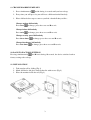
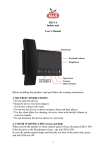
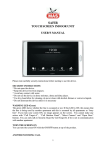
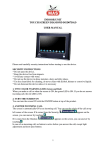
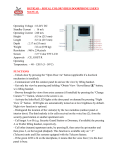
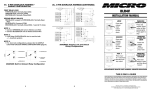
INDOOR UNIT
HANDSFREE DIAMOND DGD07AD
USER MANUAL
Please read carefully security instructions before starting to use the device.
SECURITY INSTRUCTIONS
* Do not open the device.
* Keep the device free from impacts.
* Avoid any contact with water.
* Do not use the device in dense moisture, dusty and dirty places.
* Use dry clean fabric for cleaning, do never clean with alcohol, thinner or corrosive liquids.
* Do not dismount the device unless it is necessary
1. TWO COLOR WARNING LEDS (Green and Red)
When you make a call or when the screen is ON, the green LED is ON. If you do not answer
incoming call, the red LED is ON.
2. OPEN DOORLOCK
The screen is automatically ON at an incoming call from Outdoor Panel. You can open the
doorlock while talking to outdoor panel by touching
icon.
3. CALL SECURITY
You can talk to Security Guard by pressing A button.
4. CALL DOORKEEPER
You can talk to Doorkeeper by pressing B icon.
1
5. GET IMAGE FROM OUTDOOR PANEL
icon, you can get image from outdoor panel without being called. In case many
Pressing
cameras are connected to the system, you can switch betwen cameras by pressing this button.
6. USAGE
You have 2 possibilities to use DIAMOND monitor :
1. Handsfree mode
2. Push-to-talk mode
You can switch between these modes by pressing simultaneously
seconds.
and
icons during 5
Push-to-talk mode
When you receive a call from outdoor panel or security guard, the screen turns on and stays
45 seconds. When you speak by pressing talk
button, the visitor hears you and when you
button, you can hear the visitor. Speaking time is 60 seconds and listening time is
release
15 seconds. The LED is blinking if you are not at home or if you do not answer the call. You
can turn off the LED by pressing any button.
Handsfree mode
When you receive a call from outdoor panel or security guard, the screen turns on and stays
45 seconds. You can start to speak by pressing talk
button then keep speaking and
listening without need to press any other button. Communication time is 60 seconds but if you
want to terminate it earlier, you only press again
button. The LED is blinking if you are
not at home or if you do not answer the call. You can turn off the LED by pressing any
button.
7. SET SCREEN LIGHT, COLOR AND DOORBELL VOLUME
Screen light, color and doorbell volume are preset at the factory. However, if you wish to
change the settings, you can use setting knobs at upper left corner of the monitor by means of
a screwdriver.
8. ANSWERING AN INCOMING CALL
When one of three bells of the unit is ringing :
1. If a call comes from the Doorkeeper or Security Guard, a preset melody is ON and if the
optional Security camera is available, Security Guard’s image is displayed on the screen (and
stays on screen during 60 seconds). You have to answer this call for your security.
2. If outer panel bell rings, outside image is displayed on the screen (and stays on screen
during 60 seconds). If you want to answer, you only need to press
the handset and do not press any button.
, otherwise do not lift
3. If internal door bell rings, this means you have a visitor in front of your appartment door.
For your security, we recommend you not to open your door without looking through the
peepscope
2
9. CHANGE DOORBELL MELODY
1. Press simultaneously
and A during 8 seconds until you hear a beep.
2. Every time you will press A, you will hear a different doorbell melody.
3. Please follow below steps as soon as you find a doorbell that you like :
Change outdoor bell melody
Press once
to change, press A to save and B to exit.
Change indoor bell melody
Press twice
to change, press A to save and B to exit.
Change security guard bell melody
Press three times
to change, press A to save and B to exit..
Change doorkeeper bell melody
Press four times
to change, press A to save and B to exit.
10. BACK TO FACTORY SETTINGS
and B icons during 10 seconds, the device switches back to
Pressing simultaneously
factory settings after a beep.
11. INSTALLATION
1. Take out the rail by sliding (Fig-1)
2. Mark, drill holes and place dowels then fix with screws (Fig-2)
3. Place the monitor inside the rail (Fig-3).
3
12. CONNECTION DIAGRAM WITH A DIGITAL PANEL (only up to 16 DIAMOND
monitors).
4