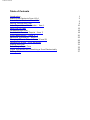
1
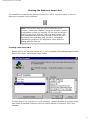
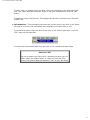
Electronic LM-4 User Guide
Electronic LM-4 User Guide
U.S. Department of Labor
Employment Standards Administration
Office of Labor-Management Standards
Table of Contents
Table of Contents
Introduction
Starting the Electronic Form LM-4
A Look at the Electronic Form LM-4
Moving Through the Form
Labor Organization File Number - Item 1
Using Pre-Fill Data
Completing the Form
Amended or Terminal Reports - Item 3
Union Identification - Items 4 - 7
Additional Information - Item 19
Changing Officers' Titles in Items 20 and 21
Checking for Errors - Error Summary
Printing the Form
Submitting a Paper Form
Digital Signatures and Submitting a Form Electronically
Getting Help
1
2
5
9
10
12
16
19
20
23
26
28
31
33
35
37
Introduction
U.S. Department of Labor
Employment Standards Administration
Office of Labor-Management Standards
Welcome to the Electronic Form LM-4
The U.S. Department of Labor’s Office of Labor-Management Standards (OLMS) is pleased to
introduce the new electronic Form LM-4. You can now complete your union’s Form LM-4 quickly
and easily using your computer and this software.
Why should you choose to complete your union’s Form LM-4 electronically, rather than
manually on paper? There are several advantages to using this new electronic version:
●
●
●
It’s easy to enter information on the form.
You can download some information from the OLMS Website and load it directly onto the
form.
Before your officers sign the form, the system checks for errors and discrepancies and
allows you to correct or explain them, reducing the likelihood of having to file an
amended report.
Your union's president and treasurer can sign the electronic form using easily obtainable digital
signatures and submit it to OLMS over the Internet. Alternatively, you can print a paper copy
of the form, have your union’s president and treasurer sign it manually, and mail it to OLMS.
We encourage you to use the electronic Form LM-4 instead of the paper form. It will make
filing your union’s Form LM-4, quicker, easier, and more accurate.
1
Starting the Electronic Form LM-4
Starting the Electronic Form LM-4
The installation process for the electronic Forms LM-2, LM-3, and LM-4 places an icon for
starting the program on your desktop.
Note: The first time that you use the electronic forms
program, a dialog box displays, giving you an option to enter
a registration number for licensing. Do not enter anything in
that box, but simply click the "Use Form Now" button. The
form templates have been fully licensed by OLMS for use in
the Shana Filler application and, therefore, no separate
registration is required. The registration option does not
display after the first use.
Creating a new Form LM-4
Double-click on the electronic forms icon. A list of available Informed templates displays.
Select "LM-4 Form" and click the "New" button.
The first page of the electronic Form LM-4 displays. Consult the table of contents of this
User Guide for detailed instructions for the various features of electronic Form LM-4
software.
2
Starting the Electronic Form LM-4
Note to Windows XP Users: If an error occurs when you try to open a new form LM-2,
LM-3, or LM-4, contact your System Administrator to modify the folder-level user
permissions for the C:\Informed directory:
Right-click on the Informed folder and select "Properties." Click on the "Security" tab and
allow the user to have full control to the Folder. Click the "Advanced" button and make
sure that the user is selected and both permission options at the bottom of the screen are
checked.
If you continue to have problems, contact the Help Desk at 1-866-319-2675.
Save your file!
As you complete your Form LM-4, remember to save your file
often. When you select "Save" or "Save As" from the "File"
menu, the system adds the extension ".ifm" to your file name.
Opening an existing Form LM-4
Double-click on the electronic forms icon to start the program. A list of available Informed
templates displays. Click the "Cancel" button.
Select "Open" from the "File" menu on the menu bar.
A file box displays. Navigate to the drive and directory where your saved file is located and
highlight the file name in the list. Click the "Open" button.
3
Starting the Electronic Form LM-4
Alternatively, you can select your file from a list of recently used forms. From the "File"
menu, select "Recent Data Documents." The names of recently used files display. Click
the appropriate file name.
4
A Look at the Electronic Form LM-4
A Look at the Electronic Form LM-4
When you start the electronic Form LM-4, the form displays on the screen ready for data entry.
Because the electronic Form LM-4 looks almost identical to the paper form, users who have
completed the paper form in the past will be familiar with the arrangement of items on the
electronic form.
System requirements
You must have an Internet browser (Internet Explorer or Netscape version 4.x or above)
installed on your computer to complete the electronic Form LM-4. To use the pre-fill data
feature of the system, you must be connected to the Internet. For detailed information on
system requirements, start the electronic Form LM-4 and select "User Information" from the
"Form Instructions" menu on the menu bar, then select "System Requirements."
On-screen features
The electronic Form LM-4 has a number of on-screen features to help you move through the
form and enter information.
5
A Look at the Electronic Form LM-4
●
●
●
●
●
Yellow buttons - Click the yellow buttons appearing on the form to perform the action
displayed on the button -- move to an item or location, add or delete pages, or obtain
further information about the electronic Form LM-4.
White arrows - Click the white arrows to move forward to the next page or back to a
previous page in Item 19, Additional Information.
Drop-down lists – Complete certain items by making selections from drop-down lists.
See Completing the Form in this User Guide.
Page tabs – Move back and forth through the pages by selecting one of the "tabs"
displayed at the top left corner. See Moving Through the Form in this User Guide.
Pop-up boxes - Dialog boxes will automatically display during the course of completing
the form to help you enter data for certain items, warn you of potential errors, or
request additional information where required.
6
A Look at the Electronic Form LM-4
●
Pre-fill data – Retrieve data from your union’s latest report filed with OLMS for
automatic entry of information in Item 2 (Period Covered), Items 4 through 7 (union
identification), and Item 8 (Mailing Address). See Using Pre-Fill Data in this User Guide.
Informed Filler features
The electronic Form LM-4 runs within Shana’s Informed Filler Version 3.0. The components of
Informed Filler required to operate the electronic form are automatically loaded on your
computer during the installation process. Some features of Informed Filler which may be useful
in completing the Form LM-4 include:
●
Place note – You can attach notes or comments to your form. A note looks like a small
piece of yellow paper.
To place a note on your form, select "Place Note" from the "Edit" menu on the menu
bar.
A small yellow note displays in the center of your form window and can be placed
anywhere on the form.
7
A Look at the Electronic Form LM-4
To enter, view, or change text in the note, click in the text box at the right side of the
note. The "Note" dialog box displays. Enter or edit your message then click the "OK"
button.
To delete the note, click the note. This changes the box from yellow to blue. Press the
"Delete" key.
●
Cell memorize – This command memorizes the current entry in an item or cell. When
you open a new form, the memorized value displays in the same item or cell.
To memorize a value, select the value in the item or cell. Select "Memorize" from the
"Cell" menu on the menu bar.
To remove the memorized value from the item or cell, memorize a blank value.
Save your file!
As you complete your Form LM-4, remember to save your file
often. When you select "Save" or "Save As" from the "File"
menu, the system adds the extension ".ifm" to your file name.
8
Moving Through the Form
Moving Through the Form
Moving from item to item
To move the cursor from item to item (or to separate fields within an item), press the <Tab>
key. This is the preferred method for moving through the form. By using the <Tab> key, you
are assured of moving to the next sequential item or field on the form.
After you enter data in a particular item, press the <Tab> key. The data is automatically
formatted and the cursor moves to the next item.
To return to a previous item, press the <Shift> and <Tab> keys at the same time.
Moving from page to page
●
●
●
<Tab> key - After you complete the last item on page 1, press the <Tab> key to move
to the first item on page 2.
Page tabs – Move back and forth through the pages by selecting one of the three "tabs"
displayed at the top left corner on Page 1, Page 2, or Item 19.
Goto menu - Select the desired page from the "Goto" menu on the menu bar.
9
Labor Organization File Number - Item 1
Labor Organization File Number - Item 1
In Item 1, you must enter the 6-digit file number which OLMS assigned to your union. Once
you enter the file number in Item 1, the system automatically enters it at the top of page 2
and all Item 19, Additional Information pages. If you do not know your union’s file number,
you can obtain it from the following sources.
Prior reports
Review your union’s copies of reports submitted to OLMS in prior years.
Mailing label
If the Form LM-4 was mailed to you with an address label, your union’s file number is the 6digit number printed on the first line of the label.
OLMS Website
Search the OLMS Website to find your union's file number. After first connecting to the
Internet, you may access the OLMS Website directly from the electronic Form LM-4.
Select "OLMS Website" from the "Goto" menu on the menu bar.
The OLMS Website displays in your browser.
Go to the LMRDA Reporting & Public Disclosure section on this site and follow instructions
for searching for a union by affiliation or organization name.
To reach the OLMS Website outside the electronic Form LM-4, go to:
10
Labor Organization File Number - Item 1
http://www.dol.gov/esa/olms_org.htm
OLMS field offices
Contact the nearest OLMS field office to obtain your union’s file number. You can access the list
of OLMS field offices within the electronic Form LM-4 by selecting "LM-4 Instructions" from the
"Form Instructions" menu on the menu bar and then selecting "If You Need Assistance" from
the Table of Contents.
You can also go to the OLMS Website (see above instructions) for the addresses and telephone
numbers of OLMS field offices.
11
Using Pre-fill Data
Using Pre-Fill Data
You can save time and ensure the accuracy of your union’s identification and mailing
information entered on Form LM-4 by retrieving the pre-fill data from your union’s latest report
filed with OLMS. You must first be connected to the Internet to access and retrieve your
union’s pre-fill information.
In Item 1, enter your union’s file number and press the <Tab> key.
Note: If you do not know your union’s file number, see Labor
Organization File Number – Item 1 in this User Guide.
Click the yellow "Get Pre-fill Data" button.
The system displays a dialog box reminding you that you must be connected to the
Internet.
Click the "OK" button.
The system displays a dialog box asking you to enter the fiscal year of the report you are
completing.
Enter the fiscal year in a 4-digit format, for example, 2000, and click the "OK" button.
12
Using Pre-fill Data
The identification and mailing information on file with OLMS display.
Review the Identification Information section of the pre-fill display.
If it is correct, click the "Approve" check box in the upper left corner to have this
information automatically entered on the report you are completing.
13
Using Pre-fill Data
If the information is not correct, you may make corrections by clicking in the appropriate
field and entering the correct information. After you have made all corrections, click the
"Approve" check box.
Scroll down to view the Mailing Information section of the pre-fill display.
If it is correct, click the "Approve" check box in the upper left corner to have this
information automatically entered on the report you are completing.
If the information is not correct, you may make corrections by clicking in the appropriate
field and entering the correct information. After you have made all corrections, click the
"Approve" check box.
Note: If for any reason you do not wish to use the pre-fill
data, click the "No" button at the bottom of the pre-fill display
to return to the form. No data will be transferred to the Form
LM-4 you are completing.
Click the "Yes" button at the bottom of the display to transfer the approved data to the
report you are completing.
The system returns to the form which now displays all approved data for Item 2 (Period
Covered), Items 4 through 7 (union identification), and Item 8 (Mailing Address) on page
1. The yellow "Get Pre-fill Data" button is no longer active.
14
Using Pre-fill Data
Reminder: After returning to page 1 of the form, complete
Item 3, if appropriate, before moving to page 2.
After retrieving pre-fill data, save your form.
15
Completing the Form
Completing the Form
There are several ways to enter information on the electronic Form LM-4:
●
●
●
●
retrieving pre-fill data from OLMS
using text or numbers
checking boxes
selecting from drop-down lists
Pre-fill data
You can retrieve your union's identification and mailing information from OLMS via the
Internet. See Using Pre-fill Data in this User Guide.
Entering financial information
When entering numbers for requested financial information, use whole dollars only –
DO NOT ENTER:
●
●
●
●
cents
decimal points
commas
dollar signs
Enter "0" in Items 14 through 18 if your union has nothing to report.
Checkboxes
16
Completing the Form
Some items on the form are answered by simply making an entry in a checkbox. For example,
complete Items 9 through 12 by making an entry in either the "Yes" or "No" checkbox.
Press the <Tab> key to move to the appropriate checkbox which becomes highlighted.
Press any key to enter an "X" in the selected box. To uncheck the box, press any key while
in the selected box.
You can also click the appropriate checkbox to both select it and enter an "X."
Depending on your answer to certain items, you may be prompted to provide additional
information in Item 19. See Additional Information – Item 19 in this User Guide.
Drop-down lists
When you move to an item having a drop-down list, the list automatically displays.
Move through the choices on the list by using the scroll bar or entering the first letters of
your selection. Make your selection by double-clicking the appropriate choice.
17
Completing the Form
Your selection displays in that item and the cursor moves to the next item.
If your union is affiliated with a national or international union and you are not using prefill data, you must select your entries for Item 4, Affiliation or Organization Name, and
Item 5, Designation, from the drop-down lists. See Union Identification – Items 4 – 7 in
this User Guide.
18
Amended or Terminal Reports - Item 3
Amended or Terminal Reports – Item 3
Answer Item 3 only if the report you are completing is an amended report or a terminal report.
●
●
An amended report is filed to correct a report previously filed by your union.
A terminal report is filed if your union goes out of existence by disbanding or merging
into another union.
If neither of these conditions apply to your union’s report, leave Item 3 blank.
19
Union Identification - Items 4 - 7
Union Identification - Items 4 - 7
If you are connected to the Internet, you can use the pre-fill data feature to retrieve data from
your union’s latest report filed with OLMS and automatically enter information in Items 4
through 7 (union identification), as well as in Item 2 (Period Covered) and Item 8 (Mailing
Address). See Using Pre-Fill Data in this User Guide. If you do not use pre-fill data, you must
enter your union’s identification information in Items 4 through 7, as appropriate.
Affiliation or Organization Name
When you move to Item 4, Affiliation or Organization Name, the drop-down list of all affiliated
unions displays.
Affiliated unions
If your union is affiliated with a national or international union, you must use the displayed
drop-down lists for entries in Items 4 and 5 to ensure proper completion and accuracy.
●
Item 4 - Affiliation or Organization Name - Select your union’s affiliation name from
the drop-down list. Move through the choices on the list by using the scroll bar or
entering the first letters of your union’s affiliation. To select an affiliation, double-click
the appropriate choice.
Your selection displays in Item 4 and the cursor moves to Item 5.
20
Union Identification - Items 4 - 7
Note: The Item 4 drop-down list contains the commonly used
names or "short titles" of all union affiliations in the OLMS
database. The first name in the short title is based on the
keyword in the union’s name. For example, "Engineers" is the
keyword for Operating Engineers. This union would be found
in the list under "e" as "Engineers, Operating." If you cannot
initially find your union affiliation name, try another affiliation
keyword for your union.
●
Item 5 - Designation Name – When you move to Item 5, a drop-down list of all union
designation names displays.
Move through the choices on the list by using the scroll bar or entering the first letters of
your union’s designation name. To select a name, double-click the appropriate choice.
Your selection displays in Item 5 and the cursor moves to Item 6.
The designation name for a national or international union is "National Headquarters
(NHQ)."
●
Item 6 – Designation Number – When you move to Item 6, a dialog box displays
informing you that Item 6, Designation Number, includes a space for a core designation
number and that space is also provided to add a prefix or suffix, if needed. Click the
"OK" button.
21
Union Identification - Items 4 - 7
The Item 6 data entry field is divided into 3 sections to display a prefix, the core
designation number, and a suffix. The cursor first moves to the core designation number
section.
Enter your union’s core designation number in this middle section and press the <Tab>
key. For example if your union’s designation name and number is LU 899, enter "899."
The number displays in the middle section and the cursor moves to the section in front
of the core number to add a prefix. Enter the prefix for your union's designation number,
if any, and press the <Tab> key to move to the suffix section. Enter the suffix, if any,
and press the <Tab> key to move to Item 7.
Note: The majority of affiliated unions have only a core
designation number. If your union's designation number has
no prefix or suffix, just press the <Tab> key twice after
entering the core number to move to Item 7.
●
Item 7 – Unit Name – If your union has any additional or alternate name by which it is
known, such as "Chicago Area Local," enter the name in Item 7.
Unaffiliated unions
If your union is not affiliated with a national or international union, ignore the drop-down list
and complete Item 4 and Item 7 (if appropriate).
●
Item 4 – Affiliation or Organization Name – Enter your union’s name in Item 4.
Names of affiliated unions may display in Item 4 as you enter your union’s name. Just
continue typing until you complete the name and press the <Tab> key. Your union’s
name is automatically formatted in all upper case letters in Item 4.
Because unaffiliated unions will not have entries in Item 5, Designation, and Item 6,
Designation Number, the cursor moves to Item 7, Unit Name (if any).
●
Item 7 – Unit Name – If your union has any additional or alternate name by which it is
known, such as "Chicago Area Local," enter the name in Item 7.
22
Additional Information - Item 19
Additional Information – Item 19
Your entries in certain items on the electronic Form LM-4 may require additional information in
Item 19.
System notification
After you make an entry that requires additional information, the system will automatically
notify you by displaying a dialog box explaining what additional information is needed.
Enter your explanation in the dialog box and click the "OK" button.
Click the "Item 19" tab at the top left corner to display the Item 19 page.
Your explanation is entered on a separate Item 19, Additional Information page which also
displays your union’s name and file number, the ending date of the period covered by the
report, and the item number for the additional information.
23
Additional Information - Item 19
Other Item 19 entries
You may also provide additional information directly in Item 19 by clicking the yellow "Click
to Enter Item 19 Information" button in the Item 19 area of page 1.
The Item 19, Additional Information page displays. Enter the number of the item to which
the information relates in the Item Number column. Enter "19" in the Item Number column
to identify additional information not associated with any specific LM-4 item.
Note: Additional information entries do not display or print in
Item 19 on page 1 of the form. A separate Item 19 page is
created for each item requiring additional information. For
example, if you made entries in Item 19 for two items, the
report will contain two Item 19, Additional Information, pages.
To view other Item 19 pages in your report, click the forward or back arrows. Buttons on
the page also allow you to delete or add an additional information page and return to page
1 of the form.
24
Additional Information - Item 19
25
Changing Officers' Titles in Items 20 and 21
Changing Officers' Titles in Items 20 and 21
When an officer other than the president or treasurer signs the completed Form LM-4, you
must provide the title of the other officer and explain why the president or treasurer did not
sign the report.
After completing all other items on the form, click on the title in Item 20 or Item 21. The
title is highlighted and a drop-down list displays.
If an officer other than the president will sign the report in Item 20 (or other than the
treasurer in Item 21), click the appropriate title, if available, in the drop-down list to
display it in Item 20 or 21.
If the title is not available in the drop-down list, double-click "Other." A dialog box displays
requesting the appropriate title. Enter the appropriate title in the dialog box and click the
"OK" button.
The new title displays in the form.
Press the <Tab> key. A dialog box displays requesting an explanation for entry in Item 19,
26
Changing Officers' Titles in Items 20 and 21
Additional Information. Enter your explanation in the dialog box and click the "OK" button.
See also Additional Information – Item 19 in this User Guide.
27
Checking for Errors - Error Summary
Checking for Errors - Error Summary
Before signing and submitting your union’s report to OLMS, you must check it for errors or
deficiencies by running the Error Summary and reviewing the Error Summary results.
To begin, select "Error Summary" from the "File" menu.
The Error Summary displays in your browser.
28
Checking for Errors - Error Summary
Note: The Error Summary lists the LM-4 items which may
need correction or an explanation in Item 19, Additional
Information. You can print the summary to use as a reference
when you return to the Form LM-4 to correct errors. Follow
your Internet browser’s instructions for printing a copy of the
Error Summary.
To return to the Form LM-4, click the "Continue" button at the bottom of the Error
Summary screen.
If you are using Netscape, the system closes the browser.
If you are using Internet Explorer, click the "Yes" button in the dialog box to close the
browser.
After you have corrected or resolved the errors or deficiencies listed on your Error
Summary, run the Error Summary again to check that you made all necessary corrections.
29
Checking for Errors - Error Summary
If you forget to run the Error Summary and attempt to sign the report by clicking on the
"Sign" button, the system reminds you to review the LM-4 Error Summary to check for
errors on the form before applying the digital signature.
To run the Error Summary from this reminder box, click the "Error Summary" button.
30
Prnting the Form
Printing the Form
After you have completed the electronic Form LM-4, run the Error Summary, and corrected any
errors noted on the Error Summary, you can sign and submit the report electronically. See
Digital Signatures and Submitting a Form Electronically in this User Guide. Alternatively, you
can print a paper copy of the form, have your union's president and treasurer sign it manually,
and mail it to OLMS. Remember to keep a copy of the report for your union’s records whether
you submit your union’s form by mail or electronically to OLMS.
Select "Print" from the "File Menu" on the menu bar.
The "Print" dialog box displays.
31
Printing the Form
Note: The print range in the dialog box displays 32 pages, the
maximum number of pages allowed for the form. When you
print the Form LM-4 with "all 32 pages" selected, only the 2page form and any Item 19, Additional Information pages will
print.
Click the "OK" button to print the form.
If you have a problem printing the form, consult User Information from the electronic Form LM4. Select "User Information" from the "Form Instructions" menu on the menu bar, then select
"Printer Settings."
32
Submitting a Paper Form
Submitting a Paper Form
As an alternative to electronic submission, you may print the completed Form LM-4 for manual
signature and submission by mail.
●
Clear the Error Summary message
After you complete the electronic Form LM-4 but before you print and sign it, you must
clear the Error Summary message displayed in the signature area of Items 20 and 21 by
running the Error Summary and making any required corrections.
Note: Your report will not be accepted by OLMS if the Error
Summary messages in the signature blocks have not been
cleared.
●
Print the form
When you have cleared the Error Summary message, print a full copy of the Form LM-4
including Item 19, Additional Information pages. See Printing the Form in this User
Guide.
●
Sign and date the form
Both the president and treasurer or corresponding principal officers of your
union must sign the report in Items 20 and 21 in black ink. Original signatures of
two officers are required on the paper Form LM-4 filed with OLMS; stamped or
mechanical signatures are not acceptable.
If officers other than the president or treasurer sign the report, see Changing Officers’
Titles in Items 20 and 21 in this User Guide.
You cannot enter and print dates for signatures on the electronic Form LM-4. Therefore,
you must manually enter in Items 20 and 21 the dates the report was signed by the
officers when submitting a paper form.
●
Forward a form to other persons
If you have e-mail software installed on your computer, you can send your form to other
persons for review or further processing. See Digital Signatures and Submitting a Form
Electronically in this User Guide.
●
Mail the form
33
Submitting a Paper Form
Mail the original completed and signed Form LM-4 and any required attachments to:
U.S. Department of Labor
Employment Standards Administration
Office of Labor-Management Standards
200 Constitution Avenue, NW, Room N-5616
Washington, DC 20210
34
Digital Signatures and Submitting a Form Electronically
Digital Signatures and Submitting a Form Electronically
Your union’s president and treasurer must obtain digital signatures and sign reports that you
submit electronically. Information on obtaining digital signatures and instructions for electronic
submission of the completed Form LM-4 are available on the OLMS Website at:
http://www.dol.gov/esa/olms_org.htm
As an alternative, you may print the completed Form LM-4 and submit it by mail to OLMS. See
Submitting a Paper Form in this User Guide.
Forwarding a form
The electronic Form LM-4 has a built-in feature for sending your form to other persons via email for review, further processing, or digital signature.
Before forwarding your form make sure you have saved the most recent version and that it
is displayed in the active window. Select "Forward" from the "File" menu on the menu bar.
The "Mail System" dialog box displays. Select your e-mail program from the drop-down
list. Choose "Internet Mail" (SMTP) if your program is not listed.
The "Send" dialog box displays.
35
Digital Signatures and Submitting a Form Electronically
Enter the e-mail addresses of the persons to whom you are sending the form along with
your message in the appropriate spaces and click the "Send" button.
Note: Persons receiving your form must have the electronic
Form LM-4 and Informed Filler installed on their computers to
view, edit, or apply digital signatures to the form.
36
Getting Help
Getting Help
You can get help in completing the electronic Form LM-4 from a number of sources.
Form instructions
You can access a full set of the Instructions for Form LM-4, which give item-by-item guidance
for completing the form, directly from the electronic Form LM-4.
Start the electronic Form LM-4 and select "LM-4 Instructions" from the "Form Instructions"
menu on the menu bar.
The Instructions for Form LM-4 display in your browser. Scroll down to the Table of
Contents and select the appropriate topic or item.
User information
You can access information on the electronic form operation directly from the electronic Form
LM-4. Topics discussed include system requirements, printer settings, digital signatures,
electronic submission, navigation, pre-fill data, and OLMS Help Desk information.
Start the electronic Form LM-4 and select "User Information" from the "Form Instructions"
menu on the menu bar.
User Information displays in your browser. Select the appropriate topic or item in the Table
of Contents.
Informed Filler
You can access information on Shana’s Informed Filler program operation directly from the
electronic Form LM-4.
Start the electronic Form LM-4 and select "Contents" from the "Help" menu on the menu
bar.
37
Getting Help
A list of available topics displays.
OLMS Help Desk
If you have problems using the electronic Form LM-4 which you are unable to solve with the
information in this User Guide or the above sources, contact the OLMS Help Desk at 1-866-3192675.
OLMS field offices
If you have questions about completing items on the Form LM-4 or other reporting questions,
contact the nearest OLMS field office. You can access the list of OLMS field offices within the
electronic Form LM-4 by selecting "LM-4 Instructions" from the "Form Instructions" menu on
the menu bar and then selecting "If You Need Assistance" from the Table of Contents.
Addresses and telephone numbers of OLMS field offices are also on the OLMS Website at:
http://www.dol.gov/esa/olms_org.htm
38