1
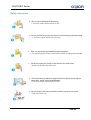
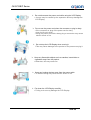
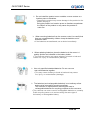
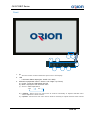
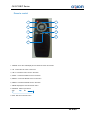
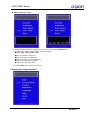
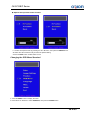
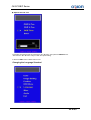
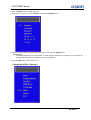
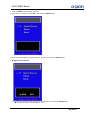
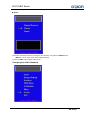
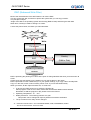
OLS-PGB/P Series
Ver. 1.0 E
OLS-PGB/P Series
User’s Guide
1 of 33
OLS-PGB/P Series
CONTENTS
Safety Instructions
Introduction
------------------------------------------------------------------- 3-7.
-------------------------------------------------------------------------- 8-10.
Remote control ------------------------------------------------------------------------ 11.
Viewing the Menus
Specifications
---------------------------------------------------------------- 12-26.
----------------------------------------------------------------------- 27-32.
EWF -------------------------------------------------------------------------------------- 33.
2 of 33
OLS-PGB/P Series
Safety Instructions
Do not use a damaged or loose plug.
This may cause electric shock or fire.
Do not pull the plug out by the wire nor touch the plug with wet hands.
This may cause electric shock or fire.
Use only a properly grounded plug and receptacle.
An improper ground may cause electric shock or equipment damage.
Insert the power plug firmly so that it does not come loose.
A bad connection may cause fire.
Do not excessively bend the plug and wire nor place heavy objects
upon them, which could cause damage.
This may cause electric shock or fire.
Do not connect too many extension cords or plugs to one outlet.
This may cause fire.
3 of 33
OLS-PGB/P Series
Do not disconnect the power cord while using the LCD Display.
A surge may be caused by the separation and may damage the
LCD Display.
Do not use the power cord when the connector or plug is dusty.
If the connector or plug of the power cord is dusty,
clean it with a dry cloth.
Using the power cord with a dusty plug or connector may cause
electric shock or fire.
Do not drop the LCD Display when moving it.
This may cause damage to the product or the person carrying it.
Keep any flammable objects such as candles, insecticides or
cigarettes away from the product.
Otherwise, this may cause fire.
Keep any heating devices away from the power cable.
A melted coating may cause electric shock or fire.
Put down the LCD Display carefully.
Failing to do so may damage the LCD Display.
4 of 33
OLS-PGB/P Series
Do not place the LCD Display face down.
This may damage the TFT-LCD surface.
The installation of the bracket must be done by a qualified
professional.
Installing the bracket by unqualified personnel may result in injury.
Always use the mounting device specified in the owner's manual.
When installing the product, make sure to keep it away from the wall
(more than 10 cm / 4 inches) for ventilation purposes.
Poor ventilation may cause an increase in the internal temperature
of the product, resulting in a shortened component life and degraded
performance.
.
Do not spray water or detergent directly onto the LCD Display.
This may cause damage, electric shock or fire.
Keep the product away from places exposed to oil, smoke or
moisture; do not install inside a vehicle.
This may cause a malfunction, electric shock or fire.
In particular, avoid operating the LCD Display near water or outdoors
Where the LCD Display could be exposed to snow or rain.
Disconnect the plug from the outlet during storms or lightning or if
it is not used for a long period of time.
Failure to do so may cause electric shock or fire.
5 of 33
OLS-PGB/P Series
`
Do not install the product on an unstable, uneven surtace or a
location prone to vibrations.
Dropping the product may cause damage to the product or the
person carrying it.
Using the product in a location prone to vibrations mayshorten
the lifetime of the product or may cause the product to
catch fire.
When removing batteries from the remote control, be careful that
they are not swallowed by children. keep the batteries out of
children's reach.
If the batteries are swallowed, see a doctor immediately.
When replacing batteries, place the batteries in the correct +/polarity position as indicated on the battery holder.
The incorrect polarity may cause a battery to break or leak and
Cause fire, injury, or contamination (damage).
Use only specified standard batteries. Do not use new
and used batteries together.
This may cause a battery to break or leak and may cause
fire, injury, or contamination (damage).
The batteries (and rechargeable batteries) is not ordinary refuse
and must be returned for recycling purposes.
The customer is responsible for returning the used or
rechargeable batteries for recycling purposes as the consumer.
The customer can return used or rechargeable batteries to a nearby
Public recycling center or to a store selling the same type of
the battery or rechargeable battery.
6 of 33
OLS-PGB/P Series
Important Safety Instructions
1.
2.
3.
4.
5.
6.
7.
8.
9.
10.
11.
12.
Read these instructions.
Keep these instructions.
Heed all warnings.
Follow all instructions.
Do not use this apparatus near water.
Clean only with dry cloth.
Do not block any ventilation openings. Install in accordance
accordance with the manufacturer’s instructions.
instructions
Do not install near any heat sources such as radiators, heat registers, stoves, or other apparatus
(including amplifiers) that produce heat.
Do not defeat the safety purpose of the polarized or grounding-type
grounding type plug. A polarized plug has two
blades with one wider than the other. A grounding type plug has two blades and a third grounding prong.
The wide blade or the third prong are provided for your
your safety. If the provided plug does not fit into your
outlet, consult an electrician for replacement of the obsolete outlet.
Protect the power cord from being walked on or pinched particularly at plugs, convenience receptacles,
and the point where they exitit from the apparatus
Only use attachments/accessories specified by the manufacturer.
Use only with the cart, stand, tripod, bracket, or table specified by the manufacturer, or sold with the
apparatus. When a cart is used, use caution when moving the cart/apparatus
cart/apparatus combination to avoid
injury from tip-over.
13. Unplug this apparatus during lightning storms or when unused for long periods of time.
14. Refer all servicing to qualified service personnel. Servicing is required when the apparatus has been
damaged in any way, such as power-supply
power supply cord or plug is damaged, liquid has been spilled or objects
have fallen into the apparatus, the apparatus has been exposed to rain or moisture, does not operate
normally, or has been dropped.
15. Do not expose this apparatus to dripping or splashing and ensure that no objects filled with liquids, such
as vases, are placed on the apparatus.
16. To completely disconnect this apparatus from the AC Mains, disconnect the power supply cord plug from
the AC receptacle.
17. The mains plug of the power supply cord shall remain readily operable.
18. An apparatus with CLASS I construction shall be connected to a Mains socket outlet with a protective
earthing connection.
Note: Prolonged use of headphones at a high volume
volume may cause health damage on your ears.
The lightning flash with arrowhead symbol within an equilateral triangle, is
intended to alert the user to the presence of uninsulated "dangerous voltage"
voltage
within the product's enclosure that may be of sufficient magnitude to
constitute a risk of electric shock to persons.
The exclamation point within an equilateral triangle is intended to alert the
user to the presence of important operating and maintenance (servicing)
instructions in the literature accompanying the product.
7 of 33
OLS-PGB/P Series
Introduction
LCD Display
Manual
User Manual CD
Cable
AC Power Cable
HDMI Cable (Option)
Other
Remote Control
Batteries (AAA X 2)
8 of 33
OLS-PGB/P Series
Front
1
a
2
c
3
b
d
e
1. IR
- Aim the remote control towards this spot on the LCD Display.
2. LED
- LCD Power Status display(On : BLUE / Off : RED)
3. OSD KEY Input(Power / Menu / Source / Left / Right / Up / Down)
a) Power : Turns the LCD Display On/ Off.
b) Menu : Displays the main On-Screen menu.
c) Source : Select Input Source
- DVI
PC
d) Left/Right : Moves from one menu item to another horizontally or adjusts selected menu
values. Adjusts the audio volume.
e) Up/Down : Moves from one menu item to another vertically or adjusts selected menu values.
9 of 33
OLS-PGB/P Series
Rear
5
7
11
9
2
1
3
1.
2.
3.
4.
5.
6.
7.
8.
9.
10.
11.
4
6
8
10
AC Power S/W On/Off.
AC Power In.(100V ~ 240V)
HDMI Out.
VGA Out.
DVI Out.
ESATA (2EA).
PS/2 Keyboard.
USB2.0 (6EA)
RJ45 LAN.
Audio Port.(Line-In / Line-Out / MIC-In)
HDD.
10 of 33
OLS-PGB/P Series
Remote control
1
2
3
4
5
6
7
8
9
1. POWER: Turns the LCD Display On and Off & PC Power On and Off.
2. UP : Control the UP cursor in the menu
3, LEFT : Control the LEFT cursor in the menu
4, RIGHT : Control the RIGHT cursor in the menu
5, ENTER : Control the ENTER cursor in the menu
6, DOWN : Control the DOWN cursor in the menu
7. MENU: Displays the main On-Screen menu
8. SOURCE : Select Input Source
- DVI
PC
9. EXIT: Exit the On-Screen menu
11 of 33
OLS-PGB/P Series
Viewing the Menus
◆ Press the MENU button.
The main menu is displayed on the screen.
Its left side has five Text: Color, Image Setting, Position , OSD Meuu, Language, Misc., Audio and Exit.
Changing the Color Standard
Your television has several setting options that allow you to control the picture quality.
1. Press the MENU button to display the menu.
2. Press the ▲ or ▼ button to select Color, then press the ENTER button.
12 of 33
OLS-PGB/P Series
3. Select the required mode by pressing the ▲ or ▼ button, then press the ENTER button.
◆ Contrast –Brightness– Color Adjust –Color Temp –Back
◆ Adjusts the Contrast and Brightness.
3-1. Select the required mode by pressing the ▲ or ▼ button, then press the ENTER button.
3-2 Press the ◀ or ◀ button until you reach the optimal setting.
13 of 33
OLS-PGB/P Series
◆ Adjust the Color. : It adjusts the intensity of the color.
3-3. Select the required mode by pressing the ▲ or ▼ button, then press the ENTER button.
3-4.Select the required mode by pressing the ◀ or ◀ button, then press the ENTER button.
◆ Red –Green– Blue
3-5. Press the ◀ or ◀ button until you reach the optimal setting.
14 of 33
OLS-PGB/P Series
◆ Adjusts the Color Temp.
3-6. Select the required mode by pressing the ▲ or ▼ button, then press the ENTER button.
3-7. Press the ◀ or ◀ button until you reach the optimal setting.
◆ 9300 – 6500 – 5800 - sRGB - USER
◆9300: This results in a blue tone.
◆6500: This results in a reddish tone.
◆5800: This results in a more reddish tone.
◆sRGB: This is standard color setting.
◆USER: This is user color setting.
4. Press the EXIT button or Back Select to exit.
Changing the Image Standard
15 of 33
OLS-PGB/P Series
1. Press the MENU button to display the menu.
2. Press the ▲ or ▼ button to select Image Setting, then press the ENTER button.
3. Select the required mode by pressing the ▲ or ▼ button, then press the ENTER button.
◆ Clock –Phase– Gamma(not available) –Sharpness –Back
◆ Adjusts the Clock.
3-1. Select the required mode by pressing the ▲ or ▼ button, then press the ENTER button.
3-2 Press the ◀ or ◀ button until you reach the optimal setting.
16 of 33
OLS-PGB/P Series
◆ Adjusts the Phase.
3-3. Select the required mode by pressing the ▲ or ▼ button, then press the ENTER button.
3-4. Press the ◀ or ◀ button until you reach the optimal setting.
◆ Adjusts the Sharpness.
3-5. Select the required mode by pressing the ▲ or ▼ button, then press the ENTER button.
3-6. Press the ◀ or ◀ button until you reach the optimal setting.
4. Press the EXIT button or Back Select to exit.
17 of 33
OLS-PGB/P Series
Changing the Position Standard
1. Press the MENU button to display the menu.
2. Press the ▲ or ▼ button to select Position, then press the ENTER button.
3. Select the required mode by pressing the ▲ or ▼ button, then press the ENTER button.
◆ H.Position –V.Position –Back
18 of 33
OLS-PGB/P Series
◆ Adjusts the H.position and V.Position.
3-1. Select the required mode by pressing the ▲ or ▼ button, then press the ENTER button.
3-2 Press the ◀ or ◀ button until you reach the optimal setting.
4. Press the EXIT button or Back Select to exit.
Changing the OSD Menu Standard
1. Press the MENU button to display the menu.
2. Press the ▲ or ▼ button to select OSD Menu, then press the ENTER button.
19 of 33
OLS-PGB/P Series
3. Select the required mode by pressing the ▲ or ▼ button, then press the ENTER button.
◆ OSD H.Pos – OSD V.Pos – OSD Time –Back
◆ Adjusts the OSD H.Pos and OSD V.Pos.
3-1. Select the required mode by pressing the ▲ or ▼ button, then press the ENTER button.
3-2 Press the ◀ or ◀ button until you reach the optimal setting.
20 of 33
OLS-PGB/P Series
◆ Adjusts the OSD Time.
3-3. Select the required mode by pressing the ▲ or ▼ button, then press the ENTER button.
3-4. Press the ◀ or ◀ button until you reach the optimal setting.
4. Press the EXIT button or Back Select to exit.
Changing the Language Standard
21 of 33
OLS-PGB/P Series
1. Press the MENU button to display the menu.
2. Press the ▲ or ▼ button to select Language, then press the ENTER button.
3. Select the required mode by pressing the ▲ or ▼ button, then press the ENTER button.
◆ Language
It is variable depending on the model. When you start using the television for the first time, you must select the
language which will be used for displaying menus and indications.
4. Press the EXIT button or Back Select to exit.
Changing the Misc. Standard
22 of 33
OLS-PGB/P Series
1. Press the MENU button to display the menu.
2. Press the ▲ or ▼ button to select Misc., then press the ENTER button.
3. Select the required mode by pressing the ▲ or ▼ button, then press the ENTER button.
◆ Adjusts the OSD Time.
3-1. Select the required mode by pressing the ◀ or ◀ button, then press the ENTER button.
◆ Changing the input Source D-SUB and DVI.
23 of 33
OLS-PGB/P Series
◆ Reset.
3-2. Select the required mode by pressing the ▲ or ▼ button, then press the ENTER button.
◆ Reset: You can return to the factory defaults settings
4. Press the EXIT button or Back Select to exit.
Changing the Audio Standard
24 of 33
OLS-PGB/P Series
1. Press the MENU button to display the menu.
2. Press the ▲ or ▼ button to select Audio., then press the ENTER button.
3. Select the required mode by pressing the ▲ or ▼ button, then press the ENTER button.
◆ Adjusts the Volume.
3-1. Press the ◀ or ◀ button until you reach the optimal setting.
25 of 33
OLS-PGB/P Series
◆ Adjusts the Mute.
3-2. Press the ◀ or ◀ button until you reach the optimal setting.
4. Press the EXIT button or Back Select to exit.
Changing the Exit.
1. Select the required mode by pressing the ▲ or ▼ button, then press the ENTER button.
◆ OSD Menu Exit.
26 of 33
OLS-PGB/P Series
Specifications
OLS-3201PGB
Items
Specifications
Display Size
32 Inch (16:9) : LCD / S-PVA TFT
Response Time
8 ms(Typ G to G)
Pixel Size
0.51075(H) x 0. 51075 (V) mm
Resolution
1366 x 768 (WXGA)
Colors
8 bit, 16.7M Colors
Brightness
600cd/㎡ (Typ)
Contrast Ratio
2000:1
View Angle
Hor. 178 Degree(Typ), Ver. 178 Degree(Typ)
Surface Treatment
Hard coating(3H), Haze 44%
Panel Size
760.0(H Typ) x 450.0(V Typ)
AC Input
AC 100~240V~, 50/60Hz, 1A
Power Consumption
210W
32 inch
POWER
OLS-4001PGB
Items
Specifications
Display Size
40 Inch (16:9) : LCD / S-PVA TFT
Response Time
8 ms(Typ G to G)
Pixel Size
0.461225(H) x 0. 461225 (V) mm
Resolution
1920 x 1080 (WUXGA)
Colors
8 bit, 16.7M Colors
Brightness
450cd/㎡ (Typ)
Contrast Ratio
4000:1
View Angle
Hor. 178 Degree(Typ), Ver. 178 Degree(Typ)
Surface Treatment
Hard coating(3H), Haze 44%
Panel Size
952.0(H Typ) x 551.0(V Typ)
AC Input
AC 100~240V~, 50/60Hz, 1A
Power Consumption
260W
40 inch
POWER
27 of 33
OLS-PGB/P Series
OLS-4001PGP
Items
Specifications
Display Size
40 Inch (16:9) : LCD / S-PVA TFT
Response Time
8 ms(Typ G to G)
Pixel Size
0.46125(H) x 0. 46125 (V) mm
Resolution
1920 x 1080 (WUXGA)
Colors
8 bit, 16.7M Colors
Brightness
700cd/㎡ (Typ)
Contrast Ratio
3000:1
View Angle
Hor. 178 Degree(Typ), Ver. 178 Degree(Typ)
Surface Treatment
Hard coating(3H), Haze 44%
Panel Size
911.7(H Typ) x 524.0(V Typ)
AC Input
AC 100~240V~, 50/60Hz, 1A
Power Consumption
260W
40 inch
POWER
OLS-4601PGB
Items
Specifications
Display Size
46 Inch (16:9) : LCD / S-PVA TFT
Response Time
8 ms(Typ G to G)
Pixel Size
0.53025(H) x 0. 53025 (V) mm
Resolution
1920 x 1080 (WUXGA)
Colors
8 bit, 16.7M Colors
Brightness
450cd/㎡ (Typ)
Contrast Ratio
4000:1
View Angle
Hor. 178 Degree(Typ), Ver. 178 Degree(Typ)
Surface Treatment
Hard coating(3H), Haze 44%
Panel Size
1083.0(H Typ) x 627.0(V Typ)
AC Input
AC 100~240V~, 50/60Hz, 1.5A
Power Consumption
320W
46 inch
POWER
28 of 33
OLS-PGB/P Series
OLS-4601PGP
Items
Specifications
Display Size
46 Inch (16:9) : LCD / S-PVA TFT
Response Time
8 ms(Typ G to G)
Pixel Size
0.53025(H) x 0. 53025 (V) mm
Resolution
1920 x 1080 (WUXGA)
Colors
8 bit, 16.7M Colors
Brightness
700cd/㎡ (Typ)
Contrast Ratio
3000:1
View Angle
Hor. 178 Degree(Typ), Ver. 178 Degree(Typ)
Surface Treatment
Hard coating(3H), Haze 44%
Panel Size
1018.08(H Typ) x 572.67V Typ)
AC Input
AC 100~240V~, 50/60Hz, 1.5A
Power Consumption
320W
46 inch
POWER
OLS-5501PGB
Items
55 inch
Specifications
Display Size
55 Inch (16:9) : LCD / S-PVA TFT
Response Time
8 ms(Typ G to G)
Resolution
1920 x 1080 (WUXGA)
Colors
8 bit, 16.7M Colors
Brightness
450cd/㎡ (Typ)
Contrast Ratio
5000:1
View Angle
Hor. 178 Degree(Typ), Ver. 178 Degree(Typ)
Surface Treatment
Hard coating(3H), Haze 44%
Panel Size
1209.2 (H) x 680.4 (V)
AC Input
AC 100~240V~, 50/60Hz, 1.5A
Power Consumption
380W
POWER
29 of 33
OLS-PGB/P Series
OLS-5501PGP
Items
55 inch
Specifications
Display Size
55 Inch (16:9) : LCD / S-PVA TFT
Response Time
8 ms(Typ G to G)
Resolution
1920 x 1080 (WUXGA)
Colors
8 bit, 16.7M Colors
Brightness
700cd/㎡ (Typ)
Contrast Ratio
3000:1
View Angle
Hor. 178 Degree(Typ), Ver. 178 Degree(Typ)
Surface Treatment
Hard coating(3H), Haze 44%
Panel Size
1209.2 (H) x 680.4 (V)
AC Input
AC 100~240V~, 50/60Hz, 1.5A
Power Consumption
400W
POWER
OLS-7001PGB
Items
Specifications
Display Size
70 Inch (16:9) : LCD / S-PVA TFT
Response Time
8 ms(Typ G to G)
Pixel Size
0.807(H) x 0. 807 (V) mm
Resolution
1920 x 1080 (WUXGA)
Colors
8 bit, 16.7M Colors
Brightness
450cd/㎡ (Typ)
Contrast Ratio
2000:1
View Angle
Hor. 178 Degree(Typ), Ver. 178 Degree(Typ)
Surface Treatment
Hard coating(3H), Haze 44%
Panel Size
952.0(H Typ) x 551.0(V Typ)
AC Input
AC 100~240V~, 50/60Hz, 9.2A
Power Consumption
920W
70 inch
POWER
30 of 33
OLS-PGB/P Series
OLS-7001PGP
Items
Specifications
Display Size
70 Inch (16:9) : LCD / S-PVA TFT
Response Time
8 ms(Typ G to G)
Pixel Size
0.807(H) x 0. 807 (V) mm
Resolution
1920 x 1080 (WUXGA)
Colors
8 bit, 16.7M Colors
Brightness
600cd/㎡ (Typ)
Contrast Ratio
2000:1
View Angle
Hor. 178 Degree(Typ), Ver. 178 Degree(Typ)
Surface Treatment
Hard coating(3H), Haze 44%
Panel Size
952.0(H Typ) x 551.0(V Typ)
AC Input
AC 100~240V~, 50/60Hz, 9.2A
Power Consumption
950W
70 inch
POWER
OLS-8201PGB
Items
Specifications
Display Size
82 Inch (16:9) : LCD / S-PVA TFT
Response Time
8 ms(Typ G to G)
Resolution
1920 x 1080 (WUXGA)
Colors
8 bit, 16.7M Colors
Brightness
450cd/㎡ (Typ)
Contrast Ratio
2000:1
View Angle
Hor. 178 Degree(Typ), Ver. 178 Degree(Typ)
Surface Treatment
Hard coating(3H), Haze 44%
AC Input
AC 100~240V~, 50/60Hz
Power Consumption
950W
82 inch
POWER
31 of 33
OLS-PGB/P Series
OLS-8201PGP
Items
Specifications
Display Size
82 Inch (16:9) : LCD / S-PVA TFT
Response Time
8 ms(Typ G to G)
Resolution
1920 x 1080 (WUXGA)
Colors
8 bit, 16.7M Colors
Brightness
600 cd/㎡ (Typ)
Contrast Ratio
1200:1
View Angle
Hor. 178 Degree(Typ), Ver. 178 Degree(Typ)
Surface Treatment
Hard coating(3H), Haze 44%
AC Input
AC 100~240V~, 50/60Hz
Power Consumption
980W
82 inch
POWER
Items
PC
Specifications
CPU
AMD 3.0G
Main Board
MINI ITX
Memory
2G
HDD
160G
Graphic
NVIDIA 8200
OS
EMBEDDED STANDARD
32 of 33
OLS-PGB/P Series
EWF (Enhanced Write Filter)
Most of the characteristics of the XPE feature is to use the EWF.
This is to protect the disk, as well as to protect the system files you can enjoy a twofer.
The principle is simple.
Jungle of the disk to the operating system and Overlay (RAM or Disk) and having the disk write
When done, Overlay be made in writing is to create.
Look at the picture below, the faster you will understand.
Application
Write
File system
Overlay
EWF
(RAM or Disk)
Partition
EWF is protecting the painting to be done at the point of writing indicates that when you know how it all
works.
Overlay does not write directly on the partition to copy the file that is in the region.
EWF is protected from the outside that you or your system settings, if you copy a file to actually Disk
Copy or in the area, which is set to Overlay, which is not. If you use the RAM Overlay
When you reboot, all the copies has been set, or will be lost.
C drive by the EWF function is to protect the System file.
Add a program or file on the C drive, reboot and nevertheless addition will be deleted.
Remember to add the program or file, please work on the D drive.
Operating Temperature : 0℃ ~ 32℃.
Quality assurance : The warranty period is one year
※ This product can be changed to improve performance without notification.
The up contents not to notify can be changed.
HEAD OFFICE FACTORY : 257-6 GONGDAN-DONG, GUMI, GYEONGBUK, KOREA
TEL 82-54-460-5700 FAX : 82-54-461-3284
33 of 33