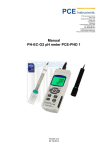
1
www.industrial-needs.com
PCE Instruments UK Ltd
Units 12/13 Southpoint
Business Park
Ensign Way, Southhampton
Hampshire
United Kingdom, SO31 4RF
Phone +44(0) 2380 98703 0
Fax +44(0) 2380 98703 9
[email protected]
www.industrial-needs.com
Thermometer with Microprocessor
PCE-HPT 1
MANUAL
Version 1.0
16.09.2014
Manual
www.industrisal-needs.com
Table Of Contents
1
Introduction ............................................................................................................... 2
1.1
2
Delivery Content ............................................................................................................................. 2
Safety Precautions .................................................................................................... 2
2.1
Warning symbols ............................................................................................................................ 2
2.2
Warning notices ............................................................................................................................. 3
3
Technical Specifications ............................................................................................ 3
4
Detailed description of device ................................................................................... 4
5
6
7
8
4.1
Pins of connection socket for temperature sensor ......................................................................... 4
4.2
Display ........................................................................................................................................... 5
Measuring Procedure ................................................................................................ 5
5.1
Switch device on and off ................................................................................................................ 5
5.2
Connection of temperature sensor................................................................................................. 5
5.3
Temperature measurement ........................................................................................................... 5
5.4
Switch temperature unit ................................................................................................................. 6
5.5
Data Hold function.......................................................................................................................... 6
5.6
Display lights .................................................................................................................................. 6
5.7
Deviation measurements ............................................................................................................... 6
5.8
Data recording ................................................................................................................................ 6
5.9
MAX / MIN function ........................................................................................................................ 6
5.10
Automatic switch-off ................................................................................................................... 6
5.11
Indication of the battery state ..................................................................................................... 6
5.12
Set time and date ....................................................................................................................... 6
5.13
Change the memory interval ...................................................................................................... 7
5.14
Erase memory ............................................................................................................................ 7
5.15
Calibrating the device ................................................................................................................. 7
5.16
Return to initial settings .............................................................................................................. 8
Data transfer to a computer....................................................................................... 8
6.1
Installing the software .................................................................................................................... 8
6.2
Main menu and buttons ............................................................................................................... 10
6.3
Real-time graph............................................................................................................................ 10
6.4
Table of values ............................................................................................................................. 10
6.5
Data logger ................................................................................................................................... 11
Maintenance and Cleaning...................................................................................... 12
7.1
Change battery............................................................................................................................. 12
7.2
How to use the adapter ................................................................................................................ 12
7.3
Cleaning ....................................................................................................................................... 12
Disposal .................................................................................................................. 12
1
Manual
www.industrial-needs.com
1
Introduction
The thermometer with the microprocessor is a high-precision 1 – channel thermometer. It is ideal for
an application in combination with various PT-100 sensors. Due to the operation with a four-terminal
sensing technology the response time becomes very short. Thus the sensor proves to be ideal for all
high-precision and fast processes. The temperature-measurement range for the microprocessor
thermometer covers -100 to +400 °C. The extensive and user-friendly software of the
microprocessor-thermometer offers a very comfortable way for any further evaluations of the
captured data. Furthermore the measurement results are shown with real-time speed. The internal
clock with time and date facilitates an accurate correlation of the measured data. The
microprocessor thermometer features an internal data logger with an adjustable measurement
interval.
1.1 Delivery Content
1 x microprocessor thermometer PCE-HPT 1
1 x PT 100 sensor
1 x USB cable
1 x software
1 x 9 V bloc battery
1 x box
1 x instruction manual
2
Safety Precautions
Please read the following instruction manual before operating with the device. Damages caused
by disregard of the instructions written in this manual, are excluded from any warranty or
liability.
2.1
Warning symbols
General Warning
Battery is down
(a low battery state might cause incorrect measurements)
2
Manual
www.industrisal-needs.com
2.2
Warning notices
- This device is only designed for the applications mentioned in this manual. In case the
device is used for any other application than these, it might lead to hazardous situations.
- Do not expose the device to extreme temperatures, direct sunlight, extreme air humidity
or liquids.
- The device may be opened only by specialized personnel of PCE instruments
- Do not operate the device with wet hands.
- Technical alternations on the device are not allowed.
- The device should be only cleaned with a damp cloth. Do not use scrubbing agents or
or detergents of any kind.
- The device may be only combined with the optional equipment provided by PCE
instruments or comparable alternatives.
- Please check the prior to every operation the enclosure of the device on any visible
damages. In case there appears any visible damage, refrain from any further application
of the device.
- Furthermore the device may not be applied in any areas where the surrounding
conditions (e.g. temperature, air humidity …) deviate from the specifications and limits
listed in this manual, any application of the device is prohibited.
- The device cannot be used in explosion-hazardous areas.
- The threshold specified in this manual cannot be trespassed under any circumstance.
- Do not use the device, if the battery is down (e.g. the display indicates that the battery is
low), since it might lead to wrong measurement results. First change the batteries
before operating the device again.
- Please check the measurement device prior to every operation with a standard.
- Do not place the measurement device anywhere with its control panel facing down (e.g.
control panel facing the table)
- Do not perform any measurements with the device connected to the computer.
- Turn off the device before changing the batteries of the device.
- A disregard of these instructions can lead to a damage of this device and serious
injuries.
For any further information feel free to contact PCE Instruments.
3
Technical Specifications
Measurement range:
Accuracy:
Resolution:
Sensor:
Temperature unit:
Display:
Data transfer:
Measurement frequency:
Power Supply:
Dimensions:
Battery lifetime:
Weight:
Operation conditions:
Storing conditions:
-100 … +400 °C
± 0.05 % + 0.1 °C (at 18 °C up to 28 °C) only device
0.01 °C
4- terminal Pt-100 class A (cable length approx.. 1.5 m)
°C / F
5 – digit LCD
USB
0.5 Hz
9 V bloc battery or optional 9 V adapter
185 x 65 x 36 mm
approx. 100 hours
360 g
0° … +50 °C, <80 % rH (non-condensing)
-10 … +60 °C, <80% rH (non-condensing)
3
Manual
www.industrial-needs.com
4
Detailed description of device
Fig.1
(1)
(2)
(3)
(4)
(5)
(6)
(7)
(8)
(9)
(10)
(11)
(12)
4.1
Connection socket for temperature sensor
Display
Power-key / key for display lights
Button for deviation measurement (REL)
Button for data recording (REC)
Key for MIN / MAX function (MIN / MAX)
Key for Data Hold function (HOLD)
Switch for temperature unit (°C / F)
Interface for connection to computer
Input for optional adapter
Stand
Cover of battery compartment
Pins of connection socket for temperature sensor
4
Manual
www.industrisal-needs.com
4.2
Display
Symbol
MIN
5
Explanation
The battery state is low. No precise operation!
MAX
HOLD
Indicating minimum value
Indicating maximum value
The data HOLD function is activated
The function “automatic switch-off is activated
REC
REL
°C F
h:m
The data is being recorded
The function “deviation measurement” is activated
Temperature unit °C or Fahrenheit
A temperature under 0 is being indicated
Hour : minute
Measuring Procedure
5.1 Switch device on and off
Press the
- button to switch on the device. In order to switch on the device, press the button for
three seconds.
5.2 Connection of temperature sensor
Push the connection plug of the sensor in to the correlating input of the device until it latches in.
5.3
Temperature measurement
The temperature senor is at the end of the metal tube of the
measurement sensor. In order to achieve an accurate
measurement of internal temperatures, insert the sensor head
deep into the medium, which should equal at least fifteen times the
sensor diameter.
5
Manual
www.industrial-needs.com
5.4 Switch temperature unit
The device is set by the manufacturer on °C. To switch to Fahrenheit, press the “°C/F“- button. The
device will save your settings even, if it is switched off.
5.5 Data Hold function
You can freeze the current measurement values by pressing the “HOLD” key. The display will then
indicate “HOLD”. To revoke the function, press the button again. If the Data Hold function is
activated, the functions “REL”, “MIN / MAX” and “°C/F” will be out of order.
5.6 Display lights
The lights of the display can be switched on by pressing the Power-button ( ). To switch the lights
off, press the button again. After 30 seconds the lights are switched off automatically.
5.7 Deviation measurements
If you press the “REL” button, the device will save the current value in its short-time memory and
indicate in the following the deviation from that value. To exit this function, press the key again.
5.8
Data recording
Note: The function “delete memory”, “data transfer to computer” and “memory settings” are deactivated in
this mode.
Set the memory interval first (see chapter 5.13 “Change memory interval”).
To start the recording, press the “REC”- button. The display will then indicate “REC”.
To stop the recording, press the “REC”- key again.
5.9
-
-
MAX / MIN function
By pressing the MIN/MAX button once, you will access the MAX / MIN function. This mode
indicates the relevant maximum and minimum value at the display
If the display indicates “MAX”, the maximum value will be indicated.
By pressing the “MIN/MAX” key again, the display switches to the minimum values. The
display will then indicate “MIN”.
By pressing the “MIN/MAX”- button again, the symbols “MIN” and “MAX” will be both
blinking. This means the minimum and maximum value will be both saved on the data
memory, while the display will indicate the current measurement value.
To exit this function, press the “MIN/MAX” button for about 2 seconds.
5.10 Automatic switch-off
The automatic switch-off will be pre-set. This means that the device will be automatically shut down,
if it has been inactive for 30 seconds. To deactivate this function, switch on the device while pressing
the “REL”- button.
5.11 Indication of the battery state
A low battery state is indicated by the
-symbol.
5.12 Set time and date
- Turn on the device whilst simultaneously pressing the “MIN/MAX”-button, in order to access
the Set-up mode.
- Press the “REL” key, to access the settings of the date and time. Both the ciphers on the
right will be blinking.
- Raise and decrease the values by pressing “REC” or “°C/F” until the correct month will be
indicated.
- Confirm your selection with the “REL” button. Now the two ciphers on the left will be blinking.
6
Manual
www.industrisal-needs.com
-
Raise and decrease their value by pressing the “REC”- or the “°C/F”-button, unit the correct
day is indicated.
Confirm your selection by pressing the “REL”-button. Now the two ciphers on the left will be
blinking.
Now you can set the hour by pressing the “REC” or the “°C/F”-button, until you have the
correct day.
Confirm your selection with the “REL”-button. Now the two ciphers on the left will be blinking.
Raise and decrease the value, by pressing the “REC”- or the “°C/F”- button, until you have
selected the right hour (24-hours format).
Confirm your setting with the “REL”-button. Now the minute (ciphers on the right) will be
blinking.
Raise and decrease their value by pressing the “REC” or the “°C/F”-button, until you have
selected the correct minute.
Confirm the selection by pressing the “REL”- button. Date and time are now set.
Note: By holding the “REC”- key pressed, or the “°C/F”-key, the value will be changing faster.
5.13 Change the memory interval
The interval determines how often the thermometer saves the measured values.
- Therefore keep the “MIN/MAX”-button pressed, while turning on the device. Thus you will
access the setup mode.
- Now press the “HOLD”-button to access the settings of the memory interval. The two ciphers
on the left will now be blinking.
- Raise or decrease the value, by pressing the “REC”- or the “°C/F”-button until it shows the
desired value for the hour (24-hours format).
- Confirm by pressing the “REL”-button. Now the two ciphers on the right will be blinking.
- Raise or decrease the indicated value by pressing the “REC”- or the “ON/OFF”-button, until
the correct value for the minutes is indicated.
- Confirm your choice by pressing the “REL”- button. Now the interval is set.
Note: By keeping the “REC”- or the “°C/F”- button pressed, the value can be changed faster.
5.14 Erase memory
If the device’s internal memory is full, the display will indicate a blinking “REC”-symbol. This means
that the values will be no longer recorded.
In order to erase the memory:
- Keep the “REC”-button pressed and turn on the device in order to switch to the “erase”mode.
- The device will now start a countdown, which will be indicated on the display, starting at 5
seconds. This is a safety mechanism. If you do not want to erase the data, release the
“REC”-button, before the countdown reaches 0.
5.15 Calibrating the device
- Place the sensor in a known, stable temperature area.
- Wait until the measurement value is stable. Now you have the option to alternate the Offsetvalue in the setup-menu, until it is accordant to the actual temperature (reference value).
- Turn on the device while keeping the “REL” or the “HOLD”- button pressed to access the setup mode.
- Press within three seconds the “°C/F”-button, and then the “Hold” button to access the
calibration mode.
7
Manual
www.industrial-needs.com
-
Use the “REC” (raise) or the “°C/F” (decrease) button to adjust the indicated value to the
actual reference value.
Confirm the selection by pressing the “HOLD”-button twice.
Note: You can cancel the process at any time by pressing the Power button (
).
5.16 Return to initial settings
- Switch on the device while pressing “REL” and “HOLD”, on order to access the setup mode.
- Press within three seconds the “°C/F”-button, to access the calibration mode.
- Press the “MIN/MAX”-button within three seconds to access the Recall-mode.
- Press the “HOLD”-button to chose the function “Default factory setting value”.
- Confirm with pressing the “HOLD”-key again.
Note: You can cancel the process at any time by pressing the Power button (
6
).
Data transfer to a computer
6.1 Installing the software
The enclosed CD will contain the software for the data collection as well as a USD driver for the
device. The software is compatible with the following system software: Windows NT 4.0 / NT2000 /
XP / Vista / Windows 7.
Follow these commands on the display for instalment. Consider that both compartments (software
and USD driver) need to be installed for a correct function. After installing the USB driver, the
window below will appear. Click on the control box “Launch the CP210x VCP installer” and continue
with the installation by clicking the “Finish” button.
8
Manual
www.industrisal-needs.com
After completing the installation, please check the device manager under the system settings to see
under which COM-Port the device is listed (e.g. the example below is the COM4 Port).
After completing the installation, the device can be connected via its USB cable to a computer. Start
the software and select the correct COM Port in the Drop-Down menu.
9
Manual
www.industrial-needs.com
6.2
Main menu and buttons
Open = retrieve data from hard drive
Save = Save data on hard drive
Print = Send current table of data to printer
Pause = Stop the data record
Run = Start the data recording
Output to Graph = Send table of data to further graphs.
New = Reset all data
Sampling rate = Time interval in-between the data recording (in minutes and seconds). You can
save up to 5000 data points. In case of transgression the oldest 100 points will be overwritten.
Option = Here you can find the options to alternate the parameters of the graph.
6.3
Real-time graph
Within the graph you can zoom in by pressing the left mouse button and marking an image section
and then releasing. To revoke the zoom again, click on the “Undo Zoom” button.
6.4 Table of values
In this view the real-time values are shown in a table. The maximum of the recordings is determined
by the hardware confirmation of the computer.
10
Manual
www.industrisal-needs.com
6.5 Data logger
In order to transfer the data from the device’s memory to the computer, press the button “data
logger”. Thus a progress beam will indicate the state of the data transfer. After a successful transfer
of the data, the number of transferred data sets will be indicated at the left side of the display with
their parameters (time and date of start, sampling rate …). Each data set can be seen in detail as a
diagram or a data table by clicking.
11
Manual
www.industrial-needs.com
7
Maintenance and Cleaning
7.1
Change battery
Warning: To avoid incorrect measurements and any damages caused by that, please
charge the battery immediately when the battery symbol is indicated on the display.
To change the batteries, switch off the battery, remove the cover of the battery compartment at the
back of the device and change the batteries. Insert a 9 V bloc battery from the same model.
Reattach the cover of the battery compartment afterwards again.
7.2 How to use the adapter
The measurement device features side-wards a Port for an optional adapter (DC 9 V). If the device
is connected via an adapter to a power source, whilst the batteries are still inside the battery
compartment, the device will drain its power from the adapter, not the batteries. The adapter is
prioritized in that case.
7.3 Cleaning
Clean the device with a damp cloth made of cotton that makes no fluffs. If necessary, use a mild
cleaner. Do not use any abrasive detergent or chemical solution.
8
Disposal
Batteries may not be put in the household waste. They have to be given in the set up collection
points.
NOTE: "This instrument doesn’t have ATEX protection, so it should not be used in potentially
explosive atmospheres (powder, flammable gases)."
Please contact PCE Instruments if you have any questions concerning our products, service etc.
Here you will find an overview of our measuring devices:
Here you will find an overview of our scales and balances:
Here you will find an overview of our laboratory equipment:
Here you will find an overview of our control systems:
http://www.industrial-needs.com/measuring-instruments.htm
http://www.industrial-needs.com/balances.htm
http://www.industrial-needs.com/laboratory-equipment.htm
http://www.industrial-needs.com/control-systems.htm
WEEE.-Reg. –Nr.: DE69278128
To follow the WEEE guidelines (Waste of Electrical and Electronic Equipment) we take our devices and either recycle them or give
them to a recycling company.
12