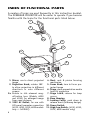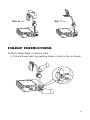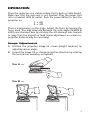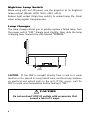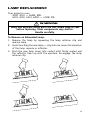
1
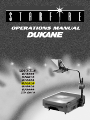
MODELS
SF6000
SF5510
SF4030
SF4010
SF3010
SF3000
HD 4010
5
5 YEAR LIMITED WARRANTY
This Dukane audio visual product is warranted to the original
purchaser under a 5 year limited warranty – – in normal use and
service – – against defects in material and workmanship. DUKANE
CORPORATION EXPRESSLY DISCLAIMS ALL OTHER WARRANTIES,
EXPRESSED OR IMPLIED,INCLUDING ALL WARRANTIES OF MERCHANTABILITY AND FITNESS FOR A PARTICULAR PURPOSE.
During the warranty period, Dukane Corporation will repair or
replace (at the Manufacturer’s option) any such defective parts
(except for lamps, which are subject to whatever warranties the
manufacturer may provide) without charge to the purchaser for
parts or labor when the product is returned, prepaid and insured, with
proof of purchase date. This remedy of repair or replacement is
exclusive of all other remedies that the purchaser may have.
This exclusive remedy is void if the product has been damaged by
accident or unreasonable use, neglect, or improper service or other
causes not arising out of defects in material or workmanship.
Dukane Corporation disclaims all liability for incidental or consequential damages of any kind, including all damages arising out
of any interruptions in operation of the product and all damages
to software.
No person, firm or representative is authorized to assume any
obligation or make any warranty on behalf of the Dukane Corporation
other than as stated above.
THIS LIMITED WARRANTY IS VALID FOR U.S.A. AND CANADA.
FOR OTHER LOCATIONS, LOCAL WARRANTIES APPLY.
Audio Visual Products
Audio Visual Products
2900 Dukane Drive • St. Charles, IL 60174-3395
Phone: 1-800-676-2487 • Fax: 630-584-0984
E-mail: [email protected] • Internet: www.dukcorp.com/av
401-546-06
IMPORTANT SAFETY INSTRUCTIONS
When using your overhead projector, basic safety precautions should
always be followed, including the following:
1. Read and understand all instructions before using.
2. Close supervision is necessary when any projector is used by or near
children. Do not leave projector unattended while in use.
3. Care must be taken as burns can occur from touching hot parts.
4. Do not operate projector with a damaged cord or if the projector
has been dropped or damaged — until it has been examined by a
qualified service technician.
5. Position the cord so that it will not be tripped over, be pulled or
contact hot surfaces.
6. If an extension cord is necessary, a cord with a current rating at least
equal to that of the projector should be used. Cords rated for less
amperage than the projector may overheat.
7. Always unplug projector from electrical outlet before cleaning and
servicing and when not in use. Never yank cord to pull plug from
outlet. Grasp plug and pull to disconnect.
8. Let projector cool completely before putting away.
9. To protect against the risk of electric shock, do not immerse this
projector in water or other liquids.
10. To avoid the risk of electric shock, do not disassemble this projector,
but take it to a qualified service technician when some service or
repair work is required. Incorrect reassembly can cause electric
shock when the projector is used subsequently.
11. The use of an accessory attachment not recommended by the manufacturer may cause a risk of fire, electric shock or injury to persons.
12. Connect this projector to a grounded outlet.
13. Disconnect this unit from its source of supply before replacing the
projection lamp.
Additional lamp safeguards: never handle lamps with bare fingers; periodically inspect lamps, when they’re turned off, for signs of blistering or
blackening; insure proper action of the cooling system; turn off the
projector immediately if the image becomes abnormally dim; never
operate a projector with the lamp housing open; and make sure that the
lamp itself is properly seated.
SAVE THESE INSTRUCTIONS
Thank you for choosing a
Starfire® Series
Portable/Professional
Overhead Projector.
The sleek, low-profile Starfire Overhead Projectors are
available in your choice of 3000, 4000/3200, 5500/4400
and 6000 ANSI lumens. Features of each model vary and can
include a single, triple or triple/wide-angle lens; built-in
AC outlets; and even an electronic “soft start” power supply
that improves the projected image, extends the
lamp life and reduces operating costs.
Because operation of all units is very similar, this
manual covers all models in the Dukane Starfire Series.
Audio Visual Products
2900 Dukane Drive • St. Charles, IL 60174-3395
Phone: 1-800-676-2487 • Fax: 630-584-0984
E-mail: [email protected] • Internet: www.dukane.com
TABLE OF CONTENTS
Page
LIFETIME LIMITED WARRANTY ................................. Inside Cover
SPECIFICATIONS .................................................................. 1
ELECTRICAL SAFETY GROUNDING INSTRUCTIONS ........................ 1
INDEX OF FUNCTIONAL PARTS ............................................. 2-3
SF MODEL SETUP and FOLDUP ............................................. 4-5
HD MODEL SETUP ................................................................. 6
OPERATION ......................................................................... 7
Image Adjustment .......................................................... 7
High/Low Lamp Switch .................................................... 8
Lamp Changer ................................................................ 8
LAMP REPLACEMENT ............................................................. 9
CLEANING ......................................................................... 10
SERVICING ........................................................................ 10
Shipping Information .................................................... 10
Service........................................................................ 10
No Charge Warranty Repair ............................................. 10
TROUBLESHOOTING ............................................................ 11
INFORMATION ON LAMP WARRANTY ...................................... 11
SF MODEL OPTIONAL ACCESSORIES ........................................ 12
HD MODEL OPTIONAL ACCESSORIES ....................................... 13
SPECIFICATIONS
SF MODEL Dimensions........... 5.6" H x 16.4" W x 17.8" D (Folded)
32" H x 16.4" W x 17.8" D (Opened)
HD MODEL Dimensions .......... 8.5" H x 16.4" W x 17.8" D (Folded)
32" H x 16.4" W x 17.8" D (Opened)
Aperture............................... 6000, 5510 — 11.2" x 11.2" (A4 )
3000, 3010, 4010, 4030 — 10.5" x 10.5"
Lens ............................ 3000 — Single Element, 293mm (11.5")
3010, 4010, 5510 — Three Element, 327mm (13.0")
4030, 6000 — Four Element, 280mm (11.0")
Lamp ............................................... 3000, 3010 — 360W, ENX
4010, 4030, 5510, 6000 — 410 W, FXL
Elevation ...................................................... Up to 20 Degrees
Focus ............................................................ Rack and Pinion
Power ..................................... 3000, 3010 — 120V, 60Hz, 4.4A
4010, 5510 — 120V, 60Hz, 9.8A
4030, 6000 — 120V, 60Hz, 10.3A
SF MODEL Power Cord ............................ 3-Wire Grounded, 10 Ft.
HD MODEL Power Cord ........................... 3-Wire Grounded, 10 Ft.
Safety ............ Safety Interlock System, Automatic Thermal Cutoff
SF MODEL Weight .........................................................19 Lbs.
HD MODEL Weight .........................................................22Lbs.
ELECTRICAL SAFETY
GROUNDING INSTRUCTIONS
This Class I product uses a three-wire power cord that grounds
the product for your protection. Do not DEFEAT or REMOVE the
grounding pin. If an extension cord is used, it must also be a
three-wire type with an ampere rating equal to or greater than
the product’s rating. The plug must be connected to a properly
grounded three-terminal power receptacle. Connection to any
other type of receptacle should be done only by a qualified
electrician in accordance with local and/or national electrical
codes.
1
INDEX OF FUNCTIONAL PARTS
A number of terms are used frequently in this instruction booklet.
The OVERHEAD PROJECTOR will be easier to operate if you become
familiar with the terms for the functional parts listed below:
1
2
2a
4
5
6
7
8
10
1. Mirror; use to direct projected
image
2. Projection Head; rotates 180°
to allow projection in different
directions or onto different
screens
2a. Rotate in 4th element magnification lens (Models 6000
and 4030) for enlarged image
from same distance
3. 120V AC Outlet; for use with
LCD panel/computer connection
(4010, 4030, 5510, 6000 models
only — 5A MAX!)
2
3
11
9
4. Mast; rack & pinion focusing
mechanism
5. Focus Knob; turn to focus projected image
6. Stage; place presentation media
here for projection
7. Stage Latch; release for lamp
access
8. Base Housing
9. Locking Collar; push down to
release mast (foldaway design)
10. Power Switch
11. High/Low Switch; (4010, 4030,
5510, 6000 models only)
13
12
12. Door Leg Assembly; close for
foldaway design, cord storage
13. Door Latch (one each side);
keeps doors closed
14
15
14. Lamp Change Lever; slide for
replacement/reserve lamp
15. Power Cord; stored in the unit’s
base
Models 6000 and 4030 also feature a soft start power supply which
extends lamp life, reduces operating costs and ensures a smoother,
flicker-free image.
3
SETUP INSTRUCTIONS SF MODELS
1. Set unit on projection table in the vertical position (handle up).
2. Slide bottom door latches out and swing both doors around to
magnet latches. Pull out the entire power cord. Leave doors open.
3. Tip unit over to rest on its legs. (Doors act as feet for the unit).
4. Turn focus knob clockwise until it stops at the end of the mast.
5. Rotate mast up until it locks into place.
6. Rotate the projection head assembly counterclockwise to the
working position.
Doors must be
7. Open mirror.
open for unit
STEP 1 —
to operate.
STEP 2 —
Slide
latches out
and swing
doors open.
Remove entire cord.
STEP 3 —
STEP 4 —
STEP 5 —
4
STEP 6 —
STEP 7 —
FOLDUP INSTRUCTIONS
Perform Setup Steps in reverse order.
• Unlock/lower mast by pushing down on lock collar as shown.
5
SETUP INSTRUCTIONS HD MODELS
1. Set unit on projection table and pull out the power cord from cord
storage compartment.
2. Turn focus knob clockwise until it stops at the end of the mast.
3. Rotate mast up until it locks into place.
4. Rotate the projection head assembly counterclockwise to the
working position.
5. Open mirror.
STEP 2 —
STEP 1 —
STEP 3 —
STEP 4 —
STEP 5 —
6
OPERATION
Place the projector on a stable surface that is desk or table height.
Make sure that the side vent is not blocked. Plug the power cord
into a standard 120V AC outlet. Push the power button to turn the
projector on.
I = ON
O = OFF
Place a transparency on the stage. Adjust the focus by turning the
focus knob. You may alternate between the wide angle (SF6000 &
4030) and standard lens by rotating the 4th element lens towards
or away from the projection head (some adjustment on screen-toprojector distance may be necessary).
Image Adjustment
A. Position the projected image on screen (height location) by
adjusting mirror angle.
B. Correct the image tilt or change projection direction by rotating
the lens/mirror assembly as required.
STEP A —
STEP B —
7
High/Low Lamp Switch
When using with an LCD panel, use the projector at its brightest
lumen output (Models 6000, 5510, 4030, 4010).
Reduce light output (High/Low switch) to extend lamp life. Ideal
when using regular transparencies.
Lamp Changer
The lamp changer allows you to quickly replace a failed lamp. Turn
the power switch “OFF.” Simply push slightly, then slide the lamp
changing lever towards the side labeled “RESERVE.”
LEVER
CAUTION: If the OHP is brought directly from a cold to a warm
location or it is placed in a very humid room, moisture may condense
on electrical and optical parts in the unit. If this occurs, wait for
OHP to reach room temperature before turning it “ON.”
CAUTION
Do not overload 120V AC outlets with accessories that
exceed a total of 5 amps.
8
LAMP REPLACEMENT
Your projector uses:
3000, 3010 — 360W, ENX.
4010, 4030, 5510, 6000 — 410W, FXL.
WARNING
Lamp and adjacent metal parts are hot. Allow lamp to cool
before replacing. Glass components may shatter.
Handle carefully.
To Remove an Exhausted Lamp:
1. Remove the lamp by squeezing the lamp retainer clip and
remove lamp.
2. Avoid touching the new lamp — oily skin can cause discoloration
of the lamp capsule or reflector.
3. Push the new lamp down into socket until firmly seated and
the reflector lines up with the aperture. Re-engage the lamp
retainer clip.
9
CLEANING
For best performance, keep your projector free of dust and surface
dirt. Keep covered when not in use.
Daily Cleaning: Use a soft, lint-free cloth to remove dust from
stage glass, projection lens and magnifier lens (6000 and 4030
models only). Lens cleaner may also be used on these components.
Projection Mirror: Do not attempt to clean this mirror with
cleaning agents — use a soft lens brush to remove dirt.
Fresnel Lens: Use a soft, lint-free cloth or soft brush to remove
dust. Use of cleaning agents may damage optics. Disassembly
is not recommended.
SERVICING
Shipping Information
If it becomes necessary to return a unit, please use the original
packing material or pack securely to insure safe shipment.
Service
Service and parts are available from Dukane or from an approved
service station. Contact the Dukane Service Department at
1-800-676-2487 to order parts or for the nearest service station.
Service manuals are also available at a nominal cost.
No Charge Warranty Repair
Your unit must be taken or sent to Dukane or to an approved service
station with your sales receipt.
10
TROUBLESHOOTING
Symptom
Neither lamp or
fan operate
Probable Cause
a. Unit unplugged
b. No power at wall outlet
c. Stage lid not closed
d. Mirror box not lowered,
(interlock switch not
activated)
e. Blown fuse
No lamp, fan runs
a. Burned-out lamp
b. Lamp changer not engaged
c. Lamp not seated in receptacle
New lamp installed,
lamp still not on,
fan runs
No fan, lamp on
a. Defective lamp
Solution
a. Plug unit into
outlet
b. Verify outlet
has power
c. Close stage lid
d. Open bottom
doors and insure
mirror box lowers
e. Call service
a. Replace lamp
b. Slide changer arm
into position
c. Seat lamp
b. Defective electrical system
a. Try another new
lamp
b. Call service
a. Fan is obstructed
b. Fan motor has burned out
a. Call service
b. Call service
Call Service at 1-800-676-2487.
INFORMATION ON LAMP WARRANTY
Projection lamps are warranted by the lamp manufacturer and not
by the equipment manufacturer. If you have a lamp which you
believe to be defective, contact the manufacturer of that particular
lamp for the appropriate warranty replacement.
A BULB, Inc.
134 Golden Gate Ave., Suite B
San Francisco, CA 94102
1-888-882-2852
WIKO Ltd.
10490 W. 164th Place
Orland Park, IL 60462-5495
1-800-524-1754
Osram-Sylvania Products, Inc.
100 Endicott St.
Danvers, MA 01923
1-888-677-2627
General Electric Company
1501 South 19th Street
Mattoon, IL 61938
1-800-435-2677
11
OPTIONAL ACCESSORIES SF MODELS
ENX LAMP
360W/82V
456-188
(Models 3000/3010)
FXL LAMP
410W/82V
456-192
(Models 4010, 4030, 5500, 6000)
SOFT SHOULDER BAG
(PADDED)
128-46
ROLL FILM
ADAPTER KIT
438-814
HARD-SIDED
CARRYING CASE
185-398
ATA SHIPPING CASE
185-397
ACETATE ROLL (50')
310-6
To order
accessories,
please call
1-800-676-2487.
PROTECTIVE
DUST COVER
128-61
12
OPTIONAL ACCESSORIES HD MODELS
ENX LAMP
360W/82V
456-188
(Models 3000/3010)
FXL LAMP
410W/82V
456-192
(Models 4010, 4030, 5500, 6000)
SOFT SHOULDER BAG
(PADDED)
128-1
HARD-SIDED
CARRYING CASE
185-385
ATA SHIPPING CASE
185-397
ROLL FILM
ADAPTER KIT
438-814
To order
accessories,
please call
1-800-676-2487.
13
Part # 401-545-05