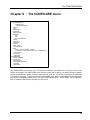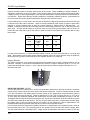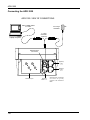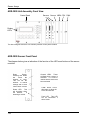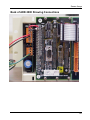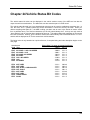
1
Operating Manual ADR ™ Line of Automatic Data Recorders Operating Manual ADR Line of Automatic Data Recorders from Quixote Traffic Corporation 2/25/2005 p/n: 99-133 Rev 2B Copyright © 2005 Quixote Traffic Corporation. All rights reserved. Information furnished by Quixote Traffic is believed to be accurate and reliable, however Quixote does not warranty the accuracy, completeness, or fitness for use of any of the information furnished. No license is granted by implication or otherwise under any intellectual property. Quixote reserves the right to alter any of the Company's products or published technical data relating thereto at any time without notice. No part of this publication may be reproduced, stored in a retrieval system, or transmitted in any form or via any electronic or mechanical means for any purpose other than the purchaser’s personal use without the expressed, written permission of Quixote Traffic Corporation. Quixote Traffic Corporation 2511 Corporate Way Palmetto, FL 34221 U.S.A. Trademarks The ADR-3000,ADR-3000 Plus, ADR-1000, ADR-1000 Plus, ADR-2000, ADR-2000 Plus, ADR JR/RT, ADR Junior, ADR-6000, ADR StopWatch, SmartToll, and TOPS are trademarks or registered trademarks of Quixote Traffic Corporation, in the USA and other countries. Idris and Idris Products are registered trademarks of Diamond Consulting Services, Ltd. Microsoft and Windows are trademarks or registered trademarks of Microsoft Corporation. Other brands and their products are trademarks or registered trademarks of their respective holders and should be noted as such. WARNING: This equipment generates, uses and can radiate radio-frequency energy, and if not installed and used properly as described in the product manual, may cause interference to radio communications. It has been designed to comply with the limits of a class A computing device pursuant to Subpart J of Part 15 of FCC rules, which are designed to provide reasonable protection against such interference when operated in a commercial environment. Operation of this equipment in a residential area is likely to cause interference, in which case, the user, at his own expense, will be required to take whatever measures may be required to correct the interference. manual assembly: 81-921 manual content: 99-133 manual cover art: 99-301 About this manual As a general rule, this manual is written in the same order as the menus of the ADR. Procedures are presented in a step-by-step manner and selection choices are explained with accompanying text, reference tables, helpful graphics, and a glossary of terms. The appendixes at the end of the document contain useful reference materials to assist in selection and installation of a variety of sensors for use with the ADR. Read the “Things you should know before you start using the ADR” section in chapter 1, first. Generally acquaint yourself with the ADR setup and operations before performing a field installation. Table of Contents Chapter 1 An Introduction to the ADR Things you should know before you start using the ADR If you have just received the ADR; Chapter 2 The Control Panel & Menus The ADR Control Panel The ADR “PEEK” Screen The ADR “MAIN MENU” Screen The “JUMP KEY” Menu Short Cuts ADR Menu Map Chapter 3 The CHECK Menu CHECK EQUIPMENT step by step Chapter 4 The SETUP FILES menu SETUP FILES FOR ADR FIRMWARE VERSION 429 SAVE SETUP Chapter 5 The CUSTOM SETUP menu INITIAL SETUP INSTRUCTIONS CUSTOM SETUP Step by Step Portable WIM Setup – step by step Chapter 6 : The CONFIGURE menu Expert Calibration Files The CALIBRATION menu FILTERS Setting the LIMITS TIMEOUTS OPTO OPERATION COMMS ENGINEERING menu 1 1 1 5 5 6 6 7 8 9 16 17 18 28 29 37 38 40 43 44 46 51 52 53 53 54 59 iii An Introduction to the ADR SENSOR CONSTRAINTS Chapter 7 The FILES Menu Chapter 8 PC cards Chapter 9 : Maintenance Chapter 10 : Troubleshooting Chapter 11 Classification What is a ClassTree? ADR Default Scheme F Classification Definitions (v429) Chapter 12 : Roadtube Arrays Chapter 13 Piezo Sensor Arrays Chapter 14 Loop Arrays Chapter 15 Combined Sensor Arrays Chapter 16 WIM Arrays Loop-WIM-Loop Array WIM-WIM Array WIM-Loop-WIM Array Loop-WIM-WIM and WIM-WIM-Loop Arrays Chapter 17 SL-58P Loop Detector LOOP BOARD HYSTERESIS SETTINGS Loops for Data Collection Chapter 18 SA-58P Piezo Detector Chapter 19 SC-514P Contact Closure Input Chapter 20 Glossary of Terms Chapter 21 ADR-1000 Reference Information Chapter 22 ADR-2000 Reference Information iv Chapter 23 ADR-3000 Reference Information Back of ADR-3000 Showing Connections Chapter 24 Vehicle Status Bit Codes v ADR Plus Operating Manual vi An Introduction to the ADR Chapter 1 An Introduction to the ADR Things you should know before you start using the ADR The ADR is designed to be easy to operate. One method used to accomplish the ease of operation is to factory set certain parameters. The factory settings in this new ADR are different from previous ADR’s you may have used. You may wish to change these for your particular area of operations. Even if you are accustomed to using other ADR or Peek equipment, you should take note of the settings as listed below. 1. The “SPACING” setting for speed sensing is factory set to 16 feet. You can change this if desired, and should use a setting of 8 feet for work in a urban or slow traffic area. 2. The factory setting for roadtube debounce is 40 ms., the maximum inter-axle distance on any vehicle is set to 35 feet, and the maximum length of any vehicle is set to 80 feet. 3. To make changes easy for you, two Expert Calibration files are included. “FAST_50” or “CITY_35” should be used based on the approximate average speed of traffic in the area where you are using the ADR. 4. Data files collected from the ADR will be “daily” type (not continuous) and a new file will be started each night at midnight. You can change this if desired. 5. File (memory) “wrapping” is active. “Wrapping” means that the oldest file is automatically deleted when space is needed for new files. You can change this if desired. 6. The communications port will automatically “turn on” when a file transfer is requested, and will “turn off” after the transfer is completed. Communications are set to a fast rate of 19,200 baud. You can change this if desired. If you have just received the ADR; Check the battery voltage and the internal battery connection before using the unit. If the battery is connected and has a usable charge, the display will turn on when you press the green “ENTER” key on the control panel. When the display turns on, you can read the battery voltage on the center of the display. The battery voltage should read approximately 6.40 volts before use. What are Setup Files? When you install a traffic recorder at a site, you perform what is called a “setup” by instructing or programming the type of information you wish to collect. In the ADR you could use the CUSTOM SETUP menu to develop a unique set of instructions. Your instructions can be saved as a “setup file”, and the file can then be reloaded. Loading a “setup file” is faster and easier than custom making a new set of instructions. ADR units are shipped ready for use with preprogrammed setup files as shown on the next page. These are supplied to you as short cuts, to help you get started collecting quality data. Just load and go. The ADR setups have been established as standard studies universally applied to traffic data collection. In your operations you may not need all of them, or you may wish for something special. Please feel free to contact us with your requirements. Upon request, Peek can supply custom setups for various applications. We will be happy to provide you with the setups you desire. 1 An Introduction to the ADR About the ADR This manual describes the installation, operation and maintenance of the Peek Traffic, Inc. Automatic Data Recorder (ADR) This manual describes all versions of the ADR and the new “Plus” versions of the ADR family. This manual may also be used as a hardware reference for the ADR-750, which is a special roadtube only model of the ADR-1000. The ADR has been developed to be the most advanced, yet simple-to-operate instrument available today for the counting, classification and monitoring of traffic. It is completely self-contained, and includes control panel facilities for configuring, data collection and live monitoring. All ADR units have at least one communications port, which allows a PC to modify the ADR’s settings and to collect the data stored. In fact, everything that can be done from the front control panel of the ADR can also be achieved by controlling the ADR from a PC. The PC can communicate via a modem with the ADR by using an optional telemetry software package. As an option, data can be collected from the ADR using a hand held PDA or Palm Pilot® with appropriate software. Depending on the sensor configuration, the ADR is able to record the total volume of traffic, and a vehicle’s direction, headway, gap, speed, axle classification, length and weight. In addition, details can be recorded on a per-vehicle, per axle or per sensor event basis for later analysis. For axle classification, a classification tree is provided that meets FHWA standards, or alternatively, custom classification can be configured by the operator for local requirements. The ADR is a precision electronic instrument, which has been built to the highest standards of quality and durability. Used with care, it will provide accurate and comprehensive data for many years. The ADR is available in three main versions: the ADR-1000 and ADR-2000, which are portable, and the ADR-3000, which is a rack mount version suitable for permanent installations. The ADR-1000, ADR-2000, ADR-3000 (and “Plus”) versions have differing numbers of slots for adding optional sensor boards. These may include piezo, piezo WIM (Weigh In Motion), loop (presence) or contact closure boards. The standard portable ADR has either 2 or 4 road tube inputs. For other applications, additional sensor boards can be fitted to the ADR internal expansion slots (up to eight boards in the racked version). Each board can contain either eight loop (presence) inputs, eight piezo inputs, or fourteen contact closure inputs. The ADR-Plus The name “ADR Plus” indicates an enhanced version of the ADR which provides 1 Megabyte of onboard SRAM (used for data storage) memory within the basic ADR before adding extra cost memory solutions such as PCMCIA cards. The new “ADR-Plus” also contains 1 Megabyte of onboard EEPROM space allows program development for more complex ITS and new technology related operations. The of the Battery Sentinel circuitry has been integrated into the main CPU board design along with a socket mounted 5 Amp Slow-Blow fuse. By incorporating the latest developments in surface mount technology, the reliability has been further enhanced and when service is required, it will be performed faster. The other changes incorporated to assist in manufacturing and service testing help to hold the line on rising costs while assuring the best quality available. Since the ADR Plus CPU boards are direct replacements for previous boards, they provide a smooth upgrade path for existing equipment owners. ADR Plus components include: ADR-1000-Plus main CPU board (#82-1099), the ADR-(2000-3000)-CPU-Plus (#82-1410-1010f), the Dual Comms card (#82-1081), and the PC-Card Drive (#82-1031). Various other sensor cards are also available and are described in other manuals. CPU Plus boards can be used as direct plug in, upgrade or repair replacements for previous boards, and will provide: EEPROM capacity of 1MB, SRAM capacity of 1MB, Integrated Battery sentinel and CPU fuse, (Socket mounted 5 Amp Slow Blow). In Plus units, the sensor card hardware reset can be controlled by the CPU, and the installation of new firmware (Reprogramming) can be performed with without a motherboard. Additionally, in the ADR-2000 Plus and ADR 3000 Plus configurations, the CPU Plus card is fitted with 2 LED’s and a hardware reset button. (not shown on 2000) 2 An Introduction to the ADR ADR-750 and ADR-1000 Plus Shown here are the popular ADR-750 with 2 roadtube inputs and the new ADR-1000 Plus. The ADR-1000 Plus builds upon the high standards of the ADR-1000 and looks essentially the same. Inside, The ADR-1000 Plus adds more memory and incorporates watertight barrier roadtube inputs. The ADR-1000 Plus unit pictured is equipped with the integral solar panel option and the PC Card (PCMCIA) memory options. The Solar option allows roadtube units to stay in the field collecting data indefinitely. The PC Card memory option is an easy way to collect or transfer files from unit to unit and to the office. In addition to the four roadtube inputs, the ADR-1000 Plus has room for one sensor module, which can provide eight loop, eight piezo, eight WIM, or 14 contact closure inputs depending on the module fitted. Various other options are available for special applications and data retrieval. ADR-2000 Plus The ADR-2000 Plus is the portable and expandable “big brother” to the 1000 unit and features a easily assessable battery compartment for in the field battery changes with out tools. A popular option is the solar panel (not shown) which is integral to the lid when ordered. Four expansion slots (one for memory, three for sensor modules) allow a extensive range of application options. When fitted with 3 of the SC-514P contact closure input cards, the portable ADR-2000 Plus is able to monitor a maximum of 42 lanes of traffic. WIM sensor boards are available which provide inputs for up to eight WIM sensors per board When fitted with three of the SL-58P eight channel loop cards, up to 24 lanes can be counted simultaneously with one loop in each lane. A WIM configuration option is two WIM modules and a loop module, providing up to eight lanes of Weigh-In-Motion data can be recorded from WIM-Loop-WIM arrays in each lane. The ADR-3000 Plus (ADR-3019 Plus shown) The ADR-3000 (and Plus versions) are intended for use at continuous permanent sites when installed in a weather proof cabinet. The ADR-3000 is available in both compact 10 inch and full width 19 inch rack mount configurations. Up to eight sensor modules provide 64 input capability. Two memory expansion options can provide additional data storage or the new high speed (115k baud) “Dual Comms” communications modules can provide up to 5 communications ports for simultaneous operation of multiple tasks. Various power supply configurations are available. 3 ADR Plus Operating Manual 4 The Control Panel & Menus Chapter 2 The Control Panel & Menus The ADR Control Panel The ADR Control Panel consists of a Liquid Crystal Display (LCD) and keypad. An overview of the function of each button on the keypad is given in the following diagram. When certain PC programs access the recorder via the comms port, the LCD displays “KEYPAD INHIBITED”. While in this state, the buttons on the front panel have no effect when pressed. The Liquid Crystal Display (LCD) enables you to view the ADR’s settings and to change those settings. The F1 & F2 keys move the cursor, up or down. The F3, & F4 keys scroll the menu options left or right. F1 is also used to arm the ADR, from the PEEK screen. F1 The two LEDs are used by the event monitor. F2 PEEK TRAFFIC ADR 11:16 6.49V IDLE F1 TO ARM NOW ESC FOR MENUS A B F3 F4 ABC 1 DEF 2 GHI 3 JKL 4 MNO 5 PQR 6 STU 7 VWZ 8 YZ_ 9 ! 0 The numbered keys allow you to enter numeric data. For SITE and STATION, Press and hold F1 for access to alphabetic characters like on a telephone dial. Release F1 to advance to the next character. ESC provides access to menus and backs up to a previous menu. This is also used to cancel some operations. ESC ENTER Pressing ENTER will power up the display and reset the power save timer. The ENTER key confirms a menu selection and advances to the next screen or menu prompt. Note: The ADR has a power-saving feature that blanks the display if no buttons have been pressed for ten minutes. To restore the display, press the ENTER button. Press and hold down the F1 key to generate alpha characters for SITE ID and STATION: . Example: While the F1 key is held, pressing key 7 will input "S" to the screen. The 9 key underscore "__" can be used as a space. Release of the F1 key will advance the cursor position to the right. Press “ENTER” when finished. The exclamation point "!" zero key will generate a full range of characters and symbols. You may press and hold to scroll through the characters. Note: Some computers or software may not accept some symbols. 5 The Control Panel & Menus The ADR “PEEK” Screen When you first power up the ADR, or when you press “ENTER” the initial display is the “PEEK” screen. which is shown in the following diagram. ENTER ADR clock time (24 hour format) ADR battery voltage. Maintain above 6.00V. Press “ENTER” to power up the display PEEK TRAFFIC ADR 13:16 6.49V IDLE F1 TO ARM NOW ESC FOR MENUS Status indicator: “IDLE”, (not ARMED or REC) “ARMED”, (will start at:) “REC” (recording) Adjusting the display contrast: While the “PEEK” screen is displayed, you can adjust the contrast of the display . Pressing “5” will darken the display. Pressing “1” will lighten the display. (see the section on Troubleshooting the ADR, in this manual, for more information) Pressing keys “6” and “0”simultaneously will invoke the power save mode (display off) if you are finished viewing the display. This command is effective at any time in any menu screen. To open the MAIN MENU: ESC When the “PEEK” screen is displayed, press “ESC” (escape) Press “ESC” to open “MAIN MENU” The ADR “MAIN MENU” Screen The MAIN MENU provides access to all of the ADR menu options. The availability of some menus depends on your ADR’s hardware and on previous settings you have made. The CHECK MENU can be used at anytime and will not disturb data recording. The CHECK menu provides access to CHECK SETUP, COUNT MONITOR, VEHICLE MONITOR, EVENT MONITOR, CHECK EQUIPMENT, and CHECK HARDWARE functions. [1] [3] [4] CHECK* SETUP FILES CUSTOM SETUP CONFIGURE v [3] [4] [5] SETUP FILES CUSTOM SETUP CONFIGURE FILES* F2 Press “F2” to move the cursor down. ENTER Press “ENTER” to make your selection The SETUP FILES menu provides access to fast setup files when the ADR is IDLE. The CUSTOM SETUP menu provides access to all of the ADR’s setup options when the ADR is IDLE. The CONFIGURE menu, provides access to a wide variety of area and site related settings. The FILES menu, provides access to all files which are stored in the ADR. For more information on any of these menus, you will find that each has a section in this manual. 6 The Control Panel & Menus The “JUMP KEY” Menu Short Cuts The operation of the menus has been modified to provide fast access by assigning a “JUMP KEY” number to the 8 most often used menus. 8 screens have been assigned a “JUMP KEY” number. From any corresponding menu with any number displayed, pressing the number associated with the desired “JUMP KEY” menu will result in the display jumping immediately to the desired menu screen. The numbers will also appear next to the menu option they represent. An example of how this appears on the main menu screen is shown below: [1] [3] [4] CHECK SETUP FILES* CUSTOM SETUP CONFIGURE v The complete list of menus for which “quick access” numbers have been assigned is as follows: Jump Key 1 2 3 4 5 6 7 8 Destination Jump Menus CHECK QUICK SETUP (UK versions only) CUSTOM SETUP CONFIGURE FILES CONFIGURE / CALIBRATION CONFIGURE / CALIBRATION / SENSITIVITY CHECK / COUNT MONITOR As an example, if you start at the main menu screen shown above left, and press key number 6, you will next see the screen below left; If you then press 4, the display will jump to the screen shown on the right. [7] SENSITIVITY* DEBOUNCE SPACINGS MAX LENGTHS [6] Press 4 CALIBRATION* FILTERS LIMITS TIMEOUTS v The menu map on the following page also shows the “JUMP KEY” numbers in association with the menus. 7 The Control Panel & Menus ADR Menu Map The “PEEK” screen PEEK TRAFFIC ADR 12:08 6.11V IDLE F1 TO ARM NOW ESC FOR MENUS The “MAIN MENU” [1] CHECK SETUP FILES [3] CUSTOM SETUP [4] CONFIGURE [5] FILES [5] FILES COPY (NEW, OLD, ALL, TAG) DELETE DIRECTORY FORMAT MEDIA (AND TEST) ESC Press “ESC” to open “MAIN MENU” 8 [1] CHECK CHECK SETUP [8] COUNT MONITOR VEHICLE MONITOR EVENT MONITOR HARDWARE MONITOR CHECK EQUIPMENT SETUP FILES LOAD SETUP SAVE SETUP [3] CUSTOM SETUP (USA) SITE ID & STATION SENSORS IN ARRAY TYPE OF ARRAY NUMBER OF ARRAYS FILES REQUIRED? NUMBER OF STUDIES? HEADING 1, HEADING 2, HEADING 3 CLASS, SPEED, HEADWAY, GAP, LENGTH, CHANNEL MAIN INTERVAL NUMBER OF PEAKS START NEXT INTERVAL? NEVER END? [4] CONFIGURE [6] CALIBRATION [7] SENSITIVITY WHICH SENSORS? WEIGHT WIM DEBOUNCE SPACINGS MAX LENGTHS FILTERS BIN PVR VEHICLE MONITOR LIMITS TIME OUTS OUTPUTS COMMS DATE / TIME FILE STORAGE MISC UNITS, LENGTH, SPEED, WEIGHT, FILES, DAILY, 24HR, 48HR, 72HR, 7 DAY, CONTINUOUS WRAP FILES? AUTOARM LANGUAGE ENGINEERING ENTER SERIAL NUMBER ACCURACY LAST REBOOT AUTO RESET BOARDS Press “ENTER” to INITIALIZE make your selection. COLD BOOT The Check Menu Chapter 3 The CHECK Menu [1] CHECK CHECK SETUP [8] COUNT MONITOR VEHICLE MONITOR EVENT MONITOR HARDWARE MONITOR CHECK EQUIPMENT The CHECK menus enable you to check that the ADR and the sensors connected to it are functioning correctly without interfering with the data recording function. CHECK is entirely safe. In the event of a fault, the CHECK options can be useful to isolate the fault and determine the cause. You will should always use the options to ensure that the ADR and sensors have been installed correctly before leaving a study site. The ADR does not need to be armed or collecting data for you to use the CHECK menu options. To gain access to the CHECK menus, select CHECK from the Main Menu. The following paragraphs explain how to use each option. CHECK SETUP [8] CHECK SETUP* COUNT MONITOR VEHICLE MONITOR EVENT MONITOR ⇒ To Check the Setup of the ADR: 1. Select CHECK SETUP from the CHECK menu. 2. Press ENTER to display the next screen of information. Repeat pressing ENTER to continue advancing through the various screens. When complete, the display will return to the “Peek Screen”. The CHECK SETUP option enables you to find out very quickly how you have configured and set up the ADR or how it was last used if the ADR is idle. The following information is displayed: • The SITE ID and STATION ID. • The array type and end-vehicles method (C = count ratio, T = timeout and B = both). • The main interval. • The four peak intervals. • The channel assignments. • The data being collected. • The PVR choices. 9 The CHECK Menu [8] COUNT MONITOR [8] CHECK SETUP COUNT MONITOR* VEHICLE MONITOR EVENT MONITOR ⇒ To Use the COUNT MONITOR: 1. Select COUNT MONITOR from the CHECK menu. 2. Press ESC to return to the CHECK menu. The COUNT MONITOR option shows the total volume of traffic for each channel being recorded according to the way the operator has setup the ADR. If the ADR is recording data, the values displayed in the COUNT MONITOR screen are reset to zero at the end of each MAIN INTERVAL. If the ADR is not recording data, the values are reset to zero each time the operator leaves the screen. Note: If 10 lanes of traffic are being recorded as only 2 channels, the count monitor will only display the 2 channels. The COUNT MONITOR screen allows you to view the count for all operational channels to be displayed by using the F1, F2, F3, and F4 keys to scroll the screen. The ADR can perform up to 64 channels of count and up to 8 channels can be viewed at the same time in this form. The cursor keys will only operate if there are additional counts to be displayed by scrolling. CH01 CH02 CH03 CHO4 1 2 3 4 CHO9 CH10 CH11 CH12 99 1010 1111 1212 CH17 CH18 CH19 CH20 17 18 19 20 CH25 CH26 CH27 CH28 2500 2600 2700 2800 10 F1-F2-F3-F4 Press to scroll the screen CH05 CH06 CH07 CHO8 55 66 77 88 CH13 CH14 CH15 CH16 1313 1414 1515 1616 CH21 CH22 CH23 CH24 221 222 223 224 CH29 CH30 CH31 CH32 9 10 11 12 The Check Menu VEHICLE MONITOR ⇒ To Use the VEHICLE MONITOR: [8] ARR 1 2 5. CHECK SETUP COUNT MONITOR VEHICLE MONITOR* EVENT MONITOR DIR CL SPD AX W + 2 70 2 - 3 65 2 1. Select VEHICLE MONITOR from the CHECK menu. 2. Use the left and right arrow keys as required to view all of the information. 3. Use the up and down arrow keys as required to scroll up and down the listing of the last twenty five vehicles that have been sensed by the ADR. 4. Press ESC to return to the CHECK menu. When the Vehicle Monitor is first displayed, Vehicles crossing all available arrays are shown. At busy sites, this may be more data than the operator can use. Pressing the corresponding number key, 1 through 9 will filter out all data except for the array number pressed. Pressing “1” will only show vehicles crossing array 1. If the operator then pushes number 5, the display will switch to showing only vehicles crossing array 5. If no array is available corresponding to the number pressed, or if “0” (zero) is pressed, the display will pause. This is useful if you wish to look at a particular vehicle that has already scrolled off screen. To clear and restart all lanes, press “ESCAPE” to leave the VEHICLE MONITOR, then press “ENTER” to return. The VEHICLE MONITOR is a display of vehicle characteristics as determined by the ADR-1000 after each vehicle has passed over the sensors of each array. In the example screen, the following information is displayed for the most recient vehicle during a classification study: Array 1, Direction +, Class 2 (car), 70 Mph, 2 Axles. More information about the axle spacings is available by pressing “F4” to scroll the display to the right. Pressing “0” (zero) will freeze the screen. Pressing “ESC” will clear the screen. This is similar to displaying Per-Vehicle-Records. The following columns may be displayed, depending on the choices made by the operator in the CONFIGURE \ FILTERS menu and the configuration of the recorder. At any time operators can turn on or off the display of individual columns they are not interested in with out any effect on the actual data being recorded. This is a display only function for use in checking the operation of a site. MM:DD:YY and HH:MM:SS - Date and time of the event. ARR - Array number. FLOW - Direction of the event; “+” means forwards and “-” means backwards. STAT - Status of vehicle information collected, represented as a hexadecimal number, e.g. FFFF (information definitely correct). Refer to the next paragraph for more information. VEHNO - Vehicle number. Each vehicle detected is given a unique sequential number. CL - Derived class of the vehicle. SPD - Derived speed of the vehicle. AX - The number of axles. LPL - Vehicle length, as measured using loop sensors. WBL - Total wheelbase length, as measured from the first axle to the last axle, using axle sensors. WBx - The distances (spacing) between the successive axles on a vehicle. WB1 (wheelbase 1) is the distance between the first axle and the second axle, etc. WBA represents wheelbase 10. HDWAY - Headway (front of vehicle to front of following vehicle in seconds). GAP - Vehicle gap (rear of vehicle to front of following vehicle in seconds). RT - Road temperature. GROSS - Gross vehicle weight. AWx - Axle weights (e.g. AW1 is the weight on the first axle). AWA is for axle 10. AWB is for axle 11. 11 The CHECK Menu Vehicle Status The vehicle status code is usually seen as a “FFFF” displayed on the screen of the ADR while observing vehicle passage in the vehicle monitor screen. The vehicle status code can also be output via serial communications. The status can also be stored as part of a PVR record. The “FFFF” is a 2 byte hexadecimal code that can be used to troubleshoot a problem site. For example FFFF (GOOD) means the sensor information is correct as seen by the ADR. The first two characters (on the left) should always be F, as they are only used as “place holders” and no error code has been assigned to them yet. When you observe anything other than an F, the ADR is telling you that it saw an error in the stream of sensor events from a particular array. Text Meaning UNBALANCED Unbalanced lead/lag sensor hits. The number of hits on the lag sensor were not equal to the number of hits on the lead sensor SEQUENCE Other unusual sensor sequence. OFF SCALE WIM onscale sensor missed. LOW SPEED Vehicle stopped over the array (i.e. any speed less than 4 MPH). NO SPEED A valid speed could not be determined. The average speed of the previous 25 good vehicles has been used to determine axle spacing, since the real speed of the vehicle could not be calculated. (If 25 good vehicles are not available than 50 mph is used as a starting value.) LAG The lag sensor was used instead of the lead sensor for the calculation of vehicle parameters. Bit 0 may also be unset at this time. If the axle sensor hits are unbalanced; the lag sensor is determined to be the most reliable and is used. NO LOOP No loop detection sensed (only relevant for arrays that include a loop) Some typical example Status Codes follow: Status code FFAE means NO LOOP, UNBALANCED, NO SPEED Status code FFEE means NO SPEED, UNBALANCED Status code FFBE means NO LOOP, UNBALANCED A table of available codes and the resultant messages is contained in an addendum to this manual for your reference use. Also note that a helpful software spreadsheet has been prepared and is available from Peek to assist you in decoding this information. Check the peektrafficinc.com website or contact your Peek representative for a free copy. 12 The Check Menu EVENT MONITOR ⇒ To Use the EVENT MONITOR: CHECK SETUP* [8] COUNT MONITOR VEHICLE MONITOR EVENT MONITOR 1. Select EVENT MONITOR from the CHECK menu. 2. Press the number of the array whose event details you wish to view. The EVENT MONITOR displays each array’s individual sensor events as they occur. 3. Use the left and right arrow keys as required to view all of the information. 4. Use the up and down arrow keys as required to scroll up and down the list of data. 5. Press ESC to return to the CHECK menu. Each line displayed has the following format: <Event ID> <Minutes> <Milliseconds/Weight> <Message> The LEDS: On an ADR-3000 unit each sensor board has individual front panel LEDs for each sensor. When the EVENT MONITOR menu is selected, either directly on the ADR control panel or by computer or telemetry contact, the sensor LED’s will turn on and off to mimic the detection activity of each sensor. Pressing and holding the front panel lamps button on each sensor module can manually enable the LED’s. Note: Piezo operation is very fast and of a short duration so the operator will have to watch closely to see the LED flash. On ADR’s with a keyboard and display there are also two red LED’s mounted just to the left of the display. These are labeled “A” and “B”. The “A” LED flashes when the lead sensor of an array activates. The “B” LED flashes when the lag sensor activates. Typically these would correspond to roadtubes 1 and 2 on portable units but have some use with other sensors. Just as with the VEHICLE MONITOR screens, pressing a number key that corresponds to an array, will assign the “A” and “B” LED’s to mimic the corresponding array. This has proven to be most useful with arrays having two axle sensors, in establishing the correct connection. The meaning of each of these fields is described below. <Event ID> The event ID is a hexadecimal (hex) value that identifies the source of the event. ADR-1000: • If a loop or other sensor board is installed, the loops would be 00 through 07, and the roadtubes would be shifted up to ID’s 08 through 11 ADR-2000: • 00 to 07 identify the sensor inputs on the left-most board in the ADR’s expansion slots (looking from the front). ADR-3000: • 00 to 07 identify the sensor inputs on the left-most board in the ADR’s expansion slots (looking from the front). Other IDs are for system-generated events, such as a minute or hour change. <Minutes> The minutes column shows the number of minutes into the hour as a hexadecimal number. 00 is the first minute. This is 00 when <Message> is WIM AREA. <Milliseconds/Weight> 13 The CHECK Menu When <Message> is not WIM AREA, this shows the number of milliseconds into the minute as a hexadecimal number. 0000 is the first millisecond. When <Message> is WIM AREA, this shows the raw weight value calculated from the sensor. <Message> The possible sensor-generated messages are as follows: LOOP ON LOOP OFF PIEZO ON TUBE ON CONTACT ON CONTACT OFF WIM ON WIM AREA (raw weight value) There are also system-generated messages such as HOUR and MINUTE for hour and minute changes. HARDWARE MONITOR ⇒ To Use the HARDWARE MONITOR: [8] COUNT VEHICLE EVENT HARDWARE MONITOR MONITOR MONITOR MONITOR* 1. Select HARDWARE MONITOR from the CHECK menu. 2. Press ENTER to view the next screen of data. 3. Press ENTER to return to the CHECK menu. The HARDWARE MONITOR menu enables you to monitor various parameters that relate to the ADR’s hardware: • SYSTEM - The total current taken by the ADR. • SOLAR - The total current supplied by the solar panel. On the ADR-1000 and ADR-2000, the value is displayed for a few seconds after opening the case. • CHARGER - The total current supplied by the external battery charger. • BATTERY - The voltage supplied by the battery. • VOLT (0) - the input voltage of analogue-to-digital converter number zero. • VOLT (1) - The input voltage of analogue-to-digital converter number one. • TEMP - The internal temperature of the ADR. This temperature may approximate the temperature of the road. (Standard only on 2000) • VOLT (3) - The input voltage of analogue-to-digital converter number three (not fitted to ADR-1000). CHECK EQUIPMENT (Step by Step Menus are shown on the next page) ⇒ To Check the Equipment Fitted: 1. Select CHECK EQUIPMENT from the CHECK menu. 2. Press ENTER to view the next screen of data. Repeat this step as required. The final press of ENTER returns you to the CHECK menu. 14 The Check Menu The CHECK EQUIPMENT option enables you to find out what equipment is fitted to your ADR. The option lists: • The crystal frequency and ADR model number. • The firmware version and date. • Whether or not a control panel is present. • The memory available on each board. • The boards fitted to the ADR and their version numbers. − SL58P is an 8-loop board. − SA58P is an 8-piezo board. − MTS38Z is a 4-loop board. − SC514P is a 14-input contact-closure board. − SW58P is an 8-piezo WIM board. − ADR4T is a built-in 4-tube board. − ADR4P is a 4-piezo board. − ADR2P4T is a 2-piezo, 4-tube board (fitted to the CPU). − 40960K PB is a PC memory card. 15 The CHECK Menu CHECK EQUIPMENT step by step (ADR-3000 initial power up, other models skip the first screen) After verifying correct connections, and power availability, connect power to the ADR. If you are observing the front of the unit (ADR-3000) you should see LED activity on the front panels of the various modules as power is applied, and on the control panel display the word “INITIALIZING….” will appear while the ADR powers up and performs internal self diagnostics. Note: If power was already applied, just press the “ENTER” key to wake up the ADR display on the control panel. INITIALIZING…… PEEK TRAFFIC ADR 11:16 6.49V IDLE F1 TO ARM NOW ESC FOR MENUS [1] CHECK* SETUP FILES CHECK SETUP* [8] COUNT MONITOR VEHICLE MONITOR On the display, the ADR will generate a menu referred to as the “PEEK” screen. This initial menu is the only one that displays the word “PEEK” and is used as a reference starting point for access to all other menus in the ADR. Pressing “ESC” will access the main menu. At this point if you press “ESC” again, you will be returned to the “Peek” screen. Select the CHECK menu; do this by moving the cursor with the arrow keys (F1 or F2) and then press “ENTER” to confirm your selection. You are now in the CHECK menu. Arrow down (F2) to CHECK EQUIPMENT and press “ENTER” VEHICLE MONITOR ^ EVENT MONITOR 12.288MHz ADR 2/3000 256K ST 28F101 V429-AS 14 DEC ‘00 FILE STORAGE 128K CPU MODULE 00 4096K PC CARD 01 SLOT 01 02 N/A SLOT N/A 16 BOARD FITTED SL58P V009 SA58P VOO8 ADR4P BOARD FITTED ADR4T On the display you will see the frequency the CPU is operating at. In our example this is 12.288mhz. You can also see the ADR type (ADR 2/3000) and the firmware (Version 429) and date. Press “ENTER” to continue. The next screen displays how much storage space is available on the CPU. This will normally be approximately 130K bytes. Options are available which can expand the available storage space. Press “ENTER” to continue. The next screen displays the optional sensor modules that are fitted and which were recognized by the CPU when you applied power Press “ENTER” to continue through the screens, and after the last screen, you will return to the PEEK screen. Now you are ready to SETUP the ADR. The SETUP FILES Menu Chapter 4 The SETUP FILES menu SETUP FILES LOAD SETUP SAVE SETUP Setup Files, What are they? Setup Files are the easiest and fastest way for you to get consistently good data. LOAD SETUP Follow along as we: ? Select and load a file, see page…4-2 ? Use an Expert calibration file for a site, see page….6-2 ? Specific steps for specific studies, see page…4-4 through 4-8 ? Check the operation see page…3-1 through 3-9 ? Collect the data, see page…Chapter 8 All roadtube equipped ADR units are now shipped ready for use with preprogrammed setup files from the factory. The following pages contain specific information describing each of the Factory Setup Files. Factory Setup Files as supplied with ADR units from the factory, are tested studies which have been established as standard studies universally applied to traffic data collection. In your operations you may not need all of them as supplied, or you may wish for something special. Please feel free to contact us with your requirements. We will be happy to provide you with the setups you desire. SAVE SETUP ? Save a setup file, see page…4-12 When you setup a traffic recorder you make various selections which instruct the recorder how to perform the traffic study you have selected.. You can save your selection settings as a unique file in memory. These saved files are what we refer to as Setup Files. You can copy your Setup Files from unit to unit, assuring exactly consistent settings for an entire group of machines. One, or an extensive selection of Setup Files, may be stored within a unit for instant recall and use. You can do this on your own or with help from the factory. We will be glad to assist you. Warning! A user selected FORMAT of the CPU media, will clear the memory and erase all files including data and Setup Files. Units are shipped from the factory ready for use and do not require formatting or COLD BOOT. If you FORMAT, or erase the Factory Setup Files you can use the restoration utility supplied on disk in conjunction with the Peek Data Collector software. If you have any questions or need more information, ask your Peek representative for assistance. You may also call 1-800-245-7660 for further information. 17 The SETUP FILES Menu SETUP FILES FOR ADR FIRMWARE VERSION 429 FILES 1RTVOL15.STP 15 Min. 1Ch Volume <>CHG: ENTER SELECTS FILES 1RTVOL60.STP 60 Min. 1Ch Volume <>CHG: ENTER SELECTS Single Channel Volume Count FILES S-LONG15.STP 15 Min. Short/Long <>CHG: ENTER SELECTS FILES S-LONG60.STP 60 Min. Short/Long <>CHG: ENTER SELECTS 2 Channel Volume by Lane FILES 2-DIR_15.STP 15 Min. 2 Directions <>CHG: ENTER SELECTS FILES 2-DIR_60.STP 15 Min. 2 Directions <>CHG: ENTER SELECTS 2 Channel Volume by Direction FILES CL2CH15_.STP CL x 2Ch, 2 Tube <>CHG: ENTER SELECTS FILES CL2CH60_.STP CL x 2Ch, 2 Tube <>CHG: ENTER SELECTS 2 Channel Class by Direction FILES SPD2CH15_.STP 13 Spd x 2Ch, 2 Tube <>CHG: ENTER SELECTS FILES SPD2CH15_.STP 13 Spd x 2Ch, 2 Tube <>CHG: ENTER SELECTS 2 Channel 2 Studies 13 Speeds by Direction FILES 2T_CLS15.STP 15 Min. 2 Tube Combo <>CHG: ENTER SELECTS FILES 2T_CLS60.STP 15 Min. 2 Tube Combo <>CHG: ENTER SELECTS 2 Channel 2 Studies Class by Direction 15 Speeds by Direction FILES 4T_CLS15.STP 15 Min. 4 Tube Combo <>CHG: ENTER SELECTS FILES 4T_CLS60.STP 60 Min. 4 Tube Combo <>CHG: ENTER SELECTS 4RT 2 Channel 2 Studies Class by Lane 15 Speeds by Lane FILES AT012901.STP Def ADR Tree 012901 <>CHG: ENTER SELECTS This is the Class Tree supplied as part of the 429 firmware. Operators may delete this file if desired, or may use it with previous versions of firmware. This file can also be edited and printed by the TOPS software Class Tree Editor. FILES CITY_35.STP Set On Urban Roads <>CHG: ENTER SELECTS For low speed operations; Loading this file sets: Debounce = 80 ms Max Space = 35 ft Max Length = 80 ft FILES FAST_50.STP Set On Fast Roads <>CHG: ENTER SELECTS For high speed operations; Loading this file sets: Debounce = 30 ms Max Space = 40 ft Max Length = 95 ft 18 (default settings) Debounce = 40 ms Max Space = 35 ft Max Length = 80 ft The SETUP FILES Menu LOAD SETUP Selecting a Setup for the ADR PEEK TRAFFIC ADR 11:16 6.49V IDLE F1 TO ARM NOW ESC FOR MENUS [1] [3] [4] CHECK SETUP FILES* CUSTOM SETUP CONFIGURE v LOAD SETUP* LOAD SETUP SOURCE MEDIA CPU MODULE 00 ENTER CONTINUES FILES 1RTVOL15.STP 15 Min. 1Ch Volume <>CHG: ENTER SELECTS LOAD SETUP ARE YOU SURE? YES <>CHG: ENTER SELECTS This is a general instruction and can be used to load any of the standard setups on the following pages. Refer to the individual pages for information on the individual setups. The beginning screens shown on this page are the same for all setups. Press “ENTER” to wake up the display. If the battery voltage in the middle of the display is less than 6.40V, charge the battery before use. From the screen showing IDLE, press “ESC” for access to the main menu selection screen. Press “F1” or “F2” to move the cursor to “SETUP FILES” and then press “ENTER” Press “ENTER” again to continue. Press “ENTER” again to continue. (some ADR units can select a second media, such as a plug in PC-card at this point) Press “F3” or “F4” to scroll to a new setup [Refer to following Pages] Press “ENTER” to select your choice. Press “F3” or “F4” to change “NO” to “YES” and press “ENTER” to confirm and load your choice. The following pages show each of the preinstalled setups from the point of selection. 19 The SETUP FILES Menu Single Tube Volume On Screen: 1RTVOL15.STP 1RTVOL60.STP Single Tube Volume Records: 1 Channel Volume (not separated by lane or direction) FILES 1RTVOL15.STP 15 Min. 1Ch Volume <>CHG: ENTER SELECTS LOAD SETUP ARE YOU SURE? NO <>CHG: ENTER SELECTS SITE ID. OOOO54930063 STATION 000000000001 WHEN ARMED START NEXT INTERVAL? YES <>CHG: ENTER SELECTS WHEN ARMED NEVER END? YES <>CHG ENTER SELECTS PEEK TRAFFIC ADR 11:17 6.49V ARMED WILL START AT 11:30 ON 08-14-00 From the SETUP FILES \ LOAD SETUP menu, press “F3” or “F4” to scroll to this setup. Press “ENTER” to select this setup. Press “F3” or “F4” to change “NO” to “YES” and press “ENTER” again to confirm your setup selection. You will be prompted for a SITE ID, (set as desired), and press “ENTER” Set the STATION identifier as desired, and press “ENTER” Press “ENTER” to confirm start time Press “ENTER” to confirm stop time The ADR automatically arms itself, and will start recording at the next available 15 minute interval. On screen confirmation of “ARMED” About the Single Tube Count Array The data that can be collected from this array is: VOLUME, HEADWAY, or GAP in one channel The diagram shows an array constructed using a single roadtube axle sensor. Using this array, the ADR records the total volume of axle traffic passing over the array. The number of vehicles is estimated by a COUNT RATIO or time-out value (or both); for example, a COUNT RATIO of two divides the number of axle sensor detections by two to estimate the number of vehicles. 20 The SETUP FILES Menu Short / Long Volume On Screen: S-LONG15.STP S-LONG60.STP Short/Long Records: Volume Count by lane Note: It is not necessary to “tell” the ADR that the roadtubes are one foot apart when using this setup. [8] CHECK SETUP* COUNT MONITOR VEHICLE MONITOR EVENT MONITOR LOAD SETUP ARE YOU SURE? NO <>CHG: ENTER SELECTS SITE ID. OOOO54930063 STATION 000000000001 WHEN ARMED START NEXT INTERVAL? YES <>CHG: ENTER SELECTS WHEN ARMED NEVER END? YES <>CHG ENTER SELECTS PEEK TRAFFIC ADR 11:17 6.49V ARMED WILL START AT 11:30 ON 08-14-00 Press “ENTER” to confirm your setup selection Press “F3” or “F4” to change “NO” to “YES” and press “ENTER” again to confirm your setup selection. You will be prompted for SITE ID, (set as desired), press “ENTER” Set the STATION identifier as desired, press “ENTER” Press “ENTER” to confirm start time Press “ENTER” to confirm stop time The ADR automatically arms itself, and will start recording at the next available 15 minute interval as selected About the Short / Long Tube Count Array The data that can be collected from this array is: VOLUME, HEADWAY, or GAP, by lane (channel) The short / long tube array can record individual lane totals on a two-lane road. Each vehicle axle detected by the short tube is subtracted from the sum of vehicle axles detected by the long tube. The short tube is connected to the ADR on roadtube input (nipple) number 1, the long tube to input number 2. Note: It is important to have to same length of hose from the edge of the road to the ADR for both hoses. 21 The SETUP FILES Menu Directional Volume On Screen: 2-DIR_15.STP 2-DIR_60.STP 2 Directions Records: Volume Count, by direction, not by Lane Note: It is not necessary to “tell” the ADR that the roadtubes are one foot apart when using this setup. FILES 2-DIR_15.STP 15 Min. 2 Directions <>CHG: ENTER SELECTS LOAD SETUP ARE YOU SURE? NO <>CHG: ENTER SELECTS SITE ID. OOOO54930063 STATION 000000000001 WHEN ARMED START NEXT INTERVAL? YES <>CHG: ENTER SELECTS WHEN ARMED NEVER END? YES <>CHG ENTER SELECTS PEEK TRAFFIC ADR 11:17 6.49V ARMED WILL START AT 11:30 ON 08-14-00 Press “ENTER” to confirm your setup selection Press “F3” or “F4” to change “NO” to “YES” and press “ENTER” again to confirm your setup selection. You will be prompted for SITE ID, (set as desired), press “ENTER” Set the STATION identifier as desired, press “ENTER” Press “ENTER” to confirm start time Press “ENTER” to confirm stop time The ADR automatically arms itself, and will start recording at the next available 15 minute interval as selected About the Directional Tube Count Array (1 foot spacing) The data that can be collected from this array is: VOLUME, HEADWAY, or GAP, by direction (channel) The directional tube array enables the total volume of traffic passing the array to be determined by direction. Note: It is important to have the same length of hose from the near edge of the road to the ADR for each hose in a pair. At least 20 feet is recommended. Both tubes should also be of equal total length to maintain accuracy. As with the previous arrays, the ADR can be set up with two of these arrays in operation at the same time, with data separated by direction across the tubes, not by lane. 22 The SETUP FILES Menu 2 Tube Class and Speed FHWA Classification and 15 Speeds On Screen: 2T_CLS15.STP 2T_CLS60.STP 2 TUBE COMBO FHWA Axle Classification & 15 speed bins. Records: Class by direction, and Speed by direction (not by lane) (two studies at the same time) Use this setup in light traffic. Avoid coincident passing traffic over the roadtubes. This set up will result in traffic recorded in two channels of data, one channel for each direction. The 15 speed bins are: <20, 25, 30, 35, 40, 45, 50, 55, 60, 65, 70, 75, 80, 85, >85 MPH Classification and Speed Studies Note: FILES The ADR assumes that the roadtubes are sixteen feet apart when using this array setup. If you change the spacing of the tubes in the road, then It is 1RTVOL15.STP necessary to “tell” the ADR via the CONFIGURE \ CALIBRATION \ 15 Min. 1Ch Volume SPACINGS menus. <>CHG: ENTER SELECTS LOAD SETUP ARE YOU SURE? NO <>CHG: ENTER SELECTS SITE ID. OOOO54930063 STATION 000000000001 Press “ENTER” to confirm your setup selection Press “F3” or “F4” to change “NO” to “YES” and press “ENTER” again to confirm your setup selection. You will be prompted for SITE ID, (set as desired), press “ENTER” Set the STATION identifier as desired, press “ENTER” Press “ENTER” to confirm start time WHEN ARMED START NEXT INTERVAL? YES <>CHG: ENTER SELECTS WHEN ARMED NEVER END? YES <>CHG ENTER SELECTS Press “ENTER” to confirm stop time The ADR automatically arms itself, and will start recording at the next available 15 minute interval as selected PEEK TRAFFIC ADR 11:17 6.49V ARMED WILL START AT 11:30 ON 08-14-00 About the Two Tube Class by Direction Array (8 or 16 foot spacing) The data that can be collected from this array is: SPEED, CLASS, LENGTH (wheelbase), VOLUME, HEADWAY, or GAP, by direction (channel), or a combination of these. The two tube class by direction array provides a cost-effective method of collecting speed or classification data by direction on low volume roads without lane discipline. This economical array is often used in residential areas where the roads are narrow or not center-lined. In low speed urban areas a spacing of 8 feet is recommended. In higher speed areas, a spacing of 16 feet is recommended. The standard ADR default spacing is 16 feet.. 23 The SETUP FILES Menu 4 Tube Class and Speed FHWA Classification and 15 Speeds On Screen: 4T_CLS15.STP 4T_CLS60.STP 4 TUBE COMBO FHWA Axle Classification & 15 Speed bins. Records: Class by lane, and Speed by lane (not by direction) (two studies at the same time) Use this setup in light to medium traffic. Avoid coincident passing traffic over the roadtubes. This set up will result in traffic recorded in two channels of data, one channel for each lane. The 15 speed bins are: <20, 25, 30, 35, 40, 45, 50, 55, 60, 65, 70, 75, 80, 85, >85 MPH Classification and Speed Studies Note: FILES The ADR assumes that the roadtubes are sixteen feet apart when using this 4T_CLS15.STP array setup. If you change the spacing of the tubes in the road, then It is necessary to “tell” the ADR via the CONFIGURE \ CALIBRATION \ 4 TUBE COMBO SPACINGS menus. <>CHG: ENTER SELECTS Press “ENTER” to confirm your setup selection LOAD SETUP ARE YOU SURE? NO <>CHG: ENTER SELECTS SITE ID. OOOO54930063 STATION 000000000001 WHEN ARMED START NEXT INTERVAL? YES <>CHG: ENTER SELECTS WHEN ARMED NEVER END? YES <>CHG ENTER SELECTS PEEK TRAFFIC ADR 11:17 6.49V ARMED WILL START AT 11:30 ON 08-14-00 Press “F3” or “F4” to change “NO” to “YES” and press “ENTER” again to confirm your setup selection. You will be prompted for SITE ID, (set as desired), press “ENTER” Set the STATION identifier as desired, press “ENTER” Press “ENTER” to confirm start time Press “ENTER” to confirm stop time The ADR automatically arms itself, and will start recording at the next available 15 minute interval as selected About the Four-Tube Class by Lane Array (8 or 16 foot spacing) The data that can be collected from this array is: SPEED, CLASS, LENGTH (wheelbase), VOLUME, HEADWAY, GAP, or direction, by lane, or a combination of these. The four tube class by lane array provides a high accuracy but still cost-effective method of collecting speed or classification data by lane on low to medium volume roads where good lane discipline is observed. This array is often used in urban areas on multi-lane roads. In low speed urban areas a spacing of 8 feet is recommended. In higher speed areas, a spacing of 16 feet is recommended. The standard ADR default spacing is 16 feet. 24 The SETUP FILES Menu Preset Start and Stop Set special start and stop times This is a general instruction and can be used with any of the standard setups. Select “NO” in response to “START NEXT INTERVAL” and you can set the start and stop times. When you set a start and/or stop time, be sure to specify times that are in the future. The ADR will not accept start times prior to the current ADR clock time. (already history) Stop times also must be after a start time and date. WHEN ARMED START NEXT INTERVAL? YES <>CHG: ENTER SELECTS WHEN ARMED START AT 00:00 01-22-01 Use “F4” to change “YES” to “NO”, and press “ENTER” to confirm. Use “F3” or “F4” and the number keys to set the start time, press “ENTER”, and then do the same for the start date. In this example, 01-22-01 is tomorrow. 00:00 is the beginning of the day. Therefore this example ADR is set to begin recording at midnight tonight. WHEN ARMED NEVER END? NO <>CHG ENTER SELECTS Use “F4” to change “YES” to “NO”, and press “ENTER” to confirm. WHEN ARMED END AT? 00:00 01-29-01 Use “F3” or “F4” and the number keys to set the END time, press “ENTER”, and then do the same for the END date. In this example, the ADR is set to END (stop) recording at the beginning of 01-29-01. PEEK TRAFFIC ADR 11:17 6.49V ARMED WILL START AT 00:00 ON 01-22-01 These example settings will result in a single data file with 7 days (168 hours) of data. 25 The SETUP FILES Menu Quit Recording How to End a Traffic Study Depending on the options chosen at setup, the ADR may automatically quit recording at a set time. However you may want to manually stop recording in your operations. It is always a good practice to have the ADR stop recording before transporting the unit. PEEK TRAFFIC ADR 11:17 6.49V REC RECORDING STARTED 11:00 ON 08-14-00 [1] [4] [5] CHECK QUIT REC* CONFIGURE FILES QUIT REC ARE YOU SURE? YES <>CHG: ENTER SELECTS PEEK TRAFFIC ADR 11:18 6.49V IDLE F1 TO ARM NOW ESC FOR MENUS 26 Press “ENTER” to wake up the display From first display showing REC, press ESC for access to menu Use “F1 or “F2” to select QUIT REC, press ENTER Display shows QUIT REC, ARE YOU SURE? NO Use the “F3” or “F4” to change to YES Press ENTER to confirm. The current recording file will be closed. Note: You do not have to quit recording to collect data. The SETUP FILES Menu Previous Setup Re-Use the Last Setup: Anytime the ADR is idle, you may re-use the previous setup by pressing the F1 key. Recording will start at the next interval. All settings will be exactly as they were for the previous (last) setup. PEEK TRAFFIC ADR 13:16 6.49V IDLE F1 TO ARM NOW ESC FOR MENUS [8] CHECK SETUP* COUNT MONITOR VEHICLE MONITOR EVENT MONITOR PEEK TRAFFIC ADR 14:01 6.49V REC RECORDING STARTED 14:00 ON 01-22-01 Press “ENTER to wake up the display Check the battery voltage Press the “F1” key The ADR automatically arms, and will start recording at the next available interval Confirmation that recording started. Note that the display will automatically blank after 10 minutes of no activity on the keys. 27 The SETUP FILES Menu SAVE SETUP Save the current ADR setup as a Setup File: When you have done something special in terms of an ADR setup, you may want to save it as a setup file and use it again. The ADR allows you do save any setup and use it again and again with out any special software or hardware accessories being necessary. After you have saved the setup as a file, you can use software to collect the file and can transfer it to other units or store a copy in the office. You can even rename it. Anytime the ADR is idle, you may re-use the saved setup by loading your named file just like any other setup file. All settings will be exactly as they were for your original setup. Make sure memory is available to store your new setup file on the CPU or a PC card. CONFIGURE\FILE STORAGE\SETUP FILES PEEK TRAFFIC ADR 11:16 6.49V IDLE F1 TO ARM NOW ESC FOR MENUS [1] [3] [4] CHECK SETUP FILES* CUSTOM SETUP CONFIGURE v LOAD SETUP SAVE SETUP* SAVE SETUP DESTINATION MEDIA PC CARD 01 ENTER CONTINUES FILES PROGRAM1.STP See Press “ENTER” to wake up the display. If the battery voltage in the middle of the display is less than 6.40V, charge the battery. From the screen showing IDLE, press “ESC” for access to the main menu selection screen. Press “F1” or “F2” to move the cursor to “SETUP FILES” and then press “ENTER” Press “F1” or “F2” to move the cursor to “SAVE SETUP” and then press “ENTER” Some ADR units can select a second memory storage media, such as a plug in PC-card or the CPU. Press “F3” or “F4” to change media, and then press “ENTER” to continue. Press “F3” or “F4” to change to your choice of the offered file names. <>CHG: ENTER SELECTS SAVE SETUP ARE YOU SURE? YES <>CHG: ENTER SELECTS SAVE SETUP OPERATION COMPLETE ENTER CONTINUES 28 Press “ENTER” to select Press “F3” or “F4” to change “NO” to “YES” and press “ENTER” again to confirm your selection. Confirmation that the file has been saved. Pressing “ENTER” will now return to the “PEEK” screen. CUSTOM SETUP Chapter 5 The CUSTOM SETUP menu [3] CUSTOM SETUP (USA) SITE ID & STATION SENSORS IN ARRAY TYPE OF ARRAY NUMBER OF ARRAYS FILES REQUIRED? NUMBER OF STUDIES? HEADING 1, HEADING 2, HEADING 3 CLASS, SPEED, HEADWAY, GAP, LENGTH, CHANNEL MAIN INTERVAL NUMBER OF PEAKS START NEXT INTERVAL? NEVER END? The CUSTOM SETUP menus enable you to specify all aspects of the ADR’s recording parameters. The information is presented here in the order of the menus of the ADR as you would experience it by actually setting up a unit. The information here will contain menus which you may not see in your unit because some menus within the ADR are dependent on various hardware options being physically present. There are two parts to this section. In the first part, Menu by Menu, we describe and explain each of the CUSTOM SETUP menu screens and the options of choice. In the second part, Step by Step we walk you through a typical setup of a permanent classification initial setup of an ADR-3000. CUSTOM SETUP PEEK TRAFFIC ADR 11:16 6.49V IDLE F1 TO ARM NOW ESC FOR MENUS [1] [3] [4] CHECK SETUP FILES CUSTOM SETUP* CONFIGURE v Start by pressing ENTER to power up the display to the PEEK screen. The PEEK screen must display the word IDLE to proceed. From the PEEK screen, use ESCAPE for access to the MAIN MENU Select CUSTOM SETUP from the Main Menu and press ENTER. You will first be prompted for the SITE ID and STATION as described below. Select or enter the required information for each option, as described in this chapter. SITE ID and STATION ID SITE ID. 001223334444 STATION 000000000001 Press the left or right arrow keys to move the cursor to the SITE ID digit(s) you wish to change, type the ID, then press ENTER. Repeat the procedure for STATION ID. SITE ID is intended to be used as a reference identifier for the ADR, the location at which you put it to work, and of the data that you will collect. This information can be unique within your organization. STATION ID is optional and should be regarded as merely an extension of the SITE ID. Each ID consists of up to 12 characters. You can also include letters of the alphabet. By default from the factory, the unique Electronic Serial Number (ESN) of each ADR is coded in as the SITE ID. Please feel free to change the SITE ID and STATION to what ever identifiers you want to use. These identifiers are part of the data files collected and will always allow you to trace files back to the ADR from which the files originated. (for more information, refer to the section on files and file types in this manual) 29 CUSTOM SETUP SENSORS IN ARRAY Your sensor choices are: AXLE ONLY, which are roadtube or piezo sensors PRESENCE ONLY, which are loop or contact switch sensors AXLE AND PRESENCE, which are a combination of both <>CHG;ENTER SELECTS WIM SENSORS, which are for weight sensing Press the left or right arrow key to display the type of sensors to be used, then press ENTER. This menu provides a short cut to find the exact sensor array in the next screen by grouping the available arrays into similar types. You will only be allowed to chose sensor types for which your ADR is correctly SENSORS IN ARRAY? LOOP TYPE OF ARRAY Press the left or right arrow key to display the type of array to be used, then press ENTER. The table below shows the standard array types and the data that can be calculated from them. If required, array configurations can be customized to your own particular requirements. The following <>CHG;ENTER SELECTS abbreviations are used In the table below for data types available from the arrays: CGH =Count, Gap, Headway, SPD =Speed, CLS = FHWA Class by axle, WHB =Wheelbase Length, LEN =Chassis Length TYPE OF ARRAY? LP-AX-LP [ ] l [ ] SENSOR AXLE R O A D T U B E P I E Z O PRESENCE (LOOP) AXLE & PRESENCE WIM 30 Array (on display) Available data TUBE I Count, Gap, Headway (by axle) SHORT/ /LONG iI Count, Gap, Headway, by lane (by axle) DIR TUBE II Count, Gap, Headway, by Dir (by axle) TUBE I C, G, H, +SPD +CLS +WHB, by Dir (by axle) I 4 TUBE iI AXLE I AXLE I I iI C, G, H, +SPD +CLS +WHB, by Dir, by lane (by axle) (Piezo) Count, Gap, Headway (by axle) (Piezo) C, G, H, +SPD +CLS +WHB, by Dir (by axle) LOOP [ ] Count, Gap, Headway (by vehicle) LOOP [ ] [ ] C, G, H, +SPD +CLS +LEN, by Dir (by vehicle) 3 LOOP/2 LANE Count, Gap, Headway (by vehicle, by lane) 4 LOOP/3 LANE Count, Gap, Headway (by vehicle, by lane) AX-LP-AX I [ ] I C, G, H, +SPD +CLS +WHB, by Dir (by axle and by vehicle) LP-AX-LP [ ] I [ ] C, G, H, +SPD +CLS +WHB, by Dir (by axle and by vehicle) WIM I WIM, C, G, H, +SPD +CLS +WHB, by Dir (by axle) I WM-LP-WM I [ ] I WIM, C, G, H, +SPD +CLS +WHB, by Dir (by axle and by vehicle) LP-WM-LP [ ] I [ ] WIM, C, G, H, +SPD +CLS +WHB, by Dir (by axle and by vehicle) CUSTOM SETUP END VEHICLES USING END VEHICLES USING? COUNT RATIO <>CHG; ENTER SELECTS F4 END VEHICLES USING? TIME OUT <>CHG; ENTER SELECTS F4 END VEHICLES USING? BOTH <>CHG; ENTER SELECTS Press the right arrow key to display the required method of ending a vehicle, then press ENTER. After you have selected the required method, screens are displayed in which you enter the required value(s): COUNT RATIO (MAXIMUM 13.99) AXLES/COUNT 02.00 ENTER COMPLETES END AFTER (MAXIMUM 60.00) 02.00 SECONDS ENTER COMPLETES The ADR does not allow you to advance to the next screen if you have entered an invalid number (if necessary, use the arrow keys to move to the digit to correct). It is important to be able to recognize the end of a vehicle, even if it is an estimate, to calculate the volume, gap and headway data from the array. This setting is used to determine the method of ending a vehicle when using axle sensor arrays that cannot otherwise distinguish individual vehicles. This will affect count, headway, or gap study results. The standard use is a count ratio of 2.00 : 1 (2 axles per vehicle) and any other setting should be used with caution. Operators should note that this setting is recorded as a part of each data file. You can choose one of the following settings: • COUNT RATIO - With this method, each vehicle is terminated after the specified number of axles have been detected. For example, if the value you specify is 3.0, every third axle is regarded as the end of the vehicle, which means that if 300 axles are detected, 100 vehicles are counted. The value need not be a whole number. The range is 1 to 13.99. • TIMEOUT - With this method, each vehicle is terminated after an axle has not been detected for the length of the time you specify. The normal setting is 2 seconds. • BOTH - If you select this setting, you need to specify both a COUNT RATIO and TIMEOUT value. In this case, the vehicle is terminated by the method that causes the earliest termination. In all cases, a vehicle is terminated automatically as soon as a fourteenth axle is detected (if the COUNT RATIO is set to less than 14, termination will occur at the set number). USE ONSCALE (WIM Option) USE ON SCALE? NO <>CHG: ENTER SELECTS Press the left or right arrow key to display YES or NO as necessary; then press ENTER. If a WIM board is installed in the ADR, this option is displayed when you select the WIM-LOOP-WIM or WIMWIM array. An onscale sensor can be useful to flag or filter vehicles which are not correctly traveling over the WIM sensors and which would generate an erroneous weight. The onscale sensor is typically installed in the right hand wheel path, is approximately 18 inches long, and all vehicles should “hit” the sensor with each right hand wheel in passage across the array. Vehicles which have wheels which miss or straddle the onscale sensor will generate a result code which can then be recorded as a flag or filtered. 31 CUSTOM SETUP NUMBER OF ARRAYS NUMBER OF ARRAYS (MAXIMUM 4) 1 ENTER COMPLETES Enter the number of arrays to be used. The system does not allow you to advance to the next option if you have entered an invalid number. This option is displayed when your ADR’s hardware enables more than one array to be used. The number of arrays that you are able to use is dependent on the array type that you have chosen and the number of sensors that can be connected to your particular ADR. All the arrays connected to the ADR should be of the same type. However, if all of the arrays are not the same, you may be able to use a special sensor mapping setup file available from Peek Traffic, Inc. FILES REQUIRED FILES REQUIRED? BIN YES < PVR NO <>CHG; ENTER SELECTS Press the left or right arrow key to specify whether or not you require BIN data, then press ENTER. Do the same for the PVR (Per-Vehicle Record) prompt. You will only be prompted for this option if a WIM board is present in your ADR or if you have specially allocated memory for PVR data file storage. (if a PC card is present in the ADR at time of setup, space is allocated, and you will be prompted.) NUMBER OF STUDIES CLASS NUMBER OF STUDIES 1 ENTER COMPLETES Type in the number desired, then press ENTER. The ADR allows you to perform more than one study at the same time. You could, for example, have two independent speed-by-lane and class by lane studies. ⇒ Multiple Studies: The ADR can record up to eight individual studies, plus Per-Vehicle-Records, simultaneously. The first study should be the most complex, as it establishes the number of data storage channels and channel mapping. The operator can establish custom array \ direction \ channel mapping in the first study and it will be carried over and applied equally to the rest of the studies. Each study can have its own bin settings as long as the total number of bins being recorded at one session, per interval, is less than 4096 bins, and the total number of bin headers is less than 128. If the number of bins or bin headers is exceeded, the ADR will not proceed and will not allow recording until settings are with-in limits. ⇒ Report Processing with Multiple Studies: When the recorded data is processed and printed, most software will produce at least two separate study reports. Only one data file is produced in the ADR for collection. Separation of the independent studies occurs in the reporting software. For example; In Peek TDP software, when the *.bin file is downloaded, it is one file, when it is converted to a .PRN file, two *.PRN files are created and each can be displayed, edited or printed independently. NOTE: Some old or non Peek PC software may not be able to process files with multiple studies. The use of the latest software from Peek traffic is recommended. 32 CUSTOM SETUP HEADING 1, HEADING 2, AND HEADING 3 HEADING 2? CHANNEL HEADING 1? CLASS <>CHG: ENTER SELECTS HEADING 3? NONE <>CHG: ENTER SELECTS <>CHG: ENTER SELECTS Select the Headings: 1. Press the left or right arrow key to display the required information to collect for each dimension (heading) of the record, then press ENTER. Only those choices that are available from the array selected are shown. It is a recommended practice to choose the largest number of bins for heading 1, the next largest for heading 2, and the smallest for heading 3. An example of this practice would be 15 classifications for heading 1, and 13 speed bins for heading 2, and 4 channels (lanes) as heading 3. 2. Selecting NONE for heading 2 or heading 3 indicates that you do not want data to be further segregated in this study, and the heading selections are complete. Depending on your previous selections, you will advance to either the next study heading 1, or PVR, WHAT CLASSES, or to the prompt for MAIN INTERVAL. Enter the number of bins desired SPEED BIN 1 OF 3 LESS THAN MPH 3. 20 SPEED BIN 2 OF 3 20 TO MPH 30 SPEED BIN 3 OF 3 GREATER THAN MPH 30 For SPEED, HEADWAY, GAP, LENGTH, GROSS WEIGHT, SINGLE, TANDEM or TRIPLE, type the number of bins, then press ENTER: Then, for each bin except the final one, type the upper limit of the bin and press ENTER: The bin limits are actually an approximation. For example, if a bin has limits of 20 TO 30 MPH, it actually means that vehicles determined by the ADR to be traveling at 20.00 to 29.99 MPH will be included in this bin. Note that vehicles determined to be traveling at 19.99 MPH will not be included in this bin. Also note that vehicles determined to be traveling at 30.00 MPH will be put into the next higher bin. 3. For CLASS, a SUMMATE CLASSES option is displayed. To accept the default bin limits (one for each of the 15 axle classifications), press ENTER when NO is displayed (recommended for normal recording). CLASS NUMBER OF BINS? 5 ENTER COMPLETES CLASS BIN 1 of 3 LESS THAN 6 ENTER COMPLETES CLASS BIN 2 OF 3 6 TO 10 ENTER COMPLETES Otherwise: a) Use the left or right arrow key to display YES, then press ENTER: b) When prompted, type the number of bins and press ENTER: Note that there are 15 “natural” classes defined, and that you are grouping (summating) them into combinations such as 1 through 5, as group 1, 6 through 10, as group 2, and 11 through 15, as group 3. c) When prompted, for each bin except the final one, type the upper limit of the bin and press ENTER. 33 CUSTOM SETUP CHANNEL MAPPING ⇒ To Use CHANNEL MAPPING: 3. Select CHANNEL as one of the study headings and press ENTER. 4. Then use the F4 arrow key to select the desired CHANNEL MAPPING method, and press ENTER. CHANNEL MAPPING COMBINED <>CHG: ENTER SELECTS SUMMATE CHANNELS? NO <>CHG; ENTER SELECTS If you have selected the COMBINED or FORWARD ONLY option, a SUMMATE CHANNELS option is displayed. To accept the default bin limits, press ENTER when NO is displayed. Otherwise: a) Use the left or right arrow key to display YES, then press ENTER. b) When prompted, type the number of bins (at the NUMBER OF CHANNELS prompt!) and press ENTER. c) When prompted, for each bin except the final one, type the upper limit (i.e. channel number) of the bin and press ENTER. If you have selected the USER DEFINED option, a NUMBER OF CHANNELS option is displayed: a) Type the number of channels to use, then press ENTER. b) For each array (and direction of flow), press the arrow key to select the channel to assign the data to for recording, then press ENTER. PVR: WHAT CLASSES and PVR: WHICH ARRAYS In order to collect PVR (Per-Vehicle Record) data (and see these menus) you must memory space allocated for the storage of the files. A PC card is recommended because the files can get very large. You are prompted whether to record all classes or only large vehicles (classes 4 and above): PVR: WHAT CLASSES? ALL CLASSES PVR: WHAT CLASSES? CLASS 4 OR ABOVE <>CHG: ENTER SELECTS <>CHG: ENTER SELECTS CLASS BIN 3 OF 3 GREATER THAN 10 ENTER COMPLETES Use the left or right arrow key to choose the appropriate setting, then press ENTER. The following screen is displayed next: PVR: WHICH ARRAYS? ARRAY 1 YES <>CHG: ENTER SELECTS Use the left or right arrow key to choose whether or not to record data for the specified array, then press ENTER. You are prompted in the same way for each array. 34 CUSTOM SETUP MAIN INTERVAL MAIN INTERVAL 15 MIN Press the left or right arrow key to display the desired normal recording interval, then press ENTER. The available choices are; 1 MIN, 2 MIN, 5 MIN, 6 MIN, 10 MIN, 15 MIN, 30 MIN, 60 MIN, 2 HR, 3 HR, 6 HR, 12 HR, and 24 HR intervals. <>CHG: ENTER SELECTS The recording interval is the frequency at which the ADR saves its recorded data in the bin file. If, for example, you choose 5 MIN, the ADR stores data in the bin file on every five-minute interval of the clock, e.g. at 13:00, 13:05, 13:10, etc. If you set the interval to 24 HR, the data recorded during a full 24 hour period is written to the bin file at midnight of each day that the ADR is recording data. NUMBER OF PEAKS NUMBER OF PEAKS (MAXIMUM 4) 2 ENTER COMPLETES PEAK 1 OF 2 INTERVAL > 15 MIN FROM 07 TO 09 <>CHG; ENTER SELECTS PEAK 2 OF 2 INTERVAL > 15 MIN FROM 11 TO 12 <>CHG; ENTER SELECTS This option is displayed only if the MAIN INTERVAL is 60 MIN or more. It enables you to set up different recording intervals for up to four peak periods of the day, e.g. morning, lunch time, late afternoon and evening. If necessary, the recording interval can be different for each peak period. Peak intervals are used to save memory space and to allow collection of detailed data in the time periods it is needed. This is accomplished by setting a very large NORMAL interval, (ex. 3 HR) for all hours when traffic is light, and then setting a small peak time interval (ex. 5 or 15 MIN) for the heavy traffic times of day when you really want detailed information. See MAIN INTERVAL for further details. ⇒ To Set Up the PEAK INTERVALS: 1. Use the left or right arrow key to display the required recording interval, then press ENTER. 2. Type the starting hour of the peak period (if required, use the left or right arrow key to move the cursor), then press ENTER. 3. Repeat step 2 for the finish hour of the peak period. Repeat steps 1 to 3 for the other peak periods, as desired. START NEXT INTERVAL WHEN ARMED START NEXT INTERVAL? YES <>CHG; ENTER SELECTS If you select “NO” WHEN ARMED START AT 22:00 01-01-01 If you want the ADR to start to collect data at the beginning of the next main or peak interval, press ENTER to select “YES”. If you want to specify a time or date in the future, press the left or right arrow key to select “NO”; and press ENTER, then type in the desired time, press ENTER, type in the desired date and press ENTER. You can use the left or right arrow key to move the cursor within the date or time to make a change. The ADR always starts to record at the beginning of the next available interval. If the MAIN INTERVAL is 1HR and the current time is 14:10, the ADR begins to record data at 15:00, assuming that there are no PEAK INTERVALS selected between 14:10 and 15:00. The ADR uses 00:00 as midnight and the minute just before midnight is 23:59 . 35 CUSTOM SETUP NEVER END? This determines when the ADR will finish collecting data. If you do not want to specify a finish time and date, just press ENTER. If you do want to specify an ending time, use the left or right arrow key to choose “NO”, then press ENTER. Type the time to end and press ENTER, then type the date and press ENTER. You can use the left or right arrow keys to move the cursor within the date or time, if you want to make a change. If you enter a unacceptable time or date (times or dates in the past) the ADR will not advance until you have corrected the error. You can not enter a time or date to stop recording that is prior to a programmed start time. WHEN ARMED NEVER END? YES <>CHG; ENTER SELECTS If you select “NO” WHEN ARMED END AT 18:00 02-02-01 Automatic Start: After pressing ENTER to confirm your selection of ending time, the ADR will automatically ARM and will display a screen as below. If you do not want to use the automatic arming feature, refer to the CONFIGURE \ MISC menu in the chapter on Configuring the ADR in this manual for an explanation of how to disable the function. Automatic Stop – You may also want to make use of the automatic stop feature in the ADR. The selection menu for this is also contained in the CONFIGURE \ MISC menu. You can learn about this optional function in the chapter on Configuring the ADR in this manual. PEEK TRAFFIC ADR 11:17 6.49V ARMED WILL START AT 11:30 ON 01-14-01 The PEEK screen ARMED The PEEK screen recording This concludes our journey through the CUSTOM SETUP menus of the ADR. 36 PEEK TRAFFIC ADR 11:31 6.49V REC RECORDING STARTED 11:30 ON 01-14-01 CUSTOM SETUP INITIAL SETUP INSTRUCTIONS These instructions are provided to assist in the first time setup of an ADR unit at a site for vehicle classification with working sensors in the road. For this example, four lanes of Loop–Piezo-Loop, collecting Class by Lane data recorded at 60-minute intervals was selected for the most common settings. For your specific application, which may be different, be prepared to alter settings. For more information about specific settings, contact your Peek representative. Verify that the site is completely installed and all components are in place and correctly connected and marked. (Power to the ADR may be off or disconnected without loss of setup, time, date, or prerecorded data) Verify the power supply is correct and functional (Solar panel, regulator, and charged battery). Verify the inroad loop and piezo sensors are in place and functional. (use specific test instruments) Use the CHECK EQUIPMENT menu to verify that the ADR is communicating with all installed sensor modules. On ADR-3000 Plus units you may take advantage of the front panel mounted RESET switch to initialize the entire unit before proceeding. On other units, a clean power interruption will accomplish the same result. You may wish to refer to other guidelines as published by various authorities for specific installation and test procedures for telephone lines, solar power supplies and sensors not manufactured by Peek. If your site is new, unknown, or if any sensors are not absolutely perfect, the best procedure is to perform a series of step by step setups with increasing data requirements, performing calibration adjustments as you progress. The basis of this is to verify proper operation of each sensor individually before using them in groups or arrays. Proper detection of axles must exist with piezo sensors before vehicle axle characteristics can be determined. Likewise, proper detection of vehicles must exist with loops before other loop based vehicle characteristics can be determined. Count detection is the most basic of all data requirements. If your installation cannot correctly detect axles and vehicles for counting on each sensor, it will be impossible for the ADR to accurately determine vehicle speeds. If basic vehicle speeds are inaccurate, then all subsequent calculated measurements that use speed as a factor, such as length, wheelbase, classification or weight, will also be inaccurate. 1. 2. 3. 4. 5. Initially setup the ADR for counting on each individual sensor in the road. To perform this, you may have to set up the ADR several times, once testing only the loops, and again testing only the piezos or other sensors. Verify that each loop is detecting vehicles correctly, one count per vehicle per loop using COUNT MONITOR and calibrating the loop sensitivity (and perhaps hysteresis) as necessary for proper operation. Verify that each piezo is detecting all of the axles on each vehicle, one count per axle per piezo using COUNT MONITOR and calibrating the piezo sensitivity and debounce settings as necessary for proper operation. When each and every sensor has been demonstrated to count correctly, proceed to verify correct speed measurement. Setup the ADR for speed measurement using two sensors (of the same type) in each lane as an array. This may be loop-loop or piezo-piezo or WIM-WIM depending on the equipment. The actual speed bin settings are not important. Use a pace car, a radar gun, or some independent means to determine the determine individual vehicle speeds on a per lane basis. Adjust the sensor spacing to provide a correct speed indication in the VEHICLE MONITOR. A longer spacing is slower, a shorter spacing is faster. When the displayed VEHICLE MONITOR speeds are accurate, and if there is at least one loop in the lane arrays, setup the ADR to display vehicle lengths in the VEHICLE MONITOR. Use a known vehicle, or a pace vehicle as a reference to adjust the displayed vehicle lengths. Measure the bumper to bumper overall length of the reference vehicle with a tape measure and write it down to the nearest tenth of a foot. (TENTH OF A FOOT) as the reference vehicle is driven repeatedly through each lane, at a consistent speed, note the length of the vehicle as displayed in the VEHICLE MONITOR. Adjusting the loop size in the ADR CONFIGURE menu will make the displayed vehicle length match the actual measured vehicle length of the reference vehicle. When the above calibrations have been performed, proceed with the CUSTOM SETUP example on the next page. If each sensor is working properly, and each step is performed correctly, the result will be good data. 37 CUSTOM SETUP PEEK TRAFFIC ADR 11:16 6.49V IDLE F1 TO ARM NOW ESC FOR MENUS [1] [3] [4] CHECK SETUP FILES CUSTOM SETUP* CONFIGURE SITE ID. 001223334444 STATION 000000000001 SENSORS IN ARRAY? AXLE AND PRESENCE CUSTOM SETUP Step by Step From the “PEEK” screen, press “ESC” to see the MAIN menu. Move the cursor to CUSTOM SETUP on the screen and press “ENTER” to confirm the selection. Enter the Site ID and press “ENTER” Enter the Station ID and press “ENTER” Use the left or right arrow keys (F3 or F4) to scroll the selections in the following screens. “ENTER” must be pressed to confirm each selection. Scroll (F3 or F4) to select “AXLE AND PRESENCE” and press “ENTER” <>CHG;ENTER SELECTS TYPE OF ARRAY? LP-AX-LP [] l [] Scroll (F3 or F4) to select “LP - AX - LP [ ] | [ ]” and press “ENTER” <>CHG;ENTER SELECTS NUMBER OF ARRAYS? (MAXIMUM 8) 4 ENTER COMPLETES NUMBER OF STUDIES? (MAXIMUM 8) 1 ENTER COMPLETES STUDY 1 HEADING 1? CLASS Use the number keys to set the “NUMBER OF ARRAYS” number of lanes at the site) and press “ENTER” (equal to the If a SW-58P WIM module is present or if memory has previously been allocated for special PVR files, you will be asked to verify the files types to be created at this point in the setup procedure. Use the number keys to set the “NUMBER OF STUDIES?” to the desired number. For our example, press “1” and then press “ENTER” to confirm. Scroll (F3 or F4) to select “CLASS” for heading 1 and then press “ENTER” to confirm. This selection determines the type of data to be recorded. Other selections are available. <>CHG;ENTER SELECTS SUMMATE CLASSES? NO Press “ENTER” to confirm the “NO” selection. <>CHG;ENTER SELECTS STUDY 1 HEADING 2? CHANNEL Scroll (F3 or F4) to select “CHANNEL” and press “ENTER”. <>CHG;ENTER SELECTS CHANNEL MAPPING FORWARD ONLY <>CHG;ENTER SELECTS 38 Scroll (F3 or F4) to select “FORWARD ONLY” and press “ENTER”. (Continued on the next page) CUSTOM SETUP SUMMATE CHANNELS? NO Press “ENTER” to confirm the “NO” selection. <>CHG;ENTER SELECTS STUDY 1 HEADING 3? NONE Scroll (F3 or F4) to select “NONE” and press “ENTER”. <>CHG;ENTER SELECTS MAIN INTERVAL? 60 MIN Scroll (F3 or F4) to select “60 MIN” (15 MIN for Urban Sites) and press “ENTER” to confirm. <>CHG;ENTER SELECTS NUMBER OF PEAKS? (MAXIMUM 4) 0 <>CHG;ENTER SELECTS WHEN ARMED START NEXT INTERVAL? YES <>CHG;ENTER SELECTS WHEN ARMED NEVER END? YES <>CHG;ENTER SELECTS PEEK TRAFFIC ADR 12:16 6.49V ARMED WILL START AT 13:00 ON 12-21-00 Use the number keys to set the “NUMBER OF PEAKS?” to the desired number. For our example, just press “ENTER” to confirm. the “0” and advance to the next screen. Press “ENTER” to confirm the “YES” selection. Or selecting “NO” will allow you to specify a future start time. Press “ENTER” to confirm the “YES” selection. Or selecting “NO” will allow you to specify a future stop time. The ADR screen display will now return to the “PEEK” screen with the status shown as ARMED. (Unless auto arming has been turned off) The ADR will start to record at the interval selected Because this example is an initial installation, we recommend that you stop at this point and monitor the operation of the ADR, and if any adjustments are needed for this particular site, adjust the settings as shown in this manual under site calibration and the “CONFIGURE” menu. 39 CUSTOM SETUP Portable WIM Setup – step by step Weigh-In-Motion – The ADR can be upgraded to record WIM data. Special WIM sensor arrays have been incorporated to expand the ability of the ADR piezo WIM system in pre-existing sites and in portable operations. A temperature compensation table is incorporated in the firmware and can be selected for use by an operator during operation. To assist in initial calibration of Weigh-In-Motion sites the base calibration factors can be directly set. This is a basic setup for portable WIM operations using For Firmware V429. If this is the first time setting up the ADR WIM unit: COLD BOOT the unit before proceeding. CHECK EQUIPMENT to confirm that all BOARDS are FITTED • • • • Verify the correct DATE and TIME If the Time and Date of the unit is not correct, Select Configure and Date / Time From the CONFIGURE MEMU select: FILE STORAGE FILE PRIMARY MEDIA BINNED: Select and Enter CPU PVR: Select and Enter MEM BOARD FILE MEDIA PERCENTAGE: BINNED: ENTER 100% OF MEMORY TO USE FOR BINNED FILES. PVR: ENTER 100% OF MEMORY TO USE FOR PVR FILES. Return to the MAIN MENU and select • CUSTOM SETUP ENTER: your SITE ID and your STATION ID • SENSORS IN ARRAY, Select and Enter: WIM SENSORS • TYPE OF ARRAY: Select and Enter: WIM--WIM • USE ON-SCALE Select and Enter: NO • NUMBER OF ARRAYS Enter: 1 • FILES REQUIRED BINNED: Select and Enter: YES PVR: • • • • • • 40 Select and Enter: YES NUMBER OF STUDIES? Enter and Enter: 1 HEADING 1 Select and Enter: CLASS SUMMATE CLASSES? Select and Enter: NO HEADING 2 Select CHANNEL and Enter CHANNEL MAPPING Select and Enter: FORWARD ONLY SUMMATE CHANNELS? Select and Enter: NO CUSTOM SETUP • • HEADING 3? Select and Enter: NONE PVRs: WHAT CLASSES? Select and Enter: CLASS 4 OR ABOVE • PVRs: WHICH ARRAYS? ARRAY 1 Select and Enter: YES for ARRAY 1 MAIN INTERVAL • • • • • • • • • • • • Select and Enter: 60 MINUTES NUMBER OF PEAKS? Select and Enter: 0 WHEN ARMED START NEXT INTERVAL? Select and Enter: YES WHEN ARMED NEVER END? Select and Enter: YES The ADR will ARME itself to start recording BINNED and PVR files at the beginning of the next full interval that you have selected. Return and Select from the Menu: CONFIGURE: CALIBRATION: SENSITIVITY: SW58-P (WIM MODULE) Select and Enter a Sensitivity level of ONE (1) for sensors one: Select and Enter a Sensitivity level of ONE (1) for sensors two: Note: All unused sensors set to “0” OFF. WIM TEMPS COMPENSATE? Select and enter either: NO AUTO CALIBRATE? Select and enter either: USER DEFINED or ARRAY By selecting “USER DEFINED” the user will set the auto calibration feature for all lanes to the same vehicle class with the same target value. By selecting “ARRAY”, the user can set a different vehicle class and target value for each lane. Auto Calibration allows the base factors to be decided automatically while the ADR WIM is collecting data. This can be achieved since the weight on a particular axle of some Classes of vehicles is always a relatively consistent known value. Using this option you may specify: 1. CLASS – This is the class of vehicle that is going to be used to calibrate the sensors for you. Select and Enter: Class: 09 2. AXLE NUMBER – This is the axle that has the know weight to be used. Select and Enter: AXLE NUMBER: 01 3. TARGET VALUE – This is the know weight on the axle. Select and Enter: TARGET VALUE: 10.00 4. MAX DIFFERENCE – The maximum allowed percentage difference between the target weight and the average measured weight, which is measured over the number of vehicles specified by UPDATE VALUE AFTER. If the difference exceeds this value, the base factor for the sensor will be automatically adjusted. Select and Enter: MAX DIFFERENCE 00% 5. AUTOCALIBRATION UPDATE VALUE AFTER. This is the number of vehicles of the specified class that are used to calculate the average measured weight. The average is recalculated in each interval of the specified number of vehicles Select and Enter: 20 VEHICLES THRESHOLD WIM AREA? Select either: NO DEBOUNCE 41 CUSTOM SETUP • • • • • 42 Select and Enter: 000mS as a value for the WIM DEBOUNCE SPACING Enter: the value for the SPACING of the Piezo sensors for the array. FILTERS PVR Select items from this menu that you need included in your PVR record file. This menu allows you to customize your per vehicle record (PVR) file. THE NORMAL FACTORY DEFAULTS ARE SET TO GIVE YOU GROSS WEIGHT, AXLE WEIGHTS AND AXLE SPACEINGS IN YOUR PVR FILE. NOTE: (IF YOU RESELECT ANY OF THE PVR FILTERS, YOU MUST SELECT YES TO GROSS AND AXLE WEIGHTS, FOR ANY WEIGHT DATA TO BE INCLUDED IN YOUR PVR FILES). BINNED THE NORMAL FACTORY DEFAULTS ARE SET FOR THE ADRs MAXIUM PERFORMANCE. ON A PORTABLE WIM SETUP NONE OF THESE FILTERS SHOULD HAVE TO BE CHANGED. This option enables you to filter the vehicles that are being recorded in the bin file on a per study basis. Only vehicles whose data fulfills all of the conditions specified here will be included in the bin file. The settings you specify for each, if: TRUE (the vehicle will only be binned if the condition is fulfilled), FALSE (the vehicle will only be binned if the condition is not fulfilled), or EITHER (the vehicle can be binned in either case). VEHICLE MONITOR This option determines the amount of information that the system displays when you are using the vehicle monitor. The CONFIGURE MENU Chapter 6 : The CONFIGURE menu [4] CONFIGURE [6] CALIBRATION [7] SENSITIVITY WHICH SENSORS? WEIGHT WIM DEBOUNCE SPACINGS MAX LENGTHS FILTERS BIN PVR VEHICLE MONITOR LIMITS TIME OUTS OUTPUTS COMMS DATE / TIME FILE STORAGE MISC UNITS, LENGTH, SPEED, WEIGHT, FILES, DAILY, 24HR, 48HR, 72HR, 7 DAY, CONTINUOUS WRAP FILES? AUTOARM LANGUAGE ENGINEERING SERIAL NUMBER ACCURACY LAST REBOOT AUTO RESET BOARDS INITIALIZE COLD BOOT The CONFIGURE menu enables you to configure those aspects of the ADR that, once set up, should rarely need to be changed. The CONFIGURE menu includes options that enable you to specify the type of modem and its communications, details of sensors, date and time, units, etc. You should not configure the ADR while it is armed or recording. To gain access to the CONFIGURE menu, select CONFIGURE from the Main Menu. The following paragraphs explain how to use each CONFIGURE option. A new feature, Expert Calibration files, is included in this section to acquaint you with its use. 43 The CONFIGURE Menu Expert Calibration Files ⇒To use the Expert Calibration files: [1] [3] [4] CHECK SETUP FILES* CUSTOM SETUP CONFIGURE v LOAD SETUP* LOAD SETUP SOURCE MEDIA CPU MODULE 00 ENTER CONTINUES FILES FAST_50_.STP Set On Fast Roads <>CHG: ENTER SELECTS LOAD SETUP ARE YOU SURE? YES <>CHG: ENTER SELECTS Select LOAD SETUP from the main menu. (The ADR must be IDLE) Press “ENTER” again to continue. Press “ENTER” again to continue. (some ADR units can select a second media, such as a plug in PC-card at this point) Press “F3” or “F4” to scroll to the desired Expert Calibration file. “ENTER” to select your choice. Press Press “F3” or “F4” to change “NO” to “YES” and press “ENTER” to confirm and load your choice. Expert Calibration files are supplied to apply the knowledge of experienced experts to your traffic studies. Each file is provided for a specific task and once “loaded” will stay active in the ADR until purposely changed. The two standard files described here (primarily for use with roadtube sensors) are supplied to improve count, speed and classification accuracy when ADR units are used in slow urban areas where some congestion may occur, and conversely, the second file is for use at higher speed locations when the low speed settings would be inappropriate. The default calibration settings of the ADR are: Roadtube Debounce = 40 ms, Maximum inter-axle Space = 35 ft and the Maximum Vehicle Length = 80 ft. The FAST_50 and CITY_35 expert calibration files will change these settings as detailed below. FAST_50 FILES FAST_50_.STP Set On Fast Roads <>CHG: ENTER SELECTS If you are using the ADR with roadtubes in an area where the approximate average speed of the traffic is 50 miles per hour, load FAST_50 (supplied as a setup file) for improved accuracy. NOTE: You only need to load this file once unless (or until) you change the settings manually or use the CITY_35 setup. The settings will stay in effect until you change them. Recommended procedure: Load the FAST_50 setup prior to loading one of the standard studies for traffic data collection. After loading FAST_50 the ADR will be optimized for typical highway traffic studies. Any of the supplied roadtube setup files or a custom setupmay be loaded after FAST_50. 44 The CONFIGURE MENU NOTE: FAST_50 can be loaded at any time the ADR is IDLE. For high speed operations, FAST_50 sets: Debounce = 30 ms Max Space = 40 ft Max Length = 95 ft A 16 foot sensor spacing is recommended when the FAST_50 is used for speed and classification traffic studies. CITY_35 FILES CITY_35_.STP Set On Urban Roads <>CHG: ENTER SELECTS If you are using the ADR with roadtubes in an area where the approximate average speed of the traffic is 35 miles per hour, load CITY_35 for improved accuracy. NOTE: You only need to load this file once unless (or until) you change the settings manually or use the FAST_50 setup. The settings will stay in effect until you change them. Recommended procedure: Load the City _35 setup prior to loading one of the standard roadtube studies for traffic data collection. After loading CITY_35 the ADR will be optimized for typical urban traffic studies. Any of the supplied roadtube setup files or a custom setup may be loaded after CITY_35. NOTE: CITY_35 can be loaded at any time the ADR is IDLE. For low speed operations, CITY_35 sets: Debounce = 80 ms Max inter-axle Space = 35 ft Max Vehicle Length = 80 ft A 8 foot sensor spacing is recommended when CITY_35 is used for speed and classification traffic studies. Be sure to set the ADR sensor spacing to match the actual sensor spacing you use in the street. 45 The CONFIGURE Menu The CALIBRATION menu The CALIBRATION menu allows you to calibrate the ADR according to the road, sensor and site conditions. SENSITIVITY [7] SENSITIVITY* WEIGHT WIM DEBOUNCE WHICH SENSORS? SL58P IN SLOT 01 SW58P IN SLOT 02* SNUM 1 2 3 ID 00 01 12 ⇒ To Specify the SENSITIVITY Settings: 1. Select CALIBRATION/SENSITIVITY from the CONFIGURE menu. 2. The screen then displays a list of boards fitted. Use the up/down arrow key to choose the board that contains the sensor input to be adjusted, then press ENTER. Type the sensitivity value for each sensor, pressing ENTER to advance to the next sensor. If the sensor array in use has two loops in each lane, both loops should be set to the same values for both sensitivity and hysteresis. SENSITIVITY 4 4 0 3. The sensitivity of each sensor input on can be adjusted if the ADR is found to be undercounting (increase sensitivity) or overcounting (decrease sensitivity). The value for SENSITIVITY is dependent on the factors such as the flexibility of the road (oscillations in the road can cause phantom pulses) and the types of vehicle using the road (heavy vehicles can cause an oscillation in the road that travels in front of the vehicle). You may need to increase the sensitivity if the road carries a lot of light traffic, such as motorcycles. LOOP BOARD HYSTERESIS SETTINGS SL58P IN SLOT 01 SENSOR 01 ID 00 SENSITIVITY 5 HYSTERESIS 3< The SL58P with has a programmable “HYSTERESIS” setting option. Hysteresis is defined as a resistance to change, and the use of this setting in the ADR with SL58P loop detectors is to curtail “drop out” and multiple counts on high bed trucks. Normally this is left at the factory default setting of 3 which is fine for almost all locations. A higher number is a greater resistance to change. If you have an installation that is otherwise working well but you observe that Milk Truck Tankers are being incorrectly detected as two smaller vehicles, you may want to set the sensitivity and hysteresis as follows: First set the sensitivity on the subject loop(s) to a value of 7 and observe traffic using the VEHICLE MONITOR. If Milk Tankers are still being detected as two cars, then set the hysteresis to a setting of 4 and observe traffic again to note the results. In the unlikely situation that you still observe Milk Tankers being detected as two vehicles, you may try a HYSTERESIS setting of 5. Caution note, if the value for hysteresis is set too high, low slung vehicles (like Cadillac’s) may be detected as being over 100 feet long, as the loop may tend to stay “on”. If you observe this and find that reducing the hysteresis value to a lower setting is not acceptable, reducing the sensitivity by one setting (from 7 to 6) may achieve the desired result. 46 The CONFIGURE MENU WEIGHT This menu is only seen if a WIM sensor board is installed. [7] SENSITIVITY WEIGHT* WIM DEBOUNCE WHICH SENSORS? SW58P IN SLOT 01* SENSOR 01 OF 08 BASE FACTOR 1.000 < CURRENTLY 1.000 ENTER COMPLETES ⇒ To Specify the WEIGHT Base Factors: 1. Select CALIBRATION/WEIGHT from the CONFIGURE menu. 2. Using the up/down arrow keys, select the appropriate WIM board, then press ENTER. 3. Type the base factor for each sensor, pressing ENTER to advance to the next sensor. This option allows you to specify the base factor for each sensor. This is the factor by which the raw value from the WIM sensors will be multiplied by the ADR to calculate a vehicle’s weight. Note: You must set the base factors during site installation. The values will be different for each site and sensor and may need to be adjusted from time to time as conditions at the site change. WIM This menu is only seen if a WIM sensor board is installed. [7] SENSITIVITY WEIGHT WIM* DEBOUNCE TEMP COMPENSATE? NO <>CHG; ENTER SELECTS AUTOCALIBRATET? USER DEFINED <>CHG; ENTER SELECTS AUTOCALIBRATE ON CLASS 09< AXLE NUMBER 01 ENTER COMPLETES • TEMP COMPENSATE - When set to YES, autocalibration is carried out according to the road temperature. It is recommended that this be set to NO unless specifically required. • AUTOCALIBRATE - This option allows the base factors (see the WEIGHT option) to be determined automatically on a per array (lane) basis while the ADR is collecting data. This can be achieved since the weight on a particular axle of some classes of vehicle is always relatively consistent and a known value. • Using this option, you may specify: − CLASS - the class of vehicle that is to calibrate the sensor. − AXLE NUMBER - the axle that has the known weight. − TARGET VALUE - the known weight on the axle. − MAX DIFFERENCE - the maximum allowed percentage difference between the target weight and the average measured weight, which is measured over the number of vehicles specified by UPDATE VALUE AFTER. If the difference exceeds this value, the base factor for the sensor is adjusted automatically. 47 The CONFIGURE Menu WIM (CONTINUED) AUTOCALIBRATION TARGET VALUE 10.00 < MAX DIFFERENCE 00% ENTER COMPLETES UPDATE VALUE AFTER - the number of vehicles of the specified class that are used to calculate the average measured weight. The average is recalculated at intervals of this many vehicles. Select a number of vehicles that will allow auto-calibration at least every 4 hours on a per lane basis. AUTOCALIBRATION TARGET VALUE 10.00 < MAX DIFFERENCE 00% ENTER COMPLETES THRESHOLD WIM AREA - A WIM array in a lane may detect a small weight change when traffic passes in an adjacent lane. Specifying YES for this setting filters out these ghost detections. Any raw weight values that are below the WIM AREA THRESHOLD are filtered out (raw values are weight values prior to the base factor being applied). AUTOCALIBRATION TARGET VALUE 10.00 < MAX DIFFERENCE 00% ENTER COMPLETES 48 The CONFIGURE MENU DEBOUNCE ⇒ To Specify the DEBOUNCE Settings: DEBOUNCE TUBE DEBOUNCE 040Ms AXLE DEBOUNCE 040Ms ENTER COMPLETES 1. Select CALIBRATION/DEBOUNCE from the CONFIGURE MENU. 2. The first value is TUBE DEBOUNCE which is an independent setting for use with roadtube sensors only. 3. The second value is AXLE DEBOUNCE which is for use with Piezo sensors. 4. Type in the desired value, then press ENTER to advance to the next option. A DEBOUNCE value ensures that phantom signals in tubes or piezo sensors are not regarded as axles. It is the time set to ignore any pulse after a valid axle detection. The range of possible values is from 1 to 998 msec. If the ADR is undercounting, reduce the debounce time; if the ADR is over-counting, increase the debounce time. Phantom Axle Diagram Real Front Axle Phantom Axle Next Real Axle Debounce Time Setting Too Short = Counts Phantoms Just Right = No Phantoms Too Long = Cuts Next Real Axles The value for TUBE DEBOUNCE is dependent on factors such as the speed of the traffic and length of the tube (reflections from the end of the tube can occur) and the smoothness of the road surface (loose tubes or ruts in the road can result in an extra slap). In urban conditions with a typical average speed of 35 miles per hour, it is normal to set the TUBE DEBOUNCE to 80 msec. In open free flowing traffic conditions with a typical average speed of 50 miles per hour, it is normal to set the TUBE DEBOUNCE to 30 msec. Adjustment of these values can improve the accuracy of the data. In a urban area, use the check menus to observe and count axles as they cross over the roadtubes. If for example; a 2 axle truck slowly drives across the tubes and the ADR counts 3 or 4 axles, increase the setting by adding 10 msec. As another example; in a high speed area, observe and count the axles on a 5 axle truck, if the ADR only counts 3 or 4 axles, decrease the setting by subtracting 10 msec. If no adjustment is made, the ADR automatically uses a setting of 40 msec. The value for AXLE DEBOUNCE and WIM DEBOUNCE are also site dependent, and can also be affected by factors such as the flexibility of the road. SPACINGS ⇒ To Specify the Sensor SPACINGS: 1. Select CALIBRATION/SPACINGS from the CONFIGURE menu. 2. Type the SPACING and LOOP values, pressing ENTER to advance. You are presented with each array’s spacings in turn. The CALIBRATION/SPACINGS option in the CONFIGURE menu enables you to specify the each array’s spacing. The option contains the following settings: • SPACING - This is the distance between the lead and lag sensors for arrays that can calculate speed. The meaning of the option is as follows: 49 The CONFIGURE Menu − For arrays with a pair of axle or WIM sensors, it is the distance between the two sensors that make up the pair. − For the four roadtube array it is the distance between the two long sensors which must be the same as the distance between the two short sensors. − For array with a pair of loop sensors it is the distance between the leading edge of the first loop and the leading edge of the second loop. • LOOP (length) This value is used to calculate vehicle length, etc. Type in the physical loop length, as measured in the road in the direction of travel, then press ENTER. All loops in an array must be of the same exact construction. For example, the physical length of the loops must be the same (within 1cm) when measuring speed, length or class. In some road situations the effective loop length may be slightly different than the physical measurement. We refer to the effective loop length as the magnetic length. For accurate vehicle length measurements, you sometimes need to adjust the Loop length setting to allow for site-dependent conditions (such as the amount of metal in the road), and the expected average height of vehicles above the ground. To adjust the value, use the array and the ADR to make some measurements of vehicle length. If the vehicle measurements are, for example, on average 1 foot too long, increase the loop length by 1 foot, and vice versa. Physical Loop Length The Electro-Magnetic Detection Field extends the effective size of the loop Magnetic Length Physical Versus Magnetic Loop Length MAX LENGTHS ⇒ To Specify the MAX LENGTHS: 1. Select CALIBRATION/MAX LENGTHS from the CONFIGURE menu. 2. Specify each value, pressing ENTER to advance to the next option. This option contains the following maximum length settings: • MAX INTER-AXLE DIST - This is your area’s maximum permitted distance between axles. The ADR uses this value with MAX VEHICLE LENGTH to recognize individual vehicles for axle sensing arrays used for classification and WIM. • MAX VEHICLE LENGTH - This is your area’s maximum permitted vehicle length. The ADR uses this value to recognize individual vehicles. If you use a value that is too small, all vehicles longer than that value are broken up into two or more vehicles. If you use a value that is too large, one large vehicle may be detected when two or more shorter vehicles are actually present. 50 The CONFIGURE MENU • MAX GROUP LENGTHS - This is the maximum distance between axles to register them as a group. The axles can be grouped as a TANDEM (two-axle group) or a TRIPLE (three-axle group). In the case of a TRIPLE, the distance specified is the distance between the first and last axles in the group. The ADR cannot classify an axle into more than one group (the ADR always attempts to classify axles into TRIPLE first). Axle groups are used in various screens; for example in CONFIGURE/LIMITS to specify the maximum group weight. FILTERS ⇒ To Set the PVR Filters: 1. Select FILTERS/PVR from the CONFIGURE menu. 2. Use the left or right arrow key to select the required setting, pressing ENTER to advance to the next option. These settings allow you to filter the data to be stored in the bin and PVR files. A setting of YES will cause the field of data to be recorded as part of each vehicle record in the PVR file. A setting of NO will cause the selected field not be recorded. To maintain file size, Peek recommends that you select NO to any fields not necessary to your needs. .PVR file filters These settings are self-explanatory, except for the following: • VEHICLE STATUS - Selecting YES instructs the ADR to record information about possible problems with the data collected about a vehicle. For example, on a Axle-Axle array, the system may have detected 3 axles on the lead sensor, but only 2 on the lag sensor. • TOTAL WHEELBASE - Selecting YES instructs the ADR to store the sum of the individual wheelbases of each vehicle. • VIOLATION CODES - If you select YES, the PVR file will store details of violations that occur. The system defines a violation according to the settings in the LIMITS option (see Setting the Limits). Any recorded information that is outside these set limits is interpreted as a violation. BIN file filters ⇒ To Set the BIN Filters: 1. Select FILTERS/BIN from the CONFIGURE menu. 2. Use the left or right arrow to choose the study that is to have its filters changed, then press ENTER. If you choose ALL STUDIES and make a change, all studies are given the same ALL STUDIES settings. If required, you can then make changes to each individual study. 3. Use the left or right arrow key to select the required setting, pressing ENTER to advance to the next option. This option enables you to filter the vehicles that are recorded in the bin file on a per-study basis. Only vehicles whose data fulfil all the conditions specified here are included in the bin file. The value you specify for each setting is TRUE (the vehicle can be binned only if the condition is fulfilled), FALSE (the vehicle can be binned only if the condition is not fulfilled) or EITHER (the vehicle can be binned in either case). • UNBALANCED - The data from the array is unbalanced. For example, for an Axle – Axle array, the data is unbalanced if the lead sensor detects 3 axles and the lag sensor detects only 2. FALSE means "do not bin vehicles with unbalanced data". 51 The CONFIGURE Menu • OFF SCALE - The vehicle was detected on a WIM array, but not on its onscale sensor (see Chapter 1, An Introduction to the ADR, for a description of onscale sensors). FALSE means "do not bin vehicles with offscale data". • NO LOOP - The vehicle was not recorded on the loop sensor of the array. FALSE means "do not bin vehicles that were not recorded on the loop sensor". • HEAVY WHEEL/AXLE/GROUP - A wheel, axle or group is overloaded, according to the limit (see Setting the Limits). FALSE means "do not bin vehicles if the wheel/axle/group is overloaded". • OVERWEIGHT/HIGH SPEED/LOW SPEED/ ACCELERATED/DECELERATED - The vehicle is outside the specified limit (see Setting the Limits). FALSE means "do not bin vehicles if the limit is exceeded". • SPEED - The vehicle’s speed could not be calculated. FALSE means "do not bin vehicles whose speed cannot be calculated". • OTHER ERROR - This indicates that it is not known in which bin to place the vehicle. For example, if a length-by-speed study is being carried out and the vehicle’s length cannot be determined, the ADR does not know in which length bin to place the vehicle. If this option is set to TRUE, the vehicle can be binned in the highest bin (in this case, the bin for the longest vehicles). If it is set to FALSE, the vehicle will not be binned. VEHICLE MONITOR display filters ⇒ To Set the VEHICLE MONITOR Filters: 1. Select FILTERS/VEHICLE MONITOR from the CONFIGURE menu. 2. Use the left or right arrow key to select the required setting, pressing ENTER to advance to the next option. 3. The vehicle monitor can display a maximum of 80 characters of information per vehicle on its LCD (there is no limit when the information is outputted from the communications port). If the ADR displays a prompt that the output is too long, choosing NO allows you to respecify the information to display. Choosing YES causes the output to be truncated on the LCD. This option determines the amount of information that the system displays when you are using the vehicle monitor (see Chapter 5: Checking the ADR). Note that acceleration information is not included in the vehicle monitor, even if selected to appear. Setting the LIMITS ⇒ To Set the LIMITS: 1. Select LIMITS from the CONFIGURE menu. Type the required value, pressing ENTER to advance to the next option. If necessary, press the left arrow key to move the cursor to the left. This option enables you to set limits for various items of recorded information about a vehicle. Any value that is outside the limits is interpreted as a violation, which can be used to trigger opto operation (see Setting Opto Operation in this chapter) or determine whether the vehicle information is stored in PVR or bin files (see Setting the FILTERS in this chapter). Each limit is always checked, even if not stored in the bin or PVR files, provided that the array type is able to calculate the data. You can set limits for: • MAX SPEED and MIN SPEED - The maximum and minimum speed of a vehicle. • MAX ACCEL and MAX DECEL - The maximum acceleration and deceleration of a vehicle. Data outside these limits may cause the data that the ADR is calculating to be incorrect. 52 The CONFIGURE MENU • MAX WHEEL WT - The maximum weight of a vehicle on a single wheel. • MAX AXLE WT - The maximum weight of a vehicle on a single axle. • MAX GROUP WT - Some large vehicles have two or three axles that are very close to each other and constitute a group (as set by the CONFIGURE/MAX LENGTHS option). This is the maximum weight of the group. • MAX GROSS WT - The maximum gross weight of the vehicle. Limits Codes (Violation Codes) These are most commonly used with Weight-In-Motion and other special applications. Like Vehicle status, limits codes can be displayed in the vehicle monitor screen and on a PC via serial communication. It can also be stored as part of the PVR record. The Vehicle Violation is represented as a 2 byte hexadecimal number, for example 0000 ( no violations ). Bits 0 to 8 may be set as follows: Bit set Meaning 0 (LSB ) Maximum wheel weight exceeded. ( not currently used ) 1 Maximum axle weight exceeded. 2 Maximum axle group weight exceeded. 3 Maximum gross vehicle weight exceeded. 4 Alarm output for bridge formula. ( not currently used ) 5 Maximum speed exceeded 6 Minimum speed exceeded 7 Maximum acceleration exceeded. ( not currently used ) 8 Maximum deceleration exceeded. ( not currently used ) TIMEOUTS ⇒ To Set the TIMEOUT: 1. Select CALIBRATION/TIMEOUTS from the CONFIGURE menu. 2. Use the left or right arrow key to select a time, then press ENTER. You can also select NEVER, i.e. do not apply a timeout (which will reduce battery life considerably). The ADR has a special power-saving feature that causes the LCD display on the front of the unit to become blank if you do not press any buttons within the time specified in this option. To restore the display, simply press the ENTER button. OPTO OPERATION ⇒ To Set OPTO OPERATION: 53 The CONFIGURE Menu 1. Select OPTO OPERATION from the CONFIGURE menu. 2. Press the left or right arrow key to select the required setting, then press ENTER. Special Alarm Output capabilities have been incorporated which can selectively control a external device or send a serial signal (Per-Vehicle-Record) when a wrong way, overspeed, or overweight vehicle is detected. A variety of limit settings are available for the operator to select. This setting determines the behavior of the ADR’s opto-isolated output, which is used to switch external devices (such as a “Going Too Fast” sign) on and off. The possible settings are: • ALWAYS ON - The output is always on. • ALWAYS OFF - The output is always off. • ON FOR ALARMS - The ADR switches the output on for approximately 1 second and then off again for each alarm (as set by the CONFIGURE/LIMITS option). • SAME AS COM1 - This means that the output is on only when the ADR’s serial port is open. The port is open under the following conditions: − When it is communicating with an external device, such as a modem, if COMMS OPERATION is set to NORMAL (as set by the CONFIGURE/COMMS option). − All the time if COMMS OPERATION is set to ALWAYS ON. − At predefined times if COMMS OPERATION is set to SCHEDULED. These predefined times are 00:00 to 01:00, 09:00 to 10:00 and 15:00 to 16:00 SAME AS COM1 is useful if you want to switch the battery power to an external modem on and off, thereby saving energy. COMMS ⇒ To Configure the COMMS Parameters: 1. Select COMMS from the CONFIGURE menu. 2. Select or enter the required information as described for each option. 3. When you have completed the final option, the CONFIGURE menu is displayed. COMMS contains the following options: The RS232 communications ports of the ADR can be used for communication with either a PC or a modem. The COMMS option enables you to set up the ADR’s communications parameters and to initialize the modem (if installed). The PC or modem communications must use 8 data bits, no parity and 1 stop bit. If you are using an external modem, always connect the modem before powering up the ADR. If the ADR and modem use the same power supply, the ADR automatically can initialize modems when power is restored following a power-supply interruption. If the ADR and modem use separate power supplies, the modem can be initialized by using the COMMS option when power to the modem is restored. MODEM Use the left or right arrow key to display one of the following, then press ENTER. • NONE/PC - Select this setting if you are using no modem, a modem that does not need to be initialised (refer to the modem’s manual) or a PC. • HAYES AT - Select this setting if you are using a Hayes-compatible modem. 54 The CONFIGURE MENU • PAKNET - Select this setting if you are using a Paknet-compatible radio communications modem. BAUD RATE Use the left or right arrow key to display the required baud rate, then press ENTER. The range of baud rates available for selection is dependent on the MODEM TYPE setting you have selected. If you are using a 14400 modem, select the 19200 baud rate, since most 14400 modems can operate at a baud rate of 19200 when using compressed data. COMMS. ID Warning! Do not change the COMMS ID from 1 without express written directions to do so. You could lock your self and all others out of communications with the ADR. This should never be set via modem or other remote communications. Always have a person on site in case of error. A communications ID is only useful if several ADR’s are connected to a single modem via a multi-plexer or some other common shared communications medium such as a network. In this very special situation, each ADR must have a unique ID so that the modem can communicate with each ADR independently. Type a unique communications ID for the ADR in the range 1 to 65534, then press ENTER. COMMS OPERATION Use the left or right arrow key to display one of the following, then press ENTER. • NORMAL - Choose this for all but Paknet-compatible modems. This keeps the modem in a low-power standby condition when not in use. It becomes fully active when an external communications device need to communicate with it. • ALWAYS ON - Select this if the ADR is connected to a mains-powered Paknet modem. It keeps certain functions of the modem powered-up at all times to enable it to respond to external communications devices. • SCHEDULED - Select this if the ADR is connected to a battery-powered Paknet modem. The modem is powered up at 00:00 to 01:00, 09:00 to 10:00 and 15:00 to 16:00. INITIALISE MODEM This option is displayed only if you have selected a HAYES AT or PAKNET modem. Use the left or right arrow key to display one of the following, then press ENTER. • BOOT ONLY - The modem is initialized when the power to the ADR is applied (or when the ADR is booted from the ENGINEERING menu). • BOOT + PERIOD - The modem is initialized as described for BOOT ONLY and at midnight of each day. Use this option (or BOOT + NOW + PERIOD) if the modem is mains-powered and is connected to an ADR that is mains powered with a backup battery. It allows the modem to be initialized at midnight if there is a mains power interruption. • BOOT + NOW - The modem is initialized immediately and as described for BOOT ONLY. • BOOT + NOW + PERIOD - The modem is initialized as described for BOOT + NOW and as described for BOOT + PERIOD. 55 The CONFIGURE Menu DATE / TIME ⇒ To Configure the Date and Time: DATE FORMAT MM-DD-YY AUTO DST OFF <>CHG: ENTER SELECTS DATE FORMAT MM-DD-YY AUTO DST OFF < <>CHG: ENTER SELECTS DATE FORMAT MM-DD-YY AUTO DST OFF < <>CHG: ENTER SELECTS DATE FORMAT MM-DD-YY AUTO DST OFF < <>CHG: ENTER SELECTS DATE FORMAT MM-DD-YY AUTO DST OFF < <>CHG: ENTER SELECTS DATE FORMAT MM-DD-YY AUTO DST OFF < <>CHG: ENTER SELECTS The ADR must be IDLE to change the date and time setting From the screen showing “IDLE”, press “ESC” Use “F1” or “F2” to move the cursor to “CONFIGURE”, and press “ENTER” Use “F1” or “F2” to move the cursor to “DATE/TIME”, and press “ENTER” Use “F3” to select the required date format, then press ENTER to confirm and continue. See “Configure Daylight Saving Time” (below) to automatically make adjustments for local daylight-saving scheme. Use the number keys to enter the date and press “ENTER” to confirm the setting. Leading Zeros must be entered (09-13-99) Enter the time and press ENTER Use leading zeros in a 24 hour format (e.g. 1300 is equal to 1 PM) After pressing “ENTER” you are returned to the CONFIGURE menu, pressing “ESCAPE” will return to the “PEEK MENU” which displays the new time. Setting the clock and calendar is a very easy procedure. Over the life of the unit, the procedure should only be required when you change time zones or perhaps when you first receive the unit. The internal clock is very accurate and should keep time even if the main ADR battery becomes discharged or is disconnected. A 7+ year lithium battery is used to independently power the clock-calendar and to provide backup power for the memory. Note: ADR time is always in 24 hour format . Using the DATE/TIME option, select the date format (MM-DD-YY, DD-MMYY or YY-MM-DD) and to set the current date and time (24-hour format). The date and time are displayed on various screens and are stored with recorded data. When the ADR is shipped, date and time are set. It is likely that you will need to reset the time to your local time. See “Configure Daylight Saving Time” (below) to automatically make adjustments for local daylight-saving scheme. Configure for Daylight Saving Time Many parts of the world utilize a time change to make better use of the longer days in the summer months. The 4.00 series of firmware for the ADR has incorporated a automatic feature that makes use of the internal hardware clock and calendar to make the change on the appropriate dates and times. Because many parts of the world do not observe Daylight Saving Time, or implement it differently, this feature is normally turned off at the factory. To turn the automatic feature on, use the “ESCAPE” and “ENTER” keys to go to the CONFIGURE \ DATE/TIME menu as shown in the screen at left. Press “ENTER” to confirm the “DATE FORMAT” as “MMDD-YY” and the “<“ symbol will be next to “AUTO DST OFF”, Press the “F4” key to change to “AUTO DST ON” and press “ENTER” to confirm your command. The ADR clock will now automatically “Spring forward 1 hour” at 2 AM on the first Sunday of April each year, and will “Fall back 1 hour” at 2 AM on the last Sunday of October each year. Note that the ADR will retain this command forever, unless you change it by a new command or COLD BOOT of the unit. 56 The CONFIGURE MENU For areas where a different scheme is desired, Peek will be happy to supply a custom setup file to perform a similar operation on your date and time scheme. Setup files used in this manner only have to be loaded once a year prior to the first time change. For 2001 a sample file has been prepared and the instructions for use of the file follow: To invoke Daylight Saving Time in the spring and turn it off in the fall, load this file once while the ADR is idle. st For best results, you should load this file prior to 2 AM on April 1 , 2001. That is the preprogrammed time when the ADR will “Spring forward 1 hour”. No further action will be required and the ADR will “Fall back 1 hour” at 2 AM Oct. 28, 2001. FILE STORAGE [7] SENSITIVITY WEIGHT WIM* DEBOUNCE TEMP COMPENSATE? NO ⇒ To Configure the FILE STORAGE: 1. Select FILE STORAGE from the CONFIGURE menu. 2. Use the left or right arrow key to select board on which to store the data, then press ENTER to advance to the next option. 3. For each file type, type the maximum percentage of the primary-location board that can be used by the specified file type, then press ENTER. When this amount of the board is full of the specified file type, new data of that type is stored in memory on the CPU board, unless old files can be overwritten, as specified by CONFIGURE/MISC/WRAP FILES. You can, for example, use the same board as the primary location for all three file types and enter a value of 100% for each. In this case, all of the memory can be used by any file type and the secondary location is used when no more memory is available on the board. <>CHG; ENTER SELECTS AUTOCALIBRATET? USER DEFINED <>CHG; ENTER SELECTS The ADR can hold several different types of files. These files can be open at the same time to record data. The memory management of the ADR allows you to specify the type of files and the location of files on a per media basis. In order to store “.stp” or “.pvr” type files on the “CPU MODULE 00”, space must first be allocated. This is performed within the ADR menu “CONFIGURE” \ “FILE STORAGE” where you can specify the percentage of any media memory allocated to a file type. A setting of 100-100-100 would allow any file type to utilize 100 percent of the memory. The factory setting (RECOMMENDED) for the CPU memory is 100% for “.bin” (data) files, 0% for “.PVR” files and 0% for “.stp” files. The bin, PVR and .stp file types have their own separate areas of memory, although each area may reside on the same physical memory device. The memory can be on a PC memory card, the CPU board, a plug-in memory board or a combination. A memory device can support several files, however a file cannot overlap two memory devices. AUTOCALIBRATE ON CLASS 09< AXLE NUMBER 01 ENTER COMPLETES This option allows you to specify the boards on which to store the files for bin, PVR and other data (such as debug log and setup files), and to specify the maximum amount of the board that can be used for each file type. The CPU board may also be used as a primary location. Making a change does not affect the location of existing data. MISC (Miscellaneous) menu The MISC menu contains various other settings that are normally only set once in the life of the machine due to the regional nature of the items. ⇒ To Configure the MISC Items: 57 The CONFIGURE Menu 1. Select MISC from the CONFIGURE menu. 2. For each option, use the left or right arrow key to display the required setting, then press ENTER to advance to the next option. MISC contains the following options: UNITS Choose the unit of measurement for length (FEET or METRES), speed (MPH or KPH) and weight (KIPS or TONNES). A KIP is 1000 pounds. If you alter any units, the system automatically converts any previouslyentered values. FILES Set FILES to one of the following: • DAILY - If you select this setting, the system creates new bin and PVR files at the beginning of each day (i.e. at midnight). You may want to use this setting if you are performing a long-term study, since having a separate file for each day simplifies the management of the information. WRAP FILES may be set to either YES or NO, as preferred and is normally set to YES. (See WRAP FILES, below) • CONTINUOUS - If you select this setting, the system will create only one bin file,(and one PVR file, if requested) for the duration of the entire study. This is (traditionally) the most common setting for portable short term studies. Operators will often use this setting if they are accustomed to manually starting and stopping recorders. The limitations are: a) The end result file is dependent on the operator to specify a correct stop time or to return to the site at the correct time to manually stop the recorder. b) Files can get quite large in this mode (if not collected in a timely manner) and WRAP FILES is normally set to NO, (see below) which requires a manual “clean out” of old files. If memory limitations are reached (filled with data) the recorder will be forced to stop and wait until more space is available. • 24 HR This will create one continuous file with a total of 24 hours elapsed recording time, from any start time to an automatic stop time 24 hours later. This could be noon to noon or any other time as different from Daily files which always end and then start a new at midnight. This 24 hour selection does not repeat. WRAP FILES may be set to either YES or NO, as preferred. • 48 HR This will create one file with a total of 48 hours elapsed recording time, from any start time to an automatic stop time 48 hours later. This could be noon today until noon day after tomorrow or any other time as different from DAILY files which always end and then start a new at midnight. This 48 hour selection does not repeat. WRAP FILES may be set to either YES or NO, as preferred. • 72 HR This will create one file with a total of 72 hours elapsed recording time, from any start time to an automatic stop time 72 hours later. This could start at noon today and record continuously for three days and then stop. This 72 hour selection does not repeat WRAP FILES may be set to either YES or NO, as preferred. • 7 DAY This will create one file with a total of 7days elapsed recording time, from any start time to an automatic stop time 7 days later. This could start at noon today and record for seven days and then stop. This 7 day selection does not repeat. WRAP FILES may be set to either YES or NO, as preferred. WRAP FILES Select YES or NO. If you select YES, when the “BIN” memory becomes full, the ADR frees file memory space for new “BIN” data by deleting the oldest bin file that is not open (i.e. is not receiving data or being read). Likewise, if the “PVR” memory becomes full, the oldest “PVR” file is deleted to free memory space for new “PVR” data. Be aware that in an extreme situation, if you specify YES, data that has not been read may be lost. 58 The CONFIGURE MENU If you select NO, the ADR stops recording bin data when the bin memory or PVR data when the PVR memory becomes full. Only when the files have been removed from the ADR can new data then be recorded. LANGUAGE Select the language to be used for text that is displayed. ENGINEERING menu The engineering menu contains advanced options to assist when troubleshooting. SERIAL NUMBER – One of the additional bytes in the ADR serial number is used to indicate the “Country code”. As the serial number is maintained over subsequent uploads, this means that units set with a “Canadian” serial number will use appropriate default settings even after their firmware is updated. SENSOR CONSTRAINTS Currently, an ADR will list all sensors connected, and will allow use of all those sensors. This means that a customer who has bought a single array WIM system (requiring 2 sensors) can actually use all 8 sensors (4 arrays). In addition, an ADR 3000 displays the internal road tube and piezo sensors, which are not usable. In a similar way to that described for setting the default units and language, some of the extra bits in the ADR serial number can be used to limit the number of sensors to be used. This can be used to simplify menus for specific applications. The number of sensors permitted can be set as a factory option. ACCURACY – When performing Gap and Headway studies you may use this setting to extend the 1 millisecond accuracy as needed. If not used, 1 milli-second accuracy is only maintained for 2 seconds after the previous vehicle, and then the ADR reverts to a power saving mode. LAST REBOOT – This is a record of the time of occurrence and apparent cause of the last reset of the ADR CPU. The total number of resets that have occurred since the last installation of firmware is also maintained here. AUTO RESET BOARDS – Sensor Board Re-initialization A menu has been added to enable / disable the periodic reconfiguration of the boards in the system. When enabled, all SL58P boards in the system are re sent an initialization message at the end of every interval. If the board is not needed for the study it is sent a message telling it to go to sleep to conserve power. If the board is required for the current study it is sent the reset message (sensor board firmware version 7 or greater), followed by the appropriate messages to initialize the sensors required. INITIALIZE – Refer to the provided table in the troubleshooting section COLD BOOT – Refer to the provided table in the troubleshooting section 59 ADR Plus Operating Manual 60 The FILES Menu Chapter 7 The FILES Menu [5] FILES COPY (NEW, OLD, ALL, TAG) DELETE DIRECTORY FORMAT MEDIA (AND TEST) This is the file management system within the ADR. Button number five (5) FILES, brings up COPY, DELETE, DIRECTORY, AND FORMAT MEDIA menus. Note that the FORMAT function allows users to purchase any compatible PC Card (PCMCIA) most anywhere, and format it for use in the ADR. Normal Binned Data Files These files have an ending extension of .bin, Example: DATECODE .bin This file records the binned data that you have set up to be reported, e.g. vehicle count, speed, length, etc. These are the normal data files that will be collected. You will normally be collecting at least one “new” file after each traffic study. When a file is read or collected by software, the “new” file is marked as having been read. Typically, a daily count data file will use less than 1K of storage memory per day. Per Vehicle Record Data Files These files have an ending extension of .pvr, Example: DATECODE .pvr These are special files used primarily for the collection of Weigh-In-Motion data and by research engineers and can get quite large. Typically a full line of information is stored for each vehicle sensed by the ADR. This file is created only if requested in the SETUP procedure. It records all the derived information that can be obtained from the array type (e.g. gap, speed, etc.) on a per-vehicle basis, together with the date and time that each vehicle’s details were created. The time is normally reported to a resolution of one second, which means that more than one vehicle’s details may have the same recorded date and time. The PVR file enables detailed analyses of the information to be made at a later date, perhaps by using analysis algorithms that are different from those built into the ADR. The wheelbase length that was used to derive the class of the vehicle is also stored in the PVR file. SETUP FILES These files have an ending extension of .stp These files should not normally be collected or deleted by software. NAME .stp NOTE: The selection of “FILE TYPES” will limit the list of files to view on “CPU MODULE 00” or “PC CARD 01” memory. The choices of file types include BIN (for binned data), PVR (for Per Vehicle Records), and SETUP (for Setup Files). The file attributes refers to ALL (for all files), OLD (for data files that were previously read and marked), NEW (for data files that have not been read), TAG (for files tagged). Files can be “Tagged” to allow you to make a list of files. This list of “tagged” files can then be used to “COPY” or “DELETE”. NOTE: In order to store the “FILE TYPE” you have selected on “CPU MODULE 00” memory space for the storage of these files must first be allocated. This is performed using the ADR program in the subdirectory “CONFIGURE” / “FILE STORAGE” of the ADR menu. You can allocate the maximum amount of memory space the “FILE TYPE” (BIN, PVR, STP) can occupy. DIRECTORY step by step View a Directory of the files inside the ADR Press “ESCAPE” for menu access. Press “F2” to move the cursor down to “FILES” and then press “ENTER” 61 The FILES Menu Press the “F2” key until the cursor appears next to “ DIRECTORY”. Press “ENTER” key. Press the “F3” key to scroll the display to either “PC CARD O1” or “CPU MODULE 00” and then press the “ENTER” key to confirm. Press the “F3” key to select “YES” or “NO” for each type of file to be viewed and then press ”ENTER” NOTE: You will press the “ENTER” key three times to move to the next screen. Press the “F3” key to select the file attributes. ( i.e. ALL, OLD, NEW, TAG ) and press “ENTER”. Pressing “F1” or “F2” will move the list up or down. Press the “2” key to see the SITE ID. Press the “3” key to see the file size. Press the “1” key to see the file name. NOTE: The files can be tagged by using the “F3” key. NOTE: The selection of “FILE TYPES” will limit the list of files to view. The file attributes may be set to ALL (for all files), OLD (for data files that were previously read and marked), NEW (for data files that have not been read), TAG (for files you have tagged). Files can be “Tagged” to allow you to make a list of files. This list of “ Tagged” files can then be used to “COPY” or “DELETE” the files as a group. 62 PC cards Chapter 8 PC cards PC Cards (PCMCIA) Three separate types of operational function are now available; a) Expanded Memory, the PC Card stays in the ADR all of the time. b) Take Away Memory, the PC Card stays in but is replaced periodically with a fresh PC Card. c) Data Collector, the PC Card is inserted only momentarily in a unit to collect data, and may collect from several or many units in succession. 63 PC cards Formatting a PC Card CAUTION! FORMATTING WILL CLEAR ALL FILES FROM A PC CARD ADR DISPLAY KEY ENTRY AND DESCRIPTION STEP 1 [ 1 ] CHECK SETUP FILES [ 3 ] CUSTOM SETUP [ 4 ] CONFIGURE [ 5 ] FILES * 1. Insert the PC CARD in the slot. 2. Press “F1” or “F2” to move the cursor to “FILES”. 3. Press the “ENTER” key. STEP 2 COPY DELETE DIRECTORY FORMAT MEDIA 1. Press “F1” or “F2” to move the cursor to “FORMAT MEDIA”. 2. Press the “ENTER” key. * STEP 3 SOURCE MEDIA 1. Press the “F3” key to display “PC CARD PC CARD 01 2. Press the “ENTER” key. FREE MEMORY XXXXXKb <>CHG; ENTER SELECTS 01”. STEP 4 FORMAT : PC CARD 01 XXXX UNREAD FILES ENTER CONTINUES 1. Press the “ENTER” key. STEP 5 FORMAT : PC CARD ARE YOU SURE ? YES ENTER COMPLETES 01 1. Use the “F3” key to select ”YES”. 2. Press the “ENTER” key. STEP 6 FORMAT : PC CARD 01 NOTE: This message will be displayed during the formatting process. PLEASE WAIT . . . <>CHG; ENTER SELECTS STEP 7 FORMAT : PC CARD 01 NOTE: This message is displayed when complete. FORMATTED 1. Press “ENTER” key to continue. XXXXXKb FREE MEMORY ENTER CONTINUES This completes this operation. 64 PC cards Collecting Data with a PC Card ADR DISPLAY KEY ENTRY AND DESCRIPTION STEP 1 SETUP FILES [ 3 ] CUSTOM SETUP [ 4 ] CONFIGURE [ 5 ] FILES * 1. Insert the PC Card 2. Press “F1” or “F2” key to move cursor to “FILES” 3. Press the “ENTER” key STEP 2 COPY DELETE DIRECTORY FORMAT MEDIA * 1. Press the “F1” or “F2” key to move cursor to “COPY”. 2. Press the “ENTER” key. STEP 3 SOURCE MEDIA 1. Press the “F3” key to display “CPU MEMORY CPU MEMORY 00 2. Press the “ENTER” key FREE MEMORY XXXXXKb <>CHG; ENTER SELECTS 00” STEP 4 DESTINATION MEDIA 1. Press the “ENTER” key. PC CARD 01 FREE MEMORY XXXXXKb <>CHG; ENTER SELECTS STEP 5 FILE TYPES TO COPY 1. BIN YES< PVR NO SETUP NO <> CHG; ENTER SELECTS Press the “F3” key to select ”YES” or “NO” for each file type. Press “ENTER” to confirm. NOTE: After pressing the “ENTER” key three times the next screen will be displayed. STEP 6 COPY FILES 1. Use the “F3” key to select NEW or ALL for ALL files to be copied. <>CHG; ENTER SELECTS 2. Press the “ENTER” key. STEP 7 XXXX FILES XXXXXXKb 1. Press the “F3” key to display “YES” . SELECTED 2. Press “ENTER“ key to begin copying the files. START COPY ? YES <>CHG; ENTER SELECTS STEP 8 COPYING FILES XXXXXXXX.XXX ESC TO CANCEL NOTE: The display will show each file name as it is copied. STEP 9 COPY COMPLETE XX FILES COPIED ENTER CONTINUES NOTE: The display indicates the number of files copied. 1. Press the “ENTER” key. 2. Remove the PC Card, and close the rubber boot cover. This completes this operation. 65 PC cards Read a Directory of Files in ADR or PC Card Memory ADR DISPLAY KEY ENTRY AND DESCRIPTION STEP 1 [ 1 ] CHECK SETUP FILES [ 3 ] CUSTOM SETUP [ 4 ] CONFIGURE [ 5 ] FILES * 1. Press “F1” or “F2” to move the cursor to “FILES” 2. Press “ENTER” STEP 2 COPY DELETE DIRECTORY FORMAT MEDIA 1. Move the cursor to “DIRECTORY” 2. Press “ENTER” key * STEP 3 SOURCE MEDIA CPU MODULE 00 FREE MEMORY XXXXXKb < > CHG;ENTER SELECTS 1. Press “F3” to select “CPU MODULE 00” or “PC CARD O1” NOTE: In an ADR 2000 or ADR 3000 the PC CARD will be 09 2. Press “ENTER” key. STEP 4 FILE TYPES TO LIST BIN YES < PVR NO SETUP NO ENTER CONTINUES 1. Press “F3” to select “YES” or “NO” for each file type 2. Press “ENTER” to confirm each type NOTE: You must press “ENTER” three times to advance STEP 5 FILE TYPES TO LIST ALL < >CHG;ENTER SELECTS 1. Press “F3” to select ALL, OLD, NEW, or TAG 2. Press “ENTER” STEP 6 LIST CPU MODULE XXXXXXXX.stp XXXXXXXX.BIN <> TAG ENTER 00 1. Press “F1” or “F2” to move the file list up or down. Press the “1” key to display the file names Press the “2” key to display the SITE ID Press the “3” key to display the file size NOTE: Files can be tagged by using the “F3” key This completes this operation. NOTE: The selection of “FILE TYPES” will limit the list of files to view. The choices of file types include BIN (for binned data), PVR (for Per Vehicle Records), and SETUP (for Setup Files). The file attributes refers to ALL (for all files), OLD (for data files that were previously read and marked), NEW (for data files that have not been read), TAG (for files tagged). Files can be “Tagged” to allow you to make a list of files. This list of “tagged” files can then be used to “COPY” or “DELETE”. NOTE: In order to store the “FILE TYPE” you have selected on “CPU MODULE 00” memory space for the storage of these files must first be allocated. This is performed using the ADR program in the subdirectory “CONFIGURE” / “FILE STORAGE” of the ADR menu. You can allocate the maximum amount of memory space each “FILE TYPE” (BIN, PVR, STP) can occupy. 66 PC cards Copying Files From a PC Card into an ADR unit Note: As a data protective function, you may have to allocate memory space before performing this function. If insufficient memory is available; a message will advise you when you try to copy the files. ADR DISPLAY KEY ENTRY AND DESCRIPTION STEP 1 [ 1 ] CHECK SETUP FILES [ 3 ] CUSTOM SETUP [ 4 ] CONFIGURE [ 5 ] FILES * 1. Insert the PC Card in the slot 2. Press “F1” or “F2” to move the cursor to “FILES” 3. Press the “ENTER” key STEP 2 COPY DELETE DIRECTORY FORMAT MEDIA * 1. Press “F1” or “F2” to select “COPY” 2. Press the “ENTER” key STEP 3 SOURCE MEDIA 1. Press the “F3” key to display “PC CARD PC CARD 01 2. Press the “ENTER” key FREE MEMORY XXXXXKb <>CHG; ENTER SELECTS 01” STEP 4 DESTINATION MEDIA 1. Press the “ENTER” key CPU MEMORY 00 FREE MEMORY XXXXXKb <> CHG; ENTER SELECTS STEP 5 FILE TYPES TO COPY 1. Press “F3” to select ”YES” or “NO” for each file type BIN YES< PVR NO 2. Press the “ENTER” key to move to the next file type SETUP NO NOTE: You must press “ENTER” three times to advance <> CHG; ENTER SELECTS STEP 6 COPY FILES 1. Press “F3” to select ALL, OLD, NEW, or TAG ALL 2. Press the “ENTER” key <>CHG; ENTER SELECTS STEP 7 XXXX FILES XXXXXXKb 1. Press the “F3” key to select “YES” SELECTED 2. Press the “ENTER“ key to begin copying the files START COPY ? YES <>CHG; ENTER SELECTS STEP 8 COPYING FILES XXXXXXXX.XXX ESC TO CANCEL NOTE: The display will show each file name as it is copied STEP 9 XX FILES COPIED ENTER CONTINUES NOTE: The display indicates the number of files copied Press “ENTER” This completes this operation. 67 ADR Plus Operating Manual 68 Routine Maintenance Chapter 9 : Maintenance Battery Life: After a full charge of a good battery, the ADR should operate (with only roadtube sensors) for several months without a re-charge being required. Note that battery capacity is affected by extreme cold temperatures. Battery manufacturers recomend that lead-gel batteries used in critical or severe service applications should be replaced after 200 service cycles of charge and discharge or every four years, which ever occurs first. With proper care in normal service, your ADR battery should last for 5 to 10 years. Normal Battery Service: Ready for use, the battery voltage display will typically read 6.40 to 7.00 volts. You should never start a traffic study in the field with a battery voltage reading less than 6.00 volts. As the battery is used and discharges, if the voltage falls below 5.75 volts, the voltage display will “FLASH” as a low battery warning. The ADR will shut down if the battery voltage falls below approximately 5.5 volts. A special battery “Sentinal” circuit is incorporated which protects the battery against deep discharge damage. The circuit works by disconnecting the battery at approximately 5.1 volts. When you connect the charger, or replace the battery, if a voltage greater than 6.1 volts is sensed, the circuit will restore the connection. The word “CHARGE“ will be displayed while the battery is accepting a charge and the display is on. Charging the Battery Inside the weatherproof case of portable ADR’s is a sealed rechargeable battery which will typically provide up to 90 days of recorder operation between charges for roadtube operations. Loops or other sensors will use more of the battery and will require recharging more often. It is recommended that the battery should be recharged via the external connector at least every 2 months. However, you can, if required, remove and recharge the battery at similar intervals. The battery voltage should never be allowed to fall below 5.75 volts, as indicated on the ADR’s initial PEEK screen. The word “CHARGE“ will be displayed while the battery is accepting a charge and the display is on. Although a typical battery charge is 48 hours, a fully discharged battery will require 72 hours to completely recharge. A fully discharged battery is considered to be 5.75 volts (or lower). Batteries which measure less than 5 volts should be removed from the ADR and may be internally damaged and require replacement. A variety of battery chargers are available. The standard charger supplied requires 60 to 72 hours to completely recharge the ADR internal battery. Typically this operation is performed over a weekend so as not to interrupt weekday operations. When the standard charger is used there is no fear of over charge damage to the internal battery. The charging rate is regulated by the ADR internal circuitry. For permanent site installations when A/C power is available, the standard charger is installed as part of the permanent power supply. When you disconnect the battery, the ADR continues to remember all settings that you configured and set up, such as site number, recording interval, time and date, etc. The recorder can be left for up to ten years without the battery, since your settings are stored in a non-volatile memory that is powered by a miniature battery contained on the recorder’s CPU board, and a real-time clock circuit maintains the time and date. The ADR drops out of recording mode when power is disconnected for more than a few seconds. If the unit is armed, recording resumes at the next main or peak interval. 69 Routine Maintenance Battery Troubleshooting: If the display does not turn on at all, try replacing the battery with a known good one. If the main battery is removed, all data files and the internal clock are retained for approximately 7 years by a separate lithium battery mounted on the CPU board. The ADR battery charger may be connected to a unit with the main battery removed without damage to the unit or the charger. How can operators improve the battery performance of the ADR? Operators should fully charge the battery before use. The battery inside an ADR requires between 48 and 72 hours to reach full charge, depending on its condition at start. This is the equivalent of connecting the charger on a Friday evening, and disconnecting on Monday morning, ready to go to work. Are there any special instructions for longer battery life with the internal Piezo detectors in portable ADR units? Piezo inputs which are not being used can be a source of “noise” inputs to the CPU which then uses battery power and processing to “wake-up” in response to the undesired input. Typically, the CPU in an ADR is operating in a low power mode between vehicle sensing and processing activities. When any input activity occurs, the CPU of the ADR “wakes up” to process the sensor input. This takes power. If the input is not being used, it should eliminated as a source of noise. For piezo inputs, if only part of the sensor harness is used, (such as only 2 of the 4 channels in a cable) the unused input wires should all be twisted together and taped. Some people use a twist on connector for this with good results. Do not connect the unused wires to “earth” ground. Checking the Weatherproof Seals Check that the weatherproof seals are undamaged. When you close the lid of the ADR, you should always check that no dirt, grass or other debris has become trapped in the weatherproof seals. Cleaning the ADR If fitted, clean the solar panel at each visit to the site. If you need to clean inside the unit, use a barely-damp, lint-free cloth. Never attempt to clean the ADR using aerosol cleaners, abrasives or other cleaning agents. Take particular care not to scratch the polycarbonate display screen. Checking the Operation of the Sensors Using the various online monitor options in the CHECK menu, check the operation of the ADR. Make sure that all tube sensors are in good condition, and replace if necessary. All loop installations should be inspected regularly for surface hairline cracks and damaged sealant. Any indication of damage to the loop wire should be repaired immediately to prevent moisture from making contact with the wire. It is recommended that all loop installations are checked at least once a year, preferably in late autumn or early spring. 70 Troubleshooting Chapter 10 : Troubleshooting The Recorder is Dead 1. Check that the battery is charged and correctly connected. 2. If fitted, check that the power supply is connected and that the line voltage is switched on. The Display is Blank This is probably not a problem. The ADR has a power-saving feature that blanks the display after no buttons have been pressed for the amount of time specified by the CONFIGURE/TIMEOUTS option. Simply press ENTER to activate the display. In extremes of temperature (hot or cold), the display may appear blank, but the ADR should be operational. If this occurs you should be able to communicate with the ADR using a laptop PC and a serial comms cable. It is usually possible to move the ADR to a more comfortable environment (such as inside your vehicle) for a short while and with the ADR lid open the display should normalize. Pressing Buttons Has No Effect If the LCD displays “TELEMETRY CONTACT”, somebody is accessing the ADR from a PC. Remote Communications Does Not Work If you cannot connect to a remote site via a modem, check the following: 1. Is the telephone number of the site correct? Does it have the correct prefix? 2. Are you using the correct communications port, and is the baud rate set correctly? 3. Does the remote modem answer the call? (Look for the DCD light to come on.) 4. Is the telephone line OK? Will a telephone connected to the remote socket ring? 5. Is the remote modem plugged into the telephone line? 6. Has the remote modem been set to auto-answer mode? See the modem’s handbook. 7. Has the modem been initialised by the CONFIGURE/COMMS option? Vehicles are Not Being Recorded Correctly 1. Check that the sensors are correctly connected. 2. Check that the correct array type is selected. 3. Check that all terminal-block connections are clean and tight. 4. If tubes are being used for speed or classification studies, it is most important that the tubes in an array are the same length. Small variations in tube length can cause errors. When tubes are being used in the Short / Long or four roadtube array configurations, it is essential that the air pulses from the shorter tubes arrive before those of the longer tubes. Verify that this is the case by using the CHECK/EVENT MONITOR option. If you experience a problem, reduce the length of the short tube or increase the length of the long tube to correct the problem. 71 Troubleshooting 5. If a loop analyser is available, check the earth leakage and inductance of any loops used. Advice on the correct readings can be obtained from your local Sales Office. Loop resistance must be less than 5 ohms. The resistance of each loop cable to earth (insulation test) when measured at 500 Volts should be greater than 100 megohms on all new loop installations and absolutely must be greater than 10 megohms. 6. Check sensor operation by using the EVENT MONITOR option in the CHECK menu. 7. If you are using an ADR-3000, you can check sensor operation by pressing the lamp button on the front of the appropriate sensor board. The channel lamps illuminate when traffic passes the sensors. Overcounting When Using Axle or Tube Sensors If you are experiencing overcounting with an axle sensing array, confirm that the value entered for the COUNT RATIO and/or TIMEOUT are correct. You can check the values by using the SETUP procedure. Standard values are 2.0 and 2 seconds respectively and are applicable for 99% of survey installations. Using the CONFIGURE/CALIBRATION/DEBOUNCE option, increase the tube debounce or axle debounce from 40 msec (the typical value) to 80-100 msec. Undercounting When Using Axle or Tube Sensors If you are experiencing undercounting with an axle sensing array, confirm that the value(s) entered for the COUNT RATIO and/or TIMEOUT are appropriate for the class or speed of vehicles using the road. You can check the values by using the SETUP procedure. Check the road clamps for pinching of the tubes. Check for blockages in tubes, and blow out the tubes. If the sensors are old or worn, replace them. If you still experience problems, using the CONFIGURE/CALIBRATION/DEBOUNCE option, reduce the tube or axle debounce time from 40 msec (the typical value) to 20-30 msec. Check whether undercounting could be attributable to axles on different vehicles hitting the tube sensors simultaneously. If this appears to be the case, either move the sensor to a different location to reduce the chance of simultaneous hits, or increase the number of channels by using additional available sensor inputs. 72 Troubleshooting ADR Resets It is possible that you may want to clear out all user settings and files in order to reset everything to the original factory settings or as part of a troubleshooting test. This should never be done with out first making every effort to extract all data files from the unit. This section on resetting is intended to help you understand the options available to you and the results of actions you may take. We have also included a listing of the automatic resets which are built into the ADR and an explanation of their causes and effects. Reset by Result of Command / Action, What is reset or erased User Command / Action Comms Settings All Other Settings, (Array, Study, Configure, Filters, Calibration, Limits, etc.) All Files on CPU Media All Files on Other Media Power up cycle,← or, RESET Button Press ↑ Retained Retained. Unit may AutoArm. Retained Retained Firmware upload Retained Reset to Defaults All files Erased Menu INITIALIZE Retained Reset to Defaults Retained Retained Menu COLD BOOT Reset to Defaults Reset to Defaults Retained Retained 3 Key & Power Bootƒ Reset to Defaults Reset to Defaults All files Erased are Retained ^C^O^L^D_^B^O^O^T via Comms Retained Reset to Defaults All files Erased are Retained Automatic Reset by Result of Action, What is reset or erased Initial Trigger (Cause) Comms Settings All Other Settings All Files on CPU Media All Files on Other Media Watchdog (Brown out, Power, or other problem) Retained Retained, the fault is logged, and unit will resume (restart) as ARMED when power is restored. Retained Retained Invalid Opcode (Program corruption) Retained Retained, the fault is logged, and unit will resume (restart) as ARMED. Retained Retained Null Pointer Assignment (Prog. or Memory Fault) Retained All Settings Reset to defaults, Fault is logged and the unit will rest at IDLE. Retained Retained Hardware Change Retained All Settings Reset to defaults, unit will rest at IDLE Retained Retained Undetermined Retained All Settings Reset to defaults, Fault is logged and the unit will attempt to restart as ARMED. Retained Retained are Retained 73 Troubleshooting Note 1: The ADR recognizes 2 kinds of power up cycle. The difference being the duration of power off that occurred. Any time a power up occurs the ADR checks memory to see when the power down occurred. If the power down occurred within the last 50 seconds and was not over a recording interval boundary, then the ADR will ignore the interruption and will resume recording with all settings as before and will continue to record into the same data files. This operation allows changing a battery in a portable unit without breaking files. If on power up the duration of the interruption is determined to have been greater than 50 seconds, or was over a recording interval boundary, than a restart is initiated. A restart will use all of the previous study settings and the ADR will be ARMED, but the previous files will be closed and a new file will be started at the next recording interval. Note 2: Some ADR units are fitted with an optional RESET button. When the button is pressed and released, the ADR will always respond as if a long power interruption occurred and will initiate a restart. Note 3. ADR 3 Key Reboot Command The ADR will “COLDBOOT” (i.e. complete re-initialization of all parameters except the comms type) if the 6, 0, and ESC keys are held down while power is applied. It should be noted that although files in the ADR will not be affected by this operation, their percentage allocation has been re-set to the original factory setting. 74 Troubleshooting HELPFUL HINTS: 1) The “Per Vehicle Records on the “VIEW MONITOR” screen are helpful to verify correct operation and configuration. If you choose “YES” to “NUM OF AXLES” in “FILTERS / VEHICLE MONITOR” the displayed numbers can be used as needed to set the unit. 2) The information is displayed as: MM:DD:YY = The date of arrival of the sensed vehicle HH:MM:SS = The exact time of arrival of the sensed vehicle at the first sensor in the array ARR = Array or data channel number (this usually corresponds to the lane number) FLOW = Direction of travel across the array, (for example, a vehicle sensed by loop “A” and then by loop “B” is displayed as a “ + ” (plus) and a vehicle sensed by loop “B” and then by loop “A” is displayed as a “ - ” (minus) ... A to B sensed travel is also referred to as FORWARD, and B to A is referred to as REVERSE VEHNO = Vehicle number as counted crossing an array in the recording interval. If FILTERS are used in the recorded study files for BINNED or PVR data, this number may be different (higher) than the count number displayed in the CHECK / COUNT MONITOR screen. CL = The derived vehicle type classification as determined by the axle classification table in use in the ADR, usually this is based on what is referred to as the FHWA axle classification scheme. Specific vehicle classifications are determined by the number and spacing of individual axles and axle groups sensed as being associated to the vehicle passing over an array in comparison to the table. SPD = The calculated speed of the vehicle as determined by the time elapsed as the vehicle is sensed by first one sensor in an array, then by a second (or third) sensor in an array when the sensors are located at a known distance spacing. Speed determination is the most important aspect of vehicle classification because all other calculations and measurements for classification are based on it. LPL = Loop Length, the calculated overall length, bumper to bumper, of a specific vehicle as derived by the speed of a vehicle and the length of time required to cross a given loop of a known size, and then subtracting the length of the loop from the result. WBL = Wheelbase, (total) vehicle wheelbase length, measured from first axle to the last axle of a vehicle. The ADR derives this measurement by the determined speed of a vehicle and the length of time elapsed between the first sensed axle and the last sensed axle of that same vehicle as it crosses an array. For vehicles with more than two axles, the ADR also derives the spacing of each pair of axles and the WBL (total wheelbase) is equal to the sum of all axle pair spacings as sensed for a specific vehicle. 75 Troubleshooting WB1 = Wheelbase, first axle pair spacing, determined as the distance between the first and second axles of a vehicle. The process is as described above, and for a two axle vehicle like a Ford Taurus passenger car, the numbers displayed for WB1 and for WBL will be the same. If a specific vehicle has more than two axles, then WB1 will always be less than WBL. WB2, WB3, .. .WB8 = Axle spacing, as determined above, for axles 2 to 3, 3 to 4, 4 to 5, etc. 2) Speed is the single most important basic criteria that is used by the ADR to determine vehicle characteristics. All other parameters for vehicle classification are dependent on accurate speed determination. Speeds are determined by the time required for a vehicle to travel from the first sensor in an array to the second sensor in an array. If two piezo sensors are used to determine the travel time, then speeds are not subject to alteration by the sensitivity adjustment. If loops are used to determine the travel time, the effective sensitivity and the sensitivity setting itself will have a effect on the determined speed. For the most accurate and consistent vehicle speed determination with loops, is important to have the lead and lag loops of an array set to the same sensitivity. 2) If the displayed LPL (loop length) for a vehicle is too long, or too short, check the setting of the loop size. An adjustment of the loop length setting can be made to effect the determined vehicle length. This adjustment maybe required to compensate for physical effects of a particular roadway, such as rebar in concrete. The ADR subtracts the loop length (measurement) from the total vehicle passage time in determining a vehicle length. Therefore, if you tell the ADR to subtract a longer loop measurement, it will adjust the determined vehicle lengths shorter. Several other factors affect the displayed loop length, among them, speed accuracy, and the effective loop sensitivity. Are the vehicle speeds reasonable? If speeds displayed are faster than actual, the vehicles will show up as being too short. Check the determined speed of vehicles using another measurement method such as a radar gun or stop watch, then adjust the loop spacing to correct the displayed speed. After determining that the displayed speeds are correct, and that the loop length is correctly set, a sensitivity adjustment may be a factor in determining a more correct and consistent displayed loop length. Generally speaking, a higher sensitivity setting will provide more consistent vehicle lengths than a lower setting. Do not set the sensitivity of the loops so high that traffic in adjacent lanes is detected. 4) If extra axles are consistently being added to vehicles (a 5 axle class 9 being shown as a 13 because of 6 axles), then consider raising the “DEBOUNCE” setting to a higher number, ie. from 040 to 042 mS. Before adjusting debounce time setting, you should check the piezo output from the sensor in the road, and check the sensitivity setting of the board first. A misplaced or poorly performing road sensor will generate extra signals. 5) If consistently losing closely spaced secondary axles from a vehicle, ( a 5 axle class 9 being shown as a 8 because of 4 axles), then consider lowering the “DEBOUNCE” setting, ie. from 040 to 038 mS. Before adjusting debounce time setting, you should check the piezo output from the sensor in the road, and check the sensitivity setting of the board first. A misplaced or poorly performing road sensor will miss light axles. 76 ADR-3000 Chapter 11 Classification Enhanced Classification The Default Classification (Scheme “F” printout attached) has been optimized to improve operations. Per customer request, vehicles determined to have more than 7 axles, (8, 9, 10, 11, 12, 13, 14, and 15 axles) now default to type 15. Previously these vehicles defaulted to type 14. Also, vehicles determined to have 3 axles, but which did not match up to the definitions for class 2, or 3, or 4, or 6, or class 8, and were placed as type 6, are now placed as type 2 vehicles. Vehicles determined to have 4 axles, but which did not match up to the definitions for class 2, or 3, or 4, or 7, or class 8, and were placed as type 8, are now placed as type 2 vehicles. The ADR firmware default settings are now: Tube Debounce is now set to 40 ms. Maximum Vehicle length is now set to 80 feet, Maximum Inter-Axle Spacing is now set to 35 feet, New setup files The City_35 will set: Tube Debounce to 80 ms Maximum Vehicle length to 80 feet Maximum Inter-axle Spacing to 35 feet. The Fast_50 file will set: Tube Debounce to 30 ms Maximum Vehicle length to 95 feet Maximum Inter-axle Spacing to 40 feet. What is a ClassTree? A ClassTree is an advanced way of determining what type of vehicle has crossed the ADR’s sensors. Unlike a simple lookup table, where there is a rigorously defined set of parameters, a ClassTree is implemented as a series of “test and branch” operations. This makes it possible to create custom classification schemes that would be difficult, or impossible, for a lookup table. A ClassTree can also be optimized so they require less system resources than the equivalent table. 77 ADR-3000 ADR Default Scheme F Classification Definitions (v429) Tree name : FHWA-USA, Description : Def ADR Tree 012901 0 axle vehicles. Default class = 2 1 axle vehicles. Default class = 2 2 axle vehicles. Default class = 2 Class 5: Axle Spacing: 13 Feet to 20 Feet Class 4: Axle Spacing: 20 Feet to 40 Feet Class 3: Axle Spacing: 10.2 Feet to 13 Feet Class 2: Axle Spacing: 6 Feet to 10.2 Feet Class 1: Axle Spacing: 0 Feet to 6 Feet 3 axle vehicles. Default class = 2 Class 8: Axle Spacing: 6 Feet to 17 Feet, 14 Feet to 40 Feet Class 6: Axle Spacing: 6 Feet to 23 Feet, 0 Feet to 6 Feet Class 4: Axle Spacing: 20 Feet to 40 Feet, 0 Feet to 6 Feet Class 3: Axle Spacing: 10.2 Feet to 13 Feet, 6 Feet to 18 Feet Class 2: Axle Spacing: 6 Feet to 10.2 Feet, 6 Feet to 18 Feet 4 axle vehicles. Default class = 2 Class 8: Axle Spacing: 6 Feet to 20 Feet, 0 Feet to 6 Feet, 6 Feet to 40 Feet Class 8: Axle Spacing: 6 Feet to 17 Feet, 14 Feet to 40 Feet, 0 Feet to 6 Feet Class 7: Axle Spacing: 6 Feet to 23 Feet, 0 Feet to 9 Feet, 0 Feet to 9 Feet Class 3: Axle Spacing: 10.2 Feet to 13 Feet, 6 Feet to 18 Feet, 0 Feet to 6 Feet Class 2: Axle Spacing: 6 Feet to 10.2 Feet, 6 Feet to 18 Feet, 0 Feet to 6 Feet 5 axle vehicles. Default class = 9 Class 11: Axle Spacing: 6 Feet to 17 Feet, 11 Feet to 25 Feet, 6 Feet to 18 Feet, 11 Feet to 25 Feet Class 9: Axle Spacing: 6 Feet to 22 Feet, 0 Feet to 6 Feet, 6 Feet to 23 Feet, 0 Feet to 23 Feet Class 9: Axle Spacing: 6 Feet to 22 Feet, 0 Feet to 6 Feet, 6 Feet to 40 Feet, 0 Feet to 14 Feet 6 axle vehicles. Default class = 10 Class 12: Axle Spacing: 6 Feet to 22 Feet, 0 Feet to 6 Feet, 0 Feet to 25 Feet, 6 Feet to 18 Feet, 11 Feet to 25 Feet Class 10: Axle Spacing: 6 Feet to 22 Feet, 0 Feet to 6 Feet, 0 Feet to 40 Feet, 0 Feet to 11 Feet, 0 Feet to 11 Feet 7 axle vehicles. Default class = 13 Class 10: Axle Spacing: 6 Feet to 22 Feet, 0 Feet to 6 Feet, 0 Feet to 40 Feet, 0 Feet to 13 Feet, 0 Feet to 12 Feet, 0 Feet to 12 Feet 8 axle vehicles. Default class = 15 9 axle vehicles. Default class = 15 10 axle vehicles. Default class = 15 11 axle vehicles. Default class = 15 12 axle vehicles. Default class = 15 13 axle vehicles. Default class = 15 14 axle vehicles. Default class = 15 15 axle vehicles. Default class = 15 78 ADR-3000 The ADR ClassTree Editor This software module is designed to assist you in creating a custom classification scheme for use in your ADR recorders. To make use of this software your ADR must be up to date with firmware version 2.10Oscar or later. The ADR ClassTree Editor is normally supplied as a part of the TOPS software but may be obtained separately. For ease of use, this ClassTree Editor makes some assumptions about the basic classification scheme. It is anticipated these assumptions will be accurate for the vast majority of users. In the unlikely event that you need to do something special that this application does not support, the factory will be happy to define a custom classification scheme for you. The main interface of the ADR’s ClassTree Editor is shown below. Tree Name field This field allows you to set the name of the ClassTree (which will appear on the ADR’s user interface, and in all the data files recorded using that tree). The name field is limited to a maximum of 8 characters in length. The ADR Default Scheme, which is based on the FHWA recognized scheme “F” 79 ADR Plus Operating Manual 80 Roadtube Arrays Chapter 12 : Roadtube Arrays Site Selection Location, Location, Location No matter what sensors you are using, the most important thing in collecting good data is to pick a good location beforehand. Intersections, curves, hills and valleys, turning lanes and passing lanes are to be avoided in the selection of a good data collection site. Vehicles should be traveling straight and true at a constant speed as they cross over the roadtubes you have installed. Bumps, cracks, loose gravel or dirt, bridges, culverts or any area where the driver has any reason or desire to change lanes, speed up, slow down or stop, should be avoided in site selection. How to Select a good location. • • • • • • • Look for free flowing traffic traveling at a consistent speed. The minimum vehicle speed at the site should be 15 mph. Avoid sites at or near intersections. Avoid sites where the road curves or lanes merge. Avoid sites where vehicles will change lanes or speeds. Stay away from driveways, pot holes and water. Find a smooth and paved section of road that is free of bumps. Good Data Guidelines for Roadtube Studies Inspect your Hoses • • • • Inspect roadtubes before each use for wear, holes, punctures, cuts, and interior cleanliness Do not use a questionable hose. Good tubes of known length are a necessity. We recommend fifty foot hose of 1/4-inch inner diameter for all studies. Periodically blow out hoses with compressed air to vacate any dirt, insects or water. New hoses should also be blown out before use to get rid of manufacturer’s powder. Plug the far end of each roadtube to prevent dirt, water, or insects from entering the tube and for accuracy. Roadtube Installation • • • • • • • • • Between the classifier and the near road edge, a 20 foot buffer length of roadtube prevents overdrive of the airswitches. Do not use a hose that is too short. When using 2 roadtubes for a study, both roadtubes should be the of the same length from the near road edge (curb) to the classifier. Roadtube clamps should be securely fastened to the road. Clamps must secure the roadtube in position without pinching the hose. Pinching can result in reduced data accuracy and lost counts. Stretch out the roadtube at the side of the road away from traffic before entering the raodway. Mark the location of each hose where it will be in the road, perpendicularly square to traffic flow. Securely fasten the far end roadtube, clamp and anchor. When traffic is clear and it is safe, cross road with the tube. Then from the near side, stretch the roadtube 10% before finally securing the near side roadclamp. Hold the end of each of the tubes (one at a time) about 4 inches away from your ear and “Listen” to the pulses coming from the end of the roadtubes as traffic passes across them. A good loud puff of air should be detectable from each vehicle. If you cannot detect a puff of air from a tube, do not proceed until you 81 Roadtube Arrays • • • have fixed the problem by replaceing the hose or re-setting the clamps as needed to produce a good load puff of air. Connect the ends of the hoses to the ADR as per the diagram for the study being performed. Observe the correct count and sensing of vehicle characteristics on the ADR control panel. The tubes should not excessively roll, move, bounce or slap the road as vehicles run over them. On many roads, ruts form in the wheel travel path. If the presence of ruts causes a gap of more than 3/4 inch between the roadtube and the road surface, it is recommended that mastic or duct tape be used to secure the roadtubes at the center of the rut. You should also use tape on the lane separation lines to prevent roll or movement of the roadtube. Special Considerations for Multiple Roadtube Setups ADR classifiers have automatic (default) spacings for roadtube studies involving 2 or 4 roadtubes in a sensor array. The detailed step by step setups shown on the following pages illustrate the default spacings for each study. You may wish to adjust the spacings for your particular application. As a general guideline, higher traffic speeds can use greater spacing between roadtubes than slower traffic. The standard default spacing of 16’ has been tested and proven to work acceptably at all speeds in light to medium traffic flow conditions. At slower speeds or in more congested areas, you may want to use a shorter spacing. The following speeds and spacings have been proven to assist in improving operation at slower speeds. Remember that if you use a spacing on the road other than the default, you must tell the ADR what you have done by going into the CALIBRATION \ SPACINGS menu and setting the correct distance. Average Speed Spacing Recommended 35 Mph 8 foot 50 Mph or more 16 foot default Security A lock and a set of keys are supplied with the ADR. Use them to chain fasten the unit to a secure post, pole or bridge abutment every time you install the equipment in the field. The most secure method is to wrap the chain around the post, drop both ends of the chain through the ADR handle, and then bring one end of the chain to the left, the other to the right, around to the front of the ADR and hook the lock through the left chain end, then the right chain end, then the ADR hasp, and then lock the lock. It is standard practice to kneel on the top of the ADR to compress the gasket while inserting the lock through the hasp. 82 Roadtube Arrays Single Tube Count Array The data that can be collected from this array is: VOLUME, HEADWAY, or GAP in one channel The diagram shows an array constructed using a single roadtube axle sensor. Using this array, the ADR records the total volume of axle traffic passing over the array. The number of vehicles is estimated by a COUNT RATIO or timeout value (or both); for example, a COUNT RATIO of two divides the number of axle sensor detections by two to estimate the number of vehicles. Two Single Tube Count Arrays The data that can be collected from this array is: VOLUME, HEADWAY, or GAP, by channel The diagram shows two of the above arrays being used, with the ADR located in the central median between the roads. Each array records the total volume of axle traffic passing across the sensor (as described above). The counts from each array can be summed together into a single channel or separated, as required. Short / Long Tube Count Array The data that can be collected from this array is: VOLUME, HEADWAY, or GAP, by lane (channel) The short / long tube array can record individual lane totals on a two-lane road. Each vehicle axle detected by the short tube is subtracted from the sum of vehicle axles detected by the long tube. The short tube is connected to the ADR on roadtube input (nipple) number 1, the long tube to input number 2. Note: It is important to have to same length of hose from the edge of the road to the ADR for both hoses. Two Short / Long Tube Count Arrays The data that can be collected from this array is: VOLUME, HEADWAY, or GAP, by lane (channel) Two short / long tube arrays can be used together on a divided highway, as shown in the diagram, to record the volume of traffic in each lane in separate channels. The first short tube is connected to the ADR on roadtube input (nipple) number 1, the first long tube to number 2. The second short tube is connected to the ADR on roadtube input (nipple) number 3, and the second long tube is connected to roadtube input number 4. Note: It is important to have the same length of hose (20 feet) from the near edge of the road to the ADR for each hose in a pair. 83 Roadtube Arrays Directional Tube Count Array (1 foot spacing) The data that can be collected from this array is: VOLUME, HEADWAY, or GAP, by direction (channel) The directional tube array enables the total volume of traffic passing the array to be determined by direction. Note: It is important to have the same length of hose from the near edge of the road to the ADR for each hose in a pair. At least 20 feet is recommended. Both tubes should also be of equal total length to maintain accuracy. As with the previous arrays, the ADR can be set up with two of these arrays in operation at the same time, with data separated by direction across the tubes, not by lane. Two Tube Class by Direction Array (8 or 16 foot spacing) The data that can be collected from this array is: SPEED, CLASS, LENGTH (wheelbase), VOLUME, HEADWAY, or GAP, by direction (channel), or a combination of these. The two tube class by direction array provides a cost-effective method of collecting speed or classification data by direction on low volume roads without lane discipline. This economical array is often used in residential areas where the roads are narrow or not center-lined. In low speed urban areas a spacing of 8 feet is recommended. In higher speed areas, a spacing of 16 feet is recommended. The standard ADR default spacing is 16 feet.. Four-Tube Class by Lane Array (8 or 16 foot spacing) The data that can be collected from this array is: SPEED, CLASS, LENGTH (wheelbase), VOLUME, HEADWAY, GAP, or direction, by lane, or a combination of these. The four tube class by lane array provides a high accuracy but still costeffective method of collecting speed or classification data by lane on low to medium volume roads where good lane discipline is observed. This array is often used in urban areas on multi-lane roads. In low speed urban areas a spacing of 8 feet is recommended. In higher speed areas, a spacing of 16 feet is recommended. The standard ADR default spacing is 16 feet. 84 Piezo Sensor Arrays Chapter 13 Piezo Sensor Arrays 1 Single-Piezo Count Array The data that can be collected from this array is: VOLUME or HEADWAY or GAP by lane. The diagram shows two single piezo arrays, one in each of two lanes. Using this array, the ADR records the total volume of axle traffic passing on each array. In many applications this array is installed where it is desirable to collect data that is directly comparable to historic roadtube counts, but on a permanent long term basis. The number of vehicles is determined by a COUNT RATIO or time-out value (or both); for example, a COUNT RATIO of two divides the number of sensor detections by two to determine the number of vehicles. It is recommended that the piezo sensor be installed so as to only have wheels on one side of the vehicles “hit” the piezo. In a 12 foot wide lane this might be achieved by using a 7 foot long piezo installed on the right side of the lane as shown in the diagram. The space between the two piezos would ideally be more than the maximum expected width of wheel track for traffic on the road. This ideal spacing width would prevent one vehicle from being counted on both piezo sensors 2 1 Piezo-Piezo Array The data that can be collected from this array is: SPEED or CLASS or LENGTH (wheelbase) or VOLUME or HEADWAY or GAP or DIRECTION by lane, or a combination of these. 2 The diagram shows two piezo-piezo arrays, one in each of two lanes. Using this array, the ADR can measure speed very accurately and can then determine classification by axle spacing and wheelbase. It is recommended that this array be used in free-flowing highway conditions where a loop detector is not needed. It is recommended that the piezo sensors be installed so as to only have wheels on one side of the vehicles “hit” the piezos. In a 12 foot wide lane this might be achieved by using 7 foot long piezos installed on the right side of the lane as shown in the diagram. The space between the opposing lane piezos would ideally be more than the maximum expected width of wheel track for traffic on the road. This ideal spacing width would prevent one vehicle from being sensed in both lanes while assuring detection of all traffic in each lane. 85 ADR Plus Operating Manual 86 Loop Arrays Chapter 14 Loop Arrays One Loop Array (per Lane) The data that can be collected from this array is: VOLUME, HEADWAY, or GAP, by Lane, or a combination of these. A single-loop array counts the number of vehicles that pass over the array very accurately. It gives better discrimination between vehicles than the single-tube or single-piezo array. 1 The diagram shows two one loop arrays, one in each of two lanes. Using this array, the ADR can process up to 64 lanes of count data individually when fully optioned with loop sensors. It is recommended that this array be used in freeflowing conditions where stop and go congestion is not a problem. It is recommended that the sensor loops be installed in the middle of the traffic path to avoid detection of vehicles in adjacent lanes. In a 12 foot wide lane this is usually a 6 foot square or octagon with 4 turns of XHHW wire providing an as installed typical minimum inductance of 124uH plus lead in inductance. 2 Two Loop Array (per Lane) The data that can be collected from this array is: SPEED, LENGTH (chassis), VOLUME, HEADWAY, or GAP, by Direction, by Lane, or a combination of these. 3 4 1 2 The two loop array is widely used for speed measurement and has set the standard for dependability-and ease of installation in permanent sensors. The diagram shows two arrays, one in each of two lanes. Using this array, the ADR can process up to 32 lanes of speed and length classification individually when fully optioned with loop sensors. It is recommended that this array be used in free-flowing conditions where stop and go congestion is not a problem. It is recommended that the sensor loops be installed in the middle of the traffic path to avoid detection of vehicles in adjacent lanes. 87 Loop Arrays Three-Loop Count Array The data that can be collected from this array is: VOLUME, HEADWAY, OR GAP 3 2 The three-loop array shown in the following diagram can be used across two lanes to give accurate counts of the number of vehicles that pass the array. The third loop in the center eliminates double counting of vehicles that cross or straddle the lanes. 1 Four-Loop Count Array The data that can be collected from this array is: VOLUME, HEADWAY, OR GAP 4 3 2 1 88 The four-loop array shown in the following diagram can be used across three lanes to give accurate counts of the number of vehicles that pass the array. The two smaller loops enable vehicles that cross or straddle lanes to be detected. Combined Sensor Arrays Chapter 15 Combined Sensor Arrays Combined sensor arrays are used to take advantage of the strengths of each sensor and provide improved accuracy of data. Many combinations are available beyond the descriptions provided here. These are the most common high accuracy combined sensor arrays in use today. Axle-Loop-Axle Array The data that can be collected from this array is: SPEED, CLASS, LENGTH (chassis), VOLUME, HEADWAY, GAP, or Direction by Lane, or a combination of these. 2 1 ADR This array has proven to provide the highest accuracy of those shown as standard in this document. The axle-loop-axle array calculates the same data as the two-piezo array and uses the loop to improve classification accuracy in situations where tailgating is a problem. The diagram shows two axleloop-axle, (also known as Piezo-Loop-Piezo or P-L-P) arrays, one in each of two lanes. Using this array, the ADR can measure speed very accurately and can then determine classification by axle spacing and wheelbase. It is recommended that the piezo sensors be installed so as to only have wheels on one side of the vehicles “hit” the piezos. In a 12 foot wide lane this might be achieved by using 7 foot long piezos installed on the right side of the lane as shown in the diagram. The space between the adjacent lane piezos would ideally be more than the maximum expected width of wheel track for traffic on the road. Also the length of the piezos should be long enough to prevent vehicles from missing the sensor by straddling. This ideal spacing would prevent one vehicle from being sensed in both lanes while assuring detection of all traffic in each lane. Note that a similar array is used for WIM, with class 1 piezo sensors. See the listing for WIM-Loop-WIM in this document. It is recommended that the sensor loops be installed in the middle of the traffic path to avoid detection of vehicles in adjacent lanes. In a 12 foot wide lane this is usually a 6 foot square or octagon with 4 turns of XHHW wire providing an as installed typical minimum inductance of 124uH plus lead in inductance. The standard distance from the first piezo “hit” by a vehicle wheel to the second piezo in the same lane is 16 feet. The loop is shown as a standard 6 foot square and is centered between the piezos. NOTE: For clarity in the diagram, the connecting wiring for the axle sensors in lane 2 are shown as going to the far side of the road. Normally this would go to a “hand” or “pull” box on the far side and then return to the ADR in conduit bored under the road. The return wiring and conduit are not shown. 89 Combined Sensor Arrays Loop-Axle-Loop Array The data that can be collected from this array is: SPEED, CLASS, LENGTH (chassis), VOLUME, HEADWAY, GAP, or Direction by Lane, or a combination of these. 3 4 1 2 AD This array type can provide slightly less accurate speed data than the piezo-piezo array, but can discriminate between vehicles more accurately. Very comparable to the piezo-looppiezo array, the loop-piezo-loop array can usually be installed at lower cost. The diagram shows two loop-axle-loop (also known as Loop-Piezo-Loop or L-P-L) arrays, one in each of two lanes. Using this array, the ADR measures each vehicle speed and can then determine classification by axle spacing and wheelbase. It is recommended that the piezo sensors be installed so as to only have wheels on one side of the vehicles “hit” the piezos. In a 12 foot wide lane this might be achieved by using 6 or 7 foot long piezos installed on the side of the lane as shown in the diagram. The space between the adjacent lane piezos would ideally be more than the maximum expected width of wheel track for traffic on the road. Also the length of the piezos should be long enough to prevent vehicles from missing the sensor by straddling. This ideal spacing would prevent one vehicle from being sensed in both lanes while assuring detection of all traffic in each lane. Note that a similar array can be used for WIM, with class 1 piezo sensors. See the listing for Loop-WIM-Loop in this document. The standard distance from the first loop edge crossed by a vehicles front bumper to the second loops first edge in the same lane is 16 feet. The loops are shown as standard 6 foot squares and the piezo is centered between the loops. Many agencies place the piezo centered between the leading edges, which would be 2 feet behind the first loop. This placement is not critical to the ADR. It is recommended that the sensor loops be installed in the middle of the traffic path to avoid detection of vehicles in adjacent lanes. In a 12 foot wide lane this is usually a 6 foot square or octagon with 4 turns of XHHW wire providing an as installed typical minimum inductance of 124uH plus lead in inductance. 90 WIM Arrays Chapter 16 WIM Arrays WIM Arrays are those arrays used for the collection of Weigh-In-Motion data with the ADR and use a “class 1” piezo sensor which has been tested by the manufacturer for linear response along its length. All ADR WIM arrays have the capability of working with, or with-out “On Scale” sensors. “On Scale” sensors provide an indication to the ADR as to the tracking of a vehicle as it passes over the WIM array. A vehicle which tracks properly will “hit” the On Scale sensor. Any vehicle which tracks too far to the left or right will miss the On Scale sensor and generate a “flag” as part of the vehicle record. Vehicles which do not track properly over the array will normally generate an erroneous weight. If the On Scale is used, ADR operators can elect to have the ”flagged” vehicle records recorded or filtered out. In this document, “On Scale” sensors are shown in the ADR WIM arrays, but should be considered optional. The ADR can also use (optional) temperature probe inputs for automatic calculation of weight compensation factors. There is no established standard for the placement of the temperature sensing probe. They are most often placed near the end of, and in the same installation slot, as a primary piezo sensor. They should not be placed under the piezo sensor or cable. In this document, temperature probes are not shown in the ADR WIM arrays to avoid clutter in the diagrams. 91 WIM Arrays Loop-WIM-Loop Array Loop-WIM-Loop Array 3 4 1 2 AD The data that can be collected from this array is: Gross Vehicle Weight, Axle Weight, Group Weight, KIPS, and, SPEED, CLASS, LENGTH (chassis), VOLUME, HEADWAY, GAP, or Direction, by Lane, or a combination of these. This array type can provide slightly less accurate weight data than the WIM-WIM array, but can discriminate between vehicles more accurately. Very comparable to the WIM-LoopWIM array, the Loop-WIM-Loop array can usually be installed at a lower cost. The diagram shows two Loop-WIM-Loop arrays, one in each of two lanes. Using this array, the ADR measures each axle weight only once in passage. It is recommended that the piezo sensors be installed so as to assure both wheels on an axle “hit” the WIM sensors equally. In a 12 foot wide lane this might be achieved by using an 11 foot long piezos installed as shown in the diagram. The space between the adjacent lane piezos should be no more than is required to achieve the following: This ideal spacing should prevent one vehicle from being sensed in both lanes while assuring accurate weights for all traffic in each lane. The standard distance from the first loop edge crossed by a vehicles front bumper to the second loops first edge in the same lane is 16 feet. The loops are shown as standard 6 foot squares and the WIM sensor is centered between the loops. Many agencies place the WIM sensor centered between the leading edges, which would be 2 feet behind the first loop. This placement is not critical to the ADR. It is recommended that the sensor loops be installed in the middle of the traffic path to avoid detection of vehicles in adjacent lanes. In a 12 foot wide lane this is usually a 6 foot square or octagon with 4 turns of XHHW wire providing an installed typical minimum inductance of 124uH plus lead in inductance. 92 WIM Arrays WIM-WIM Array WIM-WIM Array The data that can be collected from this array is: Gross Vehicle Weight, Axle Weight, Group Weight, KIPS, and, SPEED, CLASS, LENGTH (wheelbase), VOLUME, HEADWAY, GAP, or Direction, by Lane, or a combination of these. ADR This array is often used as a “portable” installation with an ADR-1000 and tape down sensors for short term survey work but also maybe used as a permanent installation on free flowing open highways. The diagram illustrates the typical installation of tape down WIM sensors by showing the sensors pulled back about 6 inches behind the edge stripe to minimize the opportunity for traffic to damage the junction of sensor to connecting cable. A permanent installation would be similar in other aspects. “On Scale” sensors are not normally used in portable installations due to their extra cost, but if used in a permanent installation should be kept approximately 18 inches behind the array. Vehicles are expected to cross the WIM sensor array before crossing the “On Scale” This array provides very good weight data in free flowing traffic. It is recommended that the piezo sensors be installed so as to assure both wheels on an axle “hit” the WIM sensors equally. In a 12 foot wide lane this might be achieved by using 11 foot long piezos installed as shown in the diagram. The standard distance from the first WIM sensor crossed by a vehicles front axle to the second WIM sensor in the same lane is typically 16 feet. Other settings may be used as long as the operator sets the ADR (See Calibration) to match the spacing used. A 8 foot spacing is recommended for use in low speed areas. 93 WIM Arrays WIM-Loop-WIM Array WIM-Loop-WIM Array 2 1 ADR The data that can be collected from this array is: Gross Vehicle Weight, Axle Weight, Group Weight, KIPS, and, SPEED, CLASS, LENGTH (wheelbase), VOLUME, HEADWAY, GAP, or Direction, by Lane, or a combination of these. This array has proven to provide the highest accuracy of those shown as standard in this document. The WIM-loopWIM array calculates the same data as the WIM-WIM array, but uses the loop to improve classification accuracy in situations where tailgating is a problem. The diagram shows two WIM-loop-WIM arrays, one in each of two lanes. Using this array, the ADR can measure speed very accurately and can then determine classification by axle spacing and wheelbase. Additionally, every wheel on a vehicle passes over two WIM sensors and this allows the weights to be more accurately reported. In a 12 foot wide lane this might be achieved by using 11 foot long WIM sensors installed on the right side of the lane as shown in the diagram. “On Scale” sensors are optional and if used in a permanent installation should be kept approximately 18 inches behind the array. Vehicles are expected to cross the WIM sensor array before crossing the “On Scale” The standard distance from the first WIM sensor “hit” by a vehicle wheel to the second piezo in the same lane is 16 feet. The loop is shown as a standard 6 foot square and is centered between the WIM sensors. It is recommended that the sensor loops be installed in the middle of the traffic path to avoid detection of vehicles in adjacent lanes. In a 12 foot wide lane this is usually a 6 foot square or octagon with 4 turns of XHHW wire providing an as installed typical minimum inductance of 124uH plus lead in inductance. Note: For clarity in the diagram, the connecting wiring for the axle sensors in lane 2 are shown as going to the far side of the road. Normally this would go to a “hand” or “pull” box on the far side and then return to the ADR in conduit bored under the road. The return wiring and conduit are not shown. 94 WIM Arrays Loop-WIM-WIM and WIM-WIM-Loop Arrays Loop- WIM-WIM and WIM-WIM-Loop Arrays 2 1 ADR The data that can be collected from these arrays is: Gross Vehicle Weight, Axle Weight, Group Weight, KIPS, and, SPEED, CLASS, LENGTH (wheelbase), VOLUME, HEADWAY, GAP, or Direction, by Lane, or a combination. The diagram shows two arrays, one of each type, in two lanes. The top lane is the Loop-WIM-WIM array, and the bottom lane is the WIM-WIM-Loop array. These arrays have proven to provide high accuracy for replacement use at existing sites where the sensors have been previously installed to a different standard. These arrays calculate the same data as the WIM-WIM array, but use the loop to improve vehicle discrimination and classification accuracy in situations where tailgating is a problem. Using either of these arrays, the ADR can measure speed very accurately and can then determine classification by axle spacing and wheelbase. Additionally, when 11 foot WIM sensors are used, every wheel on a vehicle passes over two WIM sensors and this allows the weights to be more accurately reported. Note that the WIM sensors are installed on the right side of each lane in the diagram leaving about a 12 inch space to adjacent WIM sensors in the next lane. They are not centered in the lane. This is to reduce unwanted “hits” from vehicles riding on the center line from occurring in both lanes. “On Scale” sensors are optional and if used in a installation should be kept approximately 18 inches behind the last WIM sensor. Vehicles are expected to cross the WIM sensor array before crossing the “On Scale” The standard distance from the first WIM sensor “hit” by a vehicle wheel to the second piezo in the same lane is 16 feet. The loop is shown as a standard 6 foot square and is centered between the WIM sensors. It is recommended that the sensor loops be installed in the middle of the traffic path to avoid detection of vehicles in adjacent lanes. In a 12 foot wide lane this is usually a 6 foot square or octagon with 4 turns of XHHW wire providing an as installed typical minimum inductance of 124uH plus lead in inductance. Note: For clarity in the diagram, the connecting wiring for the Loop-WIM-WIM array in lane 2 (the top lane) are shown as going to the far side of the road. Normally this would go to a “hand” or “pull” box on the far side and then return to the ADR in conduit bored under the road. The return wiring and conduit are not shown. 95 ADR Plus Operating Manual 96 SL-58P Loop Detector Chapter 17 SL-58P Loop Detector GENERAL DESCRIPTION The Sarasota SL-58P is a low current eight channel modular inductive vehicle detector designed primarily for traffic data monitoring applications, using the `EURO card' printed circuit board outline. The detector uses channel scanning techniques which permit freedom from cross channel interference from the eight channels within a detector. The detector uses the patented MT detection technique which has also been used in the Peek Traffic range of group 3 and group 5 detectors. One of the major advantages of the MT detection technique is that the loop scanning period is consistent and substantially independent of the loop inductance. The detector therefore has very good performance when parameters such as speed, occupancy, and headway are being measured. Automatic tuning on `power up' or reset allows detector operation in 2 seconds. Both power up and reset clear any detect and fault outputs already set in the detector. Software controls allow each channel sensitivity and Hysterisis to be adjusted while the detector is working, although a change in a setting will cause the detector to reset. An individual channel can be `switched off'. With a `channel off' the associated road loop will not be energized. Particular features of the SL58P are its low current requirement and stable operation with full presence time capability . The detector has an asynchronous communication port which allows an interrogating computer to read the detector internal data. SPECIFICATION Supply: 4.75 to 20 vdc nominal 8 mA (8 chan) in wait 1.92 mA, at stop 0.24 mA Operating Temperature Range: -40 to +80 C Loop Parameters: Inductance Tuning Range: 40 to 600 uH Minimum Resistance to earth: >10 meg ohms at 500 V, Recommended 100 meg ohms at 500 V. Series Resistance: <10 ohms Output: Serial communications of time stamped loop on and loop off events plus system status messages. Scan rate 3.5mS, 7mS, 14 mS. If 0.05 sensitivity is set on any channel, then scan rate doubles. Response Times: Operate and Release Delays 56 mS or 112mS ± accuracy If 0.05 sensitivity is set on any channel, then all channel accuracy times double Lightning & Transient Protection: Zener diode and flash over protection for over voltage on loop dissipated to chassis ground per CALTRANS and NEMA specifications. Failsafe on Fault: 1. Open or short circuit loop: The channel led will go into detect condition while the loop fault condition exists, and the fault output led will light (if enabled by push button). The fault output will be held as long as the fault exists. 2. Automatic retune of a channel occurs if the loop inductance changes by a nominal +-18% of its initial start up inductance. This will cause the detect led to go into detect during the retune and give a fault output. The fault condition will be held for one second after the fault condition has been cleared. OPERATING INSTRUCTIONS Note: THE POWER SUPPLY TO ALL DETECTORS IN A RACK MUST BE SWITCHED OFF WHILE ANY DETECTOR IS BEING INSTALLED OR REMOVED FROM THE RACK. 1. With ONE multiple channel detector the FREQUENCY jumpers can normally have any setting as the channels of the detector are individually activated. 2. Speed measurement :- Both channels should be set to the same sensitivity (in the range 0.1 to 1.0%) and the speed measuring pair of channels must be adjacent. 3. Where ROAD LOOPS IN CLOSE PROXIMITY ARE CONNECTED TO DIFFERENT DETECTORS then channel separation may be necessary. The frequency modes should be different and with as much separation as available. 4. Set SENSITIVITY and HYSTERESIS as required using software or ADR control panel. 97 SL-58P Loop Detector 5. 6. “Power up' or press RESET to initiate automatic tuning. This will take a nominal 2 secs during which the DETECT leds will illuminate. Observe detection of vehicles on the DETECT leds. FREQUENCY JUMPERS J20 AND J19 High Frequency J20 J19 (Default) Medium High Frequency J20 J19 Medium Low Frequency J20 J19 Low Frequency J20 J19 On the SL-58P there are two jumpers available to set the frequency of loop operation, labeled as J19 and J20 on the printed circuit board. Normally no setting is necessary due to the scanning nature of the detector which eliminates interference or crosstalk between the eight loops connected to one SL-58P. Even when several SL-58P detectors are used in the same unit or rack, interaction between loops is normally not a problem. If interference is noted as occurring between loops which are physically close to each other in the road, and which are connected to separate SL58P detectors, frequency separation may be necessary. With three SL58P detectors in a unit or rack, each with road loops in close proximity in the road, the middle (road loop) detector should have a different frequency setting to the outside two road loop connected detectors. Loops which are installed in concrete roads reinforced with steel are artificially lower in inductance and operate at a higher frequency. To counter act the effect of the steel, a low frequency setting should be used. LOOP BOARD HYSTERESIS SETTINGS 98 SL-58P Loop Detector SL58P IN SLOT 01 SENSOR 01 ID 00 SENSITIVITY 5 HYSTERESIS 3< The SL58P has a programmable “HYSTERESIS” option on the sensitivity setting screen. In the SL58P, hysteresis (a reluctance to change) is used to overcome the effects of marginal detection and jitter which may occur with high road clearance trucks and with loops where normal height sensitivity is impeded by poor loops or steel reinforcing. The SL58-P allows for a hysteresis level to be set via the ADR control panel or by the hardware links on the pc board. The hysteresis level is added to the sensitivity setting during the initial detect decision sequence. The hysteresis level is also added on the out of detect sequence (on the last 2 of the 8 out of detection counts). I.E. If sensitivity = 0.1% & hysteresis = 0.1% then signal strength must be greater than 0.2% to activate detect. Any signal of 0.1% or more will continue to hold on detect. A sustained signal of less than 0.1% be required for detection to cease. Sensitivity 8 7 6 5 4 3 2 1 0 Hysteresis 0 1 2 3 4 5 6 7 J3 J2 J1 % 0 0 0 0 1 1 1 1 O 0 0 1 1 0 0 1 1 F 0 1 0 1 0 1 0 1 F 0.05 0.10 0.15 0.20 0.30 0.45 0.70 1.00 OFF J16 J15 J14 % (on top of sensitivity) 0 0 0 0 1 1 1 1 0 0 1 1 0 0 1 1 0 1 0 1 0 1 0 1 0.000 0.033 0.067 0.100 DEFAULT 0.133 0.167 0.200 0.233 DEFAULT (NOT A JUMPER SELECTION) Presence J11 J10 J9 4 min 1 0 0 DEFAULT Available presence times are 3.5 sec, 30 sec, 1 min, 4 min, 8 min, 16 min, 60 min, Permanent (Permanent is defined as 6 weeks, with a maintained signal strength 50% greater than the sensitivity setting.) Accuracy J13 J12 7 mS 0 1 DEFAULT If 0.05 sensitivity is set on any channel, then all channel accuracy times double HARNESS 81-303 The standard PEEK part number 81-303 harness (normally referred to as an ADR loop and/or piezo harness), may be used for the loop connections between the ADR 1000 2000, 3000 and Plus versions with the Amp connectors and the field loop sensors. 99 SL-58P Loop Detector Following is the wiring instructions on how to use the PEEK 81-303 harness with loop sensors. The harness comes with 9 wires as follows: Connect to: red Loop #1 (+) black (this is the red-black wire) Loop #1 (-) white Loop #2 (+) black (this is the white-black wire) Loop #2 (-) green Loop #3 (+) black (this is the green-black wire) Loop #3 (-) blue Loop #4 (+) black (this is the blue-black wire) Loop #4 (-) green with yellow tracer. Earth (chassis) ground Twisted pair #1 Twisted pair #2 Twisted pair #3 Twisted pair #4 Single wire NOTE: If you are using shielded twisted pair loop lead-in cables, the shields should only be connected to earth ground in the cabinet. Not in the pull box or at the loop end. It is preferred to have the shields be left “floating” or isolated completely from earth. Any unused sensor connection wires should be twisted together and isolated from earth ground. This prevents electrical noise from being served as an unwanted input by the equipment. 100 SL-58P Loop Detector Loops for Data Collection ADR SL-58P 6' x 6' 4 TURNS CURRENT FLOW ELECTROMAGNETIC FIELD Basic Detector Theory The inductive loop as used for vehicle detection is comprised of two elements, the electronic detector module, and the wire which makes up the inductive loop coil in the road and its connecting lead in cable. The detector electronics contains a oscillator circuit which drives energy (10 to 200 KHz) through the wire and into the inductive loop coil creating an electromagnetic field. The loop detector forms a tuned electrical circuit of which the loop wire is the inductive element. If a conductive metallic mass passes through the electromagnetic field, eddy currents will be induced in the conductive material. Since the loop inductance is proportional to the magnetic flux, it results in a decrease in loop inductance. The electronics senses the change in inductance and activates its electronic output. Basic Loop Theory The loop wire and its connecting lead in cable are the inductive elements of the detection system and possess a combination of resistance and capacitance (both inter-wire and wire to earth capacitance). The loop wire is wound to form a coil (usually 4 turns) where the magnetic field becomes more concentrated, creating the zone of detection. All conductors or wires carrying an electrical current produce magnetic flux as long as the current is flowing through the wire. The effect of this flux is the electrical property called inductance, which is measured in henrys (h). Recommended Loop Wire XHHW (#14 or 12 SWG) Cross-Linked Polyethylene insulated, copper wire, multi-stranded. Rated 90°C in dry locations and 75°C in wet locations. Loop Wire Inductive loops, connecting lead in wire and cables typically use multi-stranded #12 or #14 AWG copper wire with low AC and DC resistance. The wire thickness is important, however, most critical is the quality, thickness and type of insulation covering the wire. Several types of insulation are available but only a Cross-Linked polyethylene (XHHW) should be used for vehicle detection loops. The insulation must withstand wear and abrasion from shifting streets as they expand and contract from high summer heat and winter cold as well as attacks from moisture, solvents and oils. Multi-stranded copper wire is recommended as better than solid wire because of its mechanical characteristics and is easier to correctly install with out damage. Stranded wire will survive bending and stretching than solid wire. Size of Loops Vehicle detection for traffic data collection is most commonly done using a 6‘ x 6’ (or 2m x 2m) loop with 4 complete wraps (turns) of wire around the sensing area. Although described as a square, the actual installation 101 SL-58P Loop Detector requires rounded corners to eliminate stress points at the corners. Many installations resemble octagons, or diamonds in outline form on the road surface. Some agencies have gone to exotic shapes and designs to attain a higher accuracy of data but generally the extra cost and maintenance complexity has not been worth while or cost effective. Quality loops that are carefully installed as consistently matched equals are recommended as best. If two loops are used for speed measurement, exact pairs are required in a lane. Loops smaller than 6’x 6’ may result in the early loss of detection for high body vehicles and should not be used if accurate truck traffic data is expected. Loops are usually installed as wide enough to span the path where detection is required, without being so wide as to detect vehicles in adjacent lanes or adjacent loops. As installed, loops should normally be 3 feet away from the nearest edge of lane line, and six feet away from any other loops. All loops should always be at least 4’ away from any moving metal objects, gates or doors. On narrow two lane roads with a loop in each lane it is better to keep the loops apart from each other than to make them smaller. Loop Size (feet) 3 Turn 4 Turn 5 Turn 4x6 56 DO NOT USE 100 128 6x6 70 124 176 6 x10 96 171 263 For large vehicle detection, i.e. trucks and tractor trailers or semis, use loops of not less than 6’ x 6’ length and width. With smaller loops the high ground clearance between axles can cause detection drop out problems, where each axle or group of axles will be seen as a separate detection on a small loop. Height of Detection The height of detection is the maximum height above the installed loop at which a reliable detection can be achieved. Normally, in the field test measurements will achieve a height of detection equal to ½ to 2/3 the length of the shortest side of a loop. i.e. a 6’x 6’ loop should produce a maximum height of detection 3’ to 3 ½’ above the loop wires. 3/8" 1" 2" INSTALLING THE LOOP (SL-58P) The loop wire will form a continuous run of wire from the detector electronics to the loop slot square, around the square 4 times, (called 4 turns) and return back to the detector electronics. Loops are normally wound into slots cut in the road surface. Two people should count the number of wire wraps (turns) around the sensing area of the loop as the wire goes into the slot. These are typically1/4” to 5/16” (9.5 to 10 mm) wide by 1 ½” to 2” (50 to 75 mm) deep and completely backfilled with sealant grout that will totally encapsulate the wires in the slot. Thoroughly clean and dry the slot before placing the wire into the slot. The bottom of the slot should be smooth and at the same depth all the way around. The wire must lay neatly in the slot in a vertical stack and then apply the sealant grout to fill the slot level with the road surface. Do not tolerate any voids or depressions in the hardened sealant which might allow sharp objects or moisture into the slot with the wire. Four turn loops should be used with an installed inductance of approximately 124 microhenries plus a value for the connecting lead in wire. The connecting lead in wire should not be more than 300 meters in length. Note: The 300 meter maximum connecting lead in length makes the assumption that there is at least 2” (50 mm) 102 SL-58P Loop Detector separation between the loop and any reinforcing in the roadway and that the connecting lead in wire used has an inductance per meter not greater than 0.73 microhenries. A normal value for the total inductance of the loop and connecting lead in wire is approximately 200 microhenries. Any new installation measured at less than 100uh should be suspect and checked, and corrected. It is advisable that all connecting lead in wire and loop tails should be twisted with at least 3 twists per foot (10 twists per meter). However the loop tails can be untwisted over a short distance where the loop tails are taken across a lane to a connection point immediately at the roadside. The maximum length of the untwisted loop tails must not exceed 100 feet (30 meters). The purpose of the twisting is a self canceling effect on the unwanted detection field which exists on the connecting wires from the sensing area (detection zone) back to the detector electronics. It is not advisable to have loop tails from different detectors in the same common slot. Not more than 50 feet (15 meters) of tails from any other loop should be laid in a common slot with out twisting and shielding. It is not advisable to mix pairs from different detectors in a multi pair cable. The loops and connecting lead in wire must have an insulation resistance to earth greater than 10 Megohms measured at 500 volts and a series resistance of less than 10 ohms. New loops should test to better than 100 Megohms measured at 500 volts and a series resistance of less than 5 ohms. TO ADR TO LOOP TWISTED PAIR W/ SHIELD PILL BOTTLE SPLICE STRIP, TWIST AND SOLDER WIRES CAP THE ENDS WITH A WIRE NUT USE A 2" DIAMETER PILL BOTTLE FILLED 3/4 WITH SEALANT STICK THE CAPPED ENDS OF SPLICED WIRES INTO THE SEALANT IN THE BOTTLE SPLICES SHOULD GO ALL THE WAY TO THE BOTTOM OF THE BOTTLE AND SEALANT SHOULD OVERFLOW THE BOTTLE THE SPLICES MUST BE COMPLETELY SUBMERGED HANG THE BOTTLE UNTIL SEALANT IS DRY AND HARD Splicing Loop Wires Splicing of loop wires is always to be avoided because the area of the splice is subject to contamination, moisture penetration and early failure. With that stated, it is still very common to install loops at multi-lane sites using the specified XHHW wire for the sensing area for the loop and then to have the loop tail (ends of the loop wire) go immediately to a curb side hand hole or pull box. In the pull box, high quality waterproof splices can be prepared to connect to a special lead in or home run cable which is a twisted pair, foil shielded, with drain wire, and which is gel filled to prevent moisture entry. This is high quality cable specially made for detection loop connections. The weak point of the installation however is the splice itself. Extra care needs to applied in this area to achieve an environmentally sound (waterproof) connection. There are two preferred methods of physically connecting the loop tails to the lead in cable. 1) Twist and solder or 2) crimp and solder. Notice that both methods employ soldering of the connection. Soldering has proven to provide the lowest resistance, and is less susceptible to corrosive degradation. Once the wires are spliced there are a variety of methods available to environmentally seal the area of the connection. To protect against weather, moisture, abrasion, etc. any of the following are acceptable as long as the integrity of the waterproofing is maintained: Self-sealing heat shrinkable tubing (with the goop inside), special gel splice packs, pill bottles filled with sealant, or the original four layer coating of brush on liquid tape, wrapped with vinyl electrical tape, and then again coated with brush on liquid tape and finally wrapped again with a final protective coating of vinyl tape. Waterproof, waterproof, waterproof. 103 ADR Plus Operating Manual 104 SA-58P Piezo Detector Chapter 18 SA-58P Piezo Detector The SA-58P low current piezo sensor detector was designed for the ADR by Peek Traffic Inc. 1. INTRODUCTION The detector utilises the analog circuitry developed in Peek Traffic with the micro-controller and parallel interface which has been used in the SL-58P loop detector. The microcontroller is used for setting up the gain of the analog circuitry via the comms. Like the SL58-P the detector can be placed into stop and awoken by command. The unit works by sensing the strike of a piezo sensor and processing the result as a time stamped signal via comms to the ADR CPU. 2. GENERAL DESCRIPTION The detector is available in 8 channel configuration. The detector is manufactured in standard (100 x 162.5 mm) Eurocard format. Piezo Sensitivity: The sensitivity of each channel may be set via the serial coms. Stop Mode: The detector can be placed into stop mode and awoken via serial coms. Detect Output: The output will be placed on the data bus when the address matches the ident of the detector. When a detect occurs the BINT\ line will be pulled low to inform the CPU card. The BINT\ line may be 105 SL-58P Loop Detector Enabled/Disabled via serial coms. The Detect Output may be displayed on the front panel LED'S via serial coms control or by pressing the “Lamps” button. Each channel may be switched ON or OFF via serial coms Default Settings: Gain of 40, BINT enabled, All outputs enabled 3. ELECTRICAL SPECIFICATION Voltage: The detector operates on a supply voltage between 4.5V and 5.5V. The board is be protected against accidental polarity reversal. Current: The detector operates within the following: 4.19mA total max current 4. Interference/Crosstalk The Detectors Channels does not mutually interfere under normal input coupling factors. The Detectors does not interfere with other cards in the system. HARNESS 81-303 The standard PEEK part number 81-303 harness (normally referred to as an ADR loop and/or piezo harness), may be used for the piezo connections between the ADR 1000, 2000, 3000 and Plus versions with the Amp connectors and the field piezo sensors. Following is the wiring instructions on how to use the PEEK 81-303 harness with piezo sensors. The harness comes with 9 wires as follows: Connect to: red Piezo #1 (+). black (we will call this the red-black wire) Piezo #1 (-) [shield]. white Piezo #2 (+). black (we will call this the white-black wire) Piezo #2 (-) [shield]. green Piezo #3 (+). black (we will call this the green-black wire) Piezo #3 (-) [shield]. blue Piezo #4 (+). black (we will call this the blue-black wire) Piezo #4 (-) [shield]. Twisted pair #1 Twisted pair #2 Twisted pair #3 Twisted pair #4 Single wire green with yellow tracer. Earth (chassis) ground NOTE: Do not connect the piezo shields to the earth ground wire. Any unused sensor connection wires should be twisted together and isolated from earth ground. This prevents electrical noise from being served as an unwanted input by the ADR. 106 SC-514P Contact Closure Input Chapter 19 SC-514P Contact Closure Input The SC-514P low current contact closure input card was designed for the ADR by Peek Traffic Inc. 1. INTRODUCTION The SC-514P utilises the analog circuitry developed in Peek Traffic with the micro-controller and parallel interface which has been used in the SL-58P loop detector. The microcontroller is used for setting up the circuitry via the comms. Like the SL58-P the SC-514P can be placed into stop and awoken by command. The unit works by sensing the change of state resulting from an external contact closure or similar signal and processing the result as a time stamped signal via comms to the ADR CPU. 2. GENERAL DESCRIPTION The detector is available in 14 channel configuration. The detector is manufactured in standard (100 x 162.5 mm) Eurocard format. Input Sensitivity: The sensitivity of each channel is preset and non adjustable (beyond on –off) via the serial coms. Stop Mode: The detector can be placed into stop mode and awoken via serial coms. Detect Output: The output will be placed on the data bus when the address matches the ident of the detector. When a detect occurs the BINT\ line will be pulled low to inform the CPU card. The BINT\ line may be Enabled/Disabled via serial coms. The Detect Output may be displayed on the front panel LED'S via serial coms control or by pressing the “Lamps” button. Each channel may be switched ON or OFF via serial coms Default Settings: BINT enabled, All outputs enabled 3. ELECTRICAL SPECIFICATION 107 SL-58P Loop Detector Voltage: The detector operates on a supply voltage between 4.5V and 5.5V. The board is protected against accidental polarity reversal. Current: The detector operates within the following: 4.19mA total max current 4. Interference/Crosstalk The Input Channels do not mutually interfere under normal input coupling factors. The SC-514P does not interfere with other cards in the system. A variety of harnesses may be used with the SC-514P, carefully determine which is correct for your application. HARNESS 0205918 The recommended standard for connections between the ADR 1000, 2000, 3000 and Plus versions (with the Amp connectors) and the field contact closure input sensors is the PEEK 0205918 contact harness (Also referred to as a 241 auxiliary input harness), Each harness can connect 7 inputs to the SC-514P, 2 harnesses are needed for all 14 inputs to be available from each SC-514P. Each harness comes with 9 wires as follows: Red Orange Yellow Green Blue Purple Gray Black Brown Electrical connections of the wires: Contact No. 1: Contact No. 2: Contact No. 3: Contact No. 4: Contact No. 5: Contact No. 6: Contact No. 7: Logic common for all closures: connect to the red wire connect to the orange wire connect to the yellow wire connect to the green wire connect to the blue wire connect to the purple wire connect to the gray wire connect to the black wire Earth ground (chassis) connect to the brown wire. Repeat as above for inputs 7 through 14 Note: Logic common and earth ground (chassis) are never to be connected together. They are two (2) completely separate wires. 108 SC-514P Contact Closure Input HARNESS 81-303 The PEEK part number 81-303 harness (normally referred to as an ADR loop and/or piezo harness), may be used for 7 of the 14 inputs to the SC-514P, 2 harnesses are needed for all 14 inputs to be available for connections between the ADR 1000, 2000, 3000 and Plus versions with the Amp connectors and the field contact closure input sensors. Following is the wiring instructions on how to use the PEEK 81-303 harness. The harness comes with 9 wires as follows: One (1) twisted pair One (1) twisted pair One (1) twisted pair One (1) twisted pair One (1) single wire red black (we call this the red-black wire). white black (we call this the white-black wire). green black (we call this the green-black wire). blue black (we call this the blue-black wire). green with yellow tracer. Electrical connections of the wires: Contact No. 1: Contact No. 2: Contact No. 3: Contact No. 4: Contact No. 5: Contact No. 6: Contact No. 7: Logic common for all closures: connect to the red wire connect to the red black wire connect to the white wire connect to the white black wire connect to the green wire connect to the green black wire connect to the blue wire connect to the blue black wire Earth ground (chassis) connect to the green with yellow trace wire. Repeat as above for inputs 8 through 14 Note: Logic common and earth ground (chassis) are never to be connected together. They are two (2) completely separate wires. HARNESS 81-292C 2 harnesses, Peek part number 81-292C, are needed for each SC-514P in an ADR-3000 or Plus rack because 14 inputs are available. Each standard PEEK 81-292C harness, may be used for 7of the 14 inputs to the SC-514P, Following is the wiring instruction on how to use the PEEK 81-292C harness with contact closure inputs. Inputs 1 through 7 are shown first, then the color code will repeat for use with the contact closure inputs 8 through 14 below. For your reference, on the back of the ADR-3000, the first harness, with inputs 1 through 7, is always the top connector, and the second harness, with inputs 8 through 14, is always the lower connector. 109 SL-58P Loop Detector Each harness comes with 8 wires as follows: Brown Red Orange Yellow Green Blue Violet Black These are straight wires, not twisted pairs. Electrical connections of the first harness: Contact No. 1: Contact No. 2: Contact No. 3: Contact No. 4: Contact No. 5: Contact No. 6: Contact No. 7: connect to the brown wire connect to the red wire connect to the orange wire connect to the yellow wire connect to the green wire connect to the blue wire connect to the violet wire Logic common for inputs 1 through 7: connect to the black wire Electrical connections of the second harness: Contact No. 8: Contact No. 9: Contact No. 10: Contact No. 11: Contact No. 12: Contact No. 13: Contact No. 14: connect to the brown wire connect to the red wire connect to the orange wire connect to the yellow wire connect to the green wire connect to the blue wire connect to the violet wire Logic common for inputs 8 through 14: connect to the black wire Note: Logic common and earth ground (chassis) are not to be connected together. The ADR-3000 chassis ground is on a separate connector (CON 2 on the FVMS SP MOTHER BOARD). 110 Glossary Chapter 20 - Glossary Many terms are used commonly in traffic data collection. Unfortunately, sometimes the same word is used to mean different things. This list contains the terms we use, together with “our” definitions as used in this manual. 2 RT – A unit will be equipped with two individual inputs for pneumatic road tube axle sensors 4 RT – A unit will be equipped with four individual inputs for pneumatic road tube axle sensors AC Adapter/Charger – Step-down transformer used to charge the internal battery of an ADR-1000 or ADR-2000. ADR— Automatic Data Recorder. A device that is installed next to a roadway and which is used to count traffic flows. The more advanced units can be called ‘traffic classifiers’ because they do more than just count vehicles, they can also separate them into classes and count vehicles in each class. Advanced ADR units can also record PVR (per vehicle record) data such as weight and speed, depending on the types of sensors that are available in the roadway. ADR-1000 — The ADR-1000 is the heart of Peek Traffic’s portable ADR product line. The unit comes with four road tube inputs standard, plus a slot for one additional sensor card which can add eight loop, eight piezo, eight WIM, or fourteen contact-closure sensor inputs. Solar power and PC Card (PCMCIA) options are also available for the ADR-1000. ADR-1000 traffic classifiers can be used with TOPS. ADR-1000 Plus – Self-Contained Lightweight Portable Traffic Counter / Classifier expandable to support one additional sensor module. ADR-2000 — The ADR-2000 is a larger version of the ADR-1000. Still portable, this unit comes with four standard road tube inputs, but it also provides additional slots for more sensor inputs: 3 sensor card slots and 1 memory card slot. Can run up to eight classification studies at a time, plus gather PVR data. ADR-2000 traffic classifiers can be used with TOPS. ADR-2000 Plus – Self-Contained Portable Traffic Counter / Classifier expandable to support three additional sensor modules ADR-3000 — The ADR-3000 is a rack-mounted version of the ADR products. It comes in a 10 inch and a 17 inch wide rack version, expanding the number of sensor and option cards that can be installed. The larger unit can accept up to eight sensor input cards, allowing up to 64 channels of input data. Comes with 2MB of onboard memory for system file and data storage. (Typically, less than 1MB is available for data storage on a stock ADR-3000.) Options include solar power, a front panel keypad and display, additional memory, PC Card reader, comm. and modem modules, and a full line of sensor input cards. ADR-3000 traffic classifiers can be used with TOPS, or it can be accessed using a PDA running Z-Link software. ADR-3010 Plus – Permanent 10” wide Rack-based Traffic Counter / Classifier which has the capability of supporting three sensors modules and two additional smart modules. 111 Glossary ADR-3019 Plus – Permanent 19” wide Rack-based Traffic Counter / Classifier which has the capability of supporting eight sensors modules and two additional smart modules. ADR-6000 — The ADR-6000 is a permanent, high-accuracy, rack-based traffic counter / classifier that uses loops only. The ADR-6000 can be used where traffic conditions range from free-flow to stop-and-go. The ADR-6000 can be used with TOPS. ADR Plus RS232 Module – Module has two additional RS232 Communication ports available for the ADR3000 only, Supports comm. 2 and 3 with baud rates up to 115200. ADR JR — With the retirement of the JR Traficounter, this is the base model of the Peek Traffic ADR product line. It is a simple, battery-powered, one-input traffic counter with a digital display. ADR Plus — All newly sold ADR units are considered ‘Plus’ versions. The Plus variant was an upgrade to the original ADR products that added additional memory (raised to 1MB onboard), simplified hardware upgrades, improved battery management, and other new features. Air Switch – Pneumatic Switch sensor used to sense the incoming air pressures change from a road-tube. AO – Alarm Output can be used to trigger a relay or similar device, available only on the ADR2000 and 3000. Armed – Is displayed on the ADR display when the unit has a completed program and is awaiting for the next full interval to begin recording Array – When referring to an array, we mean a sensor, or group of sensors which work together to determine information about the vehicles passing over them. An array can span one or more Lane, depending on array type, but are usually only one lane per array. Each array will assign a Flow number to any vehicles detected upon it. Some arrays, for example the single loop or single axle arrays, can only determine a single Flow. Others, such as the Tube-and-a-half or two tube classification arrays can determine more. Axle Class – Axle Class is vehicle type classification based on the number and spacing of axles on a vehicle. The most common reference for this is published as Scheme “F”. Bending Plates – Bending Plate WIM systems utilize plates with strain gauges bonded to the underside. As a vehicle passes over the bending plate, the system records the strain measured by the strain gauge and calculates the dynamic load. The static load is estimated using the measured dynamic load and calibration parameters. Bins – As used when saying “the number of speed bins. A bin can be thought of as a container for information or data. Bins are established by defining their limits. An example of a bin definition is contained in the following statement: “All of the cars traveling at (or above) 30 miles per hour and less than 35 miles per hour are recorded in this bin”. For any one study session the ADR can use up to 3,375 bins at once. Studies are usually described by the number of bins utilized, i.e.: 15 classes x 4 lanes is a total of 60 bins. Channel – Channel is similar in use to the word “lane” or “array” but is less specific and may have no physical reference. The data from one lane is normally collected via one array and is then often stored in one channel. A channel has the capability of either separating the data from one array or lane (by “flow” direction) or can combine the data from a set of arrays into one total. Channel Mapping – The Channel Mapping setting causes the count of vehicles to be stored in one or more “channels”. The Channel Mapping option has the following settings (Separated and Forward Only are not available for array types that cannot determine a vehicle’s direction): Combined – This causes the count of vehicles from each array to be stored in a channel. The count is incremented each time a vehicle passes the array, no matter in which direction it is traveling. Channel 1 is for array 1, Channel 2 for array 2, etc. Separated (by direction) – This causes the count of vehicles from each array to be stored in two channels. Channel 1 will contain the count of vehicles that are traveling in the forward direction across array 1. Vehicles that are traveling in the reverse direction across array 1 will be contained in Channel2. Note that if more arrays are used, each subsequent array will have two 112 Glossary channels associated with it. The forward direction is defined as those vehicles that are traveling from the lead sensor to the lag sensor. Forward Only – Vehicles traveling in the reverse direction are ignored. The count is incremented each time a vehicle passes the array in the forward direction only. Each array will have only one channel associated with it. User Defined – This enables you to specify the number of channels to create (the maximum, which is displayed on the screen, is dependent on the number of arrays and the array type). Once you have specified the number of channels, you can assign each array’s count of vehicles to a particular channel. The “+” forward direction is defined as vehicles traveling from the lead sensor to the lag sensor. The “-“ reverse direction is defined as vehicles traveling from the lag sensor to the lead sensor. Once the channel assignments have been specified, the number of bins in the heading of the record can be determined. The number of bins is dependent on whether NO or YES is selected for the Summate Channels option, which is available for the Forward Only and Combined options. If NO is selected, or the option is Separated or User-Defined, the number of bins in heading 1, 2 or 3 is the same as the number of channels. However, if YES is used, you can specify the number of bins to use and the channel numbers to assign to each set of bins Class – In the ADR the word Class is used as a menu prompt for the classification of vehicles according to a preset vehicle classification scheme. The defining criteria of a scheme are called a ClassTree or Class table. The best known and most widely used scheme in the world today is referred to as Scheme “F” which uses the number, spacing and grouping of axles to assign each vehicle to one of thirteen definitions of vehicle type. Scheme “F” is the default scheme in the ADR as supplied, with the addition of a fourteenth “Other” type and a fifteenth category for “unclassified”. ADR operators can and are encouraged to determine the best scheme for local operations and install it in the ADR. This is a very powerful feature of the ADR and operators can apply additional criteria such as length to fine tune their local scheme. Classification – The dictionary defines the act of classification as the assignment of objects to groups as determined by criteria. The ADR can assign vehicles to groups (which are called “Bins”) based on a variety of criteria. The most commonly used criteria are CLASS, SPEED, LENGTH (either wheelbase or chassis), GAP, or HEADWAY. In setting up the ADR, operators can set the limits of the criteria to be used, for example in classification by SPEED, operators can specify the number of “Speed Bins” and then can specify the limits of each of the bins as 0 to 20 mph and 20 to 30 mph and so on. Coincident Traffic – Coincident traffic occurs when two or more vehicles cross an array at the same time. Avoid traffic study situations with a high volume of coincident passing or opposing traffic. With some study setups a ratio or time out may be used to separate individual vehicles. Vehicles crossing the sensor array within the ratio or time out period (which may extend 2 or more seconds after the end of a observed vehicle) are considered to be coincident. Cold Boot – This operation allows a user to reset a recorder to its factory defaults values Comm ID – Each ADR has the option of setting a Comm ID from 1 to 65534 this option is used when several units are connected to the same communication device and a user needs have only one unit a time to answer when a command is set to all units. Continuous File – Is a binned or PVR file which has one header that includes all set-up information including the start date and time and will not include a end date time until a user ends the current recording session. This recording session could span several days, weeks or months depending on the amount of time a users desire to allow the recorder to continue to recorder without stopping or ending the recording session. CPU Module – Is the ADR’s Central Processing Unit, Plus units are equipped with 2Mb. of onboard memory non Plus units are equipped with 256K of onboard memory CPU Mother Board – CPU Mother board contains the connectors for attaching a CPU Module and additional smart modules used by the ADR3000. Daily Files – Is a binned or PVR file which is one file with a file header for each day that includes all set-up information including the start and end date and time for each day. These files will have a 113 Glossary maximum of 24 hours of data from midnight to midnight or until a user has stopped the ADR from recording data. DB9 – Is a D style 9 pin connector used on the ADR3000 as a standard RS232 connector Debounce – Debounce value ensures that phantom signals in tubes or piezo sensors are not regarded as axles. It is the time set to ignore any pulse after valid axle detection. The range of possible values is from 1 to 998 msec. If the ADR is undercounting, reduce the debounce time; if the ADR is over-counting, increase the debounce time. DST – Is the Daylight Saving Time adjustment, users have the option to allow the ADR to automatically adjust for the new time Factory Default Settings – These settings are the default settings as defined by the firmware which have been defined and set by Peek Traffic Corp. The default value settings may be different from one version firmware to another. Flow – When any vehicle crosses any sensor array, it is assigned a “flow,” indicating the vehicle passage. The assigned flow on single sensor arrays is a + (plus). Arrays with two sensors in the same lane assign either a (+) plus or a (-) minus to a vehicle passage as determined by the sequence of sensor activations. (i.e.: Travel from A to B is assigned (+) flow and travel from B to A is assigned () flow. This is commonly called direction of travel. The ADR also makes use of more complex sensor arrays, such as the four roadtube array, which can also provide a lane assignment to a vehicle passage. When monitoring the four roadtube array in the VEHICLE MONITOR you will see (*) and (-) assigned to vehicles in the near lane, and in the far lane vehicles will be assigned as (2+) or (2-). The ADR allows you to segregate (or combine) vehicles into separate data “channels” and “bins” by flow assignment in CHANNEL MAPPING. Gap – Gap is the time (in milliseconds) between the trailing axle of a vehicle and the leading axle of the next vehicle going in the same direction. This measurement is available when using piezo or tube sensors. Alternatively, it is the time between the rear of one vehicle and the front of the following vehicle when using loop sensors. Gap studies using road tube sensors should use a count ratio setting of 2.00 (or some other means) to determine the end of a vehicle and to prevent inter-axle times (spacings) from being recorded as gap times. One method is to combine studies as a matrix, such as classification by gap by lane (channel) using 2 or four road tubes. GPS – Global Positioning System Headway is the time (in milliseconds) between the front axle of one vehicle and the front axle of the next vehicle going in the same direction. This measurement is available when using piezo or tube axle sensors. Alternatively, it is the time between the front of one vehicle and the front of the next vehicle when using loop sensors. Idle – The ADR is in a state that no given start time and date have been programmed Inductive Loop (Loop) – A inductive loop detector is the (Loop and lead-in wire) which forms a electrical circuit in each lane of traffic which are then connected to a loop module IOC – Is a type of reset of the firmware performed by ADR CPU, which has been performed by the ADR and is displayed and logged as an Illegal Operation Code JR 161 – Is a lightweight semi-portable provides accurate traffic volumes using inductive loops. JR RT – The JR RT is a portable road tube volume counter with a built-in timer. Also known as the ADR Jr, or ADR Junior. Replaces the JR Traficounter. JR Traficounter – The single-input portable traffic counter that the ADR JR replaces. This was originally designed by a company called StreeterAmet, which was purchased by Peek Traffic in 1992. Keyboard and Display (KD) – Is a 16 key smart keypad and interactive 20 character by 4 line LCD Kistler Sensor – Quartz piezo sensor that is used to measure axle vehicle weights under rolling traffic conditions Lane – The term "lane" is used to refer to a physical lane on the road, typically delineated from the rest of the road with a painted line or physical barrier. 114 Glossary LCD – Liquid Crystal Display the ADR is equipped with a 20 character by 4 line display Length – Length is the total wheelbase length when measured by piezo or tube sensors, or the overall length (chassis) when using loop sensors. Load Cells – Load Cell WIM systems utilize a single load cell with two scales to detect an axle and weigh both the right and left side of the axle simultaneously. As a vehicle passes over the 2 load cells, the system records the weights measured by each scale and sums them to obtain the axle weight. LP – Loop, an inductive wire loop traffic sensor. Suitable for long-term testing sites. Marked Files – Are Binned or PVR files that have previously been downloaded or marked as a read file and will be indicated as an open book when viewed by the ADR Commander Memory – Is the available room used by ADR for storing Bin, PVR and Set-Up files in the ADR. Modem LPM – Is a low powered device that enables the ADR to transmit information over telephone cables to a remote computer New Files – Are Binned or PVR files that have never been downloaded and marked as read file, these files are shown as closed book in the ADR Commander which indicates that the file has never been read before. NPA – Is a type of reset of the ADR CPU firmware, which has been performed by the ADR and is logged and displayed as Null Pointer Assignment Occupancy – The percent of time that a loop is occupied during a given period of time, for example for a 60 second period 30 seconds is considered 50% occupied. Old Files – Are Binned or PVR files that have previously been downloaded and will be indicated as an open book by the ADR Commander. PCMCIA Module – An optional Memory expansion Port that is used on ADR to accept an S-Ram PCMCIA Card PCMCIA Card – Removable S-Ram memory card which is used in the PCMCIA Module to either expand the memory of the ADR or to collect and remove files from a ADR Per-Vehicle-Record (PVR) – Per-Vehicle-Records are individual records of each vehicle that passes over sensors that are interfaced to ADR. Each record can include items such as (if the ADR is equipped and configured for) Number of Axles, Speed, Class, Headway, Gap, Vehicle Status, Loop Length, Total Wheelbase, Axle Spacing, Gross Weight, Axle Weights, Temperature and Alarm codes. Piezo Axle Sensor – An in the road or over the road axle sensor that is used to sense axles for vehicle classification, weigh in motion and counting PMU Module – Is a Power Management Unit Module which is used to convert 120Vac or 12Vdc to 6Vdc for use by an ADR3000 unit only Power Options 0 – Accepts 6 Vdc power input only 1 – This power option is supplied with an PMU, 110Vac step-down transformer and a 12 Vdc Standby battery, this option is used where AC power is available and the user needs to have a Standby battery which can supply power during mains power outages 2 – This power option is supplied with an 110Vac step-down transformer which trickle charges a 6Vdc battery which supplies power to the ADR. 3 – Not available 4 – This power option is supplied with an PMU, which will accept power from a 12Vdc power source this option is used where a customer is using a 12Vdc Power supply (for example 12Vdc Solar) which will supplies 12Vdc power to the PMU 115 Glossary PVR – Per vehicle records. Data gathered about individual vehicles that pass over the ADR’s sensors, such as weight and speed. Road Tube – Is a pneumatic axle sensor that is used as part of portable traffic data collection system RT – Road tube, a simple rubber tube that can be used to send pressure pulses to any ADR unit that accepts road tube inputs, whenever a vehicle drives over the tube. Suited to short-term studies because of its portability. SA58-P Module (8 Channel Piezo Module) – Is a low current eight channel piezo sensor detector which is designed to be used with Piezo axle sensors SA74-P Module (4 Channel Piezo Module) – Is a four channel piezo sensor detector which is designed to be used with Piezo axle sensors SC514-P Module (14 Channel Contact Module) – Is a fourteen channel contact closure input module which is designed to accept a contact closure from some other type of sensing device, for example (Loop detector, RTMS, Radar etc) Sensor Modules – Sensor Modules for the ADR include all of the following (SA58-P, SA74-P, SC514-P, SL58-P, SL74-P and SW58-P) Sensor Mother Board (MB) – The Sensor Mother board contains the connectors for attaching additional Sensor Modules which are used by the ADR. ADR1000 supports one sensor mother board which can support one sensor module ADR2000 sensor mother board is manufactured as part of the CPU mother board and can support three additional sensor modules. ADR3000 supports two three position Sensor Mother Boards which can support a total of six additional sensor modules. Serial Cable to Computer (Direct Connect Cable) – A cable that is used between the Serial Port of the ADR and a Computers Serial Port 1000/2000 Cable equipped with a CPC connector to DB9 3000/6000 Cable equipped with a DB9 to DB9 Serial Cable to Modem – A cable that is used between the Serial Port of the ADR and a Computers Serial Port 1000/2000 Cable equipped with a CPC connector to DB25 3000/6000 Cable equipped with a DB9 to DB25 Set-Up File – Are unique instructions that can be saved as a “setup file”, and the file can then be reloaded. Loading a “setup file” is faster and easier than custom making a new set of instructions. Single – ‘Single’ is the term used to describe the weight on a single axle of a vehicle. Site – The term “Site” is typically used to refer to the physical location of traffic data collection equipment. Some examples would be “Corner of Route 301 and Smith Road”, or “M 25 Junction 14”. The “Site” and “” information can be used in combination to represent or designate a single piece of data collection equipment and the data which is collected from it. Under some circumstances, “Site” may not specify a single road or intersection. In such cases, data collected from each within the site is used to build a picture of the traffic flow through the site. By default from the factory, the electronic serial number of each ADR is shown as the Site ID. SL58-P Module – Is a low current eight channel modular inductive vehicle detector designed primarily for traffic data monitoring applications, using the `EURO card' printed circuit board outline SL74-P Module – Is a four channel modular inductive vehicle detector designed primarily for traffic data monitoring applications, using the `EURO card' printed circuit board outline. SL – Integrated lid Solar Panel can only be fitted on an ADR1000 or 2000 116 Glossary Smart Modules – Smart Modules for the ADR includes the following PCMCIA, Dual Comms and the CPU Modules. Speed – Speed is the scalar velocity of the vehicle as measured by the time required to travel a known distance from point A to point B. Point A and point B are typically two sensors of the same type in the same lane of travel. It is important that vehicles pass across a sensor array at a steady rate for accurate measurement and recording. Speed may be displayed as either miles per hour (mph) or kilometers per hour (kph). Station – A “Station” name is sometimes used to distinguish between pieces of data collection equipment at the same physical location (or “Site”). When setting up an ADR for operation at a location, you will be prompted to enter a Site and a Station identifier. You should feel free to set the Station field to contain any useful reference information desired in conjunction with the Site field . StopWatch – Is an optional Firmware which allows the ADR to perform twin operations to calculate and store all of the normal historical studies as well as Average Speed, Volume and Occupancy in selectable intervals from 10 seconds to 60 minutes. Study – Each ADR has the ability to manage eight different data studies at one time each study will be saved in its own data file. Depending on the sensor arrays selected a user may have the following to surveys to select from (Speed, Lane, Class, Headway and Gap) Surge Panel – A protection device designed to protect the ADR from incoming surges; the Surge Panel is normally used to protect inputs from communication lines, power, piezo and loop sensors. SW58-P Module – Is an eight channel Weigh-In-Motion modular which interfaces to class 1 Piezo axle sensor, using the `EURO card' printed circuit board outline Tagged (Marked) Files – Are Binned or PVR files that have been selected or sometimes referred to as (Marked) to either be collect, deleted or moved from the specific memory media Tandem – Tandem is the combined weight of a grouping of two axles of the vehicle. The group is defined by the Configure/Calibration/ Max Lengths option. TDP – The predecessor software to TOPS. This was a DOS-based program that performed some of the same features that were eventually included in TOPS. TDP had its own specific file type. TOPS can read and export to the TDP file type to support any external applications that were designed to work with the TDP software. TOPS™ – Traffic Operations and Planning Software. A Windows-based central system software package available from Peek Traffic that allows users of ADR-1000, ADR-2000, ADR-3000, ADR6000, and their ‘ADR Plus’ variants to store their data in a central location. The software manages the data and can be used to automate data gathering and to generate data reports and exports. The ADR JR cannot connect with TOPS. TOPS Essential – Includes Data Base, ADR Commander, Class Tree Editor, Modem Configuration, Setup Wizard TOPS Professional – Includes everything from the Essential package plus an Autopoll feature) TOPS Enterprise – Includes everything from the Professional package plus PVR Reports processing. Triple – Triple is the combined weight of a grouping of three axles of the vehicle. The group is defined by the Configure/Calibration/Max Lengths option. UI – Is referred to as the User Interface this includes the Keyboard and the LCD User Reboot – Is a type of reset of the ADR CPU firmware which has been performed by a user and is displayed as a User Reboot Volume – Volume is the count of vehicles. In the Setup procedure, the volume study type is called ‘Channel Study Type’. Weight – Weight is the total gross weight of the vehicle. 117 Glossary Weigh-In-Motion (WIM) – Is the practice of weighing a vehicle as it moves along a highway system. WIM – Weigh-in-motion. A method of measuring the weight of a vehicle while it is moving. Available as a plug-in card module for ADR-1000, ADR-2000, and ADR-3000 units. Wrap Files –Allows the ADR to delete the oldest files first to obtain room in memory when needed to continue recording the most current recording period. User need to use caution when recording continuous files, memory can becomes full and if the ADR is set to wrap files it will delete the currently recording file when the memory becomes full. Z-Link – Is a data collection software program used on a Palm device which allows a user to collect Binned and PVR files from an ADR then transfer those files to TOPS. 118 ADR-1000 Chapter 21 ADR-1000 Reference Information Specifications Housing Rugged, weatherproof cast aluminium housing, with brass body lock and two keys. Weight & Size Typically 3.6 Kg (8 lbs) with battery. Height: 131 mm (5.16”) Depth: 291.5 mm (11.48”) Width: 222.5 mm (8.76”) Environmental range -40ºC to +70ºC. Up to 95% humidity, non-condensing. Display 20-digit x 4-line liquid-crystal display Inputs 4 roadtube inputs, plus one optional slot can be factory installed for the use of one of the following sensor boards: 4-input piezo daughter board 8-input piezo sensor board 8-input piezo WIM sensor board 8-input loop sensor board A 14-input contact-closure sensor board Count rate 200 counts per input per second Recording Interval Selectable period of 1, 2, 5, 6, 10, 15, 30, or 60 minutes, 2, 3, 6, 12, or 24 hours. One normal and up to four daily peak periods are available. File size (duration) File duration is selectable as; 24, 48, or 72 hours, or 7 days, continuous files or midnight to midnight daily files, and is programmable for a preset start and end time and date. Memory 256KB (128KB available for data storage); up to 20MB available on a PCMCIA SRAM memory card. Autonomy period Typically 16 weeks when roadtube counting. Accuracy One count per interval, or better than 10% at 95% confidence on gross weight, or better than ASTM standard 13-18. Power Internal rechargeable lead/acid battery (6V, 10AH), or 4 x 1.5V D cells, or external battery. Recharging via AC charger or solar panel (optional). Communications Selectable RS232 port between 300 and 19,200 baud for connection to PC, Palm Pilot or remote telemetry. Classification FHWA and EEC, and programmable classification options. 119 ADR-1000 Connecting the ADR-1000 ADR-1000 VIEW OF CONNECTIONS DB-9 COMMS CABLE G1120087 AC Charger G0205905 "Y" Cable G0205927 (Optional) Laptop computer RS232/Charger Connection (Optional) Loops 1-4 (Optional) Loops 5-8 Roadtube inputs 120 (Optional) Piezos 1 - 4 Optional sensor connections are shown as typically supplied. The standard is blank. ADR-2000 Chapter 22 ADR-2000 Reference Information Specifications Housing Rugged, weatherproof cast aluminium housing, with brass body lock and two keys. Weight & Size Typically 8 Kg (17.6 lbs) with battery Height: 163.2 mm (6.44”) Depth: 342.3 mm (13.48”) Width: 242 mm (9.53”) Environmental range -40ºC to +70ºC. Up to 95% humidity, non-condensing. Display 20-digit x 4-line liquid-crystal display Inputs 4 tube inputs, plus 3 additional slots, which can contain any combination of the following sensor boards: 8-input piezo sensor board 8-input loop sensor board 4-input contact closure sensor board 8-input piezo WIM sensor board Count rate 200 counts per input per second Recording Interval Selectable period of 1, 2, 5, 6, 10, 15, 30, or 60 minutes, 2, 3, 6, 12, or 24 hours. One normal and up to four daily peak periods are available. File size (duration) File duration is selectable as; 24, 48, or 72 hours, or 7 days, continuous files or midnight to midnight daily files, and is programmable for a preset start and end time and date. Memory 2MB (256KB standard, with 127KB available for data storage); up to 64MB available on a PCMCIA memory card. Autonomy period Typically 16 weeks when roadtube counting using internal battery. Accuracy One count per interval or better than 10% at 95% confidence on gross weight or better than ASTM standard 13-18. Power Internal rechargeable lead/acid battery (6V, 10AH), or 4 x 1.5V D cells, or external battery. Recharging via AC charger or solar panel (optional). Communications Selectable RS232 port between 300 and 19,200 baud for connection to PC, Palm Pilot or modem for remote telemetry. Classification FHWA and EEC, and programmable classification options. 121 ADR-2000 Connecting the ADR-2000 ADR-2000 VIEW OF CONNECTIONS DB-9 COMMS CABLE G1120087 AC Charger G0205905 "Y" Cable G0205927 (Optional) Laptop computer P-WIM 1-4 Loops 1-4 Piezo 1-4 Loop Harness G0205866 or 81-303 RS232/Charger Connection Piezo Harness G0205901 or 81-303 Contact Closure Harness G0205918 or 81-303 P-WIM Harness G0205901 or 81-303 Portable WIM Junction Box G118/915 (with (2) 81-303) Piezo 5-8 Loops 5-8 P-WIM 5-8 Sensor Connections are shown as typical options from the factory. The standard is blank. 122 S P E C I A L FUNCTIONS This connector is reserved for optional special connections such as : Opto outputs, A/D Inputs, Temp Sensors and Super Comms connections Roadtube inputs Sensor Arrays Chapter 23 ADR-3000 Reference Information Specifications Housing Rack mounted, fits standard 25.4 cm (10”) or 48.3 cm (19”) enclosures. Can be shelf or panel mounted. Weight & Size Typically less than 7 Kg (15.4 lbs). Height: 13.3 cm (6.5”) Width: 25.4 cm-48.0 cm (10”-19”) Depth: 23.8 cm (9.35”) Environmental range -40ºC to +70ºC. Up to 95% humidity, non-condensing. Display 20-digit x 4-line liquid-crystal display (optional) Inputs The unit may have up to eight slots, each of which can accept one of the following sensor boards: • • • • An 8-input piezo sensor board An 8-input loop sensor board A 14-input contact closure sensor board An 8-input piezo WIM sensor board Count rate 200 counts per input per second Recording Interval Selectable period of 1, 2, 5, 6, 10, 15, 30, or 60 minutes, 2, 3, 6, 12, or 24 hours. One normal and up to four daily peak periods are available. File size (duration) File duration is selectable as; 24, 48, or 72 hours, or 7 days, continuous files or midnight to midnight daily files, and is programmable for a preset start and end time and date. Memory 2MB (256KB standard, with 127KB available for data storage); up to 64MB available on a PCMCIA SRAM memory card. Autonomy period Typically better than one month. Indefinite with solar-panel or mains option. Accuracy Generally one count per interval or better than 10% at 95% confidence on gross weight or better than ASTM standard 13-18. Power Mains power supply feeding a 6V backup battery. Optional solar panel. Communications Selectable RS232 port between 300 and 19,200 baud for connection to PC, Palm Pilot or modem for remote telemetry. Classification FHWA and EEC, and programmable classification options. 123 Sensor Arrays ADR-3000 Unit Assembly Front View Control Panel Sensors Comms MEM CPU PMU Display LED’s The above diagram shows the unit assembly with the control panel installed. ADR-3000 Sensor Front Panel The diagram below gives a indication of the function of the LED’s and buttons of the sensor modules. Reset Button. Pressing this button will cause the detector to reset. This will set the detector to default settings and in some cases cause it retune Detect LED. This will illuminate when the detector is detecting a vehicle. Channel LED’s. These will flash when a sensor is activated. It is used to indicate which sensor has been activated LAMP button. Press this button to allow the LED’s to illuminate. Fault LED. This LED will be illuminated if there is fault 124 Sensor Arrays Back of ADR-3000 Showing Connections 125 Sensor Arrays ADR-3000 COMPUTER COMMUNICATION CABLE 9-PIN D-SUB CONNECTOR FEMALE COMPUTER 1 126 FEMALE ADR3000 1 2 2 3 3 4 4 5 5 6 6 7 7 8 8 9 9 Sensor Arrays ADR 3000 POWER HARNESS CPC RECEPITACLE: 7 SOCKET - AMP PN / 211399 - 1 SOCKETS: 24 TO 20 AWG CPC CRIMP (7) REQUIRED – AMP PN / 66399 - 4 CPC CABLE CLAMP: SHELL SIZE 13 STANDARD – AMP PN / 206966 -1 CPC SOCKET CONFIGURATION SOCKET NUMBER 1. 2. 3. 4. 5. 6. 7. FUCTION COLOR 14 VAC 14 VAC 12 VDC+ GROUND 12 VDC 6 VDC + 6 VDC - WHITE BROWN ORANGE GREEN BLUE RED BLACK WIRE END Spade Terminal Spade Terminal Quick Slide Spade Terminal Quick Slide Quick Slide Quick Slide WIRE SPECIFICATIONS • • 20 AWG 10/30 0.1OD 48” Long 127 ADR Plus Operating Manual 128 Status Bit Codes Chapter 24 Vehicle Status Bit Codes The vehicle status bit codes can be displayed in the vehicle monitor screen of the ADR and can also be output via serial communications. The status bits can also stored as part of a PVR record. The vehicle status bit code is a 2 byte hexadecimal code that can be used to troubleshoot a problem site. In use, the code “FFFF” (GOOD) means the sensor information is correct as seen by the ADR. When you observe anything other than an F, the ADR is telling you that it saw an error in the stream of sensor events from a particular array. The first two characters (on the left) should always be F, as they are only used as “place holders” and no code has been assigned to them yet. This table explains the application of the second two code characters. When a “good” vehicle is sensed, the internal binary code of the ADR will be 11111111 and this will be displayed as FF for the second two code characters. The listing below is only intended as a quick reference, A complete listing and code description begins on the next page Hexadecimal Code Text Binary Bits (7 is most, 0 is least significant) 7654 3210 FF8F FF9F FFAF FFBF FFCF FFDF FFEF NO LOOP + LAG + NO SPEED NO LOOP + LAG NO LOOP +NO SPEED NO LOOP LAG + NO SPEED LAG NO SPEED 1000 1001 1010 1011 1100 1101 1110 1111 1111 1111 1111 1111 1111 1111 FFF8 FFF9 FFFA FFFB FFFC FFFD FFFE FFFF NOT USED NOT USED OFF SCALE + UNBALANCED OFF SCALE NOT USED NOT USED UNBALANCED GOOD 1111 1111 1111 1111 1111 1111 1111 1111 1000 1001 1010 1011 1100 1101 1110 1111 129 Status Bit Codes Table Of Status Bit Codes The table on this page is intended for use with the listing of ADR Status Bit codes on the following three pages. From observing the ADR Status Bit code from the VEHICLE MONITOR mode of the ADR, or from a PVR file, look up the code in the listing and notice which bits are listed next to the code. Find the bit in the table below and note the text and meaning associated in the same row of the table Binary bits 7 to 0 may be set by the ADR as follows: Bit Unset Text Meaning 0 ( LSB ) UNBALANCED Unbalanced lead/lag sensor hits. The number of hits on the lag sensor were not equal to the number of hits on the lead sensor 1 SEQUENCE Other unusual sensor sequence. 2 OFF SCALE WIM onscale sensor missed. 3 LOW SPEED Vehicle stopped over the array (i.e. speed less than 4MPH ). 4 NO SPEED A valid speed could not be determined. The average speed of the previous 25 good vehicles has been used to determine axle spacing, since the real speed of the vehicle could not be calculated. (If 25 good vehicles are not available than 50 mph is used as a starting value.) 5 LAG The lag sensor was used instead of the lead sensor for the calculation of vehicle parameters. Bit 0 may also be unset at this time. If the axle sensor hits are unbalanced; the lag sensor is determined to be the most reliable and is used. 6 NO LOOP No loop detection sensed (only relevant for arrays that include a loop ) 7 NOT USED Extended status byte used (not used at this time) 130 Status Bit Codes Complete Listing of ADR Status Codes with un set bit reference The ADR Status Bit code is on the left, and the corresponding bits which were “un set” by the condition are listed to the right. Find the code on the left, notice the corresponding bits, and then look them up in the table on the previous page. The first listing has been used as an example. FF8F : BIT4, BIT5, BIT6 FF9F : BIT5, BIT6 FFAF : BIT4, BIT6 FFBF : BIT6 FFCF : BIT4, BIT5 FFDF : BIT5 FFEF : BIT4 NO SPEED, LAG, NO LOOP FFF0 : BIT0, BIT1, BIT2, BIT3 FFF1 : BIT1, BIT2, BIT3 FFF2 : BIT0, BIT2, BIT3 FFF3 : BIT2, BIT3 FFF4 : BIT0, BIT1, BIT3 FFF5 : BIT1, BIT3 FFF6 : BIT0, BIT3 FFF7 : BIT3 FFF8 : BIT0, BIT1, BIT2 FFF9 : BIT1, BIT2 FFFA : BIT0, BIT2 FFFB : BIT2 FFFC : BIT0, BIT1 FFFD : BIT1 FFFE : BIT0 FFFF : NONE (This is an FFFF, which is a “good” indication) FF80 : BIT0, BIT1, BIT2, BIT3, BIT4, BIT5, BIT6 FF81 : BIT1, BIT2, BIT3, BIT4, BIT5, BIT6 FF82 : BIT0, BIT2, BIT3, BIT4, BIT5, BIT6 FF83 : BIT2, BIT3, BIT4, BIT5, BIT6 FF84 : BIT0, BIT1, BIT3, BIT4, BIT5, BIT6 FF85 : BIT1, BIT3, BIT4, BIT5, BIT6 FF86 : BIT0, BIT3, BIT4, BIT5, BIT6 FF87 : BIT3, BIT4, BIT5, BIT6 FF88 : BIT0, BIT1, BIT2, BIT4, BIT5, BIT6 FF89 : BIT1, BIT2, BIT4, BIT5, BIT6 FF8A : BIT0, BIT2, BIT4, BIT5, BIT6 FF8B : BIT2, BIT4, BIT5, BIT6 FF8C : BIT0, BIT1, BIT4, BIT5, BIT6 FF8D : BIT1, BIT4, BIT5, BIT6 FF8E : BIT0, BIT4, BIT5, BIT6 FF8F : BIT4, BIT5, BIT6 FF90 : BIT0, BIT1, BIT2, BIT3, BIT5, BIT6 FF91 : BIT1, BIT2, BIT3, BIT5, BIT6 FF92 : BIT0, BIT2, BIT3, BIT5, BIT6 FF93 : BIT2, BIT3, BIT5, BIT6 FF94 : BIT0, BIT1, BIT3, BIT5, BIT6 FF95 : BIT1, BIT3, BIT5, BIT6 FF96 : BIT0, BIT3, BIT5, BIT6 FF97 : BIT3, BIT5, BIT6 FF98 : BIT0, BIT1, BIT2, BIT5, BIT6 131 Status Bit Codes FF99 : BIT1, BIT2, BIT5, BIT6 FF9A : BIT0, BIT2, BIT5, BIT6 FF9B : BIT2, BIT5, BIT6 FF9C : BIT0, BIT1, BIT5, BIT6 FF9D : BIT1, BIT5, BIT6 FF9E : BIT0, BIT5, BIT6 FF9F : BIT5, BIT6 FFA0 : BIT0, BIT1, BIT2, BIT3, BIT4, BIT6 FFA1 : BIT1, BIT2, BIT3, BIT4, BIT6 FFA2 : BIT0, BIT2, BIT3, BIT4, BIT6 FFA3 : BIT2, BIT3, BIT4, BIT6 FFA4 : BIT0, BIT1, BIT3, BIT4, BIT6 FFA5 : BIT1, BIT3, BIT4, BIT6 FFA6 : BIT0, BIT3, BIT4, BIT6 FFA7 : BIT3, BIT4, BIT6 FFA8 : BIT0, BIT1, BIT2, BIT4, BIT6 FFA9 : BIT1, BIT2, BIT4, BIT6 FFAA : BIT0, BIT2, BIT4, BIT6 FFAB : BIT2, BIT4, BIT6 FFAC : BIT0, BIT1, BIT4, BIT6 FFAD : BIT1, BIT4, BIT6 FFAE : BIT0, BIT4, BIT6 FFAF : BIT4, BIT6 FFB0 : BIT0, BIT1, BIT2, BIT3, BIT6 FFB1 : BIT1, BIT2, BIT3, BIT6 FFB2 : BIT0, BIT2, BIT3, BIT6 FFB3 : BIT2, BIT3, BIT6 FFB4 : BIT0, BIT1, BIT3, BIT6 FFB5 : BIT1, BIT3, BIT6 FFB6 : BIT0, BIT3, BIT6 FFB7 : BIT3, BIT6 FFB8 : BIT0, BIT1, BIT2, BIT6 FFB9 : BIT1, BIT2, BIT6 FFBA : BIT0, BIT2, BIT6 FFBB : BIT2, BIT6 FFBC : BIT0, BIT1, BIT6 FFBD : BIT1, BIT6 FFBE : BIT0, BIT6 FFBF : BIT6 FFC0 : BIT0, BIT1, BIT2, BIT3, BIT4, BIT5 FFC1 : BIT1, BIT2, BIT3, BIT4, BIT5 FFC2 : BIT0, BIT2, BIT3, BIT4, BIT5 FFC3 : BIT2, BIT3, BIT4, BIT5 FFC4 : BIT0, BIT1, BIT3, BIT4, BIT5 FFC5 : BIT1, BIT3, BIT4, BIT5 FFC6 : BIT0, BIT3, BIT4, BIT5 FFC7 : BIT3, BIT4, BIT5 FFC8 : BIT0, BIT1, BIT2, BIT4, BIT5 FFC9 : BIT1, BIT2, BIT4, BIT5 FFCA : BIT0, BIT2, BIT4, BIT5 FFCB : BIT2, BIT4, BIT5 FFCC : BIT0, BIT1, BIT4, BIT5 FFCD : BIT1, BIT4, BIT5 FFCE : BIT0, BIT4, BIT5 FFCF : BIT4, BIT5 FFD0 : BIT0, BIT1, BIT2, BIT3, BIT5 FFD1 : BIT1, BIT2, BIT3, BIT5 132 Status Bit Codes FFD2 : BIT0, BIT2, BIT3, BIT5 FFD3 : BIT2, BIT3, BIT5 FFD4 : BIT0, BIT1, BIT3, BIT5 FFD5 : BIT1, BIT3, BIT5 FFD6 : BIT0, BIT3, BIT5 FFD7 : BIT3, BIT5 FFD8 : BIT0, BIT1, BIT2, BIT5 FFD9 : BIT1, BIT2, BIT5 FFDA : BIT0, BIT2, BIT5 FFDB : BIT2, BIT5 FFDC : BIT0, BIT1, BIT5 FFDD : BIT1, BIT5 FFDE : BIT0, BIT5 FFDF : BIT5 FFE0 : BIT0, BIT1, BIT2, BIT3, BIT4 FFE1 : BIT1, BIT2, BIT3, BIT4 FFE2 : BIT0, BIT2, BIT3, BIT4 FFE3 : BIT2, BIT3, BIT4 FFE4 : BIT0, BIT1, BIT3, BIT4 FFE5 : BIT1, BIT3, BIT4 FFE6 : BIT0, BIT3, BIT4 FFE7 : BIT3, BIT4 FFE8 : BIT0, BIT1, BIT2, BIT4 FFE9 : BIT1, BIT2, BIT4 FFEA : BIT0, BIT2, BIT4 FFEB : BIT2, BIT4 FFEC : BIT0, BIT1, BIT4 FFED : BIT1, BIT4 FFEE : BIT0, BIT4 FFEF : BIT4 FFF0 : BIT0, BIT1, BIT2, BIT3 FFF1 : BIT1, BIT2, BIT3 FFF2 : BIT0, BIT2, BIT3 FFF3 : BIT2, BIT3 FFF4 : BIT0, BIT1, BIT3 FFF5 : BIT1, BIT3 FFF6 : BIT0, BIT3 FFF7 : BIT3 FFF8 : BIT0, BIT1, BIT2 FFF9 : BIT1, BIT2 FFFA : BIT0, BIT2 FFFB : BIT2 FFFC : BIT0, BIT1 FFFD : BIT1 FFFE : BIT0 FFFF : NONE (This is an FFFF, which is a “good” indication) 133 ADR Plus Operating Manual 134 Firmware Information Appendix D: Firmware V429-AS.bin is the standard USA production firmware for all ADR products, 241-A, ADR-1000, ADR2000, and ADR-3000, and units with WIM and all “Plus” variants of the ADR. New firmware file naming convention (standard): The previous scheme of sequential build numbers for each code/language combination has been replaced with a code version number followed by a 2-letter languagefile suffix. Under the new scheme, the standard language version numbers are: V429-AS.BIN V429-AC.BIN V429-ES.BIN V429-ED.BIN V429-EF.BIN V429-EG.BIN V429-EA.BIN American and Spanish American and Canada English and Spanish English and Dutch English and French English and German English and American This will be displayed in the ADR's CHECK EQUIPMENT menu as: V4.29-AS 12 MAR ‘01 Note 1, Setup files: All ADR units with any number of roadtubes are to have setup files loaded before shipment. The setup files to be loaded are those packaged with PDC 4.10 (V 4.10) Note 2, Basic Documents All ADR units shipped with any air switches are to include: ADR Lid Guide (version 4.28) Peek part # 119c/508a Getting Started (version 4.28) Peek part # 119C/507 Note 3, Enhanced Operations Documents: ADR units with enhanced sensors, (such as loops, piezos, contacts, or WIM) are eligible to receive: ADR Installation, Operation, and Maintenance Manual # 99/133js (v4.28). Note: This manual will only be shipped when indicated as a item on a sales order Note 4: Service Department's procedure for serviced ADRs (includes 241-A upgrades): The procedure for the Service Department is the same as for the Production Department. Please see Notes 1 through 3 above, inclusive. Note 4: ESN (Serial number) Option Codes ADR-1000 shall be 030000 All ADR1000 and 241A, and “Plus” variants will have the Electronic Serial Number set to 030000 unless a special order instruction is placed. This will allow 4 air switches in all units. ADR-2000 shall be 034000 All ADR-2000, and all “Plus” variants will have the Electronic Serial Number set to 034000 unless a special order instruction is placed. The purpose of this is to hide the internal CPU piezos and allow 4 air switches. ADR-3000 shall be 038000 All ADR-3000, and all “Plus” variants will have the Electronic Serial Number set to 038000 unless a special order instruction is placed. The purpose of this is to hide all internal piezos and air switches. 135 Firmware Information Information concerning 429 firmware New since version 428: 1. The onscreen reporting of the class table (tree) in use shows the current file name and description. 2. The collected ADR data file includes the name of the class table (tree) used. 3. The 48 hour file (study length) supports 15 minute recording intervals in the first hour. New since version 316: The Classification (Scheme “F” printout attached) has been further optimized to improve operation and specifically a correction to the type 8 handling has been applied. Some valid type 8 vehicles were falling through and being binned as type 2’s. This correction has been tested in the lab using a variety of testers and ADR equipment as well as in the field, in comparison with permanent sites, visual observation and various roadtube configurations. Per customer request, vehicles determined to have more than 7 axles, (8, 9, 10, 11, 12, 13, 14, and 15 axles) now default to type 15. Previously these vehicles defaulted to type 14. Also, vehicles determined to have 3 axles, but which did not match up to the definitions for class 2, or 3, or 4, or 6, or class 8, and were placed as type 6, are now placed as type 2 vehicles. Vehicles determined to have 4 axles, but which did not match up to the definitions for class 2, or 3, or 4, or 7, or class 8, and were placed as type 8, are now placed as type 2 vehicles. The ADR firmware default settings are now: Tube Debounce is now set to 40 ms. Maximum Vehicle length is now set to 80 feet, Maximum Inter-Axle Spacing is now set to 35 feet, New ”Expert Calibration” setup files now included The City_35 will set: The Fast_50 file will set: Tube Debounce to 80 ms Tube Debounce to 30 ms Maximum Vehicle length to 80 feet Maximum Vehicle length to 95 feet Maximum Inter-axle Spacing to 35 feet. Maximum Inter-axle Spacing to 40 feet. Other New or Improved Features 1. Daylight Savings Time is built into the firmware, users can select YES if desired, and the ADR uses an internal formula and the real-time hardware clock calendar to calculate and implement spring forward and fall back by one hour. 2. Modem sync commands are now baud rate independent. 3. Communication speeds up to 115k baud and up to 5 comm ports are now available are now available with the new Plus Comms module in the ADR-3000 Plus. 4. Voltage and Temperature indications have been updated for accuracy. 5. Study duration control provides; Daily, 24, 48, 72 hour and 7 day studies, or Continuous files. 6. The “Cold Boot” reset command now leaves Data and Setup Files Intact, while clearing all system variables. The “Initialize” command leaves communications settings intact. 7. Support for individual per lane automatic calibration of WIM arrays has been added. 8. PVR output can now provide greater resolution when requested (tenth of a foot or millisecond). Note: This is not a file change but is a change in the output/conversion software. The ADR-PVR files have always stored high resolution data. 9. Version 429 series firmware is supplied with 10 new Traffic Study setup files (and four updated old ones) plus two new “Expert Calibration” files for urban and rural settings. These files are supplied as part of a new version of PDC software (PDC 4.10) containing all of the files as a restoration utility, and which will be posted for download from the internet. The new Class Tree is also included as a setup file for use with other versions of firmware. 136 Firmware Information 10. Serial Number Default Settings (first 2 digits of serial number) Orig UK USA USA PARAMETER 00 01 02 03 Language Amer. English Amer. Amer. Speed MPH MPH MPH MPH Length Ft m Ft Ft Weight KIPS Tonnes KIPS KIPS UK Loop 04 English MPH m Tonnes UK Inter. 06 English MPH m KIPS Canada 07 Amer.C. KPH M KIPS Date MMDDYY DDMMYY MMDDYY MMDDYY DDMMYY DDMMYY MMDDYY Max Veh. Len. 80’ 20m 80’ 80’ 20m 20m 20m Max. Int. Axle Files Baud 35’ Daily 9600 8m Cont. 9600 35’ Daily 9600 35’ Daily 19,200 8m Cont. 9600 8m Cont. 9600 8m Cont. 19,200 Reset Sens. No Yes w/lp No No Yes w/lp Yes w/lp No Output to Ui No Yes No No Yes Yes No Sens, Spacing 16.4’(5m) 5m 16.0’ 16.0’ 5m 5m 3m Loop Length 6.6’ 2m 6.0’ 6.0’ 2m 2m 2m 137 Safety Safety for you, and for the public, should be foremost in your mind at all times, especially on site. This is not a safety manual nor is it a “how to” book for installing roadtubes or other sensors in or on the roadway. Please consult your local authority for the best safety practices in your area first, before working on or near the roadway. You may not get a second chance. Make sure that you have a place to park your vehicle which will not interfere with the public on the road as you set or check the Automatic Data Recorder. Do not compromise safety. Thank you for using our products Please feel free to contact us if you have any questions or comments on our products. We would like to hear from you. Peek Traffic Inc. 2511 Corporate Way Palmetto, Florida 34221 Telephone: (800) 245-7660 Fax: (941) 845-1504 www.peektrafficinc.com Quixote Traffic Corporation 2511 Corporate Way Palmetto, FL 34221 phone: (941) 366-8770 toll free in the U.S.: (866) 260-7335 fax: (941) 365-0837 email: [email protected] 81-921