1
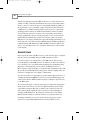
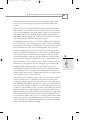
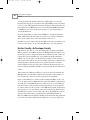
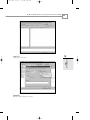
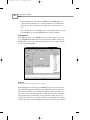
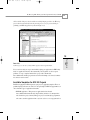
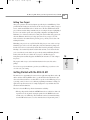
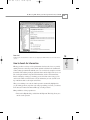
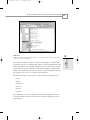
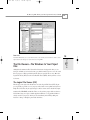
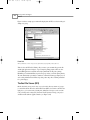
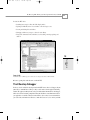
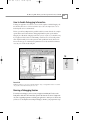
23 8911 CH18
10/16/00
1:44 PM
Page 401
CHAPTER
The KDevelop IDE: The
Integrated Development
Environment for KDE
18
by Ralf Nolden
IN THIS CHAPTER
• General Issues
402
• Creating KDE 2.0 Applications
409
• Getting Started with the KDE 2.0 API
• The Classbrowser and Your Project
413
416
• The File Viewers—The Windows to Your
Project Files 419
• The KDevelop Debugger
• KDevelop 2.0—A Preview
421
425
23 8911 CH18
10/16/00
402
1:44 PM
Page 402
Developer Tools and Support
PART IV
Although developing applications under UNIX systems can be a lot of fun, until now the programmer was lacking a comfortable environment that takes away the usual standard activities
that have to be done over and over in the process of programming. The KDevelop IDE closes
this gap and makes it a joy to work within a complete, integrated development environment,
combining the use of the GNU standard development tools such as the g++ compiler and the
gdb debugger with the advantages of a GUI-based environment that automates all standard
actions and allows the developer to concentrate on the work of writing software instead of
managing command-line tools. It also offers direct and quick access to source files and documentation. KDevelop primarily aims to provide the best means to rapidly set up and write
KDE software; it also supports extended features such as GUI designing and translation in conjunction with other tools available especially for KDE development. The KDevelop IDE itself
is published under the GNU Public License (GPL), like KDE, and is therefore publicly available at no cost—including its source code—and it may be used both for free and for commercial development.
General Issues
Before going into the details of the IDE, let’s first cover some issues that apply to development
using the C and C++ programming languages in UNIX environments in general.
As you have learned, C++ is commonly used to develop KDE software. This is necessary
because the Qt library on which KDE is based is also written in C++ and therefore offers interfaces to the library by C++ classes. KDE extends the Qt library by far and implements many
things that are either missing in Qt or that are useful for a UNIX desktop but not on a
Microsoft-based operating system. (Qt is a cross-platform toolkit, and applications written with
Qt can be directly used under MS-based operating systems, either by recompiling on that environment or by compiling with a cross-compiler as a Win32 binary.)
You can, however, make use of other languages (especially scripting languages) that have a set
of bindings that translates the Qt/KDE C++ classes to the other programming languages such
as Python or Perl; therefore, KDE is not limited to using C++, although it is the preferred way
to write KDE software.
The second issue that applies to software development is project management. An application
usually consists of more than one source file, and compilation on different systems usually
requires different settings for things such as compilers, paths to header file locations, and
linker settings to bind all compiled object files to a binary. As you learned in Chapter 16,
“Packaging and Distributing Code,” the management of all this is done via make. Writing
Makefiles by hand is usually not a trivial task, and if they are specifically written for one
development environment, you can never be sure that the same rules apply to any other
system—not even another Linux distribution. Because of this, the GNU tools offer a
23 8911 CH18
10/16/00
1:44 PM
Page 403
The KDevelop IDE: The Integrated Development Environment for KDE
CHAPTER 18
403
development framework that automates much of the project management but still requires
the developer to lay hands on the project-specific parts of the framework, which is again
non-trivial.
The tools that help here are the Automake and Autoconf packages, which sometimes make
things a bit simpler; however, sometimes they cause headaches because the developer wants to
use C++, not fuss with Makefile generation and configure scripts. At least they ensure that the
source distribution will compile automatically on almost all UNIX systems such as Linux,
SCO UNIXWare, HP-UX, and the like without much trouble. This is an issue because developers like their applications to work under as many systems as possible.
You should know that when you retrieve a source package of KDE and most other applications
that are available as source code for UNIX systems, you will have to compile it yourself. This
has two advantages: First, the binary is specifically built on your system, and when it is cleanly
built, it will run without any trouble. Second, it will install smoothly where you want it to.
The magic behind this is that the developer has to provide the source package only as
Autoconf/Automake compatible. To write this framework, you need some knowledge that is
not necessarily the developer’s job—and this is where an IDE can help. It can provide programmers with the comfort of creating a complete framework and take care of the project management during the process of creating an application.
Another important issue is handling make and the compiler, as well as the linker, to produce the
executables or libraries. These are command-line tools that require the knowledge of the
according options, which are most often very cryptic and have to be learned and are easily forgotten. On the other hand, an IDE can “remember” these things for you. An example is the following scenario: while developing your application, you will most likely program an error, and
you will have to debug the binary to follow the code while executing to find exactly where that
mistake happens. This requires telling the compiler to include debugging information into the
binary. Then the debugger can translate the function calls in the binary to the according lines in
the source files. But you will also want to switch back to optimized compilation, even if it is
only to test whether everything works as expected at a reasonable performance. Here, a simple
menu that says debug/release within an IDE helps enormously—even more so if it allows you
to debug your program with setting breakpoints directly in the source-code editor and running
a debug session within the programming environment.
18
THE KDEVELOP
IDE
Topackages:creating build a package, follow these steps: untar the package.tar.gz file and
change to the created directory containing the source files; then enter ./configure and make
on the console. After that, you can install the software package as root with entering make
install. This makes things so simple that even complete UNIX newbies who will probably
never be interested in writing applications themselves are able to compile and install a source
package. The developer, on the other hand, doesn’t have to provide so much support for the
installation process of the application on the user’s platform, but only for the functionality.
23 8911 CH18
10/16/00
404
1:44 PM
Page 404
Developer Tools and Support
PART IV
Accessing documentation is the third element where an IDE can help you as a developer.
Especially when using large C++ class libraries such as Qt and KDE, you will get lost without
a good access to the API documentation. Fortunately, the Qt has excellent documentation, and
the documentation for the KDE libraries can be created easily with the KDOC documentation
tool. KDOC also can be used to document your own project, as you learned in Chapter 15,
“Creating Documentation.”
Because the documentation as a whole is used as HTML files, a development environment
without an IDE will look like the following: an opened browser to read the documentation, a
shell to run the compiler, and one or more editor window to write the code.
After this horror scenario, which is what long-time UNIX developers have lived with for years,
let’s have a look at what you can expect when using KDevelop to create your applications.
Be User Friendly—Be Developer Friendly
Why should users have all the ease of use when working under a graphical environment like
KDE for production, such as KOffice and all the other KDE applications that make life easier,
but the developers who are writing this beautiful software suffer and look at the “normal” user
jealously? That’s why we made KDevelop—for programmers who dislike working under
UNIX the “old” way, who want to save time and be more productive, and who also like not
only the results of their work but also how it is done. Often, new developers coming from environments that offer development systems based on a graphical user interface are afraid to
switch to UNIX because they don’t want to miss a comfortable environment. In the next sections, we’ll walk through the KDevelop IDE to see what it looks like and what functionality is
available.
When you first glance at KDevelop in Figure 18.1, you’ll notice that it looks much like other
KDE applications—the main window contains the usual user interface with a menubar, toolbars, a statusbar, and a central view area that is separated into three subwindows.
Figure 18.1 shows KDevelop 1.2, which is actually for running under KDE 1.1.x, but as you
can see, the desktop it runs on is KDE 2.0. You may wonder what a KDE 1.x application has to
do with this book covering KDE 2.0, but there is a simple answer: the 1.x series of KDevelop
has been developed to be the most stable development environment so far, and we put forth a
lot of effort to make it as usable as possible—even for KDE 2.0 development, which is directly
supported. After two years of development, testing, and successful usage in industrial environments, KDevelop has proved to be an excellent, stable, and very friendly IDE that is today the
developer’s choice when starting to program with C/C++ under UNIX. Meanwhile, the
KDevelop 2.0 IDE is under development by the KDevelop Team and will be made public when
it reaches the same amount of functionality and stability as the 1.2 version (see Figure 18.2).
23 8911 CH18
10/16/00
1:44 PM
Page 405
The KDevelop IDE: The Integrated Development Environment for KDE
CHAPTER 18
FIGURE 18.1
405
18
The KDevelop 1.2 main window.
THE KDEVELOP
IDE
FIGURE 18.2
KDevelop 1.2 editing a sample project’s options.
23 8911 CH18
10/16/00
406
1:44 PM
Page 406
Developer Tools and Support
PART IV
With KDevelop 2.0, our team will break with the traditional single-window philosophy commonly used by UNIX applications, and that is what developers have to expect: complete configurability and visibility all over the user interface of the IDE. This will make KDevelop even
more attractive to users coming from other platforms and make the transition to UNIX much
easier, further reducing the learning curve for handling the programming environment.
Until the release of KDevelop 2.0, we recommend using version 1.2 for production. It offers
almost everything developers expect, especially stability and usability.
The KDevelop User Interface
As seen in Figure 18.1, the main window of KDevelop is separated into three subwindows.
Each has a certain purpose and can be resized, enabled or disabled, and automatically switched
on and off by a built-in autoswitch function.
The Tree View
The left pane contains one major part called the Tree View. It is created as a tabular window
containing several pages:
• The Class Viewer (CV)—Here, the C++ classes, C functions and structs, as well as
namespaces of your project are displayed as a tree, which allows you to dive directly into
the source files at the location of declaration and definition of attributes, functions,
classes, and namespaces. The tree is initially built when loading a project by an amazingly fast-scanning implementation and actualized during automatic and manual saving
to rematch location changes and added code to the displayed objects in the source files.
• The Logical File Viewer (LFV)—The LFV sorts all project files into groups dependent
on their MIME type; for example, all C++ source files are collected into a folder called
sources, and all C++ header files are found in a folder called headers. New groups can
easily be added via a context menu specifying the name of the folder and the file types to
be collected.
• The Real File Viewer (RFV)—Displays the project directories and files as they are
located on your system and displays all files along with their status within the project as
“registered” and “CVS” or “local.”
• The Documentation Tree View (DOC)—Offers easy access to all documentation available on your system: the KDevelop handbooks, the Qt library documentation as well as
the full KDE-API documentation, project documents, and self-configured additional documentation. The library documentations can be accessed down to the location of classmember function automatically opening the right page in the Documentation-Browser.
• The Variable Viewer (VAR)—Active while debugging your application with the internal
debugger. Here the attribute values of your application’s class instances are displayed
during runtime in a debugging session.
23 8911 CH18
10/16/00
1:44 PM
Page 407
The KDevelop IDE: The Integrated Development Environment for KDE
CHAPTER 18
407
The Tree View is one of the most effective parts of the KDevelop user interface, offering
the logistics to your project, information, and localization of source code from the
“object-oriented” point of view.
The Output View
At the bottom of the KDevelop main window, you see the Output View. This is the second
helper window that you will make use of often. Like the Tree View, it contains several pages,
each for a certain purpose:
• Messages—Any output that comes to KDevelop when running tools such as make or the
KDOC documentation program will be displayed here. The messages window also
brings you to the location of errors by clicking the error line of the output.
• Stdout—When starting your application from within KDevelop, it sends all output you
would see normally on a console into that window. Thus, you can control the behavior in
a way most developers do when using the cout function to get status information at runtime.
• Stderr—Here, the started application will put its information that is sent out via the cerr
function to monitor error messages.
• Frame Stack—Lists the calling stack of the currently monitored application or function
together with addresses.
• Disassemble—A machine-instruction view that displays the currently executed code in
assembler language.
The Output View therefore offers you the most information about the status of other applications, including the application that you are programming. Additionally, you’re offered exact
debugging information as well as an error-locating mechanism that brings you to the right
place by a single click on the error line.
The Working Area
The window that contains the actual editor is called the working area and is placed at the right
of the Tree View and above the Output View. This window is again split into several pages:
• Resource/Header Files—The first editor window, displaying C++ header files and any
other file that is not a source file to be compiled like normal text files.
• C/C++ Files—The second editor window for opening and editing C/C++ source files
(*.cpp- files). Source files can be compiled separately without rebuilding the whole project when the file to compile is loaded into this editor window.
18
THE KDEVELOP
IDE
• Breakpoint—Lists the breakpoints set in the source files and monitors how often the
application reached the breakpoint during a debugging session.
23 8911 CH18
10/16/00
408
1:44 PM
Page 408
Developer Tools and Support
PART IV
• Documentation-Browser—This window is an HTML browser like KFM and is used
together with the documentation tree to open the documentation for you. Results from
search requests over the documentation will be displayed here for direct browsing, as
well.
• Tools—The Tools window is an embedding area for other applications that can be started
from within KDevelop, such as KIconEdit, KTranslator, Cervesia, and the like.
The Dialog Editor
Because KDevelop aims to focus on KDE/Qt developers, it contains a what-you-see-is-whatyou-get (WYSIWYG) Dialog Editor that integrates seamlessly into the IDE (see Figure 18.3).
The Dialog Editor can be accessed either automatically when opening or creating a dialog file
or via the menu item Dialog Editor.
FIGURE 18.3
The KDevelop Dialog Editor with a sample dialog ready for editing.
The Dialog Editor has several advantages for a KDE/Qt developer: it lets you directly create,
edit, and build GUI components and includes a preview functionality. The user interfaces can
then be directly used within a project and adapted to further functionality needs. This is very
easy because you can set all available properties for a GUI component, such as a push button,
on the right in the Properties window. After creating a user interface, KDevelop creates the
according source files in C++ as a class derived from classes provided by Qt, such as QWidget
or QDialog. Thereafter, the developer implements the signals and slots into that class and adds
23 8911 CH18
10/16/00
1:44 PM
Page 409
The KDevelop IDE: The Integrated Development Environment for KDE
CHAPTER 18
409
the instantiation for calling the dialog at the desired place within the application’s source code.
By that, developing user interfaces for your applications is as easy as it could be with the simple steps of visually designing them and generating the source code afterward.
NOTE
It cannot be denied, however, that the current Dialog Editor has one weakness that
may require you to re-edit the source code output. Because it can handle the creation
of user interfaces only on the basis of fixed geometry measurements, your application
will have problems with translations if the texts are longer than your English originals. This will cut off the ending, for example, on buttons and labels if these are too
short to display the full translation. Thus, you need to make use of the geometry
management functions provided by the Qt library and implement a layout by yourself, separated from the default output of the Dialog Editor.
You will read more about the Dialog Editor later on when you’ll have a closer look at actually
developing a KDE application with KDevelop.
Now you’ll start with a sample session of creating a first KDE application that is compliant
with the KDE 2.0 API and offers the already described Autoconf/Automake framework. As
usual, whenever you’re creating a new project with KDevelop, from the Project menu choose
New. Then the Application Wizard of KDevelop (see Figure 18.4) will help you define the
type, the name, and other properties of your new project:
After selecting the desired project type, you get a preview of the application as it will look
after generating and compiling the source code, and a brief description. The next page lets you
set the different project settings, such as the name, the initial version, the author name and
email, and the directory where the project will be generated. The lower section allows you to
select which additional features you need; API Documentation, User Documentation, icons,
linkfile, and even the source code itself can be deselected if you want to start your application
from scratch. The third page of this wizard allows you to enable CVS support on the initial
generation. You should notice that this is restricted to be used with a local CVS repository. If
you intend to use a dedicated nonlocal CVS server, you have to do the import of the generated
source tree separately with a tool such as Cervesia. After the source tree is on the CVS server’s
repository, you can then check out again to work on a local copy with KDevelop.
THE KDEVELOP
IDE
Creating KDE 2.0 Applications
18
23 8911 CH18
10/16/00
410
1:44 PM
Page 410
Developer Tools and Support
PART IV
FIGURE 18.4
The KDevelop Application Wizard.
TIP
Cervesia is included in the KDE Development Kit provided by the KDevelop Project.
The kit contains all the KDE tools needed to develop specific KDE applications.
If you’re a developer who works alone on projects, local CVS is always a good option because
it gives you the full power of version control on your standalone machine.
The fourth and fifth pages of the wizard allow you to define the header for generated files. The
header of a file is usually a comment that includes the filename, the date of creation, the
author’s name, and a license notice for the file. The default is good enough for most developers
because it uses the GPL as a license, but you’re not restricted to that—you can change the
license notice either directly in the preview editing window or load an already existing template for your file header.
Page six is the last page of the wizard. Here, you click the Create button to start the generation
of the project. If the button is not enabled (selectable), you’ve probably not filled in a setting,
such as the project name. The project will then be built as defined; you’ll get the output of the
processes in the upper window, and errors are displayed in the lower one. The Finish button
23 8911 CH18
10/16/00
1:44 PM
Page 411
The KDevelop IDE: The Integrated Development Environment for KDE
CHAPTER 18
411
will be available if the project has been built successfully, bringing you back to the KDevelop
project editor that automatically loads the generated project to let you get started with programming your KDE 2.0 application (as shown in Figure 18.5).
18
The KDevelop project editor after generating a KDE 2.0 application with the Application Wizard.
You’ve seen how easily you can get started with developing your applications for KDE—fully
based on a graphical user interface that automatically solves beginners’ as well as experts’
problems—to set up a complete framework for a project that conforms with
Autoconf/Automake, includes pregenerated source files and running code, license, documentation, and even version control!
Available Templates for KDE 2.0 Projects
The KDevelop Application Wizard generates your project by application templates. These are
predefined packages that run “out of the box” after generating. For KDE 2.0, programmers can
choose from three types of application frameworks:
• KDE Mini application—This generates an application that has the usual
Autoconf/Automake framework with a single window (an instance of a QWidget inherited class that the project contains). This type of project is used mostly by programmers
who want to start their application from a very basic code tree to create programs such as
THE KDEVELOP
IDE
FIGURE 18.5
23 8911 CH18
10/16/00
412
1:44 PM
Page 412
Developer Tools and Support
PART IV
a kcontrol module, a wizard, or an application that needs only one window as the main
GUI interface.
• KDE Normal application—The KDE Normal type of framework offers the predefined
automatic configuration files and a source tree that contains three classes that build up a
document-view interface. Therefore, these classes are
•
projectnameApp—This
is the base class for the application window, derived from
the KTMainWindow class of the kdeui library.
•
projectnameDoc—This
•
projectnameView—The view
is the base class for the document instances. The Doc class
takes the part of loading and saving a document as a file, and it takes care of providing the interface to access the document data to other classes and instances.
This class is derived from QObject because it isn’t necessarily a window, but more
a general tool class that deals with data structures; it should be able to communicate with other application instances via the Qt signal/slot mechanism.
class, on the other hand, is directly derived from
because it represents the “view” in which the user of the application sees
the document data on the screen. Therefore, the instance of this class is directly
connected to the document instance that provides the data or at least a data area
into which the view class can write. The conclusion is that a Doc-instance could
live without a view, but a View-instance could never live without a Doc-instance;
otherwise, it would attempt to write into areas that don’t exist!
QWidget
You should, however, notice that this kind of application type is designed to build a
Single Document Interface (SDI) framework. SDI means that one application main window can handle only one main view area that takes care of one document instance. That
raises the issue that a separate document class may not be needed that much, but it is
always a good style to create the classes of an application that take care of one special
task.
• KDE-MDI application—Because the Qt library provides a child window class
(QWorkspace) since version 2.1 (which is used by KDE 2.0), we implemented a fully
functional Multiple Document Interface (MDI) application framework that is also based
on the Document-View model. Nevertheless, the Qt library lacks classes that are specifically designed to take care of the document part of applications, so the document class is
again derived from QObject.
Now you’ve seen that KDevelop offers a variety of frameworks—even specialized for KDE
2.0. These frameworks are also provided as Qt-only based applications, which make it possible
to directly port commercial applications to operating systems using Qt in conjunction with
their professional license or to compile a version that runs with the new Qt/Embedded library
for embedded systems.
23 8911 CH18
10/16/00
1:44 PM
Page 413
The KDevelop IDE: The Integrated Development Environment for KDE
CHAPTER 18
413
Editing Your Project
After project generation, the usual development steps will take place within KDevelop. You’re
provided with the Classbrowser, the Classtools, the file viewers to navigate within your project
sources, and the internal KWrite editor to edit the sources. The New and Edit menus should
give you the most-needed editing commands, and you can configure the syntax highlighting of
the source code and other options, such as the printing configuration, in the Options menu.
Furthermore, one of the most useful tools for editing is the Search in Files dialog option available in the Edit menu, which lets you look up expressions all over your project tree. The
results are listed in a box within the dialog, allowing you to go directly to the location of the
matching file and line.
File properties make it easy to set the installation destination for resource files such as
pixmaps.
You see how easy project maintainance gets when you use KDevelop; you just have to take
care of the code you’re writing.
Getting Started with the KDE 2.0 API
The main issue for a programmer who wants to write an application using libraries such as Qt
and the extensions offered by KDE is where to get the information about the interfaces (the
classes of the libraries) and how to use them. This is a special area where KDevelop gives you
a great help, even if you choose to use a different programming environment for writing your
application. Long-term emacs users, for example, might prefer to stay with their editor and
write their framework themselves.
First let’s look at what KDevelop offers in documentation availability:
• KDevelop ships with five handbooks in HTML format that are available for online reading and that can also be printed out using the sgmltools on the SGML files that come
with the source code of KDevelop. These handbooks contain a user manual describing
the whole IDE and its features, as well as an introduction to development in general, a
18
THE KDEVELOP
IDE
Maintaining your project is very easy. The New File dialog lets you create a whole set of predefined file types, such as source files, desktop files, docbook documentation, pixmaps, and
the like. Classes can be created on-the-fly with the New Class dialog, including a file header;
inheriting a class automatically adds the needed include statement, as well. Source files that
you’ve created already can be added to the project directly with the Add Existing Files functionality. After each time you’ve added a file to your project, the KDevelop projectmanagement system automatically updates the Makefile.ams and takes care of the configuration process.
23 8911 CH18
10/16/00
414
1:44 PM
Page 414
Developer Tools and Support
PART IV
programming handbook for KDE development, and a tutorial handbook with a guide
showing how to create and run KDE/Qt applications with KDevelop (including a stepby-step introduction to using the KDE API to create a sample project and the source
code of the sample program). Furthermore, the book The KDE Library Reference Guide
contains detailed explanations about the Qt signal/slot mechanism, an explanation of the
event loop of a GUI-based application, event-handling implementation and manipulation,
as well as a description of the commonly used KDE classes. Finally, the KDE 2.0
Developer’s Guide introduces the developer to some principles and guidelines toward
targeting KDE 2.0 application development. The IDE also contains a complete C/C++
reference that will assist the developer in certain questions about the C and C++ programming languages.
• Within KDevelop, you can generate the complete KDE API with the help of KDOC via
the Setup (you may choose to generate it for KDE 1.x or KDE 2.0, whatever system you
want to develop for). This includes the KDE standard libraries, the KDE base libraries
(kcontrol and libkonq) for writing modules to extend Konqueror or the KDE Control
Center, as well as the KOffice libraries used to create KOffice applications. You can
regenerate the API documentation any time you want, especially if the API has changed
or has been extended. This is a good way to get the newest set of information available.
In addition, the documentation is cross-referenced with the Qt online API documentation
that comes with the distribution of the Qt library. Therefore, you have full access to the
inheritance structure and can easily look up relationships between KDE and Qt.
• KDevelop allows you to make search requests over the complete documentation on your
system. To enable this, the system needs to have a search engine installed (available are
htdig or glimpse for use with KDevelop). The search engines contain an indexing function to create a search database that it will use to look up your request and build up the
results that will then be displayed as an HTML page in the documentation browser. The
required indexing can be done easily via a graphical interface available in the KDevelop
setup.
• KDevelop contains a documentation browser that offers direct access to the API and that
works in conjunction with the documentation tree described previously. The documentation tree displays all libraries and user documentation as books containing chapters; for
libraries, these are the classes that again can be unfolded to list all methods of a class and
that will bring you directly where you need to go—the documentation to the exact
method you want to use. Retrieving the information you need is not a matter of browsing
through header files on the system, nor is it a matter of organizing bookmarks for each
library in your favorite browser. With KDevelop’s browsing facilities, you have the best
available access to the API that you need to have to successfully develop your application within a reasonable timeframe (see Figure 18.6).
23 8911 CH18
10/16/00
1:44 PM
Page 415
The KDevelop IDE: The Integrated Development Environment for KDE
CHAPTER 18
FIGURE 18.6
How to Search for Information
KDevelop provides several ways to look up information about keywords, classes, or generally
anything of interest to the developer that could be explained somewhere in the documentation.
At first, looking up used methods within the source code can be done by setting the cursor into
the method’s name and then pressing the right mouse button and selecting Search: expression.
The search engine will then look up the desired information, switch to the DocumentationBrowser, and display a results page containing a preview of the first result of each page. You
can then select which search result seems to have the information you want—just like searching on the Internet with a search engine such as Yahoo!.
When you’re switching to one result, the found expression is automatically highlighted for
you. For looking up the next expression on the same page matching your search, you could use
the F3 shortcut or from the View menu of KDevelop, select Repeat Search.
Other possibilities to look up expressions are
• The Search for Help On dialog, available from the Help menu. This dialog allows you to
enter the search expression.
18
THE KDEVELOP
IDE
The KDevelop Documentation-Browser with the Tree View displaying the KDE 2.0 API down to the member functions
of classes.
415
23 8911 CH18
10/16/00
416
1:44 PM
Page 416
Developer Tools and Support
PART IV
• Within the Documentation-Browser, you can mark text that can then be looked up with
the context menu, the same as described for the editor window.
• Selecting text and using the Help menu item Search Marked Text or the appropriate
shortcut to call this function.
You’ll surely like these features within KDevelop because the amount of documentation grows
with the extending of the KDE/Qt API, and it would be very hard to find the functions you
need if you don’t know exactly which one to use or whether that functionality is provided by
the libraries at all.
The Classbrowser and Your Project
Now have a closer look at the actual work of a developer and what will help you most while
implementing your classes and functions: the Classbrowser and the Classtools.
While implementing KDevelop, we have thought over how to make information about the
user’s project as transparent as possible with a reasonably fast viewer. Users who know other
IDEs are already used to the concept of a Classbrowser, but I know of at least some IDEs
where this feature either doesn’t work correctly or it slows down the machine so much that you
need to have some resources in the back to develop at a reasonable speed. KDevelop, on the
other hand, contains a Classparser that scans all files while loading a project—without affecting performance. The Classtree then displays the results of this scan and automatically updates
itself either on saving by the autosave functionality or when running or compiling your application. A manual refresh can be done as well to rescan all sources. The quality and stability of
the Classparser has proven so well that it is already used in various other GPL projects, such as
KUML (a development tool using the Unified Modeling Language) for similar purposes.
The Classparser takes all source files, reads them, and looks up all classes, their methods and
members according to their access scope (public, private, or protected, including signals or
slots), their inheritance, namespaces, and global functions and attributes. Then it builds a database that stores this information and creates a Tree View that contains these classes, which can
be unfolded to display their members. As a result, you can use the Classbrowser to rapidly
browse your sources, keeping an overview of which names you have already used, and you can
navigate down into your project. Just selecting a class opens the right header file and sets the
cursor at the class declaration. Over members or C functions, it opens the right implementation
file—it doesn’t matter how many you like to use to implement a class—and sets the cursor at
the head of the implementation. (See Figure 18.7.)
23 8911 CH18
10/16/00
1:44 PM
Page 417
The KDevelop IDE: The Integrated Development Environment for KDE
CHAPTER 18
FIGURE 18.7
This results in a new habit of treating source files from the programmer’s view. Formerly, the
programmer had to take care to remember where things were declared and implemented to find
them again when they were needed. When working on large projects, this is a major undertaking that often results in a time-consuming search for interfaces and their accompanying implementation. The way KDevelop treats your sources makes you totally independent of where you
put something. You have access to it at any time via the Classbrowser.
The Classbrowser displays a project’s objects as items collected in the following folder tree:
• Classes
• Globals
• Namespaces
• Structures
• Functions
• Variables
Easy to understand, isn’t it? Now, besides the basic functionality of simple mouse clicks over
these folders and their contents, the Classviewer offers even more by pop-up menus over the
items it displays.
18
THE KDEVELOP
IDE
The KDevelop Classbrowser displaying the KDevelop source code, graphically structured with an opened class allowing direct access to methods and attributes.
417
23 8911 CH18
10/16/00
418
1:44 PM
Page 418
Developer Tools and Support
PART IV
Over the Classes folder, the menu offers
• New File—Opens the New File dialog to create a new source file. The same can be done
via the menu with File, New.
• New Class—Opens the New Class dialog to create a new class together with its sources,
including constructor and destructor implementation. The dialog can also be invoked by
selecting Project, New Class from the menubar.
• Add Folder—Adds a folder to the Classtree and creates a “real” folder in the project
directory when the first class or file is added to that subfolder with New File or New
Class.
• Options—Opens the Project Options dialog displaying the project options where you can
set compiler flags and warnings, linker flags to set the libraries to link the project
against, and make options to tell make certain settings, such as how many compilers to
start simultaneously.
• Graphical Classview—Shows the Classtree in a graphical Tree View, including the inheritance of the base classes.
Over a class, the pop-up menu allows the following options:
• Go to Declaration—Opens the file containing the class declaration and sets the cursor on
the declaration’s first line.
• Add Member Function—Opens the Add Member Function dialog to add a method to the
selected class (see Figure 18.8).
• Add Member Variable—Opens the Add Member Variable dialog to add a member variable to the selected class.
• Parent Classes—Opens the Classtools dialog with the current class and displays a tree
showing all classes the selected class inherits.
• Child Classes—Opens the Classtools dialog with the current class and displays all
classes that inherit from the selected class.
• Classtool—Opens the Classtools dialog with the selected class.
Over a selected function in the Globals folder, the pop-up menu offers going to the declaration
and definition, as well.
You see how easily you can handle your project in a more object-oriented way than what usual
development has meant under UNIX when you’re supported by the Classbrowser. In my experience, the Classbrowser usually significantly reduces the time of development because you do
not have to look up and remember everything yourself, so it is a feature every developer will
like from the start of using KDevelop.
23 8911 CH18
10/16/00
1:44 PM
Page 419
The KDevelop IDE: The Integrated Development Environment for KDE
CHAPTER 18
FIGURE 18.8
The File Viewers—The Windows to Your Project
Files
Although the documentation Tree View and the Classviewer already provide what you, as a
developer, will make use of most of the time, you should certainly be given access to the actual
files of your project. This is provided by the File Viewers, separated into two trees. One is the
Logical File Viewer (LFV); the other is the Real File Viewer (RFV), which you’ll have a closer
look at now.
The Logical File Viewer (LFV)
The first page on the right of the Classbrowser tree is the Logical File Viewer (LFV). Its purpose is generally to provide access to your project files, but in a more sophisticated way than a
simple Tree View. First, only the registered project files are shown, such as header files, implementation files, READMEs, and the like. These are collected into groups, which are shown as
folders. On creating a new project with the Application Wizard, a set of predefined folders is
already created for your project, which you can extend directly in the LFV by adding new
folders via a dialog or editing the given folder’s file filters.
18
THE KDEVELOP
IDE
The Add New Method dialog lets you easily add a method to a class, including its documentation, declaration, and an
implementation head, with support for signals and slots used by Qt/KDE.
419
23 8911 CH18
10/16/00
420
1:44 PM
Page 420
Developer Tools and Support
PART IV
Figure 18.9 shows a sample project with its files displayed in the LFV, as well as the dialog for
adding a new group:
FIGURE 18.9
The Logical File Viewer shows your project files separated into groups, depending on the file filters set.
What else does the LFV offer? Clicking a file you want to open automatically opens the file
and the right application to display it. A good example is pixmap graphics, which are often
used in KDE applications as menubar and toolbar symbols. On selecting such a pixmap,
KIconEdit gets started inside KDevelop on the Tool page and lets you edit the pixmap directly.
The same functionality is provided for a number of common file formats appearing in projects,
such as dialog definition files for KDevelop’s dialog editor and po files containing translations
for a given language.
The Real File Viewer (RFV)
On the other hand, you may need to have access to the whole directory structure of your project and all files therein. Therefore, the Real File Viewer (RFV), located next to the LFV, is the
right place to go for actions such as deleting files, adding files to the project, and even some
really cool things such as using CVS (Concurrent Version System) to manage your project—
and all that from within one graphical interface (see Figure 18.10).
23 8911 CH18
10/16/00
1:44 PM
Page 421
The KDevelop IDE: The Integrated Development Environment for KDE
CHAPTER 18
421
In detail, the RFV offers
• Switching between project files and all file display modes
• Updating the Makefile.ams of selected folders or the whole project tree
• Creating and deleting files and folders
• Changing a subdirectory’s target to a shared or static library
• Using CVS commands on files and folders, such as adding, removing, updating, and
check in
18
THE KDEVELOP
IDE
FIGURE 18.10
The Real File Viewer of KDevelop offers you direct access to all project files and even CVS commands.
Of course, opening files works the same as with the LFV.
The KDevelop Debugger
In the set of tools available for developers under the GNU license, there is a debugger, the gdb.
gdb itself is a command-line tool like g++ and gcc and is used to monitor applications during
runtime. The application binary therefore has to include runtime information for the debugger,
which can be turned on during compilation. Then gdb will deliver as much information about
your application as available: addresses, method names, object values, location of methods in
your source files, and much more. However, to make the best use of it, a lot of freely available
23 8911 CH18
10/16/00
422
1:44 PM
Page 422
Developer Tools and Support
PART IV
GUI front ends are provided, such as ddd or kdbg, which let you run your application with gdb
and display the runtime information delivered by gdb. KDevelop, however, contains a new
internal debugging front end to gdb that lets you use all features within the same environment
so that you don’t have to switch between your coding editor and the debugger application. Its
integration is seamless and easy to use, and you are still provided the possibility to use an
external debugging front end as a tool in the Tools window.
Setting the Debugger Options
The debugger settings, like all other KDevelop configuration options, are located in KDevelop
Setup, which can be accessed via the Options menu. Select the debugger tabulator to change
the debugging settings.
There you can select between the default use of the internal KDevelop debugger or using an
external debugger with the debugger name you want to use (ddd or kdbg).
Next, three major settings for the internal debugger are worth a closer look. First is the option
to set Pending Breakpoints. A breakpoint is a mark in the source code at a certain line where
you want the debugger to stop your application—for example, when you’re searching for a
segmentation fault or you want to inspect how often your application will call the same method
to increase the performance when you know how to reduce the number of times a method gets
called. Now, applications often make use of libraries that they are linked to. Although static
libraries are included into the binary, dynamic libraries such as the KDE and Qt libraries are
loaded when an application calls a method that is in one of these libraries. That means as long
as a method that is placed in a library didn’t get called, the library won’t be loaded. When you
want to set a breakpoint exactly at a method call that is in a library, gdb can’t set it if the
library isn’t in the system’s memory. The Pending Breakpoint option helps here because it
deactivates the breakpoint as long as the library hasn’t been loaded, and it tries to activate it as
soon as the library is available in memory.
The second option that is very important is the floating toolbar. In debugging mode of
KDevelop, this brings up a separate little toolbar window that contains the debugging commands as icons and that will stay on top. This is a nice feature that makes debugging easier,
and you can still monitor the source code in KDevelop behind your application window (see
Figure 18.11). There is also the option to use a separate I/O window for applications that make
use of command-line input calls, such as cin and fgets. In that case, checking the floating
toolbar is again a good option so that your input window doesn’t get obscured when activating
debugging commands.
23 8911 CH18
10/16/00
1:44 PM
Page 423
The KDevelop IDE: The Integrated Development Environment for KDE
CHAPTER 18
423
How to Enable Debugging Information
To debug your application, all you have to do is to tell the compiler to include debugging code
into the binary that serves as a reference from the object code to the original source code so
that breakpoints can be set and monitored.
For this, open the Project Options dialog available in the Project menu. Switch to the compiler
options tabulator and check the Generate Debugging Information option together with the
debugging level. By default, debugging is turned on at project creation, so you shouldn’t worry
if your application loads a bit slower when running a normal test. To see how it will perform
when compiled normally, deselect this option and enable optimization instead, which can be
done on the same page. A commonly used optimization level is -02, which will work in most
cases, but you’re on the safe side using -01.
18
THE KDEVELOP
IDE
FIGURE 18.11
The KDevelop debugger is your gateway to the CPU and memory usage of your application. It allows you to monitor
your program’s execution line by line along the source code.
Running a Debugging Session
To actually use the debugger, you have to run your application within gdb. For that, use the
Debug menu, which offers the normal Start operation and advanced selection of starting methods, such as appending arguments or attaching your application to another process. Notice that
you have to set a breakpoint before starting the debugger; otherwise, your program won’t stop!
23 8911 CH18
10/16/00
424
1:44 PM
Page 424
Developer Tools and Support
PART IV
Setting breakpoints is one of the easiest tasks. The editor windows have a gray pane on the
left; you just have to click the line on which you want to stop, and a breakpoint symbol is
placed. The context menu over this pane offers advanced options to the debugger as well as
switching between breakpoint and bookmark modes. Then the debugger will start your program and the debugging options and windows will be available. These are
• Run—Executes or continues the program.
• Run to Cursor—Executes the program until the current cursor position in the source code
is reached.
• Step Over—Executes one line of code and will stop the application on the next line.
• Step Over Instruction—Executes exactly one machine instruction. The assembler code
that is executed and where the machine instructions can be monitored is the Disassemble
tab in the output window.
• Step In—Executes one line of code where you will step into the method call, if necessary.
• Step In Instruction—Executes one machine instruction as described previously.
• Step Out—Runs to the end of the stack frame and out of the function the application is
currently processing.
• Viewers—Opens the debugging viewers dialog where you can inspect a variety of values
of the running application, such as the disassembled code, memory status, library status,
and CPU register states.
• Stop—Stops the application execution.
• Exit—Stops the application execution and exits the debugger.
With these options, you can control the processing of your application’s execution at runtime.
On the other hand, you certainly don’t want only to hop through the source code, but you
might also want to know which values your variables have during execution time. This is the
easiest way to find the cause of a segmentation fault. To those who aren’t experts with programming yet, you may have encountered a program suddenly exiting without you wanting it
to exit. It is just gone and your work is lost. The cause of this is most often a segmentation
fault. That means that the computer tries to access an object the program refers to, but the
object doesn’t exist. The program will crash in that case because it violates the memory protection by wanting to access an address area that it isn’t allowed to. Development of C++ and C
applications often involve the use of pointers to objects that are the cause of most segmentation
faults; therefore, you surely want to watch if a pointer is valid during runtime. The KDevelop
debugger now offers the Watch functionality for variables. In the VAR tabulator, you get a Tree
View of all objects of the application and their status. There, you can select which variables
23 8911 CH18
10/16/00
1:44 PM
Page 425
The KDevelop IDE: The Integrated Development Environment for KDE
CHAPTER 18
425
you want to watch. This is often useful for local variables within a method call you’re monitoring. Variables to be watched can be added to the Watch section by using the input field on the
bottom of the VAR window or by a context menu within the tree.
Now you should be able to successfully run and debug your application and make it as safe as
it can be. Keep in mind that users expect your application to be stable, and they certainly don’t
want to lose their work—the same as you don’t want your IDE to crash while you’re programming!
KDevelop 2.0—A Preview
Coming near to the end of this chapter, you will certainly think about what is in store for
developers with the upcoming KDE 2.0 version of KDevelop. As I said earlier, it is currently
not the best option to make use of it for production; it is under constant development and it
will bear some major changes and improvements that will make programming even easier (see
Figure 18.12).
Further, the Tree View and the Output View can be “docked” and “undocked” into the main
window of KDevelop. You can also separate each tabulator of these views into single windows.
With KDevelop 2.0, usability will reach a next level for programmers—so stay tuned.
Other features that will arise are a new Dialog Editor, an exchangeable editor interface to let
you choose your favorite coding editor, better project management, and improved classparsing.
We’ll also try to support more programming languages in the future, but this is currently still a
topic under discussion. Everyone’s invited to participate on the project, so there is an open
door for those that want to have new features. Feel free to implement them and help us to create an even more competitive and developer-friendly development environment.
18
THE KDEVELOP
IDE
Most changes will take place in the areas of the user interface. The current development version already contains an MDI structure that allows you to open several source-code windows at
the same time, whereas the 1.x series of KDevelop is single-window based. This improves
switching between source files, and you will be able to see more of your code at one time.
Furthermore, you’ll have the Documentation-Browser at your side while you’re editing, so you
don’t have to switch any more between the editor and the documentation windows. The MDI
interface we’re using also allows you to switch the child windows into top-level mode and
back, which will be of good use for all programmers who have more than one monitor. Now
you can spread out your coding windows all over the place.
23 8911 CH18
10/16/00
426
1:44 PM
Page 426
Developer Tools and Support
PART IV
FIGURE 18.12
KDevelop 2.0 at its current state of development.
Summary
With this chapter, I hope I have at least covered most of KDevelop’s features, although I have
only scratched the surface. KDevelop 1.2 generally provides everything a C/C++ programmer
needs for development of KDE 2.0 applications, and after a long development period of nearly
two years, it has proven to be stable and reliable. KDevelop can be your first step to getting on
the path to code a new, successful application for UNIX.
If you have any comments, feel free to contact us, and if you would like to join, support, or
sponsor the KDevelop project—you’re welcome!
Information about KDevelop, the team, and the project can be found on the Internet at
http://www.kdevelop.org. There you will find a list of contact addresses to the developers, as
well as addresses for our support mailing lists. I hope you will enjoy using KDevelop for your
own KDE 2.0 project as much as I will enjoy using your application if it’s GPL!