1
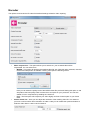
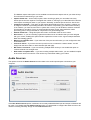
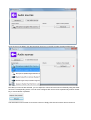
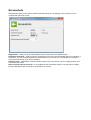
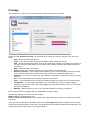
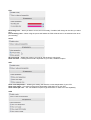
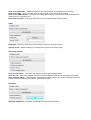
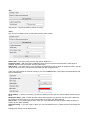
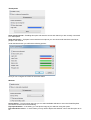
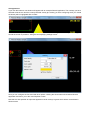
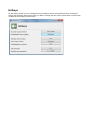
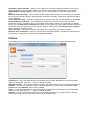
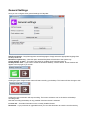
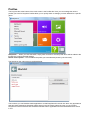
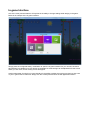
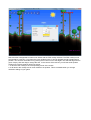
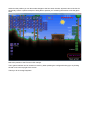
PlayClaw 5
User Manual
Introduction
Welcome to PlayClaw version 5, the ultimate recording tool for gamers. This manual will cover the options
available in PlayClaw 5 and describe how to use PlayClaw to record your gaming moments. Not only can
you make changes to the configuration of PlayClaw from the desktop but also while in-game using the ingame user interface.
PlayClaw takes full advantage of modern processors harnessing the power of multi-core systems resulting in
little to no decrease in frame rates whilst recording.
The Main Window
When you run PlayClaw you will see a compact user interface as shown below:
Each configurable section is depicted by a tile that you can click. If you navigate to a section, click the back
button to return to the main screen. In the following sections we will go through each tile and the options
available there.
Encoder
The options found under the Encoder tile handle all settings related to video capturing:
•
•
Video compression – This option allows you to select how your recorded video will be
compressed. You can select from:
◦ MJPEG – This option will produce the smallest video file size. With this option selected, note that
the Encoder setup button is available. Clicking it will open the following screen:
Here you can select the quality level of the MJPEG video file produced. Setting this option to 100
will produce the best quality video but have the most impact on your processor. You can also
enable YUV411 compression by enabling the check-box.
◦ Fast – The fast option will compress your video slightly and has a lower impact on your frame
rates.
Custom frame size – Here you can adjust the resolution of the resulting video file. If for instance
you have a monitor with a native resolution of 1680 x 1050 you can enable this option and select to
scale the video down to 1280 x 720 for instance:
•
•
•
•
•
•
•
•
The Maintain aspect ratio option can be enabled to ensure that the aspect ratio of your video is kept.
This will result in letter-boxing in your video.
Capture frame rate – As the name implies, when recording a game you can select how many
frames per second are captured. The higher this number is, the larger your video files will be and the
more impact recording will have on your system. Generally, 30 frames per second is a wise choice.
Compression threads – This option is what makes all the difference when recording. It allows you
to assign the number of processing threads to be used for compressing your video while recording.
If, for instance, you have an Intel Core i7 system with 4 cores, you will be able to select a maximum
of 8 threads for recording. This is not recommended however as the game itself also needs
processing power. Using 2 threads for compression is a good starting point.
Smooth frame flow – Using this option will result in a smoother video in some cases.
Draw cursor – If you are recording a game that makes use of an interface that you must navigate
with your mouse, enabling this option will also capture the mouse cursor. A good example would be
Real Time Strategy games.
Max pre-record buffer size – If you make use of the pre-record function you can configure the size
of the buffer here.
Convert to stereo – If you have a mono input this can be converted to a stereo stream. You will
simply hear the same audio on both channels (left and right).
Mix audio in one track – If you are recording multiple audio tracks you can enable this option to
combine all audio into a single track.
Write audio in separate files – If you are recording multiple audio tracks you can enable this option
to save each track to its own file. This can be very useful when editing your videos.
Audio Sources
The options found in the Audio Sources section relate to the audio inputs/outputs connected to your
computer.
If the Use default sources option is selected, the currently selected default input and output in Windows will
be used. If you disable the Use default sources option you will be able to configure the audio sources to be
used for recording manually. Simply click the Add source button:
Once the source is added, click the large drop-down box on the left to select the appropriate source:
Now that your sources are selected, you can adjust the volume of each source individually using the slider
next to the corresponding source. You can even configure each source to be captured only when a certain
key or mouse button is pressed:
The final button on this screen is to remove a source. Simply click the red cross to remove a source.
Screenshots
PlayClaw also gives you the option to take screenshots while you are gaming. On this screen you can
configure the options to do this.
Image format – Here you can choose between PNG or JPG format. The default is PNG.
Screenshot indication – When you take a screenshot you will see a visual indication that you have taken a
screenshot. This can either be a frame around the border of your screen or it could simply be a change in
color of the FPS overlay if you have it enabled.
Indication color – Regardless of which indication method you have chosen, you can configure which color
is used with this option.
Auto-screenshot period, seconds – If you enable the auto-screenshot function, use this option to adjust
the interval between each screenshot. The default is 15 second.
Overlays
The indications you see on screen while recording can be configured on this screen.
On the left under Available overlays you can select which overlay you want to configure. You can chose
either:
• FPS – Shows the frames per second
• Clock – If you want to keep track of the time while in game, enable this overlay.
• CPU – Shows the status of the CPU. This can be useful when adjusting your settings for recording. If
your CPU is working really hard you may want to reduce quality settings to get better performance
for instance.
• GPU – Shows the status of the GPU.
• Image – Allows you to add an image to your videos. Perfect for showing logos.
• Recording statistics – This overlay gives information on your current recording such as the length
of the recording and the size of the file. This is very useful if you are limited on disk space.
• Stopwatch – If you want to record your game based on a stopwatch for speed runs, then this option
is for you.
• Text – This overlay allows you to display a fixed text in your video.
• Timer – If you would like to time yourself for something during a recording you can use this overlay.
• TeamSpeak3 – If you are using TeamSpeak 3 you can enable this overlay to show the people
currently in your channel. Their names will highlight when they speak and the colors for such events
can also be configured.
• Webcam – When using a face cam in your recording, select this overlay to configure it.
Each overlay has its own settings. Below is a description for each overlay.
The following settings are common for each overlay:
Enable overlay – Enables the overlay.
Show in video and screenshots – When enabled the overlay will also be shown on screenshots and video
recordings.
Once you have set the options described below, click the Set appearance button to adjust how the overlay
will be shown and the position on the screen. A new window will open with a sample DirectX application. The
controls seen here are the same as the in-game interface.
FPS
Recording color - When you start to record, the FPS overlay, if enabled, will change to the color you select
here.
Pre-recording color – When using the pre-record feature the FPS will be shown in the selected color when
pre-recording.
Clock
24 hours mode – Enable this option if you want to see the time in 24h format.
Show seconds – If seeing the seconds is important for your clock, enable this option.
CPU
Show core temperature – Enabling this setting will show the current temperature of your CPU.
Show core usage – This value is shown as a percentage of the total use of your CPU.
Show values per core – You can enable this option to get information on each CPU core separately.
GPU
Show core temperature – Enable this option if you want to monitor the temperature of your GPU.
Show core usage – This overlay will show the current load of your GPU as a percentage.
Show cooler RPM (nVidia) – If you have an nVidia graphics card you can select to show the speed of the
cooling fan of your graphics card.
Show memory usage – This option will show the current graphics card memory usage.
Image
Image path – Allows you to browse for the image you wish to use for the overlay.
Opacity (0-100) – With this setting you can adjust the opacity of the image used.
Recording statistics
Show recording time – This option will show the length of the recording in time.
Show file size – This option will add information about the file size of the current recording to the overlay.
Show dropped frames – The information provided by this option can be very useful as it shows how many
frames are not recorded and can indicate a performance issue.
Stopwatch
Start/stop stopwatch – The hotkey for starting and stopping the stopwatch.
Text
Text to draw – The text that will be shown on screen.
Timer
You can show multiple pieces of information with the timer overlay.
Initial value – This is the value the timer will start at. Default is 0.
Increment value – With this option enabled the timer will count up from the initial value. If this option is
disabled, the timer will count down from the initial value.
Alarm value – If at some point in your recording you would like to see an alarm for whatever reason, set the
value here for your timer. The timer will then flash with the configured color.
There are extra options for the timer overlay if you click the More button. The options mentioned above and
also be edited here.
Reset hotkey – If, during a recording, you want to restart your time you can use this option to bind a key to
do so.
Stop alarm delay – After a certain amount of time after the alarm has gone off, you can turn the alarm off.
For instance, set this value to 10 and at 70 seconds on the timer, the alarm will stop.
Alarm color – If you have setup an alarm value, the color selected here will be used to flash the timer on
screen as your alarm indicator.
Hide timer delay – If you are using an alarm you can auto-hide the timer a certain amount of time after the
alarm.
Setting these values to 0 will disable them.
TeamSpeak3
Show server/channel – Enabling this option will show the server and channel you are currently connected
to in TeamSpeak.
Show silent users – If players have muted their microphone you can chose to still see them in the list of
people in the channel.
Under the More button you will find the following options:
Here you can configure the colors for the events listed.
Webcam
Source device – From this drop-down list you can select available webcams or even the Virtual PlayClaw
Cam which can be used to live streaming.
Flip top and bottom – If necessary you can flip the image of your webcam using this option.
Flip red and blue colors – In some cases you may need to flip the red and blue colors. Use this option to do
so.
Set appearance
If you click this button a new window will appear with an example DirectX application. The overlays you have
selected will be shown and the currently selected overlay (the overlay you were configuring when you clicked
the button) will be highlighted with a border:
In the above example the FPS overlay was selected. The box surrounding the FPS overlay can be dragged
around the screen to position it. Using the accompanying settings screen:
Here you can configure the font used and other options. Clicking the Close button will shutdown DirectX
application and return you to the main PlayClaw screen.
Note that it is also possible to adjust the appearance of all overlays in-game which will be covered later in
this document.
Hotkeys
On the hotkeys screen you can configure the keys needed to perform all necessary actions in PlayClaw.
Simply click the button next to the function you want to change and then click a mouse button or press a key
to select the new hotkey for that function.
Show/hide in-game interface – While you are in game you can call the PlayClaw interface at any time to
make adjustments to your recording settings. The in-game screen will be covered later in this manual.
Enable/disable overlays (global) – This is a key you can set to enable or disable all overlays while in
game.
Start/stop video recording – This is the key that will actually start and stop your recording. If you press the
key once, the recording will start. Pressing it again will stop the recording. Pressing it a third time will start a
new recording file.
Cancel video recording – If you are recording and you press this key, the recorded footage will be deleted.
Enable/disable pre-recording – If you would like to continuously record so that you don't miss that
spectacular moment, use this function. The recording will be saved to memory in a buffer that you defined
previous (see the Max pre-record buffer size option). If at any point you want to keep what was recorded in
the last few moments, depending on how long your buffer is, simply press the Start/stop video recording
button to write the recording to disk.
Take screenshot – Use this key to take a screenshot at any time during your gaming session.
Start/stop auto-screenshots – When you start the auto-screenshot function, a screenshot will be taken at
the interval you configured for Auto-screenshot period, seconds.
Folders
In the folders section you can define the paths to where your recordings and screenshots are saved:
Screenshots – This is the folder where the screenshots will be stored. By default it is the Pictures folder
under your user folder. Click the “...” button to change the folder.
Add process name – You can have PlayClaw create a sub folder based on the name of the game process.
Add date – You can have PlayClaw create a sub folder based on the current date. Combining the Add
process name and Add date options is also possible.
Videos - This is the folder where the video and audio files will be stored. By default it is the Videos folder
under your user folder. Click the “...” button to change the folder.
Add time – You can use the Add process name and Add date options for your videos and you can also
select to add another level to your folder structure by including the time.
General Settings
Here you can configure some general settings for PlayClaw:
Interface language – PlayClaw supports several languages. Simply select the appropriate language from
the drop-down box.
Minimize to system tray – With this option enabled PlayClaw will minimize to the system tray.
Check updates on start – This option will check for updates when PlayClaw starts up.
Desktop mode: OFF – If you want to record the Windows desktop, click this button. A new windows will
appear in the top right of you screen:
Clicking the green clapper board button will start recording your desktop. This button will also change to this:
Clicking the red cross button will stop recording. The brown exit button can be clicked to exit desktop
recording mode.
Note that recording the desktop is only possible if the Aero theme is selected.
License info – Provides information on the currently installed license.
Reactivate – If you purchase an upgraded license you can click this button to enter the new license key.
Profiles
The long blue tile at the bottom of the main screen is the Profiles tile. Here you can manage the various
profiles you have for PlayClaw. Profiles allow you to quickly switch to settings you have defined for a specific
game:
Add profile... - When you click this button, simply enter a name for the new profile and it will be added to the
list with the currently selected settings.
Delete current profile – This will delete the profile you have selected (shown by the tick mark).
The final tile on the main screen is the Blacklist tile:
This is where you can blacklist certain applications so that PlayClaw will not hook into them. Any applications
that have been detected by PlayClaw will be shown in this list. Simply select the ones you do not want
PlayClaw to interact with and click the Add to blacklist button. Applications that are blacklisted will be shown
in red.
In-game Interface
One of the most powerful features of PlayClaw is the ability to change settings while staying in the game.
Below is an example of the in-game interface:
Simply press the configured hotkey combination to open the in-game interface. As you can see, the same
tiled interface is available here. Not all tiles are available but most settings can be adjusted from this screen.
When you click a tile, a new overlay screen will appear.
Another advantage of using this in-game interface is the ability to adjust the overlays precisely so that none
of your in-game HUD is obscured. Simply click the Overlays tile and then the Set appearance button:
Notice that the Set appearance button was clicked with the FPS overlay selected. The FPS overlay is now
surrounded by a red box. If you place the cursor inside this box, it can be dragged around to determine its
position. You can also resize this box by placing the mouse on one of the edges. The selected edge will turn
green. Simply click and drag to change the size. In the corners of the red box you will see small squares.
Clicking one of these squares will do two things:
1. It will move the overlay to the corresponding corner of the screen
2. It will anchor the overlay to that corner relative to its position. This is noticeable when you change
resolution settings of your game.
Aside from the position you can also make changes to the font used, the size, style and color of the font for
the overlay. Here is a perfect example of being able to position your recording information to suit the game
HUD:
Notice the position of the FPS and CPU overlays.
The in-game interface can be closed once more by either pressing the configured hot-key(s) or by clicking
the red cross in the top right of the screen.
Thank you for choosing PlayClaw!