1
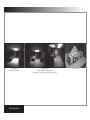
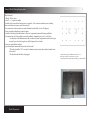
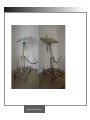
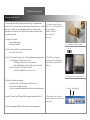
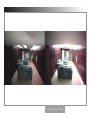
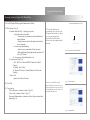
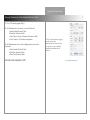
Shadowtracker User Manual
Shadowtracker is a helidon housed at the University of Oregon’s Baker Lighting Lab
College of Architecture and Allied Arts
Department of Architecture
Designed and constructed under the supervision of Alison Kwok by John Boosinger
For further information go to the Baker Lighting Lab’s website: http://baker.uoregon.edu
Manual version 1.3
Last updated: 4/27/2005
Step
1
Shadowtracker Use Policy
1) Shadowtracker shall be available for use only during open office hours. The Baker GAF or TAs will be
in the lab only for general observation and questions.
2) Training on the use of Shadowtracker will occur during predetermined meetings.
All faculty members or GTFs who wish to have students use Shadowtracker must participate in a brief
training session.
3) A trained faculty member or GTF must be present while their students use Shadowtracker. The faculty
or GTF will responsible for the proper use of Shadowtracker.
4) Independent study students who wish to use Shadowtracker must go through a training session. That
student is then responsible for his or her usage of Shadowtracker.
5) A trained independent study student may not serve as the supervisor for another untrained student.
6) Email [email protected] or call 514-346-3689 to set up an appointment.
Table of Contents
1. Model Preparation
(pg. 2)
Types of Studies
Specific Model Recommendations
General Model Building
2. Shadowtracker Preparation
(pg. 6)
3. Capturing Still Shots/Videos (pg. 8)
4. Final Steps
(pg. 14)
2
Actual Space
Straub Hall, Eugene, OR
Model Preparation
Daylighting model
Created to fulfill course requirements
Garrett Burtner, David Posada, Emily Wright, Spring 2003
Exterior of model
Model Preparation
Types of Studies/Model Recommendations
3
There are two main types of studies that can be done with Shadowtracker:
Daylighting Study
Shows what is in light and shade during a particular time in the year.
Demonstrates the movement of the sun across the sky relative to your building
Lets you test how well your light shelves, shading devices, sky lights, etc function
When constructing a daylighting model:
* care should be taken with the selection of materials
*the colors, reflectivity, texture, etc of all the materials used should be as close to accurate as possible
*do not build the exterior of your model out of a translucent material (i.e. white foam core) unless your walls
are truly translucent
*use black tape to cover the cracks that let extraneous light in
Solar Radiation Study
Measures the percent of a window that is in shade for various times of day and year.
It can be used to demonstrate the performance of a shading device.
When constructing a solar radiation model:
• build a facade model that includes the window(s) that you would like to test
• on a piece of paper, outline the window opening and draw a grid in which each square equaling 5% of the
total window area
• tape the paper onto the window opening
• during the study, the number of squares in shadow indicates the percentage of the window in shade at any
given moment
Daylighting model measurment
Solar Radiation model
General Model Making Requirements
Models should:
• Weigh: 25 lbs or less
• Size: 2’ x 3’ in plan or smaller
• be built with as much detail and accuracy as possible, if the exterior conditions (trees, shading
devices) influence the space, model those as well
• be constructed with reasonable care as the heliodon has the ability to turn 360 degrees
• have everything either glued or taped in place
• be built to allow quick modifications to allow for comparison between different possibilities
• be mounted on a stiff base which exceeds the building’s footprint by at least 1” on all sides
* use the plan of the Shadowtracker table to insure that your footprint allows the model to get
screwed down in at least two places, ideally diagonal of each other
• have true north labeled on them
• provide multiple camera holes in the sides of the model
* The holes should be 3/4” to one inch in diameter and not more than 6 inches from the base
of the model.
* Each hole should be able to be plugged
4
The above drawing of the Shadowtracker table is at 1”=1’
Photocopy to adjust it to a larger scale or go to the
website (http://baker.uoregon.edu/tools/st.htm) to get the autocad file.
Actual Shadowtracker table
Model Preparation
Model Preparation
5
Shadowtracker Preparation
6
Shadowtracker Preparation
Shadowtracker Preparation
Preparing Shadowtracker:
1. Position the model on the Shadowtracker table (Fig. 1) using hardware
found above ST computer. Make sure that south is orientated down, i.e. toward
the windows. While you are positioning the model, pay attention to the
placement of the camera as well. Make sure the camera can reach the hole
provided in the model.
2. Login to ST computer
a. User: shadowtracker
b. Password: sunpath
7
1. If the table is not level follow
Steps 10, 11, and 12 using the following coordinates:
latitude: 58 degrees
date: February 21
time: noon
Fig. 1: model attached to Shadowtracker table
Off / On
3. Create a folder named after yourself on the desktop
a. Go to: File/New Folder
4. Turn on ST External Hardware (Fig. 2) located behind the computer screen
a. Video Digitizer (VD) (silver, curvy box)
i. Click Toggle (back of box) to ‘On’ position
ii. Press Mode Button on Front of Box until ‘A’ is backlit
b. Video Control Box (VC) (black box on left)
i. Click Power Button (front of box) to ‘On’.
O
--
4. Do NOT touch remaining
hardware on desk: SCG (Stepper
Control Board) and PM (Power
Motors)
Fig. 2: Video digitizer (VD) and Video Control Box (VC)
5. Adjust Lab Lighting Environment
a. Switch on “Sun”. (Switch located on wall near ‘sun’.)
b. Close black out blinds as needed
c. Turn off overhead fluorescent fixtures (Switches located near door)
6. Open ST Controls and SGCapture2Disk programs from desktop (Fig. 3)
7. Go to the Capturing Still Shots/Videos section of this manual (pg. 8)
ST Controls
6. Do not move / resize software
windows as they are sized to relate
to each other
SGCapture2Disk
Fig. 3: Mac program menu
8
Capturing Still Shots/Videos
Step
Capturing Still Shots/Videos
9
Preparing Camera to Capture Still Shots/Videos
8. Go to SGCapture2Disk program (Shadowtracker Video)
9. Click Settings (Fig. 4)
a. Formac Studio Tab (Fig. 5, Image preview tab)
i. Adjust the camera, if needed
• Camera may be relocated to any threaded hole on
model platform
• Change lens as needed (wide-angle located in box
above computer)
ii. As necessary, adjust lighting
• Adjust focus at camera first (Twist Aperture)
• Make additional lighting adjustments needed at VC
box (AGC Button)
iii. As necessary, adjust sliding bar levels
b. Compression Tab (Fig. 6)
i. DV / DVC Pro: Choose MPEG-4 Video (Gives MAC
Output)
ii. Quality: Set to “Best”
iii. Motion: 24 Frames / Second (Balances File Size and
Quality)
c. Source Tab
i. Ignore (For Future Cameras)
9. The camera should now be
activated and show a preview in the
SGCapture2Disk window, if it doesn’t
try closing and reopening the
program. If you still don’t get a
preview restart the computer and the
directions.
10. Click OK
10. Once you click OK, the setting
function basically locks you out, so try to
get things right the first time. If you need
to change anything you will need to close
the program and start over.
11. If you want to:
Take a still picture, continue to Step 12 (pg. 10)
Take a video, continue to Step 17 (pg. 11)
Stop using Shadowtracker, continue to the Last Steps section of this
manual (pg. 14)
Fig. 4: Initial screen of SGCapture2Disk
Fig. 5: Formac Studio tab
Fig. 6: Compression tab
Capturing Still Shots
10
12. Go to ST Controls program
Preparing Camera to Capture
13. Using position 1 enter desired location, date, time information (Fig. 7)
13. Time must be imput in solar
time, that is, using the 24 hour
clock. For example, if you wanted to
check 6pm you would enter 18:00.
14. Click on Position #1: Shadowtracker will now move to the requested
situation
14. If it is the first run after logging
onto the software then
Shadowtracker will reset itself to a
zero position (i.e. turn completely
upside down) and then move to
Position 1. The Stop button is for
emergencies only!
15. Take a Picture
a. Open SnapZ Pro X Software from the desktop menu bar (Fig. 8)
b. The four square buttons on the top of the program screen offer
different ways of taking a picture; each save directly onto the desktop.
i. Screen: Takes a picture of the entire screen
ii. Object: Selects a specific object and it takes a picture of it
iii. Selection: Using a capture field you choose the area of the
image
• Adjust the capture field as needed
• Press Enter when you have the desired selection
iv. Movie: SnapZ Pro will take a movie of whatever happens
on the screen in the area you select
c. The rest of the screen allows you to adjust certain aspects of the
image, the default settings are fine for normal picture taking
d. For each of these methods name and save the file onto the desktop
15. You will only use Position 1 for
capturing still shots
15b. Generally, you will use the
selection method
16. If you want to:
Take another picture repeat from Step 12
Take a video, continue to Step 17 (pg. 11)
Stop using Shadowtracker, continue to the Last Steps section of this
manual (pg. 14)
15biv.
• Click on movie
• Adjust the capture field
• Hit Enter to start recording
(the program will exclaim
“Action”)
• Left click on the program icon to end
the movie
(It will now say “Cut”)
• On the screen that pops up, Adjust
any desired settings and press Save
(“That’s a Wrap”)
Capturing Still Shots/Videos
Fig. 7: Initial screen of ST Controls program.
The Stop buttion is for emergencies only
SnapZ Pro X
Fig. 8: Mac program menu
Step
Capturing Still Shots/Videos
11
Preparing Shadowtracker to Run Simulation/Record a Video
17. Go to ST Controls program (Fig. 9)
18. Set Shadowtracker at the start of your video (Position 1)
a. Enter Latitude (Position 1 field)
b. Enter Date (Position 1 field)
c. Enter Time, based on a 24 hour clock (Position 1 field)
d. Click Position 1 ST will move into position.
19. Set Shadowtracker to move to the ending position of your video
(Position 2)
a. Enter Latitude (Position 2 field)
b. Enter Date (Position 2 field)
c. Enter Time (Position 2 field)
DO NOT CLICK POSITION 2 YET!
18d. If it is the first run after logging
onto the software then
Shadowtracker will reset itself to a
zero position (i.e. turn completely
upside down) and then move to
Position 1
Fig. 9: Initial ST Controls screen
Capturing Video while Running Simulation
20. Go to SGCapture2Disk (aka Shadowtracker Video) (Fig. 10)
21. Click Record to start recording the video
22. Save your video to the desktop (this is the default), naming the video after
its owner
23. Tell Shadowtracker to Move
a. Go to ST Controls program
b. Click Position 2 to start Shadowtracker moving.
24. When Shadowtracker stops moving, click Stop on the SGCapture2Disk
screen to stop the recording
12
20. The movies taken are only MAC compatible, they will not work on PC
computers
Use Imovie if you have a PC
23b. Shadowtracker will now move from
Position 1 to Position 2. You can watch the
video on the SGCapture2Disk screen.
25. Click on the desktop and the file will appear
26. If you want to:
Take another video, repeat from Step 17 (pg. 11)
Take a still picture, go to Step 12 (pg. 10)
Stop using Shadowtracker, go to the Last Steps section of this manual
(pg. 14)
Fig. 10: SGCapture2Disk home screen
Capturing Still Shots/Videos
Step
Capturing Still Shots/Videos
13
Last Steps
14
27. Return Shadowtracker to its original position
a. Go to ST Controls program
b. In Position 1 enter:
i. Latitude: 58 degrees
ii. Date: February 21st
iii. Time: 12:00
c. Press Position 1
28. Turn Off VD and VC
29. Move all your files from the desktop into your file folder
30. Save Your Files to the Mac/PC Exchange
a. From Mac desktop click on Go (Fig. 11)
b. Select Connect to Server
c. Find AAA - aaafileserver
d. Press Connect (Fig. 12, there is no password and username should
be student)
e. Select Mac/PC Exchange
f. Move your folder onto the Mac/PC Exchange
29. After 5 days your files will be
deleted from the desktop so make sure
you get them off the Baker computer
Fig. 11: Mac toolbar on desktop
31. Log out of Computer
32. Turn overhead lights on
33. Turn off “Sun”
34. Remove your model and return hardware to box above the ST computer
35. Clean-up area
Fig. 12: Server connection screen
Last Steps
Step
Last Steps
15