1
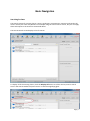
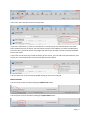
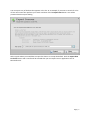
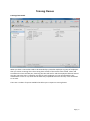
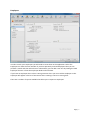
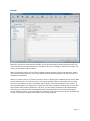
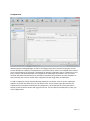
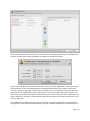
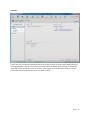
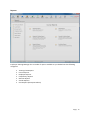
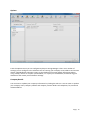
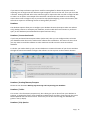
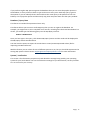
EMPLOYEE TRAINING MANAGER USER MANUAL Smart Company Software This document describes how to use Employee Training Manager, a desktop software application that allows you to track your employees or personnel training, seminars and competencies Page | 0 The main icons list across the top are used to navigate your way around the application. From left to right there is: Dashboard Displays the dashboard. Displays training classes and seminars that are due. Classes Displays the training classes search screen. You can select existing training classes or add new training classes. Courses Displays the courses search screen. You can select existing courses or add new courses. Employees Displays the employees search screen. You can select existing employees or add new employees. Competencies Displays the competencies search screen. You can select existing competencies or add new competencies. Seminars Displays the seminars search screen. You can select existing seminars or add new seminars. Vendors Displays the vendors search screen. You can select existing vendors or add new vendors. Reports Displays the reports screen. You can preview or print specific reports. Displays the options screen. Options Users You can update your company information, update selection types (values that appear in the dropdown lists), perform backup and restores of the database, perform a SQL query against the database and set the connection details for the database (Enterprise Edition). Displays the user search screen (Enterprise Edition only) You can select existing users or add new users. About Displays information about the application Close Close the application The Training Class, Course, Employee, Vendor and User icons also display a small number next to the icon. This number indicates how many records you have open i.e. if you have four training classes open then you see a number 4 next to the training class icon. The bottom of the screen has a status bar that displays who is logged in (Enterprise Edition only), what the date and time was when the user logged in and the version of application. Page | 1 Basic Navigation Searching For Data The search screens for training classes, course, employees, competencies, seminars and vendors all work in exactly the same way. Below is an example using the course search screen, but you can apply these techniques to the entire list mentioned above. The Course Search screen displays a list of courses. To display all of the training classes, click the Display All button or to filter the list, enter a search term in the search textbox and press return or click the magnifying glass. Page | 2 The search text is smart, so you only need to enter the text and it will return all the records that match the search term. If you enter the search term ‘first aid’ then all of the courses that have the word first aid in the course title will be returned. By default, only the active courses are displayed, but you can choose to display active records, inactive records or both active and inactive records. If you perform a search for both active and inactive courses then you will see the complete list of both. If a course is inactive you will see a red icon appear on the right hand side of the list to help identify that the course is inactive. There is a setting in Options that allows you to set whether you view all of the data in each search screen when you view the search screen or whether you display an empty list and then perform your own search. If you have tens of hundreds of records then you will find that have this setting off will load the search screens much quicker, whilst if you only have a smaller number of records then you can be sure that the screens will load quickly. This setting is on by default. Once the courses are displayed you can select an individual course by double-clicking the row in the list which will take you to the detail screen. Along the right hand side of the search screen there is a list of currently open records (you are allowed to have five records open at a time) and a list of recently opened records. You can doubleclick any of the items in the list to view the record quickly. If you already have a record open, then the record that is currently open will be shown. If you already have a record open you can simply click the relevant search icon at the top and perform another search leaving the other record in the state you left it in. You can make changes to a record, choose to search for another record and then go back to your original record and carry on where you left off. You can see on the main menu how many records you currently have open. Page | 3 In this case, there are two courses currently open. If you see a red asterisk (*) next to a record that is currently open, this means that the record has been modified and not yet saved. You will need to save this record before you close the application, but if you don’t you will be shown a message that informs you of which records have been modified but not yet saved. If you have a list of too many records to display on the screen, you can select the View Summary icon to give you a summarised view of the records without all the detail. You can select one of the records by double-clicking on the item in the grid. Button Actions You can create a new record by clicking the Add Course button. You can export a list of records by clicking the Export Data button. Page | 4 You can export any of the data that appears in the list. As an example, if you want to search for a list of first aid courses then perform your search and then click the Export Data button. You will be presented with an export dialog. Select a path where you would like to export the data to or accept the default. Click the Export data to the file button and a CSV file will be created that you can import into an application such as Microsoft Excel. Page | 5 Training Classes Training Class Details When you have a course that needs to be attended by a particular employee or group of employees then you create a training class. The training class consists of the course to be trained, a date and time when the class will take part, how long the class will last for and the employees who will attend the class. Once the class is complete you then for each employee you can record whether they attended the course or not, what was the date they completed the course and any score attributed to an exam. There are a number of reports available that allow you to report on training classes. Page | 6 Employees In order to track your employees you will need to create them in the application. Select the Employee icon from the main window. If you have previously entered employees then you can perform a search and then select them or alternatively you can add a new one by clicking the ‘Add Employee” button. Fill out the employee details and save them. If you have an employee who is also a training instructor then you can mark the employee so this employee will appear in the list of instructors when creating a course or training class. There are a number of reports available that allow you to report on employees. Page | 7 Courses Select the Course icon from the main window. If you have previously entered courses then you can search for them here or alternatively you can add a new one by clicking the ‘Add Course’ button. Fill out the course details and save them. When creating the course you can select a default location where the course will take place. When you create a training class for a course the default location will be assigned to the class but you can change this if necessary. When you create a course, if you don’t specify a version it will be given a default version of one. Most courses will have only one version, but you can create multiple versions. This allows you to modify the course for different versions and specify which version a particular employee was trained in. In the First Aid example, you might have a version one that only includes the training and a version two that includes some practical experience. This way, you can specify employees that completed only the training or employees that completed both the training and practical. Instead of splitting this course into two versions, you could create two separate courses both with one version. This depends on your requirements and how you conduct your training programs. Page | 8 Competencies With Employee Training Manager as well as recording training for a particular employee you can record whether an employee is competent in a particular task or activity. An example of this would be to record whether an employee is competent at changing a particular part in a machine. For this there is only a brief demonstration to the employee on how to do this and then you can record whether they demonstrated that they are able to reproduce the procedure and are competent in that particular task. You can create many competencies and assign them to employees. To add an employee, simply click the Manage Employee List button. A list of current employees appears on the left side from who you can choose from. The list on the right side contains the employees who have been selected for this competency. Any employee on the left side who is already on the list will be shown with a green tick icon. You can filter the employees by name, job role or department. Page | 9 Once the employee is on the list then you can select them to specify whether they are competent at the task, the date they became competent and when the competency expires. If you have some data that you want to store that is specific to your organization, then you can enter the information via the User-Defined fields. User-Defined fields allow you to specify a label and a value for a range of types (text, yes/no, date and number) i.e. if you wanted to store the name of an employee who is responsible for the competency then you could create a label called “Owner” and add a value to that owner label which would be the person’s name. Once you create a label, then any other competency you open or create will also have the same label, but you will need to enter a new value for each one. If a competency is mandatory then you can specify that it must be completed by a particular group. These groups can be specified as departments, job roles, individual employees or all employees i.e. if Page | 10 you have a competency for applying a bandage to a patient then you might want to make this mandatory for all the employees who work in the nursing department or have a job role of nurse. If you assign a group so they are required to take a competency, then you might want to exclude certain people in that group i.e. if you specified that the nursing department must take this competency, but Jane Smith is excluded then you can select Jane Smith and add her to the exclusion list. Jane Smith will not appear on any reports run to find out who hasn’t completed the competency training. Page | 11 Vendors If you have a lot of training requirements then you may have a list of vendors who supply training or training equipment. You can record all of the vendors that you deal with for training or equipment, along with vendor details and a list of contacts at the vendor. You can also write notes in rich text format and attach any documents such as a quote or letter. Page | 12 Reports Employee Training Manager has a number of reports available to you divided into the following categories: Training Class Reports Course Reports Employee Reports Competency Reports Seminar Reports Vendor Reports User Reports (Enterprise Edition) Page | 13 Options From the Options menu you can configure Employee Training Manager. There are a number of settings you can configure in the software such as entering your company name, address and contact details, add/edit/delete selections types, set the database connection details (Enterprise Edition only), backup, restore or compact your database, run a query on the database, check how big your database is and review your localization settings. Company Details You can enter or update your company information by clicking the edit icon. You can enter or update your company name, company address and company contact details such telephone, fax, email and website address. Page | 14 Selection Types The selection types are used throughout Employee Training Manager to present you with a list of values to select from i.e. when entering a course you are asked where the course default location is, when you click the dropdown box or pull-down box, you will be presented with a list of locations that you have previously defined in your location selection types. Employee Training Manager comes with some sample selection types, but feel free to create your own based on your requirements. The following selection types can be maintained: Categories – List of categories for a course i.e. internal or external Classifications – List of classifications for an employee i.e. full-time, part-time, contractor Departments – List of departments that an employee can belong to i.e. Accounts Job Roles – List of job roles that an employee can have i.e. Accountant Locations – List of locations that training classes can take place at i.e. boardroom Mediums – List of mediums that a course can be presented in i.e. presentation, online Shifts – List of shifts that an employee can work i.e. day, night You can add new records into any of the selection types, you can edit descriptions for existing selection types, you can delete selection types (as long as they are not used), or make a selection type active or inactive. Once you have added or updated a selection type, then the next time that you select from the list your change will be visible. Page | 15 If you want to keep a selection type that is used for existing data for historical purposes such as reporting, but no longer want the selection type to appear in the list to the user, then you can make it inactive. Existing data will still use the selection type for reports but the user will no longer be able to select it as an option. An example of this would be a location that was used for some training classes that is now no longer used, so you need to stop people assigning a class to the location, but still wish to report on old training classes as having taken part there. Database The database options allow you to configure your database location (Enterprise multi-user edition only), Backup, Restore or Compact your database, view the table data record counts or perform a query on the database (recommended for experienced users only). Database | Connection Details If you have purchased the Enterprise Edition (multi-user) then you can configure where to locate your database other than on the machine the software was installed on. The reason for this is that you may want to install the software on other machines and all access the same centralized database. To do this you need to back up your current database to a network location of your choice and then through the Connection Details configure the software so that it points to that network location. Database | Backup/Restore/Compact Please see our document Backing Up, Restoring and Compacting your Database. Database | Tables This screen is for information purposes only, but it does give you an idea of how your database is growing. To update the figures, click the Retrieve Tables button and after a few seconds, the screen will be updated with the current values. From here you can also see how big your database has grown in size (in bytes). Database | SQL Queries Page | 16 If you perform regular SQL queries against the database then you can store the popular queries in the database, so that you do not have to type each one out every time. Each SQL query is given a description so you can identify what it does and then the actual query to be performed. You can build up a list of popular queries and then easily copy them and paste them into the query window. Database | Query Data This feature is intended for experienced users only. This feature allows you to write a small SQL query that you can run against the database. For example, you might want to see a complete list of courses, including ones that have been deleted. To do this, you would type the following query into the SQL Query text box. SELECT * FROM Course Once you have type in the query, click the Run SQL Query button and the results will be displayed in the SQL Query Results window below. You also have the option to export the results data to a CSV (Comma Separated Values) file for importing into Microsoft Excel. With this feature you can select all sorts of different queries to run, but you should be experienced at writing SQL queries. Please contact [email protected] for more information. System | Localisation This screen is for information purposes only and details the settings being used by your operating system for your locale details. You can check that the settings for you date formats, currency formats etc. are correct for your country. Page | 17 Page | 18