1
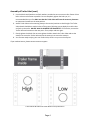
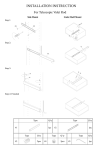
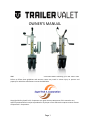
OWNER’S MANUAL WARNING: Carefully read and understand all the instructions before mounting your new Trailer Valet. Failure to follow these guidelines and common sense may result in serious injury to persons and property for which the manufacturer cannot be held liable. Copyright 2012 by SuperTech S. Corporation. All rights reserved. No portion of this manual or any artwork contained herein may be reproduced in any shape or form without the express written consent of SuperTech S. Corporation. Page 1 Congratulations on your purchase of the patented Trailer Valet. For your future reference please complete the owner’s record below: Purchase Date:________________ Retailer:_________________ Be sure to save your receipt and owner’s manual with warranty information in a safe place. Specifications The Trailer Valet is made of high strength steel and given a powder coat finish made to resist corrosion from the elements and marine use, when cared for properly, it will provide years of service. Trailer Valet mounts to the side of trailer tongue. Once mounted to your trailer, the Trailer Valet makes maneuvering your trailer much easier than your old jack. Hitching/unhitching, leveling, and moving is now done with precision. Designed for trailers up to 5,000lbs the Trailer Valet can safely propel trailers up and down slopes up to 32 degrees. The Trailer Valet is for use only on paved surfaces that are free of debris. Wheel size: 9 inches Jack range: 16 inches Tongue max weight: 500lbs Trailer max weight: 5000lbs Maximum slope to drive by Trailer Valet: 32 degrees in either direction. Weight: 50lbs Patented under US Patent number 6,619,671 and 6,739,601. The Trailer Valet is designed for certain applications only. SuperTech S. Corporation cannot be responsible for issues arising from modification. We strongly recommend that no modifications be made or used for any application other than its intended purpose. Do not exceed the designed weights and slope. If you have any questions regarding your Trailer Valet please visit the Trailer Valet website www.trailervalet.com or call SuperTech customer support 1-626 400-6299 Monday-Friday 9am-5pm PST General Safety Rules WARNING: The warnings and instructions provided in this manual cannot cover all possible conditions or situations that could occur. Common sense and caution are factors which cannot be built into any product, but must be supplied by the operator. Keep the work area clean and well lit. Keep bystanders away from and off of the trailer while using the Trailer Valet, especially children. Page 2 General Safety Rules (cont.) Do not operate Trailer Valet while under the influence of drugs or alcohol. Read prescription warning labels to determine if you may be impaired. Stay Alert! Do not operate if you are tired. As with all devices with moving parts, you should never wear clothing that is too loose, as it may become caught, resulting in injury. Long hair should also be tied back and secured. On inclines always keep tongue in downhill position. Before each use of the Trailer Valet, check for damaged parts. Any part that appears to be damaged should be carefully checked to determine if it will operate properly. Check for alignment and secure mounting of all moving parts. If not aligned and/or secured, DO NOT use Trailer Valet. It is recommended that the trailer be restricted with wheel blocks or attached to a vehicle until it can be properly repaired or replaced by a qualified technician. When servicing, use only identical replacement parts. Assembly of Trailer Valet Before assembling your Trailer Valet, double check that you have all the parts and tools you’ll need. Included in the box: 1 -- assembled Trailer Valet 8 -- lock washers 1 -- drive handle (part #4) 8 -- washers 1 -- mounting bracket (part #20) 4 -- bolts and nuts 2 -- trailer mount clamp (part #21) 1 -- stow pin (part #22) 1 -- rotation pin (part #23) 1 -- cotter pin (part #22) 1 -- owner’s manual Tools that you will need: 2 -- crescent wrench 1. The Trailer Valet is only to be installed on trailer tongues that are rectangular in profile. Cylindrical tongues are not compatible with the Trailer Valet as it will rotate, allowing the trailer to drop. 2. The safest way to install the Trailer Valet is while the trailer is securely mounted to your vehicle. 3. When choosing a location for the mounting clamp, choose a location where the Trailer Valet will be able to freely rotate from its vertical operation position to its horizontal stow position. 4. The mounting clamp has 7 holes to fit a variety of trailer frames, additionally the mounting clamp has two positions you can mount it at depending on the height of your trailer. On trailers which have more ground clearance, placing the mounting clamp’s cuff lower will minimize the amount of jacking needed to raise and lower the tires. See illustration at the end of this section on the next page. Assembly of Trailer Valet continued on next page Page 3 Assembly of Trailer Valet (cont.) 5. Use the 4 bolts and 8 washers and lock washers provided to secure to most trailer frames. Place bolts as close to the frame as possible. Do not completely tighten the bolts yet, it is recommended that you first ONLY test that the Trailer Valet will have the necessary clearance to operate and rotate into the stow position. 6. Attach Trailer Valet to the mounting clamp to the vertical position to check height. The Trailer Valet wheels should be a couple inches off the ground, allowing you to deploy the trailer valet and jack up the trailer. DO NOT JACK UP OR DRIVE THE TRAILER YET. If this checks, remove the Trailer Valet and continue to the next point. If not, adjust and test again. 7. Evenly tighten the 4 bolts. Do not over tighten the bolts. Attach the Trailer Valet and set the stow pin to secure the Trailer Valet and set the cotter pin to secure the stow pin. 8. You are now ready to enjoy your new Trailer Valet, which is at your service anytime. If you need assistance, please contact customer support. Trailer Mount Bracket and Trailer Mount Clamp illustration Page 4 Operation of Trailer Valet Never use Trailer Valet if the mounting clamps are loose or you are missing the stow pin. Unhitching: Lower the Trailer Valet into the vertical position, drop the stow pin in place and secure that with the cotter pin. Take the necessary precautions against uncontrolled trailer movement by locking the Trailer Valet brake and placing tire blocks accordingly. Loosen/unlock the hitching mechanism and turn the jack crank handle (part #3) to raise the trailer up off the hitch ball. Some hitching mechanisms can become stuck to the ball, slightly rocking the trailer will loosen the connection, freeing the trailer. Remember to also disconnect any towing safety chains and brake/turn signal wire harness or any other connections. Once clear of the ball move the vehicle and lower the jack to its lowest height for the most stable and secure use of the Trailer Valet. Driving the Trailer Valet with the jack extended will cause excessive wear on the jack and possibly result in injury, and/or property damage. Always lower the jack to its lowest height before driving the Trailer Valet. You are now free to drive the Trailer Valet. Use of the Trailer Valet Safety Brake: Never use the Trailer Valet on trailers which exceed the designed specifications listed in this manual. Doing so can damage your Trailer Valet, result in injury, and/or property damage. Your Trailer Valet is equipped with a safety brake to stop the motion of your trailer. If at any time you feel like you are going to lose control or become fatigued, stop cranking the drive handle and engage the brake. If you ever leave the area, place and secure tire blocks in case someone tampers with the brake handle. The Trailer Valet brake is integrated into the steering handle allowing you to both propel and steer the Trailer Valet while always having a hand on the brake for instant application. To apply the brake, simply drop the steering handle with one smooth motion. This will lock the brake. The Trailer Valet brake is not intended to regularly stop your trailer if it is in motion. Over time this can cause excessive wear/damage and is considered misuse of the brake. Parking your unhitched trailer: When parking your trailer while unhitched, as you would with a standard jack, always place tire blocks under the axel tires to prevent accidental movement in case the Trailer Valet brake is mistakenly released. On slopes of any degree the trailer tires should be allowed to rest against the wheel blocks; this is the most secure way to park your trailer when not hitched. Failure to follow these basic guidelines may result in damage and/or injuries to persons and property and is not the responsibility of the manufacturer. Driving and Maneuvering the Trailer Valet: Your Trailer Valet is equipped with both a high and low gear. The High-gear is recommended for use on relativity flat surfaces. The Low-gear is recommended for use on slopes where the operator needs more power to go uphill or more control going downhill. We recommend that all users start in the Low-gear setting to get a feel for safely controlling the trailer. Operator’s good judgment is important for safe operation. Page 5 Driving and Maneuvering the Trailer Valet (cont.): To drive your trailer either forward or back, stand in front of the trailer, grip both the brake/steering lever and the drive crank handle which should always be checked that it is locked in place. With a firm grasp of the drive handle, lift the brake handle all the way up to unlock the brake. You are now free to maneuver and drive your trailer forward or back. Tip: It is easier to turn the Trailer Valet wheels while in motion versus at a stop. Remember: Safety begins with you. Before moving the trailer check that the area is clear of obstacles and people/pets. Always be aware of your surroundings, especially while walking backwards! Never sit on your trailer while driving your Trailer Valet or allow other people to. Always drive on clean smooth solid surfaces to maintain traction. Hitching: Once your trailer tongue is aligned with the ball hitch, remove the drive handle placing it in a safe place and lower the Trailer Valet jack until your hitching mechanism securely locks in place. Continue to raise the Trailer Valet wheels up off the ground until it stops and replace the rotation pin (part #23). Then remove the cotter pin from the stow pin and stow pin from the mount bracket, and either rotate the Trailer Valet into its travel position, replacing the stow pin and cotter pin; or store in a safe place. Remember: Never drive your vehicle and trailer with the Trailer Valet in the deployed (vertical) position! Additional Stowing and Deploying Information: There is an additional pin that locks the wheel base in place. Replace the “Rotation Pin” (part #23) after each use to prevent the Axle Yoke Assembly from swinging into your trailer. Remember to remove it before deploying the Trailer Valet. Failure to remove the “Rotation Pin” will prevent you from steering the Trailer Valet! Maintenance Your Trailer Valet is made of high strength steel and finished with a Powder Coat to last a long time, extend that time with proper care and maintenance. Before each use of the Trailer Valet, check for damaged parts. Any part that appears to be damaged should be carefully checked to determine if it will operate properly. Check for alignment and secure mounting of all moving parts. Keep all moving parts lightly lubricated to prevent corrosion. Inside the Trailer Valet are two chains as part of the drive system. To access, remove the one of the “Gear Cover” (part #9) by unscrewing it when the Trailer Valet is not in use. If used in a marine environment or where road salt is encountered, rinse off the interior and exterior with fresh water and allow to dry. After use wipe exterior surfaces with a clean cloth. The tires (drive wheel and follow wheel) should be inflated no more than 85psi, if the tires are underinflated tire failure may result. Replacement parts can be ordered by calling customer service. Page 6 1 Year Limited Warranty Against Defects In Manufacturing This limited warranty does not cover claims resulting from misuse, failure to follow the instructions on installation, maintenance and use, abuse, alteration, involvement in an accident, commercial use and normal wear and tear. THIS LIMITED WARRANTY IS EXCLUSIVE AND IN LIEU OF ANY OTHER WARRANTY, WRITTEN OR ORAL, INCLUDING BUT NOT LIMITED TO ANY EXPRESS WARRANTY OF MERCHANTABILITY OR FITNES FOR A PARTICULAR PURPOSE. THE DURATION OF ANY IMPLIED WARRANTIES, INCLUDING ANY IMPLIED WARRANTY OF MERCHANTABILITY OR FITNESS FOR A PARTICULAR PURPOSE, IS EXPRESSLY LIMITED TO THIS LIMITED WARRANTY PERIOD. THE CUSTOMER’S EXCLUSIVE REMEDY FOR BREACH OF THIS LIMITED WARRANTY OR OF ANY IMPLIED WARRANTY OR OF ANY OTHER OBLIGATION ARISING BY OPERATION OF LAW OR OTHERWISE SHALL BE LIMITED AS SPECIFIED HEREIN TO REPAIR OR REPLACEMENT, AT OUR SOLE OPTION. IN ANY EVENT, RESPONSIBILITY FOR SPECIAL, INCIDENTAL AND CONSEQUENTIAL DAMAGES IS EXPRESSLY EXCLUDED. Patented Drive System Protected By 2 Patents (6,619,671 and 6,739,601) Page 7 1 2 3 4 5 6 7 8 9 10 11 12 13 14 15 16 17 18 19 20 21 22 23 24 Axle yoke assembly Acme jack assembly Jack crank Drive handle Brake handle Brake cap assembly Left bearing housing Right bearing housing Gear cover Low gear driveshaft High gear driveshaft Drive shaft bearing Brake engagement lever Axle bearing Drive wheel Follow wheel Axle gear Low gear chain High gear chain Trailer mount bracket Trailer mount clamp Stow pin Rotation pin Tire 24 21 3 20 14 15 22 2 1 17 10 4 23 11 9 16 13 6 7 8 18 19 5 Trailer Valet Parts list 12 9 Page 8