1
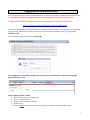
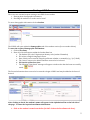
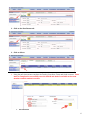
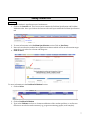
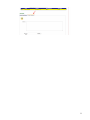
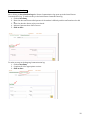
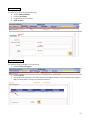
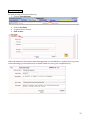
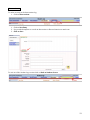
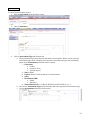
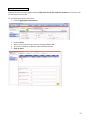
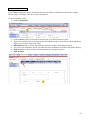
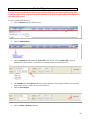
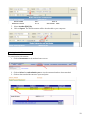
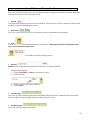
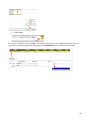
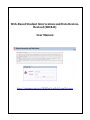
Web-‐Based Student Intervention and Data Review-‐ Revised (SIDR-‐R) User Manual https://webappe.oaisd.org/SIDRWeb/LogWeb/LoginWeb.aspx Table of Contents 1. Purpose of SIDR-‐R .......................................................................................................................................................3 2. Logging into the Web-‐Based SIDR-‐R..................................................................................................................4 3. Starting a SIDR-‐R ..........................................................................................................................................................5 4. Adding Student Data I. Student Concern.............................................................................................................................................7 II. Student Log Section......................................................................................................................................9 i. Parent Communication...........................................................................................................10 ii. Interventions................................................................................................................................11 iii. Rate of Progress..........................................................................................................................11 iv. Team Meetings.............................................................................................................................10 v. Observations.................................................................................................................................10 III. Assessments..................................................................................................................................................14 IV. Appropriate Instruction.........................................................................................................................15 V. Attendance……..............................................................................................................................................16 5. Editing SIDR-‐R Entries ............................................................................................................................................17 6. Student Reports...........................................................................................................................................................18 I. Printing Attached Documents.............................................................................................................19 7. SIDR-‐R Website Map..................................................................................................................................................20 8. Icons/Button within Application.......................................................................................................................21 2 Purpose of SIDR-‐R The Student Data and Review-‐Revised (SIDR-‐R) web based application is an online adaptation of the SIDR-‐R Word document. The overall purpose of the SIDR-‐R is to document a student’s progress in relation to intervention implementation, evaluation and modification for at-‐risk students. The SIDR-‐R is intended to assist school intervention teams in addressing potential exclusionary factors as early as possible within the student referral process. Exclusionary factors may include, but may not be limited to, lack of appropriate instruction, limited English proficiency, and environmental, cultural, or economic differences. It should also be used when reviewing existing evaluation data for developing a Review of Existing Evaluation Data (REED)-‐Student Evaluation Plan (SEP) for a suspected disability. 3 Logging into the Web-‐Based SIDR-‐R This web application will work on either Windows or Macintosh computers running an Internet browser. To optimize the SIDR-‐R web application it is recommended the Firefox browser be used. To login in to the SIDR-‐R web application enter the following url into the Firefox address bar: https://webappe.oaisd.org/SIDRWeb/LogWeb/LoginWeb.aspx A district SIDR-‐R administrator will assign you a password and username. Your password will consist of your last name followed by the first two letters of your first name and then _oaisd (e.g., John Smith: smithjo_oaisd). Your username will be the following: change.me After logging you will need to change your password by selecting User Profile at the top right portion or your screen. After clicking on User Profile: 1. Type in “Old Password” (change.me) 2. Type in “New Password” 3. Retype New Password to confirm 4. Click on Save 5. Click on Home at the upper left side of the page to return to the main SIDR-‐R screen 4 Starting a SIDR-‐R There are two essential steps in starting a new SIDR-‐R on a student: 1. Entering basic demographic information 2. Enrolling the student to a teacher and a “team” To enter demographic information click on Student The SIDR-‐R will open within the Demographics tab of the student section (See screenshot below). To enter the required demographic information: 1. Click on New Entry 2. Enter all of the information within the Student Data box a. The Student UIC is the 5 digit unique identity code (student ID number) b. ELL refers to English Language Learner c. Date of birth can be entered using the pull down calendar, or manually (e.g., 3/17/2005) d. The “Active” button is the default and does not need to be selected. e. Click on the yellow Save icon. f. The following “Data Saved” message will appear to indicate the data has been successfully saved: The Parent Information does not need to be entered to begin a SIDR-‐R and may be added in the future if desired. After clicking on Saved, the student’s name will appear in the alphabetized list on the left side of the page. To enter the required enrollment information: 1. Click on the student’s name from the list (Do NOT click on the Enrollment tab first): 5 2. Click on the Enrollment tab: 3. Click on Select: 4. Using the pull down menus complete the Teacher, Start Date, Team, and Grade sections. These must be completed to successfully start the SIDR-‐R and make it available to the team members and the student’s teacher. a. Click on Save! 6 Adding Student Data Concern To document a student’s significant areas of weaknesses: 1. Click on the Concern tab. The Concern area contains the Problem Specification and Problem Validation tabs. Once you click on the Concern tab it will open within the Problem Specification tab. 2. To enter information in the Problem Specification section Click on New Entry 3. Rate each area that the student has a significant weakness which will be an intervention target using the 1 to 4 rubric for relevant subcategories. 4. Click on Save! To enter information in the Problem Validation Section: 1. Click on Select 2. Click on Problem Validation 3. Type in the Evidence text box to document validation of the student problem, or use Browse function to attach relevant documents (e.g., progress monitoring graphs, work samples). 7 8 Student Log Section: This section contains the following student logs: • Parent Communication • Interventions • Rate of Progress • Team Meetings • Observations To enter the student log, click on Go to Student Logs. The font is in yellow to indicate you will be leaving the Home screen of the SIDR-‐R. To exit the student log and return to the Home screen click on Back to Student Screen. The Back to Student Screen option appears in each of the student logs. 9 Parent Communication: After clicking on Go to Student Logs the Parent Communication log opens up in the Initial Parent Communication log. To make an entry in the Initial Parent Communication log: 1. Click on New Entry 2. Enter the date staff first notified parents of the student’s difficulty and the staff member who did so. 3. Enter the date the district policy was shared. 4. Indicate if parents share staff concerns. 5. Click on Save To make an entry in the Ongoing Communication log: 1. Click on New Entry 2. Complete all of the appropriate sections 3. Click on Save 10 Interventions: To make an entry in the Intervention log: 1. Click on Interventions 2. Click on New Entry 3. Complete all seven sections 4. Click on Save Rate of Progress: To make an entry in the Rate of Progress log: 1. Click on Rate of Progress 2. Click on Select 3. Use the Browse function to attach documents showing the student’s rate of progress (see pages 5 and 6 for description of how to use Browse function). 11 Team Meetings: To make an entry in the Intervention log: 1. Click on Team Meetings 2. Click on New Entry 3. Complete all five sections 4. Click on Save When the student is discussed at team meetings that are scheduled on a regular basis (e.g. Data review meetings), several dates may be listed within one entry (see example below). 12 Observations: To make an entry in the Intervention log: 1. Click on Observations 1. Click on New Entry 2. Use provided template to record an observation or Browse function to attach one 3. Click on Save To exit out of the Student Logs section click on Back to Student Screen 13 Assessments: To enter the Assessment section: 1. Click on Assessment from the Home screen. 2. Click on New Entry 3. Click on Assessment Type pull down menu a. The Assessment Type menu lists several kinds of assessments. Below is a list of the six assessment types most commonly used, and the tests within that type that will display when on the Assessment pull down menu is chosen. i. Classroom: 1. Grades 2. Semester Tests 3. Teacher Report ii. State: MEAP iii. District: District GLCE/Common Core Assessments iv. Other v. Benchmark/CBM 1. Dibels 2. Aimsweb vi. Norm Referenced: (i.e., KTEA-‐II, WIAT-‐III, GORT-‐I, TOWL-‐4, etc…) b. Click on the Assessment Type pull down menu and select appropriate assessment type. c. Click on Assessment and select the test used. 14 Appropriate Instruction: Appropriate instruction should be indicated only in the areas of a student’s weakness for which he/she is receiving an intervention. To document appropriate instruction: 1. Click on Appropriate Instruction 2. 3. 4. 5. Click on Select Answer each of the four questions by clicking on Yes or No Text can be added for comments or documentation notes Click on Save! 15 Attendance/Behavior: The Attendance/Behavior section documents the amount of school a student has missed due to being absent, tardy, or serving in and out of school suspensions. To enter attendance data: 1. Click on Attendance 2. Click on Select in the current school calendar year (you cannot edit prior years) 3. Type in the number of times the student has been absent, tardy, or served an in school suspension (ISS) or out of school suspension (OSS). 4. Office Referral can be used to document the student’s number of discipline referrals. 5. For prior years attendance use the provided text box to summarize a student’s attendance history. 6. Browse function can be used in to attach attendance or discipline reports. 7. Click on Save! 16 Editing SIDR-‐R Entries After entering information in any area of the SIDR-‐R using the New Entry function a blue bar/box with Select on the left hand side will appear. To edit this previously entered information: 1. Click on Select. 2. The lower box will turn yellow indicating you are in an editing mode and you will be able to edit previously entered information or add to it. 3. Click on Save when done! *** Note: Only the information from the current school calendar year can be edited. The SIDR-‐R will not allow previous calendar years to be edited. 17 Student Reports Documents that have been attached to each student’s SIDR-‐R do not automatically print when reports are generated. To print attached documents refer to Printing Document Attachments at the end of this section. To run a student SIDR-‐R report: 1. Click on Report from the Home screen 2. Click on Student Data 3. Click on Student pull down menu. Select All is the default. Click on Select All so that no students have been chosen. Scroll down to student’s name and check their box. 4. The Calendar and the Reports pull down menus default to choosing all calendar years and all areas of the report, so these do not need clicked on. 5. Click on View Report 6. Click on Select a format pull down 18 7. Select Acrobat (PDF) file 8. Click on Export. The PDF document will be downloaded to your computer. Printing Attached Documents: To print attached documents: 1. Click on Documents on the student home screen. 2. Click on Select for each calendar year to view documents that have been attached. 3. Click on that attached document to open and print. 19 SIDR-‐R Website Map 9. Home screen I. Student i. Demographics 1. Student Data 2. Parent Information ii. Enrollment 1. Teacher, Grade, Team iii. Appropriate Instruction 1. Teacher Qualifications, Curriculum, Instructional days attended iv. Attendance/Behavior 1. Attendance, Suspensions, Discipline referrals II. Concern i. Problem Specification 1. Academics, Communication, Social/Emotional, Behavior, Adaptive, Health ii. Problem Validation 1. Evidence of student problem III. Student Logs i. Parent Communication 1. Initial and Ongoing communication ii. Interventions 1. Parent notification, Start date, Days per week, Minutes per day iii. Rate of Progress 1. Browse rate of progress data (e.g., Excel graphs on behavior and CBM) iv. Team Meetings 1. Type of meeting, Date, Participants, Next Steps, Comments v. Observations 1. Observation template to use within SIDR-‐R, Browse function for others IV. Assessment i. Assessment type, Assessment used, Open field for text V. Documents i. List of all documents that have been attached to the student’s SIDR-‐R using the Browse function VI. User Profile i. Used to change password 20 Icons/Buttons within application Below is a list and brief description of Icons/Buttons used throughout the SIDR-‐R web based application which users will need to become familiar with. 1. Search: Search function available on all screens of the SIDR-‐R. Can be used to search for students or school staff members in the User Management section. 2. New Entry: Click on to create a new record (e.g., intervention, parent communication, assessment). 3. Save: Click to save information and data after entry is complete. The program will not save the data if you exit a screen without saving it first. Indicates data has been successfully saved after clicking on Save. 4. Browse: Browse function uploads and attachment documents to a student’s SIDR-‐R To upload documents: 1. Click on New Entry or Select to edit previous entry 2. Click on Browse 3. Choose from files stored on computer 4. Click on Open 5. Student Logs: Click on to go to the Student Log section of the SIDR-‐R where the Parent Communication, Intervention, Rate of Progress, Team Meetings, and Observations logs are located. 6. Student Screen: Click on to exit the Student Logs section. 21 5. Click on Save To view the attached file, click on Select. The file will appear in the lower right hand portion of screen (see below). All attached files will also appear in the Documents section of the student’s SIDR-‐R. 22