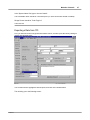
1
Main Help Menu
1
Main Help Menu
1.1
Main Menu
1
Contents for Amsoft for windows
To learn how to use Help, press the F1 key.
How to contact us
Phone
Fax
Email
Website
321-459-1950
321-452-2243
[email protected]
http://www.amsoft.org
Amsoft help - Includes this help program, Help buttons on many screens and placing your cursor on a
field button or tab & leaving it there for a second will generate a help tip.
Whats new
Getting More Help
How to
Problems Solutions & other technical stuff
Keys used in Amsoft
Forms Used
How to Install Amsoft
Screens Used in Amsoft
Main Menu
Quick Start
Entering A Record
Entering Multiple Policies for 1 Insured
Premium History
Reports
e-mailing reports
Word Processing
Import & Export
Appointments & Schedules
Options
Security
Checks and General Ledger
Posting
Payroll
ACORD Forms
Scanning Module
Scanning Solutions
Scanning TIFF Driver
Networking
License Agreement
Upgrading Software
File Maintenance
Backing Up Your Data
Rating Integration:
© Present
Amsoft for Windows
2
FSC
ITC TurboRater
Priority Data Systems
ACS2000
2
Licensing & Maintenance
2.1
License Agreement
License Agreement
It is fully understood that Hoffman Computer Systems software is being licensed for
use on a single computer or on a network at a single location for one year. The
licensee shall take all precautions to see that the software is not copied or
transferred. The licensee shall be fully liable to Hoffman Computer Systems for any
and all unauthorized use of its software.
It is further understood that Hoffman Computer Systems is not responsible for any
inaccuracies in its software. The software is being licensed on an "as is basis." It is
the agent's responsibility to determine the suitability of the software to his needs.
Hoffman Computer Systems does agree to correct any inaccuracies in its software.
Changes to software will only be made to the current version of the software. The
agent is responsible for keeping his software current.
Should the licensee make any unauthorized distribution of Hoffman Computer
Systems software, all service agreements will be null & void. The licensee shall also
compensate Hoffman Computer Systems for its losses. Further the licensee shall be
liable for All legal fees associated with enforcing the licensee agreement. Any legal
actions necessitated by this software or license agreement shall only take place in
Brevard County, Florida.
Annual phone support, updates and license fees will be billed on an annual basis.
Hoffman Computer Systems
PO Box 542184
Merritt Island, FL 32952-2184
(321) 459-1950
This manual and all accompanying disks are copyrighted material. All rights are
reserved.
© Present
Licensing & Maintenance
2.2
Upgrading Software
2.2.1
Installing Upgrades
3
Before Upgrading - Always:
1.Back up Your Data This is crucial
-
If you don't know how to make a back up, call us now - do not proceed with your upgrade until
a back up is made.
2. Run File Maintenance.
This will prepare your files for upgrading. You should
run file maintenance for any options that you use and/or plan to use.
3. How to Install Amsoft for Windows
For Windows 3.1 :
To install Amsoft for Windows, place the CD in the drive, and go to the program manager in Windows .
Click on File. Click on Run. On the command line type 'd:\install' (where 'd' is the drive letter for the CD
drive) and click on Ok . This will activate our install program. Follow the instructions on the screen to
complete installation.
For Windows 95/98:
To install Amsoft for Windows, place the CD in the drive, click on the 'Start' button, and go to 'Run...'.
On the command line type 'd:\install' (where 'd' is the drive letter for the CD drive)and click on 'Ok' . This
will activate our install program. Follow the instructions on the screen to complete installation.
4. After installing Amsoft : Run File Maintenance.
To run File Maintenance, click on 'File' on the main menu of Amsoft and choose 'File Maintenance'.
You will have two options: 'Client Files' and 'ACORD Files'. You need to run both of these programs if
you have the ACORD option. Chose 'Client Files' first. When the next screen comes up, click on
'Rebuild Files' and choose 'Client Files'. This program will modify your current data to match the new
program. If you do not run File Maintenance, you may get an error message 'Invalid Record
Declaration #47'. If you Have the General Ledger or Payroll options, click on 'Rebuild Files' again and
choose those options. When you are finished, click on the button with an open door on it to exit. You
may now run File Maintenance for the ACORD files if you have that option.
3
File Maintenance
It is always possible for a data file to be damaged from surges or malfunctions of your computer.
Amsoft provides a File Maintenance program which in most cases can restore a damaged file. This
function must be used when installing an upgrade as it will convert your old files to match the new
program. Whenever you use this function you should make a back up of your data first. Should you
need to make a quick backup, you can use the 'Zip Files' option on the Clint Files File Maintenance
menu. This should not replace your daily backups.
To use the file maintenance program from the main menu click on 'File' and chose File Maintenance.
You will then be given the following choices:
Client Files
ACORD Files (If you choose this, you will be given 2 more choices - Personal & Commercial)
© Present
Amsoft for Windows
4
Click on one of the options, and you will be taken to File Maintenance. Click on 'Rebuild Files'.
If you chose Client files, you will see a list of choices:
Clients
Payroll
Checks
You only need to run those sections that you actually use. When you make a choice, Amsoft will
rebuild all related files.
4
Backing Up Your Data
Backing up your data may be the most important part of using the software. It is possible for your hard
drive to crash or simply contaminate a file. When this happens you could lose all the information you
had entered into the computer. The only way to avoid this is to make a backup of your data. Your
computer should have been supplied with a backup program. If you do not have one, or would like one
that is easier to use we can recommend a program for you.
To backup your data you need to make a backup of the directory called hcsdata. Please back up all
files in this directory. Each backup program has its own way of backing up individual directories.
Please review your manual for instructions on backing up sub directories. Please do not call us for
instructions on how to use your backup program, for we are only familiar with Quiksave.
5
Getting Started
5.1
Basic Functions and Materials
5.1.1
Keys used in Amsoft
Functions and Keys Used in Amsoft
Before using Amsoft for Windows, you should become familiar with some of the functions and keys
used in the program. The functions described, in general, can be used on any screen in Amsoft.
Mouse -To use the mouse, move the mouse arrow on the screen to whatever you wish to activate
and 'click' on the left mouse button.
(Arrow) keys -These are used to move up, down and across on menus, update screens and browse
boxes.
(Alt) key -You will notice the words on menu bars and buttons with one letter underlined. If you do not
wish to use the mouse to click on them, you may hold down the alternate key and the underlined letter
of the function you desire, and then release both keys.
(Tab) key -This key is used to move from field to field (shift+tab moves backward).
Scroll Bars -These are located at the bottom and right-hand side of any screen which is larger than
your monitor screen size. They are also found on browse boxes and can be used to locate a client.
© Present
Getting Started
5
To use a scroll bar, place the mouse arrow on one end of the scroll bar in the direction you want it to
move. Click the left mouse button until you are where you want to be.
Buttons will allow you to look up data & have it entered into a data field.
These buttons are located on the browse screens, underneath the record
listings. These buttons allow you to scroll the screens in the direction of the arrows you choose.
These are called vcr buttons. Press the one arrow on the right and you will move down one record.
Press the double arrow & you will move down one page. Press the arrow with a line and you will move
to the last record.
This button will cancel any changes made to a record and exit to the previous screen.
This button will save the current record and will return you to the browse box. You should
always exit update screens by clicking on 'Ok'.
This button will close an application and take you back to the previous screen. It is found
on browse boxes.
This button is located on browse screens. By clicking here, you will be able to add new
records.
This button will delete records under the cursor. It is effective in the browse box.
This button indicates a print function. Some screens may contain more than one printer.
Place your mouse on a printer and a help tip will appear. This tip will tell you what type of report can be
printed.
5.1.2
Screens Used in Amsoft
The different types of screens you will encounter are the menu screen, browse box and update Screen.
Menu Screens
© Present
Amsoft for Windows
6
The menu screen will display a list of different options. You will be able to choose one of these options
by moving the mouse to the option you desire and clicking the left mouse button. The file option will
include even more program options.
Browse Boxes
The browse box will allow you to find individual records, and is divided into two parts. The top section
of the screen will have a list of records, and the bottom of the screen will contain option buttons.
These records will be listed in the format you have requested. For example, if you were using the
insured's name to find records, then the records would be in alphabetical order by insured name.
The browse box will normally let you find records in three ways. By typing in the information requested,
the record you are looking for will be highlighted. For example, if you are browsing records by account
number, and want to find 'ROBERJO', you would type an 'R', and the first record beginning with an 'R'
would be highlighted. If you then typed an 'O', the first 'RO' record would be highlighted, and so on until
the record you desire is highlighted. Finding records is case sensitive, so be sure you have caps lock
on.
The second way to find a record is to use the scroll bar(s). To use a scroll bar, either click on the arrow
© Present
Getting Started
7
pointed in the direction you want to scroll (which will move the scroll box by record), or drag the box
itself to move more rapidly.
The third way to find a record is to use the arrow keys to move the cursor up and down between
records. The (page down) and (page up) keys will move the cursor up and down one page at a time.
Any of the above methods or a combination of methods will place the cursor on a record.
By pressing enter or clicking on Change, the full information for that record will be Displayed.
To change the size of an individual display area in any browse box, place the arrow on the line you wish
to move until it changes to a cross hair arrow, then hold down the left mouse button and drag the line to
where you want it and release the button. This will allow for more information to be displayed at one
time if you so desire.
Update Screens
The last type of screen you will encounter is the update screen. This screen will allow you to enter,
view or change data for a certain record. The best way to move around this type of screen is to tab
© Present
Amsoft for Windows
8
from entry field to entry field. By pressing on the coverage buttons on the right side of the screen, you
can enter coverage information. The buttons with icons at the bottom of the screen might need some
explanation. If you place your mouse on any of these icons a message will appear for 15 seconds.
The message will explain the purpose of the icon.
Pencil & Paper = Memos & suspense
Journal
= Diary
File Folder
= Transactional filing
People Figures = Driver Family & Employee Information
Ambulance
= Claims
Money
= Premiums paid to agency, but due company(direct bill)
5.1.3
Forms Used
Optional-Forms used with Amsoft
All of the reports in Amsoft for Windows can be printed on plain paper. However, as an option some
reports use preprinted forms. The purpose of the preprinted forms is to allow your correspondence with
the insured to be more professional.
The following preprinted forms may be used in Amsoft.
Letter head used as an option for the Word Processor.
Pre-printed Form used for Memos, Invoices and Renewal Letters. To use this option of Amsoft,
Click on 'File' from the main menu, and choose 'Options'. Check on the box that says 'Print Invoices,
Memos, etc.. on Pre-printed Form'. This will reformat the reports to print correctly on the form. To turn
the option off, uncheck the box.
Form Description
Product #
Keycode
Pre-printed Form
Checks - Dot Matrix
Checks - Laser Jet
Mailing Labels
080432
091004
081004
91819
R02686
R02686
R02686
R02686
All the above forms may be ordered with their own double window envelope showing your return
address & the clients address.
Invoices, Renewal Letters, Memos, Dot Matrix Checks and other letters printed in Amsoft on
plain paper can use a double window envelope. Product # 091501 Keycode R02686.
The Pre-printed forms use a double envelope - Product # 91551 Keycode R02686
Laser Checks use a double envelope - Product # 091500 Keycode R02686
While we have listed one letter head any of the letter heads in the enclosed Deluxe Catalog will work.
To order:
Online - click here
By Mail - Fill out the order form in the middle of the deluxe catalog. Your keycode is R02686.
© Present
Getting Started
9
By phone - Call 1-800-328-0304
6
How to Install Amsoft
To install Amsoft for Windows, place the CD in the CD Rom drive, and go to the Start button. Click on
Run. On the command line type 'd:\install' (where 'd' is the drive letter if the CD Rom) and click on Ok.
This will activate our install program. Follow the instructions on the screen to complete installation.
The hcs directory will store the program files while the hcsdata directory will store the data files.
The install program will install Amsoft onto drive 'c'. If you wish it installed onto another drive, simply
replace 'c' with the letter of the drive you desire when given the choice. Do not change the directory
displayed.
After installation is complete you will return to the desktop.
Click on the Amsoft for Windows Icon to run Amsoft.
7
Using Amsoft
7.1
Amsoft Main Menu
The main menu will display the following menu choices
File- This selection will give you an option menu which includes: Print Setup, Options, Rolodex,
Calculator, File Maintenance, Payroll, Agency Information, Company Information, Lienholder
Information, Web and Exit (to exit Amsoft).
Clients- This selection will allow you to access complete policy information for each insured. This is
probably the most important section of Amsoft. Information entered here will flow to other modules of
Amsoft. These include General Ledger and Acord Forms.
Prospects- This selection is used to track clients who are prospects for new/additional policies.
Reports- This selection provides all reports associated with your client files. Reports such as: past
due invoices, production reports, renewal letters.
Forms-(Optional) This option will take you to the Acord Form section. You will be given a choice to run
form buster or use one of the ACORD managers.
Checks-(Optional) This is the General Ledger. It will allow you to track all checks issued and all
payments. It will produce a profit and loss statement, General ledger and check & deposit registers.
Under 'File' you will find these options:
© Present
Amsoft for Windows
10
Print setup- standard windows print setup screen.
Options -allows you to set up options in Amsoft.
File Maintenance- before you run this function, always make a backup copy. This function is used
when there is an update to modify your files to match the new program.
Batch- this will allow you to do batch procedures such as:
entering batch commissions.
entering batch transactional filing.
importing records
exporting records
deleting groups of records
Rolodex- this selection will run a program that will store names & addresses of people & business that
are not your clients. An example might be the office supply store.
Appointments - this selection will bring up a calendar program. You can enter as many different
calendars as you like. Appointments can be made and printed out. Imports client information.
Payroll-This will allow you to track each employee's pay record and produce the associated reports.
7.2
Quick start Guide
Quick Start Guide:
To enter client information
A. Click on Clients from the Main menu
B. Choose the order you wish clients listed. You may change the order by clicking on the option
you desire.
You may look up records by Account #, Insured, Company and Expiration
Date.(These tabs are located at
the top of the client browse screen).
C. From the browse box you may:
1. Enter a new record by clicking on Insert.
2. Change data or view data by placing cursor on the record desired clicking on Change.
3. Delete a record by placing cursor on the record desired and clicking on delete. You will then
be asked to confirmclick on Continue to delete record.
To print reports:
A. Click on Reports from the menu bar.
B. Choose the report you desire from the Reports menu.
C. Be sure your printer is on line.
To enter Memos and Suspense items
This program will allow you to store standard memo forms and use them for sending memos to insureds
or companies. This means you do not have to retype each type of memo. For example, you may store
a memo for endorsements, past due policies or any suspense item. You may then recall these
endorsement forms as you need them.
© Present
Using Amsoft
11
This program will ask you to enter a suspense date. It will then list all memos which are past the
suspense date and no reply date has been entered.
To enter a memo choose Clients from the main menu. This will take you to your list of clients. From
here you will choose the client you wish to send the memo to by placing the cursor bar on that insured.
Then click on Change to select this insured. The next screen will display the insured information. At
the bottom of this screen is displayed the button with files on it. Clicking on this will take you to the
Account menu. Click on the button next to Memos and Suspenses.
You are now at the Memos and Suspense browse box. Click on Insert. The insureds' Account #,
Name & Address, Company code, Agency code, Sub Producer, and MGA code and today's date is
displayed and the cursor is blinking at the salutation which defaults to 'underwriting department'. You
may change it to anything you like then press tab. The salutation is only used when a memo is sent to
the company. It is not used when the memo is sent to the insured. Press tab to accept.
Your cursor should have moved to the please reply by date. Amsoft displays the date it expects a reply
by. Press tab to accept, or you may change it by entering a new date. The cursor will now be at reply
received. These two dates are used to inform you of memos which are past due and no reply has been
received. For now, make no entry in this field press tab to leave it blank. When a reply is received you
will go to this field & enter the date received.
The cursor moves to the policy # field. The policy number is displayed- press tab to accept it. You will
now be at 'Select Memo to Use'. Press tab. You are now at the memo form browse box. Click on
Insert. This screen will be used to write and store standard memos. With the cursor at formcode enter
a code for this form. We suggest a code which will represent the form. For example a form for
requesting driver information might be (driver info). Enter your code now and press tab. Your cursor is
now at form. Type in any information you think is relevant. Remember you can leave spaces for
information to be filled in later. For example, you could design a memo requesting the addition of a
driver. In this case you would leave a space or underline area for the driver information. Please note
the memo is longer than the screen and the screen will scroll to show all of the memo. After you have
finished your memo,
click on Ok to save the memo.
You are again at the memo form browse box. This lists all redesigned memos. We will need one more
memo form. There will be times when we do not want anything pre printed on the memo. We will need
to add a blank memo. From the memo form browse box, click on Insert. You are now at the form code
field. Type blank and click on Ok to save the blank memo. You will now have a list of memos including
a blank memo and a driver info memo. Place the cursor on the driver info memo and click on Select.
You will now be at the memo field on the memo entry screen. The memo you just designed will be
displayed. If you left any blank spaces fill them in now.
How to print a memo. At the bottom of the screen you will see print buttons. You can have the memo
sent to the Company, Insured or Managing General Agent. Click on the appropriate button to print.
After modifying your memo and printing the memo click on Ok to save the memo. You will now see a
listing of all memos regarding this insured. Click on close to exit this item. You will be returned to the
Account menu. Please note a check has been placed next to memos & suspense. This indicates that
a memo has been entered. Click on the file box in the top left corner, choose close, and you will be
returned to the client update screen. Click on Ok to return to the Client Browse Box. Please note there
is an (x) in the box next to Memos and Suspense. This indicates there is an active memo.
To view all past due memos, Click on the 'Past Due Memos' tab from the client files browse box. A
© Present
Amsoft for Windows
12
listing of all past due memos will appear.
7.3
Entering Clients
7.3.1
Entering A Policy
You should now be at the main menu. Before we start entering clients, let's set up your agency
information and enter some companies. To do this, place the mouse cursor on 'file' and click the left
mouse button (this is referred to as 'click on file'). To enter your agency information, click on 'Agency
Information'. This will bring you to the Agency Codes browse box which is now empty. Click on 'Insert'.
The first field on the agency code update screen is Agency Code. This field is a code for your agency.
It is used to find and locate your agency name and address for letters and reports. If you have only one
agency, then you will have only one code. If you have more than one agency, you may have a number
of codes. You will now make up a three-letter code for your agency. Enter the code and press tab.
Enter the agency name, address, city, state, zip and phone number, pressing tab after each entry.
After filling in the agency information, click on Ok to accept it. You will again be at the browse box.
Click on 'close when you have finished this process.
Now let's enter some companies. Again click on 'File' and choose 'Company Information' by clicking on
it. You will see the empty Company Code browse box. Click on 'Insert'. Because we do not want to
enter a name such as Travelers Indemnity and Casualty every time we enter a policy, we will make up a
code for every company. These codes must be alphabetic. In the 'Code' field, enter TRA as a code for
Travelers Indemnity and Casualty and press tab. You will then enter information on the company and
press tab after each field. When you are finished entering all the information for a company, click on
'Ok' and you will see the company you just entered displayed in the company code browse box.
The next thing you will want to do is enter data in your client files. To do this, place the mouse arrow
on 'Clients' and click the left mouse button (This is referred to as 'click on clients').
You should now be at the Client Files Browse Box . The client files section will allow you to enter
information regarding each policy in your office. From the client files you will be able to track, among
other things: expiration dates, accounts receivable, accounts payable and commissions receivable. On
this screen, the sorting order defaults to Account #. To change the sorting order, click on the option
you desire. A listing of cancelled and expired policies can be seen by clicking on the 'Cancelled
Policies' tab. Policies expiring today will be highlighted in red. Cancelled and expired policies will
appear on the regular client browse box for 30 days after expiration. Also on this screen is a list of
update screens with boxes in front of them. You will notice as you begin entering data that a check
mark will appear next to each screen name in which you have entered data.
Amsoft can help you fill in information on each screen. When the cursor is on any given field, when
available, a message will appear at the bottom of the screen describing what that particular entry field is
for. Additional help is available by clicking on 'Help' from the main menu.
We will now insert a client. To do this, click on Insert. You should now be at the Update Client Record
Screen. The cursor should be at the account code field. The account number field is used to find
individual records, although you may also look up records by insured's name, policy number, expiration
date, or company. For now, however, we must enter an account number. Every account must be
different. Let's say we have an insured named John A. Robertson. We suggest that in making up the
account number that you use the first 5 digits of the insured's last name plus the first 2 digits of his first
name. You will want to use all capital letters to avoid problems in the future. In this case our account
number will be ROBERJO. Remember, no two account numbers can be the same. If you try to enter a
duplicate account number Amsoft will tell you that it is a duplicate. If, however, you need to enter two
© Present
Using Amsoft
13
policies for John A. Robertson, enter the same account number for the second, but add a number
behind it, for example ROBERJO2. You do not have to use the method we have just described,
however your account number should be alphabetic. For now, let's enter ROBERJO and press tab.
You have now moved to the billing account code field. You will notice that the previous account
number had to be unique. The billing account number does not have to be unique. The purpose of this
number is to allow you to enter the same number for each policy of one client. For example, for this
account we might enter ROBERJO, which is the same as the account number. The next policy we
enter for this insured, we will enter the same billing account number. By doing this we will be able to
produce an invoice for the insured and bill all of his policies at one time. If you do not normally have an
insured with more than one policy, you will not have to worry about this field.
Press tab to move the cursor to the Insured area, which has a box drawn around it. There will be
enough room here to enter the insureds' name, address, city, state and zip, as well as phone and fax
numbers (use the format ###-###-####). Enter John A. Robertson and press tab. Tab through and
enter data for the address and phone numbers.
The cursor should now be at the Bill To area. The name John A. Robertson will be displayed there.
The bill to field tells Amsoft where to send the bill. For example, for auto policies, the bill is normally
sent to the insured, but for homeowners it is normally sent to the mortgage company. In this case you
will want to enter a loan number in the provided field, otherwise you can leave it blank. For an auto
policy we would leave the name John A. Robertson there. If this were a homeowners policy we would
enter the name of the mortgage company. Let's leave the insured's name here. There are four lines
available for the insured and his address. This should allow you plenty of room for listing your corporate
accounts. Press tab at each field to accept the insured's information (leave the loan # blank).
The cursor will now be located at the Agency Code field. The agency code field is a code for your
agency. If you do not remember the agency code, click on the button next to this field and any codes
you have entered will be displayed. Click on Select to select the highlighted agency.
The next field is the Company Code field. This field is used to indicate which company is issuing the
policy. Click on the button next to this field and a list of all the companies to which you have entered
coverage and commission information. We have already entered companies, however, you will notice
that they do not show up here. That is because we have not entered a commission record. To enter a
commission record, click on insert. Now click on the company code button. You should now be at the
'Browse Company Codes' browse box. The companies we already entered will be listed here. You can
add a new company from here by clicking on 'insert'. For now, let's choose a company by highlighting it
and clicking on 'select'. You will now be back at the commission record update screen. Press tab until
you come to the coverage code field. This will hold a three letter code for the kind of coverage. For
example: AUT for Auto , or HOM for Homeowners. The coverages field will allow you to enter all
coverages written by this company. This field can be used to review the type of coverages written by a
certain company. The commission field is the commission rate paid by the company. If the company
pays different commissions on different types of policies, enter the commission you receive the most.
To enter 15% commission, simply enter .15. Click on the 'Ok' button to accept the information. The
record we entered will be highlighted in the browse box. Click on select. Every time we enter a new
policy we simply need to choose company code. The full name will not appear on the screen, however,
when we issue an invoice, the full name of the company will be printed.
The cursor is now at MGA. The purpose of this field is to indicate the general agent through which you
are purchasing the policy. If you are writing direct with this company, you will want to enter a MGA with
a code of none and everything else blank. For our case, let's assume that the general agent is Today
Underwriters. Use the code TDY to indicate this company. Click on MGA button. A browse box will
© Present
Amsoft for Windows
14
appear and you click on insert to enter the general agent information. When you have entered that
information, click on Ok, and from the browse box click on select to choose TDY. Press tab to
continue.
We are now at the producer field. The purpose of this field is to track commissions for each sub
producer. If you do not have sub producers you could simply press tab here to skip the field. For our
purpose we will have a sub producer named Jim Smith, and we will give him a code of SMI. Click on
sub producer button, the browse producer box appears. Click on insert and we will be asked for his
code. Enter SMI and press tab. Next enter the name Jim Smith and press tab. Finally, enter the
commission % the sub producer will receive. In this case enter .35 and press tab. Click on Ok. Now
you will see the producer, his name & commission displayed. As you enter more producers they will
displayed on this list. Place the cursor on the producer you desire and click on Select and press tab.
Remember, you will only have to enter the name, code & split for each producer once.
The cursor has moved to the policy number field. Displayed is "NOT ISSUED." For now we will accept
this by pressing tab. When we receive this policy we will change this to the correct Policy number.
The cursor is now at the Prospect field. This field is used as a marketing tool. The purpose of this field
is to allow you to indicate what type of insurance for which this insured is a prospect. Say you are
selling him an auto policy and feel he is a prospect for home owners. Then you would make up a code
for home owners and enter it here. For now enter "home" a four-letter code for homeowners and press
tab.
The cursor is now at the send renewal field. If you wish to send the insured a renewal notice enter a
'Y'. If you do not wish to send him a renewal (for example a direct bill policy) enter an 'N' and press tab.
The cursor is now at the coverage field. The coverage code you entered in the company field is
displayed. For now we will want to accept the code that is displayed by pressing tab. We could have
typed over this code to change it.
We will now enter the binder date, which has already defaulted to today's date. You may accept this
date by pressing tab, or you may change it by typing over it.
Your cursor will now move to the expiration date field. The expiration date will default to one year from
the binder date. You may change it by typing over it. To accept the date displayed, press tab.
The next thing you will want to do is to enter the premiums.
After entering the premiums for this client, you will be returned to the client update screen.
Amsoft will indicate the date that it expects all invoices paid by. You may change this if you want to, or
accept it by pressing tab.
You are now at the Notes input area. This scrolling area will let you enter any information you desire.
You can also access the full notes screen for this client by clicking on the tacked note to the left of this
field. Enter your information click on tab to save.
You are now at the reason for billing fields. On the screen, these appear next to each other, but they
print one below the other. Fill out these fields as you desire.
To save everything click on Ok. This button may be clicked from anywhere on this screen & will save
all entries made. After clicking Ok, you will be returned to the insured browse box & the insured you
just entered will be listed.
To add another insured from here you will click on Insert. To delete an insured from here, place the
cursor on the insured you wish deleted and click on Delete. You will then be asked to confirm the
© Present
Using Amsoft
15
deletion of the record. Click on Ok to delete the record or Cancel to cancel your request.
7.3.2
Entering Additional Policies for the same insured
Lets's take a moment and discuss how to add another policy for the same insured. When adding
another policy for the same insured, you do not want to reenter all the information, so we have added a
short cut. While in the client browse box, which is where you should be now, place the bar cursor on
the client you just entered. There should only be one policy on this screen now, but as we add more
clients you will be able to move this bar up & down with your arrow keys.
You will notice at the bottom of the client browse box a copy button. Place the bar cursor on the
record just added or the record you wish to duplicate. Click on the button.
You will now see all the information you have added displayed on the screen. You will note that at the
top of the screen is displayed 'Adding Record'. The first thing you must do is change the account
number - each policy must have an unique account number. You may change it simply by adding
letters or numbers to the end. Since already displayed is ROBERJO, simply add -1 to the account
number and press tab. If you do not change the account number you will get an error message at the
top of the screen 'Creates Duplicate'. You may simply go down the screen & change any data that
might need to be changed. For example, the name & address should be ok, but you may need to
change the company & coverages. Please note that this copy process has copied only the first screen.
You will need to enter the new premium history information. When you are done entering all new
information click on Ok to save this new file. You will be returned to the client browse box with two
policies for this insured listed.
To add more clients simply click on Insert and you will be returned to the Client Update Screen. If you
wish to exit this screen click on Close and you will be returned to the main menu.
7.4
Premium History
At the bottom of the Client Update screen (gray) you will see a button labeled: Premiums.
click on it to go to the Premium History browse box. Click on the Insert button to enter a record.
You are now at the Update Premium History screen. At the top of this screen is printed the insured
name. In the top right hand corner you will see 'Installment Premium' and two choices. The answer to
this will normally be no. To change this from No to Yes, simply click on 'Yes'. The purpose of this field
is to allow you to enter installment premiums. For example, if you have a premium of $300 and have
told your insured that you will bill him $100 a month for 3 months, then you would enter $100 as the
premium, and set Installment Premium to yes. For now we will leave the installment premium at no.
The first field the cursor will be located at is premium. Type 550 for the premium and press tab.
The cursor has now moved to the Payment from Insured field. Assume he pays only 125. Enter 125
and press tab.
The cursor is now at the Amount Financed field. Enter 400 for the amount financed and press tab.
If another agency writes through your agency, enter the amount the agency retained as commission in
the 'Broker Commission Retained' field.
© Present
Amsoft for Windows
16
Already displayed in the Due Agency field should be 25. Press tab to accept this.
Click on the method of payment and press tab.
You are now at Company. The company you entered on the first screen should now be displayed.
Simply press tab to accept this choice. To change this you would click on the button next to this field.
Your cursor has moved to Agency Bill. This field has defaulted to entry in the company file. Set this
field to 'y' and press tab.
The cursor has now moved to MGA-General Agent. The purpose of this field is to allow you to enter a
code for the general agent through which you are purchasing this policy. This field will automatically
display the entry you made on the previous screen under MGA. If you desire you can change this entry
by clicking on the button next to the field. Since TDY is already displayed, simply press tab.
Remember TDY stands for Today Underwriters.
The cursor is under Commission % and .15 is displayed. To accept this press tab, or you may change
it, and then press tab. The cursor now moves to the Commission field and the commission has been
calculated in this case 82.50. However, some companies do not pay the commission on the total
premium or the same commission on all coverages. If this is the case, you could figure the correct
commission and enter it here. Press tab to accept 82.50.
The next field the cursor is located at is Commission Received. You would enter the commission you
have received here. In our case we will be keeping our commission from the amount submitted to the
company. So enter 82.50 as the commission received and press tab. If you had not kept any
commission, you would enter a 0.
The Commission Due field will automatically calculate the commission due. Press tab to accept.
The cursor will now move to the Payment To Company field. Amsoft figures what it thinks the payment
to company should be. It takes the total of what the insured will be paying (Payment from insured + due
agency) and subtracts the commission you are keeping (commission received). In this case, 67.50 will
be displayed. If you need to change this, simply type in the amount you are paying to the company.
Press tab to accept 67.50. If this policy was an account current, then you would enter a 0 here.
Next we come to the check # field. If you ordered the general ledger option, this field will be
automatically filled in when you chose the 'post to company' button when writing a check. If you do not
have the general ledger, enter the check # here.
The Finance To Company field defaults to the amount entered in Amount financed. Press tab to accept
400.
The Commission Retained field defaults to the amount entered in Commission Received. Press tab to
accept 82.50.
The Due Company field automatically figures what is due the company.
In the next field, you can enter the date that the payment is due to the company.
With the cursor under Transaction you will see 'NEW POLICY' displayed, click on the transaction
button. You will be taken to a browse box which lists transaction descriptions. You will be able to enter
as many transaction descriptions as you like. Enter another one now by clicking the Insert button.
Type payment and click on Ok. Two items will now be displayed in the browse box: New Policy and
Payment. To chose New Policy, place the cursor on it and click on Select and press tab. Other
transaction types you may want to use might be endorsement, renewal policy, cancellation refund or
any wording you feel is necessary.
© Present
Using Amsoft
17
Now enter the date of this transaction under date. Today's date is displayed. You may accept this by
pressing tab. All reports track premiums based on this date, and the entries will be displayed by this
date order.
The effective date field will show the effective date of the policy. You may change this to whatever date
you would like it to represent. However, please note that this field is simply an informational field; the
program does not track anything by this date.
At Agency, if the Agency Code here is correct, press tab.
The Other field is a code area for your own use. Some agents use codes to indicate the type of
business, such as NEW for new business or REN for a renewal. You might want to use it to indicate
the CSR or the source of the business (i.e. YEL. for the Yellow Pages)
The cursor is now at the Sub Producer area. Here the 3 letter code you entered on the update client
screen will appear. To accept SMI, press tab. You could change this by deleting one letter and then
pressing tab, which would take you to the sub producer browse box. With the cursor at Producer
Commission %, .35 should be displayed. This is the Commission % that we entered for SMI in the sub
producer browse box. Press tab to accept this. If the Commission % is different for a certain policy,
you would type in the correct figure and press tab. If you have no sub producer, you would simply
press tab.
At the Date Paid field, you would enter the date the commission was paid. For now leave this blank.
This can be posted automatically from the Producer Statement in the Report section.
You are now at the last line of the screen. Displayed are Coverage and Policy#. If these are correct,
click on the Ok button to save the record. If you wish to change a field, make the change and then
click on Ok to save the changes.
The Premium History browse box will again be displayed. The cursor will be located over the
information we just entered. The bottom of the screen will indicate totals and the fact that 25 is due.
Since we are entering our first policy, this would normally be the only entry made today for this screen.
As the policy year went by we might add endorsements, cancellations and payments. We will now
enter a payment. From the Premium History browse box click on the Insert button. The Premium
History Update screen will again be displayed. We only need to make an entry into the payment from
insured field. To do this, use your mouse to click on the Payment From Insured field. Enter 25, the
amount still due and press tab. Move to the transaction field and type payment. Now move the cursor
to the date field and enter the date or accept by pressing tab. To save the record click on Ok. The
Premium History browse box will now be displayed with two entries, and the amount due at the bottom
will be changed to 0. You may enter as many transactions to this screen as you need.
We mentioned before that we would discuss the purpose of re-entering the policy number, company
and coverage information. Well, here we go. The reason for this is that it gives you more flexibility in
using Amsoft. Let's say your agency can charge an agency fee and you would like production reports
showing commission separate from agency fee. To do this you would add another Premium History
screen. This time you would enter the agency fee as a premium but you would set up a different
company code called FEE for agency fee. When you run a report, the commission for the policy would
be assigned to the correct company and the agency fee would be increased by the amount entered.
There are many other ways you can use this area. If you are writing two policies for one insured with
the same expiration dates, this area could be used to allow you to enter the insured only once.
You will also notice print buttons at the bottom of the browse box. The first button will print an invoice
for the current premium. The second button will print an invoice including all of the tagged records. To
tag a record, highlight it and click on the 'tag' button. When a record is tagged, an asterisk will appear
in the column to the left of it. The third print button will print an invoice for the current premiums for the
© Present
Amsoft for Windows
18
producer. If you click on the 'billing Account #' tab at the top of the screen, you will notice that the first
print button has changed and will now print an invoice for all records with that billing account #.
You can also print invoices from the client browse box (where all of the clients are listed). The first print
button on this screen will print only the total amount due. We will review this second option in a little bit.
To exit this screen click on Close . You will be returned to the main Client Update screen and all the
totals will be brought forward.
8
Getting Help
8.1
Amsoft Tutorials
You can now download and view Amsoft Tutorials from our website. They are small movies that can be
viewed from your computer over and over walking you through various parts of Amsoft. They can be
used to give you ideas about how you might better use the functions of Amsoft, or even for training new
employees. The tutorials are free to use, just go to: http://www.amsoft.org/Tutorials.htm for more
information and to view tutorials.
8.2
On-the-go help
Amsoft offers detailed help for certain screens that you can access directly from that screen. The
Client Information screen, the Premium History Screen, and the Checkbook Program all offer specific
help for each field on the screen. To view this help, right-click on the field or button that you would like
more information on. A help button will appear next to your mouse arrow. Click on it to see the help for
the selected item.
You will also notice help buttons at the bottom of some screens. When available, you can click on
these buttons to receive help for that screen or function.
8.3
Help and Discussion Board
Our website offers you help 24 hours a day. You can post and read questions at any time at our help
and discussion board.
9
Modules of Amsoft
9.1
Reports
Print reports:
To print reports, from the main menu click on Reports. A second menu will be displayed showing the
different categories of reports that are available. These selections will display a second menu offering
the specific reports. For example, when you choose 'Production', a second menu will be displayed
showing different reports which are available.
From the reports menu you choose the report you desire by clicking on the report you desire.
Depending on the report you chose, you may have the option of setting additional selection values. For
example, when running an expiration listing, you will be asked for the Expiration dates you wish the
renewals based on.
© Present
Modules of Amsoft
19
The real power of Amsoft comes from the next screen you will see. Displayed will be a choice to set
additional selections. This allows Amsoft to be both easy to use and powerful. The ease of use is
accomplished by not selecting any additional selections. This will simply give you an expiration listing
for the expiration dates you requested.
However, in most agencies it is useful for reports to be based on more than one field. For example you
may want an expiration list for a certain month, for a certain company and for a certain coverage. i.e..
All policies renewing in January for Aetna Casualty, that are homeowners and have a value over $200.
This can be accomplished by placing a check in the 'set additional selections' box after you have
entered the dates required.
When you click on 'Ok' with this box checked, a browse box will appear with all clients listed. To set
additional selections, click on 'Search'. This will display your data entry screen.
Any field can be used in the search and the criteria for each field can be set to the following:
Ignore this field
Equal this field
Not equal this field
More than this field
Less than this field
Inside range starting with this
Outside range starting with this
Begins with this
Ends with this
Contains this
Doesn't contain this
Now, you may think that it would be hard to set these criteria. We believe we have made it simple by
allowing you to choose the criteria by menu choice.
Lets search our records for all homeowners policies with a premium over $200.
Move your cursor to the coverage field and type HOM for homeowners coverage. You should enter the
exact code you have used for homeowners. After entering the code, with the cursor still in that field,
click on 'Search Type'. A menu will be displayed showing your options for this field. These options
have been listed above. For now, click in the circle next to 'Equals This' and click on 'Ok'. Now let's
set the premium to greater than $200. Move the cursor to premium and type in $200. While still in the
premium field, click on 'Search Type' again. Your options menu will again be displayed. Choose 'More
Than This' and click on 'Ok'. You have now set selections to HOM for coverage and premiums greater
than $200. To begin the search, click on 'Begin Search'. You will be asked what you want to do - click
on 'Select'.
When Amsoft has finished its search, you will be returned to the browse box which will now display the
records which meet the criteria you have selected.
This area of the reports will greatly increase the power of Amsoft. For most reports it is not necessary
to set any search criteria, but doing so will allow your reports to reflect how you do business.
© Present
Amsoft for Windows
20
By clicking on 'Print', the report will be sent to the screen for you to view. From here you may send the
report to the printer by clicking on the printer icon, or clicking on the icon with a red number over it to
print just that page (the number indicates the page).
If you wish to send your report to a data file, click on the printer icon and then click on 'Setup'. From
here, choose 'Specific Printer' and click on the arrow to see the different options. Choose 'Generic/Text
only FILE:' to send your report to a data file. The purpose of sending a report to a data file is that it can
then be changed using the word processor.
When you are finished viewing the report, click on the red 'X' to return to the report menu.
9.2
e-mailing reports
Setting It Up:
You have the option to e-mail memos and other reports from Amsoft. To use this function you need to
install it. You can do this by clicking on 'File' from the main menu and choosing 'Options'.
You will see an option to 'install pdf print driver for email'. Click on this button to begin the
installation, and follow the on-screen instructions.
Also, this feature works with Microsoft Outlook Programs. If you use AOL, Netscape, or
some other e-mail program, this funtion may not work. Outlook Express is Shipped free with
Windows. If you don't have Outlook, contact your hardware vendor.
When e-mailing reports, what you will actually be doing is creating a PDF file, and attaching it
to an e-mail. Luckily, our program will do most of the work for you. Once you have the Free
PDF Software, Amsoft will be able to create the PDF, but to be able to view the PDF, you will
need Adobe's Acrobat Reader (Also Free). You may already have this program, or you may
not want to view PDF's. Whoever you e-mail, however, will need this software in order to
view what you've sent them. Amsoft will attach the link to Adobe in your e-mail for you. The
link FYI, is //www.adobe.com
Using it:
To e-mail a memo (or any e-mail enabled report), first, check the 'E-mail Report' box at the
bottom of the screen. Then print the report. If you have Amsoft set up to preview reports
before printing, you will need to close the preview screen before it will e-mail. If you don't
have Amsoft set to preview reports, the report will print before going to the e-mail function.
Amsoft will then bring up a new e-mail with The PDF file of your report attached. You
simply need to enter the e-mail address of the recipient if it is not already there, add whatever
you like to the body of the e-mail, and send it.
Hint: Outlook Express has an address book available. Store the e-mail addresses for all of
your insured's, company's and other contacts in Outlook for easy access.
That's all there is to it. Please e-mail us with any problems reguarding e-mail:
© Present
Modules of Amsoft
21
[email protected]
Troubleshooting:
-You must have a windows\temp directory. If you are running Win NT or Windows 2000,
you will need to create this directory structure on each station.
-You must have the PDF driver installed.
-If you get a message 'Report Cancelled, Create PDF Anyway?' Click on 'Yes'.
-Please e-mail us with any problems reguarding e-mail: [email protected]
Other Information:
You may notice that not all reports in Amsoft have this option available. This does not mean that there
is no way to e-mail those reports. The PDF driver will actually allow you to e-mail anything that
you can print by simply selecting it as your printer, naming the PDF file, and attaching it to
your e-mail. This way you can e-mail not only all of your reports within Amsoft, but within
your entire computer!
9.3
Word Processing
To enter word processing, hilight the desired client from the main client browse box, and click
on the WP Button
documents for this client.
© Present
at the bottom right side of the screen. This will take you to a listing of all
Amsoft for Windows
22
The first time you enter this screen, you will need to install the word processing drivers and the
spell check drivers. To do this, click on 'Install Drivers' from the top menu. First choose 'Word
Processing Drivers' and follow the on-screen instructions. When you are returned to this screen, again
click on 'Install Drivers' and choose 'Spell Check Drivers' and follow the on-screen instructions. Once
these installations are finished, your word processor will be ready to use.
To write a document for this client, click on the 'Inset' button at the bottom left of the screen. This
will bring up a box to insert a description of the document.
© Present
Modules of Amsoft
23
Enter a description, and click on 'Ok'. This will bring you to the word processor. The menu for the word
processor looks like this:
To complete the document, simply type your letter in the white area of the screen. You can use the
menu options to formatt your document. If you wish to insert client information, you can click on the
field box down arrow
, choose a field to insert, and click on the arrow
button to the far right that says 'smith'. THis will enter the clients information directly into the document.
Once the document has been completed, you can print it by going to 'File' and 'Print'. Click on the save
and exit button
to save the document to this client's file.
You will then be shown this screen:
© Present
Amsoft for Windows
24
This screen lets you add an item to the client's Memos and Suspense file. THis will allow you to use
the memos and suspense as a To Do list, as well as keep track of items done for this client.
You can either enter any desired information into the fields, and click 'Add This Item', or you can choose
not to add it to the Memos and Suspense file.
Once this has been done, you will be returned to the Word Processing Browse box for this client, and
the document you just entered will be listed. Click on close to return to the main client browse box.
Designing Form Letter Templates
Go into a client's Word Processing Browse box, as described above, and insert a new document. Type
the letter as desired. To insert Fields which will import client data, click on the field box down arrow
and choose the desired field. Then click on the double arrow button
directly to the left of the field box down arrow. This will insert a field tag into the document. For
example, if you choose <Insured>, then <Insured> will be inserted into the document. This will
later be replaced by the insured name.
Once you have completed the form letter template, you will need to save it by clicking on 'File' and
'Save As'. You will then need to give it a name that you will recognize, and choose a folder on the hard
drive in which to save the template. We have given you a folder in your hcsdata folder called 'template'
that you can use for this purpose, and this is the default. Click on the save button to save the template.
© Present
Modules of Amsoft
25
You can cancel out of the word processor when you are finished, or, if you would like to merge the
insured's information into the template, follow the instructions in the next section.
Merge Client Information into a Form Letter Template
To create a document from a template for an insured, first, open the client's word processing browse
box as described above. Then, insert a new document, and give it the desired description. You will
then need to open the appropriate template. To do this, click on 'File' and 'Open'. Find the folder that
the template was saved in. Then find the file, and open it. You will see the template displayed in the
word processor with the field tags in place.
To merge the clien't data into the form letter, click on the arrow button with 'smith' on it
. This will replace the field tags with the client's information.
You can print the document by clicking on 'File' and choosing 'Print'.
Click on the save and exit button
when you have finished.
Helpful Hints
· The word processor will read in and save files in many different formats. The default is .rtf . You will
need to change this by doing a 'save as' and choosing your desired extension, if you want to save the
file in a different format.
· If you insert a field, and it has a grey background, and you can't seem to get control of the cursor, hit
your right arrow on your keyboard to unhighlight the field.
· You can enter a default salutation for a client form the word processing browse box by clicking on the
'salutation' button at the bottom of the screen. Choose the <Salutation> field from the field box to
insert this into a document.
· You can choose to add an item to memos and suspense, or to re-add an item by clicking on the clock
button at the bottom of the word processing browse box. You could use this if you inadvertently
cancel the screen that lets you do this, or if you were to re-send a document, you could then add this
information.
9.4
© Present
Import and Export
Amsoft for Windows
9.4.1
Rater Integration
9.4.1.1
FSC
26
To integrate FSC rating information into Amsoft, you must first set FSC to save rates in '\hcs\import\fsc'
(The drive letter for your network drive goes before this. i.e: if your network drive letter is 'H', then the
path would be 'H:\hcs\import\fsc'. This is done in the FSC Windows program. From the main menu of
FSC, click on 'Tools' and choose 'Setup'. On the next screen go to the 'Management System Exporter'
tab. Next to the 'System:' field box, click on the down arrow, and choose 'Amsoft' (If your version of
FSC does not show Amsoft as an option, choose 'Generic'.) In the 'Destination:' field, type in the path
as explained above (if your drive letter is h - H:\hcs\import\fsc ). Click on 'Apply' and then 'Ok'. That
should get you all set up and ready to go. If you have any other questions about how to set up Agency
Management integration in FSC, you should contact them directly.
Once you have FSC set to integrate with Amsoft, you can complete a rate in FSC, and follow the FSC
procedures for exporting a rate.
Then, in Amsoft, go to 'File' , choose 'Import/export', then 'Rating Companies' and choose 'FSC'.
Choose either 'Vehicle' or 'Home' from the menu. This will open a browse box which should have the
rate you quoted listed. Highlight the desired person, and click on 'Select'.
This will open a new screen displaying the Person's name as well as other information. At this point
you will want to fill in any information for this policy which has not imported, such as company, MGA,
producer. We have imported an account code based on the name, but you may need to change this.
Make sure that this code is unique, and has not previously been used for this or any other client. Once
this screen has the correct information, click on the 'Continue' button. This will bring up another screen
which will tell you that the rate has been successfully imported. You can now click on 'Ok' and close
out of this section, and go into 'Clients' from the main menu. You should now have your new client
listed. If you do not see the client in the list, close the browse box, and re-open it.
9.4.1.2
ITC Turbo Rater
ITC rating integration works best if ITC and Amsoft are installed on the same root drive. To integrate
ITC rating information into Amsoft, you must first set ITC to save rates to Amsoft. To do this, open
Turborater, and from the main menu, click on 'Tools' and 'Agency Management Setup'. You will then
see the following screen:
© Present
Modules of Amsoft
In the 'System Name' field, type or choose 'Amsoft'.
The 'Executable name' should be 'c:\hcs\itcimp.exe' (if c is the drive where Amsoft is located)
'Bridge Format' should be 'Turbo Tags 2.0'
Then click 'Ok'
Exporting a Rate from ITC:
First, you will need to fill out eh general information screen, and then quote the rate by clicking on
'Quote' and choosing 'Rate'.
You will then need to highlight the desired quote, and click on the 'Select Button.
This will bring you to the following screen:
© Present
27
Amsoft for Windows
28
From here, click on 'Breakdown', choose 'Send To' and then 'Amsoft'. (You must have set up Amsoft
as you Agency Management System as described above).
This will open Amsoft's ITC Rater Import section:
© Present
Modules of Amsoft
29
If one file is displayed, simply click on the 'Select button.
If more than one file is displayed, enter the client's last name in the field that says 'If more than one
record displayed enter Insured's last name here', and then clcik the 'Get Files' button. This should
display one file, and then you can click on the 'Select' button.
If you are using ITC's DOS version, contact us for more information.
This will bring you to a screen which allows you to select the correct Account Code, Company Code,
MGA, and Producer for this policy:
© Present
Amsoft for Windows
30
Make sure that the Account Code you use is unique. There is a list of used Account Codes listed to
the right. Be sure to double check that the Account Code has not already been used. Once this
screen has the correct information, click on the 'Continue' button.
Your quote should now be in your client file under the Account Code you chose.
9.4.1.3
Priority Data Systems
To import a rate from Priority Data, you must first export your rate from Priority Data, and choose
Amsoft. If Amsoft is not available as an export option, contact Priority Data for the newest version.
This should bring you to Amsoft's Priority Data Import Screen.
Click on 'Auto' from the main menu. This will bring up a screen which lists the client's name, a possible
account code, and some other information.
© Present
Modules of Amsoft
31
The Account code listed may not be able to be used. You must check to be sure that this account
code is unique and has not been used before. You can change the account code to whatever you
desire. You can also change or choose the other fields on this screen. When this screen is correct,
click on the 'Continue' Button to import the rate.
9.4.1.4
ACS2000
To begin importing from ACS2000, you must follow the following steps in the ACS2000 program:
1. Create a new personal auto quote.
2. Click File, and then click Export.
3. Click Amsoft, and then click Next.
Next, go to Amsoft, click on 'File' and then 'Import/Export' and then select 'ACS2000'. This will open
Amsoft's Rater Import section:
© Present
Amsoft for Windows
32
If one file is displayed, simply click on the 'Select button.
If more than one file is displayed, enter the client's last name in the field that says 'If more than one
record displayed enter Insured's last name here', and then clcik the 'Get Files' button. This should
display one file, and then you can click on the 'Select' button.
This will bring you to a screen which allows you to select the correct Account Code, Company Code,
MGA, and Producer for this policy:
© Present
Modules of Amsoft
33
Make sure that the Account Code you use is unique. There is a list of used Account Codes listed to
the right. Be sure to double check that the Account Code has not already been used. Once this
screen has the correct information, click on the 'Continue' button.
Your quote should now be in your client file under the Account Code you chose.
9.4.2
Importing and Exporting Client Information
Export files to your word processor. Click on 'File' from the main menu. Then choose 'Batch'. From
the next menu choose export. You will now be able to select clients or prospects. For now choose
clients. You will then be asked if you want to set additional selections. Additional selections will allow
you to produce a merge file with only certain records in it. For example you may want to send letters to
all your insured's with one company. To set these selections you would click on the box. For more
information on selecting records review the manual under the report section. For now let's skip this and
click on 'Ok'. This will allow us to send all records to a data file. The next screen you see will contain a
listing of the fields in your client data base. To add a field to the export file click on the field then click
add. The field will then be displayed on the export side of the screen. The names of the fields should
indicate data stored in that field. However, you might note that in the Name & address we use 4 lines
on the screen to store this data. These fields are called insured, address, city & add4. Depending how
you fill in the screen you may not actually put the city in the city field. To export data correctly always
add the 4 fields to your export file. Click on 'Ok' to create the file. You will need to refer to your word
processor's manual to correctly import the file you created into it. You may need to know that the file is
an ASCII delimeted file.
Import records- Importing should only be done before any records are added. Records can be
imported from an ASCII delimenated file. These records must contain a field that is unique. This is
because our Account# is a unique field. This is also the reason that you can not usually import records
once you have entered records into Amsoft. Since Amsoft & your ASCII file may contain records with
the same value in the account#. If you try to import into your existing data file, always make a backup.
© Present
Amsoft for Windows
9.5
34
Appointments and Schedules
Schedule Appointments & to do lists
You will find an icon to run this program in the main icon groups of Amsoft. You will also, find a menu
selection for this program under file in the main menu. The menu choice is Appointments. The first
time you run this program you will have to create a new data file - click on this icon
.
You should set the directory to hcsdata. You can give the data file any name you like. You can even
set up different file names for each person in the office. After you have created the file the main screen
will appear which looks like a calendar.
To enter or change appointments double click on the day you wish to schedule. A box will appear
allowing you to: add, modify or delete appointments. You will also find options to print schedules on
this menu. You will choose add.
The next screen will allow you to enter information for this Item. You will need to enter an appointment
type. you set the appointment types examples would be:
Sales Appointment
Office Meeting
To do items
or any other type you desire.
to enter an appointment type click on the
button. This will take you to a browse appointment
box to add a new appoint click on Insert Button. Enter the type of appointment click the OK button.
This returns you to the browse appointment type. Highlight the appoint you want & click on Select.
After you set the appointment you can click on insured or prospect to fill in the client name or phone.
You may simply type in the client name & phones if you prefer.
next set the appointment date & time. Fill in the appointment description (Something must be entered
here). When done, click on
You will be returned to the calendar. You will find data in the day you selected. Once a day fills up with
appointments a scroll will appear in that day. You can move the scroll bar up & down to view
appointments for that day.
Once you have entered a few appointments you may find it necessary to change the day of the
appointment. To change a day within the same month, click on the appointment and a down arrow will
appear. Drag this arrow to the day you want the appointment & release it. You may also change an
appointment by double clicking on the appointment & choosing modify.
View to change the view of the calendar click on this icon
will allow you to view the events in list format.
located next to the font tab. This
Reports when you click on any day you will find four reports listed as follows:
month
day
week
© Present
Modules of Amsoft
35
List
You will find the list report probably the most useful. This report can print for any amount of time & for
any category. For example you could limit the report to just to do items.
9.6
Options
Options
To change program options go to the main menu choose 'file' & then 'options'.
Print preview - This is the ability to view a report before it is printed. This is very helpful in the case
where you have chosen the wrong report & 20 pages are going to print.
Print preview will allow you to do the following.
Print or view any page of a report.
Zoom in or out on a report.
Choose number of copies to print.
Scroll through report.
Choose report destination. Such as printer or fax modem.
Print preview may be changed for the client file section & report section. The client file section prints
invoices, statements, memos and coverage lists.
Showing canceled policies on the Account# tab - In the browse clients screen you may turn on the
ability to display canceled policies. Canceled will always display for 30 days after they have expired.
They are removed from the client tab simply based on their expiration date. They will show on all other
tabs. If you change the expiration date to a current policy they will appear under the account # tab.
9.7
Security
Security for Amsoft for Windows
The security system offered with Amsoft for Windows allows you many functions. You can limit the
applications a user has access to as well as the times he is allowed into them. The hidden password
feature keeps passwords secret. These and other functions allow Amsoft to provide you with security
ranging from basic needs to complex ones. We have done our best to outline the workings of the
security system so that achieving a more complex security system does not mean going through a
complex setup.
Amsoft for Windows will not include any security features unless you install the security
feature.
1. Go to Windows Explorer (Windows 95 & 98).
2. Open your hcs Folder.
3. Find the file named: secure.exe and double click on it.
On the next screen that appears, click on the 'Ok' button to accept the directory unless you need to
change the drive (for Network users), in which case you should change the drive before clicking on 'Ok'.
When the installation is complete, click on the 'Ok' button.
© Present
Amsoft for Windows
36
Basic Security
With the security feature installed, you now have basic security for Amsoft with the following users:
First
Last
MASTER
CSR
OFFICE
Payroll
OFFICE
BOOK
OPERATOR
MASTER
MASTER
Security Program
USER
CSR
CSR
Client Files & Reports
MANAGER
MANAGER
MANAGER
Client Files, Reports &
PRODUCER
KEEPER
Login ID
PRODUCER
BKEEPER
Password
PRODUCER
BKEEPER
Access
Client Files(Update only)& Rep.
Client Files, Reports, Payroll &
Check Books
These login ID's and passwords may be used until you have entered all of your users into the system,
however, it would be a good idea to delete them once everyone has been entered.
Security System Setup
User Setup
Before you start, we would like to take this opportunity to advise you to write down every code
that you enter in the security system, and to keep them in a secure place.
To set up your security system in Windows 3.1, double click on 'Main' from the Program Manager, and
double click on 'File Manager' (Windows 95 users, Click on 'Start' and choose Windows Explorer).
You will notice on the left side of the screen a list of directories. Find the 'hcs' directory and click to
highlight it. The hcs files will now be displayed on the right. Use the scroll bars to find the
'Security.exe' file, and double click on it. You should now be at Security System Login. Your User ID
is 'MASTER' and your password is 'MASTER' (the password will not appear on the screen); DO NOT
share this login information with anyone you do not want to have access to the security system.
You are now at the main menu - the Security Administrator. To enter users for Amsoft, click on
'Security Maintenance', and choose 'Users'. This will take you to the Security System Users browse
box. You will see the general users that have already been entered. Once you have entered your own
users, you will probably want to delete these. To enter a new user, click on the 'Insert' button. Enter
the first name of the user, let's say JOHN, and press tab. It is a good idea to use all capital letters
when entering information in the security system. Now enter the last name, let's use SMITH. The
initials will automatically be entered when you press tab. You can use any Login ID and Password that
you desire. For now, type in SMITHJO and press tab. Enter S1234 for the password and press tab.
You will now be asked to verify the password. Type in S1234 and click on 'Ok'.
Next click on the tab labeled 'Personal Details'. Here you would enter the personal information for
John Smith, tabbing from field to field.
The 'Statistics' tab gives you some limited information about the users activities in the program.
By clicking on the 'Password Properties' tab you can set password options. Leave this set at the
default. If a user needs to change his password, you will need to change it for him in the security
Administrator the same way you entered the original password.
The 'User Properties' tab has information on the type of user. The default for this tab is for only the
'User' to be checked. You will notice at the bottom the option: 'Audit This Users Activities'. If this is
something you find important in security features, check it. However, if you do not plan on using this
feature, it is probably best to leave it unchecked if you do not have a lot of disk space on your machine.
© Present
Modules of Amsoft
37
At the bottom of the screen is a button with a clock on it - 'Access Times'. Click on this button to set
access times for John Smith. This option allows you to set times for a user to be allowed into Amsoft.
Let's say that John Smith works 9 am to 5 pm Mon.-Fri. And you only want him to have access to the
program during those times. First, since he will be disallowed all day Sat. And Sun., click both of those
buttons at the top of the screen. You will notice all of the check marks for those days disappear. Now
click on all the boxes of the hours that should be disallowed until only the times allowed are still
checked. When you are finished, click on the 'Ok' button.
We have now finished entering the user - click on the 'Ok' button. You will now see John Smith
highlighted in the browse box.
Application Access Setup
The next thing that you will need to do is determine which applications to allow John Smith access. To
do this - with John Smith highlighted, click on the 'Applications' button at the bottom of the screen.
You should now be at the 'User Applications (John Smith)' Browse Box. Here is listed all the
applications in Amsoft. You will notice in the far left column that all these applications are locked. To
unlock an application, highlight it and click on the 'Allow/Disallow' button. Unlock client files
now. Client Files, Report Program, Payroll Program, and Checkbook Program allow entrance into
areas of Amsoft itself. A user must have access to client files to be able to access other parts of the
program. Security.clw determines access into the program we are currently in. THIS ACCESS
SHOULD BE VERY LIMITED. Be careful not to click the 'Allow All' button for users that you do not
want to have access to the security system.
You will notice when the different applications are highlighted, the 'Resource Access' button becomes
active. This is because there are three sub directories in the applications. These can be seen when
you click on the button. You can unlock these resources in the same way you unlocked the application
on the previous screen. If you leave these resources locked, the user may be able to open the
application, but will not be able to update or enter any information. In the 'Client Files' resources,
unlocking the 'Update Client' resource allows a user access to the client information screens only.
Unlocking the 'Update Premium and Client Accounting' resource allows the user access to agency
account records. Unlocking the 'Update Direct Premium Payments' resource allows the user access to
Direct Bill account records. When you have finished, click on the 'Close' button. Unlock the desired
programs and click on 'Close'. You will now be asked if you want the access to be updated. Click on
'Yes'. You are now finished with John Smith. You may enter as many users as desired in the same
manner. To delete a user, from this browse box, highlight the user and click on the 'Delete' button.
When you have finished entering users, click on the 'Close' button.
Custom Security Options
We can now customize your security system. To do this, click on 'File' from the Security Administrator
menu and choose 'Global Security Options'. The Global Security Options screen will now appear.
Under 'Type of Security' you will notice that 'Disable All Security' and 'Login Only' are not checked. If
either of these are checked, All areas of Amsoft will be Accessible by all of your users. The check next
to 'Prompt for Password as Well As User Identity' requires the user to enter both his user ID as well as
his hidden password. This is what we recommend, because the password does not appear on the
screen , making it harder to steal. If you wish to disable the password (A user will only enter his user
ID), click on the check mark next to this option - it will disappear. You may choose the User Identity
option that you want users to enter during Login by clicking on the desired choice under 'User Identity'.
You may set User Access Restrictions by clicking on the 'User Options' tab. Set the Consecutive
Bad Login Attempts to the number desired. By checking 'Disable User After Unsuccessful Login'
denies the user access after the specified number of consecutive bad login attempts. The user will not
be allowed into the system until you come back to the Security Administrator, choose 'Users' from the
'Security Maintenance' menu option, highlight the user, click on 'Change', click on the 'User Properties'
© Present
Amsoft for Windows
38
tab, and click on the check mark next to 'Disable this User'.
By clicking on the 'Auditing' tab, you can choose Areas in which you would like to track user activity.
The 'Backdoor' tab lets you set a code that will let you into the program in case you accidentally delete
all the users of something else goes wrong. We recommend that you leave this set at 'LETMEIN' for
both the User Name and Password.
It is our recommendation that you do not check any of the options on the 'Maintenance' tab as they
may cause minor hang-ups on some machines.
When you have finished setting Security Options, click on the 'Ok' button.
Quick-add a user to an Application
Let's say you have added a user and allowed him access only to the client files, but later want to allow
him access to the Payroll Program as well. A quick way to do this is to click on 'Security
Maintenance' and choose 'Applications to Secure'. Highlight 'Payroll Program' in the browse box
that comes up, and click on the 'Q/Assign User' button. Next, highlight the user you wish to add access
to this program, and click an the 'Select' button. You have now added the user access to the Payroll
Program.
You may also use this screen to remove a user from an application, or to set Access Times for Amsoft
to be accessible to all users.
When you have finished, click on the 'Close' button.
Auditing Files
To audit the files, click on 'Audit File' from the Security Administrator, and choose 'View the Audit
File'. You may print the Audit Report by clicking on that button at the bottom of the screen. Click on
the 'Close' button when you have finished.
Reports
To print various reports, click on 'Reports' from the Security Administrator, and choose the report
desired.
Exit
To exit the Security Administrator, Click on file and Choose 'Exit Security Administrator'. You will be
asked for close down confirmation - click on 'Yes'. Your Security System is now complete.
10
Optional Modules of Amsoft
10.1
Acord Forms
10.1.1 ACORD Forms
Agency Form Buster can print all ACORD forms. The complete form will display on the screen
and data from Amsoft can be dragged to where it needs to be on each form.
To run this program Click on clients. Highlight the client you want a Acord form for. You will find a
button on the bottom of the screen labeled "Merge Forms". After you click on this button you will see a
© Present
Optional Modules of Amsoft
39
screen where you can select the client you want to import information for which lists different coverages
you can export to form buster.
First, select the desired insured by clicking on the button with a flashlight on it , highlighting the insured,
and clicking on 'Select'.
You can now click on the type coverage for this policy. Data from Amsoft will now be sent to form
buster & form buster will run.
A input screen for Form buster might look like this.
For complete instructions on how to use form buster see your user manual; there are 4 pages that go
over it's use.
One of the main advantages of form buster is you can scan any form into form buster and fill it in on the
screen. You can export data from Amsoft to this form.
Form Managers are the easiest way to produce ACORD forms. To find these, click on 'Forms'
from the first menu of Amsoft. You will then see a listing of forms available through the managers. The
form managers do not include all the ACORD forms, however, more forms are being added all the time.
The purpose of the form managers is to enable you to access data from Amsoft & do a fast fill of
ACORD forms. The advantages of this method are:
Uses same keystrokes as Amsoft.
Allows display of data in different sort orders.
© Present
Amsoft for Windows
40
Can quickly add additional forms filled from other forms. Works great for certificates.
To do a form, click on 'Forms' and select 'Form Managers. Then click on the desired form. The
manager for that form will appear. To insert a record, click on the 'Insert' button. This will take you to
the input screen.
An input screen for a form manager might look like this.
To import Insured information, click on the flashlight button next to Insured's Account #. This will pring
up a list of your clients. Highlight the desired client, and click on 'Select'. To import coverage
information that has been entered into the client's file, click on the appropriate flashlight button, and the
list of coverages entered for that client will appear. Highlight the desired information, and click on
'Select' (if no information appears, then you have either selected the wrong policy, or you have not
entered coverage information of this type in this client's file). After the information for the form is filled
in, click on 'Ok'. You will see the entry you just made listed on the browse box. To print the ACORD
Form, click on the appropriate printer button in the lower left corner. For Certificates, you will need to
tag the desired records you wish to print before clicking on the print button. To tag Certificates,
highlight the desired certificate record, and click on the 'Tag' button.
10.2
Scanning
10.2.1 Scanning Module
To access the optional scanning module of Amsoft, highlight the desired client from the main client
browse box, and click on the 'Scan' button at the bottom right hand side of the screen that has a big
eye on it. This takes you to a browse/viewing area for the selected client. All scanned images for this
client will be listed and viewed from this screen.
© Present
Optional Modules of Amsoft
41
To scan a new image for this client, click on the 'Insert' button located under the browse box. A
browse box with image descriptions will be displayed. To insert a description, click on 'Insert' and enter
the description of the image to be scanned (this will identify the image on the browse box for easy
retrieval) click 'Ok', then click on 'Select' to select the description. The update screen will automatically
display the client, account # , date and description. The very first time you use the scanning module,
you will need to set the path. To do this, click on the 'Path' button with a flashlight on it. Select the
folder on your hard drive where you will be storing the images (you will want to back this folder up on a
regular basis). Next, click on the button that says 'Set Path As Default' - YOU ONLY NEED TO DO
THIS ONCE. Then Click on 'Ok'.
You will now see the item you just entered highlighted in the browse box. This item is ready to have
a(n) image(s) scanned. To scan an image for this item, click on the 'Scan' button located on the bottom
right of the screen. This will activate your scanner's scanning software.
Select the scanning option from your scanning software to start the scan. Once the scan is completed,
if it is not automatically closed, close your scanning software. You are now back at the listing of images
for the selected client, and the image you scanned will be displayed as a thumbnail at the bottom of the
screen, and larger to the right of the screen. To scan a second image under the same item, simply
click on the 'Scan' button and follow the same procedures as before. To start a new item, click on
insert and select the description and click on 'Ok'. With the new item highlighted, click on the 'Scan'
button and follow the same procedures as before.
To View an image on the whole screen, highlight the desired image, and click on the 'View' button
located at the bottom right of the screen. To print an image, hilight the desired image an click on the
'Print Image' button located under the image description browse box. To print a listing of images for the
selected client, click on the 'Print Listing' button, also located under the image description browse box.
10.2.2 Scanning Solutions
Using Scanning
There are many ways to use the scanning function of Amsoft. We suggest one of the following
methods:
1. Create a separate item for each document scanned. For instance, if you are scanning a
homeowner's application, click on insert and type 'Homeowners Application' for the description. Scan in
all pages of the document under this item. The next time you have a document to scan for this client,
you will click on insert again (even if it is another Homeowner's application) and scan all pages for that
document under the new item. This will create a very specific list of items and the images will be easy
to retrieve. You are also creating a transactional file which should make your hard copy filing simple.
Since you have all of a client's images listed by date, you can file all hard copies for all clients by date
without having to file for each client. Should you need to retrieve a hard copy, you would simply look up
the client, find the document that you scanned, and note the date it was scanned. If you only need a
copy of the document, you can print the image. If you need the original, simply find the file for the day
that the document was scanned. Most agents have found this to be a great timesaver!
2. Create separate items for each type of document. For instance, all Homeowner Applications for one
client would be scanned under the same item. The advantage of this method is that it reduces the
number of items you have listed in the browse box therefore reducing clutter. You may only have 3
items listed if the only documents you have are Applications, Endorsements, and Dec Pages. The
disadvantage is that as you add more images under each item they will become more and more difficult
to distinguish between.
Backing Up your Images
© Present
Amsoft for Windows
42
You will definately want to make backups of your images. This should be done regularly (when you
backup the rest of your data would be a good time). The images are stored wherever you set the path
to. It would be a good idea to create a folder on your hard drive (perhaps under HCSDATA) just for
images. You may also want to create sub folders for each year. This way, you can only continue to
backup the images for the current year.
DPI
The DPI setting of your scanner affects the quality of the scan but also affects the size of the file. The
most important thing to realize is that the size increases exponentially with the DPI setting. On
average, we have found that:
At 100 DPI, images are same quality as older faxes and size is around 50K per page.
At 150 DPI, quality improves considerably but size is about 100K per page.
At 200 DPI, quality is great but size is around 200K per page.
We suggest 150 DPI
Scanners
Most scanners support some level of twain - make sure that your scanner is twain compliant. If you are
looking for a heavy-duty scanner with a page feeder, we reccommend Fujitsu ScanPartner 15C. It is
one of the more inexpensive of this type of scanner, has good tech support, and other agents seem to
like it a lot.
Troubleshooting
Our scanning module uses OCX imaging drivers. The imaging OCX has been shipped free with all
versions of Windows since 95B and they are available as a free download for 95A. This means that
most computers running Windows 95 or higher already have this driver installed. However, if your
computer is missing this driver, the following error message will appear:
Unable to load the Imaging OCX. Please make sure the control is
installed and registered.
If you have received this message, never fear. You can download the control free from Kodak's
imaging site: http://www.eastmansoftware.com/products/Imaging/pr_img_index.htm
If you click on 'Scan' and the wrong scanning software is activated, you may have more than one
scanning driver installed on your computer. To select the correct driver, from the scanning screen, click
on the 'Source' button located at the bottom of the screen.
If you click on 'Scan' and nothing seems to happen, check that the path specified on the description
screen is valid. If not, choose a valid path and set it as the default.
10.2.3 TIFF Driver
The optional TIFF driver allows you to send anything that you can print on your computer into a client's
scanning file. Together, these two modules link your entire computer to amsoft seamlessly. You can
attach e-mails, websites, faxes received by the computer, documents and more. After a short set-up
on each machine, using it is as easy as selecting a printer.
© Present
Optional Modules of Amsoft
43
Once you have installed the TIFF Print Driver, you will need to set it up to interact with Amsoft. This
should only need to be done once on each machine.
First, you'll need to open the printer properties. To do this, go to the control panel, open 'printers and
faxes', find the TIFF Xchange icon, and right click on it. Then, go to 'Properties' . On the next screen,
go to 'Printing preferences'.(Note: this may vary slightly depending on your version of Windows).
On the printer Properties screen, first go to the 'Save' tab. Select the 'Use Predefined Values' option.
Then make the path: C:\importimage (use the C drive for this regardless of whether you are on a
network or not). Click on the 'Macro' button, and click on 'Document Name'. Then, click on the 'Macro'
button again, and click on 'Date'. This should change the file name to: %[DocName]%[Date]. Finally,
check on 'Append Pages to Existing File.
The next step is to click on the 'Finish' tab. Check on 'Run Application After Printing', then select the
'Application' option, and enter the path for the import program. The file is called imptiff.exe, and it is
located in the 'HCS' folder on the server drive. So, if your server drive letter is 'H', for example, the
application line would read: H:\HCS\imptiff.exe .
© Present
Amsoft for Windows
44
Once that is done, click on 'Ok' to save the changes we've made. To permantently save the changes,
you will now need to restart the computer. Your TIFF Driver is all set up and ready to use!
Using the TIFF Printer Driver
It is quite easy to use the TIFF Driver to attach files into Amsoft. First, print the item you wish to attach,
and select the TIFF-Xchange V3 as the printer. This will bring up the following screen:
© Present
Optional Modules of Amsoft
45
Click on the flashlight next to 'Account' to select the client whose file you will be attaching this item to.
Next, enter the description of the image you are attaching, and check that the path is correct. Then,
click on 'Ok'. This will bring up a screen with the iimage listed as a file on the hard drive. It should
normally only show the file item you just printed. Highlight the file, and click on Open.
This brings up a screen with your document being viewed. Click on the 'Save' button at the top of the
© Present
Amsoft for Windows
46
screen to save the image to the client's scanning file.
This will take you to the regular scanning screen, and the new document will be showing. You can
simply close out of this screen.
10.3
Checks and General Ledger
10.3.1 Checkbook
(Optional)
The purpose of this section of Amsoft is to keep track of income & expense items that flow through your
check book. From here you will be able to produce a general ledger & profit & loss reports.
Please do not confuse this section with policy accounting. Policy accounting such as accounts
receivable, account payable and commission receivable are handled in the client file section. The
amounts developed in the client section can then be posted to the general ledger. We will review this
later.
This portion of the program will allow you to print checks and at the same time keep track of your bank
balance and all income and expenses. The checks program will also allow you to balance your bank
statement.
© Present
Optional Modules of Amsoft
47
To run this program click on 'Checks' from the main menu. The first thing you will need to do is enter
your accounts. To do this, click on 'Browse Check Books' from the menu bar, select a checkbook by
highlighting it (click on it once) and click 'select'.. Click on 'Browse Accounts' from the menu bar that
appears. You will now be at the Accounts file browse box. To begin click on 'Insert.' Enter the account
#, the description, click on the type, and then click on the 'Ok' button. The information you entered will
now be displayed. Continue this process with each account. We would suggest the following
accounts:
Account #
1
4020
4025
4030
5010
5020
5030
5040
5050
5060
5070
5080
Description
Starting Balance
Premiums from Insured
Commission Received
Other Income
Premiums to Companies
Refunds
Office Supplies
Rent
Phones
Advertising
Net Payroll
With Holding Tax
Type
Asset
Income
Income
Income
Expense
Expense
Expense
Expense
Expense
Expense
Expense
Expense
These are only some examples, you will certainly need to add more accounts to this list. If you are
already using a set of numbers you may use those instead of the ones we have suggested. When you
are finished, click on the 'Close' button.
After entering your accounts you will be able to enter checks and deposits. We will start by entering
your agency's starting balance. This is done the same way as entering a check or deposit. You should
be at the checks browse box which will now be empty. Click on 'Insert' to enter a record. The first thing
you need to do is choose whether you want to enter a check, deposit or a journal entry. This will always
default to 'check'; to change it you simply click on the desired choice. For now, we will click on
'Deposit'. Most of the time much of this information will be automatically filled out. To change imported
information just delete it and enter the desired information.
To enter the amount of the check or deposit, or in this case to enter the starting balance, click on the
'Insert' button located to the right of the screen. This will bring up an update screen. Enter the starting
balance in the appropriate box. If you were entering a check, you would enter the amount of the check
(the button next to this field is a calculator; click on it to do any figuring - when you exit the calculator,
the amount is imported). Now click on the button labeled 'Accounts.' Highlight 'Starting Balance' and
click on 'Select.' If you were entering a check or deposit you would obviously choose the appropriate
account. The screen should now be filled in. Click on 'Ok' to accept. You will now see the starting
balance displayed. If you were entering a check or deposit, the amount would be displayed here. The
purpose of entering the amount this way is to allow you to split a check for your records. You have
now finished entering your starting balance - click on 'Ok'. The rest of this section deals with entering a
check. You will now want to follow the same procedure as for entering the starting balance, but for a
check to this point before going on.
To enter the payee, click on 'Payee' located next to 'Check' at the top left side of the screen. Click on
the button of the category of the payee. For example: if the payee is an insured, click on the 'Insured'
button. Choose the payee desired from the browse box and click on 'Select.' The payee information
will fill in. To go back to the check screen, click on 'Check.' You will see that the payee has been
transferred. You will notice the 'Cleared' box at the bottom left of the screen. This is used for balancing
your checkbook. Click on 'Ok' when you are finished entering information. The check you entered will
now be displayed in the browse box.
© Present
Amsoft for Windows
48
To see your running balance, and for access to General Ledger and Profit & Loss reports, click on the
'Check Book Balance & Reports' button.
You will notice at the bottom of the screen the print check button. When you are ready to print a check,
click on this button, and your check will be printed. To order checks contact deluxe printers 1-800-3364168. You will need to order check number 091004. You may want to consider purchasing window
envelopes for your checks. Please note you do not need to print checks to use the checking and
general ledger program. The program will still handle all accounting and keep balances.
Call Deluxe Forms 1-800-328-0304
Give them your keycode R02686
Dot matrix checks #091004.
Laser jet checks
#081004.
Window envelope - Dot matrix #091501. (Optional)
- Laser
#091500. (Optional)
When ordering you will be asked for a key code. Your key code is R02686.
We have gone over the procedure for entering a simple check or deposit; now let's get insured
payments from the client files and post company paid items. Start with the same procedure as a
regular check or deposit until the amount update screen. You will notice three buttons at the top of this
screen: 'Get Insured Payments' , 'Get Payroll' and 'Post Company Paid'. Click on 'Get Insured
Payments.' Enter the dates for which you want to import payments from insured that you have entered
in the premium history screen and click on 'Ok.' The insured payments that you have entered in the
client files for the dates entered will be listed. Click on 'Close' to accept. You are now back at the
amount update screen. Click on 'Accounts', highlight 'Premiums from Insured', and click on 'Select.'
Click on 'Ok' to enter this on the check screen. The rest of the screen is filled out the same way as a
regular check or deposit.
The procedure is the same for importing payroll information, except you click on the 'Get Payroll' button
and choose the employee.
The General Ledger allows you to post company paid items into the checkbook and automatically
enters them into the client files. To do this, click on the 'Post Company Paid' button from the amount
update screen. From the browse box, click on 'Insert'. This will bring you to an update screen that you
will fill out. To browse account #'s, click on the button with dots on it located next to that field. Highlight
the account you desire and click on 'Select.' Tab through the rest of the form, filling out anything that is
not automatically imported, and click on 'Ok'. The information you entered will now be listed. You can
enter as many items for one company as you like by clicking on 'Insert'. When you have finished, click
on 'Close'. You are now back at the amount update screen. Click on 'Accounts', highlight 'Premiums to
Companies', and click on 'Select'. Click on 'Ok' to enter this information on the check screen. The rest
of the screen is filled out the same way as a regular check or deposit.
There are a number of reports that you can run from the checkbook program. These are: Check
Register, Deposit Register, General Ledger, Profit-Loss, and Accounts List. To run a report, choose
'Reports' from the menu bar, and choose the report you desire. Enter the starting and ending dates
that you desire the report to reflect on the update screen, and click on 'Ok'.
The final step you may be interested in is reconciling your bank statement. To do this click on the
'Reconcile' button from the check browse box. After choosing this you will be asked to enter the
© Present
Optional Modules of Amsoft
49
balance on your checking statement and click on 'Ok'. A screen will be displayed showing all uncleared
checks and deposits. At the bottom of the screen you will be told how far out of balance you are. Now
you will need to find on the screen each check in your bank statement. To clear these checks, highlight
the desired check and click on 'Change.' Change the 'Cleared' status from 'No' to 'Yes' and click on
'Ok.' When you do this the check or deposit will be removed from the screen and your out of balance
figure will change. You will need to do this for each check or deposit received back from your bank.
Please note that in order for the computer and your bank statement to balance you need to start out
with the correct balance.
Other Related Items:
Payroll
Posting Accounts Receivable
10.3.2 Posting
Posting Accounts Receivable, Accounts Payable & Commissions Receivable.
As you enter client information into Amsoft, you are automatically setting up accounts payable,
accounts receivable and commissions receivable. There is nothing special you have to do to
accomplish this.
However, at some time (usually once a month), you may want to bring those totals into your general
ledger. To do this, simply click on the 'Post' button on the checkbook browse box. You will be asked
for a date that you want to post through (it defaults to today) enter the desired ending date (and if you
want to set additional selections indicate that as well) and click on 'Ok'. This will retrieve accounts
receivable, accounts payable and commission receivable from the policy history files. Amsoft will
display the totals on the screen, then write them to a file. Once the totals come up on the screen, click
on 'Close.' The totals have now been posted. After posting is completed you can run your General
Ledger by choosing 'Reports' from the menu bar, and totals for each of these accounts will be printed.
10.4
Payroll
The first thing you must do to begin using the payroll program is to enter your employees into the
system. First, click on 'File' and choose 'Payroll'. From the Payroll menu, click on 'Browse' and choose
'Browse the Employee File'. You should now be at the employee browse box. Click on 'Insert' to enter
an employee record. The Employee Update screen will now appear. Fill in the name, address, etc...
for this employee. When you have finished, click on the 'Pay Info' tab at the top of the screen. Here
you input pay amounts and withholding amounts. If the payee is paid an hourly wage, you will need to
enter that amount under 'Hourly Pay' and the overtime hourly wage under 'Overtime Pay'. For
employees that are paid a salary, you enter the base pay for the pay period under 'Base Pay'. Enter all
withholding and deduction rates and amounts that are applicable in the spaces provided. When you
have finished, click on 'Ok'. The employee you just entered will now be displayed in the browse box.
Repeat this procedure for each employee. When you are finished, click on 'Close'.
Now that your employees have been entered into the system, we are ready to do the payroll. You
should be back at the Payroll Menu at this point. Click on 'Browse' and choose 'Browse the Payroll
File'. From the browse box that comes up, click on the 'Insert' button. You should now be at the
Payroll Update screen. Click on the button at the top of the screen that says 'Name' and has a
flashlight on it. This will bring up your list of employees. Highlight the desired employee and click on
the 'Select' button. The information you entered in the employee file will automatically be brought in. If
this is a salary employee, everything should be correct, simply tab through the fields to figure the net
pay. If the employee is paid an hourly wage, you will need to enter the number of hours worked during
the pay period and any overtime hours in the spaces provided. The program will figure the net and
gross pay for you using the information that you entered as you tab through the fields. When you are
done, click on the 'Ok' button. The information you have just entered will now be listed in the browse
© Present
Amsoft for Windows
50
box. Repeat this procedure for the rest of your employees to finish your payroll. You may print a pay
stub by highlighting the desired record and clicking on the print button at the bottom of the browse box.
When you have finished, click on the 'Close' button. Click on 'File' and choose 'Exit' to return to Amsoft.
To print your payroll checks from the Checkbook program, simply click on 'Insert' to enter a check and
click on 'Insert' from the Update screen to enter the amount. On the next screen you will see some
buttons to the right. Click on the one that says 'Get Payroll'. The payroll information that you entered
will appear. Highlight the record you wish to write a check for and click the 'Select' button. The amount
of the check and the payee information will be imported. Continue the procedure described under
Checks and General Ledger to finish the check, and repeat until all payroll checks are complete.
10.5
Networking
Networking for Amsoft can be done in a variety of ways. From the start, you need to decide whether
Amsoft will be installed on one machine (with the other machines running the program over the
network) or on all machines (with Amsoft installed directly on each machine, but looking for the data
over the network). The most important thing to remember with a network, is that when an update is
made, every machine that has Amsoft installed directly needs to be updated at the same time.
Basically, installing Amsoft on one machine only makes updating the software easier and more foolproof, but may result in some slowness in Amsoft. Installing Amsoft on each computer will make
Amsoft run Speedily, but much more care needs to be taken when updating to ensure that data doesn't
get corrupted.
Whichever way you decide to run your Amsoft system over the network, you will first establish the
computer that will be the main Amsoft computer, and install Amsoft on that machine. Next, you will
need to map a network drive from each computer to the drive which houses the network data. If you
are not sure how to go about doing this, it is a simple step for a hired IT person.
Once the drive is mapped, if you are running the entire program from the main machine, the next step is
simply to setup your shortcut. To do this, open 'My Computer', then find the mapped serverdrive, and
open it. Next, open the 'hcs' folder. Then find the Amswin file. It will have a globe attached to it and
will either be called Amswin.exe or just amswin, depending on your settings. Right click on this file,
then go to 'Send To..' and then click on 'Desktop (create shortcut)'. Once this has been done on each
machine, Amsoft is ready to run on the network.
Setting up Amsoft on the Network with Amsoft installed on each computer works a little differently.
Once you have the drive mapped, install Amsoft on the local machine. This will create your Amsoft
Icon on the desktop. To set where Amsoft gets the data, open Amsoft. In Amsoft, go to "file' and then
'Options'. On the options window, click on the 'Data Storage' tab. You will be asked for the path for the
AMsoft data. This is where the mapped drive comes into play. Your mapped drive can have any drive
letter you assign to it when you map it, but for this example we will use the letter 'H' as the drive letter
for the mapped drive. With 'H' as the drive letter for the server, the path will read 'H:\hcsdata' (if your
mapped drive is not H, change the H to the correct drive letter). Then click the 'OK' button, and you are
done. This process needs to be done on each machine. And any time the software is updated (either
from a download or by CD), each computer needs to be updated.
11
Troubleshooting
11.1
How to
In this section we will review the questions that agents call with most frequently. At this point you
should have a fair working knowledge of Amsoft. The answers will be kept short & to the point.
Enter a new client - choose Clients from the main menu. You will be taken to the Browse client
files screen. At the bottom of this screen is a button with insert on the button. Click on the insert
© Present
Troubleshooting
51
button to enter a new client. If it is a second policy for the insured, place the bar on the client you want
to work with & click on the copy button at the bottom of the screen. This will duplicate all information for
this insured into a new policy.
Move a prospect to the client file - First from the browse client screen click on the insert
button to add a new record. At the top of the screen you will see a button (get prospect). Click on this
button. You will get a listing of prospects. Place the cursor on the prospect you want. Click on the
select button. You will be returned to the client update screen and the insured information will be filled
in.
Bill a policy to the lienholder - from the browse client file click on insert. You will be taken to
the update client file screen. In the bill to section you will see a button on the top line. Click on this
button. You will see a listing of lienholders. Place the cursor bar on the one you want & click the select
button at the bottom of the list. The bill to portion of the screen will have been filled in.
Fill In Optional screens for each policy- these are screens mostly coverage screens which
can be added to each policy. To add a screen either insert a new record or change an existing record.
This will take you to the client update screen. At the bottom of the screen and along the right hand side
of the screen are buttons - some have icons on them and some have words. These represent different
screens. Click on the button of the option you desire. You will then be taken to that screen.
Enter a memo or suspense item - choose clients from the main menu. If you wish to enter or
view a memo for a particular insured, find the insured on the screen and place the cursor bar on top of
the client. Click on Change and information on the desired client will be displayed. At the bottom of the
update screen will be a button with a picture a pencil on it. Click on this button togo to the Memos &
Suspense browse box. Click on Insert. This will bring you to the memo update screen. This screen
will be mostly pre filled in with the insured information. Enter your memo. When done, click on 'Ok' to
save. You will now be at the Browse Memos & Suspense screen. At the bottom of the screen will be
displayed 'Print Memo To' and five buttons:
Insured
MGA
Company
Bill To
Producer
whichever button you click on will determine how the memo is addressed. To exit this screen click on
close.
Find memos which are past due - From the main menu click on 'clients'. Choose the 'Past
Due Memos' tab. All past due memos will be displayed. To print past due memos, click on the
appropriate button, or go to the reports 'other' section.
Enter a negative number- this situation arises most often when entering a return premium. To
enter the negative number press the (-) key and then enter the premium you wish to be negative.
Enter an additional premium transaction- go to your client files. Choose the correct insured
by placing the cursor on his account and click on Change. The insureds' account will be displayed.
Click on Premiums at the bottom of the update screen. To make another entry click on 'Insert'. Enter
the needed information. Click on Ok to return to the main premium history screen. There should now
be another premium added to your list of transactions. You would follow these steps to enter an
endorsement premium, a payment from the insured, a payment to the company, commission received,
etc...
To exit this screen, click on Close. You will be returned to the client update screen. Any premium
changes you made in the premium history screen will now be reflected on this screen. To save these
© Present
Amsoft for Windows
52
changes you will need to click on Ok.
Enter a Policy/Agent/Service Fee - The first thing you need to do is set up a company as
'FEE'. To do this, go to the client's file, and click on the 'Company' button. Click on 'Insert', and then
click on the 'Company Code' button with a flashlight on it. Now click on 'Insert' again. Use FEE for the
Company Code, and whatever wording you desire for the Company Name (i.e. Policy Fees). Click on
'Ok'. Now enter 'FEE' as the Coverage Code, and '1.0' for the commission. You can enter 'Policy Fee'
under 'Notes', and click on 'Ok'.
Now click on the 'Premiums' button. Click on 'Insert' to enter the fee. In the 'Premium' field, enter the
amount of the fee. 'Payment from Insured', 'Amt Financed/Dir Billed', and 'Broker Comm. Retained' will
all be '0.00' and 'Due Agency' will be the amount of the fee. Click on the 'Company' button, highlight the
'FEE' item, and click on 'Select'. 'Commission' will be the amount of the fee, 'Commission Received' will
be '0.00', and 'Commission Due' will be the amount of the fee. The rest of the fields will be '0.00' except
for 'Commission Retained' which will be the amount of the fee. Change the transaction to 'Policy Fee'
(or whatever wording you like) and click on 'Ok'.
Enter an installment premium- many agents will have the need to bill a client for premiums due
on some sort of schedule. This schedule may be as simple as $150. Due every quarter or as
complicated as a different amount due every week. In any case, Amsoft can handle it.
To do an installment billing, enter a new client. Then you click on Premiums. At the Premium History
Browse Box, click on Insert. You will now be at the Premium field. We have a premium of $600 which
we want to bill to the insured at $150. Per quarter.
At the premium field we will enter $150. We will want to change the installment premium from no to
yes.
You can accept the default response for the rest of the fields until you reach the date field. At the date
field you will enter the date you want this payment due by. Finish filling the screen. You will notice at
the bottom of the screen the print button. By clicking here you can print an invoice for this installment to
the insured.
After printing the invoice you need to save the record. You will be returned to the premium history
browse box.
We have billed for the first $150.00. We must now bill him for the next 3 installments. To do this put
the cursor on the insured we just entered and click on Copy. This will copy the record under the cursor
to a new record. Your screen should now show a new data input screen that is already filled in. This
screen is not completely correct. We will need to go to the transaction field and change it to second
installment. And change the date to the new due date. Then save the record. We will follow the
above step until we have entered installment three & four.
After completing this we will be at the premium history browse box. Click on Close to return to the
main client update screen. If you have not entered anything else in Premium History, you will notice
that the total premium of $600 will be displayed. Also, the total amount due of $600. Will be displayed.
We will not want to send past due notices to the insured. Finish the form & save it.
The last point to this is that you will want to send a notice to your insured as each installment is due.
To do this choose reports from the main menu. You will then be given another menu from this you will
choose installment billing. You will then be asked through what date you want installment billing issued.
© Present
Troubleshooting
53
Enter the date and press enter. All installments that are equal or less than the chosen date will be
printed.
Enter an Agency Bill Payment - Go to the client's screen, and click on 'Premiums'. From the
Premium Browse Box click on 'Insert'. Enter the amount of the payment under 'Payment From Insured'.
The 'Due Agency' amount will be the negative amount of the payment. If you are retaining any
commission out of this payment, enter that amount under 'Commission Received'. The 'Commission
Due' field will then show the negative amount of the commission received. Change the transaction field
to 'Payment From Insured', and click on 'Ok'.
Enter a direct premium payment- first we must know what a direct premium is. This is a
premium paid by the insured to the agency. This premium is not owed to the agency but to the
insurance company, which would be paid on a direct bill policy. Or the premium may be received by the
agency for payment to a finance company for a financed policy.
Amsoft can keep track of these payments & produce a listing or transmittal form for these items. To
make an entry, find the insured who is making the payment. Bring his account up on the screen. One
of the options will be direct $, located at the bottom right. Click on the direct $. You will now see the
direct premium browse box for that insured. Click on Insert. At the update screen enter the payment
and press tab. You can then save the record by clicking on Ok.
Print a transmittal each day - Go to the report section. Choose direct premiums. You will then get a
choice of listings or transmittal. The listings will give you a report of all direct premiums received that
day. The transmittal will produce a report for each company displaying the insured, policy number &
amount paid.
Asses Late Fees - Click on 'File' and choose 'Batch'. Click on 'Late Fees'. Fill out the screen - If
you are charging interest, fill out that field (.015 for 1.5%) or if you charge a flat fee, fill out that field.
Enter the number of days past due. This takes the 'Due By' field and figures how many days past due
the premium is, if it falls under the # of days that you have selected, a fee will be added to their
premium history screen.
Cancel a policy - Look up the policy in the browse box. When the cursor is on the policy desired,
click on change to view the policy. You will need to change the expiration date of the policy to the date
the policy has been canceled. If there is a return premium you will need to enter that in the premium
history screen. Remember when you enter a return premium you need to begin the entry with a - sign.
Renew a Policy - Go to the client's file and change the policy dates, and anything else that is
changing for the renewal. Then click on the 'Premiums' button. Click on the 'Archive All' button. This
will put the old premium history records on the 'Archived Records' tab (these records will still be active
in the report section). You can now insert the new renewal premium.
Batch Enter Commission Received - Click on 'File' and choose 'Batch'. When the Batch
menu comes up, click on 'Commission Rec'd'. You will now be prompted for a company; click on the
'Companies' button to select a company. Highlight the desired company and click on 'Select'. The
company code will be imported, and today's date will show as the batch date. To accept this
information, click on 'Ok'. You will be brought to an empty browse box. Click on 'Insert' to add an item.
An input screen will appear. Click on the flashlight button to see a list of clients for the selected
company. Highlight the desired client, and click on 'Select'. Most of the information will be imported; all
© Present
Amsoft for Windows
54
you should have to fill out will be the amount of commission received. This field is located directly under
the Account Code field. Once this amount is entered, click on 'Ok'. (The 'Premium' and 'Commission'
fields at the bottom of the screen would only be used by agents who do not enter a premium record
when entering a policy).
You will now be back at the batch commission received browse box, and the record you just entered will
be highlighted. The total commission received is located at the bottom right of the browse box and will
keep a running total as you enter more records. Continue adding records in this same procedure until
all records have been entered. When you are finished, you can print a commission received statement
from the printer button at the bottom of the browse box. This should match the statement from the
company if you have entered everything correctly.
Each of the entries you have made on this screen have been simultaneously entered into the
corresponding Premium History screens. Deleting a record from this screen will delete that entry from
the corresponding Premium History screen as well.
Enter producer commission & printing statements - The producer statements are based
on the commission received field & the date the commission was received. You may enter the
commission received in one of two ways. First, look up the client. Go to the premium history screen for
that client. Click on Insert to enter a new record. In the commission received field enter the
commission received. In the date field enter the date the commission was received. Next be sure to
enter the code for the sub producer. There may be other fields you wish to fill in this is ok!. The above
steps could actually be done as you enter a new policy.
The second method for entering commissions would be used when you are entering a large number of
commissions. These commissions might be from a company statement. From the menu bar, choose
Batch. Now you will see a browse box with the date at the top. Click on Insert and you will see a
screen allowing you to enter commission information. Your cursor will be located at the account # field.
Enter the account number or at least the first few letters. A list of accounts will appear if you did not
enter the complete account#. Choose the correct account# & press enter. Fill in each of the following
fields. When done click on Ok to save. You will notice that each item will be displayed in the look up
box. At the bottom of the screen will be a total of all commissions entered today. To enter another
commission click on Insert.
Print a producer statement - go to the main menu, choose reports. From the reports menu you
will see producer statements. Place the mouse on accounting then on producer statements. You will
now have a selection of: Date written and date paid
The date written report will print a statement for each producer. It will list all items within the desired
time frame. The report will be based on commission received. After the report prints you will be given
the option of posting the date paid. If you choose yes each record that was printed will be changed to
reflect the date paid date. Once this date is posted this item will not print on the producer statement
again.
The second selection you will have from the producer menu is date paid. This will print a listing by
producer of all commissions paid on a certain date.
Look up records other than by account# - From the main menu choose clients. You will
then see a listing of clients, and you will be able to select your client by Account #. To change this
selection click on the option you desire. These are located directly under the left side of the scrolling
portion of the browse box.
Enter a surplus lines premium - Choose clients from the main menu. Choose the appropriate
© Present
Troubleshooting
55
client or enter a new client. Go to the premium history screen. Enter the policy premium and any other
information. Set transaction to new policy. Do not enter any fees or taxes on this entry. Save the
record - it will be displayed in the premium history browse box. To enter the fees click on insert while in
the premium history browse box. You will be given another premium history update screen. Enter the
tax for the policy in the premium field. Fill in any other fields. At the transaction field enter taxes. Save
the record. You will now be at the premium browse box. You should see an entry for the original
premium and the taxes. You can add as many additional entries as you desire by clicking on Insert.
Enter a prospect or expiration date - Choose prospects from the main menu. You will see
the prospect browse box. Click on Insert. Now simply enter the prospects name & address, phone
number, expiration date and a code for the type of coverage he is a prospect for. When done click on
Ok to save the record. Click on close to exit prospecting.
Print prospecting reports - choose reports from the main menu. When the reports menu
appears select prospecting. You will then see the prospecting menu. You will have the following
choices:
Mailing Labels by Name
Mailing Labels by Zip
Prospect Listings
Mail Merge Report
Any of the above reports can give you a listing of all prospects. The report can be limited to any
combination of fields. For example, you could get a listing of expiring policies in a certain zip code.
Enter a claim- From the main menu choose clients. Next you get a list of clients. Chose the client
that had a claim. Place the cursor on him click on Change. Now displayed is the client update screen.
Click on the claims icon which is indicated by two cars and the claim browse box will be displayed.
Click on Insert. To save the claims information click on Ok. Enter all the claim information you have.
If you wish a claims report click on the printer icon button.
Enter Family, Driver & Employee Information - this section stores names, address & dates
of birth of insured's. It can also, store employee information for commercial accounts or employee lists
for group insurance. To enter family information, go to the insured's update screen you want to add this
information to. Click on driver family & employee information. This icon will be indicated by a smiling
face. From the browse box click on Insert. At the update screen enter information for each field
desired. When you are done click on Ok to save the information.
Print date of birth labels - Go to the report section and choose 'Mailing Labels' and then 'Date
of Birth'. Choose 3 or 1 across. The next screen you see will give you a choice to set additional
selections. You will need to click on this box.
Batch Delete Records - To delete expired policies through a certain date, click on 'File' from the
main menu and choose 'Batch'. From the Batch Menu, click on 'Delete Files'. A window will come up
and ask you if you have a backup for your data; you will only be able to batch delete old files if you have
a backup. Click on the button indicating that you do have a backup to continue. The batch delete
screen will now appear. Enter a date through which you wish to delete all expired policies. Next, enter
the code 'GETRIDOFOLDRECORDS' in all capital letters in the space provided. Click on the 'Begin
Deleting Records' button. A processing records screen will appear, and when the system is done
deleting records you will be returned to the previous screen. Click on the 'Exit' button, and on the next
screen (which asks if you have a backup) click on the icon in the top left corner and choose 'close'.
© Present
Amsoft for Windows
11.2
56
Problems and Solutions
For many errors and other problems you may encounter in Amsoft, simply closing out of
Amsoft and then opening it back up will solve the problem. Other times you may need to
restart the computer and network (if you have one) and then try again.
Problem - you get an error message when installing an upgrade or renewal: 'The file
\hcsdata\cksaccts.tps could not be opened'.
Solution - This is actually not a problem, the install program was simply trying to make a backup of a
part of the program that you do not have. The installation has already succeeded at this point. You do
not need to doanything.
Problem - When you enter a policy or premium and save it, the record gets duplicated.
Solution - check the Company Code for the duplicated record. Then close out ofeverything except the
very first screen of Amsoft. Click on 'File' and 'Company Information'. Find the Company Code. You
will probably see the same code entered twice. Change the code that has the most records attached to
it. If the code is not duplicated, check your Agency information and make sure that your agency code is
only listed once, and that there are no blank records on the Agency Browse Box.
Problem - when you start the program you get an error message: Too many files open.
Solution - this normally occurs the first time you run the software. To resolve this change your
config.sys file on the main directory to files =170 & buffers =20. If you have been running the software
with no problems & this problem occurs, then it was probably created by installing a new program which
changed you config.sys file. If your config.sys file shows a number of 170 or more & you are still getting
the error message "too many open files" then you will need to increase this number. This correct
number is actually derived from the programs you are using on your computer. Windows & networks
generally mean the files statement must be increased. Please note that for any change in your
config.sys file to be activated you must reboot your computer.
Problem - CODE #3:Path Not Found - The directory name specified as part of the path does not
exist.
Solution - This is a network error - Make sure your shortcut (Amsoft icon) points to the right drive,
and that the computer that stores Amsoft Information and the computer having the problem is online
with the network.
Problem - CODE #4:Too Many Open Files - The total number of file handles available has been
used.
Solution - Check the FILES= setting in the CONFIG.SYS file, or the user's or network's simultaneous
open files setting in a network environment. Increase the file statement for example if it says 100 make
it 150. After making the change reboot. If you are on a network you may have to do this to all
© Present
Troubleshooting
57
machines. To change the config.sys file GOTO your main directory & type edit config.sys. If you have
dos 6.0 or higher & dos in you path this will load the ms dos editor. For more information on how to use
it see your ms dos manual.
Problem - CODE #5:Access Denied - The file has already been opened by another user for exclusive
access, has been left in a locked state, or you do not have network rights to open the file. This error
can also occur when no disk space is available.
Solution- This is normally caused by not having share in you autoexec.bat file or not having the right
parameters after it. Share should look this way in your autoexec.bat Share.exe /f:4096 /l:500. The f
& l numbers may need to be increased in some cases. Windows 95 normally does not need a share
statement only windows 3.1.
Problem - CODE #7:Memory Corrupted - Some unknown memory corruption has occurred.
Solution - Try shutting down your computer and network (if you have one). If this doesn't help, contact
a hardware person.
Problem - CODE #8:Insufficient Memory - There is not enough unallocated memory left to perform
the operation.
Solution - Closing other applications may free up enough memory.
Problems CODE #36:Invalid Data File - Some unknown data file corruption has occurred.
CODE #38:Invalid Key File - Some unknown key file corruption has occurred.
CODE #46: Key File Must Be Rebuilt - Some unknown key corruption has occurred that requires the
BUILD statement to re-build the key.
CODE #47:Invalid Record Declaration - The data file on disk does not match the file's declaration in
the .EXE, usually because you have changed the file's definition in the Data Dictionary and have not yet
converted the file to the new format.
Solution Error messages 36-47 are generated by damaged data files. Make a backup before trying to resolve
this problem. To resolve these in most cases, run file maintenance. You may need to run File
Maintenance Utilities 'Release' 'Pack' and then 'Build'. If this doesn't work, click on 'Freshen' from the
same screen, and try 'Release' 'Pack' and 'Build' again. In severe cases you may need to delete the
key files first. Always make a backup copy. You can delete these files located in the hcsdata directory
extensions k01through k12 from Windows Explorer.
Problem - CODE #64:Sharing Violation - An attempt to perform some action on a file which requires
that the file be opened for shared access.
© Present
Amsoft for Windows
58
Solution - Make sure you have share in you autoexec.bat file. Some networks need files set to read
only. There is a file in the hcs directory called ro.bat type ro.bat to set needed files to read only. Please
note: If files are set to read only, you will need to set them to read write before installing any upgrade.
To do this Go to the hcs directory and type rw.bat. Then install the files. Then you will need to set
them to read only.
Problem - CODE #40:Creates Duplicate Key - An attempt to ADD or PUT a record with key field
values that duplicate another existing record in the file has been made to a file with a key that does not
allow duplicate entries.
Solution - Simply change you account number, you have already used it.
Problem - An hour glass appears when choosing a function of Amsoft & never leaves.
Solution - You need to due one of two things. First you must exit Amsoft. Then delete a file in the
windows directory called amswin.ini. Then go back into Amsoft & see if the problem has been resolved.
If not, run file maintenance.
© Present
Troubleshooting
11.3
59
Whats New
10/14/2006 The Paperless Office/ Scanning module has been upgraded to a new version.
10/07/2006 The Property Loss ACORD form has been updated to the newest form.
10/02/2006 The Certificate of Liability has been updated.
09/30/2006 The NY Personal Auto Application has been updated.
09/26/2006 The NJ Personal Auto App has been updated in te Form Manager.
09/23/2006 The Homeowners Application has been updated.
09/14/2006 The Watercraft Applcation has been updated in the Form Mnagers.
09/10/2006 The Ohio Commercial Auto Section has been updated.
09/06/2006 The Property Section has been updated.
08/17/2006 The Broker of Record Change form has been updatedupdated agent?broker change
of record change 36
08/04/2006 We have added an export function for the MGA and Rolodex sections.
07/29/2006 The Umbrella Excess Section has been added to the Form Managers.
07/22/2006 The Evidence of Property has been updated.
07/16/2006 The General Liability Application has been updated.
07/12/2006 The tagging in the scanning section has been upgraded to allow for faster emailing and printing.
07/08/2006 The Word Processor has been updated with additional Watercraft Tokens for
mail-merging.
07/01/2006 The General Liability Loss Notice has been updated to the most recent version.
06/24/2006 The Auto Loss has been updated to the most recent version.
06/18/2006 The Property Loss Notice has been updated to the most recent version.
06/13/2006 The Evidence of Property has been updated.
06/06/2006 The Evidence of Commercial Property has been updated.
© Present
Amsoft for Windows
60
05/23/2006 The Watercraft Coverage screen has been upgraded.
05/14/2006 The General Fraud Statement has been updated to the most recent version.
05/09/2006 We have added a spell check function to Amsoft. This is probably most useful in
the Memos and Suspense.
05/03/2006 ACORD 82 - Watercraft Application - has been added to the Form Managers.
04/29/2006 Report for Past Due Memos - you now have the ability tobsort by priority and choice of
account, company, producer or mga
04/24/2006 We have updated the Evidence of Commercial Property in the Form Managers.
04/20/2006 The Check writing now has the ability to export data to an ascii file, excel or a new report.
03/24/2006 Added a new memo report that prints by priority.
03/12/2006 Added a new form: ACORD 148 Electronic Data Processing
02/27/2006 Added notes to the claim update screen.
02/12/2006 Added more fields and the ability to sort by different criteria in the claim report.
01/23/2006 the Professional Liability Application has been added to the Form Managers.
01/18/2006 The Good Student and Statement of No Loss Forms have been updated.
01/08/2006 the Additional Interest and Restraunt Supplement forms have been updated.
01/02/2006 The following fields have been added to the loss screen: public adjuster and
claimant.
12/28/2005 The Business Owners Application and Young Driver Questionare forms have
been updated
12/20/2005 A rating section has been added to the Workers Comp coverage screen.
12/18/2005 The Business Owners App has been updated in the Form Managers.
12/17/2005 The Property Loss notice has been updated to the new format.
12/15/2005 The following forms have been updated/fixed: Auto Loss Notice, Statement of No
Loss, Cancellation Rquest, Certificate of Property
12/12/2005 E-mailing capability has been added to the scanning section, as well as the ability
to turn images into .pdf files. To e-mail images: tag the image(s) you want to send, then click
© Present
Troubleshooting
61
on the 'E-mail tagged' button. On the next screen the image files tagged will be showing in the
list. To add additional .pdf's, click on the '1. Add Files' button. next, click on '2. Create PDF' this will preview the file you will be sending. Once satisfied, exit out of the preview, and click
on '3. Email'. This will take you to the regular e-mail scrren for Amsoft - proceed as usual.
12/06/2005 The Florida Workers Compensation application has been updated in the Form
Managers.
11/30/2005 Check printing has been added to the premium history screen.
10/06/2005 The Kansas Personal Auto Application has been added to the Form Managers.
10/02/2005 The Personal Policy Change Request ACORD Form has been updated.
09/28/2005 A priority field has been added to the memos and suspense.
09/01/2005 We have added a tutorial on our website which covers merging multiple forms
into one pdf for e-mailing:http://www.amsoft.org/Tutorials.htm
08/28/2005 The Lost and Cancelled Policy Request has been updated in the Form Managers.
08/24/2005 The Contractor's Supplement has been added to the Form Managers.
08/23/2005 The Restaurant Supplement has been updated in the Form Managers.
08/20/2005 The Additional Interest Form has been updated in the Form Managers.
08/16/2005 The Statement of No Loss has been updated in the Form Managers.
08/12/2005 The Good Student Supplement has been updated in the Form Managers.
08/10/2005 The Professional Liability ACORD Form has been updated in the Form Managers.
07/20/2005 The Flood Application has been updated to the new format and the newest version
in the form managers.
07/12/2005 The ACORD 125 and 127 (Commercial Application and Business Auto App)
have been updated in the Form Managers to the newest version.
07/06/2005 The Premium Payment Supplement has been added to the Form Managers.
07/05/2005 The Agent/Broker Change Form and the Personal Umbrella Form have been
updated in the Form Managers.
06/20/2005 The Glass and Sign Supplement has been updated in the Form Managers.
06/16/2005 The Garage and Dealers section has been added to the Form Managers for the
© Present
Amsoft for Windows
62
following states: AL, AZ, CA, CO, CT, FL, GA, IA, ID, IL, LA, MI, MN, NC, NJ, NY, NE,
PA, TX
06/10/2005 The WC 133 for specific states has been added to the Form Managers.
05/24/2005 The Oklahoma Personal Auto App has been added to the Form Managers.
05/20/2005 The Open Cargo section has been added to the Form Managers.
05/18/2005 The Dealers Section has been added to the Form Managers.
05/12/2005 The Accounts Receivable Acord Form has been Added to the Form Managers.
05/04/2005 The Certificate of Property ACORD From has been updated to the new version.
04/30/2005 The Commercial Property ACORD Form has been updated to the new version.
04/28/2005 The commercial Property Coverage page has been completely updated.
04/14/2005 The Crime Application has been added to the Form Managers
04/11/2005 The Certificates can now be archived.
04/08/2005 You can now e-mail multiple forms in one e-mail. To do this, preview the print,
and click on the pdf icon button in the top right corner. This creates a .pdf of the form and
saves it in the amsoftpdf folder on your hard drive. You can then cancell out of the print, and
say 'Yes' when asked if you want to create the pdf anyway. Do this for each of the forms you
want to send in one e-mail. Then, go to 'Forms', 'Form Managers' and 'Create Pdf'. This will
allow you to select the .pdfs that you want to merge together. Once you have merged them,
you can e-mail the new .pdf by clicking on the e-mail button. Available now in the following
forms, with others to follow: Certificates, Binders, Commercial Application, General Liability
Section, Property Section, and Memos.
04/04/2005 The First line of the Description of Operations has been added to the Certificate
Listing.
03/25/2005 You can now go directly to a Company's website directly from a client's
information screen. First, you will need to have each company's website address entered
under 'File' and 'Company Information'. Then, when you are on the client's screen (the main
information screen with their address and phone #'s on it), simply click on the 'Web' button
next to the company code.
03/10/2005 The Personal Inland Marine Application has been added to the Form Managers.
02/19/2005 The Restaurant Supplement has been added to the Form Managers
02/07/2005 The Homeowners Application has been updated to the newest version.
© Present
Troubleshooting
63
02/04/2005 We have added the Hotel/Motel Supplement to the Form Managers
02/02/2005 The North Carolina Personal Auto Application has been added to the form
managers.
01/30/2005 The Colorado Personal Auto Application has been added to the form managers.
01/28/2005 We have added the FL WC Application to the Form Managers and updated the
general WC Application to the new format.
01/12/2004 We have added an area which will allow you to designate a 'data storage path'
which will speed up performance over networks. For more information/instructions, please
see 'Networking' in the manual.
01/10/2004 The Louisiana Personal Auto Application has been added to the Form Managers.
12/17/2004 The Ability to map a client or prospect's address via mapquest.com has been
added.
10/18/2004 The Evidence of Property Form has been upgraded to the newest version and the
wysiwyg format.
09/30/2004 The Commercial Property section has been updated to the new wysiwyg format.
08/30/2004 The Commercial General Liability Section has been upgraded to the 2004
version, and is now in the new format.
08/27/2004 Scanning has been added to the prospect and the claims sections.
08/23/2004 The ACORD Evidence of Commercial Property Form has been added to the form
managers.
08/12/2004 The ACORD Notice of Information Practices has been added to the Form
Managers.
07/14/2004 The driver screen can now change the fields displayed and a new 'send to' button
allows sending data to a word, excel, html or ASCII file.
06/23/2004 The Terror ACORD Forms 60,61, 62 and 66 have been added to the Form
Managers.
06/16/2004 The general Commercial Application has been updated to the new WYSIWYG
Format.
04/21/2004 The General Fraud Statement has been added to the Form Managers.
03/09/2004 On the Direct Premiums Screen, you can now lookup and select a different
© Present
Amsoft for Windows
64
Company to print out on the receipt, and 2 note fields have been added to the receipt so that
you can add anything you need to the print out.
03/07/2004 The ACORD 87 Personal Lines Package Application Watercraft and inland
marine supplement has been added to the form managers.
02/29/2004 The WP now imports Home information, MGA, Producer and watercraft info.
02/24/2004 The Binder has been updated with more space and put into the new WYSIWYG
Format.
02/10/2004 We have added the Michigan Personal Auto Application to the form managers.
02/06/2004 We have added the ability to change the path for all or selected scanned images in
the scanning module.
02/03/2004 The Certificate has been updated to the new format - when you fill in the
information, you see the actual form on the screen.
01/30/2004 The Leased Auto Certificate has been added to the Form Managers.
01/23/2004 Fields for 'Source' and 'Group' have been added to the client screen. This will
allow you to indicate where you got the business, and group related policies that are not
policies for the same insured together.
01/10/2004 a 'Cancelled' check box has been added to the client screen, allowing you to
differentiate between cancelled and expired policies.
12/16/2003 The Commercial Change Request has been updated.
12/12/2003 Added a file export for checkbooks into ascii files. Located under 'File' and
'Export' in the Checkbook program.
12/08/2003 We have added Iowa to the Personal Auto Applications.
12/05/2003 When deleting clients you will now be asked for a 2nd confirmation on deletion.
11/05/2003 We have added postcards to the report section. These can be used for renewal
notices, marketing, announcements, etc...
10/30/2003 The following forms have been updated: Equipment Floater, General Liability
Section, Evidence of Property, and the Transportation section.
10/20/2003 We have added FL to the Personal Auto Applications.
09/29/2003 We have added AL to the Personal Auto Applications.
© Present
Troubleshooting
65
09/23/2003 We have added NE to the Personal Auto Applications.
09/18/2003 Most of the Commercial Applications can now be e-mailed with both pages of the
form on one e-mail. i.e. when you e-mail the workers comp section, you no longer have to email each page separately.
09/15/2003 We have added e-mailing capability to the Workers Comp Section.
09/12/2003 We have updated the Personal auto policy change request
09/10/2003 We have added TX to the Personal Auto Applications.
09/07/2003 We have updated the Homeowners and Dwelling Fire Applications (ACORD 80
& 84).
09/03/2003 We have added unlimited phone #s and email addresses for MGAs.
08/28/2003 The Installation/Builders Risk ACORD Form has been added to the Form
Managers.
08/20/2003 The Equipment Floater ACORD Form has been updated in the Form Managers
08/18/2003 A Contact/phone database has been added to the company files. This will allow
you to store multiple contacts for each company.
08/11/2003 The ACORD Garage and Dealers Section has been added to the Form Managers.
08/01/2003 The NC Workers Compensation ACORD form (133 NC) has been added to the
form managers.
07/27/2003 The Contractors Supplement Application ACORD form has been added to the
form managers.
07/23/2003 The Business Auto section ACORD form has been updated in the form managers.
07/18/2003 The Auto Endorsement ACORD form has been updated in the form managers.
07/14/2003 The Boiler & Machinery Section ACORD form has been updated in the form
managers.
07/12/2003 The Property Section ACORD form has been updated in the form managers.
07/08/2003 You can now set a default for whether the ID cards print the insured's address or
not. Simply choose yes or no, and then click on the 'Set as default' button. This way you don't
have to set it every time you print ID Cards.
07/03/2003 The GL section has been updated in the Form Managers. It is now the 2000/04
© Present
Amsoft for Windows
66
version.
6/20/2003 A producer code field has been added to the claims file. You can now select a
certain producer when you print a claims report by checking 'Check to set additional
selections' and creating a search for that producer.
06/18/2003 The Commercial Application has been updated in the Form Managers to the
2003/01 version.
6/15/2003 The Certificate of Property Certificate holder fields have been enlarged. This form
can also now be e-mailed.
06/12/2003 The Homeowner Application and Dwelling Fire Application in the Form
Managers - field tabbing has been updated.
06/09/2003 We now integrate with CCI Rater. To use this function, export a quote in CCI
Rater, then, in Amsoft go to 'File', 'Import Export', 'Rating Companies', and 'CCI Rater'.
Follow the on-screen instructions, or call for more help.
06/03/2003 The 'Make' field on the vehicle screen has been made longer.
05/30/2003 The driver list now prints in the named driver order.
05/27/2003 The CT and CA Personal Auto Apps have been added to the form managers.
05/07/2003 We have added the ability to print File Folder Labels. To print a label, highlight
the account on the main client browse screen, and click on the button at the bottom that has a
folder that says 'Label' on it. You will need to use Avery Labels # 2181 or equivalent, and
some printers may not be able to handle this function. If you have troubles, try printing it as
an envelope.
04/24/2003 The Workers Compensation Section of The Commercial Application has been
updated to the 2003/09 version.
04/18/2003 The ID Cards in the Form Managers now have the option of not printing the
insured's address for safety reasons.
04/12/2003 We have added additional spaces for the insured name on the Certificate.
04/3/2003 We have added a new phone database to the client files. Click on the phone button
to access the list for phone #'s. This section will allow you to add additional phone #'s for
multiple people associated with the client, as well as add extensions.
3/15/2003 The Homeowner Application now prints both pages at once. This should make emailing and automatic faxing much more convenient.
02/17/2003 We have added a wind section to the homeowner coverage screen.
© Present
Troubleshooting
67
02/12/2003 NY and PA have been added to the Personal Auto Apps in Form Manager.
01/28/2003 We have added a report to the accounting section - past due invoices now have a
listing by producer.
01/23/2003 Word Processing has been added to the prospect section.
01/20/2003 The Word Processor now imports Vehicle and leinholder data. You must select
the correct vehicle before merging data into the document.
01/02/2003 The Dwelling/Fire Application has been updated in the Form Manager.
12/20/2002 We have added 'easy entry' to the auto screen. This will allow previous entries to
be chosen on the coverage screens.
12/10/2002 The Personal Auto Application has been added to the Form Manager for selected
states.
11/03/2002 We have added more fields in the driver & family screen. These will be used in
our soon to be released personal auto application for form managers.
10/30/2002 We have updated the Security section, so you no longer have to re-enter your
login data to enter the scanning section for Companies, MGAs, Leinholders and Agency.
10/23/2002 The auto id cards in Form Manager now process faster when working on a
network.
10/17/2002 We have added the Professional Liability Application to the Form Managers.
10/06/2002 We have added the ability to view Certificates for one client, and then sort them
by Certificate Holder.
09/27/2002 The Date of Birth Mailing labels in the reports section now supports tagging.
09/15/2002 We have added a Batch delete option to the Certificate Manager. You can now
search and/or tag Certificates that you wish to delete and purge them all at the same time.
08/20/2002 We have added the Workers Comp Assigned Risk Form to the Form Managers.
This is ACORD 133.
08/10/2002 We have a new file search feature under 'File' and 'Options'. While it will mostly
be used for Tech Support, it is a utility that searches the hard drive, so you can use it to find
things like word document files that you have lost.
08/02/2002 The Word Processor now does a mass mail merge. This means that you can
create a template form letter, and merge all desired client's information and print in a mass
procedure. It will also let you do a search for the exact clients you wish to merge, just like the
© Present
Amsoft for Windows
68
report section searches. We feel that this is a powerfull addition to Amsoft.
06/21/2002 The Homeowners application has been updated in the Form Manager to the Jan
2002 version. The old version is still available from the Homeowner Application browse box.
06/10/2002 We now integrate with Priority Data Rater. For information on using this feature,
please see the rating section of the help.
05/26/2002 We have updated the claims screen. This can be found from the claims button on
the client update screen.
04/12/2002 Amsoft Now integrates with ITC TurboRater. To find out how to use this
integration, please see the ITC rating section of the help.
04/02/2002 We have added e-mail capability to the following ACORD applications:
Commercial Application, Property Section, and the General Liability Section.
03/13/2002 The Workers Compensation ACORD form has been updated to the 08/2002
version in the forma Managers.
03/04/2002 The direct premium screen now stores the time the receipt was issued. Before
the time was generated at the time of printing. It now stores the time, so anytime you print a
receipt, it will print the original time.
02/27/2002 The premium history and check book screens now incorporate electronic funds
transfer options (displayed on-screen as 'efunds').
02/12/2002 Amsoft now integrates with FSC Rater. To access the rating integration, go to
'File' and 'Import/export', choose 'Rating Companies' and choose the appropriate company.
FSC is the only company available at present. To find out more about rater integration, please
see the rating section in the manual.
01/06/2002 The New Certificate is availible in the Form Managers. Both the old and the new
certificate are available by going to the same Certificate Manager as before. Simply fill out the
certificate as before, and select which certificate you wish to print by clicking on the
appropriate button.
12-20-2001 We have added Directors And Officers to the list of Coverage screens. It is
located at the bottom of the list of coverages on the right side of the main client update screen
(the blue screen).
11-30-2001 We have added an Advanced search feature to the client files. On the main client
browse box, you will see a button with a flashlight on it in the lower right side of the screen.
Clicking this button will bring up a new browse box. Click on the search button at the bottom
of the screen. This will bring up a screen which will let you enter a word or phrase to search
for. If 'Search on related Files' is checked, then it will search all client areas of Amsoft
(memos, coverages, drivers, premiums) for the word(s) you enter. Click on 'Ok' at the top of
© Present
Troubleshooting
69
the screen to begin the search (this could take a while). Once the search is completed, you
will be at a browse screen with the matching records checked with a green check mark.
Highlighting a record and clicking on change will bring you to that client's update screen (the
blue screen with the basic client info.). We hope that this will be a very helpful tool.
11-06-2001 We have added the Statement of Values to the Form Managers. It can be found
under Applications, then Commercial.
10-24-2001 The driver screen now has field for when a driver is added and removed. The
screen now supports tagging- so you can print a list of tagged records only.
The report for the driver is now e-mailable.
10-20-2001 Check book - Certain columns on the screen can now be sorted. For example the
amount field now shows +amount. Clicking on any header with a plus sign will sort that
column by the header. Clicking on +Amount will sort all checks by the amount field
10-15-2001 We have added the ability to set an option for the dates to default to a six month
expiration for the policy. To do this go to 'File' on the main menu, and click on 'Options' click
on the 6month policy option.
10-10-2001 Evidence of property insurance now has email and signatue capability. Also, the
word processor now can merge company and mga information in addition to client
information.
10-05-2001 we have added email capability to the lien holder letter and the ID form which is
accessed from the vehicle update screen. We have also added the ability to add your
'Signature' to the Certificate and Binder. This is for e-mailing purposes, and prints your name
in a handwriting font.
9-30-2001 The vehicle screens can now be sorted by year, make, model, vehicle# and date
added. You do this by clicking on the '+'in the column heading. (ie: '+Vehicle #')
9-20-2001 We have added the e-mailing option to a larger number of forms, including the
binder and the invoices. We have also added the e-mail driver installation into the program.
To install the driver, click on 'File' 'Options' and click on the 'Install pdf print driver for email'
button and follow the on-screen instructions. For more information about e-mailing, please see
the e-mailing reports section of the manual.
9-15-2001 We have upgraded our word processor to a more complete version. The word
processor now stores each client's word processing documents in his file. It also asks you if
you wish to add the task as completed into the memos and suspense file. We believe this is a
wonderful addition to the program.
To open a clients word processing file, highlight the client on the main client browse box, and
click on the 'WP' button at the bottom right of the screen. The first time you enter word
processing you will need to install the drivers by clicking on 'Install Drivers' from the wp
menu.
© Present
Amsoft for Windows
70
This Word processor will read in many different file types, including microsoft word, and
should be able to read in any documents created in our old word processor. For documents
created in the old word processor that have merge fields inserted into them, the merge fields
will need to be deleted and then re-inserted. Should you have any problems opening old
documents, the old word processor is still available to you
For more information about the new word processor, please see the word processing module
section of the manual.
8-20-2001 Added a zip backup procedure to file maintenance. Should you need to make a
quick backup of your most important files, you can do so with this utility. Go to 'File' 'File
Maintenence' and 'Client Files'. Then choose 'Zip Files'. This should not replace your daily
backups.
8-9-2001 New binder report prints a list of binders by expiration date
7-23-2001 Added e-mail capabilities to the ACORD Auto Endorsement.
6-20-2001 Added the Young Driver Questionairre to the Form Managers.
5-10-2001 There is a new Report for Direct Payments that indicates Which companies have
not yet been paid. You can find this under 'Reports', 'Accounting', 'Direct Premiums', and
'Amount due Company'.
4-24-2001 We have added e-mail capability to memos. This will allow you to e-mail a memo
from Memo's and Suspense (pencil button) Please see our e-mailing section
© Present
Troubleshooting
71
for more information.
4-23-2001 The Certificate of Property Insurance is now available in our Form Manager.
4-6-2001 We have added the ability to include non-commissioned fees and taxes on the
premium screen. This will allow you to enter the base premium and non-commissioned fees
on the same screen, instead of having a separate transaction for every fee and tax.
4-1-2001 We have changed the Main client screen. The first tab now shows all policies, and
turns the cancelled or expired policies red. This was needed to answer speed problems that
many users were experiencing. If you want to view just current or just cancelled policies,
click on the open folder iconed button at the bottom of the screen, and those tabs will appear
on the screen.
2-3-2001 We have a new version of Amsoft available with some revised screens. You will
notice additional alphabetic search keys and some new color coding. Mostly, the new version
has a lot of 'behind the scenes' stuff that will allow us to do a lot more in the future.
1-2-2001 We have added the Flood Application and the Flood endorsement to the Form
Managers. These import information from the new flood coverage screen.
12-28-2000 We have added a flood screen to our listing of coverage screens.
12-20-2000 The copy button on the main Client browse box will now give you the option of
also copying related records. The related records are the coverage screens for the record being
copied.
12-12-2000 The ID Cards in the Form Manager now print without tagging a vehicle from the
client screen. Now you can just go to the ID Card Manager, select the client you wish to print
ID cards for, and go to the form. Not only should this make them easier to use, but should
also speed up the printing process.
12-10-2000 The ability to get a vehicle schedule for tagged vehicles
12-7-2000 Added an option to print the current record in the Certificate Manager. This will
allow you to print only the record at the cursor without having to tag it, and will also be much
faster for anyone experiencing delays when printing the tagged forms.
12-3-2000 Added a Production Report by MGA under the Report section.
11-29-2000 Scanning: We have added the ability to store notes for each image in the
scanning section.
11-16-2000 We have increased the Producer code field to accept 7 digits. This will allow
agencies with a large number of producers to keep track of them more efficiently.
11-9-2000 Our website now features National Insurance News which is updated hourly. Go
© Present
Amsoft for Windows
72
to: http://www.amsoft.org/news.htm don't forget to bookmark it and check back regularly!
11-5-2000 Added the Good Student Form to the Form Managers.
10-28-2000 Added a guestbook to our website. Go to our homepage: www.amsoft.org and
click on the link to our guestbook.
10-25-2000 Added an Asset, Liability & Equity report to the General Ledger Reports.
10-15-2000 Added Amsoft Help and Discussion Board to the website. This is a resource for
agents to ask questions and get them answered by us as well as other agents.
9-19-2000 Added the FL Commercial Auto Application to the Form Manager.
9-05-2000 Added The FL Auto ID Card to the Form Manager.
8-17-2000 Added the ACORD Medical Statement to the Form Manager.
8-14-2000 NEW FEATURE: We have added graphs as an alternative to our regular reports. Click on
'Reports' from the main menu, and choose 'Graphs'.
8-9-2000 Added a Past Due Invoice by Producer for MGA's. This report will list all accounts with a
balance billed to the selected producer for the account.
7-29-2000 Added a Bond Screen to the list of coverage screens.
4-29-2000 Added a Past Due Invoice that is billed to the producer. This is for MGA's.
4-8-2000 Added new coverage fields to the Life/Health Coverage screen.
4-1-2000 Imaging now automatically scans following a new Insert.
3-14-2000 Added the Statement of No Loss ACORD form to the Form Managers.
3-3-2000 Added the Personal Auto Endorsement ACORD Form under the Form Managers. (An Amsoft
Auto endorsement was previously available).
2-12-2000 Added the ability to tag client payments in the checkbook for importing the deposits under
the 'Get Payments' button.
1-6-2000 Added the Commercial Auto Application to the Form Managers for the following states: AK,
AL, AZ, CA, ID, IL, IN, MO, MS, ME, MT, NC, NE, NH, NM, NV, NY, OH, OK, RI, TN, VT, WI, WV, WY
© Present
Index
Index
-Ee-mail 20
e-mail memos 20
e-mailing 20
Employee 49
Employee Payroll 49
Enter a memo 50
Enter an additional Premium 50
Enter an installment premium 50
Enter negative number 50
Entering a Client 12
Entering a Policy 12
Entering a Record 12
Entering Additional Policies 15
Export 25
-AAccount Payable 15
Account Receivable 15
Accounts Payable 49
Accounts Receivable 49
ACORD 38
Acrobat Reader 20
Additionsal Selections 18
Aggreement 2
Amsoft Main Menu 9
Amsoft Menu 9
Appointments 34
Archive 15
-F-
-BBacking Up 3, 4
Backing up images 41
Batch enter Commission Received
Bill a policy to lienholder 50
Browse 5
-CCalendar 34
Change 4
Checkbook 46
Checks 46
Clients - Main Menu 1
Clients quick start 10
Commission Receivable
Contact Amsoft 1
50
-GGeneral Ledger
46
-H15, 49
-DData Storage 50
Delete 4
Deluxe 8
Dispalying canceled policies
DPI 41
© Present
50
File - Main menu 1
File Maintenance 3
Find past due memos
Form Managers 38
Formbuster 38
Forms 38
FSC 26
FSI 26
35
help 18
Help Menu 1
History 15
How to 50
How to Install 9
How To Use Scanning
-IImport
Insert
25
4
40
73
Amsoft for Windows
Inserting a Record 12
Install 9
Installation 9
Invalid key file 56
Invalid record declaration
ITC 26
74
Printing 18
Problems 56
Producer Payable 15
Profit & Loss 46
Prospect move to client file
Protecting Data 4
56
-KKeys used
50
-R4
raters 26
Rating Integration 26
Reports 18
Reports - Main menu 1
-LLiscense 2
Liscense Agreement
-S-
2
-MMain Menu 1, 9
Memos & Suspense quick start
Menu 5
Merge Data WP 21
Multiple Policies 15
-NNetwork 50
Networking 50
New 59
-OOptional screens 50
Options 35
Ordering Forms 8
-PPayroll 49
Payroll Checks 49
PDF 20
Post 49
Posting 49
Premium 15
pre-printed Forms 8
Print preview 35
10
Scanners 41
Scanning Methods 41
Scanning Module 40
Scheduling 34
Screens Used 5
Security 35
Set Additional Selections
Sharing violations 56
specific help 18
Spell Check 21
18
-TToo many open files
Turbo Rater 26
56
-UUpdate 5
Upgrading 3
Upgrading Software
3
-WWord Processing
WP 21
21
© Present