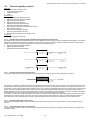
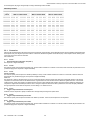
1
Standard Chiller Modular HP 1/4 Generic
/Bitzer screw compressor and CAREL valve
Application program for pCO1, pCO2, pCO3
User manual
Manual Version: 1.4 dated 11/09/08
Program code: FLSTDmMSBE
LEGGI E CONSERVA
QUESTE ISTRUZIONI
READ AND SAVE
THESE INSTRUCTIONS
We wish to save you time and money!
We can assure you that the thorough reading of this manual will guarantee correct installation and safe use of the product described.
IMPORTANT WARNINGS
BEFORE INSTALLING OR HANDLING THE DEVICE PLEASE CAREFULLY READ AND FOLLOW THE INSTRUCTIONS DESCRIBED IN THIS MANUAL.
The device this software refers to was built to operate risk free for the intended purposes, providing:
software installation, programming, operational control and maintenance must be carried out by qualified personnel according to the instructions in this manual;
all the conditions prescribed and contained in the installation and use manual of the application in question are observed.
All other uses and modifications made to the device which are not authorised by the manufacturer are considered incorrect.
Liability for injury or damage caused by the incorrect use of the device lies exclusively with the user.
INDEX
1.
APPLICATIONS AND FUNCTIONS PERFORMED BY THE SOFTWARE ........................................ 7
2.
THE USER TERMINAL ........................................................................... 8
2.1
TYPE AND OPERATION.................................................................................................................................................................................................. 8
2.2
LEDS................................................................................................................................................................................................................................. 8
2.3
USE OF THE BUTTONS .................................................................................................................................................................................................. 9
3.
PLAN MANAGEMENT BETWEEN BOARDS ............................................................. 11
3.1
HOW TO ASSIGN THE PLAN ADDRESSES ................................................................................................................................................................ 11
4.
INSTALLATION OF DEFAULT VALUES ............................................................. 12
5.
LANGUAGE OPTION ............................................................................ 12
6.
SELECTING THE UNIT OF MEASURE .............................................................. 12
7.
LIST
7.1
7.2
7.3
7.4
7.5
7.6
OF INPUTS/OUTPUTS ..................................................................... 13
CHILLER-ONLY UNIT - MACHINE TYPE “0” ................................................................................................................................................................ 13
CHILLER UNIT + HEAT PUMP – MACHINE TYPE “1” ................................................................................................................................................. 14
CHILLER UNIT WITH FREECOOLING – MACHINE TYPE “2” ..................................................................................................................................... 15
CHILLER-ONLY UNIT – MACHINE TYPE “3”................................................................................................................................................................ 16
CHILLER UNIT + HEAT PUMP WITH GAS REVERSING – MACHINE TYPE “4” ........................................................................................................ 17
CHILLER UNIT + HEAT PUMP WITH WATER REVERSING – MACHINE TYPE “5”................................................................................................... 18
8. LIST OF PARAMETERS ........................................................................... 19
9. SCREENS ...................................................................................... 24
9.1
LIST OF SCREENS........................................................................................................................................................................................................ 24
10.
EVD 200 ELECTRONIC EXPANSION VALVE ......................................................... 25
10.1 DRIVER PARAMETERS ................................................................................................................................................................................................ 25
10.2 SPECIAL “GO AHEAD” FUNCTION............................................................................................................................................................................... 28
11.
UNIT ON/OFF ................................................................................ 29
12.
CONTROL .................................................................................... 29
12.1 CONTROL SET-POINT .................................................................................................................................................................................................. 29
12.2 INLET TEMPERATURE CONTROL............................................................................................................................................................................... 30
12.3 OUTLET TEMPERATURE CONTROL........................................................................................................................................................................... 30
12.4 CONTROL OF WATER /WATER CHILLER ONLY UNITS ........................................................................................................................................... 31
12.5 CONTROL OF WATER/WATER CHILLER UNIT WITH GAS REVERSING HEAT PUMP ........................................................................................... 31
12.6 CONTROL OF WATER/WATER CHILLER UNIT WITH WATER REVERSING HEAT PUMP...................................................................................... 32
13.
TYPES OF CONTROLLED COMPRESSORS ............................................................ 33
13.1 STEPPED CAPACITY CONTROL ................................................................................................................................................................................. 33
13.2 STEPPED CAPACITY CONTROL WITH CONTROL AT INLET ................................................................................................................................... 34
13.3 STEPPED CAPACITY CONTROL WITH CONTROL AT OUTLET ............................................................................................................................... 34
13.4 CONTINUOUS CAPACITY CONTROL.......................................................................................................................................................................... 34
13.5 CONTINUOUS CAPACITY CONTROL WITH CONTROL AT OUTLET ........................................................................................................................ 35
IN THE INCREASING ZONE, TB MASK, COMES CONTROLLED EVERY “DERIVATIVE TIME” IF THE OUTLET TEMPERATURE IS CHANGED IN ORDER
MORE THAN 0,2 °C. IF THIS IS TRUE THE COMPRESSOR REMAINS IN STAND-BY UNTIL THE NEW CONTROL. THIS MANAGEMENT CAN BE DISABLED
WITH “DERIVATIVE TIME” EQUAL TO 0. ...................................................................... 36
14.
COMPRESSOR ROTATION ........................................................................ 37
15.
STARTING A SINGLE COMPRESSOR ............................................................... 37
15.2 STARTING THE COMPRESSOR MOTOR.................................................................................................................................................................... 37
15.3 COMPRESSOR START RESTRICTIONS ..................................................................................................................................................................... 37
16.
FORCED CAPACITY CONTROL .................................................................... 38
17.
SOLENOID-VALVE MANAGEMENT. ................................................................. 39
18.
PUMP-DOWN .................................................................................. 39
19.
CONDENSATION CONTROL ....................................................................... 40
19.1 ON/OFF CONDENSER CONTROL LINKED TO COMPRESSOR OPERATION .......................................................................................................... 40
19.2 ON/OFF CONDENSER CONTROL LINKED TO THE PRESSURE OR TEMPERATURE SENSOR ........................................................................... 40
19.3 MODULATING CONDENSER CONTROL LINKED TO THE PRESSURE OR TEMPERATURE SENSOR................................................................. 40
19.4 PREVENT FUNCTION ................................................................................................................................................................................................... 40
20.
DEFROSTING CONTROL FOR WATER/AIR MACHINES .................................................. 41
20.1 TYPES OF DEFROSTING ............................................................................................................................................................................................. 41
20.2 TYPE OF END AND START DEFROST ........................................................................................................................................................................ 41
20.3 DEFROSTING A CIRCUIT WITH TIME/TEMPERATURE CONTROL .......................................................................................................................... 41
20.4 DEFROSTING A CIRCUIT WITH TIME/PRESSURE SWITCHES CONTROL.............................................................................................................. 41
20.5 OPERATION OF FANS DURING THE DEFROSTING STAGE .................................................................................................................................... 41
21.
FREE
21.2
21.3
21.4
21.5
21.6
21.7
21.8
21.9
21.10
COOLING CONTROL ....................................................................... 42
FREE COOLING ACTIVATION CONDITION................................................................................................................................................................. 42
FREE COOLING THERMOSTAT................................................................................................................................................................................... 43
FREE COOLING DISABLING CONDITIONS................................................................................................................................................................. 44
FREE COOLING ON/OFF VALVE ................................................................................................................................................................................. 44
FREE COOLING ON/OFF VALVE WITH STEPPED CONDENSATION ....................................................................................................................... 45
FREE COOLING ON/OFF VALVE WITH INVERTER CONTROLLED CONDENSATION............................................................................................ 45
0-10 VOLT FREE COOLING ON/OFF VALVE............................................................................................................................................................... 46
0-10 VOLT FREE COOLING ON/OFF VALVE WITH STEPPED CONDENSATION .................................................................................................... 46
0-10 VOLT FREE COOLING VALVE WITH INVERTER CONTROLLED CONDENSATION........................................................................................ 47
22.
CONTROL ALGORITHM FOR BITZER SCREW COMPRESSORS ............................................. 48
22.1 PROTECTION ................................................................................................................................................................................................................ 49
22.2 START UP PROCEDURE.............................................................................................................................................................................................. 50
22.3 CAPACITY CONTROL ................................................................................................................................................................................................... 50
23.
ALARMS ..................................................................................... 51
23.1 SERIOUS ALARMS........................................................................................................................................................................................................ 51
23.2 CIRCUIT ALARMS ......................................................................................................................................................................................................... 51
23.3 WARNING ONLY ALARMS............................................................................................................................................................................................ 51
23.4 PRESSURE DIFFERENTIAL ALARM MANAGEMENT ................................................................................................................................................. 51
23.5 ANTIFREEZE CONTROL............................................................................................................................................................................................... 51
23.6 PCO ALARMS TABLE.................................................................................................................................................................................................... 52
23.7 DRIVER CARD ALARMS ............................................................................................................................................................................................... 53
24.
ALARM LOG .................................................................................. 54
24.1 STANDARD LOG ........................................................................................................................................................................................................... 54
24.2 ADVANCED LOG ........................................................................................................................................................................................................... 54
24.3 LIST OF ALARM LOG CODES ...................................................................................................................................................................................... 54
25.
SUPERVISOR ................................................................................. 55
Standard Chiller/HP modulare per compressore a vite Generico/Bitzer con driver CAREL
1. Applications and functions performed by the software
Type of control unit
AIR / WATER CHILLER
• Chiller only
• Chiller + Heat pump
• Chiller + Freecooling
WATER / WATER CHILLER
• Chiller only
• Chiller + Heat pump with gas reversing
• Chiller + Heat pump with water reversing
Type of control
Proportional or proportional + integral control on the evaporator water inlet temperature probe.
Time control of the neutral zone on the evaporator water outlet temperature probe.
Types of compressors
Screw compressors with 4 capacity control steps
Screw compressors with continuous duty capacity control.
Bitzer screw compressors
Maximum number of compressors
From 1 to 4 with a maximum of 4 capacity control steps
From 1 to 4 with continuous duty capacity control.
(1 compressor for every pCO*)
(1 compressor for every pCO*)
Compressor duty call rotation
Rotation of all compressors to FIFO logic for stepped and continuous duty capacity control.
Condensation
Condensation can be performed according to temperature, pressure or ON/OFF
Fan management in stepped mode or with 0/10 Volt proportional signal
Type of defrosting
Overall defrosting of all pCO units connected to network: Independent/Simultaneous/Separate
Safety devices for all refrigerating circuits
High pressure (pressure switch/transducer)
Low pressure (pressure switch/transducer)
Oil/Oil Level differential pressure switch
Compressor thermal cutout
Thermal cutout for condensation fan
High delivery temperature to compressor
Pressure differential alarm
Antifreeze alarm
Low superheat alarm (only with EVD driver enabled)
System Safety devices
Serious alarm input (shuts down entire unit)
Flow-switch input for evaporator/condenser (shuts down entire unit)
Pump thermal cutout input (shuts down entire unit)
Remote ON/OFF input.
Check electronic expansion valve driver operating status (only with EVD driver enabled)
Other functions
Alarms logging
Built-in terminal management (on pCO²-pCO3 only)
Management of ratiometric probes for pressure control (on pCO1-pCO3 only)
EVD driver for piloting the EXV valve.
Multi-language management.
Accessories
Supervision with serial card RS485 (CAREL or MODBUS protocol)
Supervision with LON serial board
Compatible hardware
pCO¹ Medium, pCO² Medium and pCO² Medium built-in, pCO3 Medium and pCO3 Medium built-in.
Cod.: +030221296 - Rel. 1.4 11/09/08
7
Standard Chiller/HP modulare per compressore a vite Generico/Bitzer con driver CAREL
2. The user terminal
2.1 Type and operation
Three different types of user terminal can be connected:
1. PGD0/semigraphic/6 buttons/4 rows - 20 columns/connection via telephone cable
2. LCD/15 buttons/4 rows - 20 columns/connection via telephone cable
3. Built-in display/6 buttons/4 rows - 20 columns (only on pCO² - pCO3 board)
The user terminal, whichever is used, can perform all the operations allowed by the application program installed. The user terminal displays the operating conditions
of the unit.
The terminal can be used to modify all the unit operating parameters, in real time.
The user terminal is not required for the correct operation of the unit.
2.2
LEDs
2.2.1 PGD0 terminal with 6 buttons
LEDs
Colour
Description
Red
On – One or more alarm conditions have occurred
[ ] button (Alarm)
PRG button
Yellow
On – Unit on
Flashing – Unit off from supervisor or digital input
All the LEDs not described and located underneath the remaining 4 buttons indicate that the instrument is powered.
Together with the backlighting of the display, these will be switched off if no button is pressed on the keypad for 5 minutes.
2.2.2
LCD terminal with 15 buttons
Each button has a green LED indicating the specific group of parameters selected during the operations to display/modify the operating parameters.
The silicone rubber buttons have three different coloured LEDs, whose meaning is specified in the following table:
LEDs
Colour
Description
[ On/Off ] button Green On – Unit on
Flashing – Unit off from supervisor or digital input
[ Alarm ] button Red
On – One or more alarm conditions have occurred
[ Enter ] button Yellow On – Instrument correctly powered
2.2.3
Built-In terminal with 6 buttons
Given the number of buttons and LEDs available, these have general meanings, as described below:
LEDs
Colour
Description
Red
On – One or more alarm conditions have occurred
[ ] button (Alarm)
[ ] button (Enter) Yellow On – Unit on
Flashing – Unit off from supervisor or digital input
[ Prg ] button
Green On – Displaying/modifying the operating parameters
[ Esc] button
Green On – Main menu parameters displayed
Cod.: +030221296 - Rel. 1.4 11/09/08
8
Standard Chiller/HP modulare per compressore a vite Generico/Bitzer con driver CAREL
2.3
Use of the buttons
2.3.1 PGD0 terminal with 6 buttons
Button
ALARM
UP
DOWN
ENTER
PRG
PRG + ENTER
ESC + ENTER
2.3.2
ALARM
UP
PRG
ENTER
ESC
DOWN
Description
displays the alarms, mutes the buzzer and deletes the active alarms
if the cursor is in the home position (top left corner), scrolls up the screens in the same group; if the cursor is in a setting field, increases the
value
if the cursor is in the home position (top left corner), scrolls down the screens in the same group; if the cursor is in a setting field, decreases
the value
used to move the cursor from the home position (top left corner) to the setting fields, in the setting fields confirms the set value and moves
to the next parameter
accesses the menu for selecting the group of parameters to be displayed/modified (access to the parameters is confirmed by pressing the
[Enter] button)
In pLAN applications with more than one board connected in the network and a shared user terminal, switches the user terminal between
the different units to display/modify the parameters
Pressed at the same time for 20 seconds access the screen for switching the unit On/Off
LCD terminal with 15 buttons
Button
Description
From any point of the user interface (with the exception of the manufacturer group of parameters) returns to the Main
menu screen (M0) displaying the unit status, readings of the control probes and operating mode.
MENU
In the group of manufacturer parameters, organised into nested sub-groups, returns to screen for selecting the
parameters.
Goes to the first screen of Maintenance parameters (A0)
MAINTENANCE The maintenance parameters are used to check the operating status of devices and the probes, control
maintenance, calibrate the readings and run manual operations
PRINTER
Temporary display of the pLAN address of the current board
Goes to the first screen of I/O parameters (I0)
INPUTS
The I/O parameters display the status of the inputs and the outputs on the board
AND OUTPUTS
CLOCK
Cod.: +030221296 - Rel. 1.4 11/09/08
Goes to the first screen of Clock parameters (K0)
The Clock parameters are used to display/set the operating parameters for the clock board and activate the time
bands
9
Standard Chiller/HP modulare per compressore a vite Generico/Bitzer con driver CAREL
Button
SET POINT
PROGRAM
+
Description
Goes to the first screen of Set point parameters (S0).
The Set point parameters are used to display/modify the unit working set point within the limits defined in the
configuration
Goes to the screen for entering the user password (P0)
The user parameters are used to modify the unit operating mode
MENU+PROG
Goes to the screen for entering the manufacturer password (Z0)
The manufacturer parameters are used to configure the unit in terms of the number and type of devices connected,
enable specific accessories or special functions
INFO
In pLAN applications with more than one board connected in the network and a shared user terminal, switches the
user terminal between the different units to display/modify the parameters
RED
With the unit off, if the chiller+heat pump configuration is featured, enables heating operation
BLUE
With the unit off, if the chiller+heat pump configuration is featured, enables cooling operation
Silicon rubber buttons
1
2
3
Button
ON/OFF
ALARM
UP ARROW
4
5
DOWN
ARROW
ENTER
2.3.3
Description
switches the unit on/off
displays the alarms, mutes the buzzer and deletes the active alarms
if the cursor is in the home position (top left corner), scrolls up the screens in the same group; if the cursor is in a setting field, increases the
value
if the cursor is in the home position (top left corner), scrolls down the screens in the same group; if the cursor is in a setting field, decreases the
value
used to move the cursor from the home position (top left corner) to the setting fields, in the setting fields confirms the set value and moves to the
next parameter
Built-in 6 button terminal
Button
ALARM
UP
DOWN
ENTER
PRG
PRG + ENTER
ESC + ENTER
ALARM
PRG
ESC
DOWN
UP
ENTER
Description
displays the alarms, mutes the buzzer and deletes the active alarms
if the cursor is in the home position (top left corner), scrolls up the screens in the same group; if the cursor is in a setting field, increases the
value
if the cursor is in the home position (top left corner), scrolls down the screens in the same group; if the cursor is in a setting field, decreases
the value
used to move the cursor from the home position (top left corner) to the setting fields, in the setting fields confirms the set value and moves
to the next parameter
accesses the menu for selecting the group of parameters to be displayed/modified (access to the parameters is confirmed by pressing the
[Enter] button)
Temporary display of the board pLAN serial address
Pressed at the same time for 20 seconds access the screen for switching the unit On/Off
Cod.: +030221296 - Rel. 1.4 11/09/08
10
Standard Chiller/HP modulare per compressore a vite Generico/Bitzer con driver CAREL
3. pLAN management between boards
The pLAN network identifies a physical connection between the cards (pCO1 pCO2, pCO3) and the external terminals.
pLAN=p.CO L.ocal A.rea N.etwork.. The purpose of the pLAN network connection between the cards is to exchange variables among the cards with a logic decided
by the program, in order to make the cards work together functionally.
The variables exchanged among the cards have already been established by the program, and likewise their direction of origin and destination. Therefore, the user does
not have to set them, but has only make the electrical connections.
The following is a layout of the pLAN network
The main MO mask shows the address of the connected card in the bottom left-hand corner. With the terminal showing 32, it is possible to view all the boards
without the need for other terminals.
3.1
How to assign the pLAN addresses
The pLAN addresses have to be unequivocal and correspond with the diagram shown above.
There are various means of assigning the pLAN address
3.1.1
PGD0 Terminal
To direct (default level is 32) a PGD0 terminal, one has to:
1. Provide the terminal with voltage
2. Press the Up + Down + ENTER buttons until a “display address setting” appears
3. Type in the numerical pLAN address with the Up and Down buttons, then confirm by pressing Enter
4. The “No link” screen appears
5. If the “NO Link” screen does not appear, press Up + Down + ENTER again
6. Once the “display address setting” screen appears, press Enter 3 times
Once the “adr Priv/shard” screen appears, set the correct levels and confirm by typing in “YES”
3.1.2
pCO1- pCO3 addressing
Here is a description of the operations necessary for addressing pLAN from the pCO1, pCO3 cards.
1. Power down the pCO1 card and connect a LCD 4x20 / PGD0 terminal with the pLAN "0" address.
2. Power up the pCO1 card, by holding down the Alarm + Up keys until a mask appears
3. When the “pLAN Address” screen is shown, perform the indicated operations, i.e. insert the numeric (1,2,.3 or 4…) pLAn address with the Up and Down
keys and then confirm by pressing Enter.
4. Power down the pCO* card.
5. If necessary, assign the correct pLAN address to the external terminal if specified.
6. Power up the pCO* card.
3.1.3
pCO2 addressing, PCOI/PCOT terminals and EVD-200 valve driver
The pLAN addresses on these are set with binary logic, changing the position of a group of dip-switches located at the back of the pCOI / PCOT terminals, on the
pCO2 cards and inside the EVD-200 electronic valve drivers, with all the devices compulsorily powered down. For further information, consult the specific manual for
the device.
In all the other screens in the program, to display the address of the board that is currently connected, press the printer button or Enter+Prg, depending
on the terminal used.
Cod.: +030221296 - Rel. 1.4 11/09/08
11
Standard Chiller/HP modulare per compressore a vite Generico/Bitzer con driver CAREL
4. Installation of default values
When you have checked the connections between the cards and terminals, power up the pCO card/s*.
When the machine is powered up, the software automatically installs the default values selected by CAREL for all the chiller and driver configuration parameters.
This section tells you how to reset default values to return to the initial conditions. Therefore, this operation need not be carried out at the first power-up.
The following procedure is used for resetting all the in-plant configuration parameters selected by CAREL:
ATTENTION! this procedure irreversibly cancels any programming done by the user
As resetting the default values is an operation that concerns each pCO* card, if there are two or more cards, repeat the operation for each card. The procedure is
identical for all the cards.
These are the steps:
•
•
press the “menu” and “prog” keys simultaneously on the terminal with 15 keys (PRG in the terminals with 6 keys). Once they have been pressed, both the LED
above the “menu” key and the one above the “prog” key should light up (lighting up of LEDs on the PRG key in the terminals with 6 keys).
Input the password using the "arrow" keys and press Enter: in this way, you enter the "constructor" configuration :
+--------------------+
¦Manufacturer
¦
¦Type in password
¦
¦
¦
¦
0000 ¦
+--------------------+
•
press the up arrow key to rapidly reach the default values installation screen:
+--------------------+
|Erase memory
V0|
|Install global
|
|default values
S|
|Please wait…
|
+--------------------+
•
¦
press the "enter" key to position the cursor above the letter "N", and take it to "S" with the arrow keys. The "please wait…" words appear immediately. The
following screen will appear after a few seconds:
+--------------------+
|DEFAULT STATUS:
|
| 1:¦ 2:? 3:? 4:- |
|> Switch-off unit <|
|> to data confirm <|
+--------------------+
•
¦ Default complete
? Default in process
- No unit
wait for the defaults to have been installed in all the units, then restart the units.
5. Language option
When the unit is powered up, a screen appears by default, where you can select the language to be used (Italian/English/French/German/Spanish).
This mask stays active for 30 seconds. When this time has elapsed, the program automatically changes over to the main menu (M0 screen)
This function can be disabled. How to disable it:
1. Press the PROG (PRG) button and access P0 screen
2. Enter the correct password.
3. Go to screen “Pc”, pressing the down arrow repeatedly
4. Select "N" under item "Show language screen at start-up".
In any case, you can change the language in use at any time. To do this, all it takes is to go to the third screen (Ak) in the maintenance menu.
6. Selecting the unit of measure
The unit can be configured for operation with different units of measure for the temperature and pressure, depending on the target market. The options are metric
(°C / Bar) or imperial (°F / Psi ).
To change the setting, proceed as follows:
1. Press the PROG (PRG) button and access P0 screen
2. enter the correct password;
3. go to screen “Pm”, pressing the “down arrow” repeatedly;
4. choose “METRIC” or “IMPERIAL” for the item “Type of unit of measure”.
After the selection has been made, all the parameters are converted into the new unit of measure.
Cod.: +030221296 - Rel. 1.4 11/09/08
12
Standard Chiller/HP modulare per compressore a vite Generico/Bitzer con driver CAREL
7. List of inputs/outputs
Inputs and outputs are listed below based on unit type. A number has been associated with each type of machine. This number is the program's main parameter
because it identifies the inputs and outputs configuration. Using this list of inputs and outputs, select the number you require from the numbers associated in the
program configuration screens.
AIR/WATER UNIT WITH MAX. 4 SCREW COMPRESSORS (UP TO 4 CAPACITY STAGES PER COMPRESSOR)
7.1
CHILLER-ONLY UNIT - MACHINE TYPE “0”
DIGITAL INPUTS
N°
pCO2 / pCO3 MEDIUM
Master (Address 1)
pCO¹ MEDIUM
Slave (addresses 2/3/4)
Master (Address 1)
Slave (addresses 2/3/4)
ID 1
Serious Alarm
Serious Alarm
Serious Alarm
Serious Alarm
ID 2
Evaporator Flow-switch
Evaporator Flow-switch
Evaporator Flow-switch
Evaporator Flow-switch
ID 3
Remote ON/OFF
Remote ON/OFF
Remote ON/OFF
Remote ON/OFF
ID 4
Pump Thermal cutout
Pump Thermal cutout
ID 5
Low Pressure 2 Pressure-switch Low Pressure 2 Pressure-switch
Low Pressure 2 Pressure-switch Low Pressure 2 Pressure-switch
ID 6
Differential / Oil Level
Differential / Oil Level
Differential / Oil Level
Differential / Oil Level
ID 7
Phase monitor
Phase monitor
Phase monitor
Phase monitor
ID 8
Double Set-point
ID 9
Fan 1 Thermal cutout
Fan 1 Thermal cutout
Fan 1 Thermal cutout
Fan 1 Thermal cutout
ID10
Fan 2 Thermal cutout
Fan 2 Thermal cutout
Fan 2 Thermal cutout
Fan 2 Thermal cutout
ID11
High Pressure Pressure-switch
High Pressure Pressure-switch
High Pressure Pressure-switch
High Pressure Pressure-switch
ID12
Compressor Thermal cutout
Compressor Thermal cutout
Compressor Thermal cutout
Compressor Thermal cutout
Double Set-point
ID13
ID14
ANALOGUE INPUTS
N°
B1
B2
pCO2 / pCO3 MEDIUM
pCO¹ MEDIUM
Master (Address 1)
Slave (addresses 2/3/4)
Water temperature at Evaporator
Inlet(1)
Water temp. at Evaporator Outlet(1)
Water temp. at Evaporator Outlet(1)
B3
B4
B5
B6
B7
B8
(1) NTC
Outlet Temperature (4)
Condenser Temperature (1)
Voltage/Current/Ext. Set-point(5)
High Pressure (2)
Low Pressure (2)
(2) 4-20 mA
(3) 4-20mA/0-5V
Outlet Temperature (4)
Condenser temperature
Voltage / Current(5)
High Pressure (2)
Low Pressure (2)
(4) NTC-HT/4-20mA/NTC/PT1000
Slave (addresses 2/3/4)
High Pressure (3)
Low Pressure (3)
Voltage/Current/Ext. Set point(6)
Outlet Temperature (2)
Water temp. at Evaporator Inlet(1)
Water temp. at Evaporator Outlet(1)
Condenser Temperature (1)
Low Pressure (3)
Voltage / Current (6)
Outlet Temperature (2)
(5) 4-20mA/0-1V/0-10V
DIGITAL OUTPUTS
N°
pCO2 / pCO3 MEDIUM
Master (Address 1)
Slave (addresses 2/3/4)
Generic
Master (Address 1)
High Pressure (3)
(6) 4-20mA/0-1V
Water temp. at Evaporator Outlet(1)
Condenser Temperature (1)
(7) NTC-HT/4-20mA/NTC
Master (Address 1)
pCO¹ MEDIUM
Slave (addresses 2/3/4)
Bitzer
Generic
Bitzer
Generic
Bitzer
Generic
Bitzer
Relay 1
CR1
NO2 Relay 2
CR2
NO3 Circulation Pump
NO 4 Fan 1
NO 5 Liquid Solenoid
NO 6 Antifreeze Heater
NO 7 Relay 3
CR3
NO 8 General Alarm
NO 9 Liquid inj./Econ/Oil Cooler
NO10 Line Contactor
PW1
NO11 Triangle Contactor
PW2
NO12 Star Contactor
CR4
NO13 Fan 2
ANALOGUE OUTPUTS
N° pCO2 / pCO3 MEDIUM
Master (Address 1)
Y1
Speed Controller
Relay 1
Relay 2
CR1
CR2
Relay 1
Relay 2
CR1
CR2
Fan 1
Liquid Solenoid
Antifreeze Heater
Relay 3
CR3
General Alarm
Liquid inj./Econ/Oil Cooler
Line Contactor
PW1
Triangle Contactor
PW2
Star Contactor
CR4
Fan 2
Relay 1
CR1
Relay 2
CR2
Circulation Pump
Fan 1
Liquid Solenoid
Antifreeze Heater
Relay 3
CR3
General Alarm
Liquid inj./Econ/Oil Cooler
Line Contactor
PW1
Triangle Contactor
PW2
Star Contactor
CR4
Fan 2
Fan 1
Liquid Solenoid
Antifreeze Heater
Relay 3
CR3
General Alarm
Liquid inj./Econ/Oil Cooler
Line Contactor
PW1
Triangle Contactor
PW2
Star Contactor
CR4
Fan 2
Slave (addresses 2/3/4)
Speed Controller
pCO1 MEDIUM
Master (Address 1)
Speed Controller
Slave (addresses 2/3/4)
Speed Controller
NO1
Y2
Y3
Y4
Cod.: +030221296 - Rel. 1.4 11/09/08
13
Standard Chiller/HP modulare per compressore a vite Generico/Bitzer con driver CAREL
7.2
CHILLER UNIT + HEAT PUMP – MACHINE TYPE “1”
DIGITAL INPUTS
N°
pCO2 / pCO3 MEDIUM
Master (Address 1)
Slave (addresses 2/3/4)
ID 1 Serious Alarm
Serious Alarm
ID 2 Evaporator Flow-switch
Evaporator Flow-switch
ID 3 Remote ON/OFF
Remote ON/OFF
ID 4 Pump Thermal cutout
ID 5 Low Pressure 2 Pressure-switch
Low Pressure 2 Pressure-switch
ID 6 Differential / Oil Level
Differential / Oil Level
ID 7 Phase monitor
Phase monitor
ID 8 Double Set-point
ID 9 Fan 1 Thermal cutout
Fan 1 Thermal cutout
ID10 Summer / Winter
ID11 High Pressure Pressure-switch
High Pressure Pressure-switch
ID12 Compressor Thermal cutout
Compressor Thermal Cutouts
pCO1 MEDIUM
Master (Address 1)
Slave (addresses 2/3/4)
Serious Alarm
Serious Alarm
Evaporator Flow-switch
Evaporator Flow-switch
Remote ON/OFF
Remote ON/OFF
Pump Thermal cutout
Low Pressure 2 Pressure-switch Low Pressure 2 Pressure-switch
Differential / Oil Level
Differential / Oil Level
Phase monitor
Phase monitor
Double Set-point
Fan 1 Thermal cutout
Fan 1 Thermal cutout
Summer / Winter
High Pressure Pressure-switch
High Pressure Pressure-switch
Compressor Thermal cutout
Compressor Thermal Cutouts
ID13
ID14
ANALOGUE INPUTS
N°
pCO2 / pCO3 MEDIUM
Master (Address 1)
Slave (addresses 2/3/4)
B1
Water temperature at Evaporator
Inlet (1)
B2
Water temperature at Evaporator Water temperature at
Evaporator Outlet(1)
Outlet (1)
Master (Address 1)
High Pressure (3)
B3
B4
B5
B6
B7
B8
Outlet Temperature (4)
Condenser temperature
Outlet Temperature (4)
Condenser temperature
Voltage / Current / External Setpoint (5)
High Pressure (2)
Low Pressure (2)
Voltage / Current (5)
(1) NTC
(2) 4-20 mA
(3) 4-20mA/0-5V
High Pressure (2)
Low Pressure (2)
(4) NTC-HT/4-20mA/NTC/PT1000
Generic
NO1
NO2
NO3
NO 4
NO 5
NO 6
NO 7
NO 8
NO 9
NO10
NO11
NO12
NO13
Low Pressure (3)
Low Pressure (3)
Voltage / Current / External Setpoint(6)
Outlet Temperature (7)
Water temperature at Evaporator
Inlet (1)
Water temperature at Evaporator
Outlet (1)
Condenser temperature
Voltage / Current (6)
(5) 4-20mA/0-1V/0-10V
DIGITAL OUTPUTS
N°
pCO2 / pCO3 MEDIUM
Master (Address 1)
Slave (addresses 2/3/4)
pCO1 MEDIUM
Slave (addresses 2/3/4)
High Pressure (3)
(6) 4-20mA/0-1V
Outlet Temperature (7)
Water temperature at
Evaporator Outlet (1)
Condenser temperature
(7) NTC-HT/4-20mA/NTC
Master (Address 1)
pCO1 MEDIUM
Slave (addresses 2/3/4)
Bitzer
Generic
Bitzer
Generic
Bitzer
Generic
Bitzer
Relay 1
CR1
Relay 2
CR2
Circulation Pump
Fan 1
Liquid Solenoid
Antifreeze Heater
Relay 3
CR3
General Alarm
Liquid inj./Econ/Oil Cooler
Line Contactor
PW1
Triangle Contactor
PW2
Star Contactor
CR4
4-way Valve
Relay 1
Relay 2
CR1
CR2
Relay 1
CR1
Relay 2
CR2
Circulation Pump
Fan 1
Liquid Solenoid
Antifreeze Heater
Relay 3
CR3
General Alarm
Liquid inj./Econ/Oil Cooler
Line Contactor
PW1
Triangle Contactor
PW2
Star Contactor
CR4
4-way Valve
Relay 1
Relay 2
CR1
CR2
Fan 1
Liquid Solenoid
Antifreeze Heater
Relay 3
CR3
General Alarm
Liquid inj./Econ/Oil Cooler
Line Contactor
PW1
Triangle Contactor
PW2
Star Contactor
CR4
4-way Valve
ANALOGUE OUTPUTS
N°
pCO2 / pCO3 MEDIUM
Master (Address 1)
Slave (addresses 2/3/4)
Master (Address 1)
Fan 1
Liquid Solenoid
Antifreeze Heater
Relay 3
CR3
General Alarm
Liquid inj./Econ/Oil Cooler
Line Contactor
PW1
Triangle Contactor
PW2
Star Contactor
CR4
4-way Valve
pCO1 MEDIUM
Slave (addresses 2/3/4)
Y1
Y2
Speed Controller
Speed Controller
Speed Controller
Y3
Y4
Cod.: +030221296 - Rel. 1.4 11/09/08
14
Speed Controller
Standard Chiller/HP modulare per compressore a vite Generico/Bitzer con driver CAREL
7.3
CHILLER UNIT WITH FREECOOLING – MACHINE TYPE “2”
DIGITAL INPUTS
N°
pCO2 / pCO3 MEDIUM
Master (Address 1)
Slave (addresses 2/3/4)
ID 1 Serious Alarm
Serious Alarm
ID 2 Evaporator Flow-switch
Evaporator Flow-switch
ID 3 Remote ON/OFF
Remote ON/OFF
ID 4 Pump Thermal cutout
ID 5 Low Pressure 2 Pressure-switch
Low Pressure 2 Pressure-switch
ID 6 Differential / Oil Level
Differential / Oil Level
ID 7 Phase monitor
Phase monitor
ID 8 Double Set-point
ID 9 Fan 1 Thermal cutout
Fan 1 Thermal cutout
ID10 Fan 2 Thermal cutout
Fan 2 Thermal cutout
ID11 High Pressure Pressure-switch
High Pressure Pressure-switch
ID12 Compressor Thermal cutout
Compressor Thermal cutout
pCO1 MEDIUM
Master (Address 1)
Slave (addresses 2/3/4)
Serious Alarm
Serious Alarm
Evaporator Flow-switch
Evaporator Flow-switch
Remote ON/OFF
Remote ON/OFF
Pump Thermal cutout
Low Pressure 2 Pressure-switch Low Pressure 2 Pressure-switch
Differential / Oil Level
Differential / Oil Level
Phase monitor
Phase monitor
Double Set-point
Fan 1 Thermal cutout
Fan 1 Thermal cutout
Fan 2 Thermal cutout
Fan 2 Thermal cutout
High Pressure Pressure-switch
High Pressure Pressure-switch
Compressor Thermal cutout
Compressor Thermal cutout
ID13
ID14
ANALOGUE INPUTS
N°
pCO2 / pCO3 MEDIUM
Master (Address 1)
Slave (addresses 2/3/4)
B1
Water temperature at Evaporator
Inlet (1)
B2
Water temperature at Evaporator Water temperature at Evaporator
Outlet (1)
Outlet (1)
B3
Water temperature at
Freecooling Inlet (1)
B4
Outlet Temperature (4)
Outlet Temperature (4)
B5
Outside Air Temperature (1)
B6
B7
B8
Voltage / Current / External Setpoint (5)
High Pressure (2)
Low Pressure (2)
(1) NTC
(2) 4-20 mA
(3) 4-20mA/0-5V
Voltage / Current (5)
High Pressure (2)
Low Pressure (2)
(4) NTC-HT/4-20mA/NTC/PT1000
Generic
NO2
NO3
NO 4
NO 5
NO 6
NO 7
NO 8
NO 9
NO10
NO11
NO12
NO13
Low Pressure (3)
Low Pressure (3)
Voltage / Current / External Setpoint (6)
Outlet Temperature (7)
Water temperature at Evaporator
Inlet (1)
Water temperature at Evaporator
Outlet (1)
Outside Air Temperature(1)
Water temperature at
Freecooling Inlet (1)
Voltage / Current (6)
(5) 4-20mA/0-1V/0-10V
DIGITAL OUTPUTS
N°
pCO2 / pCO3 MEDIUM
Master (Address 1)
Slave (addresses 2/3/4)
NO1
pCO1 MEDIUM
Master (Address 1)
Slave (addresses 2/3/4)
High Pressure (3)
High Pressure (3)
(6) 4-20mA/0-1V
Outlet Temperature (7)
Water temperature at Evaporator
Outlet (1)
(7) NTC-HT/4-20mA/NTC
Master (Address 1)
pCO1 MEDIUM
Slave (addresses 2/3/4)
Bitzer
Generic
Bitzer
Generic
Bitzer
Generic
Bitzer
Relay 1
CR1
Relay 2
CR2
Circulation Pump
Fan 1
Liquid Solenoid
Antifreeze Heater
Relay 3
CR3
General Alarm
Liquid inj./Econ/Oil cooler
Line Contactor
PW1
Triangle Contactor
PW2
Star Contactor
CR4
Freecooling ON/OFF Valve
Relay 1
Relay 2
CR1
CR2
Relay 1
CR1
Relay 2
CR2
Circulation Pump
Fan 1
Liquid Solenoid
Antifreeze Heater
Relay 3
CR3
General Alarm
Liquid inj./Econ/Oil cooler
Line Contactor
PW1
Triangle Contactor
PW2
Star Contactor
CR4
Freecooling ON/OFF Valve
Relay 1
Relay 2
CR1
CR2
Fan 1
Liquid Solenoid
Antifreeze Heater
Relay 3
CR3
General Alarm
Liquid inj./Econ/Oil cooler
Line Contactor
PW1
Triangle Contactor
PW2
Star Contactor
CR4
ANALOGUE OUTPUTS
N°
pCO2 / pCO3 MEDIUM
Master (Address 1)
Slave (addresses 2/3/4)
Y1
Speed Controller
Speed Controller
Y2
3-way Freecooling Valve
Master (Address 1)
Speed Controller
3-way Freecooling Valve
Y3
Y4
Cod.: +030221296 - Rel. 1.4 11/09/08
15
Fan 1
Liquid Solenoid
Antifreeze Heater
Relay 3
CR3
General Alarm
Liquid inj./Econ/Oil cooler
Line Contactor
PW1
Triangle Contactor
PW2
Star Contactor
CR4
pCO1 MEDIUM
Slave (addresses 2/3/4)
Speed Controller
Standard Chiller/HP modulare per compressore a vite Generico/Bitzer con driver CAREL
WATER/WATER UNIT WITH MAX. 4 SCREW COMPRESSORS (UP TO 4 CAPACITY STAGES PER COMPRESSOR)
7.4
CHILLER-ONLY UNIT – MACHINE TYPE “3”
DIGITAL INPUTS
N°
pCO2 / pCO3 MEDIUM
Master (Address 1)
Slave (addresses 2/3/4)
ID 1 Serious Alarm
Serious Alarm
ID 2 Evaporator Flow-switch
Evaporator Flow-switch
ID 3 Remote ON/OFF
Remote ON/OFF
ID 4 Evaporator Pump thermal Cutout
ID 5 Low Pressure 2 Pressure-switch
Low Pressure 2 Pressure-switch
ID 6 Differential / Oil Level
Differential / Oil Level
ID 7 Phase monitor
Phase monitor
ID 8 Double Set-point
ID 9 Evaporator Flow-switch
Evaporator Flow-switch
(Enablable)
(Enablable)
ID10 Condenser Pump thermal Cutout
ID11 High Pressure Pressure-switch
High Pressure Pressure-switch
ID12 Compressor Thermal cutout
Compressor Thermal cutout
pCO1 MEDIUM
Master (Address 1)
Slave (addresses 2/3/4)
Serious Alarm
Serious Alarm
Evaporator Flow-switch
Evaporator Flow-switch
Remote ON/OFF
Remote ON/OFF
Evaporator Pump thermal Cutout
Low Pressure 2 Pressure-switch Low Pressure 2 Pressure-switch
Differential / Oil Level
Differential / Oil Level
Phase monitor
Phase monitor
Double Set-point
Evaporator Flow-switch
Evaporator Flow-switch
(Enablable)
(Enablable)
Condenser Pump thermal Cutout
High Pressure Pressure-switch
High Pressure Pressure-switch
Compressor Thermal cutout
Compressor Thermal cutout
ID13
ID14
ANALOGUE INPUTS
N°
pCO2 / pCO3 MEDIUM
Master (Address 1)
Slave (addresses 2/3/4)
B1 Water temperature at Evaporator
Inlet (1)
B2 Water temperature at Evaporator Water temperature at Evaporator
Outlet (1)
Outlet (1)
B3 Water temperature at Condenser Water temperature at Condenser
Outlet (1)
Outlet (1)
(4)
B4 Outlet Temperature
Outlet Temperature (4)
B5 Water temperature at Condenser
Inlet (1)
B6 Voltage / Current / External Set- Voltage / Current (5)
point (5)
B7 High Pressure (2)
High Pressure (2)
B8
Low Pressure (2)
(1) NTC
(2) 4-20 mA
Low Pressure (2)
(3) 4-20mA/0-5V
(4) NTC-HT/4-20mA/NTC/PT1000
Generic
NO2
NO3
NO 4
NO 5
NO 6
NO 7
NO 8
NO 9
NO10
NO11
NO12
pCO1 MEDIUM
Slave (addresses 2/3/4)
High Pressure (3)
Low Pressure (3)
Low Pressure (3)
Voltage / Current / External Setpoint (6)
Outlet Temperature (7)
Water temperature at Evaporator
Inlet (1)
Water temperature at Evaporator
Outlet (1)
Water temperature at Condenser
Inlet (1)
Water temperature at Condenser
Outlet (1)
Voltage / Current (6)
(5) 4-20mA/0-1V/0-10V
DIGITAL OUTPUTS
N°
pCO2 / pCO3 MEDIUM
Master (Address 1)
Slave (addresses 2/3/4)
NO1
Master (Address 1)
High Pressure (3)
(6) 4-20mA/0-1V
Outlet Temperature (7)
Water temperature at Evaporator
Outlet (1)
Water temperature at Condenser
Outlet (1)
(7) NTC-HT/4-20mA/NTC
Master (Address 1)
pCO1 MEDIUM
Slave (addresses 2/3/4)
Bitzer
Generic
Bitzer
Generic
Bitzer
Generic
Bitzer
Relay 1
CR1
Relay 2
CR2
Evaporator Pump
Condenser Pump
Liquid Solenoid
Antifreeze Heater
Relay 3
CR3
General Alarm
Liquid inj./Econ/Oil Cooler
Line Contactor
PW1
Triangle Contactor
PW2
Star Contactor
CR4
Relay 1
Relay 2
CR1
CR2
Relay 1
CR1
Relay 2
CR2
Evaporator Pump
Condenser Pump
Liquid Solenoid
Antifreeze Heater
Relay 3
CR3
General Alarm
Liquid inj./Econ/Oil Cooler
Line Contactor
PW1
Triangle Contactor
PW2
Star Contactor
CR4
Relay 1
Relay 2
CR1
CR2
Liquid Solenoid
Antifreeze Heater
Relay 3
CR3
General Alarm
Liquid inj./Econ/Oil Cooler
Line Contactor
PW1
Triangle Contactor
PW2
Star Contactor
CR4
Liquid Solenoid
Antifreeze Heater
Relay 3
CR3
General Alarm
Liquid inj./Econ/Oil Cooler
Line Contactor
PW1
Triangle Contactor
PW2
Star Contactor
CR4
NO13
ANALOGUE OUTPUTS
N°
pCO2 / pCO3 MEDIUM
Master (Address 1)
Slave (addresses 2/3/4)
Master (Address 1)
Y1
Y2
Y3
Y4
Cod.: +030221296 - Rel. 1.4 11/09/08
16
pCO1 MEDIUM
Slave (addresses 2/3/4)
Standard Chiller/HP modulare per compressore a vite Generico/Bitzer con driver CAREL
7.5
CHILLER UNIT + HEAT PUMP WITH GAS REVERSING – MACHINE TYPE “4”
DIGITAL INPUTS
N°
pCO2 / pCO3 MEDIUM
Master (Address 1)
Slave (addresses 2/3/4)
ID 1 Serious Alarm
Serious Alarm
ID 2 Evaporator Flow-switch
Evaporator Flow-switch
ID 3 remote ON/OFF
ID 4 Evaporator Pump thermal Cutout
ID 5 Low Pressure Pressure-switch
Low Pressure Pressure-switch
ID 6 Oil differential / Oil Level
Oil differential / Oil Level
ID 7 Phase monitor
Phase monitor
ID 8 Double Set-point
ID 9 Evaporator Flow-switch
Evaporator Flow-switch
(Enablable)
(Enablable)
ID10 Summer / Winter
ID11 High pressure pressure-switch
High pressure pressure-switch
ID12 Compressor Thermal cutout
Compressor Thermal cutout
pCO1 MEDIUM
Master (Address 1)
Slave (addresses 2/3/4)
Serious Alarm
Serious Alarm
Evaporator Flow-switch
Evaporator Flow-switch
remote ON/OFF
Evaporator Pump thermal Cutout
Low Pressure Pressure-switch
Low Pressure Pressure-switch
Oil differential / Oil Level
Oil differential / Oil Level
Phase monitor
Phase monitor
Double Set-point
Evaporator Flow-switch
Evaporator Flow-switch
(Enablable)
(Enablable)
Summer / Winter
High pressure pressure-switch
High pressure pressure-switch
Compressor Thermal cutout
Compressor Thermal cutout
ID13
ID14
ANALOGUE INPUTS
N°
pCO2 / pCO3 MEDIUM
Master (Address 1)
Slave (addresses 2/3/4)
B1
Water temperature at Evaporator
Inlet (1)
B2
Water temperature at Evaporator Water temperature at Evaporator
Outlet (1)
Outlet (1)
B3
Water temperature at Condenser Water temperature at Condenser
Outlet (1)
Outlet (1)
B4
Outlet Temperature (4)
Outlet Temperature (4)
B5
Water temperature at Condenser
Inlet (1)
B6
Voltage / Current / External Set- Voltage / Current (5)
point (5)
B7
High Pressure (2)
High Pressure (2)
B8
Low Pressure (2)
(1) NTC
(2) 4-20 mA
Low Pressure (2)
(3) 4-20mA/0-5V
(4) NTC-HT/4-20mA/NTC/PT1000
Generic
NO2
NO3
NO 4
NO 5
NO 6
NO 7
NO 8
NO 9
NO10
NO11
NO12
NO13
pCO1 MEDIUM
Slave (addresses 2/3/4)
High Pressure (3)
Low Pressure (3)
Low Pressure (3)
Voltage / Current / External Setpoint (6)
Outlet Temperature (7)
Water temperature at Evaporator
Inlet (1)
Water temperature at Evaporator
Outlet (1)
Water temperature at Condenser
Inlet (1)
Water temperature at Condenser
Outlet (1)
Voltage / Current (6)
(5) 4-20mA/0-1V/0-10V
DIGITAL OUTPUTS
N°
pCO2 / pCO3 MEDIUM
Master (Address 1)
Slave (addresses 2/3/4)
NO1
Master (Address 1)
High Pressure (3)
(6) 4-20mA/0-1V
pCO1 MEDIUM
Slave (addresses 2/3/4)
Bitzer
Generic
Bitzer
Generic
Relay 1
Relay 2
CR1
CR2
Relay 1
CR1
Relay 2
CR2
Evaporator Pump
Condenser Pump
Liquid Solenoid
Antifreeze Heater
Relay 3
CR3
General Alarm
Liquid inj./Econ/Oil Cooler
Line Contactor
PW1
Triangle Contactor
PW2
Star Contactor
CR4
4-way Valve
Master (Address 1)
Y1
Y2
Y3
Y4
Cod.: +030221296 - Rel. 1.4 11/09/08
Water temperature at Condenser
Outlet (1)
Master (Address 1)
Bitzer
ANALOGUE OUTPUTS
N°
pCO2 / pCO3 MEDIUM
Master (Address 1)
Slave (addresses 2/3/4)
Water temperature at Evaporator
Outlet (1)
(7) NTC-HT/4-20mA/NTC
Relay 1
CR1
Relay 2
CR2
Evaporator Pump
Condenser Pump
Liquid Solenoid
Antifreeze Heater
Relay 3
CR3
General Alarm
Liquid inj./Econ/Oil Cooler
Line Contactor
PW1
Triangle Contactor
PW2
Star Contactor
CR4
4-way Valve
Liquid Solenoid
Antifreeze Heater
Relay 3
CR3
General Alarm
Liquid inj./Econ/Oil Cooler
Line Contactor
PW1
Triangle Contactor
PW2
Star Contactor
CR4
4-way Valve
Outlet Temperature (7)
17
Generic
Bitzer
Relay 1
Relay 2
CR1
CR2
Liquid Solenoid
Antifreeze Heater
Relay 3
CR3
General Alarm
Liquid inj./Econ/Oil Cooler
Line Contactor
PW1
Triangle Contactor
PW2
Star Contactor
CR4
4-way Valve
pCO1 MEDIUM
Slave (addresses 2/3/4)
Standard Chiller/HP modulare per compressore a vite Generico/Bitzer con driver CAREL
7.6
CHILLER UNIT + HEAT PUMP WITH WATER REVERSING – MACHINE TYPE “5”
DIGITAL INPUTS
N°
pCO² MEDIUM
Master (Address 1)
Slave (addresses 2/3/4)
ID 1 Serious Alarm
Serious Alarm
ID 2 Evaporator Flow-switch
Evaporator Flow-switch
ID 3 Remote ON/OFF
Remote ON/OFF
ID 4 Evaporator Pump thermal Cutout
ID 5 Low Pressure Pressure-switch
Low Pressure Pressure-switch
ID 6 Oil 1 differential / Oil Level
Oil 2 differential / Oil Level
ID 7 Phase monitor
Phase monitor
ID 8 Double Set-point
ID 9 Evaporator Flow-switch
Evaporator Flow-switch
(Enablable)
(Enablable)
ID10 Summer / Winter
ID11 High pressure pressure-switch
High pressure pressure-switch
ID12 Compressor Thermal cutout
Compressor Thermal cutout
pCO¹ MEDIUM
Master (Address 1)
Slave (addresses 2/3/4)
Serious Alarm
Serious Alarm
Evaporator Flow-switch
Evaporator Flow-switch
Remote ON/OFF
Remote ON/OFF
Evaporator Pump thermal Cutout
Low Pressure Pressure-switch
Low Pressure Pressure-switch
Oil 1 differential / Oil Level
Oil 2 differential / Oil Level
Phase monitor
Phase monitor
Double Set-point
Evaporator Flow-switch
Evaporator Flow-switch
(Enablable)
(Enablable)
Summer / Winter
High pressure pressure-switch
High pressure pressure-switch
Compressor Thermal cutout
Compressor Thermal cutout
ID13
ID14
ANALOGUE INPUTS
N°
pCO2 / pCO3 MEDIUM
Master (Address 1)
Slave (addresses 2/3/4)
B1
Water temperature at Evaporator
Inlet (1)
B2
Water temperature at Evaporator Water temperature at Evaporator
Outlet (1)
Outlet (1)
B3
Water temperature at Condenser Water temperature at Condenser
Outlet (1)
Outlet (1)
(4)
B4
Outlet Temperature
Outlet Temperature (4)
B5
Water temperature at Condenser
Inlet (1)
B6
Voltage / Current / External Set- Voltage / Current (5)
point (5)
B7
High Pressure (2)
High Pressure (2)
B8
(1) NTC
Low Pressure (2)
(2) 4-20 mA
Low Pressure (2)
(3) 4-20mA/0-5V
(4) NTC-HT/4-20mA/NTC/PT1000
Generic
NO2
NO3
NO 4
NO 5
NO 6
NO 7
NO 8
NO 9
NO10
NO11
NO12
NO13
pCO1 MEDIUM
Slave (addresses 2/3/4)
High Pressure (3)
Low Pressure (3)
Low Pressure (3)
Voltage / Current / External Setpoint (6)
Outlet Temperature (7)
Water temperature at Evaporator
Inlet (1)
Water temperature at Evaporator
Outlet (1)
Water temperature at Condenser
Inlet (1)
Water temperature at Condenser
Outlet (1)
Voltage / Current (6)
(5) 4-20mA/0-1V/0-10V
DIGITAL OUTPUTS
N°
pCO2 / pCO3 MEDIUM
Master (Address 1)
Slave (addresses 2/3/4)
NO1
Master (Address 1)
High Pressure (3)
(6) 4-20mA/0-1V
Outlet Temperature (7)
Water temperature at Evaporator
Outlet (1)
Water temperature at Condenser
Outlet (1)
(7) NTC-HT/4-20mA/NTC
Master (Address 1)
pCO1 MEDIUM
Slave (addresses 2/3/4)
Bitzer
Generic
Bitzer
Generic
Bitzer
Generic
Bitzer
Relay 1
CR1
Relay 2
CR2
Evaporator Pump
Condenser Pump
Liquid Solenoid
Antifreeze Heater
Relay 3
CR3
General Alarm
Liquid inj./Econ/Oil Cooler
Line Contactor
PW1
Triangle Contactor
PW2
Star Contactor
CR4
4-way Valve
Relay 1
Relay 2
CR1
CR2
Relay 1
CR1
Relay 2
CR2
Evaporator Pump
Condenser Pump
Liquid Solenoid
Antifreeze Heater
Relay 3
CR3
General Alarm
Liquid inj./Econ/Oil Cooler
Line Contactor
PW1
Triangle Contactor
PW2
Star Contactor
CR4
4-way Valve
Relay 1
Relay 2
CR1
CR2
Liquid Solenoid
Antifreeze Heater
Relay 3
CR3
General Alarm
Liquid inj./Econ/Oil Cooler
Line Contactor
PW1
Triangle Contactor
PW2
Star Contactor
CR4
4-way Valve
ANALOGUE OUTPUTS
N°
pCO2 / pCO3 MEDIUM
Master (Address 1)
Slave (addresses 2/3/4)
Master (Address 1)
Y1
Y2
Y3
Y4
Cod.: +030221296 - Rel. 1.4 11/09/08
18
Liquid Solenoid
Antifreeze Heater
Relay 3
CR3
General Alarm
Liquid inj./Econ/Oil Cooler
Line Contactor
PW1
Triangle Contactor
PW2
Star Contactor
CR4
4-way Valve
pCO1 MEDIUM
Slave (addresses 2/3/4)
Standard Chiller/HP modulare per compressore a vite Generico/Bitzer con driver CAREL
8. List of parameters
The table below describes program parameters along with the following additional information: screen code (screens have a code in the top right corner) to make
identifying the parameter easier (screen), factory setting, upper and lower limits of the range within which values can be effected, unit of measurement, and an empty
column for writing the desired value.
To find the parameter you are interested in on the terminal’s display, proceed as follows:
•
Locate the parameter in the table below and the code of the screen it appears on
•
Using the list of screens (coming section) and screen code, call up the screen on the terminal
DESCRIPTION OF PARAMETER
SCREEN
CLOCK
FACTORY
VALUE
15 button terminal
MAINTENANCE
Password inputting
Duty hours thresholds for evaporator pump
Reset duty hours thresholds for evaporator pump
Duty hours thresholds for condenser pump
Reset duty hours thresholds for condenser pump
Duty hours thresholds for compressor
Reset compressor duty hours
Adjustment of probe B1
Adjustment of probe B2
Adjustment of probe B3
Adjustment of probe B4
Adjustment of probe B5
Adjustment of probe B6
Adjustment of probe B7
Adjustment of probe B8
Compressor 1 enable
Compressor 2 enable
Compressor 3 enable
Compressor 4 enable
Alarm log delete
Manual release of Driver 1 at start-up
Manual release of Driver 2 at start-up
Adjustment mode for Driver 1 valve
Number of steps for manual opening of Driver 1 valve
Adjustment mode for Driver 2 valve
Number of steps for manual opening of Driver 2 valve
Enter new Maintenance password
MASTER
SLAVE
M/S
M
M
M
M
M
M
M/S
M/S
M/S
M/S
M/S
M/S
M/S
M/S
M
M
M
M
M/S
M/S
M/S
M/S
M/S
M/S
M/S
M/S
1234
10
N
10
N
10
N
0
0
0
0
0
0
0
0
Y
Y
Y
Y
N
No
No
Automatic
0
Automatic
0
1234
15 button terminal
CLOCK button
K1
K1
K1
K1
K1
K2
K3
K4
M/S
M/S
M/S
M/S
M/S
M
M
M
current hour
current minutes
current day
current month
current year
1234
N
0
K5
M
0
Select time bands (F1-F2-F3-F4) for each day
Enter new Clock password
K6
K7
M
M
F1
1234
Summer set point
Winter set point
Second summer set-point
Second winter set point
15 button terminal
SET POINT key
S1
S1
S2
S2
USER
User password inputting
Minimum limit of summer set point
Maximum limits for the cooling set point
Minimum limit of winter set point
Maximum limits for the heating set point
Selection of control probe
Control with probe at evaporator input
Integration time
Control at output - summer forced power down
Control at output - winter forced power down
Control band
Neutral zone with modulating capacity control
Delayed power up between pump and compressors
Delayed power down of main pump
Cod.: +030221296 - Rel. 1.4 11/09/08
0÷9999
0÷999
Y/N
0÷999
Y/N
0÷999
Y/N
-9.9÷9.9
-9.9÷9.9
-9.9÷9.9
-9.9÷9.9
-9.9÷9.9
-9.9÷9.9
-9.9÷9.9
-9.9÷9.9
Y/N
Y/N
Y/N
Y/N
Y/N
No-Yes
No-Yes
Aut-Man
0÷9999
Aut-Man
0÷9999
0÷9999
hours x 1000
hours x 1000
hours x 1000
Steps
Steps
0÷23
0÷59
1÷31
1÷12
0÷99
Y/N
0-23
0-59
0-23
0-59
F1-F2-F3-F4
0 ÷ 9999
Hours
minutes
Hours
Minutes
Hours
Minutes
PGD0 Terminal with 6-keys or built-in version
PRG and SET POINT button in the menu
M/S
M
M
M/S
12.0
45.0
12.0
45,0
15 button terminal
PROG button
P0
P1
P1
P2
P2
P3
P4
P4
P5
P5
P6
P7
P8
P9
UNIT
MEASURE
MENT
PGD0 Terminal with 6-keys or built-in version
PRG and CLOCK button in the menu
Hour setting
Minute setting
Day setting
Month setting
Year setting
Enter clock password
Enable on-off time bands
Start and end hours and minutes for time band
F1-1 and F1-2
Start and end hours and minutes for time band F2
SET POINT
RANGE
Terminal with 6-keys or built-in version
PRG and MAINTENANCE button in the
menu
MAINTENANCE button
A3
A4
A4
A5
A5
A6
A6
A7
A7
A7
A7
A8
A8
A8
A8
A9
A9
A9
A9
Aa
Ab
Ac
Ad
Ad
Ae
Ae
Af
USER
VALUE
see P1
see P2
see P1
see P2
°C
°C
°C
°C
PGD0 Terminal with 6-keys or built-in version
PRG and USER button in the menu
M/S
M/S
M
M
M
M
M
M
M
M
M
M/S
M
M
1234
7,0
17,0
40,0
50,0
Input
Prop.
600
5,0
47,0
3,0
1,0
5
5
19
0÷9999
-99,9 / 99,9
-99,9 / 99,9
-99,9 / 99,9
-99,9 / 99,9
Input / Output
Prop./Prop+Int.
0÷9999
-99,9 ÷ 99,9
-99,9 ÷ 99,9
0÷99,9
0÷99,9
0÷999
0÷999
°C
°C
°C
°C
seconds
°C
°C
°C
°C
seconds
seconds
Standard Chiller/HP modulare per compressore a vite Generico/Bitzer con driver CAREL
DESCRIPTION OF PARAMETER
SCREEN
MASTER
SLAVE
FACTORY
VALUE
Enable remote On/Off
Type of remote on / off from master
Pa
Pa
M/S
M
N
On/Off Unit
Enable On/Off from supervisor
Alarm relay logic
Enable summer / winter selection from digital input
Enable summer / winter selection from supervisor
Enable language mask start-up
Type of freecooling control
Integral time for freecooling management
Freecooling offset on set-point
Minimum freecooling delta
Maximum freecooling delta
Freecooling differential
Compressors delay in freecooling
Minimum threshold for freecooling valve start
Maximum threshold for freecooling valve opening
Defrosting starts
Defrosting ends
Drip-off time
Delayed defrosting start
Maximum defrosting time
Cycle reversing configuration
Pl
Pl
Pb
Pb
Pc
Pd
Pd
Pd
Pe
Pe
Pe
Pe
Pf
Pf
Pg
Pg
Ph
Ph
Ph
Pi
M/S
M/S
M
M
M/S
M/S
M/S
M/S
M/S
M/S
M/S
M/S
M/S
M/S
M/S
M/S
M/S
M/S
M/S
M/S
N
N.A
N
N
Y
Prop.
150
5,0
2,0
10,0
4,0
5
50
50
2,0
12,0
10
1800
300
Comp. always on
Board identification number for supervisory network
Card communication speed for supervision network
Selection of communication serial network
Select type of unit of measure
Pj
Pj
Pj
Pm
M/S
M/S
M/S
M
1
19200
CAREL PTC
STANDARD
Pk
M/S
1234
New user password inputting
MANUFACTURER
15 button terminal
PROG + MENU button
USER
VALUE
RANGE
Y/N
On/Off unit
On/Off circuit
Y/N
N.O. / N.C.
Y/N
Y/N
Y/N
Prop./Prop+Int.
0÷9999
0÷99,9
0÷99,9
0÷99,9
2,0÷99,9
0÷500
0÷100
0÷100
-99,9 / 99,9
-99,9 / 99,9
5÷999
0÷32000
0÷32000
Comp. always ON Comp.
OFF start of defr. Cmp.
OFF end defr.
Comp. OFF start/end
0÷200
1200÷19200
Carel / Modbus / LON
STANDARD / ANGLOSAXON
0÷9999
Z0
M/S
1234
0÷9999
C1
C2
M/S
M/S
0÷5
Y/N
Enable probe B2
Enable probe B3
Enable probe B4
Enable probe B5
C2
C2
C2
C2
M/S
M/S
M/S
M/S
Enable probe B6
Enable probe B7
Enable probe B8
Generic probe generic configuration (B4 on pCO1, B5 on pCOC,
B6 on pCO2)
Type of generic probe
C2
C2
C2
C3
M/S
M/S
M/S
M/S
0
S (if pCO2-pCO3)
N (if pCO1)
N
N
N
N (if pCO2-pCO3)
S (if pCO1)
N
N
N
No
C3
M/S
Generic probe lower limit
C4
M/S
Generic probe upper limit
C4
M/S
Type of probes on analogue inputs 1 and 2 (pCO1 only)
Type of delivery temperature probe
Delivery probe lower limit
Delivery probe upper limit
High pressure probe lower limit
High pressure probe upper limit
Low pressure probe lower limit
Low pressure probe upper limit
Enable double set-point
Number of drivers present
Number of compressors present
Compressor rotation
Kind of compressor and load steps
C5
C6
C6
C6
C7
C7
C8
C8
C9
Ca
Ca
Ca
Cb
M/S
M/S
M/S
M/S
M/S
M/S
M/S
M/S
M
M/S
M/S
M
M/S
0-1V(Set point and
voltage)
4-20mA(current)
0 (voltage and
current),
-5.0 (external set point)
630(voltage)
400(current)
5.0 (external set point)
4-20mA
Ntc
-30,0
150,0
00,0
30,0
-0,5
7,0
Disabled
0
1
Y
Generic-step
Number of steps per compressor
Cb
M/S
4
20
seconds
°C
°C
°C
°C
minutes
%
%
°C/bar
°C/bar
seconds
seconds
seconds
bps
PGD0 Terminal with 6-keys or built-in version
PRG and MANUFACTURER button in the menu
Constructor password inputting
CONFIGURATION →
Unit configuration
Enable probe B1
Cod.: +030221296 - Rel. 1.4 11/09/08
UNIT
MEASURE
MENT
Y/N
Y/N
Y/N
Y/N
Y/N
Y/N
Y/N
No Current Voltage
external Set-point
0-1 V
0-10 V
4-20mA
-999,9÷999,9
°C/V/A
-999,9÷999,9
°C/V/A
4-20mA / 0-5V
Ntc / 4-20mA
-999,9÷999,9
0,0÷999,9
-99,9÷99,9
-99,9÷99,9
-99,9÷99,9
-99,9÷99,9
Disabled / Enabled
0÷2
1÷4
Y/N
Generic-Step
Generic-Stepless
Bitzer-Step
Bitzer-Stepless
1÷4
°C
°C
bar
bar
bar
bar
Standard Chiller/HP modulare per compressore a vite Generico/Bitzer con driver CAREL
DESCRIPTION OF PARAMETER
SCREEN
MASTER
SLAVE
FACTORY
VALUE
Solenoid valve configuration
Cy
M/S
None
Field enabling reduced power
Step 1 - Relay 1 logic
Step 1 - Relay 2 logic
Step 1 - Relay 3 logic
Step 2 - Relay 1 logic
Step 2 - Relay 2 logic
Step 2 - Relay 3 logic
Step 3 - Relay 1 logic
Step 3 - Relay 2 logic
Step 3 - Relay 3 logic
Step 4 - Relay 1 logic
Step 4 - Relay 2 logic
Step 4 - Relay 3 logic
Off configuration for relay 1
Off configuration for relay 2
Stand-by configuration for relay 1
Stand-by configuration for relay 2
Decrementing configuration for relay 1
Decrementing configuration for relay 2
Incrementing configuration for relay 1
Incrementing configuration for relay 2
Compressor configuration visualisation OFF CR 1 (Btz)
Compressor configuration visualisation OFF CR 2 (Btz)
Compressor configuration visualisation OFF CR 3 (Btz)
Compressor configuration visualisation stand-by CR 1 (Btz)
Compressor configuration visualisation stand-by CR 2 (Btz)
Compressor configuration visualisation stand-by CR 3 (Btz)
Decreasing configuration visualisation CR 1 (Btz)
Decreasing configuration visualisation CR 2 (Btz)
Decreasing configuration visualisation CR 3 (Btz)
Increasing configuration visualisation CR 1 (Btz)
Increasing configuration visualisation CR 2 (Btz)
Increasing configuration visualisation CR 3 (Btz)
Enable solenoid forcing when compressor OFF
Enable pump - down
Minimum pump - down time
Conf. step compressor for safety capacity
Enable condensation
Type of condensation control
Number of fans per condenser
Enable clock card
PARAMETERS →
Enable high pressure prevention
Type of high condensation prevention
Condensation set-point
High condensation differential
Enable delivery prevention
Delivery prevention set-point
Delivery prevention differential
Antifreeze prevention setpoint
Antifreeze prevention differential
Condensation set-point
Condensing differential
Inverter maximum speed
Inverter maximum speed
Maximum speed time
Enable serious alarm
Enable phase monitor alarm
Enable evaporator flow-switch alarm
Enable condenser flow-switch alarm
Alarm set-point for delivery temperature probe
Alarm differential for delivery temperature probe
High pressure probe alarm set-point
High pressure probe alarm differential
Low pressure probe alarm set-point
Low pressure probe alarm differential
Alarm set-point: difference between high and low pressure
Delayed start due to low pressure difference alarm
High voltage alarm set-point
High voltage alarm differential
High current alarm set-point
High current alarm percentage differential
Antifreeze set point
Antifreeze differential
Pump status in case of antifreeze alarm
Ch
Cd
Cd
Cd
Ce
Ce
Ce
Cf
Cf
Cf
Cg
Cg
Cg
Cz
Cz
Ci
Ci
Cj
Cj
Ck
Ck
Ct
Ct
Ct
Cu
Cu
Cu
Cv
Cv
Cv
Cw
Cw
Cw
Co
Cp
Cp
Cq
Cr
Cr
Cr
Cs
M/S
M/S
M/S
M/S
M/S
M/S
M/S
M/S
M/S
M/S
M/S
M/S
M/S
M/S
M/S
M/S
M/S
M/S
M/S
M/S
M/S
M/S
M/S
M/S
M/S
M/S
M/S
M/S
M/S
M/S
M/S
M/S
M/S
M/S
M/S
M/S
M/S
M/S
M/S
M/S
M/S
N
ON
OFF
OFF
OFF
OFF
ON
OFF
ON
OFF
OFF
OFF
OFF
OFF
ON
OFF
ON
ON
ON
OFF
OFF
OFF
ON
OFF
OFF
OFF
OFF
OFF
ON
OFF
OFF
OFF
ON
N
N
50
Max. power
No
Inverter
1
Disabled
None/
Liquid Injection/
Economiser
Y/N
OFF/ON
OFF/ON
OFF/ON
OFF/ON
OFF/ON
OFF/ON
OFF/ON
OFF/ON
OFF/ON
OFF/ON
OFF/ON
OFF/ON
OFF/ON
OFF/ON
OFF/ON
OFF/ON
OFF/ON
OFF/ON
OFF/ON
OFF/ON
OFF/ON
OFF/ON
OFF/ON
OFF/ON
OFF/ON
OFF/ON
OFF/ON
OFF/ON
OFF/ON
OFF/ON
OFF/ON
OFF/ON
Y/N
Y/N
0÷999
Max. power / Min. power
NO/YES
Inverter / Steps
1÷2
Disabled / Enabled
G1
G1
G1
G1
G2
G2
G2
G3
G3
G4
G4
G5
G5
G5
G6
G6
G7
G7
G8
G8
G9
G9
Ga
Ga
Gb
Gb
Gc
Gc
Gd
Gd
Ge
Ge
Gf
M/S
M/S
M/S
M/S
M/S
M/S
M/S
M/S
M/S
M/S
M/S
M/S
M/S
M/S
M/S
M/S
M/S
M/S
M/S
M/S
M/S
M/S
M/S
M/S
M/S
M/S
M/S
M/S
M/S
M/S
M/S
M/S
M
N
Pressure
20,0
2,0
N
90,0
5,0
6,0
1,0
14,0
2,0
10,0
3,0
10
N
N
N
N
120,0
5,0
21,0
2,0
1,0
0,5
6,0
20
440,0
5,0
200,0
10,0
3,0
1,0
Pump ON
Y/N
Press / Temp
0÷99,9
0÷99,9
Y/N
0÷999,9
0÷99,9
-99,9÷99,9
0÷99,9
-999,9÷999,9
-999,9÷999,9
0,0÷10,0
0,0÷10,0
0÷99
Y/N
Y/N
Y/N
Y/N
0÷999,9
0÷99,9
0÷99,9
0÷99,9
-99,9÷99,9
-99,9÷99,9
0÷99,9
0÷999
0÷999,9
0÷99,9
0÷999,9
0÷99,9
0÷999,9
0÷99,9
Pump ON /Pump OFF
Cod.: +030221296 - Rel. 1.4 11/09/08
21
USER
VALUE
RANGE
UNIT
MEASURE
MENT
seconds
bar/ °C
bar/ °C
°C
°C
°C
°C
bar/ °C
bar/ °C
V
V
seconds
°C
°C
bar
bar
bar
bar
bar
seconds
V
V
A
%
°C
°C
Standard Chiller/HP modulare per compressore a vite Generico/Bitzer con driver CAREL
DESCRIPTION OF PARAMETER
SCREEN
MASTER
SLAVE
FACTORY
VALUE
Pump status in the event of evaporator or condenser flow switch
alarm
Solenoid-valve management set-point
Solenoid-valve management differential
Antifreeze heater setpoint
Antifreeze heater differential
Cycle reversing valve logic
Type of freecooling control
Antifreeze temperature
Defrosting probe configuration
Gk
M
Pumps off
Gg
Gg
Gh
Gh
Gi
Gi
Gi
Cj
M/S
M/S
M/S
M/S
M/S
M/S
M/S
M/S
80,0
10,0
5,0
1,0
N.O.
0/10V
-2,0
Pressure switches
Type of overall defrosting
Cj
M/S
Simultaneous
F0
F2
F2
F2
F3
F3
F3
F4
F4
F5
F5
F6
F6
F7
F8
F8
F9
F9
Fa
Fa
Fc
M/S
M/S
M/S
M/S
M/S
M/S
M/S
M/S
M/S
M/S
M/S
M/S
M/S
M/S
M/S
M/S
M/S
M/S
M/S
M/S
M/S
N
--N
R407c
0
1600
3600
N
N
250
100
100
50
0
-0,5
7,0
120
20
120
0
33
Y/N
See EVD Manual
Y/N
See EVD Manual
0÷8100
0÷8100
0÷8100
Y/N
Y/N
0÷1000
0÷1000
32÷330
0÷100
0÷8100
-9,9÷10,0
3,5÷200,0
0÷3600
0÷500
0÷3600
0÷3600
0÷100
Bar
Bar
seconds
minutes
seconds
seconds
%
Fc
Fd
Fd
M/S
M/S
M/S
55
77
100
0÷100
0÷100
0÷100
%
%
%
Fs
Ft
Fu
Fu
Fv
Fv
Fw
Fw
Fw
Fx
Fx
Fx
Fy
M/S
M/S
M/S
M/S
M/S
M/S
M/S
M/S
M/S
M/S
M/S
M/S
M/S
N
60
Screws
Steps
-----2,0
-18,0
-30,0
12,0
12,0
15,0
20,0
Y/N
0÷100
See EVD manual
See EVD manual
See EVD manual
See EVD manual
-70,0÷50,0
-70,0÷50,0
-70,0÷50,0
-50,0÷90,0
-50,0÷90,0
-50,0÷90,0
0,0÷99,9
°C
°C
°C
°C
°C
°C
°C
Fe
M/S
60
0÷100
%
Ff
Ff
Fg
Fg
Fh
M/S
M/S
M/S
M/S
M/S
0
0
7,0
2,5
60
0,0÷99,9
0÷999
2,0÷50,0
0÷9,9
0÷100
seconds
°C
°C
%
Fi
Fi
Fj
Fj
M/S
M/S
M/S
M/S
0
0
7,0
2,5
0,0÷99,9
0÷999
2,0÷50,0
0÷9,9
seconds
°C
°C
Fk
M/S
60
0÷100
%
Fl
Fl
Fm
Fm
Fn
Fn
Fo
Fo
Fp
Fp
M/S
M/S
M/S
M/S
M/S
M/S
M/S
M/S
M/S
M/S
0
0
7,0
2,5
0
1,5
1,0
1,5
2,5
60
0,0÷99,9
0÷999
2,0÷50,0
0÷9,9
0÷9,9
0÷99,9
0÷30,0
0÷25,5
0÷25,5
0÷500
CAREL EXV DRIVERS / System parameters →
Activation of driver battery
Type of valve
Select bi-directional valve
Type of refrigerant
Custom Valve: minimum steps
Custom Valve: maximum steps
Custom Valve: closing steps
Custom Valve: enable extra step at opening
Custom Valve: enable extra step at closure
Custom Valve: current operating
Custom Valve: current stopped
Custom Valve: frequency
Custom Valve: duty cycle
Custom Valve: stand-by steps
Minimum value of S1 pressure sensor
Maximum value of S1 pressure sensor
Delay low superheat alarm
Delay high superheat alarm
Delay LOP alarm
Delay MOP alarm
Capacity required from driver with step 1 active (stepped capacity
control) or with continuous capacity control
Capacity required from driver with step 2 active
Capacity required from driver with step 3 active
Capacity required from driver with step 4 active
CAREL EXV DRIVERS / Autosetup →
Installation of default parameters
Percentage ratio between fridge power and driver power
Type of compressor or unit
Type of capacity control
Type of cold mode exchanger
Type of heat mode exchanger
Threshold for LOP protection during chiller operation
Threshold for LOP protection during heat pump operation
Threshold for LOP protection during defrost. operation
Threshold for MOP protection during chiller operation
Threshold for MOP protection during heat pump operation
Threshold for MOP protection during defrost. operation
Superheat high alarm threshold
CAREL EXV DRIVERS / Advanced
→
Percentage ratio between fridge power and driver power in chiller
function
Proportional gain in chiller function
Integral time during chiller operation
Superheat set point during chiller operation
Threshold for superheat protection during chiller operation.
Percentage ratio between fridge power and driver power during
heat pump operation
Proportional gain during heat pump operation
Integral time during heat pump operation
Superheat set-point during heat pump operation
Threshold for superheat low protection during heat pump
operation
Percentage ratio between fridge power and driver power during
defrosting operation
Proportional gain during defrosting operation
Integral time during defrosting operation
Superheat set point during defrosting operation
Threshold for low superheat protection during defrost. operation
Superheat dead band
Derivative time
Integral time for superheat low protection
Threshold Integral time for LOP protection during chiller. operation
Threshold Integral time for LOP protection during chiller. operation
Delay in MOP protection departure
Cod.: +030221296 - Rel. 1.4 11/09/08
22
USER
VALUE
RANGE
Pumps on /
Pumps off
0÷999,9
0÷99,9
0÷99,9
0÷99,9
N.O. / N.C.
ON-OFF/0-10V
-99,9÷99,9
Temperature Pressure
switches
Simultaneous Separate
Independent
UNIT
MEASURE
MENT
°C
°C
°C
°C
°C
mA
mA
Hertz
%
%
seconds
°C
°C
°C
seconds
seconds
seconds
seconds
Standard Chiller/HP modulare per compressore a vite Generico/Bitzer con driver CAREL
DESCRIPTION OF PARAMETER
SCREEN
MASTER
SLAVE
FACTORY
VALUE
Dynamic proportional enabling factor
Protection threshold for high temperature condensation
Integral time for high temperature condensation
TIMES →
Delayed start due to evaporator flow-switch alarm
Delayed steady state operation due to evaporator flow-switch
alarm
Delayed start due to condenser flow-switch alarm
Delayed steady state operation due to condenser flow-switch
alarm
Delayed start due to low pressure alarm
Delayed steady state operation due to low pressure alarm
Delayed start due to oil differential alarm
Delayed steady state operation due to oil differential alarm
High current alarm activation delay from compressor start
High current alarm delay from threshold exceeded
Time between star / line
Star time
Delta / star time
Compressor minimum ON time
Compressor minimum OFF time
Time between power ups of different compressors
Time between thrusts of same compressor
Time for reaching maximum power
Time for reaching minimum power
Solenoid-compressor start sequence
Fq
Fr
Fr
M/S
M/S
M/S
N
85,0
0
Y/N
0÷99,9
0÷25,5
°C
seconds
T0
T0
M/S
M/S
15
3
0÷99
0÷99
seconds
seconds
T1
T1
M/S
M/S
15
3
0÷99
0÷99
seconds
seconds
T2
T2
T3
T3
T8
T8
T4
T4
T4
T5
T5
T6
T6
Td
Td
T7
M/S
M/S
M/S
M/S
M/S
M/S
M/S
M/S
M/S
M/S
M/S
M/S
M/S
M/S
M/S
M/S
40
0
120
10
10
300
2
200
1
60
360
10
450
60
60
SOL/CMP
seconds
seconds
seconds
seconds
seconds
seconds
100 seconds.
100 seconds.
100 seconds.
seconds
seconds
seconds
seconds
seconds
seconds
T7
M/S
10
0÷99
0÷99
0÷999
0÷999
0÷9999
0÷9999
0÷999
0÷999
0÷999
0÷9999
0÷9999
0÷9999
0÷9999
0÷9999
0÷9999
0: SOL/CMP
1: CMP/SOL
0÷9999
T7
T7
T7
T9
T9
M/S
M/S
M/S
M/S
M/S
25
300
300
10
60
0÷9999
0÷9999
0÷9999
0÷999
seconds
seconds
seconds
seconds
seconds
T9
Ta
Ta
Ta
Tb
Tb
Tb
Tc
Te
Te
M/S
M/S
M/S
M/S
M/S
M/S
M/S
M/S
M/S
M/S
300
6
1,5
3,0
3
1,5
3,0
20
0
0
0÷9999
0÷99
0÷99,9
0÷99,9
seconds
seconds
seconds
seconds
seconds
seconds
seconds
seconds
Minute
Second
V0
V1
M/S
M/S
N
1234
Y/N
0÷9999
Time between solenoid and compressor or opposite. During this
time the condenser fan is force to 100%
Time between capacity controls 1 and 2
Time between capacity controls 2 and 3
Time between capacity controls 3 and 4
CR4 period
Maximum operating time out-with the operating limits
Delay at start up of the high suction pressure alarm
Pulse period for modulating configuration
Minimum decrementing pulse
Maximum decrementing pulse
Derivation time for modulating configuration
Minimum increasing pulse
Maximum increasing pulse
Decrement forcing time at compressor start
Delay to reach to the normal working
Unloader time
INITIALISATION →
Deletion of memory and installation of default values.
Set new Constructor password
Cod.: +030221296 - Rel. 1.4 11/09/08
23
USER
VALUE
RANGE
0÷99,9
0÷99,9
0÷999
0÷999
0÷9999
UNIT
MEASURE
MENT
seconds
Standard Chiller/HP modulare per compressore a vite Generico/Bitzer con driver CAREL
9. Screens
Screens can be divided into 5 categories:
USER screens, not password protected: they appear in all loops except “prog” and “menu+prog” and show probe values, alarms, hours of operation of the devices, time and date, and can be used to
set temperature and humidity setpoints and for clock set-up. They are marked with the “W” symbol in the parameters table below.
password-protected USER screens (password 1234, editable): called up by pressing the “prog” key, via these screens you can set the main functions (times, setpoints, differentials) of connected
devices. Screens referring to functions that are not available are not displayed. They are marked with the “X” symbol in the parameters table below.
password-protected MAINTENANCE screens (password 1234, editable): called up by pressing the “maintenance” key. Via these screens you can monitor devices, set connected probes, edit hours of
operation and manage devices in manual mode. They are marked with the “Y” symbol in the parameters table below.
password-protected MANUFACTURER screens (password 1234, editable): called up by pressing key combination “menu+prog” - via these screens you can configure the air-conditioner and enable
main functions, as well as choosing connected devices. They are marked with the “Z” symbol in the parameters table below.
9.1
List of screens
Following is the list of screens shown on the display. The table’s columns represent screen loops, and the first screen (A0, B0…) is the one that appears when you press the relevant key. You can then
use the arrow keys to scroll through the others. The codes (Ax, Bx, Cx…) appear in the top right corner of the screens, making them easier to distinguish. The meaning of the symbols W,X…is
explained in the previous paragraph. The PSW symbol indicates screens where you are required to enter passwords.
b
M0
b Ah
b Ai
b Ak
b A0
b A1
b A2
PSW A3
d A4
d A5
d A6
d A7
d A8
d A9
d Aa
d Ab
d Ac
d Ad
d Ae
d Af
b
b
b
b
b
b
b
b
b
b
b
b
b
b
I0
I1
I2
I3
I4
I5
I6
I7
I8
I9
Ia
Ib
Ic
Id
b K0
b K1
PSW K2
b K3
b K4
b K5
b K6
b K7
b
b
b
S0
S1
S2
PSW P0
c P1
c P2
c P3
c P4
c P5
c P6
c P7
c P8
c P9
c Pa
c Pl
c Pb
c Pc
c Pd
c Pe
c Pf
c Pg
c Ph
c Pi
c Pj
c Pm
c Pk
+
PSW Z0
CONFIGURAZIONE
→
→
PARAMETRI
·····
Gf
Gk
Gg
Gh
Gi
Gj
e
e
CAREL EXV DRIVER →
Advanced
e
e
e
CAREL EXV DRIVER →
Autosetup
e
e
e
→
e
e
F0
F2
·····
Fd
Fe
Ff
·····
Fr
Fs
Fs
·····
Fy
T0
e
e
e
e
e
e
e
e
e
e
e
e
e
T1
T2
T3
T8
T4
T5
T6
Td
T7
T9
Ta
Tb
Tc
INIZIALIZZAZIONE →
24
e
e
e
e
e
e
CAREL EXV DRIVER →
Parametri di sistema
TEMPISTICHE
Cod.: +030221296 - Rel. 1.4 11/09/08
e
e
e
e
e
e
e
e
e
e
e
e
e
e
e
e
e
e
e
e
e
C1
C2
·····
Cb
Cy
Ch
Cd
Ce
Cf
Cg
Cz
Ci
Cj
Ck
Ct
Cu
Cv
Cw
Co
Cp
Cq
Cr
Cs
G1
e
e
e
e
V0
V1
Standard Chiller/HP modulare per compressore a vite Generico/Bitzer con driver CAREL
10. EVD 200 electronic expansion valve
The EV Driver module for piloting the electronic expansion valves (EEV) for the pLAN network, makes it possible to control intake superheating to enable the
refrigerating unit to operate more efficiently and with greater versatility.
Condensor
We say efficiently, because by improving and stabilising the flow of
refrigerant to the evaporator, we increases the system's overall
performance, while guaranteeing safety (low pressure pressure switch less
frequently tripped, fewer returns of liquid refrigerant to the compressor,…).
pLAN
Furthermore, if the EEV is correctly sized, use of condensation pressure
Compressor
(or evaporation pressure,) either floating or at low set point, considerably
increases the system's efficiency, while ensuring lower energy
Motor
T probe
connection
consumption and greater refrigerating yield. It is versatile, because the
EEV
electronic expansion valve makes it possible to serve refrigerating units
with a lower refrigerating capacity and in operating conditions which may
P probe
differ considerably from each other.
Using an expansion valve entails the installation not only of the EVDriver
and the expansion valve itself, but also of a temperature sensor and a
pressure transducer, both located on the refrigerating side at the end of
the evaporator (on the compressor's intake pipe). Consult the following
diagram for a better understanding of the system's typical lay-out. The
priorities to be considered for optimal control of the refrigerating system:
Evaporator
obtaining a high, constant refrigerating yield rather than very low, stable
superheating. The heart of the control is a PID control with settable coefficients for superheating.
These are the additional controls:
LOW
(Low superheating with integral time and adjustable threshold)
LOP
(Low evaporation pressure, operating in transients only, with integral time and adjustable threshold)
MOP
(High evaporation pressure with integral time and adjustable threshold)
HiT cond
(High condensing pressure, activated with condensing pressure probe read by the pCO, with programmable integral time and threshold)
10.1
Driver parameters
Below are shown the fundamental and most important parameters to operate the EVD200 driver.
The parameters are divided into three different branches that can be accessed via the EVD menu:
•
System parameters (information on what is physically installed)
•
Autosetup (Standard information on the kind of unit)
•
Advanced parameters (parameters who should be changed by experts)
IMPORTANT : in order for the unit to operate, the parameters in the “system parameter” and “autosetup” branches should be inserted. Otherwise, an
alarm will appear to indicate that the autosetup procedure has not occurred.
10.1.1
BRANCH system parameter
•
Battery presence
Indicate the presence of the battery connected to EVD
•
Valve type
Insert the kind of electronic valve used, a read only parameter will indicate the number of maximum regulation passes of the valve (useful for identifying certain
valve models should the trade name be changed))
Alco EX5
Alco EX6
Alco EX7
Alco EX8
SPORLAND 0.5-20tons
SPORLAND 25-20tons
SPORLAND 50-250tons
CAREL E2V**P
CAREL E2V
DANFOSS ETS-25/50
DANFOSS ETS-100
DANFOSS ETS-250/400
CUSTOM
An incorrect choice of valve or configuration of the CUSTOM valve can damage the hardware of the valve itself.
•
Refrigerant
Select the kind of refrigerant used.
R22, R134A, R404A, R407C, R410A, R507C, R290, R600, R600A, R717, R744, R728, R1270.
Cod.: +030221296 - Rel. 1.4 11/09/08
25
Standard Chiller/HP modulare per compressore a vite Generico/Bitzer con driver CAREL
•
CUSTOM VALVE CONFIGURATION
If a CUSTOM valve is selected, the configuration levels shown below appear.
Minimum Steps
Minimum opening steps used only in repositioning to capacity change.
Maximum Steps
Maximum opening steps
Closure Steps
Steps to obtain a complete closure of the valve
Extra Opening Step
Enabling opening steps beyond the maximum ones.
Do not activate if one’s own expansion valve has an overall course (closure steps) greater than the controlling course (Maximum steps) for example with the
Sporlan valve.
Do not use without prior authorisation from one’s own EEV supplier at the enabling of the steps against the opening mechanical end stroke.
These steps are given every second up to 30% of the maximum steps in the event that the valve is completely open with overheating above the setpoint.
On return to normality (superheat below the setpoint and/or valve opening below maximum) the meter for the extra steps provides is reset and if the fault
reappears, others will be provided again 30% greater than the maximum steps.
Extra Step Closure
Enabling of closure steps with valve already completely closed.
Do not use without prior authorisation from one’s own EEV supplier at the enabling of the steps against the closure mechanical end stroke.
These steps are given every second up to 30% of the maximum steps in the event that the valve is completely closed with overheating below the setpoint. On
return to normality (superheat above the setpoint and/or valve opening different from zero) the meter for the extra steps provides is reset and if the fault
reappears, others will be provided again 30% greater than the maximum steps.
Movement Current
Stationary Current
Step Frequency
Duty Cycle
Report on maximum gear.
Indicate the maximum time percentage (based on a second) where the valve can be running (to avoid superheat of some motors).
•
EEV steps in standby
Represents the number of steps that the valve maintains during the adjustment pauses (unit at OFF).
By selecting a level greater than zero, the valve will remain partially open.
If a solenoid valve is installed before the expansion valve, this level can be increased (e.g. 25% of the maximum steps) to minimise the risks of blocking the
valve (due to ice, dirt, wear….)
•
Pressure sensor limits (deafault -1..9.3 barg)
Range of an adjustment sensor for overheating connected to the EVD.
•
ALARMS DELAY
Low Superheat (Default 120 S)
A zero level deactivates the alarm.
High Superheat (Default 20 Min)
A zero level deactivates the alarm.
LOP (default 120 s)
Delay alarm for evaporation low pressure.
A zero level deactivates the alarm.
MOP (default 0 s)
Delay alarm for evaporation high pressure.
A zero level deactivates the alarm.
10.1.2
BRANCH autosetup
•
Start up opening percentage
Insert the ratio between the circuit potential and that of the valve, considering the circuit at 100%. The percentage is always lower than or equal to 100% the
valve will always be larger than the circuit where it is installed. This percentage is used to calculate the position of the first opening (pre-positioned) of the valve
when the circuit starts up. In the case of non modulating circuits (0% or 100%), the percentage is the only parameter that influences the first opening: by
selecting 40% the valve will open 40% of its controlling course. In the case of stepped circuits (e.g. 0%-25%-50%-100%), the valve will open 40% of the
controlling course multiplied for the first step of the circuit (e.g. 40%*25%=10%).
The parameter is changed according to the ideal obtained from the ratio of the circuit/valve capacity so that when the circuit is turned on, there is no
considerable liquid reflux (for more than a minute, in this case reduce the percentage) or excessively low evaporation pressure problems for an excessively
long period (in this case increase the percentage). The parameter also automatically influences certain PID regulation levels (proportional gain).
•
Kind if compressor or unit
Insert the unit/compressor category in which the expansion valve is used.
This selection optimises the PID control parameters and the Driver’s auxiliary protection, bearing in mind the control specifications in the various kinds of plant.
The following choices are available:
Alternative
Screws
Scroll
Rapid Group / Cell
Group / Cell
Cod.: +030221296 - Rel. 1.4 11/09/08
26
Standard Chiller/HP modulare per compressore a vite Generico/Bitzer con driver CAREL
•
Kind of load step
In this field, one must insert the kind of capacity control used in the circuit.
The following choices are available:
None or steps: compressor without load steps or with step load steps.
Slow continuation: compressor with continuous modulation that is not particularly fast or with a considerable inertia speed (e.g. case for screw compressors)
compressor with fast continuous modulation or with low inertia (e.g. control with inverter or with speed case)
•
Kind of evaporator
Insert the kind of exchanger used as evaporator for the hot and/or cold modes: depending on the reversibility of the circuit there can be either one or two fields.
The following choices are available:
Metal sheets
Plates/pipes
Fast Finned
Slow Finned
•
Minimum saturation temperature ( LOP )
Separately set the limits lower than the evaporation temperature for the operational modes available (Cold, Hot, Defrost).
The level to be inserted is not the calibration level of a low pressure switch but the minimum temperature of acceptable evaporation for the unit in continuous
operation.
For example, for water refrigerator without glycol with water outlet setpoint at 7°C, a typical level is -2°C.
On the other hand, for a heat pump, the level could also be lower than -20°C depending on the use and project characteristics.
In the case of centralised unit (e.g. supermarket) and/or multi-evaporator where the behaviour of the valve does not influence the evaporation pressure (being
set a compressor pack) set at -50°C (function not operational).
•
Maximum saturation temperature ( MOP )
Separately set the limits greater than the evaporation temperature for the operational modes available (Cold, Hot, Defrost).
Once this threshold has been reached, the expansion valve will start to modulate (closing) in order to stay below.
Obviously in these cases, the superheat control will be abandoned: the MOP work point normally helps maintain the superheat considerably above the set
setpoint.
•
Superheat high alarm threshold Default 20°C
Insert the maximum superheat for the generation of the relative alarm (delay set in the system branch).
This parameter shows a double field like the one in the advanced branch.
10.1.3
Advanced BRANCH
This branch allows for the configuration of all the expansion valve control parameters that is generally unnecessary.
For each parameter, in this section, two fields are shown. The left hand field shows the level set by the AUTOSETUP procedure and cannot be changed since it is
read only. The right hand field can be changed (by default equal to zero that means the use of the autosetup parameter) and makes it possible to change the level
of variation used by the control. The description of the parameter can start with a prefix indicating on which operational mode it will be used:
CH: COLD mode
HP: HOT mode
DF: DEFROST mode
•
EEV opening percentage
Percentage of initial opening of the valve on activation of the driver/circuit.
•
Set superheat
Superheat target level that the driver aims at.
Do not set levels that are too low (less than 5°C) or too close to the limit of low superheat (a difference of at least 3°C).
Proportional gain
Proportional gain of the PID control.
On increasing this parameter, the valve’s reaction speed increases, above all with frequent variations of superheat (e.g. fast capacity ramp or evaporator loading).
This parameter influences all the valve’s movements, not only those linked to the standard PID but also to the control of accessories (low superheat, high or low
evaporation pressure……)
•
Integral time
Integral time of PID control.
On the decreasing of this valve, the driver increases the number of steps sends a command to the valve every second to achieve the setpoint.
High levels, therefore, reduce the integral action and slow down the valve movement.
Excessively low levels (below 20s) can create hunting to the system for excessive movements of the expansion valve. The level 0 (zero) completely cancels
the integral action.
•
Low superheat
Limits of low superheat.
Below this level of superheat, the driver sends a command to the expansion valve for a faster closure speed than normal, in order to avoid liquid reflux.
In fact, it represents an additional integral term to the PID control that intervenes below the threshold selected.
Do not set levels that are too close to the superheat setpoint (a difference of at least 3°C) or levels too close to zero (less than 2°C) in order to avoid the
protection intervening in the event of an incorrect reading of the control probes.
Cod.: +030221296 - Rel. 1.4 11/09/08
27
Standard Chiller/HP modulare per compressore a vite Generico/Bitzer con driver CAREL
•
•
Superheat neutral area
Neutral area for PID control. In this setpoint context, the driver will stop the control and the valve not make any movements.
The control starts again when the superheat exits the neutral area.
Derivative time
Derivative time of PID control.
Avoid levels greater than 4 seconds in order to prevent unstable control.
•
Low superheat integral time
Integral time for low superheat control.
On this parameter decreasing, the control of low superheat diverts more speed/energy. Levels close to 1.0 seconds are advised for fast evaporators (plates,
piping bands….) and close to 10.0 seconds for slow batteries (refrigeration counters, centralised units..).
A level of 0 (zero) disables the control.
•
LOP integral time
Integral control time at the protection stage for low pressure/evaporation temperature (LOP).
When this parameter diminishes, the control becomes faster.
Levels close to 1.0 seconds are advised for fast evaporators (plates, piping bands….) and close to 10.0 seconds for slow batteries (refrigeration counters,
units..). It is advisable to deactivate for centralised use (supermarket use, centralised units….)
A level of 0 (zero) disables the protection.
•
MOP integral time
Integral control time at the protection stage for high pressure/evaporation temperature (MOP).
When this parameter diminishes, the control becomes faster.
Levels close to 2.5 seconds are advised for fast evaporators (plates, piping bands….) and close to 25.0 seconds for slow batteries (refrigeration counters,
units..). A level of 0 (zero) disables the control.
•
Delay in MOP start up
The MOP action is disabled for this time when control starts.
This time is needed to allow for the achievement of low evaporation pressures in circuits that start with equalised pressures. in the case of excessively reduced
times, the MOP control leaving the unit could be activated only because the evaporation pressure did not have the time to reach the “real” working level.
•
High condensation temperature protection
Maximum condensation temperature.
Only use if the driver controls the condensation probe or receives the level from the main control (pCO…)
Over and above this level, the driver ignores the superheat control and progressively closes the expansion valve to limit the fridge capacity and subsequently
the condensation pressure. This way, the evaporation pressure is considerably reduced. Only use in plants that can operate at negative evaporation
temperatures and that do not have other methods to reduce the condensation pressure (unloading, capacity reduction….)
•
Integral time for high condensation temperature
Integral control time during the protection stage for high condensation pressure (HiTcond).
When this parameter diminishes, the control becomes faster.
Levels close to 5.0 seconds are advised.
A level of 0 (zero) disables the control.
•
Dynamic proportional control
This function allows the driver to change the proportional PID gain depending on the actual circuit capacity.
In the case of valves that are particularly large and/or circuits with the possibility of working at low load steps (below 50%), this function allows for the automatic
reduction of the gain in proportion to the low potential.
Use in the case of low potential, the valve seems to react too quickly/violently, causing hunting in the evaporation pressure and/or superheat.
This is a particular function to activate, so it will only show one field.
10.2
Special “go ahead” function
+--------------------+
|Driver 1 status
|
|
|
|Valve open restart |
|Go ahead? N
|
+--------------------+
There are three alarm conditions which prevent the driver from performing normal control (one of these is shown above ):
•
an open valve
Æ during the last blackout, the valve was not shut completely
•
battery charge
Æ the battery is not operating correctly or it is discharged or disconnected
•
eeprom restart Æ malfunctioning eeprom
When one of these conditions is active, the following alarm appears:
+--------------------+
| AL086
|
|Driver1:Waiting for |
|eeprom/batt.charged |
|or open valve error |
+--------------------+
With the "Ignore" function, these alarms can be ignored to enable the driver to control the valve (otherwise the driver would keep the valve shut).
Cod.: +030221296 - Rel. 1.4 11/09/08
28
Standard Chiller/HP modulare per compressore a vite Generico/Bitzer con driver CAREL
WARNING! deleting the alarms means ignoring them, and consequently it is recommended to carefully check that the system is not damaged or malfunctioning or
becomes unreliable (e.g.: if “recharge battery” is signalled, it probably means that the battery is not charged or is not connected, etc. Consequently, in the event of a
blackout, it may not be able to close the valve. The valve would thus remain open when the installation starts again).
If none of the three above alarms is present, the screen changes over to the next screen:
+-----------------+
¦ Driver 1 status ¦
¦
¦
No fault
¦
¦
¦
+-----------------+
11.
Unit On/Off
There two power-up and power-down modes for the machine:
1. Power-up and power-down of System
2. Power-up and power-down of Circuit
The unit status can be controlled from the keypad, digital input (can be enabled), supervisor (can be enabled)
The power-up/power down operation with the ON/OFF key on the keyboard has absolute priority. When this key is pressed, the green LED (ON or OFF) near the
key will indicate the current status.
The machine can be powered up or down from the supervisor and/or the digital input, only if it was powered up from the keyboard. Any power-down from the
supervisor or digital input will be signalled by the flashing of the green LED on the ON/OFF key and by a special wording on the main menu screen.
Power-up and power-down of System
Control is by the master board : if the board is powered up, it will power up also all the system's slaves, and vice-versa if OFF.
Power-up and power-down of Circuit
Control is by the slave board : the individual slave boards can be powered up or down from the supervisor/digital input, only if the master card is ON.
The main mask of the terminal connected to master board shows, on normal working, the status of unit. If the master circuit is switch-off, by digital input, the status
blink between unit status and circuit off (Circ.OFF).
12.
Control
There are two different modes for controlling the control thermostat:
- control depending on the water temperature values measured by the probe installed at the evaporator inlet;
- control depending on the water temperature values measured by the probe installed at the evaporator outlet.
In the first case, the control is proportional and based on the absolute temperature value measured by the probe; in the second case, control features a dead band
based on the time the temperature measured by the probe remains over certain thresholds. The type of control in any case depends on the type of compressor
managed:
- if the compressor features stepped capacity control (load steps) then either type of control can be used;
- if the compressor features continuous capacity control, then only outlet temperature control will be available.
Control set-point
Employed Inputs:
•
Digital input to enable second set point
•
Analogue input for remote set point variation
•
Supervisor serial network
Employed Parameters:
•
Control set point
•
Enable second set point from digital input
•
Enable remote set point from analogue input
•
Limits for calculating remote set point from analogue input
•
Display set point used by the control
Description of operation
The temperature control, irrespective of the type, is based on the setting of two fundamental parameters: set point and control band.
The control set point can be changed according to the operating requirements of the unit.
There are four different ways to change the control set point:
•
Different from the screen: accessing the special screen, the user can set the value of the parameter directly.
•
Different from the supervisor: if a supervisory system is connected, the cooling or heating set point can be modified by accessing the dedicated addresses.
•
Different from digital input: enabling the management of the secondary set point, the set point defined on the dedicated screen will be replaced by the
corresponding user parameter, depending on the status of the digital input.
•
Different from analogue input: enabling the remote set point from analogue input (0-1V) will activate the control set point compensation, with a proportional
value between the two limits for the conversion of the input signal.
All the conditions may exist together, condition “1” is always active, while the others can be enabled or disabled separately.
Cod.: +030221296 - Rel. 1.4 11/09/08
29
Standard Chiller/HP modulare per compressore a vite Generico/Bitzer con driver CAREL
Inlet temperature control
Employed Inputs:
•
Water temperature at evaporator inlet
Employed Parameters:
•
Type of unit
•
Total number of compressors
•
Type of compressor capacity control
•
Number of Capacity Control Steps
•
Control set-point
•
Proportional band for control at inlet.
•
Type of control (proportional or proportional + integral)
•
Integration time (if the proportional + integral control is enabled)
•
Time between start-up and first capacity control
•
Time between first and second capacity control
•
Time between second and third capacity control
•
Time between third and fourth capacity control
Outputs used:
•
Liquid Solenoid
•
Windings for compressor Line - Delta – Star
•
All compressor capacity control relays
The thermostatic control according to the values measured by the temperature probe at evaporator inlet, is based on proportional control.
According to the total number of configured compressors and capacity control steps per compressor, the set control band will be subdivided into a certain number of
steps of equal amplitude. When the activation thresholds of the individual steps is exceeded, a different compressor or capacity control steps will be activated.
To determine the different activation thresholds, the following relations must be applied:
Total number of control steps : Total number of compressors * Number of capacity control/compressor steps
Step proportional amplitude = Proportional control band / Total number of control steps
Step activation thresholds =
Control set-point + (Step proportional amplitude * Step sequential number [1,2,3…]
Outlet temperature control
Employed Inputs:
•
Water temperature at evaporator outlet
Employed Parameters:
•
Type of unit
•
Total number of compressors
•
Type of compressor capacity control
•
Number of capacity control steps
•
Control set-point
•
Control band for outlet control
•
Delayed starting of compressor capacity control stages
•
Devices activation delay
•
Devices disablement delay
•
Summer limit of temperature at outlet (powers down all compressors without observing the disabling time)
•
Winter limit of temperature at outlet (powers down all compressors without observing the disabling time)
Outputs used :
•
Liquid Solenoid
•
Windings for compressor Line - Delta - Star
•
All compressor capacity control relays
Richiesta di inserimento
dei compressori
Richiesta di disinserimento
dei compressori
Zona neutra
Setpoint
Banda neutra
Temperatura in uscita
Punto A
Punto B
A neutral temperature zone is identified, based on the set set-point and band values.
- Temperature values between the set point and set point + band (A < Temperature < B) will not switch any compressors On/Off.
- Temperature values above set point + band (Temperature > Point B) will activate the compressors
- Temperature values below the set point (Temperature < Point A ) will deactivate the compressors
A temperature threshold, subdivided into summer and winter operation is also specified: the installed devices are unconditionally disabled above/below this
threshold, in order to prevent the units producing too much cold/heat.
With capacity-control compressors, the activation and deactivation occur further outside of point A and B. See the chapter Continuous capacity control with outlet
control.
Cod.: +030221296 - Rel. 1.4 11/09/08
30
Standard Chiller/HP modulare per compressore a vite Generico/Bitzer con driver CAREL
Control of water /water chiller only units
Employed Inputs:
•
Water temperature at evaporator inlet
•
Water temperature at evaporator outlet
•
Water temperature at condenser inlet
•
Water temperature at condenser outlet
Employed Parameters:
•
Type of unit
•
Total number of compressors
•
Type of compressor capacity control
•
Number of capacity control steps
•
Control set-point
•
Control band
•
Type of control (inlet - outlet)
•
Type of control at inlet (proportional - proportional + integral)
•
Integration time (if the proportional + integral control is enabled)
•
Delayed starting of compressor capacity control stages
•
Devices activation delay
Outputs used :
•
Liquid Solenoid
•
Windings for compressor Line - Delta – Star
•
All compressor capacity control relays
Description of operation:
Activation of compressors is controlled by the water temperature measured by the probe located at evaporator inlet/outlet. No condensation fans are supplied
because the condenser is water-cooled.
Control of water/water chiller unit with gas reversing heat pump
Employed Inputs:
•
Water temperature at evaporator inlet
•
Water temperature at evaporator outlet
•
Water temperature at condenser inlet
•
Water temperature at condenser outlet
Employed Parameters:
•
Type of unit
•
Total number of compressors
•
Type of compressor capacity control
•
Number of capacity control steps
•
Control set-point
•
Control band
•
Type of control (inlet - outlet)
•
Type of control at inlet (proportional - proportional + integral)
•
Integration time (if the proportional + integral control is enabled)
•
Delayed starting of compressor capacity control stages
•
Devices activation delay
•
Refrigerating circuit reversing valve logic
•
Outputs used
•
Liquid Solenoid
•
Windings for compressor Line - Delta - Star
•
All compressor capacity control relays
•
Refrigerating circuit reversing valve
Description of operation:
Activation of compressors is controlled by the water temperature measured by the probe located at evaporator inlet/outlet. No condensation fans are supplied because the condenser
is water-cooled.
During the reversing of the refrigerator cycle, i.e. at changeover from refrigeration to heating and vice-versa, the evaporator and condenser functions are exchanged. In this mode, the
refrigerating circuit is reversed, but the compressors are always controlled by the temperature at evaporator inlet/outlet.
Cod.: +030221296 - Rel. 1.4 11/09/08
31
Standard Chiller/HP modulare per compressore a vite Generico/Bitzer con driver CAREL
Control of water/water chiller unit with water reversing heat pump
Employed Inputs:
•
Water temperature at evaporator inlet
•
Water temperature at evaporator outlet
•
Water temperature at condenser inlet
•
Water temperature at condenser outlet
Employed Parameters:
•
Type of unit
•
Total number of compressors
•
Type of compressor capacity control
•
Number of capacity control steps
•
Control set-point
•
Control band
•
Type of control (inlet - outlet)
•
Type of control at inlet (proportional - proportional + integral)
•
Integration time (if the proportional + integral control is enabled)
•
Delayed starting of compressor capacity control stages
•
Devices activation delay
•
Water circuit reversing valve logic
Outputs used
•
Liquid Solenoid
•
Windings for compressor Line - Delta - Star
•
All compressor capacity control relays
•
Water circuit reversing valve
Description of operation:
Activation of compressors is controlled by the water temperature measured by the probe located at evaporator inlet/outlet. There are no condensation fans because
the condenser is cooled using water. During the reversal of the refrigerator cycle, that is, during the passage from refrigeration to heating or vice versa, there is no
exchange between the evaporator and condenser functions. In this mode, the water circuit is reversed, and the compressors are controlled by the temperature at
evaporator or condenser inlet/outlet according to the selected mode.
Cod.: +030221296 - Rel. 1.4 11/09/08
32
Standard Chiller/HP modulare per compressore a vite Generico/Bitzer con driver CAREL
13.
Types of controlled compressors
Stepped capacity control
A maximum number of four compressors are managed, with a maximum of four capacity control steps each. Capacity control is achieved by three relay outputs
which, when suitably commanded, short-circuit the refrigerant thrust by the compressor, varying its capacity and, therefore, the power input into the circuit.
Configuration of stepped capacity control relays
The enabling sequence of the capacity control relays differs for each compressor. Therefore, the software has a facility for configuring the enabling sequence
according to the needs of different compressor manufacturers. For multi-card systems: as several compressors are housed on the same machine, it is considered
that the compressors controlled by each pCO are perfectly equal and, therefore, the capacity control configuration selected on board the master card also applies to
the slave cards. The following table shows examples of the configuration of the dedicated digital outputs for the different power stages entered.
The effective status of the digital output is indicated. The relation between the data in the table and the values set on the display.
Closed = ON Open = OFF
Default configuration :
% LOAD
25%
50%
75%
100%
Relay 1
CLOSED
OPEN
OPEN
OPEN
Relay 2
OPEN
OPEN
CLOSED
OPEN
Relay 3
OPEN
CLOSED
OPEN
OPEN
Relay 1
OPEN
CLOSED
CLOSED
CLOSED
Relay 2
CLOSED
CLOSED
OPEN
CLOSED
Relay 3
CLOSED
OPEN
CLOSED
CLOSED
Configuration example :
% LOAD
25%
50%
75%
100%
Stepped capacity control times
Delays are specified for capacity control management. These delays can be set when the capacity controls are enabled. Such delays indicate the minimum
operating time of a compressor at a given power stage. If the machine is enabled at maximum level request, these delays prevent a changeover from power level 0
to maximum level.
Graph of times for capacity control in 4 steps:
100%
75%
50%
25%
T1
T2
T3
T4
With Bitzer compressor the time T2-T3-T4 are force the follow value:
T2: The minimum value is force to 10 second
T3: zero
T4: zero
The T1 time does not have restriction.
To have more flexible management of the unloader during the unit start up and the normal working condition, it is possible to set a time (mask Te) starting from the
pump on and after this the unit is in normal working mode. If this time equal to zero then the management is disable.
During start up mode the time T1, T2, T3 (mask T7) are respected, but in normal mode they are ignored and an equal time for all the uloaders is used set by mask
Te. With Bitzer compressor the minimum time is force to 10 second.
Special management of capacity control first stage
A facility is provided for enabling special management of the first stage of capacity control, managing the compressor's special requirements when it is operating at
low power. In general, the control entails the use of the first capacity control stage only at power-up and if temperature falls below the control set-point. When
controlling the compressor, this type of control uses a reduced power modulation range, between the second and maximum power stages.
Management varies according to whether the compressor is in its starting or disabling stage. In both cases, you are recommended not work at 25% power for too long.
•
Starting: after being started, if the compressor does not receive any thermostatic request for changeover to the second capacity control stage, the changeover
is forced by the software after a time which can be set on the screen (T1).
•
Power-down: if a reduction in the power of the circuit is requested, power is controlled between the maximum and second capacity control stage. Only if
temperature drops below set-point value, the compressor is forced to operate according to the first capacity control stage for the set time (T1).
This special operating mode is enabled from the screen. If the first capacity control step is not enabled, it is treated as just any step. The compressor can operate at
this power level for an infinite time.
Cod.: +030221296 - Rel. 1.4 11/09/08
33
Standard Chiller/HP modulare per compressore a vite Generico/Bitzer con driver CAREL
Stepped capacity control with control at inlet
A description of stepped capacity control of 4 compressors with four capacity control steps each:
C1P1
C2P1
P2
P3
P4
C3P1
P2
P3
C4P1
P4
P2
P3
P4
P2
P3
P4
Temperatura
ingresso evaporatore
Banda di regolazione
Setpoint di regolazione
All compressors and the relevant capacity control steps will be proportionally positioned in the band. Increasing temperature values will cause the control steps to be
subsequently input. Each step will be input according to the set delay times. The compressors will be started at the first entered capacity control stage. If special
management of the first capacity control stage was selected, control will be effected according to the description in the dedicated section. In any event, the times for
the capacity controls will be applied as described.
Stepped capacity control with control at outlet
A description of stepped capacity control of 4 compressors with four capacity control steps each:
Activation of compressors
if the water temperature measured by the probe located at the evaporator outlet exceeds the threshold of Control Set-point + Control Band (Point B), the number of
power stages will be increased - the power stages were input according to the set parameter known as "delay between power-up of different devices".
Temperatura Uscita Evaporatore
Setpoint di
regolazione
Punto B
C1P1
C2P1
P2
P3
P4
C3P1
P2
P3
P4
C4P1
P2
P3
P4
P2
P3
P4
Tempo [s]
Ritardo Attivazione Dispositivi
In this configuration the time between the activation of the steps will be equal to the set time between the starts of different compressors, while in the event of
capacity-control, the delay time between load steps set will still be applied, and therefore the higher of the two times will prevail.
Power-down of compressors
If the water temperature measured by the probe located at the evaporator outlet falls below the Control set point (Point A), then the number of load steps will be
decreased, according to the parameter “device deactivation delay”.
Setpoint
Regolazione
Punto A
Soglia spegnimento
forzato
C4P1
P4
P3
P2
C3P1
P4
P3
P2
C2P1
P4
P3
P2
Temperatura Uscita
Evaporatore
C1P1
P4
P3
P2
Tempo [s]
Ritardo Disattivazione Dispositivi
If the temperature falls below the forced off threshold, the compressors are stopped irrespective of the set delays, to avoid the activation of the antifreeze alarm.
Continuous capacity control
A maximum number of four compressors are managed, with continuous capacity control. The compressor's capacity is controlled by two relay outputs, which, when
suitably controlled, enable compressor power to be increased or reduced, varying the capacity of the compression chamber. Compressor power is controlled by
sending impulses to the outputs of the capacity control relays. These impulses command the compressor to be charged or discharged. These impulses are at a
constant frequency, settable, and of variable duration between two minimum and maximum limits, also settable. As there is no acquisition regarding the absolute
position of the compressor 's capacity control valve, and, consequently, as no direct verification is possible of the power percentage input in the circuit, a time based
control is run. With this control, when a set time threshold is reached, the compressor is considered fully charged/discharged and thus control of the capacity control
impulses is suspended.
Durata
Impulso
Calcolata
Durata
Impulso
Calcolata
Durata
Impulso
Calcolata
Durata
Impulso
Calcolata
Tempo [s]
Periodo Impulso
Periodo Impulso
Cod.: +030221296 - Rel. 1.4 11/09/08
Periodo Impulso
34
Standard Chiller/HP modulare per compressore a vite Generico/Bitzer con driver CAREL
13.4.1
Configuration of continuous capacity control relays
The control method of the capacity control relays differs for each compressor. Therefore, the software has a facility for configuring the enabling sequence according
to the needs of different compressor manufacturers.
For multi-card systems: as several compressors are housed on the same machine, it is considered that the compressors controlled by each pCO are perfectly equal
and, therefore, the capacity control configuration selected on board the master card also applies to the slave cards. The following table shows examples of the
configuration of the dedicated digital outputs for the different power stages entered.
The effective status of the digital output is indicated.
The relation between the data in the table and the values set on the display.
Closed = ON
Open = OFF
Default configuration :
Compressor behaviour
Power reduction
Power stand-by
Power increase
Relay 1
CLOSED
OPEN
OPEN
Relay 2
CLOSED
CLOSED
OPEN
The power stand-by configuration is taken on by the outputs when no variation of input power is requested, or if the maximum/minimum compressor power is
reached, or because the water temperature measured by the probe located at evaporator outlet is inside the neutral control zone. For compressor charging /discharging,
the digital outputs of the pCO card are commanded alternately according to the stand-by and charge/discharge configuration, causing the dedicated relay to pulse.
13.5
Continuous capacity control with control at outlet
Temperature control with compressors on continuous capacity control can occur only if control at outlet is selected, according to the temperature values measured
by the probe located at evaporator outlet. To that end, further configuration parameters are input. They are specific for the particular type of compressor, and are
added to those previously mentioned in the description of the special type of control.
Employed Parameters:
•
Neutral zone for continuous capacity control
•
Impulse period
•
Charging impulse minimum duration
•
Charging impulse maximum duration
•
Discharging impulse minimum duration
•
Discharging impulse maximum duration
•
Forced discharge period at compressor power-up
•
Capacity control relay forcing enabled when compressor is OFF:
Outputs used :
•
Compressor capacity control Relay 1
•
Compressor capacity control Relay 2
Banda di regolazione per controllo in uscita
Decremento
modulato
potenza
Spegnimento
compressori
Incremento
modulato
potenza
Zona
neutra
Accensione
compressori
Temperatura Uscita
Evaporatore
A
Soglia
Spegnimento Forzato
B
C
Setpoint
Regolazione
D
E
13.5.1
Control of continuous capacity control according to points in the graph
According to the set-point values, the control band with control at output and the neutral zone of compressors on continuous capacity control, points C, D and E are
identified. If the water temperature measured by the probe located at evaporator outlet exceeds point E
Point E = Control set point + Control band/2 + Dead zone /2
Then there will be a request for the compressor to start and an increase in capacity according to charge impulses of the maximum duration until reaching the
maximum compressor load time. If the water temperature measured by the probe located at evaporator outlet is below point B
Point B = Control set point + Dead zone /2 - Control band/2
In this case, there is a request for the compressors to be discharged according to the maximum duration impulses until compressor maximum discharging time is
reached and until possible power-down. If the water temperature measured by the probe located at the evaporator outlet is between points D-E/B-C
Point D = Control set point + Dead zone
Point C = Control set point
Then the power of the compressor will be increased/reduced by impulses of variable duration according to the values calculated within the minimum and maximum
limits set for an infinite time.
Cod.: +030221296 - Rel. 1.4 11/09/08
35
Standard Chiller/HP modulare per compressore a vite Generico/Bitzer con driver CAREL
13.5.2
Power-up of compressors (temperature above point E)
The compressors are powered up in sequence at a rate calculated by the set time required to reach maximum power. As there is no absolute measurement of the
effective capacity, when the compressor is started it performs a forced unload cycle for a set time (unloader relays energised continuously according to the unload
configuration). Subsequently, the compressor power will be increased by maximum duration impulses.
13.5.3
Increase of compressor power
When the maximum time limit for reaching maximum power is reached, a forced charging cycle is commanded for a time of 20% of the set threshold, then the
compressor capacity control relays change to the power stand-by configuration.
If the temperature remains in the power-up zone (beyond point E), every ten minutes a forced charging cycle is commanded with a duration of 20% of the time
required to reach the maximum set power.
In the case of multi-compressor units, the periodic forced charging cycle will be carried out by all powered-up compressors which have reached maximum power.
13.5.4
Modulated increase of power (temperature in range between points D-E)
The compressor's power is modulated in this temperature range, by applying charging impulses of variable duration to the capacity control relays (duration is
calculated between the minimum and maximum values set according to the measured temperature values).
For multi-compressor units, modulated increase of power will occur simultaneously for all powered-up compressors.
13.5.5
Operation of compressor in neutral zone (temperature in range between points C-D)
If the temperature value locates inside the neutral zone, the capacity control relays of all powered-up compressors change to the power stand-by configuration, thus
maintaining the power level that had been reached.
13.5.6
Modulated reduction of power (temperature in range between points C-B)
The compressor's power is modulated in this temperature range, by applying discharging impulses of variable duration to the capacity control relays (duration is
calculated between the minimum and maximum values set according to the measured temperature values). For multi-compressor units, modulated reduction of
power will occur simultaneously for all powered-up compressors.
13.5.7
Power-down of compressors (temperature below point B)
The compressors are first unloaded by sending unload impulses of the maximum duration to the unloader relays. The compressors are then powered down, by
reducing the number of requested devices, at a rate equal to the time required to reach minimum set power.
FIFO Rotation is applied, whereby the first powered-up compressor is discharged and then powered-down. Instead, if rotation is disabled, the last powered-up
compressors is discharged and then powered down.
13.5.8
Derivative regulation in the increasing zone
In the increasing zone, Tb mask, comes controlled every “Derivative Time” if the outlet temperature is changed in order more than 0,2 °C. If this is true the
compressor remains in stand-by until the new control. This management can be disabled with “Derivative time” equal to 0.
Cod.: +030221296 - Rel. 1.4 11/09/08
36
Standard Chiller/HP modulare per compressore a vite Generico/Bitzer con driver CAREL
14. Compressor rotation
Compressor calls are rotated in order to equal the number of duty hours and power-ups among the devices. Rotation follows the FIFO logic: the first compressor to
be powered up is the first to be powered down. At the initial stage, there may be considerable differences in the on-duty hours of the compressors, however, the
hours are very similar to each other in steady state. Rotation occurs only among compressors and not among capacity controls, and, in any case, this type of rotation
operates only if the compressors have stepped capacity control.
Rotation-free management
•
Power-up: C1,C2,C3,C4.
•
Power-down: C4,C3,C2,C1.
FIFO rotation management (the first compressor to be powered up is the first to be powered down):
•
Power-up: C1,C2,C3,C4.
•
Power-down: C1,C2,C3,C4.
15. Starting a single compressor
15.1.1
Description of operation
The start-up stages are described in the following graph
Termost
Liquid Solenoid
Condenser fan
Compressor
Time on mask T7
From mask T7 it is possible to set the liquid solenoid and compressor start sequenze. Pay attention that during this time the condenser fan are force to maximum
speed.
15.2
Starting the compressor motor
15.2.1
Delta / Star starting
Starting the motor is described in the following diagram
Contattore
Linea
Contattore
Stella
Contattore
Triangolo
Ritardo
Linea - Stella
Ritardo
Stella-Triangolo
Durata stella
15.2.2
Start-up with Part - Winding
To start the compressor with part-winding, you must reset the star and delta-star times, setting the desired part-winding time as the delta-star time. The outputs used
are those of the line and triangle relays, used respectively as part-winding relays A and B. Example:
Star-line time
0 / 100 s
Star Time 0 / 100 s
Delta-star time
100 / 100 s
for a part-winding time of 1 s.
15.3
Compressor start restrictions
There are two start restricting methods. Both start the compressor directly with the delta contactor, by-passing the star contactor. There is a single enablement for
both cases:
1. Set high and low pressure thresholds exceeded
2. Set equalised pressure threshold exceeded (equalised pressure is the average pressure between high and low pressure measured by the transducers).
Cod.: +030221296 - Rel. 1.4 11/09/08
37
Standard Chiller/HP modulare per compressore a vite Generico/Bitzer con driver CAREL
16.
Forced capacity control
Inputs used
•
Water temperature at evaporator outlet
•
Compressor delivery temperature
•
Condensation pressure
•
Current
Parameters used
•
High delivery temperature prevention threshold
•
High delivery temperature prevention differential
•
High pressure prevention threshold
•
High pressure prevention differential
•
Antifreeze temperature prevention threshold
•
Antifreeze temperature prevention differential
•
Forced selection of compressor at minimum/maximum power
•
High current alarm threshold
•
High current alarm percentage differential
•
Delay time to signal the high current alarm
•
Delay time to prevent high current from compressor start
Outputs used
•
All compressor capacity control relays
16.1.1
Description of the condensing pressure-antifreeze-discharge temperature prevent function
The compressor forced capacity control function prevents the unit from operating in abnormal conditions of pressure, refrigerated water temperature or condensation
temperature, thus preventing any intervention by specific alarms. A parameter is provided for selecting the compressor operating mode if forced capacity control is
enabled. The compressor can be taken to minimum/maximum power according to the selection when:
•
High delivery temperature threshold exceeded
•
High pressure threshold exceeded
•
Antifreeze temperature threshold exceeded
Soglia temperatura
mandata
Differenziale
Soglia pressione
condensazione
Differenziale
Soglia temperatura
antigelo
Temperatura mandata
compressore
Pressione
condensazione
Temperatura uscita
evaporatore
Differenziale
16.1.2
Description of the high current prevent function
If the probe for measuring the current input is enabled and correctly configured, forced capacity control is active for the high current condition.
Parzializzazione
costante
D1
Differenziale
percentuale
S1
Soglia allarme
Alta corrente
Corrente
The high current is controlled on a settable alarm threshold and differential. After a delay time from when compressor starts, is the current measured exceeds the set
alarm threshold, a preventive action starts, which involves gradually decreasing the capacity of the compressor. The frequency of capacity reduction is equal to 1/3
of the set time T1 (delay time for signalling the high current alarm); in the case of compressors with stepped capacity control, the number of steps on will gradually be
reduced, in the case of compressors with continuous capacity control, the unload will be managed with impulses lasting equal the minimum set time. There is a
settable differential to return from the forced capacity control condition, expressed as a percentage of the alarm differential. The return of the current to values below
the alarm threshold and in any case within the set differential will not cause any variation to the capacity of the compressor.
The activation of a further forced capacity-control function due to pressure or temperature will be managed by assigning higher priority to the function that involves a
greater decrease in compressor capacity. The duration of the current measured above the alarm threshold for a continuous time that exceeds the set time, will
involve the activation of the corresponding high current alarm, with the immediate shutdown of the compressor and the need for manual reset by the user.
16.1.3
Compressors with stepped capacity control
For compressors with stepped capacity control, forced capacity control means that the compressor has to operate at minimum or maximum power according to
selection.
16.1.4
Compressors with continuous capacity control.
For compressors with continuous capacity control, forced capacity control means that the compressor has to operate in continuous charging or discharging mode
according to selection.
Cod.: +030221296 - Rel. 1.4 11/09/08
38
Standard Chiller/HP modulare per compressore a vite Generico/Bitzer con driver CAREL
17.
Solenoid-valve management.
Inputs used:
•
Compressor delivery temperature
Parameters used:
•
Solenoid-valve activation threshold
•
Solenoid-valve differential
Outputs used:
•
Economizer solenoid-valve, oil-cooler, liquid-injection
17.1.1
Description of operation
A digital output is provided for controlling an economizer solenoid-valve, oil-cooler and liquid injection. Activation depends on the compressor discharge temperature
read by the probe, as shown in the following graph:
Differenziale
18.
Soglia attivazione
elettrovalvola
Differenziale
Soglia Allarme
Mandata
Pump-down
Inputs used
•
Low Pressure Pressure-switch
Parameters used
•
Enable pump – down
•
Pump - down maximum duration
Outputs used
•
Liquid Solenoid
•
Windings for compressor Line - Delta – Star
•
All compressor capacity control relays
18.1.1
Description of operation
If enabled, pump-down occurs by the thermostat disabling the compressor.
The duration of the function can be set, and ends after a maximum time or if the low pressure switch is activated.
If any alarm powers down the machine or even just the compressor, the pump-down finishes immediately.
The activation of the pump-down function operates the compressor in forced capacity control mode:
- for compressors with stepped capacity control, the compressor operates at the minimum/maximum capacity.
- for compressors with modulating capacity-control, the compressor operates in continuous unload/load.
Cod.: +030221296 - Rel. 1.4 11/09/08
39
Temperatura mandata
compressore
Standard Chiller/HP modulare per compressore a vite Generico/Bitzer con driver CAREL
19.
Condensation control
Condensation can be performed in the following modes:
•
ON/OFF linked to compressor operation (without pressure transducers)
•
ON/OFF or modulating linked to reading by the pressure transducer (if the high pressure transducers were enabled)
•
ON/OFF or modulating linked to reading by the battery temperature probes (if the battery temperature probes were enabled)
Employed Inputs:
•
Condensing pressure probe
•
Condenser coil temperature probe
Outputs used:
•
Fan 1
•
Fan 2
•
Speed control for fans AOUT 1
Employed Parameters:
•
Selection of condensation control None /pressure/temperature
•
Condensation set point
•
Condensation band
•
Number of fans
•
Enable prevent function
•
Prevent threshold
•
Prevent differential
•
Output voltage for inverter minimum speed
•
Output voltage for inverter maximum speed
•
Inverter speed-up time
19.1
ON/OFF condenser control linked to compressor operation
Fan operation will solely depend on compressor operation:
Compressor OFF = fan OFF
Compressor ON = fan ON
19.2
ON/OFF condenser control linked to the pressure or temperature sensor
Fan operation depends on compressor operation and on the value read by the pressure or temperature sensors according to a set point or to a band. When the
pressure/temperature is lower than or equal to the set point, all fans are OFF, but when the pressure/temperature rises to set point + band, all fans are ON.
19.3
Modulating condenser control linked to the pressure or temperature sensor
With this type of condensation, the fans will be controlled through a 0/10 V analogue output, in proportion to demand by the pressure/temperature sensors. If the
lower limit of the ramp is greater than 0 V, there will not be a proportional straight line, but, as in the first section of the graph, it will be below the set point-diff. by one
step.
10 Volt
Setpoint
19.4
Soglia
Prevenzione
Banda Regolazione
Soglia
Allarme
Pressione / Tempetatura
Condensazione
Prevent function
This function can be selected under the constructor password, and is used to prevent circuits shutting down due to high pressure. With the compressor ON, when
this threshold is reached, the compressor is capacity-control forced until pressure returns to below the set point - of a settable differential. With the compressor OFF,
when this threshold is reached, the fans are capacity-control forced until pressure returns to below the set point - a settable differential.
Cod.: +030221296 - Rel. 1.4 11/09/08
40
Standard Chiller/HP modulare per compressore a vite Generico/Bitzer con driver CAREL
20.
Defrosting control for water/air machines
Employed Inputs:
•
battery B3 temperature (can be used as a pressure switch)
•
high pressure B7
•
Input for defrosting pressure switch 1
Employed Parameters:
•
Inputs used for defrosting
•
Type of defrosting (simultaneous / separate/independent)
•
Type of defrosting start and finish (compressor behaviour)
•
defrosting start set point
•
defrosting stop set point
•
Defrosting delay time
•
Maximum defrosting time
•
Type of compressor operation during the refrigerating cycle reversing stage.
•
Drip-off time
Outputs used:
•
Compressor 1
•
Cycle reversing solenoid-valve 1
•
Fan.
20.1
Types of defrosting
Simultaneous
Only one circuit has to request entering the defrosting cycle for all circuits to forcibly enter defrosting. Circuits which do not need to defrost (temperature above
defrosting stop set-point) stop and wait. As soon as all circuits finish defrosting, the compressors may restart on heat pump operation.
Separate
The first pCO unit requesting defrosting begins to defrost, the other units - even if they request defrosting - wait (the heat pump continues to operate) until the first
one finishes defrosting. All the units sequentially complete their defrosting cycle.
Independent
The units can start defrosting at random, independently of each other. In this way, there may be several machine starting to defrost simultaneously.
20.2
Type of end and start defrost
Defrosting can be managed either by the coil temperature probe or the high pressure probe; the user can choose, on the screen, one of the two probes. The
compressor can have four different types of behaviour in connection with start/end of defrosting. This makes it possible to protect the compressor against sudden
cycle reversing, if necessary. Times are not considered in these compressor power-downs and power-ups.
•
None: The refrigerating cycle is reversed at inlet/outlet to/from the defrosting cycle occurs with the compressor ON.
•
Start of defrosting: The compressor is powered down by the reversal of the refrigerating cycle only at the inlet of the defrosting cycle.
•
End of Defrosting: The compressor is powered down by the reversal of the refrigerating cycle only at the outlet from the defrosting cycle.
•
Start/end of defrosting: The compressor is powered down by the reversal of the refrigerating cycle both at the inlet and outlet to/from the defrosting cycle.
20.3
Defrosting a circuit with time/temperature control
If the battery temperature/pressure remains below
the defrosting start set-point for a cumulative time
equal to defrosting delay time, the circuit in
question enters a defrosting cycle.
the system's refrigerating capacity reaches
maximum value
the refrigerating circuit is reversed with the 4-way
valve
the fan in question goes OFF (if pressure probes
are present)
Temperatura
Set.stop
Set.start
t1
t2
t3
Ciclo di sbrinamento
Tempo [s]
The circuit leaves the defrosting cycle due to temperature/pressure (if battery temperature exceeds the defrosting stop set point) or due to maximum time if the
defrosting cycle exceeds the set maximum time threshold.
20.4
Defrosting a circuit with time/pressure switches control
The control is exactly the same, the only difference is the fact that the temperature/pressure is no longer counted, but rather the status of the pressure switches.
20.5
Operation of fans during the defrosting stage
The fans are usually OFF during the defrosting cycle. They are activated only if the pressure probes were enabled and pressure exceeds the prevent threshold - in
this way the unit is prevented from going into high pressure alarm status.
Cod.: +030221296 - Rel. 1.4 11/09/08
41
Standard Chiller/HP modulare per compressore a vite Generico/Bitzer con driver CAREL
21.
Free Cooling Control
Inputs used
•
Water temperature at evaporator outlet
•
Water temperature at inlet of Free Cooling battery
•
External air temperature
Parameters used
•
Type of unit
•
Number of units
•
Type of condensation
•
Number of fans
•
Free Cooling valve type
•
Free Cooling type control
•
Integration time
•
Control set point
•
Control setpoint offset
•
Minimum Free Cooling Delta
•
Maximum Free Cooling Delta
•
Free Cooling Control differential
•
Maximum threshold for Free Cooling valve opening
•
Minimum threshold for condensation speed controller
•
Free Cooling antifreeze threshold
•
Compressor activation delay
Outputs used
•
Condenser fans
•
Condensation fans speed controller
•
Free Cooling ON/OFF valve
•
Free Cooling 3-way valve
21.1.1
Description of operation
Free Cooling control makes it possible to exploit the temperature conditions of external air to facilitate cooling use water. To this end, a heat exchanger is supplied. If
necessary, a certain quantity of water is returned to this exchanger by the system, deviated via an appropriately commanded valve.
The favourable conditions of outside air cause the water to cool beforehand, and, therefore activation of the cooling devices is delayed.
Free Cooling is available in the air/water unit in the internal Free Cooling mode only. i.e. with the Free Cooling battery housed inside the machine near the
condensation battery/ies, with which its shares control of the condensation fan/s.
21.2
Free Cooling activation condition
The entire Free Cooling procedure is based on a relationship between the temperature value measured by the external temperature probe, and the temperature
value measured by the temperature probe located at the input of the Free Cooling heat exchanger and the set Free Cooling delta.
External T. < Free Cooling Input T. – Min. Delta Freecooling
If this condition is true, the freecooling function will be enabled, by activating/deactivating the dedicated devices.
Cod.: +030221296 - Rel. 1.4 11/09/08
42
Standard Chiller/HP modulare per compressore a vite Generico/Bitzer con driver CAREL
21.3
Free Cooling Thermostat
Free Cooling control exploits the calculated control set point values (taking into account any compensation) and the set Free Cooling control differential. The control
is based on the water temperature measured by the probe located at the evaporator outlet, considering the effective supply of cold of the Free Cooling exchanger
according to the different external temperature conditions.
Two different control modes can be selected: proportional, proportional + integral - the integration constant must be set in the latter case.
The set point for thermostatic control of Free Cooling will be determined according to the nominal value of the temperature of the water you wish the unit to produce.
Depending on the type of control adopted for the compressors (inlet – outlet), as the temperature references are different, two distinct control graphs will be
identified. In machines controlled output with a neutral zone, the Free Cooling control set point will correspond to the control set point of the compressors.
Free Cooling Set point = Compressors set Point
Zona Neutra Compressori
Banda Regolazione Free Cooling
T Out
Setpoint Free Cooling = Setpoint Compressori
The proportional control band will be equally distributed at the sides of the set point. The proportional band will be equally distributed on both sides of the set point. In
units with inlet control and proportional band, the freecooling control set point will use an offset from the compressor control set point to compensate for the presence
of the evaporator coil.
Free Cooling Set point = Compressors Set-point - Offset
Banda Regolazione Compressori
Setpoint Compressori
Banda Regolazione Free Cooling
Setpoint Free Cooling
T In
T Out
Offset Setpoint Free Cooling
The proportional control band will be equally distributed at the sides of the set point. In the Free Cooling control band, the activation thresholds for dedicated devices
(e.g. valves and fans or speed variators) will be calculated in different ways according to the type of selection.
As the fans and/or speed variators are shared by Free Cooling control and condensation control, if one or more compressors in a given refrigerating circuit is/are
enabled, priority will be given to condensation control to protect the circuit itself.
The Free Cooling valve will, in any event, be maintained fully open to provide as high as possible a thermal yield even at minimum ventilating capacity.
To optimise Free Cooling performance during the machine start transients and in steady state operating situations, a by-pass time is applied for thermostatic control
of the compressors.
The purpose of this time is to delay the activation of the compressors in order to give Free Cooling sufficient time to reach the steady state conditions and take the
machine's yield to nominal value. Only after this time has elapsed, and with the main thermostat dissatisfied, the compressors are commanded to operate. If time is
set to 0, the function will be disabled. While the unit is operating, the same parameter is used by Free Cooling control to reassess the machine's working conditions
according to the value measured by the external temperature probe. A further temperature delta should be set. This identifies a second threshold below which the
yield of the Free Cooling battery is so high that it can fully satisfy the system's thermal load solely through combined operation of valve and fans.
If the compressors are ON, the external temperature falls below "maximum delta" set according to the following relation:
External T. < Free Cooling Input T. – Free Cooling "Maximum Delta"
and this condition continues for a continuous time period equal to the set by-pass time for the compressors. When this time has elapsed, the compressors will be
commanded to OFF followed by a changeover to pure Free Cooling operation to satisfy load requirements with minimum use of energy. When the by-pass time for
thermostatic control of the compressors has again elapsed, the requests will be re-assessed.
An antifreeze threshold is specified . It is based on the temperature value of external air to protect the heat exchanger when operating in a cold environment. If the
temperature of external air is lower than the set threshold, the valve controlling water flow inside the Free Cooling exchanger will be commanded to open, and the
main circulation pump will be enabled (if OFF). This pump moves the fluid and prevents the interior of the exchanger from freezing.
If the valve is a 0-10V type, the degree of opening will depend on the unit's operating status.
•
with the unit off the valve will open to 100% of capacity
•
with the unit on the valve will open to 10% of capacity
If the valve is of the ON/OFF type, it will always open to maximum value irrespective of the unit's operating mode.
The entire procedure will finish as soon as the external air temperature reaches a fixed hysteresis of 1.0°C with respect to the set threshold.
Cod.: +030221296 - Rel. 1.4 11/09/08
43
Standard Chiller/HP modulare per compressore a vite Generico/Bitzer con driver CAREL
21.4
Free Cooling disabling conditions
There are two main causes of the closure of the Free Cooling valve: the first depends on the external temperature conditions, and the second on thermostatic
demand. The freecooling valve will be closed if the freecooling conditions are no longer present
External T. < Free Cooling Input T. – (Free Cooling Delta) + 1.5°C
The Free Cooling valve will close if the Free Cooling thermostat is satisfied. For system safety, the reading of the water temperature probe a the evaporator outlet
will be checked. According to the set thresholds, the following will be processed: an antifreeze pre-alarm, which will enable any post-heating heaters and totally
disable the Free Cooling devices; and an antifreeze alarm which will totally disable the unit. Other system safety devices : serious alarm from digital input, circulation
pump thermal cutout, failed control probe, failed antifreeze control probe, evaporator flow-switch alarm, phase monitor alarm. These safety device will totally disabled
the unit, and, therefore, stop the Free Cooling control.
21.5
Free Cooling ON/OFF valve
21.5.1
Proportional control
Differenziale Free Cooling
Valvola ON/OFF
Free Cooling
5,0 %
Setpoint Free Cooling
Temperatura Uscita Evaporatore
If temperature conditions favour Free Cooling control, the Free Cooling ON/OFF valve will be activated as soon as temperature exceeds the activation threshold of
the individual step, identified by a temperature value of:
Control Set point - Free Cooling Differential +5.0% Free Cooling Differential
The step amplitude is fixed at 5.0% of the set Free Cooling control differential.
21.5.2
Proportional + integral control
Differenziale Free Cooling
Differenziale Free Cooling
2
Valvola ON/OFF
Free Cooling
5%
Setpoint Free Cooling
Temperatura Uscita Evaporatore
If temperature conditions favour Free Cooling control, the Free Cooling ON/OFF valve will be activated as soon as temperature exceeds the activation threshold of
the individual step, identified by a temperature value of:
-
Control Set point + 5.0 % Freecooling differential
The step amplitude is fixed at 5.0% of the Free Cooling control differential.
Cod.: +030221296 - Rel. 1.4 11/09/08
44
Standard Chiller/HP modulare per compressore a vite Generico/Bitzer con driver CAREL
21.6
Free Cooling ON/OFF valve with stepped condensation
21.6.1
Proportional control
Here is an example of Free Cooling control with ON/OFF valve and three condensation steps.
Differenziale Free Cooling
Valvola ON/OFF
Free Cooling
V1
V2
5.0 %
V3
Setpoint Free Cooling
Temperatura Uscita Evaporatore
The ON/OFF valve activation step will, in any case, be positioned in the first part of the control differential and will have an amplitude of 5.0% of the said differential.
The activation steps of the condensation fans will be positioned proportionally inside the Free Cooling control differential.
To calculate the amplitude of each step, use the following relation:
Step amplitude
=
Free Cooling Differential
(Number of Master fans X number of cards)
It is assumed that all the circuits controlled by the pCO cards making up the system are equivalent and that the number of controlled devices is the same.
21.6.2
Proportional + integral control
Here is an example of Free Cooling control with ON/OFF valve and three condensation steps.
Differenziale Free Cooling
Differenziale Free Cooling
2
5.0 %
Valvola ON/OFF
Free Cooling
V1
V2
V3
Setpoint Free Cooling
Temperatura Uscita Evaporatore
The devices, whether they are valve or fans, will be activated in the second half of the control differential through the effect of the integrating control. Their activation
will be tied to the set integrating constant: the slower it is, the greater the value attributed to the specific parameter.
The amplitude of the valve control step will be 5.50% of the said control differential.
The amplitude of the fan control steps will be calculated according to the following relation:
Step amplitude
=
Free Cooling Differential
(Number of Master fans X number of cards)
It is assumed that all the circuits controlled by the pCO cards making up the system are equivalent and that the number of controlled devices is the same.
21.7
Free Cooling ON/OFF valve with inverter controlled condensation
21.7.1
Proportional control
Differenziale Free Cooling
Valvola ON/OFF
Free Cooling
Rampa 0÷10V
Inverter
10 Volt
0 Volt
5.0 %
Setpoint Free Cooling
Temperatura Uscita Evaporatore
The ON/OFF valve activation step will, in any case, be positioned in the first part of the control differential and will have an amplitude of 5.0% of the said differential.
The proportional ramp for piloting the analogue control output of the condensation inverter will be calculated on the entire control differential. If necessary, Value 010 Volt can be further limited downward according to the minimum output voltage value set on the screen.
All proportional outputs relating to the different units of the system will be piloted in parallel
21.7.2
Proportional + integral control
Cod.: +030221296 - Rel. 1.4 11/09/08
45
Standard Chiller/HP modulare per compressore a vite Generico/Bitzer con driver CAREL
Differenziale Free Cooling
Differenziale Free Cooling
2
5.0 %
Valvola ON/OFF
Free Cooling
10 Volt
Rampa 0÷10V
Inverter
0 Volt
Setpoint Free Cooling
Temperatura Uscita Evaporatore
The devices, whether they are valve or fans, will be activated in the second half of the control differential through the effect of the integrating control. Their activation
will be tied to the set integrating constant: the slower it is, the greater the value attributed to the specific parameter. The amplitude of the valve control step will be
5.50% of the said control differential. All proportional outputs relating to the different units of the system will be piloted in parallel
21.8
0-10 Volt Free Cooling ON/OFF valve
The Free Cooling valve is proportionally commanded in a different way depending on whether condensation control is in steps or by inverter.
The control diagrams of the two different situations are shown below.
21.9
0-10 Volt Free Cooling ON/OFF valve with stepped condensation
21.9.1
Proportional control
Differenziale Free Cooling
Valvola 0÷10V
Free Cooling
10 Volt
V1
V2
V3
0 Volt
Setpoint
Free Cooling
Temperatura Uscita Evaporatore
The proportional control ramp of the Free Cooling valve will be calculated inside the first activation step of the condensation fans. In this way, when the first fan is
enabled, the valve will be completely open, and, therefore, water flow in the Free Cooling exchanger will be at maximum level. The activation steps of the
condensation fans will be positioned proportionally inside the Free Cooling control differential. To calculate the amplitude of each step, use the following relation:
Step amplitude
Free Cooling Differential
(Number of Master fans X number of cards)
It is assumed that all the circuits controlled by the pCO cards making up the system are equivalent and that the number of controlled devices is the same.
21.9.2
=
Proportional + integral control
Differenziale Free Cooling
Differenziale Free Cooling
2
10 Volt
Valvola 0÷10V
Free Cooling
V1
V2
V3
0 Volt
Setpoint Free Cooling
Temperatura Uscita Evaporatore
The devices, whether they are valve or fans, will be activated in the second half of the control differential through the effect of the integrating control. Their activation
will be tied to the set integrating constant: the slower it is, the greater the value attributed to the specific parameter. The proportional control ramp of the Free Cooling
valve will be calculated inside the first activation step of the fans. In this way, when the first fan is enabled, the valve will be completely open, and, therefore, water
flow in the Free Cooling battery (exchanger) will be at maximum level. The activation steps of the fans will be positioned proportionally inside the Free Cooling
control differential.
To calculate the amplitude of each step, use the following relation:
Step amplitude
=
Free Cooling Differential
(Number of Master fans X number of cards)
It is assumed that all the circuits controlled by the pCO cards making up the system are equivalent and that the number of controlled devices is the same.
Cod.: +030221296 - Rel. 1.4 11/09/08
46
Standard Chiller/HP modulare per compressore a vite Generico/Bitzer con driver CAREL
21.10 0-10 Volt Free Cooling valve with inverter controlled condensation
21.10.1
Proportional control
Differenziale Free Cooling
Valvola 0÷10V
Free Cooling
Rampa 0÷10V
Inverter
10 Volt
0 Volt
Soglia % massima
Soglia % minima
apertura valvola
velocità inverter
Setpoint Free Cooling
Temperatura Uscita
Evaporatore
The control proportional ramp of the Free Cooling valve will be calculated inside the area determined by the thresholds:
Control Set point -Free Cooling Differential/2
Control Set point -Free Cooling Differential/2 + valve maximum opening % Threshold
The control proportional ramp of the condensation inverter will be calculated inside the area determined by the thresholds:
Control Set point -Free Cooling Differential/2 + inverter speed minimum % Threshold
Control Set point + Free Cooling Differential/2
The start/end points of the two control ramps can be modified at the user's discretion by varying the value of the thresholds (see graph) as a percentage of the value
of the set Free Cooling differential.
For the Free Cooling valve, the setting field ranges from 25 to 100% of the differential.
For the condensation inverter, the setting field ranges from 0 to 75% of the differential.
Example
Control setpoint
Free Cooling Differential
Free Cooling valve % threshold
Condensation inverter % threshold:
12.0ºC
4.0ºC
40%
80%
Proportional area for control of Free Cooling valve =
Control Set point - Free Cooling Differential/2 =
Maximum % threshold for valve opening =
10.0 ÷ 11.6 ºC
10.0ºC
1.6ºC
Proportional area for control of condensation inverter =
13.2 ÷ 16.0 ºC
Control Set point - Free Cooling Differential/2 =
10.0ºC
Control Set point - Free Cooling Differential/2 + inverter speed minimum % Threshold =13.2ºC
21.10.2
Proportional + integral control
Differenziale Free Cooling
Differenziale Free Cooling
2
10 Volt
Valvola 0÷10V
Free Cooling
Rampa 0÷10V
Inverter
0 Volt
Soglia % minima
velocità inverter
Soglia % massima
apertura valvola
Temperatura Uscita
Evaporatore
Setpoint Free
Cooling
The devices, whether they are valve or fans, will be activated in the second half of the control differential through the effect of the integrating control. This activation
will be constrained by the set integrative constant. The greater the value assigned to the integration time, the slower the system's response.
Cod.: +030221296 - Rel. 1.4 11/09/08
47
Standard Chiller/HP modulare per compressore a vite Generico/Bitzer con driver CAREL
22.
Control algorithm for Bitzer screw compressors
Carel developed a second Algorithm according to the Bitzer specifications to manage and protect their compressors.
By setting the “Compressor Type” parameter to “Bitzer Steps” or “Bitzer Stepless”, the compressor’s control algorithm is automatically set according to their
specifications.
With this kind of compressor, it is best to use hardware with SSR outlets to guarantee a long control life, because the CR4 valve switchings in the Steps
and CR3 and CR4 in the Stepless are very high.
In this case, the hardware codes become PCO1004CM0, PCO3002AM0 or PCO3002BM0 and for the connection table (chpt. 7) see the Bitzer column.
The Bitzer management is integrated into the software application and keeps the suction and outlet pressure conditions under control, optimising the compressor
fridge capacity both via the management of the control valves in step mode and in continuous control mode.
On the basis of the refrigerant selected via the “Refrigerant” parameter, the Bitzer management considers the compressor’s application limits, that is, the enveloping
of the pressures according to the Bitzer specifications. With this compressor, only the R407c, R22, R134a refrigerants can be selected.
This enveloping of the application limits.
Diagramma di applicazione
Condensaz.
[Bar]
Zone A
max C
Zone B
2
1
10
9
3
Zone B
Zone C
Zone D
Zone E
8
7
6
Zone F
4
Zone G
5
8, Evaporaz.
[Bar]
max O
Cod.: +030221296 - Rel. 1.4 11/09/08
48
Standard Chiller/HP modulare per compressore a vite Generico/Bitzer con driver CAREL
For each refrigerant, the polygon changes shape according to the following levels in the table.
Absolute pressures
Polygon
points
R22
With or without ECO
to
po
tc
pc
R134a ECO
With or without ECO
to
po
Tc
pc
R407C
With or without ECO
to
po
tc
pc
1
12,5
7,3
60,0
24,3
12,5
4,5
60,0
16,8
12,5
7,0
60,0
25,3
2
-10,0
3,5
60,0
24,3
-13,0
1,8
60,0
16,8
-8,0
3,5
60,0
25,3
3
-15,0
3,0
55,0
21,7
-15,0
1,6
58,0
16,0
-15,0
2,6
55,0
22,4
4
-15,0
3,0
20,0
9,1
-15,0
1,6
20,0
5,7
-15,0
2,6
20,0
8,8
5
-3,0
4,5
20,0
9,1
-10,0
2,0
20,0
5,7
0,0
4,6
20,0
8,8
6
12,5
7,3
32,5
12,7
12,5
4,5
35,0
8,9
12,5
7,0
32,5
12,6
7
15,0
7,9
34,0
13,2
15,5
5,0
37,0
9,4
15,0
7,6
34,0
13,1
8
17,5
8,5
35,8
13,8
20,0
5,7
40,0
10,2
17,5
8,2
35,8
13,8
9
17,5
8,5
60,0
24,3
20,0
5,7
60,0
16,8
17,5
8,2
60,0
25,3
10
15,0
7,9
60,0
24,3
15,5
5,0
60,0
16,8
15,0
7,6
60,0
25,3
60,0
24,3
65,0
18,9
60,0
25,3
max c
max o
22.1
17,5
8,5
20,0
5,7
17,5
8,2
Protection
Apart from the standard protection with the high and low pressure switches, the heat windings, the oil differential pressure switch and the Bitzer management keeps
the compressor away from dangerous pressure conditions. Furthermore, the Bitzer management controls the frequency of the compressor thrusts, including in the
case of loss of power, and minimum on/off times.
And more than this:
22.1.1
Zone A
•
Above the maximum condensation limit (max. c)
The compressor is stopped immediately.
22.1.2
Zone B
The maximum capacity of the compressor is limited to 75%, and this condition is allowed for a maximum of one minute; if after one minute, the pressure level is not
yet within the polygon, the compressor is stopped immediately.
22.1.3
Zone F
NORMAL WORKING
The maximum capacity of the compressor is unlimited (available up to 100%), but this condition is allowed for a maximum of one minute; if after one minute, the
pressure level is not yet within the polygon, the compressor is stopped immediately.
START-UP
The compressor is switch-on with the power to 25% for 10s in order then passing to 50% and remains in this state for any thermostatic demand. In this zone the
compressor can remain active if after 70s min difference HP-LP is greater then 1 bar and if after 370s the same difference is greater then 3 bars. If one of these
conditions doesn’t respect the compressor is switched-off then it is turned-on when protection times expired. This last procedure is repeated for 3 attempts. The
compressor is stopped if after third attempts it stills into zone F. During the compressor restart the unit status, present in the main mask, will display “RESTART”.
This type of protection is active when the compressor, in same starting, is not entered in zone C.
22.1.4
Zone C
•
Polygon compressed between 1-2-3-4-5-6 points
Inside this zone, the compressor’s capacity is unlimited and is managed solely according to the requests made.
22.1.5
Zone D
•
Polygon compressed between points 6-7-10-1
The maximum capacity of the compressor is limited to 75% without any time limit. In this case, the compressor is not compressed.
22.1.6
Zone E
•
Polygon compressed between points 7-8-10-1
The maximum capacity of the compressor is limited to 50%, and this condition is allowed for a maximum of 10 minutes; if after 10 minutes, the pressure level is not
yet within the polygon, the compressor is stopped immediately.
Cod.: +030221296 - Rel. 1.4 11/09/08
49
Standard Chiller/HP modulare per compressore a vite Generico/Bitzer con driver CAREL
22.1.7
Zone G
•
above max. o
If the limit is reached when already operational, the compressor is stopped immediately.
On the contrary, only at the start, above this limit, the maximum capacity of the compressor is limited to 50% and this condition is allowed for a maximum of 5
minutes.
If after 5 minutes from the start, the pressure level is still not inside the polygon, the compressor is stopped immediately, otherwise all the above protections are
applied.
22.1.8
High delivery temperature alarm
The alarm condition that can be set via relative setpoint and hysteresis, stops the compressor immediately. The default level is 120°C.
22.2
Start up procedure
On start up, the compressor capacity is limited to 25% for 10 seconds. After 10 seconds, the compressor is controlled according to the enveloping of the application
limits and depending on the requests made.
22.2.1
Part winding
The part winding start up is handled directly by Macroblocco in line with Bitzer specifications.
22.3
Capacity control
Via the “Compressor Type” parameter, the kind of capacity control can be selected, that is, stepped if “Bitzer Steps” or modulating if set at “Bitzer Stepless”.
22.3.1
Step control
By choosing “Bitzer Steps”, the compressor capacity varies between 0% (compressor off), 25%, 50%, 75% and 100% (maximum load) depending on the requests
made. Under every kind of condition, the maximum capacity is limited according to application enveloping even in the case where 100% is requested.
There is no delay in the stepped control on the capacity change.
22.3.2
Stepless control
By choosing “Bitzer Stepless”, the compressor capacity varies between 0% (compressor off), and is modulated from 25% to 100% (full load) depending on the
requests made. Under every kind of condition, the maximum capacity is limited according to application enveloping even in the case where 100% is requested.
In all condition the maximum cooling capacity is limited according to the envelop application limits, even in case of cooling demand is requiring 100%.
22.3.3
Economiser and liquid injection
The economiser or liquid injection valve is controlled by the relative setpoints and hysteresi
Cod.: +030221296 - Rel. 1.4 11/09/08
50
Standard Chiller/HP modulare per compressore a vite Generico/Bitzer con driver CAREL
23.
Alarms
Alarms are divided into three categories:
- signal-only alarms (signal on the display, buzzer, alarm relay)
- circuit alarms (deactivate only the corresponding circuit, signal on the display, buzzer, alarm relay)
- serious alarms (deactivate the entire system, signal on the display, buzzer, alarm relay)
23.1
•
•
•
•
"No water flow" alarm
Serious alarm from digital input
Phase monitor alarm
Pump thermal cutout
23.2
•
•
•
•
•
•
•
•
•
Circuit alarms
High pressure/pressure switch alarm
Low pressure alarm
Compressor thermal overload alarm
Oil differential alarm
Fan thermal overload alarm
Unit disconnected from network alarm
Pressure differential alarm
Evaporator antifreeze alarm
High current alarm
23.3
•
•
•
•
Serious alarms
Warning only alarms
Unit maintenance alarm
Compressor maintenance alarm
Clock card faulty or disconnected alarm
High voltage alarm
23.4
Pressure differential alarm management
Inputs used
•
Low pressure transducer
•
High pressure transducer
Parameters used
•
Enable alarm
•
Pressure differential set-point
•
Alarm activation delay
Outputs used
•
General alarm relays
•
All compressor outputs
23.4.1
Description of operation
The alarm is based on the differential between high and low pressure probe readings If this differential drops below the set differential value, the alarm is signalled
and the compressor is powered down, according to the set delay.
23.5
Antifreeze control
Inputs used:
•
Water temperature at evaporator outlet
•
Water temperature at condenser outlet
Parameters used:
•
Enable evaporator outlet probe
•
Enable condenser outlet probe
•
Antifreeze heater setpoint
•
Antifreeze heater differential
•
Antifreeze alarm set point
•
Antifreeze alarm set point
•
Forcing of main pump due to antifreeze alarm
Outputs used :
•
Antifreeze heater
•
General alarm relays
•
All compressor outputs
•
Main circulation pump
Cod.: +030221296 - Rel. 1.4 11/09/08
51
Standard Chiller/HP modulare per compressore a vite Generico/Bitzer con driver CAREL
Description of operation
Every pCO unit is able to manage antifreeze control providing the water temperature probe at evaporator/condenser outlet is connected and enabled according to
the type of unit being controlled.
Antifreeze alarm
Heater activation
activation
Antifreeze
Setpoint
Heater
setpoint
Antifreeze
differential
Heater
differential
Antifreeze control is always enabled, even if the machine is OFF, both in summer and winter operating modes. For type 5 machines with reversing of the water
circuit, the antifreeze control always controls water temperature at evaporator outlet, shifting control to the evaporator or condenser according to the operating mode
(summer-winter).
The antifreeze alarm is a circuit alarm, in multi-board systems, and will cause the total shutdown of the unit when all the circuits are in antifreeze mode. A control
parameter is provided, which enables you to select whether to keep the main circulation pump ON or OFF in the event of an antifreeze alarm This will have effect
only when all the circuits are in antifreeze status, otherwise the pump will remain on. In units with the freecooling coil, in the event of antifreeze alarms the 4-way
valve will be closed.
The heater activation is displayed on unit status of main mask.
23.6
Code
011
012
018
019
013
014
031
001
002
003
004
020
015
032
017
016
034
033
021
022
035
036
037
051
052
053
060
061
062
063
064
065
066
067
041
090
091
pCO alarms table
Alarm description
Serious Alarm
Phase Monitor Alarm
Evaporator Pump thermal Cutout
Condenser Pump thermal Cutout
Evaporator Flow-switch
Condenser Flow-switch
Antifreeze alarm
Unit 1 Offline
Unit 2 Offline
Unit 3 Offline
Unit 4 Offline
Compressor Thermal cutout
Oil Differential Pressure Switch
Low Pressure Differential
Low Pressure 2 Pressure-switch
High Pressure Pressure-switch
Low Transducer Pressure
High Transducer Pressure
Fan 1 Thermal cutout
Fan 2 Thermal cutout
High outlet temperature
High Voltage
High Current
Evap. Pump Maintenance
Cond. Pump Maintenance
Compressor Maintenance
B1 Probe Failed
B2 Probe Failed
B3 Probe Failed
B4 Probe Failed
B5 Probe Failed
B6 Probe Failed
B7 Probe Failed
B8 Probe Failed
32KB Clock Card Failed
Operation limit exceed
Gas not managed
Cod.: +030221296 - Rel. 1.4 11/09/08
OFF
Compressors
*
*
*
*
*
*
*
*
*
*
*
*
*
*
*
*
*
*
OFF
Fans
*
*
*
*
*
*
*
*
*
*
*
OFF
Pump
*
*
*
*
*
*
OFF
System
*
*
*
*
*
*
*
*
*
*
*
*
*
*
*
*
*
*
*
*
*
*
*
*
*
*
*
*
*
*
*
*
*
52
Reset
Manual
Manual
Manual
Manual
Manual
Manual
Manual
Automatic
Automatic
Automatic
Automatic
Manual
Manual
Manual
Manual
Manual
Manual
Manual
Manual
Manual
manual
Manual
Manual
Manual
Manual
Manual
Automatic
Automatic
Automatic
Automatic
Automatic
Automatic
Automatic
Automatic
Manual
Manual
Automatic
Delay
Settable
Settable
50 / 30 s
50 / 30 s
50 / 30 s
50 / 30 s
Settable
Settable
Settable
10 s
10 s
10 s
10 s
10 s
10 s
10 s
10 s
Signal
Mst/Slv
Mst/Slv
Mst
Mst
Mst/Slv
Mst/Slv
Mst/Slv
Slv
Mst
Mst
Mst
Mst/Slv
Mst/Slv
Mst/Slv
Mst/Slv
Mst/Slv
Mst/Slv
Mst/Slv
Mst/Slv
Mst/Slv
Mst/Slv
Mst/Slv
Mst/Slv
Mst
Mst
Mst/Slv
Mst
Mst/Slv
Mst/Slv
Mst/Slv
Mst/Slv
Mst/Slv
Mst/Slv
Mst/Slv
Mst/Slv
Mst/Slv
Mst/Slv
Standard Chiller/HP modulare per compressore a vite Generico/Bitzer con driver CAREL
23.7
Code
101
102
103
104
105
106
107
108
109
114
115
116
201
202
203
204
205
206
207
208
209
214
215
216
Driver card alarms
Alarm description
Probe driver 1 fault
Diver 1 EEPROM error
Diver 1 stepped motor error
Diver 1 battery error
High pressure on driver 1
Low pressure on driver 1
Low super-heat driver 1
Valve not shut while driver 1
being disabled
High super-heat driver 1
Standby due to EEPROM
/battery recharge / or open valve
error, driver 1
LAN disconnected, driver 1
Setup incomplete
Probe driver 1 fault
Diver 2 motor EEPROM error
Diver 2 stepped motor error
Diver 2 battery error
High pressure on driver 2
Low pressure on driver 2
Low super-heat driver 2
Valve not shut while driver 2
being disabled
Driver 2 high intake temperature
Standby due to EEPROM
/battery recharge / or open valve
error, driver 2
LAN disconnected, driver 2
Setup incomplete
Cod.: +030221296 - Rel. 1.4 11/09/08
OFF
Compressors
OFF
Fans
OFF
Pump
*
*
*
OFF
System
Reset
Delay
Signal
*
*
Manual
Manual
Manual
Manual
Manual
Manual
Manual
Mst/Slv
Mst/Slv
Mst/Slv
Mst/Slv
Mst/Slv
Mst/Slv
Mst/Slv
*
Manual
Manual
Mst/Slv
Mst/Slv
*
*
Manual
Manual
Manual
Manual
Manual
Manual
Manual
Manual
Manual
Manual
Mst/Slv
Mst/Slv
Mst/Slv
Mst/Slv
Mst/Slv
Mst/Slv
Mst/Slv
Mst/Slv
Mst/Slv
Mst/Slv
*
Manual
Manual
Mst/Slv
Mst/Slv
Manual
Manual
Mst/Slv
Mst/Slv
*
*
*
*
*
*
53
Standard Chiller/HP modulare per compressore a vite Generico/Bitzer con driver CAREL
24.
Alarm log
The alarm log can store the standard chiller’s operating state when alarms are generated or at particular times. Each record represents an event that can be
displayed from the list of all the events available in the memory. The log is used to resolve problems and faults as it represents a “snapshot” of the installation at the
moment the alarm was activated, and may suggest the possible causes and solutions to the faults. There are two kinds of log in the program, the STANDARD log
and ADVANCED log.
24.1
Standard log
The pCO* boards’ considerable buffer space means events can be saved in the STANDARD log, which is always available on the various boards. If there is no clock
card (optional extra on pCO1, built-in feature on pCO2 and pCO3), the STANDARD log just gives the alarm code. The maximum number of events that can be
logged is 100. Once the hundredth alarm is reached, i.e. the last available slot in the memory is taken, the oldest alarm (00) is erased as it is overwritten with the
next alarm, and so on for subsequent events. Logged events cannot be deleted by the user unless installing factory settings. The STANDARD log screen can be
called up by pressing the MAINTENANCE key, and looks like this:
+--------------------------------------------+
| Alarms history
A2|
|AL000 00:00 00/00/00|
|TIn 000.0 TOut 000.0|
|HP 000.0 LP
000.0|
+--------------------------------------------+
For each alarm, the following data are stored relating to the standard chiller at the time of the alarm:
•
•
•
•
alarm code
Time;
Date;
chronological number of the event (0...99)
The chronological event number indicates the “seniority” of the event with respect to the 100 available storage slots. The alarm with number 00 is the first to occur
after the STANDARD logs are enabled, and hence the oldest.
If you move the cursor onto the chronological number, you can run through the alarm log, from 0 to 99, using the arrow keys.
For instance, if you are on position 00, pressing the down arrow will not take you anywhere.
If 15 alarms have been logged, for instance, and you are on position 014, pressing the up arrow will not take you anywhere.
24.2
Advanced log
Events are logged on the 1MB or 2MB memory expansion module, which is a permanent appendix to the board. Advantages and features are listed below:
•
Event-based log: a typical event-based log is the alarm log. When an alarm occurs, the alarm generated is stored along with significant data (temperatures,
pressures, setpoints etc.).
•
Time-based log: a typical event[sic! probably time]-based log is the temperatures/pressure log. Temperature and pressure values are stored at regular
intervals.
•
Log log: this is the log of the last alarms/temperatures/pressures stored before a serious alarm. Unlike data stored in the event- and time-based logs, these
data are not overwritten when the memory is full.
•
You have the option of choosing the values to be saved at any time as well as the method used to save them. Using the “WinLOAD” utility program, you can
define the values to be saved and the method used to save them with the aid of a practical Wizard. WinLOAD does not need application software files as it can
procure all the information required directly from the pCO* board’s resident application software.
•
1MB of dedicated FLASH memory. With this system, data are saved to the 1MB FLASH memory included in the memory expansion module (code
PCO200MEM0 for pCO2). By way of example, 1MB of memory can hold 5,000 alarm events with 5 values for each alarm, and 6 months of recording 2 values for instance, temperature and pressure - saved every 5 minutes.
•
Option of defining up to 7 different log configurations. Usually, each controller will have one alarm log and one log for control values
(temperature/humidity/pressure) configured, in addition to a number of “log logs”.
•
Stored data can be consulted either via the (separate or built-in) LCD terminal or via a connected PC.
•
“Black box” operating mode. The memory expansion module containing the logs can be removed from the controlled unit’s pCO² and inserted in another pCO²,
via which the stored data can be consulted. The host pCO² does not need to contain the same software as the original.
•
Stored data reliability. Data are saved to a FLASH memory that does not need batteries, which are liable to run down. If previously stored data are not
compatible with new software following an upgrade, all data are erased (you are prompted to confirm first).
24.3
List of alarm log codes
AL:001
AL:002
AL:003
AL:004
AL:011
AL:012
AL:013
AL:014
AL:015
AL:016
AL:017
AL:018
Unit No. 1 Offline
Unit No. 2 Offline
Unit No.3 Offline
Unit no. 4 Offline
Serious alarm from digital input
Phase monitor alarm
Evaporator flow-switch alarm
Condenser flow-switch alarm
Oil level alarm
High pressure alarm (pressure switch)
Low pressure alarm (pressure switch)
Evaporator Pump thermal Cutout
Cod.: +030221296 - Rel. 1.4 11/09/08
54
Standard Chiller/HP modulare per compressore a vite Generico/Bitzer con driver CAREL
AL:019
AL:020
AL:021
AL:022
AL:031
AL:032
AL:033
AL:034
AL:035
AL:036
AL:037
AL:041
AL:051
AL:052
AL:053
AL:060
AL:061
AL:062
AL:063
AL:064
AL:065
AL:066
AL:067
AL:090
AL:101
AL:102
AL:103
AL:104
AL:105
AL:106
AL:107
AL:108
AL:109
AL:114
AL:115
AL:116
AL 201
AL:202
AL:203
AL:204
AL:205
AL:206
AL:207
AL:208
AL:209
AL:214
AL:215
AL:216
Condenser Pump thermal cutout
Compressor thermal cutout
Condenser 1 Thermal cutout
Condenser 2 Thermal cutout
Antifreeze alarm
Low pressure differential alarm
High pressure alarm (transducer)
Low pressure alarm (transducer)
High delivery temperature alarm
High voltage alarm
High current alarm
Alarm: clock card failed or disconnected
Evaporator pump maintenance
Condenser pump maintenance
Compressor Maintenance
Probe B1 failed or not connected
Probe B2 failed or not connected
Probe B3 failed or not connected
Probe B4 failed or not connected
Probe B5 failed or not connected
Probe B6 failed or not connected
Probe B7 failed or not connected
Probe B8 failed or not connected
Compressor out-with operating limits
Driver 1 probe fault
Diver 1 EEPROM error
Diver 1 stepped motor error
Alarm: driver 1 battery
High pressure (MOP) driver 1
Low pressure (LOP) driver 1
Low super-heat alarm, driver 1
Valve not shut while driver 1 being disabled
High super-heat alarm, driver 1
Standby due to EEPROM /battery recharge / or open valve error, driver 1
LAN disconnected, driver 1
Incomplete setup procedure on driver 1
Driver 2 probe fault
Diver 2 EEPROM error
Diver 2 stepped motor error
Alarm: driver 2 battery
High pressure (MOP) driver 2
Low pressure (LOP) driver 2
Low super-heat alarm, driver 2
Valve not shut while driver 2 being disabled
High super-heat alarm, driver 2
Standby due to EEPROM /battery recharge / or open valve error, driver 2
LAN disconnected, driver 2
Incomplete setup procedure on driver 2
25.
Supervisor
The unit can be interfaced to a local or remote supervision/remote-assistance system. Between the pCO* card accessories, an optional card is planned for serial
communication via RS485 interface, supplied separately from the pCO* card (for installation instructions for the serial communication optional cards, see installation
manual of pCO* card).
The software can handle the following supervision protocols:
•
CAREL
•
Modbus
•
LonWorks (via special optional card)
•
Trend (via special optional card)
•
Bacnet (via external gateway or PCO-WEB)
If the serial communication values (serial address and communication speed) are correctly set, the parameters transmitted by the unit will be as shown on the
following table. By setting the serial identification number to 0, the communication towards the supervision system is disabled.
Follow the list of variables managed by the supervisor.
Cod.: +030221296 - Rel. 1.4 11/09/08
55
Standard Chiller/HP modulare per compressore a vite Generico/Bitzer con driver CAREL
25.1.1.1 Key
A
Analogue variable
D
Digital variable
I
Integer variable
IN
OUT
IN/OUT
Input variable
Output variable
Input/output variable
Type
A
A
A
A
A
A
A
A
A
A
A
A
A
A
A
A
A
Direction
OUT
OUT
OUT
OUT
OUT
OUT
OUT
OUT
OUT
OUT
IN/OUT
IN/OUT
IN/OUT
IN/OUT
IN/OUT
IN/OUT
OUT
pCO Å Supervisor
pCO Æ Supervisor
pCO ÅÆ Supervisor
Address
1
2
3
4
5
6
7
8
9
10
11
12
13
14
15
16
127
Description
Analogue input 1 value
Analogue input 2 value
Analogue input 3 value
Analogue input 4 value
Analogue input 5 value
Analogue input 6 value
Analogue input 7 value
Analogue input 8 value
Analogue output 1 value
Analogue output 2 value
Summer temperature set-point
Winter temperature set-point
Condensation set-point
Temperature control band
Double cooling temperature set point
Double heating temperature set point
Software version
I
I
I
I
I
I
I
I
I
I
I
I
I
I
I
I
I
I
I
I
I
OUT
OUT
OUT
OUT
OUT
OUT
OUT
OUT
OUT
OUT
OUT
OUT
OUT
OUT
OUT
OUT
OUT
OUT
OUT
OUT
OUT
1
2
3
4
5
6
7
50
51
52
53
80
119
120
121
122
123
124
125
126
127
Unit status
pLAN address of unit
Type of fan management
Unit configuration type
Number of compressors
Number of fans
Kind of compressor
Minimum compressor on time / Time to reach minimum capacity
Minimum compressor off time
Time between starts of different compressors / Time to reach maximum capacity
Time between thrusts of same compressor
Bitzer working point
pCO type
pCO size
Bios release
Bios data
Boot release
Boot data
Software date- day
Software date- month
Software date- year
D
D
D
D
D
D
D
D
D
D
D
D
D
D
D
D
D
D
D
D
D
D
D
D
D
D
OUT
OUT
OUT
OUT
OUT
OUT
OUT
OUT
OUT
OUT
OUT
OUT
OUT
OUT
OUT
OUT
OUT
OUT
OUT
OUT
OUT
OUT
OUT
OUT
OUT
OUT
1
2
3
4
5
6
7
8
9
10
11
12
13
14
15
16
17
18
19
20
21
22
23
24
25
26
Unit status (On/Off)
Digital output 1 value
Digital output 2 value
Digital output 3 value
Digital output 4 value
Digital output 5 value
Digital output 6 value
Digital output 7 value
Digital output 8 value
Digital output 9 value
Digital output 10 value
Digital output 11 value
Digital output 12 value
Digital output 13 value
Enable evaporator flow-switch alarm
Enable probe 1
Enable probe 2
Enable probe 3
Enable probe 4
Enable probe 5
Enable probe 6
Enable probe 7
Enable probe 8
ON/OFF by supervisor
Enable starting restrictions
Type of compressor capacity control
Cod.: +030221296 - Rel. 1.4 11/09/08
56
Standard Chiller/HP modulare per compressore a vite Generico/Bitzer con driver CAREL
Type
D
D
D
D
D
D
D
D
D
D
D
D
D
D
D
D
D
D
D
D
D
D
D
D
D
D
D
D
D
D
D
D
D
D
D
D
D
D
D
D
D
D
D
D
D
D
D
D
D
D
D
D
D
D
D
D
D
D
D
D
D
D
D
Direction
OUT
OUT
OUT
OUT
IN/OUT
IN/OUT
OUT
OUT
OUT
OUT
OUT
OUT
OUT
OUT
OUT
OUT
OUT
OUT
OUT
OUT
OUT
OUT
OUT
OUT
OUT
OUT
OUT
OUT
OUT
OUT
OUT
OUT
OUT
OUT
OUT
OUT
OUT
OUT
OUT
OUT
OUT
OUT
OUT
OUT
OUT
OUT
OUT
OUT
OUT
OUT
OUT
OUT
OUT
OUT
OUT
OUT
OUT
OUT
OUT
OUT
OUT
OUT
OUT
Address
27
28
29
30
31
32
45
46
47
48
49
50
51
52
53
54
55
56
57
58
59
60
61
62
63
64
65
66
67
68
69
70
71
72
73
74
75
76
77
78
79
80
81
82
83
84
86
87
88
89
90
92
93
94
95
96
97
98
99
100
101
102
103
Cod.: +030221296 - Rel. 1.4 11/09/08
Description
Summer/Winter selection from digital input
Heat pump enabled
Summer/Winter operation
Selection of condensation with inverter
Select cooling / heating
Reset alarms
General alarm
Antifreeze alarm
Compressor thermal overload alarm
Evaporator flow-switch alarm
Condenser flow-switch alarm
High pressure alarm from pressure switch
Oil level alarm
Low pressure alarm from pressure switch
High pressure alarm from transducer
Serious alarm from digital input
Fan 1 thermal cutout alarm
Fan 2 thermal cutout alarm
Evaporator pump thermal cutout alarm
Card 1 offline alarm
Slave 1 Offline alarm
Slave 2 Offline alarm
Slave 3 Offline alarm
Alarm: Probe 1 failed or not connected
Alarm: Probe 2 failed or not connected
Alarm: Probe 3 failed or not connected
Alarm: Probe 4 failed or not connected
Alarm: Probe 5 failed or not connected
Alarm: Probe 6 failed or not connected
Alarm: Probe 7 failed or not connected
Alarm: Probe 8 failed or not connected
Condenser pump duty hours alarm
Compressor duty hours alarm
Condenser pump thermal cutout alarm
Clock alarm
Phase monitor alarm
Low pressure alarm from transducer
High voltage alarm
High current alarm
Evaporator pump duty hours alarm
Operation limit exceedi alarm
High delivery temperature alarm
Pressure differential alarm
Driver 1 probe alarm
Alarm: driver 1 EEPROM error
Alarm: driver 1 stepped motor valve error
Driver 1 high pressure alarm (MOP)
Driver 1 low pressure alarm (LOP)
Driver 1 low superheat alarm
Alarm - valve not shut after driver 1 black-out
Driver 1 high intake temperature alarm
Alarm: driver 2 EEPROM error
Alarm: driver 2 stepped motor valve error
Driver 2 probe alarm
Driver 2 high pressure alarm (MOP)
Driver 2 low pressure alarm (LOP)
Driver 2 low superheat alarm
Alarm - valve not shut after driver 2 black-out
Driver 2 high intake temperature alarm
Standby due to eeprom or open valve error, driver 1
Standby due to eeprom or open valve error, driver 2
Probe alarm on diver 1
Probe alarm on diver 2
57
CAREL S.p.A.
Via dell’Industria, 11 - 35020 Brugine - Padova (Italy)
Tel. (+39) 049.9716611 Fax (+39) 049.9716600
http: // www . carel . com - e-mail: carel @ carel . com
Cod. CAREL +030221296 – rel. 1.4 – 11/09/08
Agency