1
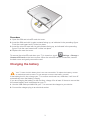
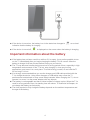
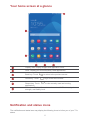
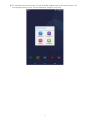
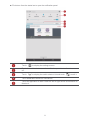
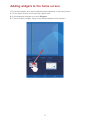
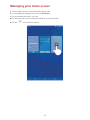
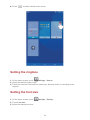
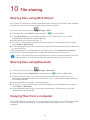
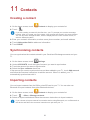
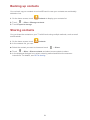
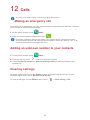
User Guide 1 Welcome 1 2 Getting started 2 honor T1 at a Glance 2 Installation 2 Charging the battery 3 Important information about the battery 4 Your home screen at a glance 5 Notification and status icons 5 Common keys 6 Shortcut operations 6 3 Text input 9 Editing Text 9 Selecting an input method 9 4 Network connection 10 Connecting to a Wi-Fi network 10 Connecting to a Wi-Fi network using WPS 10 Turning on your mobile data connection 10 5 Network sharing 11 Sharing your network using a Wi-Fi hotspot 11 Sharing your data connection through USB tethering 11 6 Managing applications 12 Installing an application 12 Clearing the application cache 12 Uninstalling an application 12 7 Email 13 Adding an email account 13 Configuring an email account 13 Deleting an email account 13 8 Multimedia 14 Viewing photos or videos 14 Taking a panoramic photo 14 Editing a photo 14 Sharing photos or videos 15 9 Customised settings 16 Changing the theme 16 I Adding widgets to the home screen 17 Managing your home screen 18 Setting the ringtone 19 Setting the font size 19 Adjusting the screen brightness 20 10 File sharing 21 Sharing files using Wi-Fi Direct 21 Sharing files using Bluetooth 21 Copying files from a computer 21 11 Contacts 23 Creating a contact 23 Synchronising contacts 23 Importing contacts 23 Backing up contacts 24 Sharing contacts 24 12 Calls 25 Making an emergency call 25 Adding an unknown number to your contacts 25 Clearing call logs 25 13 Messaging 26 Searching for a message 26 Customising message settings 26 14 Settings 27 Setting the screen timeout period 27 Setting a screen lock 27 Adjusting the volume 27 Checking the memory status 27 Setting the date and time 27 Formatting a microSD card 28 Restoring factory settings 28 Updating your T1 28 15 Personal Information and Data Security 29 16 Legal Notice 30 II 1 Welcome Welcome to the bright new world of the honor T1 (T1 for short). With your T1, you can: Surf the Internet at lightning-fast speeds. Take photos and record videos anytime, anywhere. Enjoy the latest and hottest movies. Immerse yourself in an extraordinary audio experience. And much more Your T1 sets your imagination and creativity free. Start using it now and discover all the pleasant surprises that await you. All pictures and illustrations in this document are for your reference only. The actual product may vary. The Wi-Fi only version of the T1 does not support SIM cards and therefore does not provide mobile network functions, such as calls and messaging. 1 2 Getting started honor T1 at a Glance Congratulations on your purchase of the honor T1. Press and hold the power key to power on or off your device or restart it. Press the power key once to turn on or off the screen. Installation Your T1 supports only standard micro-SIM cards. Do not insert other cards as doing so may damage your device. Contact your service provider to replace or purchase a microSIM card. Do not insert or remove the micro-SIM card when your device is turned on. The dimensions of a standard micro-SIM card are 15 mm x 12 mm x 0.76 mm (0.59 in. x 0.47 in. x 0.03 in.). The Wi-Fi only version of the T1 does not support micro-SIM cards. 2 Procedure 1. Open the SIM and microSD card slot cover. 2. Insert the SIM card with its gold contacts facing up, as indicated in the preceding figure. Push the card inward until it clicks into place. 3. Insert the microSD card with its gold contacts facing up, as indicated in the preceding figure. Push the card inward until it clicks into place. 4. Replace the card slot cover. To remove the microSD card when your T1 is turned on, touch Settings > Storage > Unmount SD card on the home screen. When the microSD card is unmounted, remove the back cover and gently remove the card. Charging the battery Your T1 uses a built-in battery that is not user-removable. To replace the battery, contact an authorised service centre. Do not attempt to remove the battery yourself. If the battery level is low, charge your T1 to ensure continued use; otherwise, it will turn off automatically once the battery is empty. If you are charging the battery for the first time, charge it for at least 12 hours to ensure that the correct battery level is displayed on your T1. 1. Use the USB cable provided with your T1 to connect the charger to your device. 2. Connect the charger plug to an electrical socket. 3 If the device is turned on, the battery icon in the status bar changes to indication that the battery is charging. If the device is turned off, as a visual is displayed on the screen when the battery is charging. Important information about the battery If the battery has not been used for a while or if it is empty, it may not be possible to turn on the T1 immediately after you begin charging the battery. This is normal. Allow the battery to charge for a few minutes before turning on your device. The T1 may become hot after being turned on for a long period of time, especially in high temperature environments. If the T1 is hot, stop charging it, close any running applications, and move it to a cool place. To avoid burning yourself, do not hold the T1 for too long if it is hot. It is strongly recommended that you use the charger and USB cable provided with the T1 to charge the device. Using other chargers or USB cables may cause the T1 performance to deteriorate or may cause safety hazards. When charging the T1, do not operate it or cover it or the power adapter with any objects. The battery is rechargeable and has a limited number of charge cycles. When the T1 is used for a long period of time, its standby time will reduce. To maximise its lifespan, do not charge the battery too frequently. The time required to fully charge the battery depends on the ambient temperature and the age of the battery. 4 Your home screen at a glance Display area: Display widgets and application icons. Dock: Display your most frequently used applications. Back key: Touch Home key: Touch Recent key: Touch applications. to return to the previous screen. to go to the home screen. to view recently used and running Status bar: Display information such as time, Wi-Fi status, signal strength, and battery level. Notification and status icons The notification and status bars may display the following icons to inform you of your T1's status. 5 Flight mode Bluetooth on GPS in use Charging Battery full Battery extremely low New email Wi-Fi hotspot on SIM card not inserted Preparing the microSD card Upcoming event Alarms enabled Uploading or sending files Downloading or receiving files Memory full System exception Synchronising data Synchronisation failed Connected to a VPN USB tethering on Wi-Fi networks available Connected to a Wi-Fi network USB debugging on Headset connected Common keys More Share Completed Edit Attachment Add Search Set Refresh Delete data Favourites Save Clean the system environment Call Shortcut operations To open an application: On the home screen, touch the application. To switch between the home screen and its extensions: On the home screen, flick your finger left or right. 6 To customise the home screen: Touch and hold a blank area on the home screen. On the displayed option menu, set the wallpaper, widgets, and more. 7 Flick down from the status bar to open the notification panel. Touch to display the settings screen. Touch the switch shortcuts on the notification panel to turn functions on or off. Touch to display the switch shortcut list and touch to edit it. Touch Clear all to delete all notifications. Touch an application to start it and flick left or right across a notification to dismiss it. 8 3 Text input Your T1 comes with multiple input methods. It's easy to enter text using the onscreen keyboard. Touch a text input field to bring up the onscreen keyboard. When you are done, touch to hide the onscreen keyboard. Editing Text You can copy, cut, and paste text. Select text: Touch and hold the text field until and appear. Drag and to select the text you want to edit, or touch Select all to select all text. Copy text: After selecting text, touch Copy. Cut text: After selecting text, touch Cut. Paste text: Touch where you want to insert the text (to move the insertion point, drag ) and touch Paste to paste the text you copied or cut. Selecting an input method The T1 provides multiple methods to input text. You can select your desired input method. 1. On the text editing screen, touch a text field to bring up the onscreen keyboard. 2. Flick down from the notification bar to display the notification panel. 3. On the notification panel, touch Choose input method. 4. On the displayed option menu, select the desired input method. 9 4 Network connection Connecting to a Wi-Fi network If a Wi-Fi network and a mobile network are available at the same time, the T1 preferentially connects to the Wi-Fi network. If the Wi-Fi network becomes unavailable, the T1 then automatically connects to the mobile network. 1. On the home screen, touch Settings > Wi-Fi. 2. Touch the key next to Wi-Fi or drag the key to . Your T1 then automatically scans for available Wi-Fi networks. 3. Select the desired Wi-Fi network and follow the onscreen instructions. If the SSID of the Wi-Fi network you selected is hidden, touch > Add network and follow the onscreen instructions to enter the required network information (including the SSID). Your T1 consumes more power when Wi-Fi is turned on. To save battery power, turn off WiFi when it is not in use. Connecting to a Wi-Fi network using WPS If the wireless router being used supports Wi-Fi protected setup (WPS), it is easy to connect to a Wi-Fi network using WPS. 1. On the home screen, touch Settings > Wi-Fi. > WPS Push Button or WPS Pin Entry. Then, follow the onscreen 2. Touch instructions to perform operations on the wireless router. Turning on your mobile data connection The Wi-Fi only version of the T1 does not support this function. Using a mobile data connection may incur data usage charges. For details, contact your service provider. 1. On the home screen, touch Settings. 2. Touch More… > Mobile networks under WIRELESS & NETWORKS. 3. Select the Data enabled check box to enable the data service. 10 5 Network sharing You can use various methods to share your T1's data connection with other wireless devices. Sharing your network using a Wi-Fi hotspot By setting up your T1 as a Wi-Fi hotspot, you can share your mobile network with other devices. Before sharing your data connection, enable the data service on your T1. For details, see 4.3 Turning on your mobile data connection. The Wi-Fi only version of the T1 does not support this function. Other devices that access the Internet using your T1's data connection will consume the data usage of your T1. 1. On the home screen, touch Settings. 2. Touch More… > Tethering & portable hotspot under WIRELESS & NETWORKS. 3. Select the Portable Wi-Fi hotspot check box to turn on your Wi-Fi hotspot. 4. Touch Configure Wi-Fi hotspot and follow the onscreen instructions to set the required information, such as your Wi-Fi network name and password. Once the Wi-Fi hotspot settings are complete, other Wi-Fi enabled devices can search for and connect to the Wi-Fi hotspot provided by your T1. Sharing your data connection through USB tethering You can share your T1's network connection with a computer using a single USB cable. 1. Use the USB cable included with your T1 to connect a computer to your device. 2. On the home screen, touch Settings. 3. Touch More… > Tethering & portable hotspot under WIRELESS & NETWORKS. 4. Select the USB tethering check box. The onscreen instructions will inform you whether USB tethering is successful. You can then access the Internet from the computer using your T1's data connection. When using the USB tethering function, you cannot use your T1 as a USB storage device. 11 6 Managing applications Installing an application When you install an application, the "Install blocked" message may be displayed. Read the message carefully. If you want to continue with the installation, follow the onscreen instructions. You can obtain and install an application using any of the following methods: Download it from an online app store or by using a browser. After the application is downloaded, follow the onscreen instructions to install it. Some third-party applications may not be compatible with your T1. They may not run properly and your T1 may shut down. It is recommended that you download applications only from trusted sources. Connect your T1 to a computer. Then use the HiSuite or third-party software to download the application. After the application is downloaded, follow the onscreen instructions to install it. Use Bluetooth or Wi-Fi Direct to send the application on another device, such as a phone or tablet, to your T1. Once you have received the application, click it to install it. Download the application from a computer. Then copy the application to your T1. Once copied, touch touch App Installer on your T1's home screen. Select the application and > Install. Clearing the application cache Regularly clearing the application cache helps the T1 run more smoothly. Settings > Manage apps. 1. On the home screen, touch 2. Touch All to view all applications. 3. Touch Clear cache. Uninstalling an application On the home screen, touch and hold the application you want to uninstall, then drag it to . Some pre-installed applications cannot be uninstalled. 12 7 Email Adding an email account Email parameters must be set when you add an email account. For details, contact your email service provider. 1. 2. 3. 4. On the home screen, touch Email. On the Add account screen, select the type of account that you want. In Account setup, enter the email address and password. Touch Next and follow the onscreen instructions to complete more settings. After you add an email account, touch accounts. > Settings > Add account to add more Configuring an email account You can configure an email account, such as changing the email signature, font size, inbox refresh frequency, and email notification tone. 1. On the home screen, touch 2. Touch Email. > Settings. Then you can: Touch General to change the email font size or set the picture that will be displayed after an email is deleted. Select an email account to change the email signature, set the inbox refresh frequency, or change the email notification tone. Do not arbitrarily change the default value of SERVER SETTINGS; otherwise, sending and receiving emails may fail. Deleting an email account Deleting an email account will not delete the emails stored on the server. You can still use other devices to log in to the mailbox and check the emails. After an email account is deleted, the T1 will no longer use the account to send and receive emails. 1. On the home screen, touch Email. > Settings. 2. Touch 3. In the email account list, select the email account you want to delete. 4. On the screen, flick your finger up and touch Remove account. 13 8 Multimedia Viewing photos or videos Gallery lets you conveniently view photos and videos. It automatically searches for and organises the photos and videos stored on your T1's internal storage and the microSD card. 1. On the home screen, touch Gallery to open Gallery. 2. Touch a photo or video to view it in full screen mode. Flick your finger left or right across the screen to view the previous or next file. You can pinch two fingers apart or together to zoom in or out. When viewing a photo or video, you can: Filter fragmented images. Open the camera. Share photos or videos. Play the photo or video in a small window. View more menu options. Taking a panoramic photo Your T1 enables you to easily take panoramic photos without a wide-angle lens. 1. On the home screen, touch Camera. > Panorama to enter panoramic shooting mode. 2. Touch > 3. Touch to start shooting. Pan your T1 slowly to capture the view. If the viewfinder turns red, the view will not be captured. This may happen because you have moved your T1 too fast or the viewfinder scope exceeds the limit of the panoramic view. Try panning your T1 more slowly. 4. Touch to stop shooting. Your T1 then automatically generates a panoramic photo. Editing a photo Your T1 provides powerful photo editing functions that allow you to make your photos even more stunning. It is easy to apply effects such as red eye removal, light adjustment, and cropping a photo. 14 1. Touch Gallery and locate the photo you want to edit. 2. Touch > Edit. Crop the photo or adjust its luminance and colour. 3. Touch SAVE. The edited photo is saved to the same folder as the original photo. Sharing photos or videos You can share photos and videos via Bluetooth or email. Take your T1 and start sharing! Gallery to open Gallery. 1. On the home screen, touch 2. Touch and hold the photo or video you want to share. 3. Touch and choose how you want to share the selected file, for example, using Bluetooth or Wi-Fi Direct. Then follow the onscreen instructions. For details, see File sharing. 15 9 Customised settings The T1 allows you to use your favourite photo as the wallpaper, design home screen widgets, and set different ringtones. Changing the theme Your T1 comes with multiple themes, allowing you to change the look of your device as often as you want. Themes. 1. On the home screen, touch 2. Select the desired theme. Then, touch APPLY. 16 Adding widgets to the home screen You can add widgets, such as the calendar and bookmarks, to the home screen. 1. On the home screen, touch and hold a blank area. 2. In the displayed dialogue box, touch Widgets. 3. Touch and hold a widget, drag it to the desired position, then release it. 17 Managing your home screen 1. On the home screen, touch and hold a blank area. 2. In the displayed dialogue box, touch Thumbnails. 3. On the thumbnail screen, you can: Touch and hold a home screen thumbnail to move its position. Touch to add a home screen. 18 Touch to delete a blank home screen. Setting the ringtone 1. On the home screen, touch Settings > Sound. 2. Select the desired ringtone type. 3. Follow the onscreen instructions to select your favourite music or recording as the ringtone. Setting the font size 1. On the home screen, touch 2. Touch Font size. 3. Select the desired font size. Settings > Display. 19 Adjusting the screen brightness Your T1 incorporates a light sensor that can automatically adjust the screen brightness based on the ambient light. You can also manually adjust the display brightness. Lower the display brightness to reduce your T1's power consumption. 1. On the home screen, touch Settings > Display > Brightness. 2. Drag the slider left or right to adjust the screen brightness. 20 10 File sharing Sharing files using Wi-Fi Direct Wi-Fi Direct is a function to connect wireless devices using a Wi-Fi network. After wireless devices are connected, they can quickly share files among them. 1. On the home screen, touch Settings > Wi-Fi. to turn on Wi-Fi. 2. Touch the key next to Wi-Fi or drag the key to 3. Touch Wi-Fi Direct. On the receiving device, turn on Wi-Fi Direct. Your T1 then automatically searches for available devices. 4. Select the device to pair it with your T1. 5. On your T1, touch and hold the file you want to share. On the displayed option menu, touch Share > Wi-Fi Direct. 6. On the displayed option menu, select the desired device and touch the key on the device to receive the file. If the desired device is not displayed on the option menu, touch Search for devices to enter the Wi-Fi Direct settings screen. Select the desired device to connect to it. If your T1 and the device have connected to the same Wi-Fi network and both have Wi-Fi Direct turned on, you can directly share files between them without pairing them. Sharing files using Bluetooth 1. On the home screen, touch Settings > Bluetooth. to turn on Bluetooth. 2. Touch the key next to Bluetooth or drag the key to 3. Touch the name of your T1 to make it visible to other Bluetooth devices. Turn on Bluetooth on the device that is to receive the file. Your T1 then automatically searches for available devices. 4. Select the device to pair your T1 and the device. 5. On your T1, touch and hold the file you want to share. On the displayed option menu, touch Share > Bluetooth. 6. On the displayed option menu, select the desired device. On the device, touch the related key to receive the file. Copying files from a computer Use a USB cable to connect your T1 to a computer. Follow your T1's onscreen instructions to select a connection method. You can then transfer files between your T1 and the computer. 21 Connectio n Mode Function Operation Media device (MTP) On the computer, view and Click the newly displayed drive Camera (PTP) On the computer, view and manage the image files stored on your T1. Click the newly displayed drive letter on the computer. Then transfer image files between your T1 and the computer. HiSuite Manage the files (such as Follow the HiSuite onscreen USB storage device On the computer, view and manage the files stored on the microSD card. NOTE Click the newly displayed drive letter on the computer. Then transfer files between the microSD card and the computer. manage the files stored on your T1 and the microSD card. Using Windows Media Player 11 or a later version on the computer, view and manage the multimedia files stored on your T1 and the microSD card. contacts and images) on your T1 using the HiSuite software. On the computer, view and manage the files stored on your T1 and the microSD card. This method is available only when your T1 has a microSD card inserted. 22 letter on the computer. Then transfer files between your T1 and the computer. Start Windows Media Player on the computer. Follow the onscreen instructions to transfer multimedia files between your T1 and the computer. instructions to perform operations. Click the newly displayed drive letter on the computer. Then transfer files between your T1 and the computer. 11 Contacts Creating a contact 1. On the home screen, touch 2. Touch Contacts to display your contacts list. . If you are creating a contact for the first time, your T1 prompts you to select a storage location. After you create your first contact, new contacts are stored in the same location. You can touch the storage location, which is displayed on the new contacts screen, to select a different location. 3. Enter your contact's information, such as name, phone number, and email address. 4. Touch Add another field to add more information. 5. Touch DONE. Synchronising contacts You can synchronise the contacts stored in your Gmail and Exchange accounts and your T1. 1. On the home screen, touch Settings. 2. Under ACCOUNTS, touch the type of account you want to synchronise. 3. Touch the account you want to synchronise. 4. Select the Sync contacts check box. If the account you want to synchronise has not been added to your T1, touch Add account and follow the onscreen instructions to add the account. When it is added, your T1 automatically synchronises with it. Importing contacts You can import contacts from the SIM or microSD card to your T1. You can also use Bluetooth to import contacts from other Bluetooth devices. 1. On the home screen, touch Contacts to display your contacts list. 2. Touch > More > Manage contacts. 3. Select an import method and follow the onscreen instructions to import contacts. If you choose to import contacts from another device using Bluetooth, turn on Bluetooth on the device and follow the onscreen instructions to pair with your T1. 23 Backing up contacts You can back up your contacts to a microSD card in case your contacts are accidentally deleted or lost. 1. On the home screen, touch Contacts to display your contacts list. 2. Touch > More > Manage contacts. 3. Touch Export to storage. Sharing contacts You can share the contacts on your T1 with friends using multiple methods, such as email and Bluetooth. 1. On the home screen, touch 2. In the contacts list, you can: Contacts. Select the contact you want to share and touch > Share. > More > Share contacts and select more contacts to share. 3. In the displayed dialogue box, select a sharing method and follow the onscreen instructions. For details, see 10 File sharing. Touch 24 12 Calls The Wi-Fi only version of the T1 does not support this function. Making an emergency call In the event of an emergency, you can make emergency calls without a SIM card. However, you must still be within mobile coverage. 1. On the home screen, touch Dialler. 2. Enter a local emergency number and touch . Emergency calls are subject to the quality of the mobile network, usage environment, service provider policies, and local laws and regulations. Never rely solely on your T1 for critical communications if emergencies occur. Adding an unknown number to your contacts 1. On the home screen, touch Dialler. next to an unknown number. 2. From the call log, touch 3. Touch Create new contact or Save to existing contact to add the number to your contacts list. Clearing call logs To delete a single call log: On the Dialler screen, touch and hold the call log. On the displayed option menu, touch Remove from call log. To clear all call logs: On the Dialler screen, touch 25 > Clear call log > OK. 13 Messaging The Wi-Fi only version of the T1 does not support this function. Searching for a message Lots of messages and looking for one in particular? This handy function makes it easy to find that elusive message. 1. On the home screen, touch Messaging. 2. Touch > Search. 3. Enter a keyword in the search box. 4. In the results list, select the desired message to open it. Customising message settings To customise text and multimedia message settings, message notification tones, and other settings, touch > Settings in the message list. 26 14 Settings Setting the screen timeout period You can set a screen timeout period so that your T1 automatically turns the screen off to save power. 1. On the home screen, touch 2. Choose a timeout period. Settings > Display > Sleep. Setting a screen lock 1. On the home screen, touch Settings > Security > Screen lock. 2. Select a locking method and follow the onscreen instructions. With a screen lock set, if your T1 is idle for the specified period of time, it automatically locks its screen. You can also touch the power key to lock the screen. Adjusting the volume You can set the volume for the ringtone, media, alarms, and notifications. Settings > Sound > Volumes. 1. On the home screen, touch 2. Drag the sliders left or right to adjust the volume. You can also use the volume keys to adjust the volume of running applications. Checking the memory status Before moving a large file to your T1's internal storage or the microSD card, check whether there is enough storage space available. 1. On the home screen, touch Settings. 2. Touch Storage to view memory information. Setting the date and time 1. On the home screen, touch Settings > Date & time. 2. Deselect the Automatic date & time check box. 3. Follow the onscreen instructions to set the date and time. 27 If your T1 is set to automatically update the date and time, it obtains information about the date and time from the network and updates them according to your time zone. In this case, you cannot manually change the time zone, date, or time displayed on your T1. Formatting a microSD card Back up important data before you format a microSD card. 1. On the home screen, touch Settings. 2. Touch Storage > Erase SD card. Restoring factory settings Restoring your T1 to its factory settings erases all your personal data, including information about your accounts, your system and application settings, and your installed applications. Before restoring factory settings, back up important data on your T1. 1. On the home screen, touch Settings > Backup & reset. 2. Touch Factory data reset and follow the onscreen instructions to back up data or restore factory settings. Updating your T1 Updating your T1 may clear all data stored in it. Back up important data before updating your T1. If you use unauthorised software to update the system, the update may fail or your personal information may be leaked. Update your T1 online or use only authorised software. System Update to view system 1. On the home screen, touch Cloud apps > information. 2. Touch Online update to download and install updates from Huawei, or touch Local update to update your T1 locally. If you choose to update your T1 locally, carefully read the update guide included with the update package. 28 15 Personal Information and Data Security The use of some functions or third-party applications on your device could result in your personal information and data being lost or becoming accessible to others. Several measures are recommended to help you protect personal and confidential information. Place your device in a safe area to prevent it from unauthorised use. Set your device screen to lock and create a password or unlock pattern to open it. Periodically back up personal information kept on your memory card, or stored in your device memory. If you change to a different device, be sure to move or delete any personal information on your old device. If you are worried about viruses when you receive messages or emails from a stranger, you can delete them without opening them. If you use your device to browse the Internet, avoid websites that might pose a security risk to avoid theft of your personal information. If you use services such as Wi-Fi or Bluetooth, set passwords for these services to prevent unauthorised access. When these services are not in use, turn them off. Install or upgrade device security software and regularly scan for viruses. Be sure to obtain third-party applications from a legitimate source. Downloaded thirdparty applications should be scanned for viruses. Install security software or patches released by Huawei or third-party application providers. Some applications require and transmit location information. As a result, a third-party may be able to share your location information. Your device may provide detection and diagnostic information to third-party application providers. Third party vendors use this information to improve their products and services. If you have concerns about the security of your personal information and data, please contact [email protected]. 29 16 Legal Notice Copyright © Huawei Technologies Co., Ltd. 2014. All rights reserved. This document, whether in part or whole, shall not be reproduced or transmitted in any way, shape, or form without the prior written consent of Huawei Technologies Co., Ltd. and its affiliates ("Huawei"). The product described in this document may include software that is the copyright of Huawei or its licensors. Such software shall not be reproduced, distributed, modified, decompiled, disassembled, decrypted, extracted, reverse engineered, leased, assigned, or sublicensed unless such restrictions are prohibited by law or such actions are approved by the copyright holder. Trademarks and Permissions is a trademark or registered trademark of Huawei Technologies Co., Ltd. Android™ is a trademark of Google Inc. The Bluetooth® word mark and logos are registered trademarks owned by Bluetooth SIG, Inc. and any use of such marks by Huawei Technologies Co., Ltd. is under license. Other trademarks, products, services and company names mentioned herein may be the property of their respective owners. Notice Some features of the product and its accessories described herein rely on the software installed or the capacities and settings of the local network, and therefore may not be activated or may be limited by local network operators or network service providers. Therefore, the descriptions herein may not exactly match the purchased product or its accessories. Huawei reserves the right to change or modify any information or specifications contained in this document at any time without prior notice and without any liability. Third-Party Software Statement Huawei does not own the intellectual property of the third-party software and applications that are delivered with this product. Therefore, Huawei will not provide any warranty of any kind for third-party software and applications. Neither will Huawei provide support to customers who use third-party software and applications, nor be responsible or liable for the functions or performance of third-party software and applications. Third-party software and applications services may be interrupted or terminated at any time, and Huawei does not guarantee the availability of any content or service. Third-party service providers provide content and services through network or transmission tools outside of the control of Huawei. To the greatest extent permitted by applicable law, it is explicitly stated that Huawei shall not compensate or be liable for services provided by third-party service providers, or the interruption or termination of third-party contents or services. Huawei shall not be responsible for the legality, quality, or any other aspects of any thirdparty software installed on this product, or for any uploaded or downloaded third-party works in any form, including but not limited to texts, images, videos, or software etc. Customers shall bear the risk for any and all effects, including incompatibility between the software and this product, which result from installing software or uploading or downloading the third-party works. 30 This product is based on the open-source Android™ platform. Huawei has made necessary changes to the platform. Therefore, this product may not support all the functions that are supported by the standard Android platform or may be incompatible with third-party software. Huawei does not provide any warranty or representation in connect with any such compatibility and expressly excludes all liability in connection with such matters. DISCLAIMER ALL CONTENTS OF THIS DOCUMENT ARE PROVIDED “AS IS”. EXCEPT AS REQUIRED BY APPLICABLE LAWS, NO WARRANTIES OF ANY KIND, EITHER EXPRESS OR IMPLIED, INCLUDING BUT NOT LIMITED TO, THE IMPLIED WARRANTIES OF MERCHANTABILITY AND FITNESS FOR A PARTICULAR PURPOSE, ARE MADE IN RELATION TO THE ACCURACY, RELIABILITY OR CONTENTS OF THIS DOCUMENT. TO THE MAXIMUM EXTENT PERMITTED BY APPLICABLE LAW, UNDER NO CIRCUMSTANCES SHALL HUAWEI BE LIABLE FOR ANY SPECIAL, INCIDENTAL, INDIRECT, OR CONSEQUENTIAL DAMAGES, OR LOSS OF PROFITS, BUSINESS, REVENUE, DATA, GOODWILL SAVINGS OR ANTICIPATED SAVINGS REGARDLESS OF WHETHER SUCH LOSSES ARE FORSEEABLE OR NOT. THE MAXIMUM LIABILITY (THIS LIMITATION SHALL NOT APPLY TO LIABILITY FOR PERSONAL INJURY TO THE EXTENT APPLICABLE LAW PROHIBITS SUCH A LIMITATION) OF HUAWEI ARISING FROM THE USE OF THE PRODUCT DESCRIBED IN THIS DOCUMENT SHALL BE LIMITED TO THE AMOUNT PAID BY CUSTOMERS FOR THE PURCHASE OF THIS PRODUCT. Import and Export Regulations All applicable export or import laws and regulations must be complied with and all necessary governmental permits and licenses must be obtained before exporting or importing the product, including the software and technical data, described in this document. Privacy Policy To better understand how we protect your personal information, please see our privacy policy at http://consumer.huawei.com/privacy-policy. 31 903374_01