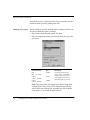
1
User Manual for NCD ThinSTAR 532LX Running Linux Release 2.3 Hotkey Quick Reference Guide To... Press.... Display the NCD Connection Manager CTRL + ALT + END Display the next/previous connection CTRL + ALT + ↑ or ↓ Change Window Focus CTRL + ALT + TAB i FCC regulatory and safety information FCC regulatory and safety information can be found in the Quick-Start Guide that came with your device, and on the Support section of the NCD website which can be found at: http://www.ncd.com/support.html CANADA ICES/NMB-003 Class/Classe (B) This Class B digital apparatus complies with Canadian ICES-003. Cet appareil numérique de la classe B est conform à la norme NMB-003 du Canada. NCD Hardware Warranty NCD hardware warranties can be found in the Quick-Start Guide that came with your device, and on the Support section of the NCD website which can be found at: http://www.ncd.com/support.html Revision History December 6, 2002 User Manual for NCD ThinSTAR 532LX running Linux, Rev. A. ii FCC regulatory and safety information Safety Instructions Please read these safety instruction carefully and keep this user’s manual for later reference. 1. Before removing the outer case from the device always disconnect the AC power cord to prevent the possibility of dangerous electrical shock. 2. Before cleaning, disconnect the device from AC power. Do not use liquid or sprayed cleaning products to clean the unit. Instead, use a moistened sheet or cloth for cleaning. 3. Be sure not to expose the device to excessive humidity. 4. Be sure to install the device on a secure surface. A falling device could cause injury. 5. Place the power cord in such a way to avoid people stepping on it. Do not place anything over the power cord. 6. Be sure to note all cautions and warnings on the device. 7. If the device is not used for a long period of time, disconnect the AC power to avoid damage caused by voltage transients. 8. Never pour any liquid into any device openings: This could cause fire or electrical shock. 9. If one of the following situation occurs, be sure to get the device checked by a qualified service technician: a. The power cord or plug is damaged. b. Liquid penetrates the device case. c. The device is exposed to moisture. d. The device does not work well or you cannot get it to work according to the user’s manual. e. The device has been dropped or damaged. f. If the device has obvious signs of breakage. 10. The device should be stored and used only in temperature and humidity controlled environments. Storing devices below -20°C (-4°F) or above 60°C (140°F) may cause damage. 11. The sound pressure level at the operators position according to IEC 704-1:1982 is equal or less to 70dB(A). 12. The input power cord shall be minimum H05VV-F, 3G, 0.75mm², rate minimum 6A. 13. The device should be used only where ambient air temperatures are maintained below 40°C. Safety Instructions iii iv Safety Instructions Linux ThinSTAR User Manual Table of Contents FCC regulatory and safety information NCD Hardware Warranty Safety Instructions ii iii Introduction Overview 1 Purpose and intended readers Topics covered 1 1 1 What is a ThinSTAR? 2 A new way to use Windows 2 NCD Connection Manager 2 NCD ThinSTAR Hardware 3 Embedded Linux Software 3 Getting More Information 3 Technical support 4 CHAPTER 1 Setting up Your ThinSTAR 5 Unpacking Your ThinSTAR Packaging contents ii CANADA ICES/NMB-003 Class/Classe (B) ii 5 Connecting the Components 6 Back panel connectors 6 Connecting the cables 6 Connecting Parallel and Serial peripheral devices 7 Connecting USB peripheral devices for use with Citrix ICA 8 Determining the Release Version of Your Software 9 Accessing the Help | About dialog 9 Arranging Your Work Area 11 Getting comfortable 11 CHAPTER 2 Configuring Your Network Settings 13 Selecting the Network Settings 13 Do you need to configure? 13 Accessing Network Settings 13 Network Settings Dialog 14 5 v Table of Contents CHAPTER 3 Editing an ICA connection NCD Connection Manager 17 Managing Connections 17 NCD Connection Manager Creating connections 18 Editing Connections 18 Deleting Connections 19 Copying Connections 19 CHAPTER 5 17 Using Connections 19 Establishing a Connection 19 Ending a Connection 20 Switching between Connections Session Management 20 RDP Connections CHAPTER 6 Basic Terminal Connections 47 Configuring Basic Terminal Connections 47 Creating a Basic Terminal connection 47 Editing a Basic Terminal connection 50 20 CHAPTER 7 X Window Connections 51 Configuring X Window Connections 51 Creating an X Window Connection 51 Editing an X Window connection 55 CHAPTER 8 32 Custom Connections 57 Configuring Custom Connections 57 Creating a Custom connection 57 Editing a Custom connection 59 Global ICA Settings 32 CHAPTER 9 CHAPTER 4 ICA Connections Configuring ICA Connections 35 Creating an ICA connection 35 vi 41 Configuring RDP Connections 41 Creating an RDP connection 41 Editing an RDP connection 45 Appliance properties 21 Security 21 Printers 24 Sound 25 Servers 26 Setting the Date and Time 28 Desktop Settings 29 Messages and Console 31 Factory Reset 31 Connection Properties 40 35 Using the Linux Desktop 61 Getting Started 61 Overview 61 Table of Contents Using the Taskbar 62 Using the Desktop Divider Using Linux Windows 63 Using the window controls 62 63 CHAPTER 10 Pericom Terminal Connections 65 Configuring Pericom Terminal Connections 65 Creating a Pericom Terminal connection 66 Editing a Pericom Terminal connection 69 Printing text screens 69 Setting up a text printer 70 Setting your ThinSTAR to ignore BOOTP or DHCP responses 73 Editing the pump.conf configuration file to ignore BOOTP or DHCP responses 73 Troubleshooting with the Diagnostic Console 74 Index 75 vii Table of Contents viii Linux ThinSTAR User Manual Introduction This chapter describes the purpose and main topics of this manual, as well as the basic features of the NCD ThinSTAR 532LX Overview Purpose and intended readers This manual explains how to use a ThinSTAR that runs Linux Software Release 2.3. It’s intended primarily for administrators and users of Linux on a ThinSTAR. (For instructions about determining which release version of software is running on your ThinSTAR, see “Determining the Release Version of Your Software” on page 9.) Topics covered We recommend that you read the chapters in this manual in order. The main topics covered are: • Unpacking and setting up your ThinSTAR. • Configuring your ThinSTAR for your network. • Changing settings on your ThinSTAR. • Creating and using connections to various servers and main- frames. 1 Introduction The appendixes cover additional topics that you may need to know. What is a ThinSTAR? A new way to use Windows A ThinSTAR is a thin client terminal that provides access to programs running on network servers. Once a connection is made to a server, depending on the version of software installed, you can use your favorite Windows programs such as Microsoft Office or Adobe Photoshop in the familiar Windows desktop, connect to LINUX/UNIX servers, mainframes and minicomputers via telnet and X Window connections or optional terminal emulation softwarre. A ThinSTAR sends keystrokes and mouse clicks to the server, which responds with screen updates for your monitor. Most of the processing occurs on the server. Due to the speed of modern computer networks, this exchange happens as fast, if not faster, than processing on a personal computer. A ThinSTAR is not difficult to use. If you know how to use a personal computer, or even if you don’t, you can use a ThinSTAR. NCD Connection Manager 2 NCD Connection Manager consists of a simple, easy, and highly customizable user interface for Linux that shields users from the complexity of the Linux operating system, and is designed specifically for thin client terminal computing applications. NCD Connection Manager allows users or administrators to create a variety of connections to run Microsoft Windows applications on servers, UNIX applications via the X Window protocol, terminal connections to mainframes and minicomputers, and custom connections to launch virtually any Linux application. ThinPATH Connection Manager also allows users to customize the operation of the terminal. What is a ThinSTAR? Introduction NCD ThinSTAR Hardware The NCD ThinSTARS are sleek computing devices that have no hard drive, fan, or other moving parts, which makes them extremely reliable, as well as silent. They use standard VGA, SVGA, and XVGA-type monitors, PS/2 mouse and keyboard, and pointing devices, parallel port, serial port(s), and USB ports for peripheral devices that may include printers, modems, floppy drives, zip drives, cd-roms, and bar code scanners. Your ThinSTAR can automatically connect to either 10BaseT or 100BaseT (twisted-pair) Ethernet networks, as well as make serial port connections with or without a modem. Embedded Linux Software Your ThinSTAR arrives with the Linux software pre-installed. This software is installed in the local Flash disk memory internally installed in your ThinSTAR. Linux provides powerful and flexible computing capabilities for networks that have many types of servers. Using Linux, your ThinSTAR can start simultaneous, multiple connections to Windows XP, Windows 2000 Servers, Windows NT Terminal Servers, UNIXbased servers, mainframes, minicomputers, intranets, and the Internet, depending on the software version installed in the ThinSTAR. Note To make Windows connections using ICA, the server must be running Citrix MetaFrame or WinFrame. Connections to Windows XP, Windows 2000 Server and NT-based servers are made via Citrix’s Independent Computing Architecture (ICA) protocol, as well as Microsoft’s Remote Desktop Protocol (RDP). Access to UNIX-based servers can be made by telnet connections and by X Window protocols. Linux supports DHCP and BOOTP remote configuration services, and NFS file transfer protocol. Getting More Information You can find current and archival information about NCD products, including the latest software updates, at: http://www.ncd.com In addition, this user manual and other NCD documentation are available on the NCD Web site for reading or downloading. What is a ThinSTAR? 3 Introduction Technical support 4 For technical support, call NCD at 1-800-800-9599, or send an Email message to [email protected]. What is a ThinSTAR? Linux ThinSTAR User Manual CHAPTER 1 Setting up Your ThinSTAR This chapter describes how to unpack and set up your ThinSTAR. Unpacking Your ThinSTAR Packaging contents Your ThinSTAR typically is shipped in cartons containing these items. Depending on the shipping configuration, one or more of the items may be contained in separate shipping cartons (such as a monitor, keyboard, and mouse): ThinSTAR • A keyboard with cable attached. • A mouse with cable attached. • A power cable. • A stand for stabilizing your ThinSTAR in a vertical orientation. • NCD ThinSTAR Quick-Start Guide. Monitor • A monitor power cable (attached to some monitors). • A monitor video cable (attached to most monitors). • A tilt/swivel base, attached or unattached. To unpack your ThinSTAR, open the cartons carefully, remove the components, and save the packing materials in case you need to repack them. 5 Setting up Your ThinSTAR Connecting the Components Back panel connectors The following is an explanation of the different connections that can be found on ThinSTARs. • MOUSE is a PS/2-type mouse port (green-colored connec- Note The serial and parallel ports can be used with ICA connections. tor marked with the word "MOUSE" or with the icon displayed here). • KEYBOARD is a PS/2-type keyboard port (purple-col- ored connector marked with the word "KEYBOARD" or with the icon displayed here). • LAN is an RJ-45 jack. The ThinSTAR automatically detects and connects to either 10BaseT or 100BaseT (twisted-pair) Ethernet. • PARALLEL is a standard DB-25 parallel port for local printers. • COM 1 and COM 2 are DB-9, RS-232 serial ports. Depending on which software version is loaded in the ThinSTAR, serial ports may be used for peripheral devices such as modems, personal digital assistants (PDAs), and bar code scanners. • USB ports (two Type A USB ports) • MIC is a 3.5 mm microphone jack. • LINE IN is a 3.5 mm line audio input jack. • LINE OUT is a 3.5 mm audio output jack. • MONITOR is a standard DB-15, high-density, VGA-type monitor connector. • The internal power supply connects through the supplied power cable. It automatically detects and accepts either 120 VAC or 240 VAC line voltage. Connecting the cables 6 1 Arrange your ThinSTAR and monitor in your work area. Connecting the Components Setting up Your ThinSTAR 2 Connect the monitor power cable to a power source. 3 Connect the power cord into the socket. Make sure the Thin- STAR is powered off. 4 Connect the keyboard cable to the KEYBOARD (purple) port. 5 Connect the mouse cable to the MOUSE (green) port. 6 Connect the monitor video cable to the MONITOR port. Don’t overtighten the screws. The video cable connection to the monitor varies. Some monitors have attached video cables. 7 Connect a twisted-pair, 10BaseT or 100BaseT Ethernet cable with RJ-45 plug into the LAN jack. Connecting Parallel and Serial peripheral devices You can connect a modem, printer, bar code scanner, and other peripheral devices to your ThinSTAR. 1 If your ThinSTAR is turned on, log off all its open connec- tions, and then turn off the ThinSTAR. 2 If you have a local printer, connect its cable to the PARAL- LEL port. You can also attach local serial printers to either serial port: COM 1 or COM 2. 3 If you have an external modem, bar code scanner, or other serial device, connect its cable to a serial port (COM 1 or COM 2). 4 Turn on your ThinSTAR and then the peripheral device. Connecting the Components 7 Setting up Your ThinSTAR Connecting USB peripheral devices for use with Citrix ICA You can connect USB external drives to your ThinSTAR, including floppy drives, zip drives, and CD-ROM drives. 1 In the NCD Connection Manager menu bar, select Settings | Connection Properties | Global ICA Settings. Click Here 2 When the Global ICA Connection Properties tabbed dialog appears, select the Drive Maps tab. 3 Click the Enable Drive Mapping checkbox. 4 Click the Add button. 5 When the Setup Drive Mapping dialog appears, select the drive letter you would like to represent the USB peripheral device you are setting up and type the path of the drive in the 8 Connecting the Components Setting up Your ThinSTAR path field. When finished Click OK. Note: Depending on the device you are connecting the path will be one of the following: • Zip drive - /usb/zip • Floppy Drive - /usb/floppy • Cd drive - /usb/cdrom 6 Click OK in the Global ICA Connection Properties tabbed dialog. The external USB drive will now work when using the Linux operating system and when connecting to ICA sessions with MetaFrame servers. Determining the Release Version of Your Software Accessing the Help | About dialog By accessing the Help | About dialog using NCD Connection Manager, you can determine which release version of Linux your ThinSTAR is running. 1 In the Connection Manager menu bar, select Help | About. Click Here Determining the Release Version of Your Software 9 Setting up Your ThinSTAR 2 The About information box that appears contains informa- tion about which release version of Linux is installed in your ThinSTAR, and about which release version of ThinPATH Connection Manager is installed. NCD Connection Manager Release Information 10 Determining the Release Version of Your Software Linux Release Informatio Setting up Your ThinSTAR Arranging Your Work Area Getting comfortable These tips will help reduce eye strain and body fatigue when using your ThinSTAR: • Adjust your chair seat level so that your feet are flat on the floor, • • • • your legs form a right angle with the floor, your knees are free of the chair seat, and your lower back is fully supported. Adjust the chair height so the keyboard and mouse are at elbow height so your wrists are straight and supported. Maintain a neutral neck posture with the top of the monitor no higher than your eye level. Adjust the monitor and lighting to reduce glare on the screen and to place the monitor at a correct distance for your vision. Take periodic breaks to stretch your arms and wrists and rest your eyes. Arranging Your Work Area 11 Setting up Your ThinSTAR 12 Arranging Your Work Area Linux ThinSTAR User Manual CHAPTER 2 Configuring Your Network Settings This chapter describes how to initially configure your ThinSTAR for your network. Selecting the Network Settings Do you need to configure? Note DHCP and BOOTP automatically supply the IP address and other setting for your appliance when it starts up. Accessing Network Settings To use your ThinSTAR on a network, it must be assigned a unique Internet Protocol (IP) address for identification. Your network may also require a few other settings. If your network uses a remote configuration service such as the Dynamic Host Configuration Protocol (DHCP) or the Bootstrap Protocol (BOOTP), your ThinSTAR may not need to be configured. In that case, all you do is turn on your ThinSTAR. Ask your system administrator if your network uses DHCP or BOOTP. To configure your ThinSTAR’s network settings, select Settings | Appliance properties | Network from the NCD Connection Manager menu bar or press the F2 key. Click these to set your appliance properties 13 Configuring Your Network Settings Network Settings Dialog The following values may be set under Network Settings where a tab exists for each interface: DHCP/Bootp Server: Click here if your network uses DHCP or BOOTP. To set a static IP address, click here to deselect DHCP/Bootp Enable Interface: Click here to enable the network interface. IP Address: Uneditable (grayed-out) if DHCP is selected. The IP (Internet Protocol) address assigned to the ThinSTAR. Entered in a dotted-decimal format (for example, 10.10.10.10). Network Mask: Uneditable (grayed-out) if DHCP is selected. If needed, type a dotted-decimal subnet mask number. The network mask distinguishes your local network from a larger network. For example, 255.255.0.0. Broadcast Address: Uneditable (grayed-out) if DHCP is selected. If needed, type a dotted-decimal network mask num14 Selecting the Network Settings Configuring Your Network Settings ber. Specify how broadcast requests are sent from your ThinSTAR to the network. Typically the setting is 255.255.255.255 or 0.0.0.0. Ask your system administrator. Speed: Select the bandwidth speed of your network Ethernet connection. This setting will only affect the onboard Realtek Ethernet on your ThinSTAR’s motherboard. The default AutoSense setting should be selected unless your network environment requires manually selecting speed and duplex mode. Edit Default Values: Click here if you would like to manually edit the Client Name, Default Domain, Primary and Secondary DNS Server, and Default Gateway settings. Note: These values may be overridden by DHCP values. Client Name: If needed, enter a client name. This name is used by UNIX/Linux systems as a hostname and by ICA and RDP servers as a Client Name. The default client name utilizes the last six digits of the device’s MAC address as the last six digits of the Client Name. Since the serial number of each ThinSTAR also ends in the last six digits of the MAC address, the Client Name enables easy asset management when used with the ThinPATH Management Portal tool available from NCD. Default Domain: If needed, type the domain name used by your local network for DNS (Domain Name Service). For example: ncd.com Ask your system administrator. Primary DNS Server: If needed, type the IP address of a DNS server on your network. Secondary DNS Server: If desired, type the IP address of a second DNS server available to your ThinSTAR on the network. Default Gateway: If your ThinSTAR and the DNS servers, or other routinely accessed servers, are on different networks, type the IP address of the router or gateway computer that connects them. Selecting the Network Settings 15 Configuring Your Network Settings 16 Selecting the Network Settings Linux ThinSTAR User Manual CHAPTER 3 NCD Connection Manager This chapter describes how to use the Connection Manager to create and use connections on your ThinSTAR to connect to servers. Managing Connections NCD Connection Manager NCD Connection Manager first appears when your ThinSTAR starts and allows you to configure and manage many types of connections. 17 NCD Connection Manager Creating connections 1 If NCD Connection Manager isn’t on screen, simultaneously press CTRL + ALT + END. 2 Click the Add button or select Connection | Add. 3 In the Add Connection dialog select the type of connection you would like to create from the drop-down menu and then click OK. The Add New Connection wizard will start, prompting you to enter the configuration settings for the type of connection you chose to create, with a series of dialogs. For more information concerning setting up and managing the different types of connections, please see Chapters four through ten that describe them. Editing Connections 1 If NCD Connection Manager isn’t on screen, simultaneously press CTRL + ALT + END. 2 Select the connection from the connection list that you would like to edit. 3 Click the Edit button or select Connection | Edit. 4 In the Edit Connection dialog select the tab that contains the configuration settings you would like to edit and make the appropriate changes. When finished, click OK. Right-click on a connection to open a context menu for shortcuts to connection options. When editing a connection the user is presented with a tabbed dialog that corresponds to the series of dialogs from the Add New Connection wizard. For a description of these dialogs see the Chapter that corresponds to the type of connection you would like to edit. 18 Managing Connections NCD Connection Manager Deleting Connections 1 If NCD Connection Manager isn’t on screen, simultaneously press CTRL + ALT + END. 2 Select the connection from the connection list that you would like to delete. 3 Click the Delete button or select Connection | Delete. 4 When the delete confirmation message appears, click OK to delete the connection or click Cancel. Copying Connections 1 If NCD Connection Manager isn’t on screen, simultaneously press CTRL + ALT + END. 2 Select the connection from the connection list that you would like to copy. 3 Click the Copy button or select Connection | Copy. When the user copies a connection a new connection appears with the title of “Copy of (connection copied).” Using Connections Establishing a Connection 1 If NCD Connection Manager isn’t on screen, simultaneously press CTRL + ALT + END. 2 Select the connection from the connection list that you would like to run. 3 Click the Connect button, or select Connection | Connect. Note: Other ways of starting a connection include double-clicking on the connection name, right-clicking on a connection name and clicking Connect in the window that appears, as well as selecting a connection and pressing the Enter key. Your connection will start. Using Connections 19 NCD Connection Manager Ending a Connection 1 If NCD Connection Manager isn’t on screen, simultaneously press CTRL + ALT + END. 2 Select the connection from the connection list that you would like to end. 3 Click the End button or select Connection | End. Note: If you disconnect or logout from within a session, then you will return to the NCD Connection Manager screen. To learn how this is done please consult the documentation concerning that connection. Your connection will end. Switching between Connections Once you have multiple connections started you can switch between them by: • Typing the key sequence CTRL + ALT + UP or DOWN arrow • Connecting to any active connection from within the NCD Connection Manager screen. • Accessing the Go To Window by clicking on the Linux desktop background. Once the Go To Window appears click the active connection that you would like to use. Click on a connection to restore it. Session Management A user can disconnect or close all of the sessions that are active on their ThinSTAR with a selection from the connections menu bar item. 1 If NCD Connection Manager isn’t on screen, simultaneously press CTRL + ALT + END. 2 Select Connection in the menu bar and then highlight Session by placing your mouse over it. This will cause a drill down menu to appear containing the following options: 20 Using Connections NCD Connection Manager • Close All Connections - This logs the user out of any active connection running on their ThinSTAR • Restart - This option disconnects the user from any active session (leaving those that support this feature running on the server) and restarts the ThinSTAR. 3 Select either Close All Connection or Restart. Appliance properties 1 If NCD Connection Manager isn’t on screen, simultaneously Security press CTRL + ALT + END. Select Settings | Appliance properties | Security. The Security Settings dialog will open. Click here to set password. Note: NCD strongly recommends setting the ThinSTAR configuration password on every ThinSTAR when it is initially configured. Setting the same password on all ThinSTARs in a group or enterprise makes managing those devices easier. Appliance properties 21 NCD Connection Manager Once set, only authorized administrators with access to the password can change ThinSTAR and connection settings either at the device or remotely. This dialog allows the system administrator to selectively set specific security options in order to limit a user’s ability to make ThinSTAR setting changes. These security options include: • Set/Change Password (button) Click here to set or change the configuration password for the ThinSTAR. • Require password to access NCD Connection Manager - Select this checkbox if you would like to require that the user type in the password in order to access the NCD Connection Manager. This option is applicable for ThinSTAR configurations where the end user is only to have access to a specific autostarted connection. One example of a specific configuration would be a ThinSTAR running an ICA connection in Kiosk mode, set to autostart on terminal startup. Timeout - Set the amount of time to allow the user to enter the password to access NCD Connection Manager. After the timeout is reached, the display automatically returns to the autostarted connection. 22 Appliance properties NCD Connection Manager • Allow connections to be created or modified - Select this checkbox to allow the user to create and configure connections in NCD Connection Manager on the ThinSTAR. Compare this secured version of the NCD Connection Manager interface to the unsecured version on page 17. The Add, Edit, Delete, and Copy buttons are removed when NCD Connection Manager is secured. With this button un-checked, there is no “Connection Properties” menu under Settings on the NCD Connection Manager. In addition, only the following options are available under the Appliance Properties menu: Network, Security, Printers and Sound (The following are not available: Servers, Setting the Date and Time, Desktop Settings, Messages, Console, and Factory Reset.) • Allow remote X Window application to connect - Select this checkbox to allow X window applications running on a remote server to access your ThinSTAR. This does not affect X window connections defined in NCD Connection Manager. Note: Selecting this feature can create a security risk by allowing people to access your ThinSTAR remotely. • Enable Virtual Terminal switching via hotkeys - Select this checkbox to allow the user to switch between Virtual Terminal connections using hotkeys. This can be accomplished by typing the key combination ALT + SYSRQ and then typing a Function key. For example, type ALT + SYSRQ and then type F3 in order to access a diagnostic console. To return from a Virtual Terminal type ALT+F4. Disabling Virtual Terminal switching is frequently desirable for public-access kiosk type installations. Appliance properties 23 NCD Connection Manager If you are accessing the diagnostic console you should be familiar with Linux (at a command line level). Accessing this mode will only be required under the direction of NCD Techincal Support personnel. In order to use this mode you must have set the configuration password on the ThinSTAR (see page 21). At the login prompt type “root” and press the Enter key, then enter the password (not echoed) that you have set as the security password and hit the Enter key. At this point you are at the Linux command line. To exit this mode type either Control-D, exit or logout immediately after the prompt ([root@<machine-name> /root]# ), then Alt-F4. Printers 1 If NCD Connection Manager isn’t on screen, simultaneously press CTRL + ALT + END. 2 Select Settings | Appliance properties | Printers. The Printer Settings dialog will open. This dialog is a graphical print spool manager that allows you to manage your local print jobs. It allows you to choose a default printer, and remove print jobs that are waiting in the queue. The user can also determine the status of the printer they are using. 24 Appliance properties NCD Connection Manager Note: The Printer Settings dialog only handles print jobs that originate on your local ThinSTAR. It will not handle print jobs that come from external connections such as the ICA client. Sound 1 If NCD Connection Manager isn’t on screen, simultaneously press CTRL + ALT + END. 2 Select Settings | Appliance properties | Sound. The Sound Settings dialog will appear on your screen. 3 Use the Stereo Volume slider to raise or lower the line out or ThinSTAR speaker (if applicable) volume. 4 Use the Stereo Balance slider to adjust the left/right mix of your line out sound. Note: This will not affect the sound output of a ThinSTAR’s internal speaker (if applicable). 5 Use the Bell Settings to adjust the pitch and duration of the system bell. Click the Test Sound button to preview your settings. 6 Click OK to accept the changes. Appliance properties 25 NCD Connection Manager Servers Note: If the Servers menu selection does not appear on your ThinSTAR, it is most likely that the “Allow connections to be created or modified” option is disabled on the Security Settings screen found under Appliance Properties. 1 If NCD Connection Manager isn’t on screen, simultaneously press CTRL + ALT + END. 2 Select Settings | Appliance properties | Servers. The Server Settings dialog will appear on your screen. The Network Drives tab is used to map a network drive for Linux applications to use. The X Window tab allows you to specify XDM and X Font servers that do not respond to XDMCP broadcasts so that they are available when creating an X Window connection. The general reason for no response to XDMCP broadcasts is that there is a router between the ThinSTAR and the XDMCP machine(s). To map a network drive, continue with step 3. To specify XDM and X font servers, continue with step 9. Network Drive Tab 3 Select the Network Drive tab and click the Add button to map 26 Appliance properties NCD Connection Manager a network drive for Linux applications to use. The Add Network Drive Dialog will appear. 4 In the Remote Server field specify the host name or IP address of the server that contains the drive you would like to map. 5 In the Remote Path field specify the full path of the directory which you would like to map (directory that is exported). 6 In the Local Path field specify the name of the local directory that will be created and that will have the Remote Path (above) mounted onto. Note: The directory you specify can be found in the path /var/ mnt/. 7 Click the Writable checkbox if you would like Linux Applica- tions to be able to write to the mapped network drive. 8 Click OK to map the specified network drive. X Window tab 9 Select the X Window tab and click the Add button to specify XDM and X Font servers that do not respond to XDMCP broadcasts so that they are available when creating an X Window connection. The Add Server dialog will appear. Appliance properties 27 NCD Connection Manager The X Window tab of the Server Settings dialog allows an administrator to prepopulate XDM and font server lists used when configuring individual connections. For more information about configuring individual X Window connections, see “Creating an X Window Connection” on page 51.. Adding a server in the X Window tab is only the first step. This prepopulates XDM and font server lists used in setting up individual connections. 10 In the Add server Enter the host name or IP address of the server that you would like to add. 11 Click OK to add the server. Setting the Date and Time 1 If NCD Connection Manager isn’t on screen, simultaneously press CTRL + ALT + END. 2 Select Settings | Appliance properties | Time & Date. 28 Appliance properties NCD Connection Manager The Date & Time Settings dialog will appear on your screen. Note: If the Date and Time Settings menu selection does not appear on your ThinSTAR, it is most likely that the “Allow connections to be created or modified” option is disabled on the Security Settings screen found under Appliance Properties. 3 Adjust the month, day, and year if incorrect. 4 Adjust the time (using the 24-hour clock) for your location. 5 Adjust the time zone for your location. Note that time zone information is used by Citrix MetaFrame XP servers, only. 6 Click OK to accept the changes. Desktop Settings 1 If NCD Connection Manager isn’t on screen, simultaneously press CTRL + ALT + END. 2 Select Settings | Appliance properties | Desktop. Appliance properties 29 NCD Connection Manager The Desktop Settings tabbed dialog will appear on your screen. Note: If the Desktop Settings menu selection does not appear on your ThinSTAR, it is most likely that the “Allow connections to be created or modified” option is disabled on the Security Settings screen found under Appliance Properties. 3 Select the tab for the Desktop settings you would like to change and adjust the appropriate parameters. • Display - Adjust your display resolution and color palette. Additionally, you can enable a screen saver and determine the type and timeout. • Fonts - Control font servers and path settings for the fonts on your ThinSTAR. • Touchscreen - If you are using the ThinSTAR with a touchscreen device, you configure and calibrate the touchscreen device from this tab. • Mouse - Specify and test your input device settings. 30 Appliance properties NCD Connection Manager • Keyboard - Specify and test the Repeat Rate and Delay for your keyboard. You can also specify the Keyboard Locale and whether you would like to enable NumLock at startup. • Advanced - Choose whether you would like the Taskbar of the Linux desktop to Auto hide and/or appear on the NCD Connection Manager screen. You can also specify whether you would like the desktop to appear on X display :1 instead of X display :0. (Some X Window applications require the ability to write to display :0 which otherwise is being used by Linux for NCD Connection Manager and client applications.) Messages and Console The System Messages is a diagnostic log of system error messages and other information. The Console Window is used by administrators to view system directories and files. To open them, click Settings | Appliance properties | Messages or Console from the NCD Connection Manager menu bar. Note: If the Messages or the Console menu selection do not appear on your ThinSTAR, it is most likely that the “Allow connections to be created or modified” option is disabled on the Security Settings screen found under Appliance Properties. Factory Reset Selecting this option from the terminal properties menu will restore your ThinSTAR to its factory default state. Note: If the Factory Reset menu selection does not appear on your ThinSTAR, it is most likely that the “Allow connections to be created or modified” option is disabled on the Security Settings screen found under Appliance Properties. Appliance properties 31 NCD Connection Manager Connection Properties Note: If the Connection Properties menu selection does not appear on your ThinSTAR, it is most likely that the “Allow connections to be created or modified” option is disabled on the Security Settings screen found under Appliance Properties. Global ICA Settings When a user clicks Settings | Connection properties | Global ICA Settings, a tabbed dialog appears allowing the user to customize settings that apply to all ICA connections defined on their ThinSTAR. These settings include: •Preferences - This tab includes fields for setting the Keyboard layout and type, as well as port and device settings. Note: In order for your keyboard to work properly during an ICA session, the setting for the Keyboard Layout must either be set to “Local Keyboard” or it must match the Keyboard Locale setting in the Linux Desktop Settings dialog (see page 31). • Window - This tab allows the user to set the default number of colors and screen size of all ICA connections. 32 Connection Properties NCD Connection Manager • Server - This tab allows the user to define a list of primary Citrix • • • • browser servers that can be accessed to determine the list of available ICA connections (desktops and/or published applications). The default network protocol (“TCP/IP + HTTP server location”) works only with Citrix MetaFrame XP servers or later. Change the default network protocol to “TCP/IP” for connecting to earlier versions of MetaFrame and WinFrame. Some models also include a selection called “SSL + HTTPS server location” which provides Secure Sockets Layer (SSL) support. This provides SSL-level server authentication, data stream encryption, and message integrity checks. Hotkeys - This tab allows the user to set standard hotkey combinations. Drive Mapping - This tab will allow the user to specify ThinSTAR mounted directories or drives that they would like to access within their ICA sessions. Advanced - This tab allows the user to set specific ICA WFClient and Thinwire key item value registry entries. Note: Modifications to these registry entries can cause the ICA client to not run. Firewall - This tab allows the user to configure the ICA client to connect to a Citrix server through a firewall. Connection Properties 33 NCD Connection Manager 34 Connection Properties Linux ThinSTAR User Manual CHAPTER 4 ICA Connections This chapter describes how to create and edit the configuration of ICA connections. Configuring ICA Connections ICA is a network protocol used by Windows based servers running Citrix MetaFrame, or WinFrame. After you have clicked the add button in NCD Connection Manager, follow these steps to properly setup your new ICA connection. Creating an ICA connection 1 In the Add Connection dialog, select Citrix ICA Connection from the drop-down menu. When finished, click OK. 2 In the Select a Citrix Server or Published Application dialog type a title for your connection and select either a Citrix Server or Published Application. Then select the server or application you wish to connect to from the drop-down 35 ICA Connections menu. If you need to set another primary Citrix server, for example one located on a different subnet from the ThinSTAR, click the Server Location button. For more information concerning the dialog that opens see the explanation of the server tab in the Global ICA Settings section of the NCD Connection Manager chapter. When finished, click Next. Note: If there is no server or application listed in the drop-down menu, and you know the name, then you can directly enter the name or the IP address in the field. If neither server or application radio buttons produce a listing, and you are using MetaFrame with browsing enabled, click on Server Location and set the Network Protocol to “TCP/IP” instead of “TCP/IP + HTTP server location.” If your servers can only respond to TCP/IP browser requests, you should consider using the Global ICA Defaults dialog to make TCP/IP the default network protocol. For more information, see “Global ICA Settings” on page 32. When ICA browsing is required across a router, you will need to set server location addresses using the Server Location dialog. 3 In the Startup Options dialog, you can select whether you would like this connection to automatically start at startup, and/or automatically restart the connection after it has become 36 Configuring ICA Connections ICA Connections disconnected. When finished, or if you do not wish to enable these options, click Next. 4 In the Specify Application Information dialog enter the com- mand line and Working Directory of the application you wish to run. If you wish only to run a Windows NT or 2000 desktop, leave these fields blank. When finished, click Next. Configuring ICA Connections 37 ICA Connections 5 If you want, specify logon information, and then click Next. Note: If you don’t type logon information now, it will be requested when the connection starts. 6 In the Select Window Option dialog you can select specific Window Colors and Size options by deselecting the Use Default option and then choosing the setting from the dropdown menus. When finished, or if you would like to use the default settings, click Next. 7 If needed, select sound settings, speed screen settings, encryp- 38 Configuring ICA Connections ICA Connections tion level, whether you would like to use data compression, and whether or not to use disk cache in the Select Connection Options dialog. When finished, or if you do not wish to enable these options, click Next. 8 Click in the checkbox if you would like to use an alternate address when connecting through firewalls. Click in the SOCKS checkbox if you would like to connect via a SOCKS proxy server. If so, specify the address and port for the proxy to use. When finished, or if you do not wish to enable these options, Configuring ICA Connections 39 ICA Connections click Finish. The ICA connection will appear in the NCD Connection Manager connection list. Editing an ICA connection 40 When editing an ICA connection, the user is presented with a tabbed dialog, with each tab corresponding to the series of dialogs contained in the Add ICA Connection wizard. For specific information concerning the detailed settings contained in these tabs, refer to the Creating an ICA connection instructions above. Configuring ICA Connections Linux ThinSTAR User Manual CHAPTER 5 RDP Connections This chapter describes how to create and edit the configuration of RDP connections. Configuring RDP Connections RDP connections utilize the open source RDP client to connect to Windows NT Terminal Server, Windows 2000 Servers and Windows XP Professional using the RDP protocol. After you have clicked the add button in NCD Connection Manager, follow these steps to properly setup a new RDP connection. Creating an RDP connection 1 In the Add Connection dialog, select NCD RDP Connection from the drop-down menu. When finished, click OK. 2 In the Enter Connection and Server dialog type a title for your connection in the name field and then type the name of the server you would like to connect to in the Server field. 41 RDP Connections When finished click Next or Finish. Note: By clicking the Finish button at the end of this step or any subsequent step a connection will be created using the default settings for the remaining configuration options. 3 In the Specify Application Information dialog, select whether you would like to display the desktop, or if you would like an application to start when the connection is established. Be sure to specify the Application File Name (command line) and a Working Directory for an application that you would like to start when the connection is established. When finished, click Next or Finish. 4 If you want, specify logon information. When finished, click 42 Configuring RDP Connections RDP Connections Next or Finish. Note: If you don’t type logon information now, it will be requested when the connection starts. 5 In the Specify Window Size dialog decide whether you would like the connection to be Full Screen or Windowed. If you would like your connection to be windowed then choose the size you would like your connection window to be. When finished, click Next or Finish. 6 In the Select Connection Options dialog, specify the options you would like applied to the RDP connection you are creat- Configuring RDP Connections 43 RDP Connections ing. The following options can be applied to RDP connections • Client Name - In this field you can specify the RDP client name. Note: If the Client Name is left blank then the RDP connection will use the Client Name in the General Settings dialog (see Client Name on page 15). • Keyboard Layout - Select the type of keyboard you are using. Note: The setting for the Keyboard Layout must either be set to “Local Keyboard” or it must match the Keyboard Locale setting in the Linux General settings dialog (see Desktop Settings dialog on page 31). • Disable Encryption - Selecting this checkbox will disable encryption so that your ThinSTAR can connect to French Windows NT4 servers running Terminal Server Edition. • Disable sending mouse movements to server - This option reduces the amount of network traffic and should be used for low bandwidth RDP connections. • Use off-screen backup window - This improves the screen refresh. Note: This option uses system memory and can result in slight performance decrease. 44 Configuring RDP Connections RDP Connections 7 In the Startup Options dialog, you can select whether you would like this connection to automatically start at startup, and/or automatically restart the connection after it has become disconnected. When finished, click Finish. Editing an RDP connection When editing an RDP connection, the user is presented with a tabbed dialog, with each tab corresponding to the series of dialogs contained in the Add RDP Connection wizard. For specific informa- Configuring RDP Connections 45 RDP Connections tion concerning the detailed settings contained in these tabs, refer to the Creating a RDP connection instructions above. 46 Configuring RDP Connections Linux ThinSTAR User Manual CHAPTER 6 Basic Terminal Connections This chapter describes how to create and edit Basic Terminal connections. Configuring Basic Terminal Connections A Basic Terminal connection allows the user to connect to a UNIX, or Linux server, using a Telnet session. After you have clicked the add button in NCD Connection Manager, follow these steps to properly setup a new Basic Terminal connection. Creating a Basic Terminal connection 1 In the Add Connection dialog, select Basic Terminal Con- nection from the drop-down menu. When finished, click OK. 2 In the Specify Title and Server dialog, enter a title for your connection. Then enter the name or lP address and the port 47 Basic Terminal Connections of a host to connect to. When finished, click Next or Finish. Note: By clicking the Finish button at the end of this step or any subsequent step a connection will be created using the default settings for the remaining configuration options. 3 In the Startup Options dialog, you can select whether you would like this connection to automatically start at startup, and/or automatically restart the connection after it has become disconnected. When finished, or if you do not wish to enable these options, click Next or Finish. 4 If you want, select a window size for your connection, and then 48 Configuring Basic Terminal Connections Basic Terminal Connections click Next. 5 If you would like to specify which font size to use, select the font size you would like to use from the drop-down list. When finished, click Next. 6 If you would like to specify the foreground and background colors for your connection, select the colors you would like to Configuring Basic Terminal Connections 49 Basic Terminal Connections use from the drop-down lists. When finished, click Finish. The Basic Terminal connection will appear in the NCD Connection Manager connection list. Editing a Basic Terminal connection 50 When editing a Basic Terminal connection, the user is presented with a tabbed dialog, with each tab corresponding to the series of dialogs contained in the Add Terminal Connection wizard. For specific information concerning the detailed settings contained in these tabs, refer to the Creating a Basic Terminal connection instructions above. Configuring Basic Terminal Connections Linux ThinSTAR User Manual CHAPTER 7 X Window Connections Configuring X Window Connections An X Window connection allows the user to connect to XDM servers for remote X desktops. After you have clicked the add button in NCD Connection Manager, follow these steps to properly setup a new X Window connection. Note: Certain dialogs in the Add X Window Connection wizard contain “Use Main Desktop Settings” checkboxes. By enabling this option, the settings for which the checkbox applies will equal the corresponding Terminal properties Desktop setting (see “Desktop Settings” on page 29). Creating an X Window Connection 1 In the Add Connection dialog, select X Window Connection from the drop-down menu. When finished, click OK. 2 Enter a name for your X Window connection. When fin- 51 X Window Connections ished, click Next. 3 In the Enter XDM Server dialog, enter the name of the XDM server you wish to connect to, and then specify the type of X connection you are creating. When finished, click Next. Note: There are four types of XDM sessions: direct, chooser, 52 Configuring X Window Connections X Window Connections indirect, and broadcast. Direct requires you to specify the server you will connect to using this connection. Chooser presents a list of possible servers to the user at connection time. This list consists of a combination of servers located by a broadcast and servers specified by an administrator in the Server Settings dialog (for more information about preconfiguring XDM server lists, see “X Window tab” on page 27.) Indirect works like direct but allows the specified server to redirect you to another server. Broadcast will connect to the first server that responds to a location broadcast. 4 In the Configure Display Settings dialog, adjust your display resolution and color palette. Additionally, you can enable a screen saver and determine the type and timeout. The display settings for X Window connections can be any desired resolution and color depth supported by the ThinSTAR, even if they are different from the ones set in Appliance Properties for the standard ThinSTAR desktop. However, setting different resolutions can increase the time required to switch between connections / sessions. When finished, click Next. 5 Enter the font server and the font server port you wish to use. Configuring X Window Connections 53 X Window Connections When finished, click Next. 6 In the Select Mouse Options dialog specify and test your input device settings. When finished, click Next. 7 In the Startup Options dialog, you can select whether you would like this connection to automatically start at startup, and/or automatically restart the connection after it has 54 Configuring X Window Connections X Window Connections become disconnected. When finished, or if you do not wish to enable these options, click Finish. The X Window connection will appear in the NCD Connection Manager connection list. Editing an X Window connection When editing an X Window connection, the user is presented with a tabbed dialog, with each tab corresponding to the series of dialogs contained in the Add X Window connection wizard. For specific Configuring X Window Connections 55 X Window Connections information concerning the detailed settings contained in these tabs, refer to the Creating an X Window connection instructions above. 56 Configuring X Window Connections Linux ThinSTAR User Manual CHAPTER 8 Custom Connections Configuring Custom Connections A Custom connection allows the user to define an executable command that is run as if from a command line in order to start a Connection. After you have clicked the add button in NCD Connection Manager, follow these steps to properly setup a Custom connection. Creating a Custom connection 1 In the Add Connection dialog, select Custom Connection from the drop-down menu. When finished, click OK. 2 In the Specify Name and Command, enter a name for your connection, and the executable command you would like to use to start your custom connection. When finished, click 57 Custom Connections Next or Finish. Note: By clicking the Finish button at the end of this step or any subsequent step a connection will be created using default settings for the remaining options. Example of a custom connection If you wish to create a custom connection that spawns a window with a vi-like text editor, enter the following in the Command field: rxvt -e vi This will produce a windowed connection that looks like this: 3 In the Startup Options dialog, you can select whether you 58 Configuring Custom Connections Custom Connections would like this connection to automatically start at startup, and/or automatically restart the connection after it has become disconnected. When finished, or if you do not wish to enable these options, click Finish. The Custom connection will appear in the NCD Connection Manager connection list. Editing a Custom connection When editing a Custom connection, the user is presented with a tabbed dialog, with each tab corresponding to the series of dialogs contained in the Add Custom Connection wizard. For specific information concerning the detailed settings contained in these tabs, refer to the Creating a Custom connection instructions above. Configuring Custom Connections 59 Custom Connections 60 Configuring Custom Connections Linux ThinSTAR User Manual CHAPTER 9 Using the Linux Desktop This chapter explains how to use the Linux desktop to manage your program windows. Getting Started Overview Many other thin clients use full screen connections only, requiring the user to know keyboard short-cuts in order to switch between multiple connections. In addition to full screen connections, Linux allows the user to create windowed connections, between which they can easily switch at the click of a mouse. After you start a windowed connection, that connection will appear upon the Linux desktop. The Linux desktop is a graphical user interface that lets you manage multiple windows. 61 Using the Linux Desktop Using the Taskbar The Linux taskbar is a movable control bar. Every open Windows connection and Linux window has a taskbar button. • To open the NCD menu, click the NCD button on the taskbar. Then click a menu item to select it. To open the Linux menu, click the NCD button. To select a window, click its taskbar button. • To select a window or connection, even when it isn’t on the cur- Note Your system administrator can hide the Linux taskbar so that it appears as a thin line. When you point to this line, the taskbar appears. When you point away from taskbar, the taskbar hides again. Using the Desktop Divider rent Linux desktop, left-click its taskbar button. To learn how to use Linux windows, see page 63. • To move the taskbar, middle-click and drag the edge of the taskbar beyond the middle of the desktop. Then release the mouse button, and the taskbar moves to the top or bottom. • To resize the taskbar, left-click and drag an edge of the taskbar. As you open more windows, you may want to enlarge the taskbar to make its buttons more readable. • To display the window properties, right-click its taskbar button. To close a Properties box, click it. The Desktop Divider, that resides on the right hand side of the taskbar, is a miniature representation of four desktops in which you can open and move Linux windows. In effect, the Desktop Divider quadruples the work space available on the Linux desktop. • To display a Linux desktop, left-click one of the colored squares in the Desktop Divider in order to access the desktop it represents. • To move windows between Linux desktops, Left-click on the computer icon in the upper left-hand corner of the window you would like to move. Highlight the Move to desk option in the drop-down menu, and then from the drill down menu select a Desk to place the window. 62 Getting Started Using the Linux Desktop Using Linux Windows Using the window controls Each program on the Linux desktop operates in a separate window that you can maximize, minimize, and move. Note The title bar displays the name of the program in the window. When it’s highlighted, the window is active, meaning the keyboard and mouse interact with that program. Menu Button Title Bar Minimize Maximize Close Window Control Menu • To display the Window Control menu, click the Menu button. • • • • Then click a menu command. For example, click Move, drag the window, and then click the pointer at the desired position. To reduce a window to a taskbar button, click its Minimize button (-), or select minimize from the drop-down menu. To reopen the window, click its taskbar button. To fill the desktop with a window, click its Maximize button (❒ ), or select maximize from the drop-down menu. To close a window and its program(s), left-click its Close button (X), or select close from the drop-down menu. To move a window, left-click and drag its title bar. Or click and drag a window edge or corner with the middle or right mouse buttons. Using Linux Windows 63 Using the Linux Desktop • To resize a window, left-click and drag an edge or corner. 64 Using Linux Windows Linux ThinSTAR User Manual CHAPTER 10 Pericom Terminal Connections If your ThinSTAR has the optional Pericom software, then this chapter describes how to create and edit Pericom Terminal connections. Configuring Pericom Terminal Connections Alphanumeric Emulations • ADDS A2. • ANSI BBS. • AT&T 5510. • Data General DG410. • DEC VT52, VT100, VT101, VT102, VT125, VT131, VT132, VT220, VT240, VT320, VT340, VT400-7, VT400-8, VT420. • DOC 18. • Hazeltine 1500. • Hewlett Packard 2392A, 2622A, 700/92. • IBM 3151, 3270 2, 3, 4, 5 NVT Mode, 3270E, and 5250. • ICL 7561. • • • • • • • • • • McDonnell Douglas Prism-8, -9. Microcolor 2200. Prime PT250. SCO Console. Siemens 97801. Stratus V102. Tandem 6526, 6530. Televideo 910, 925. Viewdata 40, 80, Split. WYSE 50, 50+, 60. Graphic Emulations • DEC VT340 (ReGIS). • IBM 3270. • Retrographics VT640. • Tektronix 4010, 4014. • Westward 2119. A Pericom Terminal connection allows the user to access mainframes or minicomputers using teemX. The Pericom terminal connection differs from the Basic terminal connection by offering the 65 Pericom Terminal Connections user advanced functionality features such as printing, macro, scripting, and teemX, which is a suite of more than 30 alphanumeric and graphic terminal emulations. These emulations include those listed on the previous page. After you have clicked the add button in NCD Connection Manager, follow these steps to properly setup a Pericom Terminal connection. Creating a Pericom Terminal connection 1 In the Add Connection dialog, select Pericom Terminal Con- nection from the drop-down menu. When finished, click OK. 2 In the Specify Name, Host, and Emulation dialog, enter a name for your connection, a name or lP address of a host to connect to (optional), and the emulation you would like to use. When finished, click Next or Finish. Note: By clicking the Finish button at the end of this step or any subsequent step a connection will be created using default settings for the remaining options. 3 In the Startup Options dialog, you can select whether you would like this connection to automatically start at startup, and/or automatically restart the connection after it has become disconnected. When finished, or if you do not wish to enable 66 Configuring Pericom Terminal Connections Pericom Terminal Connections these options, click Next or Finish. 4 In the Modify User Interface dialog, choose the settings you would like applied to the Pericom Terminal Connection User Interface. Check the box of the corresponding option to set the feature. These options include: • Menu Bar Items - These options allow you to customize the menu bar displayed at the top of the Pericom Terminal window. You can hide the entire Menu Bar, or you can disable one or more of the individual menus (File, Settings, Help, and Quit) on the Menu Bar. • Actions On Host Close - These option allow you to customize what occurs when a terminal emulation session is closed. You can Exit Pericom, Stay Alive (keep Pericom running without a session), Reconnect, or have a dialog display allowing you to choose which option you would like to occur. Configuring Pericom Terminal Connections 67 Pericom Terminal Connections • Toolbars - These option allow you to hide the toolbars in the Pericom Terminal window. You can disable the Status Bar, Scroll Bar, and the Soft Buttons. When finished customizing the user interface, if necessary, click Next or Finish. 5 In the Optional Advanced Settings dialog, type any command line options you would like to append to the Pericom executable command. When finished, click Finish. 68 Configuring Pericom Terminal Connections Pericom Terminal Connections For a list of the advanced command-line options that might be entered in the Options field, click on the Help button. Note: The Use Local Keyboard option (selected by default) causes your keyboard to be automatically configured using the Keyboard Locale setting in the General Settings dialog (see Desktop Settings dialog on page 31). Unchecking this option will require the user to configure their keyboard for the Pericom connection manually. The Pericom Terminal connection will appear in the NCD Connection Manager connection list. Editing a Pericom Terminal connection When editing a Pericom Terminal connection, the user is presented with a tabbed dialog, with each tab corresponding to the series of dialogs contained in the Add Terminal Connection wizard. For specific information concerning the detailed settings contained in these tabs, refer to the Creating a Pericom Terminal connection instructions above. Printing text screens You can print teemX text screens to a printer directly attached to your ThinSTAR. (Your system administrator can configure your Configuring Pericom Terminal Connections 69 Pericom Terminal Connections ThinSTAR to print to a network printer.) The local printer must be turned on and not currently printing other files. Setting up a text printer Before printing to a locally attached printer, configure teemX to use the port on which the printer is attached. • Select Printer Setup from the teemX File menu. • Select the appropriate printer port and type from the setup selection screen. Printer Selection Port Description LPT_1 LPT_1_TextOnly Parallel COM_1 COM_1_TextOnly COM1 COM_2 COM_2_TextOnly COM2 Text printer (Use the "TextOnly" version -- which adds carriage returns if necessary -if the output does not line up with what appears on-screen) Note: The printer names that appear in the Printer Setup utility are listed in the Linux /etc/printcap file. Administrators familiar with UNIX/Linux printcap files can modify this file to add network printers, or to modify the default entries. 70 Configuring Pericom Terminal Connections Pericom Terminal Connections • If the status bar is turned on (Settings | VT/ANSI/SCO dialog, Status Line = Indicator), Printer Ready appears when the settings have been made. Configuring Pericom Terminal Connections 71 Pericom Terminal Connections 72 Configuring Pericom Terminal Connections Linux ThinSTAR User Manual Appendix A: Advanced Linux Configuration This appendix discusses advanced configuration procedures for Linux based terminals. Setting your ThinSTAR to ignore BOOTP or DHCP responses Linux has the capability of allowing the user to set their Ethernet controller to ignore BOOTP or DHCP responses from the server. In order for this to be accomplished, it is necessary to edit the pump.conf configuration file in the /writable/sys directory of your Linux file system. Editing the pump.conf configuration file to ignore BOOTP or DHCP responses 1 Open a ThinSTAR console by selecting Settings | Appliance properties | Console from the NCD Connection Manager menu bar. 2 At the bash$ prompt type su and hit enter to login as the superuser. When prompted type the ThinSTAR password and hit enter. Note: If you have not set a ThinSTAR password, you will need to do so for this operation. For instruction on setting the ThinSTAR password see “Security” on page 21. 3 At the bash# prompt type e3pi /writable/sys/pump.conf and hit enter in order to open the pump.conf file in the e3pi text editor. 4 When the e3pi text editor appears, place the cursor at the end of the pump.conf file and add the following device entry: device eth0 { ignore-dhcp 73 } Note: The device entry example above is used to set the ThinSTAR to ignore DHCP responses. In order to ignore BOOTP responses replace the ignore-dhcp line with ignore-bootp. 5 Type CTRL-O to save the pump.conf file. 6 Type CTRL-X to exit the e3pi text editor. 7 Restart the ThinSTAR by selecting Connection | Session | Restart from the NCD Connection Manager menu bar. Troubleshooting with the Diagnostic Console If you are accessing the diagnostic console you should be familiar with Linux (at a command line level). Accessing this mode is typically only required under the direction of NCD Techincal Support personnel. In order to use this mode you must have set the configuration password on the ThinSTAR. You can use a Virtual Terminal connection by typing the key combination ALT + SYSRQ and then hitting F3. At the login prompt type root and the Enter key, then enter the password (not echoed) that you have set as the security password and the Enter key. At this point you are at the Linux command line. To exit this mode type either Control-D, exit or logout immediately after the prompt ([root@<machine-name> /root]# ), then Alt-F. You can also use the Console by clicking Settings | Appliance Properties | Console from the NCD Connection Manager menu bar (see the above section on setting BOOTP or DHCP options.) Pressing ALT + SYSRQ and then hitting F2 provides diagnostic information on the success or failure of various subsystem startup during the boot process. 74 Troubleshooting with the Diagnostic Console Linux ThinSTAR User Manual Index Numerics 10BaseT Ethernet 7 A active windows, defined 63 ADDS A2 65 alphanumeric emulations 65 ANSI BBS 65 Appliance Properties Date and Time 28 Appliance properties Console 31 desktop settings 29 Factory Reset 31 Messages 31 network settings 14 Printers 24 Servers 26 Sound 25 AT&T 5510 65 audio ICA connections 38 AutoSense 15 B back panel connections 6, 9 bar code scanners 6, 7 Basic Terminal 47 connections adding 47 creating 47 editing 50 BOOTP ignoring 73 BOOTP (Bootstrap Protocol) configuring for 14 understanding 13 Broadcast Address 14 C Client Name 15 COM ports 6 Computing Appliance 2 connecting back panel ports 6, 9 modems 7 monitors 7 network cables 7 peripherals 6 printers 6, 7 connections adding 18 basic terminal 47 Custom 57 ICA 35 Pericom temrinal 66 RDP 41 75 Index X Window 51 Basic Terminal 47 copying 19 creating 18 basic terminal 47 Custom 57 ICA 35 Pericom terminal 66 RDP 41 X Window 51 Custom 57 deleting 19 editing 18 basic terminal 50 Custom 59 ICA 40 Pericom terminal 69 RDP 45 X Window 55 ending 20 establishing 19 ICA 35 managing 17 Pericom Terminal emulation 65 RDP 41 running 19 session management 20 using 19 X Window 51 Console 31 Console window function of 31 opening from NCD Connection Manager 31 Custom connections adding 57 creating 57 editing 59 D data compression 39 Data General DG410 65 date, setting 28 76 DEC 65 DEC VT52, VT100, VT101, VT102, VT125, VT131, VT132, VT220, VT240, VT320, VT340, VT400-7*, VT400-8*, VT420 65 Default Domain 15 Default Gateway 15 Desktop Divider using 62 Desktop Settings 29 DHCP ignoring 73 DHCP (Dynamic Host Configuration Protocol) defined 13 DHCP/Bootp server 14 DNS Server Primary 15 Secondary 15 DOC 18 65 E Edit Default Values 15 Enable interface 14 Ethernet connector 7 F Factory Reset 31 G Global ICA Settings 32 Advanced tab 33 Drive Mapping tab 33 Firewall tab 33 Hotkeys tab 33 Preferences tab keyboard layout/type 32 ports and devices 32 Server tab 33 Window tab 32 graphics emulations 65 H Hazeltine 1500 65 Hewlett Packard 2392A, 2622A, 700/92 65 Index I IBM 3151 65 IBM 3270 Models 2, 3, 4, 5 NVT Mode 65 IBM 5250 65 ICA (Independent Computing Architecture) 35 audio settings 38 connections adding 35 creating 35 editing 40 data compression 39 Global ICA Settings 32 overview 3 ICL 7561 65 IP Address 14 appliance setting assigned by DHCP or BOOTP 13 K keyboard connecting 6 KB port location 6 setting 32 Keyboard layout 32 L LAN 6 Linux desktop divider 62 desktops displaying 62 moving windows between 62 using 61 taskbar 62 hiding 62 moving 62 opening active windows 62 properties box 62 windows 63 closing 63 maximizing 63 minimizing 63 moving 63 resizing 64 M MAC address as part of default Client Name 15 McDonnell Douglas Prism-8, Prism-9 65 Messages 31 MetaFrame 3, 35 Microcolor 2200 65 Minimize button 63 modems 6 connecting 7 monitor connecting 7 Monitor port 6 mouse devices connecting 6 PS/2 type 6 N NCD technical support 4 Web site 3 NCD Connection Manager 2, 17 Appliance properties 21 connection properties 32 copying connections 19 creating connections 18 deleting connections 19 displaying connection manager 18 editing connections 18 ending connections 20 managing connections Connection Manager 17 running connections 19 session management 20 using connections 19 Network Mask 14 Network Settings 14 broadcast address 14 Client Name 15 Default Domain 15 Default Gateway 15 DHCP/Bootp server 14 77 Index Edit Default Values 15 Enable Interface 14 IP address 14 network mask 14 Primary DNS Server 15 Secondary DNS Server 15 Speed 15 P Pericom Terminal connections adding 66 creating 66 editing 69 printing text screens 69 Pericom Terminal emulation 65 peripheral devices parallel and serial 7 usb 8 personal digital assistants (PDAs) 6 power jack 6 Prime PT250 65 printcap file 70 printers settings 24 printing connecting printers 7 parallel port 6 Pericom Terminal connections text screens 69 serial port 6 Properties box from Linux taskbar 62 protocols ICA 3, 35 RDP 3, 41 PS/2 mouse 6 PWR connector 6 R RDP (Remote Desktop Protocol) 41 Connection Options 43 Client Name 44 Disable Encryption (French NT4-TSE servers only) 44 78 Disable sending mouse movements to server 44 Keyboard Layout 44 Use off-screen backup window 44 connections adding 41 creating 41 editing 45 overview 3 Retrographics VT640 65 RJ-45 Ethernet jack 6 S SCO Console emulation 65 Secure Sockets Layer (SSL) 33 Security Settings 21 set/change password 22 Serial port location 6 serial ports 6 Serial Window accessory 31 Servers settings 26 Set/change password 22 setting the date and time 28 Siemens 97801 65 Sound settings 25 Speed 15 Stratus V102 65 T Tandem 6526, 6530 65 technical support 4 teemX alphanumeric emulations 65 graphics emulations 65 Tektronix 4010, 4014 65 Televideo 910, 925 65 Telnet 47 ThinSTAR 3 connecting cables and monitor 6 power cord 7 Index title bar (Linux windows) 63 Touchscreen 30 U USB ports, locating 6 V Viewdata 40, 80, Split 65 Virtual Terminal switching via hotkeys 23 W Westward 2119 65 windows 63 active 63 buttons 63 closing 63 maximizing 63 minimizing 63 moving 63 resizing 64 title bar 63 using the controls 63 WinFrame 3, 35 Work Area 11 WYSE 50, 50+, 60 65 X X Window 51 connections adding 51 creating 51 editing 55 X Window tab 27 XDM 51 79 Index 80