1
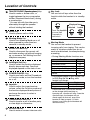
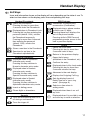
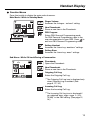
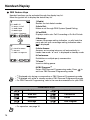
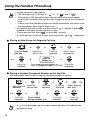
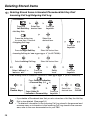
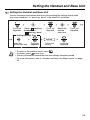
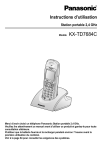
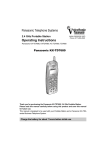
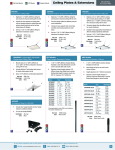
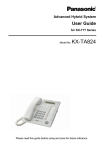
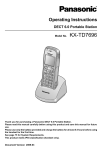
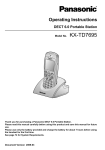
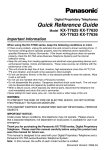
Advanced Hybrid System
User Guide for KX-TD7896
Model
KX-TA308/KX-TA624/KX-TA824
HOLD
XFER
1
2
4
7
5
8
CLR
3
6
9
0
RCL
FLAS
H
Thank you for purchasing the Panasonic KX-TD7896 Wireless PT (Wireless
Proprietary Telephone). Please read this manual carefully before using this product
and save this manual for future use.
This manual is designed to be used with the KX-TD7896 Wireless PT (Wireless
Proprietary Telephone) and a Panasonic KX-TA series (other than KX-TA1232) PBX
(Business Telephone System).
Please use only the battery provided and charge the battery for about
7 hours before using the handset for the first time.
Table of Contents
Location of Controls ...................................................................................... 3
Before Operating the Handset ...................................................................... 5
Unsupported PBX Features ......................................................................................5
Selecting the Display Language ...............................................................................5
Setting the Date and Time ........................................................................................6
Enabling the Outgoing Call Log ................................................................................6
Entering the Standby Display Name .........................................................................7
Entering the Names of the Flexible Keys ..................................................................7
Adjusting the Ringer Volume ....................................................................................8
Adjusting the Vibrate Setting.....................................................................................9
Adjusting the Receiver/Speaker/Headset Volume ....................................................9
Handset Display ........................................................................................... 10
Icons .......................................................................................................................10
Soft Keys.................................................................................................................11
Operation Outline ....................................................................................................12
Operation for the KX-TA308/624/824 .......................................................... 16
Making Calls ...........................................................................................................16
Receiving Calls .......................................................................................................18
When the Dialed Extension is Busy/No Answer......................................................19
During a Conversation ............................................................................................20
Useful Features.......................................................................................................20
Making Use of the Voice Mail Service.....................................................................22
Using the Handset Phonebook ................................................................... 23
Handset Phonebook ...............................................................................................23
Storing an Item in the Handset Phonebook ............................................................23
Entering Characters ................................................................................................25
Locking the Handset Phonebook ............................................................................27
Deleting Stored Items .................................................................................. 28
Deleting Stored Items in Handset Phonebook/Hot Key Dial/Incoming Call Log/
Outgoing Call Log ...................................................................................................28
Setting the Handset and Base Unit ............................................................ 29
Setting the Handset and Base Unit .........................................................................29
Troubleshooting and Error Messages ....................................................... 35
Troubleshooting ......................................................................................................35
Error Messages.......................................................................................................37
Important Information .................................................................................. 38
Battery Information..................................................................................................38
2
Location of Controls
Location of Controls
Handset
Back View
Ringing/Charge
Indicator
Headset Jack
Receiver
The headset is an option.
Please use only a Panasonic
KX-TCA86/KX-TCA88HA/
KX-TCA91/KX-TCA92 headset.
Speaker
Display
Open the
cover.
Power On
6
5
Press POWER
for more than
2 seconds.
Standby mode
Power Off
Blank display
Up
7
Left
1
2
3
2
3
4
5
6
7
8
9
1
0
8
OK (Press Center.)
Right
Down
The joystick can be used to navigate
through menus and to select items
shown on the display.
9
Charge Contact
4
Microphone
3
Location of Controls
1
2
HOLD Key:
Used to place a call on Hold.
3
Meeting Mode Key:
Used to turn Meeting Mode on or off
when pressed for more than two
seconds in standby mode.
4
RECALL/FLASH Key:
Used to disconnect the current call
and make another call without hanging
up, or answer a Call Waiting from the
telephone company.
5
Left/Right Soft Key:
Used to select the function displayed
directly above each key. Functions
displayed depend on the state of use.
6
POWER/CANCEL Key:
Used to end calls, exit the Phonebook
or Function mode, or turn the handset
on or off.
7
4
TALK/SP-PHONE (Speakerphone) Key:
Used to make or answer calls, or
toggle between the two conversation
modes (Receiver/Hands-free*) during
a conversation.
* You can talk with the other party
alternately through the speaker
without holding the handset.
Joystick:
Used to adjust the ringer/receiver
volume, select the Function mode and
the function displayed directly above it,
and move the cursor to select a
desired item.
8
TRANSFER/CLEAR Key:
Used to transfer a call to another party,
or clear digits or characters.
9
INTERCOM Key:
Used to make or answer intercom calls.
Key Lock
You can lock all keys other than the
Joystick while the handset is in standby
mode.
<Displayed Icon>
Unlocked
Locked
Press the Joystick
for more than
2 seconds to
lock/unlock.
Meeting Mode
You can set the handset to prevent
incoming calls from ringing. This can be
useful in situations where you do not
want to be disturbed, for example during
a meeting.
• During Meeting Mode, functions are:
Function
Microphone volume
Low battery alarm
Key tone
Ringer/Voice Call/Paging/LCS
Ring On Charger
Vibrate
Status
Up
Off
Off
Off
Off
On
• During Meeting Mode or when Vibrate is set
to Vib.& Ring and Vib. Ring, while
handset is on charger:
Function
Vibrate*
Ringer
Status
Off
User Setting
* Please note that, if you set the handset
on the charger while receiving an
incoming call, vibration will stop. Once the
vibration stops, the handset will not
vibrate again for that call, even if the
handset is lifted up again. (If Quick
Answer is set, lifting up the handset will
answer the call.)
Before Operating the Handset
Before Operating the Handset
Unsupported PBX Features
The following PBX features are not supported when using a KX-TD7896:
1) Turning Background Music (BGM) on and off.
2) Switching displays between “date and time” and “self extension number”.
3) Confirming the current time service mode (day/night/lunch).
4) Entering PBX System Programming mode.
Selecting the Display Language
You can select the desired language (English/Spanish/French).
Press the
Joystick.
Select
“Language”.
Select “
Setting Press the
Handset”.
Joystick.
Press the
Joystick.
Select “Display
Option”.
Select the desired language.
(English/Español/FRANÇAIS)
Press the
Joystick.
Press the
Joystick.
• The display language of both the handset and PBX can be selected, and both
should be set to the same language. For more information, refer to the user
documentation for your PBX.
5
Before Operating the Handset
Setting the Date and Time
If you selected “PBX Type-Type 2 (KX-TA308)” in the PBX Type setting, you should
set a date and time.
Press the
Joystick.
Select “
Base”.
Press the
Joystick.
Setting
Select
“Date&Time”.
Press the
Joystick.
date & time
Enter Day (01-31), Month (01-12),
Year (00-99), Hour (00-12)
and Minute (00-59) from the left.
Press the Right
Soft Key to select
“AM” or “PM”.
Press the
Joystick.
• Set the current date and time on the base unit. If you do not do so, the date and
time of incoming calls will not be displayed correctly.
Enabling the Outgoing Call Log
The default setting is “Off” for the Outgoing Call Log. You can enable the Outgoing Call
Log if needed.
Press the
Joystick.
Select “ Setting
Handset”.
Press the
Joystick.
Select “Other
Option”.
Press the
Joystick.
Enter Password
----
Select
“Outgoing Log”.
Press the
Joystick.
Enter your password.
(default: 1234)
Select “On”. Press the
Joystick.
• Only the numbers you dial, or numbers dialed using Hot Key Dial or Phonebook
will be stored in the Outgoing Call Log.
6
Before Operating the Handset
Entering the Standby Display Name
You can enter the name of the standby mode display of the handset.
Press the
Joystick.
Select “
Setting
Handset”.
Press the
Joystick.
Select “Display
Option”.
Press the
Joystick.
name
Select “Standby
Display”.
Press the
Joystick.
Press the
Joystick.
Enter a name.
(max. 16 characters)
• To enter the name, see page 25.
Entering the Names of the Flexible Keys
You can enter a name for each flexible key of the handset.
Press the
Joystick.
Select
Press the Select “Display Press the Select “F-Key
“ Setting Joystick. Option”.
Joystick. Name”.
Handset”.
name
Press the
Joystick.
Select the desired
flexible key.
Press the
Joystick.
Enter the name.
(max. 12 characters)
Press the
Joystick.
• To enter the name, see page 25.
7
Before Operating the Handset
Adjusting the Ringer Volume
Press the
Joystick.
Select “
Ringer
Volume”.
Press the
Joystick.
Select the desired
setting. (Step Up/
Step Down/Level 1-6/Off)
Press the
Joystick.
• For the ringer pattern, see page 31.
Adjusting the Ringer Volume or Turning the Ringer Off While Ringing
While receiving a call
<To adjust the ringer volume>
Move the Joystick UP or DOWN to adjust the volume.*
<To turn the ringer off>
OR
Press the Joystick.
Press CANCEL.
• * The adjusted volume level will also be used for subsequent calls.
• If you attach the headset while receiving an incoming call, the ring from the
handset does not switch to the headset. If you attach the headset before
receiving an incoming call, and headset tone is set to on, a tone will be heard
from the headset. If Vibrate is set to on, the handset will vibrate whether a
headset is attached or not.
8
Before Operating the Handset
Adjusting the Vibrate Setting
Press the
Joystick.
Select
“Vibrate”.
Select “
Setting Handset”.
Press the
Joystick.
Press the
Joystick.
Select “Incoming
Option”.
Select the desired setting.
(Vib.& Ring / Vib. Ring / Off)
Press the
Joystick.
Press the
Joystick.
• You can receive an intercom call by the caller’s voice instead of rings (Voice
Call). For further information, refer to “Alternate Receiving—Ring/Voice” in the
user documentation for your PBX.
• To set Vibrate only, without ringing, turn Meeting Mode on or set the Ringer
Volume to off. (See page 8.)
Adjusting the Receiver/Speaker/Headset Volume
During a conversation
Move the Joystick UP or DOWN to adjust the volume.
(Receiver Volume-Level 1-4, Speaker Volume-Level 1-6, Headset Volume-Level 1-4)
9
Handset Display
Handset Display
Icons
Anne
A.Ans Fwd
25.Jan 21:05
Soft Keys
(See page 11.)
Ringer Volume OFF
(See page 8.)
Within range of a base unit
Out of range
If this icon flashes when
making a call, move closer to
the base unit and dial again.
Vibrate (See page 9.)
Fwd
Call Forwarding
(See page 21.)
DND
Do Not Disturb
(See page 21.)
A.Ans
Intercom Indicator
Off-hook Status
Auto Answer (For Hands-free
Answerback, see page 18.)
Meeting Mode
(See page 4.)
<Standby Mode>
For “Entering the
Standby Display
Name”, see on
page 7.
Message Waiting
Phonebook
Battery Indicator
<While Off-hook/During a Conversation>
Displayed during a conversation using the receiver.
Talk
Speaker Phone
Headset
Headset(SP)
Displayed during a conversation using the speaker
(Hands-free mode).
Displayed when a headset is attached.
Displayed when a headset is attached
during Hands-free mode.
Mic Mute
Flashes when Mic Mute is on.
10
Handset Display
Soft Keys
Icons and information shown on the display will vary depending on the state of use. To
select an item shown on the display, press the corresponding soft keys.
Handset Phonebook
Opens the Phonebook.
Pressing this key for more than
2 seconds locks the Phonebook.
Displayed when in Phonebook Lock.
Pressing this key then entering the
password (default: 1234), unlocks
the Phonebook temporarily.
Pressing for more than 2 seconds,
then entering the password
(default: 1234), unlocks the
Phonebook.
Stores a new item in the Phonebook.
Searches for an item in the
Phonebook alphabetically.
Entering Characters
Displayed when in Alphabetic
character entry mode.
Pressing this key switches to
Numeric character entry mode.
Displayed when in Numeric
character entry mode.
Pressing this key switches to
Special character entry mode.
Displayed when in Special
character entry mode.
Pressing this key switches to
Alphabetic character entry mode.
Inserts a dialing pause.
PBX Features
Establishes a multiple-party
conversation (Conference).
Displayed when a phone number
contains over 15 digits.
Pressing these keys displays the
rest of the phone number.
Pressing while in PBX Personal
programming mode, moves to the
next or previous display.
Others
Opens the main menu.
Pressing this key for more than
2 seconds locks all keys.
Returns to the previous display.
Opens the list menu
(edit/delete in the Phonebook, etc.).
Confirms the entry.
Displayed when in Key Lock mode.
Pressing this key for more than
2 seconds unlocks the keys.
Advances to the next display.
Displays the Outgoing Call Log.
Sets the display format of
Date&Time set in “Setting
Base”. (See page 6.)
Selects an item when in
setting mode.
Clears digits or characters.
Displayed when there is no soft
key icon.
Sounds
Turns the microphone mute on or
off during a conversation.
Displayed when it is possible to use
an arrow key to make a selection.
Turns the ringer off.
11
Handset Display
Operation Outline
Handset functions are accessed through the display menu, and selected with the joystick
and soft keys. The guidance display is shown in standby mode for easy operation.
<Phonebook>
<Outgoing Call Log>
<Incoming Call Log>
*2
*1
Anne
Becky
Charles
David
1234567890123456
Incoming Log
<Phonebook Details>
<In standby mode>
Anne
1234567890123456
Outgoing Log
1
1
Ext108
108
0921234567
25.Jan 21:00
No Answer /New
* The Outgoing Call Log soft key (
Anne
A.Ans Fwd
)
is displayed only when Outgoing
Log is enabled. (See page 6, 33.)
25.Jan 21:05
*
<PBX Feature Keys>
<PBX Flexible Keys>
*3
1:Redial
2:Auto Dial
3:Fwd/DND
4:Message
5:Auto Answer
FUNC
F-CO
1:F-Key
2:F-Key
3:F-Key
4:F-Key
5:F-Key
01
02
03
04
05
<Main Menu>
Ringer Volume
• These functions cannot be accessed while in key lock mode.
• The displays marked with
are only shown when the following values have been set:
*1 Setting Base: PBX Type → Type 2 (KX-TA308)/Date&Time/Incoming Log
(See page 34.) You cannot make a call using the Incoming Call Log.
*2 Setting Handset → Other Option → Outgoing Log → On (See page 6, 33.)
*3 Setting Handset → Display Option → Guidance → On (See page 33.)
12
Handset Display
Function Menus
Press the joystick to display the main and sub menus.
Main Menu—While in Standby Mode
Ringer Volume:
Accesses the “Ringer Volume” setting.
New Phonebook:
Stores a new item in the Phonebook.
Ringer Volume
Icon Description
PBX Program:
Enters PBX Personal Programming mode.
For PBX Personal Programming, refer to the
to
user documentation for your PBX. Press
exit from PBX Personal Programming mode.
Setting Handset:
Accesses the “Setting Handset” settings.
Setting Base:
Accesses the “Setting Base” settings.
Sub Menu—While Off-hook/During a Conversation
Phonebook:
Opens the Phonebook.
New Phonebook:
Stores a new item in the Phonebook.
Phonebook
*1 Outgoing Call Log:
Enters the Outgoing Call Log.
*1 The Outgoing Call Log icon is displayed only
when Outgoing Log is enabled. (See
page 6, 12, 33.)
*2 Incoming Call Log:
Enters the Incoming Call Log.
*2 The Incoming Call Log icon is displayed if
you selected “PBX Type-Type 2 (KXTA308)” in the PBX setting. (See page 12,
34.)
13
Handset Display
PBX Feature Keys
Handset functions can be activated through the display key list.
Move the joystick left to display the feature key list.
1:Redial:
Redials the last dialed number.
1:Redial
2:Auto Dial
3:Fwd/DND
4:Message
5:Auto Answer
2:Auto Dial:
Makes a call through PBX System Speed Dialing.
3:Fwd/DND:
Displays and/or sets Call Forwarding or Do Not Disturb.
4:Message:
Leaves a message waiting indication, or calls back the
party who left you a message waiting indication when
is displayed.
5:Auto Answer:
Answers an incoming intercom call automatically in
hands-free mode. “A.Ans” is displayed in standby mode.
6:Conference
7:Pause
0:PBX Program
6:Conference:
Establishes a multiple-party conversation.
7:Pause*1:
Inserts a dialing pause.
0:PBX Program*2:
Enters PBX Personal Programming mode. Press
exit from PBX Personal Programming mode.
to
• *1 Displayed only during a conversation or PBX Personal Programming mode.
• *2 Displayed only while in standby mode or PBX Personal Programming mode.
• For PBX Personal Programming, refer to the user documentation for your PBX.
Combination Keys
1
Redial
5
Auto Answer
2
Auto Dial
6
Conference
3
Fwd/DND
7
Pause
4
Message
0
PBX Program
• For operation, see page 16.
14
Handset Display
PBX Flexible Keys
A flexible key can be used either to seize a line in order to make or receive an outside call
(F-Key), or used as a function key. Move the Joystick right to display the flexible key list.
Here you can access the 12 flexible keys. The icon shown beside each F-Key indicates
line status similarly to the LED indicators on a PT: is the same as a green LED; is
the same as a red LED.
Example:
Understanding the F-Key Icons *
1:F-Key
2:F-Key
3:F-Key
4:F-Key
5:F-Key
01
02
03
04
05
(on):
(flashing slowly):
(on):
(flashing rapidly):
You are currently using this line.
You have a call on hold on this line.
This line is in use by someone else.
There is an incoming call on
this line.
(flashing slowly): Someone has a call on hold on this line.
(no icon):
This line is idle.
Key Number
• * The meanings of these icons vary depending on the status of the CO line.
• For further information, refer to “LED Indication” in the feature documentation for
your PBX.
• To select a key, press its key number, or move the Joystick
to select the
desired key then press
(hands-free mode) or
(receiver). For operation,
see “Receiving—An Outside Call on a specific line” on page 18.
• To go to the next or previous display, move the Joystick
.
• To go to the next display, press
.
15
Operation for the KX-TA308/624/824
For further information, refer to the user documentation for your PBX or consult your dealer.
Operation for the KX-TA308/624/824
Making Calls
Operation
Desired Function
Making Calls
To an external party
To an extension
9
OR
extension no.
8
CO line
group no.
phone no.
To use F-Keys
X
idle F-Key (0-9,
, #)
phone no.
OR
Talk on the
Speakerphone.
idle F-Key
phone no.
Calling
idle F-Key
To use Hot Key Dial
Press the dialing key
X – for more than 1 second.
To use the Outgoing Call Log*1
To use the Phonebook
OR
<Direct Search>
Enter the first letter of the
X – desired name. (0-9)
<Name Search>
OR
• To enter a character, press
the corresponding dialing key
repeatedly until the character
is displayed.
name
• You can confirm a number was dialed correctly before calling (Predialing) by entering the
number, then pressing
.
• To clear an entire number while predialing, press
for more than 1 second.
CLR
• *1 Only the numbers you dial, or numbers dialed using Hot Key Dial or Phonebook will be
stored in the Outgoing Call Log. Note that, the Outgoing Log setting of your handset must be set
to on for this feature to operate. (See page 6, 33.)
Any Password or Account Code you enter will also be stored in the Outgoing Call Log.
Therefore, for security purposes please delete as necessary. (See page 28.)
• To store an item in the Phonebook or as a Hot Key, see page 23 or 24.
16
Operation for the KX-TA308/624/824
Operation
Desired Function
Making Calls
Redial*
1
1
To program
X
idle F-Key (0-9,
0
One-touch
Dialing
, #)
2
OR
phone no.
idle F-Key
To dial
X
One-touch Dialing Key (0-9,
, #)
OR
One-touch Dialing Key
Calling an
operator
0
To store
personal speed
dial no.
2
Speed Dialing
(Personal)
To dial
personal speed
dial no.
#
Speed Dialing
(System)
To dial
2
To program
system speed dial no.
X
idle F-Key (0-9,
0
, #)
6
OR
9
Calling back
a caller using
the Incoming
Call Log
(KX-TA624/
824 only)
#
desired no.
Assign as Caller ID
Indication—Personal
as Caller ID
6 Assign
Indication—Common
idle F-Key
To dial
X
X
Caller ID Indication—
Personal/Common Key
(0-9, , #)
Caller ID Indication—
Personal/Common Key
(0-9, , #)
OR
Caller ID Indication—
Personal/Common Key
OR
desired Incoming
Call Log *
Caller ID Indication—
Personal/Common Key
* Caller ID is displayed for about 20 seconds. If you press
during that time period,
the display goes blank until the time expires. While Caller ID is displayed or the display is blank,
you cannot receive a call, make a call using
or enter PBX Personal Programming mode.
To return to the standby display, press
then press
.
*1 You can use the last number stored in the PBX to make calls (Last Number Redial).
However, in this case the number will not be stored as a new entry in the Outgoing Call Log.
1 .
To display the last number you dialed, press
17
Operation for the KX-TA308/624/824
Receiving Calls
Operation
Desired Function
Receiving Calls
An Intercom Call/An Outside Call
An Intercom Call
Talk on the
Speakerphone.
Receiving
An Outside Call on a specific line
X
rapidly flashing F-Key
(0-9, , #)
Talk on the
Speakerphone.
rapidly flashing F-Key
OR
rapidly flashing F-Key
Directed
Picking up
a call
Hands-free
Answerback
(Auto Answer)
Group
extension no.
4
4
0
An Intercom Call
To set/cancel
5
To answer the call
X
OR
Hands-free
mode
LCS Key
(0-9, , #)
To stop monitoring
RCL
OR
LCS Key
X
OR
FLASH
LCS Cancel Key
(0-9, , #)
LCS Cancel Key
To start monitoring
Live Call
Screening*1
(LCS)
To stop the alert tone
RCL
X
OR
LCS Cancel Key
LCS Cancel Key
(0-9, , #)
FLASH
Private
mode
While monitoring
To answer the call
X
OR
LCS Key
(0-9, , #)
To stop monitoring
RCL
FLASH
OR
LCS Key
X
LCS Cancel Key
(0-9, , #)
LCS Cancel Key
*1 This feature is available when the PBX is connected to a Panasonic Voice Processing
System (VPS). For setting LCS, refer to the user documentation for your PBX.
18
Operation for the KX-TA308/624/824
When the Dialed Extension is Busy/No Answer
Operation
Desired Function
When the Dialed Extension is Busy/No Answer
Automatic
Callback Busy
To set
While hearing a busy tone
To answer
If you hear callback ringing
6
To leave a notification
When the receiver's extension is busy or does not answer
4
Sender
To cancel a notification
receiver's
extension no.
Message
Waiting
4
4
To call back
4
Receiver
To clear all notifications
7
0
0
#
While hearing a busy tone
Sender
1
Wait for an answer.
To set/cancel
For outside calls
7
3
1
1
#
Set
7
3
1
0
#
Cancel
For intercom calls/doorphone calls
Call Waiting
7
3
2
1
#
Set
7
3
2
0
#
Cancel
To talk to the new party (While hearing the Call Waiting tone)
Receiver
To terminate a current status
To hold and then talk to the new party
X
OR
lit F-Key (0-9,
, #)
lit F-Key
OR
Disregard this step if both parties
are extensions.
19
Operation for the KX-TA308/624/824
During Features
Useful
a Conversation
Operation
Desired Function
During a Conversation
Transferring
a call*1
extension no.
to an extension
phone no. to an external party
CLR
To hold
Announce.
To retrieve a call at the holding extension
X
OR
flashing F-Key (0-9,
, #)
flashing F-Key
OR
Holding a call*2
To retrieve an outside call from another extension
X
flashing F-Key (0-9,
, #)
OR
flashing F-Key
To Hold
To retrieve a call on exclusive hold
X
OR
Holding a call
exclusively*2
OR
third party's no.
OR
, #)
flashing F-Key
You can hold a call exclusively so that
other people cannot retrieve the call.
Three-party
conference
flashing F-Key (0-9,
OR
6
6
Useful Features
To page
All extensions
3
3
All external speakers
3
0
Paging*
3
3
4
All extensions & external speakers
Group
3
group no.
3
3
Announce.
To answer an announced page
Through a telephone speaker
OR
4
3
*1 To return to the call before the destination answers, press
or
, or select the
CLR
corresponding F-Key.
*2 When you hold several outside calls, you need to assign the F-Keys (Single-CO/Group-CO/
Other-CO) to a flexible key as necessary, beforehand.
*3 While making a paging announcement, battery consumption is the same as that of a normal
conversation.
20
Operation for the KX-TA308/624/824
Operation
Desired Function
Useful Features
Setting Absent
Message
7
5
Clearing the
setting
7
9
Log-in/Log-out
message
no.
parameter
(if required)
#
#
7
3
6
0
# Log-in
7
3
6
1
# Log-out
Do Not Disturb
(DND)
3
4
Set
0
Cancel
#
3
All calls
extension no.
1
Busy/No answer
extension no.
2
To a CO line
phone no.
line access code
3
Follow Me
Call Forwarding
(Fwd)
5
your extension no.
#
Follow Me Cancel
your extension no.
8
Cancel
0
To Voice Processing System (VPS)
KX-TA624/824 only
All calls
VPS extension no.
1
❑
Busy/No answer
VPS extension no.
2
Locking your
extension
7
7
lock code*
lock code*
7
7
lock code*
#
#
Lock
Unlock
* The lock code contains 4 digits.
21
Operation for the KX-TA308/624/824
Making Use of the Voice Mail Service
Operation
Desired Function
Making Use of the Voice Mail Service (KX-TA624/824 only)
VPS extension no.
From your
own
extension
VPS password*
❑ KX-TVA series
1
2
3
4
5
6
#
If you have no password, you can
skip the last step.
Listening to
a message
#
Mailbox Management
Automated Attendant
Message Notification
Other Features
End Call
1
2
3
4
5
6
6
mailbox no.
VPS password*
Deliver Message
❑ KX-TVS series
VPS extension no.
From
someone
else's
extension
Listen to Message
#
If you have no password, you can
skip the last step.
Listen to Message
Deliver Message
Check Mailbox Distribution
Automated Attendant
Mailbox Management
Other Features
End Call
VPS extension no.
From your own extension
VPS password*
#
From someone else's extension
mailbox no.
#
6
Leaving a
message
2
VPS password*
#
If you have no password, you can skip the last step.
#
1
Enter the first 3 or 4 letters
of the desired name
1
1
Leave
a message
To send the message immediately
KX-TVA series
2
1
1
2
2
❑
❑ KX-TVS series
To set the delivery time
Follow the guidance
1
1
During playback
0
Repeat Voice Guidance
Exit Menu
• * For more information on the VPS password, refer to the user documentation for the VPS.
• Some feature access numbers may vary depending on the market. Please consult your local
dealer for the details.
22
Using the Handset Phonebook
Using the Handset Phonebook
Handset Phonebook
You can store up to 200 items with names, phone numbers and category numbers in the handset for
easy access. You can set unique Ringer/LED/Vibrate patterns for each category to identify incoming
calls. All Phonebook items are stored in alphabetical order. For security purposes, you can lock the
Phonebook. To make a call using the Phonebook, Outgoing Call Log or Hot Key Dial, see page 16.
Incoming Call Identification (Private Ring)
You can organize entries in the Phonebook into one of 9 categories. A call from someone stored
in one of these categories will be indicated by the ringer pattern, ringing indication (LED) color
pattern and vibrate pattern assigned to the category (“Private Ring-Category 1-9”).
Item
Setting
Ringer pattern
6 bells, 9 melodies (See page 31.)
LED pattern
4 patterns (See page 31.)
Vibrate pattern
7 patterns (See page 31.)
Storing an Item in the Handset Phonebook
Storing a New Item and Editing a Stored Item
<To store>
Press the Joystick.
Select “
New Phonebook”.
Press the Joystick.
<To edit>
Press the
Left Soft Key.
Select the
desired item.
Name
Press the
Joystick.
Press the
Joystick.
Press the
Joystick.
name
Enter or edit the name
(max. 16 characters).
Phone
Number
Select
“Edit”.
Press the
Joystick.
phone no.
Enter or edit the
phone number*
(max. 32 digits).
Press the
Joystick.
Private
Category
Select the desired
Press the
category number (1-9) or Off. Joystick.
Press the
Joystick.
23
Using the Handset Phonebook
• To enter characters, see page 25.
RCL
• * The valid digits are “0” through “9”, “ ”, “#”, “P (
)” and “F ( FLASH
)”.
• * Although up to 200 Phonebook items can be stored, each phone number
stored in the Phonebook that contains over 24 digits counts as two Phonebook
items.
• * If there is only one Phonebook memory location available left, you cannot store
a phone number that is over 24 digits long.
• To change a character or digit, move the joystick
to highlight it, press
CLR
to delete it, then enter the new character or digit.
• To clear an entire line, press
for more than 1 second.
CLR
• To move the cursor to the left or right, move the joystick
or
, respectively.
Storing an Item Using the Outgoing Call Log
Press the Right
Soft Key.
Select the
desired item.
Press the
Joystick.
Select “Save
Phonebook”.
name
phone no.
category no.
Press the
Joystick.
Enter a name, phone number, and
select the category number (1-9) or Off.
Press the
Joystick.
Storing a Handset Phonebook Number as Hot Key Dial
A phone number stored in the Phonebook can be assigned as a Hot Key.
Press the Left
Soft Key.
Press the
Joystick.
Select the
desired item.
Press the
Joystick.
Select a blank
hot key number (0-9).
Press the
Joystick.
Press the
Joystick.
Select “Regist.
Hot Key”.
Press the
Joystick.
• A “ ” will be displayed next to hot key numbers that have a Phonebook item
registered to them.
24
Using the Handset Phonebook
Entering Characters
You can enter characters and digits using the dialing keys.
You can select one of 3 character modes by pressing the Right Soft
Key while entering a name. The function icon above the soft key
displays the current character mode.
See “Character Mode Table” (page 26) for available characters.
A, a
B, b
C, c
2
To change the character mode while editing a name in the Phonebook, press
the Right Soft Key.
Alphabet
Numeric
Extended 1
Example: To enter “Anne” in Alphabet Mode.
2
6
6
6
6
3
3
• To switch between uppercase and lowercase, press
.
• To enter a character located on the same dialing key as the previous character,
move the cursor by moving the Joystick
, then enter the desired character.
• If you enter a different character by mistake, move the Joystick
to highlight
the character, press
to
delete
it,
then
enter
the
correct
character.
CLR
• To clear an entire line, press
for more than 1 second.
CLR
• To move the cursor, move the Joystick
.
25
Using the Handset Phonebook
Character Mode Table
Keys
1
2
3
4
5
6
7
8
9
0
• Press
before or after entering a character to change between uppercase and
lowercase.
• For example, to enter the letter “C”, press 2 three times.
26
Using the Handset Phonebook
Locking the Handset Phonebook
You can lock/unlock the Phonebook while the handset is in standby mode.
Locking the Handset Phonebook
Press the Left Soft Key
for more than 2 seconds.
Locked.
Unlocking the Handset Phonebook
Unlock Phonebook
Enter Password
----
Press the Left Soft Key
for more than 2 seconds.
Enter your password.
(default: 1234)
Accesses
the Phonebook
You can view the
Phonebook and use
it to make calls.
Unlocked.
Press
CANCEL.
Unlocking the Handset Phonebook Temporarily
Enter Password
----
Press the Left Soft Key
for less than 2 seconds.
Press
CANCEL.
Enter your password.
(default: 1234)
Accesses
the Phonebook
You can view the
Phonebook and use
it to make calls.
Still locked.
27
Deleting Stored Items
Deleting Stored Items
Deleting Stored Items in Handset Phonebook/Hot Key Dial/
Incoming Call Log/Outgoing Call Log
<Phonebook>
Select the
Press the
Left Soft Key. desired item.
Press the
Joystick.
<Hot Key Dial>
X
Press the dialing key
for more than 1 second.
Select the
desired item.
<Outgoing Call Log>
Press the
Joystick.
Press the Right Soft Key.
Select the desired item.
<Incoming Call Log for “PBX Type-Type 2” (for KX-TA308)>
Select Incoming Call Log.
Select “Delete” or
“Delete All”.
Select the desired item.
Press the
Joystick.
Select
“Yes”.
Press the
Joystick.
When selecting Caller ID Indication—Personal for “PBX Type-Type 1” (for KX-TA624/824)*
X
Press Caller ID Indication
—Personal Key (0-9, , #).
OR
CLR
Select
Flexible Keys.
Select Caller ID
Press the
Indication—Personal Key. Joystick.
Select the
desired item.
Press
CLEAR.
• If you delete a Phonebook item that you also stored as a Hot Key, the Hot Key
Dial is also deleted. (See page 24.)
• * To delete all information in the Incoming Call Log stored in the personal and
common areas or information in the Incoming Call Log stored in the common
area, refer to the user documentation for your PBX.
28
Setting the Handset and Base Unit
Setting the Handset and Base Unit
Setting the Handset and Base Unit
You can customize the handset and base unit by editing the settings found under
“Setting Handset” or “Setting Base” in the menu list, as follows:
Press the
Joystick.
Select “ Setting
Handset” or
“ Setting Base”.
Setting Handset Only
Press the
Joystick.
Select the
desired
main item.
Press the
Joystick.
setting
Select the
desired sub item.
Press the
Joystick.
Follow the
setting.
Press the
Joystick.
• To return to the previous menu, press
.
• To cancel, press
at any time.
• The unit will beep to indicate that the new settings have been saved.
• For more information, refer to “Handset and Base Unit Menu Layout” on page
30.
29
Setting the Handset and Base Unit
Handset and Base Unit Menu Layout
<Main Item>
Setting Handset
Incoming Option
<Sub Item>
Ringer Volume
Headset Tone
Vibrate
(See page 31.)
Ring On Charger
Single Tone
Double Tone
Triple Tone
S-Double Tone
Private Ring
Category 1-9
Talk Option
Speaker Volume
Receiver Volume
Headset Volume
Headset Mic Vol
Answer Option
Any Key Answer
Quick Answer
Tone Option
Key Tone
Range Alarm
Display Option
Language
Backlight
LCD Contrast
Standby Display
Category Name
F-Key Name
Guidance
Other Option
Setting Base
PBX Type*
Caller ID Line
“PBX Type-Type 1” only
Date&Time
“PBX Type-Type 2” only
“PBX Type-Type 2” only
Incoming Log
* There are 2 types of PBX
30
Outgoing Log
Reset Handset
Fwd/DND Icon
(See page 34.)
PBX Type
Type 1
Type 2
Date&Time Form
“PBX Type-Type 2” only
(See page 34.)
Change Password
PBX Models
KX-TA624/824
KX-TA308
Setting the Handset and Base Unit
Main Item
Incoming Option
Sub Item
Ringer Volume
Headset Tone
Vibrate
Ring On Charger
Single Tone
Double Tone
Triple Tone
S-Double Tone
Description
Step Up
Step Down
Level 1-6
Off
Selects whether
a tone is heard
from the
attached
headset while
receiving a call.
On
Off
Selects whether
the handset
vibrates while
receiving a call.
Vib.& Ring
Vib.→ Ring
Off
Selects the
ringing mode
(On or Off) while
a handset is set
on the charger.*1
On
Off
Selects the
ringer pattern for
each type of call.
Bell 1-6
Melody 1-9
Selects the LED
pattern for each
type of call.*2
Red
Green
Orange
R→ G→ O
Selects the
vibrate pattern
for each type of
call.
Single
Double
Triple
Short Double
Short Triple
Short Term
Continuous
• For tone patterns,
refer to the user
documentation
for your PBX.
Private Ring
Category 1-9
Setting
Adjusts the
ringer volume.
Default
Level 3
Off
Off
On
Bell 1
Single Tone:
Red
Double Tone/
Private Ring:
Green
Triple Tone:
Orange
S-Double Tone:
R→ G→ O
Single
*1 When “Ring On Charger” is set to on but “Ringer Volume” is set to off, the handset rings
at level 1.
*2 The LED pattern does not change when a call is being monitored with the Call Monitor feature.
31
Setting the Handset and Base Unit
Main Item
Talk Option
Sub Item
Description
Setting
Speaker Volume Adjusts the rear
Level 1-6
Receiver Volume Adjusts the
Level 1-4
Headset Volume Adjusts the
Level 1-4
Headset Mic Vol Adjusts the
Level 1-4
speaker volume.
receiver volume.
headset speaker
volume.
Any Key Answer Answers a call
by pressing any
dialing key.*1
Quick Answer
Tone Option
Key Tone
Range Alarm
Display Option
Language
Backlight
Level 2
Level 1
On
Off
Off
Answers a call
while charging
by just lifting up
a handset from
the charger.
On
Off
Turns the key
tone off or on.
On
Off
On
Selects whether
the range alarm
tone rings or not.
Talk
Idle
Talk & Idle
Off
Talk
Selects the
display
language.
English
Español
FRANÇAIS
English
Turns on the
backlight of the
LCD and keypad.
On*2
On & Receiving
Off
*1 This feature functions when receiving Paging or Voice Calls as well.
*2 On: The backlight of the LCD and keypad is turned on for about 5 seconds:
– from the moment a call is received.
– after operating the handset.
32
Level 3
Level 2
headset
microphone
volume.
Answer Option
Default
Off
On
Setting the Handset and Base Unit
Main Item
Display Option
Sub Item
LCD Contrast
Standby Display
Category Name
F-Key Name
Guidance
Date&Time Form
“PBX TypeType 2 (KXTA308)” only
(See page 34.)
Other Option
Description
Adjusts the LCD Level 1-5
contrast.
Edits the name
16 characters
displayed on the
LCD while in
standby mode.
Edits the
category name.
Category 1-9
Edits the names
of the flexible
keys. (max. 12
characters)
12 characters ×
12 flexible keys
Selects whether
the guidance
display is shown
or not in standby
mode.
On
Off
Selects the format
for the date shown
on the display in
the Incoming Call
Log.
DD-MM 12H
DD-MM 24H
MM-DD 12H
MM-DD 24H
Change Password Changes the
Reset Handset
Default
Level 3
Not stored
Not stored
Not stored
On
DD-MM 12H
Enter Old
Password.+
Enter New
Password.+
Verify New
Password.
1234
Selects whether
to save an
outgoing log or
not.
Enter Password.+
On
Off
Off
Returns the
handset settings
(except
Registration) to
the default
settings.
Enter
Password.+
Select
menu(s).+
Press “OK”.
Not stored
handset
password.
(4 digits)
Outgoing Log
Setting
33
Setting the Handset and Base Unit
Main Item
PBX Type
Fwd/DND Icon
Caller ID Line
“PBX Type-Type 1
(KX-TA624/824)” only
Description
Setting
Selects the type of PBX that
the base unit is connected to.*1
Type 1*
Type 2
When using a PBX other than
a KX-TAW848/KX-TDA series
PBX, you do not need to
change this setting.
Mode 1
Mode 2
Selects which line of information
is displayed as Caller ID. When
the Caller ID matches an item
stored in the Phonebook, the
handset rings according to the
setting of the item. As shown
below, a caller’s number, caller’s
name and CO line number are
displayed on each line.
Displayed items vary depending
on your PBX and its settings.
1st Line
2nd Line
3rd Line
Default
2
Type 1
Mode 1
1st Line
<Example>
1st Line
2nd Line
3rd Line
Date&Time
“PBX Type-Type 2
(KX-TA308)” only
Incoming Log
“PBX Type-Type 2
(KX-TA308)” only
01234567890
T.Edison
Call on CO 1
Sets the current date and time
for the base unit.
Date
Time
Sets each type of Incoming
Single Tone
Call Log to either on or off.*3
On
You must set at least one of the
Off
incoming call types to on to
Double Tone
store a received call in the
On
Incoming Call Log.
Off
Triple Tone
On
Off
01-01-05 (D-M-Y)
12:00 AM (H:M)
Single Tone: Off
Double Tone: Off
Triple Tone: Off
*1 After you set the PBX type, disconnect and reconnect the telephone cord.
*2 To check the type of PBX you are using, see page 30.
*3 When a check mark is displayed beside a tone type, the incoming call log for that tone type
will be logged.
• These settings are only applied to your telephone, not the PBX itself.
34
Troubleshooting and Error Messages
Troubleshooting and Error Messages
Troubleshooting
Problem
Description and Solution
The handset does not work.
• The battery is drained.
→ Charge the battery fully. (See “Charging the Battery” in the
Installation Instructions.)
• The power is OFF.
→ Turn it ON. (See “Handset” on page 3.)
→ Re-insert the battery and try again. (See “Battery
Installation” in the Installation Instructions.)
The handset does not ring.
• Ringer volume is set to “Off”.
→ Adjust the ringer volume level. (See “Adjusting the Ringer
Volume” on page 8.)
You cannot make/receive a call.
• The handset is out of range or the telephone line is not
connected properly.
→ Move closer to the base unit.
→ Check the telephone line.
You cannot dial.
• The number which you dialed is restricted by the PBX.
→ Consult your dealer.
• The key lock mode is ON.
→ To cancel the mode, press the Joystick for about 2 seconds.
(See “Key Lock” on page 4.)
You cannot use the handset
during a power failure.
• The handset will not function during a power failure
because the base unit stops emitting radiowaves.
You cannot have a conversation
in hands-free mode.
→ Set program [617] Wireless PT Port Assignment to “Not
Connect” in PBX System Programming.
The headset does not work.
• A headset tone cannot be heard when receiving an
incoming call, when the headset is attached.
→ Make sure the headset tone setting is set to on. (See
page 31.)
→ Make sure the headset jack is connected properly. (See
“Handset” on page 3.)
The tone from the headset
cannot be changed to a bell or
melody.
• The headset tone is a specific tone and is not related to
the Incoming Option Tone settings (Single/Double/Triple/
S-Double/Private Ring).
The date and time are not
displayed correctly when viewing
the Incoming Call Log.
→ Only for “PBX Type-Type 2 (KX-TA308)”: Set the correct
date and time on the base unit. The form of the date and
time can be set on the handset. (See “Setting the Date and
Time” on page 6.) (See page 34.)
→ Only for “PBX Type-Type 1 (KX-TA624/824)”: Time
settings can only be changed on the PBX.
35
Troubleshooting and Error Messages
Problem
Description and Solution
While Caller ID is displayed using • Caller ID is displayed for about 20 seconds. If you press
during that time period, the display goes blank until
the Incoming Call Log, the
display goes blank after pressing the time expires.
→ Press
then press
to return to the standby display.
. (KX-TA624/824 only)
Some received calls are not
stored in the Incoming Call Log.
(KX-TA308 only)
→ Incoming calls via Voice Call/Paging/LCS/Auto Answer
cannot be stored in the Incoming Call Log.
→ Set at least one of the incoming call types to On. (See
page 34.)
Some dialed calls are not stored
in the Outgoing Call Log.
→ Outgoing calls using some PBX features (e.g., Redial, Onetouch Dialing or Speed Dialing) cannot be stored in the
Outgoing Call Log.
Even when in standby mode, you • The BGM setting may be on.
cannot access the Phonebook or → KX-TA824: Set program [626] BGM Control for APT to
“Disable” in PBX System Programming.
other menus.
→ KX-TA308/624: Press “1” to turn BGM off.
(
is displayed in standby
mode.)
Noise is frequently heard.
Two short beeps are heard
during a conversation.
→ Set the handset and base unit away from other electrical
appliances.
→ Move closer to the base unit.
• The radio signal is weak.
→ Move closer to the base unit.
The charge indicator flashes red • The charger is not connected properly.
→ Make sure the battery is inserted properly.
rapidly.
→ Set the handset in the charger properly.
• The battery charge contacts may be dirty.
You charged the battery for 7
→ Clean the battery charge contacts without damaging them
hours, but the beep tones sound
and charge once more.
every 5 seconds and
(needs
to be charged) flashes after a few • It is time to change the battery.
→ Replace with a new one.
telephone calls.
The battery indicator does not
display the remaining charge
properly after you replace the
battery.
→ Charge the battery for about 7 hours when the low battery
warning is displayed.
While operating the unit, the AC • These are normal conditions.
adaptor feels warm. While
charging the battery, the handset
feels warm.
36
Troubleshooting and Error Messages
Error Messages
Displayed Message
Description and Solution
No Service
• The handset is out of range.
→ Move closer to the base unit.
• The base unit is turned off.
→ Make sure the power cord is connected.
Not Connected
• The telephone cord between the PBX and the base unit is not
connected.
→ Make sure the telephone cord is connected.
Please Wait...
• The handset is connecting to the base unit.
→ Wait for a moment.
Charge Battery
• The handset battery has little charge remaining.
→ Charge the battery fully. (See “Charging the Battery” in the Installation
Instructions.)
Memory Empty
• When trying to view the Phonebook: No items have been stored.
(See “Storing an Item in the Handset Phonebook” on page 23.)
• When trying to view the Incoming or Outgoing Call Log: No logs
have been stored.
Memory Full
• The Phonebook is full, and cannot store the new item.
→ Remove unnecessary data in the Phonebook, and try again.
Over 24 Digits
can’t be stored.
• You are trying to store a telephone number that is over 24 digits in
the last free space in the Phonebook.
→ Try to store the phone number as 24 digits or less, or remove
unnecessary data in the Phonebook.
Need Repair 1(-2)
→ Consult your dealer.
37
Important Information
Battery Information
Important Information
After your Panasonic battery is fully charged [at 25 °C (77 °F)]:
Operation
Operating Time
While in use (Talk)
Up to about 10 h
While not in use (Standby)
Up to about 250 h
• Operating time may be shortened depending on usage conditions and ambient
temperature.
• The battery will drain slowly even while the unit is turned off.
• The handset can receive calls while charging.
• Battery consumption increases when the handset is used out of range. If “ ” flashes,
power off the handset.
Low Battery Warning
The battery needs to be charged in the following situations:
•“
” flashes or the alarm sounds every 5 seconds.*
• “Charge Battery” is displayed. In this situation, the handset cannot be operated.
* If the low battery warning occurs during a conversation, the call will be disconnected
automatically one minute later.
Replacing the Battery
If “
” flashes after using the phone for a short time, even when the battery has been
fully charged, the battery should be replaced.
Before replacing the battery, make sure the low battery warning is displayed, then turn off
the power to prevent memory loss. Replace the battery, and charge the new battery for at
least 7 hours.
If you replace the battery before the low battery warnings appears, the battery strength
icon may display an incorrect reading. In this case, use the handset as normal with the
new battery installed. When the low battery warning is displayed, charge the battery for
about 7 hours. The battery strength icon will then display the correct reading.
1. Turn the power off to prevent memory loss.
2. Press the notch on the cover firmly and slide it as
indicated by the arrow.
3. Open the cover and replace the battery.
4. Close the cover and charge the handset.
• Please use a Panasonic battery with the service part number N4HHGMB00005 or
HHR-P103.
This product is powered by a recyclable nickel-metal hydride battery.
Please call 1-800-8-BATTERY for information on how to recycle this battery.
There is a danger of explosion if the battery is incorrectly replaced.
38
39
Panasonic Consumer Electronics Company
Division of Panasonic Corporation of
North America
One Panasonic Way,
Secaucus, New Jersey 07094
http://www.panasonic.com/csd
Panasonic Puerto Rico, lnc.
Ave. 65 de Infantería, Km. 9.5,
San Gabriel Industrial Park, Carolina,
Puerto Rico 00985
Copyright:
This material is copyrighted by Panasonic Communications Co., Ltd., and may be
reproduced for internal use only. All other reproduction, in whole or in part, is
prohibited without the written consent of Panasonic Communications Co., Ltd.
2005 Panasonic Communications Co., Ltd. All Rights Reserved.
PSQX3737ZA KK0905ST0