1
www.uniquecomm.com
1800-265-9605
Digital
Proprietary
Telephones
Quick
Ref erence
er
G uide
uid
MODELS
KX-DT343
KX-DT346
LTD KT-DT300 Q_R_Guide_EN_FA.indd 1
7/14/09 8:50:39 AM
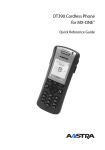
Digital Proprietary Telephones
<KX-DT346>
Quick Reference Guide
Model
Important Information
KX-DT343
KX-DT346
F
T
F
U
S
When using the KX-DT300 series, keep the following conditions in mind.
• If there is any problem, unplug the extension line and connect a known working phone.
If the known working phone operates properly, have the defective phone repaired by a
specified Panasonic Factory Service Centre. If the known working phone does not
operate properly, check the Panasonic Phone System series Business Telephone
Systems and the internal extension wiring.
• Keep the unit away from heating appliances and electrical noise generating devices such
as fluorescent lamps, motors and televisions. These noise sources can interfere with the
performance of the unit.
• This unit should be kept free of dust, moisture, high temperature (more than 40 oC) and
vibration, and should not be exposed to direct sunlight.
• Do not use benzine, thinner, or similar products, or any abrasive powder to clean the cabinet.
Wipe it with a soft cloth.
• Do not use any handset other than a Panasonic handset.
• Do not disassemble this product. Dangerous electrical shock could result. The unit must
only be disassembled and repaired by qualified service technicians.
• When a failure occurs, which exposes any internal parts, disconnect the telephone line
cord immediately and return this unit to service centre.
• Never attempt to insert wires, pins, etc, into the vents or other holes of this unit.
T
m
d
N
WARNING:
TO PREVENT THE RISK OF FIRE OR ELECTRIC SHOCK, DO NOT EXPOSE
THIS PRODUCT TO RAIN OR MOISTURE.
THIS HANDSET EARPIECE IS MAGNETISED AND MAY RETAIN SMALL FERROUS OBJECTS.
IMPORTANT NOTICE:
• Under power failure conditions, this telephone may not operate. Please ensure that a
separate telephone, not dependent on local power, is available for use in an emergency.
• This Class B digital apparatus complies with Canadian ICES-003.
Note:
• In this manual, the suffix of each model number is omitted.
• Displays are described in English as samples.
LTD KT-DT300 Q_R_Guide_EN_FA.indd 2
7/14/09 8:50:41 AM
*1
s
e
3
6
h
e
.
Table of Contents
Features for the Digital Proprietary
Telephones................................................ 4
Features List ............................................. 5
Using the Display Proprietary Telephone.. 7
Using the Call Log or Directories ............ 7
Accessing the System Features ............. 8
Settings on the Programming Mode......10
Setting Features ...................................10
Location of Controls .............................. 12
Setting ..................................................... 14
Connection.............................................. 15
Wall Mounting......................................... 16
Installing the KX-DT301/KX-NT303........17
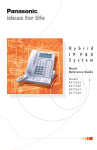
Before Initial Use
Thank you for purchasing a Panasonic Digital Proprietary Telephone (DPT). Please read this
manual carefully before using this product and save this manual for future use. For more
details, please refer to the manuals of the PBX.
Note: In this manual, the suffix of each model number is omitted unless necessary.
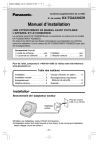
Accessories (included)
Handset: 1
Handset Cord: 1
Screws for wall: 2
Telephone Line
Cord: 1
Wall Mounting
Adaptor*1: 1
t
S.
*1 This telephone comes with the wall mounting adaptor already attached.
To remove the adaptor, refer to step 1 on page 16.
3
LTD KT-DT300 Q_R_Guide_EN_FA.indd 3
7/14/09 8:50:42 AM
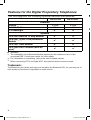
Features for the Digital Proprietary Telephones
This unit supports the following optional devices and features:
Features
Display
Flexible Buttons
LCD Backlight
Options
KX-NT303 Add-on 12 Key Module
KX-NT307 (PSLP1528) Bluetooth
*1 *2 *3
Module
KX-DT301 USB Module
KX-DT390 DSS Console (with 60
*2
keys)
*3
®
Ic
Fea
KX-DT343
KX-DT346
3-Line
24
✔
6-Line
24
✔
M
✔
✔
T
✔
✔
✔
✔
✔
✔
✔ : Available
*1 The availability of the Bluetooth Module depends on the software version of the
connected PBX. Consult your dealer for more details.
*2 For information on connecting, refer to the each included manual.
*3 When connecting DPTs via Digital XDP, this optional device cannot be used.
Trademark:
T
The Bluetooth® word mark and logos are owned by the Bluetooth SIG, Inc. and any use of
such marks by Panasonic Corporation is under licence.
T
T
T
4
LTD KT-DT300 Q_R_Guide_EN_FA.indd 4
7/14/09 8:50:44 AM
f
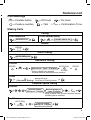
Features List
Icon Meanings
Features List
(CO)
= Flexible button
= Off-hook
= Feature number
Making Calls
= Talk
= On-hook
C. Tone
= Confirmation Tone
Calling
To an extension
To an outside party
extension no.
(CO)
outside phone no.
Redial
REDIAL
Quick Dialing
quick dialing no.
One-touch Dialing
To store
PAUSE
To dial
desired no.* (max. 32 digits)
(CO)
AUTO DIAL
PAUSE
STORE
* Enter outside line access
number before outside phone number.
assigned as a
(One-touch Dialing) One-touch Dialing button
Personal Speed Dialing
To store
personal speed
dialing no. (2 digits)
desired phone no.*
(max. 32 digits)
C. Tone
* Enter outside line access number before
outside phone number.
To dial
AUTO DIAL
STORE
personal speed
dialing no. (2 digits)
5
LTD KT-DT300 Q_R_Guide_EN_FA.indd 5
7/14/09 8:50:44 AM
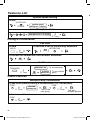
Features List
System Speed Dialling
To dial
AUTO DIAL
STORE
system speed
dialing no. (3 digits)
Doorphone Call
doorphone no. (2 digits)
During a Conversation
To hold
C. Tone
Call Hold
To retrieve a call at the holding extension
HOLD
(CO)
C. Tone
/
INTERCOM
To retrieve an outside call from another extension
(CO)
Call Transfer
extension no.
TRANSFER
C. Tone
Useful Features
(CO)
To an extension
outside
phone no.
To an outside
party
Multiple Party Conversation
To add other parties during a conversation (i.e., conference)
CONF
C. Tone
desired
phone no.
CONF
Talk to the
new party.
C. Tone
Talk with
multiple parties.
To leave a conference
CONF
C. Tone
6
LTD KT-DT300 Q_R_Guide_EN_FA.indd 6
7/14/09 8:50:46 AM
Using the Display Proprietary Telephone
Using the Call Log or Directories
You can make a call with the call log or directories as follows:
Outgoing Call Log
Incoming Call Log
Extension Number Directory
System Speed Dialling Directory
Personal Speed Dialling Directory
Calling with a call log or directory
While on-hook
Press Left or Right
until desired log/
directory appears.
Press Up or Down until
desired item appears.
Press ENTER.
• To cancel or exit, press
CANCEL
or
EXIT
Off-hook.
.
Clearing the log information
While confirming the log information
CLEAR
Press Up or Down until
desired item appears.
Press “CLEAR”.
Storing the caller’s information for the Personal Speed Dialing Directory
While confirming the log information
AUTO DIAL
AUTO DIAL
STORE
STORE
OR
.
Press Up or Down
until desired item Press STORE
appears.
or ENTER.
name
Enter name*
(max. 20
characters).
OR
EXIT
OR
PAUSE
Press STORE
or ENTER.
Press “EXIT” or
PAUSE.
• * To enter characters, refer to “Entering Characters”.
7
LTD KT-DT300 Q_R_Guide_EN_FA.indd 7
7/14/09 8:50:46 AM
Using the Display Proprietary Telephone
Storing names and numbers for the Personal Speed Dialing Directory
While on-hook
phone no.
Enter phone
number
(max. 32 digits).
AUTO DIAL
AUTO DIAL
STORE
STORE
OR
Press STORE
or ENTER.
name
Enter name*
(max. 20
characters).
OR
EXIT
OR
PAUSE
Press STORE
or ENTER.
Press “EXIT” or
PAUSE.
• * To enter characters, refer to “Entering Characters”.
Accessing the System Features
You can access these features with the “Feature Access” menu:
Automatic Callback
Group Call Pickup
Directed Call Pickup
Doorphone Call
Door Open
External Background Music
Paging
While on-hook
Press Right
four times.
Press ENTER.
Press Up or Down
until desired feature
appears.
Input a
parameter.
Press ENTER.
• For further information, refer to the Business Telephone System User Manual.
8
LTD KT-DT300 Q_R_Guide_EN_FA.indd 8
7/14/09 8:50:48 AM
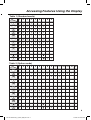
Accessing Features Using the Display
Table 1 (Standard mode)
Times
1
2
3
4
5
6
7
1
!
?
"
1
2
A
B
C
a
b
c
2
3
D
E
F
d
e
f
3
4
G
H
I
g
h
i
4
5
J
K
L
j
k
l
5
6
M
N
O
m
n
o
6
7
P
Q
R
S
p
q
r
8
T
U
V
t
u
v
8
9
W
X
Y
Z
w
x
y
0
(space)
.
,
’
:
;
0
/
+
—
=
<
>
$
%
&
@
(
)
Buttons
#
8
9
s
7
z
9
£
#
8
9
10
11
12
13
14
15
Æ
Ç
2
Ø
Œ
6
Table 2 (Option mode)
Times
Buttons
1
2
3
4
5
6
7
1
!
?
"
ä
ö
ü
1
2
A
B
C
a
b
c
À
Á
Â
Ã
Ä
Å
3
D
E
F
d
e
f
Ð
È
É
Ê
Ë
3
4
G
H
I
g
h
i
Ì
Í
Î
Ï
4
5
J
K
L
j
k
l
5
6
M
N
O
m
n
o
Ñ
Ò
Ó
Ô
Õ
7
P
Q
R
S
p
q
r
s
ß
7
8
T
U
V
t
u
v
Ù
Ú
Û
Ü
9
W
X
Y
Z
w
x
y
z
ý
9
0
(space)
.
,
’
:
;
0
/
+
—
=
<
>
$
%
&
@
(
)
£
#
#
Ö
8
9
LTD KT-DT300 Q_R_Guide_EN_FA.indd 9
7/14/09 8:50:48 AM
Settings on the Programming Mode
Setting Features
You can customize many features of your telephone as shown in the following tables.
Original settings are shown in the grey boxes. For later reference, place a check mark in
the boxes below to indicate your customized settings.
To enter the
programming mode
To programme
To exit
W
a
c
d
(
EXIT
PROG
OR
OR
PROGRAM
OR
program no.
Press
“PROG”or
PROGRAM.
STORE
Press ENTER
or STORE.
Follow
Programming
Input.
Item
Do you prefer to receive call
waiting for outside calls?
Which type of call waiting
for intercom calls do you
prefer?
(Call Waiting Selection)
Which type of call waiting
tone do you prefer?
(Call Waiting Tone Type
Selection)
2
1
Follow Selection
& Parameter.
0
[C.Wait Extrnl]
3
1
[C.Wait Intrnl]
3
2
[C.Wait Tone]
PROGRAM
AUTO DIAL
STORE
Press ENTER
or STORE.
Press
“EXIT”or
PROGRAM.
Selection & Parameter
0
Yes–ON in use [Automatic]
1
Yes–always ON [Always On]
2
No–always OFF [Always Off]
0
Ringing [Tone Call]
1
Directly–The party's voice is heard
without ringing. [Voice Call]
2
Ring only–Prohibiting the caller
switching to the voice mode.
0
No (No Tone) [CW Tone Off]
1
Yes (Tone) [CW Tone On]
0
No call [CW Tone Off]
1
Tone [CW Tone On]
2
Voice announcement through the built-in
speaker [OHCA (Announce)]
3
Voice announcement through the
handset [Whisper OHCA]
0
Tone 1 [CW Tone 1]
1
Tone 2 [CW Tone 2]
[Voice Call]
3
OR
OR
program no.
Programming
Input
Would you like to turn on the
display backlight of the
0
4
KX-DT343/KX-DT346?
(Display Backlight Selection) [Backlight]
How do you prefer to
receive an intercom call?
(Alternate Receiving–Ring/
Voice)
OR
AUTO DIAL
[Voice Call Deny]
10
LTD KT-DT300 Q_R_Guide_EN_FA.indd 10
7/14/09 8:50:50 AM
W
y
c
e
o
[
N
n
n
Settings on the Programming Mode
Item
Programming
Input
Selection & Parameter
0
Would you like to show
a message on the
4
0
caller's telephone
message no. (1-8)
[Absent Msg]
display?
(Absent Message)
9
0
5
OR
FWD/DND
6
1
[Headset Mode]
Yes–Shows the selected message.
Yes–Shows your personal message.
0
Off [Fwd/DND Off]
1
Do Not Disturb (DND) [Do Not Disturb]
(for both calls) 2 + desired no.
Where are your
[Fwd/DND Both] (max. 32 digits)
incoming calls
forwarded or refused?
5
1
(Call Forwarding
3 + desired no.
[FWD]/Do Not Disturb (for outside
(max. 32 digits)
calls)
[DND])
[Fwd/DND Extnl] 4 + desired no.
(max. 32 digits)
5
2
(for intercom
5 + desired no.
calls)
[Fwd/DND Intnl] (max. 32 digits)
Do you use the
headset?
(Headset Operation)
No-Off [Absent Msg Off]
All–Forward all calls [Fwd All:]
Busy–Forwarded when your
extension is busy. [Fwd Busy:]
No Answer–Forwarded when
you do not answer. [Fwd N/A:]
Busy/No Answer–Forwarded when
you do not answer or when your
extension is busy. [Fwd B/NA:]
0
No–Headset off [Headset Mode Off]
1
Yes–Headset on [Headset Mode On]
extension PIN
(max. 10 digits)
Would you like to set
+ ENTER/STORE
your extension PIN or
+ same PIN
change a stored
9
0
extension PIN to new
stored extension
one? (Extension PIN [Extension PIN] PIN + new PIN
[Personal Identification
(max. 10 digits)
Number])
+ ENTER/STORE
+ same PIN
To set an
extension PIN
To change a
stored extension
PIN to new one
extension PIN
Would you like to
To unlock
(max. 10 digits)
prevent others from
[Display Lock Off]
+
0
seeing your personal
9
2
directory and call log?
extension PIN
(Directory and Call Log [Display Lock] (max. 10 digits)
To lock
Lock)
[Display Lock On]
+ 1
WARNING
When a third party discovers
the password (extension PIN)
of the Business Telephone
System, there will be a risk
that they will make fraudulent
phone calls using the
telephone line, and the cost
will be charged to your own
account. In order to avoid
this problem, we strongly
recommend the following
points:
a) Carefully maintain the
secrecy of the PIN.
b) Specify a complicated PIN
as long and random as you
can make it.
c) Change the PIN frequently.
• If nothing is entered for one minute in the programming mode, the telephone
returns to normal status.
• To exit the mode at any time, lift the handset.
• For further information on “Settings on the Programming Mode”, refer to the
Business Telephone System User Manual.
11
LTD KT-DT300 Q_R_Guide_EN_FA.indd 11
7/14/09 8:50:51 AM
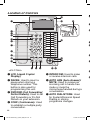
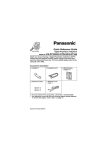
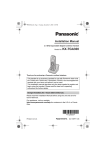
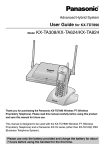
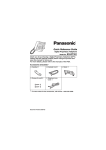
Location of Controls
Location
Controls of
I
p
o
Q
i
O
P
W
E
R
T
Y
u
{
U
}
I
O
P
q
y
t
{
<KX-DT346>
} q w
Q LCD (Liquid Crystal
Display)
W PAUSE: Used to insert a
pause when storing a
telephone number. This
button is also used for
programming this unit.
E FWD/DND (Call Forwarding/
Do Not Disturb): Used to set
Call Forwarding or Do Not
Disturb on your extension.
R CONF (Conference): Used
to establish a multiple party
conversation.
w
e r
e
T INTERCOM: Used to make
or receive intercom calls.
Y AUTO ANS (Auto Answer)/
MUTE: Used to receive an
incoming call in hands-free
mode or mute the
microphone/handset during a
conversation.
U AUTO DIAL/STORE: Used
for System/Personal Speed
Dialing or storing
programme changes.
12
LTD KT-DT300 Q_R_Guide_EN_FA.indd 12
7/14/09 8:50:52 AM
r
I TRANSFER: Used to
O
P
{
}
q
w
e
r
transfer a call to another
party.
REDIAL: Used to redial the
last dialed number.
MESSAGE: Used to leave a
message waiting indication
or call back the party who left
the message waiting
indication.
Headset Jack
FLASH/RECALL: Used to
disconnect the current call
and make another call
without hanging up.
HOLD: Used to place a call
on hold.
SP-PHONE
(Speakerphone): Used for
performing hands-free
operations.
ENTER: Used to assign the
selected item.
Microphone: Used for
hands-free conversations.
Location of Controls
t Navigator Key: Used to
y
u
i
o
p
adjust the volume and the
display contrast or select
desired items.
CANCEL: Used to cancel
the selected item.
Flexible Buttons: Used to
seize an outside line or
perform a feature that has
been assigned to the key.
LCD Panel: Can be adjusted
to the desired angle.
Soft Buttons (S1-S4): S1S4 (located from left to right)
are used to select the item
displayed on the bottom line
of the display.
Message/Ringer Lamp:
When you receive an
intercom call, the lamp
flashes green, and for an
outside call, the lamp flashes
red. When someone has left
you a message, the lamp
stays red.
a
13
LTD KT-DT300 Q_R_Guide_EN_FA.indd 13
7/14/09 8:50:53 AM
Settings
Settings
Conn
Speaker volume While in a hands-free
conversation
Handset/Headset While using the handset or
volume*1
headset
Ringer volume
LCD Contrast
While on-hook or receiving a call Press Up to increase
or Down to decrease
the volume.
While on-hook
PAUSE
PAUSE
Ring Tone
PAUSE
LCD Backlight
(CO)
OR
INTERCOM
OR
AUTO DIAL
Press 2 times.
STORE
PAUSE
H
While on-hook
Automatic
PAUSE
OR
AUTO DIAL
STORE
Always ON
Always OFF
•
C
W
•
W
•
OR
AUTO DIAL
PAUSE
STORE
*1
If you hear your own voice through the handset or headset, decrease the
volume.
14
LTD KT-DT300 Q_R_Guide_EN_FA.indd 14
7/14/09 8:50:55 AM
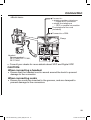
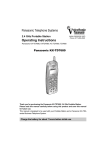
Connection
Connection
<Back view>
e
e
Connect to:
a digital proprietary telephone
— Digital XDP connection
a single line telephone
— XDP or parallel connection
The telephone line cord
(included)
Connect to a PBX.
Clamp
Headset
Recommended:
RP-TCA86, RP-TCA91,
RP-TCA92
• Consult your dealer for more details about XDP and Digital XDP.
CAUTION:
When connecting a headset
• Ensure that the headset cord is wound around the hook to prevent
damage to the connector.
When connecting cords
• Ensure the cords are inserted in the grooves, and are clamped to
prevent damage to the connectors.
e
15
LTD KT-DT300 Q_R_Guide_EN_FA.indd 15
7/14/09 8:50:55 AM
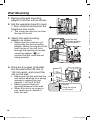
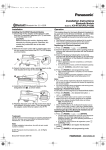
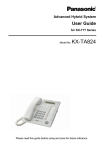
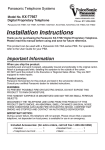
Wall Mounting
C
•
Wall Mounting
Instal
1. Remove the wall mounting
adaptor from the unit as shown.
2. Set the operation board to level
1, then connect and secure the
telephone line cords.
•
• The cords can also be run from
the top of the unit.
3. Attach the wall mounting
adaptor as shown.
Slide the wall
mounting adaptor
up to this point.
• Make sure the cords are not
pinched by the wall mounting
adaptor. When running the cords
from the top of the unit, look
through the opening in the wall
mounting adaptor ( ) to
confirm that the cords are not
being pinched.
4. Drive the 2 screws (included)
into the wall either 83 mm or
100 mm apart, and mount the
unit on the wall.
• Make sure that the wall that the
unit will be attached to is strong
enough to support the unit
(approx. 1.65 kg [3.64 lb]).
• Make sure the cords are
securely fastened to the wall.
• When this unit is no longer in
use, make sure to detach it
from the wall.
1
83 mm
100 mm
3
Washer
Drive the screw
to this point.
16
LTD KT-DT300 Q_R_Guide_EN_FA.indd 16
K
T
a
u
o
D
a
7/14/09 8:51:02 AM
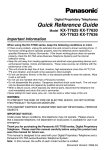
Installing KX-DT301/KX-NT303
CAUTION:
• To prevent damage to the telephone, be sure to unplug the
extension line before you set up or remove the KX-DT301 (USB
Module) or the KX-NT303 (Add-on 12 Key Module).
• Connect the KX-NT303 first when installing both the KX-DT301
and the KX-NT303.
KX-NT303
The Add-on 12 Key Module allows 12
additional flexible buttons to be added to this
unit. These buttons are used to seize an
outside line, make a call using One-touch
Dialling, or perform a feature that has been
assigned to the key.
<with a KX-DT346>
Installing KX-DT301/KX-NT303
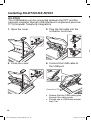
1. Open the cover.
2. Attach the KX-NT303 to your
unit with the screws (included
with KX-NT303).
3. Plug the flat cable into the
connector ( ), then bend the
cable slightly as shown ( ).
4. Close the cover.
17
LTD KT-DT300 Q_R_Guide_EN_FA.indd 17
7/14/09 8:51:05 AM
Installing KX-DT301/KX-NT303
KX-DT301
The USB Module can be connected between the DPT and the
personal computer through USB interface to implement personal
CTI (Computer Telephony Integration).
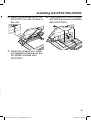
1. Open the cover.
5
2. Plug the flat cable into the
connector as shown.
7
3. Close the cover.
4. Connect the USB cable to
the USB port.
Connect to a PC
• Ensure that the USB cable goes
through the cable guide.
• Please use a USB cable shorter
than 3 m.
18
LTD KT-DT300 Q_R_Guide_EN_FA.indd 18
7/14/09 8:51:07 AM
Installing KX-DT301/KX-NT303
5. Insert the protrusions on the
KX-DT301 into the 2 holes in
the unit.
6. Attach the KX-DT301 to your
unit with the screws (included
with KX-DT301).
7. Install the USB driver. Refer
to Installation Manual on the
CD-ROM included with
KX-DT301.
19
LTD KT-DT300 Q_R_Guide_EN_FA.indd 19
7/14/09 8:51:08 AM
Panasonic Canada Inc.
5770 Ambler Drive, Mississauga, ON L4W 2T3
www.panasonic.ca
PSQX46842A KK1208YHO©
04/09
LTD KT-DT300 Q_R_Guide_EN_FA.indd 20
7/14/09 8:51:08 AM