1
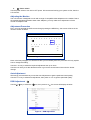
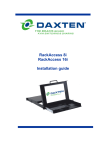
RackAccess Installation guide Specifications Part Numbers 3115-00P-xx 3115-00RP-xx 3117-00P-xx 3119-00P-xx RackAccess kvm console with 15” TFT Display RackAccess kvm console with 15” TFT Display Reduced Length Version RackAccess kvm console with 17” TFT Display RackAccess kvm console with 19” TFT Display xx represents country specific keyboard layouts Physical Properties RackAccess 15” TFT Display RackAccess 17” TFT Display Operation and Storage parameters Operating Temperature: Humidity: Storage Temperature: Humidity: Connections PC: Power 15” TFT Display 0 ~ 40° C 32 ~104° F 10~85% RH noncondensing -20 ~ 60° C - 4 ~140° F 10~95% RH noncondensing Scan frequency horizontal: Scan frequency vertical: Viewing Angle: Video: Sync: Video Connector: Width 48.26cm / 19” 48.26cm / 19” Depth 51.51cm / 20.28” 56.59cm / 22.28” 17” TFT Display 0 ~ 40°C 32 ~104° F 10~85% RH noncondensing -20 ~ 60° C - 4 ~140° F 10~95% RH noncondensing HD 15, PS/2 Keyboard, PS/2 Mouse IEC Female connector Monitor Display Area: Pixels: Pixel pitch: Picture tube: Height 4.32cm / 1.7” 4.32cm / 1.7” 15” TFT Display 30.4 x 22.8 cm 12 x 9” 31.47K to 68KHz 60Hz to 85Hz 160° Horizontal, 160° Vertical 1024 x 768 0.297 x 0.297 mm 15” TFT Active Matrix Analog RGB 7Vp-p/75Ω Separate 15pin Mini D-Sub 17” TFT Display 33.7 x 27.0 cm 13.7 x 10.64” 31.47K to 68KHz 60Hz to 75Hz 140° Horizontal, 110° Vertical 1280 x 1024 0.264 x 0.264 mm 17” TFT Active Matrix Analog RGB 0.7 Vp-p/75Ω Separate 15pin Mini D-Sub Weight 13kg / 28.6lb 15kg / 33.0lb Keyboard Keys Travel Typing force Life cycle 88 key keyboard & 17 key numeric keypad 3mm / 0.11” 60g ± 20g / 2.11oz ± 0.70oz 10 million key presses Touchpad Compatibility Mouse button Life cycle Operations User Controls: On Screen Display Adjustment Control type Power Input Consumption Industrial standard Two key buttons >1 million cycles On/Off Power Button Contrast, Brightness, Select and adjust buttons Auto-Adjustment Contrast, Balance Phase, Pixel clock TXT/GFX Selection Colour temperature & brightness Digital 110-240 VAC (auto sensing) 48-62Hz 35 Watts maximum (On) on 15” RackAccess 45 Watts maximum (On) on 17” RackAccess 1 Watt Power Saving Mode (Off) Agency Approvals EMI Emissions Safety Energy Saving FCC-A and CE MRP-II UL, cUL EPA energy star, VESA DPMS NOTE: This equipment complies with the requirements of European EMC directive 89/336 EEC in respect of EN55022 Class B, EN 50082-1 and EN 60555-2. This equipment has been found to comply with the limits for a Class A digital device, pursuant to Part 15 of the FCC Rules. These limits are designed to provide reasonable protection against harmful interference when the equipment is operated in a commercial environment. This equipment generates, uses, and can radiate radio frequency energy and, if not installed and used in accordance with the instruction manual, may cause harmful interference to radio communications. Operation of this equipment in a residential area is likely to cause harmful interference in which case the user will be required to correct the interference at his own expense. © Copyright 2003. All rights reserved. Daxten, the Daxten logo, RackAccess and The Brains Behind KVM Switching and Sharing are trademarks of Daxten Industries. All other trademarks acknowledged. Revision 1.4 RackAccess Introduction The RackAccess is compact 1U high rack mountable TFT Screen, keyboard and mouse. With screens available in 3 sizes 15”, 17” and 19” Product Features Operating system independent, transparent to all applications. Plug and play system configuration. LCD panel size: 15”, 17” or 19” depending on model. Keyboard layouts in English UK and US, German, French, Spanish, Swiss, Dutch, Danish, Russian, Swedish and Norwegian High VGA resolution 1024x768 on the 15” model and 1280x1024 on the 17” model and 1280 x1024 on 19” model 88key keyboard + 17key numeric keypad Standard 19” Rack mounting accessories High Video Quality The RackAccess built in TFT LCD monitor supports resolution up to 1024x768 (15”) or 1280x1024 (17”), with a colour depth to 16M (dithering). With automatic adjustment to easily configure your LCD setting for optimum video quality. LCD monitor’s OSD operation Control Functions The Monitor control functions are located right to the screen. The control key description 1. 2. 3. 4. 5. 6. MENU ∇ ∆ ® ▬ Activate the on screen display function Down / Brightness control Up / Brightness control Increment / Contrast control Decrement / Contrast control Power Switch Description 1. Menu Press the Menu key to activate the on screen display screen. It is a toggle key. Press twice to turn off the OSD. After 30 seconds idle time, the OSD screen will automatically turn off. 2. ∇ & ∆: Select key/ Brightness Control keys The two keys have two sets of functions: When OSD screen is not activated, the two keys are used to adjust the brightness When OSD screen is activated (when “Menu” key is pressed), the two keys are used to select the required adjustment items 3. ▬ & : decrement & increment/ Contrast Control keys The two keys have two sets of functions: When OSD screen is not activated, the two keys are used to adjust the contrast When OSD screen is activated (when “Menu” key is pressed), the two keys are defined to decrease or increase the values of each selected item. 4. Power switch Use the power switch to turn ON or OFF power. We recommend turning your system on first, then the LCD monitor. Adjusting the Monitor The LCD monitor is designed to work with a range of compatible video adapters on the market. Due to the possible deviations between these video adapters, you may make some adjustment to fit the monitor for adapter used. Adjustment Procedure First, you must activate the OSD screen through pressing the MENU key, the screen will show in the centre of screen as below 800 x 600 60.3HZ / 37.9KHZ AUTO ADJUSTMENT Menu Menu DOS TXT / GFX off user 100 VERSION SVGAAH1511-100 Figure 1 - The OSD Screen Note: In the last paragraph, we will assume that you had already done this procedure and only explain how to change the setting. Use the ∇ & ∆ key to select the required adjustment item up or down. Use the ▬ & ¬ key to do the desired function or go into the second menu item to do the further change. Auto-Adjustment We strongly recommend that you use the Auto-Adjustment to get the optimized visual quality. Use the ∆ & ∇ key to select auto-adjustment, then press ▬ or ¬ to get the optimized quality. RGB Adjustment Use the ∆ & ∇ key to select the icon, then press ▬ or¬, the screen will display as below Figure 2 – RGB Adjustment Adjust the Contrast Value Use the ∆ & ∇ key to select the CONTRAST item, press ▬ or ¬ to get the best contrast optimization. You can adjust R, G, B, values simultaneous or R, G, B values individually, (you can use this item to change the RGB purity.) Colour Balance Use the ∆ & ∇ key to select the balance item, then press ▬ & ¬ to get the best colour balance effect or separate set the RGB colour value. (You can use this item to change the RGB intensity) The easy way to adjust the contrast and colour balance setting is to use the auto-balance item. Geometry Adjustment Use the ∆ & ∇ key to select the icon, then press ▬ &¬, then the screen will display as below Figure 3 – Geometry Adjustment If you want to go back to the previous OSD menu screen, pressing the MENU key, you will see the OSD screen as shown in Figure 1. Vertical & Horizontal Position adjustment Use the ∆ & ∇ key to move to the the centre position. icon, then press ▬ & ¬ to move the whole screen left or right to Use the ∆ & ∇ key to move to the to the centre position. icon, then press ▬ & ¬ to move the whole screen down or up Adjust the viewing screen size Use the ∆ & ∇ key to move to the icon, then press ▬ & ¬ to get the larger viewing size. PHASE adjustment Adjust phase tracking of display signal to reduce the display flicker. The invalid phase tracking will cause unstable and flicking display. Use the ∆ & ∇ key to move to the Phase item, then press ▬ & ¬ to get better image quality. DOS TXT/GFX Now, you can select the display mode as 640 x 400 (called graphic mode), or 720 x 400 (called Text mode). Colour Temperature We provide three modes, one is user mode, one is 6500 and the other is 9300. Use the ∆ & ∇ key to move to the colour temperature, then press ▬ & ¬ to select the colour temperature setting. When set at 6500 or 9300, you can not change the value. Brightness Adjustment Use the ∆ & ∇ key to select the icon then press ▬ & ¬ to change the brightness value. The Display Resolution Setting In the OSD screen, you will see the horizontal frequency (HF), vertical frequency (VF), display resolution (MODE) and the monitor firmware version (ROM LEVEL). It is automatically detected by the monitor, and you can not change this setting. Service Information Technical Support If you cannot determine the nature of a problem, please call Daxten and ask for Technical Support. If possible, call from a phone located near the unit, as we may be able to solve your problem directly over the phone. If we cannot solve your problem, and determine that the fault is in the unit, we will issue a Return Material Authorisation (RMA) number that must appear on the outside of all returned products. The unit should be double-packed in the original container, insured, and shipped to the address given to you by our Technical Support representative. The Technical Support offices are found on the back of this manual. Limited Warranty Daxten warrants to the end user that this product is and will be free from defects in materials and workmanship for a period of 24 months from the date of purchase. If during the warranty period the product should fail, the purchaser must promptly call Daxten for a RETURN MATERIALS AUTHORIZATION (RMA) number. Make sure that the RMA number appears on the packing slip, proof of purchase, AND ON THE OUTSIDE OF EACH SHIPPING CARTON. Unauthorized returns or collect shipments will be refused. Ship prepaid to the Daxten office (see back page) where you purchased your product. The above limited warranty is voided by occurrence of any of the following events, upon which the product is provided as is, with all faults, and with all disclaimers of warranty identified below: 1. 2. 3. 4. 5. 6. 7. If non-Daxten approved power supply or cabling is attached to the product. If defect or malfunction was caused by abuse, mishandling, unauthorized repair, or use other than intended. If unauthorized modifications were made to product. If unreported damages occurred in any shipment of the product. If damages were due to or caused by equipment or software not provided by Daxten. If the product is used with non-grounded or incorrectly polarized AC power. If the product is used in contradiction to any instruction provided by any User Guide or Instruction Sheet provided to you or with the product. EXCEPT AS SPECIFICALLY PROVIDED ABOVE AND TO THE MAXIMUM EXTENT ALLOWED BY LAW, DAXTEN DISCLAIMS ALL WARRANTIES AND CONDITIONS WHETHER EXPRESS, IMPLIED, OR STATUTORY AS TO ANY MATTER WHATSOEVER INCLUDING, WITHOUT LIMITATION, TITLE, NON-INFRINGEMENT, CONDITION, MERCHANTABILITY OR FITNESS FOR ANY PARTICULAR OR INTENDED PURPOSE. EXCEPT AS EXPRESSLY PROVIDED ABOVE AND TO THE MAXIMUM EXTENT ALLOWED BY LAW, DAXTEN SHALL NOT BE LIABLE FOR ANY SPECIAL, INDIRECT OR CONSEQUENTIAL DAMAGES (INCLUDING WITHOUT LIMITATION, LOSS OF PROFIT, LOSS OF BUSINESS, LOSS OF INFORMATION, FINANCIAL LOSS, PERSONAL INJURY, LOSS OF PRIVACY OR NEGLIGENCE) WHICH MAY BE CAUSED BY OR RELATED TO, DIRECTLY OR INDIRECTLY, THE USE OF A PRODUCT OR SERVICE, THE INABILITY TO USE A PRODUCT OR SERVICE, INADEQUACY OF A PRODUCT OR SERVICE FOR ANY PURPOSE OR USE THEREOF OR BY ANY DEFECT OR DEFICIENCY THEREIN EVEN IF DAXTEN OR AN AUTHORIZED DAXTEN DEALER HAS BEEN ADVISED OF THE POSSIBILITY OF SUCH DAMAGES OR LOSSES. Waste Electrical and Electronic Equipment (WEEE) Within the European this symbol indicates that this product should not be disposed in household waste. It should be deposited at an appropriate facility to enable recovery and recycling. For information on how to recycle this product, please check with the reseller of the product that replaces this product "Take Back" or the original seller of this product. www.daxten.com Ireland Unit 5 Distribution Centre Shannon Free Zone Shannon, Co. Clare [email protected] www.daxten.ie Tel: +353 (0) 61 23 4000 Fax: +353 (0) 61 23 4099 USA 811 W. Evergreen Ave Suite 302A Chicago, IL 60622 [email protected] www.daxten.us Tel: +1 312 475 0795 Fax: +1 312 475 0797 United Kingdom 5 Manhattan Business Park Westgate London W5 1UP [email protected] www.daxten.co.uk Tel: +44 (0) 20 8991 6200 Fax: +44 (0) 20 8991 6299 • • • Österreich Künstlergasse 11/4 A-1150 Wien [email protected] www.daxten.at Tel: +43 (0)1 879 77 65 Fax: +43 (0)1 879 77 65 30 Deutschland Salzufer 16, Geb. B 10587 Berlin [email protected] www.daxten.de Tel: +49 (0) 30 8595 37-0 Fax: +49 (0) 30 8595 37-99 Schweiz Seebahnstr. 231 8004 Zürich [email protected] www.daxten.ch Tel: +41 (0) 43 243 32 11 Fax: +41 (0) 43 243 32 16 • • • España C/Florian Rey, 8 50002 Zaragoza France B.P 04 - 77 Route de Cheptainville 91630 Marolles-en-Hurepoix [email protected] www.daxten.fr Tel: +33 (0)1 64 56 09 33 Fax: +33 (0)1 69 14 88 34 Denmark Finlandsgade 33 8200 Aarhus N. [email protected] www.daxten.dk Tel: +45 7022 5411 Fax: +45 8739 4618 • • [email protected] www.daxten.com.es Tel: +34 902 197 662 Fax: +34 976 201 633 • Sweden Solna Strandväg 78 171 54 Solna [email protected] www.daxten.se Tel: +46 (8) 602 82 50 Fax: +46 (8) 602 82 85 • • •