1
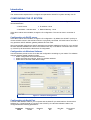
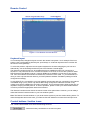
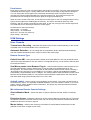
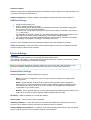
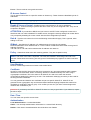
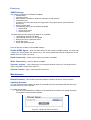
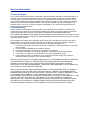
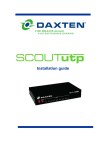
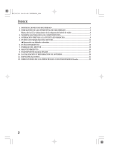
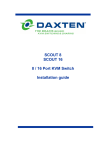
RackAccess 16IP
Operating Guide
Introduction
The sections below explain how to configure and operate the SCOUT IP system remotely over IP.
CONFIGURING THE IP SYSTEM
The SCOUT ip's communication interfaces are based on TCP/IP, and it comes configured with the
values listed below.
♦ DHCP active
♦ IP address - None
♦ Net Mask – 255.255.255.0
♦ Default Gateway - None
If the above values are unsuitable, change the IP configuration. This can be done in a number of
ways:
Configuration via DHCP server
If the above values are unsuitable, change the IP configuration. By default, the SCOUT ip will try to
contact a DHCP server in the subnet to which it is physically connected. If a DHCP server is found it
may provide a valid IP address, gateway address and net mask.
We recommended configuring a fixed IP assignment to the MAC address of SCOUT ip. You can find
the MAC address labelled on the back of the RackAccess 16ip. If the DHCP connection fails on boot
up, SCOUT ip will boot with the last known IP configuration.
Configuration via Windows Software
Use the software provide on the CD to alter the configuration according to your needs. The software
requires Windows based operation system.
¾ Select configuration and Find new devices.
¾ Select the newly found device, shown by the MAC address.
¾ Select Device and then Initial Device setup.
Figure 1 – Network Configuration
Configuration via Serial Port
Connect a Null Modem Cable to your computer and the SCOUT ip’s serial interface. Use terminal
software (e.g. HyperTerminal) to connect to the SCOUT ip, the terminal software needs to be
configured with the following parameters:Parameter
Value
Bits/second
115200
Data bits
8
Parity
No
Stop bits
1
Flow control
None
Reset the SCOUT ip, and immediately press the ESC key. You will see some device information, and
a => prompt. Enter the command “config”, and press the Enter key. You will then be asked to adjust
the IP auto configuration, the IP address, the net mask, and the default gateway. Pressing the Enter
key without entering values does not change the settings.
The gateway value has to be set to 0.0.0.0 (for no gateway) or any other value for the IP address of
the gateway. After the confirmation the SCOUT ip performs a reset using the new values set.
Web Interface
The SCOUT ip can be accessed using a standard Java enabled web browser. You can use either the
HTTP protocol or HTTPS secure protocol. You will need to enter the IP address that you configured
the SCOUT ip for into your web browser, and you should be presented with a login page. Initially there
is only one user configured who has unrestricted access to all the SCOUT ip features, this is the user
named “super”.
Figure 2 - The Login Screen
NOTE: The initial settings are Username: super, Password: pass.
Once you typed the default username and password, click login. The SCOUT ip’s Home page will
appear, as shown in Figure 3
Figure 3 - The SCOUT IP Home Page
Keyboard, Video, Mouse Configuration
The correct operation of the client mouse depends on the following two settings
SCOUT IP Mouse configuration
To make the remote keyboard and mouse work properly the SCOUT IP settings for the host's mouse
and keyboard types must be correct. Check the settings in the SCOUT IP front-end
Host system mouse settings
The host operating system has various settings for the mouse driver. SCOUT IP works with
accelerated mice and is able to synchronize the host with the client mouse pointer. Special vendorspecific Mouse drivers disrupt the synchronization process. Ensure these are not on the host system
Windows XP has a setting ' enhanced pointer precision’. Deactivate it.
Check the correct setting by moving the mouse of your administration system to the upper left corner
of the Remote Console and moving it there slightly forth and back. This will force mouse
synchronization in that corner of the screen. Once that is done you may observe the behaviour of your
client mouse in accordance to the host one. If both mice desynchronize quickly one of the above may
be the reason.
SCOUT IP Video Modes
SCOUT IP recognizes a limited number of common video modes. When running X-Window on the
host system, don't use any custom mode lines with special video modes. If you do, SCOUT IP may not
be able to detect these. Use any standard VESA video mode.
You can adjust up to 4 Custom Video Modes if your video mode differs from the standard VESA video
mode. Set the Custom Video Modes in the Video settings section.
Operating the SCOUT IP system
Operate the SCOUT IP system through one of the following interfaces:
1. HTTP/HTTPS - Any standard Web browser. Depending on the Web browser, you can access
the SCOUT IP card using the unsecured HTTP protocol or, in case the browser supports it,
the encrypted HTTPS protocol. We recommend using HTTPS when possible.
2. SNMP (Simple Network Management Protocol) - Any standard SNMP client can use this
protocol.
3. Telnet - Use a standard Telnet client to access an arbitrary device connected to one of the
SCOUT IP's serial ports via a terminal mode.
All the above interfaces are accessed using the TCP/IP protocol. They can thus be used via the builtin Ethernet adapter or modem. This chapter deals with the HTTP interface.
The Web browser must come with a Java Runtime Environment version 1.1 or higher. Without Java
support, you can still maintain the remote host system using the administration forms displayed by the
browser.
We recommend the following browsers for an unsecured connection:
¾
¾
Microsoft Internet Explorer version 5.0 or higher with Windows 98, ME, 2000 and XP
Netscape Navigator 7.0 or Mozilla 1.0 with Windows 98, ME, 2000, and XP, Linux and other
UNIX like operating systems
To access the remote host system using a securely encrypted connection you need a browser that
supports the HTTPS protocol. Strong security is only assured by using key length of 128 Bit. We
recommend the following browsers.
¾
¾
Microsoft Internet Explorer version 5.5 or higher with Windows 98, ME, 2000 and XP
Netscape Navigator 7.0 or Mozilla 1.0 with Windows 98, ME, 2000, and XP, Linux and other
UNIX like operating systems
Timeout
After half an hour of non-activity the system automatically logs out. Clicking anywhere on the screen
will lead back to the Login screen.
Remote Control
From the menu click Show Remote Console. The remote console appears
Figure 4 - The Remote Console Screen
Keyboard layout
Your host keyboard changes its layout to match the remote host system. So for example if the host
system uses a US English keyboard layout, special keys on a German keyboard won't work but will
function as US English keys.
To solve this problem, adjust the remote system keyboard to the same mapping as your host one.
Alternatively, use the Soft-Keyboard that is part of the Remote Console applet.
The Remote Console window is a Java Applet that tries to establish its own TCP connection to
SCOUT IP. The protocol that is run over this connection is not HTTP or HTTPS but a protocol called
RFB (Remote Frame Buffer Protocol). Currently RFB tries to establish a connection to port number
443. Your local network environment must allow this connection to be made, i.e. your firewall and, in
case you have a private internal network, your NAT (Network Address Translation) settings must be
configured accordingly.
In case SCOUT IP is connected to your local network environment and your connection to the Internet
is available using a proxy server only without NAT being configured, the Remote Console is very
unlikely to be able to establish the according connection. This is because today's Web proxies are not
capable of relaying the RFB protocol. In case of problems, please consult your network administrator
in order to provide an appropriate network environment.
The Remote Console window shows the remote screen at its optimal size. However, you can always
resize the Remote Console window in your host window system.
Hint: The Remote Console window on your local window system is just one window among others. To
make the keyboard and mouse work, your Remote Console window must have the local input focus.
Control buttons / toolbar icons
The control buttons/toolbar icons have the following functions:
- Sends the hotkey combination to the remote system
Auto adjust - Adjusts the screen to the best visual quality
Sync mouse – Synchronizes the host and remote mice. Necessary when using
accelerated mouse settings on the host system. There is generally no need to change mouse settings
on the host.
- Single Mouse - Loss of the mouse on the local site
Options
Monitor Only –When turned on, the Remote Console does not accept keyboard / mouse
input. The top right hand icon appears as shown.
Exclusive Access - If a user has the appropriate permission, he can force the Remote Consoles
of all other users to close. No one can open the Remote Console until this user disables the Exclusive
access or logs off.
Readability Filter - Turn the filter on in scaling mode to preserve most of the screen details. Only
available with a Java Virtual Machine version 1.3 or higher.
Scaling - Scale down the Remote Console. Not all display details will be preserved.
Mouse handling – - The submenu for mouse handling offers 3 options for synchronizing the host
and the client mouse pointer. The option for 'Fast Sync' shows the hotkey if you defined one using the
Remote Console Settings.
Mouse synchronisation – There are two ways to synchronize the host and remote mice:
a) Choose Options / Mouse Handling / Fast Sync. This corrects a temporary, but fixed skew.
b) Intelligent Sync If the fast sync doesn't work or the mouse settings have been changed on the
host system use the Intelligent Sync option.
To do so:
1. Ensure the picture is correctly adjusted, Click Auto Adjust or manually correct the picture
using the Video Settings.
2. Choose Options / Mouse Handling / Intelligent Sync.
button usually leads to a fast sync, except when the KVM port or the video
Pressing the
mode recently changed.
Synchronization may not work properly in the following cases:
1. For the intelligent sync to work, the picture MUST be correctly adjusted. Use the auto
adjustment function or the manual correction in the Video Settings panel to adjust the
picture. The video must also be of sufficiently good quality.
2. Special vendor-specific Mouse drivers disrupt the synchronization process. Ensure these
are not on the host system
3. Windows XP has a setting 'enhanced pointer precision'. Deactivate it.
4. Active Desktop. Disable it. Or do not use a plain background, use wallpaper.
Single mouse Mode The information above applies to the Double Mouse Mode, where remote
and host mouse pointers are visible and need to be synchronized. There is also the Single Mouse
mode. In this mode only the client mouse pointer is visible. Single Mouse mode needs a Sun Java
Virtual Machine 1.3 or later. Select the mode in the Remote console.
Or press
From the Options menu choose Mouse Handling/Mouse Mode/ Single Mouse Mode.
from the Control Buttons toolbar. The client mouse pointer can be controlled directly.
To leave this mode, you must define a mouse hotkey in the Remote Console Settings Panel. Press
this key to free the captured host mouse pointer.
Local cursor - Choose a cursor shape for the host mouse. The number of available shapes
depends on the Java Virtual Machine, only version 1.2 or higher offers the full list.
Chat Window - Opens the Chat window. Use the Chat window to chat with others logged into the
system. All messages are broadcast to ALL connected users. There is no option to direct a message
to a particular user only. There is no message history, so messages can only be received after
opening the Remote Console.
Video Settings – adjust the video settings.
From the Options menu choose Video Settings. The Video Settings box appears.
The parameters have the following functions:
Brightness - Brightness control.
Contrast Red/Green/Blue Contrast Red/Green/Blue- RGB contrast control.
Clock - Sets the horizontal frequency for a video line, this depends on the video mode. Different
video cards may require different values. The default settings and auto adjustment procedure should
be adequate for all common configurations. If not change this setting together with the sampling
phase.
Phase - Sets the phase for video sampling.
Horizontal Offset – Horizontale Bildschirmanpassung
Vertical Offset - Moves the picture in a vertical direction.
Brightness, Black level and contrast affect all modes and KVM ports globally; the other settings are
changed specifically for each mode on each KVM port.
- Resets mode to factory defaults.
- Resets all modes to factory defaults.
- Saves changes.
- Undoes changes that have not yet been saved.
Refresh video - Refreshes the video
Soft Keyboard - Opens the soft-keyboard menu:
¾
¾
¾
Click Show. The soft-keyboard appears.
Click Layout. Choose layout
Click Mapping. Choose the desired language and country
Local Keyboard - Used to change the language mapping of your browser machine running the
Remote Console Applet. Normally the Applet determines the correct value automatically. However,
depending on your particular JVM and your browser machine settings this is not always possible. A
typical example is a German localized system that uses a US-English keyboard mapping. In this case
you have to change the Local Keyboard setting manually to the right language.
KVM keys – Each key represents a KVM port. The keys also appear in the toolbar.
Hotkeys – The Hotkeys Button simulate keystrokes on the remote system that cannot be generated
locally, e.g. Ctrl Alt Delete.
User Management
Change Password
Initially there is only one user configured who has unrestricted access to all the SCOUT IP features.
The username is “super” and the password is “pass”. You should change them immediately.
Users & Groups
The user and group management of SCOUT IP is based on configurable users and groups. Each user
or group can have different access capabilities.
User Management
Existing user – Select an existing user for modification or deletion.
New user name - Enter a login name for a new user here. Ensure that it is not the same as a
current user or group.
Full user name – Write the full name of the new user.
Password - Confirm password – The password must be at least four characters. Confirm
password.
Email address – Mobile number – These are optional
Group membership / Member of / Not Member of – Each user can be a member of one
or more groups and inherit the rights of that group. Use the arrows to add or remove a user from a
group.
Group Management
Existing groups - Select an existing group for copying, modification or deletion.
New group name – To create a new group, enter a new group name
Create
Once the required fields are filled in, click the Create User button to create a new user.
Delete
To delete a user:
1. Select a user in the Existing users Drop-down list.
2. Click the Lookup button. The complete user information appears.
3. Click the Delete User button. - Note: The factory set supervisor user `super' cannot be
deleted, but it can be renamed.
Modify
To modify a user:
1. Select a user in the Existing users Drop-down list.
2. Click the lookup button to get all the user's information.
3. All fields can be modified as required. The old password is not displayed, but can be modified.
4. Click the Modify User button
Copy
To copy an existing user’s properties to a new user:
1. Select a user in the Existing user Drop-down list.
2. Enter a new user name in the New user name box.
3. Click the Copy User button. All properties of the selected user will be copied to the new one,
except user specific permissions.
Permissions
Each user or group has a set of access rights to the SCOUT IP functions. The user 'super' always has
unalterable full access rights. A newly created user has the access rights of all groups he belongs to.
You can change the access rights in the User/Group Permissions panel. The panel shows the
changes to the access rights inherited by the user's ancestors only. This means an empty user
permission list has exactly the same access rights as the groups he belongs to.
When one user creates a new user, he can alter his access rights. A user can change another user or
group's access rights if he stands higher in hierarchy. The 'super' user stands at the top of the
hierarchy, and can change everybody's access rights. A user can never give more access rights than
he himself has but he can always reduce the access rights.
Permissions for Users and Groups:
deny access – no access
deny change – no modification
allow view – the user can view only
allow change – full access
KVM Settings
User Console
Transmission Encoding – Optimizes the speed of the remote screen depending on the number
of parallel users and the bandwidth of the connection line.
Automatic Detection – The encoding and the compression level is determined automatically
from the available bandwidth and the current content of the video image.
Remote Console Type
Default Java-VM – Uses your Browser’s default Java Virtual Machine. This may be the Microsoft
JVM for the Internet Explorer or the Sun JVM if it is configured this way. Use of the Sun JVM may also
be forced (see below).
Sun Microsystems Java Browser Plug-in – Uses Sun Microsystems Java Browser Plug-in -
Sets the administration system’s Web browser to use the JVM (Java Virtual Machine) of Sun
Microsystems. The JVM is used to run the code for the Remote Console window, which is actually a
Java Applet. If the Java plug-in is not installed on your system, it will be downloaded and installed
automatically. The download is about 11 Mbytes. The JVM provides a stable and identical Java Virtual
Machine across different platforms. The Remote Console software is optimized for this JVM version
and offers wider range of functionality when run in Sun’s JVM.
ActiveX control - Use an ActiveX control instead of a Java applet - This is the ActiveX-Control of
the KVM Vision Viewer - an application available separately. You must install the viewer on your local
system. See the Viewer Guide for further information. This option only works with Microsoft Internet
Explorer on Win32 Systems.
Miscellaneous Remote Console Settings
Start in Monitor Mode – Check this option to open the Remote Console window in read only
mode.
Exclusive Access – Enables the Exclusive Access mode at Remote Console start-up. This forces
the Remote Consoles of all other users to close. No one can open the Remote Console until this user
disables the Exclusive Access or logs off.
Mouse hotkey – Used for fast mouse synchronization in Double Mouse mode and to free the
grabbed mouse when in single mouse mode.
Remote Console Button Keys - Button Keys simulate keystrokes on the remote system that
cannot be generated locally. For example ‘Control + Alt + Delete' on Windows and DOS or ‘Control +
Backspace' on Linux.
Define a new Button Key as follows:
Type the required keys e.g. ‘Ctrl+Alt+Delete’. The + sign means that the keys are pressed together.
The – sign means the keys are pressed sequentially.
The * sign inserts a pause with a definable duration. To require a confirmation request before
keystrokes are sent, write confirm at the start. E.g. confirm Ctrl+Alt+Delete.
Press Apply for the changes to take effect.
Video
Local Video Port Settings
This option decides if the video output on the front panel of SCOUT IP is active and passing through
the incoming signal from the host system.
Miscellaneous Video Settings
Noise filter – Define how SCOUT IP reacts to small changes in the video input signal. A large
tolerance needs less network traffic and leads to a faster video display, but small changes in some
display regions may not be recognized immediately. A small tolerance displays all changes instantly
but may lead to a constant amount of network traffic even if display content is not really changing
(depending on the quality of the video input signal). The default setting should be suitable for most
situations.
Custom Video Modes – Add video modes to SCOUT IP, which are not recognized using the factory
settings, when for example using special mode lines in an X-Window configuration on the host or with
uncommon hosts or operating systems.
Custom Modes Handling – Off - default settings
Additional - standard and custom
Only - one custom video mode
X Resolution – Visible number of horizontal pixels
Y Resolution – Visible number of vertical pixels.
Horizontal Frequency (Hz) - horizontal (line) frequency.
Vertical Frequency (Hz) - Vertical (refresh) frequency.
Total horizontal pixels – The total amount of pixels per line, including non-visible and blank areas.
Polarity – The polarity (positive/negative) of the synchronization signals. V means vertical, H means
horizontal.
Description – Give the mode a name. The name appears in the Remote Console when the custom
mode is activated.
KVM Ports
By default the SCOUT IP is configured for 16 ports. When you want to add more, adjust the settings
for the KVM ports. From the SCOUT IP menu choose KVM Ports. You can configure 64 ports, which
also can be cascaded kvm switches, so that you can administrate 256 ports.
Active Port - To switch to a computer:
1. Choose a number in the Active port Drop-down list.
2. Press
. The computer screen appears in the Remote Console.
Number of Ports - To set the number of ports the KVM uses:
1. Choose a number in the Number of Ports Drop-down list.
2. Press
The number of rows chosen appears in the KVM Port Settings list.
Duration of Pause
Define the pause time for KVM and Remote Console Button Keys in milli-seconds, represented by the
* symbol in all hotkeys and button keys.
Default configuration – Default settings of the integrated SCOUTutp switch for the SCOUT IP.
KVM Port Settings
1. Assign names for each port.
2. Define hotkeys to switch to each port.
Choose SCOUTutp as default hotkeys by selecting SCOUTutp in the Default configuration
box, and then click the Set Defaults button.
Or choose your own hotkeys. The syntax to define a new hotkey is as follows: <key code> [ +
| - | * ] <key code>.
For example LShift-LShift-*1-Enter. A + sign means that the keys are pressed together. The –
sign means the keys are pressed sequentially. LShift means the left Shift key.
The * sign inserts a pause with a definable duration. Add more than one pause if necessary.
3. Press Apply at the bottom of the page. The settings are saved.
SCOUT IP uses separate mouse synchronization settings and video-settings for each port.
Show in console – check this option to have a button appear on the top of the Remote console.
Click the button to switch to that computer.
Device Settings
Network
In the Network Settings panel you can change the network parameters.
The initial IP configuration is usually done directly at the host system. However you can also connect
to the SCOUT IP using its pre-configured IP settings.
Warning! Changing the network settings of SCOUT IP may result in losing the connection. If you
remotely change the settings ensure that all values will give you access to the SCOUT IP.
Network Basic Settings
IP auto configuration – Choose between the 3 options:
None – No IP auto configuration. In this case type a static IP address in the appropriate
settings below.
DHCP – When selected, SCOUT IP will contact a DHCP (Dynamic Host Configuration
Protocol) server in the local sub-net to obtain a valid IP address, gateway address and net
mask. Before you connect SCOUT IP to your local sub-net, complete the corresponding
configuration of your DHCP server.
BOOTP – When selected, SCOUT IP will contact a BOOTP (Bootstrap Protocol) server in the
local sub-net to obtain a valid IP address, gateway address and net mask.
IP address – Static IP address in the usual dot notation.
Subnet mask – The net mask of the local network
Gateway IP address – In case the SCOUT IP should be accessible from networks other than the
local one, this IP address must be set to the local network router's IP address.
Primary DNS Server IP address – IP address of the primary Domain Name Server. This may be left
empty; however SCOUT IP won't be able to perform name resolution.
Secondary DNS Server IP address
This address will be used in case the Primary DNS Server can't be contacted.
Network Miscellaneous Settings
Remote Console & HTTPS port
Port number at which SCOUT IP's Remote Console server and HTTPS server are listening. If empty
the default value is used.
HTTP port
Port number at which SCOUT IP's HTTP server is listening. If empty the default value is used.
Telnet port
Port number at which SCOUT IP's Telnet server is listening. If empty the default value is used.
Bandwidth limit
The maximum network traffic generated through the SCOUT IP Ethernet device.
Enabel / Disable Setup Protocol – Exclude the SCOUT IP from the setup protocol.
LAN Interface Settings
LAN Interface Parameter: auto negotiation on, 100 Mbps, full duplex, link ok
LAN Interface Speed:
Auto detect
10Mbps
100 Mbps
LAN Interface Duplex Mode
Auto detect
Half Duple
Full Duplex
Dynamic DNS
SCOUT IP is reachable via the IP address of the DSL router, which is dynamically assigned by the
provider. Since the administrator doesn't know the IP address assigned by the provider, SCOUT IP
connects to a special dynamic DNS server in regular intervals and registers its IP address there. The
administrator can contact this server as well and pick up the same IP address belonging to his card.
The administrator has to register a SCOUT IP that is supposed to take part in the service with the
Dynamic DNS Server. He will get an approved nickname and password in return to the registration
process. This account information is needed in order to determine the IP address of the registered
SCOUT IP.
To enable the Dynamic DNS:
1. Ensure the SCOUT IP LAN interface is properly configured.
2. From the SCOUT IP menu choose Network Settings / Dynamic DNS. The Dynamic DNS
Settings appear.
3. Check the Enable Dynamic DNS box.
4. Change the settings as desired.
Security
Encryption Settings
Controls the encrypting of the RFB protocol, used by the Remote Console to transmit the screen data
to the administrator machine and keyboard and mouse data back to the host
Force HTTPS – Access the Web front-end only using an HTTPS connection. SCOUT IP won't listen
on the HTTP port for incoming connections.
Off – No encrypting used.
Try – Tries to make an encrypted connection. If unsuccessful, an unencrypted connection is used.
Force – Tries to make an encrypted connection.
IP Access Control
This is used to limit access to a specific number of clients only. These clients are identified by their IP
addresses.
The IP access control settings apply to the LAN interface only!
Enable IP Access Control – Enables access control based on IP source addresses.
Default policy - Controls arriving IP packets that don't match any of the configured rules. They can be
accepted or dropped..
ATTENTION: If you set this to DROP and you have no ACCEPT rules configured, access to the
Web front-end over LAN is disabled! To enable access, change the security settings via modem dial in
or by temporarily disabling IP access control with the initial configuration procedure.
Rule # - Type the rule number for which the following commands will apply. This is ignored, when
adding a new rule.
IP/Mask - Specifies the IP address or IP address range for which the rule applies.
Numbers attached to an IP address with a `/' is the number of valid bits that are used for the given IP
address. Examples:
192.168.0.22 or 192.168.0.22/32 matches the IP Address 192.168.0.22
Policy – Determines what to do with matching packets. They are accepted or drop.
NOTE: The order of the rules is important. The rules are checked in ascending order until a rule
matches. Rules below the matching one are ignored. The default policy applies if no match has been
found.
User Blocking
Number of failed Login trails and minutes to block after failure.
Certificate
SCOUT IP uses the SSL (Secure Socket Layer) protocol for any encrypted network traffic between
itself and a connected client. When connecting, SCOUT IP reveals its identity to a client using a
cryptographic certificate. This is the same for all SCOUT IP’s and won't match the network
configurations applied to the device by its user. The certificate's underlying secret key is also used for
securing the SSL handshake.
You can generate and install a new certificate unique to a specific SCOUT IP. SCOUT IP can
generate a new cryptographic key and the associated Certificate Signing Request that needs to be
certified by a certification authority (CA). A CA verifies you are who you claim to be and signs and
issues a SSL certificate to you.
Attention! If you destroy the CSR on SCOUT IP there is no way to get it back! If you deleted it, repeat
the above steps.
Date / Time
You can insert user specific access times.
Authentication
Local Authentication – Local authentication
LDAP – You can keep authentication information in a central LDAP directory.
Radius – Click here if the authentication should be done over Radius.
Event Log
SNMP Settings
The following information is available via SNMP:
¾ Serial number
¾ Firmware version
¾ MAC address / IP address / Netmask / Gateway of LAN interface
¾ Configured users
¾ Currently active users with login time (login time is only valid if time is synchronized on
SCOUT IP)
¾ Server's power state
¾ The following actions can be initiated via SNMP:
¾ Reset server
¾ Power on/off server
¾ Reset SCOUT IP
The following events are reported by SCOUT IP via SNMP:
¾ Login attempt at SCOUT IP failed
¾ Login attempt at SCOUT IP succeeded
¾ Denying access to a particular action
¾ Server was reset
¾ Server was powered on/off
From the SCOUT IP Menu choose SNMP settings:
Enable SNMP Agent – When checked, SCOUT IP will answer to SNMP requests. If a community
is blank, you cannot perform the request. E.g. if you want to disable the ability to reset SCOUT IP via
SNMP, don't set a write community.
Read Community – Allows you to retrieve information via SNMP.
Write Community – Option or Reset via SNMP
System Location – Type a description of the physical location of the host. This will be used in
reply to the SNMP request "sysLocation.0".
System Contact - Type a contact person for the host
Maintenance
Board Summary - This contains information about the SCOUT IP and its current firmware.
Updating firmware
You can receive firmware updates by email or download them from the Daxten Web site. Save the
firmware file on the client computer.
To update the firmware:
1. Scroll down the Maintenance window. Under Maintenance features click Update Firmware.
The Update Firmware window appears.
Figure 5 - Update Firmware window
2. Locate and upload the firmware file from your client system. In case of any errors the upload
will be aborted.
After a smooth upload the Update Firmware panel appears showing the current firmware
version number and the uploaded firmware version number.
3. Press the Update button. The firmware updates. Warning! This process is irreversible; ensure
the SCOUT IP's power supply won't be interrupted during the update process, as this may
cause damage.
4. When prompted reset SCOUT IP manually by pressing Reset button. When pressed all
connections to the administration or Remote console close. 30 seconds later, SCOUT IP runs
with the new firmware. You must login again.
Attention: Only experienced staff members or administrators should perform a firmware update.
Data file for support
Click the link to access the SCOUT IP data file. The file contains support information, which will help
us to troubleshoot your problem.
Service Information
Technical Support
If you cannot determine the nature of a problem, please call Daxten and ask for Technical Support. If
possible, call from a phone located near the unit, as we may be able to solve your problem directly
over the phone. If we cannot solve your problem, and determine that the fault is in the unit, we will
issue a Return Material Authorisation (RMA) number that must appear on the outside of all returned
products. The unit should be double-packed in the original container, insured, and shipped to the
address given to you by our Technical Support representative. The Technical Support offices are
found on the back of this manual.
Limited Warranty
Daxten warrants to the enduser that this product is and will be free from defects in materials and
workmanship for a period of 24 months from the date of purchase. If during the warranty period the
product should fail, the purchaser must promptly call Daxten for a RETURN MATERIALS
AUTHORIZATION (RMA) number. Make sure that the RMA number appears on the packing slip, proof
of purchase, AND ON THE OUTSIDE OF EACH SHIPPING CARTON. Unauthorized returns or collect
shipments will be refused.
Ship prepaid to the Daxten office (see back page) where you purchased your product. The above
limited warranty is voided by occurrence of any of the following events, upon which the product is
provided as is, with all faults, and with all disclaimers of warranty identified below:
1. If defect or malfunction was caused by abuse, mishandling, unauthorized repair, or use other
than intended.
2. If unauthorized modifications were made to product.
3. If unreported damages occurred in any shipment of the product.
4. If damages were due to or caused by equipment or software not provided by Daxten.
5. If the product is used with non-grounded or incorrectly polarized AC power.
6. If the product is used in contradiction to any instruction provided by any User Guide or
Instruction Sheet provided to you or with the product.
EXCEPT AS SPECIFICALLY PROVIDED ABOVE AND TO THE MAXIMUM EXTENT ALLOWED BY
LAW, DAXTEN DISCLAIMS ALL WARRANTIES AND CONDITIONS WHETHER EXPRESS,
IMPLIED, OR STATUTORY AS TO ANY MATTER WHATSOEVER INCLUDING, WITHOUT
LIMITATION, TITLE, NON-INFRINGEMENT, CONDITION, MERCHANTABILITY OR FITNESS FOR
ANY PARTICULAR OR INTENDED PURPOSE.
EXCEPT AS EXPRESSLY PROVIDED ABOVE AND TO THE MAXIMUM EXTENT ALLOWED BY
LAW, DAXTEN SHALL NOT BE LIABLE FOR ANY SPECIAL, INDIRECT OR CONSEQUENTIAL
DAMAGES (INCLUDING WITHOUT LIMITATION, LOSS OF PROFIT, LOSS OF BUSINESS, LOSS
OF INFORMATION, FINANCIAL LOSS, PERSONAL INJURY, LOSS OF PRIVACY OR
NEGLIGENCE) WHICH MAY BE CAUSED BY OR RELATED TO, DIRECTLY OR INDIRECTLY, THE
USE OF A PRODUCT OR SERVICE, THE INABILITY TO USE A PRODUCT OR SERVICE,
INADEQUACY OF A PRODUCT OR SERVICE FOR ANY PURPOSE OR USE THEREOF OR BY
ANY DEFECT OR DEFICIENCY THEREIN EVEN IF DAXTEN OR AN AUTHORIZED DAXTEN
DEALER HAS BEEN ADVISED OF THE POSSIBILITY OF SUCH DAMAGES OR LOSSES.
Daxten Ltd
Unit 5 Distribution Centre
Shannon Free Zone
Shannon, Co. Clare
Ireland
[email protected]
www.daxten.ie
Tel: +353 (0) 61 23 4000
Fax: +353 (0) 61 23 4099
•
Daxten Ges.m.b.H.
Künstlergasse 11/4
A-1150 Wien
Österreich
[email protected]
www.daxten.at
Tel: +43 (0)1 879 77 65
Fax: +43 (0)1 879 77 65 30
•
Dakota Computer Solutions S.L.
C/Florian Rey, 8
50002 Zaragoza
España
[email protected]
www.daxten.com.es
Tel: +34 902 197 662
Fax: +34 976 201 633
•
•
Daxten LLC
811 W. Evergreen Ave
Suite 302A
Chicago, IL 60622
USA
[email protected]
www.daxten.us
Tel: +1 312 475 0795
Fax: +1 312 475 0797
•
Daxten GmbH
Salzufer 16, Geb. B
10587 Berlin
Deutschland
[email protected]
www.daxten.de
Tel: +49 (0) 30 8595 37-0
Fax: +49 (0) 30 8595 37-99
•
Daxten Ltd
4 Harp Business Centre
Apsley Way
London NW2 7LW
United Kingdom
[email protected]
www.daxten.co.uk
Tel: +44 (0) 20 8438 3800
Fax: +44 (0) 20 8438 3899
•
Daxten
Seebahnstr. 231
8004 Zürich
Schweiz
[email protected]
www.daxten.ch
Tel: +41 (0) 43 243 32 11
Fax: +41 (0) 43 243 32 16
•
Daxten
B.P 04 - 77
Route de Cheptainville
91630 Marolles-en-Hurepoix
France
[email protected]
www.daxten.fr
Tel: +33 (0)1 64 56 09 33
Fax: +33 (0)1 69 14 88 34
Denmark
[email protected]
www.daxten.dk
Tel: +45 7022 5411
Fax: +45 8739 4618
•
•
•
•
Daxten Sweden AB
Box 90 166
Ostmästargränd 10A / Årsta
120 22 Stockholm
Sweden
[email protected]
www.daxten.se
Tel: +46 (8) 602 82 50 / 70
Fax: +46 (8) 602 82 85
Daxten
Finlandsgade 33
8200 Aarhus N.