1
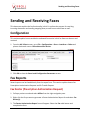
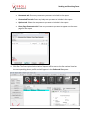
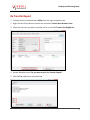
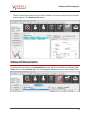
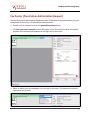
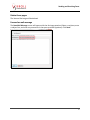
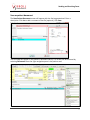
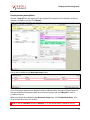
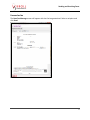
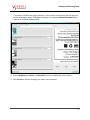
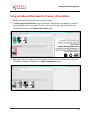
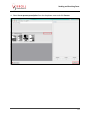
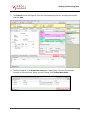
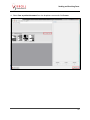
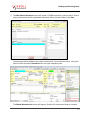
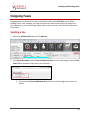
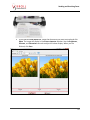
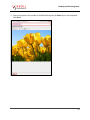
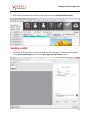
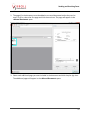
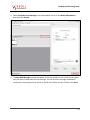
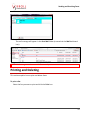
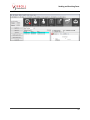
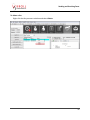
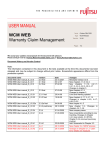
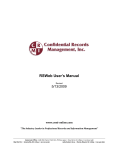
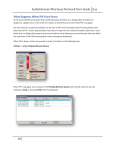
Sending and Receiving Faxes Sending and Receiving Faxes Contents Configuration ...................................................................................................... 1 Fax Reports ......................................................................................................... 1 Fax Doctor (Prescription Authorization Request) ....................................................................... 1 Rx Transfer Report ...................................................................................................................... 3 Inbound Documents ........................................................................................... 4 Fax Doctor (Prescription Authorization Request) ....................................................................... 5 Modifying an Inbound Document ............................................................................................. 10 Using an Inbound Document to Process a Prescription............................................................ 12 Saving as a Patient Document ................................................................................................... 15 Outgoing Faxes ................................................................................................. 18 Sending a Fax ............................................................................................................................. 18 Sending as Mail ......................................................................................................................... 21 Printing and Deleting ........................................................................................ 24 i Sending and Receiving Faxes Sending and Receiving Faxes This document explains the fax functionality in Kroll. It outlines the process for receiving incoming documents and sending outgoing faxes, as well how to send faxes as mail. Configuration This section explains how to enable the outbound fax service in Kroll so faxes can be sent and received. 1. From the Alt-X Start screen, go to File > Configuration > Store > Interfaces > Other and place a checkmark next to Use outbound fax service. 2. Click OK to close the Store Level Configuration Parameters screen. Fax Reports Several reports can be faxed directly from the report form. This section explains how to fax Prescription Authorization Requests and Rx Transfer Reports. Fax Doctor (Prescription Authorization Request) 1. Call up a patient record and select All Rxs from the right navigation pane. 2. Right-click the Rx you want to generate a Doctor Authorization Report for and select Fax Doctor(s). 3. The Doctor Authorization Report form will appear. Select the Fax radio button and complete the form. 1 Sending and Receiving Faxes Comments tab: Enter any comments you want to include in the report Customized Text tab: Enter any body text you want to include in the report Options tab: Select the components you want to include in the report Cover Page Comments tab: Enter any comments you want to appear on the cover page for the report 4. Click Fax. The Prescription Authorization Request will be sent to the fax number listed on the corresponding doctor profile and will appear in the Outbound Fax queue: 2 Sending and Receiving Faxes Rx Transfer Report 1. Call up a patient record and select All Rxs from the right navigation pane. 2. Right-click the Rx you want to transfer out and select Transfer Rx to Another Store. 3. Search for the store you want to transfer the Rx to and click Transfer Out Eligible Rxs. 4. Answer Yes when asked ‘Do you want to print the Transfer Report?’. 5. Click the Fax radio button and select Fax. 3 Sending and Receiving Faxes The Rx Transfer Report will be sent to the fax number on the store record that you selected and will appear in the Outbound Fax queue: Inbound Documents Incoming faxes are located in the Inbound Docs screen, which is accessed from the default AltX Start screen. Select Inbound Fax from the highlighted dropdown menu to view inbound faxes. 4 Sending and Receiving Faxes Fax Doctor (Prescription Authorization Request) Inbound Prescription Authorization Requests contain 2D barcodes that get decoded by the Kroll Background Service. Once a 2D barcode has been decoded ….. 1. Double-click the inbound fax from the Inbound Documents frame. 2. The Sort Pages into Documents screen will appear. If the 2D barcode has been successfully decoded, Rx information will populate on the right side of the screen. 3. Select an option from the dropdown list at the top of the screen. This determines how the inbound fax will be used. 5 Sending and Receiving Faxes Delete these pages The inbound fax image will be deleted. Forward as mail message The New Mail Message screen will appear with the fax image attached. Select a recipient, enter a subject line, and enter any comments in the space provided (optional). Click Send. 6 Sending and Receiving Faxes Save as patient document The New Patient Document screen will appear with the fax image attached. Enter a description. Click Ins to add a comment to the file (optional). Click Save. The fax image will appear in the patient’s document library. This screen can be accessed by selecting Documents from the right navigation pane in the patient card. 7 Sending and Receiving Faxes Use to process prescriptions The F11 - Drop-off form will appear with the original fill parameters of the faxed Rx. Make any necessary changes to the Rx. Click Okayed. The Rx will be added to the Workorder items frame. If the Prescription Authorization Request contains additional Rxs, the original fill parameters of the next faxed Rx will populate. Make any necessary changes and click Okayed for each Rx included in the fax. When each Rx has been added to the Workorder items pane, click Finalize Work Order. A To Do record will be created for each Rx. NOTE: If you click Refused instead of Okayed, no To Do record will be created for the Rx. 8 Sending and Receiving Faxes Forward as fax The New Fax Message screen will appear with the fax image attached. Select a recipient and click Send. 9 Sending and Receiving Faxes Modifying an Inbound Document 1. Double-click the fax you want to modify. 2. The Sort Pages into Documents screen will appear. The pages must be added to a manual document before they can be modified. To do so, select the first page and click the star icon. The page will appear in the <Manual Document> pane. 3. Select each additional page you want included in the document and click the plus sign icon. The additional pages will appear in the <Manual Document> pane. 10 Sending and Receiving Faxes If you want to modify each page separately, click the star icon instead of the plus sign icon for the subsequent pages. Each page will appear in a separate <Manual Document> pane and can be modified independently. 4. Use the Brightness, Contrast, and Saturation controls to adjust the colour display. 5. Click Process to save the changes you made to the document. 11 Sending and Receiving Faxes Using an Inbound Document to Process a Prescription 1. Double-click the fax you want to use for a prescription. 2. The Sort Pages into Documents screen will appear. The pages must be added to a manual document before they can be used. To do so, select the first page and click the star icon. The page will appear in the <Manual Document> pane. 3. Select each additional page you want included in the document and click the plus sign icon. The additional pages will appear in the <Manual Document> pane. 12 Sending and Receiving Faxes 4. Select Use to process prescription from the dropdown menu and click Process. 13 Sending and Receiving Faxes 5. The Drop-off screen will appear. Enter the required patient, doctor, and drug information and click Add. 6. The Rx will appear in the Workorder Items pane. Repeat step 5 for each Rx you want included in the work order. When you are finished, click Finalize Work Order. 14 Sending and Receiving Faxes Saving as a Patient Document 1. Double-click the fax you want to save as a patient document. 2. The Sort Pages into Documents screen will appear. The pages must be added to a manual document before they can be used. To do so, select the first page and click the star icon. The page will appear in the <Manual Document> pane. 3. Select each additional page you want included in the document and click the plus sign icon. The additional pages will appear in the <Manual Document> pane. 15 Sending and Receiving Faxes 4. Select Save as patient document from the dropdown menu and click Process. 16 Sending and Receiving Faxes 5. The New Patient Document screen will appear. Click F2 to perform a patient search. Enter a title and description and any applicable comments. When you are finished, click Save. The document will be added to the patient’s documents. To view the document, call up the Patient Profile and select Documents from the right navigation pane. The Patient Document List screen will appear. Double-click a document view its contents. 17 Sending and Receiving Faxes Outgoing Faxes Outgoing faxes are located at the top of the default view on the Alt-X Start screen. When sending a fax or mail message, you have the option to include an existing script image from your computer or scan a new image. Please refer to your scanner’s user manual for operation instructions. Sending a Fax 1. Select the Outbound Fax tab and click New Fax. 2. Click Attach Document. Select From Fax/Network Scan to scan a new image, or select From Other File to upload an image from your computer. If you selected From Fax/Network Scan, feed the script through your scanner, as shown: 18 Sending and Receiving Faxes If you selected From Other File, locate the document you want to attach and click Open. The image will display in the Picture Importer window. Use the Brightness, Contrast, and Saturation controls to adjust the colour display. When you are finished, click Save. 19 Sending and Receiving Faxes 3. Enter the recipient’s fax number in the To field and press the Enter key on your keyboard. Click Send. 20 Sending and Receiving Faxes 4. When the fax has been transmitted, it will show a status of Completed Successfully. Sending as Mail 1. Double-click the document you want to send as a mail message. The document will appear in the Unprocessed Pages section of the Sort Pages into Documents screen. 21 Sending and Receiving Faxes 2. The page(s) in the document must be added to a manual document before they can be used. To do so, select the first page and click the start icon. The page will appear in the <Manual Document> pane. 3. Select each additional page you want included in the document and click the plus sign icon. The additional pages will appear in the <Manual Document> pane. 22 Sending and Receiving Faxes 4. Select Forward as mail message from the dropdown menu in the <Manual Document> pane and click Process. 5. The New Mail Message window will appear. Enter the recipient’s user initials and any body text you want included with the mail message. You can send this message to additional recipients by entering more user initials in the To: field. When you are finished, click Send. 23 Sending and Receiving Faxes The mail message will appear in the Sent Mail folder (accessed via the Mail dashboard icon). NOTE: Mail messages can be sent to Kroll users only. Printing and Deleting This section explains how to print and delete faxes. To print a fax: Select the fax you want to print and click the Print icon. 24 Sending and Receiving Faxes 25 Sending and Receiving Faxes To delete a fax: Right-click the fax you want to delete and select Delete. 26