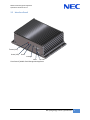
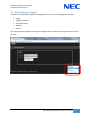
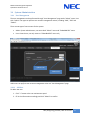
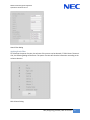
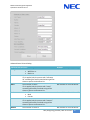
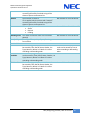
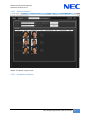
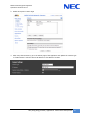
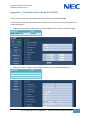
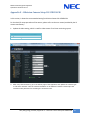
1
Mobile Facial Recognition Appliance User Manual NEC (Hong Kong) Limited Version 1.1 Date: 30/6/2014 Mobile Facial Recognition Appliance Quick Start Guide Version 1.1 Contents 1 2 Introduction .......................................................................................................................................... 4 1.1 Overview ....................................................................................................................................... 4 1.2 Compatibility ................................................................................................................................. 4 1.2.1 Support Environment ............................................................................................................ 4 1.2.2 Camera .................................................................................................................................. 4 Specification .......................................................................................................................................... 5 2.1 Hardware Specification ................................................................................................................. 5 2.2 Dimensions.................................................................................................................................... 5 2.3 Interface Panel .............................................................................................................................. 6 2.3.1 3 Panel Interface Description................................................................................................... 7 Built-in Function .................................................................................................................................... 8 3.1 Login .............................................................................................................................................. 8 3.2 Multi-Languages Support .............................................................................................................. 9 3.3 Main menu .................................................................................................................................. 10 3.3.1 Admin .................................................................................................................................. 10 3.3.2 Embedded FRS .................................................................................................................... 11 3.4 System Administration ................................................................................................................ 12 3.4.1 User Management .............................................................................................................. 12 3.4.1.1 Add User.......................................................................................................................... 12 3.4.1.2 Edit User .......................................................................................................................... 13 3.4.1.3 Delete User ..................................................................................................................... 13 3.4.2 Log & Audit Trail.................................................................................................................. 15 3.4.3 System Reboot .................................................................................................................... 16 3.4.4 Firmware Upgrade .............................................................................................................. 17 3.4.5 Date Time Settings .............................................................................................................. 20 3.4.5.1 Update Time Zone & NTP Service Provider .................................................................... 20 3.4.5.2 Synchronize the system time with local PC .................................................................... 20 3.4.6 E-mail Notifications ............................................................................................................. 21 3.4.7 Network Settings................................................................................................................. 23 3.4.7.1 Change Device Name ...................................................................................................... 23 3.4.7.2 LAN Network Setup ......................................................................................................... 23 NEC (Hong Kong) Limited | Introduction 1 Mobile Facial Recognition Appliance Quick Start Guide Version 1.1 3.4.7.3 WIFI Setup ....................................................................................................................... 24 3.4.7.4 Direct Connection with IP Camera .................................................................................. 26 3.4.8 3.5 Camera Setup ...................................................................................................................... 27 3.4.8.1 Camera Settings .............................................................................................................. 27 3.4.8.2 Quality Control Parameters ............................................................................................ 28 Integrated Real Time Monitoring System ................................................................................... 28 3.5.1 Real Time Monitoring System Settings ............................................................................... 29 3.5.2 Trigger External Device ....................................................................................................... 30 3.5.3 Surveillance ......................................................................................................................... 33 3.5.4 Person Maintenance ........................................................................................................... 35 3.5.4.1 Person List Navigation..................................................................................................... 35 3.5.4.2 Enroll Person ................................................................................................................... 38 3.5.4.3 Edit person information .................................................................................................. 40 3.5.4.4 Update Person Photo ...................................................................................................... 41 3.5.4.5 Delete Person .................................................................................................................. 42 3.5.4.6 Export & Import .............................................................................................................. 43 3.5.5 Search Record Enquiry ........................................................................................................ 44 3.5.5.1 Hit Record Enquiry .......................................................................................................... 47 3.5.5.2 Not Hit Record Enquiry ................................................................................................... 47 3.5.5.3 Hit Ranking Enquiry ......................................................................................................... 50 3.6 Function NeoFrs .......................................................................................................................... 51 3.7 Face Capture FTP......................................................................................................................... 52 3.8 Appliance Health Status .............................................................................................................. 53 3.8.1 General ................................................................................................................................ 53 3.8.2 Health Status Event Summary ............................................................................................ 54 Appendix A - AXIS Camera Setup P1346 ..................................................................................................... 55 Appendix B - AXIS Camera Setup P1355 ..................................................................................................... 57 Appendix C – Panasonic Camera Setup WV-SP508E................................................................................... 59 Appendix D – Sony Camera Setup SNC-CH240 ........................................................................................... 61 Appendix E – Hikvision Camera Setup DS-2CD854-EW .............................................................................. 63 Appendix F – Samsung Camera Setup SNO-6011R ..................................................................................... 65 NEC (Hong Kong) Limited | Introduction 2 Mobile Facial Recognition Appliance Quick Start Guide Version 1.1 Appendix G – Bosch Camera Setup NBN-832V-IP....................................................................................... 67 NEC (Hong Kong) Limited | Introduction 3 Mobile Facial Recognition Appliance Quick Start Guide Version 1.1 1 Introduction 1.1 Overview NEC’s Mobile Facial Recognition Appliance is a comprehensive solution which utilizes Neoface – NEC’s world No.1 Facial recognition algorithm to deliver a powerful video surveillance platform as a new approach to physical security and traditional CCTV systems. With seamless integration to IP cameras and networks, this appliance instantly transforms passive/reactive CCTV surveillance systems into a smart pro-active surveillance solution capable of recognizing unwanted visitors and generates intrusion alerts even before security breaches can occur. 1.2 Compatibility 1.2.1 Support Environment Operating System Windows 7 or above Android 4.0.3 or above iOS version 6.1 or above Browser Chrome version 32.0 or above Chrome version 18.0 or above Safari version 6.0 or above 1.2.2 Camera The Appliance supports standard H.264 or motion jpeg streaming IP camera. Here is the list of cameras which are being tested. Brand Name AXIS Panasonic Sony Hikvison Samsung Bosch Model P1346 P1355 WV-SP508E SNC-CH240 DS-2CD854F-EW SNO-6011R NBN-832V-IP NEC (Hong Kong) Limited | Introduction 4 Mobile Facial Recognition Appliance Quick Start Guide Version 1.1 2 Specification 2.1 Hardware Specification Conditions Operating Temperature Operating Humidity Sea Level Input Weight 3G/ WIFI Special Interface -20 ℃ to 50 ℃ 0%-95% non-condensing Under 2000m 100-240V 500 g Support external USB WIFI device PoE, GPIO 2.2 Dimensions 150. 5 48. 1 103.2 5 132. 9 NEC (Hong Kong) Limited | Specification 5 Mobile Facial Recognition Appliance Quick Start Guide Version 1.1 2.3 Interface Panel Power (LED) Status (LED) Reset Initialize DC inlet GPIO Front Panel of Mobile Facial Recognition Appliance NEC (Hong Kong) Limited | Specification 6 Mobile Facial Recognition Appliance Quick Start Guide Version 1.1 Ethernet PoE USB Rear Panel of Mobile Facial Recognition Appliance 2.3.1 Panel Interface Description Interface DC inlet Power (LED) Status (LED) Reset Initialize GPIO Ethernet USB Description DC-in plug for 12V power adapter If power is supplied to the appliance it will be turned on Show the status of the appliance, if everything is normal, it will be turned off. For detail information, please refer to Appliance Health Status section Reset button, press to restart the appliance Factory reset button, hold 10 second to trigger factory reset. General purpose I/O, which is used for controlling external device triggered by white/ black list hit in real time monitoring system Ethernet plug which support PoE (Power over Ethernet) 2 USB plugs support external WIFI/ 3G modem NEC (Hong Kong) Limited | Specification 7 Mobile Facial Recognition Appliance Quick Start Guide Version 1.1 3 Built-in Function 3.1 Login The system can be accessed by URL: http://<<ip address>>:8080 with a supported browser. Please type in username and password and click “Login” button. If user with “Admin” type is login, it will redirect to admin page, otherwise it will redirect to embedded FRS page directly. NEC (Hong Kong) Limited | Built-in Function 8 Mobile Facial Recognition Appliance Quick Start Guide Version 1.1 3.2 Multi-Languages Support The built-in web application supports five languages currently, the list of languages are as follow: English Traditional Chinese Simplified Chinese Japanese Spanish The language can be changed by selecting the language option combo box at the right bottom corner of the page. NEC (Hong Kong) Limited | Built-in Function 9 Mobile Facial Recognition Appliance Quick Start Guide Version 1.1 3.3 Main menu 3.3.1 Admin “Admin” menu is the administrative page. Click “Embedded FRS” for switching to “Embedded FRS” menu Page Information System Setting Network Setting Function Setup Camera Setup Usage General Information System Reboot Firmware Upgrade Date & Time Settings E-Mail Notifications Lan Network Wifi Network 3G Network Real Time Monitoring System NeoFRS Face Capture FTP Camera Settings Quality Control Parameters NEC (Hong Kong) Limited | Built-in Function 10 Mobile Facial Recognition Appliance Quick Start Guide Version 1.1 User Management Audit Log 3.3.2 Add/ Edit / Delete System User Server Log System Audit Log Embedded FRS Page Surveillance Search Record Enquiry Person Maintenance Usage Alert viewer for real time monitor system Hit record enquiry Not hit record enquiry Hit ranking enquiry Facial database Maintenance NEC (Hong Kong) Limited | Built-in Function 11 Mobile Facial Recognition Appliance Quick Start Guide Version 1.1 3.4 System Administration 3.4.1 User Management The user management can be performed through “User Management” page under “Admin” menu. User with “Admin” user type can perform user account management actions, including “Add”, “Edit” and “Delete”. There are two type of user account for the system: Admin: System administrator, can access both “Admin” menu and “Embedded FRS” menu User: General user, can only access to “Embedded FRS” menu only Update User Add User Delete User Admin user can perform user account management action via “User Management” page 3.4.1.1 Add User To add a new user 1. Click “+” button at the user maintenance panel 2. Fill in the information accordingly and click “Submit” to confirm NEC (Hong Kong) Limited | Built-in Function 12 Mobile Facial Recognition Appliance Quick Start Guide Version 1.1 Add User popup dialog 3.4.1.2 Edit User To edit an existing user 1. 2. 3. 4. Click “Edit” button at right side of the selected user Update the description/ user type Type in the new password if it is necessary Click “Submit” to continue the action Edit User popup dialog 3.4.1.3 Delete User To edit an existing user 1. Click “Delete” button at right side of the selected user NEC (Hong Kong) Limited | Built-in Function 13 Mobile Facial Recognition Appliance Quick Start Guide Version 1.1 Delete User confirmation dialog NEC (Hong Kong) Limited | Built-in Function 14 Mobile Facial Recognition Appliance Quick Start Guide Version 1.1 3.4.2 Log & Audit Trail Admin user can access to system log through “Audit Log” page under “Admin” menu. There are two type of log from the system: Server Log o The current system running log for detail analysis o Please copy the log to system support engineer, if detail analysis is required System Audit Log o The system will log every system event, user operation into the system audit log. Settings update System startup o User can search the audit log by date and trace level filter o The system will show the audit log order by time in descending order. Admin user can check the system log via “Audit Log” page NEC (Hong Kong) Limited | Built-in Function 15 Mobile Facial Recognition Appliance Quick Start Guide Version 1.1 3.4.3 System Reboot Software reboot can be performed via web interface. To trigger software reboot, please go to “Information” page and click “System Reboot” button. After the button is clicked, the system will be rebooted and the web page will redirect to login page after 120 seconds. Admin user can perform system reboot via “Information” page Confirmation dialog will be prompted if “Reboot” button is clicked. NEC (Hong Kong) Limited | Built-in Function 16 Mobile Facial Recognition Appliance Quick Start Guide Version 1.1 System resume count down The page will redirect to login page automatically in 120 seconds. 3.4.4 Firmware Upgrade The firmware version can be found at the top right corner of “Information” page. To upgrade the firmware, please click the “Firmware Upgrade” button at the bottom and click upload after selecting the file via the dialog box. The system will be upgraded and the page will redirect to login page after 90 seconds. Buzzer “Beep” sound will be triggered, if the update procedure is started. If the system update and restart successfully, another “Beep” sound will be triggered. NEC (Hong Kong) Limited | Built-in Function 17 Mobile Facial Recognition Appliance Quick Start Guide Version 1.1 Admin user can perform firmware upgrade via “Information” page and the current firmware version can be obtained at the top right corner of the page. File upload dialog will be prompted if “Firmware Update” button is clicked. After selecting the new firmware file, click “Upload” button to continue the firmware update. NEC (Hong Kong) Limited | Built-in Function 18 Mobile Facial Recognition Appliance Quick Start Guide Version 1.1 System resume count down The page will redirect to login page automatically in 90 seconds. NEC (Hong Kong) Limited | Built-in Function 19 Mobile Facial Recognition Appliance Quick Start Guide Version 1.1 3.4.5 Date Time Settings Date & Time settings can be modified via “System Setting” page. 3.4.5.1 Update Time Zone & NTP Service Provider Parameters Description Server Time Zone The time zone of the server, which can be selected via combo box Synchronized with NTP server If it is checked, the system will synchronize the system time with provide NTP service provider periodically NTP Server Address The NTP service provider URL The settings will be effective after the “Save” button is clicked. 3.4.5.2 Synchronize the system time with local PC Click “Sync with PC” button to synchronize the system time with local PC. Click this button to synchronize the time with local PC Click this button to save the setting Admin user can change the date time setting via “System Setting” page NEC (Hong Kong) Limited | Built-in Function 20 Mobile Facial Recognition Appliance Quick Start Guide Version 1.1 3.4.6 E-mail Notifications The system provide e-mail notifications feature, there are 3 kinds of email alert. System alert E-mail alert will be sent to predefined e-mail list : “System Mail List”, if system alert such as “Frame capture failed”, “System startup” is occurs by the system. Hit record alert for white list Email alert will be sent to predefined e-mail list, if white listed person is matched in real time monitoring system. Hit record alert for black list Email alert will be sent to predefined e-mail, if black listed person is matched in real time monitoring system. To enable the e-mail notification, please check the “e-mail notification” and fill in the mail server gateway information. The system support both SMTP and TLS protocol. For the email list, please input one email address on each line of the textbox as shown as the screenshot below. The system will sent the testing mail to all listed e-mail account, if the “Email Alert Test” button is clicked. To make the settings effective, please click “Save” button at the bottom of the page. NEC (Hong Kong) Limited | Built-in Function 21 Mobile Facial Recognition Appliance Quick Start Guide Version 1.1 System Mailing List Search Hit (White List) Mailing List Search Hit (Black List) Mailing List NEC (Hong Kong) Limited | Built-in Function 22 Mobile Facial Recognition Appliance Quick Start Guide Version 1.1 3.4.7 Network Settings 3.4.7.1 Change Device Name To update the device name (hostname), update the “Device name” textbox and click “Save” to confirm. 3.4.7.2 LAN Network Setup Obtain IP via DHCP Select “Option IP address via DHCP” radio button Obtain DNS server address via DHCP Select “DNS server address via DHCP” radio button Use Static IP Address Select “Using the following IP address” radio button Input the “IP address”, “Subnet mask” and “Default gateway” textboxes Manual input DNS server address Select “Using the following DNS server address” radio button Input the “Primary DNS server” and “Secondary DNS server” textboxes NEC (Hong Kong) Limited | Built-in Function 23 Mobile Facial Recognition Appliance Quick Start Guide Version 1.1 After complete updating LAN network setting, click “Save” to confirm the changes. 3.4.7.3 WIFI Setup To enable WIFI interface, please follow the instructions below: 1. Plug in the WIFI receiver to the USB port of the appliance. 2. Navigate to “Admin->Network Setting”. In the Wifi Interface section, check the checkbox “Enable WIFI”. The appliance will search for the WIFI access point automatically and update the network setup page directly. 3. Select the WIFI access point from the “Access Point List” 4. Enter the key of the access point and click “Save & Connect” 5. If the appliance connects to the access point successfully, the IP Address will be shown. After selecting the access point, enter the key and click “Save & Connect” NEC (Hong Kong) Limited | Built-in Function 24 Mobile Facial Recognition Appliance Quick Start Guide Version 1.1 If the appliance connects to the access point successfully, the IP Address will be shown. NEC (Hong Kong) Limited | Built-in Function 25 Mobile Facial Recognition Appliance Quick Start Guide Version 1.1 3.4.7.4 Direct Connection with IP Camera Direct Connection with IP camera Static IP 192.168.2.100 StaticIP IP Static 192.168.2.50 192.168.2.50 Network cable Camera Camera Wifi Appliance with Wifi-receiver Wifi-Router Wifi Wifi Surveillance Interface Direct connection between IP Camera and Appliance The IP camera can be connected to the appliance directly, if WIFI is enabled (as shown as diagram above). To achieve this architecture, the setup procedures are as follow: 1. Follow section 3.4.8 setup the camera and enable the option “Preview Redirect” 2. Follow section 3.4.7.3 setup the WIFI network. Remark: The network group WIFI network MUST NOT be same as LAN network which is used for direct connection with IP camera. 3. Connect the IP camera with the appliance directly as shown as the diagram above. 4. Access the appliance by the IP of WIFI network. NEC (Hong Kong) Limited | Built-in Function 26 Mobile Facial Recognition Appliance Quick Start Guide Version 1.1 3.4.8 Camera Setup Live CCTV Camera can be setup through “Admin->Camera Setup” Menu. The system supports IP cameras with H.264 or motion jpeg streaming. The system supports IP cameras with H.264 or motion jpeg streaming. 3.4.8.1 Camera Settings The default “Camera Type” is set to “Custom”, the parameters are as follows: Parameters IP Camera Url Capture Delay Preview Type Description URL to access the IP camera The capture interval between frames. Default is set to 300 ms. The type of the preview URL, either static jpeg(H.264) or motion jpeg streaming Preview Url Url to preview the camera at Surveillance page. It is for viewing purpose only. Static Jpeg Refresh Interval The refresh interval of static jpeg in the surveillance page. Default is set to 20. (Shown when Preview Type is set to Static Jpeg) Preview Redirect To redirect the preview source from the appliance, instead of allowing the appliance to be connected directly to the IP camera source. It is usually used when “Direct Connection with IP camera” is used (section 3.4.7.4). If it is set, user can access the home page of IP camera by URL http://<<ip address>>:8282. Please check the IP camera manual for the URL. Here is the list of cameras which are being tested and predefined camera type can be used for ease of setup. For the detail recommendation regarding the supported cameras, please refer to Appendix A – G. Brand Name AXIS Panasonic Sony Hikvison Samsung Bosch Model P1346 P1355 WV-SP508E SNC-CH240 DS-2CD854F-EW SNO-6011R NBN-832V-IP Camera Type AXIS Camera Resolution 1920 x 1080 Panasonic Camera Sony Camera Hikvison Camera Samung Camera Bosch Camera 1920 x 1080 1920 x 1080 1280 x 720 1920 x 1080 1920 x 1080 NEC (Hong Kong) Limited | Built-in Function 27 Mobile Facial Recognition Appliance Quick Start Guide Version 1.1 3.4.8.2 Quality Control Parameters Some facial quality control parameters can be set in camera setup, which is used for fine tuning the sensitivity for face detection. Parameters Max number of heads per image Min pixel between eyes Range 1–5 30 – 200 Face quality score 0.00 – 1.00 Description Max number of heads can be detected in the screen. Min pixel between eyes for detected face, if the pixel between eyes of the faces is smaller than this value, the face cannot be detected. Face quality threshold score for face detection. For any face detected in image, face quality score will be given by the system. If the face score is larger than this value, the face image will be qualified to continue the further action. (e.g. real time monitoring) 3.5 Integrated Real Time Monitoring System Working with IP camera stream, the system can be sued as real time monitoring system. Images can be obtained from the live stream of IP camera and the system will perform facial matching against the internal enrolled person record. The system will alert for and hit/ not hit case for user further action. NEC (Hong Kong) Limited | Built-in Function 28 Mobile Facial Recognition Appliance Quick Start Guide Version 1.1 3.5.1 Real Time Monitoring System Settings The real time monitoring function can be enabled via “Function Setup” page. Check the “Enabled” checkbox for enabling the system. Here are the descriptions of real time monitoring system options: Parameters Threshold Max Search Hit Result Retention Day Housekeep Percentage Description The facial matching threshold for the real time monitoring system. If any one of face matching score between live face image and database face image is larger than the threshold, search hit will be generated. Otherwise, not hit record will be generated instead. Max number of hit photos e.g. if 6 hit photos is obtained from one hit case, while “Max Search Hit Result” is set to 3. Only 3 matched photos (with the highest score) will be saved in database. The retention period in days. If the search record is expired, the system will remove the data automatically. Alternative mechanism for search record retention, if search record database size reach the housekeep percentage (e.g. 50 %), the system will start remove the oldest data automatically. The current search record database size can be obtained at “Admin>Information” page. To make the settings effective, please click “Save” button at the bottom of the page. NEC (Hong Kong) Limited | Built-in Function 29 Mobile Facial Recognition Appliance Quick Start Guide Version 1.1 Real time Monitoring System Settings can be found under “Function Setup” page 3.5.2 Trigger External Device External device can be triggered by black/ white list hit. The external device can be connected to the appliance with the GPIO. The pin assignment are as follow: White List Hit Black List Hit Pin 02 Pin 04 NEC (Hong Kong) Limited | Built-in Function 30 Mobile Facial Recognition Appliance Quick Start Guide Version 1.1 The appliance can trigger external device with the provided GPIO. The external device setting can be enabled under the section “Output” at “Function Setup" page. The White List Hit Trigger and Black List Trigger can be individually enabled. The parameters for the trigger are as follow. Parameters Active State Hit Duration (ms) Rematch Interval (ms) Description Define the output voltage for the hit case How long will the voltage kept during white list/ black list hit How long will the voltage be retriggered, if same person hit the list again. Active State is set to “High” NEC (Hong Kong) Limited | Built-in Function 31 Mobile Facial Recognition Appliance Quick Start Guide Version 1.1 Active State is set to “Low” Output setting can be found under “Function Setup” page NEC (Hong Kong) Limited | Built-in Function 32 Mobile Facial Recognition Appliance Quick Start Guide Version 1.1 3.5.3 Surveillance There are 4 panels in “Surveillance” page. Camera o Display the live camera streaming Hit Record Detail o Show the hit record detail o If “Show Latest” is checked, then it will update automatically according to the new hit record Hit Records o Instant hit records o If the hit record row is clicked, the detail information will be shown at “Hit Record Details” Not Hit Records o Instant not hit records o User can enroll the not hit record by clicking the image Live Camera View Hit Record Detail Hit Record list Not Hit Record List Surveillance page can be found under Embedded FRS menu NEC (Hong Kong) Limited | Built-in Function 33 Mobile Facial Recognition Appliance Quick Start Guide Version 1.1 Enroll a person from Not Hit List NEC (Hong Kong) Limited | Built-in Function 34 Mobile Facial Recognition Appliance Quick Start Guide Version 1.1 3.5.4 Person Maintenance 3.5.4.1 Person List Navigation Edit the columns list for display Apply Filter to find specific person Show the person detail if a person row is clicked Total number of enrolled persons Switch to different page Person Maintenance page can be find under Embedded FRS menu. NEC (Hong Kong) Limited | Built-in Function 35 Mobile Facial Recognition Appliance Quick Start Guide Version 1.1 Applying Search Filter To locate a person from a large list, filter can be applied. Filter dialog will be prompted, if “Apply Filter” button is clicked. Person Filter List Type Reference ID Name Gender Memo 1 Memo 2 Memo 3 Status Sort Condition First Condition Second Condition Third Condition Person list type filter White List or Black List The text filter of reference ID If it is applied, only the person with “reference ID” containing the exactly matched string will be shown at person maintenance list. The text filter of name If it is applied, only the person with “name” containing the exactly matched string will be shown at person maintenance list. Gender filter Male Female The text filter of memo 1 If it is applied, only the person with “memo 1” containing the exactly matched string will be shown at person maintenance list. The text filter of memo 2 If it is applied, only the person with “memo 2” containing the exactly matched string will be shown at person maintenance list. The text filter of memo 3 If it is applied, only the person with “memo 3” containing the exactly matched string will be shown at person maintenance list. Effective/ Expiry Status filter Active Expired Pending The first sorting condition, the search result can be sorted by Time, Ref ID, Name, Gender, List Type, Memo 1, Memo 2 or Memo 3 in either ascending or descending order The second sorting condition, the search result can be sorted by Time, Ref ID, Name, Gender, List Type, Memo 1, Memo 2 or Memo 3 in either ascending or descending order The third sorting condition, the search result can be sorted by Time, Ref ID, Name, Gender, List Type, Memo 1, Memo 2 or Memo 3 in either ascending or descending order NEC (Hong Kong) Limited | Built-in Function 36 Mobile Facial Recognition Appliance Quick Start Guide Version 1.1 Search Filter Dialog Applying Search Filter To customize the person list view, the columns of the person can be selected. If “Edit Columns” button is click, the following dialog will be shown. The person list view will show the information according to the columns selection. Edit Columns Dialog NEC (Hong Kong) Limited | Built-in Function 37 Mobile Facial Recognition Appliance Quick Start Guide Version 1.1 3.5.4.2 Enroll Person To enroll a new person record 1. Click the “Enroll Person” button 2. Select the photo by one of the following method: a. Capture from camera USB Camera Available only at PC b. Capture from IP Camera Capture from the IP Camrea defined in Camera Settings c. Load from file Load a jpeg file from the OS 3. Input the person information 4. Click Subitted to confirm the action List of fields for person data Field Type Mandatory Yes Reference ID No Name Gender Yes No Memo1 Memo2 Memo3 Effective Date Expiry Date Photo No No No No No Yes Description Person List type, it should be either Black List or White List. If door control is enabled, when the white listed person is matched by the real time monitoring system, door on signal will be triggered. Unique reference id for the person. If it is not set, the system will generate a reference id for the enrollment. This value cannot be changed after the person is enrolled. The name of person Gender of person. Male or Female or Unspeific Any user defined string Any user defined string Any user defined string Effective date of person record Expriy date of person record Person photo for facial matching NEC (Hong Kong) Limited | Built-in Function 38 Mobile Facial Recognition Appliance Quick Start Guide Version 1.1 1. Click “Enroll” to open enrollment popup 3. Input the person information 2. Choose the photo for the person Person Enrollment Dialog 4. Click “Submit” button to enroll NEC (Hong Kong) Limited | Built-in Function 39 Mobile Facial Recognition Appliance Quick Start Guide Version 1.1 3.5.4.3 Edit person information To edit person record 1. Select a person at the “Person Maintance” Panel, the person information detail will be displayed at “Person Information” on the right hand side “ 2. Update the information at “Person Information” and click “Submit” to confirm the action. 1. Click a person for editing 2. Edit the person information Click submit the confirm Person information edit Update person confirmation dialog NEC (Hong Kong) Limited | Built-in Function 40 Mobile Facial Recognition Appliance Quick Start Guide Version 1.1 3.5.4.4 Update Person Photo To update a person photo 1. Select a person at the “Person Maintance” Panel, the person information detail will be displayed 2. Update the image by one of the image selection buttons 1. Click a person for editing 2. Update the image by one of the image selection buttons User can update the photo by the image selection buttons at Person details NEC (Hong Kong) Limited | Built-in Function 41 Mobile Facial Recognition Appliance Quick Start Guide Version 1.1 3.5.4.5 Delete Person To delete person 1. Select a person at the “Person Maintance” Panel, the person information detail will be displayed 2. Click “Remove” button at the bottom of the “Person Information” panel 1. Click a person for editing 2. Click “Remove” to delete a person Delete person confirmation dialog NEC (Hong Kong) Limited | Built-in Function 42 Mobile Facial Recognition Appliance Quick Start Guide Version 1.1 3.5.4.6 Export & Import Enrolled person list can be exported to a XML file and import to the system, which can be useful for data backup, co-operation with multiple appliances or integrated with external system. For the xml schema, please refer to Appendix A: XML Schema for Data Export & Import. Both Export & Import functions are only available for user with admin user type. To Export Enrollment Database 1. Click “Export” button at the “Person Maintenance” panel. 2. The confirmation dialog will be prompted, click “OK” to continue the export. The process may take a long time. It is recommended disabling all facial functions before start this action. The xml file will be named in following format: <<hostname>>_<<export timestamp>>, and the timestamp will be in string format: “yyyy_MM_dd_hh_mm_ss”. To Import Enrollment Database 1. Click “Import” button at the “Person Maintenance” panel 2. The file selection dialog will be prompted. After selecting the xml file, click “OK” to continue. 3. After “Import”, reboot is needed to refresh the database. The process may take a long time. It is recommended disabling all facial functions before start this action. NEC (Hong Kong) Limited | Built-in Function 43 Mobile Facial Recognition Appliance Quick Start Guide Version 1.1 3.5.5 Search Record Enquiry The facial search record can be enquiry through “Search Record Enquiry” page. There are three enquiry types: Hit Record: The record store the facial image from camera which is matched against the enrolled person database Not Hit Record: The record store the facial image from camera which does not match against the enrolled person database Hit Ranking: The ranking statistics for Hit Record which summarize the number of hit records of enrolled person in database. Click “Advanced Criteria” to open “Advanced Criteria Dialog” Click “Search” to perform searching Enquiry type selection Time range criteria for enquiry Search Record Enquiry can be perform through “Search Record Enquiry” page NEC (Hong Kong) Limited | Built-in Function 44 Mobile Facial Recognition Appliance Quick Start Guide Version 1.1 Advanced Search Criteria Dialog Advanced Search Criteria List Type Person list type filter White List or Black List Reference ID The text filter of reference ID If it is applied, only the person with “reference ID” containing the exactly matched string will be shown at person maintenance list. Name The text filter of name If it is applied, only the person with “name” containing the exactly matched string will be shown at person maintenance list. Gender Gender filter Male Female Memo 1 The text filter of memo 1 If it is applied, only the person with “memo 1” containing the exactly matched string will be shown at person maintenance list. Memo 2 The text filter of memo 2 Remarks Not available to “Not Hit Record” Not available to “Not Hit Record” Not available to “Not Hit Record” Not available to “Not Hit Record” Not available to “Not Hit Record” Not available to “Not Hit Record” NEC (Hong Kong) Limited | Built-in Function 45 Mobile Facial Recognition Appliance Quick Start Guide Version 1.1 If it is applied, only the person with “memo 2” containing the exactly matched string will be shown at person maintenance list. Memo 3 The text filter of memo 3 If it is applied, only the person with “memo 3” containing the exactly matched string will be shown at person maintenance list. Status Effective/ Expiry Status filter Active Expired Pending Matching Score The range of matching score of the matched photo(s) Face Quality The range of face quality of query face image from camera Sort Condition First Condition The first sorting condition, the search result can be sorted by Time, Ref ID, Name, Gender, List Type, Memo 1, Memo 2 or Memo 3 in either ascending or descending order Second The second sorting condition, the search result Condition can be sorted by Time, Ref ID, Name, Gender, List Type, Memo 1, Memo 2 or Memo 3 in either ascending or descending order Third Condition The third sorting condition, the search result can be sorted by Time, Ref ID, Name, Gender, List Type, Memo 1, Memo 2 or Memo 3 in either ascending or descending order Not available to “Not Hit Record” Not available to “Not Hit Record” Not available to “Not Hit Record” For “Not Hit Record”, the search result can be sorted by Time in either ascending or descending order. Not available to “Not Hit Record” Not available to “Not Hit Record” NEC (Hong Kong) Limited | Built-in Function 46 Mobile Facial Recognition Appliance Quick Start Guide Version 1.1 3.5.5.1 Hit Record Enquiry Sample “Hit Record” enquiry result 3.5.5.2 Not Hit Record Enquiry NEC (Hong Kong) Limited | Built-in Function 47 Mobile Facial Recognition Appliance Quick Start Guide Version 1.1 Sample “Not Hit Record” enquiry result NEC (Hong Kong) Limited | Built-in Function 48 Mobile Facial Recognition Appliance Quick Start Guide Version 1.1 Person can be added via Not Hit Record NEC (Hong Kong) Limited | Built-in Function 49 Mobile Facial Recognition Appliance Quick Start Guide Version 1.1 3.5.5.3 Hit Ranking Enquiry Sample “Hit Ranking” enquiry result NEC (Hong Kong) Limited | Built-in Function 50 Mobile Facial Recognition Appliance Quick Start Guide Version 1.1 3.6 Function NeoFrs The system can provide face image feed for NeoFrs. To enable this function, please check the “Enabled” checkbox at “NeoFrs” under “Function Setup” page. For detail regarding NeoFRS, please refers to the NeoFRS User Manual. Parameters Feature conversion servers lists Description The list of NeoFrs feature conversion address list, in format <<IP Address>>:<<Port>> If multiple feature conversion servers are used, input one server address per each line. To make the settings effective, please click “Save” button at the bottom of the page. NEC (Hong Kong) Limited | Built-in Function 51 Mobile Facial Recognition Appliance Quick Start Guide Version 1.1 3.7 Face Capture FTP The system can provide face image feed for other external system via FTP. To enable this function, please check the “Enabled” checkbox at “Face Capture FTP” under “Admin->Function Setup” menu. Parameters Description FTP server hostname The IP address of the ftp server FTP server port The port of the ftp server Username Username of ftp account Password Password of ftp account The settings can be test by clicking “Connection Test” button. To make the settings effective, please click “Save” button at the bottom of the page. NEC (Hong Kong) Limited | Built-in Function 52 Mobile Facial Recognition Appliance Quick Start Guide Version 1.1 3.8 Appliance Health Status 3.8.1 General The appliance health status can be shown at the Admin -> Information page. There are four main type of event: System Real Time Monitor Face FTP NeoFRS System Health Status section can be found at information page NEC (Hong Kong) Limited | Built-in Function 53 Mobile Facial Recognition Appliance Quick Start Guide Version 1.1 3.8.2 Health Status Event Summary Here is the summary of appliance status event with alert action. Action include: Trigger Email (*): Email alert if the event is triggered Resume Email (*): Email if the event is resumed from triggered Status LED: The signal pattern from status LED at the appliance front panel Event Trigger Resume Status LED L: On for 2000 ms and Off for 200 ms Email Email S: On for 200 ms and Off for 200 ms Camera is not set Capture fail NeoFaceError System Reboot Firmware Upgrade Real Time Monitor is Off Image Frame Droppeed Disk usage reach the defined limitation Disk usage Full Face FTP is Off Face FTP queue size is large Error occur during FTP NeoFRS is Off NeoFRS queue size is large Some of the NeoFRS Servers cannot be reached All NeoFRS servers were not be reached System False False True True True False True False True False Real Time Monitor True True False False True False True False Face FTP True True False False True True NeoFRS True True True True True True True True LSS LSS LS N/A N/A N/A N/A LSSSSS LSSSSS N/A N/A LSSSS N/A N/A LSSS LSSS (*) E-mail addresses defined in system alert list from System Settings “E-mail Notifications” will receive the email according to the summary. NEC (Hong Kong) Limited | Built-in Function 54 Mobile Facial Recognition Appliance Quick Start Guide Version 1.1 Appendix A - AXIS Camera Setup P1346 In this section, it shows the recommanded setting for AXIS Camera P1346. For the detail for setup procedure of the camera, please refers to the user manual provided by the IP camera manufactory. 1. Set the resolution of the capture mode to “1920x1080 (16:9)” NEC (Hong Kong) Limited | Appendix A - AXIS Camera Setup P1346 55 Mobile Facial Recognition Appliance Quick Start Guide Version 1.1 2. Enable anonymous viewer login 3. After setup the IP Camera, go to the admin page of the Appliance and update the camera type to ”AXIS Camera” with the camera IP address to “IP Address” textbox. NEC (Hong Kong) Limited | Appendix A - AXIS Camera Setup P1346 56 Mobile Facial Recognition Appliance Quick Start Guide Version 1.1 Appendix B - AXIS Camera Setup P1355 In this section, it shows the recommanded setting for AXIS Camera P1355. For the detail for setup procedure of the camera, please refers to the user manual provided by the IP camera manufactory. 1. Set the resolution of the capture mode to “1920x1080 (16:9)” NEC (Hong Kong) Limited | Appendix B - AXIS Camera Setup P1355 57 Mobile Facial Recognition Appliance Quick Start Guide Version 1.1 2. Enable anonymous viewer login 3. After setup the IP Camera, go to the admin page of the Appliance and update the camera type to ”AXIS Camera” with the camera IP address to “IP Address” textbox. NEC (Hong Kong) Limited | Appendix B - AXIS Camera Setup P1355 58 Mobile Facial Recognition Appliance Quick Start Guide Version 1.1 Appendix C – Panasonic Camera Setup WV-SP508E In this section, it shows the recommanded setting for Panasonic Camera WV-SP508E For the detail for setup procedure of the camera, please refers to the user manual provided by the IP camera manufactory. 1. Update the Image “JPEG” section, which is used for appliance live preview in surveillance page Parameter Value Image capture size 640x360 2. Update the Image “H.264(1)” section, which is used for real time monitoring streaming. Parameter Value H.264 Transmission On Refresh interval (JPEG) 3 fps Image capture size 1920x1080 NEC (Hong Kong) Limited | Appendix C – Panasonic Camera Setup WV-SP508E 59 Mobile Facial Recognition Appliance Quick Start Guide Version 1.1 3. Turn off the User auth. From User mng. section 4. After setup the IP Camera, go to the admin page of the Appliance and update the camera type to ”Panasonic Camera” with the camera IP address to “IP Address” textbox. NEC (Hong Kong) Limited | Appendix C – Panasonic Camera Setup WV-SP508E 60 Mobile Facial Recognition Appliance Quick Start Guide Version 1.1 Appendix D – Sony Camera Setup SNC-CH240 In this section, it shows the recommanded setting for Sony Camera SNC-CH240 For the detail for setup procedure of the camera, please refers to the user manual provided by the IP camera manufactory. 1. Update the Image “Image 1” section, which is used for video stream of real time monitoring system. Parameter Codec Image size Frame rate Value H.264 1920x1080 3 fps 2. Update the Image “Image 2” section, which is used for appliance live preview in surveillance page Parameter Value Codec JPEG Image size 640x368 NEC (Hong Kong) Limited | Appendix D – Sony Camera Setup SNC-CH240 61 Mobile Facial Recognition Appliance Quick Start Guide Version 1.1 3. Set the Viewer authentication to “Off” 4. After setup the IP Camera, go to the admin page of the Appliance and update the camera type to ”Panasonic Camera” with the camera IP address to “IP Address” textbox. NEC (Hong Kong) Limited | Appendix D – Sony Camera Setup SNC-CH240 62 Mobile Facial Recognition Appliance Quick Start Guide Version 1.1 Appendix E – Hikvision Camera Setup DS-2CD854-EW In this section, it shows the recommanded setting for Hikvision Camera DS-2CD854-EW For the detail for setup procedure of the camera, please refers to the user manual provided by the IP camera manufactory. 1. Update the video setting, which is used for video stream of real time monitoring system. Parameter Image size Video Encode Type Value 1280*720 H.264 2. After setup the IP Camera, go to the admin page of the Appliance and update the camera type to ”Hikvision Camera” with the camera IP address to “IP Address” textbox. Please input the username with password for accessing the camera as well. NEC (Hong Kong) Limited | Appendix E – Hikvision Camera Setup DS-2CD854-EW 63 Mobile Facial Recognition Appliance Quick Start Guide Version 1.1 NEC (Hong Kong) Limited | Appendix E – Hikvision Camera Setup DS-2CD854-EW 64 Mobile Facial Recognition Appliance Quick Start Guide Version 1.1 Appendix F – Samsung Camera Setup SNO-6011R In this section, it shows the recommanded setting for Samsung Camera SNO-6011R For the detail for setup procedure of the camera, please refers to the user manual provided by the IP camera manufactory. 1. Update the video profile “H.264”, which is used for video stream of real time monitoring system. Parameter Value Resolution 1920x768 (16:9) NEC (Hong Kong) Limited | Appendix F – Samsung Camera Setup SNO-6011R 65 Mobile Facial Recognition Appliance Quick Start Guide Version 1.1 2. Update the video profile “MJPEG”, which is used for live preview in surveillance page Parameter Value Resolution 640x360 (16:9) 3. After setup the IP Camera, go to the admin page of the Appliance and update the camera type to ”Samsung Camera” with the camera IP address to “IP Address” textbox. Please input the username with password for accessing the camera as well. NEC (Hong Kong) Limited | Appendix F – Samsung Camera Setup SNO-6011R 66 Mobile Facial Recognition Appliance Quick Start Guide Version 1.1 Appendix G – Bosch Camera Setup NBN-832V-IP In this section, it shows the recommanded setting for Bosch Camera NBN-832V-IP For the detail for setup procedure of the camera, please refers to the user manual provided by the IP camera manufactory. 1. Update the “Encoder Streams” and set the following: H.264 settings Stream1 to “1080p Live” for real time monitoring system. JPEG streams Resolution to “432p” for live preview 2. Update the “Device Access” and set the following: Set the Password ‘live’, or Leave the Password ‘live’ as blank if “Is Anonymous” option is used (Please refer to step 3) NEC (Hong Kong) Limited | Appendix G – Bosch Camera Setup NBN-832V-IP 67 Mobile Facial Recognition Appliance Quick Start Guide Version 1.1 3. After setup the IP Camera, go to the admin page of the Appliance and update the camera type to ”Bosch Camera” with the camera IP address to “IP Address” textbox. If Password ‘live’ is set at step 2, please uncheck the “Is Anonymous” and enter the username and password correspondingly. If Password ‘live’ is NOT set at step 2, please check the “Is Anonymous” NEC (Hong Kong) Limited | Appendix G – Bosch Camera Setup NBN-832V-IP 68