1
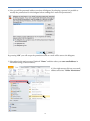
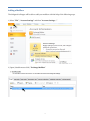
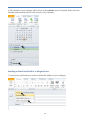
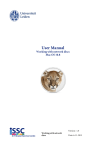
User Manual
Sharing Mail & Calendar
Outlook 2010
Version: 1.0
Sharing Mail & Calendar
Date: 30-01-2014
Introduction
With Outlook 2010 it is possible to share your mail and calendar with your colleagues. You can give
these colleagues read access or when needed, full access and sent mail on your behalf.
Note: it isn’t possible to grant access to a non-personal account. For example issc-helpdesk or a
secretariat. Though it is possible to give a non-personal account the rights on a personal account.
This manual consists of two parts, the first part describes how you can give a colleague access to your
mail account and the second part describes how your colleague has to set up his or her outlook
account.
Setting up permission to your mailbox and calendar
The steps below describe how you can give another person access to your mailbox and calendar.
When all steps have been completed, your colleague who you granted access will have to configure his
or her outlook account.
1) Select “File”, “Account Settings” and then “Delegate Access”
2
2) Select “Add” and then select the user in the global address list of whom you like to delegate access
to your mailbox and calendar.
3) You will now be presented with the screen below. Here you can set permissions for your colleague.
In the example below, we give editor rights on the calendar, tasks and inbox. Also we will notify
the delegated user with a summarize of these permissions.
“Automatically send a message to delegate summarizing these permissions”
3
4) Now you will be presented with an overview of delegates (by selecting a person it is possible to
modify the permissions for this delegate before sending the e-mail with permissions).
By pressing “OK” you will accept the permissions and an e-mail will be sent to the delegates.
5) Now select in the main screen of Outlook “Home” and then select your own email address in
the folder listing (as shown below).
6) Now right mouse click on your email
address and select “Folder Permissions”
4
7) Select “Add” in the permissions tab and add the user you just gave delegate access to your
mailbox/calendar. (in this window it is also possible to modify the permissions of an exciting
delegated user).
8) select the user in the global address list of whom you like to delegate access
to your mailbox and calendar and then select “OK”.
5
9) Now select the colleague followed by a predefined permission in
the dropdown menu “Permission Level”
It is also possible to manually set the permissions for the selections: “Read”,
“Write”, “Delete” and “Other”.
When you are finished setting up the permissions, select “OK”.
6
Adding a Mailbox
The delegated colleague will be able to add your mailbox with the help of the following steps.
1) Select “File”, “Account Settings” and then “Account Settings…”
2) Open (double mouse click) “Exchange Mailbox”
7
3) Select “More Settings”
4) Select “Advanced” and then “Add”
8
5) Search for and select the colleague who granted you access to his or her mailbox and select “OK”
6) An overview of the additional mailboxes will be presented to you.
Now select “Apply”, “OK”, “Next” and finally “Finish”.
7) The mailbox of your colleague will now be available in the folder overview (E-mail)
By default, only the inbox will visible. When more of the email folders should be visible, then your
colleague who gave you delegated access, should grant you access to these specific folders according
to step 5 of the previous chapter of this document.
9
9) The calendar of your colleague will be shown in the calendar menu of Outlook. Please select the
calendars that should be shown in the overview (My Calendars).
Sending an Email on behalf of a delegated user
1) Create a new email and select in the from field the mailbox of your colleague.
10