1
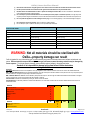
Laboratory Sterilization System A division of Gene Therapy Systems, Inc. Catalog # Description/Content Content Related Products Catalog # E400110 Ozilla® Ozone Sterilizer, 110V E400220 Ozilla® Ozone Sterilizer, 220V 1 Ozilla Device, 110V 1 Ozilla Scrub Filter 1 Power Cord 1 Spare Fuse 1 Ozilla Device, 220V 1 Ozilla Scrub Filter 1 Power Cord 1 Spare Fuse Ozilla® Ozone Gas Detector, rechargeable, 1 each Ozilla® Ozone Sterilizer Nest, 1 each Ozilla® Scrub Filter, 1 each Ozilla® Remote Control Ozilla® Ceramic Ozone Plates, Set of 2 Plates CoolCLAVE™ Laboratory Bench Top Sterilizer, 110V CoolCLAVE™Laboratory Bench Top Sterilizer, 220V BioCooler™ Cold Box , 48 vials BioCooler™ Cell Storage Box, 42 vials Mini BioCooler™ Cold Box, 8 x 1.5 ml tubes BioCooler™ Midi Cold Box, 12 x 2.0 ml tubes Dr. Spin™ Personal Centrifuge-Blue Dr. Spin™ Personal Centrifuge-Teal Dr. Spin™ Personal Centrifuge-Purple E4001GD E4001OB E4001SF E4001RC E4001OP E300110 E300220 E100100 E100200 E100300 E100500 E200100 E200200 E200300 Shipping and Storage: Ozilla is shipped at room temperature. Store on a lab bench away from water and heat sources. INTRODUCTION The Ozilla® Sterilizer is a unique and innovative laboratory sterilization system. This portable bench top sterilizer from Genlantis uses high-levels of ozone gas to clean and sterilize laboratory work cabinets (hoods, incubators, etc.) and various tools, especially ones involved in sensitive experiments or assays and that cannot be sterilized with standard heat autoclaves. The Ozilla Sterilizer will eliminate*† surface (or airborne) bacteria, mold, fungi, spores and viruses, and eliminate odors when used correctly. The device is small enough to put directly inside cell culture incubators, tissue culture hoods, or any other sealed enclosures that need to be sterilized or kept sterile. When used with the Ozilla® Ozone Sterilizer Nest (available separately under catalog # E40010B) the Ozilla Sterilizer can be used to clean a variety of equipment and tools - especially ones that will be damaged or destroyed in a standard autoclave - such as pipettes, pipette tips, gloves, safety eyewear, lab coats, plates, small instruments, cell culture plasticware, and much more. The Ozilla Sterilizer generates and releases triatomic oxygen (O3) gas, which readily gives up a single oxygen atom. This single oxygen is able to combine with other molecules (odors, toxic gases, bacteria, spores, etc.) and neutralize them via the powerful and natural oxidative process. Best of all, the Ozilla Sterilizer contains a de-ozonation (aka “scrubbing”) feature, which converts ozone gas back to oxygen at the end of a sterilization cycle, hence removing ozone gas from the environment. The Ozilla Sterilizer offers the following features and benefits: Features Sturdy stainless steel construction Programmable timed operation Simple and easy maintenance Powerful (2000 mgph) ozone output De-ozonation at 240 cfm Compact, portable, and lightweight Benefits Sterilizes surfaces and air spaces in multiple areas and locations Eliminates need for harmful liquids, chemicals, UV rays, or damaging heat Powerful reduction or elimination* of microscopic organisms Keeps equipment, tools, and work areas clean without chemical residue or damage Highly cost effective Safe and efficient * Disclaimer: The Genlantis Ozilla Ozone Sterilizer is not a replacement or substitute for autoclaves, and should not be used to sterilize equipment for use in medical or surgical applications of any kind. The Ozilla sterilizing cycles can eliminate most surface contaminants, especially bacteria and fungus that exist under normal use in laboratory areas. Heavier concentrations of contaminants should be removed or wiped clean first before using the Ozilla sterilizer. CAREFULLY READ AND FOLLOW ALL INSTRUCTIONS FOR OPERATION OF THE OZILLA STERILIZER. AVOID walking into any room or enclosure while the Ozilla Sterilizer is still running AND before it completes its full sterilization and de-ozonation cycles. †Genlantis makes no claims and offers no guarantees of any kind that the Ozilla Sterilizer will eliminate 100% of all contaminants under all circumstances. Whenever and wherever possible, users should test an Ozilla sterilized area for presence of trace contaminants if absolute cleanliness is desired or required. PRECAUTIONS AND WARNINGS (a) DEVICE IS INTENDED FOR CHEMICAL OXIDATION AND DISINFECTION IN LABORATORIES IN THE BIOTECHNOLOGY, PHARMACEUTICAL, CHEMICAL, AND ELECTRONICS INDUSTRIES. (b) DEVICE IS NOT INTENDED FOR USE IN OCCUPIED SPACES. (c) DEVICE NOT INTENDED FOR CLEANING AIR NEAR A PERSON, IN RESIDENTIAL OR COMMERCIAL SPACES, MOTOR VEHICLES, OR OCCUPIED SPACES. Ozilla® Ozone Sterilizer Manual (d) (e) (f) (h) Read all instructions before using the appliance. This device must be used ONLY as intended and described in this manual. Do NOT operate the Ozilla device without the filter grills inserted and fastened on top of the Ozilla device. DO NOT Immerse the Ozilla Sterilizer in water or operate at humidity levels above 60%. Use an air conditioner or dehumidifier to lower humidity levels before using the sterilizer. Do not attempt to operate the Ozilla Sterilizer in an enclosed space when people or animals are present; ozone gas may cause respiratory irritation at higher concentrations; make sure the Ozilla device finishes its sterilization and de-ozonation scrub cycles in full. Do not operate this appliance if it has a damaged cord or plug, if it is not working properly, or if it has been damaged or dropped. (i) (j) Do not immerse cord or plug in water; keep cord away from heated surfaces. Do not attempt to repair or open the unit unless you are a qualified repair technician. (g) SPECIFICATIONS 110V Model (E400110) 220V Model (E400220) Electrical 110 VA, 60 Hz. AC 230 VA, 50 Hz. AC Fuse Type 239, 250V, 3 Amp Type 239, 250V, 3 Amp Dimensions (Width x Depth x Height) 13 x 11 x 3 inches (33.02 x 27.94 x 9.84 cms) 13 x 11 x 3 inches (33.02 x 27.94 x 9.84 cms) Weight 11.5 lbs. (5.2 kg.) 13.5 lbs. (5.2 kg.) Ozone Fan 30 CFM 30 CFM Ozone Output 2000 mg/hr 2000 mg/hr De-ozonation (scrub) Fans 2 @ 120 cfm 2 @ 120 cfm Warranty 1 year parts and labor 1 year parts and labor WARNING: Not all materials should be sterilized with Ozilla—property damage can result Ozilla is intended for use in laboratories and on some laboratory equipment to eliminate airborne and surface contaminants and germs. Different materials respond differently to ozone gas, and some common laboratory materials may be damaged by ozone exposure. To minimize property damage, please carefully read and adhere to the guidelines below. Genlantis is not responsible for damage arising from failure to follow instructions relating to Ozilla’s use. Guidelines SE = Strong effect: Materials are most susceptible to ozone gas degradation; these materials should be removed from areas to be sterilized with Ozilla. MEH = Moderate Effect High: Materials are noticeably affected by ozone gas and exposure should be limited to short periods of time only. Frequent exposure of these materials to ozone gas will require they be discarded or replaced. MEL = Moderate Effect Low: Materials are not affected by infrequent, brief exposure, but ozone gas can deteriorate materials found under MEL. Prolonged exposure to high levels of ozone gas will require they be discarded or replaced. ZE = Zero Effect: materials are not affected by ozone gas; sterilize as often as needed. Unlisted Materials: if a laboratory material is not listed in the table below, err on the side of caution and remove these unlisted materials from areas to be sterilized with Ozilla. Material Buna-‐N (nitrile) Fiber reinforced plastic (FRP) Magnesium Natural rubber Nylon Steel Zinc SE X X X X X X X Material Acetal resin (Delrin®) Cast Iron Galvanized steel SE VKM140808 Genlantis MEH MEL MEH MEL X X X ZE ZE Page 2 of 7 11011 Torreyana Road. San Diego, CA 92121 • Toll Free (888) 428-0558 • U.S. & Canada (858) 457-1919 • www.genlantis.com ©2014 Genlantis and Gene Therapy Systems, Inc. Ozilla® Ozone Sterilizer Manual Chlorosulfonated polyethylene (CSPE) (Hypalon®) Thermoplastic elastomer (Hytrel®) Monel® Neoprene (Polychloroprene®) Polyamide Polypropylene Glass filled polypropylene (GFPP) ABS Plastic Acrylic Aluminum Brass Bronze Copper Ethylene propylene diene monomer (EPDM) Flexelene® tubing Low-‐density polyethylene (LDPE) Poly(vinyl chloride) (PVC) Polyacrylate Polyethylene Polysulfide Tygon® Butyl Chlorinated polyvinyl chloride (CPVC) Cross linked polyethelene (PEX) ehtylene propylene Ethylene acrylic elastomer (Vamac®) Ethylene propylene rubber (EPR) Fluorosilicone Glass High-‐density polyethylene (HDPE) Perfluoroelastomer (Kalrez®, Chemraz®, Viton®) Polycarbonate Polychlorotrifluoroethene(PCTFE) Polyether ether ketone (PEEK) Polytetrafluoroethylene (PTFE) Polyurethane PVDF Silicone Stainless Steel Superalloys (Hastelloy®, Inconel, Thermoplastic elastomer (TPE) Titanium X X X X X X X X X X X X X X X X X X X X X X X X X X X X X X X X X X X X X X X X X X Hastelloy®-‐C is a trademark of Haynes International Chemraz® is a registered trademark of Green, Tweed and Co. Tygon® is a registered trademark of Saint-‐Gobain Corporation Monel® is a registered trademark of Special Metals Corporation Delrin®,Hypalon®, Hytrel®, Hypalon®, Polychloroprene®, Vamac®, Viton®, and Kalrez® are trademarks of DuPont® VKM140808 Genlantis Page 3 of 7 11011 Torreyana Road. San Diego, CA 92121 • Toll Free (888) 428-0558 • U.S. & Canada (858) 457-1919 • www.genlantis.com ©2014 Genlantis and Gene Therapy Systems, Inc. Ozilla® Ozone Sterilizer Manual OPERATION I. Positioning the Unit The Ozilla® Ozone Sterilizer is portable and ready to plug in and use directly out of the box. Its effectiveness depends on the amount of ozone gas that is generated and how it dispersed through ambient air. For optimal sterilization, follow these simple recommendations: • Place the Ozilla Sterilizer as close as possible to the contaminated area; the ozone concentration is highest as it exits the unit. • Place the Ozilla Sterilizer at the highest possible point in a room or cabinet; ozone is heavier than air and will drift down and neutralize contaminants in its path. • Use existing air currents or circulating fans (whenever possible or available) to help disperse the ozone gas as much as possible. II. Preparing the Area To Be Sterilized 1. Clean area or cabinet that needs sterilization from heavy or excess contaminants using appropriate cleaning solutions like soap, ethanol, bleach, etc. NOTE: ozone gas is able to safely and effectively sterilize airborne or surfaces contaminants, however the gas will not penetrate and clean liquids and solutions, or contaminants hidden from the gas. Water inhibits the high-level generation of Ozone gas. Remove any liquid from the area to be cleaned by the Ozilla Ozone Sterilizer. Place the ozone sterilizer in a central and high location in the space that needs sterilization. Seal off any gaps in the unit or area to be sterilized. This is critical to get a high-level of ozone gas buildup to sterilize the area that is exposed to the ozone gas. If sterilizing a room, large openings or holes to create an air tight space and prevent ozone gas from escaping. It is necessary to seal openings in intended sterilization space with plastic sheeting and/or tape. Do not use the Ozilla Sterilizer in areas in which ozone will contact oxidizable substances. See Material Safety Data Sheet for further information. 2. 3. 4. 5. IMPORTANT: photocopy the “CAUTION” page in this manual (Page 5), or make your own “CAUTION” note, and prepare to affix the note on the cabinet or room door indicating that an ozone sterilization cycle is in progress to avoid disrupting a cleaning cycle, and to minimize others’ exposure to ozone gas. III. Operating the Unit Figure 1: Front panel of the Ozilla Ozone Sterilizer In General: the [TIME SELECT] button will cycle through the time digits from left to right (two lef®ost digits are for hours, and two righ®ost digits are for minutes); the [SET TIME] buttons (up and down arrows) will increase or decrease the selected (blinking) digit. The Ozilla Sterilizer can be set to operate from a minimum of 1 minute to a maximum 99 hours and 99 minutes for each ozone or de-ozonation scrub cycles (set to run simultaneously). We highly recommend that users keep a log sheet to track users and hours of Ozilla usage; this log sheet will also be very useful to guide users in replacing the Scrub Filter it in a timely manner (every 3,000 hours or 9 months, whichever comes first). To set the run time for the ozone cycle: For recommended sterilization times based on size of area, see Table 1 below. a. b. c. d. e. VKM140808 Press the [OZONE TIME] button; the digital display will light up and read either “0000” or a previously set time.. Press [TIME SELECT] button; the left-most digit will blink; Press [SET TIME] up or down arrow button repeatedly until desired time is selected. Press [TIME SELECT] button to move to next digit, repeat Step c, then press [SET TIME] to move to the next digit. Repeat Step d. one last time to set the last digit; the display now should read the ozone time with no blinking digits. Genlantis Page 4 of 7 11011 Torreyana Road. San Diego, CA 92121 • Toll Free (888) 428-0558 • U.S. & Canada (858) 457-1919 • www.genlantis.com ©2014 Genlantis and Gene Therapy Systems, Inc. Ozilla® Ozone Sterilizer Manual To set the run time for the scrub cycle: For recommended scrubbing times based on size of area, see Table 1 below. f. g. h. i. j. Press the [SCRUB TIME] button; the digital display will read either “0000” or a previously set time. Press [TIME SELECT] button; the left-most digit will blink; Press [SET TIME] up or down arrow button repeatedly until desired time is selected. Press [TIME SELECT] button to move to next digit, repeat Step c, then press [SET TIME] to move to the next digit. Repeat Step d. one last time to set the last digit; the display now should read the ozone time with no blinking digits. k. Once the ozone and scrub cycles have been set, press the [RUN] button; the green light will turn on and you will hear the machine begin its cycle run. If needed or desired, set a lab timer with the total sterilization and scrubbing cycle times as a reminder. Close the enclosure door or window to seal the cabinet that is being sterilized, or if sterilizing a room, exit and close the door behind. Upon sterilization and scrub cycles completion, the Ozilla Sterilizer will automatically turn off (digital display will be blank); users can enter the room or open the cabinet that is being sterilized. If needed, the Ozilla Sterilizer can be run again with current or readjusted settings for further cleaning cycles. l. For units with the optional remote control (E4001RC) The Ozilla Remote Control allows users to switch the Ozilla Sterilizer [RUN] cycle from “Ozone” to “Scrub”. This allows users to immediately terminate the sterilization cycle (short of the programmed time) by turning the Scrub cycle on. By doing that, the Ozilla Sterilizer will start to remove the ozone gas that has been generated by the unit and will run the Scrub cycle for the amount of time that has been programmed by the user. Table 1: Recommended Sterilization and Scrubbing Times Based on Size of Cabinet or Area Enclosure Type Area Measurement Recommended Minimum Recommended Minimum (HxWxD, feet) Sterilization Time (hours) Scrubbing Time (hours)** Incubator 2x3x2 2 hours 15 minutes Tissue Culture Hood (3 feet wide) 2.4 x 2.83 x 2 (13.5 ft3) 4.5 hours 1 hour Tissue Culture Hood (4 feet wide) 2.4 x 3.9 x 2 (18.7 ft3) 6 hours 1 hour Tissue Culture Hood (5-6 feet wide) 2.4 x 4.9 x 2 (23.5 ft3) 8 hours 1 hour Room 8 x 12 x 10 (960 ft3) 12 hours 4 hours Ozilla® Ozone Sterilizer Nest 2x2x2 1.5 hours 15 minutes **NOTE: Minimum Scrub Times recommended can be extended by running additional scrub cycles if needed or desired. TROUBLESHOOTING Problem Solution Unit does not start when [OZONE TIME] or [SCRUB TIME] buttons are pressed. • Check that power cord is attached on the back of the unit; • Check that both thumb screws that secure the large and small grill plates on top of the unit are fully screwed in. • Sometimes during shipping, the ozone ceramic plates may get dislodged. Check the plates and seat them properly by removing them and reinserting them back tightly in their respective slots. Clean the ceramic ozone plates as described in the MAINTENTANCE section. If plates are older than one year replace with new ones (Cat# E4001OP). Check fuse on the back side of the unit; and if blown, replace with type 239, 250V, 3 Amp fuse. Ozone smell is not as noticeable as usual, or there is no detectable ozone smell. Power does not come on. VKM140808 Genlantis Page 5 of 7 11011 Torreyana Road. San Diego, CA 92121 • Toll Free (888) 428-0558 • U.S. & Canada (858) 457-1919 • www.genlantis.com ©2014 Genlantis and Gene Therapy Systems, Inc. MAINTENANCE WARNING: Ozilla® Ozone Sterilizer Manual The Ozilla® Ozone Sterilizer generates high voltage current inside the machine. MAKE SURE TO UNPLUG UNIT from power outlet before performing any parts cleaning or replacements. (a) White Filter Cleaning: periodically clean the white dust filter located under the small grill on the top of the unit. Remove the thumb screw, lift the plate, and peel off the filter. Wash it in warm soapy water. Make sure it is completely dry before reinstalling it. NOTE: As a safety mechanism, the Ozilla Sterilizer will not operate if the small grill is missing or the thumb screw is not reinserted fully into the unit. Figure 2: Top view of Ozilla® Ozone Sterilizer (b) Scrub Filter Replacement: Replace the scrub filter once every 3,000 hours of operating the unit or 9 months (whichever comes first) by removing the large grill on the top of the unit. NOTE: As a safety mechanism, the Ozilla Sterilizer will not operate if the scrub filter is absent or the thumb screw is not reinserted fully into the unit. (c) Ozone Plates Cleaning: Clean the ozone plates at the beginning of each new season, or when you suspect that ozone production has decreased. To clean the ozone plates, remove the small grill on top of the unit, and pull out the two white ceramic generator plates. i.) wash the plates in warm soapy water and air dry or use a hair dryer; ii) clean the contact area of the flat stainless steel springs with a Q-tip moistened with alcohol and dry with tissue or let air dry; iii) to avoid arcing or damaging the Ozilla Sterilizer, make sure plates are completely dry before re-inserting into the unit. NOTE: As a safety mechanism, the Ozilla Sterilizer will not operate if the small grill is missing or the thumb screw is not reinserted fully into the unit. (d) Ozone Plates Replacement: Replace every year or two, especially when you notice a decrease in cleaning efficiency or a decrease in ozone gas smell. Follow the procedure described in (c) to remove and replace the ceramic ozone plates. (e) General cleaning: wipe the Ozilla Sterilizer with a clean soft cloth tissue that’s lightly moistened with water of mild cleaning solution. DO NOT SPRAY the unit directly with any liquid cleaner or immerse in water or solution of any kind. FIRST AID: if users experience eye or breathing irritations, immediately take the following steps: (i) Turn the sterilization cycle off by pressing [RUN] button; (ii) Remove affected person from the area and administer first aid as necessary and described in the Material Safety Data Sheet; (iii) Run a scrub cycle as indicated in this Owner’s Manual, Section III “Operating the Unit” on Page 3; alternatively, turn the Ozilla device off and air the affected area until the odor of ozone is no longer detectable or noticeable. LIMITED LICENSE: The purchase price paid for the Ozilla® Ozone Sterilizer grants end users a non-transferable, non-exclusive license to use the unit in a research laboratory setting, and for sterilizing purposes only as described in this manual. This use license excludes and without limitation, resale, repackaging, or modification of the unit in any way and without prior notification of and approval by Genlantis. Under no circumstances shall the Ozilla device be used on food or drink products intended for human or animal consumption. At all times, care and attention should be exercised in handling and using the Ozilla device by following the instructions in the manual, using common sense lab practices, wearing protective lab clothing and eyewear. NEVER OPERATE THE OZILLA DEVICE IN A ROOM OR AREA WHERE PEOPLE OR ANIMALS ARE PRESENT. Purchasers may refuse this license by returning the Ozilla Sterilizing unit unused and its original packaging. By keeping or using the Ozilla device, users agree to be bound by the terms of this license. The laws of the State of California shall govern the interpretation and enforcement of the terms of this license VKM140808 Genlantis Page 6 of 7 11011 Torreyana Road. San Diego, CA 92121 • Toll Free (888) 428-0558 • U.S. & Canada (858) 457-1919 • www.genlantis.com ©2014 Genlantis and Gene Therapy Systems, Inc. CAUTION Ozone sterilization In progress Do NOT open door until this sign is removed For users with remote control, press the remote button to immediately cancel the Ozone cycle and enter the unit into the Scrub cycle. Allow the Ozilla device to fully run the Scrub cycle (the digital display will go blank) before entering space, or opening cabinet that is being sterilized. Name:________________________________________ Date:_________________________________________ Time Sterilization Cycle Started:____________ Expected Cycle Completion:________________ Photocopy this page of the manual and post on the door of an area or cabinet during every ozone sterilization cycle.