1
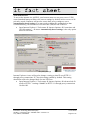
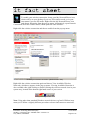
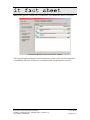
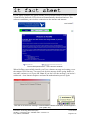
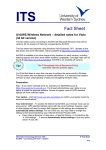
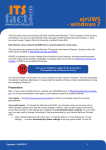
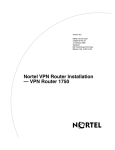
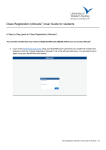
it fact sheet
AirUWS Wireless Network – detailed notes for XP
This fact sheet covers connecting to AirUWS, the University wide wireless network
released in 2007. The current version of this fact sheet will be available at
http://www.uws.edu.au/wireless.
The initial rollout for PCs is restricted to users of laptops running Microsoft Windows
XP with Service Pack 2 and Internet Explorer 6 (IE 6). Other software and operating
systems may work, but aren’t supported. Although they may detect and connect to
AirUWS, Personal Digital Assistants (PDAs) cannot login to, or use AirUWS.
AirUWS extends the existing wired network and is available at key locations on each
campus, including teaching spaces and other areas where students congregate.
Coverage maps for each campus are available at http://www.uws.edu.au/wireless, and
we’ll be providing signage to show where you can find campus wireless zones.
If your laptop meets the specifications available at: http://www.uws.edu.au/wireless,
you have administrative user rights on your laptop, and you have an active
MyUWSAccount login, you’ll be able to access the wireless network at no additional
charge. The IT Acceptable Use of Resources Policy and other relevant policies apply
to all users of AirUWS, just as they apply to users of the wired network.
Unlike using the wired network, staff computers won’t automatically connect – you’ll
need to follow the connection process before using networked services.
Preparation:
You
If you haven’t already done so, activate your MyUWSAccount at
https://myuwsaccount.uws.edu.au/. You’ll need administrative user rights on your
laptop to install the required software. Almost all regular users of UWS owned
standard laptops are “Self Managed Mobile Users” and will have sufficient rights.
Your laptop
Confirm your laptop meets the minimum specifications published at:
http://www.uws.edu.au/wireless.
All users of UWS owned standard laptops must successfully log into their laptop at
least once while it’s connected to the wired network, before they can log into the
same laptop on either the wireless network or as a stand alone device. A successful
wired network login is required to establish your user account on the machine. This is
not an issue for privately owned laptops.
Information Technology Directorate (ITD)
AirUWS – connecting a PC – detailed notes – Version 1.2.1
Tony Fathers, 26/03/2007
IT fact sheet
Page 1 of 12
it fact sheet
Your web browser
To access the internet via AirUWS, your browser must use our proxy server. UWS
owned standard laptops will have the correct settings by default; however users of all
privately owned computers will need to ensure their proxy settings are set to
automatically detect settings. You may need to change this setting back to that
recommended by your Internet Services Provider (ISP) for non-UWS use.
• Open Internet Explorer’s Tools menu Æ Internet Options Æ Connections tab
Æ LAN settings… Æ ensure Automatically detect settings is the only option
ticked Æ click OK.
IE’s proxy settings
Internet Explorer 6 users will need to change a setting so that IE uses HTTP 1.1
through proxy connections. IE 7 has this setting enabled by default. This setting
should not need to be changed back for non-UWS use.
• Open Internet Explorer’s Tools menu Æ Internet Options Æ Advanced tab Æ
scroll to HTTP 1.1 settings Æ tick Use HTTP 1.1 through proxy connections
Æ click OK.
Information Technology Directorate (ITD)
AirUWS – connecting a PC – detailed notes – Version 1.2.1
Tony Fathers, 26/03/2007
IT fact sheet
Page 2 of 12
it fact sheet
Tick Use HTTP 1.1 through proxy connections
If you have a complex home page address (URL) or a blank home page, the UWS
browser redirect feature may not work. If you have any problems opening the login
screen, try setting your home page to http://www.uws.edu.au, which is known to
redirect properly. Changing your home page back for non-UWS use is optional.
• Open IE’s Tools menu Æ Internet options Æ General tab Æ Home page Æ
enter the new home page details Æ click OK.
Set your home page here
Information Technology Directorate (ITD)
AirUWS – connecting a PC – detailed notes – Version 1.2.1
Tony Fathers, 26/03/2007
IT fact sheet
Page 3 of 12
it fact sheet
If your browser is set to reuse windows when launching a shortcut (eg, clicking a link
in Outlook) rather than opening a new window, you run the risk of accidentally
moving away from the portal page and being disconnected. This setting works on or
off campus.
• Open IE’s Tools menu Æ Internet Options Æ Advanced tab Æ scroll to
Browser settings Æ untick Reuse windows for launching shortcuts Æ click
OK.
Make certain Reuse windows for launching shortcuts isn’t ticked
Connecting:
Turning your wireless hardware off until you have logged into Windows may reduce
start up and shutdown times, and connected performance is likely to be less erratic.
After logging into Windows, turn your wireless hardware back on and enable it. Most
laptops have a switch that turns wireless on or off, but the method varies between
brands and models. Some Acers have a separate switch, and LGs use the keys Fn +
F6. Refer to your laptop’s user manual for more information.
An Acer’s wireless on/off switch
Information Technology Directorate (ITD)
AirUWS – connecting a PC – detailed notes – Version 1.2.1
Tony Fathers, 26/03/2007
IT fact sheet
Page 4 of 12
it fact sheet
To enable your wireless connection, locate your My Network Places icon,
which will be on your desktop if you use XP in classic mode, or in your
start menu if you use XP mode. Right click the My Network Places icon
and choose Properties from the pop-up menu. Alternatively, open Network
Connections from the Control Panel, which opens the same window.
Right click the wireless connection and choose enable from the pop-up menu.
Enable your wireless connection (detailed folder view)
Right click the wireless connection again and choose View Available Wireless
Networks, which now appears in the pop-up menu. Viewing Available Networks is
also available after right clicking or double clicking the wireless network icon in your
system tray, located in the bottom right hand corner of your screen.
The system tray wireless icon
Note: Using other than standard Windows network drivers (eg Intel’s PROset) may
mean you’ll follow a slightly different procedure to detect and connect to networks.
Information Technology Directorate (ITD)
AirUWS – connecting a PC – detailed notes – Version 1.2.1
Tony Fathers, 26/03/2007
IT fact sheet
Page 5 of 12
it fact sheet
Choose View Available Wireless Networks
Your Wireless Connection Window will open. You may find more than one wireless
network is visible – select AirUWS and press Connect.
After selecting AirUWS, click Connect
Information Technology Directorate (ITD)
AirUWS – connecting a PC – detailed notes – Version 1.2.1
Tony Fathers, 26/03/2007
IT fact sheet
Page 6 of 12
it fact sheet
Wait for the process to show you’re connected. This should take under 30 seconds.
The wireless hardware is now connected to AirUWS
UWS owned standard laptops try and synchronise as soon as the wireless connection
is established. Because you haven’t yet authenticated, synchronisation will fail.
Information Technology Directorate (ITD)
AirUWS – connecting a PC – detailed notes – Version 1.2.1
Tony Fathers, 26/03/2007
IT fact sheet
Page 7 of 12
it fact sheet
Authenticate (log in)
Open Internet Explorer. You should be automatically redirected to the login portal,
where you’ll enter your MyUWSAccount login details.
The AirUWS login screen
After logging in, Internet Explorer will download and launch TunnelGuard, which
checks your laptop meets the AirUWS specifications. If TunnelGuard doesn’t start,
you probably need to update your Java Runtime environment (JRE). A direct link to
the Java installation file for XP is available on the login page. Alternatively, use a
connected computer to go to http://java.com/en/download/manual.jsp and download
the offline version to your USB drive. Return your USB drive to your laptop, and
install the JRE. TunnelGuard should now work after you login. If TunnelGuard finds
your laptop doesn’t comply, it will prevent you going further.
TunnelGuard has found this laptop meets AirUWS specifications
Information Technology Directorate (ITD)
AirUWS – connecting a PC – detailed notes – Version 1.2.1
Tony Fathers, 26/03/2007
IT fact sheet
Page 8 of 12
it fact sheet
If your laptop complies, the portal window will open and NetDirect (Nortel Networks
Virtual Private Network (VPN) client) will automatically download and run. This
software establishes your wireless connection to the internet and intranet.
The AirUWS portal screen – don’t close this window!
When NetDirect successfully installs, you’ll see a banner message welcoming you to
the campus VPN Gateway. You must wait for this message before going further (it
may take a minute or so). Press OK. Note: If you don’t see the message, you haven’t
connected – close Internet Explorer and start the authentication process again.
Click OK on the welcome message. A Nortel NetDirect bubble notification will also appear in
your system tray
Information Technology Directorate (ITD)
AirUWS – connecting a PC – detailed notes – Version 1.2.1
Tony Fathers, 26/03/2007
IT fact sheet
Page 9 of 12
it fact sheet
For security reasons, each time you connect you’ll go through the authentication,
download and installation process.
I’m connected – what can I do?
Don’t close the AirUWS portal window, or you’ll be disconnected!
Once fully connected, minimise the portal window, but don’t close it. If you close the
portal window, you’ll be disconnected from AirUWS and have to start again.
Open a new instance of your browser to surf the web. Opening a new instance
means that you’ll need to click the icon used to launch the browser program again –
don’t just open a new window or a new tab. Programs such as Internet Explorer, MSN
Messenger, and email software should work normally.
To improve security, all users of AirUWS will be required to authenticate again when
they try to access external websites. This process will be familiar to students, as it’s
the same as required when using the general purpose computer labs. Enter your
MyUWSAccount details when the login box appears, and press OK to continue. You
should only be asked to authenticate once per browser session – that is, if you close
your browser, or logout of AirUWS, you will need to re-authenticate when next you
try to access an external website. If your browser stays open, and you stay connected,
you should not be asked to authenticate again.
Authenticate with your MyUWSAccount details
Note: UWS recommends using your ISP's web portal to access your home email
account. This will minimise potential problems reading or sending email from that
account. If you use email software such as Outlook, Eudora or Thunderbird, you may
not be able to send email. Setting the "SMTP server" to "smtp.uws.edu.au" within the
email software should solve this problem. Unfortunately, UWS cannot provide any
further assistance with access to non UWS email accounts.
Information Technology Directorate (ITD)
AirUWS – connecting a PC – detailed notes – Version 1.2.1
Tony Fathers, 26/03/2007
IT fact sheet
Page 10 of 12
it fact sheet
Students will soon be able to access their My Documents via AirUWS, using the web.
This feature is still undergoing testing before release.
Privately owned computers will not be able to connect to network shares, synchronise
off-line files or print, but will have internet access. If you need to print from a
privately owned laptop, we recommend saving your work to a USB drive, which you
can take to an on campus computer lab to print as you normally do in the labs.
Staff using UWS owned standard laptops will be able to print normally, synchronise
off line files, and connect to their network based files and any shared network drives
they are permitted to access.
Click this icon to see if you are able to connect to your network based drives
The Offline Files Status window opens after clicking the icon
How do I log off?
Always use the logoff link on the portal page.
Users of UWS owned/leased standard computers should save their work, manually
synchronise their files, close open programs (other than the AirUWS portal page), and
use the logoff link on the portal page. They should disable their wireless connection
before shutting down. Doing so prevents the computer attempting to synchronise files
and save settings to the network on logout, which can cause your computer to hang
for long periods.
Users of privately owned computers should be sure they save their work, close
programs linking them to the network (other than the AirUWS portal page), and use
the logoff link on the AirUWS portal page.
Information Technology Directorate (ITD)
AirUWS – connecting a PC – detailed notes – Version 1.2.1
Tony Fathers, 26/03/2007
IT fact sheet
Page 11 of 12
it fact sheet
Minimum specifications:
The minimum specifications will be subject to change as different configurations are
tested and certified for use.
•
The current specifications can be found at:
http://www.uws.edu.au/wireless
Help
Students should contact the Teaching Technology Officers located at each campus’
general purpose computer labs in the first instance. Students can also contact the
Helpdesk for phone based support.
Staff should contact the Helpdesk.
Helpdesk
Phone:
Email:
02 9852 5111 (ext 5111)
[email protected]
Tips:
You must leave the portal window open or you will be disconnected from AirUWS.
Save often. Wireless networks are inherently less reliable than wired networks, and
you could potentially lose your data if your network connection is lost. Save often to
minimise your risk of losing data.
Don’t try and connect wirelessly while still running a wired connection – the laptop
will get confused about which connection to use.
Updating your laptop’s wireless drivers can give a much more reliable and consistent
service, however, the appearance of your network connection may change.
Inactivity timeouts apply. UWS has a limited number of licences available for
wireless connection. To be fair to all, users will be automatically logged off after a
lengthy period of inactivity, to allow others to connect.
After logging into their computer, but before logging into the wireless network, users
of UWS owned standard computers will receive the warning “Windows cannot locate
the server copy of your roaming profile. Attempting to log you on with your local
profile….” This is normal, because the roaming profile will not be available until you
are network connected. Press OK, and then proceed as per the start of this document.
More information:
More information is available at http://www.uws.edu.au/wireless.
Information Technology Directorate (ITD)
AirUWS – connecting a PC – detailed notes – Version 1.2.1
Tony Fathers, 26/03/2007
IT fact sheet
Page 12 of 12