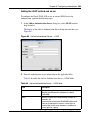
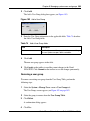
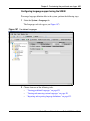
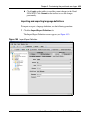
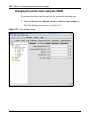
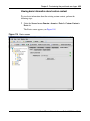
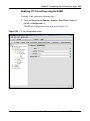
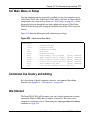
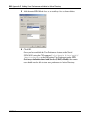
1
Part No. 320818-A
December 2005
4655 Great America Parkway
Santa Clara, CA 95054
Nortel Secure Network Access
Switch 4050 User Guide
Nortel Secure Network Access Switch
Software Release 1.0
*320818-A*
2
Copyright © Nortel Networks Limited 2005. All rights reserved.
The information in this document is subject to change without notice. The statements, configurations, technical data, and
recommendations in this document are believed to be accurate and reliable, but are presented without express or implied
warranty. Users must take full responsibility for their applications of any products specified in this document. The
information in this document is proprietary to Nortel Networks Inc.
The software described in this document is furnished under a license agreement and may be used only in accordance
with the terms of that license. The software license agreement is included in this document.
Trademarks
*Nortel, Nortel Networks, the Nortel logo, the Globemark, Passport, BayStack, and Contivity are trademarks of
Nortel Networks.
All other products or services may be trademarks or registered trademarks of their respective owners.
The asterisk after a name denotes a trademarked item.
Restricted rights legend
Use, duplication, or disclosure by the United States Government is subject to restrictions as set forth in subparagraph
(c)(1)(ii) of the Rights in Technical Data and Computer Software clause at DFARS 252.227-7013.
Notwithstanding any other license agreement that may pertain to, or accompany the delivery of, this computer software,
the rights of the United States Government regarding its use, reproduction, and disclosure are as set forth in the
Commercial Computer Software-Restricted Rights clause at FAR 52.227-19.
Export
This product, software and related technology is subject to U.S. export control and may be subject to export or import
regulations in other countries. Purchaser must strictly comply with all such laws and regulations. A license to export or
reexport may be required by the U.S. Department of Commerce.
Statement of conditions
In the interest of improving internal design, operational function, and/or reliability, Nortel Networks Inc. reserves the
right to make changes to the products described in this document without notice.
Nortel Networks Inc. does not assume any liability that may occur due to the use or application of the product(s) or
circuit layout(s) described herein.
Portions of the code in this software product may be Copyright © 1988, Regents of the University of California. All
rights reserved. Redistribution and use in source and binary forms of such portions are permitted, provided that the
above copyright notice and this paragraph are duplicated in all such forms and that any documentation, advertising
materials, and other materials related to such distribution and use acknowledge that such portions of the software were
developed by the University of California, Berkeley. The name of the University may not be used to endorse or promote
products derived from such portions of the software without specific prior written permission.
SUCH PORTIONS OF THE SOFTWARE ARE PROVIDED “AS IS” AND WITHOUT ANY EXPRESS OR IMPLIED
WARRANTIES, INCLUDING, WITHOUT LIMITATION, THE IMPLIED WARRANTIES OF MERCHANTABILITY
AND FITNESS FOR A PARTICULAR PURPOSE.
320818-A
3
In addition, the program and information contained herein are licensed only pursuant to a license agreement that contains
restrictions on use and disclosure (that may incorporate by reference certain limitations and notices imposed by third
parties).
Licensing
This product includes software developed by the OpenSSL Project for use in the OpenSSL Toolkit
(http://www.openssl.org/).
This product includes cryptographic software written by Eric Young ([email protected]).
This product includes software written by Tim Hudson ([email protected]).
This product includes software developed by the Apache Software Foundation (http://www.apache.org/).
This product includes a TAP-Win32 driver derived from the CIPE-Win32 kernel driver, Copyright © Damion K. Wilson,
and is licensed under the GPL.
Portions of the TunnelGuard code include software licensed from The Legion of the Bouncy Castle.
See Appendix H, “Software licensing information,” on page 905 for more information.
Nortel Networks Inc. software license agreement
This Software License Agreement (“License Agreement”) is between you, the end-user (“Customer”) and Nortel
Networks Corporation and its subsidiaries and affiliates (“Nortel Networks”). PLEASE READ THE FOLLOWING
CAREFULLY. YOU MUST ACCEPT THESE LICENSE TERMS IN ORDER TO DOWNLOAD AND/OR USE THE
SOFTWARE. USE OF THE SOFTWARE CONSTITUTES YOUR ACCEPTANCE OF THIS LICENSE
AGREEMENT. If you do not accept these terms and conditions, return the Software, unused and in the original shipping
container, within 30 days of purchase to obtain a credit for the full purchase price.
“Software” is owned or licensed by Nortel Networks, its parent or one of its subsidiaries or affiliates, and is copyrighted
and licensed, not sold. Software consists of machine-readable instructions, its components, data, audio-visual content
(such as images, text, recordings or pictures) and related licensed materials including all whole or partial copies. Nortel
Networks grants you a license to use the Software only in the country where you acquired the Software. You obtain no
rights other than those granted to you under this License Agreement. You are responsible for the selection of the
Software and for the installation of, use of, and results obtained from the Software.
1. Licensed Use of Software. Nortel Networks grants Customer a nonexclusive license to use a copy of the Software
on only one machine at any one time or to the extent of the activation or authorized usage level, whichever is applicable.
To the extent Software is furnished for use with designated hardware or Customer furnished equipment (“CFE”),
Customer is granted a nonexclusive license to use Software only on such hardware or CFE, as applicable. Software
contains trade secrets and Customer agrees to treat Software as confidential information using the same care and
discretion Customer uses with its own similar information that it does not wish to disclose, publish or disseminate.
Customer will ensure that anyone who uses the Software does so only in compliance with the terms of this Agreement.
Customer shall not a) use, copy, modify, transfer or distribute the Software except as expressly authorized; b) reverse
assemble, reverse compile, reverse engineer or otherwise translate the Software; c) create derivative works or
modifications unless expressly authorized; or d) sublicense, rent or lease the Software. Licensors of intellectual property
to Nortel Networks are beneficiaries of this provision. Upon termination or breach of the license by Customer or in the
event designated hardware or CFE is no longer in use, Customer will promptly return the Software to Nortel Networks
or certify its destruction. Nortel Networks may audit by remote polling or other reasonable means to determine
Customer’s Software activation or usage levels. If suppliers of third party software included in Software require Nortel
Networks to include additional or different terms, Customer agrees to abide by such terms provided by Nortel Networks
with respect to such third party software.
2. Warranty. Except as may be otherwise expressly agreed to in writing between Nortel Networks and Customer,
Software is provided “AS IS” without any warranties (conditions) of any kind. NORTEL NETWORKS DISCLAIMS
ALL WARRANTIES (CONDITIONS) FOR THE SOFTWARE, EITHER EXPRESS OR IMPLIED, INCLUDING,
Nortel Secure Network Access Switch 4050 User Guide
4
BUT NOT LIMITED TO THE IMPLIED WARRANTIES OF MERCHANTABILITY AND FITNESS FOR A
PARTICULAR PURPOSE AND ANY WARRANTY OF NON-INFRINGEMENT. Nortel Networks is not obligated to
provide support of any kind for the Software. Some jurisdictions do not allow exclusion of implied warranties, and, in
such event, the above exclusions may not apply.
3. Limitation of Remedies. IN NO EVENT SHALL NORTEL NETWORKS OR ITS AGENTS OR SUPPLIERS BE
LIABLE FOR ANY OF THE FOLLOWING: a) DAMAGES BASED ON ANY THIRD PARTY CLAIM; b) LOSS OF,
OR DAMAGE TO, CUSTOMER’S RECORDS, FILES OR DATA; OR c) DIRECT, INDIRECT, SPECIAL,
INCIDENTAL, PUNITIVE, OR CONSEQUENTIAL DAMAGES (INCLUDING LOST PROFITS OR SAVINGS),
WHETHER IN CONTRACT, TORT OR OTHERWISE (INCLUDING NEGLIGENCE) ARISING OUT OF YOUR
USE OF THE SOFTWARE, EVEN IF NORTEL NETWORKS, ITS AGENTS OR SUPPLIERS HAVE BEEN
ADVISED OF THEIR POSSIBILITY. The foregoing limitations of remedies also apply to any developer and/or supplier
of the Software. Such developer and/or supplier is an intended beneficiary of this Section. Some jurisdictions do not
allow these limitations or exclusions and, in such event, they may not apply.
4.
General
a. If Customer is the United States Government, the following paragraph shall apply: All Nortel Networks
Software available under this License Agreement is commercial computer software and commercial computer
software documentation and, in the event Software is licensed for or on behalf of the United States
Government, the respective rights to the software and software documentation are governed by Nortel
Networks standard commercial license in accordance with U.S. Federal Regulations at 48 C.F.R. Sections
12.212 (for non-DoD entities) and 48 C.F.R. 227.7202 (for DoD entities).
b. Customer may terminate the license at any time. Nortel Networks may terminate the license if Customer fails to
comply with the terms and conditions of this license. In either event, upon termination, Customer must either
return the Software to Nortel Networks or certify its destruction.
c. Customer is responsible for payment of any taxes, including personal property taxes, resulting from Customer’s
use of the Software. Customer agrees to comply with all applicable laws including all applicable export and
import laws and regulations.
d. Neither party may bring an action, regardless of form, more than two years after the cause of the action arose.
e. The terms and conditions of this License Agreement form the complete and exclusive agreement between
Customer and Nortel Networks.
f.
This License Agreement is governed by the laws of the country in which Customer acquires the Software. If the
Software is acquired in the United States, then this License Agreement is governed by the laws of the state of
New York.
320818-A
5
Contents
Preface . . . . . . . . . . . . . . . . . . . . . . . . . . . . . . . . . . . . . . . . . . . . . . . . . . . . . . 25
Before you begin . . . . . . . . . . . . . . . . . . . . . . . . . . . . . . . . . . . . . . . . . . . . . . . . . . . . . 26
Text conventions . . . . . . . . . . . . . . . . . . . . . . . . . . . . . . . . . . . . . . . . . . . . . . . . . . . . . . 27
Related information . . . . . . . . . . . . . . . . . . . . . . . . . . . . . . . . . . . . . . . . . . . . . . . . . . . 28
Publications . . . . . . . . . . . . . . . . . . . . . . . . . . . . . . . . . . . . . . . . . . . . . . . . . . . . . . 28
Online . . . . . . . . . . . . . . . . . . . . . . . . . . . . . . . . . . . . . . . . . . . . . . . . . . . . . . . . . . 29
How to get help . . . . . . . . . . . . . . . . . . . . . . . . . . . . . . . . . . . . . . . . . . . . . . . . . . . . . . 29
Chapter 1: Overview . . . . . . . . . . . . . . . . . . . . . . . . . . . . . . . . . . . . . . . . . . . 31
The Nortel SNA solution . . . . . . . . . . . . . . . . . . . . . . . . . . . . . . . . . . . . . . . . . . . . . . . 31
Elements of the NSNA solution . . . . . . . . . . . . . . . . . . . . . . . . . . . . . . . . . . . . . . . 32
Supported users . . . . . . . . . . . . . . . . . . . . . . . . . . . . . . . . . . . . . . . . . . . . . . . . . . 32
Role of the Nortel SNAS 4050 . . . . . . . . . . . . . . . . . . . . . . . . . . . . . . . . . . . . . . . . 33
Nortel SNAS 4050 functions . . . . . . . . . . . . . . . . . . . . . . . . . . . . . . . . . . . . . . 34
Nortel SNA VLANs and filters . . . . . . . . . . . . . . . . . . . . . . . . . . . . . . . . . . . . . 34
Groups and profiles . . . . . . . . . . . . . . . . . . . . . . . . . . . . . . . . . . . . . . . . . . . . . 35
Authentication methods . . . . . . . . . . . . . . . . . . . . . . . . . . . . . . . . . . . . . . . . . . 36
TunnelGuard host integrity check . . . . . . . . . . . . . . . . . . . . . . . . . . . . . . . . . . 37
Communication channels . . . . . . . . . . . . . . . . . . . . . . . . . . . . . . . . . . . . . . . . 38
Nortel SNAS 4050 clusters . . . . . . . . . . . . . . . . . . . . . . . . . . . . . . . . . . . . . . . . . . 39
One-armed and two-armed configurations . . . . . . . . . . . . . . . . . . . . . . . . . . . . . . 40
One-armed configuration . . . . . . . . . . . . . . . . . . . . . . . . . . . . . . . . . . . . . . . . 41
Two-armed configuration . . . . . . . . . . . . . . . . . . . . . . . . . . . . . . . . . . . . . . . . . 41
Nortel SNA configuration and management tools . . . . . . . . . . . . . . . . . . . . . . . . . . . . 42
Nortel SNAS 4050 configuration roadmap . . . . . . . . . . . . . . . . . . . . . . . . . . . . . . . . . . 43
Chapter 2: Initial setup . . . . . . . . . . . . . . . . . . . . . . . . . . . . . . . . . . . . . . . . . 49
Before you begin . . . . . . . . . . . . . . . . . . . . . . . . . . . . . . . . . . . . . . . . . . . . . . . . . . . . . 50
About the IP addresses . . . . . . . . . . . . . . . . . . . . . . . . . . . . . . . . . . . . . . . . . . . . . 51
Nortel Secure Network Access Switch 4050 User Guide
6 Contents
Management IP address . . . . . . . . . . . . . . . . . . . . . . . . . . . . . . . . . . . . . . . . . 51
Portal Virtual IP address . . . . . . . . . . . . . . . . . . . . . . . . . . . . . . . . . . . . . . . . . 51
Real IP address . . . . . . . . . . . . . . . . . . . . . . . . . . . . . . . . . . . . . . . . . . . . . . . . 52
Initial setup . . . . . . . . . . . . . . . . . . . . . . . . . . . . . . . . . . . . . . . . . . . . . . . . . . . . . . . . . . 52
Setting up a single Nortel SNAS 4050 device or the first in a cluster . . . . . . . . . . 52
Settings created by the quick setup wizard . . . . . . . . . . . . . . . . . . . . . . . . . . . 60
Adding a Nortel SNAS 4050 device to a cluster . . . . . . . . . . . . . . . . . . . . . . . . . . 61
Before you begin . . . . . . . . . . . . . . . . . . . . . . . . . . . . . . . . . . . . . . . . . . . . . . . 62
Joining a cluster . . . . . . . . . . . . . . . . . . . . . . . . . . . . . . . . . . . . . . . . . . . . . . . 63
Next steps . . . . . . . . . . . . . . . . . . . . . . . . . . . . . . . . . . . . . . . . . . . . . . . . . . . . . . . . . . 66
Applying and saving the configuration . . . . . . . . . . . . . . . . . . . . . . . . . . . . . . . . . . . . . 67
Applying and saving the configuration using the CLI . . . . . . . . . . . . . . . . . . . . . . . 68
Applying and saving the configuration using the SREM . . . . . . . . . . . . . . . . . . . . 68
Chapter 3: Managing the network access devices . . . . . . . . . . . . . . . . . . . 71
Before you begin . . . . . . . . . . . . . . . . . . . . . . . . . . . . . . . . . . . . . . . . . . . . . . . . . . . . . 72
Managing network access devices using the CLI . . . . . . . . . . . . . . . . . . . . . . . . . . . . 73
Roadmap of domain commands . . . . . . . . . . . . . . . . . . . . . . . . . . . . . . . . . . . . . . 73
Adding a network access device using the CLI . . . . . . . . . . . . . . . . . . . . . . . . . . . 75
Using the quick switch setup wizard . . . . . . . . . . . . . . . . . . . . . . . . . . . . . . . . 75
Manually adding a switch . . . . . . . . . . . . . . . . . . . . . . . . . . . . . . . . . . . . . . . . 78
Deleting a network access device using the CLI . . . . . . . . . . . . . . . . . . . . . . . . . . 79
Configuring the network access devices using the CLI . . . . . . . . . . . . . . . . . . . . . 80
Mapping the VLANs using the CLI . . . . . . . . . . . . . . . . . . . . . . . . . . . . . . . . . . . . 82
Managing SSH keys using the CLI . . . . . . . . . . . . . . . . . . . . . . . . . . . . . . . . . . . . 84
Generating SSH keys for the domain using the CLI . . . . . . . . . . . . . . . . . . . . 85
Managing SSH keys for Nortel SNA communication using the CLI . . . . . . . . 88
Reimporting the network access device SSH key using the CLI . . . . . . . . . . 89
Monitoring switch health using the CLI . . . . . . . . . . . . . . . . . . . . . . . . . . . . . . . . . 89
Controlling communication with the network access devices using the CLI . . . . . 90
Managing network access devices using the SREM . . . . . . . . . . . . . . . . . . . . . . . . . . 91
Adding a network access device using the SREM . . . . . . . . . . . . . . . . . . . . . . . . 91
Deleting a network access device using the SREM . . . . . . . . . . . . . . . . . . . . . . . 93
Configuring the network access devices using the SREM . . . . . . . . . . . . . . . . . . 93
Mapping the VLANs using the SREM . . . . . . . . . . . . . . . . . . . . . . . . . . . . . . . . . . 96
320818-A
Contents
7
Mapping VLANs by domain . . . . . . . . . . . . . . . . . . . . . . . . . . . . . . . . . . . . . . . 97
Mapping VLANs by switch . . . . . . . . . . . . . . . . . . . . . . . . . . . . . . . . . . . . . . . 100
Managing SSH keys using the SREM . . . . . . . . . . . . . . . . . . . . . . . . . . . . . . . . . 102
Generating SSH keys for the domain using the SREM . . . . . . . . . . . . . . . . . 105
Exporting SSH keys for the domain using the SREM . . . . . . . . . . . . . . . . . . 106
Managing SSH keys for Nortel SNA communication using the SREM . . . . . 109
Reimporting the network access device SSH key using the SREM . . . . . . . 110
Monitoring switch health using the SREM . . . . . . . . . . . . . . . . . . . . . . . . . . . . . . 111
Viewing a connected client list using the SREM . . . . . . . . . . . . . . . . . . . . . . . . . 113
Controlling communication with the network access devices using the SREM . . 115
Chapter 4: Configuring the domain . . . . . . . . . . . . . . . . . . . . . . . . . . . . . . 117
Configuring the domain using the CLI . . . . . . . . . . . . . . . . . . . . . . . . . . . . . . . . . . . . 118
Roadmap of domain commands . . . . . . . . . . . . . . . . . . . . . . . . . . . . . . . . . . . . . 119
Creating a domain using the CLI . . . . . . . . . . . . . . . . . . . . . . . . . . . . . . . . . . . . . 121
Manually creating a domain using the CLI . . . . . . . . . . . . . . . . . . . . . . . . . . 121
Using the Nortel SNAS 4050 domain quick setup wizard in the CLI . . . . . . . 123
Deleting a domain using the CLI . . . . . . . . . . . . . . . . . . . . . . . . . . . . . . . . . . . . . 129
Configuring domain parameters using the CLI . . . . . . . . . . . . . . . . . . . . . . . . . . 130
Configuring the TunnelGuard check using the CLI . . . . . . . . . . . . . . . . . . . . . . . 132
Using the quick TunnelGuard setup wizard in the CLI . . . . . . . . . . . . . . . . . 134
Configuring the SSL server using the CLI . . . . . . . . . . . . . . . . . . . . . . . . . . . . . . 135
Tracing SSL traffic using the CLI . . . . . . . . . . . . . . . . . . . . . . . . . . . . . . . . . . 136
Configuring SSL settings using the CLI . . . . . . . . . . . . . . . . . . . . . . . . . . . . 139
Configuring traffic log settings using the CLI . . . . . . . . . . . . . . . . . . . . . . . . . 142
Configuring HTTP redirect using the CLI . . . . . . . . . . . . . . . . . . . . . . . . . . . . . . . 144
Configuring advanced settings using the CLI . . . . . . . . . . . . . . . . . . . . . . . . . . . 145
Configuring RADIUS accounting using the CLI . . . . . . . . . . . . . . . . . . . . . . . . . . 146
Managing RADIUS accounting servers using the CLI . . . . . . . . . . . . . . . . . 147
Configuring Nortel SNAS 4050-specific attributes using the CLI . . . . . . . . . 149
Configuring the domain using the SREM . . . . . . . . . . . . . . . . . . . . . . . . . . . . . . . . . . 150
Creating a domain using the SREM . . . . . . . . . . . . . . . . . . . . . . . . . . . . . . . . . . 151
Manually creating a domain using the SREM . . . . . . . . . . . . . . . . . . . . . . . . 152
Using the SREM Domain Quick Wizard . . . . . . . . . . . . . . . . . . . . . . . . . . . . 154
Deleting a domain using the SREM . . . . . . . . . . . . . . . . . . . . . . . . . . . . . . . . . . . 163
Nortel Secure Network Access Switch 4050 User Guide
8 Contents
Configuring domain parameters using the SREM . . . . . . . . . . . . . . . . . . . . . . . . 164
Additional domain configuration in the SREM . . . . . . . . . . . . . . . . . . . . . . . . 166
Configuring the TunnelGuard check using the SREM . . . . . . . . . . . . . . . . . . . . . 168
Using the TunnelGuard Quick Setup in the SREM . . . . . . . . . . . . . . . . . . . . 172
Configuring the SSL server using the SREM . . . . . . . . . . . . . . . . . . . . . . . . . . . 174
Configuring SSL settings using the SREM . . . . . . . . . . . . . . . . . . . . . . . . . . 176
Configuring traffic log settings using the SREM . . . . . . . . . . . . . . . . . . . . . . 178
Tracing SSL traffic using the SREM . . . . . . . . . . . . . . . . . . . . . . . . . . . . . . . 181
Configuring HTTP redirect using the SREM . . . . . . . . . . . . . . . . . . . . . . . . . . . . 181
Configuring RADIUS accounting using the SREM . . . . . . . . . . . . . . . . . . . . . . . 183
Configuring Nortel SNAS 4050-specific attributes using the SREM . . . . . . . 184
Managing RADIUS accounting servers using the SREM . . . . . . . . . . . . . . . 186
Chapter 5: Configuring groups and profiles . . . . . . . . . . . . . . . . . . . . . . . 191
Overview . . . . . . . . . . . . . . . . . . . . . . . . . . . . . . . . . . . . . . . . . . . . . . . . . . . . . . . . . . 192
Groups . . . . . . . . . . . . . . . . . . . . . . . . . . . . . . . . . . . . . . . . . . . . . . . . . . . . . . . . . 192
Default group . . . . . . . . . . . . . . . . . . . . . . . . . . . . . . . . . . . . . . . . . . . . . . . . . 193
Linksets . . . . . . . . . . . . . . . . . . . . . . . . . . . . . . . . . . . . . . . . . . . . . . . . . . . . . . . . 194
TunnelGuard SRS rule . . . . . . . . . . . . . . . . . . . . . . . . . . . . . . . . . . . . . . . . . . . . . 194
Extended profiles . . . . . . . . . . . . . . . . . . . . . . . . . . . . . . . . . . . . . . . . . . . . . . . . . 195
Before you begin . . . . . . . . . . . . . . . . . . . . . . . . . . . . . . . . . . . . . . . . . . . . . . . . . . . . 196
Configuring groups and extended profiles using the CLI . . . . . . . . . . . . . . . . . . . . . . 196
Roadmap of group and profile commands . . . . . . . . . . . . . . . . . . . . . . . . . . . . . 197
Configuring groups using the CLI . . . . . . . . . . . . . . . . . . . . . . . . . . . . . . . . . . . . 198
Configuring client filters using the CLI . . . . . . . . . . . . . . . . . . . . . . . . . . . . . . . . . 201
Configuring extended profiles using the CLI . . . . . . . . . . . . . . . . . . . . . . . . . . . . 203
Mapping linksets to a group or profile using the CLI . . . . . . . . . . . . . . . . . . . . . . 206
Creating a default group using the CLI . . . . . . . . . . . . . . . . . . . . . . . . . . . . . . . . 208
Configuring groups and extended profiles using the SREM . . . . . . . . . . . . . . . . . . . 208
Configuring groups using the SREM
. . . . . . . . . . . . . . . . . . . . . . . . . . . . . . . . . 208
Using the guide for creating groups . . . . . . . . . . . . . . . . . . . . . . . . . . . . . . . 209
Adding a group . . . . . . . . . . . . . . . . . . . . . . . . . . . . . . . . . . . . . . . . . . . . . . . 210
Modifying a group . . . . . . . . . . . . . . . . . . . . . . . . . . . . . . . . . . . . . . . . . . . . . 212
Configuring client filters using the SREM . . . . . . . . . . . . . . . . . . . . . . . . . . . . . . 213
Adding a client filter . . . . . . . . . . . . . . . . . . . . . . . . . . . . . . . . . . . . . . . . . . . 214
320818-A
Contents
9
Modifying a client filter . . . . . . . . . . . . . . . . . . . . . . . . . . . . . . . . . . . . . . . . . . 217
Configuring extended profiles using the SREM . . . . . . . . . . . . . . . . . . . . . . . . . . 219
Adding an extended profile
. . . . . . . . . . . . . . . . . . . . . . . . . . . . . . . . . . . . . 220
Modifying an extended profile . . . . . . . . . . . . . . . . . . . . . . . . . . . . . . . . . . . . 222
Mapping linksets to a group or profile using the SREM . . . . . . . . . . . . . . . . . . . . 223
Mapping linksets to a group . . . . . . . . . . . . . . . . . . . . . . . . . . . . . . . . . . . . . 224
Mapping linksets to a profile . . . . . . . . . . . . . . . . . . . . . . . . . . . . . . . . . . . . . 227
Creating a default group using the SREM
. . . . . . . . . . . . . . . . . . . . . . . . . . . . . 230
Chapter 6: Configuring authentication . . . . . . . . . . . . . . . . . . . . . . . . . . . 233
Overview . . . . . . . . . . . . . . . . . . . . . . . . . . . . . . . . . . . . . . . . . . . . . . . . . . . . . . . . . . 234
Before you begin . . . . . . . . . . . . . . . . . . . . . . . . . . . . . . . . . . . . . . . . . . . . . . . . . . . . 235
Configuring authentication using the CLI . . . . . . . . . . . . . . . . . . . . . . . . . . . . . . . . . . 236
Roadmap of authentication commands . . . . . . . . . . . . . . . . . . . . . . . . . . . . . . . . 237
Configuring authentication methods using the CLI . . . . . . . . . . . . . . . . . . . . . . . 239
Configuring advanced settings using the CLI . . . . . . . . . . . . . . . . . . . . . . . . . . . 241
Configuring RADIUS authentication using the CLI . . . . . . . . . . . . . . . . . . . . . . . 242
Adding the RADIUS authentication method using the CLI . . . . . . . . . . . . . . 243
Modifying RADIUS configuration settings using the CLI . . . . . . . . . . . . . . . . 245
Managing RADIUS authentication servers using the CLI . . . . . . . . . . . . . . . 247
Configuring session timeout using the CLI . . . . . . . . . . . . . . . . . . . . . . . . . . 249
Configuring LDAP authentication using the CLI . . . . . . . . . . . . . . . . . . . . . . . . . 249
Adding the LDAP authentication method using the CLI . . . . . . . . . . . . . . . . 250
Modifying LDAP configuration settings using the CLI . . . . . . . . . . . . . . . . . . 252
Managing LDAP authentication servers using the CLI . . . . . . . . . . . . . . . . . 256
Managing LDAP macros using the CLI . . . . . . . . . . . . . . . . . . . . . . . . . . . . . 258
Managing Active Directory passwords using the CLI . . . . . . . . . . . . . . . . . . 260
Configuring local database authentication using the CLI . . . . . . . . . . . . . . . . . . 261
Adding the local database authentication method using the CLI . . . . . . . . . 261
Managing the local database using the CLI . . . . . . . . . . . . . . . . . . . . . . . . . 264
Specifying authentication fallback order using the CLI . . . . . . . . . . . . . . . . . . . . 267
Configuring authentication using the SREM . . . . . . . . . . . . . . . . . . . . . . . . . . . . . . . 269
Configuring authentication methods using the SREM . . . . . . . . . . . . . . . . . . . . . 270
Configuring RADIUS authentication using the SREM . . . . . . . . . . . . . . . . . . . . . 271
Adding the RADIUS method and server . . . . . . . . . . . . . . . . . . . . . . . . . . . . 272
Nortel Secure Network Access Switch 4050 User Guide
10 Contents
Modifying RADIUS configuration . . . . . . . . . . . . . . . . . . . . . . . . . . . . . . . . . . 273
Managing additional RADIUS servers . . . . . . . . . . . . . . . . . . . . . . . . . . . . . . 279
Next steps . . . . . . . . . . . . . . . . . . . . . . . . . . . . . . . . . . . . . . . . . . . . . . . . . . . 282
Configuring LDAP authentication using the SREM . . . . . . . . . . . . . . . . . . . . . . . 282
Adding the LDAP method and server . . . . . . . . . . . . . . . . . . . . . . . . . . . . . . 283
Modifying LDAP configuration . . . . . . . . . . . . . . . . . . . . . . . . . . . . . . . . . . . . 284
Managing additional LDAP servers . . . . . . . . . . . . . . . . . . . . . . . . . . . . . . . . 291
Managing LDAP macros . . . . . . . . . . . . . . . . . . . . . . . . . . . . . . . . . . . . . . . . 294
Next steps . . . . . . . . . . . . . . . . . . . . . . . . . . . . . . . . . . . . . . . . . . . . . . . . . . . 298
Configuring local database authentication using the SREM . . . . . . . . . . . . . . . . 298
Adding the Local method . . . . . . . . . . . . . . . . . . . . . . . . . . . . . . . . . . . . . . . 299
Populating the database . . . . . . . . . . . . . . . . . . . . . . . . . . . . . . . . . . . . . . . . 301
Modifying Local database configuration . . . . . . . . . . . . . . . . . . . . . . . . . . . . 305
Exporting the database . . . . . . . . . . . . . . . . . . . . . . . . . . . . . . . . . . . . . . . . . 312
Next steps . . . . . . . . . . . . . . . . . . . . . . . . . . . . . . . . . . . . . . . . . . . . . . . . . . . 313
Specifying authentication fallback order using the SREM . . . . . . . . . . . . . . . . . . 314
Saving authentication settings . . . . . . . . . . . . . . . . . . . . . . . . . . . . . . . . . . . . . . . 316
Chapter 7: TunnelGuard SRS Builder . . . . . . . . . . . . . . . . . . . . . . . . . . . . 317
Configuring SRS rules . . . . . . . . . . . . . . . . . . . . . . . . . . . . . . . . . . . . . . . . . . . . . . . . 318
The TunnelGuard user interface . . . . . . . . . . . . . . . . . . . . . . . . . . . . . . . . . . . . . . . . . 318
Menu commands . . . . . . . . . . . . . . . . . . . . . . . . . . . . . . . . . . . . . . . . . . . . . . . . . 319
File menu . . . . . . . . . . . . . . . . . . . . . . . . . . . . . . . . . . . . . . . . . . . . . . . . . . . 319
Software Definition menu . . . . . . . . . . . . . . . . . . . . . . . . . . . . . . . . . . . . . . . 319
Software Definition Entry menu . . . . . . . . . . . . . . . . . . . . . . . . . . . . . . . . . . . 320
TunnelGuard Rule menu . . . . . . . . . . . . . . . . . . . . . . . . . . . . . . . . . . . . . . . . 321
Tool menu . . . . . . . . . . . . . . . . . . . . . . . . . . . . . . . . . . . . . . . . . . . . . . . . . . . 321
SRS definition toolbar . . . . . . . . . . . . . . . . . . . . . . . . . . . . . . . . . . . . . . . . . . . . . 322
Software Definition — Available SRS list . . . . . . . . . . . . . . . . . . . . . . . . . . . . . . . 323
SRS Components table . . . . . . . . . . . . . . . . . . . . . . . . . . . . . . . . . . . . . . . . . . . . 323
Customizing a component . . . . . . . . . . . . . . . . . . . . . . . . . . . . . . . . . . . . . . . 324
Memory snapshot . . . . . . . . . . . . . . . . . . . . . . . . . . . . . . . . . . . . . . . . . . . . . . . . 325
TunnelGuard Rule Definition screen . . . . . . . . . . . . . . . . . . . . . . . . . . . . . . . . . . 325
SRS Rule toolbar . . . . . . . . . . . . . . . . . . . . . . . . . . . . . . . . . . . . . . . . . . . . . 325
SRS Rule list . . . . . . . . . . . . . . . . . . . . . . . . . . . . . . . . . . . . . . . . . . . . . . . . . 326
320818-A
Contents
11
SRS Rule Expression Constructor . . . . . . . . . . . . . . . . . . . . . . . . . . . . . . . . 326
Managing TunnelGuard rules and expressions . . . . . . . . . . . . . . . . . . . . . . . . . . . . . 327
Creating a software definition . . . . . . . . . . . . . . . . . . . . . . . . . . . . . . . . . . . . . . . 327
Adding entries to a software definition . . . . . . . . . . . . . . . . . . . . . . . . . . . . . . . . . 328
Selecting modules or files from running processes . . . . . . . . . . . . . . . . . . . . 328
Selecting file on disk . . . . . . . . . . . . . . . . . . . . . . . . . . . . . . . . . . . . . . . . . . . 331
Creating logical expressions . . . . . . . . . . . . . . . . . . . . . . . . . . . . . . . . . . . . . . . . 333
Registry-based rules . . . . . . . . . . . . . . . . . . . . . . . . . . . . . . . . . . . . . . . . . . . . . . 338
Registry-only SRS entry . . . . . . . . . . . . . . . . . . . . . . . . . . . . . . . . . . . . . . . . 338
Creating a registry entry . . . . . . . . . . . . . . . . . . . . . . . . . . . . . . . . . . . . . . . . 341
Registry-based File/Module . . . . . . . . . . . . . . . . . . . . . . . . . . . . . . . . . . . . . 342
Manually creating SRS entries . . . . . . . . . . . . . . . . . . . . . . . . . . . . . . . . . . . . . . 343
Manually creating an OnDisk file entry . . . . . . . . . . . . . . . . . . . . . . . . . . . . . 343
Manually creating a Memory Module entry . . . . . . . . . . . . . . . . . . . . . . . . . . 345
File age check . . . . . . . . . . . . . . . . . . . . . . . . . . . . . . . . . . . . . . . . . . . . . . . . . . . 347
Adding comments . . . . . . . . . . . . . . . . . . . . . . . . . . . . . . . . . . . . . . . . . . . . . . . . 348
Adding a TunnelGuard rule comment . . . . . . . . . . . . . . . . . . . . . . . . . . . . . . 348
Adding a software definition comment . . . . . . . . . . . . . . . . . . . . . . . . . . . . . 349
Deleting SRS rules and their components . . . . . . . . . . . . . . . . . . . . . . . . . . . . . . 349
Deleting a software definition . . . . . . . . . . . . . . . . . . . . . . . . . . . . . . . . . . . . 350
Deleting a software definition entry . . . . . . . . . . . . . . . . . . . . . . . . . . . . . . . . 350
Deleting a TunnelGuard rule . . . . . . . . . . . . . . . . . . . . . . . . . . . . . . . . . . . . . 350
Deleting an expression . . . . . . . . . . . . . . . . . . . . . . . . . . . . . . . . . . . . . . . . . 350
TunnelGuard support for API calls . . . . . . . . . . . . . . . . . . . . . . . . . . . . . . . . . . . . . . . 351
Making API calls . . . . . . . . . . . . . . . . . . . . . . . . . . . . . . . . . . . . . . . . . . . . . . . . . 351
Chapter 8: Managing system users and groups . . . . . . . . . . . . . . . . . . . . 353
User rights and group membership . . . . . . . . . . . . . . . . . . . . . . . . . . . . . . . . . . . . . . 354
Managing system users and groups using the CLI . . . . . . . . . . . . . . . . . . . . . . . . . . 355
Roadmap of system user management commands . . . . . . . . . . . . . . . . . . . . . . 355
Managing user accounts and passwords using the CLI . . . . . . . . . . . . . . . . . . . 356
Managing user settings using the CLI . . . . . . . . . . . . . . . . . . . . . . . . . . . . . . . . . 358
Managing user groups using the CLI . . . . . . . . . . . . . . . . . . . . . . . . . . . . . . . . . . 359
CLI configuration examples . . . . . . . . . . . . . . . . . . . . . . . . . . . . . . . . . . . . . . . . . 360
Adding a new user . . . . . . . . . . . . . . . . . . . . . . . . . . . . . . . . . . . . . . . . . . . . 360
Nortel Secure Network Access Switch 4050 User Guide
12 Contents
Changing a user’s group assignment . . . . . . . . . . . . . . . . . . . . . . . . . . . . . . 365
Changing passwords . . . . . . . . . . . . . . . . . . . . . . . . . . . . . . . . . . . . . . . . . . . 366
Deleting a user . . . . . . . . . . . . . . . . . . . . . . . . . . . . . . . . . . . . . . . . . . . . . . . 369
Managing system users and groups using the SREM . . . . . . . . . . . . . . . . . . . . . . . . 370
Managing user accounts using the SREM . . . . . . . . . . . . . . . . . . . . . . . . . . . . . 370
Adding new user accounts . . . . . . . . . . . . . . . . . . . . . . . . . . . . . . . . . . . . . . 372
Removing existing user accounts . . . . . . . . . . . . . . . . . . . . . . . . . . . . . . . . . 373
Setting password expiry using the SREM . . . . . . . . . . . . . . . . . . . . . . . . . . . . . . 374
Changing your password using the SREM . . . . . . . . . . . . . . . . . . . . . . . . . . . . . 376
Changing another user’s password using the SREM . . . . . . . . . . . . . . . . . . . . . 377
Setting the certificate export passphrase using the SREM . . . . . . . . . . . . . . . . . 379
Managing user groups using the SREM . . . . . . . . . . . . . . . . . . . . . . . . . . . . . . . 381
Adding a user group . . . . . . . . . . . . . . . . . . . . . . . . . . . . . . . . . . . . . . . . . . . 382
Removing a user group . . . . . . . . . . . . . . . . . . . . . . . . . . . . . . . . . . . . . . . . . 383
Chapter 9: Customizing the portal and user logon . . . . . . . . . . . . . . . . . 385
Overview . . . . . . . . . . . . . . . . . . . . . . . . . . . . . . . . . . . . . . . . . . . . . . . . . . . . . . . . . . 386
Captive portal and Exclude List . . . . . . . . . . . . . . . . . . . . . . . . . . . . . . . . . . . . . . 386
Exclude List . . . . . . . . . . . . . . . . . . . . . . . . . . . . . . . . . . . . . . . . . . . . . . . . . . 387
Portal display . . . . . . . . . . . . . . . . . . . . . . . . . . . . . . . . . . . . . . . . . . . . . . . . . . . . 389
Portal look and feel . . . . . . . . . . . . . . . . . . . . . . . . . . . . . . . . . . . . . . . . . . . . 389
Language localization . . . . . . . . . . . . . . . . . . . . . . . . . . . . . . . . . . . . . . . . . . 392
Linksets and links . . . . . . . . . . . . . . . . . . . . . . . . . . . . . . . . . . . . . . . . . . . . . 394
Macros . . . . . . . . . . . . . . . . . . . . . . . . . . . . . . . . . . . . . . . . . . . . . . . . . . . . . 395
Automatic redirection to internal sites . . . . . . . . . . . . . . . . . . . . . . . . . . . . . . 396
Examples of redirection URLs and links . . . . . . . . . . . . . . . . . . . . . . . . . . . . 396
Managing the end user experience . . . . . . . . . . . . . . . . . . . . . . . . . . . . . . . . . . . 397
Automatic JRE upload . . . . . . . . . . . . . . . . . . . . . . . . . . . . . . . . . . . . . . . . . . 397
Windows domain logon script . . . . . . . . . . . . . . . . . . . . . . . . . . . . . . . . . . . . 398
Customizing the portal and logon using the CLI . . . . . . . . . . . . . . . . . . . . . . . . . . . . 398
Roadmap of portal and logon configuration commands . . . . . . . . . . . . . . . . . . . 398
Configuring the captive portal using the CLI . . . . . . . . . . . . . . . . . . . . . . . . . . . . 400
Configuring the Exclude List using the CLI . . . . . . . . . . . . . . . . . . . . . . . . . . . . . 401
Changing the portal language using the CLI . . . . . . . . . . . . . . . . . . . . . . . . . . . . 402
Configuring language support using the CLI . . . . . . . . . . . . . . . . . . . . . . . . . 402
320818-A
Contents
13
Setting the portal display language using the CLI . . . . . . . . . . . . . . . . . . . . . 404
Configuring the portal display using the CLI . . . . . . . . . . . . . . . . . . . . . . . . . . . . 405
Changing the portal colors using the CLI . . . . . . . . . . . . . . . . . . . . . . . . . . . . . . 408
Configuring custom content using the CLI . . . . . . . . . . . . . . . . . . . . . . . . . . . . . . 409
Configuring linksets using the CLI . . . . . . . . . . . . . . . . . . . . . . . . . . . . . . . . . . . . 411
Configuring links using the CLI . . . . . . . . . . . . . . . . . . . . . . . . . . . . . . . . . . . . . . 413
Configuring external link settings using the CLI . . . . . . . . . . . . . . . . . . . . . . 415
Configuring FTP link settings using the CLI . . . . . . . . . . . . . . . . . . . . . . . . . 415
Customizing the portal and logon using the SREM . . . . . . . . . . . . . . . . . . . . . . . . . . 416
Configuring the captive portal using the SREM . . . . . . . . . . . . . . . . . . . . . . . . . . 416
Enabling DNS capture . . . . . . . . . . . . . . . . . . . . . . . . . . . . . . . . . . . . . . . . . . 416
Configuring the DNS Exclude List using the SREM . . . . . . . . . . . . . . . . . . . 418
Changing the portal language using the SREM . . . . . . . . . . . . . . . . . . . . . . . . . 419
Configuring language support using the SREM . . . . . . . . . . . . . . . . . . . . . . 420
Importing and exporting language definitions . . . . . . . . . . . . . . . . . . . . . . . . 422
Setting the portal display language using the SREM . . . . . . . . . . . . . . . . . . 424
Configuring the portal display using the SREM . . . . . . . . . . . . . . . . . . . . . . . . . . 425
Configuring content . . . . . . . . . . . . . . . . . . . . . . . . . . . . . . . . . . . . . . . . . . . . 426
Importing banners . . . . . . . . . . . . . . . . . . . . . . . . . . . . . . . . . . . . . . . . . . . . . 429
Changing the portal colors using the SREM . . . . . . . . . . . . . . . . . . . . . . . . . . . . 431
Configuring custom content using the SREM . . . . . . . . . . . . . . . . . . . . . . . . . . . 433
Viewing basic information about custom content . . . . . . . . . . . . . . . . . . . . . 434
Importing custom content . . . . . . . . . . . . . . . . . . . . . . . . . . . . . . . . . . . . . . . 436
Exporting custom content . . . . . . . . . . . . . . . . . . . . . . . . . . . . . . . . . . . . . . . 438
Configuring linksets using the SREM . . . . . . . . . . . . . . . . . . . . . . . . . . . . . . . . . 439
Creating a linkset . . . . . . . . . . . . . . . . . . . . . . . . . . . . . . . . . . . . . . . . . . . . . 440
Modifying a linkset . . . . . . . . . . . . . . . . . . . . . . . . . . . . . . . . . . . . . . . . . . . . . 442
Configuring links using the SREM . . . . . . . . . . . . . . . . . . . . . . . . . . . . . . . . . . . . 444
Creating an external link using the SREM . . . . . . . . . . . . . . . . . . . . . . . . . . 445
Creating an FTP link using the SREM . . . . . . . . . . . . . . . . . . . . . . . . . . . . . 447
Modifying external link settings using the SREM . . . . . . . . . . . . . . . . . . . . . 450
Modifying FTP link settings using the SREM . . . . . . . . . . . . . . . . . . . . . . . . 452
Reordering links using the SREM . . . . . . . . . . . . . . . . . . . . . . . . . . . . . . . . . 453
Nortel Secure Network Access Switch 4050 User Guide
14 Contents
Chapter 10: Configuring system settings . . . . . . . . . . . . . . . . . . . . . . . . . 457
Configuring the cluster using the CLI . . . . . . . . . . . . . . . . . . . . . . . . . . . . . . . . . . . . . 459
Roadmap of system commands . . . . . . . . . . . . . . . . . . . . . . . . . . . . . . . . . . . . . 460
Configuring system settings using the CLI . . . . . . . . . . . . . . . . . . . . . . . . . . . . . 463
Configuring the Nortel SNAS 4050 host using the CLI . . . . . . . . . . . . . . . . . . . . 465
Viewing host information . . . . . . . . . . . . . . . . . . . . . . . . . . . . . . . . . . . . . . . . 469
Configuring host interfaces using the CLI . . . . . . . . . . . . . . . . . . . . . . . . . . . . . . 469
Configuring static routes using the CLI . . . . . . . . . . . . . . . . . . . . . . . . . . . . . . . . 471
Configuring host ports using the CLI . . . . . . . . . . . . . . . . . . . . . . . . . . . . . . . . . . 472
Managing interface ports using the CLI . . . . . . . . . . . . . . . . . . . . . . . . . . . . . . . . 473
Configuring the Access List using the CLI . . . . . . . . . . . . . . . . . . . . . . . . . . . . . . 474
Configuring date and time settings using the CLI . . . . . . . . . . . . . . . . . . . . . . . . 475
Managing NTP servers . . . . . . . . . . . . . . . . . . . . . . . . . . . . . . . . . . . . . . . . . 476
Configuring DNS servers and settings using the CLI . . . . . . . . . . . . . . . . . . . . . 477
Managing DNS servers . . . . . . . . . . . . . . . . . . . . . . . . . . . . . . . . . . . . . . . . . 479
Configuring RSA servers using the CLI . . . . . . . . . . . . . . . . . . . . . . . . . . . . . . . . 480
Configuring syslog servers using the CLI . . . . . . . . . . . . . . . . . . . . . . . . . . . . . . 481
Configuring administrative settings using the CLI . . . . . . . . . . . . . . . . . . . . . . . . 483
Enabling TunnelGuard SRS administration using the CLI . . . . . . . . . . . . . . . . . . 485
Configuring Nortel SNAS 4050 host SSH keys using the CLI . . . . . . . . . . . . . . . 485
Managing known hosts SSH keys using the CLI . . . . . . . . . . . . . . . . . . . . . . 487
Configuring RADIUS auditing using the CLI . . . . . . . . . . . . . . . . . . . . . . . . . . . . 488
About RADIUS auditing . . . . . . . . . . . . . . . . . . . . . . . . . . . . . . . . . . . . . . . . . 488
About the vendor-specific attributes . . . . . . . . . . . . . . . . . . . . . . . . . . . . . . . 488
Configuring RADIUS auditing . . . . . . . . . . . . . . . . . . . . . . . . . . . . . . . . . . . . 489
Managing RADIUS audit servers using the CLI . . . . . . . . . . . . . . . . . . . . . . 490
Configuring authentication of system users using the CLI . . . . . . . . . . . . . . . . . 492
Managing RADIUS authentication servers using the CLI . . . . . . . . . . . . . . . 493
Configuring the cluster using the SREM . . . . . . . . . . . . . . . . . . . . . . . . . . . . . . . . . . 495
Configuring system settings using the SREM . . . . . . . . . . . . . . . . . . . . . . . . . . . 496
Configuring a Nortel SNAS 4050 host using the SREM . . . . . . . . . . . . . . . . . . . 497
Viewing host information . . . . . . . . . . . . . . . . . . . . . . . . . . . . . . . . . . . . . . . . 498
Viewing and configuring TCP/IP properties . . . . . . . . . . . . . . . . . . . . . . . . . 499
Viewing and installing host licenses . . . . . . . . . . . . . . . . . . . . . . . . . . . . . . . 500
Configuring host interfaces using the SREM . . . . . . . . . . . . . . . . . . . . . . . . . . . . 508
320818-A
Contents
15
Adding a host interface . . . . . . . . . . . . . . . . . . . . . . . . . . . . . . . . . . . . . . . . . 509
Configuring an existing host interface . . . . . . . . . . . . . . . . . . . . . . . . . . . . . . 511
Removing a host interface . . . . . . . . . . . . . . . . . . . . . . . . . . . . . . . . . . . . . . . 514
Configuring static routes using the SREM . . . . . . . . . . . . . . . . . . . . . . . . . . . . . . 514
Viewing static routes for a cluster . . . . . . . . . . . . . . . . . . . . . . . . . . . . . . . . . 515
Viewing static routes for a host . . . . . . . . . . . . . . . . . . . . . . . . . . . . . . . . . . . 516
Viewing static routes for an interface . . . . . . . . . . . . . . . . . . . . . . . . . . . . . . 517
Managing static routes . . . . . . . . . . . . . . . . . . . . . . . . . . . . . . . . . . . . . . . . . 517
Configuring host ports using the SREM . . . . . . . . . . . . . . . . . . . . . . . . . . . . . . . 520
Managing interface ports using the SREM . . . . . . . . . . . . . . . . . . . . . . . . . . . . . 523
Adding interface ports . . . . . . . . . . . . . . . . . . . . . . . . . . . . . . . . . . . . . . . . . . 524
Removing interface ports . . . . . . . . . . . . . . . . . . . . . . . . . . . . . . . . . . . . . . . 524
Configuring the access list using the SREM . . . . . . . . . . . . . . . . . . . . . . . . . . . . 525
Adding an access list entry . . . . . . . . . . . . . . . . . . . . . . . . . . . . . . . . . . . . . . 526
Removing an Access List entry . . . . . . . . . . . . . . . . . . . . . . . . . . . . . . . . . . . 527
Managing date and time settings using the SREM . . . . . . . . . . . . . . . . . . . . . . . 528
Configuring the date and time settings . . . . . . . . . . . . . . . . . . . . . . . . . . . . . 529
Adding an NTP server . . . . . . . . . . . . . . . . . . . . . . . . . . . . . . . . . . . . . . . . . . 530
Removing an NTP server . . . . . . . . . . . . . . . . . . . . . . . . . . . . . . . . . . . . . . . 531
Configuring DNS settings using the SREM . . . . . . . . . . . . . . . . . . . . . . . . . . . . . 532
Configuring servers using the SREM . . . . . . . . . . . . . . . . . . . . . . . . . . . . . . . . . 534
Managing syslog servers . . . . . . . . . . . . . . . . . . . . . . . . . . . . . . . . . . . . . . . 534
Managing DNS servers . . . . . . . . . . . . . . . . . . . . . . . . . . . . . . . . . . . . . . . . . 537
Managing RSA servers . . . . . . . . . . . . . . . . . . . . . . . . . . . . . . . . . . . . . . . . . 540
Configuring administrative settings using the SREM . . . . . . . . . . . . . . . . . . . . . . 546
Configuring SRS control settings using the SREM . . . . . . . . . . . . . . . . . . . . . . . 547
Configuring Nortel SNAS 4050 host SSH keys using the SREM . . . . . . . . . . . . 548
Showing SSH keys . . . . . . . . . . . . . . . . . . . . . . . . . . . . . . . . . . . . . . . . . . . . 549
Managing Nortel SNAS 4050 and known host SSH keys . . . . . . . . . . . . . . . 551
Adding an SSH key for a known host using the SREM . . . . . . . . . . . . . . . . . . . . 553
Managing RADIUS audit settings using the SREM . . . . . . . . . . . . . . . . . . . . . . . 554
About RADIUS auditing . . . . . . . . . . . . . . . . . . . . . . . . . . . . . . . . . . . . . . . . . 554
About the vendor-specific attributes . . . . . . . . . . . . . . . . . . . . . . . . . . . . . . . 555
Configuring RADIUS auditing . . . . . . . . . . . . . . . . . . . . . . . . . . . . . . . . . . . . 556
Configuring RADIUS audit settings using the SREM . . . . . . . . . . . . . . . . . . 557
Nortel Secure Network Access Switch 4050 User Guide
16 Contents
Managing RADIUS audit servers using the SREM . . . . . . . . . . . . . . . . . . . . 559
Managing RADIUS authentication of system users using the SREM . . . . . . . . . 562
Configuring RADIUS authentication of system users using the SREM . . . . . 563
Managing RADIUS authentication servers using the SREM . . . . . . . . . . . . . 565
Chapter 11: Managing certificates . . . . . . . . . . . . . . . . . . . . . . . . . . . . . . . 569
Overview . . . . . . . . . . . . . . . . . . . . . . . . . . . . . . . . . . . . . . . . . . . . . . . . . . . . . . . . . . 570
Key and certificate formats . . . . . . . . . . . . . . . . . . . . . . . . . . . . . . . . . . . . . . . . . 571
Creating certificates . . . . . . . . . . . . . . . . . . . . . . . . . . . . . . . . . . . . . . . . . . . . . . . 573
Installing certificates and keys . . . . . . . . . . . . . . . . . . . . . . . . . . . . . . . . . . . . . . . 573
Saving or exporting certificates and keys . . . . . . . . . . . . . . . . . . . . . . . . . . . . . . 574
Updating certificates . . . . . . . . . . . . . . . . . . . . . . . . . . . . . . . . . . . . . . . . . . . . . . 574
Managing private keys and certificates using the CLI . . . . . . . . . . . . . . . . . . . . . . . . 575
Roadmap of certificate management commands . . . . . . . . . . . . . . . . . . . . . . . . 576
Managing and viewing certificates and keys using the CLI . . . . . . . . . . . . . . . . . 577
Generating and submitting a CSR using the CLI . . . . . . . . . . . . . . . . . . . . . . . . . 579
Adding a certificate to the Nortel SNAS 4050 using the CLI . . . . . . . . . . . . . . . . 584
Adding a private key to the Nortel SNAS 4050 using the CLI . . . . . . . . . . . . . . . 587
Importing certificates and keys into the Nortel SNAS 4050 using the CLI . . . . . 588
Displaying or saving a certificate and key using the CLI . . . . . . . . . . . . . . . . . . . 591
Exporting a certificate and key from the Nortel SNAS 4050 using the CLI . . . . . 594
Generating a test certificate using the CLI . . . . . . . . . . . . . . . . . . . . . . . . . . . . . 596
Managing private keys and certificates using the SREM . . . . . . . . . . . . . . . . . . . . . . 597
Viewing certificates using the SREM . . . . . . . . . . . . . . . . . . . . . . . . . . . . . . . . . . 598
Creating a certificate using the SREM . . . . . . . . . . . . . . . . . . . . . . . . . . . . . . . . . 599
Generating and submitting a CSR using the SREM . . . . . . . . . . . . . . . . . . . . . . 601
Importing a certificate or key using the SREM . . . . . . . . . . . . . . . . . . . . . . . . . . 603
Displaying or saving a certificate and key using the SREM . . . . . . . . . . . . . . . . . 605
Exporting a certificate and key from the Nortel SNAS 4050 using the SREM . . . 607
Viewing certificate information using the SREM . . . . . . . . . . . . . . . . . . . . . . . . . 610
Viewing configuration details . . . . . . . . . . . . . . . . . . . . . . . . . . . . . . . . . . . . . 610
Viewing general information . . . . . . . . . . . . . . . . . . . . . . . . . . . . . . . . . . . . . 612
Viewing certificate subject settings . . . . . . . . . . . . . . . . . . . . . . . . . . . . . . . . 614
320818-A
Contents
17
Chapter 12: Configuring SNMP . . . . . . . . . . . . . . . . . . . . . . . . . . . . . . . . . 617
Configuring SNMP using the CLI . . . . . . . . . . . . . . . . . . . . . . . . . . . . . . . . . . . . . . . . 618
Roadmap of SNMP commands . . . . . . . . . . . . . . . . . . . . . . . . . . . . . . . . . . . . . . 619
Configuring SNMP settings using the CLI . . . . . . . . . . . . . . . . . . . . . . . . . . . . . . 620
Configuring the SNMP v2 MIB using the CLI . . . . . . . . . . . . . . . . . . . . . . . . . . . 621
Configuring the SNMP community using the CLI . . . . . . . . . . . . . . . . . . . . . . . . 622
Configuring SNMPv3 users using the CLI . . . . . . . . . . . . . . . . . . . . . . . . . . . . . . 623
Configuring SNMP notification targets using the CLI . . . . . . . . . . . . . . . . . . . . . 626
Configuring SNMP events using the CLI . . . . . . . . . . . . . . . . . . . . . . . . . . . . . . . 627
Configuring SNMP settings using the SREM . . . . . . . . . . . . . . . . . . . . . . . . . . . . . . . 631
Configuring SNMP using the SREM . . . . . . . . . . . . . . . . . . . . . . . . . . . . . . . . . . 632
Configuring SNMP targets using the SREM . . . . . . . . . . . . . . . . . . . . . . . . . . . . 634
Adding SNMP targets . . . . . . . . . . . . . . . . . . . . . . . . . . . . . . . . . . . . . . . . . . 635
Managing SNMP targets . . . . . . . . . . . . . . . . . . . . . . . . . . . . . . . . . . . . . . . . 638
Removing SNMP targets . . . . . . . . . . . . . . . . . . . . . . . . . . . . . . . . . . . . . . . . 639
Configuring SNMPv3 users using the SREM . . . . . . . . . . . . . . . . . . . . . . . . . . . 640
Adding SNMPv3 users . . . . . . . . . . . . . . . . . . . . . . . . . . . . . . . . . . . . . . . . . 641
Managing SNMPv3 users . . . . . . . . . . . . . . . . . . . . . . . . . . . . . . . . . . . . . . . 644
Removing SNMPv3 users . . . . . . . . . . . . . . . . . . . . . . . . . . . . . . . . . . . . . . . 646
Configuring SNMP events using the SREM . . . . . . . . . . . . . . . . . . . . . . . . . . . . 647
Managing monitor events . . . . . . . . . . . . . . . . . . . . . . . . . . . . . . . . . . . . . . . 647
Managing notification events . . . . . . . . . . . . . . . . . . . . . . . . . . . . . . . . . . . . . 655
Chapter 13: Viewing system information and performance statistics . . 659
Viewing system information and performance statistics using the CLI . . . . . . . . . . . 660
Roadmap of information and statistics commands . . . . . . . . . . . . . . . . . . . . . . . 660
Viewing system information using the CLI . . . . . . . . . . . . . . . . . . . . . . . . . . . . . . 661
Viewing alarm events using the CLI . . . . . . . . . . . . . . . . . . . . . . . . . . . . . . . . . . 666
Viewing log files using the CLI . . . . . . . . . . . . . . . . . . . . . . . . . . . . . . . . . . . . . . . 667
Viewing AAA statistics using the CLI . . . . . . . . . . . . . . . . . . . . . . . . . . . . . . . . . . 667
Viewing all statistics using the CLI . . . . . . . . . . . . . . . . . . . . . . . . . . . . . . . . . . . . 670
Viewing system information and performance statistics using the SREM . . . . . . . . . 670
Viewing local information using the SREM . . . . . . . . . . . . . . . . . . . . . . . . . . . . . 670
Viewing cluster information using the SREM . . . . . . . . . . . . . . . . . . . . . . . . . . . . 672
Viewing the controller list using the SREM . . . . . . . . . . . . . . . . . . . . . . . . . . 673
Nortel Secure Network Access Switch 4050 User Guide
18 Contents
Viewing SONMP topology information using the SREM . . . . . . . . . . . . . . . . 675
Viewing switch distribution using the SREM . . . . . . . . . . . . . . . . . . . . . . . . . 677
Viewing port information using the SREM . . . . . . . . . . . . . . . . . . . . . . . . . . . 678
Viewing license information using the SREM . . . . . . . . . . . . . . . . . . . . . . . . 680
Viewing session details using the SREM . . . . . . . . . . . . . . . . . . . . . . . . . . . 684
Viewing alarms using the SREM . . . . . . . . . . . . . . . . . . . . . . . . . . . . . . . . . . 691
Managing log files using the SREM . . . . . . . . . . . . . . . . . . . . . . . . . . . . . . . 695
Viewing AAA statistics using the SREM . . . . . . . . . . . . . . . . . . . . . . . . . . . . . . . 698
Viewing AAA statistics for a host . . . . . . . . . . . . . . . . . . . . . . . . . . . . . . . . . . 699
Viewing License statistics . . . . . . . . . . . . . . . . . . . . . . . . . . . . . . . . . . . . . . . 701
Viewing RADIUS statistics . . . . . . . . . . . . . . . . . . . . . . . . . . . . . . . . . . . . . . 702
Viewing Local database statistics . . . . . . . . . . . . . . . . . . . . . . . . . . . . . . . . . 704
Viewing LDAP statistics . . . . . . . . . . . . . . . . . . . . . . . . . . . . . . . . . . . . . . . . . 705
Viewing AAA statistics for the domain . . . . . . . . . . . . . . . . . . . . . . . . . . . . . . 707
Viewing License statistics . . . . . . . . . . . . . . . . . . . . . . . . . . . . . . . . . . . . . . . 709
Viewing RADIUS statistics . . . . . . . . . . . . . . . . . . . . . . . . . . . . . . . . . . . . . . 711
Viewing Local database statistics . . . . . . . . . . . . . . . . . . . . . . . . . . . . . . . . . 713
Viewing LDAP statistics . . . . . . . . . . . . . . . . . . . . . . . . . . . . . . . . . . . . . . . . . 715
Viewing Ethernet statistics using the SREM . . . . . . . . . . . . . . . . . . . . . . . . . . . . 716
Viewing Rx statistics . . . . . . . . . . . . . . . . . . . . . . . . . . . . . . . . . . . . . . . . . . . 718
Viewing Tx statistics . . . . . . . . . . . . . . . . . . . . . . . . . . . . . . . . . . . . . . . . . . . 720
Chapter 14: Maintaining and managing the system . . . . . . . . . . . . . . . . . 723
Managing and maintaining the system using the CLI . . . . . . . . . . . . . . . . . . . . . . . . 724
Roadmap of maintenance and boot commands . . . . . . . . . . . . . . . . . . . . . . . . . 725
Performing maintenance using the CLI . . . . . . . . . . . . . . . . . . . . . . . . . . . . . . . . 726
Backing up or restoring the configuration using the CLI . . . . . . . . . . . . . . . . . . . 730
Managing Nortel SNAS 4050 devices using the CLI . . . . . . . . . . . . . . . . . . . . . . 733
Managing software for a Nortel SNAS 4050 device using the CLI . . . . . . . . . . . 734
Managing and maintaining the system using the SREM . . . . . . . . . . . . . . . . . . . . . . 736
Performing maintenance using the SREM . . . . . . . . . . . . . . . . . . . . . . . . . . . . . . 736
Dumping logs and status information using the SREM . . . . . . . . . . . . . . . . . 737
Starting and stopping a trace using the SREM . . . . . . . . . . . . . . . . . . . . . . . 738
Checking configuration using the SREM . . . . . . . . . . . . . . . . . . . . . . . . . . . . 741
Backing up or restoring the configuration using the SREM . . . . . . . . . . . . . . . . . 742
320818-A
Contents
19
Managing Nortel SNAS 4050 devices and software using the SREM . . . . . . . . . 743
Managing software versions using the SREM . . . . . . . . . . . . . . . . . . . . . . . . 744
Downloading images using the SREM . . . . . . . . . . . . . . . . . . . . . . . . . . . . . 748
Rebooting or deleting a Nortel SNAS 4050 device using the SREM . . . . . . 750
Downloading files using the SREM . . . . . . . . . . . . . . . . . . . . . . . . . . . . . . . . . . . 752
Running Nortel SNAS 4050 diagnostics using the SREM . . . . . . . . . . . . . . . . . . 754
Chapter 15: Upgrading or reinstalling the software . . . . . . . . . . . . . . . . . 757
Upgrading the Nortel SNAS 4050 . . . . . . . . . . . . . . . . . . . . . . . . . . . . . . . . . . . . . . . 757
Performing minor and major release upgrades . . . . . . . . . . . . . . . . . . . . . . . . . . 758
Downloading the software image using the CLI . . . . . . . . . . . . . . . . . . . . . . 759
Activating the software upgrade package . . . . . . . . . . . . . . . . . . . . . . . . . . . . . . 760
Reinstalling the software . . . . . . . . . . . . . . . . . . . . . . . . . . . . . . . . . . . . . . . . . . . . . . 763
Before you begin . . . . . . . . . . . . . . . . . . . . . . . . . . . . . . . . . . . . . . . . . . . . . . . . . 763
Reinstalling the software from an external file server . . . . . . . . . . . . . . . . . . . . . 765
Reinstalling the software from a CD . . . . . . . . . . . . . . . . . . . . . . . . . . . . . . . . . . 767
Chapter 16: The Command Line Interface . . . . . . . . . . . . . . . . . . . . . . . . . 769
Connecting to the Nortel SNAS 4050 . . . . . . . . . . . . . . . . . . . . . . . . . . . . . . . . . . . . 770
Establishing a console connection . . . . . . . . . . . . . . . . . . . . . . . . . . . . . . . . . . . . 770
Requirements . . . . . . . . . . . . . . . . . . . . . . . . . . . . . . . . . . . . . . . . . . . . . . . . 771
Procedure . . . . . . . . . . . . . . . . . . . . . . . . . . . . . . . . . . . . . . . . . . . . . . . . . . . 771
Establishing a Telnet connection . . . . . . . . . . . . . . . . . . . . . . . . . . . . . . . . . . . . . 772
Enabling and restricting Telnet access . . . . . . . . . . . . . . . . . . . . . . . . . . . . . 772
Running Telnet . . . . . . . . . . . . . . . . . . . . . . . . . . . . . . . . . . . . . . . . . . . . . . . 773
Establishing a connection using SSH . . . . . . . . . . . . . . . . . . . . . . . . . . . . . . . . . 773
Enabling and restricting SSH access . . . . . . . . . . . . . . . . . . . . . . . . . . . . . . 773
Running an SSH client . . . . . . . . . . . . . . . . . . . . . . . . . . . . . . . . . . . . . . . . . 774
Accessing the Nortel SNAS 4050 cluster . . . . . . . . . . . . . . . . . . . . . . . . . . . . . . . . . . 775
CLI Main Menu or Setup . . . . . . . . . . . . . . . . . . . . . . . . . . . . . . . . . . . . . . . . . . . . . . 777
Command line history and editing . . . . . . . . . . . . . . . . . . . . . . . . . . . . . . . . . . . . . . . 777
Idle timeout . . . . . . . . . . . . . . . . . . . . . . . . . . . . . . . . . . . . . . . . . . . . . . . . . . . . . . . . . 777
Chapter 17: Configuration example . . . . . . . . . . . . . . . . . . . . . . . . . . . . . . 779
Scenario . . . . . . . . . . . . . . . . . . . . . . . . . . . . . . . . . . . . . . . . . . . . . . . . . . . . . . . . . . . 779
Steps . . . . . . . . . . . . . . . . . . . . . . . . . . . . . . . . . . . . . . . . . . . . . . . . . . . . . . . . . . . . . 782
Nortel Secure Network Access Switch 4050 User Guide
20 Contents
Configure the network DNS server . . . . . . . . . . . . . . . . . . . . . . . . . . . . . . . . . . . 782
Configure the network DHCP server . . . . . . . . . . . . . . . . . . . . . . . . . . . . . . . . . . 783
Configure the network core router . . . . . . . . . . . . . . . . . . . . . . . . . . . . . . . . . . . . 789
Configure the Ethernet Routing Switch 8300 using the CLI . . . . . . . . . . . . . . . . 790
Steps . . . . . . . . . . . . . . . . . . . . . . . . . . . . . . . . . . . . . . . . . . . . . . . . . . . . . . . 790
Enabling SSH . . . . . . . . . . . . . . . . . . . . . . . . . . . . . . . . . . . . . . . . . . . . . . . . 791
Configuring the Nortel SNAS 4050 pVIP subnet . . . . . . . . . . . . . . . . . . . . . . 791
Creating port-based VLANs . . . . . . . . . . . . . . . . . . . . . . . . . . . . . . . . . . . . . 791
Configuring the VoIP VLANs . . . . . . . . . . . . . . . . . . . . . . . . . . . . . . . . . . . . . 791
Configuring the Red, Yellow, and Green VLANs . . . . . . . . . . . . . . . . . . . . . . 791
Configuring the NSNA uplink filter . . . . . . . . . . . . . . . . . . . . . . . . . . . . . . . . . 792
Configuring the NSNA ports . . . . . . . . . . . . . . . . . . . . . . . . . . . . . . . . . . . . . 792
Enabling NSNA globally . . . . . . . . . . . . . . . . . . . . . . . . . . . . . . . . . . . . . . . . 792
Configure the Ethernet Routing Switch 5510 . . . . . . . . . . . . . . . . . . . . . . . . . . . 793
Steps . . . . . . . . . . . . . . . . . . . . . . . . . . . . . . . . . . . . . . . . . . . . . . . . . . . . . . . 793
Setting the switch IP address . . . . . . . . . . . . . . . . . . . . . . . . . . . . . . . . . . . . 793
Configuring SSH . . . . . . . . . . . . . . . . . . . . . . . . . . . . . . . . . . . . . . . . . . . . . . 794
Configuring the Nortel SNAS 4050 pVIP subnet . . . . . . . . . . . . . . . . . . . . . . 794
Creating port-based VLANs . . . . . . . . . . . . . . . . . . . . . . . . . . . . . . . . . . . . . 794
Configuring the VoIP VLANs . . . . . . . . . . . . . . . . . . . . . . . . . . . . . . . . . . . . . 794
Configuring the Red, Yellow, and Green VLANs . . . . . . . . . . . . . . . . . . . . . . 794
Configuring the login domain controller filters . . . . . . . . . . . . . . . . . . . . . . . . 795
Configuring the NSNA ports . . . . . . . . . . . . . . . . . . . . . . . . . . . . . . . . . . . . . 795
Enabling NSNA globally . . . . . . . . . . . . . . . . . . . . . . . . . . . . . . . . . . . . . . . . 795
Configure the Nortel SNAS 4050 . . . . . . . . . . . . . . . . . . . . . . . . . . . . . . . . . . . . . 795
Performing initial setup . . . . . . . . . . . . . . . . . . . . . . . . . . . . . . . . . . . . . . . . . 796
Completing initial setup . . . . . . . . . . . . . . . . . . . . . . . . . . . . . . . . . . . . . . . . . 797
Adding the network access devices . . . . . . . . . . . . . . . . . . . . . . . . . . . . . . . 798
Mapping the VLANs . . . . . . . . . . . . . . . . . . . . . . . . . . . . . . . . . . . . . . . . . . . 800
Enabling the network access devices . . . . . . . . . . . . . . . . . . . . . . . . . . . . . . 801
Appendix A: CLI reference . . . . . . . . . . . . . . . . . . . . . . . . . . . . . . . . . . . . . 803
Using the CLI . . . . . . . . . . . . . . . . . . . . . . . . . . . . . . . . . . . . . . . . . . . . . . . . . . . . . . . 804
Global commands . . . . . . . . . . . . . . . . . . . . . . . . . . . . . . . . . . . . . . . . . . . . . . . . 804
Command line history and editing . . . . . . . . . . . . . . . . . . . . . . . . . . . . . . . . . . . . 806
320818-A
Contents
21
CLI shortcuts . . . . . . . . . . . . . . . . . . . . . . . . . . . . . . . . . . . . . . . . . . . . . . . . . . . . 807
Command stacking . . . . . . . . . . . . . . . . . . . . . . . . . . . . . . . . . . . . . . . . . . . . 807
Command abbreviation . . . . . . . . . . . . . . . . . . . . . . . . . . . . . . . . . . . . . . . . . 808
Tab completion . . . . . . . . . . . . . . . . . . . . . . . . . . . . . . . . . . . . . . . . . . . . . . . 808
Using a submenu name as a command argument . . . . . . . . . . . . . . . . . . . . 809
Using slashes and spaces in commands . . . . . . . . . . . . . . . . . . . . . . . . . . . . . . 810
IP address and network mask formats . . . . . . . . . . . . . . . . . . . . . . . . . . . . . . . . 810
IP addresses . . . . . . . . . . . . . . . . . . . . . . . . . . . . . . . . . . . . . . . . . . . . . . . . . 810
Network masks . . . . . . . . . . . . . . . . . . . . . . . . . . . . . . . . . . . . . . . . . . . . . . . 810
Variables . . . . . . . . . . . . . . . . . . . . . . . . . . . . . . . . . . . . . . . . . . . . . . . . . . . . . . . 811
CLI Main Menu . . . . . . . . . . . . . . . . . . . . . . . . . . . . . . . . . . . . . . . . . . . . . . . . . . . . . . 812
CLI command reference . . . . . . . . . . . . . . . . . . . . . . . . . . . . . . . . . . . . . . . . . . . . . . . 812
Information menu . . . . . . . . . . . . . . . . . . . . . . . . . . . . . . . . . . . . . . . . . . . . . . . . . 814
Statistics menu . . . . . . . . . . . . . . . . . . . . . . . . . . . . . . . . . . . . . . . . . . . . . . . . . . 815
Configuration menu . . . . . . . . . . . . . . . . . . . . . . . . . . . . . . . . . . . . . . . . . . . . . . . 816
Boot menu . . . . . . . . . . . . . . . . . . . . . . . . . . . . . . . . . . . . . . . . . . . . . . . . . . . . . . 835
Maintenance menu . . . . . . . . . . . . . . . . . . . . . . . . . . . . . . . . . . . . . . . . . . . . . . . 836
Chapter 18: Troubleshooting . . . . . . . . . . . . . . . . . . . . . . . . . . . . . . . . . . . 837
Troubleshooting tips . . . . . . . . . . . . . . . . . . . . . . . . . . . . . . . . . . . . . . . . . . . . . . . . . . 837
Cannot connect to the Nortel SNAS 4050 using Telnet or SSH . . . . . . . . . . . . . 838
Verify the current configuration . . . . . . . . . . . . . . . . . . . . . . . . . . . . . . . . . . . 838
Enable Telnet or SSH access . . . . . . . . . . . . . . . . . . . . . . . . . . . . . . . . . . . . 838
Check the Access List . . . . . . . . . . . . . . . . . . . . . . . . . . . . . . . . . . . . . . . . . . 838
Check the IP address configuration . . . . . . . . . . . . . . . . . . . . . . . . . . . . . . . 839
Cannot add the Nortel SNAS 4050 to a cluster . . . . . . . . . . . . . . . . . . . . . . . . . . 841
Cannot contact the MIP . . . . . . . . . . . . . . . . . . . . . . . . . . . . . . . . . . . . . . . . . . . . 841
Check the Access List . . . . . . . . . . . . . . . . . . . . . . . . . . . . . . . . . . . . . . . . . . 842
Add Interface 1 IP addresses and the MIP to the Access List . . . . . . . . . . . 842
The Nortel SNAS 4050 stops responding . . . . . . . . . . . . . . . . . . . . . . . . . . . . . . 843
Telnet or SSH connection to the MIP . . . . . . . . . . . . . . . . . . . . . . . . . . . . . . 843
Console connection . . . . . . . . . . . . . . . . . . . . . . . . . . . . . . . . . . . . . . . . . . . . 843
A user password is lost . . . . . . . . . . . . . . . . . . . . . . . . . . . . . . . . . . . . . . . . . . . . 844
Administrator user password . . . . . . . . . . . . . . . . . . . . . . . . . . . . . . . . . . . . . 844
Operator user password . . . . . . . . . . . . . . . . . . . . . . . . . . . . . . . . . . . . . . . . 844
Nortel Secure Network Access Switch 4050 User Guide
22 Contents
Root user password . . . . . . . . . . . . . . . . . . . . . . . . . . . . . . . . . . . . . . . . . . . 844
Boot user password . . . . . . . . . . . . . . . . . . . . . . . . . . . . . . . . . . . . . . . . . . . . 845
A user fails to connect to the Nortel SNAS 4050 domain . . . . . . . . . . . . . . . . . . 845
Trace tools . . . . . . . . . . . . . . . . . . . . . . . . . . . . . . . . . . . . . . . . . . . . . . . . . . . . . . . . . 845
System diagnostics . . . . . . . . . . . . . . . . . . . . . . . . . . . . . . . . . . . . . . . . . . . . . . . . . . 847
Installed certificates . . . . . . . . . . . . . . . . . . . . . . . . . . . . . . . . . . . . . . . . . . . . . . . 847
Network diagnostics . . . . . . . . . . . . . . . . . . . . . . . . . . . . . . . . . . . . . . . . . . . . . . 847
Active alarms and the events log file . . . . . . . . . . . . . . . . . . . . . . . . . . . . . . . . . . 849
Error log files . . . . . . . . . . . . . . . . . . . . . . . . . . . . . . . . . . . . . . . . . . . . . . . . . . . . 849
Appendix B: Syslog messages. . . . . . . . . . . . . . . . . . . . . . . . . . . . . . . . . . 851
Syslog messages by message type . . . . . . . . . . . . . . . . . . . . . . . . . . . . . . . . . . . . . . 851
Operating system (OS) messages . . . . . . . . . . . . . . . . . . . . . . . . . . . . . . . . . . . 852
System Control Process messages . . . . . . . . . . . . . . . . . . . . . . . . . . . . . . . . . . . 853
About alarm messages . . . . . . . . . . . . . . . . . . . . . . . . . . . . . . . . . . . . . . . . . 854
About event messages . . . . . . . . . . . . . . . . . . . . . . . . . . . . . . . . . . . . . . . . . 856
Traffic Processing Subsystem messages . . . . . . . . . . . . . . . . . . . . . . . . . . . . . . 857
Start-up messages . . . . . . . . . . . . . . . . . . . . . . . . . . . . . . . . . . . . . . . . . . . . . . . 860
AAA subsystem messages . . . . . . . . . . . . . . . . . . . . . . . . . . . . . . . . . . . . . . . . . 861
NSNAS subsystem messages . . . . . . . . . . . . . . . . . . . . . . . . . . . . . . . . . . . . . . . 863
Syslog messages in alphabetical order . . . . . . . . . . . . . . . . . . . . . . . . . . . . . . . . . . . 865
Appendix C: Supported MIBs . . . . . . . . . . . . . . . . . . . . . . . . . . . . . . . . . . . 875
Supported MIBs . . . . . . . . . . . . . . . . . . . . . . . . . . . . . . . . . . . . . . . . . . . . . . . . . . . . . 875
Supported traps . . . . . . . . . . . . . . . . . . . . . . . . . . . . . . . . . . . . . . . . . . . . . . . . . . . . . 879
Appendix D: Supported ciphers . . . . . . . . . . . . . . . . . . . . . . . . . . . . . . . . . 881
Appendix E: Adding User Preferences attribute to Active Directory . . . 883
Install All Administrative Tools
(Windows 2000 Server) . . . . . . . . . . . . . . . . . . . . . . . . . . . . . . . . . . . . . . . . . . 883
Register the Schema Management dll (Windows Server 2003) . . . . . . . . . . . . . 883
Add the Active Directory Schema Snap-in
(Windows 2000 Server and Windows Server 2003) . . . . . . . . . . . . . . . . . . . . . 884
Create a shortcut to the console window . . . . . . . . . . . . . . . . . . . . . . . . . . . 886
Permit write operations to the schema (Windows 2000 Server) . . . . . . . . . . . . . 886
320818-A
Contents
23
Create a new attribute
(Windows 2000 Server and Windows Server 2003) . . . . . . . . . . . . . . . . . . . . . 887
Create the new class . . . . . . . . . . . . . . . . . . . . . . . . . . . . . . . . . . . . . . . . . . . . . . 888
Add isdUserPrefs attribute to nortelSSLOffload class . . . . . . . . . . . . . . . . . 888
Add the nortelSSLOffload Class to the User Class . . . . . . . . . . . . . . . . . . . . 889
Appendix F: Configuring DHCP to auto-configure IP Phones. . . . . . . . . 891
Configuring IP Phone auto-configuration . . . . . . . . . . . . . . . . . . . . . . . . . . . . . . . . . . 892
Creating the DHCP options . . . . . . . . . . . . . . . . . . . . . . . . . . . . . . . . . . . . . . . . . 892
Configuring the Call Server Information and VLAN Information options . . . . . . . 896
Setting up the IP Phone . . . . . . . . . . . . . . . . . . . . . . . . . . . . . . . . . . . . . . . . . . . . 899
Appendix G: Using a Windows domain logon script to launch the Nortel
SNAS 4050 portal . . . . . . . . . . . . . . . . . . . . . . . . . . . . . . . . . . . . . . . . . . . . . 901
Configuring the logon script . . . . . . . . . . . . . . . . . . . . . . . . . . . . . . . . . . . . . . . . . . . . 901
Creating a logon script . . . . . . . . . . . . . . . . . . . . . . . . . . . . . . . . . . . . . . . . . . . . . . . . 902
Creating the script as a batch file . . . . . . . . . . . . . . . . . . . . . . . . . . . . . . . . . . . . 902
Creating the script as a VBScript file . . . . . . . . . . . . . . . . . . . . . . . . . . . . . . . . . . 903
Assigning the logon script . . . . . . . . . . . . . . . . . . . . . . . . . . . . . . . . . . . . . . . . . . . . . 903
Appendix H: Software licensing information . . . . . . . . . . . . . . . . . . . . . . 905
Index . . . . . . . . . . . . . . . . . . . . . . . . . . . . . . . . . . . . . . . . . . . . . . . . . . . . . . . 911
Nortel Secure Network Access Switch 4050 User Guide
24 Contents
320818-A
25
Preface
Nortel* Secure Network Access (Nortel SNA) is a clientless solution that provides
seamless, secure access to the corporate network from inside or outside that
network. The Nortel SNA solution combines multiple hardware devices and
software components to support the following features:
•
•
•
partitions the network resources into access zones (authentication,
remediation, and full access)
provides continual device integrity checking using TunnelGuard
supports both dynamic and static IP clients
The Nortel Secure Network Access Switch 4050 (Nortel SNAS 4050) controls
operation of the Nortel SNA solution.
This user guide covers the process of implementing the Nortel SNA solution using
the Nortel SNAS 4050 for Nortel Secure Network Access Switch
Software Release 1.0. The document includes the following information:
•
•
•
•
•
•
•
•
overview of the role of the Nortel SNAS 4050 in the Nortel SNA solution
initial setup
configuring authentication, authorization, and accounting (AAA) features
managing system users
customizing the portal
upgrading the software
logging and monitoring
troubleshooting installation and operation
Nortel Secure Network Access Switch 4050 User Guide
26
Preface
The document provides instructions for initializing and customizing the features
using the Command Line Interface (CLI). To learn the basic structure and
operation of the Nortel SNAS 4050 CLI, refer to “CLI reference” on page 803.
This reference guide provides links to where the function and syntax of each CLI
command are described in the document. For information on accessing the CLI,
see “The Command Line Interface” on page 769.
Security & Routing Element Manager (SREM) is a graphical user interface (GUI)
that runs in an online, interactive mode. SREM allows the management of
multiple devices (for example, the Nortel SNAS 4050) from one application. To
use SREM, you must have network connectivity to a management station running
SREM in one of the supported environments. For instructions on installing and
starting SREM, refer to Installing and Using the Security & Routing Element
Manager (320199-A).
Before you begin
This guide is intended for network administrators who have the following
background:
•
•
•
•
basic knowledge of networks, Ethernet bridging, and IP routing
familiarity with networking concepts and terminology
experience with windowing systems or GUIs
basic knowledge of network topologies
Before using this guide, you must complete the following procedures. For a new
switch:
1
Install the switch.
For installation instructions, see Nortel Secure Network Access Switch 4050
Installation Guide (320846-A).
2
Connect the switch to the network.
For more information, see “The Command Line Interface” on page 769.
Ensure that you are running the latest version of Nortel SNAS 4050 software. For
information about upgrading the Nortel SNAS 4050, see “Upgrading or
reinstalling the software” on page 757.
320818-A
Preface 27
Text conventions
This guide uses the following text conventions:
angle brackets (< >)
Enter text based on the description inside the brackets.
Do not type the brackets when entering the command.
Example: If the command syntax is
ping <ip_address>, you enter
ping 192.32.10.12
bold text
Objects such as window names, dialog box names, and
icons, as well as user interface objects such as buttons,
tabs, and menu items.
bold Courier text
Command names, options, and text that you must enter.
Example: Use the dinfo command.
Example: Enter show ip {alerts|routes}.
braces ({})
Required elements in syntax descriptions where there is
more than one option. You must choose only one of the
options. Do not type the braces when entering the
command.
Example: If the command syntax is
show ip {alerts|routes}, you must enter either
show ip alerts or show ip routes, but not both.
brackets ([ ])
Optional elements in syntax descriptions. Do not type
the brackets when entering the command.
Example: If the command syntax is
show ip interfaces [-alerts], you can enter
either show ip interfaces or
show ip interfaces -alerts.
ellipsis points (. . . )
Repeat the last element of the command as needed.
Example: If the command syntax is
ethernet/2/1 [<parameter> <value>]... ,
you enter ethernet/2/1 and as many
parameter-value pairs as needed.
Nortel Secure Network Access Switch 4050 User Guide
28
Preface
italic text
Variables in command syntax descriptions. Also
indicates new terms and book titles. Where a variable is
two or more words, the words are connected by an
underscore.
Example: If the command syntax is
show at <valid_route>,
valid_route is one variable and you substitute one
value for it.
plain Courier
text
Command syntax and system output, for example,
prompts and system messages.
Example: Set Trap Monitor Filters
separator ( > )
Menu paths.
Example: Protocols > IP identifies the IP command on
the Protocols menu.
vertical line ( | )
Options for command keywords and arguments. Enter
only one of the options. Do not type the vertical line
when entering the command.
Example: If the command syntax is
show ip {alerts|routes}, you enter either
show ip alerts or show ip routes, but not
both.
Related information
This section lists information sources that relate to this document.
Publications
Refer to the following publications for information on the Nortel SNA solution:
•
•
•
•
320818-A
Nortel Secure Network Access Solution Guide (320817-A)
Nortel Secure Network Access Switch 4050 Installation Guide (320846-A)
Nortel Secure Network Access Switch 4050 User Guide (320818-A)
Installing and Using the Security & Routing Element Manager
(SREM) (320199-B)
Preface 29
•
•
•
•
•
Release Notes for Nortel Ethernet Routing Switch 5500 Series, Software
Release 4.3 (217468-B)
Release Notes for the Ethernet Routing Switch 8300, Software Release
2.2.8 (316811-E)
Release Notes for the Nortel Secure Network Access Solution,
Software Release 1.0 (320850-A)
Release Notes for Enterprise Switch Manager (ESM), Software Release
5.1 (209960-H)
Using Enterprise Switch Manager Release 5.1 (208963-F)
Online
To access Nortel technical documentation online, go to the Nortel web site:
www.nortel.com/support
You can download current versions of technical documentation. To locate
documents, browse by category or search using the product name or number.
You can print the technical manuals and release notes free, directly from the
Internet. Use Adobe* Reader* to open the manuals and release notes, search for
the sections you need, and print them on most standard printers. Go to the Adobe
Systems site at www.adobe.com to download a free copy of Adobe Reader.
How to get help
If you purchased a service contract for your Nortel product from a distributor or
authorized reseller, contact the technical support staff for that distributor or
reseller for assistance.
If you purchased a Nortel service program, use the www.nortel.com/help web
page to locate information to contact Nortel for assistance:
•
To obtain Nortel Technical Support contact information, click the
CONTACT US link on the left side of the page.
Nortel Secure Network Access Switch 4050 User Guide
30
Preface
•
To call a Nortel Technical Solutions Center for assistance, click the CALL
US link on the left side of the page to find the telephone number for your
region.
An Express Routing Code (ERC) is available for many Nortel products and
services. When you use an ERC, your call is routed to a technical support person
who specializes in supporting that product or service. To locate the ERC for your
product or service, go to the www.nortel.com/help web page and follow these
links:
320818-A
1
Click CONTACT US on the left side of the HELP web page.
2
Click Technical Support on the CONTACT US web page.
3
Click Express Routing Codes on the TECHNICAL SUPPORT web page.
31
Chapter 1
Overview
This chapter includes the following topics:
Topic
Page
The Nortel SNA solution
31
Elements of the NSNA solution
32
Supported users
32
Role of the Nortel SNAS 4050
33
Nortel SNAS 4050 clusters
39
One-armed and two-armed configurations
40
Nortel SNA configuration and management tools
42
Nortel SNAS 4050 configuration roadmap
43
The Nortel SNA solution
Nortel Secure Network Access (Nortel SNA) solution is a protective framework to
completely secure the network from endpoint vulnerability. The Nortel SNA
solution addresses endpoint security and enforces policy compliance. Nortel SNA
delivers endpoint security by enabling only trusted, role-based access privileges
premised on the security level of the device, user identity, and session context.
Nortel SNA enforces policy compliance, such as for Sarbanes-Oxley and COBIT,
ensuring that the required anti-virus applications or software patches are installed
before users are granted network access.
Nortel Secure Network Access Switch 4050 User Guide
32 Chapter 1 Overview
For Nortel, success is delivering technologies providing secure access to your
information using security-compliant systems. Your success is measured by
increased employee productivity and lower network operations costs. Nortel’s
solutions provide your organization with the network intelligence required for
success.
Elements of the NSNA solution
The following devices are essential elements of the Nortel SNA solution:
•
•
•
Nortel Secure Network Access Switch 4050 (Nortel SNAS 4050), which acts
as the Policy Decision Point
network access device, which acts as the Policy Enforcement Point
— Ethernet Routing Switch 8300
— Ethernet Routing Switch 5510, 5520, or 5530
DHCP and DNS servers
The following devices are additional, optional elements of the Nortel SNA
solution:
•
•
remediation server
corporate authentication services such as LDAP or RADIUS services
Each Nortel SNAS 4050 device can support up to five network access devices.
Supported users
The Nortel SNAS 4050 supports the following types of users:
•
PCs using the following operating systems:
— Windows 2000 SP4
— Windows XP SP2
The Nortel SNAS 4050 supports the following browsers:
— Internet Explorer version 6.0 or later
— Netscape Navigator version 7.3 or later
— Mozilla Firefox version 1.0.6 or later
320818-A
Chapter 1 Overview 33
Java Runtime Environment (JRE) for all browsers:
•
— JRE 1.5.0_04 or later
VoIP phones
— Nortel IP Phone 2002
— Nortel IP Phone 2004
— Nortel IP Phone 2007
See Release Notes for the Nortel Secure Network Access Solution,
Software Release 1.0 (320850-A) for the minimum firmware versions
required for the IP Phones operating with different call servers.
Each NSNA-enabled port on a network access device can support one PC
(untagged traffic) and one IP Phone (tagged traffic). Softphone traffic is
considered to be the same as PC traffic (untagged).
Note: Where there is both an IP Phone and a PC, the PC must be
connected through the 3-port switch on the IP Phone.
Role of the Nortel SNAS 4050
The Nortel SNAS 4050 helps protect the network by ensuring endpoint
compliance for devices that connect to the network.
Before allowing a device to have full network access, the Nortel SNAS 4050
checks user credentials and host integrity against predefined corporate policy
criteria. Through tight integration with network access devices, the Nortel
SNAS 4050 can:
•
•
•
dynamically move the user into a quarantine VLAN
dynamically grant the user full or limited network access
dynamically apply per port firewall rules that apply to a device’s connection
Once a device has been granted network access, the Nortel SNAS 4050
continually monitors the health status of the device to ensure continued
compliance. If a device falls out of compliance, the Nortel SNAS 4050 can
dynamically move the device into a quarantine or remediation VLAN.
Nortel Secure Network Access Switch 4050 User Guide
34 Chapter 1 Overview
Nortel SNAS 4050 functions
The Nortel SNAS 4050 performs the following functions:
•
•
•
•
•
•
•
•
•
Acts as a web server portal, which is accessed by users in clientless mode for
authentication and host integrity check and which sends remediation
instructions and guidelines to endpoint clients if they fail the host integrity
check.
Communicates with backend authentication servers to identify authorized
users and levels of access.
Acts as a policy server, which communicates with the TunnelGuard applet
that verifies host integrity.
Instructs the network access device to move clients to the appropriate VLAN
and, if applicable, to apply additional filters.
Can be a DNS proxy in the Red VLAN when the Nortel SNAS 4050 functions
as a captive portal
Performs session management.
Monitors the health of clients and switches.
Performs logging and auditing functions.
Provides High Availability (HA) through IPmig protocol.
Nortel SNA VLANs and filters
There are four types of Layer 2 or Layer 3 VLANs in a Nortel SNA network:
•
•
•
320818-A
Red — extremely restricted access. If the default filters are used, the user can
communicate only with the Nortel SNAS 4050 and the Windows domain
controller network. There is one Red VLAN for each network access device.
Yellow — restricted access for remediation purposes if the client PC fails the
host integrity check. Depending on the filters and TunnelGuard rules
configured for the network, the client may be directed to a remediation server
participating in the Yellow VLAN. There can be up to five Yellow VLANs for
each network access device. Each user group is associated with only one
Yellow VLAN.
Green — full access, in accordance with the user’s access privileges. There
can be up to five Green VLANs for each network access device.
Chapter 1 Overview 35
•
VoIP — automatic access for VoIP traffic. The network access device places
VoIP calls in a VoIP VLAN without submitting them to the Nortel
SNAS 4050 authentication and authorization process.
When a client attempts to connect to the network, the network access device
places the client in its Red VLAN. The Nortel SNAS 4050 authenticates the client
and then downloads a TunnelGuard applet to check the integrity of the client host.
If the integrity check fails, the Nortel SNAS 4050 instructs the network access
device to move the client to a Yellow VLAN, with its associated filter. If the
integrity check succeeds, the Nortel SNAS 4050 instructs the network access
device to move the client to a Green VLAN, with its associated filter. The network
access device applies the filters when it changes the port membership.
The VoIP filters allow IP Phone traffic into one of the preconfigured VoIP VLANs
for VoIP communication only.
The default filters can be modified to accommodate network requirements, such
as Quality of Service (QoS) or specific workstation boot processes and network
communications.
For information about configuring VLANs and filters on the network access
device, see Release Notes for Nortel Ethernet Routing Switch 5500 Series,
Software Release 4.3 (217468-B) or Release Notes for the Ethernet Routing
Switch 8300, Software Release 2.2.8 (316811-E).
Groups and profiles
Users are organized in groups. Group membership determines:
•
user access rights
Within the group, extended profiles further refine access rights depending on
the outcome of the TunnelGuard checks.
•
•
•
number of sessions allowed
the TunnelGuard SRS rule to be applied
what displays on the portal page after the user has been authenticated
For information about configuring groups and extended profiles on the Nortel
SNAS 4050, see “Configuring groups and profiles” on page 191.
Nortel Secure Network Access Switch 4050 User Guide
36 Chapter 1 Overview
Authentication methods
You can configure more than one authentication method within a Nortel
SNAS 4050 domain. Nortel Secure Network Access Switch Software Release 1.0
supports the following authentication methods:
•
external database
— Remote Authentication Dial-In User Service (RADIUS)
— Lightweight Directory Access Protocol (LDAP)
The Nortel SNAS 4050 authenticates the user by sending a query to an
external RADIUS or LDAP server. This makes it possible to use
authentication databases already existing within the intranet. The Nortel
SNAS 4050 device includes username and password in the query and requires
the name of one or more access groups in return. The name of the RADIUS
and LDAP access group attribute is configurable.
•
local database
The Nortel SNAS 4050 itself can store up to 1,000 user authentication entries,
each defining a username, password, and relevant access group. You can
populate the database by manually adding entries on the Nortel SNAS 4050,
or you can import a database from a TFTP/FTP/SCP/SFTP server.
Use the local authentication method if no external authentication databases
exist, for testing purposes, for speedy deployment, or as a fallback for external
database queries. You can also use the local database for authorization only, if
an external server provides authentication services but cannot be configured to
return a list of authorized groups.
For information about configuring authentication on the Nortel SNAS 4050, see
“Configuring authentication” on page 233.
For more information about the Nortel SNA solution and the way the Nortel
SNAS 4050 controls network access, see Nortel Secure Network Access Solution
Guide (320817-A).
320818-A
Chapter 1 Overview 37
TunnelGuard host integrity check
The TunnelGuard application checks client host integrity by verifying that the
components you have specified are required for the client’s personal firewall
(executables, DLLs, configuration files, and so on) are installed and active on the
client PC. You specify the required component entities and engineering rules by
configuring a Software Requirement Set (SRS) rule and mapping the rule to a user
group.
After a client has been authenticated, the Nortel SNAS 4050 downloads a
TunnelGuard agent as an applet to the client PC. The TunnelGuard applet fetches
the SRS rule applicable for the group to which the authenticated user belongs, so
that TunnelGuard can perform the appropriate host integrity check. The
TunnelGuard applet reports the result of the host integrity check to the Nortel
SNAS 4050.
If the required components are present on the client machine, TunnelGuard
reports that the SRS rule check succeeded. The Nortel SNAS 4050 then instructs
the network access device to permit access to intranet resources in accordance
with the user group’s access privileges. The Nortel SNAS 4050 also requests the
TunnelGuard applet to redo a DHCP request in order to renew the client’s DHCP
lease with the network access device.
If the required components are not present on the client machine, TunnelGuard
reports that the SRS rule check failed. You configure behavior following host
integrity check failure: The session can be torn down, or the Nortel SNAS 4050
can instruct the network access device to grant the client restricted access to the
network for remediation purposes.
The TunnelGuard applet repeats the host integrity check periodically throughout
the client session. If the check fails at any time, the client is either evicted or
quarantined, depending on the behavior you have configured. The recheck interval
is configurable.
For information about configuring the TunnelGuard host integrity check, see
“Configuring the TunnelGuard check using the CLI” on page 132 or “Configuring
the TunnelGuard check using the SREM” on page 168. For information about
configuring the SRS rules, see “TunnelGuard SRS Builder” on page 317. For
information about mapping an SRS rule to a group, see “Configuring groups using
the CLI” on page 198 or “Configuring groups using the SREM” on page 208.
Nortel Secure Network Access Switch 4050 User Guide
38 Chapter 1 Overview
Communication channels
Communications between the Nortel SNAS 4050 and key elements of the Nortel
SNA solution are secure and encrypted. Table 1 shows the communication
channels in the network.
Table 1 Communication channels in the Nortel SNA network
Communication
Communication protocol
Between Nortel SNAS 4050 and edge
switches
SSH
Between Nortel SNAS 4050 devices in a
cluster
TCP and UDP
Between Nortel SNAS 4050 and client PC
(TunnelGuard applet)
SSL/TLS
Between Nortel SNAS 4050 and SREM
SSH
From edge switch to EPM
SNMPv3 Inform
From EPM to edge switch
Telnet over SSH
From authorized endpoint to DHCP server
UDP
Telnet or SSH can be used for management communications between remote PCs
and the Nortel SNAS 4050 devices.
About SSH
The Secure Shell (SSH) protocol provides secure and encrypted communication
between the Nortel SNAS 4050 and the network access devices, and between
Nortel SNAS 4050 devices and remote management PCs not using Telnet.
SSH uses either password authentication or public key authentication. With public
key authentication, pairs of public/private SSH host keys protect against “man in
the middle” attacks by providing a mechanism for the SSH client to authenticate
the server. SSH clients keep track of the public keys to be used to authenticate
different SSH server hosts.
SSH clients in the Nortel SNA network do not silently accept new keys from
previously unknown server hosts. Instead, they refuse the connection if the key
does not match their known hosts.
320818-A
Chapter 1 Overview 39
The Nortel SNAS 4050 supports the use of three different SSH host key types:
•
•
•
RSA1
RSA
DSA
SSH protocol version 1 always uses RSA1 keys. SSH protocol version 2 uses
either RSA or DSA keys.
For management communications in the Nortel SNA solution, the Nortel
SNAS 4050 can act both as SSH server (when a user connects to the CLI using an
SSH client) and as SSH client (when the Nortel SNAS 4050 initiates file or data
transfers using the SCP or SFTP protocols).
For information about managing SSH keys for communication between the Nortel
SNAS 4050 and the network access devices, see “Managing SSH keys using the
CLI” on page 84 or “Managing SSH keys using the SREM” on page 102.
For information about managing SSH keys for Nortel SNAS 4050 management
communications, see “Configuring Nortel SNAS 4050 host SSH keys using the
CLI” on page 485 or “Configuring Nortel SNAS 4050 host SSH keys using the
SREM” on page 548.
Nortel SNAS 4050 clusters
A cluster is a group of Nortel SNAS 4050 devices that share the same
configuration parameters. Nortel Secure Network Access Switch
Software Release 1.0 supports two Nortel SNAS 4050 devices, or nodes, in a
cluster. A Nortel SNA network can contain multiple clusters.
Clustering offers the following benefits:
•
•
manageability — The cluster is a single, seamless unit that automatically
pushes configuration changes to its members.
scalability — The Nortel SNAS 4050 nodes in a cluster share the burden of
resource-intensive operations. The cluster distributes control of the network
access devices between the Nortel SNAS 4050 nodes and distributes handling
of session logon. As a result, Nortel SNAS 4050 devices in a cluster can
control more switches and handle more user sessions.
Nortel Secure Network Access Switch 4050 User Guide
40 Chapter 1 Overview
•
fault tolerance — If a Nortel SNAS 4050 device fails, the failure is detected
by the other node in the cluster, which takes over the switch control and
session handling functions of the failed device. As long as there is one
running Nortel SNAS 4050, no sessions will be lost.
The devices in the cluster can be located anywhere in the network and do not have
to be physically connected to each other. All the Nortel SNAS 4050 devices in the
cluster must be in the same subnet. The cluster is created during initial setup of the
second node, when you specify that the setup is a join operation and you associate
the node with an existing Management IP address (MIP).
For more information about Nortel SNAS 4050 IP addresses, see “About the IP
addresses” on page 51. For information about adding a node to a cluster, see
“Adding a Nortel SNAS 4050 device to a cluster” on page 61.
One-armed and two-armed configurations
The Nortel SNAS 4050 must interface to two kinds of traffic: client and
management. The interface to the client side handles traffic between the
TunnelGuard applet on the client and the portal. The interface to the management
side handles Nortel SNAS 4050 management traffic (traffic connecting the Nortel
SNAS 4050 to internal resources and configuring the Nortel SNAS 4050 from a
management station).
There are two ways to configure the Nortel SNAS 4050 interfaces:
•
•
one-armed configuration (see “One-armed configuration” on page 41)
two-armed configuration (see “Two-armed configuration” on page 41)
You specify whether the Nortel SNAS 4050 will function in a one-armed or
two-armed configuration during initial setup (see “Initial setup” on page 49).
320818-A
Chapter 1 Overview 41
One-armed configuration
In a one-armed configuration, the Nortel SNAS 4050 has only one interface,
which acts as both the client portal interface and the management traffic interface.
Figure 1 illustrates a one-armed configuration.
Figure 1 One-armed configuration
NSNAS
1
Management/client portal interface (1)
192.168.128.11 (MIP [management])
192.168.128.12 (RIP [host])
192.168.128.100 (pVIP [portal])
Default gateway
192.168.128.1
Internet
Network access device
Endpoint
device
Management
station
Two-armed configuration
In a two-armed configuration, there are two separate interfaces. Interface 1
handles management traffic. Interface 2 handles client portal traffic.
Nortel Secure Network Access Switch 4050 User Guide
42 Chapter 1 Overview
Figure 2 illustrates a two-armed configuration.
Figure 2 Two-armed configuration
Client portal interface (2)
192.168.128.11 (RIP 2 [host]) 2
192.168.128.100 (pVIP [portal])
NSNAS
1
Management interface (1)
10.1.0.11 (MIP [management])
10.1.0.12 (RIP 1 [host])
Default gateway
192.168.128.1
Internet
Network access device
Endpoint
device
Management
station
Nortel SNA configuration and management tools
You can use a number of device and network management tools to configure the
Nortel SNAS 4050 and manage the Nortel SNA solution:
•
Command Line Interface (CLI)
You must use the CLI to perform initial setup on the Nortel SNAS 4050 and to
set up the Secure Shell (SSH) connection between the Nortel SNAS 4050 and
the network access devices, and between the Nortel SNAS 4050 and the GUI
management tool. You can then continue to use the CLI to configure and
manage the Nortel SNAS 4050, or you can use the GUI.
The configuration chapters in this User Guide describe the specific CLI
commands used to configure the Nortel SNAS 4050. For general information
about using the CLI, see Chapter 16, “The Command Line Interface,” on
page 769.
320818-A
Chapter 1 Overview 43
•
Security & Routing Element Manager (SREM)
The SREM is a GUI application you can use to configure and manage the
Nortel SNAS 4050.
The configuration chapters in this User Guide describe the specific steps to
configure the Nortel SNAS 4050 using the SREM. For general information
about installing and using the SREM, see Installing and Using the Security &
Routing Element Manager (SREM) (320199-B).
•
Enterprise Policy Manager (EPM) release 4.2
Enterprise Policy Manager (EPM) is a security policy and quality of service
provisioning application. You can use EPM to provision filters on the Nortel
SNA network access devices. EPM 4.2 supports preconfiguration of Red,
Yellow, and Green VLAN filters prior to enabling the NSNA feature. In future
releases of the Nortel SNAS 4050 and EPM software, users will have the
additional ability to add and modify security and quality of service filters
while Nortel SNA is enabled on the device.
For general information about installing and using EPM, see Installing Nortel
Enterprise Policy Manager (318389).
•
Simple Network Management Protocol (SNMP) agent
For information about configuring SNMP for the Nortel SNAS 4050, see
“Configuring SNMP” on page 617.
Nortel SNAS 4050 configuration roadmap
The following task list is an overview of the steps required to configure the Nortel
SNAS 4050 and the Nortel SNA solution.
1
Configure the network DNS server to create a forward lookup zone for the
Nortel SNAS 4050 domain.
For an example, see “Configuration example” on page 779.
2
Configure the network DHCP server.
For an example, see “Configuration example” on page 779.
Nortel Secure Network Access Switch 4050 User Guide
44 Chapter 1 Overview
For each VLAN:
a
Create a DHCP scope.
b
Specify the IP address range and subnet mask for that scope.
c
Configure the following DHCP options:
— Specify the default gateway.
— Specify the DNS server to be used by endpoints in that scope.
— If desired, configure DHCP so that the IP Phones learn their VLAN
configuration data automatically from the DHCP server. For more
information, see Appendix F, “Configuring DHCP to auto-configure
IP Phones,” on page 891.
Note: For the Red VLANs, the DNS server setting is one of the Nortel
SNAS 4050 portal Virtual IP addresses (pVIP).
While the endpoint is in the Red VLAN, there are limited DNS server
functions to be performed, and the Nortel SNAS 4050 itself acts as the
DNS server. When the endpoint is in one of the other VLANs, DNS
requests are forwarded to the corporate DNS servers.
The DNS server setting is required for the captive portal to work.
3
Configure the network core router:
a
Create the Red, Yellow, Green, VoIP, and Nortel SNAS 4050 management
VLANs.
b
If the edge switches are operating in Layer 2 mode, enable 802.1q tagging
on the uplink ports to enable them to participate in multiple VLANs, then
add the ports to the applicable VLANs.
Note: The uplink ports must participate in all the VLANs.
c
Configure IP addresses for the VLANs.
These IP interfaces are the default gateways the DHCP Relay will use.
d
320818-A
If the edge switches are operating in Layer 2 mode, configure DHCP relay
agents for the Red, Yellow, Green, and VoIP VLANs.
Chapter 1 Overview 45
Use the applicable show commands on the router to verify that DHCP
relay has been activated to reach the correct scope for each VLAN.
For more information about performing these general configuration steps, see
the regular documentation for the type of router used in your network.
4
Configure the network access devices:
a
Configure static routes to all the networks behind the core router.
b
Configure the switch management VLAN, if necessary.
c
Configure and enable SSH on the switch.
d
Configure the Nortel SNAS 4050 portal Virtual IP address (pVIP)/subnet.
e
Configure port tagging, if applicable.
For a Layer 2 switch, the uplink ports must be tagged to allow them to
participate in multiple VLANs.
f
Create the port-based VLANs.
These VLANs are configured as VoIP, Red, Yellow, and Green VLANs
in step i and step j.
g
Configure DHCP relay and IP routing if the switch is used in Layer 3
mode.
h
(Optional) Configure the Red, Yellow, Green, and VoIP filters.
The filters are configured automatically as predefined defaults when you
configure the Red, Yellow, and Green VLANs (step j). Configure the
filters manually only if your particular system setup requires you to
modify the default filters. You can modify the filters after NSNA is
enabled.
i
Configure the VoIP VLANs.
j
Configure the Red, Yellow, and Green VLANs, associating each with the
applicable filters.
k
Configure the NSNA ports.
Nortel Secure Network Access Switch 4050 User Guide
46 Chapter 1 Overview
Identify switch ports as either uplink or dynamic. When you configure the
uplink ports, you associate the NSNA VLANs with those ports. Clients
are connected on the dynamic ports. You can configure NSNA ports (both
dynamic and uplink) after NSNA is enabled globally.
l
Enable NSNA globally.
For more information about configuring an Ethernet Routing Switch 5510,
5520, or 5530 in a Nortel SNA network, see Release Notes for Nortel Ethernet
Routing Switch 5500 Series, Software Release 4.3 (217468-B).
For more information about configuring an Ethernet Routing Switch 8300 in a
Nortel SNA network, see Release Notes for the Ethernet Routing Switch 8300,
Software Release 2.2.8 (316811-E).
For an example of the commands used to create a Nortel SNA configuration,
see “Configuration example” on page 779.
5
Perform the initial setup on the Nortel SNAS 4050 (see “Initial setup” on
page 52). Nortel recommends running the quick setup wizard during initial
setup, in order to create and configure basic settings for a fully functional
portal.
6
Enable SSH and SRS Admin to allow communication with the SREM (see
“Configuring administrative settings using the CLI” on page 483).
7
Generate and activate the SSH key for communication between the Nortel
SNAS 4050 and the network access devices (see “Managing SSH keys using
the CLI” on page 84 or “Managing SSH keys using the SREM” on page 102).
8
Specify the Software Requirement Set (SRS) rule for the default
tunnelguard group (see “Configuring groups using the CLI” on page 198
or “Configuring groups using the SREM” on page 208).
9
Add the network access devices and export the SSH key (see “Adding a
network access device using the CLI” on page 75 or “Adding a network
access device using the SREM” on page 91).
10 Specify the VLAN mappings (see “Mapping the VLANs using the CLI” on
page 82 or “Mapping the VLANs using the SREM” on page 96).
11 Test NSNA connectivity by using the /maint/chkcfg command in the CLI
(see “Performing maintenance using the CLI” on page 726) or checking the
320818-A
Chapter 1 Overview 47
configuration in the SREM (see “Checking configuration using the SREM”
on page 741).
12 Configure groups (see “Configuring groups and profiles” on page 191).
13 Configure client filters (see “Configuring client filters using the CLI” on
page 201).
14 Configure extended profiles (see “Configuring extended profiles using the
CLI” on page 203).
15 Specify the authentication mechanisms (see “Configuring authentication” on
page 233).
16 Configure system users (see “Managing system users and groups” on
page 353).
17 Configure the end user experience (see “Customizing the portal and user
logon” on page 385).
Nortel Secure Network Access Switch 4050 User Guide
48 Chapter 1 Overview
320818-A
49
Chapter 2
Initial setup
This chapter includes the following topics:
Topic
Page
Before you begin
50
About the IP addresses
51
Initial setup
52
Setting up a single Nortel SNAS 4050 device or the first in a cluster
52
Adding a Nortel SNAS 4050 device to a cluster
61
Next steps
66
Applying and saving the configuration
67
Applying and saving the configuration using the CLI
68
Applying and saving the configuration using the SREM
68
Nortel Secure Network Access Switch 4050 User Guide
50 Chapter 2 Initial setup
Before you begin
Before you can set up the Nortel SNAS 4050, you must complete the following
tasks:
1
Plan the network. For more information, see Nortel Secure Network Access
Solution Guide (320817-A).
In order to configure the Nortel SNAS 4050, you require the following
information:
•
IP addresses
— Nortel SNAS 4050 Management IP address (MIP), portal Virtual IP
address (pVIP), Real IP address (RIP)
— default gateway
— DNS server
— NTP server (if applicable)
— external authentication servers (if applicable)
— network access devices
— remediation server (if applicable)
For more information about the Nortel SNAS 4050 MIP, pVIP, and RIP,
see “About the IP addresses” on page 51.
•
•
320818-A
VLAN IDs
— Nortel SNAS 4050 management VLAN
— Red VLANs
— Yellow VLANs
— Green VLANs
— VoIP VLANs
Groups and profiles to be configured
2
Configure the network DNS server, DHCP server, core router, and network
access devices, as described in “Nortel SNAS 4050 configuration roadmap”
on page 43, steps 1 through 4.
3
Install the Nortel SNAS 4050 device. For more information, see Nortel Secure
Network Access Switch 4050 Installation Guide (320846-A).
Chapter 2 Initial setup 51
4
Establish a console connection to the Nortel SNAS 4050 (see “Establishing a
console connection” on page 770).
About the IP addresses
Management IP address
The Management IP address (MIP) identifies the Nortel SNAS 4050 in the
network. In a multi-Nortel SNAS 4050 solution, the MIP is an IP alias to one of
the Nortel SNAS 4050 devices in the cluster and identifies the cluster. The MIP
always resides on a master Nortel SNAS 4050 device. If the master Nortel
SNAS 4050 that currently holds the MIP fails, the MIP automatically migrates to
a functional master Nortel SNAS 4050. In order to configure the Nortel
SNAS 4050 or Nortel SNAS 4050 cluster remotely, you connect to the MIP using
Telnet (for the CLI) or SSH (for the CLI or the SREM).
Portal Virtual IP address
The portal Virtual IP address (pVIP) is the address assigned to the Nortel
SNAS 4050 device’s web portal server. The pVIP is the address to which clients
connect in order to access the Nortel SNA network. While the client is in the Red
VLAN and the Nortel SNAS 4050 is acting as DNS server, the pVIP is the DNS
server IP address. Although it is possible to assign more than one pVIP to a Nortel
SNAS 4050 device, Nortel recommends that each Nortel SNAS 4050 have only
one pVIP. When the Nortel SNAS 4050 portal is configured as a captive portal,
the pVIP is used to load balance logon requests.
Nortel Secure Network Access Switch 4050 User Guide
52 Chapter 2 Initial setup
Real IP address
The Real IP address (RIP) is the Nortel SNAS 4050 device host IP address for
network connectivity. The RIP is the IP address used for communication between
Nortel SNAS 4050 devices in a cluster. The RIP must be unique on the network
and must be within the same subnet as the MIP. In a two-armed configuration, the
Nortel SNAS 4050 device has two RIPs: one for the client portal interface and one
for the management traffic interface (see “One-armed and two-armed
configurations” on page 40).
Note: Nortel recommends that you always use the MIP for remote
configuration, even though it is possible to configure the Nortel
SNAS 4050 device remotely by connecting to its RIP. Connecting to the
MIP allows you to access all the Nortel SNAS 4050 devices in a cluster.
The MIP is always up, even if one of the Nortel SNAS 4050 devices is
down and therefore not reachable at its RIP.
Initial setup
The initial setup is a guided process that launches automatically the first time you
power up the Nortel SNAS 4050 and log on. You must use a console connection in
order to perform the initial setup.
•
•
For a standalone Nortel SNAS 4050 or the first Nortel SNAS 4050 in a
cluster, see “Setting up a single Nortel SNAS 4050 device or the first in a
cluster” on page 52.
To add a Nortel SNAS 4050 to a cluster, see “Adding a Nortel SNAS 4050
device to a cluster” on page 61.
Setting up a single Nortel SNAS 4050 device or the first in a
cluster
1
Log on using the following username and password:
login: admin
Password: admin
320818-A
Chapter 2 Initial setup 53
The Setup Menu displays.
Alteon iSD NSNAS
Hardware platform: 4050
Software version: x.x
------------------------------------------------------[Setup Menu]
join
- Join an existing cluster
new
- Initialize host as a new installation
boot
- Boot menu
info
- Information menu
exit
- Exit [global command, always available]
>> Setup#
2
Select the option for a new installation.
>> Setup# new
Setup will guide you through the initial configuration.
3
Specify the management interface port number. This port will be assigned to
Interface 1.
Enter port number for the management interface [1-4]:
<port>
In a one-armed configuration, you are specifying the port you want to use for
all network connectivity, since Interface 1 is used for both management traffic
(Nortel SNAS 4050 management and connections to intranet resources) and
client portal traffic (traffic between the TunnelGuard applet on the client and
the portal).
Nortel Secure Network Access Switch 4050 User Guide
54 Chapter 2 Initial setup
In a two-armed configuration, you are specifying the port you want to use for
Nortel SNAS 4050 management traffic.
Note: You can later convert a one-armed configuration into a two-armed
one by adding a new interface to the cluster and assigning an unused port
to that interface. The new interface will be used exclusively for client
portal traffic. For information about adding a new interface, see
“Configuring host interfaces using the CLI” on page 469 or
“Configuring host interfaces using the SREM” on page 508. For
information about assigning ports to an interface, see “Configuring host
ports using the CLI” on page 472 or “Configuring host ports using the
SREM” on page 520.
4
Specify the RIP for this device. This IP address will be assigned to
Interface 1.
Enter IP address for this machine (on management
interface): <IPaddr>
The RIP must be unique on the network and must be within the same subnet
as the MIP.
5
Specify the network mask for the RIP on Interface 1.
Enter network mask [255.255.255.0]: <mask>
6
If the core router attaches VLAN tag IDs to incoming packets, specify the
VLAN tag ID used.
Enter VLAN tag id (or zero for no VLAN) [0]:
If you do not specify a VLAN tag id (in other words, you accept the default
value of zero), the traffic will not be VLAN tagged. When configuring the
network access devices in Layer 2 configurations, ensure that you add the
uplink ports to the Nortel SNAS 4050 management VLAN, for traffic
between the Nortel SNAS 4050 and the network access device.
320818-A
Chapter 2 Initial setup 55
7
Specify whether you are setting up a one-armed or a two-armed configuration.
Setup a two armed configuration (yes/no) [no]:
If you are setting up a one-armed configuration, press Enter to accept the
default value (no). Go to step 8.
If you are setting up a two-armed configuration, enter yes. Go to step 9.
8
Specify the default gateway IP address.
Enter default gateway IP address (or blank to skip):
<IPaddr>
The default gateway is the IP address of the interface on the core router that
will be used if no other interface is specified. The default gateway IP address
must be within the same network address range as the RIP.
Go to step 10.
9
Configure the interface for client portal traffic (Interface 2).
a
Specify a port number for the client portal interface. This port will be
assigned to Interface 2. The port number must not be the same as the port
number for the management interface (Interface 1).
b
Specify the RIP for Interface 2.
c
Specify the network mask for the RIP on Interface 2.
d
If the core router attaches VLAN tag IDs to incoming packets, specify the
VLAN tag ID used.
e
Specify the default gateway IP address for Interface 2. The default
gateway is the IP address of the interface on the core router that will be
Nortel Secure Network Access Switch 4050 User Guide
56 Chapter 2 Initial setup
used if no other interface is specified. The default gateway IP address on
Interface 2 must be within the same subnet as the RIP for Interface 2.
Enter port number for the traffic interface [1-4]:
<port>
Enter IP address for this machine (on traffic interface):
<IPaddr>
Enter network mask [255.255.255.0]: <mask>
Enter VLAN tag id (or zero for no VLAN) [0]:
Enter default gateway IP address (on the traffic
interface): <IPaddr>
10 Specify the MIP for this device or cluster.
Enter the Management IP (MIP) address: <IPaddr>
Making sure the MIP does not exist...ok
Trying to contact gateway...ok
The MIP must be unique on the network and must be within the same subnet
as the RIP and the default gateway for Interface 1.
Note: If you receive an error message that the iSD (the Nortel
SNAS 4050 device) cannot contact the gateway, verify your settings on
the core router. Do not proceed with the initial setup until the
connectivity test succeeds.
11 Specify the time zone.
Enter a timezone or 'select' [select]: <timezone>
If you do not know the time zone you need, press <CR> to access the selection
menus:
Select a continent or ocean: <Continent or ocean by
number>
Select a country: <Country by number>
Select a region: <Region by number, if applicable>
Selected timezone: <Suggested timezone, based on your
selections>
320818-A
Chapter 2 Initial setup 57
12 Configure the time settings.
Enter the current date (YYYY-MM-DD) [2005-05-02]:
Enter the current time (HH:MM:SS) [19:14:52]:
13 Specify the NTP server, if applicable.
Enter NTP server address (or blank to skip): <IPaddr>
Note: If you do not have access to an NTP server at this point, you can
configure this item after the initial setup is completed. See “Configuring
date and time settings using the CLI” on page 475 or “Managing date
and time settings using the SREM” on page 528.
14 Specify the DNS server, if applicable.
Enter DNS server address (or blank to skip): <IPaddr>
15 Generate the SSH host keys for secure management and maintenance
communication from and to Nortel SNAS 4050 devices.
Generate new SSH host keys (yes/no) [yes]:
This may take a few seconds...ok
If you do not generate the SSH host keys at this stage, generate them later
when you configure the system (see “Configuring Nortel SNAS 4050 host
SSH keys using the CLI” on page 485 or “Configuring Nortel SNAS 4050
host SSH keys using the SREM” on page 548).
For communication between the Nortel SNAS 4050 and the network access
devices, generate the SSH key after you have completed the initial setup (see
“Managing SSH keys using the CLI” on page 84 or “Managing SSH keys
using the SREM” on page 102).
Nortel Secure Network Access Switch 4050 User Guide
58 Chapter 2 Initial setup
16 Change the admin user password, if desired.
Enter a password for the "admin" user:
Re-enter to confirm:
Make sure you remember the password you define for the admin user. You
will need to provide the correct admin user password when logging in to the
Nortel SNAS 4050 (or the Nortel SNAS 4050 cluster) for configuration
purposes.
17 Run the Nortel SNAS 4050 quick setup wizard. This creates all the settings
required to enable a fully functional portal, which you can customize later
(see “Configuring the domain” on page 117).
For information about the default settings created by the wizard, see “Settings
created by the quick setup wizard” on page 60.
a
Start the quick setup wizard.
Run NSNAS quick setup wizard [yes]: yes
Creating default networks under /cfg/domain 1/aaa/
network
b
Specify the pVIP of the Nortel SNAS 4050 device.
Enter NSNAS Portal Virtual IP address(pvip): <IPaddr>
c
Specify a name for the Nortel SNAS 4050 domain.
Enter NSNAS Domain name: <name>
d
Specify any domain names you wish to add to the DNS search list, as a
convenience to clients. If the domain name is in the DNS search list,
clients can use a shortened form of the domain name in the address fields
on the Nortel SNAS 4050 portal.
Enter comma separated DNS search list
(eg company.com,intranet.company.com):
320818-A
Chapter 2 Initial setup 59
For example, if you entered company.com in the DNS search list, users
can type nsnas to connect to nsnas.company.com from the portal
page.
e
If you want to enable HTTP to HTTPS redirection, create a redirect
server.
Create http to https redirect server [no]:
f
Specify the action to be performed when an SRS rule check fails. The
options are:
— restricted. The session remains intact, but access is restricted in
accordance with the rights specified in the access rules for the group.
— teardown. The SSL session is torn down.
The default is restricted.
Use restricted (teardown/restricted) action for
TunnelGuard failure? [yes]:
g
Create the default user and group.
The wizard creates a default user (tg) within a group (tunnelguard),
which you can subsequently reuse. The wizard also creates the default
client filters, profiles, and linksets to be applied when the user passes
(tg_passed) or fails (tg_failed) the TunnelGuard check. The wizard
prompts you to specify the VLAN IDs to associate with the respective
profiles.
Nortel Secure Network Access Switch 4050 User Guide
60 Chapter 2 Initial setup
The action to be performed when the TunnelGuard check fails depends on
your selection in step f on page 59.
Create default tunnel guard user [no]: yes
Using 'restricted' action for TunnelGuard failure.
User name: tg
User password: tg
Creating client filter 'tg_passed'.
Creating client filter 'tg_failed'.
Creating linkset 'tg_passed'.
Creating linkset 'tg_failed'.
Creating group 'tunnelguard' with secure access.
Creating extended profile, full access when tg_passed
Enter green vlan id [110]: <VID>
Creating extended profile, remediation access when
tg_failed
Enter yellow vlan id [120]: <VID>
Creating user 'tg' in group 'tunnelguard'.
Initializing system......ok
Setup successful. Relogin to configure.
Settings created by the quick setup wizard
The quick setup wizard creates the following basic Nortel SNAS 4050 settings:
320818-A
1
A Nortel SNAS 4050 domain (Domain 1). A Nortel SNAS 4050 domain
encompasses all switches, authentication servers, and remediation servers
associated with that Nortel SNAS 4050.
2
A virtual SSL server. A portal IP address, or pVIP, is assigned to the virtual
SSL server. Clients connect to the pVIP in order to access the portal.
3
A test certificate has been installed and mapped to the Nortel SNAS 4050
portal.
4
The authentication method is set to Local database.
5
One test user is configured. You were prompted to set a user name and
password during the quick setup wizard (in this example, user name and
password are both set to tg). The test user belongs to a group called
tunnelguard. There are two profiles within the group: tg_passed and
tg_failed. Each profile has a client filter and a linkset associated with it.
Chapter 2 Initial setup 61
The profiles determine the VLAN to which the user will be allocated. Table 2
shows the extended profiles that have been created.
Table 2 Extended profile details
Index
Client filter name
VLAN ID
Linkset name
1
tg_failed
yellow
tg_failed
2
tg_passed
green
tg_passed
6
One or several domain names have been added to the DNS search list,
depending on what you specified at the prompt in the quick setup wizard. This
means that the client can enter a short name in the portal’s various address
fields (for example, inside instead of inside.example.com if
example.com was added to the search list).
7
If you selected the option to enable http to https redirection, an additional
server of the http type was created to redirect requests made with http to https,
since the Nortel SNAS 4050 portal requires an SSL connection.
Adding a Nortel SNAS 4050 device to a cluster
After you have installed the first Nortel SNAS 4050 in a cluster (see “Setting up a
single Nortel SNAS 4050 device or the first in a cluster” on page 52), you can add
another Nortel SNAS 4050 to the cluster by configuring the second Nortel
SNAS 4050 setup to use the same MIP. When you set up the Nortel SNAS 4050 to
join an existing cluster, the second Nortel SNAS 4050 gets most of its
configuration from the existing Nortel SNAS 4050 device in the cluster. The
amount of configuration you need to do at setup is minimal.
You can later modify settings for the cluster, the device, and the interfaces using
the /cfg/sys/[host <host ID>/interface] commands.
Nortel Secure Network Access Switch 4050 User Guide
62 Chapter 2 Initial setup
Before you begin
Log on to the existing Nortel SNAS 4050 device to check the software version and
system settings. Use the /boot/software/cur command to check the currently
installed software version (for more information, see “Managing software for a
Nortel SNAS 4050 device using the CLI” on page 734). Use the /cfg/sys/
accesslist/list command to view settings for the Access List (for more
information, see “Configuring the Access List using the CLI” on page 474).
Do not proceed with the join operation until the following requirements are met.
•
•
Verify that the IP addresses you will assign to the new Nortel SNAS 4050
device conform to Nortel SNA network requirements. For more information,
see “About the IP addresses” on page 51 and “One-armed and two-armed
configurations” on page 40.
The Access List has been updated, if necessary.
The Access List is a system-wide list of IP addresses for hosts authorized to
access the Nortel SNAS 4050 devices by Telnet and SSH.
If the /info/sys command executed on the existing Nortel SNAS 4050
shows no items configured for the Access List, no action is required.
However, if the Access List is not empty before the new Nortel SNAS 4050
joins the cluster, you must add to the Access List the cluster’s MIP, the
existing Nortel SNAS 4050 RIP on Interface 1, and the new Nortel
SNAS 4050 RIP on Interface 1. You must do this before you perform the join
operation, or the devices will not be able to communicate with each other.
For information about adding entries to the Access List, see “Configuring the
Access List using the CLI” on page 474.
•
320818-A
The existing Nortel SNAS 4050 and the new Nortel SNAS 4050 must run the
same version of software. If the versions are different, decide which version
you want to use and then do one of the following:
• To change the version on the new NSNAS, download the desired software
image and reinstall the software (see “Reinstalling the software” on
page 763).
Chapter 2 Initial setup 63
•
To change the version on the existing NSNAS, download the desired
software image and upgrade the software on the existing cluster (see
“Upgrading the Nortel SNAS 4050” on page 757).
Note: Nortel recommends always using the most recent software
version.
Joining a cluster
1
Log on using the following username and password:
login: admin
Password: admin
The Setup Menu displays.
Alteon iSD NSNAS
Hardware platform: 4050
Software version: x.x
------------------------------------------------------[Setup Menu]
join
- Join an existing cluster
new
- Initialize host as a new installation
boot
- Boot menu
info
- Information menu
exit
- Exit [global command, always available]
>> Setup#
2
Select the option to join an existing cluster.
>> Setup# join
Setup will guide you through the initial configuration.
3
Specify the management interface port number. This port will be assigned to
Interface 1.
Enter port number for the management interface [1-4]:
<port>
Nortel Secure Network Access Switch 4050 User Guide
64 Chapter 2 Initial setup
In a one-armed configuration, you are specifying the port you want to use for
all network connectivity, since Interface 1 is used for both management traffic
(Nortel SNAS 4050 management and connections to intranet resources) and
client portal traffic (traffic between the TunnelGuard applet on the client and
the portal).
In a two-armed configuration, you are specifying the port you want to use for
Nortel SNAS 4050 management traffic.
Note: For consistency, Nortel recommends that you specify the same
port number for the management interface port on all Nortel SNAS 4050
devices in the cluster.
4
Specify the RIP for this device. This IP address will be assigned to
Interface 1.
Enter IP address for this machine (on management
interface): <IPaddr>
The RIP must be unique on the network and must be within the same subnet
as the MIP.
5
Specify the network mask for the RIP on Interface 1.
Enter network mask [255.255.255.0]: <mask>
6
If the core router attaches VLAN tag IDs to incoming packets, specify the
VLAN tag ID used.
Enter VLAN tag id (or zero for no VLAN) [0]:
7
Specify whether you are setting up a one-armed or a two-armed configuration.
Setup a two armed configuration (yes/no) [no]:
If you are setting up a one-armed configuration, press Enter to accept the
default value (no). Go to step 9.
If you are setting up a two-armed configuration, enter yes. Go to step 8.
320818-A
Chapter 2 Initial setup 65
8
Configure the interface for client portal traffic (Interface 2).
a
Specify a port number for the client portal interface. This port will be
assigned to Interface 2. The port number must not be the same as the port
number for the management interface (Interface 1).
b
Specify the RIP for Interface 2.
c
Specify the network mask for the RIP on Interface 2.
d
If the core router attaches VLAN tag IDs to incoming packets, specify the
VLAN tag ID used.
Enter port number for the traffic interface [1-4]:
<port>
Enter IP address for this machine (on traffic interface):
<IPaddr>
Enter network mask [255.255.255.0]: <mask>
Enter VLAN tag id (or zero for no VLAN) [0]:
9
Specify the MIP of the existing cluster.
The system is initialized by connecting to the management
server on an existing iSD, which must be operational and
initialized.
Enter the Management IP (MIP) address: <IPaddr>
10 Specify the default gateway IP address for Interface 2. The default gateway is
the IP address of the interface on the core router that will be used if no other
interface is specified. The default gateway IP address on Interface 2 must be
within the same subnet as the RIP for Interface 2.
Enter default gateway IP address (on the traffic
interface): <IPaddr>
11 Provide the correct admin user password configured for the existing cluster.
Enter the existing admin user password: <password>
Nortel Secure Network Access Switch 4050 User Guide
66 Chapter 2 Initial setup
12 Wait while the Setup utility finishes processing. When processing is complete,
you will see Setup successful.
The new Nortel SNAS 4050 automatically picks up all other required
configuration data from the existing Nortel SNAS 4050 in the cluster. After a
short while, you receive the login prompt.
Setup successful.
login:
Next steps
1
To enable the SREM connection to the Nortel SNAS 4050:
a
Use the /cfg/sys/adm/ssh on command to enable SSH access to the
Nortel SNAS 4050 (for more information, see “Configuring
administrative settings using the CLI” on page 483).
b
Use the /cfg/sys/adm/srsadmin ena command to enable
TunnelGuard SRS administration (for more information, see “Enabling
TunnelGuard SRS administration using the CLI” on page 485 or
“Configuring SRS control settings using the SREM” on page 547).
Note: For greater security, you may want to restrict access to the Nortel
SNAS 4050 to those machines specified in an Access List. In this case,
ensure that you add an IP address for the SREM to the Access List. For
more information about using the Access List to control Telnet and SSH
access, see “Configuring the Access List using the CLI” on page 474 or
“Configuring the access list using the SREM” on page 525.
From this point on, you can configure the Nortel SNAS 4050 using either the
CLI or the SREM.
2
To enable remote management using Telnet, use the /cfg/sys/adm/
telnet on command to enable Telnet access to the Nortel SNAS 4050 (for
more information, see “Configuring administrative settings using the CLI” on
page 483).
320818-A
Chapter 2 Initial setup 67
3
To finish connecting the Nortel SNAS 4050 to the rest of the network,
complete the following tasks:
a
Generate and activate the SSH keys for communication between the
Nortel SNAS 4050 and the network access devices (see “Managing SSH
keys using the CLI” on page 84 or “Managing SSH keys using the
SREM” on page 102).
b
Specify the SRS rule for the tunnelguard group (see “Configuring
groups using the CLI” on page 198 or “Configuring groups using the
SREM” on page 208).
c
Add the network access devices (see “Adding a network access device
using the CLI” on page 75 or “Adding a network access device using the
SREM” on page 91).
d
Specify the VLAN mappings (see “Mapping the VLANs using the CLI”
on page 82 or “Mapping the VLANs using the SREM” on page 96).
e
If you did not run the quick setup wizard during the initial setup,
configure the following:
— Create the domain (see “Creating a domain using the CLI” on
page 121 or “Creating a domain using the SREM” on page 151).
— Create at least one group.
— Specify the VLANs to be used when the TunnelGuard check succeeds
and when it fails (see “Configuring extended profiles using the CLI”
on page 203 or “Configuring extended profiles using the SREM” on
page 219).
4
Save the configuration (see “Applying and saving the configuration” on
page 67).
Applying and saving the configuration
On both the CLI and the SREM, you must enter explicit commands in order to
make configuration changes permanent and in order to create a backup
configuration file.
Nortel Secure Network Access Switch 4050 User Guide
68 Chapter 2 Initial setup
Applying and saving the configuration using the CLI
If you have not already done so after each sequence of configuration steps,
confirm your changes using the apply command.
To view your configuration on the screen, for copy and paste into a text file, use
the following command:
/cfg/dump
To save your configuration to a TFTP, FTP, SCP, or SFTP server, use the following
command:
/cfg/ptcfg
For more information, see “Backing up or restoring the configuration using
the CLI” on page 730.
Applying and saving the configuration using the SREM
In the SREM, there are two steps to saving configuration changes, described
below:
1
Click Apply after each change, to send the change to the Nortel SNAS 4050
device.
Changes that have been applied are not yet permanent. To cancel changes that
have been applied, click Revert to remove all unconfirmed changes.
2
Click Commit once your changes are complete, to change the permanent
configuration on the Nortel SNAS 4050.
Committed changes take effect immediately.
320818-A
Chapter 2 Initial setup 69
Figure 3 on page 69 shows the location of the Apply and Commit buttons.
Figure 3 Apply and Commit buttons
For more information about the Apply and Commit functions, see Installing and
Using the Security & Routing Element Manager (SREM) (320199-B).
Nortel Secure Network Access Switch 4050 User Guide
70 Chapter 2 Initial setup
320818-A
71
Chapter 3
Managing the network access devices
This chapter includes the following topics:
Topic
Page
Before you begin
72
Managing network access devices using the CLI
73
Roadmap of domain commands
73
Adding a network access device using the CLI
75
Deleting a network access device using the CLI
79
Configuring the network access devices using the CLI
80
Mapping the VLANs using the CLI
82
Managing SSH keys using the CLI
84
Monitoring switch health using the CLI
89
Controlling communication with the network access devices using
the CLI
90
Managing network access devices using the SREM
91
Adding a network access device using the SREM
91
Deleting a network access device using the SREM
93
Configuring the network access devices using the SREM
93
Mapping the VLANs using the SREM
96
Managing SSH keys using the SREM
102
Nortel Secure Network Access Switch 4050 User Guide
72 Chapter 3 Managing the network access devices
Topic
Page
Monitoring switch health using the SREM
111
Controlling communication with the network access devices using
the SREM
115
Before you begin
In Trusted Computing Group (TCG) terminology, the edge switches in a Nortel
SNA solution function as the Policy Enforcement Point. In this document, the
term network access device is used to refer to the edge switch once it is configured
for the Nortel SNA network.
The following edge switches can function as network access devices in the Nortel
SNA solution:
•
•
Ethernet Routing Switch 8300
Ethernet Routing Switch 5510, 5520, and 5530
Before you can configure the edge switches as network access devices in the
Nortel SNAS 4050 domain, you must complete the following:
•
•
Create the domain, if applicable. If you ran the quick setup wizard during
initial setup, Domain 1 has been created. For more information about creating
a domain, see “Configuring the domain” on page 117.
Configure the edge switches for Nortel SNA (see “Nortel SNAS 4050
configuration roadmap”, step 4 on page 45). For detailed information about
configuring the edge switches for Nortel SNA, see Release Notes for the
Ethernet Routing Switch 8300, Software Release 2.2.8 (316811-E) or Release
Notes for Nortel Ethernet Routing Switch 5500 Series, Software Release
4.3 (217468-B).
For secure communication between the Nortel SNAS 4050 and the network access
device, each must have knowledge of the other’s public SSH key. After you have
added the network access device to the Nortel SNAS 4050 domain, you must
exchange the necessary SSH keys (see “Managing SSH keys using the CLI” on
page 84 or “Managing SSH keys using the SREM” on page 102).
320818-A
Chapter 3 Managing the network access devices 73
You require the following information for each network access device:
•
•
•
•
IP address of the switch
VLAN names and VLAN IDs for the Red, Yellow, and Green VLANs
the TCP port to be used for Nortel SNA communication
for Ethernet Routing Switch 8300 switches, a valid rwa user name
Managing network access devices using the CLI
The Nortel SNAS 4050 starts communicating with the network access device as
soon as you enable the switch on the Nortel SNAS 4050 by using the
/cfg/domain #/switch #/ena command.
You cannot configure the VLAN mappings for a network access device in the
Nortel SNAS 4050 domain if the switch is enabled. When you add a network
access device to the domain, it is disabled by default. Do not enable the network
access device until you have completed the configuration. To reconfigure the
VLAN mappings for an existing network access device, first disable it by using
the /cfg/domain #/switch #/dis command.
Roadmap of domain commands
The following roadmap lists the CLI commands to configure the network access
devices in a Nortel SNA deployment. Use this list as a quick reference or click on
any entry for more information:
Command
Parameter
/cfg/domain #/switch <switch ID>
/cfg/domain #/switch #/delete
/cfg/domain #/switch <switch ID>
name <name>
type ERS8300|ERS5500
ip <IPaddr>
port <port>
rvid <VLAN ID>
Nortel Secure Network Access Switch 4050 User Guide
74 Chapter 3 Managing the network access devices
Command
Parameter
reset
ena
dis
delete
/cfg/domain #/vlan
add <name> <VLAN ID>
del <index>
list
/cfg/domain #/switch #/vlan
add <name> <VLAN ID>
del <index>
list
/cfg/domain #/sshkey
generate
show
export
/cfg/domain #/switch #/sshkey
import
add
del
show
export
user <user>
/cfg/domain #/switch #/hlthchk
interval <interval>
deadcnt <count>
sq-int <interval>
/cfg/domain #/switch #/dis
/cfg/domain #/switch #/ena
320818-A
Chapter 3 Managing the network access devices 75
Adding a network access device using the CLI
You can add a network access device to the configuration in two ways. You must
repeat the steps for each switch that you want to add to the domain configuration.
•
•
“Using the quick switch setup wizard” on page 75
“Manually adding a switch” on page 78
Using the quick switch setup wizard
To add a network access device to the Nortel SNAS 4050 domain using the quick
switch setup wizard, use the following command:
/cfg/domain 1/quick
You can later modify all settings created by the quick switch setup wizard (see
“Configuring the network access devices using the CLI” on page 80).
1
Launch the quick switch setup wizard.
>> Main# cfg/domain 1/quick
2
Specify the type of switch. Valid options are:
•
•
ERS8300 (for an Ethernet Routing Switch 8300)
ERS5500 or ERS55 (for an Ethernet Routing Switch 5510, 5520, or
5530).
The default is ERS8300.
Note: The input is case sensitive.
Enter the type of the switch (ERS8300/ERS5500) [ERS8300]
3
Specify the IP address of the network access device.
IP address of Switch: <IPaddr>
Nortel Secure Network Access Switch 4050 User Guide
76 Chapter 3 Managing the network access devices
4
Specify the TCP port for communication between the Nortel SNAS 4050 and
the network access device. The default is port 5000.
NSNA communication port[5000]:
5
The SSH fingerprint of the switch is automatically picked up if the switch is
reachable. If the fingerprint is successfully retrieved, go to step 7 on page 77.
If the fingerprint is not successfully retrieved, you will receive an error
message and be prompted to add the SSH key.
Trying to retrieve fingerprint...failed.
Error: “Failed to retrieve host key”
Do you want to add ssh key? (yes/no) [no]:
Choose one of the following:
a
To paste in a public key you have downloaded from the switch, enter Yes.
Go to step 6 on page 76.
b
To continue adding the switch to the configuration without adding its
public SSH key at this time, press Enter to accept the default value (no).
After you have added the switch, add or import the SSH public key for the
switch (see “Managing SSH keys for Nortel SNA communication using
the CLI” on page 88).
Go to step 7 on page 77.
6
320818-A
To add the switch public key:
a
At the prompt to add the SSH key, enter Yes.
b
When prompted, paste in the key from a text file, then press Enter.
c
Enter an ellipsis (...) to signal the end of the key.
Chapter 3 Managing the network access devices 77
d
To continue, go to step 7 on page 77.
Do you want to add ssh key? (yes/no) [no]: yes
Paste the key, press Enter to create a new line,
and then type "..." (without the quotation marks)
to terminate.
> 47.80.18.98 ssh-dss
AAAAB3NzaC1kc3MAAABRAJfEJJvYic9yOrejtZ88prdWdRWBF8Qkm9iJz
3I6t6O1nzymt1Z1DVMXxCSb2InPcjq3o7WfPKa3VnUNUgTpESrFlH7ooK
+Zys8iEUbmJ3kpAAAAFQCUE/74fr6ACaxJpMcz0TlWwahdzwAAAFEAgPW
Vrk0VOOXQmfLhutwaTrxltIDkJzOEIXPfAIEpvDsvnlNkFE/i2vVdq/GT
KmAghfN3BYjRIQT0PAwUKOS5gkyfLG9I5rKqJ/hFWJThR4YAAABQI9yJG
5Q7q+2Pnk+tx1Kd44nCD6/9j7L4RIkIEnrDbgsVxvMcsNdI+HLnN+vmBR
5wd+vrW5Bq/ToMvPspwI+WbV8TjycWeC7nk/Tg++X53hc=
> ...
7
Specify the VLAN ID of the Red VLAN, as configured on the network access
device. The network access devices in the domain can share a common Red
VLAN or can each have a separate Red VLAN.
Red vlan id of Switch: <VLAN ID>
8
Wait while the wizard completes processing to add the network access device,
then enter Apply to activate the changes. The system automatically assigns
the lowest available switch ID to the network access device.
The switch is disabled when it is first added to the configuration. Do not
enable the switch until you have completed configuring the system. For more
information, see “Configuring the network access devices using the CLI” on
page 80.
Creating Switch 1
Use apply to activate the new Switch.
>> Domain 1#
Nortel Secure Network Access Switch 4050 User Guide
78 Chapter 3 Managing the network access devices
Manually adding a switch
To add a network access device and configure it manually, use the following
command:
/cfg/domain #/switch <switch ID>
where switch ID is an integer in the range 1 to 255 that uniquely identifies the
network access device in the Nortel SNAS 4050 domain.
When you first add the network access device, you are prompted to enter the
following information:
•
•
•
•
•
•
switch name — a string that identifies the switch on the Nortel SNAS 4050.
The maximum length of the string is 255 characters. After you have defined a
name for the switch, you can use either the switch name or the switch ID to
access the Switch menu.
type of switch — valid options are ERS8300 and ERS5500. The input is case
sensitive.
IP address of the switch.
NSNA communication port — the TCP port for communication between the
Nortel SNAS 4050 and the network access device. The default is port 5000.
Red VLAN ID — the VLAN ID of the Red VLAN configured on the switch.
username — the user name for an rwa user on the switch (required for
Ethernet Routing Switch 8300 only).
The SSH fingerprint of the switch is automatically picked up if the switch is
reachable. If the fingerprint is not successfully retrieved, you receive an error
message (Error: Failed to retrieve host key). After you have added
the switch, you must add or import the SSH public key for the switch (see
“Managing SSH keys for Nortel SNA communication using the CLI” on page 88).
The Switch menu displays.
Figure 4 on page 79 shows sample output for the /cfg/domain #/switch
command and commands on the Switch menu. For more information about the
Switch menu commands, see “Configuring the network access devices using the
CLI” on page 80.
320818-A
Chapter 3 Managing the network access devices 79
Figure 4 Adding a switch manually
>> Domain 1# switch 1
Creating Switch 3
Enter name of the switch: Switch1_ERS8300
Enter the type of the switch (ERS8300/ERS5500): ERS8300
Enter IP address of the switch: <IPaddr>
NSNA communication port[5000]:
Enter VLAN Id of the Red VLAN: <VLAN ID>
Entering: SSH Key menu
Enter username: rwa
Leaving: SSH Key menu
---------------------------------------------------------[Switch 3 Menu]
name
- Set Switch name
type
- Set Type of the switch
ip
- Set IP address
port
- Set NSNA communication port
hlthchk - Health check intervals for switch
vlan
- Vlan menu
rvid
- Set Red VLAN Id
sshkey - SSH Key menu
reset
- Reset all the ports on a switch
ena
- Enable switch
dis
- Disable switch
delete - Remove Switch
Error: Failed to retrieve host key
>> Switch 3#..
Deleting a network access device using the CLI
To remove a network access device from the domain configuration, first disable
the switch then delete it. Use the following commands:
/cfg/domain #/switch #/dis
/cfg/domain #/switch #/delete
The disable and delete commands log out all clients connected through the
switch.
Nortel Secure Network Access Switch 4050 User Guide
80 Chapter 3 Managing the network access devices
The delete command removes the current switch from the control of the Nortel
SNAS 4050 cluster.
Configuring the network access devices using the CLI
When you first add a network access device to the Nortel SNAS 4050 domain, the
switch is disabled by default. Do not enable the switch until you have completed
configuring it. In particular, do not enable the switch until you have mapped the
VLANs (see “Mapping the VLANs using the CLI” on page 82) and exchanged the
necessary SSH keys (see “Managing SSH keys using the CLI” on page 84).
If you want to reconfigure the VLAN mappings or delete a VLAN for an existing
network access device, use the /cfg/domain #/switch #/dis command to
disable the switch first.
Note: Remember to enable the network access device after completing
the configuration in order to activate the network access device in the
Nortel SNA network.
To configure a network access device in the Nortel SNAS 4050 domain, use the
following command:
/cfg/domain #/switch <switch ID>
where switch ID is the ID or name of the switch you want to configure.
The Switch menu displays.
320818-A
Chapter 3 Managing the network access devices 81
The Switch menu includes the following options:
/cfg/domain #/switch <switch ID>
followed by:
name <name>
Names or renames the switch. After you have defined a
name for the switch, you can use either the switch
name or the switch ID to access the Switch menu.
• name is a string that must be unique in the domain.
The maximum length of the string is 255
characters.
type ERS8300|ERS5500
Specifies the type of network access device. Valid
options are:
• ERS8300 — an Ethernet Routing Switch 8300
• ERS5500 — an Ethernet Routing Switch 5510,
5520, or 5530
The default is ERS8300.
ip <IPaddr>
Specifies the IP address of the switch.
port <port>
Specifies the TCP port used for Nortel SNA
communication. The default is port 5000.
hlthchk
Accesses the Healthcheck menu, in order to configure
settings for the Nortel SNAS 4050 to monitor the health
of the switch (see “Monitoring switch health using the
CLI” on page 89).
vlan
Accesses the Switch Vlan menu, in order to map the
Green and Yellow VLANs configured on switch (see
“Mapping the VLANs using the CLI” on page 82).
rvid <VLAN ID>
Identifies the Red VLAN for the network access device.
• VLAN ID is the ID of the Red VLAN, as configured
on the switch
sshkey
Accesses the SSH Key menu, in order to manage the
exchange of public keys between the switch and the
Nortel SNAS 4050 (see “Managing SSH keys for Nortel
SNA communication using the CLI” on page 88)
reset
Resets all the Nortel SNA-enabled ports on the switch.
Clients connected to the ports are moved into the Red
VLAN.
ena
Enables the network access device. As soon as you
enable the switch, the Nortel SNAS 4050 begins
communicating with the switch and controlling its Nortel
SNA clients.
Nortel Secure Network Access Switch 4050 User Guide
82 Chapter 3 Managing the network access devices
/cfg/domain #/switch <switch ID>
followed by:
dis
Disables the switch for Nortel SNA operation.
delete
Removes the switch from the Nortel SNAS 4050
domain configuration.
Mapping the VLANs using the CLI
The VLANs are configured on the network access devices. You specify the Red
VLAN for each network access device when you add the switch (see “Adding a
network access device using the CLI” on page 75). After adding the switch, you
must identify the Yellow and Green VLANs to the Nortel SNAS 4050.
You can perform the VLAN mapping in two ways:
•
•
for all switches in a domain (by using the /cfg/domain #/vlan/add
command)
switch by switch (by using the /cfg/domain #/switch #/vlan/add
command)
Nortel recommends mapping the VLANs by domain. In this way, if you later add
switches which use the same VLAN IDs, their VLAN mappings will
automatically be picked up.
If you map the VLANs by domain, you can modify the mapping for a particular
network access device by using the switch-level vlan command. Switch-level
settings override domain settings.
To manage the VLAN mappings for all the network access devices in the Nortel
SNAS 4050 domain, first disable all the switches in the domain, then use the
following command:
/cfg/domain #/vlan
To manage the VLAN mappings for a specific network access device, first disable
the switch in the domain, then use the following command:
/cfg/domain #/switch #/vlan
320818-A
Chapter 3 Managing the network access devices 83
The Nortel SNAS 4050 maintains separate maps for the domain and the switch. If
you add a VLAN from the domain-level vlan command, you must use the
domain-level command for all future management of that mapping. Similarly, if
you add a VLAN from the switch-level vlan command, you must use the
switch-level command for all future management of that mapping.
The Domain vlan or Switch vlan menu displays.
The Domain vlan or Switch vlan menu includes the following options:
/cfg/domain #[/switch #]/vlan
followed by:
add <name> <VLAN ID>
Adds the specified VLAN to the domain or switch VLAN
map. You are prompted to enter the required
parameters if you do not include them in the command.
• name is the name of the VLAN, as configured on
the switch
• VLAN ID is the ID of the VLAN, as configured on
the switch
The system automatically assigns an index number to
the VLAN entry when you add it. If you are executing
the command from the Domain vlan menu, the index
number indicates the position of the new entry in the
domain map. If you are executing the command from
the Switch vlan menu, the index number indicates the
position of the new entry in the switch map.
Repeat this command for each Green and Yellow VLAN
configured on the network access devices.
del <index>
Removes the specified VLAN entry from the applicable
VLAN map.
• index is an integer indicating the index number
automatically assigned to the VLAN mapping when
you created it
The index numbers of the remaining entries adjust
accordingly.
To view the index numbers for all VLAN entries in the
map, use the
/cfg/domain #[/switch #]/vlan/list
command.
list
Displays the index number, name, and VLAN ID for all
VLAN entries in the map.
Nortel Secure Network Access Switch 4050 User Guide
84 Chapter 3 Managing the network access devices
Managing SSH keys using the CLI
The Nortel SNAS 4050 and the network access devices controlled by the Nortel
SNAS 4050 domain exchange public keys so that they can authenticate
themselves to each other in future SSH communications.
To enable secure communication between the Nortel SNAS 4050 and the network
access device, do the following:
1
Generate an SSH public key for the Nortel SNAS 4050 domain (see
“Generating SSH keys for the domain using the CLI” on page 85), if
necessary. Apply the change immediately.
If you created the domain manually, the SSH key was generated automatically
(see “Manually creating a domain using the CLI” on page 121).
Note: The SSH key for the Nortel SNAS 4050 domain is not the same
as the SSH key generated during initial setup for all Nortel SNAS 4050
hosts in the cluster (see “Initial setup”, step 15 on page 57).
2
Export the Nortel SNAS 4050 public key to each network access device.
•
For an Ethernet Routing Switch 8300:
Use the /cfg/domain #/switch #/sshkey/export command to
export the key directly to the switch (see “Managing SSH keys for Nortel
SNA communication using the CLI” on page 88).
•
For an Ethernet Routing Switch 5510, 5520, or 5530:
Use the /cfg/domain #/sshkey/export command to upload the key
to a TFTP server, for manual retrieval from the switch (see “Generating
SSH keys for the domain using the CLI” on page 85). For information
about downloading the key from the server to the switch, see Release
Notes for Nortel Ethernet Routing Switch 5500 Series, Software Release
4.3 (217468-B).
320818-A
Chapter 3 Managing the network access devices 85
If you regenerate the key at any time, you must re-export the key to each
network access device.
Note: If you export the key after the network access device has been
enabled, you may need to disable and re-enable the switch in order to
activate the change.
3
For each network access device, import its public key into the Nortel
SNAS 4050 domain, if necessary (see “Managing SSH keys for Nortel SNA
communication using the CLI” on page 88).
•
•
For an Ethernet Routing Switch 8300, you can retrieve the key in two
ways:
— Use the /cfg/domain #/switch #/sshkey/import command
to import the key directly from the network access device.
— Use the /cfg/domain #/switch #/sshkey/add command to
paste in the key.
For an Ethernet Routing Switch 5510, 5520, or 5530:
— Use the /cfg/domain #/switch #/sshkey/import command
to import the key directly from the network access device.
If the network access device was reachable when you added it to the domain
configuration, the SSH key was automatically retrieved.
If the network access device defaults, it generates a new public key. You must
reimport the key whenever the switch generates a new public key (see
“Reimporting the network access device SSH key using the CLI” on page 89).
Note: In general, enter Apply to apply the changes immediately after
you execute any of the SSH commands.
Generating SSH keys for the domain using the CLI
To generate, view, and export the public SSH key for the domain, use the
following command:
/cfg/domain #/sshkey
The NSNAS SSH key menu displays.
Nortel Secure Network Access Switch 4050 User Guide
86 Chapter 3 Managing the network access devices
The NSNAS SSH key menu includes the following options:
/cfg/domain #/sshkey
followed by:
generate
Generates an SSH public key for the domain. There
can be only one key in effect for the Nortel SNAS 4050
domain at any one time. If a key already exists, you are
prompted to confirm that you want to replace it.
Enter Apply to apply the change immediately and
create the key.
show
Displays the SSH public key generated for the domain.
export
Exports the Nortel SNAS 4050 domain public key to a
file exchange server. You are prompted to enter the
following information:
• protocol — options are tftp|ftp|scp|sftp.
The default is tftp.
Note: Use TFTP to export to an Ethernet Routing
Switch 5500 Series switch. Ethernet Routing
Switch 5500 Series switches do not support the
other protocols.
• host name or IP address of the server
• file name of the key (file type .pub) you are
exporting
• for FTP, SCP, and SFTP, user name and password
to access the file exchange server
To export the key directly to an Ethernet Routing
Switch 8300, use the
/cfg/domain #/switch #/sshkey/export
command (see “Managing SSH keys for Nortel SNA
communication using the CLI” on page 88).
320818-A
Chapter 3 Managing the network access devices 87
Figure 5 shows sample output for the /cfg/domain #/sshkey command.
Figure 5 Generating an SSH key for the domain
>> Main# /cfg/domain 1/sshkey
---------------------------------------------------------[NSNAS SSH key Menu]
generate -Generate new SSH key for the NSNAS domain
show
- Show NSNAS domain public SSH key
>> NSNAS SSH key# generate
Key already exists, overwrite? (yes/no) [no]: yes
Generating new SSH key, this operation takes a few seconds... done.
Apply to activate.
>> NSNAS SSH key# apply
>> NSNAS SSH key# show
Type: DSA Fingerprint:
4c:7c:b6:b4:47:5f:ae:6e:65:f1:b3:b1:7a:f0:59:d3
---- BEGIN SSH2 PUBLIC KEY ---AAAAB3NzaC1kc3MAAACBANWNQJzGnZ7lqIUZw5VkjseaR0dcgPhx/CA6Zl
JPZlRkY/USzJmZLoXpWuhAiByMPJ/69BLWCHTQUI/+FqNPzEXnjBBKHSw0
smb3OKfCJMfv4OfF7YQyfQP6KiKjsdNdHYH1ErHqNe1G8q8KIKinlG35z3
Bc7Yi9BxK84suWm3jdAAAAFQDg5ohEvhYoDlYhal3zMkgq0+t33wAAAIBh
Sa+J/5SxwYfnE/ltdwlOgcMk4eomP03M4BsI8vylsvHt4THD3typTtqjWo
jQG0vDBt7a/4hcHQ55LTrC81/u/+ep5NVlTjxlmczCz6C1wOq4Ab1iiQub
gRRL7DnZSghjNAU8JqzcEbU7g0VKorlxwt/M9P17ZmBdhkgwsdgArAAAAI
BtMdI1Q5eNq/yRmRuvinEwVjbQNVaywDkQljLvY4wnHjj+OjWpxVyLvzHI
Qs3IRBSzTCXGOqmmTNYXeDkHANPGl5RkfyldEq4/pJpUIMPBEj/C4H34Eq
WTkZvCaHRG3HH6QsJj3Wreskh574t/ubybhmzDw5Ubl42AxUJbDMVbZg==
---- END SSH2 PUBLIC KEY --->> NSNAS SSH key# export
Select protocol (tftp/ftp/scp/sftp) [tftp]:
Enter hostname or IP address of server: localhost
Enter filename on server: key.pub
Trying to export NSNAS public key to tftp://localhost/key.pub
.
sent 590 bytes
>> NSNAS SSH key#
Nortel Secure Network Access Switch 4050 User Guide
88 Chapter 3 Managing the network access devices
Managing SSH keys for Nortel SNA communication using
the CLI
To retrieve the public key for the network access device and export the public key
for the domain, use the following command:
/cfg/domain #/switch #/sshkey
The SSH Key menu displays.
The SSH Key menu includes the following options:
/cfg/domain #/switch #/sshkey
followed by:
320818-A
import
Retrieves the SSH public key from the network access
device, if it is reachable.
add
Allows you to paste in the contents of a key file you
have downloaded from the Ethernet Routing
Switch 8300 network access device.
When prompted, paste in the key, then press Enter.
Enter an elllipsis (...) to signal the end of the key.
del
Deletes the SSH public key for the network access
device in the domain.
show
Displays the SSH public key for the network access
device.
export
Exports the SSH public key for the Nortel SNAS 4050
domain to the network access device.
Note: You cannot use this command to export the key
to an Ethernet Routing Switch 5500 series switch.
Instead, use the
/cfg/domain#1/sshkey/export command to
upload the key to a file exchange server.
user <user>
Specifies the user name for the network access device
(required for Ethernet Routing Switch 8300 only).
• user is the user name of an administrative user
(rwa) on the switch.
Chapter 3 Managing the network access devices 89
Reimporting the network access device SSH key using
the CLI
Whenever the network access device generates a new public SSH key, you must
import the new key into the Nortel SNAS 4050 domain.
1
Use the /cfg/domain #/switch #/sshkey/del command to delete the
original key.
2
Enter Apply to apply the change immediately.
3
Use the /cfg/domain #/switch #/sshkey/import command to import
the new key.
4
Enter Apply to apply the change immediately.
For more information about the commands, see “Managing SSH keys for Nortel
SNA communication using the CLI” on page 88.
Monitoring switch health using the CLI
The Nortel SNAS 4050 continually monitors the health of the network access
devices. At specified intervals, a health check daemon sends queries and
responses to the switch as a heartbeat mechanism. If no activity (heartbeat) is
detected, the daemon will retry the health check for a specified number of times
(the dead count). If there is still no heartbeat, then after a further interval (the
status-quo interval) the network access device moves all its clients into the Red
VLAN. When connectivity is re-established, the Nortel SNAS 4050 synchronizes
sessions with the network access device.
The health check interval, dead count, and status-quo interval are configurable.
To configure the interval and dead count parameters for the Nortel SNAS 4050
health checks and status-quo mode, use the following command:
/cfg/domain #/switch #/hlthchk
The HealthCheck menu displays.
Nortel Secure Network Access Switch 4050 User Guide
90 Chapter 3 Managing the network access devices
The HealthCheck menu includes the following options:
/cfg/domain #/switch #/hlthchk
followed by:
interval <interval>
Sets the time interval between checks for switch
activity.
• interval is an integer that indicates the time
interval in seconds (s), minutes (m), or hours (h).
The valid range is 60s (1m) to 64800s (18h). The
default is 1m (1 minute).
deadcnt <count>
Specifies the number of times the Nortel SNAS 4050
will repeat the check for switch activity when no
heartbeat is detected.
• count is an integer in the range 1–65535 that
indicates the number of retries. The default is 3.
If no heartbeat is detected after the specified number of
retries, the Nortel SNAS 4050 enters status-quo mode.
sq-int <interval>
Sets the time interval for status-quo mode, after which
the network access device moves all clients into the
Red VLAN.
• interval is an integer that indicates the time
interval in seconds (s), minutes (m), or hours (h).
The valid range is 0 to 64800s (18h). The default is
1m (1 minute).
Controlling communication with the network access
devices using the CLI
To stop communication between the Nortel SNAS 4050 and a network access
device, use the following command:
/cfg/domain #/switch #/dis
Enter apply to apply the change immediately.
Note: If the switch is not going to be used in the Nortel SNA network,
Nortel recommends deleting the switch from the Nortel SNAS 4050
domain, rather than just disabling it.
320818-A
Chapter 3 Managing the network access devices 91
To restart communication between the Nortel SNAS 4050 and a network access
device, use the following command:
/cfg/domain #/switch #/ena
Enter apply to apply the change immediately.
Managing network access devices using the SREM
The Nortel SNAS 4050 starts communicating with the network access device as
soon as you enable the switch on the Nortel SNAS 4050.
You cannot configure the VLAN mappings for a network access device in the
Nortel SNAS 4050 domain if the switch is enabled. When you add a network
access device to the domain, it is disabled by default. Do not enable the network
access device until you have completed the configuration. For information about
enabling and disabling the network access device, see “Controlling
communication with the network access devices using the SREM” on page 115.
Note: Remember to enable the network access device after completing
the configuration, or it will not be active.
Adding a network access device using the SREM
To add a network access device, use the following steps:
1
Select the Secure Access Domain > domain > Switches > Switches tab.
Nortel Secure Network Access Switch 4050 User Guide
92 Chapter 3 Managing the network access devices
The Switches screen appears (see “Switch Configuration screen” on
page 116).
2
Click Add.
The Add a Switch dialog box appears (see Figure 6).
Figure 6 Add a Switch
3
Enter the network access device information in the applicable fields. Table 3
describes the Add a Switch fields.
Table 3 Add a Switch fields
320818-A
Field
Description
Index
Specifies an integer that uniquely identifies the network
access device in the Nortel SNAS 4050 domain.
Name
Specifies a string that identifies the switch on the Nortel
SNAS 4050.
The maximum length of the string is 255 characters. After
you have defined a name for the switch, you can use either
the switch name or the switch ID to access the network
access device.
Type
Specifies the type of network access device. The options
are ERS8300 and ERS5500.
IP Address
Specifies the network access device IP address.
Red VLAN ID
Specifies the VLAN ID of the Red VLAN configured on the
network access device
Chapter 3 Managing the network access devices 93
4
Click Apply.
The network access device appears in the list of Switches.
5
Click Commit on the toolbar to save the changes permanently.
Deleting a network access device using the SREM
To remove an existing network access device from the domain configuration, you
must first disable it (see “Managing network access devices using the SREM” on
page 91). Once the network access device is disabled, complete the following
steps:
1
Select the Secure Access Domain > domain > Switches > switch >
Configuration tab.
The network access device Configuration screen appears (see Figure 16 on
page 116).
2
Select the network access device from the Switches list.
3
Click Delete.
A dialog box appears to confirm that you want to delete this network access
device.
4
Click Yes.
The network access device disappears from the Switches list.
5
Click Commit on the toolbar to save the changes permanently.
Configuring the network access devices using the SREM
When you first add a network access device to the Nortel SNAS 4050 domain, the
switch is disabled by default. Do not enable the switch until you have completed
configuring it. In particular, do not enable the switch until you have mapped the
VLANs (see “Mapping the VLANs using the SREM” on page 96) and exchanged
the necessary SSH keys (see “Managing SSH keys using the SREM” on
page 102).
Nortel Secure Network Access Switch 4050 User Guide
94 Chapter 3 Managing the network access devices
To reconfigure the VLAN mappings for an existing network access device, you
must first disable it (see “Controlling communication with the network access
devices using the SREM” on page 115). Once the network access device is
disabled, complete the following steps:
1
Select the Secure Access Domain > domain > Switches > switch >
Configuration tab.
The Switch Configuration screen appears (see Figure 7).
Figure 7 Switch Configuration screen
320818-A
Chapter 3 Managing the network access devices 95
2
Enter the network access device information in the applicable fields. Table 4
describes the Switch Configuration fields.
Table 4 Switch Configuration fields
Field
Description
Index
An integer that uniquely identifies the network access
device in the Nortel SNAS 4050 domain.
Name
Names or renames the switch. After you have defined a
name for the switch, you can use either the switch name or
the switch ID to access the network access device.
Accepts a string that must be unique in the domain. The
maximum length of the string is 255 characters.
IP Address
Specifies the IP address of the switch.
NSNA Communication Port
Specifies the TCP port for communication between the
Nortel SNAS 4050 and the network access device.
The default value is 5000
Type
Specifies the type of network access device. Valid options
are:
• ERS8300 — an Ethernet Routing Switch 8300
• ERS5500 — an Ethernet Routing Switch 5510, 5520,
or 5530
Red VLAN ID
Identifies the Red VLAN ID for the network access device,
as configured on the switch
Enable Switch
Enables or disables the switch. As soon as you enable the
switch, the Nortel SNAS 4050 begins communicating with
the switch and controlling its Nortel SNA clients.
User Name on Switch
The name of an administrative user (rwa) on the network
access device (required for Ethernet Routing Switch 8300
only).
Reset Switch Ports
Resets all the Nortel SNA-enabled ports on the switch.
Clients connected to the ports are moved into the Red
VLAN.
3
Click Apply on the toolbar to send the current changes to the Nortel
SNAS 4050. Click Commit on the toolbar to save the changes permanently.
Nortel Secure Network Access Switch 4050 User Guide
96 Chapter 3 Managing the network access devices
Mapping the VLANs using the SREM
The VLANs are configured on the network access devices. You specify the Red
VLAN for each network access device when you add the switch (see “Adding a
network access device using the SREM” on page 91). After adding the switch,
you must identify the Yellow and Green VLANs to the Nortel SNAS 4050.
You can perform the VLAN mapping in two ways:
•
•
for all switches in a domain (see “Mapping VLANs by domain” on page 97)
switch by switch (see “Mapping VLANs by switch” on page 100)
Nortel recommends mapping the VLANs by domain. In this way, if you later add
switches which use the same VLAN IDs, their VLAN mappings will
automatically be picked up.
If you map the VLANs by domain, you can modify the mapping for a particular
network access device at the switch level. Switch-level settings override domain
settings.
The Nortel SNAS 4050 maintains separate maps for the domain and the switch. If
you add a domain-level VLAN, then you must use the domain-level command for
all future management of that mapping. Similarly, if you add a switch-level
VLAN, then you must use the switch-level command for all future management
of that mapping.
320818-A
Chapter 3 Managing the network access devices 97
Mapping VLANs by domain
To map VLANs in a domain, select the Secure Access Domain > domain >
VLANs tab.
The domain VLANs screen appears (see Figure 8), listing all current VLANs
applied to the domain.
Figure 8 Domain VLANs screen
This screen allows you to manage VLANs on the domain by adding or deleting
entries to the VLAN Table. For detailed steps on adding or removing VLANs,
see:
•
•
“Adding VLANs to a domain” on page 98
“Removing VLANs from a domain” on page 99
Nortel Secure Network Access Switch 4050 User Guide
98 Chapter 3 Managing the network access devices
Adding VLANs to a domain
To add VLANs to a domain, complete the following steps:
1
Select the Secure Access Domain > domain > VLANs tab.
The domain VLANs screen appears (see Figure 8 on page 97).
2
Click Add.
The Add a new VLAN dialog box appears (see Figure 6).
Figure 9 Add a new VLAN
3
Enter the VLAN information in the applicable fields. Table 5 describes the
Add a new VLAN fields.
Table 5 Add a new VLAN fields
Field
Description
Name
The name of the VLAN, as configured on the domain.
ID
The ID of the VLAN, as configured on the domain.
4
Click Add.
The new VLAN appears in the VLAN Table.
320818-A
5
Repeat this step for each Green and Yellow VLAN configured on the domain.
6
Click Apply on the toolbar to send the current changes to the Nortel
SNAS 4050. Click Commit on the toolbar to save the changes permanently.
Chapter 3 Managing the network access devices 99
Removing VLANs from a domain
To remove existing VLANs from the domain, complete the following steps:
1
Select the Secure Access Domain > domain > VLANs tab.
The domain VLANs screen appears (see Figure 8).
2
Select a VLAN entry from the VLAN Table.
3
Click Delete.
A dialog box appears to confirm that you want to delete this VLAN.
4
Click Yes.
The VLAN disappears from the VLAN Table.
5
Click Apply on the toolbar to send the current changes to the Nortel
SNAS 4050. Click Commit on the toolbar to save the changes permanently.
Nortel Secure Network Access Switch 4050 User Guide
100 Chapter 3 Managing the network access devices
Mapping VLANs by switch
To map VLANs by switch, you must first disable the network access device (see
“Managing network access devices using the SREM” on page 91). Once the
network access device is disabled, select the Secure Access Domain > domain >
Switches > switch > VLANs tab.
The switch VLANs screen appears (see Figure 10), listing all current VLANs
applied to the switch.
Figure 10 Switch VLANs screen
This screen allows you to manage VLANs on the switch by adding or deleting
entries in the VLAN Table. For detailed steps on adding or removing switch
VLANs, see:
•
320818-A
“Adding VLANs to a switch” on page 101
Chapter 3 Managing the network access devices 101
•
“Removing VLANs from a switch” on page 102
Adding VLANs to a switch
To add VLANs to a switch, complete the following steps:
1
Select the Secure Access Domain > domain > Switches > switch > VLANs
tab.
The switch VLANs screen appears (see Figure 10 on page 100).
2
Click Add.
The Add a new VLAN dialog box appears (see Figure 11).
Figure 11 Add a new VLAN
3
Enter the VLAN information in the applicable fields. Table 5 describes the
Add a new VLAN fields.
Table 6 Add a new VLAN fields
Field
Description
Name
The name of the VLAN, as configured on the switch.
ID
The ID of the VLAN, as configured on the switch.
4
Click Add.
The new VLAN appears in the VLAN Table.
5
Repeat this step for each Green and Yellow VLAN configured on the network
access device.
6
Click Apply on the toolbar to send the current changes to the Nortel
SNAS 4050. Click Commit on the toolbar to save the changes permanently.
Nortel Secure Network Access Switch 4050 User Guide
102 Chapter 3 Managing the network access devices
Removing VLANs from a switch
To remove existing VLANs from the switch, complete the following steps:
1
Select the Secure Access Domain > domain > Switches > switch > VLANs
tab.
The switch VLANs screen appears (see Figure 10).
2
Select a VLAN entry from the VLAN Table.
3
Click Delete.
A dialog box appears to confirm that you want to delete this VLAN.
4
Click Yes.
The VLAN disappears from the VLAN Table.
5
Click Apply on the toolbar to send the current changes to the Nortel
SNAS 4050. Click Commit on the toolbar to save the changes permanently.
Managing SSH keys using the SREM
The Nortel SNAS 4050 and the network access devices controlled by the Nortel
SNAS 4050 domain exchange public keys so that they can authenticate
themselves to each other in future SSH communications.
Note: When you add a new network access device, the SSH fingerprint
of the switch is automatically picked up if the switch is reachable. If the
fingerprint is not successfully retrieved, then the SSH key will not be set
for this network access device.
To enable secure communication between the Nortel SNAS 4050 and the network
access device, do the following:
1
320818-A
Generate an SSH public key for the Nortel SNAS 4050 domain (see
“Generating SSH keys for the domain using the SREM” on page 105), if
necessary. Apply the change immediately.
Chapter 3 Managing the network access devices 103
If you created the domain manually, the SSH key was generated automatically
(see “Manually creating a domain using the SREM” on page 152).
Note: The SSH key for the Nortel SNAS 4050 domain is not the same
as the SSH key generated during initial setup for all Nortel SNAS 4050
hosts in the cluster (see “Initial setup”, step 15 on page 57).
2
Export the Nortel SNAS 4050 public key to each network access device.
•
•
For an Ethernet Routing Switch 8300, you can export the key directly to
the switch (see “Managing SSH keys for Nortel SNA communication
using the SREM” on page 109).
For an Ethernet Routing Switch 5510, 5520, or 5530, upload the key to a
TFTP server, for manual retrieval from the switch (see “Exporting SSH
keys for the domain using the SREM” on page 106). For information
about downloading the key from the server to the switch, see Release
Notes for Nortel Ethernet Routing Switch 5500 Series, Software Release
4.3 (217468-B).
If you regenerate the key at any time, you must re-export the key to each
network access device.
Note: If you export the key after the network access device has been
enabled, you may need to disable and re-enable the switch in order to
activate the change.
3
For each network access device, import its public key into the Nortel
SNAS 4050 domain, if necessary. You can retrieve the key in two ways (see
“Managing SSH keys for Nortel SNA communication using the SREM” on
page 109):
•
•
Use Import SSH Key from Switch to import the key directly from the
network access device.
(For the Ethernet Routing Switch 8300 only) Paste the SSH key value
into the available text area, and Add the new SSH key manually.
If the network access device was reachable when you added it to the domain
configuration, the SSH key was automatically retrieved.
Nortel Secure Network Access Switch 4050 User Guide
104 Chapter 3 Managing the network access devices
If the network access device defaults, it generates a new public key. You must
reimport the key whenever the switch generates a new public key (see
“Reimporting the network access device SSH key using the SREM” on
page 110).
Note: In general, click Apply on the toolbar immediately after you
change any of the SSH settings.
320818-A
Chapter 3 Managing the network access devices 105
Generating SSH keys for the domain using the SREM
To generate, view, and export the public SSH key for the domain, complete the
following steps:
1
Select the Secure Access Domain > domain > SSH Key > Key Generation
tab.
The Key Generation screen appears (see Figure 12).
Figure 12 Key Generation screen
Nortel Secure Network Access Switch 4050 User Guide
106 Chapter 3 Managing the network access devices
Table 9 describes the fields and controls available from the switch SSH Key
screen.
Table 7 Switch SSH Key fields
Field
Description
Generate SSH Key
Generates an SSH public key for the domain.
There can be only one key in effect for the Nortel
SNAS 4050 domain at any one time. If a key already exists,
you are prompted to confirm that you want to replace it.
Click Apply and Commit on the toolbar to save the change
immediately and create the key.
Show
Displays the SSH public key generated for the domain.
Copy
Copies the displayed SSH public key, to be pasted into
another field or a text editor.
2
Click Apply on the toolbar to send the current changes to the Nortel
SNAS 4050. Click Commit on the toolbar to save the changes permanently.
Exporting SSH keys for the domain using the SREM
You cannot export the domain SSH key directly to an Ethernet Routing
Switch 5500 series switch. Instead, you must upload the key to a file exchange
server using the following export procedure.
To export the SSH public key for the domain, complete the following steps:
1
320818-A
Select the Secure Access Domain > domain > SSH Key > Export Key tab.
Chapter 3 Managing the network access devices 107
The Export Key screen appears (see Figure 13).
Figure 13 Export Key screen
Nortel Secure Network Access Switch 4050 User Guide
108 Chapter 3 Managing the network access devices
2
Enter the export information in the applicable fields. Table 8 describes the
fields available from the Export Key screen.
Table 8 Export Key fields
Field
Description
Protocol
Specifies the export protocol to use. The options are:
• tftp
• ftp
• scp
• sftp
Note: Use TFTP to export to an Ethernet Routing
Switch 5500 Series switch. Ethernet Routing Switch 5500
Series switches do not support the other protocols.
Host
Specifies the host name or IP address of the server you
are exporting to.
Filename
Specifies the file name of the key (file type .pub) you are
exporting.
Username
Specifies the FTP user name to access the server.
Password
Specifies the FTP password to access the server.
3
320818-A
Click Apply on the toolbar to begin the export process.
Chapter 3 Managing the network access devices 109
Managing SSH keys for Nortel SNA communication using the
SREM
To retrieve the public key for the network access device and export the public key
for the domain, complete the following steps:
1
Select the Secure Access Domain > domain > Switches > switch > SSH
Key tab.
The switch SSH Key screen appears (see Figure 14).
Figure 14 Switch SSH Key screen
Nortel Secure Network Access Switch 4050 User Guide
110 Chapter 3 Managing the network access devices
Table 9 describes the fields and controls available from the switch SSH Key
screen.
Table 9 Switch SSH Key fields
Field
Description
User Name
The user name of an administrative user (rwa) on the
network access device. (Required for Ethernet Routing
Switch 8300 only.)
Import SSH Key from Switch Retrieves the SSH public key from the network access
device, if it is reachable.
Export SSH Key to Switch
Exports the SSH public key for the Nortel SNAS 4050
domain to the network access device.
Note: You cannot use this command to export the key to an
Ethernet Routing Switch 5500 series switch. See
“Exporting SSH keys for the domain using the SREM” on
page 106 for details.
Delete Switch SSH Key
Deletes the SSH public key for the network access device
in the domain.
Show
Displays the SSH public key for the network access device.
Add
Adds the information currently displayed in the text area as
a new SSH public key.
Copy
Copies the SSH public key information currently displayed
in the text area.
Paste
Pastes the contents of a key file you have copied from the
network access device into the text area.
2
Click Apply on the toolbar to send the current changes to the Nortel
SNAS 4050. Click Commit on the toolbar to save the changes permanently.
Reimporting the network access device SSH key using
the SREM
Whenever the network access device generates a new public SSH key, you must
import the new key into the Nortel SNAS 4050 domain.
To reimport a public SSH key, complete the following steps:
1
320818-A
Select the Secure Access Domain > domain > Switches > switch > SSH
Key tab.
Chapter 3 Managing the network access devices 111
The switch SSH Key screen appears (see Figure 14 on page 109).
2
Click Delete Switch SSH Key.
3
Click Apply on the toolbar to send the current changes to the Nortel
SNAS 4050. Click Commit on the toolbar to save the changes permanently.
4
Click Import SSH from Switch.
5
Click Apply on the toolbar to send the current changes to the Nortel
SNAS 4050. Click Commit on the toolbar to save the changes permanently.
For more information about the SSH Key commands, see “Managing SSH keys
for Nortel SNA communication using the SREM” on page 109.
Monitoring switch health using the SREM
The Nortel SNAS 4050 continually monitors the health of the network access
devices. At specified intervals, a health check daemon sends queries and
responses to the switch as a heartbeat mechanism. If no activity (heartbeat) is
detected, the daemon will retry the health check for a specified number of times
(the dead count). If there is still no heartbeat, then after a further interval (the
status-quo interval) the network access device moves all its clients into the Red
VLAN. When connectivity is re-established, the Nortel SNAS 4050 synchronizes
sessions with the network access device.
The health check interval, dead count, and status-quo interval are configurable.
To configure parameters for the Nortel SNAS 4050 health checks, complete the
following steps:
1
Select the Secure Access Domain > domain > Switches > switch > Health
Check tab.
Nortel Secure Network Access Switch 4050 User Guide
112 Chapter 3 Managing the network access devices
The Health Check screen appears (see Figure 15).
Figure 15 Health Check screen
320818-A
Chapter 3 Managing the network access devices 113
2
Enter the health check information in the applicable fields. Table 10 describes
the Health Check fields.
Table 10 Health Check fields
Field
Description
Interval
Sets the time interval between checks for switch activity.
Accepts an integer that indicates the time interval in
seconds (s), minutes (m), or hours (h). The valid range is
60s (1m) to 64800s (18h). The default is 1m (1 minute).
Dead Count
Specifies the number of times the Nortel SNAS 4050 will
repeat the check for switch activity when no heartbeat is
detected.
Accepts an integer in the range 1–65535 that indicates the
number of retries. The default is 3.
If no heartbeat is detected after the specified number of
retries, the Nortel SNAS 4050 enters status-quo mode.
Status Quo Interval
Sets the time interval for status-quo mode, after which the
network access device moves all clients into the Red
VLAN.
Accepts an integer that indicates the time interval in
seconds (s), minutes (m), or hours (h). The valid range is 0
to 64800s (18h). The default is 1m (1 minute).
3
Click Apply on the toolbar to send the current changes to the Nortel
SNAS 4050. Click Commit on the toolbar to save the changes permanently.
Viewing a connected client list using the SREM
To view a list of clients that are connected to a particular switch, select the Secure
Access Domain > domain > Switches > switch > Connected Clients tab.
Nortel Secure Network Access Switch 4050 User Guide
114 Chapter 3 Managing the network access devices
The Connected Clients screen appears, displaying information about the
connection status and a list of all connected clients.
describes the Connected Clients fields.
Table 11 Connected Clients fields
320818-A
Field
Description
Auto Refresh
Specifies whether the information displayed is
automatically refreshed.
Interval
Specifies the interval in seconds before the screen is
automatically refreshed. Only applicable if Auto
Refresh is selected.
Logging
Specifies whether a log file is automatically created for
the Controller List.
If selected, you can click Browse to specify the log file
name and location.
Controller List
Lists details for each active controller.
Switch Connection Status
Displays a brief description of the switch connection
status.
Connected Client Table
Displays a list of all connected clients. Information
about each client includes:
• Port ID
• VLAN
• Device
• MAC Address
• Client IP
Chapter 3 Managing the network access devices 115
Controlling communication with the network access
devices using the SREM
To stop communication between the Nortel SNAS 4050 and a network access
device, disable the switch. Click Apply and Commit to apply the change
immediately.
Note: If the switch is not going to be used in the Nortel SNA network,
Nortel recommends deleting the switch from the Nortel SNAS 4050
domain, rather than just disabling it.
To restart communication between the Nortel SNAS 4050 and a network access
device, enable the switch. Click Apply and Commit to apply the change
immediately.
When you first add a network access device to the Nortel SNAS 4050 domain, the
switch is disabled by default. Do not enable the switch until you have completed
configuring it. In particular, do not enable the switch until you have mapped the
VLANs (see “Mapping the VLANs using the SREM” on page 96) and exchanged
the necessary SSH keys (see “Managing SSH keys using the SREM” on
page 102).
Nortel Secure Network Access Switch 4050 User Guide
116 Chapter 3 Managing the network access devices
To disable or enable the network access device, perform the following steps:
1
Select the Secure Access Domain > domain > Switches > switch >
Configuration tab.
The network access device Configuration screen appears (see Figure 16).
Figure 16 Switch Configuration screen
2
Ensure the Enable Switch setting is correct.
•
•
3
320818-A
selected — the network access device is enabled
cleared — the network access device is disabled
Click Apply on the toolbar to send the current changes to the Nortel
SNAS 4050. Click Commit on the toolbar to save the changes permanently.
117
Chapter 4
Configuring the domain
This chapter includes the following topics:
Topic
Page
Configuring the domain using the CLI
118
Roadmap of domain commands
119
Creating a domain using the CLI
121
Deleting a domain using the CLI
129
Configuring domain parameters using the CLI
130
Configuring the TunnelGuard check using the CLI
132
Configuring the SSL server using the CLI
135
Configuring HTTP redirect using the CLI
144
Configuring advanced settings using the CLI
145
Configuring RADIUS accounting using the CLI
146
Configuring the domain using the SREM
150
Creating a domain using the SREM
151
Deleting a domain using the SREM
163
Configuring domain parameters using the SREM
164
Configuring the TunnelGuard check using the SREM
168
Configuring the SSL server using the SREM
174
Configuring HTTP redirect using the SREM
181
Configuring RADIUS accounting using the SREM
183
Nortel Secure Network Access Switch 4050 User Guide
118 Chapter 4 Configuring the domain
A Nortel SNAS 4050 domain encompasses all the switches, authentication
servers, and remediation servers associated with that Nortel SNAS 4050 cluster.
If you ran the quick setup wizard during initial setup, Domain 1 has been created.
If you did not run the quick setup wizard, you must create at least one domain. For
information about creating a domain, see “Creating a domain using the CLI” on
page 121 or “Creating a domain using the SREM” on page 151.
To delete a domain, see “Deleting a domain using the CLI” on page 129 or
“Deleting a domain using the SREM” on page 163.
Note: With Nortel Secure Network Access Switch
Software Release 1.0, you cannot configure the Nortel SNA solution to
have more than one domain.
Configuring the domain using the CLI
To configure the domain, access the Domain menu by using the following
command:
/cfg/domain
From the Domain menu, you can configure and manage the following:
•
•
•
320818-A
domain parameters such as name and portal IP address (pVIP) (see
“Configuring domain parameters using the CLI” on page 130)
Authentication, Authorization, and Accounting (AAA) features
• for authentication, see “Configuring authentication” on page 233
• for authorization, see “Configuring groups and profiles” on page 191 and
“Configuring the TunnelGuard check using the CLI” on page 132
• for accounting, see “Configuring RADIUS accounting using the CLI” on
page 146
the SSL server used for the domain portal (see “Configuring the SSL server
using the CLI” on page 135)
• SSL trace commands
• SSL settings
Chapter 4 Configuring the domain 119
•
•
•
•
•
•
• logging traffic with syslog messages
portal settings (see “Customizing the portal and user logon” on page 385)
• captive portal
• portal look and feel
• linksets
the network access devices (see “Managing the network access devices” on
page 71)
the Nortel SNA VLANs (see “Managing the network access devices” on
page 71)
SSH keys for the domain (see “Managing SSH keys using the CLI” on
page 84)
HTTP redirect settings (see “Configuring HTTP redirect using the CLI” on
page 144)
advanced settings such as a backend interface and logging options (see
“Configuring advanced settings using the CLI” on page 145)
Roadmap of domain commands
The following roadmap lists the CLI commands to configure the domain in a
Nortel SNA deployment. Use this list as a quick reference or click on any entry for
more information:
Command
Parameter
/cfg/domain <domain ID>
/cfg/quick
/cfg/domain #/del
/cfg/domain <domain ID>
name <name>
pvips <IPaddr>
/cfg/domain #/aaa/tg
recheck <interval>
heartbeat <interval>
hbretrycnt <count>
status-quo on|off
action teardown|restricted
list
Nortel Secure Network Access Switch 4050 User Guide
120 Chapter 4 Configuring the domain
Command
Parameter
details on|off
loglevel fatal|error|warning|
info|debug
/cfg/domain #/aaa/tg/quick
/cfg/domain #/server
port <port>
interface <interface ID>
dnsname <name>
/cfg/domain #/server/trace
ssldump
tcpdump
ping <host>
dnslookup <host>
traceroute <host>
/cfg/domain #/server/ssl
cert <certificate index>
cachesize <sessions>
cachettl <ttl>
cacerts <certificate index>
cachain <certificate index list>
protocol ssl2|ssl3|ssl23|tls1
ciphers <cipher list>
ena
dis
/cfg/domain #/server/adv/traflog
sysloghost <IPaddr>
udpport <port>
protocol ssl2|ssl3|ssl23|tls1
priority debug|info| notice
facility
auth|authpriv|daemon|local0-7
ena
dis
/cfg/domain #/httpredir
320818-A
port <port>
Chapter 4 Configuring the domain 121
Command
Parameter
redir on|off
/cfg/domain #/adv
interface <interface ID>
log
/cfg/domain #/aaa/radacct
ena
dis
/cfg/domain #/aaa/radacct/servers
list
del <index number>
add <IPaddr> <port> <shared
secret>
insert <index number> <IPaddr>
move <index number> <new index
number>
/cfg/domain #/aaa/radacct/vpnattribu vendorid
vendortype
Creating a domain using the CLI
You can create a domain in two ways:
•
•
“Manually creating a domain using the CLI” on page 121
“Using the Nortel SNAS 4050 domain quick setup wizard in the CLI” on
page 123
Manually creating a domain using the CLI
To create and configure a domain manually, use the following command:
/cfg/domain <domain ID>
where domain ID is an integer in the range 1 to 256 that uniquely identifies the
domain in the Nortel SNAS 4050 cluster.
Nortel Secure Network Access Switch 4050 User Guide
122 Chapter 4 Configuring the domain
When you first create the domain, you are prompted to enter the following
parameters:
•
•
domain name — a string that identifies the domain on the Nortel SNAS 4050,
as a mnemonic aid. The maximum length of the string is 255 characters.
portal Virtual IP address (pVIP) — the IP address of the Nortel SNAS 4050
portal. You can have more than one pVIP for a domain. To specify more than
one pVIP, use a comma separator. The pVIP is the address to which the client
connects for authentication and host integrity check. For more information,
see “About the IP addresses” on page 51.
The Domain menu displays.
Figure 17 on page 123 shows sample output for the /cfg/domain
<domain ID> command and commands on the Domain menu. For more
information about the Domain menu commands, see “Configuring domain
parameters using the CLI” on page 130.
320818-A
Chapter 4 Configuring the domain 123
Figure 17 Creating a domain
>> Main# /cfg/domain
Enter domain number (1-256): 2
Creating Domain 2
Domain name: MyDomain
Enter Domain Portal Vips(comma separated): 10.40.40.100
Entering: SSH key menu
Generating new SSH key, this operation takes a few
seconds... done.
Leaving: SSH key menu
---------------------------------------------------------[Domain 2 Menu]
name
- Set Domain name
pvips
- Set Portal VIP addr(s) for the domain
aaa
- AAA menu
server
- SSL server menu
portal
- Portal look and feel menu
linkset - Portal linkset menu
switch
- Switch menu
vlan
- Vlan menu
sshkey
- SSH key menu
dnscapt - Dns captive portal menu
httpredir - Http to Https redirection menu
quick
- Quick switch setup wizard
adv
- Advanced settings menu
del
- Remove domain
Apply to activate.
>> Domain 2#
Using the Nortel SNAS 4050 domain quick setup wizard in the
CLI
To create a domain using the NSNAS quick setup wizard, use the following
command:
/cfg/quick
The NSNAS quick setup wizard is similar to the quick setup wizard available
during initial setup.
Nortel Secure Network Access Switch 4050 User Guide
124 Chapter 4 Configuring the domain
Depending on the options you select in connection with certificates and creating a
test user, the two wizards also create similar default settings (see “Settings created
by the quick setup wizard” on page 60).
You can later modify all settings created by the domain quick setup wizard (see
“Configuring domain parameters using the CLI” on page 130).
1
Launch the domain quick setup wizard.
>> Main# cfg/quick
2
Specify the pVIP of the Nortel SNAS 4050 domain.
You can configure additional pVIPs later (see “Configuring domain
parameters using the CLI” on page 130).
IP address of domain portal: <IPaddr>
3
Specify a name for the Nortel SNAS 4050 domain, as a mnemonic aid.
Name of the domain: <name>
4
Specify the port on which the portal web server listens for SSL
communications. The default for HTTPS communications is port 443.
Listen port of domain portal [443]:
5
Specify the certificate to be used by the portal server.
Use existing certificate (no/1) [no]:
If certificates exist on the system, the certificate numbers will be offered as
valid input options. Choose one of the following:
320818-A
a
To create a new certificate by pasting in the contents of a certificate file
from a text editor, press Enter to accept the default value (no). Go to step
6 on page 125.
b
To create a test certificate, press Enter to accept the default value (no).
Go to step 7 on page 125.
Chapter 4 Configuring the domain 125
c
To use an existing certificate, enter the applicable certificate number. Go
to step 8 on page 126.
Use the /info/certs command to view the main attributes of all configured
certificates. The certificate number is shown in the Certificate Menu line (for
example, Certificate Menu 1:).
For more information about certificates and keys, see “Managing certificates”
on page 569.
6
To create a new certificate:
a
At the prompt to create a test certificate, enter No.
b
When prompted, paste in the certificate and key from a text file, then
press Enter.
c
Enter an ellipsis (...) to signal the end of the certificate.
d
To continue, go to step 8 on page 126.
Use existing certificate (no/1) [no]:
Create a test certificate? (yes/no): no
Enter server certificate.
Paste the certificate and key, press Enter to create a new
line, and then type "..." (without the quotation marks)
to terminate.
>
7
To create a test certificate:
a
At the prompt to create a test certificate, enter Yes.
b
When prompted, enter the required certificate information. For more
information, see “Generating and submitting a CSR using the CLI” on
page 579.
Nortel Secure Network Access Switch 4050 User Guide
126 Chapter 4 Configuring the domain
c
To continue, go to step 8 on page 126.
Use existing certificate (no/1) [no]:
Create a test certificate? (yes/no): yes
The combined length of the following parameters may not
exceed 225 bytes.
Country Name (2 letter code):
State or Province Name (full name):
Locality Name (eg, city):
Organization Name (eg, company):
Organizational Unit Name (eg, section):
Common Name (eg, your name or your server's hostname):
Email Address:
Subject alternative name (blank or comma separated list
of URI:<uri>, DNS:<fqdn>, IP:<ip-address>,
email:<email-address>):
Valid for days [365]:
Key size (512/1024/2048/4096) [1024]:
8
Specify whether the SSL server uses chain certificates.
Do you require chain certificates (yes/no) [no]:
9
If you want to enable HTTP to HTTPS redirection, create a redirect server.
Do you want an http to https redirect server (yes/no)
[no]:
10 Specify whether you want to add a network access device to the domain.
Do you want to configure a switch? (yes/no) [no]:
If you do want to add a network access device, enter yes to launch the quick
switch wizard. Go to step 11 on page 127.
If you do not want to add a network access device at this time, press Enter to
accept the default value (no). Go to step 12 on page 127.
320818-A
Chapter 4 Configuring the domain 127
11 To add a network access device, enter the required information when
prompted. For more information, see “Using the quick switch setup wizard”
on page 75.
Do you want to configure a switch? (yes/no) [no]: yes
Enter the type of the switch (ERS8300/ERS5500) [ERS8300]:
IP address of Switch:
NSNA communication port[5000]:
Red vlan id of Switch:
To continue, go to step 12.
12 Specify the action to be performed when an SRS rule check fails. The options
are:
•
restricted — the session remains intact, but access is restricted in
•
accordance with the rights specified in the access rules for the group
teardown — the SSL session is torn down
The default is restricted.
In the event that the TunnelGuard checks fails on a
client, the session can be teardown, or left in
restricted mode with limited access.
Which action do you want to use for TunnelGuard failure?
(teardown/restricted) [restricted]:
13 Specify whether you want to create a test user (tg) in the default
tunnelguard group.
Do you want to create a tunnelguard test user? (yes/no)
[yes]:
If you do want to create a test user, press Enter to accept the default value
(yes). The wizard will create a test user named tg, with password tg, in the
default tunnelguard group.
If you do not want to create a test user, enter no.
14 Wait while the wizard completes processing to create the domain, then enter
Apply to activate the changes.
Nortel Secure Network Access Switch 4050 User Guide
128 Chapter 4 Configuring the domain
The wizard assigns the following default VLAN IDs:
•
•
Green VLAN = VLAN ID 110
Yellow VLAN = VLAN ID 120
You can change the VLAN mappings when you add or modify the network
access devices (see “Configuring the network access devices using the CLI”
on page 80). You specify the Red VLAN when you add the network access
device to the domain.
The components created by the wizard depend on the selections you made in
the preceding steps. For example, the sample output illustrates the following
options:
•
•
•
320818-A
an existing certificate (Certificate 1) is being used
no network access device is being added
the test user is being created
Chapter 4 Configuring the domain 129
Creating Domain 2
Creating Client Filter 1
Name: tg_passed
Creating Client Filter 2
Name: tg_failed
Creating Linkset 1
Name: tg_passed
This Linkset just prints the TG result
Creating Linkset 2
Name: tg_failed
This Linkset just prints the TG result
Creating Group 1
Name: tunnelguard
Creating Extended Profile 1
Giving full access when tg passed
Creating "green" vlan with id 110
Creating Access rule 1
Giving remediation access when tg failed
Creating Extended Profile 2
Creating "yellow" vlan with id 120
Creating Access rule 1
Using no SRS rule
Creating Authentication 1
Adding user 'tg' with password 'tg'
Using certificate 1
Use apply to activate the new domain.
>> Configuration#
Deleting a domain using the CLI
To delete a domain, use the following command:
/cfg/domain #/del
This command removes the current domain from the system configuration,
including all settings in menus and submenus for the portal, groups, authentication
services, linksets, and network access devices configured for that domain.
Nortel Secure Network Access Switch 4050 User Guide
130 Chapter 4 Configuring the domain
Configuring domain parameters using the CLI
To configure the domain, use the following command:
/cfg/domain <domain ID>
where domain ID is an integer in the range 1 to 256 that uniquely identifies the
domain in the Nortel SNAS 4050 cluster.
The Domain menu displays.
The Domain menu includes the following options:
/cfg/domain <domain ID>
followed by:
320818-A
name <name>
Names or renames the domain.
• name is a string that must be unique in the domain.
The maximum length of the string is 255
characters.
The name is a mnemonic aid only and is not used by
other functions.
pvips <IPaddr>
Sets the pVIP for the domain. The pVIP is the portal
address to which clients connect in order to access the
Nortel SNA network. For more information, see “About
the IP addresses” on page 51.
A domain can have more than one pVIP. To configure
multiple IP addresses for the portal, use a comma to
separate the IP address entries.
aaa
Accesses the AAA menu, in order to configure
authentication, authorization, and accounting features.
• For authentication, see “Configuring authentication”
on page 233.
• For authorization, see “Configuring groups and
profiles” on page 191 and “Configuring the
TunnelGuard check using the CLI” on page 132.
• For accounting, see “Configuring RADIUS
accounting using the CLI” on page 146.
server
Accesses the Server menu, in order to configure the
portal SSL server (see “Configuring the SSL server
using the CLI” on page 135).
Chapter 4 Configuring the domain 131
/cfg/domain <domain ID>
followed by:
portal
Accesses the Portal menu, in order to customize the
portal page that displays in the client’s web browser
(see “Customizing the portal and user logon” on
page 385).
linkset
Accesses the Linkset menu, in order to configure the
linksets to display on the portal Home tab (see
“Configuring linksets using the CLI” on page 411).
switch
Accesses the Switch menu, in order to configure the
network access devices controlled by the Nortel
SNAS 4050 domain (see “Managing network access
devices using the CLI” on page 73).
vlan
Accesses the Domain vlan menu, in order to manage
VLAN mappings on the Nortel SNAS 4050 domain (see
“Mapping the VLANs using the CLI” on page 82).
sshkey
Accesses the NSNAS SSH key menu, in order to
generate and show the public SSH key for the Nortel
SNAS 4050 domain (see “Generating SSH keys for the
domain using the CLI” on page 85).
dnscapt
Accesses the DNS capture menu, in order to set the
Nortel SNAS 4050 domain portal as a captive portal
and to configure the Exclude List (see “Configuring the
captive portal using the CLI” on page 400).
httpredir
Accesses the HTTP Redir menu, in order to configure
HTTP to HTTPS redirect settings (see “Configuring
HTTP redirect using the CLI” on page 144).
quick
Launches the quick switch setup wizard, in order to add
network access devices to the Nortel SNAS 4050
domain (see “Using the quick switch setup wizard” on
page 75).
adv
Accesses the Advanced menu, in order to configure a
backend interface for the Nortel SNAS 4050 domain
and specify the log settings for syslog messages (see
“Configuring advanced settings using the CLI” on
page 145).
del
Removes the current domain from the system
configuration, including all settings in menus and
submenus.
Nortel Secure Network Access Switch 4050 User Guide
132 Chapter 4 Configuring the domain
Configuring the TunnelGuard check using the CLI
Before an authenticated client is allowed into the network, the TunnelGuard
application checks client host integrity by verifying that the components required
for the client’s personal firewall (executables, DLLs, configuration files, and so
on) are installed and active on the client PC. For more information about how the
TunnelGuard check operates in the Nortel SNA solution, see “TunnelGuard host
integrity check” on page 37.
If you ran the quick setup wizard during the initial setup or to create the domain,
the TunnelGuard check has been configured with default settings and the check
result you selected (teardown or restricted). You can rerun the TunnelGuard
portion of the quick setup wizard at any time by using the
/cfg/domain #/aaa/tg/quick command (see “Using the quick TunnelGuard
setup wizard in the CLI” on page 134).
To configure settings for the TunnelGuard host integrity check and the check
result, use the following command:
/cfg/domain #/aaa/tg
The TG menu displays.
The TG menu includes the following options:
/cfg/domain #/aaa/tg
followed by:
320818-A
quick
Launches the quick TunnelGuard setup wizard, in
order to configure default TunnelGuard check settings
and the check result (see “Using the quick TunnelGuard
setup wizard in the CLI” on page 134).
recheck <interval>
Sets the time interval between SRS rule rechecks
made by the TunnelGuard applet on the client machine.
• interval is an integer that indicates the time
interval in seconds (s), minutes (m), or hours (h).
The valid range is 60s (1m) to 86400s (24h). The
default is 15m (15 minutes).
If a recheck fails, the Nortel SNAS 4050 performs the
action specified in the action command (see
page 133).
Chapter 4 Configuring the domain 133
/cfg/domain #/aaa/tg
followed by:
heartbeat <interval>
Sets the time interval between checks for client activity.
• interval is an integer that indicates the time
interval in seconds (s), minutes (m), or hours (h).
The valid range is 60s (1m) to 86400s (24h). The
default is 1m (1 minute).
hbretrycnt <count>
Specifies the number of times the Nortel SNAS 4050
will repeat the check for client activity when no
heartbeat is detected.
• count is an integer in the range 1–65535 that
indicates the number of retries. The default is 3.
If no heartbeat is detected after the specified number of
retries (the inactivity interval), the Nortel SNAS 4050
default behavior is to terminate the session (see
/cfg/domain #/aaa/tg/status-quo).
status-quo on|off
Specifies whether the Nortel SNAS 4050 domain
operates in status-quo mode. Status-quo mode
determines the behavior of the Nortel SNAS 4050 if no
client activity is detected after the inactivity interval
(heartbeat x hbretrycnt). The options are:
• on — the client session continues indefinitely
• off — the Nortel SNAS 4050 terminates the
session immediately
The default is off.
action
teardown|restricted
Specifies the action to be performed if the client fails
the TunnelGuard SRS rule check. The options are:
• restricted — the session remains intact, but
access is restricted in accordance with the rights
specified in the access rules for the group
• teardown — the SSL session is torn down
list
Lists the SRS rules configured for the domain.
For information about creating SRS rules, see
“TunnelGuard SRS Builder” on page 317.
The TunnelGuard applet can apply different SRS rules
for different groups. For information about specifying
the SRS rule to use for the TunnelGuard check, see
“Configuring groups using the CLI” on page 198.
Nortel Secure Network Access Switch 4050 User Guide
134 Chapter 4 Configuring the domain
/cfg/domain #/aaa/tg
followed by:
details on|off
Specifies whether SRS failure details can be displayed
on the portal page.
Valid options are:
• on — details will be displayed
• off — details will not be displayed
The default is off.
If set to on, the client can click on the TG icon on the
portal page to display details about which elements of
the SRS rule check failed.
loglevel
fatal|error|warning|
info|debug
Sets the log level for debug information from the
TunnelGuard applet. The options are:
• fatal — displays fatal errors only
• error — displays all errors
• warning — displays warning information about
conditions that are not error conditions
• info — displays high-level information about
processes
• debug — displays detailed information about all
processes
The default is info.
The information displays in the client’s Java Console
window. You can use the information to track errors in
the TunnelGuard SRS rules.
Using the quick TunnelGuard setup wizard in the CLI
To configure the settings for the SRS rule check using the TunnelGuard quick
setup wizard, use the following command:
/cfg/domain #/aaa/tg/quick
The TunnelGuard quick setup wizard is similar to the last few steps of the Nortel
SNAS 4050 domain quick setup wizard. The wizard prompts you for the
following information:
•
•
320818-A
the action to be performed if the TunnelGuard check fails (see step 12 on
page 127)
whether you want to create a test user (see step 13 on page 127)
Chapter 4 Configuring the domain 135
The TunnelGuard quick setup wizard creates a default SRS rule
(srs-rule-test). This rule checks for the presence of a text file on the client’s
machine (C:\tunnelguard\tg.txt).
Figure 18 shows sample output for the TunnelGuard quick setup wizard.
Figure 18 TunnelGuard quick setup wizard
>> Main# /cfg/domain #/aaa/tg/quick
In the event that the TunnelGuard checks fails on a client,
the session can be teardown, or left in restricted mode
with limited access.
Which action do you want to use for TunnelGuard failure?
(teardown/restricted) [restricted]:
Do you want to create a tunnelguard test user? (yes/no)
[yes]: no
Using existing tg_passed filter
Using existing tg_failed filter
Using existing tg_passed linkset
Using existing tg_failed linkset
Adding test SRS rule srs-rule-test
This rule check for the presence of the file
C:\tunnelguard\tg.txt
Using existing tg_passed filter
Configuring the SSL server using the CLI
The server number assigned to the portal server configured for the domain is
server 1001.
To configure the portal server used in the domain, use the following command:
/cfg/domain #/server
The Server 1001 menu displays.
Nortel Secure Network Access Switch 4050 User Guide
136 Chapter 4 Configuring the domain
The Server 1001 menu includes the following options:
/cfg/domain #/server
followed by:
port <port>
Specifies the port to which the portal server listens for
HTTPS communications.
• port is an integer in the range 1–65534 that
indicates the TCP port number. The default is 443.
interface
<interface ID>
Specifies the backend interface used by the server.
• interface ID is an integer that indicates the
interface number. The default is 0.
dnsname <name>
Assigns a DNS name to the portal IP address.
• name is the fully qualified domain name (FQDN) of
the pVIP (for example, nsnas.example.com).
Generally, you need to specify a DNS name only if your
corporate DNS server is unable to perform reverse
lookups of the portal IP address.
When you press Enter after specifying the DNS name,
the system performs a check against the DNS server
included in the system configuration (see
/cfg/sys/dns) to verify that:
• the FQDN is registered in DNS
• the resolved IP address corresponds to the pVIP
trace
Accesses the Trace menu, in order to capture and
analyze SSL and TCP traffic between clients and the
portal server. For more information, see “Tracing SSL
traffic using the CLI” on page 136.
ssl
Accesses the SSL Settings menu, in order to
configure SSL settings for the portal server (see
“Configuring SSL settings using the CLI” on page 139).
adv
Accesses the Advance settings menu, in order to
configure traffic log settings for a syslog server (see
“Configuring traffic log settings using the CLI” on
page 142).
Tracing SSL traffic using the CLI
To verify connectivity and to capture information about SSL and TCP traffic
between clients and the portal server, use the following command:
/cfg/domain #/server/trace
320818-A
Chapter 4 Configuring the domain 137
The Trace menu displays.
The Trace menu includes the following options:
/cfg/domain #/server/trace
followed by:
ssldump
Creates a dump of the SSL traffic flowing between
clients and the portal server. You are prompted to enter
the following information:
• ssldump flags and ssldump filter — for
more information about the flags and filter
expressions available for SSLDUMP using UNIX,
see http://www.tcpdump.org/tcpdump_man.html.
• output mode
Options for the output mode are:
• interactive — captured information displays
decrypted on the screen. SSLDUMP cannot
decrypt any traffic if it is started after the browser.
SSLDUMP must be running during the initial SSL
handshake.
• tftp|ftp|sftp — the dump will be saved as a
file to the file exchange server you specify, using a
destination file name you specify. You are prompted
to enter the required information. You can specify
the file exchange server using either the host name
or the IP address.
For TFTP, the number of files sent depends on the
amount of captured information. A sequence
number is appended to the file name given in the
CLI, starting at 1 and incremented automatically for
additional files.
For ftp and sftp, you will also be prompted to
specify a user name and password valid on the file
exchange server.
The default output mode is interactive.
Nortel Secure Network Access Switch 4050 User Guide
138 Chapter 4 Configuring the domain
/cfg/domain #/server/trace
followed by:
320818-A
tcpdump
Creates a dump of the TCP traffic flowing between
clients and the virtual SSL server. You are prompted to
enter the following information:
• tcpdump flags and tcpdump filter — for
more information about the flags and filter
expressions available for TCPDUMP using UNIX,
see http://www.tcpdump.org/tcpdump_man.html.
• output mode
Options for the output mode are:
• interactive — captured information displays
on the screen
• tftp|ftp|sftp — the dump will be saved as a
file to the file exchange server you specify, using a
destination file name you specify. You are prompted
to enter the required information. You can specify
the file exchange server using either the host name
or the IP address.
For TFTP, the number of files sent depends on the
amount of captured information. A sequence
number is appended to the file name given in the
CLI, starting at 1 and incremented automatically for
additional files.
For ftp and sftp, you will also be prompted to
specify a user name and password valid on the file
exchange server.
You can read a saved TCP traffic dump file using the
TCPDUMP or Ethereal application on a remote
machine.
The default output mode is interactive.
ping <host>
Verifies station-to-station connectivity across the
network.
• host is the host name or IP address of the target
station
If a backend interface is mapped to the current Nortel
SNAS 4050 domain, the check is made through the
backend interface. To map a backend interface to the
domain, use the
/cfg/domain #/adv/interface command
(see “Configuring advanced settings using the CLI” on
page 145).
To be able to use a host name, the DNS parameters
must be configured (see “Configuring DNS servers and
settings using the CLI” on page 477).
Chapter 4 Configuring the domain 139
/cfg/domain #/server/trace
followed by:
dnslookup <host>
Finds the IP address for a machine whose host name
you specify, or the host name of a machine whose IP
address you specify.
• host is the host name or IP address of the
machine
If a backend interface is mapped to the current Nortel
SNAS 4050 domain, the check is made through the
backend interface. To map a backend interface to the
domain, use the
/cfg/domain #/adv/interface command
(see “Configuring advanced settings using the CLI” on
page 145).
traceroute <host>
Identifies the route used for station-to-station
connectivity across the network.
• host is the host name or IP address of the target
station
If a backend interface is mapped to the current Nortel
SNAS 4050 domain, the check is made through the
backend interface. To map a backend interface to the
domain, use the
/cfg/domain #/adv/interface command
(see “Configuring advanced settings using the CLI” on
page 145).
To be able to use a host name, the DNS parameters
must be configured (see “Configuring DNS servers and
settings using the CLI” on page 477).
Configuring SSL settings using the CLI
To configure SSL-specific settings for the portal server, use the following
command:
/cfg/domain #/server/ssl
The SSL Settings menu displays.
Nortel Secure Network Access Switch 4050 User Guide
140 Chapter 4 Configuring the domain
The SSL Settings menu includes the following options:
/cfg/domain #/server/ssl
followed by:
320818-A
cert <certificate
index>
Specifies which server certificate the portal server will
use. You cannot specify more than one server
certificate for the server to use at any one time.
• certificate index is an integer indicating
the index number automatically assigned to the
certificate when you created it
To view basic information about available certificates,
use the /info/certs command. For information
about adding a new certificate, see “Installing
certificates and keys” on page 573.
cachesize <sessions>
Sets the size of the SSL cache.
• sessions — is an integer less than or equal to
10000 indicating the number of cached sessions.
The default is 4000.
If there are many cache misses, increase the
cachesize value for better performance.
cachettl <ttl>
Specifies the maximum time to live (TTL) value for
items in the SSL cache. After the TTL has expired, the
items are discarded.
• ttl is an integer that indicates the TTL value in
seconds (s), minutes (m), or hours (h). If you do not
specify a measurement unit, seconds is assumed.
The default is 5m (5 minutes).
cacerts <certificate
index>
Specifies which of the available CA certificates to use
for client authentication.
Not supported in Nortel Secure Network Access Switch
Software Release 1.0.
Chapter 4 Configuring the domain 141
/cfg/domain #/server/ssl
followed by:
cachain <certificate
index list>
Specifies the CA certificate chain of the server
certificate.
• certificate index list is a
comma-separated list of the certificate index
numbers assigned to the certificates in the chain.
The chain starts with the issuing CA certificate of
the server certificate and can range up to the root
CA certificate.
The command explicitly constructs the server
certificate chain. The chain and the server certificate
are sent to the browser.
To clear all specified chain certificates, press Enter at
the prompt to enter the certificate numbers. At the
prompt to confirm that you want to clear the list, enter
yes.
Note: The SSL server can use chain certificates only if
the protocol version is set to ssl3 or ssl23 (see
/cfg/domain #/server/ssl/protocol).
protocol
ssl2|ssl3|ssl23|tls1
Specifies the protocol to use when establishing an SSL
session with a client. Valid options are:
• ssl2 — accept SSL 2.0 only
• ssl3 — accept SSL 3.0 and TLS 1.0
• ssl23 — accept SSL 2.0, SSL 3.0, and TLS 1.0
• tls1 — accept TLS 1.0 only
The default value is ssl3.
verify none|optional| Specifies the level of client authentication to use when
establishing an SSL session. Valid options are:
required
• none — no client certificate is required
• optional — a client certificate is requested, but
the client need not present one
• required — a client certificate is required
The default value is none.
Not supported in Nortel Secure Network Access Switch
Software Release 1.0.
ciphers <cipher list> Specifies the cipher preference list.
• cipher list is an expression that consists of
cipher strings separated by colons. The default
cipher list is ALL@STRENGTH.
For more information about cipher lists, see “Supported
ciphers” on page 881.
Nortel Secure Network Access Switch 4050 User Guide
142 Chapter 4 Configuring the domain
/cfg/domain #/server/ssl
followed by:
ena
Enables SSL on the portal server.
SSL is enabled by default.
dis
Disables SSL on the portal server.
SSL is enabled by default.
Configuring traffic log settings using the CLI
You can configure a syslog server to receive User Datagram Protocol (UDP)
syslog messages for all HTTP requests handled by the portal server.
Nortel does not recommend routinely enabling this functionality for the following
reasons:
•
•
•
Logging traffic with syslog messages generates a substantial amount of
network traffic.
Logging traffic places an additional CPU load on each Nortel SNAS 4050
device in the cluster.
In general, syslog servers are not intended for the traffic type of log message.
Therefore, the syslog server might not be able to cope with the quantity of
syslog messages generated within a cluster of Nortel SNAS 4050 devices.
Enable traffic logging with syslog messages in environments where laws or
regulations require traffic logging to be performed on the SSL terminating device
itself. You can also enable it temporarily for debugging purposes.
Because of the amount of traffic generated, Nortel recommends that you set up
syslog on the backend server if possible.
A syslog message generated on a Nortel SNAS 4050 device looks like the
following:
Mar 8 14:14:33 192.168.128.24 <ISD-SSL>:
192.168.128.189 TLSv1/SSLv3 DES-CBC3-SHA “GET / HTTP/1.0”.
320818-A
Chapter 4 Configuring the domain 143
To set up a syslog server to receive UDP syslog messages for all HTTP requests
handled by the portal server, use the following command:
/cfg/domain #/server/adv/traflog
The Traffic Log Settings menu displays.
The Traffic Log Settings menu includes the following options:
/cfg/domain #/server/adv/traflog
followed by:
sysloghost <IPaddr>
Specifies the IP address of the syslog server.
udpport <port>
Specifies the UDP port number of the syslog server.
• port is an integer in the range 1–65534 that
indicates the UDP port number. The default is 514.
protocol
ssl2|ssl3|ssl23|tls1
Specifies the protocol to use when establishing an SSL
session with a client. Valid options are:
• ssl2 — accept SSL 2.0 only
• ssl3 — accept SSL 3.0 and TLS 1.0
• ssl23 — accept SSL 2.0, SSL 3.0, and TLS 1.0
• tls1 — accept TLS 1.0 only
The default value is ssl3.
priority debug|info|
notice
Specifies the priority level of the syslog messages that
are sent. Valid options are:
• debug — information useful for debugging
purposes only
• info — informational messages
• notice — information about conditions that are
not error conditions but nevertheless warrant
special attention
The default value is info.
Sets the facility parameter of syslog messages. The
facility
auth|authpriv|daemon| facility parameter specifies the type of program logging
the message. The configuration file can then specify
local0-7
different handling for messages from different facilities.
The default value is local4.
ena
Enables traffic logging with syslog messages to the
specified syslog server.
Traffic logging with syslog messages is disabled by
default.
Nortel Secure Network Access Switch 4050 User Guide
144 Chapter 4 Configuring the domain
/cfg/domain #/server/adv/traflog
followed by:
dis
Disables traffic logging with syslog messages.
Traffic logging with syslog messages is disabled by
default.
Configuring HTTP redirect using the CLI
You can configure the Nortel SNAS 4050 domain to automatically redirect HTTP
requests to the HTTPS server. For example, a client request directed to
http://nsnas.com is automatically redirected to https://nsnas.com.
To configure the domain to automatically redirect HTTP requests to the HTTPS
server specified for the domain, use the following command:
/cfg/domain #/httpredir
The Http Redir menu displays.
The Http Redir menu includes the following options:
/cfg/domain #/httpredir
followed by:
320818-A
port <port>
Specifies the port to which the portal server listens for
HTTP communications.
• port is an integer that indicates the TCP port
number. The default is 80.
Note: If you do not accept the default value and you
specify a different port, you must modify the Red and
Yellow filters on the network access devices
accordingly. Otherwise, the client PC will not be able to
reach the portal for user authentication.
redir on|off
Specifies whether HTTP requests will be redirected to
the HTTPS server.
• on — HTTP redirect is enabled
• off — HTTP redirect is disabled
The default is off.
Chapter 4 Configuring the domain 145
Configuring advanced settings using the CLI
You can configure the following advanced settings for the Nortel SNAS 4050
domain:
•
•
a backend interface
logging options
To map a backend interface to the domain and to configure logging options, use
the following command:
/cfg/domain #/adv
The Advanced menu displays.
The Advanced menu includes the following options:
/cfg/domain #/adv
followed by:
interface
<interface ID>
References a previously created interface to serve as a
backend interface for the domain.
• interface ID is an integer that indicates the
interface number. The default is 0.
To configure the interface, use the
/cfg/sys/host #/interface command (see
“Configuring host interfaces using the CLI” on
page 469).
log
Specifies the type of requests and operations to log.
You are prompted to enter a comma-separated list of
log types. Valid options are:
• all — logs all options
• login — logs portal logins and logouts
• http — logs HTTP requests made from the portal
• portal — logs non-HTTP portal operations, such
as FTP and SMB file server access
• reject — logs rejected requests
The default is login.
Each type of log generates its own set of syslog
messages. The syslog messages include date, time,
type of request, user, source IP address, and
requested destination.
Nortel Secure Network Access Switch 4050 User Guide
146 Chapter 4 Configuring the domain
Configuring RADIUS accounting using the CLI
The Nortel SNAS 4050 can be configured to provide support for logging
administrative operations and user session start and stop messages to a RADIUS
accounting server.
With RADIUS accounting enabled, the Nortel SNAS 4050 sends an accounting
request start packet to the accounting server for each user who successfully
authenticates to the Nortel SNAS 4050 domain. The start packet contains the
following information:
•
•
•
client user name
Nortel SNAS 4050 device Real IP address (RIP)
session ID
When the user session terminates, the Nortel SNAS 4050 sends an accounting
request stop packet to the accounting server. The stop packet contains the
following information:
•
•
•
session ID
session time
cause of termination
Configure the RADIUS server in accordance with the recommendations in
RFC 2866.
Certain Nortel SNAS 4050-specific attributes are sent to the RADIUS server
when you enable accounting (see “Configuring Nortel SNAS 4050-specific
attributes using the CLI” on page 149). In conjunction with custom plugins on
RADIUS, these attributes can be used for more detailed monitoring of Nortel
SNAS 4050 activity.
320818-A
Chapter 4 Configuring the domain 147
When you add an external RADIUS accounting server to the configuration, the
server is automatically assigned an index number. Nortel SNAS 4050 accounting
will be performed by an available server with the lowest index number. You can
control accounting server usage by reassigning index numbers (see “Managing
RADIUS accounting servers using the CLI” on page 147).
To configure the Nortel SNAS 4050 to support RADIUS accounting, use the
following command:
/cfg/domain #/aaa/radacct
The Radius Accounting menu displays.
The Radius Accounting menu includes the following options:
/cfg/domain #/aaa/radacct
followed by:
servers
Accesses the Radius Accounting Servers menu, in
order to configure external RADIUS accounting servers
for the domain (see “Managing RADIUS accounting
servers using the CLI” on page 147).
vpnattribu
Accesses the VPN Attribute menu, in order to
configure Nortel SNAS 4050-specific attributes to be
sent to the accounting server (see “Configuring Nortel
SNAS 4050-specific attributes using the CLI” on
page 149).
ena
Enables RADIUS accounting.
The default is disabled.
dis
Disables RADIUS accounting.
The default is disabled.
Managing RADIUS accounting servers using the CLI
To configure the Nortel SNAS 4050 to use external RADIUS accounting servers,
use the following command:
/cfg/domain #/aaa/radacct/servers
The Radius Accounting Servers menu displays.
Nortel Secure Network Access Switch 4050 User Guide
148 Chapter 4 Configuring the domain
The Radius Accounting Servers menu includes the following options:
/cfg/domain #/aaa/radacct/servers
followed by:
320818-A
list
Lists the IP addresses of currently configured RADIUS
accounting servers, by index number.
del <index number>
Removes the specified RADIUS accounting server
from the current configuration. The index numbers of
the remaining entries adjust accordingly.
To view the index numbers of all configured RADIUS
accounting servers, use the list command.
add <IPaddr> <port>
<shared secret>
Adds a RADIUS accounting server to the configuration.
You are prompted to enter the following information:
• IPaddr — the IP address of the accounting server
• port — the TCP port number used for RADIUS
accounting. The default is 1813.
• shared secret — the password used to
authenticate the Nortel SNAS 4050 to the
accounting server
The system automatically assigns the next available
index number to the server.
insert <index number>
<IPaddr>
Inserts a server at a particular position in the list of
RADIUS accounting servers in the configuration.
• index number — the index number you want
the server to have
• IPaddr — the IP address of the accounting server
you are adding
The index number you specify must be in use. The
index numbers of existing servers with this index
number and higher are incremented by 1.
move <index number>
<new index number>
Moves a server up or down the list of RADIUS
accounting servers in the configuration.
• index number — the original index number of
the server you want to move
• new index number — the index number
representing the new position of the server in the
list
The index numbers of the remaining entries adjust
accordingly.
Chapter 4 Configuring the domain 149
Configuring Nortel SNAS 4050-specific attributes using the CLI
The RADIUS accounting server uses Vendor-Id and Vendor-Type attributes in
combination to identify the source of the accounting information. The attributes
are sent to the RADIUS accounting server together with the accounting
information for the logged in user.
You can assign vendor-specific codes to the Vendor-Id and Vendor-Type
attributes for the Nortel SNAS 4050 domain. In this way, the RADIUS accounting
server can provide separate accounting information for each Nortel SNAS 4050
domain.
Each vendor has a specific dictionary. The Vendor-Id specified for an attribute
identifies the dictionary the RADIUS server will use to retrieve the attribute
value. The Vendor-Type indicates the index number of the required entry in the
dictionary file.
The Internet Assigned Numbers Authority (IANA) has designated SMI Network
Management Private Enterprise Codes that can be assigned to the Vendor-Id
attribute (see www.iana.org/assignments/enterprise-numbers).
RFC 2866 describes usage of the Vendor-Type attribute.
Contact your RADIUS system administrator for information about the
vendor-specific attributes used by the external RADIUS accounting server.
To simplify the task of finding accounting entries in the RADIUS server log, do
the following:
1
In the RADIUS server dictionary, define a descriptive string (for example,
NSNAS-Portal-ID).
2
Map this string to the Vendor-Type value.
To configure vendor-specific attributes in order to identify the Nortel SNAS 4050
domain, use the following command:
/cfg/domain #/aaa/radacct/vpnattribu
The VPN Attribute menu displays.
Nortel Secure Network Access Switch 4050 User Guide
150 Chapter 4 Configuring the domain
The VPN Attribute menu includes the following options:
/cfg/domain #/aaa/radacct/vpnattribu
followed by:
vendorid
Corresponds to the vendor-specific attribute used by
the RADIUS accounting server to identify accounting
information from the Nortel SNAS 4050 domain.
The default Vendor-Id is 1872 (Alteon).
vendortype
Corresponds to the Vendor-Type value used in
combination with the Vendor-Id to identify accounting
information from the Nortel SNAS 4050 domain.
The default Vendor-Type value is 3.
Configuring the domain using the SREM
To configure the domain, select the Secure Access Domain > Secure Access
Domain Table tab. The Secure Access Domain Table screen appears (see
Figure 19 on page 152), displaying a list of existing domains.
From the Secure Access Domain screens, you can configure and manage the
following:
•
•
•
320818-A
domain parameters such as name and portal IP address (pVIP) (see
“Configuring domain parameters using the SREM” on page 164)
Authentication, Authorization, and Accounting (AAA) features
• for authentication, see “Configuring authentication” on page 233
• for authorization, see “Configuring groups and profiles” on page 191 and
“Configuring the TunnelGuard check using the SREM” on page 168
• for accounting, see “Configuring RADIUS accounting using the SREM”
on page 183
the SSL server used for the domain portal (see “Configuring the SSL server
using the SREM” on page 174)
• SSL trace commands
• SSL settings
• logging traffic with syslog messages
Chapter 4 Configuring the domain 151
•
•
•
•
•
portal settings (see “Customizing the portal and user logon” on page 385)
• captive portal
• portal look and feel
• linksets
the network access devices (see “Managing the network access devices” on
page 71)
the Nortel SNA VLANs (see “Managing the network access devices” on
page 71)
SSH keys for the domain (see “Managing SSH keys using the SREM” on
page 102)
HTTP redirect settings (see “Configuring HTTP redirect using the SREM” on
page 181)
Creating a domain using the SREM
You can create a domain in two ways:
•
•
“Manually creating a domain using the SREM” on page 152
“Using the SREM Domain Quick Wizard” on page 154
Nortel Secure Network Access Switch 4050 User Guide
152 Chapter 4 Configuring the domain
Manually creating a domain using the SREM
To create and configure a domain manually, perform the following steps:
1
Select the Secure Access Domain > Secure Access Domain Table tab.
The Secure Access Domain Table screen appears (see Figure 19).
Figure 19 Secure Access Domain Table screen
320818-A
Chapter 4 Configuring the domain 153
2
Click Add.
The Add a Secure Access Domain dialog box appears (see Figure 20).
Figure 20 Add a Secure Access Domain
3
Enter the domain information in the applicable fields. Table 12 describes the
Add a Secure Access Domain fields.
Table 12 Add a Secure Access Domain fields
Field
Description
Index
Specifies an integer in the range 1 to 256 that uniquely
identifies the domain in the Nortel SNAS 4050 cluster.
Domain Name
Specifies a string that identifies the domain on the Nortel
SNAS 4050, as a mnemonic aid. The maximum length of
the string is 255 characters.
Portal VIP Address
Specifies the IP address of the Nortel SNAS 4050 portal.
You can have more than one portal VIP (pVIP) for a
domain. To specify more than one pVIP, use a comma
separator.
The pVIP is the address to which the client connects for
authentication and host integrity check. For more
information, see “About the IP addresses” on page 51.
4
Click Apply.
The new domain appears in the Secure Access Domain Table.
5
Click Apply on the toolbar to send the current changes to the Nortel
SNAS 4050. Click Commit on the toolbar to save the changes permanently.
Nortel Secure Network Access Switch 4050 User Guide
154 Chapter 4 Configuring the domain
Using the SREM Domain Quick Wizard
The Nortel SNAS 4050 quick setup wizard is similar to the quick setup wizard
available during initial setup.
Depending on the options you select in connection with certificates and creating a
test user, the two wizards also create similar default settings (see “Settings created
by the quick setup wizard” on page 60).
You can later modify all settings created by the domain quick setup wizard (see
“Configuring domain parameters using the SREM” on page 164).
320818-A
Chapter 4 Configuring the domain 155
To create a domain using the Nortel SNAS 4050 quick setup wizard, perform the
following steps:
1
Select the Secure Access Domain > Domain Quick Wizard tab.
The Domain Quick Wizard screen appears (see Figure 21).
Figure 21 Domain Quick Wizard screen
Nortel Secure Network Access Switch 4050 User Guide
156 Chapter 4 Configuring the domain
2
Click Domain Quick Wizard.
The Domain Quick Wizard — General Settings dialog box appears (see
Figure 22).
Figure 22 Domain Quick Wizard – General Settings
3
Enter the general domain information in the applicable fields. Table 13
describes the General Settings fields.
Table 13 Domain Quick Wizard — General Settings fields
Field
Description
Domain IP Address
Specifies the pVIP of the Nortel SNAS 4050 domain.
Domain Name
Specifies a name for the Nortel SNAS 4050 domain.
Port
Specifies the port on which the portal web server listens for
SSL communications.
The default for HTTPS communications is port 442.
4
320818-A
Click Next.
Chapter 4 Configuring the domain 157
The Domain Quick Wizard — Certificate dialog box appears (see Figure 23).
Figure 23 Domain Quick Wizard – Certificate
5
Enter the certificate information in the applicable fields.
There are three ways to specify certificate information: specifying an existing
certificate, creating a test certificate, or entering a new server certificate.
Table 14 describes the Certificate fields.
Table 14 Domain Quick Wizard — Certificate fields
Field
Description
Certificate
Specifies an existing certificate from the list.
Test Certificate
Specifies that a temporary test certificate will be created
using information in the related fields.
Country Code
Specifies the two-letter ISO code for the country where the
web server is located. For current information about ISO
country codes, see http://www.iana.org.
State/Province
Specifies the name of the state or province where the head
office of the organization is located. Enter the full name of
the state or province.
Locality
Specifies the name of the city where the head office of the
organization is located.
Nortel Secure Network Access Switch 4050 User Guide
158 Chapter 4 Configuring the domain
Table 14 Domain Quick Wizard — Certificate fields (continued)
Field
Description
Organization Name
Specifies the registered name of the organization. The
organization must own the domain name that appears in
the common name of the web server. Do not abbreviate the
organization name and do not use any of the following
characters:
<>~!@#$%^*/\()?
Organization Unit
Secifies the name of the department or group that uses the
secure web server.
Common Name
Specifies the name of the web server as it appears in the
URL. The name must be the same as the domain name of
the web server that is requesting a certificate. If the web
server name does not match the common name in the
certificate, some browsers will refuse a secure connection
with your site. Do not enter the protocol specifier (http://) or
any port numbers or pathnames in the common name.
Wildcards (such as * or ?) and IP address are not allowed.
Email Address
Specifies the user’s e-mail address.
Alternate Name
Specifies alternate information if you did not provide a
Common Name or e-mail address. Enter a
comma-separated list of URI:<uri>, DNS:<fqdn>,
IP:<ip-address>, email:<email-address>).
Valid Days
Specifies the number of days a test certificate remains
valid.
Key Length
Specifies the length of the generated key, in bits. Available
options are:
• 512
• 1024
• 2048
• 4096
The default value is 1024.
Input Server Certificate
Select this box to create a new certificate by pasting the
certificate file from a text editor.
Server Certificate
The area where contents of an existing certificate file is
pasted when the Input Server Certificate option is selected.
6
320818-A
Click Next.
Chapter 4 Configuring the domain 159
The Domain Quick Wizard — Certificate Chain dialog box appears (see
Figure 24).
Figure 24 Domain Quick Wizard – Certificate Chain
7
Enter the certificate chain information in the applicable fields. Table 15
describes the Certificate Chain fields.
Table 15 Domain Quick Wizard — Certificate Chain fields
Field
Description
Certificate Chain
Specifies whether the SSL server uses chain certificates.
Select additional certificates from the list to force the SSL
server to use chain certificates.
8
Click Next.
Nortel Secure Network Access Switch 4050 User Guide
160 Chapter 4 Configuring the domain
The Domain Quick Wizard — Server dialog box appears (see Figure 25).
Figure 25 Domain Quick Wizard – Server
9
Enter the server information in the applicable fields. Table 16 describes the
Server fields.
Table 16 Domain Quick Wizard — Server fields
Field
Description
Create HTTP or HTTPS
Redirect Server
Specifies whether or not to create a redirect server for
HTTP to HTTPS redirection.
10 Click Next.
320818-A
Chapter 4 Configuring the domain 161
The Domain Quick Wizard — Switch dialog box appears (see Figure 26).
Figure 26 Domain Quick Wizard – Switch
11 To configure a switch, enter the network access device information in the
applicable fields. If you don’t want to add a switch at this time, continue with
step 12.
Table 17 describes the Switch fields.
Table 17 Domain Quick Wizard — Switch fields
Field
Description
Configure a Switch
Specifies whether or not to add a network access device to
the domain.
Type of Switch
Specifies the type of network access device from the list.
Valid options are ERS8300 and ERS5500.
VlanId
Specifies the Red VLAN ID for the network access device.
IP Address of Switch
Specifies the IP address of the network access device.
NSNA Communication Port
Specifies the TCP port used for communication with the
Nortel SNAS 4050. The default is port 5000.
Key For Switch
Allows you to paste in the switch public SSH key if it was
not automatically retrieved. Alternatively, you can later
import the key from the switch (see “Managing SSH keys
using the SREM” on page 102).
12 Click Next.
Nortel Secure Network Access Switch 4050 User Guide
162 Chapter 4 Configuring the domain
The Domain Quick Wizard — Tunnel Guard dialog box appears (see
Figure 27).
Figure 27 Domain Quick Wizard – Tunnel Guard
13 Enter the TunnelGuard information in the applicable fields. Table 18
describes the Tunnel Guard fields.
Table 18 Domain Quick Wizard — Tunnel Guard fields
Field
Description
Tunnel Guard Action
Specifies the action performed when an SRS rules check
fails. The options are:
• restricted — the session remains intact, but access is
resticted in accordance with the rights specified in the
access rules for the group
• teardown — the SSL session is torn down
Create Tunnel Guard Test
User
Specifies whether a TunnelGuard test user is created.
If selected, the wizard creates a test user named tg, with
password tg, in the default tunnelguard group.
14 Click Finish.
If any information entered is not valid, a dialog box appears describing the
errors encountered when completing the wizard processing. Click Back to
correct the invalid information before continuing.
320818-A
Chapter 4 Configuring the domain 163
If there are no problems, then a dialog appears to indicate that the wizard is
processing the information. The wizard creates the domain, and assigns the
following default VLAN IDs:
•
•
Green VLAN = VLAN ID 110
Yellow VLAN = VLAN ID 120
You can change the VLAN mappings when you add or modify the network
access devices (see “Managing the network access devices” on page 71).
15 Click Close to exit the wizard.
16 Click Apply on the toolbar to send the current changes to the Nortel
SNAS 4050. Click Commit on the toolbar to save the changes permanently.
Deleting a domain using the SREM
To delete a domain, perform the following steps:
1
Select the Secure Access Domain > Secure Access Domain Table tab.
The Export Content screen appears (see “Secure Access Domain Table
screen” on page 152).
2
Select the domain from the Secure Access Domain Table list.
3
Click Delete.
A dialog box appears to confirm this domain is to be deleted.
4
Click Yes.
The domain is removed from the Secure Access Domain Table.
5
Click Apply on the toolbar to send the current changes to the Nortel
SNAS 4050. Click Commit on the toolbar to save the changes permanently.
Nortel Secure Network Access Switch 4050 User Guide
164 Chapter 4 Configuring the domain
Configuring domain parameters using the SREM
To configure a domain, perform the following steps:
1
Select the Secure Access Domain > domain > Configuration tab.
The domain Configuration screen appears (see Figure 28).
Figure 28 Domain Configuration screen
320818-A
Chapter 4 Configuring the domain 165
2
Enter the domain information in the applicable fields. Table 19 describes the
domain Configuration fields.
Table 19
Domain Configuration fields
Field
Description
Index
Specifies an integer in the range 1 to 256 that uniquely
identifies the domain in the Nortel SNAS 4050 cluster.
This field cannot be modified after a domain is created.
Domain Name
Specifies a name for the domain on the Nortel SNAS 4050,
as a mnemonic aid. The maximum length of the string is
255 characters.
Portal VIP Address
Specifies the IP address of the Nortel SNAS 4050 portal.
The pVIP is the address to which the client connects for
authentication and host integrity check. For more
information, see “About the IP addresses” on page 51.
You can have more than one pVIP for a domain. For each
pVIP, enter the IP address and click Add. To remove
existing entries, select the pVIP from the list and click
Delete.
Log Setting
Specifies the type of requests and operations to log. The
options are:
• all — logs all options
• login — logs portal logins and logouts
• http — logs HTTP requests made from the portal
• portal — logs non-HTTP portal operations, such as
FTP and SMB file server access
• reject — logs rejected requests
Each type of log generates its own set of syslog messages.
The syslog messages include date, time, type of request,
user, source IP address, and requested destination.
3
Click Apply on the toolbar to send the current changes to the Nortel
SNAS 4050. Click Commit on the toolbar to save the changes permanently.
Nortel Secure Network Access Switch 4050 User Guide
166 Chapter 4 Configuring the domain
Additional domain configuration in the SREM
To configure additional domain settings, there are tabs and tree components
available beyond the Configuration tab.
Table 20 describes the purpose of additional tabs from the Secure Access
Domain > domain > Configuration screen.
Table 20 Additional domain configuration tabs
320818-A
SREM tab
Description
VLANs
Accesses the domain VLANs screen, in order to
manage VLAN mappings on the Nortel SNAS 4050
domain (see “Mapping the VLANs using the SREM” on
page 96).
SSH Key
Accesses the domain SSH Key screens, in order to
generate, show, and export the public SSH key for the
Nortel SNAS 4050 domain (see “Generating SSH keys
for the domain using the SREM” on page 105).
DNS Capture
Accesses the DNS Capture screen, in order to set the
Nortel SNAS 4050 domain portal as a captive portal
and to configure the DNS Exclude List (see
“Configuring the captive portal using the SREM” on
page 416).
HTTP Redirect
Accesses the HTTP Redirect screen, in order to
configure HTTP to HTTPS redirect settings (see
“Configuring HTTP redirect using the SREM” on
page 181).
Chapter 4 Configuring the domain 167
Table 21 describes the purpose of additional tree components found within the
Secure Access Domain > domain component.
Table 21 Additional domain tree components
Component
Description
Portal Links
Accesses the Portal Links screens, in order to
configure links and linksets displayed after client
authentication is completed.
For more information, see “Linksets and links” on
page 394.
AAA
Accesses the AAA screens, in order to configure
authentication, authorization, and accounting features.
• For authentication, see “Configuring authentication”
on page 233.
• For authorization, see “Configuring groups and
profiles” on page 191 and “Configuring the
TunnelGuard check using the SREM” on page 168.
• For accounting, see “Configuring RADIUS
accounting using the SREM” on page 183.
Server
Accesses the Server screens, in order to configure the
portal SSL server (see “Configuring the SSL server
using the SREM” on page 174).
Switches
Accesses the Switch screens, in order to configure the
network access devices controlled by the Nortel
SNAS 4050 domain (see “Managing network access
devices using the SREM” on page 91).
Portal
Accesses the Portal screens, in order to customize the
portal page that displays in the client’s web browser
(see “Customizing the portal and user logon” on
page 385).
Nortel Secure Network Access Switch 4050 User Guide
168 Chapter 4 Configuring the domain
Configuring the TunnelGuard check using the SREM
Before an authenticated client is allowed into the network, the TunnelGuard
application checks client host integrity by verifying that the components required
for the client’s personal firewall (executables, DLLs, configuration files, and so
on) are installed and active on the client PC. For more information about how the
TunnelGuard check operates in the Nortel SNA solution, see “TunnelGuard host
integrity check” on page 37.
If you ran the quick setup wizard during the initial setup or to create the domain,
the TunnelGuard check has been configured with default settings and the check
result you selected (teardown or restricted). You can rerun the TunnelGuard
portion of the quick setup wizard at any time by using the steps at “Using the
TunnelGuard Quick Setup in the SREM” on page 172.
320818-A
Chapter 4 Configuring the domain 169
To configure settings for the TunnelGuard host integrity check and the check
result, perform the following steps:
1
Select the Secure Access Domain > domain > AAA > Tunnel Guard >
Configuration tab.
The TunnelGuard Configuration screen appears (see Figure 29).
Figure 29 TunnelGuard Configuration screen
Nortel Secure Network Access Switch 4050 User Guide
170 Chapter 4 Configuring the domain
2
Enter the TunnelGuard information in the applicable fields. Table 22
describes the TunnelGuard Configuration fields.
Table 22 TunnelGuard Configuration fields
320818-A
Field
Description
Recheck Interval
Specifies the time interval between SRS rule rechecks
made by the TunnelGuard applet on the client machine.
Accepts an integer that indicates the time interval in
seconds (s), minutes (m), or hours (h). The valid range is
60s (1m) to 86400s (24h). The default is 15m (15 minutes).
If a recheck fails, the Nortel SNAS 4050 terminates the
session and evicts the client from the portal.
Action on Failure
Specifies the action to be performed if the client fails the
TunnelGuard SRS rule check. The options are:
• Restricted — the session remains intact, but access is
restricted in accordance with the rights specified in the
access rules for the group
• Tear Down — the SSL session is torn down
Heart Beat Interval
Specifies the time interval between checks for client
activity.
Accepts an integer that indicates the time interval in
seconds (s), minutes (m), or hours (h). The valid range is
60s (1m) to 86400s (24h). The default is 1m (1 minute).
Heart Beat Retry Count
Specifies the number of times the Nortel SNAS 4050 will
repeat the check for client activity when no heartbeat is
detected.
Acceptable range is an integer from 1–65535. The default
is 3.
If no heartbeat is detected after the specified number of
retries (the inactivity interval), the Nortel SNAS 4050
terminates the session.
Status-quo Mode
Specifies whether the Nortel SNAS 4050 domain operates
in status-quo mode. Status-quo mode determines the
behavior of the Nortel SNAS 4050 if no client activity is
detected after the inactivity interval.
If selected (status-quo on), then the client session
continues indefinitely.
If not selected (status-quo off), the Nortel SNAS 4050
terminates the session immediately.
The default is status-quo off (not selected).
Chapter 4 Configuring the domain 171
Table 22 TunnelGuard Configuration fields (continued)
Field
Description
Display SRS Failure Details
Specifies whether SRS failure details can be displayed.
• If selected, then the details will be displayed.
• If not selected, the details will not be displayed.
The default is off (details are not be displayed).
If set to on, the client can click on the TG icon on the portal
page to display details about which elements of the SRS
rule check failed.
Applet Log Level
Specifies the log level for debug information from the
TunnelGuard applet. The options are:
• fatal — displays fatal errors only
• error — displays all errors
• warning — displays warning information about
conditions that are not error conditions
• info — displays high-level information about
processes
• debug — displays detailed information about all
processes
The default is info.
The information displays in the client’s Java Console
window. You can use the information to track errors in the
TunnelGuard SRS rules.
SRS Rule Table
Lists the SRS rules configured for the domain.
For information about creating SRS rules, see
“TunnelGuard SRS Builder” on page 317.
The TunnelGuard applet can apply different SRS rules for
different groups. For information about specifying the SRS
rule to use for the TunnelGuard check, see “Configuring
groups using the SREM” on page 208.
3
Click Apply on the toolbar to send the current changes to the Nortel
SNAS 4050. Click Commit on the toolbar to save the changes permanently.
Nortel Secure Network Access Switch 4050 User Guide
172 Chapter 4 Configuring the domain
Using the TunnelGuard Quick Setup in the SREM
To configure settings for the TunnelGuard host integrity check and the check
result, perform the following steps:
1
Select the Secure Access Domain > domain > AAA > Tunnel Guard >
Quick Setup tab.
The TunnelGuard Quick Setup screen appears (see Figure 30).
Figure 30 TunnelGuard Quick Setup screen
320818-A
Chapter 4 Configuring the domain 173
2
Enter the TunnelGuard information in the applicable fields. Table 23
describes the TunnelGuard Configuration fields.
Table 23 TunnelGuard Quick Setup fields
Field
Description
Action for Tunnel Guard
check failure
Specifies the action performed when an SRS rules check
fails. The options are:
• restricted — the session remains intact, but access is
resticted in accordance with the rights specified in the
access rules for the group
• teardown — the SSL session is torn down
Create a Tunnel Guard test
user
Specifies whether a TunnelGuard test user is created.
If selected, the wizard creates a test user named tg, with
password tg, in the default tunnelguard group.
3
Click Apply on the toolbar to send the current changes to the Nortel
SNAS 4050. Click Commit on the toolbar to save the changes permanently.
Nortel Secure Network Access Switch 4050 User Guide
174 Chapter 4 Configuring the domain
Configuring the SSL server using the SREM
To configure settings for the SSL server, perform the following steps:
1
Select the Secure Access Domain > domain > Server > Configuration tab.
The server Configuration screen appears (see Figure 31).
Figure 31 Server Configuration screen
320818-A
Chapter 4 Configuring the domain 175
2
Enter the server information in the applicable fields. Table 24 describes the
server Configuration fields.
Table 24 Server Configuration fields
Field
Description
Port
Specifies the port to which the portal server listens for
HTTPS communications.
Accepts an integer in the range 1–65534 that indicates the
TCP port number. The default is 443.
DNS Name
Specifies a DNS name for the portal IP address.
Accepts the fully qualified domain name (FQDN) of the
pVIP (for example, nsnas.example.com).
Generally, you need to specify a DNS name only if your
corporate DNS server is unable to perform reverse lookups
of the portal IP address.
When you press Apply after specifying the DNS name, the
system performs a check against the DNS server included
in the system configuration to verify that:
• the FQDN is registered in DNS
• the resolved IP address corresponds to the pVIP
3
Click Apply on the toolbar to send the current changes to the Nortel
SNAS 4050. Click Commit on the toolbar to save the changes permanently.
Nortel Secure Network Access Switch 4050 User Guide
176 Chapter 4 Configuring the domain
Configuring SSL settings using the SREM
To configure SSL-specific settings for the portal server, perform the following
steps:
1
Select the Secure Access Domain > domain > Server > SSL Settings tab.
The server SSL Settings screen appears (see Figure 32).
Figure 32 Server SSL Settings screen
320818-A
Chapter 4 Configuring the domain 177
2
Enter the server information in the applicable fields. Table 25 describes the
server SSL Settings fields.
Table 25 Server SSL Settings fields
Field
Description
Certificate
Specifies which server certificate the portal server will use.
You cannot specify more than one server certificate for the
server to use at any one time.
Status
Specifies whether SSL is enabled on the portal server. The
default is enabled.
Protocol
Specifies the protocol to use when establishing an SSL
session with a client. The options are:
• ssl2 — accept SSL 2.0 only
• ssl3 — accept SSL 3.0 and TLS 1.0
• ssl23 — accept SSL 2.0, SSL 3.0, and TLS 1.0
• tls1 — accept TLS 1.0 only
Ciphers
Specifies the cipher preference list.
Allows expressions that consists of cipher strings
separated by colons. The default cipher list is
ALL@STRENGTH.
For more information about cipher lists, see Appendix D,
“Supported ciphers,” on page 881.
Verify
Specifies the level of client authentication to use when
establishing an SSL session. The options are:
• none — no client certificate is required
• optional — a client certificate is requested, but the
client need not present one
• require — a client certificate is required
Not supported in Nortel Secure Network Access Switch
Software Release 1.0.
Cache Size
Specifies the size of the SSL cache.
Allows an integer less than or equal to 10000 indicating the
number of cached sessions. The default is 4000.
If there are many cache misses, increase the Cache Size
value for better performance.
Timeout
Specifies the maximum time to live (TTL) value for items in
the SSL cache. After the TTL has expired, the items are
discarded.
Allows an integer that indicates the TTL value in seconds
(s), minutes (m), or hours (h). If you do not specify a
measurement unit, seconds is assumed. The default is 5m
(5 minutes).
Nortel Secure Network Access Switch 4050 User Guide
178 Chapter 4 Configuring the domain
Table 25 Server SSL Settings fields (continued)
Field
Description
CA Chain List
Specifies the CA certificate chain of the server certificate.
Select certificates from the list to create the chain. The
chain starts with the issuing CA certificate of the server
certificate and can range up to the root CA certificate.
Note: The SSL server can use chain certificates only if the
protocol version is set to ssl3 or ssl23.
CA Certificate List
Specifies which of the available CA certificates to use for
client authentication.
Not supported in Nortel Secure Network Access Switch
Software Release 1.0.
3
Click Apply on the toolbar to send the current changes to the Nortel
SNAS 4050. Click Commit on the toolbar to save the changes permanently.
Configuring traffic log settings using the SREM
You can configure a syslog server to receive User Datagram Protocol (UDP)
syslog messages for all HTTP requests handled by the portal server.
Nortel does not recommend routinely enabling this functionality for the following
reasons:
•
•
•
Logging traffic with syslog messages generates a substantial amount of
network traffic.
Logging traffic places an additional CPU load on each Nortel SNAS 4050
device in the cluster.
In general, syslog servers are not intended for the traffic type of log message.
Therefore, the syslog server might not be able to cope with the quantity of
syslog messages generated within a cluster of Nortel SNAS 4050 devices.
Enable traffic logging with syslog messages in environments where laws or
regulations require traffic logging to be performed on the SSL terminating device
itself. You can also enable it temporarily for debugging purposes.
Because of the amount of traffic generated, Nortel recommends that you set up
syslog on the backend server if possible.
320818-A
Chapter 4 Configuring the domain 179
To set up a syslog server to receive UDP syslog messages for all HTTP requests
handled by the portal server, perform the following steps:
1
Select the Secure Access Domain > domain > Server > Traffic Log Syslog
Settings tab.
The Traffic Log Syslog Settings screen appears (see Figure 33).
Figure 33 Traffic Log Syslog Settings screen
Nortel Secure Network Access Switch 4050 User Guide
180 Chapter 4 Configuring the domain
2
Enter the traffic log information in the applicable fields. Table 26 describes
the Traffic Log Syslog Settings fields.
Table 26 Traffic Log Syslog Settings fields
Field
Description
IP Address
Specifies the IP address of the syslog server.
UDP Port
Specifies the UDP port number of the syslog server.
Accepts an integer in the range 1–65534 that indicates the
UDP port number. The default is 514.
Priority
Specifies the priority level of the syslog messages that are
sent. The options are:
• debug — information useful for debugging purposes
only
• info — informational messages
• notice — information about conditions that are not error
conditions but nevertheless warrant special attention
The default value is info.
Facility
Specifies the facility parameter of syslog messages.
The facility parameter specifies the type of program logging
the message. The configuration file can then specify
different handling for messages from different facilities.
The default value is local4.
Enabled
Enables or disables traffic logging with syslog messages to
the specified syslog server.
Traffic logging with syslog messages is disabled by default.
3
320818-A
Click Apply on the toolbar to send the current changes to the Nortel
SNAS 4050. Click Commit on the toolbar to save the changes permanently.
Chapter 4 Configuring the domain 181
Tracing SSL traffic using the SREM
To verify connectivity and to capture information about SSL and TCP traffic
between clients and the portal server, see “Starting and stopping a trace using the
SREM” on page 738.
Configuring HTTP redirect using the SREM
You can configure the Nortel SNAS 4050 domain to automatically redirect HTTP
requests to the HTTPS server. For example, a client request directed to
http://nsnas.com is automatically redirected to https://nsnas.com.
Nortel Secure Network Access Switch 4050 User Guide
182 Chapter 4 Configuring the domain
To configure the domain to automatically redirect HTTP requests to the HTTPS
server specified for the domain, perform the following steps:
1
Select the Secure Access Domain > domain > HTTP Redirect tab.
The HTTP Redirect screen appears (see Figure 34).
Figure 34 HTTP Redirect screen
320818-A
Chapter 4 Configuring the domain 183
2
Enter the redirection information in the applicable fields. Table 27 describes
the HTTP Redirect fields.
Table 27 HTTP Redirect fields
Field
Description
Port Number
Specifies the TCP port number on which the portal server
listens for HTTP communications. The default value is 80.
Note: If you do not accept the default value and you specify
a different port, you must modify the Red and Yellow filters
on the network access devices accordingly. Otherwise, the
client PC will not be able to reach the portal for user
authentication.
Enable Http Redirect
Specifies whether HTTP requests will be redirected to the
HTTPS server.
3
Click Apply on the toolbar to send the current changes to the Nortel
SNAS 4050. Click Commit on the toolbar to save the changes permanently.
Configuring RADIUS accounting using the SREM
The Nortel SNAS 4050 can be configured to provide support for logging
administrative operations and user session start and stop messages to a RADIUS
accounting server.
With RADIUS accounting enabled, the Nortel SNAS 4050 sends an accounting
request start packet to the accounting server for each user who successfully
authenticates to the Nortel SNAS 4050 domain. The start packet contains the
following information:
•
•
•
client user name
Nortel SNAS 4050 RIP
session ID
When the user session terminates, the Nortel SNAS 4050 sends an accounting
request stop packet to the accounting server. The stop packet contains the
following information:
•
•
session ID
session time
Nortel Secure Network Access Switch 4050 User Guide
184 Chapter 4 Configuring the domain
•
cause of termination
Configure the RADIUS server in accordance with the recommendations in
RFC 2866.
Certain Nortel SNAS 4050-specific attributes are sent to the RADIUS server
when you enable accounting (see “Configuring Nortel SNAS 4050-specific
attributes using the SREM” on page 184). In conjunction with custom plugins on
RADIUS, these attributes can be used for more detailed monitoring of Nortel
SNAS 4050 activity.
When you add an external RADIUS accounting server to the configuration, the
server is automatically assigned an index number. Nortel SNAS 4050 accounting
will be performed by an available server with the lowest index number. You can
control accounting server usage by reassigning index numbers (see “Managing
RADIUS accounting servers using the SREM” on page 186).
Configuring Nortel SNAS 4050-specific attributes using the
SREM
The RADIUS accounting server uses Vendor-Id and Vendor-Type attributes in
combination to identify the source of the accounting information. The attributes
are sent to the RADIUS accounting server together with the accounting
information for the logged in user.
You can assign vendor-specific codes to the Vendor-Id and Vendor-Type
attributes for the Nortel SNAS 4050 domain. In this way, the RADIUS accounting
server can provide separate accounting information for each Nortel SNAS 4050
domain.
Each vendor has a specific dictionary. The Vendor-Id specified for an attribute
identifies the dictionary the RADIUS server will use to retrieve the attribute
value. The Vendor-Type indicates the index number of the required entry in the
dictionary file.
The Internet Assigned Numbers Authority (IANA) has designated SMI Network
Management Private Enterprise Codes that can be assigned to the Vendor-Id
attribute (see http://www.iana.org/assignments/enterprise-numbers).
RFC 2866 describes usage of the Vendor-Type attribute.
320818-A
Chapter 4 Configuring the domain 185
Contact your RADIUS system administrator for information about the
vendor-specific attributes used by the external RADIUS accounting server.
To configure vendor-specific attributes in order to identify the Nortel SNAS 4050
domain, perform the following steps:
1
Select the Secure Access Domain > domain > AAA > Radius Accounting >
Configuration tab.
The RADIUS accounting Configuration screen appears (see Figure 34).
Figure 35 RADIUS accounting Configuration screen
Nortel Secure Network Access Switch 4050 User Guide
186 Chapter 4 Configuring the domain
2
Enter the RADIUS accounting information in the applicable fields. Table 27
describes the RADIUS accounting Configuration fields.
Table 28 RADIUS accounting Configuration fields
Field
Description
Enable Radius Accounting
Specifies whether RADIUS accounting is enabled or not.
Vendor ID
Specifies the vendor-specific attribute used by the RADIUS
accounting server to identify accounting information from
the Nortel SNAS 4050 domain.
The default Vendor-Id is 1872 (Alteon).
Vendor Type
Specifies the Vendor-Type value used in combination with
the Vendor-Id to identify accounting information from the
Nortel SNAS 4050 domain.
The default Vendor-Type value is 3.
3
Click Apply on the toolbar to send the current changes to the Nortel
SNAS 4050. Click Commit on the toolbar to save the changes permanently.
Managing RADIUS accounting servers using the SREM
There are three steps to managing RADIUS accounting servers using the SREM:
•
•
•
“Adding a RADIUS accounting server using the SREM” on page 186
“Moving a RADIUS accounting server using the SREM” on page 188
“Deleting a RADIUS accounting server using the SREM” on page 189
Adding a RADIUS accounting server using the SREM
To configure the Nortel SNAS 4050 to use external RADIUS accounting servers,
perform the following steps:
1
320818-A
Select the Secure Access Domain > domain > AAA > Radius Accounting >
Radius Accounting Servers tab.
Chapter 4 Configuring the domain 187
The Radius Accounting Servers screen appears (see Figure 36).
Figure 36 Radius Accounting Servers screen
2
Click Add.
The Add a Radius Accounting Server dialog box appears (see Figure 37).
Figure 37 Add a Radius Accounting Server
Nortel Secure Network Access Switch 4050 User Guide
188 Chapter 4 Configuring the domain
3
Enter the RADIUS accounting server information in the applicable fields.
Table 29 describes the Radius Accounting Server fields.
Table 29 Radius Accounting Server fields
Field
Description
IP Address
Specifies the IP address of the accounting server
Port
Specifies the TCP port number used for RADIUS
accounting. The default is 1813
Secret
Specifies the password used to authenticate the Nortel
SNAS 4050 to the accounting server.
4
Click Add.
The RADUIS accounting server appears in the Radius Accounting Server
Table.
5
Click Apply on the toolbar to send the current changes to the Nortel
SNAS 4050. Click Commit on the toolbar to save the changes permanently.
Moving a RADIUS accounting server using the SREM
To arrange the order of the RADIUS accounting servers, perform the following
steps:
1
Select the Secure Access Domain > domain > AAA > Radius Accounting >
Radius Accounting Servers tab.
The Radius Accounting Servers screen appears (see Figure 36 on page 187),
listing all servers in the Radius Accounting Server Table.
2
Select the RADIUS accounting server entry from the list.
3
Click either the up or down arrows until the RADIUS accounting server entry
is positioned correctly.
The index values do not update until you apply the changes.
4
320818-A
Click Apply on the toolbar to send the current changes to the Nortel
SNAS 4050. Click Commit on the toolbar to save the changes permanently.
Chapter 4 Configuring the domain 189
Deleting a RADIUS accounting server using the SREM
To delete a RADIUS accounting server entry, perform the following steps:
1
Select the Secure Access Domain > domain > AAA > Radius Accounting >
Radius Accounting Servers tab.
The Radius Accounting Servers screen appears (see Figure 36 on page 187).
2
Select the RADIUS accounting server entry from the list.
3
Click Delete.
A dialog box appears to confirm this entry is to be deleted.
4
Click Yes.
The RADUIS accounting server disappears from the Radius Accounting
Server Table.
5
Click Apply on the toolbar to send the current changes to the Nortel
SNAS 4050. Click Commit on the toolbar to save the changes permanently.
Nortel Secure Network Access Switch 4050 User Guide
190 Chapter 4 Configuring the domain
320818-A
191
Chapter 5
Configuring groups and profiles
This chapter includes the following topics:
Topic
Page
Overview
192
Groups
192
Linksets
194
TunnelGuard SRS rule
194
Extended profiles
195
Before you begin
196
Configuring groups and extended profiles using the CLI
196
Roadmap of group and profile commands
197
Configuring groups using the CLI
198
Configuring client filters using the CLI
201
Configuring extended profiles using the CLI
203
Mapping linksets to a group or profile using the CLI
206
Creating a default group using the CLI
208
Configuring groups and extended profiles using the SREM
208
Configuring groups using the SREM
208
Configuring client filters using the SREM
213
Configuring extended profiles using the SREM
219
Nortel Secure Network Access Switch 4050 User Guide
192 Chapter 5 Configuring groups and profiles
Topic
Page
Mapping linksets to a group or profile using the SREM
223
Creating a default group using the SREM
230
Overview
This section includes the following topics:
•
•
•
•
“Groups” on page 192
“Linksets” on page 194
“TunnelGuard SRS rule” on page 194
“Extended profiles” on page 195
For more information about groups and extended profiles in the Nortel SNA
solution, see Nortel Secure Network Access Solution Guide (320817-A).
Groups
The Nortel SNAS 4050 determines which VLANs users are authorized to access,
based on group membership.
When a user logs on to the Nortel SNAS 4050 domain, the authentication method
returns the group name associated with the user’s credentials. The Nortel
SNAS 4050 then maps the user to groups defined on the Nortel SNAS 4050. You
can define up to 1023 groups in the Nortel SNAS 4050 domain.
320818-A
Chapter 5 Configuring groups and profiles 193
Each group’s data include the following configurable parameters:
•
•
•
linksets
TunnelGuard SRS rule
extended profiles
After the user has been authenticated, the Nortel SNAS 4050 checks the groups
defined for the domain to match the group name returned from the authentication
database. For the duration of the user’s login session, the Nortel SNAS 4050
maintains a record of the group matched to the user.
When the Nortel SNAS 4050 has identified the matching group, it applies group
data to the user as follows:
•
•
•
linksets — All linksets configured for the group of which the user is a member
display on the user’s portal page (see “Linksets” on page 194).
TunnelGuard SRS rule — The TunnelGuard host integrity check uses the
criteria specified in the SRS rule assigned to the group.
extended profiles — The Nortel SNAS 4050 checks the group to identify if
there is an applicable extended profile (see “Extended profiles” on page 195).
For information about configuring a group, see “Configuring groups using the
CLI” on page 198 or “Configuring groups using the SREM” on page 208.
Default group
You can configure a group to be the default group, with limited access rights. If
the group name returned from the authentication database does not match any
group defined on the Nortel SNAS 4050, the Nortel SNAS 4050 will map the user
to the default group.
To create a default group, see “Creating a default group using the CLI” on
page 208 or “Creating a default group using the SREM” on page 230.
Nortel Secure Network Access Switch 4050 User Guide
194 Chapter 5 Configuring groups and profiles
Linksets
A linkset is a set of links that display on the portal page, so that the user can easily
access internal or external web sites, servers, or applications. After the user has
been authenticated, the user’s portal page displays all the linksets associated with
the group to which the user belongs. The user’s portal page also displays all the
linksets associated with the user’s extended profile.
When mapping linksets to groups or extended profiles, make sure that the access
rules specified for the profile do not contradict the links defined for the linkset.
For information about creating and configuring the linksets, see “Configuring
linksets using the CLI” on page 411 or “Configuring linksets using the SREM” on
page 439.
For information about mapping the linksets to groups, see “Mapping linksets to a
group or profile using the CLI” on page 206 or “Mapping linksets to a group or
profile using the SREM” on page 223.
TunnelGuard SRS rule
The SRS rule specified for the group is the set of operating system and other
software criteria that constitute the host integrity check performed by the
TunnelGuard applet. The SRS rule can be a composite of other rules, but there is
only one SRS rule for the group. Each group can have a different SRS rule.
For information about configuring SRS rules, see “TunnelGuard SRS Builder” on
page 317. You cannot configure SRS rules using the CLI.
If you ran the quick setup wizard during the initial setup, you specified the action
to result if the SRS rule check fails. You can rerun the wizard at any time by using
the /cfg/domain 1/aaa/tg/quick command. If you want to change the SRS
rule check result, use the /cfg/domain 1/aaa/tg/action command (see
“Configuring the TunnelGuard check using the CLI” on page 132 or “Configuring
the TunnelGuard check using the SREM” on page 168).
320818-A
Chapter 5 Configuring groups and profiles 195
Extended profiles
Passing or failing the SRS rule check is the only authorization control provided at
the group level. This is the base profile. In future releases of the Nortel
SNAS 4050 software, extended profiles will provide a mechanism to achieve
more granular authorization control, based on specific characteristics of the user's
connection. You can define up to 63 extended profiles for each group.
In Nortel Secure Network Access Switch Software Release 1.0, the data for an
extended profile include the following configurable parameters:
•
•
linksets
the VLAN which the user is authorized to access
Each extended profile references a client filter in a one-to-one relationship. With
Nortel Secure Network Access Switch Software Release 1.0, you can configure
the TunnelGuard check result as the criterion for the client filters, in order to
establish the user’s security status.
The client filter referenced in the extended profile determines whether the
extended profile data will be applied to the user. After the user has been
authenticated and the TunnelGuard host integrity check has been conducted, the
Nortel SNAS 4050 checks the group’s extended profiles in sequence, in order of
the profile IDs, for a match between the client filter conditions and the user’s
security status. When it finds a match, the Nortel SNAS 4050 applies that
particular extended profile’s data to the user. Data defined for the base profile (for
example, linksets) are appended to the extended profile’s data. If the Nortel
SNAS 4050 finds no match in any of the extended profiles, it applies the base
profile data.
For information about configuring client filters, see “Configuring client filters
using the CLI” on page 201 or “Configuring client filters using the SREM” on
page 213.
For information about configuring extended profiles, see “Configuring extended
profiles using the CLI” on page 203 or “Configuring extended profiles using the
SREM” on page 219.
Nortel Secure Network Access Switch 4050 User Guide
196 Chapter 5 Configuring groups and profiles
Before you begin
Before you configure groups, client filters, and extended profiles on the Nortel
SNAS 4050, complete the following tasks:
1
Create the linksets, if desired (see “Linksets and links” on page 394).
2
Create the SRS rules (see “TunnelGuard SRS Builder” on page 317).
3
If authentication services have already been configured, ascertain the group
names used by the authentication services.
Group names defined on the Nortel SNAS 4050 must correspond to group
names used by the authentication services. Table 30 summarizes the
requirements for the various authentication methods.
Table 30 Group names in the Nortel SNAS 4050 and authentication services
Authentication method
Group name on the Nortel SNAS 4050 must correspond
to...
RADIUS
A group name defined in the vendor-specific attribute used by
the RADIUS server. Contact your RADIUS system
administrator for information.
LDAP
A group name defined in the LDAP group attribute used by
the LDAP server. Contact your LDAP system administrator for
information.
Local database
A group name used in the database. The group name is for
internal use to control access to intranet resources according
to the associated access rules. When you add a user to the
local database, you map the user to one or more of the
defined user groups.
Configuring groups and extended profiles using the CLI
The basic steps to configure groups and extended profiles on the Nortel
SNAS 4050 using the CLI are:
320818-A
1
Configure the group (see “Configuring groups using the CLI” on page 198).
2
Configure the client filters that will be referenced in the extended profiles (see
“Configuring client filters using the CLI” on page 201). The client filters can
be referenced by all extended profiles in the domain.
Chapter 5 Configuring groups and profiles 197
3
Configure the extended profiles for the group (see “Configuring extended
profiles using the CLI” on page 203).
4
Map the linksets to the group and extended profiles (see “Mapping linksets to
a group or profile using the CLI” on page 206).
5
Create a default group, if desired (see “Creating a default group using the
CLI” on page 208).
Roadmap of group and profile commands
The following roadmap lists all the CLI commands to configure groups, client
filters, extended profiles, and linkset mappings. Use this list as a quick reference
or click on any entry for more information:
Command
Parameter
/cfg/domain 1/aaa/group <group ID>
name <name>
restrict
tgsrs <SRS rule name>
comment <comment>
del
/cfg/domain 1/aaa/filter
<filter ID>
name <name>
tg true|false|ignore
comment <comment>
del
/cfg/domain 1/aaa/group
<group ID|group name>/extend
[<profile ID>]
filter <name>
vlan <name>
linkset
del
/cfg/domain 1/aaa/group #/linkset
list
del <index number>
add <linkset name>
Nortel Secure Network Access Switch 4050 User Guide
198 Chapter 5 Configuring groups and profiles
Command
Parameter
insert <index number> <linkset
name>
move <index number> <new index
number>
/cfg/domain
1/aaa/group #/extend #/linkset
list
del <index number>
add <linkset name>
insert <index number> <linkset
name>
move <index number> <new index
number>
/cfg/domain 1/aaa/defgroup
<group name>
Configuring groups using the CLI
To create and configure a group, use the following command:
/cfg/domain 1/aaa/group <group ID>
where group ID is an integer in the range 1 to 1023 that uniquely identifies the
group in the Nortel SNAS 4050 domain.
When you first create the group, you must enter the group ID. After you have
created the group, you can use either the ID or the name to access the group for
configuration.
When you first create the group, you are prompted to enter the following
parameters:
•
320818-A
group name — a string that uniquely identifies the group on the Nortel
SNAS 4050. The maximum length of the string is 255 characters. After you
have defined a name for the group, you can use either the group name or the
group ID to access the Group menu. The group name must match a group
name used by the authentication services. For more information, see Table 30
on page 196.
Chapter 5 Configuring groups and profiles 199
•
number of sessions — the maximum number of simultaneous portal or Nortel
SNAS 4050 sessions allowed for each member of the group. The default is
0 (unlimited). You can later modify the number of sessions by using the
restrict command on the Group menu.
The Group menu displays.
Note: If you ran the quick setup wizard during initial setup, a group
called tunnelguard has been created with group ID = 1.
The Group menu includes the following options:
/cfg/domain 1/aaa/group #
followed by:
name <name>
Names or renames the group. After you have defined a
name for the group, you can use either the group name
or the group ID to access the Group menu.
• name is a string that must be unique in the domain.
The maximum length of the string is 255
characters.
The group name must match a group name used by the
authentication services. For more information, see
Table 30 on page 196.
restrict
Sets the maximum number of simultaneous portal or
Nortel SNAS 4050 sessions allowed for each member
of the group.
For example, if the value is set to 2, then a user can
use two computers at the same time and have two
simultaneous sessions running. The default is 0
(unlimited).
linkset
Accesses the Linksets menu, in order to map
preconfigured linksets to the group (see “Mapping
linksets to a group or profile using the CLI” on
page 206).
For information about creating and configuring the
linksets, see “Configuring linksets using the CLI” on
page 411.
extend <profile ID>
Accesses the Extended Profiles menu, in order to
configure extended profiles for the group (see
“Configuring extended profiles using the CLI” on
page 203).
To view existing profiles, press TAB following the
extend command.
Nortel Secure Network Access Switch 4050 User Guide
200 Chapter 5 Configuring groups and profiles
/cfg/domain 1/aaa/group #
followed by:
tgsrs <SRS rule name> Specifies the preconfigured TunnelGuard SRS rule to
apply to the group.
For information about configuring the SRS rules using
the SREM, see “TunnelGuard SRS Builder” on
page 317. You cannot configure SRS rules in the CLI.
comment <comment>
Sets a comment for the group.
del
Removes the group from the Nortel SNAS 4050
domain. When you delete the group, you also delete all
extended profiles associated with that group ID.
Figure 38 shows sample output for the /cfg/domain 1/aaa/group
<group ID> command and commands on the Group menu.
Figure 38 Group menu commands
>> Main# /cfg/domain 1/AAA/group 2
Creating Group 2
Group name: TestGroup
Enter number of sessions (0 is unlimited):
---------------------------------------------------------[Group 2 Menu]
name
- Set group name
restrict - Set number of login sessions
linkset - Linkset menu
extend - Extended profiles menu
tgsrs
- Set TunnelGuard SRS Rule
comment - Set comment
del
- Remove group
>> Group 2# tgsrs
Current value: ""
Enter TunnelGuard SRS rule name: TestRule
>> Group 2#
320818-A
Chapter 5 Configuring groups and profiles 201
Configuring client filters using the CLI
To create and configure a client filter, use the following command:
/cfg/domain 1/aaa/filter <filter ID>
where filter ID is an integer in the range 1 to 63 that uniquely identifies the
filter in the Nortel SNAS 4050 domain.
When you first create the filter, you must enter the filter ID. After you have
created the filter, you can use either the ID or the name to access the filter for
configuration.
When you first create the filter, you are prompted to enter the client filter name.
The Client Filter menu displays.
Note: If you ran the quick setup wizard during initial setup, two client
filters have been created: tg_passed (filter ID = 1) and tg_failed
(filter ID = 2).
Nortel Secure Network Access Switch 4050 User Guide
202 Chapter 5 Configuring groups and profiles
The Client Filter menu includes the following options:
/cfg/domain 1/aaa/filter <filter ID>
followed by:
320818-A
name <name>
Names or renames the filter. After you have defined a
name for the filter, you can use either the filter name or
the filter ID to access the Client Filter menu.
• name is a string that must be unique in the domain.
The maximum length of the string is 255
characters.
You reference the client filter name when configuring
the extended profile.
tg true|false|ignore
Specifies whether passing or failing the TunnelGuard
host integrity check triggers the filter.
• true — the client filter triggers when the
TunnelGuard check succeeds.
• false — the client filter triggers when the
TunnelGuard check fails.
• ignore — passing or failing the TunnelGuard
check will not trigger the client filter.
The default is ignore.
For example, in order to grant limited access rights to
users who fail the TunnelGuard check, set the tg value
to false, create an extended profile that references
this client filter, and then map the extended profile to a
restrictive VLAN.
For information about configuring the TunnelGuard
checks, see “Configuring the TunnelGuard check using
the CLI” on page 132.
comment <comment>
Creates a comment about the client filter.
del
Removes the client filter from the current configuration.
Chapter 5 Configuring groups and profiles 203
Figure 39 shows sample output for the /cfg/domain 1/aaa/filter
<filter ID> command and commands on the Client Filter menu.
Figure 39 Client Filter menu commands
>> Main# /cfg/domain 1/AAA/filter 3
Creating Client Filter 3
Filter name: branch_pass
---------------------------------------------------------[Client Filter 3 Menu]
name
- Set filter name
tg
- TunnelGuard checks passed
comment
-Set comment
del
- Remove client filter
>> Client Filter 3# tg
Current value: ignore
TunnelGuard passed (true/false/ignore): true
>> Client Filter 3#
Configuring extended profiles using the CLI
To create and configure an extended profile, use the following command:
/cfg/domain 1/aaa/group <group ID|group name>/extend
[<profile ID>]
where profile ID is an integer in the range 1 to 63 that uniquely identifies the
profile in the group. If you do not enter the profile ID as part of the command, you
are prompted to do so.
When you first create the extended profile, you must enter the profile ID. After
you have created the extended profile, you can use either the profile ID or the
name of the associated client filter to access the extended profile for configuration.
Nortel Secure Network Access Switch 4050 User Guide
204 Chapter 5 Configuring groups and profiles
When you first create the profile, you are prompted to enter the following
parameters:
•
•
client filter name — the name of the predefined client filter that determines
whether the Nortel SNAS 4050 will apply this extended profile to the user. To
view available filters, press TAB at the prompt. You can later change the filter
referenced by the profile by using the filter command on the Extended
Profile menu.
VLAN — the name of the VLAN to which the Nortel SNAS 4050 will assign
users with this profile. You can later change the VLAN assignment for the
profile by using the vlan command on the Extended Profile menu.
The Extended Profile menu displays.
Note: If you ran the quick setup wizard during initial setup, two
extended profiles have been created: profile ID 1 associated with client
filter tg_failed, and profile ID 2 associated with client filter
tg_passed.
The Extended Profile menu includes the following options:
/cfg/domain 1/aaa/group #/extend #
followed by:
320818-A
filter <name>
Specifies the predefined client filter that determines
whether the Nortel SNAS 4050 will apply this extended
profile to the user. If the user’s TunnelGuard check
result matches the filter’s criteria, the Nortel
SNAS 4050 will apply the extended profile. To view
available filters, press TAB following the filter
command.
• name is a string that must be unique in the domain.
For information about configuring client filters, see
“Configuring client filters using the CLI” on page 201.
vlan <name>
Specifies the VLAN to which the Nortel SNAS 4050 will
assign users with this profile.
• name is a string that must be unique in the domain.
Chapter 5 Configuring groups and profiles 205
/cfg/domain 1/aaa/group #/extend #
followed by:
linkset
Accesses the Linksets menu, in order to map
preconfigured linksets to the profile (see “Mapping
linksets to a group or profile using the CLI” on
page 206).
For information about creating and configuring the
linksets, see “Configuring linksets using the CLI” on
page 411.
del
Removes the extended profile from the group.
Figure 40 shows sample output for the /cfg/domain 1/aaa/group
<group ID>/extend command and commands on the Extended Profile menu.
Figure 40 Extended Profile menu commands
>> Main# cfg/domain 1/aaa/group 2/extend
Enter profile number or filter reference name (1-63): 1
Creating Extended Profile 1
Enter client filter name:
tg_failed(2) tg_passed(1)
Enter client filter name: tg_passed
Enter VLAN name: green
---------------------------------------------------------[Extended Profile 1 Menu]
filter - Set client filter reference
vlan
- Set VLAN name
linkset - Linkset menu
del
- Remove profile
>> Extended Profile 1# ../extend 2/filter tg_failed/vlan
yellow
Creating Extended Profile 2
>> Extended Profile 2#
Nortel Secure Network Access Switch 4050 User Guide
206 Chapter 5 Configuring groups and profiles
Mapping linksets to a group or profile using the CLI
You can tailor the portal page for different users by mapping preconfigured
linksets to groups and extended profiles.
For more information about linksets, see “Linksets and links” on page 394.
To map a linkset to a group, access the Linksets menu from the Group menu. Use
the following command:
/cfg/domain 1/aaa/group #/linkset
To map a linkset to an extended profile, access the Linksets menu from the
Extended Profile menu. Use the following command:
/cfg/domain 1/aaa/group #/extend #/linkset
The Linksets menu displays.
The Linksets menu includes the following options:
/cfg/domain 1/aaa/group #[/extend #]/linkset
followed by:
320818-A
list
Lists the currently configured linksets by index number.
del <index number>
Removes the linkset entry represented by the specified
index number. The index numbers of the remaining
entries adjust accordingly.
add <linkset name>
Adds a linkset to the group or extended profile. The
linkset displays on the portal page after the user has
been authenticated. You can add as many linksets as
you want.
The Nortel SNAS 4050 assigns an index number to the
linkset name as you add the linkset to the list for the
group. The linksets display on the portal page in the
order of the index numbers.
insert <index number>
<linkset name>
Inserts a linkset at a particular position in the list. The
index numbers of existing linkset entries with this index
number and higher are incremented by 1.
move <index number>
<new index number>
Moves a linkset entry up or down the list. The index
numbers of the remaining entries adjust accordingly.
Chapter 5 Configuring groups and profiles 207
Figure 41 shows sample output for the /cfg/domain 1/aaa/group
<group ID>/linkset command and commands on the Linksets menu.
Figure 41 Linksets menu commands
>> Main# cfg/domain 1/aaa/group 1/linkset
---------------------------------------------------------[Linksets Menu]
list
- List all values
del
- Delete a value by number
add
- Add a new value
insert
- Insert a new value
move
- Move a value by number
>> Linksets# add
linkset name: example1
>> Linksets# add example2
>> Linksets# list
Old:
Pending:
1: example1
2: example2
>> Linksets# insert 2 example3
>> Linksets# list
Old:
Pending:
1: example1
2: example3
3: example2
>> Linksets# move
Index number to move: 3
Destination index: 1
>> Linksets# list
Old:
Pending:
1: example2
2: example1
3: example3
>> Linksets# del 2
>> Linksets# list
Old:
Pending:
1: example2
2: example3
Nortel Secure Network Access Switch 4050 User Guide
208 Chapter 5 Configuring groups and profiles
Creating a default group using the CLI
To create a default group, first create a group with extended profiles mapped to a
restrictive VLAN (see “Configuring groups using the CLI” on page 198 and
“Configuring extended profiles using the CLI” on page 203). Then use the
following command to make this group the default group:
/cfg/domain 1/aaa/defgroup <group name>
Configuring groups and extended profiles using
the SREM
The basic steps to configure groups and extended profiles on the Nortel
SNAS 4050 using the SREM are:
1
Configure the group (see “Configuring groups using the SREM” on
page 208).
2
Configure the client filters that will be referenced in the extended profiles (see
“Configuring client filters using the SREM” on page 213).
The client filters can be referenced by all extended profiles in the domain.
3
Configure the extended profiles for the group (see “Configuring extended
profiles using the SREM” on page 219).
4
Map the linksets to the group and extended profiles (see “Mapping linksets to
a group or profile using the SREM” on page 223).
5
Create a default group, if desired (see “Creating a default group using the
SREM” on page 230).
Configuring groups using the SREM
This section contains the following topics:
•
•
•
320818-A
“Using the guide for creating groups” on page 209
“Adding a group” on page 210
“Modifying a group” on page 212
Chapter 5 Configuring groups and profiles 209
Using the guide for creating groups
If you desire additional information before creating a group, there is a guide
available that explains some of the prerequisites and details about creating groups.
To access the guide to creating groups, complete the following steps:
1
Click A Guide to Create a Group on the toolbar.
A dialog box appears, prompting you to select a domain.
2
Select the domain where this group is created.
3
Click OK.
A Guide dialog appears, and the screen displayed in the SREM changes to
display the next screen used to add a group.
4
Use Next and Previous to view the steps to create a group.
As each step, follow the instructions provided before continuing with the next
configuration step.
5
Click Finish to exit the guide after completing all of the steps, or click Cancel
to exit the guide any time before finishing.
Nortel Secure Network Access Switch 4050 User Guide
210 Chapter 5 Configuring groups and profiles
Adding a group
To create and configure a group, perform the following steps:
1
Select the Secure Access Domain > domain > AAA > Groups tab.
The Groups screen appears (see Figure 42).
Figure 42 Groups screen
320818-A
Chapter 5 Configuring groups and profiles 211
2
Click Add.
The Add a Group dialog box appears (see Figure 43).
Figure 43 Adding a Group screen
3
Enter the Group information in the applicable fields. Table 31 describes the
Add a Group fields.
Table 31 Add a Group fields
Field
Description
Group ID (Index)
An integer in the range 1 to 1023 that uniquely
identifies the group in the Nortel SNAS 4050 domain.
Group Name
A string that uniquely identifies the group on the Nortel
SNAS 4050. The group name must match a group
name used by the authentication services.
Maximum Login Sessions
The maximum number of simultaneous portal or Nortel
SNAS 4050 sessions allowed for each member of the
group. The default is 0 (unlimited).
Tunnel Guard SRS Rule
Specifies the preconfigured TunnelGuard SRS rule to
apply to the group.
For information about configuring the SRS rules using
the SREM, see “TunnelGuard SRS Builder” on
page 317.
4
Click Apply.
The new group appears in the list of groups.
5
Click Apply on the toolbar to send the current changes to the Nortel
SNAS 4050. Click Commit on the toolbar to save the changes permanently.
Nortel Secure Network Access Switch 4050 User Guide
212 Chapter 5 Configuring groups and profiles
Modifying a group
To configure a group, perform the following steps:
1
Select the Secure Access Domain > domain > AAA > Groups > group >
Configuration tab.
The group Configuration screen appears (see Figure 44).
Figure 44 Group Configuration screen
320818-A
Chapter 5 Configuring groups and profiles 213
2
Enter the group information in the applicable fields. Table 32 describes the
group Configuration fields.
Table 32 Group Configuration fields
Field
Description
Group ID (Index)
An integer in the range 1 to 1023 that uniquely
identifies the group in the Nortel SNAS 4050 domain.
This value cannot be changed after a group is created.
Group Name
A string that uniquely identifies the group on the Nortel
SNAS 4050. The group name must match a group
name used by the authentication services.
Maximum Login Sessions
The maximum number of simultaneous portal or Nortel
SNAS 4050 sessions allowed for each member of the
group.
The default is 0 (unlimited).
Tunnel Guard SRS Rule
Specifies the preconfigured TunnelGuard SRS rule to
apply to the group.
For information about configuring the SRS rules using
the SREM, see “TunnelGuard SRS Builder” on
page 317.
Comment
A comment related to this group.
3
Click Apply on the toolbar to send the current changes to the Nortel
SNAS 4050. Click Commit on the toolbar to save the changes permanently.
Configuring client filters using the SREM
This section contains the following topics:
•
•
“Adding a client filter” on page 214
“Modifying a client filter” on page 217
Nortel Secure Network Access Switch 4050 User Guide
214 Chapter 5 Configuring groups and profiles
Adding a client filter
To create and configure a client filter, perform the following steps:
1
Select the Secure Access Domain > domain > AAA > Filters > Client
Filters tab.
The Client Filters screen appears (see Figure 45).
Figure 45 Client Filters screen
320818-A
Chapter 5 Configuring groups and profiles 215
2
Click Add.
The Add a Client Filter dialog box appears (see Figure 46).
Figure 46 Adding a Client Filter screen
3
Enter the Client Filter information in the applicable fields. Table 33 describes
the Add a Client Filter fields.
Table 33 Add a Client Filter fields (Sheet 1 of 2)
Field
Description
Filter ID (Index)
An integer in the range 1 to 63 that uniquely identifies
the filter in the Nortel SNAS 4050 domain.
Nortel Secure Network Access Switch 4050 User Guide
216 Chapter 5 Configuring groups and profiles
Table 33 Add a Client Filter fields (Sheet 2 of 2)
Field
Description
Name
Names the filter.
• name is a string that must be unique in the
domain.
You reference the client filter name when configuring
the extended profile.
TunnelGuard Check Passed Specifies whether passing or failing the TunnelGuard
host integrity check triggers the filter.
• true — the client filter triggers when the
TunnelGuard check succeeds.
• false — the client filter triggers when the
TunnelGuard check fails.
• ignore — passing or failing the TunnelGuard
check will not trigger the client filter.
The default is ignore.
For example, in order to grant limited access rights to
users who fail the TunnelGuard check, set the value to
false, create an extended profile that references this
client filter, and then map the extended profile to a
restrictive VLAN.
For information about configuring the TunnelGuard
checks, see “Configuring the TunnelGuard check using
the CLI” on page 132 or “Configuring the TunnelGuard
check using the SREM” on page 168.
4
Click Apply.
The new client filter now appears in the Client Filters table.
5
320818-A
Click Apply on the toolbar to send the current changes to the Nortel
SNAS 4050. Click Commit on the toolbar to save the changes permanently.
Chapter 5 Configuring groups and profiles 217
Modifying a client filter
To configure a client filter, perform the following steps:
1
Select the Secure Access Domain > domain > AAA > Filters > filter >
Configuration tab.
The client filter Configuration screen appears (see Figure 47).
Figure 47 Client filter Configuration screen
Nortel Secure Network Access Switch 4050 User Guide
218 Chapter 5 Configuring groups and profiles
2
Enter the Client Filter information in the applicable fields. Table 34 describes
the Client Filter configuration fields.
Table 34 Client Filters configuration fields
Field
Description
Filter ID (Index)
An integer in the range 1 to 63 that uniquely identifies
the filter in the Nortel SNAS 4050 domain.
Name
Names the filter.
• name is a string that must be unique in the
domain.
You reference the client filter name when configuring
the extended profile.
TunnelGuard Check Passed Specifies whether passing or failing the TunnelGuard
host integrity check triggers the filter.
• true — the client filter triggers when the
TunnelGuard check succeeds.
• false — the client filter triggers when the
TunnelGuard check fails.
• ignore — passing or failing the TunnelGuard
check will not trigger the client filter.
The default is ignore.
For example, in order to grant limited access rights to
users who fail the TunnelGuard check, set the value to
false, create an extended profile that references this
client filter, and then map the extended profile to a
restrictive VLAN.
For information about configuring the TunnelGuard
checks, see “Configuring the TunnelGuard check using
the CLI” on page 132 or “Configuring the TunnelGuard
check using the SREM” on page 168.
Comment
3
320818-A
Creates a comment about the client filter.
Click Apply on the toolbar to send the current changes to the Nortel
SNAS 4050. Click Commit on the toolbar to save the changes permanently.
Chapter 5 Configuring groups and profiles 219
Configuring extended profiles using the SREM
To view the extended profiles within a group, select the Secure Access Domain >
domain > AAA > Groups > group > Extended Profiles tab. The Extended
Profiles screen appears with a list of all profiles for that group.
When you select a profile in the list, the extended profile configuration details and
linksets become accessible from the tabs that display below the list. You can view
or edit details for an extended profile from these additional tabs.
This section contains the following topics:
•
•
“Adding an extended profile” on page 220
“Modifying an extended profile” on page 222
Nortel Secure Network Access Switch 4050 User Guide
220 Chapter 5 Configuring groups and profiles
Adding an extended profile
To create an extended profile for a group, perform the following steps:
1
Select the Secure Access Domain > domain > AAA > Groups > group >
Extended Profiles tab.
The Extended Profiles screen appears (see Figure 48).
Figure 48 Extended Profiles screen
320818-A
Chapter 5 Configuring groups and profiles 221
2
Click Add.
The Add an Extended Profile dialog box opens (see Figure 49).
Figure 49 Add an Extended Profile screen
3
Enter the Extended Profile information in the applicable fields. Table 35
describes the Add an Extended Profile fields.
Table 35 Add an Extended Profile fields
Field
Description
Index
An integer in the range 1 to 63 that uniquely identifies the
profile in the group.
The default value for this field is the lowest unused index
number available.
Filter Name
The name of the predefined client filter that determines
whether the Nortel SNAS 4050 will apply this extended
profile to the user.
VLAN Name
The name of the VLAN to which the Nortel SNAS 4050 will
assign users with this profile.
4
Click Apply to create the new extended profile.
The new extended appears appears in the list on the Extended Profiles tab.
Nortel Secure Network Access Switch 4050 User Guide
222 Chapter 5 Configuring groups and profiles
Modifying an extended profile
To modify an extended profile for a group, perform the following steps:
1
Select the Secure Access Domain > domain > AAA > Groups > group >
extended profile > Configuration tab.
The extended profiles Configuration screen appears (see Figure 50).
Figure 50 Extended profiles Configuration screen
320818-A
Chapter 5 Configuring groups and profiles 223
2
Enter the Extended Profile information in the applicable fields. Table 36
describes the Extended Profile Configuration fields.
Table 36 Extended Profile Configuration fields
Field
Description
Index
An integer in the range 1 to 63 that uniquely identifies the
profile in the group.
The default value for this field is the lowest unused index
number available. This value cannot be changed after the
extended profile is created.
Filter Name
The name of the predefined client filter that determines
whether the Nortel SNAS 4050 will apply this extended
profile to the user.
VLAN Name
The name of the VLAN to which the Nortel SNAS 4050 will
assign users with this profile.
3
Click Apply to create the new extended profile.
The new extended appears appears in the list on the Extended Profiles tab.
Mapping linksets to a group or profile using the SREM
You can tailor the portal page for different users by mapping preconfigured
linksets to groups and extended profiles. Linksets configured for a group display
on the portal page after the linksets configured for the user’s extended profile.
For information about configuring linksets, see “Configuring linksets using the
SREM” on page 439.
Topics in this section include:
•
•
“Mapping linksets to a group” on page 224
“Mapping linksets to a profile” on page 227
Nortel Secure Network Access Switch 4050 User Guide
224 Chapter 5 Configuring groups and profiles
Mapping linksets to a group
To map a linkset to a group, select the Secure Access Domain > domain >
AAA > Groups > group > Linksets tab.
The Linksets screen appears and displays the group Linkset Table (see Figure 51).
Figure 51 Linksets screen for a group
The group Linkset Table allows you to manage linksets for the selected group, by
performing any of the following procedures:
•
•
•
320818-A
“Adding linksets to a group” on page 225
“Removing linksets from a group” on page 226
“Reordering linksets in a group” on page 226
Chapter 5 Configuring groups and profiles 225
Adding linksets to a group
To add a linkset to a group, perform the following steps:
1
Select the Secure Access Domain > domain > AAA > Groups > group >
Linksets tab.
The Linksets screen appears and displays the Linkset Table (see Figure 51 on
page 224).
2
Click Add.
The Add a Linkset dialog box appears (see Figure 52).
Figure 52 Adding a Linkset screen
3
Enter the linkset information in the applicable fields. Table 37 describes the
Add a Linkset fields.
Table 37 Add a Linkset fields
Field
Description
Name
The name of the preconfigured linkset you want to add.
4
Click Add.
The new linkset appears in the Linkset Table.
5
Click Apply on the toolbar to send the current changes to the Nortel
SNAS 4050. Click Commit on the toolbar to save the changes permanently.
Nortel Secure Network Access Switch 4050 User Guide
226 Chapter 5 Configuring groups and profiles
Removing linksets from a group
To remove a linkset from a group, perform the following steps:
1
Select the Secure Access Domain > domain > AAA > Groups > group >
Linksets tab.
The Linksets screen appears and displays the Linkset Table (see Figure 51 on
page 224).
2
Select the linkset you want to remove from the Linkset Table.
3
Click Delete.
A confirmation dialog appears.
4
Click Yes.
The linkset disappears from the Linkset Table.
5
Click Apply on the toolbar to send the current changes to the Nortel
SNAS 4050. Click Commit on the toolbar to save the changes permanently.
Reordering linksets in a group
To adjust the order in which group linksets appear on the portal page, perform the
following steps:
1
Select the Secure Access Domain > domain > AAA > Groups > group >
Linksets tab.
The Linksets screen appears and displays the Linkset Table (see Figure 51 on
page 224).
320818-A
2
Select the linkset you want to move from the Linkset Table.
3
Adjust the linkset position with the up and down arrows.
4
Click Apply on the toolbar to send the current changes to the Nortel
SNAS 4050. Click Commit on the toolbar to save the changes permanently.
Chapter 5 Configuring groups and profiles 227
Mapping linksets to a profile
To map a linkset to an extended profile, select the Secure Access Domain >
domain > AAA > Groups > group > extended profile > Linksets tab.
The Linksets screen appears and displays the Linkset Table (see Figure 53).
Figure 53 Linksets screen for an extended profile
The group Linkset Table allows you to manage linksets for the selected extended
profile, by performing any of the following procedures:
•
•
•
“Adding linksets to an extended profile” on page 228
“Removing linksets from an extended profile” on page 229
“Reordering linksets in an extended profile” on page 229
Nortel Secure Network Access Switch 4050 User Guide
228 Chapter 5 Configuring groups and profiles
Adding linksets to an extended profile
To add a linkset to an extended profile, perform the following steps:
1
Select the Secure Access Domain > domain > AAA > Groups > group >
extended profile > Linksets tab.
The Linksets screen appears and displays the Linkset Table (see Figure 53 on
page 227).
2
Click Add.
The Add a Linkset dialog box appears (see Figure 54).
Figure 54 Adding a Linkset screen
3
Enter the linkset information in the applicable fields. Table 38 describes the
Add a Linkset fields.
Table 38 Add a Linkset fields
Field
Description
Name
The name of the preconfigured linkset you want to add.
4
Click Add.
The new linkset appears in the Linkset Table.
5
320818-A
Click Apply on the toolbar to send the current changes to the Nortel
SNAS 4050. Click Commit on the toolbar to save the changes permanently.
Chapter 5 Configuring groups and profiles 229
Removing linksets from an extended profile
To remove a linkset from an extended profile, perform the following steps:
1
Select the Secure Access Domain > domain > AAA > Groups > group >
extended profile > Linksets tab.
The Linksets screen appears and displays the Linkset Table (see Figure 51 on
page 224).
2
Select the linkset you want to remove from the Linkset Table.
3
Click Delete.
A confirmation dialog appears.
4
Click Yes.
The linkset disappears from the Linkset Table.
5
Click Apply on the toolbar to send the current changes to the Nortel
SNAS 4050. Click Commit on the toolbar to save the changes permanently.
Reordering linksets in an extended profile
To adjust the order in which extended profile linksets appear on the portal page,
perform the following steps:
1
Select the Secure Access Domain > domain > AAA > Groups > group >
extended profile > Linksets tab.
The Linksets screen appears and displays the Linkset Table (see Figure 51 on
page 224).
2
Select the linkset you want to move from the Linkset Table.
3
Adjust the linkset position with the up and down arrows.
4
Click Apply on the toolbar to send the current changes to the Nortel
SNAS 4050. Click Commit on the toolbar to save the changes permanently.
Nortel Secure Network Access Switch 4050 User Guide
230 Chapter 5 Configuring groups and profiles
Creating a default group using the SREM
To create a default group, first create a group with extended profiles mapped to a
restrictive VLAN (see “Configuring groups using the SREM” on page 208 and
“Configuring extended profiles using the SREM” on page 219). Then perform the
following steps:
1
Select the Secure Access Domain > domain > AAA tab.
The AAA Configuration screen appears (see Figure 55).
Figure 55 AAA Configuration screen
320818-A
Chapter 5 Configuring groups and profiles 231
2
Enter the AAA information in the applicable fields. Table 39 describes the
AAA Configuration fields.
Table 39 AAA Configuration fields
Field
Description
Default Group
The name of the group you want to set as a default.
3
Click Apply on the toolbar to send the current changes to the Nortel
SNAS 4050. Click Commit on the toolbar to save the changes permanently.
Nortel Secure Network Access Switch 4050 User Guide
232 Chapter 5 Configuring groups and profiles
320818-A
233
Chapter 6
Configuring authentication
This chapter includes the following topics:
Topic
Page
Overview
234
Before you begin
235
Configuring authentication using the CLI
236
Roadmap of authentication commands
237
Configuring authentication methods using the CLI
239
Configuring advanced settings using the CLI
241
Configuring RADIUS authentication using the CLI
242
Configuring LDAP authentication using the CLI
249
Configuring local database authentication using the CLI
261
Specifying authentication fallback order using the CLI
267
Configuring authentication using the SREM
269
Configuring authentication methods using the SREM
270
Configuring RADIUS authentication using the SREM
271
Configuring LDAP authentication using the SREM
282
Configuring local database authentication using the SREM
298
Specifying authentication fallback order using the SREM
314
Saving authentication settings
316
Nortel Secure Network Access Switch 4050 User Guide
234 Chapter 6 Configuring authentication
Overview
The Nortel SNAS 4050 controls authentication of clients when they log on to the
network.
The Nortel SNA solution supports the following authentication methods in Nortel
Secure Network Access Switch Software Release 1.0:
•
•
external database
— Remote Authentication Dial-In User Service (RADIUS)
— Lightweight Directory Access Protocol (LDAP)
local database on the Nortel SNAS 4050
Note: If you ran the quick setup wizard during initial setup, the Local
database authentication method has been created as Authentication 1.
You can configure more than one authentication method within a Nortel
SNAS 4050 domain. You determine the order in which the methods are applied by
default. Client credentials are checked against the various authentication
databases until the first match is found.
You can configure the methods so that their names display on the portal login page
(see “Configuring authentication methods using the CLI” on page 239 or
“Configuring authentication methods using the SREM” on page 270). You can
then direct clients to select a specific authentication server (for example, for
direction to a specific Windows domain). If the client selects a Login Service
name, the authentication request is directed immediately to the specified service.
Otherwise, authentication defaults to being carried out according to the
authentication order you have configured (see “Specifying authentication fallback
order using the CLI” on page 267 or “Specifying authentication fallback order
using the SREM” on page 314).
For general information about authentication within the Nortel SNA solution, see
Nortel Secure Network Access Solution Guide (320817-A).
320818-A
Chapter 6 Configuring authentication 235
Before you begin
Before you configure authentication on the Nortel SNAS 4050, you must
complete the following tasks:
1
Create the Nortel SNAS 4050 domain, if applicable (see “Creating a domain
using the CLI” on page 121 or “Creating a domain using the SREM” on
page 151).
If you ran the quick setup wizard during initial setup, Domain 1 has been
created on the Nortel SNAS 4050.
Note: With Nortel Secure Network Access Switch
Software Release 1.0, you cannot configure the Nortel SNA solution to
have more than one domain.
2
Create and configure the groups (see “Configuring groups and profiles” on
page 191).
3
For external authentication servers, create or modify settings on the external
server as required.
4
a
A free RADIUS server may require specific settings in the clients.conf
file and the Users file to match group parameters you may have
configured on the Nortel SNAS 4050.
b
A Steel-belted RADIUS server requires specific settings in the vendor.ini
file, master dictionary, and vendor dictionary.
c
An MS IAS RADIUS server may require vendor parameters to be
configured on the Microsoft Management Console (MMC).
To configure external authentication, you require the following information
about the authentication server configuration:
a
RADIUS servers:
—
—
—
—
server IP address
port number used for the service
shared secret
Vendor-Id attribute
Nortel Secure Network Access Switch 4050 User Guide
236 Chapter 6 Configuring authentication
— Vendor-Type
Note: You can assign vendor-specific codes to the Vendor-Id and
Vendor-Type attributes. The RADIUS server uses Vendor-Id and
Vendor-Type attributes in combination to identify what values it will
assign and send for attributes such as group name and session timeout.
Each vendor has a specific dictionary. The Vendor-Id specified for an
attribute identifies the dictionary the RADIUS server will use to retrieve
the attribute value. The Vendor-Type indicates the index number of the
required entry in the dictionary file.
The Internet Assigned Numbers Authority (IANA) has designated SMI
Network Management Private Enterprise Codes that can be assigned to
the Vendor-Id attribute (see
http://www.iana.org/assignments/enterprise-numbers).
RFC 2865 describes usage of the Vendor-Type attribute.
If you specify Vendor-Id and Vendor-Type on the RADIUS server and on
the Nortel SNAS 4050, the Nortel SNAS 4050 will retrieve
vendor-specific values for the associated attribute. If you set the
Vendor-Id and Vendor-Type attributes to 0, the RADIUS server sends
standard attribute values.
b
LDAP servers:
— server IP address
— port number used for the service
— configured accounts and users so that you can specify appropriate
search entries and group and user attributes
Configuring authentication using the CLI
The basic steps for configuring and managing client authentication are:
320818-A
1
Create the authentication methods.
2
Configure specific settings for the methods.
Chapter 6 Configuring authentication 237
3
Specify the order in which the authentication methods will be applied.
Perform this step even if you define only one method on the Nortel
SNAS 4050.
To configure authentication, access the AAA menu by using the following
command:
/cfg/domain 1/aaa
From the AAA menu, you can manage the following authentication-related tasks:
•
•
creating and configuring the authentication methods
• “Configuring authentication methods using the CLI” on page 239
• “Configuring advanced settings using the CLI” on page 241
• “Configuring RADIUS authentication using the CLI” on page 242
• “Configuring LDAP authentication using the CLI” on page 249
• “Configuring local database authentication using the CLI” on page 261
setting the order in which authentication methods will be applied (see
“Specifying authentication fallback order using the CLI” on page 267)
Roadmap of authentication commands
The following roadmap lists the CLI commands to configure client authentication
in the Nortel SNAS 4050 domain. Use this list as a quick reference or click on any
entry for more information:
Command
Parameter
/cfg/domain 1/aaa/auth <auth ID>
type radius|ldap|local
name <name>
display
del
/cfg/domain 1/aaa/auth #/adv
groupauth <auth IDs>
secondauth <auth ID>
/cfg/domain 1/aaa/auth #/radius
vendorid <vendor ID>
vendortype <vendor type>
Nortel Secure Network Access Switch 4050 User Guide
238 Chapter 6 Configuring authentication
Command
Parameter
domainid <domain ID>
domaintype <domain type>
authproto pap|chapv2
timeout <interval>
/cfg/domain 1/aaa/auth #/radius/serv list
ers
del <index number>
add <IPaddr> <port> <shared
secret>
insert <index number> <IPaddr>
move <index number> <new index
number>
/cfg/domain 1/aaa/auth #/radius/sess vendorid <vendor ID>
iontim
vendortype <vendor type>
ena
dis
/cfg/domain 1/aaa/auth #/ldap
searchbase <DN>
groupattr <names>
userattr <names>
isdbinddn <DN>
isdbindpas <password>
enaldaps true|false
enauserpre true|false
timeout <interval>
/cfg/domain 1/aaa/auth #/ldap/server list
s
del <index number>
add <IPaddr> <port>
insert <index number> <IPaddr>
move <index number> <new index
number>
320818-A
Chapter 6 Configuring authentication 239
Command
Parameter
/cfg/domain 1/aaa/auth #/ldap/ldapma list
cro
del <index number>
add <variable name> <LDAP
attribute> [<prefix>] [<suffix>]
insert <index number> <variable
name>
move <index number> <new index
number>
/cfg/domain 1/aaa/auth #/ldap/active enaexpired true|false
dire
expiredgro <group>
/cfg/domain 1/aaa/auth #/local
add <user name> <password> <group>
passwd <user name> <password>
groups <user name> <desired group>
del <user name>
list
import <protocol> <server>
<filename> <key>
export <protocol> <server>
<filename> <key>
/cfg/domain 1/aaa/authorder
<auth ID>[,<auth ID>]
Configuring authentication methods using the CLI
To create and configure an authentication method, use the following command:
/cfg/domain 1/aaa/auth <auth ID>
where auth ID is an integer in the range 1 to 63 that uniquely identifies the
authentication method in the Nortel SNAS 4050 domain.
Nortel Secure Network Access Switch 4050 User Guide
240 Chapter 6 Configuring authentication
When you first create the method, you are prompted to specify the type. For
Nortel Secure Network Access Switch Software Release 1.0, valid options are:
•
•
•
RADIUS
LDAP
local
The selected method type determines the remainder of the parameters you are
prompted to provide when you create the method, as well as the submenu options
that are provided on the Authentication menu.
The Authentication menu includes the following options:
/cfg/domain 1/aaa/auth <auth ID>
followed by:
320818-A
type
radius|ldap|local
Sets the authentication mechanism. The type selected
determines which submenu option will display.
name <name>
Names or renames the method. After you have defined
a name for the method, you can use either the method
name or the auth ID to access the Authentication
menu.
• name is a string that must be unique in the domain.
The maximum allowable length of the string is 255
characters, but Nortel recommends a maximum of
32 characters.
In future releases of the Nortel SNAS 4050 software,
you will be able to reference this string in a client filter,
so that authentication to the server in question
becomes a condition for access rights for a group.
display
Specifies a name for the method, to display in the Login
Service list box on the portal login page, together with
the names of other authentication services available.
Chapter 6 Configuring authentication 241
/cfg/domain 1/aaa/auth <auth ID>
followed by:
radius|ldap|local
Accesses a method-specific menu, in order to
configure settings for the method. The option displayed
depends on the method type.
• radius — accesses the RADIUS menu (see
“Configuring RADIUS authentication using the CLI”
on page 242)
• ldap — accesses the LDAP menu (see
“Configuring LDAP authentication using the CLI” on
page 249)
• local — accesses the Local database menu
(see “Configuring local database authentication
using the CLI” on page 261)
adv
Accesses the Advanced menu, in order to configure
the current method to retrieve group information from
other authentication schemes (see “Configuring
advanced settings using the CLI” on page 241).
del
Removes the method from the Nortel SNAS 4050
domain.
Configuring advanced settings using the CLI
You can configure the Nortel SNAS 4050 domain to use one method for
authentication and another for authorization.
For example, there are three authentication methods configured for the domain:
Local (auth ID 1), RADIUS (auth ID 2), and LDAP (auth ID 3). The user groups
are stored in an LDAP database. You can configure the domain to have the Local
and LDAP methods used for authorization after users have been authenticated by
RADIUS. In this example, the command is: /cfg/domain 1/aaa/auth 2/
adv/groupauth 1,3. When a user logs on through RADIUS, the system first
checks the RADIUS database. If no match is found, the system checks the other
authentication schemes (in the order in which you listed them in the groupauth
command) to see if the user name can be matched against user groups defined in
the authentication databases. The first group matched is returned to the Nortel
SNAS 4050 as the user’s group, and determines the user’s access privileges for the
session.
Nortel Secure Network Access Switch 4050 User Guide
242 Chapter 6 Configuring authentication
To configure the current authentication scheme to retrieve user group information
from a different authentication scheme, use the following command:
/cfg/domain 1/aaa/auth #/adv
The Advanced menu displays.
The Advanced menu includes the following options:
/cfg/domain 1/aaa/auth #/adv
followed by:
groupauth <auth IDs>
Specifies one or more preconfigured LDAP or Local
database authentication schemes (not including the
current one) that will be used to retrieve the user’s
group information after the user has been
authenticated.
To specify more than one authentication method to use
for authorization, enter the auth IDs separated by a
comma (,).
secondauth <auth ID>
Specifies a second authentication service to be used
after the first one succeeds. The feature supports
single sign-on to backend servers in cases where the
first authentication method is token based or uses
client certificate authentication.
Note: Not supported in Nortel Secure Network Access
Switch Software Release 1.0.
Configuring RADIUS authentication using the CLI
To configure the Nortel SNAS 4050 domain to use an external RADIUS server for
authentication, use the following command:
/cfg/domain 1/aaa/auth <auth ID>
where auth ID is an integer in the range 1 to 63 that uniquely identifies the
authentication method in the Nortel SNAS 4050 domain. If you do not specify the
auth ID in the command, you are prompted for it.
When you first create the method for the domain, you must enter the
authentication ID. After you have created the method and defined a name for it,
you can use either the ID or the name to access the method for configuration.
320818-A
Chapter 6 Configuring authentication 243
You can perform the following configuration tasks:
•
•
•
•
“Adding the RADIUS authentication method using the CLI” on page 243
“Modifying RADIUS configuration settings using the CLI” on page 245
“Managing RADIUS authentication servers using the CLI” on page 247
“Configuring session timeout using the CLI” on page 249
Adding the RADIUS authentication method using the CLI
The command to create the authentication ID launches a wizard. When prompted,
enter the following information. You can later modify all settings for the specific
RADIUS configuration (see “Configuring authentication methods using the CLI”
on page 239 and “Modifying RADIUS configuration settings using the CLI” on
page 245).
•
•
•
•
•
•
authentication type — options are radius|ldap|local. Enter radius.
authentication method name (auth name) — a string that specifies a name
for the method. After you have defined a name for the method, you can use
either the method name or the auth ID to access the Authentication menu.
In future releases of the Nortel SNAS 4050 software, you will be able to
reference this string in a client filter, so that authentication to the server in
question becomes a condition for access rights for a group.
IP address of the RADIUS server.
port on which the RADIUS server is listening — the port number configured
on the RADIUS server to specify the port used by the service. The default is
1812.
shared secret — a unique shared secret configured on the RADIUS server that
authenticates the Nortel SNAS 4050 to the RADIUS server.
vendor ID for group — corresponds to the vendor-specific attribute used by
the RADIUS server to send group names to the Nortel SNAS 4050. The
default Vendor-Id is 1872 (Alteon).
To use a standard RADIUS attribute rather than the vendor-specific one, set
the vendor ID to 0 (see also vendor type).
Nortel Secure Network Access Switch 4050 User Guide
244 Chapter 6 Configuring authentication
•
vendor type for group — corresponds to the Vendor-Type value used in
combination with the Vendor-Id to identify the groups to which the user
belongs. The group names to which the vendor-specific attribute points must
match names you define on the Nortel SNAS 4050 using the /cfg/domain
1/aaa/group <group ID> command (see “Configuring groups using the
CLI” on page 198). The default is 1.
If you set the vendor ID to 0 in order to use a standard RADIUS attribute (see
vendor ID), set the vendor type to a standard attribute type as defined in
RFC 2865. For example, to use the standard attribute Class, set the vendor ID
to 0 and the vendor type to 25.
•
•
vendor ID for domain — corresponds to the vendor-specific attribute used by
the RADIUS server to send domain names to the Nortel SNAS 4050. The
default Vendor-Id is 1872 (Alteon).
vendor type for domain — corresponds to the Vendor-Type value used in
combination with the Vendor-Id to identify the domain. The default is 3.
The Authentication menu displays.
320818-A
Chapter 6 Configuring authentication 245
Figure 56 shows sample output for the RADIUS method for the
/cfg/domain 1/aaa/auth <auth ID> command and commands on the
Authentication menu.
Figure 56 Authentication menu commands — RADIUS
>> Main# /cfg/domain 1/aaa/auth
Enter auth id: (1-63) 2
Creating Authentication 2
Select one of radius, ldap or local: radius
Auth name: radius
Entering: RADIUS settings menu
Entering: RADIUS servers menu
IP Address to add: <IPaddr>
Port (default is 1812):
Enter shared secret: <secret>
Leaving: RADIUS servers menu
Enter vendor id for group [alteon]:
Enter vendor type for group [1]:
Enter vendor id for domain [alteon]:
Enter vendor type for domain [3]:
Leaving: RADIUS settings menu
--------------------------------------------------------[Authentication 2 Menu]
type
- Set authentication mechanism
name
- Set auth name
display - Set auth display name
radius - RADIUS settings menu
adv
- Advanced settings menu
del
- Remove Authentication
>> Authentication 2#
Modifying RADIUS configuration settings using the CLI
To modify settings for the authentication method itself, see “Configuring
authentication methods using the CLI” on page 239.
To modify settings for the specific RADIUS configuration, use the following
command:
/cfg/domain 1/aaa/auth #/radius
Nortel Secure Network Access Switch 4050 User Guide
246 Chapter 6 Configuring authentication
The RADIUS menu displays.
The RADIUS menu includes the following options:
/cfg/domain 1/aaa/auth #/radius
followed by:
320818-A
servers
Accesses the RADIUS servers menu, in order to
manage the external RADIUS servers configured for
the domain (see “Managing RADIUS authentication
servers using the CLI” on page 247).
vendorid <vendor ID>
Specifies the vendor-specific attribute used by the
RADIUS server to send group names to the Nortel
SNAS 4050. The default Vendor-Id is 1872 (Alteon).
To use a standard RADIUS attribute rather than the
vendor-specific one, set the vendor ID to 0 (see also
vendor type).
Note: If authproto is chapv2, the Vendor-Id must
be set to 311 (Microsoft).
vendortype <vendor
type>
Specifies the Vendor-Type value used in combination
with the Vendor-Id to identify the groups to which the
user belongs. The group names to which the
vendor-specific attribute points must match names you
define on the NSNAS. The default is 1.
If you set the vendor ID to 0 in order to use a standard
RADIUS attribute (see vendor ID), set the vendor type
to a standard attribute type as defined in RFC 2865.
For example, to use the standard attribute Class, set
the vendor ID to 0 and the vendor type to 25.
domainid <domain ID>
Specifies the vendor-specific attribute used by the
RADIUS server to send domain names to the NSNAS.
The default Vendor-Id is 1872 (Alteon).
Note: If authproto is chapv2, consider setting the
Vendor-Id for the domain to 10 (MS-CHAP-Domain).
domaintype <domain
type>
Specifies the Vendor-Type value used in combination
with the Vendor-Id to identify the domain. The default
is 3.
authproto pap|chapv2
Specifies the protocol used for communication between
the Nortel SNAS 4050 and the RADIUS server. The
options are:
• pap — Password Authentication Protocol (PAP)
• chapv2 — Challenge Handshake Authentication
Protocol (CHAP), version 2
The default is PAP.
Chapter 6 Configuring authentication 247
/cfg/domain 1/aaa/auth #/radius
followed by:
timeout <interval>
Sets the timeout interval for a connection request to a
RADIUS server. At the end of the timeout period, if no
connection has been established, authentication will
fail.
• interval is an integer that indicates the time
interval in seconds (s), minutes (m), or hours (h). If
you do not specify a measurement unit, seconds is
assumed. The range is 1–10000 seconds. The
default is 10 seconds.
sessiontim
Accesses the Session Timeout menu, in order to
configure settings to control the length of client
sessions (see “Configuring session timeout using the
CLI” on page 249).
Managing RADIUS authentication servers using the CLI
You can configure additional RADIUS servers for the domain, for redundancy.
You can have a maximum of three RADIUS authentication servers in the
configuration. You can control the order in which the RADIUS servers respond to
authentication requests.
To enable RADIUS authentication, ensure that the authentication ID that
represents the RADIUS configuration is included in the authentication order you
have specified for the Nortel SNAS 4050 domain (see “Specifying authentication
fallback order using the CLI” on page 267).
To manage the RADIUS servers used for client authentication in the domain, use
the following command:
/cfg/domain 1/aaa/auth #/radius/servers
The Radius servers menu displays.
Nortel Secure Network Access Switch 4050 User Guide
248 Chapter 6 Configuring authentication
The Radius servers menu includes the following options:
/cfg/domain 1/aaa/auth #/radius/servers
followed by:
320818-A
list
Lists the IP address, port, and shared secret of
currently configured RADIUS authentication servers, by
index number.
del <index number>
Removes the specified RADIUS authentication server
from the current configuration. The index numbers of
the remaining entries adjust accordingly.
To view the index numbers of all configured RADIUS
authentication servers, use the list command.
add <IPaddr> <port>
<shared secret>
Adds a RADIUS authentication server to the
configuration. You are prompted to enter the following
information:
• IPaddr — the IP address of the authentication
server
• port — the TCP port number used for RADIUS
authentication. The default is 1813.
• shared secret — the password used to
authenticate the Nortel SNAS 4050 to the
authentication server
The system automatically assigns the next available
index number to the server.
insert <index number>
<IPaddr>
Inserts a server at a particular position in the list of
RADIUS authentication servers in the configuration.
• index number — the index number you want
the server to have
• IPaddr — the IP address of the authentication
server you are adding
The index number you specify must be in use. The
index numbers of existing servers with this index
number and higher are incremented by 1.
move <index number>
<new index number>
Moves a server up or down the list of RADIUS
authentication servers in the configuration.
• index number — the original index number of
the server you want to move
• new index number — the index number
representing the new position of the server in the
list
The index numbers of the remaining entries adjust
accordingly.
Chapter 6 Configuring authentication 249
Configuring session timeout using the CLI
You can configure the Nortel SNAS 4050 to enable session timeout and to retrieve
a session timeout value from the RADIUS server. With session timeout enabled,
the session timeout value controls the length of the client’s Nortel SNA network
session. When the time is up, the client is automatically logged out. Idle time has
no effect on the session timeout.
To configure the Nortel SNAS 4050 for session timeout, use the following
command:
/cfg/domain 1/aaa/auth #/radius/sessiontim
The Session Timeout menu displays.
The Session Timeout menu includes the following options:
/cfg/domain 1/aaa/auth #/radius/sessiontim
followed by:
vendorid <vendor ID>
Specifies the vendor-specific attribute used by the
RADIUS server to send a session timeout value to the
Nortel SNAS 4050. The default Vendor-Id is 0.
With the Vendor-Type also set to 0 (the default value),
the RADIUS server sends the standard attribute for
session timeout.
vendortype <vendor
type>
Specifies the Vendor-Type value used in combination
with the Vendor-Id to identify the session timeout value
to send to the Nortel SNAS 4050. The default is 0.
ena
Enables retrieval of the RADIUS server session timeout
value. The default is disabled.
dis
Disables retrieval of the RADIUS server session
timeout value. The default is disabled.
Configuring LDAP authentication using the CLI
To configure the Nortel SNAS 4050 domain to use an external LDAP server for
authentication, use the following command:
/cfg/domain 1/aaa/auth <auth ID>
Nortel Secure Network Access Switch 4050 User Guide
250 Chapter 6 Configuring authentication
where auth ID is an integer in the range 1 to 63 that uniquely identifies the
authentication method in the Nortel SNAS 4050 domain. If you do not specify the
auth ID in the command, you are prompted for it.
When you first create the method for the domain, you must enter the
authentication ID. After you have created the method and defined a name for it,
you can use either the ID or the name to access the method for configuration.
You can perform the following configuration tasks:
•
•
•
•
•
“Adding the LDAP authentication method using the CLI” on page 250
“Modifying LDAP configuration settings using the CLI” on page 252
“Managing LDAP authentication servers using the CLI” on page 256
“Managing LDAP macros using the CLI” on page 258
“Managing Active Directory passwords using the CLI” on page 260
Adding the LDAP authentication method using the CLI
The command to create the authentication ID launches a wizard. When prompted,
enter the following information. For more information about the parameters, see
page 253. You can later modify all settings for the specific LDAP configuration
(see “Configuring authentication methods using the CLI” on page 239 and
“Modifying LDAP configuration settings using the CLI” on page 252).
•
•
•
•
•
320818-A
authentication type — options are radius|ldap|local. Enter ldap.
authentication method name (auth name) — a string that specifies a name
for the method. After you have defined a name for the method, you can use
either the method name or the auth ID to access the Authentication menu.
In future releases of the Nortel SNAS 4050 software, you will be able to
reference this string in a client filter, so that authentication to the server in
question becomes a condition for access rights for a group.
IP address of the LDAP server.
port on which the LDAP server is listening — the port number configured on
the LDAP server to specify the port used by the service. The default is 389.
search base entry — the Distinguished Name (DN) that points to one of the
following:
• the entry that is one level up from the user entries (does not require
isdBindDN and isdBindPassword)
Chapter 6 Configuring authentication 251
•
•
•
•
•
•
if user entries are located in several places in the LDAP Dictionary
Information Tree (DIT), the position in the DIT from where all user
records can be found with a subtree search (requires isdBindDN and
isdBindPassword)
group attribute name — the LDAP attribute that contains the names of the
groups. You can specify more than one group attribute name.
user attribute name — refers to one of the following:
• the LDAP attribute that contains the user name (does not require
isdBindDN and isdBindPassword)
• the LDAP attribute that is used in combination with the user’s login name
to search the DIT (requires isdBindDN and isdBindPassword)
isdBindDN — used to authenticate the Nortel SNAS 4050 to the LDAP
server, so that the LDAP DIT can be searched. The isdBindDN corresponds
to an entry created in the Schema Admins account (for example, cn=ldap
ldap, cn=Users, dc=example, dc=com). An account must be created
on the LDAP server to enable the Nortel SNAS 4050 to do the bind search in
the directory structure.
isdBindPassword — used to authenticate the Nortel SNAS 4050 to the LDAP
server. The isdBindPassword is the password, configured in the Schema
Admins account, for the entry referenced in isdBindDN.
enable LDAPS — if true, makes LDAP requests between the Nortel
SNAS 4050 and the LDAP server occur over a secure SSL connection. The
default is false. Retain the default value or reset to false.
The Authentication menu displays.
Nortel Secure Network Access Switch 4050 User Guide
252 Chapter 6 Configuring authentication
Figure 57 shows sample output for the LDAP method for the /cfg/domain
1/aaa/auth <auth ID> command and commands on the Authentication
menu.
Figure 57 Authentication menu commands — LDAP
>> Main# /cfg/domain 1/aaa/auth
Enter auth id: (1-63) 3
Creating Authentication 3
Select one of radius, ldap, or local: ldap
Auth name: ldap
Entering: LDAP settings menu
Entering: LDAP servers menu
IP Address to add: <IPaddr>
Port (default is 389):
Leaving: LDAP servers menu
Search Base Entry: <search base entry>
Group attribute name: <attribute>
User attribute name: <attribute>
isdBindDN: <DN>
isdBindPassword: <password>
Enable LDAPS (true/false):
Leaving: LDAP settings menu
---------------------------------------------------------[Authentication <auth ID> Menu]
type
- Set authentication mechanism
name
- Set auth name
display - Set auth display name
domain - Set windows domain for backend single sign-on
ldap
- LDAP settings menu
adv
- Advanced settings menu
del
- Remove Authentication
>> Authentication 3#
Modifying LDAP configuration settings using the CLI
To modify settings for the authentication method itself, see “Configuring
authentication methods using the CLI” on page 239.
To modify settings for the specific LDAP configuration, use the following
command:
/cfg/domain 1/aaa/auth #/ldap
320818-A
Chapter 6 Configuring authentication 253
The LDAP menu displays.
The LDAP menu includes the following options:
/cfg/domain 1/aaa/auth #/ldap
followed by:
servers
Accesses the LDAP servers menu, in order to manage
the external LDAP servers configured for the domain
(see “Managing LDAP authentication servers using the
CLI” on page 256).
searchbase <DN>
Specifies the Distinguished Name (DN) that points to
one of the following:
1. the entry that is one level up from the user entries
For example, if the searchbase value is set to:
ou=People,dc=bluetail,dc=com
authentication will be performed against a DN that
corresponds to:
uid = <user>, ou = People, dc = bluetail, and dc =
com
where uid is an example of a user attribute, ou =
organization unit, and dc = domain component.
Do not use the isdbinddn and isdbindpas
commands.
2. if user entries are located in several places in the
LDAP Dictionary Information Tree (DIT), or if the
client’s portal logon name is different from the user
record identifier (RDN), the position in the DIT from
where all user records can be found with a subtree
search
The isdbinddn and isdbindpas parameters
are required so that the Nortel SNAS 4050 can
authenticate itself to the LDAP server, in order to
search the DIT.
groupattr <names>
Specifies the LDAP attribute that contains the names of
the groups. The group names contained in the LDAP
attribute must be defined in the Nortel SNAS 4050
domain (see “Configuring groups using the CLI” on
page 198).
To specify more than one group attribute name, enter
the names separated by a comma (,).
Nortel Secure Network Access Switch 4050 User Guide
254 Chapter 6 Configuring authentication
/cfg/domain 1/aaa/auth #/ldap
followed by:
userattr <names>
Refers to one of the following:
1. the LDAP attribute that contains the user name
used for authenticating a client in the domain
The default user attribute name is uid.
Do not use the isdbinddn and isdbindpas
commands.
2. if the client’s portal logon name is different from the
RDN (for example, when using LDAP for
authentication towards Active Directory), the LDAP
attribute that is used in combination with the client’s
logon name to search the DIT
For example, a user record in Active Directory is
defined as the following DN: cn=Bill Smith,
ou=Users, dc=example, dc=com. The
user record also contains the attribute
sAMAccountName=bill. The user’s login
name is bill. If the user attribute is defined as
sAMAccountName, the user record for Bill Smith
will be found.
The isdbinddn and isdbindpas parameters
are required so that the Nortel SNAS 4050 can
authenticate itself to the LDAP server, in order to
search the DIT.
isdbinddn <DN>
Specifies an entry in the LDAP server used to
authenticate the Nortel SNAS 4050 to the LDAP server,
so that the LDAP DIT can be searched.
The isdBindDN corresponds to an entry created in
the Schema Admins account (for example, cn=ldap
ldap, cn=Users, dc=example, dc=com).
Required for searchbase and userattr
method 2.
isdbindpas <password> Specifies the password used to authenticate the Nortel
SNAS 4050 to the LDAP server. The isdbindpas is
the password, configured in the Schema Admins
account, for the entry referenced in isdBindDN.
Required for searchbase and userattr
method 2.
ldapmacro
320818-A
Accesses the LDAP Macro menu, in order to manage
macros (see “Managing LDAP macros using the CLI”
on page 258).
Chapter 6 Configuring authentication 255
/cfg/domain 1/aaa/auth #/ldap
followed by:
enaldaps true|false
If true, makes LDAP requests between the Nortel
SNAS 4050 and the LDAP server occur over a secure
SSL connection (LDAPS). The default is false. Retain
the default value or reset to false.
Note: The default TCP port number used by the LDAP
protocol is 389. If LDAPS is enabled, change the port
number to 636.
enauserpre true|false Enables or disables storage of user preferences in an
external LDAP/Active Directory database.
• true — storage and retrieval of user preferences
is enabled. When the client logs out from a portal
session, the Nortel SNAS 4050 saves any user
preferences accumulated during the session in the
isdUserPrefs attribute. The next time the client
successfully logs on through the portal, the Nortel
SNAS 4050 retrieves the LDAP attribute from the
LDAP database.
• false — storage and retrieval of user preferences
is disabled.
To support storage and retrieval of user preferences,
you must extend the LDAP server schema with one
new ObjectClass and one new Attribute. For more
information, see Appendix E, “Adding User
Preferences attribute to Active Directory,” on page 883.
The default is false.
timeout <interval>
Sets the timeout interval for a connection request to an
LDAP server. At the end of the timeout period, if no
connection has been established, authentication will
fail.
• interval is an integer that indicates the time
interval in seconds (s), minutes (m), or hours (h). If
you do not specify a measurement unit, seconds is
assumed. The range is 1–10000 seconds. The
default is 5 seconds.
activedire
Accesses the Active Directory menu, in order to
manage client passwords (see “Managing Active
Directory passwords using the CLI” on page 260).
Nortel Secure Network Access Switch 4050 User Guide
256 Chapter 6 Configuring authentication
Managing LDAP authentication servers using the CLI
You can configure additional LDAP servers for the domain, for redundancy. You
can have a maximum of three LDAP authentication servers in the configuration.
You can control the order in which the LDAP servers respond to authentication
requests.
If there is more than one LDAP server configured for the Nortel SNAS 4050
domain, the first accessible LDAP server in the list returns a reply to the query.
This stops the query, regardless of whether or not the client’s credentials were
matched. If you add more than one LDAP server to the domain, for redundancy,
ensure that each listed LDAP server contains the same SSL domain client
database.
If the Nortel SNAS 4050 clients are dispersed in different LDAP server databases,
you can configure the LDAP servers as separate authentication methods, with
different authentication IDs. If you include all LDAP authentication IDs in the
authentication order, each LDAP server will be used to authenticate client groups.
To enable LDAP authentication, ensure that the authentication ID that represents
the LDAP configuration is included in the authentication order you have specified
for the Nortel SNAS 4050 domain (see “Specifying authentication fallback order
using the CLI” on page 267).
To manage the LDAP servers used for client authentication in the domain, use the
following command:
/cfg/domain 1/aaa/auth #/ldap/servers
The LDAP servers menu displays.
The LDAP servers menu includes the following options:
/cfg/domain 1/aaa/auth #/ldap/servers
followed by:
list
320818-A
Lists the IP address and port of currently configured
LDAP servers, by index number.
Chapter 6 Configuring authentication 257
/cfg/domain 1/aaa/auth #/ldap/servers
followed by:
del <index number>
Removes the specified LDAP server from the current
configuration. The index numbers of the remaining
entries adjust accordingly.
To view the index numbers of all configured LDAP
servers, use the list command.
add <IPaddr> <port>
Adds an LDAP server to the configuration. You are
prompted to enter the following information:
• IPaddr — the IP address of the authentication
server
• port — the TCP port number used for LDAP
authentication. The default is 389.
The system automatically assigns the next available
index number to the server.
Note: The default TCP port number used by the LDAP
protocol is 389. If LDAPS is enabled, change the port
number to 636.
insert <index number>
<IPaddr>
Inserts a server at a particular position in the list of
LDAP servers in the configuration.
• index number — the index number you want
the server to have
• IPaddr — the IP address of the server you are
adding
The index number you specify must be in use. The
index numbers of existing servers with this index
number and higher are incremented by 1.
move <index number>
<new index number>
Moves a server up or down the list of LDAP servers in
the configuration.
• index number — the original index number of
the server you want to move
• new index number — the index number
representing the new position of the server in the
list
The index numbers of the remaining entries adjust
accordingly.
Nortel Secure Network Access Switch 4050 User Guide
258 Chapter 6 Configuring authentication
Managing LDAP macros using the CLI
You can create your own macros (or variables), to allow you to retrieve data from
the LDAP database. You can then map the variable to an LDAP user attribute in
order to create user-specific links on the portal Home tab. When the client
successfully logs on, the variable expands to the value retrieved from the LDAP or
Active Directory user record. For more information about using macros in portal
links, see “Macros” on page 395.
To configure LDAP macros, use the following command:
/cfg/domain 1/aaa/auth #/ldap/ldapmacro
The LDAP macro menu displays.
The LDAP macro menu includes the following options:
/cfg/domain 1/aaa/auth #/ldap/ldapmacro
followed by:
320818-A
list
Lists all macros in the LDAP configuration in the Nortel
SNAS 4050 domain, by index number.
del <index number>
Removes the specified LDAP macro from the current
configuration. The index numbers of the remaining
entries adjust accordingly.
To view the index numbers of all configured LDAP
macros, use the list command.
Chapter 6 Configuring authentication 259
/cfg/domain 1/aaa/auth #/ldap/ldapmacro
followed by:
Adds an LDAP macro to the configuration. You are
add <variable name>
prompted to enter the following information:
<LDAP attribute>
[<prefix>] [<suffix>] • variable name — the name of the variable.
• LDAP attribute — the LDAP user attribute
whose value will be retrieved from the client’s
LDAP/Active Directory user record.
• prefix — if the value string of the LDAP attribute
is long and you wish to extract only part of it, the
values at the start of the string that you want to
ignore. Combine with a suffix if the value you want
is in the middle of the string.
• suffix — if the value string of the LDAP attribute
is long and you wish to extract only part of it, the
values at the end of the string that you want to
ignore. Combine with a prefix if the value you want
is in the middle of the string.
The system automatically assigns the next available
index number to the macro.
insert <index number>
<variable name>
Inserts a macro at a particular position in the list of
LDAP macros in the configuration.
• index number — the index number you want
the macro to have
• variable name — the LDAP macro you are
adding
The index number you specify must be in use. The
index numbers of existing macros with this index
number and higher are incremented by 1.
move <index number>
<new index number>
Moves a macro up or down the list of macros in the
configuration.
• index number — the original index number of
the macro you want to move
• new index number — the index number
representing the new position of the macro in the
list
The index numbers of the remaining entries adjust
accordingly.
Nortel Secure Network Access Switch 4050 User Guide
260 Chapter 6 Configuring authentication
Managing Active Directory passwords using the CLI
You can set up a mechanism for clients to change their passwords when the
passwords expire.
1
Define a user group in the Local database for users whose passwords have
expired.
2
Create a linkset and link to a site where the user can change the password (see
“Configuring groups using the CLI” on page 198).
3
Map the linkset to the group (see “Mapping linksets to a group or profile using
the CLI” on page 206).
4
Set the Active Directory settings using the
/cfg/domain 1/aaa/auth #/ldap/activedire command.
To manage clients whose passwords have expired or who need to change their
passwords, use the following command:
/cfg/domain 1/aaa/auth #/ldap/activedire
The Active Directory Settings menu displays.
The Active Directory Settings menu includes the following options:
/cfg/domain 1/aaa/auth #/ldap/activedire
followed by:
enaexpired true|false Specifies whether the system will perform a
password-expired check.
• true — the system performs a password-expired
check against Active Directory when the client logs
on
• false —the system does not perform a
password-expired check against Active Directory
when the client logs on
expiredgro <group>
320818-A
Specifies the group in which clients with expired
passwords will be placed.
Chapter 6 Configuring authentication 261
Configuring local database authentication using the CLI
You can configure the Nortel SNAS 4050 domain to use a local database for
authentication. To configure the Local database method, perform the following
steps:
1
Create the Local database method (see “Adding the local database
authentication method using the CLI” on page 261).
Note: If you ran the quick setup wizard during initial setup, Local
database authentication has been created with authentication ID = 1. The
database contains one test user (tg), who belongs to a group called
tunnelguard. To continue configuring the local database, go to
“Managing the local database using the CLI” on page 264.
2
Populate the database (see “Managing the local database using the CLI” on
page 264).
3
Save a backup copy of the database, using the /cfg/domain 1/aaa/
auth #/local/export command (see “Managing the local database using
the CLI” on page 264).
4
Modify settings for the authentication method itself, if desired (see
“Configuring authentication methods using the CLI” on page 239).
5
Set the authentication order (see “Specifying authentication fallback order
using the CLI” on page 267).
Adding the local database authentication method using the CLI
To create the Local database authentication method, use the following command:
/cfg/domain 1/aaa/auth <auth ID>
Nortel Secure Network Access Switch 4050 User Guide
262 Chapter 6 Configuring authentication
where auth ID is an integer in the range 1 to 63 that uniquely identifies the
authentication method in the Nortel SNAS 4050 domain. If you do not specify the
auth ID in the command, you are prompted for it..
When you first create the method for the domain, you must enter the
authentication ID. After you have created the method and defined a name for it,
you can use either the ID or the name to access the method for configuration.
The command to create the authentication ID launches a wizard. When prompted,
enter the following information. You can later modify all settings for the specific
local database configuration (see “Configuring authentication methods using
the CLI” on page 239 and “Managing the local database using the CLI” on
page 264).
•
•
•
authentication type — options are radius|ldap|local. Enter local.
authentication method name (auth name) — a string that specifies a name
for the method. After you have defined a name for the method, you can use
either the method name or the auth ID to access the Authentication menu.
In future releases of the Nortel SNAS 4050 software, you will be able to
reference this string in a client filter, so that authentication to the database in
question becomes a condition for access rights for a group.
user name — a string that specifies a unique user login name. This item
creates the first entry in the local database. To fully populate the database, add
more users later (see “Managing the local database using the CLI” on
page 264).
There are no restrictions on the Nortel SNAS 4050 regarding acceptable user
names. However, if you want the user name in the local database to mirror the
Windows login name, observe Windows username conventions (for example,
keep the length to no more than 32 characters).
•
320818-A
password (passwd) — the password that applies to the user you specified.
Chapter 6 Configuring authentication 263
•
group name — the name of the group to which the specified user belongs. The
group must exist in the Nortel SNAS 4050 domain. To view available group
names, press TAB.
Note: The prompt implies that you can enter multiple group names for a
user, but the Nortel SNAS 4050 does not allow membership in multiple
groups. If you enter multiple group names, the first group name entered
is the one that will be returned to the Nortel SNAS 4050 after
authentication.
The Authentication menu displays.
Figure 56 shows sample output for the Local method for the
/cfg/domain 1/aaa/auth <auth ID> command and commands on the
Authentication menu.
Figure 58 Authentication menu commands — local database
>> Main# /cfg/domain 1/aaa/auth
Enter auth id: (1-63) 4
Creating Authentication 4
Select one of radius, ldap or local: local
Auth name: local4
Entering: Local database menu
Enter user name: <username>
Enter passwd: <password>
Enter group names (comma separated): <group>
Leaving: Local database menu
--------------------------------------------------------[Authentication 4 Menu]
type
- Set authentication mechanism
name
- Set auth name
display - Set auth display name
radius - RADIUS settings menu
adv
- Advanced settings menu
del
- Remove Authentication
>> Authentication 4#
Nortel Secure Network Access Switch 4050 User Guide
264 Chapter 6 Configuring authentication
Managing the local database using the CLI
You can add users to the database in two ways:
•
•
manually, using the /cfg/domain 1/aaa/auth #/local/add command
by importing a database, using the /cfg/domain 1/aaa/auth #/local/
import command
Note: The imported database overwrites existing entries in the local
database.
You can use the local database for authorization only, after an external
authentication server has authenticated the user. To do so, use an asterisk (*) for
the user password in the local database. For information about configuring the
Nortel SNAS 4050 to perform external database authentication in conjunction
with local database authorization, see “Configuring advanced settings using
the CLI” on page 241.
To manage users and their passwords in the local database, use the following
command:
/cfg/domain 1/aaa/auth #/local
The Local database menu displays.
320818-A
Chapter 6 Configuring authentication 265
The Local database menu includes the following options:
/cfg/domain 1/aaa/auth #/local
followed by:
add <user name>
<password> <group>
Adds a user to the local authentication database. You
are prompted for the following information:
• user name — a string that specifies a unique
user logon name. There are no restrictions on the
NSNAS regarding acceptable user names.
However, if you want the user name in the local
database to mirror the Windows login name,
observe Windows username conventions (for
example, keep the length to no more than 32
characters).
When the client attempts to log on to the Nortel
SNAS 4050 domain and local database
authentication is applied, the client is prompted for
the user name and password you define for the
database.
• password — the password that applies to the
user you specified. To use the local database for
authorization only, after an external authentication
server has authenticated the user, enter an
asterisk (*).
• group — the name of the group to which the
specified user belongs. The group must exist in the
NSNAS domain. The group name is used for
authorization. To view available group names, press
TAB or use the /cfg/domain 1/aaa/
cur group command.
passwd <user name>
<password>
Changes the specified user’s password in the local
database.
groups <user name>
<desired group>
Changes the specified user’s group membership in the
local database.
del <user name>
Deletes the specified user from the local database.
list
Lists all users added to the local database by user
name, password (encrypted), and group membership.
The command displays a maximum of 100 database
entries at a time. If there are more than 100 entries in
the database, you can limit the display by using a string
of characters directly followed by an asterisk (*). For
example, the command list jo* displays all entries
with user names starting with jo.
Nortel Secure Network Access Switch 4050 User Guide
266 Chapter 6 Configuring authentication
/cfg/domain 1/aaa/auth #/local
followed by:
import <protocol>
<server> <filename>
<key>
Imports a database from the specified
TFTP/FTP/SCP/SFTP file exchange server. You are
prompted to provide the following information:
• protocol is the import protocol. Options are
•
tftp|ftp|scp|sftp.
server is the host name or IP address of the
server.
•
filename is the name of the database file on the
•
key is the password key for user password
server.
protection. For a database file whose passwords
were protected with a key when the file was
exported, the key you must provide is the same as
the password key provided at the time of export. If
the file is not protected with a key, enter any
characters (a minimum of four) when prompted.
• FTP user name and password, if applicable.
The file you import must be in ASCII format. Each row
entry consists of values for user name, password, and
group, separated by a colon (for example,
username:password:group)
Passwords in the imported database can be clear-text
or encrypted. Clear-text passwords will be encrypted
after import.
The imported database overwrites existing entries in
the local database.
320818-A
Chapter 6 Configuring authentication 267
/cfg/domain 1/aaa/auth #/local
followed by:
export <protocol>
<server> <filename>
<key>
Exports the local database to the specified
TFTP/FTP/SCP/SFTP file exchange server. You are
prompted to provide the following information:
• protocol is the export protocol. Options are
•
tftp|ftp|scp|sftp.
server is the host name or IP address of the
server.
•
•
filename is the name of the destination
database file on the server (for example, db.txt).
key is the password key for user password
protection. If you are not protecting the file with a
key, enter any characters (a minimum of four) when
prompted.
• FTP user name and password, if applicable.
The file is exported in ASCII format. Each row entry
consists of values for user name, password
(encrypted), and group, separated by a colon. The
following is an example of an exported user record with
the password encrypted:
john:$2$7á?yLs…ßìöonž±†:trusted
where $2$ indicates an encrypted password
Specifying authentication fallback order using the CLI
Authentication in the Nortel SNA solution is performed by checking client
credentials against available authentication databases until the first match is
found. You specify the order in which the Nortel SNAS 4050 applies the methods
configured for the Nortel SNAS 4050 domain.
Nortel Secure Network Access Switch 4050 User Guide
268 Chapter 6 Configuring authentication
Perform this step even if there is only one method defined on the Nortel
SNAS 4050.
Note: For best performance, set the authentication order so that the
method that supports the biggest proportion of users is applied first.
However, if you use the Nortel SNAS 4050 local database as one of the
authentication methods, Nortel recommends that you set the Local
method to be first in the authentication order. The Local method is
performed extremely fast, regardless of the number of users in the
database. Response times for the other methods depend on such factors
as current network load, server performance, and number of users in the
database.
To specify the authentication fallback order, use the following command:
/cfg/domain 1/aaa/authorder <auth ID>[,<auth ID>]
When prompted, enter the authentication method IDs in the order in which you
want the methods applied. Use a comma to separate the entries.
To view the currently configured authentication methods and their corresponding
authentication IDs, use the /cfg/domain 1/aaa/cur command.
For example: You have configured Local database authentication under auth ID 1,
RADIUS authentication under auth ID 2, and LDAP authentication under
auth ID 3. You want the Nortel SNAS 4050 to check the local database first, then
send requests to the LDAP server, then to the RADIUS server. Figure 59 shows
the required command.
Figure 59 Authentication order command
>> Main# /cfg/domain 1/aaa/authorder
Current value: ""
Enter auth order (comma separated): 1,3,2
>> AAA# apply
Changes applied successfully.
320818-A
Chapter 6 Configuring authentication 269
Configuring authentication using the SREM
The basic steps for configuring and managing authentication are:
1
Create the authentication methods.
2
Configure specific settings for the methods.
3
Specify the order in which the authentication methods will be applied.
Perform this step even if you define only one method on the Nortel
SNAS 4050.
4
Commit the configuration changes.
To configure authentication on the Nortel SNAS 4050 using the SREM, refer to
the following tasks:
•
•
•
•
•
•
“Configuring authentication methods using the SREM” on page 270
“Configuring RADIUS authentication using the SREM” on page 271
“Configuring LDAP authentication using the SREM” on page 282
“Configuring local database authentication using the SREM” on page 298
“Specifying authentication fallback order using the SREM” on page 314
“Saving authentication settings” on page 316
Nortel Secure Network Access Switch 4050 User Guide
270 Chapter 6 Configuring authentication
Configuring authentication methods using the SREM
To create and configure an authentication method, perform the following steps:
1
Select the Secure Access Domain > domain > AAA > Authentication >
Authentication Server Table tab.
The Authentication Server Table appears (see Figure 60).
Figure 60 Authentication Server Table
320818-A
Chapter 6 Configuring authentication 271
2
Click Add.
The Add an Authentication Server dialog box opens (see Figure 61 on
page 272).
3
In the list, select the authentication type you want to add. Available options
are:
— Radius
— LDAP
— Local
The default value is Radius. Fields displayed on the Add an Authentication
Server dialog change, depending on the method you select.
4
Continue with the appropriate section for the authentication method being
added:
•
•
•
For RADIUS authentication, go to “Configuring RADIUS authentication
using the SREM” on page 271
For LDAP authentication, go to “Configuring LDAP authentication using
the SREM” on page 282
For Local authentication, go to “Configuring local database
authentication using the SREM” on page 298
Configuring RADIUS authentication using the SREM
To configure the Nortel SNAS 4050 to use RADIUS authentication, perform the
following steps:
1
Add the RADIUS method to the domain and specify the RADIUS server (see
“Adding the RADIUS method and server” on page 272)
2
Modify the RADIUS configuration settings, if desired (see “Modifying
RADIUS configuration” on page 273)
3
Add extra RADIUS servers, for redundancy, if desired (see “Managing
additional RADIUS servers” on page 279)
Nortel Secure Network Access Switch 4050 User Guide
272 Chapter 6 Configuring authentication
Adding the RADIUS method and server
To configure the Nortel SNAS 4050 to use an external RADIUS or Steel-belted
RADIUS server for authentication, perform the following steps:
1
In the Add an Authentication Server dialog box, select Radius from the
drop-down list.
The display of the Add an Authentication Server dialog box refreshes (see
Figure 61).
Figure 61 Add an Authentication Server — Radius
320818-A
Chapter 6 Configuring authentication 273
2
Enter the authentication server information in the applicable fields.
Table 40 describes the Add an Authentication Server —Radius fields.
Table 40 Add an Authentication Server — Radius fields
Field
Description
Index
Specifies an integer in the range 1 to 63 that uniquely
identifies the authentication method on the Nortel
SNAS 4050.
Name
Specifies a name for the authentication method, as a
mnemonic aid.
The maximum allowable length of the name string is 255
characters, but Nortel recommends a maximum of 32
characters.
Future releases of the Nortel SNAS 4050 software will
allow you to reference this name in a client filter, so
authentication to this server becomes a condition for
access rights for a group.
Display Name
Specifies a name for the method, to display in the Login
Service list box on the portal login page, together with the
names of other authentication services available.
IP Address
Specifies the IP address of the RADIUS server.
Port
Specifies the port number configured for this server to use
on the RADIUS server. The default is 1812.
Secret
Specifies a unique shared secret configured on the
RADIUS server that authenticates the Nortel SNAS 4050
to the RADIUS server.
3
Click Apply.
The RADIUS authentication method displays in the Authentication Server
Table.
4
Click Apply on the toolbar to send the current changes to the Nortel
SNAS 4050. Click Commit on the toolbar to save the changes permanently.
Modifying RADIUS configuration
You can modify the RADIUS configuration in the following ways:
•
Modify settings for the authentication method itself (see “Modifying
RADIUS method settings” on page 274).
Nortel Secure Network Access Switch 4050 User Guide
274 Chapter 6 Configuring authentication
•
Modify settings for the specific RADIUS configuration (see “Modifying
RADIUS configuration settings” on page 276).
Modifying RADIUS method settings
To modify settings for an existing RADIUS authentication method, perform the
following steps:
1
Select the Secure Access Domain > domain > AAA > Authentication >
radius > Configuration tab.
The Configuration screen appears, showing current settings for the method
(see Figure 62).
Figure 62 Configuration
320818-A
Chapter 6 Configuring authentication 275
2
Modify settings for the authentication method as necessary.
Table 41 describes the Configuration fields.
Table 41 Configuration fields
Field
Description
Index
Specifies an integer in the range 1 to 63 that uniquely
identifies the authentication method on the Nortel
SNAS 4050.
Name
Specifies a name for the authentication method, as a
mnemonic aid.
Future releases of the Nortel SNAS 4050 software will
allow you to reference this name in a client filter, so
authentication to this server becomes a condition for
access rights for a group.
Mechanism
Displays the authentication type for this method.
Display Name
Specifies a name for the method, to display in the Login
Service list box on the portal login page, together with the
names of other authentication services available.
Secondary Authentication
Server
Specifies a second authentication method to use as a
backup authentication service, if necessary.
Group Authentication List
Specifies another authentication method to use for
retrieving group information.
You can choose any existing Local or LDAP database to
retrieve group information. User groups that exist in the
RADIUS authentication scheme are added to the user
groups found in the specified authentication schemes.
3
Click Apply on the toolbar to send the current changes to the Nortel
SNAS 4050. Click Commit on the toolbar to save the changes permanently.
Nortel Secure Network Access Switch 4050 User Guide
276 Chapter 6 Configuring authentication
Modifying RADIUS configuration settings
To modify the RADIUS method configuration, perform the following steps:
1
Select the Secure Access Domain > domain > AAA > Authentication >
radius > Radius Configuration tab.
The Radius Configuration screen appears (see Figure 63).
Figure 63 Radius Configuration
320818-A
Chapter 6 Configuring authentication 277
2
Modify settings for the RADIUS configuration as necessary.
Table 42 describes the Radius Configuration fields.
Table 42 Radius Configuration fields
Field
Description
Vendor Id for Group
Attributes
Specifies the vendor-specific attribute used by the RADIUS
server to send group names to the Nortel SNAS 4050. The
default Vendor-Id is 1872 (Alteon).
To use a standard RADIUS attribute rather than the
vendor-specific one, set the vendor ID to 0 (see also
vendor type).
Note: If the Authentication Protocol is CHAPv2, the
Vendor-Id must be set to 311 (Microsoft).
Vendor Type for Group
Attributes
Specifies the Vendor-Type value used in combination with
the Vendor-Id to identify the groups to which the user
belongs. The group names to which the vendor-specific
attribute points must match names you define on the Nortel
SNAS 4050. The default is 1.
If you set the vendor ID to 0 in order to use a standard
RADIUS attribute (see vendor ID), set the vendor type to a
standard attribute type as defined in RFC 2865. For
example, to use the standard attribute Class, set the
vendor ID to 0 and the vendor type to 25.
Vendor Id for Domain ID
Attributes
Specifies the vendor-specific attribute used by the RADIUS
server to send domain names to the Nortel SNAS 4050.
The default Vendor-Id is 1872 (Alteon).
Note: If the Authentication Protocol is CHAPv2, consider
setting the Vendor-Id for the domain to 10
(MS-CHAP-Domain).
Vendor Type for Domain ID
Attributes
Specifies the Vendor-Type value used in combination with
the Vendor-Id to identify the domain. The default is 2.
Radius Server Timeout
Sets the timeout interval for a connection request to a
RADIUS server. At the end of the timeout period, if no
connection has been established, authentication will fail.
Acceptable values are an integer that indicates the time
interval followed by a letter to specify the measurement
unit. The options for measurement units are:
• s — seconds
• m — minutes
• h — hours
If you do not specify a measurement unit, seconds is
assumed. The range is 1–10000 seconds. The default is
10 seconds.
Nortel Secure Network Access Switch 4050 User Guide
278 Chapter 6 Configuring authentication
Table 42 Radius Configuration fields (continued)
Field
Description
Authentication Protocol
Specifies the protocol used for communication between the
Nortel SNAS 4050 and the RADIUS server. The options
are:
• PAP — Password Authentication Protocol (PAP)
• CHAPv2 — Challenge Handshake Authentication
Protocol (CHAP), version 2
The default is PAP.
Vendor ID
Specifies the vendor-specific attribute used by the RADIUS
server to send a session timeout value to the Nortel
SNAS 4050. The default Vendor-Id is 0.
With the Vendor-Type also set to 0 (the default value), the
RADIUS server sends the standard attribute for session
timeout.
Vendor Type
Specifies the Vendor-Type value used in combination with
the Vendor-Id to identify the session timeout value to send
to the Nortel SNAS 4050. The default is 0.
State
Enables of disable retrieval of the RADIUS server session
timeout value. The default is disabled.
3
320818-A
Click Apply on the toolbar to send the current changes to the Nortel
SNAS 4050. Click Commit on the toolbar to save the changes permanently.
Chapter 6 Configuring authentication 279
Managing additional RADIUS servers
Additional RADIUS servers can be specified for redundancy. In the event that the
preferred RADIUS server is not responding, the first available server in the list
will be used instead.
To manage additional RADIUS servers, select the Secure Access Domain >
domain > AAA > Authentication > radius > Radius Servers tab.
The RADIUS Servers screen appears (see Figure 64), displaying a list of the
existing RADIUS servers.
Figure 64 Radius Servers
Nortel Secure Network Access Switch 4050 User Guide
280 Chapter 6 Configuring authentication
The RADIUS Server Table allows you to manage additional RADIUS servers by
performing any of the following procedures:
•
•
•
“Adding a RADIUS server” on page 280
“Reordering additional RADIUS servers” on page 281
“Removing a RADIUS server” on page 281
Adding a RADIUS server
To add additional RADIUS servers for redundancy, perform the following steps:
1
Select the Secure Access Domain > domain > AAA > Authentication >
radius > Radius Servers tab.
The RADIUS Servers screen appears (see Figure 64 on page 279).
2
Click Add.
The Add a Radius Server dialog box appears (see Figure 65).
Figure 65 Add a Radius Server
3
Enter the RADIUS server information in the applicable fields.
Table 43 describes the Add a RADIUS Server fields.
Table 43 Add a Radius Server fields
320818-A
Field
Description
IP Address
Specifies the IP address of the RADIUS server.
Chapter 6 Configuring authentication 281
Table 43 Add a Radius Server fields (continued)
Field
Description
Port
Specifies the port number configured for this server to use
on the RADIUS server. The default is 1812.
Secret
Specifies a unique shared secret configured on the
RADIUS server that authenticates the Nortel SNAS 4050
to the RADIUS server.
4
Click Apply.
The new RADIUS server is automatically assigned a unique index number,
and appears in the RADIUS Server Table.
5
Click Apply on the toolbar to send the current changes to the Nortel
SNAS 4050. Click Commit on the toolbar to save the changes permanently.
Reordering additional RADIUS servers
To adjust the order in which RADIUS servers are used, perform the following
steps:
1
Select the Secure Access Domain > domain > AAA > Authentication >
radius > Radius Servers tab.
The RADIUS Servers screen appears (see Figure 69 on page 291).
2
Select an RADIUS server entry from the RADIUS Server Table.
3
Use the up and down arrows to reposition the selected entry.
4
Click Apply on the toolbar to accept the new order, and adjust index numbers
for the RADIUS servers accordingly. Click Commit on the toolbar to save the
changes permanently.
Removing a RADIUS server
To remove an existing RADIUS server from the RADIUS Server Table, perform
the following steps:
1
Select the Secure Access Domain > domain > AAA > Authentication >
radius > Radius Servers tab.
Nortel Secure Network Access Switch 4050 User Guide
282 Chapter 6 Configuring authentication
The RADIUS Servers screen appears (see Figure 69 on page 291).
2
Select an RADIUS server entry from the RADIUS Server Table.
3
Click Delete.
A confirmation dialog appears.
4
Click Yes.
The RADIUS server is removed from the RADIUS Server Table.
5
Click Apply on the toolbar to accept the new order, and adjust index numbers
for the RADIUS servers accordingly. Click Commit on the toolbar to save the
changes permanently.
Next steps
1
Configure additional authentication methods, if desired (see “Configuring
LDAP authentication using the SREM” on page 282 or “Configuring local
database authentication using the SREM” on page 298).
2
Set the authentication order (see “Specifying authentication fallback order
using the SREM” on page 314).
3
Commit the changes (see “Saving authentication settings” on page 316).
Configuring LDAP authentication using the SREM
To configure the Nortel SNAS 4050 to use LDAP authentication, perform the
following steps:
320818-A
1
Add the LDAP method to the domain and specify the LDAP server (see
“Adding the LDAP method and server” on page 283).
2
Modify the LDAP configuration settings, if desired (see “Modifying LDAP
configuration” on page 284).
3
Add extra LDAP servers, for redundancy, if desired (see “Managing
additional LDAP servers” on page 291).
4
Add LDAP macros, if desired (see “Managing LDAP macros” on page 294).
Chapter 6 Configuring authentication 283
Adding the LDAP method and server
To configure the Nortel SNAS 4050 to use an external LDAP server for
authentication, perform the following steps:
1
In the Add an Authentication Server dialog box, select LDAP from the
drop-down list.
The display of the Add an Authentication Server dialog box refreshes (see
Figure 66).
Figure 66 Add an Authentication Server — LDAP
2
Enter the authentication server information in the applicable fields.
Table 44 describes the Add an Authentication Server —LDAP fields.
Table 44 Add an Authentication Server — LDAP fields
Field
Description
Index
Specifies an integer in the range 1 to 63 that uniquely
identifies the authentication method on the Nortel
SNAS 4050.
Name
Specifies a name for the authentication method, as a
mnemonic aid.
Future releases of the Nortel SNAS 4050 software will
allow you to reference this name in a client filter, so
authentication to this server becomes a condition for
access rights for a group.
Nortel Secure Network Access Switch 4050 User Guide
284 Chapter 6 Configuring authentication
Table 44 Add an Authentication Server — LDAP fields (continued)
Field
Description
Display Name
Specifies a name for the method, to display in the Login
Service list box on the portal login page, together with the
names of other authentication services available.
IP Address
Specifies the IP address of the RADIUS server.
Port
Specifies the port number configured for this server to use
on the RADIUS server. The default is 1812.
3
Click Apply.
The LDAP authentication method displays in the Authentication Server Table.
4
Click Apply on the toolbar to send the current changes to the Nortel
SNAS 4050. Click Commit on the toolbar to save the changes permanently.
Modifying LDAP configuration
You can modify the LDAP configuration in the following ways:
•
•
320818-A
Modify settings for the authentication method itself (see “Modifying LDAP
method settings” on page 285).
Modify settings for the specific LDAP configuration (see “Modifying LDAP
configuration settings” on page 287).
Chapter 6 Configuring authentication 285
Modifying LDAP method settings
To modify settings for an existing LDAP authentication method, perform the
following steps:
1
Select the Secure Access Domain > domain > AAA > Authentication >
ldap > Configuration tab.
The Configuration screen appears, showing current settings for the method
(see Figure 67).
Figure 67 Configuration
Nortel Secure Network Access Switch 4050 User Guide
286 Chapter 6 Configuring authentication
2
Modify settings for the authentication method as necessary.
Table 45 describes the Configuration fields.
Table 45 Configuration fields
Field
Description
Index
Specifies an integer in the range 1 to 63 that uniquely
identifies the authentication method on the Nortel
SNAS 4050.
Name
Specifies a name for the authentication method, as a
mnemonic aid.
Future releases of the Nortel SNAS 4050 software will
allow you to reference this name in a client filter, so
authentication to this server becomes a condition for
access rights for a group.
Mechanism
Displays the authentication type for this method.
Display Name
Specifies a name for the method, to display in the Login
Service list box on the portal login page, together with the
names of other authentication services available.
Group Authentication List
Specifies another authentication method to use for
retrieving group information.
You can choose any existing Local or LDAP database to
retrieve group information. User groups that exist in the
RADIUS authentication scheme are added to the user
groups found in the specified authentication schemes.
3
320818-A
Click Apply on the toolbar to send the current changes to the Nortel
SNAS 4050. Click Commit on the toolbar to save the changes permanently.
Chapter 6 Configuring authentication 287
Modifying LDAP configuration settings
To modify the LDAP method configuration, perform the following steps:
1
Select the Secure Access Domain > domain > AAA > Authentication >
ldap > LDAP Configuration tab.
The LDAP Configuration screen appears (see Figure 68).
Figure 68 LDAP Configuration
Nortel Secure Network Access Switch 4050 User Guide
288 Chapter 6 Configuring authentication
2
Modify settings for the LDAP configuration as necessary.
Table 46 describes the LDAP Configuration fields.
Table 46 LDAP Configuration fields
320818-A
Field
Description
Enable LDAPs
If selected, makes LDAP requests between the Nortel
SNAS 4050 and the LDAP server occur over a secure SSL
connection (LDAPS). The default is not selected.
Note: The default TCP port number used by the LDAP
protocol is 389. If LDAPS is enabled, change the port
number to 636.
Search Base Entry
Specifies the Distinguished Name (DN) that points to one
of the following:
• the entry that is one level up from the user entries (does
not require a Bind ISD DN and Bind ISD Password)
• if user entries are located in several places in the LDAP
Dictionary Information Tree (DIT), the position in the
DIT from where all user records can be found with a
subtree search (requires Bind ISD DN and Bind ISD
Password)
Group Attribute
Specifies the LDAP attribute that contains the names of the
groups. The group names contained in the LDAP attribute
must be defined in the Nortel SNAS 4050 domain (see
“Configuring groups using the SREM” on page 208).
To specify more than one group attribute name, enter the
names separated by a comma (,).
Chapter 6 Configuring authentication 289
Table 46 LDAP Configuration fields (continued)
Field
Description
User Attribute
Refers to one of the following:
1. the LDAP attribute that contains the user name used for
authenticating a client in the domain.
The default user attribute name is uid.
Do not use the Bind ISD DN and Bind ISD Password
fields.
2. if the client’s portal logon name is different from the
RDN (for example, when using LDAP for authentication
towards Active Directory), the LDAP attribute that is
used in combination with the client’s logon name to
search the DIT.
For example, a user record in Active Directory is
defined as the following DN: cn=Bill Smith,
ou=Users, dc=example, dc=com. The user
record also contains the attribute
sAMAccountName=bill. The user’s login name is
bill. If the user attribute is defined as
sAMAccountName, the user record for Bill Smith will
be found.
The Bind ISD DN and Bind ISD Password fields are
required so that the Nortel SNAS 4050 can
authenticate itself to the LDAP server, in order to
search the DIT.
Bind ISD DN
Specifies an entry in the LDAP server used to authenticate
the Nortel SNAS 4050 to the LDAP server, so that the
LDAP DIT can be searched.
The Bind ISD DN corresponds to an entry created in the
Schema Admins account (for example, cn=ldap ldap,
cn=Users, dc=example, dc=com).
Required for the Search Base Entry and User Attribute
method 2.
Bind ISD Password
Specifies the password used to authenticate the Nortel
SNAS 4050 to the LDAP server. The Bind ISD Password is
the password, configured in the Schema Admins account,
for the entry referenced in Bind ISD DN.
Required for the Search Base Entry and User Attribute
method 2.
Nortel Secure Network Access Switch 4050 User Guide
290 Chapter 6 Configuring authentication
Table 46 LDAP Configuration fields (continued)
Field
Description
Enable User Preferences
Enables or disables storage of user preferences in an
external LDAP/Active Directory database.
If selected, the storage and retrieval of user preferences is
enabled. When the client logs out from a portal session, the
Nortel SNAS 4050 saves any user preferences
accumulated during the session in the isdUserPrefs
attribute. The next time the client successfully logs on
through the portal, the Nortel SNAS 4050 retrieves the
LDAP attribute from the LDAP database.
If cleared, the storage and retrieval of user preferences is
disabled.
To support storage and retrieval of user preferences, you
must extend the LDAP server schema with one new
ObjectClass and one new Attribute. For more information,
see Appendix E, “Adding User Preferences attribute to
Active Directory,” on page 883,.
Cut Domain From User
Name
Specifies whether the domain is cut from user names.
Default is disabled.
LDAP Server Timeout
Sets the timeout interval for a connection request to an
LDAP server. At the end of the timeout period, if no
connection has been established, authentication will fail.
Accepted value is an integer that indicates the time interval
in seconds (s), minutes (m), or hours (h). If you do not
specify a measurement unit, seconds is assumed. The
range is 1–10000 seconds. The default is 5 seconds.
Expired Password Group
Specifies the group in which clients with expired passwords
will be placed.
Check Expired Account
Specifies whether the system will perform a
password-expired check.
If selected, then the system performs a password-expired
check against Active Directory when the client logs on.
If cleared, then the system does not perform a
password-expired check against Active Directory when the
client logs on.
3
320818-A
Click Apply on the toolbar to send the current changes to the Nortel
SNAS 4050. Click Commit on the toolbar to save the changes permanently.
Chapter 6 Configuring authentication 291
Managing additional LDAP servers
Additional LDAP servers can be specified for redundancy. In the event that the
preferred LDAP server is not responding, the first available server in the list will
be used instead.
To manage additional LDAP servers, select the Secure Access Domain >
domain > AAA > Authentication > ldap > LDAP Servers tab.
The LDAP Servers screen appears (see Figure 69), displaying a list of the existing
LDAP servers.
Figure 69 LDAP Servers
Nortel Secure Network Access Switch 4050 User Guide
292 Chapter 6 Configuring authentication
The LDAP Server Table allows you to manage additional LDAP servers by
performing any of the following procedures:
•
•
•
“Adding an LDAP server” on page 292
“Reordering additional LDAP servers” on page 293
“Removing an LDAP server” on page 293
Adding an LDAP server
To add an additional LDAP server, perform the following steps:
1
Select the Secure Access Domain > domain > AAA > Authentication >
ldap > LDAP Servers tab.
The LDAP Servers screen appears (see Figure 69 on page 291).
2
Click Add.
The Add an LDAP Server dialog box appears (see Figure 70).
Figure 70 Add an LDAP Server
3
Enter the LDAP server information in the applicable fields.
Table 47 describes the Add an LDAP Server fields.
Table 47 Add an LDAP Server fields
Field
Description
IP Address
Specifies the IP address of the LDAP server.
Port
Specifies the port number configured for this server to use
on the LDAP server. The default is 1812.
4
320818-A
Click Apply.
Chapter 6 Configuring authentication 293
The new LDAP server is automatically assigned a unique index number, and
appears in the LDAP Server Table.
5
Click Apply on the toolbar to send the current changes to the Nortel
SNAS 4050. Click Commit on the toolbar to save the changes permanently.
Reordering additional LDAP servers
To adjust the order in which LDAP servers are used, perform the following steps:
1
Select the Secure Access Domain > domain > AAA > Authentication >
ldap > LDAP Servers tab.
The LDAP Servers screen appears (see Figure 69 on page 291).
2
Select an LDAP server entry from the LDAP Server Table.
3
Use the up and down arrows to reposition the selected entry.
4
Click Apply on the toolbar to accept the new order, and adjust index numbers
for the LDAP servers accordingly. Click Commit on the toolbar to save the
changes permanently.
Removing an LDAP server
To remove an existing LDAP server from the LDAP Server Table, perform the
following steps:
1
Select the Secure Access Domain > domain > AAA > Authentication >
ldap > LDAP Servers tab.
The LDAP Servers screen appears (see Figure 69 on page 291).
2
Select an LDAP server entry from the LDAP Server Table.
3
Click Delete.
A confirmation dialog appears.
4
Click Yes.
The LDAP server is removed from the LDAP Server Table.
Nortel Secure Network Access Switch 4050 User Guide
294 Chapter 6 Configuring authentication
5
Click Apply on the toolbar to send the current changes to the Nortel
SNAS 4050. Click Commit on the toolbar to save the changes permanently.
Managing LDAP macros
You can create your own macros (or variables), to allow you to retrieve data from
the LDAP database. You can then map the variable to an LDAP user attribute in
order to create user-specific links on the portal Home tab. When the client
successfully logs on, the variable expands to the value retrieved from the LDAP or
Active Directory user record. For more information about using macros in portal
links, see “Macros” on page 395.
320818-A
Chapter 6 Configuring authentication 295
To manage LDAP macro variables, select the Secure Access Domain > domain >
AAA > Authentication > ldap > LDAP Macros tab.
The LDAP Macros screen appears (see Figure 71) and displays a list of existing
LDAP macros.
Figure 71 LDAP Macros
The LDAP Macro Table allows you to manage LDAP macros by performing any
of the following procedures:
•
•
•
“Adding LDAP macros” on page 296
“Reordering LDAP macros” on page 297
“Removing LDAP macros” on page 297
Nortel Secure Network Access Switch 4050 User Guide
296 Chapter 6 Configuring authentication
Adding LDAP macros
To create an LDAP macro variable, perform the following steps:
1
Select the Secure Access Domain > domain > AAA > Authentication >
ldap > LDAP Macros tab.
The LDAP Macros screen appears (see Figure 71 on page 295).
2
Click Add.
The Add an LDAP Macro dialog box appears (see Figure 72).
Figure 72 Add an LDAP Macro
3
Enter the LDAP macro information in the applicable fields.
Table 48 describes the Add an LDAP Macro fields.
Table 48 Add an LDAP Macro fields
320818-A
Field
Description
Variable Name
Specifies the name of the variable.
Attribute Name
Specifies the LDAP user attribute whose value will be
retrieved from the client’s LDAP/Active Directory user
record.
Prefix
Specifies values at the start of the string that you want to
ignore, if the value string of the LDAP attribute is long and
you wish to extract only part of it. Combine with a suffix if
the value you want is in the middle of the string.
Suffix
Specifies values at the end of the string that you want to
ignore, if the value string of the LDAP attribute is long and
you wish to extract only part of it. Combine with a prefix if
the value you want is in the middle of the string.
Chapter 6 Configuring authentication 297
4
Click Apply.
The new LDAP macro is automatically assigned a unique index number, and
appears in the LDAP Macro Table.
5
Click Apply on the toolbar to send the current changes to the Nortel
SNAS 4050. Click Commit on the toolbar to save the changes permanently.
Reordering LDAP macros
To change the order of existing LDAP macro variables, perform the following
steps:
1
Select the Secure Access Domain > domain > AAA > Authentication >
ldap > LDAP Macros tab.
The LDAP Macros screen appears (see Figure 71 on page 295).
2
Select an LDAP macro entry from the LDAP Macro Table.
3
Use the up and down arrows to reposition the selected entry.
4
Click Apply on the toolbar to accept the new order, and adjust index numbers
for the LDAP macros accordingly. Click Commit on the toolbar to save the
changes permanently.
Removing LDAP macros
To remove existing LDAP macro variables, perform the following steps:
1
Select the Secure Access Domain > domain > AAA > Authentication >
ldap > LDAP Macros tab.
The LDAP Macros screen appears (see Figure 71 on page 295).
2
Select an LDAP macro entry from the LDAP Macro Table.
3
Click Delete.
A confirmation dialog appears.
4
Click Yes.
The LDAP macro is removed from the LDAP Macro Table.
Nortel Secure Network Access Switch 4050 User Guide
298 Chapter 6 Configuring authentication
5
Click Apply on the toolbar to send the current changes to the Nortel
SNAS 4050. Click Commit on the toolbar to save the changes permanently.
Next steps
1
Configure additional authentication methods, if desired (see “Configuring
RADIUS authentication using the SREM” on page 271 or “Configuring local
database authentication using the SREM” on page 298).
2
Set the authentication order (see “Specifying authentication fallback order
using the SREM” on page 314).
3
Commit the changes (see “Saving authentication settings” on page 316).
Configuring local database authentication using the SREM
Note: If you ran the quick setup wizard during initial setup, Local
database authentication has been created with authentication ID = 1. The
database contains one test user (tg), who belongs to a group called
tunnelguard. To continue configuring the local database, go to
“Populating the database” on page 301.
To configure the Nortel SNAS 4050 to use a local database for authentication,
perform the following steps:
320818-A
1
Add the Local method to the domain and create the local database (see
“Adding the Local method” on page 299).
2
Populate the database (see “Populating the database” on page 301).
3
Modify the local database settings, if desired (see “Modifying Local database
configuration” on page 305).
4
Export the local database, if desired (see “Exporting the database” on
page 312).
Chapter 6 Configuring authentication 299
Adding the Local method
To configure the Nortel SNAS 4050 to use the Local authentication method,
perform the following steps:
1
In the Add an Authentication Server dialog box, select Local from the
drop-down list.
The display of the Add an Authentication Server dialog box refreshes (see
Figure 73).
Figure 73 Add an Authentication Server — Local
Nortel Secure Network Access Switch 4050 User Guide
300 Chapter 6 Configuring authentication
2
Enter the authentication server information in the applicable fields.
Table 49 describes the Add an Authentication Server —Local fields.
Table 49 Add an Authentication Server — Local fields
Field
Description
Index
Specifies an integer in the range 1 to 63 that uniquely
identifies the authentication method on the Nortel
SNAS 4050.
Name
Specifies a name for the authentication method, as a
mnemonic aid.
Future releases of the Nortel SNAS 4050 software will
allow you to reference this name in a client filter, so
authentication to this server becomes a condition for
access rights for a group.
Display Name
Specifies a name for the method, to display in the Login
Service list box on the portal login page, together with the
names of other authentication services available.
User Name
Specifies a unique user login name. This item creates the
first entry in the local database. To fully populate the
database, add more users later (see “Populating the
database” on page 301).
There are no restrictions on the Nortel SNAS 4050
regarding acceptable user names. However, if you want the
user name in the local database to mirror the Windows
login name, observe Windows username conventions (for
example, keep the length to no more than 32 characters).
User Password
Specifies the password that applies to the user.
Confirm
Confirms the password specified for the user.
Change User Group
Specifies which group the user belongs to. All groups in the
Nortel SNAS 4050 domain are presented in the list.
3
Click Apply.
The Local authentication method displays in the Authentication Server Table.
4
320818-A
Click Apply on the toolbar to send the current changes to the Nortel
SNAS 4050. Click Commit on the toolbar to save the changes permanently.
Chapter 6 Configuring authentication 301
Populating the database
You can populate the Local database in two ways:
•
•
adding users manually (see “Adding users to the local database” on page 301)
importing a database (see “Importing a database” on page 304)
Adding users to the local database
To manually add individual users to the database, perform the following steps:
1
Select the Secure Access Domain > domain > AAA > Authentication >
local > Local Users tab.
The Local Users screen appears (see Figure 74).
Figure 74 Local Users
Nortel Secure Network Access Switch 4050 User Guide
302 Chapter 6 Configuring authentication
2
Click Add.
The Add a Local User dialog box appears (see Figure 75).
Figure 75 Add a Local User
3
Enter the local user information in the applicable fields.
Table 50 describes the Add a Local User fields.
Table 50 Add a Local User fields
320818-A
Field
Description
User Name
Specifies a unique user logon name. There are no
restrictions on the Nortel SNAS 4050 regarding acceptable
user names. However, if you want the user name in the
local database to mirror the Windows login name, observe
Windows username conventions (for example, keep the
length to no more than 32 characters).
When the client attempts to log on to the Nortel
SNAS 4050 domain and local database authentication is
applied, the client is prompted for the user name and
password you define for the database.
User Password
Specifies the password that applies to the new user. To
only use the local database for authorization after an
external authentication server has authenticated the user,
enter an asterisk (*).
Confirm
Confirms the user password.
Change User Group
Specifies the group to which the new user belongs. The
group must exist in the Nortel SNAS 4050 domain. The
group name is used for authorization.
Chapter 6 Configuring authentication 303
4
Click Apply.
The new user entry appears in the list of local users.
5
Repeat step 2 through step 4 for each user you want to add to the database.
6
To remove users from the local users list:
a
Select a user from the table.
b
Click Delete.
A confirmation dialog appears.
c
Click Yes.
The local user is removed from the list.
7
Click Apply on the toolbar to send the current changes to the Nortel
SNAS 4050. Click Commit on the toolbar to save the changes permanently.
Nortel Secure Network Access Switch 4050 User Guide
304 Chapter 6 Configuring authentication
Importing a database
Note: The imported database will overwrite existing entries in the local
database.
To import a database of local users, perform the following steps.
1
Select the Secure Access Domain > domain > AAA > Authentication >
local > Import Local User Database tab.
The Import Local User Database screen appears (see Figure 67).
Figure 76 Import Local User Database
320818-A
Chapter 6 Configuring authentication 305
2
Enter the import information in the applicable fields.
Table 45 describes the Import Local User Database fields.
Table 51 Import Local User Database fields
Field
Description
Protocol
Specifies the import protocol. Options are:
• ftp
• tftp
• sftp
• scp
The default is ftp.
Host
Specifies the host name or IP address of the server.
Filename
Specifies the name of the database file on the server.
Pass Phrase/Key
Specifies the password key for user password protection.
For a database file whose passwords were protected with a
key when the file was exported, the key you must provide is
the same as the password key provided at the time of
export. If the file is not protected with a key, enter any
characters (a minimum of four) when prompted.
Username
For FTP, SFTP, and SCP, the user name and password to
access the file exchange server.
Password
For FTP, SFTP, and SCP, the user name and password to
access the file exchange server.
3
Click Apply on the toolbar to import the specified local user database.
Modifying Local database configuration
You can modify the Local configuration in the following ways:
•
•
•
Modify settings for the authentication method itself (see “Modifying Local
method settings” on page 306).
Modify user settings in the local database (see “Modifying local users” on
page 307).
Modify user passwords in the local database (see “Modifying local user
passwords” on page 309).
Nortel Secure Network Access Switch 4050 User Guide
306 Chapter 6 Configuring authentication
Modifying Local method settings
To modify settings for an existing local or LDAP authentication method, perform
the following steps:
1
Select the Secure Access Domain > domain > AAA > Authentication >
local > Configuration tab.
The Configuration screen appears, showing current settings for the method
(see Figure 77).
Figure 77 Configuration
320818-A
Chapter 6 Configuring authentication 307
2
Modify settings for the authentication method as necessary.
Table 52 describes the Configuration fields.
Table 52 Configuration fields
Field
Description
Index
Specifies an integer in the range 1 to 63 that uniquely
identifies the authentication method on the Nortel
SNAS 4050.
Name
Specifies a name for the authentication method, as a
mnemonic aid.
Future releases of the Nortel SNAS 4050 software will
allow you to reference this name in a client filter, so
authentication to this server becomes a condition for
access rights for a group.
Mechanism
Displays the authentication type for this method.
Display Name
Specifies a name for the method, to display in the Login
Service list box on the portal login page, together with the
names of other authentication services available.
Group Authentication List
Specifies another authentication method to use for
retrieving group information.
You can choose any existing Local or LDAP database to
retrieve group information. User groups that exist in the
RADIUS authentication scheme are added to the user
groups found in the specified authentication schemes.
3
Click Apply on the toolbar to send the current changes to the Nortel
SNAS 4050. Click Commit on the toolbar to save the changes permanently.
Modifying local users
To edit settings for existing users in the database, perform the following steps:
1
Select the Secure Access Domain > domain > AAA > Authentication >
local > Local Users tab.
The Local Users screen appears (see Figure 67 on page 285).
Nortel Secure Network Access Switch 4050 User Guide
308 Chapter 6 Configuring authentication
2
In the User Name list, select the user you want to edit.
The Local Users screen refreshes to display an editing pane in the bottom half
of the screen, with the user Configuration tab active (see Figure 78).
Figure 78 Local Users — Configuration
320818-A
Chapter 6 Configuring authentication 309
3
Modify the local user information in the applicable fields, as necessary.
Table 50 describes the Local Users — Configuration fields.
Table 53 Local Users — Configuration fields
Field
Description
User Name
Specifies a unique user logon name. There are no
restrictions on the Nortel SNAS 4050 regarding acceptable
user names. However, if you want the user name in the
local database to mirror the Windows login name, observe
Windows username conventions (for example, keep the
length to no more than 32 characters).
When the client attempts to log on to the Nortel
SNAS 4050 domain and local database authentication is
applied, the client is prompted for the user name and
password you define for the database.
User Password
Specifies the password that applies to the new user. To
only use the local database for authorization after an
external authentication server has authenticated the user,
enter an asterisk (*).
Change User Group
Specifies the group to which the new user belongs. The
group must exist in the Nortel SNAS 4050 domain. The
group name is used for authorization.
4
Click Apply on the toolbar to send the current changes to the Nortel
SNAS 4050. Click Commit on the toolbar to save the changes permanently.
Modifying local user passwords
To modify password settings for existing users in the database, perform the
following steps:
1
Select the Secure Access Domain > domain > AAA > Authentication >
local > Local Users tab.
The Local Users screen appears (see Figure 74 on page 301).
Nortel Secure Network Access Switch 4050 User Guide
310 Chapter 6 Configuring authentication
2
In the User Name list, select the user you want to edit.
The Local Users screen refreshes to display an editing pane in the bottom half
of the screen, with the user Configuration tab active (see Figure 78 on
page 308).
3
Select the Local User Configuration tab.
The Local Users screen refreshes to display the Local User Configuration
tab active (see Figure 79).
Figure 79 Local Users — Local User Configuration
320818-A
Chapter 6 Configuring authentication 311
4
Modify the local user information in the applicable fields, as necessary.
Table 50 describes the Local Users — Configuration fields.
Table 54 Local Users — Local User Configuration fields
Field
Description
User Password
Specifies the password that applies to the new user. To
only use the local database for authorization after an
external authentication server has authenticated the user,
enter an asterisk (*).
Confirm
Confirms the user password.
5
Click Apply on the toolbar to send the current changes to the Nortel
SNAS 4050. Click Commit on the toolbar to save the changes permanently.
Nortel Secure Network Access Switch 4050 User Guide
312 Chapter 6 Configuring authentication
Exporting the database
To export the database of local users, perform the following steps:
1
Select the Secure Access Domain > domain > AAA > Authentication >
local > Export Local User Database tab.
The Export Local User Database screen appears (see Figure 80).
Figure 80 Export Local User Database
320818-A
Chapter 6 Configuring authentication 313
2
Enter the export information in the applicable fields.
Table 55 describes the Export Local User Database fields.
Table 55 Export Local User Database fields
Field
Description
Protocol
Specifies the export protocol. Options are:
• ftp
• tftp
• sftp
• scp
The default is ftp.
Host
Specifies the host name or IP address of the server.
Filename
Specifies the name of the database file on the server.
Pass Phrase/Key
Specifies the password key for user password protection.
For a database file whose passwords were protected with a
key when the file was exported, the key you must provide is
the same as the password key provided at the time of
export. If the file is not protected with a key, enter any
characters (a minimum of four) when prompted.
Username
For FTP, SFTP, and SCP, the user name and password to
access the file exchange server.
Password
For FTP, SFTP, and SCP, the user name and password to
access the file exchange server.
3
Click Apply on the toolbar to export the specified local user database.
Next steps
1
Configure additional authentication methods, if desired (see “Configuring
RADIUS authentication using the SREM” on page 271 or “Configuring
LDAP authentication using the SREM” on page 282).
2
Set the authentication order (see “Specifying authentication fallback order
using the SREM” on page 314).
3
Commit the changes (see “Saving authentication settings” on page 316).
Nortel Secure Network Access Switch 4050 User Guide
314 Chapter 6 Configuring authentication
Specifying authentication fallback order using the SREM
Authentication in the Nortel SNAS 4050 solution is performed by checking client
credentials against available authentication databases until the first match is
found. You specify the order in which the Nortel SNAS 4050 applies the methods
configured for the Nortel SNAS 4050 domain.
Perform this step even if there is only one method defined on the Nortel
SNAS 4050.
Note: For best performance, set the authentication order so that the
method that supports the biggest proportion of users is applied first.
However, if you use the Nortel SNAS 4050 local database as one of the
authentication methods, Nortel recommends that you set the Local
method to be first in the authentication order. The Local method is
performed extremely fast, regardless of the number of users in the
database. Response times for the other methods depend on such factors
as current network load, server performance, and number of users in the
database.
320818-A
Chapter 6 Configuring authentication 315
To specify authentication fallback order, perform these steps:
1
Expand the Secure Access Domain > domain > AAA > Authentication >
Authentication Server Table.
The Authentication Server Order screen appears (see Figure 80).
Figure 81 Authentication Server Order
2
In the Fallback Order section, specify the authentication methods you wish
to use by selecting the applicable check boxes.
An authentication method whose check box is clear will not be used in the
domain.
Nortel Secure Network Access Switch 4050 User Guide
316 Chapter 6 Configuring authentication
3
4
Rearrange the list so that the methods appear in the desired order.
a
Click on a method to select it.
b
Using the up and down arrows, move the method to the desired position
in the list.
c
Repeat for the other methods until the list is in the desired order.
Click Apply on the toolbar to send the current changes to the Nortel
SNAS 4050. Click Commit on the toolbar to save the changes permanently.
Saving authentication settings
To save changes to the current configuration at any time, perform the following
steps:
1
Send changes to the Nortel SNAS 4050 using one of the following
procedures:
a
Click Apply on the toolbar to immediately accept all changes.
b
Click the Change Manager icon in the bottom right corner to view and
confirm the list of change current changes.
Note: A confirmation dialog may appear before entering the Change
Manager screen, asking if you want to review the changes and apply
them to the device. If this dialog does appear, click No to continue
viewing the Change Manager.
The Change Manager allows you to review or remove specific changes
before clicking Apply All.
320818-A
2
Click Diff to view pending changes on the Nortel SNAS 4050.
3
Do one of the following to implement or remove pending changes:
a
To implement the changes and alter the configuration permanently, click
Commit on the toolbar.
b
To discard the changes and revert to the previous configuration, click
Revert on the toolbar.
317
Chapter 7
TunnelGuard SRS Builder
This chapter includes the following topics:
Topic
Page
Configuring SRS rules
318
The TunnelGuard user interface
318
Menu commands
319
SRS definition toolbar
322
Software Definition — Available SRS list
323
SRS Components table
323
Memory snapshot
325
TunnelGuard Rule Definition screen
325
Managing TunnelGuard rules and expressions
327
Creating a software definition
327
Adding entries to a software definition
328
Creating logical expressions
333
Registry-based rules
338
Manually creating SRS entries
343
File age check
347
Adding comments
348
Deleting SRS rules and their components
349
TunnelGuard support for API calls
Making API calls
351
351
Nortel Secure Network Access Switch 4050 User Guide
318 Chapter 7 TunnelGuard SRS Builder
Configuring SRS rules
The building blocks used to construct the Software Requirement Set (SRS) are
files (or combinations of files) and registry key settings that must either be present
or be absent on the client host. You can create different SRS rules for different
groups.
You must use the TunnelGuard SRS Builder in the SREM to create or modify SRS
rules. You cannot create your own SRS rules using the CLI.
You can use the TunnelGuard quick setup wizard in either the CLI or the SREM to
create a test rule (srs-rule-test), which you can subsequently modify using
the TunnelGuard SRS Builder. To create the test rule, see “Using the quick
TunnelGuard setup wizard in the CLI” on page 134 or “Using the TunnelGuard
Quick Setup in the SREM” on page 172. The test rule tests for the presence of the
following file on the client host:
C:\tunnelguard\tg.txt
To create an SRS rule, perform the following steps:
1
Create a software definition (see “Creating a software definition” on
page 327)
2
Add entries to the software definition (see “Adding entries to a software
definition” on page 328 and “Creating a registry entry” on page 341)
3
Create logical expressions (see “Creating logical expressions” on page 333)
Note: When creating an SRS rule, consider the user rights that clients in
your network have on their machines. For example, do not configure an
SRS rule to check for registry items that users may not be authorized to
access.
The TunnelGuard user interface
To learn more about an item, select one of the following topics:
•
•
320818-A
“Menu commands” on page 319
“SRS definition toolbar” on page 322
Chapter 7 TunnelGuard SRS Builder 319
•
•
•
“Software Definition — Available SRS list” on page 323
“Memory snapshot” on page 325
“TunnelGuard Rule Definition screen” on page 325
Menu commands
Most functions within the TunnelGuard SRS Builder tool are accessed through the
following menus:
•
•
•
•
•
“File menu” on page 319
“Software Definition menu” on page 319
“Software Definition Entry menu” on page 320
“TunnelGuard Rule menu” on page 321
“Tool menu” on page 321
File menu
Table 56 describes important items from the File menu.
Table 56 File menu items
Item
Description
Save
Save the SRS definition in the Nortel
SNAS 4050 LDAP database.
Software Definition menu
Table 57 describes important items from the Software Definition menu.
Table 57 Software Definition menu items (Sheet 1 of 2)
Item
Description
New Software Definition
Creates a new software definition.
Delete Software Definition
Deletes the selected software definition.
Nortel Secure Network Access Switch 4050 User Guide
320 Chapter 7 TunnelGuard SRS Builder
Table 57 Software Definition menu items (Sheet 2 of 2)
Item
Description
Clone Software Definition
Clones the selected software definition.
Import Software Definition
Imports a software definition from an
XML-formatted file.
Export Software Definition
Exports a software definition to an
XML-formatted file.
Edit Software Definition
Comment
Edits the comment for the selected software
definition.
Auto Generate TunnelGuard Select this item to automatically create a rule
Rule
when a new SRS is created.
Software Definition Entry menu
Table 58 describes important items from the Software Definition Entry menu.
Table 58 Software Definition Entry menu items (Sheet 1 of 2)
320818-A
Item
Description
Add OnDisk file as entry
Select a file from the local file system, a text
configuration file, for example, and add it as
one component of the SRS.
Add Selected memory
module as entry
Add the selected memory module from the
current memory snapshot as a required
entry.
Add Registry Key entry
Add the registry key entry.
Delete
Delete the selected component.
Copy
Copy the selected component.
Paste
Paste a component (from one SRS definition
to another).
Custom Path
Select this option to specify a customized
path to a file.
Set Version Range
Specifies a version or version range for a
SRS component.
Set Date/Time Range
Specifies a date and/or time range for a SRS
component.
Chapter 7 TunnelGuard SRS Builder 321
Table 58 Software Definition Entry menu items (Sheet 2 of 2)
Item
Description
Add Vendor-Customized
API call check
Implements a third party API call to do
additional checking on the software.
Modify Registry entry
Modifies the registry entry
Ignore Hash Checking
Select this item to ignore the hash value
checking for the selected SRS entry.
Default Hash Algorithm
Select the default hash algorithm, MD5 or
SHA1.
TunnelGuard Rule menu
Table 59 describes important items from the TunnelGuard Rule menu.
Table 59 TunnelGuard Rule menu items
Item
Description
New TunnelGuard Rule
Creates a new TunnelGuard rule.
Delete TunnelGuard Rule
Deletes the selected TunnelGuard rule.
Clone TunnelGuard Rule
Clones the selected TunnelGuard rule.
Tool menu
Table 60 describes important items from the Tool menu.
Table 60 Tool menu item descriptions
Item
Description
Refresh memory snapshot
Refreshes the list of processes shown in the
memory snapshot area of the main screen.
You may want to refresh the view if you have
launched other applications while running the
SRS builder or if other processes started
after the SRS builder was started.
Nortel Secure Network Access Switch 4050 User Guide
322 Chapter 7 TunnelGuard SRS Builder
SRS definition toolbar
The buttons on the SRS definition toolbar allow you to create, delete, and manage
software requirement sets. Figure 82 on page 322 describes the toolbar icons. For
a description of each item see Table 61 on page 322.
Figure 82 SRS Definition toolbar
Create a new SRS definition
Delete an existing SRS definition
Clone an SRS
Import an SRS definition from an XML file
Export an SRS definition to an XML file
Edit Software comments
Table 61 SRS Definition toolbar item descriptions
Item
Description
Create a new SRS definition Creates a new SRS definition.
320818-A
Delete an existing SRS
definition
Deletes the currently selected SRS definition.
Clone an SRS
Creates a copy of the currently selected SRS
definition.
Import an SRS definition
from an XML file
Imports an XML-formatted SRS definition file.
Export an SRS definition to
an XML file
Exports SRS definitions to an XML-formatted
file.
Edit Software comments
Adds a comment. If the check fails, the
specified comment is written to the log.
Chapter 7 TunnelGuard SRS Builder 323
Software Definition — Available SRS list
The available SRS list shown in the Software Definition section of the
TunnelGuard SRS Builder main screen is initially retrieved from the Nortel
SNAS 4050. The list is updated when you make changes and click Save while
running the SRS Builder.
SRS Components table
When an SRS is selected in the Software Definition section that lists available
SRS definitions, the components of the SRS are shown on the right-hand side in
the SRS Components table. Table 62 describes the SRS components.
Table 62 SRS Components table items
Item
Description
Path
Shows the full directory path to the file
location.
Process
Shows the process name, in which the
component runs. For files the only exist on
disk, this column does not apply.
Version
Shows version information on the
component.
Date/Time
Shows the last modified time of the
component.
Registry Key
Shows the registry key entry.
Registry Expression
Shows a regular expression used to match a
registry key value.
DiskOnly
If checked, means the file will not be loaded
in memory. If this option is combined with the
API option, the file will be loaded and the API
called.
API
If checked, means the component contains a
third party API for further checking.
HashAlg
Shows the hash algorithm used to generate
the hash.
Hash
Shows the hash value of the file.
Nortel Secure Network Access Switch 4050 User Guide
324 Chapter 7 TunnelGuard SRS Builder
Customizing a component
When an SRS component is selected by clicking on it, you can customize it using
the toolbar below the component table, as shown in Figure 83. To learn more
about available customizations, see Table 63.
Figure 83 SRS Component table toolbar
Table 63 Component customization descriptions
Item
Description
Add OnDisk file as entry
Select a file from the local file system and
add it as one component of the SRS, for
example, a text configuration file or a DLL.
This enables you to make an API call to a
DLL, that is not yet loaded by TunnelGuard
or the application.
Add selected memory
module as entry
Add the selected memory module from
current memory snapshot.
Add registry key entry
Add the registry key entry.
Delete entry
Delete the selected component.
Copy entry
Copy the selected component.
Paste entry
Paste component (from one SRS definition to
another).
Customize path
Replace part of the path with a string of
system environment variables. For example:
%WINNT%\xxx.dll
320818-A
Set version range
Specify a particular version or a version
range for the selected component.
Set date/time range
Specify a last modified date/time of the
component, or a date/time range.
Add/Remove Vendor API
call check
Indicate if third party API calls will be made
using this component to do further checking.
Modify registry entry
Modify the registry key entry.
Ignore hash checking
Ignore hash value checking for the selected
SRS entry.
Chapter 7 TunnelGuard SRS Builder 325
Memory snapshot
The memory snapshot section in the lower half of the of the TunnelGuard SRS
Builder Software Definition screen displays all processes currently running on the
administrator’s system.
You can select and add any process currently running and loaded into the memory
snapshot to the SRS set by double-clicking on it or using the Add a selected
memory module menu command. To view descriptions of the information
displayed see Table 64.
Table 64 Memory snapshot item descriptions
Item
Description
Process
Shows the name of the process or file
currently in memory.
PID
Shows the unique system process ID for
each running process.
Description
Shows a text description, if one is available,
for each process.
TunnelGuard Rule Definition screen
Select the TunnelGuard Rule Definition tab to access the rule definition screen.
You use this screen to create and manage rules. The SRS Rule toolbar appears at
the top of the screen.
SRS Rule toolbar
The SRS rule toolbar icons allow you to:
•
•
•
Define a new SRS rule
Delete the selected SRS rule
Clone the selected SRS rule
Nortel Secure Network Access Switch 4050 User Guide
326 Chapter 7 TunnelGuard SRS Builder
SRS Rule list
The SRS Rule list shows the existing SRS rules. These rules are retrieved from the
Nortel SNAS 4050 at the TunnelGuard SRS Builder applet start-up time. For a
description of the information provided, see Table 65.
Table 65 SRS Rule information
Item
Description
TunnelGuard Rule Name
Shows the name of the rule.
TunnelGuard Rule
Expression
Provides the rule expression.
TunnelGuard Rule
Comment
Shows any comments related to the rule.
SRS Rule Expression Constructor
You use this section of the screen to define SRS rule expressions. To learn more
about managing TunnelGuard rules and expressions see “Managing TunnelGuard
rules and expressions” on page 327.
Available Expression list
The Available Expression list contains the elements you need to construct the
Boolean expression. The expressions can be basic SRS definitions or expressions
you construct.
Rule Expression Constructor
You can group multiple SRS Rule expressions into more compound expressions
using the AND, OR, or NOT operators.
Form TunnelGuard rule expression
Select this option to put the expression you created into the Available SRS Rule
Expression list.
320818-A
Chapter 7 TunnelGuard SRS Builder 327
Once the expression is formed, it is available for rule definitions. Any unused
expressions will not be saved on the Nortel SNAS 4050 and hence will not be
available after the TunnelGuard SRS Builder applet is closed.
Managing TunnelGuard rules and expressions
When the TunnelGuard applet is launched, all processes that are currently running
on your local system are displayed in the memory snapshot section at the bottom.
Select a process in the left pane of the Memory Snapshot section to display
included files and modules on the right.
To manage TunnelGuard Rules and Expressions, choose from one of the
following tasks:
•
•
•
•
•
•
•
•
“Creating a software definition” on page 327
“Adding entries to a software definition” on page 328
“Creating logical expressions” on page 333
“Registry-based rules” on page 338
“Manually creating SRS entries” on page 343
“File age check” on page 347
“Adding comments” on page 348
“Deleting SRS rules and their components” on page 349
Creating a software definition
To create a software definition, perform the following steps:
1
On the Software Definition menu, select New software definition.
The New SRS window appears (see Figure 84 on page 328).
Nortel Secure Network Access Switch 4050 User Guide
328 Chapter 7 TunnelGuard SRS Builder
Figure 84 The New SRS window
2
Enter a name for the software definition and click OK.
For example, to create a software definition specifying the antivirus modules
that must be present on the client system, enter the name “Antivirus”.
The new software definition is added in the Software Definition area.
Adding entries to a software definition
There are different ways of specifying which files and software executables
should be (or should not be) present or running on the client system. To learn
about these methods, select one of the following topics:
•
•
“Selecting modules or files from running processes” on page 328
“Selecting file on disk” on page 331
Selecting modules or files from running processes
1
On the Software Definition screen, in the Process list bottom left, select the
application or process to include in the software definition.
All processes that are currently running on your local PC system are
displayed. When you select a process or application, all its associated
modules are listed to the right.
2
On the right pane, under the Module Path heading, double-click a module
that should be included as an entry in the current software definition.
The Create New Memory Module SRS window is displayed (see Figure 85 on
page 329).
320818-A
Chapter 7 TunnelGuard SRS Builder 329
Figure 85 The Create New Memory Module SRS window
3
In the File (or Module) Path field, verify that the correct file or module is
selected.
If you want to add another file or module to the current software definition,
click Browse Local System and find the desired file.
4
Select the Fetch Module Path from Registry Entry check box, if the
module name can be fetched from a local registry entry on the desktop PC.
Then enter the desired key path and key value in the fields. Use this option if a
module name varies in different setups and is available in a registry key.
5
To ignore path checking, select the Ignore Path Checking check box.
Nortel Secure Network Access Switch 4050 User Guide
330 Chapter 7 TunnelGuard SRS Builder
If enabled, the client system will be searched for the specified file name,
irrespective of path to folder.
6
In the Process Name field, enter the name of the process whose module you
wish to add as a software definition entry.
The name of the selected process is displayed by default.
7
In the Min and Max Version area, you can specify the minimum or
maximum version of the file/module.
If there are no restrictions as to version (minimum or maximum) select Any.
8
Choose one of the following actions:
•
Select the Relative Date/Time Range button and specify the maximum
file age.
Lets you specify the file age in number of days.
•
Select the Specific Date/Time Range button and specify the desired time
range or specific date/time.
Lets you specify a date/time range or an exact date/time referring to when
the file was created or last modified.
9
Select the Vendor API Call Check check box to invoke a 3rd-party API call
for doing additional checking on the software.
One of the features of TunnelGuard is the ability to specify an API that you
want to use to check a file, such as an executable. TunnelGuard supports the
use of API calls that check on either startup, when the component (for
example, an executable or DLL) is launched from a file on disk; or during
runtime, when a component is already launched and running in memory.
For more information, see “Making API calls” on page 351.
10 Select the Enable Hash Checking check box to enable hash value checking
of the current SRS entry.
Then paste the hash value to be checked in the Hash Value field. The hash
value of a selected file/module (if any) is displayed by default.
11 Click OK.
320818-A
Chapter 7 TunnelGuard SRS Builder 331
The file/module is added as an entry in the selected software definition. By
clicking the Save and More button, the entry is saved but the Create New
Memory Module SRS window remains open so you can add more entries to
the current software definition.
12 Select the TunnelGuard Rule Definition tab.
A TunnelGuard SRS rule and expression with the same name as the software
definition are automatically created and shown on the TunnelGuard Rule
Definition tab. The expression is shown in the Available Expressions area
bottom left of the TunnelGuard Rule Definition tab.
The TunnelGuard SRS rule can now be mapped to the desired user group. If
needed, a new software definition can be created. The expression created for
this software definition can be used to form a new logical expression,
including both the new and the existing expression. See “Creating logical
expressions” on page 333.
Selecting file on disk
This method lets you add files that are not shown in the memory snapshot. Select
a file from the local file system, for example a text configuration file, and add it as
a software definition entry. You can also add files that are not present on your file
system, such as malicious files. Using the NOT operand when forming logical
expressions, you can then instruct TunnelGuard to verify that certain files are not
present on the client system.
Nortel Secure Network Access Switch 4050 User Guide
332 Chapter 7 TunnelGuard SRS Builder
To create a software definition entry for a file not shown in the memory snapshot,
perform the following steps:
1
On the Software Definition Entry menu, select Add OnDisk File as entry.
To include the file in a new software definition, first create the new software
definition (select New Software Definition on the Software Definition menu).
The Create New ON Disk SRS Entry window is displayed (see Figure 86).
Figure 86 The Create New ON Disk SRS Entry window
2
In the File (or Module) Path field, enter the path to the file.
To add a file that exists on your system, click the Browse Local System button
and find the desired file.
320818-A
Chapter 7 TunnelGuard SRS Builder 333
3
Select the Fetch Module Path from Registry Entry check box, if the file
name can be fetched from a local registry entry on the desktop PC.
Then enter the desired key path and key value in the fields. Use this option if a
module name varies in different setups and available in a registry key.
4
Specify the desired limitations regarding version and file age.
See the previous section for more detailed information about these options.
5
Select the Enable Hash Checking check box to enable hash value checking
of the current SRS entry.
Then paste the hash value to be checked in the Hash Value field. The hash
value of a selected file/module (if any) is displayed by default.
6
Click OK.
The file/module is added as an entry in the selected software definition. By
clicking the Save and More button, the entry is saved but the Create New On
Disk SRS Entry window remains open so you can add more entries to the
current software definition.
The file is added as a software definition entry on the right pane.
Creating logical expressions
To be able to specify an SRS rule that comprises a number of different
requirements, you may create a logical expression. The logical expression should
contain the conditions that must be true for the TunnelGuard checks to pass. For
example, a logical expression can define several applications that must be present
on the client computer or that either of two applications must be present.
Having created a logical expression with the desired conditions, select the
expression for the TunnelGuard SRS rule.
1
Create the desired software definitions.
For example, you may create one software definition identifying an antivirus
program, another software definition that identifies a certain executable, a
third that identifies a certain dll file an so on. For instructions on how to create
a software definition, see “Creating a software definition” on page 327.
Nortel Secure Network Access Switch 4050 User Guide
334 Chapter 7 TunnelGuard SRS Builder
2
Click the TunnelGuard Rule Definition tab.
TunnelGuard rules and expressions with the same names as the software
definitions have been created and appear on the TunnelGuard Rule Definition
tab (see Figure 87).
Figure 87 The TunnelGuard Rule Definition tab
In the example above, two TunnelGuard rules have been created, each
defining a unique application. To create one TunnelGuard rule comprising
both applications, we should start by creating a new logical expression.
3
Select the desired expression in the Available Expressions area and click the
arrow right button.
The expression is copied to the right area.
320818-A
Chapter 7 TunnelGuard SRS Builder 335
4
Select another expression that you will use to form a new logical expression
in combination with the first.
5
Using the radio buttons, select the type of expression you wish to construct, in
this example an AND expression.
The AND expression lets you construct a logical expression where both
conditions must be met for the TunnelGuard checks to pass. The OR
expression lets you construct an expression where either of the conditions
must be met for the TunnelGuard checks to pass. The NOT operand lets you
construct an expression where the condition must not be met for the
TunnelGuard checks to pass, for example the file or files in the software
definition must not be found on the client machine.
6
Click the Form TunnelGuard Rule Expression button.
A new expression is created and copied to the Available Expressions area (see
Figure 88 on page 336).
Nortel Secure Network Access Switch 4050 User Guide
336 Chapter 7 TunnelGuard SRS Builder
Figure 88 The Available Expressions screen
7
Create a new TunnelGuard Rule.
On the TunnelGuard Rule menu, select New TunnelGuard Rule. The New
SRS Rule window appears (see Figure 89).
Figure 89 The New SRS Rule window
8
320818-A
Enter a name for the TunnelGuard rule and click OK.
Chapter 7 TunnelGuard SRS Builder 337
The new rule name appears in the TunnelGuard Rule Name column (see
Figure 90).
Figure 90 The TunnelGuard Rule Name screen
9
Click the TunnelGuard Rule Expression column. This column converts to a
drop down list. Scroll through the list of expressions and choose the
expression you would to associate with this rule.
Any logical expression that you create may be used in a new logical
expression, for example to construct more complex conditions.
Nortel Secure Network Access Switch 4050 User Guide
338 Chapter 7 TunnelGuard SRS Builder
Registry-based rules
TunnelGuard Agent supports checking of on-disk files, running processes, hash
checking, and version numbers to verify installed software packages. Reading the
registry settings on a client’s PC is another way of checking software packages
and their installed state.
The following sections provide details on registry-based rules:
•
•
•
•
“Registry-only SRS entry” on page 338
“Creating a registry entry” on page 341
“Registry-based File/Module” on page 342
“Manually creating SRS entries” on page 343
Registry-only SRS entry
Both TunnelGuard Agent and TunnelGuard administrator applet support
registry-checking functionality. The administrator tool applet is used to add
registry key checks into SRS entries. You can check for the existence of certain
registry keys and enforce their values on a desktop PC before allowing access to
the network. One SRS entry holds any number of registry key checks, just as one
SRS entry holds any number of file checks. Contrary to file and process checks,
registry key checks do not have hash checking, date, and version number checking
enabled. However, you can combine registry key checking entry with any other
type of checking, such as process check or on-disk entry check.
Registry-based rules are most useful in instances where rules are created based on
Registry Key Values. TunnelGuard supports simple regular expressions-based
rules for Registry Key Values.
TunnelGuard Agent leverages the advantage of being a Java-based application
and uses the pattern and regular expression support available in JRE. It provides
all of the relevant pattern-matching facility based on regular expressions provided
by JRE.
Registry Key Values of type string and integer are supported. Binary data type for
Registry Key Values is not supported.
320818-A
Chapter 7 TunnelGuard SRS Builder 339
Table 66 describes supported operands for integer values.
Table 66 Supported integer operands
Operand
Description
>=
greater than or equal to
<=
less than or equal to
==
equal to
!=
not equal to
<
less than
>
greater than
The following are examples of regular expressions for integer Registry Key
values:
•
•
•
•
>= 20 — matches integer values that are greater than or equal to 20
= 100 — matches integer values that are exactly equal to 100
< 50 — matches integer values that are less than 50
!= 200 — matches all integer values that are not equal to 200
Nortel Secure Network Access Switch 4050 User Guide
340 Chapter 7 TunnelGuard SRS Builder
Table 67 describes supported constructs for string-based regular expressions.
Table 67 Constructs for string based regular expressions (Sheet 1 of 2)
320818-A
String regular expression
Description
x
The character x
.
Any character
\\
The backslash character
\0n
The character with octal value 0n (0 <= n <= 7)
\xhh
The character with the hexidecimal value 0xhh
\t
The tab character (‘\u0009’)
\n
The newline (line feed) character (‘\u000A’)
\d
A digit: [0-9]
\D
A non-digit: [^0-9]
\s
A whitespace character: [\t\n\x0B\f\r]
\S
A non=whitespace character: [^\s]
\w
A word character: [a-zA-Z_0-9]
\W
A non-word character: [^\w]
[abc]
a, b, or c
[^abc]
not a, b, or c
[a-z]
any character a through z
[a-d[m-p]]
a through d, or m through p: [a-dm-p] (union)
[a-z&&[def]]
d, e, or f (intersection)
[a-z&&[^bc]]
a through z, except for b and c: [ad-z] (subtraction)
X?
X, once or not at all
X*
X, zero or more times
X+
X, one or more times
X{n}
X, exactly n times
X{n,}
X, at least n times
X{n,m}
X, at least n but not more than m times
\
Nothing, but quotes the following character
\Q
Nothing, but quotes all characters until \E
\E
Nothing, but ends quoting started by \Q
^
The beginning of a line
Chapter 7 TunnelGuard SRS Builder 341
Table 67 Constructs for string based regular expressions (Sheet 2 of 2)
String regular expression
Description
$
The end of a line
\b
A word boundary
The following are examples of regular expressions for string-based Registry Key
values:
•
•
•
^Nortel .*Networks — matches anything that starts with Nortel and ends with
Networks
\w* — matches TunnelGuard_2; does not match TunnelGuard_2.0.0 (word
definition includes_but not “.”)
[a-z] {2}_[\.\d]+ — matching tg_2.0.0; does not match Tg_2.0.0; does not
match tg_; does not match tg_two; does not match tug_2.0.0
Creating a registry entry
To create a registry entry:
1
Click the Software Definition tab in the TunnelGuard Software and Rule
Definition Tool page.
2
Click the Software Definition Entry menu and select Add Registry Key Entry.
The Registry Entry page opens (see Figure 91 on page 342).
Nortel Secure Network Access Switch 4050 User Guide
342 Chapter 7 TunnelGuard SRS Builder
Figure 91 Registry Entry page
3
Select the Registry Key Path from the Registry Editor.
4
Select the Key Value type.
5
Enter the Key Value Data Expression.
6
Click OK.
If you want to create multiple entries, click Save and More. That saves this
entry and another window opens for you to create another Registry entry.
Registry-based File/Module
If the File/Module path or name is not known to the administrator or is not static
for SRS rule creation, the file name or module is sometimes available as Registry
Key Value data. Administrators can define a Registry Key to look for and derive a
File/Module path and name from the Registry Key Value data. This path is then
treated exactly as any other OnDisk entry or Memory Module entry as defined by
the administrator.
320818-A
Chapter 7 TunnelGuard SRS Builder 343
Manually creating SRS entries
The administrator tool applet provides OnDisk and Memory Module buttons to
create custom SRS entries and rules without anything installed on a desktop PC.
In order to create these rules, you must know the name of the executables or files
to be checked. Since these rules are created manually, extra care is required to
avoid any mistakes.
Choose from the following options:
•
•
“Manually creating an OnDisk file entry” on page 343
“Manually creating a Memory Module entry” on page 345
Manually creating an OnDisk file entry
To manually create an OnDisk SRS file entry:
1
Click the Software Definition tab in the TunnelGuard Software and Rule
Definition Tool page.
2
Click the Software Definition Entry menu and select Create New OnDisk
SRS Entry. The Create New OnDisk SRS Entry page opens (see Figure 92 on
page 344).
Nortel Secure Network Access Switch 4050 User Guide
344 Chapter 7 TunnelGuard SRS Builder
Figure 92 Create new OnDisk SRS Entry
3
Click Browse Local System to select the File or Module Path. The File (OR
Module) Path appears in the text box and the rest of the information on the
page is filled in automatically.
Note: If you select Fetch Module Path from Registry Entry, you must
manually enter the Registry Entry and the Key Value. The other fields
on the page must also be completed manually.
4
Select the desired Min Version option.
If Any is selected, the dates are deselected and the boxes are cleared.
5
Select the desired Max Version option.
If Any is selected, the dates are deselected and the boxes are cleared.
320818-A
Chapter 7 TunnelGuard SRS Builder 345
6
Click an option button for either Relative Date/Time Range or Specific
Date/ Time Range.
a
If you select Relative Date/Time Range, enter the number of days in the
Not Older Than (in days) text box.
b
If you select Specific Date/Time Range, click a radio button for either
Any or Specify Date/Time from the From Date/Time and To Date/Time.
— If you selected Specify Date/Time, enter the specific date and time in
the From Date/Time and To Date/Time text boxes.
7
To enable Hash Checking, select the Enable Hash Checking box.
8
Click OK.
If you want to create multiple entries, click Save and More. That saves this
entry and another window will opens so that you can create another OnDisk
SRS entry.
Manually creating a Memory Module entry
To manually create a Memory Module entry:
1
Click the Software Definition tab in the TunnelGuard Software and Rule
Definition Tool page.
2
Select Software Definition Entry > Create New Memory Module SRS
Entry menu item.
The Create New Memory Module SRS Entry page opens (see Figure 93 on
page 346).
Nortel Secure Network Access Switch 4050 User Guide
346 Chapter 7 TunnelGuard SRS Builder
Figure 93 Create new Memory Module SRS entry
3
Click Browse Local System to select the File or Module Path.
The File (OR Module) Path appears in the text box and the rest of the
information on the page is filled in automatically.
Note: If you select Fetch Module Path from Registry Entry, you must
enter the Registry Entry and the Key Value. The rest of the fields on the
page must also be completed manually.
320818-A
4
Enter the process name in the Process Name text box.
5
Click an option button for Min Version.
Chapter 7 TunnelGuard SRS Builder 347
6
Click an option button for Max Version.
7
Click an option button for either Relative Date/Time Range or Specific
Date/Time Range.
a
If you select Relative Date/Time Range, enter the number of days in the
Not Older Than (in days) text box.
b
If you select Specific Date/Time Range, click an option button for either
Any or Specify Date/Time from the From Date/Time and To Date/Time:
— If you select Specify Date/Time, enter the specific date and time in
the From Date/Time and To Date/Time text boxes.
The information below each text box tells you the format of the information.
8
To enable vendor API call check, click the Vendor API Call Check box.
9
To enable hash checking, click the Enable Hash Checking box.
10 Click OK.
If you want to create multiple entries, click Save and More. That saves this
entry and another window will pop up so that you can create another Memory
Module SRS entry.
File age check
Most desktop PCs have antivirus software with virus-definition files that are
updated weekly, biweekly, or monthly. You can create a rule so that the
TunnelGuard check will fail if users have virus definitions older than a time
period you specify.
The administrator tool applet’s Set Date/Time Range button allows you to specify
a Not older than option. If this option is selected, To and From dates are
automatically deselected.
Figure 94 on page 348 shows the interface you use to set the relative date and time
range. This interface is accessed from a button in the middle of the TunnelGuard
Software and Rule Definition Tool page.
Nortel Secure Network Access Switch 4050 User Guide
348 Chapter 7 TunnelGuard SRS Builder
Figure 94 Date/Time Range
Adding comments
•
•
“Adding a TunnelGuard rule comment” on page 348
“Adding a software definition comment” on page 349
Adding a TunnelGuard rule comment
By adding a TunnelGuard rule comment to a TunnelGuard rule, you can provide
important information to the user (for example, the reason the TunnelGuard
checks failed and the recommended action). The information is included in the
<var:tgFailureReason> variable, along with the TunnelGuard rule expression
name. If teardown mode is used, the comment is automatically displayed on the
Portal Login page.
1
Click the TunnelGuard Rule Definition tab.
2
In the TunnelGuard Rule Comment column, click the row corresponding to
the SRS rule for which you wish to add a comment.
The following button appears:
320818-A
Chapter 7 TunnelGuard SRS Builder 349
3
Click the button to display the Rule Comment window (see Figure 95 on
page 349).
Figure 95 The Rule Comment window
4
Type the comment and click OK.
Adding a software definition comment
The software definition comment is shown in the message displayed when the
user clicks the details link on the Portal login page.
1
Click the Software Definition tab.
2
On the Software Definition menu, select Edit Software Definition
Comment.
The Software Definition Comment window is displayed.
3
Type in the desired text and click OK.
Deleting SRS rules and their components
You can delete SRS rules and their component elements.
•
•
•
•
•
“Deleting a software definition” on page 350
“Deleting a software definition entry” on page 350
“Deleting a TunnelGuard rule” on page 350
“Deleting an expression” on page 350
Nortel Secure Network Access Switch 4050 User Guide
350 Chapter 7 TunnelGuard SRS Builder
Deleting a software definition
1
Click the Software Definition tab.
2
In the Software Definition column, select the desired software definition.
3
Click the trash can symbol on the tool bar located above the Software
Definition column.
Note: You cannot delete a software definition that is used in a
TunnelGuard rule. Delete the TunnelGuard rule first.
Deleting a software definition entry
A software definition entry is typically a file that is listed on the right pane of the
Software definition tab (for example, a file that is included in the current software
definition).
1
Click the Software Definition tab.
2
In the Software Definition column, select the desired software definition.
3
On the right pane, select the desired software definition entry.
4
Click the trash can symbol on the tool bar located below the right pane.
Deleting a TunnelGuard rule
1
Click the TunnelGuard Rule Definition tab.
2
In the TunnelGuard Rule Name column, select the desired rule.
3
Click the trash can symbol on the tool bar located above the TunnelGuard
Rule Name column.
Note: You cannot delete a TunnelGuard rule that is currently assigned
to any group. Remove the assignment first.
Deleting an expression
1
320818-A
Click the TunnelGuard Rule Definition tab.
Chapter 7 TunnelGuard SRS Builder 351
2
In the Available Expressions area, select the desired expression and click the
Delete Expression button.
Note: You cannot delete an expression that is used in a TunnelGuard
rule.
TunnelGuard support for API calls
TunnelGuard can interact with other software vendor applications. In addition to
its own checks, TunnelGuard can be configured to communicate with other
applications and ask for their status. The result of the status check is treated the
same as other checks and is reported back to the server. This capability allows
administrators to use TunnelGuard to retrieve status from other software
packages, such as personal firewalls and virus checkers, to make sure they are
running properly.
Making API calls
TunnelGuard requires a Windows Platform DLL that implements at least one
common entry point as described below.
Windows
#include <windows.h>
/* return values */
#define STATUS_SUCCESS 0
#define STATUS _FAILURE -1
#define STATUS_REQUIRES_UPDATE 1
/* simple check */
int WINAPI CheckStatus(void);
This API blocks until one of the required status, as mentioned above, is returned
in 10 seconds or less. If an answer is not returned in a timely manner, it is assumed
the software is unavailable, and the call times out and returns an error message.
Nortel Secure Network Access Switch 4050 User Guide
352 Chapter 7 TunnelGuard SRS Builder
320818-A
353
Chapter 8
Managing system users and groups
This chapter includes the following topics:
Topic
Page
User rights and group membership
354
Managing system users and groups using the CLI
355
Roadmap of system user management commands
355
Managing user accounts and passwords using the CLI
356
Managing user settings using the CLI
358
Managing user groups using the CLI
359
CLI configuration examples
360
Managing system users and groups using the SREM
370
Managing user accounts using the SREM
370
Setting password expiry using the SREM
374
Changing your password using the SREM
376
Changing another user’s password using the SREM
377
Setting the certificate export passphrase using the SREM
379
Managing user groups using the SREM
381
Nortel Secure Network Access Switch 4050 User Guide
354 Chapter 8 Managing system users and groups
User rights and group membership
There are three groups of system users who routinely access the system for
configuration and management:
•
•
•
admin (administrator)
certadmin (certificate administrator)
oper (operator)
Note: There are two additional types of users with specialized
functions: boot and root. For more information, see “Accessing the
Nortel SNAS 4050 cluster” on page 775.
Group membership dictates user rights, as shown in Table 68 on page 354. When
a user is a member of more than one group, user rights accumulate. The admin
user, who by default is a member of all three groups, therefore has the same user
rights as granted to members in the certadmin and oper group, in addition to the
specific user rights granted by the admin group membership. The most permissive
user rights become the effective user rights when a user is a member of more than
one group. For more information about default user groups and related access
levels, see “Accessing the Nortel SNAS 4050 cluster” on page 775.
Table 68 Group membership and user rights
Rights
Group
Account
User
account
System
Group
Add user Delete user Add user
admin
Delete user Change own Change others
Yes
Yes
Yes, to own Yes
group
Yes
Yes, if Admin is
a member of
the other user’s
first group
certadmin admin
No
No
Yes, to own No
group
Yes
No
oper
No
No
Yes, to own No
group
Yes
No
320818-A
admin
Password
oper
admin
Chapter 8 Managing system users and groups 355
Managing system users and groups using the CLI
To manage system users and groups, access the User menu by using the following
command:
/cfg/sys/user
From the User menu, you can configure and manage the following:
•
•
•
•
add new users (for a detailed example, see “Adding a new user” on page 360)
reassign users (for a detailed example, see “Changing a user’s group
assignment” on page 365)
change passwords (for a detailed example, see “Changing passwords” on
page 366)
delete users (for a detailed example, see “Deleting a user” on page 369)
For detailed information about the CLI commands, see “CLI configuration
examples” on page 360.
Roadmap of system user management commands
The following roadmap lists all the CLI commands to configure and manage
system users for the Nortel SNAS 4050 cluster. Use this list as a quick reference
or click on any entry for more information:
Command
Parameter
/cfg/sys/user
password <old password> <new
password> <confirm new password>
expire <time>
list
del <username>
add <username>
caphrase
/cfg/sys/user/edit <username>
password <own password> <user
password> <confirm user password>
cur
Nortel Secure Network Access Switch 4050 User Guide
356 Chapter 8 Managing system users and groups
Command
Parameter
/cfg/sys/user/edit
<username>/groups
list
del <group index>
add admin|oper|certadmin
Managing user accounts and passwords using the CLI
To change the password for the currently logged on user and to add or delete user
accounts, access the User menu by using the following command:
/cfg/sys/user
The User menu displays.
The User menu includes the following options:
/cfg/sys/user
followed by:
320818-A
password <old
password> <new
password> <confirm
new password>
Allows you to change your own password. Passwords
can contain spaces and are case sensitive. The change
takes effect as soon as you execute the command.
expire <time>
Sets an expiration time for system user passwords. The
time applies to all system users. The counter starts
from when the password was last set. The first time the
system user logs on after the specified time has
expired, the user is prompted for a new password.
• time is the length of time in days (d), hours (h),
minutes (m), or seconds (s or unspecified). The
default unit is seconds. The default expiration time
is 0 seconds (no expiry).
If the time you specify combines time units, the
format is DDdHHhMMmSS. For example, to make
all passwords expire in 30 days, 2 hours, and 45
minutes, enter 30d2h45m..
list
Lists all user accounts. The three built-in users (admin,
oper, and root) are always listed.
Chapter 8 Managing system users and groups 357
/cfg/sys/user
followed by:
del <username>
Removes the specified user account from the system.
Of the three built-in users (admin, oper, and root), only
the oper user can be deleted.
You must have administrator rights in order to delete
user accounts.
Note: When you delete a user, the user’s group
assignment is also deleted. If you are deleting a user
who is the sole member of a group, none of the
remaining users on the system can then be added to
that group. Existing users can only be added to a group
by a user who is already a member of that group.
Before deleting a user, verify that the user is not the
sole member of a group.
add <username>
Adds a user account to the system. The maximum
length of the user name is 255 characters. No spaces
are allowed.
After adding a user account, you must also assign the
user account to a group (see “Managing user groups
using the CLI” on page 359).
You must have administrator rights in order to add user
accounts.
Nortel Secure Network Access Switch 4050 User Guide
358 Chapter 8 Managing system users and groups
/cfg/sys/user
followed by:
edit <username>
Accesses the User <username> menu, in order
change user settings (see “Managing user settings
using the CLI” on page 358).
You must have administrator rights in order to change a
user’s settings. You must also be a member of the first
group listed for the other user.
caphrase
Sets the certificate administrator’s passphrase for
encrypted private keys in a configuration backup, if the
certificate administrator role has been separated from
the administrator role.
If the admin user is a member of the certadmin group
(the default setting), the admin user is prompted for an
export passphrase to protect the private keys in the
configuration dump each time the /cfg/ptcfg
command is used.
Set a certificate administrator export passphrase only if
the admin user has removed himself or herself from the
certadmin group and added a certificate administrator
user with certadmin group rights. When a configuration
backup is performed using the /cfg/ptcfg
command, the certadmin export passphrase is
automatically used (without prompting the user) to
protect the encrypted private keys. When the
/cfg/gtcfg command is used to restore a
configuration backup from a file exchange server, the
user is prompted for the correct certadmin passphrase,
as defined using the caphrase command.
Note: The caphrase menu command is displayed
only when the logged on user is a member of the
certadmin group.
Managing user settings using the CLI
You must have administrator rights in order to change a user’s settings. You must
also be a member of the other user’s first group (the first group listed for the other
user when you use the /cfg/sys/user/edit <username>/groups/list
command).
320818-A
Chapter 8 Managing system users and groups 359
To set or change the login password for a specified user and to view and manage
group assignments, access the User <username> menu by using the following
command:
/cfg/sys/user/edit <username>
The User <username> menu displays.
The User <username> menu includes the following options:
/cfg/sys/user/edit <username>
followed by:
password <own
password> <user
password> <confirm
user password>
Sets the login password for the specified user.
Passwords can contain spaces and are case sensitive.
groups
Accesses the Groups menu, in order to manage user
group assignments (see “Managing user groups using
the CLI” on page 359).
cur
Displays the current group settings for the specified
user.
Managing user groups using the CLI
All users must belong to at least one group. Only an administrator user can add a
new user account to the system, but any user can grant an existing user
membership in a group to which the granting user belongs.
By default, the administrator user is a member of all three built-in groups (admin,
oper, certadmin) and can therefore add a new user to any of these groups.
However, a certificate administrator, who is a member of the certadmin group
only, can add an existing user to the certadmin group only.
If a user belongs to only one group and you want to change the user’s group
membership, add the user to the new group first, and then remove the user from
the old one.
Nortel Secure Network Access Switch 4050 User Guide
360 Chapter 8 Managing system users and groups
To set or change a user’s group assignment, access the Groups menu by using the
following command:
/cfg/sys/user/edit <username>/groups
The Groups menu displays.
The Groups menu includes the following options:
/cfg/sys/user/edit <username>/groups
followed by:
list
Lists all groups to which the user is currently assigned,
by group index number.
del <group index>
Removes the user from the specified group.
• group index is an integer indicating the group
index number
You must have administrator rights in order to remove
other users from groups.
add
admin|oper|certadmin
Assigns the user to one of the built-in groups (admin,
oper, certadmin).
CLI configuration examples
This section includes the following detailed examples:
•
•
•
•
“Adding a new user” on page 360
“Changing a user’s group assignment” on page 365
“Changing passwords” on page 366
• “Changing your own password” on page 366
• “Changing another user’s password” on page 367
“Deleting a user” on page 369
Adding a new user
To add a new user to the system, you must be a member of the admin group. By
default, only the admin user is a member of the admin group.
320818-A
Chapter 8 Managing system users and groups 361
In this configuration example, a certificate administrator user is added to the
system, and then assigned to the certadmin group. The certificate administrator
specializes in managing certificates and private keys, without the possibility to
change system parameters or configure virtual SSL servers. A user who is a
member of the certadmin group can therefore access the Certificate menu
(/cfg/cert), but not the SSL Server 1001 menu (/cfg/domain
#/server/ssl). On the System menu (/cfg/sys), the certadmin user has
access only to the User submenu (/cfg/sys/user).
1
Log on to the Nortel SNAS 4050 cluster as the admin user.
login: admin
Password: (admin user password)
2
Access the User Menu.
>> Main# /cfg/sys/user
-----------------------------------------------------------[User Menu]
passwd
- Change own password
list
- List all users
del
- Delete a user
add
- Add a new user
edit
- Edit a user
caphrase
- Certadmin export passphrase
>> User#
3
Add the new user and designate a user name.
The maximum length for a user name is 255 characters. No spaces are
allowed. Each time the new user logs in to the Nortel SNAS 4050 cluster, the
user must enter the name you designate as the user name in this step.
>> User# add
Name of user to add: cert_admin (maximum 255 characters, no spaces)
4
Assign the new user to a user group.
You can only assign a user to a group in which you yourself are a member.
When this criterion is met, users can be assigned to one or more of the
following three groups:
Nortel Secure Network Access Switch 4050 User Guide
362 Chapter 8 Managing system users and groups
— oper
— admin
— certadmin
By default, the admin user is a member of all groups above, and can therefore
assign a new or existing user to any of these groups. The group assignment of
a user dictates the user rights and access levels to the system.
>> User# edit cert_admin
>> User cert_admin# groups/add
Enter group name: certadmin
5
Verify and apply the group assignment.
When you enter the list command, the current and pending group
assignment of the user being edited is listed by index number and group name.
Because the cert_admin user is a new user, the current group assignment listed
by Old: is empty.
>> Groups# list
Old:
Pending:
1: certadmin
>> Groups# apply
Changes applied successfully.
6
Define a login password for the user.
When the user logs in to the Nortel SNAS 4050 cluster the first time, the user
will be prompted for the password you define in this step. When successfully
logged on, the user can change his or her own password. The login password
is case sensitive and can contain spaces.
>> Groups# /cfg/sys/user
>> User# edit cert_admin
>> User cert_admin# password
Enter admin's current password: (admin user password)
Enter new password for cert_admin: (cert_admin user password)
Re-enter to confirm: (reconfirm cert_admin user password)
320818-A
Chapter 8 Managing system users and groups 363
7
Apply the changes.
>> User cert_admin# apply
Changes applied successfully.
8
Let the Certificate Administrator user define an export passphrase.
This step is only necessary if you want to fully separate the Certificate
Administrator user role from the Administrator user role. If the admin user is
removed from the certadmin group (as in <z_blue>Step 9), a Certificate
Administrator export passphrase (caphrase) must be defined.
As long as the admin user is a member of the certadmin group (the default
configuration), the admin user is prompted for an export passphrase each time
a configuration backup that contains private keys is sent to a
TFTP/FTP/SCP/SFTP server (command: /cfg/ptcfg). When the admin
user is not a member of the certadmin group, the export passphrase defined by
the Certificate Administrator is used instead to encrypt private keys in the
configuration backup. The encryption of private keys using the export
passphrase defined by the Certificate Administrator is performed
transparently to the user, without prompting. When the configuration backup
is restored, the Certificate Administrator must enter the correct export
passphrase.
Note: If the export passphrase defined by the Certificate Administrator
is lost, configuration backups made by the admin user while he or she
was not a member of the certadmin group cannot be restored.
The export passphrase defined by the Certificate Administrator remains the
same until changed by using the /cfg/sys/user/caphrase command. For
users who are not members of the certadmin group, the caphrase command
in the User menu is hidden. Only users who are members of the certadmin
group should know the export passphrase. The export passphrase can contain
spaces and is case sensitive.
>> User cert_admin# ../caphrase
Enter new passphrase:
Re-enter to confirm:
Passphrase changed.
Nortel Secure Network Access Switch 4050 User Guide
364 Chapter 8 Managing system users and groups
9
Remove the admin user from the certadmin group.
Again, this step is only necessary if you want to fully separate the Certificate
Administrator user role from the Administrator user role. Note however, that
once the admin user is removed from the certadmin group, only a user who is
already a member of the certadmin group can grant the admin user certadmin
group membership anew.
When the admin user is removed from the certadmin group, only the
Certificate Administrator user can access the Certificate menu (/cfg/cert).
>> User# edit admin
>> User admin# groups/list
1: admin
2: oper
3: certadmin
>> Groups# del 3
Note: It is critical that a Certificate Administrator user is created and
assigned certadmin group membership before the admin user is removed
from the certadmin group. Otherwise there is no way to assign certadmin
group membership to a new user, or to restore certadmin group
membership to the admin user, should it become necessary.
10 Verify and apply the changes.
>> Groups# list
Old:
1: admin
2: oper
3: certadmin
Pending:
1: admin
2: oper
>> Groups# apply
320818-A
Chapter 8 Managing system users and groups 365
Changing a user’s group assignment
Only users who are members of the admin group can remove other users from a
group. All users can add an existing user to a group, but only to a group in which
the “granting” user is already a member. The admin user, who by default is a
member of all three groups (admin, oper, and certadmin) can therefore add users
to any of these groups.
1
Log on to the Nortel SNAS 4050 cluster.
In this example the cert_admin user, who is a member of the certadmin group,
will add the admin user to the certadmin group. The example assumes that the
admin user previously removed himself or herself from the certadmin group,
in order to fully separate the Administrator user role from the Certificate
Administrator user role.
login: cert_admin
Password: (cert_admin user password)
2
Access the User Menu.
>> Main# /cfg/sys/user
-----------------------------------------------------------[User Menu]
passwd
- Change own password
list
- List all users
del
- Delete a user
add
- Add a new user
edit
- Edit a user
caphrase
- Certadmin export passphrase
>> User#
3
Assign the admin user certadmin user rights by adding the admin user to the
certadmin group.
>> User# edit admin
>> User admin# groups/add
Enter group name: certadmin
Nortel Secure Network Access Switch 4050 User Guide
366 Chapter 8 Managing system users and groups
Note: A user must be assigned to at least one group at any given time. If
you want to replace a user’s single group assignment, you must therefore
always first add the user to the desired new group, then remove the user
from the old group.
4
Verify and apply the changes.
>> Groups# list
Old:
1: admin
2: oper
Pending:
1: admin
2: oper
3: certadmin
>> Groups# apply
Changing passwords
Changing your own password
All users can change their own password. Login passwords are case sensitive and
can contain spaces.
1
Log on to the Nortel SNAS 4050 cluster by entering your user name and
current password.
login: cert_admin
Password: (cert_admin user password)
320818-A
Chapter 8 Managing system users and groups 367
2
Access the User Menu.
>> Main# /cfg/sys/user
-----------------------------------------------------------[User Menu]
passwd
- Change own password
list
- List all users
del
- Delete a user
add
- Add a new user
edit
- Edit a user
caphrase
- Certadmin export passphrase
>> User#
Type the passwd command to change your current password.
When your own password is changed, the change takes effect immediately
without having to use the apply command.
>> User# passwd
Enter cert_admin's current password: (current cert_admin user password)
Enter new password: (new cert_admin user password)
Re-enter to confirm: (reconfirm new cert_admin user password)
Password changed.
Changing another user’s password
Only the admin user can change another user’s password, and then only if the
admin user is a member of the other user’s first group (the group that is listed first
for the user with the /cfg/sys/user/edit <username>/groups/list
command). Login passwords are case sensitive and can contain spaces.
1
Log on to the Nortel SNAS 4050 cluster as the admin user.
login: admin
Password: (admin user password)
Nortel Secure Network Access Switch 4050 User Guide
368 Chapter 8 Managing system users and groups
2
Access the User Menu.
>> Main# /cfg/sys/user
-----------------------------------------------------------[User Menu]
passwd
- Change own password
list
- List all users
del
- Delete a user
add
- Add a new user
edit
- Edit a user
caphrase
- Certadmin export passphrase
>> User#
3
Specify the user name of the user whose password you want to change.
>> User# edit
Name of user to edit: cert_admin
4
Type the password command to initialize the password change.
>> User cert_admin# password
Enter admin's current password: (admin user password)
Enter new password for cert_admin: (new password for user being edited)
Re-enter to confirm: (confirm new password for user being edited)
5
Apply the changes.
>> User cert_admin# apply
Changes applied successfully.
320818-A
Chapter 8 Managing system users and groups 369
Deleting a user
To delete a user from the system, you must be a member of the admin group. By
default, only the admin user is a member of the admin group.
Note: Remember that when a user is deleted, that user’s group
assignment is also deleted. If you are deleting a user who is the sole
member of a group, none of the remaining users on the system can then
be added to that group. Existing users can only be added to a group by a
user who is already a member of that group. Before deleting a user, you
may therefore want to verify that the user is not the sole member of a
group.
1
Log on to the Nortel SNAS 4050 cluster as the admin user.
login: admin
Password: (admin user password)
2
Access the User Menu.
>> Main# /cfg/sys/user
-----------------------------------------------------------[User Menu]
passwd
- Change own password
list
- List all users
del
- Delete a user
add
- Add a new user
edit
- Edit a user
>> User#
3
Specify the user name of the user you want to remove from the system
configuration.
In this example, the cert_admin user is removed from the system. To list all
users currently added to the system configuration, use the list command.
>> User# del cert_admin
4
Verify and apply the changes.
Nortel Secure Network Access Switch 4050 User Guide
370 Chapter 8 Managing system users and groups
The imminent removal of the cert_admin user is indicated as a pending
configuration change by the minus sign (-). To cancel a configuration change
that has not yet been applied, use the revert command.
>> User# list
root
admin
oper
-cert_admin
>> User# apply
Managing system users and groups using the SREM
To manage users, choose from one of the following tasks:
•
•
•
•
•
•
“Managing user accounts using the SREM” on page 370
“Setting password expiry using the SREM” on page 374
“Changing your password using the SREM” on page 376
“Changing another user’s password using the SREM” on page 377
“Setting the certificate export passphrase using the SREM” on page 379
“Managing user groups using the SREM” on page 381
Managing user accounts using the SREM
To manage user accounts, select the System > Manage Users > User Table tab.
320818-A
Chapter 8 Managing system users and groups 371
The User Table appears (see Figure 96), displaying a list of user accounts that
have been added to the Nortel SNAS 4050.
Figure 96 User Table
Only the admin user can add users to the system. After adding a user, you must
assign the user to a group (see “Managing user groups using the SREM” on
page 381).
Nortel Secure Network Access Switch 4050 User Guide
372 Chapter 8 Managing system users and groups
Only the admin user can delete users from the system. Of the three built-in users
(admin, oper, and root), only the oper user can be deleted.
Note: When you delete a user, the user’s group assignment is also
deleted. If you are deleting a user who is the sole member of a group,
none of the remaining users on the system can then be added to that
group. Existing users can only be added to a group by a user who is
already a member of that group. Before deleting a user, verify that the
user is not the sole member of a group.
To manage Nortel SNAS 4050 users, select from the following tasks:
•
•
“Adding a new user” on page 360
“Removing existing user accounts” on page 373
Adding new user accounts
To add additional user accounts, perform the following steps:
1
Select the System > Manage Users > User Table tab.
The User Table appears (see Figure 96).
2
Click Add.
The Add a User dialog box appears (see Figure 97).
Figure 97 Add a User
320818-A
Chapter 8 Managing system users and groups 373
3
Enter the user information in the applicable fields. Table 69 describes the Add
a User fields.
Table 69
Add a User fields
Field
Description
Name
The user name for the new user. The maximum length of
the user name is 255 characters. No spaces are allowed.
4
Click Apply.
The new user entry appears in the User Table.
5
Click Apply on the toolbar to send the current changes to the Nortel
SNAS 4050. Click Commit on the toolbar to save the changes permanently.
Removing existing user accounts
To remove an existing user, perform the following steps:
1
Select the System > Manage Users > User Table tab.
The User Table appears (see Figure 96 on page 371).
2
Select a user entry to remove from the User Table.
3
Click Delete.
A dialog box appears to confirm the deletion of this user account.
4
Click Yes.
The entry is immediately removed from the User Table.
5
Click Apply on the toolbar to send the current changes to the Nortel
SNAS 4050. Click Commit on the toolbar to save the changes permanently.
Nortel Secure Network Access Switch 4050 User Guide
374 Chapter 8 Managing system users and groups
Setting password expiry using the SREM
To set a password expiry date for all passwords in the system, perform the
following steps:
1
Select the System > Manage Users > Password Setting tab.
The Password Setting screen appears (see Figure 98).
Figure 98 Password Setting
320818-A
Chapter 8 Managing system users and groups 375
2
Enter the Password Setting information in the applicable fields. Table 70
describes the Password Settings fields.
Table 70
Field
Password Settings fields
Description
Password Expiration Interval Sets the password expiration interval, in days (d).
A value of 0 indicates that the password never expires.
3
Click Apply on the toolbar to send the current changes to the Nortel
SNAS 4050. Click Commit on the toolbar to save the changes permanently.
Nortel Secure Network Access Switch 4050 User Guide
376 Chapter 8 Managing system users and groups
Changing your password using the SREM
Only the admin user can change the passwords of other users. Logged on users
can change their own passwords.
To change the password for the logged on user, perform the following steps:
1
Select the System > Manage Users > Change Your Password tab.
The Change Your Password screen appears (see Figure 99).
Figure 99 Change Your Password
320818-A
Chapter 8 Managing system users and groups 377
2
Enter the password information in the applicable fields. Table 71 describes the
Change Your Password fields.
Table 71
Change Your Password fields
Field
Description
Current Password
The current password.
Enter New Password
Sets the new password. The password must be at least
four characters and can contain spaces. The password is
case sensitive.
Re-enter New Password
Confirms the new password.
3
Click Change Password.
A dialog box appears for confirmation.
4
Click Yes.
5
Click Apply to send the changes to the device. To make the changes
permanent, click Commit.
Changing another user’s password using the SREM
Only the admin user can change the passwords of other users.
Nortel Secure Network Access Switch 4050 User Guide
378 Chapter 8 Managing system users and groups
To change the password for another user, perform the following steps:
1
Select the System > Manage Users > user > Change User Password tab.
The Change User Password screen appears (see Figure 100).
Figure 100 Change User Password
320818-A
Chapter 8 Managing system users and groups 379
2
Enter the password information in the applicable fields. Table 71 describes the
Change User Password fields.
Table 72
Change User Password fields
Field
Description
Current Administrator
Password
The current password of the admin user performing the
change.
Enter New Password
Sets the new password. The password must be at least
four characters and can contain spaces. The password is
case sensitive.
Re-enter New Password
Confirms the new password.
3
Click Change Password.
A dialog box appears for confirmation.
4
Click Yes.
5
Click Apply to send the changes to the device. To make the changes
permanent, click Commit.
Setting the certificate export passphrase using the SREM
You can set a certificate administrator’s passphrase for encrypted private keys in a
configuration backup, if the certificate administrator role has been separated from
the administrator role.
If the admin user is a member of the certadmin group (the default setting), the
admin user must provide an export passphrase to protect the private keys in the
configuration dump each time the configuration is backed up to an external file
server.
Set a certificate administrator export passphrase only if the admin user has
removed himself or herself from the certadmin group and added a certificate
administrator user with certadmin group rights. When a configuration backup is
performed, the certificate export passphrase is automatically used to protect the
encrypted private keys. When the configuration is restored from the file exchange
server, the user is prompted for the correct certificate export passphrase.
Nortel Secure Network Access Switch 4050 User Guide
380 Chapter 8 Managing system users and groups
To set a certificate export pass phrase, perform the following steps:
1
Select the System > Manage Users > Set Certificate Export PassPhrase
tab.
The Set Certificate Export PassPhrase screen appears (see Figure 101).
Figure 101 Set Certificate Export PassPhrase
320818-A
Chapter 8 Managing system users and groups 381
2
Enter the PassPhrase information in the applicable fields. Table 73 describes
the Set Certificate Export PassPhrase fields.
Table 73
Set Certificate Export PassPhrase fields
Field
Description
Enter New Pass Phrase
Sets the pass phrase. Must be at least four characters.
Re-enter New Pass Phrase
Confirms the pass phrase.
3
Click Set Pass Phrase.
4
Click Apply on the toolbar to send the current changes to the Nortel
SNAS 4050. Click Commit on the toolbar to save the changes permanently.
Managing user groups using the SREM
All users must belong to at least one group. Only an administrator user can add a
new user account to the system, but any user can grant an existing user
membership in a group to which the granting user belongs.
By default, the administrator user is a member of all three built-in groups (admin,
oper, certadmin) and can therefore add a new user to any of these groups.
However, a certificate administrator, who is a member of the certadmin group
only, can add an existing user to the certadmin group only.
If a user belongs to only one group and you want to change the user’s group
membership, add the user to the new group first, and then remove the user from
the old one.
Nortel Secure Network Access Switch 4050 User Guide
382 Chapter 8 Managing system users and groups
To manage the group to which a user belongs, select the System > Manage
Users > user > User Groups tab. The User Groups screen appears, displaying the
user’s current group membership (see Figure 102).
Figure 102 User Groups
Choose from the following tasks to manage users groups:
•
•
“Adding a user group” on page 382
“Removing a user group” on page 383
Adding a user group
To add a new user group, perform the following steps:
1
Select the System > Manage Users > user > User Groups tab.
The User Groups screen appears (see Figure 102 on page 382).
320818-A
Chapter 8 Managing system users and groups 383
2
Click Add.
The Add a User Group dialog box appears (see Figure 103).
Figure 103 Add a User Group
3
Enter the User Group information in the applicable fields. Table 74 describes
the Add a User Group fields.
Table 74
Add a User Group fields
Field
Description
Name
Specifies the name of the group to which you are adding
the user. Options are oper, admin, certadmin.
4
Click Add.
The new user group appears in the table.
5
Click Apply on the toolbar to send the current changes to the Nortel
SNAS 4050. Click Commit on the toolbar to save the changes permanently.
Removing a user group
To remove an existing user group from the User Group Table, perform the
following steps:
1
Select the System > Manage Users > user > User Groups tab.
The User Groups screen appears (see Figure 102 on page 382).
2
Select the group to remove from the User Group Table.
3
Click Delete.
A confirmation dialog appears.
4
Click Yes.
Nortel Secure Network Access Switch 4050 User Guide
384 Chapter 8 Managing system users and groups
The user group is immediately removed from the User Group Table.
5
320818-A
Click Apply on the toolbar to send the current changes to the Nortel
SNAS 4050. Click Commit on the toolbar to save the changes permanently.
385
Chapter 9
Customizing the portal and user logon
This chapter includes the following topics:
Topic
Page
Overview
386
Captive portal and Exclude List
386
Portal display
389
Managing the end user experience
397
Customizing the portal and logon using the CLI
398
Roadmap of portal and logon configuration commands
398
Configuring the captive portal using the CLI
400
Configuring the Exclude List using the CLI
401
Changing the portal language using the CLI
402
Configuring the portal display using the CLI
405
Changing the portal colors using the CLI
408
Configuring custom content using the CLI
409
Configuring linksets using the CLI
411
Configuring links using the CLI
413
Customizing the portal and logon using the SREM
416
Configuring the captive portal using the SREM
416
Changing the portal language using the SREM
419
Configuring the portal display using the SREM
425
Nortel Secure Network Access Switch 4050 User Guide
386 Chapter 9 Customizing the portal and user logon
Topic
Page
Changing the portal colors using the SREM
431
Configuring custom content using the SREM
433
Configuring linksets using the SREM
439
Configuring links using the SREM
444
Overview
The end user accesses the Nortel SNA network through the Nortel SNAS 4050
portal. You can customize the end user experience by configuring the following
logon and portal features:
•
•
•
“Captive portal and Exclude List” on page 386
• “Exclude List” on page 387
“Portal display” on page 389
• “Portal look and feel” on page 389
• “Language localization” on page 392
• “Linksets and links” on page 394
• “Macros” on page 395
• “Automatic redirection to internal sites” on page 396
• “Examples of redirection URLs and links” on page 396
“Managing the end user experience” on page 397
Captive portal and Exclude List
When the Nortel SNAS 4050 is configured to function as a captive portal, the
Nortel SNAS 4050 acts as a DNS proxy while clients are in the Red VLAN. The
captive web portal:
•
•
•
320818-A
accepts redirected HTTP/HTTPS requests from the clients
resolves unknown names to a fixed IP address
receives and manages communication requests from the clients to
unauthorized network resources
Chapter 9 Customizing the portal and user logon 387
•
redirects client requests to an authentication page served by the portal
The DHCP server must be configured to assign the portal Virtual IP address
(pVIP) as the DNS server when the client is in the Red VLAN.
The DHCP server is configured to specify the regular DNS servers for the scopes
for the Green and Yellow VLANs. Once the client has been authenticated and is in
a Green or Yellow VLAN, DNS requests are forwarded in the regular way to the
corporate DNS servers.
For information about configuring the captive portal, see “Configuring the captive
portal using the CLI” on page 400 or “Configuring the captive portal using the
SREM” on page 416.
Exclude List
The Exclude List is a configurable list of domain names that will not be captured
by the Nortel SNAS 4050. The DNS server in the captive portal forwards requests
for domain names in the Exclude List directly to the corporate DNS servers.
In order to speed up client logon, add to the Exclude List any domain names for
URLs that are routinely accessed during client logon or startup sequences. The
Exclude List entry can be the full domain name or an expression.
By default, the captive portal Exclude List includes the following:
•
windowsupdate
This will match all automatic Windows update domain names used by
browsers, for example:
•
•
•
windowsupdate.com
windowsupdate.microsoft.com
download.windowsupdate.microsoft.com
For information about configuring the Exclude List, see “Configuring the Exclude
List using the CLI” on page 401 or “Configuring the DNS Exclude List using the
SREM” on page 418.
Nortel Secure Network Access Switch 4050 User Guide
388 Chapter 9 Customizing the portal and user logon
Table 75 lists the regular expressions and escape sequences you can use in an
Exclude List entry. The set of allowable regular expressions is a subset of the set
found in egrep and in the AWK programming language. The escape sequences are
allowed in Erlang strings.
Table 75 Allowed regular expressions and escape sequences
String
Usage
Expressions
c
Matches the non-metacharacter c.
\c
Matches the literal character c (see escape sequence).
.
Matches any character.
^
Matches the beginning of a string.
$
Matches the end of a string.
[abc...]
Character class, which matches any of the characters abc....
Character ranges are specified by a pair of characters separated by a
hyphen (-).
[^abc...]
Negated character class, which matches any character except abc....
r1|r2
Alternation — matches either r1 or r2.
r1r2
Concatenation — matches r1 and then r2.
r+
Matches one or more r’s.
r*
Matches zero or more r’s.
r?
Matches zero or one r’s.
(r)
Grouping — matches r.
Escape sequences
320818-A
\b
backspace
\f
form feed
\n
newline (line feed)
\r
carriage return
\t
tab
\e
escape
\v
vertical tab
\s
space
\d
delete
Chapter 9 Customizing the portal and user logon 389
Table 75 Allowed regular expressions and escape sequences (continued)
\ddd
the octal value ddd
\
literal character
For example: \c for literal character c, \\ for backslash, \” for double
quotation marks (“)
Portal display
You can modify the following features of the portal display and behavior:
•
•
•
•
portal look and feel (see “Portal look and feel” on page 389)
language used (see “Language localization” on page 392)
links (see “Linksets and links” on page 394)
post-authentication behavior (see “Automatic redirection to internal sites” on
page 396)
Portal look and feel
You can customize the colors, logos, icons, and text used on the portal page. You
can also add custom content, such as Java applets, to the portal. You can then add
links to the portal page to make the content available to clients.
This section includes information about the following topics:
•
•
“Default appearance” on page 390
“Colors” on page 390
For information about the commands to configure the portal look and feel, see
“Configuring the portal display using the CLI” on page 405 or “Configuring the
portal display using the SREM” on page 425.
Nortel Secure Network Access Switch 4050 User Guide
390 Chapter 9 Customizing the portal and user logon
Default appearance
Figure 104 shows the default portal Home tab.
Figure 104 Default appearance of the portal Home tab
Active tab, URL
area, and icon
(Color3)
Banner
Tab
background
(Color2)
Area for
links
Background
(Color1)
Colors
There are four colors used on the portal page:
•
•
320818-A
color1 — the large background area below the tabs
color2 — the background area behind the tab labels
TunnelGuard
icon
Chapter 9 Customizing the portal and user logon 391
•
•
color3 — the fields, information area, and clean icons on the active tab
color4 — not used
There are five optional color themes. The themes are predefined sets of web-safe
colors that complement each other.
•
•
•
•
•
aqua
apple
jeans
cinnamon
candy
You can change the individual colors, but Nortel recommends using the color
themes to change the look and feel of the portal page. If you change the portal
colors, use colors that are considered web safe. Also consider how the applied
colors fit with your company logo and brand.
The colors are specified using hexadecimal codes. Table 76 lists the hexadecimal
values for some commonly used web-safe colors. For additional color values, use
an Internet search engine to find web sites offering comprehensive listings.
Table 76 Common colors, with hexadecimal codes (Sheet 1 of 2)
Color
Hexadecimal code
White
FFFFFF
Black
000000
Dark gray
A9A9A9
Light gray
D3D3D3
Red
FF0000
Green
008000
Blue
0000FF
Yellow
FFFF00
Orange
FFA500
Violet
EE82EE
Dark violet
9400D3
Pink
FFC0CB
Nortel Secure Network Access Switch 4050 User Guide
392 Chapter 9 Customizing the portal and user logon
Table 76 Common colors, with hexadecimal codes (Sheet 2 of 2)
Color
Hexadecimal code
Brown
A52A2A
Beige
F5F5DC
Lime green
32CD32
Light green
90EE90
Dark blue
00008B
Navy
000080
Light skyblue
87CEFA
Medium blue
0000CD
Dark red
8B0000
For the commands to configure the colors used on the portal, see “Changing the
portal colors using the CLI” on page 408 or “Changing the portal colors using the
SREM” on page 431.
For examples of how you can use macros to configure links and redirection to
internal sites, see “Automatic redirection to internal sites” on page 396.
Language localization
The default English-language dictionary file contains entries for the text for tab
names, general text, messages, buttons, and field labels on the portal page. The
entries in the dictionary file can be translated into another language. You can then
set the portal to display the translated text.
The languages supported by the Nortel SNAS 4050 are configured for the system,
but the language selected for the portal is a domain parameter.
The Nortel SNAS 4050 uses ISO 639 language codes to track languages that have
been added to the configuration. English (en) is the predefined language and is
always present.
320818-A
Chapter 9 Customizing the portal and user logon 393
To change the language displayed for tab names, general text, messages, buttons,
and field labels on the portal page, do the following:
1
Export the language definition template (see “Configuring language support
using the CLI” on page 402 or “Importing and exporting language
definitions” on page 422).
2
Translate the language definition template file.
a
Open the file with a text editor such as Notepad.
b
Verify that the charset parameter specified in the Content-Type entry is
set according to the character encoding scheme you are using. For
example:
“Content-Type: text/plain; charset=iso-8859-1/n”
c
Translate the entries displayed under msgstr (message string).
Note: Do not translate the entries under msgid (message id).
There are useful Open Source software tools for translating po files.
Search for po files editor in your web search engine to find tools that run
on Windows and Unix. A translation tool is particularly useful when a
new version of the Nortel SNAS 4050 software is released: you can
export the new template file supplied with the software and merge it with
a previously translated language file, so that only new and changed text
strings need to be translated.
3
Import the translated language definition file (see “Configuring language
support using the CLI” on page 402 or “Importing and exporting language
definitions” on page 422).
4
Set the portal to display the new language (see “Setting the portal display
language using the CLI” on page 404 or “Setting the portal display language
using the SREM” on page 424).
Nortel Secure Network Access Switch 4050 User Guide
394 Chapter 9 Customizing the portal and user logon
Linksets and links
You can add the following types of links to the portal Home tab:
•
•
External — links directly to a web page. Suitable for external web sites.
FTP — links to a directory on an FTP server.
A linkset is a set of one or more links. Each linkset configured for the domain can
be mapped to one or more groups and extended profiles in the domain. After the
client has been authenticated, the client’s portal page displays all the links
included in the linksets associated with the client’s group. The client’s portal page
also displays all the linksets associated with the client’s extended profile. For
information about mapping linksets to groups and extended profiles, see
“Mapping linksets to a group or profile using the CLI” on page 206 or “Mapping
linksets to a group or profile using the SREM” on page 223.
Autorun linksets
You can enable an autorun feature for a linkset so that all links defined for that
linkset execute automatically after the client has been authenticated. For example,
you can configure an autorun linkset to automatically link to the URL of the
remediation server, and then map this linkset to all extended profiles which filter
for clients who fail the TunnelGuard host integrity check.
No links for the autorun linkset display on the portal page. Each link in the linkset
opens in a new browser window. If the autorun linkset includes multiple links,
multiple browser windows will open. For information about configuring autorun,
see “Configuring linksets using the CLI” on page 411 or “Configuring linksets
using the SREM” on page 439.
The linkset autorun feature is similar to the portal feature allowing automatic
redirection to internal sites (see “Automatic redirection to internal sites” on
page 396). The linkset feature allows more granular control of this functionality.
Also, unlike the linkset autorun feature, the automatic redirection feature does not
open the link in a new browser window.
320818-A
Chapter 9 Customizing the portal and user logon 395
Planning the linksets
Plan your configuration so that linksets containing common links are separate
from linksets containing group-specific links. Also ensure that the links you are
providing to resources do not contradict the client’s access rights.
You can control the order in which links display on the portal Home tab. Consider
the following in your planning:
•
•
•
Linksets for the group display after the linksets for the client’s extended
profile.
The index number you assign to the linkset controls the order in which the
linksets display. You assign the index number when you map the linkset to the
group or extended profile (see “Mapping linksets to a group or profile using
the CLI” on page 206 or “Mapping linksets to a group or profile using the
SREM” on page 223).
The index number you assign to the link controls the order in which the links
display within the linkset. You assign the index number when you include the
link in the linkset (see “Configuring links using the CLI” on page 413 or
“Configuring links using the SREM” on page 444).
Macros
Macros are inline functions you can use to insert variable arguments in text, in
order to customize the portal for individual users.
The following macros are available for use as arguments in parameters for links,
display text, and redirection commands:
•
•
•
•
<var:portal> — expands to the domain name of the portal
<var:user> — expands to the user name of the currently logged in client
<var:password> — expands to the password of the currently logged in
client
<var:group> — expands to the name of the group of which the currently
logged in client is a member
Nortel Secure Network Access Switch 4050 User Guide
396 Chapter 9 Customizing the portal and user logon
Automatic redirection to internal sites
You can configure the portal to automatically redirect authenticated clients to an
internal site. Unlike the linkset autorun feature, automatic redirection does not
open a new browser window. Rather, it replaces the default Home page in the
internal frame on the portal browser page. As long as the browser remains open,
the session remains logged in.
The commands to configure automatic redirection require you to specify the URL
to which the clients will be redirected, prefixed by the portal address (see
“Configuring the portal display using the CLI” on page 405 or “Configuring the
portal display using the SREM” on page 425).
Examples of redirection URLs and links
Table 77 shows example specifications for redirection URLs and associated links.
In these examples:
•
•
the portal address is nsnas.example.com
the address to which you want to redirect clients is inside.example.com
Table 77 Examples of redirection URLs and link text (Sheet 1 of 2)
Purpose
Redirection URL or link text
Redirect the client to an internal site.
Redirection URL:
https://nsnas.example.com/http/inside.example.com
or
https://<var:portal>/http/inside.example.com
Redirect the client to a password-protected site.
Note: The user name and password on the intranet
site and the portal must be identical.
Redirection URL:
https://<var:portal>/http/<var:user>:<var:password>
@inside.example.com/protected
320818-A
Chapter 9 Customizing the portal and user logon 397
Table 77 Examples of redirection URLs and link text (Sheet 2 of 2)
Purpose
Redirection URL or link text
Redirect clients to different sites, depending on their Linktext (static text) entry:
group membership (deptA or deptB).
<script>if ("<var:group>" ==
"deptA") { location.replace
("https://nsnas.example.com/http/
inside.example.com/deptA.html");}
else if ("<var:group>" == "deptB")
{ location.replace
("https://nsnas.example.com/http/in
side.example.com/deptB.html");}
</script>
Insert a link on the internal site for the client to log
off from the portal.
Link:
<a href=https://nsnas.example.com/
logout.yaws> Logout from portal
</a>
Managing the end user experience
Nortel recommends that you consider the following ways in which you can
manage the end user’s experience:
•
•
“Automatic JRE upload” on page 397
“Windows domain logon script” on page 398
Automatic JRE upload
The Nortel SNAS 4050 portal requires the client device to be running a minimum
version of the Java Runtime Environment (JRE) in order for the TunnelGuard
applet to load properly. Nortel recommends adding the required JRE version and
plugins.html as custom content to the portal. In this way, if the client does not
meet the Java requirement and TunnelGuard does not load, the client will be
presented with a logon screen to automatically download and install the
required JRE.
To configure the portal to automate the process of updating the client’s JRE
version, perform the following steps:
1
Create the plugins.html file, with a link to the JRE installer that you want.
Nortel Secure Network Access Switch 4050 User Guide
398 Chapter 9 Customizing the portal and user logon
2
Download the JRE installer from the Sun Microsystems Java web site
(http://www.java.com).
3
Bundle plugins.html and the JRE installer in a zip file.
4
Add the zip file as custom content to the portal.
For general information about adding custom content to the portal, see
“Configuring custom content using the CLI” on page 409 or “Configuring custom
content using the SREM” on page 433. For information about the minimum JRE
requirements, see Release Notes for the Nortel Secure Network Access Solution,
Software Release 1.0 (320850-A).
Windows domain logon script
Configure a Windows domain logon script to automatically launch the end user’s
browser and present the Nortel SNA portal page on start-up. The exact
requirements for the script depend on your particular network setup and usual
modes of end-user access.
For an example of a very simple script and instructions on assigning the script to
all users in the domain, see Appendix G, “Using a Windows domain logon script
to launch the Nortel SNAS 4050 portal,” on page 901.
Customizing the portal and logon using the CLI
The following section describes the CLI commands to customize the portal and
user logon.
Roadmap of portal and logon configuration commands
The following roadmap lists all the CLI commands to customize the portal and
user logon. Use this list as a quick reference or click on any entry for more
information.
Command
Parameter
/cfg/domain 1/dnscapt
ena
dis
320818-A
Chapter 9 Customizing the portal and user logon 399
Command
Parameter
/cfg/domain 1/dnscapt/exclude
list
del <index name>
add <domain name>
insert <index number> <domain
name>
move <index number> <new index
number>
/cfg/lang
import <protocol> <server>
<filename> <code>
export <protocol> <server>
<filename>
list
vlist [<letter>]
del <code>
/cfg/domain 1/portal/lang
setlang <code>
charset
list
/cfg/domain 1/portal
import <protocol> <server>
<filename>
restore
banner
redirect <URL>
logintext <text>
iconmode clean|fancy
linktext <text>
linkurl on|off
linkcols <columns>
linkwidth <width>
companynam
ieclear on|off
/cfg/domain 1/portal/colors
color1 <code>
Nortel Secure Network Access Switch 4050 User Guide
400 Chapter 9 Customizing the portal and user logon
Command
Parameter
color2 <code>
color3 <code>
color4 <code>
theme default|aqua|apple|
jeans|cinnamon|candy
/cfg/domain 1/portal/content
import <protocol> <server>
<filename>
export <protocol> <server>
<filename>
delete
available
ena
dis
/cfg/domain 1/linkset
<linkset ID>
name <name>
text <text>
autorun true|false
del
/cfg/domain 1/linkset
<linkset ID>/link <index>
move <new index>
text <text>
type external|ftp
del
/cfg/domain 1/linkset
<linkset ID>/link <index>/
external/quick
/cfg/domain 1/linkset
<linkset ID>/link <index>/
ftp/quick
320818-A
Chapter 9 Customizing the portal and user logon 401
Configuring the captive portal using the CLI
By default, the Nortel SNAS 4050 is set up to function as a captive portal. (For
more information about the captive portal in the Nortel SNAS 4050 domain, see
“Captive portal and Exclude List” on page 386.)
To configure the Nortel SNAS 4050 portal as a captive portal, use the following
command:
/cfg/domain 1/dnscapt
The DNS Capture menu displays.
The DNS Capture menu includes the following options:
/cfg/domain 1/dnscapt
followed by:
exclude
Accesses the DNS Exclude menu, in order to
configure the Exclude List (see “Configuring the
Exclude List using the CLI” on page 401).
ena
Enables captive portal functionality.
dis
Disables captive portal functionality.
Configuring the Exclude List using the CLI
The Exclude List is a list of domain names that will not be captured by the Nortel
SNAS 4050. (For more information about the Exclude List, see “Exclude List” on
page 387.)
To create and manage the Exclude List, use the following command:
/cfg/domain 1/dnscapt/exclude
The DNS Exclude menu displays.
Nortel Secure Network Access Switch 4050 User Guide
402 Chapter 9 Customizing the portal and user logon
The DNS Exclude menu includes the following options:
/cfg/domain 1/dnscapt/exclude
followed by:
list
Lists the currently configured Exclude List entries by
index number
del <index name>
Removes the Exclude List entry represented by the
specified index number. The index numbers of the
remaining entries adjust accordingly.
add <domain name>
Adds an entry to the Exclude List.
• domain name is a string identifying the domain
names to be forwarded directly to the corporate
DNS servers
For information about allowable expressions and
escape sequences, see “Exclude List” on page 387.
The Nortel SNAS 4050 assigns the next available index
number to the entry.
insert <index number>
<domain name>
Inserts an entry at a particular position in the list. The
index number you specify must be in use. The index
numbers of existing entries with this index number and
higher are incremented by 1.
move <index number>
<new index number>
Moves an entry up or down the list. The index numbers
of the remaining entries adjust accordingly.
Changing the portal language using the CLI
To change the language displayed for tab names, general text, messages, buttons,
and field labels on the portal page, do the following:
320818-A
1
Export the language definition template (see “Configuring language support
using the CLI” on page 402).
2
Translate the language definition template file (see “Language localization”
on page 392).
3
Import the translated language definition file (see “Configuring language
support using the CLI” on page 402).
4
Set the portal to display the new language (see “Setting the portal display
language using the CLI” on page 404).
Chapter 9 Customizing the portal and user logon 403
Configuring language support using the CLI
To manage the language definition files in the system, use the following
command:
/cfg/lang
The Language Support menu displays.
Nortel Secure Network Access Switch 4050 User Guide
404 Chapter 9 Customizing the portal and user logon
The Language Support menu includes the following options:
/cfg/lang
followed by:
import <protocol>
<server> <filename>
<code>
Imports a ready-to-use language definition file from the
specified TFTP/FTP/SCP/SFTP file exchange server.
• protocol is the import protocol. Options are
•
tftp|ftp|scp|sftp.
server is the host name or IP address of the
server
•
filename is the name of the language definition
•
code is the ISO 639 language code to identify the
file on the server
language
When you import the file, you are prompted to specify
the ISO 639 language code. The language code is
saved to the configuration together with the imported
language definition file. To view valid language codes,
use the /cfg/lang/vlist command.
For more information about language support on the
portal, see “Language localization” on page 392.
export <protocol>
<server> <filename>
Exports the language definition template to the
specified TFTP/FTP/SCP/SFTP file exchange server.
• protocol is the export protocol. Options are
•
tftp|ftp|scp|sftp.
server is the host name or IP address of the
server
•
filename is the name of the language definition
file
code is the ISO 639 language code to identify the
language
Once the template file has been exported and
downloaded, you can translate screen text, such as
button and field labels, directly in the file. Then upload
the translated file to a TFTP/FTP/SCP/SFTP file
exchange server and import it using the
/cfg/lang/import command.
•
list
320818-A
Lists the languages that have been added to the
configuration, by language code and description.
English (en) is the predefined language and is always
present.
Chapter 9 Customizing the portal and user logon 405
/cfg/lang
followed by:
vlist [<letter>]
Lists all valid language codes and their corresponding
description. To list all valid language codes beginning
with a specific letter, specify the letter in the command.
del <code>
Deletes the language definition file for the specified
language code. You cannot delete a language file that
is currently in use. English (en) is the predefined
language and cannot be deleted.
Setting the portal display language using the CLI
To set the preferred language for the portal display, use the following command:
/cfg/domain 1/portal/lang
The Portal Language menu displays.
The Portal Language menu includes the following options:
/cfg/domain 1/portal/lang
followed by:
setlang <code>
Specifies the language to be used for the portal display.
• code is the ISO 639 language code to identify the
language
Before you can set the preferred language, you must
import the corresponding language definition file (see
“Configuring language support using the CLI” on
page 402). To view supported language codes, use the
/cfg/domain 1/portal/lang/list
command.
charset
Prints the character set that is currently in use on the
portal.
list
Lists the currently supported languages, by language
code and description.
Nortel Secure Network Access Switch 4050 User Guide
406 Chapter 9 Customizing the portal and user logon
Configuring the portal display using the CLI
To modify the look and feel of the portal page that displays in the client’s web
browser, use the following command:
/cfg/domain 1/portal
The Portal menu displays.
The Portal menu includes the following options:
/cfg/domain 1/portal
followed by:
import <protocol>
<server> <filename>
Imports a graphics file for the banner (in GIF format)
from the specified TFTP/FTP/SCP/SFTP file exchange
server.
• protocol is the import protocol. Options are
•
tftp|ftp|scp|sftp.
server is the host name or IP address of the
server
• filename is the name of the graphics file (.gif)
When the download is complete and you apply the
changes, the new image replaces the existing banner
image on the portal web page. Clients who are
currently logged on will not notice the change unless
they reload the portal web page.
The maximum size of the banner image file is 16 MB. If
there are several Nortel SNAS 4050 domains, the total
size of all imported banner image files must not exceed
16 MB.
For more information about the customizable elements
on the portal web page, see “Portal look and feel” on
page 389.
320818-A
restore
Restores the default Nortel banner.
banner
Displays the file name of the banner image file currently
in use.
Chapter 9 Customizing the portal and user logon 407
/cfg/domain 1/portal
followed by:
redirect <URL>
Sets the URL to which clients are automatically
redirected after authentication by the portal.
• URL is the URL to which to direct the client,
prefixed by the portal address
For example, if the portal address is
nsnas.example.com and you want to redirect clients
automatically to inside.example.com, the URL
parameter is:
https://nsnas.example.com/http/inside.example.com
Alternatively, you can use the <var:portal> macro
to represent the portal address.
With redirection configured, the client will not be able to
access tabs on the portal page.
To remove redirection, replace the previously specified
URL with an empty string by pressing Enter at the URL
prompt.
For more information about using macros in URLs, see
“Macros” on page 395. For more information about
redirecting clients to internal sites, see “Automatic
redirection to internal sites” on page 396.
logintext <text>
Specifies custom text to be displayed on the portal
logon page.
• text is an ordinary text string or HTML code
You can type in the text or paste it in at the prompt. To
signal the end of the string, press Enter to create a
new line, type an ellipsis (...), and then press Enter
again.
iconmode clean|fancy
Specifies the mode for the icons representing portal
links (for example, file server links).
• clean displays simple icons using a single color
(color3)
• fancy displays displays multicolored, shaded, and
animated icons
The default value is fancy.
For more information about linksets and links, see
“Linksets and links” on page 394. For information about
configuring links, see “Configuring links using the CLI”
on page 413.
For information about customizing the colors used on
the portal page, see “Changing the portal colors using
the CLI” on page 408.
Nortel Secure Network Access Switch 4050 User Guide
408 Chapter 9 Customizing the portal and user logon
/cfg/domain 1/portal
followed by:
320818-A
linktext <text>
Specifies static text to be displayed above the group
links on the portal Home tab. The static text displays for
all clients, but the links themselves may change,
depending on the client’s group membership.
• text is an ordinary text string or HTML code
You can type in the text or paste it in at the prompt. To
signal the end of the string, press Enter to create a
new line, type an ellipsis (...), and then press Enter
again.
You can use the <var:user> and <var:group>
macros in the link text. For an example of using the
<var:group> macro in a Java script linktext entry in
order to configure group-controlled redirection to
internal sites, see Table 77 on page 396.
For more information about using macros in links, see
“Macros” on page 395. For more information about
configuring links, see “Configuring links using the CLI”
on page 413.
linkurl on|off
Sets the display mode for the Enter URL field on the
portal Home tab. Display mode options are:
• on — the Enter URL field is displayed
• off — the Enter URL field is not displayed
The default is on.
linkcols <columns>
Sets the number of columns for the link table on the
portal Home tab.
• columns is a positive integer
The default value is 2.
linkwidth <width>
Sets the width of the link table on the portal Home tab.
The link table is adjusted to the left on the white area of
the Home tab. The options for the table width are:
• auto — the columns are distributed evenly across
the Home tab
• <percent> — specifies the percentage of the
white area that will be used for the link table. The
range is 1–100%. The default value is 100% (the
entire white area will be used).
companynam
Specifies the company name to display on the portal
page. The default is Nortel.
colors
Accesses the Portal Colors menu, in order to
customize the color theme and individual colors used
on the portal page (see “Changing the portal colors
using the CLI” on page 408).
Chapter 9 Customizing the portal and user logon 409
/cfg/domain 1/portal
followed by:
content
Accesses the Portal Custom Content menu, in order
to provide custom content for the portal page (see
“Configuring custom content using the CLI” on
page 409).
lang
Accesses the Portal Language menu, in order to set
the preferred language for the portal display (see
“Setting the portal display language using the CLI” on
page 404).
ieclear on|off
Controls use of the ClearAuthenticationCache feature
available in Internet Explorer 6, SP 1 and later (IE). The
feature is used to clear sensitive information (such as
passwords and cookies) from the cache when a user
logs out from a secure session.
• on — the cache is cleared for all instances of the
current process when the user logs off from the
portal. The user will also be logged off from any
other sites at the same time.
• off — when the user logs off from the portal, the
cache is not cleared until the user closes the
browser
The default value is on.
Changing the portal colors using the CLI
To customize the colors used for the portal display, use the following command:
/cfg/domain 1/portal/colors
The Portal Colors menu displays.
Nortel Secure Network Access Switch 4050 User Guide
410 Chapter 9 Customizing the portal and user logon
The Portal Colors menu includes the following options:
/cfg/domain 1/portal/colors
followed by:
color1 <code>
Specifies the color for the large background area below
the tabs.
• code is the hexadecimal value for the color,
including the # symbol (not case sensitive)
The default value is #ACCDD5.
color2 <code>
Specifies the color for the background area behind the
labels.
• code is the hexadecimal value for the color,
including the # symbol (not case sensitive)
The default value is #D0E4E9.
color3 <code>
Specifies the color for the fields, information area, and
clean icons on the active tab.
• code is the hexadecimal value for the color,
including the # symbol (not case sensitive)
The default value is #2088A2.
color4 <code>
Specifies the color fornon-active tabs.
• code is the hexadecimal value for the color,
including the # symbol (not case sensitive)
The default value is #58B2C9.
theme
default|aqua|apple|
jeans|cinnamon|candy
Specifies the color theme for the portal. The default is
default.
For more information about the portal colors and themes, see “Colors” on
page 390.
Configuring custom content using the CLI
To add custom content, such as Java applets, to the portal, use the following
command:
/cfg/domain 1/portal/content
The Portal Custom Content menu displays.
320818-A
Chapter 9 Customizing the portal and user logon 411
The Portal Custom Content menu includes the following options:
/cfg/domain 1/portal/content
followed by:
import <protocol>
<server> <filename>
Imports a content file (in ZIP format) from the specified
TFTP/FTP/SCP/SFTP file exchange server.
• protocol is the import protocol. Options are
tftp|ftp|scp|sftp.The default is tftp.
• server is the host name or IP address of the
server
• filename is the name of the content file (.zip) on
the server
The file is saved in the portal’s root directory and is
automatically unpacked.
export <protocol>
<server> <filename>
Exports a content file (in ZIP format) from the portal to
the specified TFTP/FTP/SCP/SFTP file exchange
server.
• protocol is the export protocol. Options are
•
tftp|ftp|scp|sftp.
server is the host name or IP address of the
server
•
filename is the name of the content file (.zip)
delete
Deletes all uploaded content from the portal.
available
Shows remaining memory space available for custom
content, in kilobytes (KB).
ena
Enables client access to custom content.
The default is disabled.
dis
Disables client access to custom content.
Nortel Secure Network Access Switch 4050 User Guide
412 Chapter 9 Customizing the portal and user logon
Configuring linksets using the CLI
A linkset is a set of links that display on the portal Home tab. For more
information about linksets and links, see “Linksets and links” on page 394.
To create and configure a linkset, use the following command:
/cfg/domain 1/linkset <linkset ID>
where linkset ID is an integer in the range 1 to 1024 that uniquely identifies
the linkset in the Nortel SNAS 4050 domain.
Note: If you ran the quick setup wizard during initial setup, two linksets
have been created: tg_passed (linkset ID = 1) and tg_failed
(linkset ID = 2). The linksets are empty.
When you first create the linkset, if you do not specify the ID in the command,
you will be prompted to enter the linkset ID or name. You must enter the ID for
the new linkset. You will then be prompted to enter the linkset name. After you
have created the linkset, you can use either the ID or the name to access the linkset
for configuration.
The Linkset menu displays.
320818-A
Chapter 9 Customizing the portal and user logon 413
The Linkset menu includes the following options:
/cfg/domain 1/linkset <linkset ID>
followed by:
name <name>
Names or renames the linkset. After you have defined a
name for the linkset, you can use either the linkset
name or the linkset ID to access the Linkset menu.
• name is a string that must be unique in the domain.
The maximum length of the string is 255
characters.
You reference the linkset name when mapping the
linkset to groups or extended profiles using the
/cfg/domain 1/aaa/group #[/extend #]
/linkset command (see “Mapping linksets to a
group or profile using the CLI” on page 206).
When you map the linkset to a group, members of the
group get access to all the links contained in the
linkset. The links display on the portal Home tab.
text <text>
Specifies text to display as a heading above the linkset
links on the portal Home tab.
• text is an ordinary text string or HTML code
The heading text is optional.
autorun true|false
Specifies whether autorun support is enabled or
disabled. The options are:
• true — autorun is enabled
• false — autorun is disabled
If enabled, all links defined for the linkset execute
automatically after the client has been authenticated.
No links for this linkset display on the portal Home tab.
The default is disabled.
For more information about the type of links you can
configure, see “Linksets and links” on page 394.
link <index>
Accesses the Link menu, in order to create or
configure links for the linkset (see “Configuring links
using the CLI” on page 413).
To view existing linksets, press TAB following the
link command.
del
Removes the linkset from the current configuration.
Nortel Secure Network Access Switch 4050 User Guide
414 Chapter 9 Customizing the portal and user logon
Configuring links using the CLI
To create and configure the links included in the linkset, use the following
command:
/cfg/domain 1/linkset <linkset ID>/link <index>
where index is an integer in the range 1 to 256 that indicates the position of the
link in the linkset.
When you first create the link, if you do not specify the index in the command,
you will be prompted to enter the index or name. You must enter the index for the
new link. You will then be prompted to enter the following parameters:
•
•
link text — a string that displays on the portal Home tab as the clickable link
text. You can later modify the text by using the text command on the Link
menu.
type — the link type (external or ftp). The default is external. After you
enter the link type, you automatically enter a wizard to configure type-specific
settings for the link. You can later relaunch the wizard to modify the settings.
For more information about the settings, see “Configuring external link
settings using the CLI” on page 415 or “Configuring FTP link settings using
the CLI” on page 415.
The Link menu displays.
320818-A
Chapter 9 Customizing the portal and user logon 415
The Link menu includes the following options:
/cfg/domain 1/linkset <linkset ID>/link <index>
followed by:
move <new index>
Moves the link to a new position in the linkset. The
index numbers of existing link entries with this index
number and higher are incremented by 1.
• new index is an integer in the range 1 to 256
that indicates the position of the link in the linkset
For example: You have two portal links, Link 1 and
Link 2. To move Link 2 so it displays before Link 1 on
the portal page, enter the following command:
>> Link 3# move 1
Link 2 becomes Link 1, and Link 1 becomes Link 2.
text <text>
Specifies text to display as the clickable link text on the
portal Home tab.
• text is an ordinary text string or HTML code
Provide descriptive text that clearly identifies the
targeted resource. The client sees only the link text, not
the URL contained in the link.
type external|ftp
Specifies the type of link. The options are:
• external — directs the client to a web page. The
external link is not secured by the Nortel
SNAS 4050.
• ftp — directs the client to a directory on an FTP
file exchange server
The default is external.
The Link menu changes to include a command
corresponding to the specified link type.
Note: Nortel Secure Network Access Switch
Software Release 1.0 supports external links only.
external
Accesses the External Settings menu, in order to
configure settings for the link (see “Configuring external
link settings using the CLI” on page 415).
This command displays only if the link type is
external.
ftp
Accesses the FTP Settings menu, in order to configure
settings for the link (see “Configuring FTP link settings
using the CLI” on page 415).
This command displays only if the link type is ftp.
del
Removes the link from the current configuration.
Nortel Secure Network Access Switch 4050 User Guide
416 Chapter 9 Customizing the portal and user logon
Configuring external link settings using the CLI
To launch the wizard to configure settings for a link to an external web page, use
the following command:
/cfg/domain 1/linkset <linkset ID>/link <index>/
external/quick
The wizard prompts you to enter the following settings:
•
•
•
method — HTTP or HTTPS
host — the host name or IP address of the web server
path — the path on the web server. You must specify a path. A single slash (/)
indicates the web server document root.
Configuring FTP link settings using the CLI
To launch the wizard to configure settings for a link to a directory on an FTP file
exchange server, use the following command:
/cfg/domain 1/linkset <linkset ID>/link <index>/
ftp/quick
The wizard prompts you to enter the following settings:
•
•
FTP host — the host name or IP address of the FTP server (for example,
ftp.example.com or 10.1.10.1)
initial path on host — the path to the directory (for example,
/home/share/john/manuals/). If you do not specify a path, the FTP
server root directory is implied. A slash and exclamation mark (/!) indicate the
logged in user’s home directory.
You can use the <var:user> and <var:group> macros in the initial path.
For example, you can create a shared project directory with a name that
corresponds to the name of a group, and then use the <var:group> macro to
provide access to that directory for members of the group. For more
information about using macros in links, see “Macros” on page 395.
320818-A
Chapter 9 Customizing the portal and user logon 417
Customizing the portal and logon using the SREM
The following section describes the SREM procedures to customize the portal and
user logon. It includes the following topics:
•
•
•
•
•
•
•
“Configuring the captive portal using the SREM” on page 416
“Changing the portal language using the SREM” on page 419
“Configuring the portal display using the SREM” on page 425
“Changing the portal colors using the SREM” on page 431
“Configuring custom content using the SREM” on page 433
“Configuring linksets using the SREM” on page 439
“Configuring links using the SREM” on page 444
Configuring the captive portal using the SREM
By default, the Nortel SNAS 4050 is set up to function as a captive portal. (For
more information about the captive portal in the Nortel SNAS 4050 domain, see
“Captive portal and Exclude List” on page 386.)
To configure the Nortel SNAS 4050 as a captive portal, complete the following
processes:
•
•
“Enabling DNS capture” on page 416
“Configuring the DNS Exclude List using the SREM” on page 418
Enabling DNS capture
To configure the Nortel SNAS 4050 portal as a captive portal, perform the
following steps:
1
Select the Secure Access Domain > domain > DNS Capture tab.
The DNS Capture screen appears (see Figure 105).
Nortel Secure Network Access Switch 4050 User Guide
418 Chapter 9 Customizing the portal and user logon
Figure 105 DNS Capture screen
The DNS Capture screen includes the following components:
Table 78 DNS Capture fields
320818-A
Fields
Description
Enable DNS Capture
When selected, enables captive portal functionality.
DNS Exclude List
Lists the currently configured DNS domains to exclude
when using the Nortel SNAS 4050 portal as a captive
portal.
2
Select Enable DNS Capture to enable the Nortel SNAS 4050 portal as a
captive portal.
3
Click Apply on the toolbar to send the current changes to the Nortel
SNAS 4050. Click Commit on the toolbar to save the changes permanently.
Chapter 9 Customizing the portal and user logon 419
Configuring the DNS Exclude List using the SREM
The Exclude List is a list of domain names that will not be captured by the Nortel
SNAS 4050. (For more information about the Exclude List, see “Exclude List” on
page 387.)
To create and manage the Exclude List, perform the following steps:
1
Select the Secure Access Domain > domain > DNS Capture tab.
The DNS Capture screen appears (see Figure 105).
2
To add entries to the DNS Exclude List:
a
Click Add
The Add DNS Domain dialog box appears (see Figure 106).
Figure 106 Add DNS Domain
b
Enter the DNS domain information in the applicable fields. Table 79
describes the Add DNS Domain fields.
Table 79 Add DNS Domain fields
Field
Description
Domain
Specifies the domain name you want to exclude. The
domain name is a string identifying the domain names to
be forwarded directly to the corporate DNS servers.
For information about allowable expressions and escape
sequences see “Exclude List” on page 387.
c
Click Add.
The entry appears in the DNS Exclude List.
Nortel Secure Network Access Switch 4050 User Guide
420 Chapter 9 Customizing the portal and user logon
3
To remove an entry from the Exclude List:
a
In the DNS Exclude List, select the entry you want to remove.
b
Click Delete.
c
When prompted, click Yes.
The entry is removed from the DNS Exclude List.
4
To move an entry up or down in the DNS Exclude List:
a
Select the entry you want to move.
b
Using the up and down arrows, move the selected entry.
The index numbers adjust automatically when changes are applied.
5
Click Apply on the toolbar to send the current changes to the Nortel
SNAS 4050. Click Commit on the toolbar to save the changes permanently.
Changing the portal language using the SREM
To change the language displayed for tab names, general text, messages, buttons,
and field labels on the portal page, complete the following procedures:
320818-A
1
Export the language definition template (see “Importing and exporting
language definitions” on page 422).
2
Translate the language definition template file (see “Language localization”
on page 392).
3
Import the translated language definition file (“Importing and exporting
language definitions” on page 422).
4
Set the portal to display the new language (see “Setting the portal display
language using the SREM” on page 424).
Chapter 9 Customizing the portal and user logon 421
Configuring language support using the SREM
To manage language definition files in the system, perform the following steps:
1
Select the System > Language tab.
The Languages sub-tabs appear (see Figure 107).
Figure 107 Pre-defined Languages
2
Choose from one of the following tasks:
•
•
•
“Viewing predefined languages” on page 421
“Viewing and removing custom languages” on page 421
“Importing and exporting language definitions” on page 422
Nortel Secure Network Access Switch 4050 User Guide
422 Chapter 9 Customizing the portal and user logon
Viewing predefined languages
To view predefined languages, click the Pre-defined Languages tab. The
Pre-defined Languages table appears (see Figure 107).
Viewing and removing custom languages
To view custom languages, use the following procedure:
1
Select the System > Language > Custom Languages tab.
The Custom Added Languages table appears (see Figure 108).
Figure 108 Custom Added Languages
2
To delete a custom language:
a
320818-A
Select it from the table and click Delete.
Chapter 9 Customizing the portal and user logon 423
b
Click Apply on the toolbar to send the current changes to the Nortel
SNAS 4050. Click Commit on the toolbar to save the changes
permanently.
Importing and exporting language definitions
To import or export a language definition, use the following procedure:
1
Click the Import/Export Definition tab.
The Import/Export Definition screen appears (see Figure 109).
Figure 109 Import/Export Definition
Nortel Secure Network Access Switch 4050 User Guide
424 Chapter 9 Customizing the portal and user logon
2
Enter the Language information in the applicable fields. Table 80 describes
the Import Definition fields.
Table 80
Import/Export Definition fields
Field
Description
Action
Specifies whether you are importing or exporting the
language definition file.
Protocol
Specifies the protocol used to import or export. Options
are:
• tftp
• ftp
• scp
• sftp
Host
Specifies the host name or IP address of the server.
Filename
Specifies the name of the language definition file.
ISO 639 Code
Specifies the ISO 639 language code.
Username
Specifies the FTP username.
Password
Specifies the FTP password.
3
Click Apply on the toolbar to send the current changes to the Nortel
SNAS 4050. Click Commit on the toolbar to save the changes permanently.
Note: When exporting, the language definition is exported immediately
after the Apply button is clicked.
320818-A
Chapter 9 Customizing the portal and user logon 425
Setting the portal display language using the SREM
To set the preferred language for the portal display, perform the following steps:
1
Select the Secure Access Domain > domain > Portal > Language tab.
The Language screen appears (see Figure 110).
Figure 110 Language screen
Nortel Secure Network Access Switch 4050 User Guide
426 Chapter 9 Customizing the portal and user logon
2
Enter the language information in the applicable fields. Table 81 describes the
Langauge fields.
Table 81 Language fields
Field
Description
Charset in use
Specifies the character set in currently use.
To change or configure this character set, refer to
“Language localization” on page 392.
Used Language
Specifies the language to be used in the portal display.
Before you can select a custom language, you must import
the corresponding language definition file (see “Importing
and exporting language definitions” on page 422).
3
Click Apply on the toolbar to send the current changes to the Nortel
SNAS 4050. Click Commit on the toolbar to save the changes permanently.
Configuring the portal display using the SREM
To modify the look and feel of the portal page that displays in the client’s web
browser, select one of the following options:
•
•
320818-A
“Configuring content” on page 426
“Importing banners” on page 429
Chapter 9 Customizing the portal and user logon 427
Configuring content
To configure and modify portal content, perform the following steps:
1
Select the Secure Access Domain > domain > Portal navigation tree
component.
The portal Configuration tab appears (see Figure 111).
Figure 111 Portal Configuration screen
Nortel Secure Network Access Switch 4050 User Guide
428 Chapter 9 Customizing the portal and user logon
2
Enter the Portal Configuration information in the applicable fields. Table 82
describes the Portal Configuration fields.
Table 82 Portal Configuration fields
320818-A
Field
Description
Installed Banner
Displays the file name of the banner image file currently in
use.
Company Name
Specifies the company name to display on the portal page.
Icon Mode
Specifies the mode for the icons representing portal links
(for example, file server links).
• Clean displays simple icons using a single color
(color3)
• Fancy displays multicolored, shaded, and animated
icons
The default value is fancy.
For more information about linksets and links, see
“Linksets and links” on page 394. For more information
about configuring links, see “Configuring links using the
SREM” on page 444.
For information about customizing the colors used on the
portal page, see “Changing the portal colors using the
SREM” on page 431.
Number of Columns on
Home Tab
Specifies the number of columns for the link table on the
portal Home tab.
Width of Link Columns
Specifies the width of the link table on the portal Home tab.
The link table is adjusted to the left of the white area of the
Home tab. The width value is specified in percent. This
represents the percentage of the white area that will be
used for the link table.
URL on Link Page
Specifies the display mode for the Enter URL field on the
portal Home tab. When selected, the Enter URL field is
displayed. By default, this option is not selected (disabled).
Chapter 9 Customizing the portal and user logon 429
Table 82 Portal Configuration fields (continued)
Field
Description
Redirect URL
Sets the URL to which clients are automatically redirected
after authentication by the portal.
For example, if the portal address is nsnas.example.com
and you want to redirect clients automatically to
inside.example.com, the URL parameter is:
https://nsnas.example.com/http/inside.example.com
Alternatively, you can use the <var:portal> macro to
represent the portal address.
With redirection configured, the client will not be able to
access tabs on the portal page.
To remove redirection, replace the previously specified
URL with an empty string by pressing Enter at the URL
prompt.
For more information about using macros in URLs, see
“Macros” on page 395. For more information about
redirecting clients to internal sites, see “Automatic
redirection to internal sites” on page 396.
Text on Link Page
Specifies static text to be displayed above the group links
on the portal Home tab. The static text displays for all
clients, but the links themselves may change, depending
on the client’s group membership.
You can type in the text or paste it in at the prompt. Press
Enter to create a new line.
You can use the <var:user> and <var:group>
macros in the link text. For an example of using the
<var:group> macro in a Java script linktext entry in
order to configure group-controlled redirection to internal
sites, see Table 77 on page 396.
For more information about using macros in links, see
“Macros” on page 395. For more information about
configuring links, see “Configuring links using the SREM”
on page 444.
Text on Login Page
Specifies custom text to be displayed on the portal logon
page.
You can type in the text or paste it in at the prompt. Press
Enter to create a new line.
Restore Default Banner
Restores the default Nortel banner.
Nortel Secure Network Access Switch 4050 User Guide
430 Chapter 9 Customizing the portal and user logon
Importing banners
To import a banner to display on the portal Home page, perform the following
steps:
1
Select the Secure Access Domain > domain > Portal > Import Banner tab.
The Import Banner screen appears (see Figure 112).
Figure 112 Import Banner screen
320818-A
Chapter 9 Customizing the portal and user logon 431
2
Enter the banner information in the applicable fields. Table 83 describes the
Import Banner fields.
Table 83 Import Banner fields
Field
Description
Protocol
Specifies the protocol used to import. Options are:
• tftp
• ftp
• scp
• sftp
Host
Specifies the host name or IP address of the server.
Filename
Specifies the name of the graphics file. The file must be in
GIF format.
Username
Specifies the username that is used to logon to the server.
Password
Specifies the password that is used to logon to the server.
3
Click Apply on the toolbar to send the current changes to the Nortel
SNAS 4050. Click Commit on the toolbar to save the changes permanently.
When the download is complete and you apply the changes, the new image
replaces the existing banner image on the portal web page.
Note: Clients who are currently logged on when the banner is updated
will not notice the change unless they reload the portal web page.
The maximum size of the banner image file is 16 MB. If there are several Nortel
SNAS 4050 domains, the total size of all imported banner image files must not
exceed 16 MB. For more information about the customizable elements on the
portal web page, see “Portal look and feel” on page 389.
Nortel Secure Network Access Switch 4050 User Guide
432 Chapter 9 Customizing the portal and user logon
Changing the portal colors using the SREM
To customize the colors used for portal display, perform the following steps:
1
Select the Secure Access Domain > domain > Portal > Color Settings tab.
The Color Settings screen appears (see Figure 113).
Figure 113 Color Settings screen
320818-A
Chapter 9 Customizing the portal and user logon 433
2
Enter the color information in the applicable fields. Table 84 describes the
Color Settings fields.
Table 84 Color Settings fields
Field
Description
Background Below the Tabs
Specifies the color, in hexadecimal value, for the
background area below the tabs.
The default value is #58b2c9.
Background Behind the Tab
Labels
Specifies the color, in hexadecimal value, for the
background area behind the labels.
The default value is #d0e4e9.
Active Tab
Specifies the color, in hexadecimal, for the fields,
information area, and clean icons on the active tab.
The default value is #2088a2.
Non Active Tabs
Specifies the color, in hexadecimal, for non-active tabs.
The default value is #accdd5.
Color Themes
Specifies the color values for the portal to a preset theme.
Note: The Color Themes field does not accurately display
the currently active color theme. To use a color theme,
select one of the color themes from the list, then apply and
commit the change. Selecting a theme changes the color
settings to the new theme values. The new color theme
remains in effect for the portal page until you overtly select
a different color scheme and apply the change. However,
the Color Themes field reverts to displaying the default
value when the screen refreshes.
3
Click Apply on the toolbar to send the current changes to the Nortel
SNAS 4050. Click Commit on the toolbar to save the changes permanently.
For more information about the portal colors and themes, see “Portal look and
feel” on page 389.
Nortel Secure Network Access Switch 4050 User Guide
434 Chapter 9 Customizing the portal and user logon
Configuring custom content using the SREM
To configure custom content, such as Java applets, on the portal, perform the
following steps:
•
•
•
320818-A
“Viewing basic information about custom content” on page 434
“Importing custom content” on page 436
“Exporting custom content” on page 438
Chapter 9 Customizing the portal and user logon 435
Viewing basic information about custom content
To view basic information about the existing custom content, perform the
following steps:
1
Select the Secure Access Domain > domain > Portal > Custom Content >
Basic tab.
The Basics screen appears (see Figure 114).
Figure 114 Basics screen
Nortel Secure Network Access Switch 4050 User Guide
436 Chapter 9 Customizing the portal and user logon
2
Enter the basic information in the applicable fields. Table 85 describes the
Basics fields.
Table 85 Basics fields
Field
Description
Custom Content State
Specifies the custom content state. When selected,
enables client access to custom content.
The default is disabled.
Available Space
Specifies the remaining memory space available for
custom content, in kilobytes (KB).
This field is informational and cannot be modified.
3
320818-A
Click Apply on the toolbar to send the current changes to the Nortel
SNAS 4050. Click Commit on the toolbar to save the changes permanently.
Chapter 9 Customizing the portal and user logon 437
Importing custom content
To import custom content, perform the following steps:
1
Select the Secure Access Domain > domain > Portal > Custom Content >
Import Content tab.
The Import Content screen appears (see Figure 115).
Figure 115 Import Content screen
Nortel Secure Network Access Switch 4050 User Guide
438 Chapter 9 Customizing the portal and user logon
2
Enter the import information in the applicable fields. Table 86 describes the
Import Content fields.
Table 86 Import Content fields
Field
Description
Protocol
Specifies the import protocol. Options are:
• tftp
• ftp
• scp
• sftp
The default is ftp.
Host
Specifies the host name or IP address of the server.
Filename
Specifies the name of the content file (.zip) on the server.
Username
Specifies the username used to connect to the FTP server.
Password
Specifies the password used to connect to the FTP server.
3
320818-A
Click Apply on the toolbar to send the current changes to the Nortel
SNAS 4050. Click Commit on the toolbar to save the changes permanently.
Chapter 9 Customizing the portal and user logon 439
Exporting custom content
To export custom content, perform the following steps:
1
Select the Secure Access Domain > domain > Portal > Custom Content >
Export Content tab.
The Export Content screen appears (see Figure 115).
Figure 116 Export Content screen
Nortel Secure Network Access Switch 4050 User Guide
440 Chapter 9 Customizing the portal and user logon
2
Enter the export information in the applicable fields. Table 87 describes the
Export Content fields.
Table 87 Export Content fields
Field
Description
Protocol
Specifies the import protocol. Options are:
• tftp
• ftp
• scp
• sftp
The default is ftp.
Host
Specifies the host name or IP address of the server.
Filename
Specifies the name of the content file (.zip) on the server.
Username
Specifies the username used to connect to the FTP server.
Password
Specifies the password used to connect to the FTP server.
3
Click Apply on the toolbar to send the current changes to the Nortel
SNAS 4050. Click Commit on the toolbar to save the changes permanently.
Configuring linksets using the SREM
A linkset is a set of links that display on the portal Home tab. For more
information about linksets and links, see “Linksets and links” on page 394.
To create or modify a linkset, select one of the following options:
•
•
320818-A
“Creating a linkset” on page 440
“Modifying a linkset” on page 442
Chapter 9 Customizing the portal and user logon 441
Creating a linkset
To create a linkset, perform the following steps:
1
Select the Secure Access Domain > domain > Portal Links > Portal Links
tab.
The Portal Links screen appears (see Figure 117).
Figure 117 Portal Links screen
Nortel Secure Network Access Switch 4050 User Guide
442 Chapter 9 Customizing the portal and user logon
2
Click Add.
The Add a Linkset dialog box appears (see Figure 118).
Figure 118 Add a Linkset
3
Enter the linkset information in the applicable fields. Table 88 describes the
Add a Linkset fields.
Table 88 Add a Linkset fields
Field
Description
Index
Specifies an integer in the range 1 to 1024 that uniquely
identifies the linkset in the Nortel SNAS 4050 domain.
Name
Specifies a name for the linkset. The name must be unique
in the domain. The maximum length of the string is 255
characters.
You reference the linkset name when mapping the linkset
to groups or extended profiles.
See “Linksets and links” on page 394 for more details
about linksets.
Link Text
Specifies text to display as a heading above the linkset
links on the portal Home tab.
Text can be an ordinary string or HTML code.
The heading text is optional.
4
Click Apply.
The new linkset appears in the linkset table.
5
320818-A
Click Apply on the toolbar to send the current changes to the Nortel
SNAS 4050. Click Commit on the toolbar to save the changes permanently.
Chapter 9 Customizing the portal and user logon 443
Modifying a linkset
To modify a linkset, perform the following steps:
1
Select the Secure Access Domain > domain > Portal Links > linkset >
Configuration tab.
The linkset Configuration screen appears (see Figure 119).
Figure 119 Linkset Configuration screen
Nortel Secure Network Access Switch 4050 User Guide
444 Chapter 9 Customizing the portal and user logon
2
Enter the linkset information in the applicable fields. Table 89 describes the
linkset Configuration fields.
Table 89 Linkset Configuration fields
Field
Description
Index
Specifies an integer in the range 1 to 1024 that uniquely
identifies the linkset in the Nortel SNAS 4050 domain.
Name
Specifies a name for the linkset. The name must be unique
in the domain. The maximum length of the string is 255
characters.
You reference the linkset name when mapping the linkset
to groups or extended profiles.
See “Linksets and links” on page 394.
Link Text
Specifies text to display as a heading above the linkset
links on the portal Home tab.
Text can be an ordinary string or HTML code.
The heading text is optional.
Enable AutoRun
Specifies whether the AutoRun feature is enable.
If enabled, all links defined for the linkset execute
automatically after the client has been authenticated. No
links for this linkset display on the portal Home tab.
The default is disabled.
For more information about the type of links you can
configure, see “Linksets and links” on page 394.
Note: If you ran the quick setup wizard during initial setup, two linksets
have been created: tg_passed (linkset ID = 1) and tg_failed
(linkset ID = 2).
The linksets are empty.
3
320818-A
Click Apply on the toolbar to send the current changes to the Nortel
SNAS 4050. Click Commit on the toolbar to save the changes permanently.
Chapter 9 Customizing the portal and user logon 445
Configuring links using the SREM
After you create the linkset, add the individual links included in the linkset. For
information about links, refer to “Linksets and links” on page 394.
Use the following procedures to create or modify the links included in the linkset:
•
•
•
•
•
“Creating an external link using the SREM” on page 445
“Creating an FTP link using the SREM” on page 447
“Modifying external link settings using the SREM” on page 450
“Modifying FTP link settings using the SREM” on page 452
“Reordering links using the SREM” on page 453
Nortel Secure Network Access Switch 4050 User Guide
446 Chapter 9 Customizing the portal and user logon
Creating an external link using the SREM
To create an external link, perform the following steps:
1
Select the Secure Access Domain > domain > Portal Links > linkset >
Links tab.
The Links screen appears (see Figure 120).
Figure 120 Links screen
320818-A
Chapter 9 Customizing the portal and user logon 447
2
Click Add.
The Add a Portal Link dialog box appears (see Figure 121).
Figure 121 Add a Portal Link — External
3
Ensure that External is selected from the list at the top of the dialog.
If FTP link fields were being displayed, the dialog refreshes to display the
fields required for an external link.
4
Enter the link information in the applicable fields. Table 90 describes the Add
a Portal Link fields.
Table 90 Add a Portal Link fields
Field
Description
Index
Specifies an integer in the range 1 to 256 that uniquely
identifies the link within the linkset.
Link Text
Specifies text to display as the clickable link text on the
portal Home tab.
Text can be an ordinary string or HTML code. The client
sees only the link text, not the URL contained in the link.
Protocol
Specifies the protocol used for this link. Available options
are:
• https
• http
Note: This field is available for External links only.
Nortel Secure Network Access Switch 4050 User Guide
448 Chapter 9 Customizing the portal and user logon
Table 90 Add a Portal Link fields (continued)
Field
Description
Host
Specifies the host for this link. This field can contain either
an IP address or a domain name for the host being used.
Path
Specifies the path on the web server. You must specify a
path. A single slash (/) indicates the web server document
root.
5
Click Apply.
The new external link appears in the Links table.
6
Click Apply on the toolbar to send the current changes to the Nortel
SNAS 4050. Click Commit on the toolbar to save the changes permanently.
Creating an FTP link using the SREM
Note: Nortel Secure Network Access Switch Software Release 1.0
supports External links only.
320818-A
Chapter 9 Customizing the portal and user logon 449
To create an FTP link, perform the following steps:
1
Select the Secure Access Domain > domain > Portal Links > linkset >
Links tab.
The Links screen appears (see Figure 120 on page 445).
2
Click Add.
The Add a Portal Link dialog box appears (see Figure 122).
Figure 122 Add a Portal Link — FTP
3
Ensure that FTP is selected from the list at the top of the dialog.
If external link fields were being displayed, the dialog refreshes to display the
fields required for an FTP link.
Nortel Secure Network Access Switch 4050 User Guide
450 Chapter 9 Customizing the portal and user logon
4
Enter the link information in the applicable fields. Table 91 describes the Add
a Portal Link — FTP fields.
Table 91 Add a Portal Link — FTP fields
Field
Description
Index
Specifies an integer in the range 1 to 256 that uniquely
identifies the link within the linkset.
Link Text
Specifies text to display as the clickable link text on the
portal Home tab.
Text can be an ordinary string or HTML code. The client
sees only the link text, not the URL contained in the link.
FTP Host
Specifies the FTP host for this link. This field can contain
either an IP address or a domain name for the FTP host
being used.
Initial Host Path
Specifies the path to the directory (for example,
/home/share/john/manuals/). If you do not specify a path,
the FTP server root directory is implied. A slash and
exclamation mark (/!) indicate the logged in user’s home
directory. You can use the <var:user> and <var:group>
macros in the initial path.
5
Click Apply.
The new FTP link appears in the Links table.
6
320818-A
Click Apply on the toolbar to send the current changes to the Nortel
SNAS 4050. Click Commit on the toolbar to save the changes permanently.
Chapter 9 Customizing the portal and user logon 451
Modifying external link settings using the SREM
To modify a link, perform the following steps:
1
Select the Secure Access Domain > domain > Portal Links > linkset >
ext.link > Configuration tab.
The external link Configuration screen appears (see Figure 123).
Figure 123 External link Configuration screen
Nortel Secure Network Access Switch 4050 User Guide
452 Chapter 9 Customizing the portal and user logon
2
Enter the link information in the applicable fields. Table 92 describes the
external link Configuration fields.
Table 92 External link Configuration fields
Field
Description
Index
Specifies an integer in the range 1 to 256 that uniquely
identifies the link within the linkset.
To change the index value of an existing link, see
“Reordering links using the SREM” on page 453.
Link Text
Specifies text to display as the clickable link text on the
portal Home tab.
Text can be an ordinary string or HTML code. The client
sees only the link text, not the URL contained in the link.
HREF
Displays the full path for the external link. You cannot edit
this field directly. Change the value displayed in this field by
updating values in the Protocol, Host, and Path fields.
Protocol
Specifies the protocol used for this link. Available options
are:
• https
• http
Host
Specifies the host for this link. This field can contain either
an IP address or a domain name for the host being used.
Path
Specifies the path on the web server. You must specify a
path. A single slash (/) indicates the web server document
root.
3
320818-A
Click Apply on the toolbar to send the current changes to the Nortel
SNAS 4050. Click Commit on the toolbar to save the changes permanently.
Chapter 9 Customizing the portal and user logon 453
Modifying FTP link settings using the SREM
To modify a link, perform the following steps:
1
Select the Secure Access Domain > domain > Portal Links > linkset >
ftp link > Configuration tab.
The FTP link Configuration screen appears (see Figure 124).
Figure 124 FTP link Configuration screen
Nortel Secure Network Access Switch 4050 User Guide
454 Chapter 9 Customizing the portal and user logon
2
Enter the link information in the applicable fields. Table 93 describes the FTP
link Configuration fields.
Table 93 FTP link Configuration fields
Field
Description
Index
Specifies an integer in the range 1 to 256 that uniquely
identifies the link within the linkset.
To change the index value of an existing link, see
“Reordering links using the SREM” on page 453.
Link Text
Specifies text to display as the clickable link text on the
portal Home tab.
Text can be an ordinary string or HTML code. The client
sees only the link text, not the URL contained in the link.
FTP Host
Specifies the FTP host for this link. This field can contain
either an IP address or a domain name for the FTP host
being used.
Initial Host Path
Specifies the path to the directory (for example,
/home/share/john/manuals/). If you do not specify a path,
the FTP server root directory is implied. A slash and
exclamation mark (/!) indicate the logged in user’s home
directory. You can use the <var:user> and <var:group>
macros in the initial path.
3
Click Apply on the toolbar to send the current changes to the Nortel
SNAS 4050. Click Commit on the toolbar to save the changes permanently.
Reordering links using the SREM
To change the order in which links display in the linkset, perform the following
steps:
1
320818-A
Select the Secure Access Domain > domain > Portal Links > linkset >
link > Re Order Links tab.
Chapter 9 Customizing the portal and user logon 455
The Re Order Links screen appears (see Figure 125).
Figure 125 Re Order Links screen
2
Enter the link index in the applicable fields. Table 94 describes the Re Order
Links fields.
Table 94 Re Order Links fields
Field
Description
Move to Index
Specifies an integer in the range 1 to 256 that identifies the
position of the link within the linkset.
The index number of existing link entries with this index
number and higher are incremented by 1.
3
Click Apply on the toolbar to send the current changes to the Nortel
SNAS 4050. Click Commit on the toolbar to save the changes permanently.
Nortel Secure Network Access Switch 4050 User Guide
456 Chapter 9 Customizing the portal and user logon
320818-A
457
Chapter 10
Configuring system settings
This chapter includes the following topics:
Topic
Page
Configuring the cluster using the CLI
459
Roadmap of system commands
460
Configuring system settings using the CLI
463
Configuring the Nortel SNAS 4050 host using the CLI
465
Configuring host interfaces using the CLI
469
Configuring static routes using the CLI
471
Configuring host ports using the CLI
472
Managing interface ports using the CLI
473
Configuring the Access List using the CLI
474
Configuring date and time settings using the CLI
475
Configuring DNS servers and settings using the CLI
477
Configuring RSA servers using the CLI
480
Configuring syslog servers using the CLI
481
Configuring administrative settings using the CLI
483
Enabling TunnelGuard SRS administration using the CLI
485
Configuring Nortel SNAS 4050 host SSH keys using the CLI
485
Configuring RADIUS auditing using the CLI
488
Configuring authentication of system users using the CLI
492
Nortel Secure Network Access Switch 4050 User Guide
458 Chapter 10 Configuring system settings
Topic
Page
Configuring the cluster using the SREM
495
Configuring system settings using the SREM
496
Configuring a Nortel SNAS 4050 host using the SREM
497
Configuring host interfaces using the SREM
508
Configuring static routes using the SREM
514
Configuring host ports using the SREM
520
Managing interface ports using the SREM
523
Configuring the access list using the SREM
525
Managing date and time settings using the SREM
528
Configuring DNS settings using the SREM
532
Configuring servers using the SREM
534
Configuring administrative settings using the SREM
546
Configuring SRS control settings using the SREM
547
Configuring Nortel SNAS 4050 host SSH keys using the SREM
548
Adding an SSH key for a known host using the SREM
553
Managing RADIUS audit settings using the SREM
554
Managing RADIUS authentication of system users using the SREM
562
System settings apply to a cluster as a whole.
You can log on to either the Management IP address (MIP) or a Nortel
SNAS 4050 host Real IP address (RIP) in order to configure the system.
320818-A
Chapter 10 Configuring system settings 459
Configuring the cluster using the CLI
To configure the cluster, access the System menu by using the following
command:
/cfg/sys
From the System menu, you can configure and manage the following:
•
•
•
•
•
•
•
•
•
•
Management IP address (MIP) (see “Configuring system settings using the
CLI” on page 463)
the Nortel SNAS 4050 host, including interfaces and ports (see “Configuring
the Nortel SNAS 4050 host using the CLI” on page 465)
static routes (see “Configuring static routes using the CLI” on page 471)
date and time (see “Configuring date and time settings using the CLI” on
page 475)
DNS settings (see “Configuring DNS servers and settings using the CLI” on
page 477)
RSA servers (see “Configuring RSA servers using the CLI” on page 480) (not
supported in Nortel Secure Network Access Switch Software Release 1.0)
Syslog servers (see “Configuring syslog servers using the CLI” on page 481)
Access Lists (see “Configuring the Access List using the CLI” on page 474)
administrative applications, including
• managing access for Telnet, SSH, and SONMP (see “Configuring
administrative settings using the CLI” on page 483)
• configuring system management using SNMP (see “Configuring SNMP”
on page 617)
• enabling SRS administration (see “Enabling TunnelGuard SRS
administration using the CLI” on page 485)
• managing Nortel SNAS 4050 host SSH keys (see “Configuring Nortel
SNAS 4050 host SSH keys using the CLI” on page 485)
• managing RADIUS auditing (see “Configuring RADIUS auditing using
the CLI” on page 488)
• managing RADIUS authentication of system users (see “Configuring
authentication of system users using the CLI” on page 492)
user access (see “Managing system users and groups” on page 353)
Nortel Secure Network Access Switch 4050 User Guide
460 Chapter 10 Configuring system settings
•
disabling SSL traffic trace commands (see “Configuring system settings using
the CLI” on page 463)
Roadmap of system commands
The following roadmap lists the CLI commands to configure cluster-wide
parameters and the Nortel SNAS 4050 host within the cluster. Use this list as a
quick reference or click on any entry for more information:
Command
Parameter
/cfg/sys
mip <IPaddr>
distrace
/cfg/sys/host <host ID>
ip <IPaddr>
sysName <name>
sysLocatio <location>
license <key>
gateway <IPaddr>
ports
hwplatform
halt
reboot
delete
/cfg/sys/host
<host ID>/interface
<interface ID>
ip <IPaddr>
netmask <mask>
gateway <IPaddr>
vlanid <tag>
mode failover|trunking
primary <port>
delete
/cfg/sys/routes
320818-A
list
Chapter 10 Configuring system settings 461
Command
Parameter
del <index number>
add <IPaddr> <mask> <gateway>
/cfg/sys/host <host ID>/routes
list
del <index number>
add <IPaddr> <mask> <gateway>
/cfg/sys/host #/interface
<interface ID>/routes
list
del <index number>
add <IPaddr> <mask> <gateway>
/cfg/sys/host #/port <port>
autoneg on|off
speed <speed>
mode full|half
/cfg/sys/host #/interface
<interface ID>/ports
list
del <port>
add <port>
/cfg/sys/accesslist
list
del <index number>
add <IPaddr> <mask>
/cfg/sys/time
date <date>
time <time>
tzone
/cfg/sys/time/ntp
list
del <index number>
add <IPaddr>
/cfg/sys/dns
cachesize <entries>
retransmit <interval>
count <count>
ttl <ttl>
Nortel Secure Network Access Switch 4050 User Guide
462 Chapter 10 Configuring system settings
Command
Parameter
health <interval>
hdown <count>
hup <count>
/cfg/sys/dns/servers
list
del <index number>
add <IPaddr>
insert <index number> <IPaddr>
move <index number> <new index
number>
/cfg/sys/rsa
rsaname <name>
import <protocol> <server>
<filename> [<FTP user name> <FTP
password>]
rmnodesecr
del
/cfg/sys/syslog
list
del <index number>
add <IPaddr> <facility>
insert <index number> <IPaddr>
<facility>
move <index number> <new index
number>
/cfg/sys/adm
sonmp on|off
clitimeout <interval>
telnet on|off
ssh on|off
/cfg/sys/adm/srsadmin
port <port>
ena
dis
/cfg/sys/adm/sshkeys
320818-A
generate
Chapter 10 Configuring system settings 463
Command
Parameter
show
/cfg/sys/adm/sshkeys/knownhosts
list
del <index number>
add
import <IPaddr>
/cfg/sys/adm/audit
vendorid
vendortype
ena
dis
/cfg/sys/adm/audit/servers
list
del <index number>
add <IPaddr> <port> <shared
secret>
insert <index number> <IPaddr>
move <index number> <new index
number>
/cfg/sys/adm/auth
timeout <interval>
fallback on|off
ena
dis
/cfg/sys/adm/auth/servers
list
del <index number>
add <IPaddr> <port> <shared
secret>
insert <index number> <IPaddr>
move <index number> <new index
number>
Nortel Secure Network Access Switch 4050 User Guide
464 Chapter 10 Configuring system settings
Configuring system settings using the CLI
To view and configure cluster-wide system settings, use the following command:
/cfg/sys
The System menu displays.
The System menu includes the following options:
/cfg/sys
followed by:
320818-A
mip <IPaddr>
Sets the MIP for the cluster. The MIP identifies the
cluster and must be unique on the network. For more
information, see “About the IP addresses” on page 51.
Note: Nortel does not recommend reconfiguring this
parameter if you are logged on to the MIP, because you
may lose connectivity. To reset the MIP, log on to the
RIP instead.
host <host ID>
Accesses the Cluster Host menu, in order to configure
a specific Nortel SNAS 4050 host (see “Configuring the
Nortel SNAS 4050 host using the CLI” on page 465).
routes
Accesses the Routes menu, in order to manage static
routes for the cluster when there is more than one
interface (see “Configuring static routes using the CLI”
on page 471).
time
Accesses the Date and Time menu, in order to
configure date and time settings and to access Network
Time Protocol (NTP) servers (see “Configuring date
and time settings using the CLI” on page 475).
dns
Accesses the DNS Settings menu, in order to manage
DNS servers and tune DNS settings (see “Configuring
DNS servers and settings using the CLI” on page 477).
rsa <server ID>
Accesses the RSA Servers menu, in order to configure
the RSA server (see “Configuring RSA servers using
the CLI” on page 480).
Note: Not supported in Nortel Secure Network Access
Switch Software Release 1.0.
syslog
Accesses the Syslog Servers menu, in order to
configure the Syslog servers for receiving log
messages (see “Configuring syslog servers using the
CLI” on page 481).
Chapter 10 Configuring system settings 465
/cfg/sys
followed by:
accesslist
Accesses the Access List menu, in order to control
Telnet and SSH access to Nortel SNAS 4050 devices
(see “Configuring the Access List using the CLI” on
page 474).
adm
Accesses the Administrative Applications menu, in
order to set the CLI timeout value; manage Telnet,
SSH, SNMP, and SONMP access to Nortel SNAS 4050
devices; enable SRS administration; generate SSH
host keys; and configure the system for RADIUS
auditing and authentication of system users (see
“Configuring administrative settings using the CLI” on
page 483).
user
Accesses the User menu, in order to manage users
and passwords (see “Managing system users and
groups” on page 353).
distrace
Permanently disables the
/cfg/domain #/server/trace/ssldump
and
/cfg/domain #/server/trace/tcpdump
commands (see “Tracing SSL traffic using the CLI” on
page 136).
The distrace command is used to improve security.
The only way to reverse this command is to do a boot
install.
Configuring the Nortel SNAS 4050 host using the CLI
To configure basic TCP/IP properties for a particular Nortel SNAS 4050 device in
the cluster, use the following command:
/cfg/sys/host <host ID>
where host ID is an integer automatically assigned to the host when you
perform initial setup on the Nortel SNAS 4050 device.
The /cfg/sys/host <host ID> command also allows you to halt, reboot, or
delete the specified Nortel SNAS 4050 device.
The Cluster Host menu displays.
Nortel Secure Network Access Switch 4050 User Guide
466 Chapter 10 Configuring system settings
The Cluster Host menu includes the following options:
/cfg/sys/host <host ID>
followed by:
ip <IPaddr>
Sets the Real IP address (RIP) for Interface 1 on the
device. The RIP is the Nortel SNAS 4050 device host
IP address for network connectivity and must be unique
on the network. For more information, see “About the
IP addresses” on page 51.
Changing the RIP using this command does not affect
the MIP for the cluster.
sysName <name>
Assigns a name to the managed Nortel SNAS 4050
host. The name is a useful mnemonic when managing
the Nortel SNAS 4050 using SNMP.
sysLocatio <location> Identifies the physical location of the managed Nortel
SNAS 4050 host. The location description is a useful
mnemonic when managing the Nortel SNAS 4050
using SNMP.
320818-A
license <key>
Installs the license key for the type of license you have
purchased. The Nortel SNA SSL (portal and Nortel
SNAS 4050 domain client access) license is available
for 100, 250, 500, and 1000 users.
• key is text you paste in. The license key text is
supplied to you by Nortel Technical Support. When
pasting, ensure you include the BEGIN LICENSE
and END LICENSE lines.
To obtain a license key, first use the /info/local
command to find out the MAC address of the Nortel
SNAS 4050 device. Then provide the MAC address to
Nortel Technical Support and request the key for the
desired license type.
gateway <IPaddr>
Sets the default gateway address for the device. The
default gateway is the IP address of the interface on the
core router that will be used if no other interface is
specified.
To specify a default gateway for Interface 1 traffic, use
the /cfg/sys/host #/interface #/
gateway command (see “Configuring host interfaces
using the CLI” on page 469).
routes
Accesses the Host Routes menu, in order to manage
static routes for the Nortel SNAS 4050 when there is
more than one interface (see “Configuring static routes
using the CLI” on page 471).
interface
<interface number>
Accesses the Host Interface menu, in order to
configure an IP interface (see “Configuring host
interfaces using the CLI” on page 469).
Chapter 10 Configuring system settings 467
/cfg/sys/host <host ID>
followed by:
port
Accesses the Host Port menu, in order to configure
port properties (see “Configuring host ports using the
CLI” on page 472).
ports
Lists the physical ports on the device, by port number.
Ports that can exist on the same network (for failover or
trunking) are listed together, separated by a comma (,).
A port that cannot exist on the same network as other
listed ports appears after a colon (:). For example:
Ports = 1,2:3
hwplatform
Displays the hardware platform of the Nortel
SNAS 4050 device.
halt
Stops Nortel SNAS 4050 processing. Always use this
command before turning off the device.
If the Nortel SNAS 4050 you want to halt has become
isolated from the cluster, you will receive an error
message when executing the halt command. In this
case, log on to the Nortel SNAS 4050 using a console
connection or remotely by connecting to the Nortel
SNAS 4050 RIP (host address). Then use the
/boot/halt command (see page 733).
Nortel Secure Network Access Switch 4050 User Guide
468 Chapter 10 Configuring system settings
/cfg/sys/host <host ID>
followed by:
320818-A
reboot
Reboots the Nortel SNAS 4050.
If the Nortel SNAS 4050 you want to reboot has
become isolated from the cluster, you will receive an
error message when executing the reboot command.
In this case, log on to the Nortel SNAS 4050 using a
console connection or remotely by connecting to the
Nortel SNAS 4050 RIP (host address). Then use the
/boot/reboot command (see page 734).
delete
Removes the Nortel SNAS 4050 host from the cluster
and resets the device to its factory default
configuration. Other Nortel SNAS 4050 devices in the
cluster are not affected.
To ensure that you remove the intended Nortel
SNAS 4050, first use the /cfg/sys/host #/cur
command to view current settings and verify that it is
the correct host. (To view information for all Nortel
SNAS 4050 devices in the cluster, use the
/cfg/sys/cur command.)
After you have removed the Nortel SNAS 4050 from
the cluster, you must use a console connection to
access the device. Log on as the admin user with the
admin password to enter the Setup utility.
Note: If there are other Nortel SNAS 4050 devices in
the cluster configuration, you cannot delete a device if it
is the only Nortel SNAS 4050 in the cluster whose
status is up. In this case, you will receive an error
message when executing the delete command. To
delete a device from the cluster while all the other
cluster members are down, log on to the Nortel
SNAS 4050 using a console connection or remotely by
connecting to the Nortel SNAS 4050 RIP (host
address). Then use the /boot/delete command.
When the remaining cluster members come back up,
connect to the MIP and repeat the command to delete
the Nortel SNAS 4050 from the cluster configuration
(/cfg/sys/host #/delete).
Chapter 10 Configuring system settings 469
Viewing host information
To view the host number and IP address for each Nortel SNAS 4050 device in the
cluster, use the /cfg/sys/host <host ID>/cur command.
Configuring host interfaces using the CLI
The default IP interface on the Nortel SNAS 4050 host is Interface 1. You can
create additional interfaces and specify the ports to be assigned to each interface.
If you assign more than one port to an interface, you can choose whether the ports
will operate in failover or trunking mode.
You can create a maximum of four interfaces on each Nortel SNAS 4050 host.
To configure an IP interface and the assignment of physical ports on a particular
Nortel SNAS 4050 host, use the following command:
/cfg/sys/host <host ID>/interface <interface ID>
where interface ID is an integer in the range 1 to 252 that uniquely identifies
the interface on the Nortel SNAS 4050 host. To configure a new interface, enter an
unused interface ID number. To change the configuration of an existing interface,
enter the applicable interface ID number.
The Host Interface menu displays.
The Host Interface menu includes the following options:
/cfg/sys/host #/interface <interface ID>
followed by:
ip <IPaddr>
Sets the network address for the interface. (For
Interface 1, the network address is the RIP.)
netmask <mask>
Sets the subnet mask for the interface.
Nortel Secure Network Access Switch 4050 User Guide
470 Chapter 10 Configuring system settings
/cfg/sys/host #/interface <interface ID>
followed by:
320818-A
gateway <IPaddr>
Sets the default gateway address for the interface. The
default gateway is the IP address of the interface on the
core router that will be used for management traffic
(such as requests to private authentication servers and
DNS servers).
The default gateway will be used only for Nortel
SNAS 4050 domains that point to this interface
(/cfg/domain 1/adv/interface command on
page 145). If no domain points to this interface, the
specified gateway will be ignored.
routes
Accesses the Host Routes menu, in order to manage
static routes for the Nortel SNAS 4050 when there is
more than one interface (see “Configuring static routes
using the CLI” on page 471).
vlanid <tag>
Specifies the VLAN tag if packets received by the
interface are tagged with a specific VLAN tag ID.
mode
failover|trunking
Specifies the mode of operation for the port numbers
assigned to this interface. The options are:
• failover — only one link is active at any given
time. If the port with an active link fails, the active
link is immediately switched over to one of the other
ports configured for the interface. When you select
failover mode, you also have the option of
specifying a primary port (see /cfg/sys/
host #/interface #/primary).
• trunking — active links are sustained on all
configured ports simultaneously, in order to
increase network throughput.
The default is failover.
ports
Accesses the Interface Ports menu, in order to
manage ports for the interface (see “Managing
interface ports using the CLI” on page 473).
Chapter 10 Configuring system settings 471
/cfg/sys/host #/interface <interface ID>
followed by:
primary <port>
Specifies the primary port in the interface, on which the
active link is set up. If the primary port fails, the active
link is immediately transferred to a remaining
(secondary) port. As soon as the primary port regains
functionality, the active link is transferred back to the
primary port.
• port is an integer indicating the port number of
the physical port assigned to the interface. The
default is 0 (zero).
The default value of zero means that the currently
active link remains in use until it fails. If the port fails,
the link is transferred to another port. The link remains
active on the port to which it was transferred, even after
the failed port regains functionality.
The primary port setting applies only when you have
configured more than one port in the interface, and the
mode is failover.
delete
Removes the interface from the system configuration.
Configuring static routes using the CLI
To manage static routes on a cluster-wide level when more than one interface is
configured, use the following command:
/cfg/sys/routes
To manage static routes for a particular Nortel SNAS 4050 host when more than
one interface is configured, use the following command:
/cfg/sys/host <host ID>/routes
where host ID is an integer automatically assigned to the host when you
perform initial setup on the Nortel SNAS 4050 device.
To manage static routes for a particular interface, use the following command:
/cfg/sys/host #/interface <interface ID>/routes
where interface ID is an integer in the range 1 to 252 that uniquely identifies
the interface on the Nortel SNAS 4050 host.
Nortel Secure Network Access Switch 4050 User Guide
472 Chapter 10 Configuring system settings
The system, host, or interface Routes menu displays.
When you add a static route to the system, host, or interface configuration, the
route is automatically assigned an index number. There are separate sequences of
index numbers for routes configured for the cluster, for each host, and for each
interface.
The system, host, or interface Routes menu includes the following options:
/cfg/sys/[host #[/interface #]/]routes
followed by:
list
Displays IP address information for all configured static
routes, by index number.
del <index number>
Removes the specified route from the system, host, or
interface configuration.
• index number is the identification number
automatically assigned to the route when you
added the route to the configuration.
To view the index numbers of all configured static
routes, use the list command.
add <IPaddr> <mask>
<gateway>
Adds a static route to the system, host, or interface
configuration.
• IPaddr is the destination IP address.
• mask is the network mask.
• gateway is the IP address on the core router.
An index number is automatically assigned to the route.
Configuring host ports using the CLI
To configure the connection properties for a port, use the following command:
/cfg/sys/host #/port <port>
where port is an integer in the range 1 to 4 indicating the port number of the
physical port on the Nortel SNAS 4050. The port number is the number
identifying the port on the back of the Nortel SNAS 4050.
The Host Port menu displays.
320818-A
Chapter 10 Configuring system settings 473
The Host Port menu includes the following options:
/cfg/sys/host #/port <port>
followed by:
autoneg on|off
Specifies the Ethernet auto-negotiation setting for the
host and NIC port. The options are:
• on — the port is set to auto-negotiate speed and
mode. This is the recommended setting.
• off — speed and mode are fixed at a specified
setting.
The default is on.
When auto-negotiation is on, ensure that the device to
which the port is connected is also set to
auto-negotiate.
speed <speed>
Sets the speed for the host and NIC port when
auto-negotiation is set to off.
• speed — the port speed in megabits per second.
The options are 10|100|1000.
mode full|half
Sets the duplex mode for the host and NIC port when
auto-negotiation is set to off. The options are full
and half.
The default duplex mode is full.
Managing interface ports using the CLI
To view and manage the ports assigned to an interface, use the following
command:
/cfg/sys/host #/interface <interface ID>/ports
where interface ID is an integer in the range 1 to 252 that uniquely identifies
the interface on the Nortel SNAS 4050 host.
The Interface Ports menu displays.
Nortel Secure Network Access Switch 4050 User Guide
474 Chapter 10 Configuring system settings
The Interface Ports menu includes the following options:
/cfg/sys/host #/interface <interface ID>/ports
followed by:
list
Displays all ports assigned to the interface.
del <port>
Removes the specified port from the interface.
• port is the port number of the physical port on the
device.
add <port>
Adds a port to be used in the interface.
• port is the port number of the physical port on the
device.
To view available port numbers on the Nortel
SNAS 4050 device, use the
/cfg/sys/host #/ports command (see
page 467).
Configuring the Access List using the CLI
The Access List is a cluster-wide list of IP addresses for hosts authorized to access
the Nortel SNAS 4050 devices by Telnet, SSH, and SREM. You can configure the
list to allow access by individual machines or a range of machines on a specific
network.
If the Access List is empty, then access is open to any machine.
Note: Before you join a Nortel SNAS 4050 to the cluster, if there are
existing entries in the Access List, you must add to the Access List the
RIP (host IP address) for Interface 1 of all Nortel SNAS 4050 devices in
the cluster. You must do this before you perform the join. Otherwise, the
devices will not be able to communicate.
For information about enabling Telnet and SSH access, see “Configuring
administrative settings using the CLI” on page 483 or “Configuring administrative
settings using the SREM” on page 546.
To manage the Access List in order to control Telnet and SSH access to the Nortel
SNAS 4050 cluster, use the following command:
/cfg/sys/accesslist
320818-A
Chapter 10 Configuring system settings 475
The Access List menu displays.
The Access List menu includes the following options:
/cfg/sys/accesslist
followed by:
list
Displays the network address and network mask for all
entries in the Access List, by index number.
del <index number>
Removes the specified entry from the list.
• index number is the identification number
automatically assigned to the entry when you
added the entry to the list.
To view the index numbers of all configured Access List
entries, use the list command.
add <IPaddr> <mask>
Adds an entry to the Access List. Only those machines
listed will be allowed to access the Nortel SNAS 4050
through Telnet or SSH.
• IPaddr is the IP address of the host to be allowed
access.
• mask is the subnet mask. You can set the mask to
specify a single machine or a range of machines on
a specific network.
An index number is automatically assigned to the entry.
Configuring date and time settings using the CLI
To configure date and time settings for the cluster, use the following command:
/cfg/sys/time
The Date and Time menu displays.
Nortel Secure Network Access Switch 4050 User Guide
476 Chapter 10 Configuring system settings
The Date and Time menu includes the following options:
/cfg/sys/time
followed by:
date <date>
Sets the system date.
• date is the date in YYYY-MM-DD format.
time <time>
Sets the system time.
• time is the time in HH:MM:SS format, using a
24-hour clock.
tzone
Specifies the time zone. You are prompted to enter a
continent or ocean area, a country, and a region (if
applicable). To view available input options, press
Enter to accept the default (select) in order to
display selection menus for each item.
ntp
Accesses the NTP Servers menu, in order to manage
NTP servers used by the cluster (see “Managing NTP
servers” on page 476).
Managing NTP servers
You can add NTP servers to the system configuration to enable the NTP client on
the Nortel SNAS 4050 to synchronize its clock. To compensate for discrepancies,
it is recommended that NTP have access to at least three NTP servers.
To manage NTP servers used by the system, use the following command:
/cfg/sys/time/ntp
The NTP Servers menu displays.
320818-A
Chapter 10 Configuring system settings 477
The NTP Servers menu includes the following options:
/cfg/sys/time/ntp
followed by:
list
Displays IP address information for all NTP servers
configured for the system, by index number.
del <index number>
Removes the specified NTP server from the system
configuration.
• index number is the identification number
automatically assigned to the server when you
added the server to the configuration.
To view the index numbers of all configured NTP
servers, use the list command.
add <IPaddr>
Adds an NTP server to the system configuration.
• IPaddr is the IP address of the NTP server.
An index number is automatically assigned to the
server.
Configuring DNS servers and settings using the CLI
To configure DNS settings for the cluster, use the following command:
/cfg/sys/dns
The DNS Settings menu displays.
The DNS Settings menu includes the following options:
/cfg/sys/dns
followed by:
servers
Accesses the DNS Servers menu, in order to manage
servers configured for the cluster (see “Managing DNS
servers” on page 479).
cachesize <entries>
Specifies the size of the local DNS cache.
• entries is an integer in the range 0–10000
indicating the maximum number of DNS entries in
the local DNS cache. The default is 1000.
Nortel Secure Network Access Switch 4050 User Guide
478 Chapter 10 Configuring system settings
/cfg/sys/dns
followed by:
retransmit <interval> Sets the interval for retransmitting a DNS query.
• interval is a positive integer that indicates the
time interval in seconds (s), minutes (m), or hours
(h). If you do not specify a measurement unit,
seconds is assumed. The default is 2 (2 seconds).
320818-A
count <count>
Specifies the number of retries.
• count is a non-negative integer that indicates the
maximum number of times a DNS query is
retransmitted. The default is 3.
ttl <ttl>
Specifies the maximum time to live (TTL) value for
entries in the DNS cache. After the TTL has expired,
the entries are discarded.
• ttl is a non-negative integer that indicates the
TTL value in seconds (s), minutes (m), hours (h), or
days (d). You can enter compound values (for
example, 2h30m). If you do not specify a
measurement unit, seconds is assumed. The
default is 3h (3 hours).
health <interval>
Sets the interval for the Nortel SNAS 4050 to check the
health of the DNS servers. At the specified interval, the
Nortel SNAS 4050 performs a DNS query to each DNS
server in the system configuration to determine its
health status.
• interval is an integer that indicates the time
interval in seconds (s), minutes (m), or hours (h). If
you do not specify a measurement unit, seconds is
assumed. The default is 10 (10 seconds).
hdown <count>
Sets the health check down counter.
• count is a positive integer that indicates the
number of times a DNS server health check can
time out before the Nortel SNAS 4050 determines
the DNS server is down. The default is 2.
hup <count>
Sets the health check up counter.
• count is a positive integer that indicates the
number of times a DNS server health check returns
a positive response before the Nortel SNAS 4050
determines the DNS server is up. The default is 2.
Chapter 10 Configuring system settings 479
Managing DNS servers
You can add up to three DNS servers to the system configuration. The DNS server
is used by the captive portal when it forwards queries on the Exclude List. (For
more information about the captive portal and the Exclude List, see “Captive
portal and Exclude List” on page 386.)
To configure the cluster to use external DNS servers, use the following command:
/cfg/sys/dns/servers
The DNS Servers menu displays.
The DNS Servers menu includes the following options:
/cfg/sys/dns/servers
followed by:
list
Lists the IP addresses of currently configured DNS
servers, by index number.
del <index number>
Removes the specified DNS server from the system
configuration. The index numbers of the remaining
entries adjust accordingly.
To view the index numbers of all configured DNS
servers, use the list command.
add <IPaddr>
Adds a DNS server to the system configuration.
• IPaddr — the IP address of the DNS server
The system automatically assigns the next available
index number to the server.
You can add up to three DNS servers to the
configuration.
insert <index number>
<IPaddr>
Inserts a server at a particular position in the list of
DNS servers in the configuration.
• index number — the index number you want
the server to have
• IPaddr — the IP address of the DNS server you
are adding
The index number you specify must be in use. The
index numbers of existing servers with this index
number and higher are incremented by 1.
Nortel Secure Network Access Switch 4050 User Guide
480 Chapter 10 Configuring system settings
/cfg/sys/dns/servers
followed by:
move <index number>
<new index number>
Moves a server up or down the list of DNS servers in
the configuration.
• index number — the original index number of
the server you want to move
• new index number — the index number
representing the new position of the server in the
list
The index numbers of the remaining entries adjust
accordingly.
To view the index numbers of all configured DNS
servers, use the list command.
Configuring RSA servers using the CLI
To configure the symbolic name for the RSA server and import the sdconf.rec
configuration file, use the following command:
/cfg/sys/rsa
The RSA Servers menu displays.
Note: This feature is not supported in Nortel Secure Network Access
Switch Software Release 1.0.
320818-A
Chapter 10 Configuring system settings 481
The RSA Servers menu includes the following options:
/cfg/sys/rsa
followed by:
rsaname <name>
Sets the symbolic name of the RSA server.
import <protocol>
<server> <filename>
[<FTP user name> <FTP
password>]
Imports a copy of the sdconf.rec file from the
specified TFTP/FTP/SCP/SFTP server.
• protocol is the import protocol. Options are
•
tftp|ftp|scp|sftp.
server is the host name or IP address of the
server.
•
filename is the name of the sdconf.rec file
on the server.
The sdconf.rec file is a configuration file that
contains critical RSA ACE/Server information. Contact
your RSA ACE/Server administrator to obtain the file
and make it available on the specified
TFTP/FTP/SCP/SFTP server.
rmnodesecr
Removes the RSA node secret, if necessary.
Authentication will then fail until the Node secret
created check box is unchecked in the Edit Agent
Host window on the RSA server.
del
Deletes the current RSA server information.
Configuring syslog servers using the CLI
The Nortel SNAS 4050 software can send log messages to specified syslog hosts.
For descriptions of the log messages that the Nortel SNAS 4050 can send to a
syslog host, see Appendix B, “Syslog messages,” on page 851.
To configure syslog servers for the cluster, use the following command:
/cfg/sys/syslog
The Syslog Servers menu displays.
Nortel Secure Network Access Switch 4050 User Guide
482 Chapter 10 Configuring system settings
The Syslog Servers menu includes the following options:
/cfg/sys/syslog
followed by:
320818-A
list
Lists the IP addresses and facility numbers of all
configured syslog servers, by index number.
del <index number>
Removes the specified syslog server from the system
configuration. The index numbers of the remaining
entries adjust accordingly.
To view the index numbers of all configured syslog
servers, use the list command.
add <IPaddr>
<facility>
Adds a syslog server to the system configuration. You
are prompted to enter the following information
• IPaddr — the IP address of the syslog server
• facility — the local facility number, to uniquely
identify syslog entries. For more information about
the local facility number, see the manual page for
syslog.conf under UNIX.
The system automatically assigns the next available
index number to the server.
insert <index number>
<IPaddr> <facility>
Assigns a specific index number to the syslog server
you add.
• index number — the index number you want
the server to have
• IPaddr — the IP address of the syslog server you
are adding
• facility — the local facility number, to uniquely
identify syslog entries. For more information about
the local facility number, see the manual page for
syslog.conf under UNIX.
The index number you specify must be in use. The
index numbers of existing servers with this index
number and higher are incremented by 1.
move <index number>
<new index number>
Moves a server up or down the list of syslog servers in
the configuration.
• index number — the original index number of
the server you want to move
• new index number — the index number
representing the new position of the server in the
list
The index numbers of the remaining entries adjust
accordingly.
To view the index numbers of all configured syslog
servers, use the list command.
Chapter 10 Configuring system settings 483
Configuring administrative settings using the CLI
Administrative settings control the functioning of the CLI. Important
administrative settings include:
•
•
•
•
enabling Telnet access to the CLI
enabling SSH access to the CLI (required in order to use the SREM)
enabling SRS administration to configure the TunnelGuard SRS rules (see
“Enabling TunnelGuard SRS administration using the CLI” on page 485)
setting CLI idle timeout
To configure administrative settings for the system, use the following command:
/cfg/sys/adm
The Administrative Applications menu displays.
The Administrative Applications menu includes the following options:
/cfg/sys/adm
followed by:
snmp
Accesses the SNMP menu, in order to configure
network management of the cluster (see ).
sonmp on|off
Enables or disables support for SynOptics Network
Management Protocol (SONMP) network topology
information. The default is disabled (off).
clitimeout <interval> Sets the timeout interval for user inactivity in the CLI. At
the end of the timeout period, if there is still no activity,
the user is automatically logged out.
• interval is an integer that indicates the time
interval in seconds (s), minutes (m), hours (h), or
days (d). If you do not specify a measurement unit,
seconds is assumed. The range is 300–604800
seconds (5 m–7 d). The default is 600 (10 m).
Changes to the timeout value do not take effect until
the next logon.
When the user is automatically logged out, any
unapplied changes are lost. Save your configuration
changes regularly by using the global apply
command.
Nortel Secure Network Access Switch 4050 User Guide
484 Chapter 10 Configuring system settings
/cfg/sys/adm
followed by:
320818-A
audit
Accesses the Audit menu, in order to configure
RADIUS auditing (see “Configuring RADIUS auditing
using the CLI” on page 488).
auth
Accesses the Authentication menu, in order to
configure RADIUS authentication of system users (see
“Configuring authentication of system users using the
CLI” on page 492).
telnet on|off
Enables or disables Telnet access for remote
management of the system. The options are:
• on — Telnet access is enabled. If there are no
entries in the Access List, all Telnet connections are
allowed. If there are any entries in the Access List,
only the specified machines are allowed Telnet
access.
• off — All Telnet connections are rejected,
including connections from machines in the Access
List.
The default is off.
For more information about the Access List, see
“Configuring the Access List using the CLI” on
page 474.
ssh on|off
Enables or disables SSH access for remote
management of the system. The options are:
• on — SSH access is enabled. If there are no
entries in the Access List, all SSH connections are
allowed. If there are any entries in the Access List,
only the specified machines are allowed SSH
access.
• off — all SSH connections are rejected, including
connections from machines in the Access List.
The default is off.
For more information about the Access List, see
“Configuring the Access List using the CLI” on
page 474.
srsadmin
Accesses the SRS Admin menu, in order to configure
the TunnelGuard SRS rules (see “Enabling
TunnelGuard SRS administration using the CLI” on
page 485).
sshkeys
Accesses the SSH Host Keys menu, in order to
manage SSH keys used by all Nortel SNAS 4050 hosts
in the cluster in accordance with the Single System
Image (SSI) concept (see “Configuring Nortel
SNAS 4050 host SSH keys using the CLI” on
page 485).
Chapter 10 Configuring system settings 485
Enabling TunnelGuard SRS administration using the CLI
To create and modify the TunnelGuard Software Requirement Set (SRS) rules,
you must use the SREM (see “TunnelGuard SRS Builder” on page 317). Before
you can access the Rule Builder utility in the SREM, you must enable support for
SRS administration.
To configure support for managing the SRS rules, use the following command:
/cfg/sys/adm/srsadmin
The SRS Admin menu displays.
The SRS Admin menu includes the following options:
/cfg/sys/adm/srsadmin
followed by:
port <port>
Specifies the TCP port used for communication with
the SRS administration server. The default is
port 4443.
ena
Enables SRS administration, for creating and
managing SRS rules.
dis
Disables SRS administration. The default is disabled.
Configuring Nortel SNAS 4050 host SSH keys using the CLI
The Nortel SNAS 4050 functions as both SSH client (for importing and exporting
logs using SFTP) and SSH server for secure management communications
between the Nortel SNAS 4050 devices in a cluster.
Note: SCP is not supported.
The SSH host keys are a set of keys to be used by all hosts in the cluster in
accordance with the Single System Image (SSI) concept. As a result, connections
to the MIP always appear to an SSH client to be to the same host.
Nortel Secure Network Access Switch 4050 User Guide
486 Chapter 10 Configuring system settings
During initial setup, there is an option to generate the SSH host keys
automatically.
To generate and view the SSH keys used by all hosts in the cluster for secure
management communications, use the following command:
/cfg/sys/adm/sshkeys
The SSH Host Keys menu displays.
The SSH Host Keys menu includes the following options:
/cfg/sys/adm/sshkeys
followed by:
320818-A
generate
Generates new SSH host keys (RSA1, RSA, and DSA)
to be used by all hosts in the cluster.
Enter Apply to apply the change immediately and
create the key.
show
Displays the current SSH host keys and corresponding
fingerprints for the cluster. The following formats are
used:
• RSA1 keys — there is no standard format. The
format in the CLI output is the OpenSSH
implementation, except that the line is wrapped. To
fully conform to the OpenSSH implementation, you
may need to edit the output back into a single line
for use in the key storage of an SSH client.
• RSA and DSA keys — the SECSH Public Key File
Format, as described in Internet Draft
draft-ietf-secsh-publickeyfile.
knownhosts
Accesses the SSH Known Host Keys menu, in order
to manage the public SSH keys of remote hosts (see
“Managing known hosts SSH keys using the CLI” on
page 487)
Chapter 10 Configuring system settings 487
Managing known hosts SSH keys using the CLI
You can paste or import public SSH keys from remote hosts as a convenience, so
that you do not get prompted to accept a new key during later use of SCP or SFTP
for file or data transfer.
To achieve strict “man in the middle” protection, verify the fingerprint before
applying the changes.
To manage the public SSH keys of known remote hosts, use the following
command:
/cfg/sys/adm/sshkeys/knownhosts
The SSH Known Host Keys menu displays.
The SSH Known Host Keys menu includes the following options:
/cfg/sys/adm/sshkeys/knownhosts
followed by:
list
Lists the type and fingerprint of the known SSH keys for
remote hosts, by index number.
del <index number>
Removes the specified known host SSH key.
To view the index numbers of all known host SSH keys,
use the list command.
add
Allows you to paste in the contents of a key file you
have downloaded from the remote host.
When prompted, paste in the key, then press Enter.
Enter an elllipsis (...) to signal the end of the key.
Valid formats are as described for the
/cfg/sys/adm/sshkeys/show command or the
native format used by the OpenSSH implementation.
If the key has a valid format, you will be prompted for
the corresponding host name or IP address. You can
provide a comma-separated list of names and
IP addresses for the host.
The system automatically assigns the next available
index number to the known host SSH key.
import <IPaddr>
Allows you to import an SSH key from a remote host.
• IPaddr — the IP address of the remote host
The system automatically assigns the next available
index number to the known host SSH key.
Nortel Secure Network Access Switch 4050 User Guide
488 Chapter 10 Configuring system settings
Configuring RADIUS auditing using the CLI
You can configure the Nortel SNAS 4050 cluster to include a RADIUS server to
receive log messages about commands executed in the CLI or the SREM, for audit
purposes.
About RADIUS auditing
An event is generated whenever a system user logs on, logs off, or issues a
command from a CLI session. The event contains information about user name
and session ID, as well as the name of executed commands. You can configure the
system to send the event to a RADIUS server for audit trail logging, in accordance
with RFC 2866 (RADIUS Accounting).
If auditing is enabled but no RADIUS server is configured, events will still be
generated to the event log and any configured syslog servers.
When you add an external RADIUS audit server to the configuration, the server is
automatically assigned an index number. You can add several RADIUS audit
servers, for backup purposes. Nortel SNAS 4050 auditing will be performed by an
available server with the lowest index number. You can control audit server usage
by reassigning index numbers (see “Managing RADIUS audit servers using the
CLI” on page 490).
For information about configuring a RADIUS accounting server to log portal user
sessions, see “Configuring RADIUS accounting using the CLI” on page 146.
About the vendor-specific attributes
The RADIUS audit server uses Vendor-Id and Vendor-Type attributes in
combination to identify the source of the audit information. The attributes are sent
to the RADIUS audit server together with the event log information.
Each vendor has a specific dictionary. The Vendor-Id specified for an attribute
identifies the dictionary the RADIUS server will use to retrieve the attribute value.
The Vendor-Type indicates the index number of the required entry in the
dictionary file.
320818-A
Chapter 10 Configuring system settings 489
The Internet Assigned Numbers Authority (IANA) has designated SMI Network
Management Private Enterprise Codes that can be assigned to the Vendor-Id
attribute (see http://www.iana.org/assignments/enterprise-numbers).
RFC 2866 describes usage of the Vendor-Type attribute.
Contact your RADIUS system administrator for information about the
vendor-specific attributes used by the external RADIUS audit server.
To simplify the task of finding audit entries in the RADIUS server log, do the
following:
1
In the RADIUS server dictionary, define a descriptive string (for example,
NSNAS-SSL-Audit-Trail).
2
Map this string to the Vendor-Type value.
Configuring RADIUS auditing
To configure the Nortel SNAS 4050 to support RADIUS auditing, use the
following command:
/cfg/sys/adm/audit
The Audit menu displays.
The Audit menu includes the following options:
/cfg/sys/adm/audit
followed by:
servers
Accesses the RADIUS Audit Servers menu, in order
to configure external RADIUS audit servers for the
cluster (see “Managing RADIUS audit servers using
the CLI” on page 490).
vendorid
Corresponds to the vendor-specific attribute used by
the RADIUS audit server to identify event log
information from the Nortel SNAS 4050 cluster.
The default Vendor-Id is 1872 (Alteon).
Nortel Secure Network Access Switch 4050 User Guide
490 Chapter 10 Configuring system settings
/cfg/sys/adm/audit
followed by:
vendortype
Corresponds to the Vendor-Type value used in
combination with the Vendor-Id to identify event log
information from the Nortel SNAS 4050 cluster.
The default Vendor-Type value is 2
(Alteon-ASA-Audit-Trail).
ena
Enables RADIUS auditing.
The default is disabled.
dis
Disables RADIUS auditing.
The default is disabled.
Managing RADIUS audit servers using the CLI
To configure the Nortel SNAS 4050 to use external RADIUS audit servers, use the
following command:
/cfg/sys/adm/audit/servers
The RADIUS Audit Servers menu displays.
The RADIUS Audit Servers menu includes the following options:
/cfg/sys/adm/audit/servers
followed by:
320818-A
list
Lists the IP addresses of currently configured RADIUS
audit servers, by index number.
del <index number>
Removes the specified RADIUS audit server from the
current configuration. The index numbers of the
remaining entries adjust accordingly.
To view the index numbers of all configured RADIUS
audit servers, use the list command.
Chapter 10 Configuring system settings 491
/cfg/sys/adm/audit/servers
followed by:
add <IPaddr> <port>
<shared secret>
Adds a RADIUS audit server to the configuration. You
are prompted to enter the following information:
• IPaddr — the IP address of the audit server
• port — the TCP port number used for RADIUS
auditing. The default is 1813.
• shared secret — the password used to
authenticate the Nortel SNAS 4050 to the audit
server
The system automatically assigns the next available
index number to the server.
insert <index number>
<IPaddr>
Inserts a server at a particular position in the list of
RADIUS audit servers in the configuration.
• index number — the index number you want
the server to have
• IPaddr — the IP address of the audit server you
are adding
The index number you specify must be in use. The
index numbers of existing servers with this index
number and higher are incremented by 1.
move <index number>
<new index number>
Moves a server up or down the list of RADIUS audit
servers in the configuration.
• index number — the original index number of
the server you want to move
• new index number — the index number
representing the new position of the server in the
list
The index numbers of the remaining entries adjust
accordingly.
Nortel Secure Network Access Switch 4050 User Guide
492 Chapter 10 Configuring system settings
Configuring authentication of system users using the CLI
You can configure the Nortel SNAS 4050 cluster to use an external RADIUS
server to authenticate system users. Authentication applies to both CLI and SREM
users.
The user name and password defined on the RADIUS server must be the same as
the user name and password defined on the Nortel SNAS 4050. When the user
logs on, the RADIUS server authenticates the password. The user group (admin,
oper, or certadmin) is picked up from the local definition of the user.
For more information about specifying user names, passwords, and group
assignments for Nortel SNAS 4050 system users, see “Managing system users and
groups” on page 353.
When you add an external RADIUS authentication server to the configuration, the
server is automatically assigned an index number. You can add several RADIUS
authentication servers, for backup purposes. Nortel SNAS 4050 authentication
will be performed by an available server with the lowest index number. You can
control authentication server usage by reassigning index numbers (see “Managing
RADIUS authentication servers using the CLI” on page 493).
To configure the Nortel SNAS 4050 to support RADIUS authentication of system
users, use the following command:
/cfg/sys/adm/auth
The Authentication menu displays.
The Authentication menu includes the following options:
/cfg/sys/adm/auth
followed by:
servers
320818-A
Accesses the RADIUS Authentication Servers menu,
in order to configure external RADIUS authentication
servers for the cluster (see “Managing RADIUS
authentication servers using the CLI” on page 493).
Chapter 10 Configuring system settings 493
/cfg/sys/adm/auth
followed by:
timeout <interval>
Sets the timeout interval for a connection request to a
RADIUS server. At the end of the timeout period, if no
connection has been established, authentication will
fail.
• interval is an integer that indicates the time
interval in seconds (s), minutes (m), or hours (h). If
you do not specify a measurement unit, seconds is
assumed. The range is 1–10000 seconds. The
default is 10 seconds.
fallback on|off
Specifies the desired fallback mode. Valid options are:
• on — if the RADIUS servers are unreachable, the
local passwords defined on the Nortel SNAS 4050
are used as fallback
• off — if the RADIUS servers are unreachable, the
only way to access the system is to reinstall the
software (boot install)
The default is on.
Note: With the fallback mode set to on, unwanted
access to the Nortel SNAS 4050 is possible using a
serial cable if the network cable is disconnected and
the local password is known.
ena
Enables RADIUS authentication of system users.
The default is disabled.
dis
Disables RADIUS authentication of system users.
The default is disabled.
Managing RADIUS authentication servers using the CLI
To configure the Nortel SNAS 4050 to use external RADIUS servers to
authenticate system users, use the following command:
/cfg/sys/adm/auth/servers
The RADIUS Authentication Servers menu displays.
Nortel Secure Network Access Switch 4050 User Guide
494 Chapter 10 Configuring system settings
The RADIUS Authentication Servers menu includes the following options:
/cfg/sys/adm/auth/servers
followed by:
320818-A
list
Lists the IP addresses of currently configured RADIUS
authentication servers, by index number.
del <index number>
Removes the specified RADIUS authentication server
from the current configuration. The index numbers of
the remaining entries adjust accordingly.
To view the index numbers of all configured RADIUS
authentication servers, use the list command.
add <IPaddr> <port>
<shared secret>
Adds a RADIUS authentication server to the
configuration. You are prompted to enter the following
information:
• IPaddr — the IP address of the authentication
server
• port — the TCP port number used for RADIUS
authentication. The default is 1813.
• shared secret — the password used to
authenticate the Nortel SNAS 4050 to the
authentication server
The system automatically assigns the next available
index number to the server.
insert <index number>
<IPaddr>
Inserts a server at a particular position in the list of
RADIUS authentication servers in the configuration.
• index number — the index number you want
the server to have
• IPaddr — the IP address of the authentication
server you are adding
The index number you specify must be in use. The
index numbers of existing servers with this index
number and higher are incremented by 1.
move <index number>
<new index number>
Moves a server up or down the list of RADIUS
authentication servers in the configuration.
• index number — the original index number of
the server you want to move
• new index number — the index number
representing the new position of the server in the
list
The index numbers of the remaining entries adjust
accordingly.
Chapter 10 Configuring system settings 495
Configuring the cluster using the SREM
To configure the cluster, choose from one of the following tasks:
•
•
•
•
•
•
•
•
•
•
•
•
•
•
•
•
“Configuring system settings using the SREM” on page 496
“Configuring a Nortel SNAS 4050 host using the SREM” on page 497
“Configuring host interfaces using the SREM” on page 508
“Configuring static routes using the SREM” on page 514
“Configuring host ports using the SREM” on page 520
“Managing interface ports using the SREM” on page 523
“Configuring the access list using the SREM” on page 525
“Managing date and time settings using the SREM” on page 528
“Configuring DNS settings using the SREM” on page 532
“Configuring servers using the SREM” on page 534
“Configuring administrative settings using the SREM” on page 546
“Configuring SRS control settings using the SREM” on page 547
“Configuring Nortel SNAS 4050 host SSH keys using the SREM” on
page 548
“Adding an SSH key for a known host using the SREM” on page 553
“Managing RADIUS audit settings using the SREM” on page 554
“Managing RADIUS authentication of system users using the SREM” on
page 562
Nortel Secure Network Access Switch 4050 User Guide
496 Chapter 10 Configuring system settings
Configuring system settings using the SREM
To view and configure cluster-wide system settings, perform the following steps:
1
Select the System > Configuration tab.
The system Configuration screen appears (see Figure 126).
Figure 126 System Configuration
320818-A
Chapter 10 Configuring system settings 497
2
Enter the Management IP Address (MIP) information in the applicable fields.
Table 95 describes the Management IP Address fields.
Table 95 System Configuration fields
Field
Description
Management IP Address
Sets the MIP for the cluster. The MIP identifies the cluster
and must be unique on the network. For more information,
see “About the IP addresses” on page 51.
Note: Nortel does not recommend reconfiguring this
parameter if you are logged on to the MIP, because you
may lose connectivity. To reset the MIP, log on to the RIP
instead.
3
Click Apply on the toolbar to send the current changes to the Nortel
SNAS 4050. Click Commit on the toolbar to save the changes permanently.
Configuring a Nortel SNAS 4050 host using the SREM
To configure a Nortel SNAS 4050 host, complete one or more of the following
procedures:
•
•
•
“Viewing host information” on page 498
“Viewing and configuring TCP/IP properties” on page 499
“Viewing and installing host licenses” on page 500
For details about configuring host interfaces, see “Configuring host interfaces
using the SREM” on page 508. For details about configuring host and interface
ports using the SREM, see “Configuring host ports using the SREM” on page 520,
and “Managing interface ports using the SREM” on page 523.
Nortel Secure Network Access Switch 4050 User Guide
498 Chapter 10 Configuring system settings
Viewing host information
To display a list of available Nortel SNAS 4050 hosts, select the System >
Hosts > Hosts tab.
The Hosts screen appears (see Figure 127), listing all hosts currently in the Nortel
SNAS 4050 configuration.
Figure 127 Hosts
To view detailed host information, select a particular host from the navigation
tree, or in the Hosts list.
320818-A
Chapter 10 Configuring system settings 499
Viewing and configuring TCP/IP properties
To configure basic TCP/IP properties for a particular Nortel SNAS 4050 device in
the cluster, perform the following steps:
1
Select the System > Hosts > host > Host tab.
The Host screen appears (see Figure 128).
Figure 128 Host
Nortel Secure Network Access Switch 4050 User Guide
500 Chapter 10 Configuring system settings
2
Enter the host information in the applicable fields. Table 96 describes the Host
fields.
Table 96 Host fields
Field
Description
Index
An integer automatically assigned to the host when you
perform initial setup on the Nortel SNAS 4050 device.
IP Address
Sets the Real IP address (RIP) for Interface 1 on the
device. The RIP is the Nortel SNAS 4050 device host IP
address for network connectivity and must be unique on
the network. For more information, see “About the IP
addresses” on page 51.
Changing the RIP does not affect the MIP for the cluster.
System Name
Assigns a name to the managed Nortel SNAS 4050 host.
The name is a useful mnemonic when managing the Nortel
SNAS 4050 using SNMP.
System Location
Identifies the physical location of the managed Nortel
SNAS 4050 host. The location description is a useful
mnemonic when managing the Nortel SNAS 4050 using
SNMP.
IP Gateway
Sets the default gateway address for the device. The
default gateway is the IP address of the interface on the
core router that will be used if no other interface is
specified.
To specify a default gateway for Interface 1 traffic, use
Interface configuration screen (see “Configuring host
interfaces using the SREM” on page 508).
HW Platform
Displays the hardware platform of the Nortel SNAS 4050
device.
3
Click Apply on the toolbar to send the current changes to the Nortel
SNAS 4050. Click Commit on the toolbar to save the changes permanently.
Viewing and installing host licenses
There are three ways to view installed licenses using the SREM:
•
•
•
320818-A
“Viewing global licenses for all hosts” on page 501
“Viewing per domain licenses for all hosts” on page 503
“Viewing installed licenses for a particular host” on page 505
Chapter 10 Configuring system settings 501
Additionally, new licenses can be added to a particular host, as described in
“Installing a license for a particular host” on page 506.
Viewing global licenses for all hosts
To view global licenses for all Nortel SNAS 4050 devices in the cluster, perform
the following steps:
1
Select the System > Hosts > Licenses > Global Licenses tab.
The Global Licenses screen appears (see Figure 129).
Figure 129 Global Licenses
Nortel Secure Network Access Switch 4050 User Guide
502 Chapter 10 Configuring system settings
Table 97 describes the Global Licenses fields.
Table 97 Global Licenses fields
320818-A
Field
Description
Auto Refresh
An integer automatically assigned to the host when you
perform initial setup on the Nortel SNAS 4050 device.
Interval
An integer used to specify the interval (in seconds)
between log entries.
Logging
Specifies if a log file of Global license details is created.
To specify a filename and location, use the Browse button
to select a path.
State of Global Licences
A table that describes the available global licenses. Fields
include:
• Type — The type of license.
• Domain — The number of domains in which this license
is valid. Global licenses
• Used — The number of global licenses currently in use.
• Size — The number of global licenses still available to
be used.
2
Modify the Auto Refresh and Logging settings, if desired.
3
Click Apply on the toolbar to send the current changes to the Nortel
SNAS 4050. Click Commit on the toolbar to save the changes permanently.
Chapter 10 Configuring system settings 503
Viewing per domain licenses for all hosts
To view licenses by domain for all Nortel SNAS 4050 devices in the cluster,
perform the following steps:
1
Select the System > Hosts > Licenses > Per Domain Licenses tab.
The Per Domain Licenses screen appears (see Figure 130).
Figure 130 Per Domain Licenses
Nortel Secure Network Access Switch 4050 User Guide
504 Chapter 10 Configuring system settings
Table 98 describes the Per Domain Licenses fields.
Table 98 Per Domain Licenses fields
320818-A
Field
Description
Auto Refresh
An integer automatically assigned to the host when you
perform initial setup on the Nortel SNAS 4050 device.
Interval
An integer used to specify the interval (in seconds)
between log entries.
Logging
Specifies if a log file of Global license details is created.
To specify a filename and location, use the Browse button
to select a path.
State of Licences Per
Domain
A table that describes the available licenses. Fields
include:
• Type — The type of license.
• Domain — The Domain ID in which this license is valid.
• Used — The number of licenses of the specified type
currently in use in the domain.
2
Modify the Auto Refresh and Logging settings, if desired.
3
Click Apply on the toolbar to send the current changes to the Nortel
SNAS 4050. Click Commit on the toolbar to save the changes permanently.
Chapter 10 Configuring system settings 505
Viewing installed licenses for a particular host
To view the licenses applied to a particular Nortel SNAS 4050 device in the
cluster, select the System > Hosts > host > Installed Licenses tab.
The Installed Licenses screen appears (see Figure 131), displaying a list of the
type and value for each license installed on that Nortel SNAS 4050 host.
Figure 131 Installed Licenses
Nortel Secure Network Access Switch 4050 User Guide
506 Chapter 10 Configuring system settings
Installing a license for a particular host
The Nortel SNA SSL (portal and Nortel SNAS 4050 domain client access) license
is available for 100, 250, 500, and 1000 users.
Note: Before installing a new license, you must first purchase a Nortel
SNA SSL (portal and Nortel SNAS 4050 domain client access) license
key from Nortel Technical Support. To obtain a license key, check the
Information screen to find out the MAC address of the Nortel
SNAS 4050 device. Then provide the MAC address to Nortel Technical
Support and request the key for the desired license type.
To install a new license on a Nortel SNAS 4050 device in the cluster, perform the
following steps:
1
Open the license key provided by Nortel Technical Support in a text editor.
2
Select and copy the entire license key.
When copying the license key, ensure you include the BEGIN LICENSE and
END LICENSE lines.
320818-A
Chapter 10 Configuring system settings 507
3
In the SREM, select the System > Hosts > host > Install New License tab.
The Install New License screen appears (see Figure 132).
Figure 132 Install New License
4
Click Paste to insert the license key into the text box.
5
Click Add to add the new license to this Nortel SNAS 4050 host.
6
Click Apply on the toolbar to send the current changes to the Nortel
SNAS 4050. Click Commit on the toolbar to save the changes permanently.
Nortel Secure Network Access Switch 4050 User Guide
508 Chapter 10 Configuring system settings
Configuring host interfaces using the SREM
The default IP interface on the Nortel SNAS 4050 host is Interface 1. You can
create additional interfaces and specify the ports to be assigned to each interface.
If you assign more than one port to an interface, you can choose whether the ports
will operate in failover or trunking mode.
To view a list of interfaces on a particular Nortel SNAS 4050 host, select the
System > Hosts > host > Interfaces tab, as shown in Figure 133.
Figure 133 Interfaces
To continue, choose one of the following procedures:
•
•
320818-A
“Adding a host interface” on page 509
“Configuring an existing host interface” on page 511
Chapter 10 Configuring system settings 509
•
“Removing a host interface” on page 514
Adding a host interface
To create a host interface, perform the following steps:
1
Select the System > Hosts > host > Interfaces tab.
The Interfaces screen appears (see Figure 133 on page 508).
2
Click Add.
The Add an Interface dialog box appears (see Figure 134).
Figure 134 Add an Interface
3
Enter the interface information in the applicable fields. Table 99 describes the
Add an Interface fields.
Table 99 Add an Interface fields
Field
Description
Index
An integer in the range 1 to 252 that uniquely identifies the
interface on the Nortel SNAS 4050.
Ip Address
Sets the network address for the interface. (For Interface 1,
the network address is the RIP.)
Nortel Secure Network Access Switch 4050 User Guide
510 Chapter 10 Configuring system settings
Table 99 Add an Interface fields (continued)
Field
Description
Gateway
Sets the default gateway address for the interface. The
default gateway is the IP address of the interface on the
core router that will be used for management traffic (such
as requests to private authentication servers and DNS
servers).
The default gateway will be used only for Nortel
SNAS 4050 domains that point to this interface. If no
domain points to this interface, the specified gateway will
be ignored.
Netmask
Sets the subnet mask for the interface.
VlanId
Specifies the VLAN tag if packets received by the interface
are tagged with a specific VLAN tag ID.
Mode
Specifies the mode of operation for the port numbers
assigned to this interface. The options are:
• failover — only one link is active at any given time. If the
port with an active link fails, the active link is
immediately switched over to one of the other ports
configured for the interface. When you select failover
mode, you also have the option of specifying a primary
port.
• trunking — active links are sustained on all configured
ports simultaneously, in order to increase network
throughput.
The default is failover.
Primary Port
Specifies the primary port in the interface, on which the
active link is set up. If the primary port fails, the active link
is immediately transferred to a remaining (secondary) port.
As soon as the primary port regains functionality, the active
link is transferred back to the primary port.
An integer indicating the port number of the physical port
assigned to the interface. The default is 0 (zero).
The default value of zero means that the currently active
link remains in use until it fails. If the port fails, the link is
transferred to another port. The link remains active on the
port to which it was transferred, even after the failed port
regains functionality.
The primary port setting applies only when you have
configured more than one port in the interface, and the
mode is failover.
4
Click Apply.
The new interface appears in the Interfaces table.
320818-A
Chapter 10 Configuring system settings 511
5
Click Apply on the toolbar to send the current changes to the Nortel
SNAS 4050. Click Commit on the toolbar to save the changes permanently.
Configuring an existing host interface
To configure an existing host interface, perform the following steps:
1
Select the System > Hosts > host > interface > Interface tab.
The Interface configuration screen appears (see Figure 135).
Figure 135 Interface configuration screen
Nortel Secure Network Access Switch 4050 User Guide
512 Chapter 10 Configuring system settings
2
Enter the interface information in the applicable fields. Table 100 describes
the Interface configuration fields.
Table 100 Interface fields
320818-A
Field
Description
Index
An integer in the range 1 to 252 that uniquely identifies the
interface on the Nortel SNAS 4050.
This field cannot be changed after the interface is added.
Ip Address
Sets the network address for the interface. (For Interface 1,
the network address is the RIP.)
Gateway
Sets the default gateway address for the interface. The
default gateway is the IP address of the interface on the
core router that will be used for management traffic (such
as requests to private authentication servers and DNS
servers).
The default gateway will be used only for Nortel
SNAS 4050 domains that point to this interface. If no
domain points to this interface, the specified gateway will
be ignored.
Netmask
Sets the subnet mask for the interface.
VlanId
Specifies the VLAN tag if packets received by the interface
are tagged with a specific VLAN tag ID.
Chapter 10 Configuring system settings 513
Table 100 Interface fields (continued)
Field
Description
Mode
Specifies the mode of operation for the port numbers
assigned to this interface. The options are:
• failover — only one link is active at any given time. If the
port with an active link fails, the active link is
immediately switched over to one of the other ports
configured for the interface. When you select failover
mode, you also have the option of specifying a primary
port.
• trunking — active links are sustained on all configured
ports simultaneously, in order to increase network
throughput.
The default is failover.
Primary Port
Specifies the primary port in the interface, on which the
active link is set up. If the primary port fails, the active link
is immediately transferred to a remaining (secondary) port.
As soon as the primary port regains functionality, the active
link is transferred back to the primary port.
An integer indicating the port number of the physical port
assigned to the interface. The default is 0 (zero).
The default value of zero means that the currently active
link remains in use until it fails. If the port fails, the link is
transferred to another port. The link remains active on the
port to which it was transferred, even after the failed port
regains functionality.
The primary port setting applies only when you have
configured more than one port in the interface, and the
mode is failover.
3
Click Apply on the toolbar to send the current changes to the Nortel
SNAS 4050. Click Commit on the toolbar to save the changes permanently.
Nortel Secure Network Access Switch 4050 User Guide
514 Chapter 10 Configuring system settings
Removing a host interface
To delete a host interface, perform the following steps:
1
Select the System > Hosts > host > Interfaces tab.
The Interfaces screen appears (see Figure 133 on page 508).
2
Select an interface from the list.
3
Click Delete.
A confirmation dialog appears.
4
Click Yes.
The interface is removed from the Interfaces list.
5
Click Apply on the toolbar to send the current changes to the Nortel
SNAS 4050. Click Commit on the toolbar to save the changes permanently.
Configuring static routes using the SREM
Static routes can be applied to a cluster, a host, or a particular interface. To view or
configure static routes at a particular level, choose from the following sections:
•
•
•
“Viewing static routes for a cluster” on page 515
“Viewing static routes for a host” on page 516
“Viewing static routes for an interface” on page 517
All static route are configured the same way, as described in “Managing static
routes” on page 517.
320818-A
Chapter 10 Configuring system settings 515
Viewing static routes for a cluster
To configure static routes for the cluster, select the System > IP Routes tab.
The IP Routes screen appears (see Figure 136), displaying a list of the existing
static routes on the Nortel SNAS 4050 cluster.
Figure 136 IP Routes
To continue, see “Managing static routes” on page 517.
Nortel Secure Network Access Switch 4050 User Guide
516 Chapter 10 Configuring system settings
Viewing static routes for a host
To configure static routes for a host, select the System > Hosts > host > Routes
tab.
The Routes screen appears (see Figure 137), displaying a list of the existing static
routes on this host.
Figure 137 Routes
To continue, see “Managing static routes” on page 517.
320818-A
Chapter 10 Configuring system settings 517
Viewing static routes for an interface
To configure static routes for an interface, select the System > Hosts > host >
interface > Interface Route tab.
The Interface Route screen appears (see Figure 138), displaying a list of the
existing static routes on this interface.
Figure 138 Interface Route
To continue, see “Managing static routes” on page 517.
Managing static routes
Select the static route tab for the appropriate level, as described in “Configuring
static routes using the SREM” on page 514.
Nortel Secure Network Access Switch 4050 User Guide
518 Chapter 10 Configuring system settings
From the selected static route screen, complete the following tasks as necessary:
•
•
“Adding a static route” on page 518
“Removing a static route” on page 519
Adding a static route
To add a static routes, perform the following steps:
1
Select the static route from the table.
2
Click Add.
The Add Route dialog box appears (see Figure 139).
Figure 139 Add Route
3
Enter the static route information in the applicable fields. Table 101 describes
the Add Route fields.
Table 101 Add Route fields
Field
Description
Destination Address
Specifies the static route destination IP address.
Netmask
Specifies the network mask to apply to the IP address.
Gateway
Specifies the IP address on the core router.
Note: When you add a static route to the system, host, or interface
configuration, the route is automatically assigned an index number.
There are separate sequences of index numbers for routes configured for
the cluster, for each host, and for each interface.
320818-A
Chapter 10 Configuring system settings 519
4
Click Add.
The new route appears in the table.
5
Click Apply on the toolbar to send the current changes to the Nortel
SNAS 4050. Click Commit on the toolbar to save the changes permanently.
Removing a static route
To remove an existing static route, perform the following steps:
1
Select the static route from the table.
2
Click Delete.
A confirmation dialog appears.
3
Click Yes.
The static route is removed from the table.
4
Click Apply on the toolbar to send the current changes to the Nortel
SNAS 4050. Click Commit on the toolbar to save the changes permanently.
Nortel Secure Network Access Switch 4050 User Guide
520 Chapter 10 Configuring system settings
Configuring host ports using the SREM
To configure the connection properties for a port, perform the following steps:
1
Select the System > Hosts > host > Ports tab.
The Ports screen appears (see Figure 140).
Figure 140 Ports
320818-A
Chapter 10 Configuring system settings 521
2
Select a port to configure from the list.
The Port screen appears (see Figure 141), displaying configuration details for
the selected port.
Figure 141 Port
Nortel Secure Network Access Switch 4050 User Guide
522 Chapter 10 Configuring system settings
3
Enter the port information in the applicable fields. Table 102 describes the
Port fields.
Table 102 Port fields
Field
Description
Index
Specifies an integer in the range 1 to 4, indicating the port
number of the physical port on the Nortel SNAS 4050
Autonegotiate
Specifies the Ethernet auto-negotiation setting for the host
and NIC port. The options are:
• on — the port is set to auto-negotiate speed and mode.
This is the recommended setting.
• off — speed and mode are fixed at a specified setting.
The default is on.
When auto-negotiation is on, ensure that the device to
which the port is connected is also set to auto-negotiate.
Speed
Specifies the speed in megabits per second for the host
and NIC port when auto-negotiation is set to off. The
options are 10|100|1000.
Mode
Specifies the duplex mode for the host and NIC port when
auto-negotiation is set to off. The options are full and half.
The default duplex mode is full.
4
320818-A
Click Apply on the toolbar to send the current changes to the Nortel
SNAS 4050. Click Commit on the toolbar to save the changes permanently.
Chapter 10 Configuring system settings 523
Managing interface ports using the SREM
To view and manage the ports assigned to an interface, select the System >
Hosts > host > interface > Port tab.
The Port screen appears (see Figure 142).
Figure 142 Port
This screen allows you to complete any of the following tasks:
•
•
“Adding interface ports” on page 524
“Removing interface ports” on page 524
Nortel Secure Network Access Switch 4050 User Guide
524 Chapter 10 Configuring system settings
Adding interface ports
To add ports to the selected interface, perform the following steps:
1
Select the System > Hosts > host > interface > Port tab.
The Port screen appears (see Figure 142 on page 523).
2
Click Add.
The Add a Port dialog appears.
3
Enter the port information in the applicable fields. Table 102 describes the
Add a Port fields.
Table 103 Add a Port fields
Field
Description
Port Number
Specifies the port number of the physical port on the
device.
4
Click Add.
The new port appears in the Port Table.
5
Click Apply on the toolbar to send the current changes to the Nortel
SNAS 4050. Click Commit on the toolbar to save the changes permanently.
Removing interface ports
To remove ports assigned to an interface, perform the following steps:
1
Select the System > Hosts > host > interface > Port tab.
The Port screen appears (see Figure 142 on page 523).
2
Select the port from the Port Table.
3
Click Delete.
A confirmation dialog appears.
4
320818-A
Click Yes.
Chapter 10 Configuring system settings 525
The port is removed from the Port Table.
5
Click Apply on the toolbar to send the current changes to the Nortel
SNAS 4050. Click Commit on the toolbar to save the changes permanently.
Configuring the access list using the SREM
The access list is a cluster-wide list of IP addresses for hosts authorized to access
the Nortel SNAS 4050 devices by Telnet, SSH, and SREM. You can configure the
list to allow access by individual machines or a range of machines on a specific
network.
If the access list is empty, then access is open to any machine.
For information about enabling Telnet and SSH access, see “Configuring
administrative settings using the CLI” on page 483 or “Configuring administrative
settings using the SREM” on page 546.
To configure the access list, select the System > Access List tab.
Nortel Secure Network Access Switch 4050 User Guide
526 Chapter 10 Configuring system settings
The Access List Table appears (see Figure 143).
Figure 143 Access List
From here, you can manage the access list by choosing from the following tasks:
•
•
“Adding an access list entry” on page 526
“Removing an Access List entry” on page 527
Adding an access list entry
To add an entry to the access list, perform the following steps:
1
Select the System > Access List tab.
The Access List Table appears (see Figure 143 on page 526).
2
320818-A
Click Add.
Chapter 10 Configuring system settings 527
The Add Access Host dialog box appears (see Figure 144).
Figure 144 Add Access Host
3
Enter the access host information in the fields provided. Table 104 describes
the Add Access Host fields.
Table 104 Add Access Host fields
Field
Description
IP Address
Specifies the IP address of the host to be allowed access.
Network mask
Specifies the subnet mask. You can set the mask to specify
a single machine or a range of machines on a specific
network.
4
Click Add.
The new host appears in the table. An index number is automatically assigned
to the entry.
5
Click Apply on the toolbar to send the current changes to the Nortel
SNAS 4050. Click Commit on the toolbar to save the changes permanently.
Removing an Access List entry
To remove an existing entry from the access list, perform the following steps:
1
Select the System > Access List tab.
The Access List Table appears (see Figure 143 on page 526).
2
Select an entry from the Access List Table to remove.
3
Click Delete.
A confirmation dialog appears.
Nortel Secure Network Access Switch 4050 User Guide
528 Chapter 10 Configuring system settings
4
Click Yes.
The entry disappears from the Access List Table.
5
Click Apply on the toolbar to send the current changes to the Nortel
SNAS 4050. Click Commit on the toolbar to save the changes permanently.
Managing date and time settings using the SREM
To manage system date and time settings, select the System > Date & Time tab.
The Date and Time screen appears (see Figure 145), allowing you to modify
existing system settings and manage a list of NTP servers.
Figure 145 Date & Time
320818-A
Chapter 10 Configuring system settings 529
You can add NTP servers to the system configuration to enable the NTP client on
the Nortel SNAS 4050 to synchronize its clock. To compensate for discrepancies,
it is recommended that NTP have access to at least three NTP servers.
For detailed steps about managing date and time settings, refer to the following
tasks:
•
•
•
“Configuring the date and time settings” on page 529
“Adding an NTP server” on page 530
“Removing an NTP server” on page 531
Configuring the date and time settings
To configure the system date and time, perform the following steps:
1
Select the System > Date & Time tab.
The Date & Time screen appears (see Figure 145 on page 528).
2
Enter the date and time information in the applicable fields. Table 105
describes the Date & Time fields.
Table 105 Date & Time fields
Field
Description
Time
Specifies the system date in YYYY-MM-DD format.
Date
Specifies the system time in HH:MM:SS format, using a
24-hour clock.
Time Zone
Specifies the time zone, selected from the list.
NTP Server Table
Displays a list of active NTP servers.
3
Click Apply on the toolbar to send the current changes to the Nortel
SNAS 4050. Click Commit on the toolbar to save the changes permanently.
Nortel Secure Network Access Switch 4050 User Guide
530 Chapter 10 Configuring system settings
Adding an NTP server
To add an additional NTP server, perform the following steps:
1
Select the System > Date and Time tab.
The Date and Time screen appears (see Figure 145 on page 528).
2
Click Add.
The Add NTP Server dialog box appears (see Figure 146).
Figure 146 Add NTP Server
3
Enter the NTP Server information in the applicable fields. Table 106 describes
the Add NTP Server fields.
Table 106 Add NTP Server fields
Field
Description
IP Address
Specifies the IP address of an NTP server. An index
number is automatically assigned to the server.
4
Click Add.
The NTP server appears in the NTP Server Table.
5
320818-A
Click Apply on the toolbar to send the current changes to the Nortel
SNAS 4050. Click Commit on the toolbar to save the changes permanently.
Chapter 10 Configuring system settings 531
Removing an NTP server
To remove an existing NTP server from the NTP Server Table, perform the
following steps:
1
Select the System > Date and Time tab.
The Date and Time screen appears (see Figure 145 on page 528).
2
Select the NTP server entry you wish to remove from the NTP Server Table.
3
Click Delete.
A confirmation dialog box appears.
4
Click Yes.
The NTP server entry disappears from the NTP Server Table
5
Click Apply on the toolbar to send the current changes to the Nortel
SNAS 4050. Click Commit on the toolbar to save the changes permanently.
Nortel Secure Network Access Switch 4050 User Guide
532 Chapter 10 Configuring system settings
Configuring DNS settings using the SREM
To configure DNS client settings, use the following procedure:
1
Select the System > DNS Client Settings tab.
The DNS Client Settings screen appears (see Figure 147).
Figure 147 DNS Client Settings
320818-A
Chapter 10 Configuring system settings 533
2
Enter the DNS Client information in the applicable fields. Table 107 describes
the DNS Client Settings fields.
Table 107
DNS Client Settings fields
Field
Description
Cache size
Specifies the maximum number of DNS entries contained
in the local DNS cache. The range is 0–10000. The default
is 1000.
Retransmit Interval
Specifies the interval for retransmitting a DNS query in
seconds (s), minutes (m), or hours (h). If you do not specify
a measurement unit, seconds is assumed. The default is 2
(2 seconds).
Retransmit Counter
Specifies the maximum number of times a DNS query is
retransmitted. The default is 3.
Max TTL
Specifies the maximum Time-to-live(TTL) value for entries
in the DNS cache. After the TTL has expired, the entries
are discarded. Specify the TTL in seconds (s), minutes (m),
hours (h), or days (d). You can enter compound values (for
example, 2h30m). If you do not specify a measurement
unit, seconds is assumed. The default is 3h (3 hours).
Health Check
Specifies the interval for the Nortel SNAS 4050 to check
the health of the DNS servers. At the specified interval, the
Nortel SNAS 4050 performs a DNS query to each DNS
server in the system configuration to determine its health
status. Specify the interval in seconds (s), minutes (m), or
hours (h). If you do not specify a measurement unit,
seconds is assumed. The default is 10 (10 seconds).
Health Check Down Counter Specifies the number of times a DNS server health check
can time out before the Nortel SNAS 4050 determines the
DNS server is down. The default is 2.
Health Check Up Counter
3
Specifies the number of times a DNS server health check
returns a positive response before the Nortel SNAS 4050
determines the DNS server is up. The default is 2.
Click Apply on the toolbar to send the current changes to the Nortel
SNAS 4050. Click Commit on the toolbar to save the changes permanently.
Nortel Secure Network Access Switch 4050 User Guide
534 Chapter 10 Configuring system settings
Configuring servers using the SREM
To configure servers, choose from one of the following tasks:
•
•
•
“Managing syslog servers” on page 534
“Managing DNS servers” on page 537
“Managing RSA servers” on page 540
Managing syslog servers
To manage syslog servers, select the System > Servers > Syslog Servers tab.
The Syslog Servers table appears (see Figure 148), displaying a list of active
syslog servers.
Figure 148 Syslog Servers
320818-A
Chapter 10 Configuring system settings 535
From this screen, complete the following tasks as necessary:
•
•
•
“Adding a new syslog server” on page 535
“Reordering a new syslog server” on page 536
“Removing an existing syslog server” on page 536
Adding a new syslog server
To add a new syslog server entry, perform the following steps:
1
Select the System > Servers > Syslog Servers tab.
The Syslog Servers table appears (see Figure 148).
2
Click Add.
The Add Syslog Server dialog box appears (see Figure 149).
Figure 149 Add Syslog Server
3
Enter the syslog server information in the applicable fields. Table 108
describes the Add Syslog Server fields.
Table 108 Add Syslog Server fields
Field
Description
IP Address
Specifies the IP address of the syslog server.
Local Facility
Specifies a local facility number that can be used to
uniquely identify syslog entries.
4
Click Add.
The syslog server entry appears in the Syslog Server Table.
Nortel Secure Network Access Switch 4050 User Guide
536 Chapter 10 Configuring system settings
5
Click Apply on the toolbar to send the current changes to the Nortel
SNAS 4050. Click Commit on the toolbar to save the changes permanently.
Reordering a new syslog server
To reorder the existing syslog servers, perform the following steps:
1
Select the System > Servers > Syslog Servers tab.
The Syslog Servers table appears (see Figure 148).
2
Select the syslog server entry you want to reorder from the Syslog Server
Table.
3
Use the arrow up and arrow down buttons to move the syslog server entry to
the correct position.
4
Click Apply on the toolbar to automatically reindex all syslog server entries.
Click Commit on the toolbar to save the changes permanently.
Removing an existing syslog server
To remove an existing syslog server entry from the Syslog Server Table, perform
the following steps:
1
Select the System > Servers > Syslog Servers tab.
The Syslog Servers table appears (see Figure 148).
2
Select the syslog server entry to delete from the Syslog Server Table.
3
Click Delete.
A confirmation dialog box appears.
4
Click Yes.
The syslog server entry is immediately removed from the Syslog Server
Table.
5
320818-A
Click Apply on the toolbar to send the current changes to the Nortel
SNAS 4050. Click Commit on the toolbar to save the changes permanently.
Chapter 10 Configuring system settings 537
Managing DNS servers
You can add up to three DNS servers to the system configuration. The DNS server
is used by the captive portal when it forwards queries on the Exclude List. (For
more information about the captive portal and the Exclude List, see “Captive
portal and Exclude List” on page 386.)
To manage DNS servers in the system configuration, select the System >
Servers > DNS Servers tab. The DNS Server Table appears (see Figure 150).
Figure 150 DNS Server Table
From this screen, you can complete the following tasks as necessary:
•
•
“Adding a DNS server” on page 538
“Removing an existing DNS server” on page 539
Nortel Secure Network Access Switch 4050 User Guide
538 Chapter 10 Configuring system settings
Adding a DNS server
To manage DNS servers in the system configuration, perform the following steps:
1
Select the System > Servers > DNS Servers tab.
The DNS Server Table appears (see Figure 150 on page 537).
2
Click Add.
The Add DNS Server dialog box appears (see Figure 126).
Figure 151 Add DNS Servers
3
Enter the DNS server information in the applicable fields. Table 110 describes
the Add DNS Server fields.
Table 109 Add DNS Server fields
Field
Description
IP Address
Specifies the IP address for the DNS server.
4
Click Add.
The DNS server entry appears in the DNS Server Table.
5
320818-A
Click Apply on the toolbar to send the current changes to the Nortel
SNAS 4050. Click Commit on the toolbar to save the changes permanently.
Chapter 10 Configuring system settings 539
Removing an existing DNS server
To remove a DNS server from the system configuration, perform the following
steps:
1
Select the System > Servers > DNS Servers tab.
The DNS Server Table appears (see Figure 150 on page 537).
2
Select the DNS server to remove from the DNS Server Table.
3
Click Delete.
A dialog box appears for confirmation.
4
Click Yes.
The DNS server entry is immediately removed from the DNS Server Table.
5
Click Apply on the toolbar to send the current changes to the Nortel
SNAS 4050. Click Commit on the toolbar to save the changes permanently.
Nortel Secure Network Access Switch 4050 User Guide
540 Chapter 10 Configuring system settings
Managing RSA servers
To manage RSA servers, select the System > Servers > RSA Server Table tab.
The RSA Server Table appears (see Figure 152), listing RSA servers that have
already been configured on the Nortel SNAS 4050.
Note: This feature is not supported in Nortel Secure Network Access
Switch Software Release 1.0.
Figure 152 RSA Server Table
This screen allows you to view, manage, and configure RSA server entries by
completing any of the following tasks:
•
•
320818-A
“Adding an RSA server” on page 541
“Removing an existing RSA server” on page 542
Chapter 10 Configuring system settings 541
•
•
“Removing the RSA node secret” on page 542
“Importing sdconf.rec” on page 544
Adding an RSA server
To configure RSA servers, perform the following steps.
1
Select the System > Servers > RSA Server Table tab.
The RSA Server Table appears (see Figure 152 on page 540).
2
Click Add.
The Add RSA Server dialog box appears (see Figure 153).
Figure 153 Add RSA Server
3
Enter the RSA server information in the applicable fields. Table 110 describes
the Add RSA Server fields.
Table 110 Add RSA Server fields
Field
Description
Index
Specifies the index value for the server entry.
Symbolic Name
Specifies the symbolic name of the RSA server.
4
Click Apply.
The RSA server appears in the RSA Server Table.
5
Click Apply on the toolbar to send the current changes to the Nortel
SNAS 4050. Click Commit on the toolbar to save the changes permanently.
Nortel Secure Network Access Switch 4050 User Guide
542 Chapter 10 Configuring system settings
Removing an existing RSA server
To remove an existing RSA server, perform the following steps.
1
Select the System > Servers > RSA Server Table tab.
The RSA Server Table appears (see Figure 152).
2
Select the RSA server entry to remove from the RSA Server Table.
3
Click Delete.
A dialog box appears for confirmation.
4
Click Yes.
The RSA server entry disappears from the RSA Server Table.
5
Click Apply on the toolbar to send the current changes to the Nortel
SNAS 4050. Click Commit on the toolbar to save the changes permanently.
Removing the RSA node secret
You can remove the RSA node secret, if necessary. Authentication will then fail
until the Node secret created check box is unchecked in the Edit Agent Host
window on the RSA server.
To remove the RSA node secret, perform the following steps:
1
Select the System > Servers > RSA Server Table tab.
The RSA Server Table appears (see Figure 152 on page 540).
2
320818-A
Select the RSA server entry from the RSA Server Table.
Chapter 10 Configuring system settings 543
3
Select the RSA Server sub-tab.
The RSA Server screen appears (see Figure 154). The screen displays the
index number and symbolic name assigned to the RSA server when you added
it.
Figure 154 RSA Server
Table 111 describes the RSA Server fields.
Table 111 RSA Server fields
Field
Description
Index
Specifies the index value for the server entry.
This value cannot be changed once the RSA server has
been created.
Symbolic Name
Specifies the symbolic name of the RSA server.
Nortel Secure Network Access Switch 4050 User Guide
544 Chapter 10 Configuring system settings
4
Click Remove Secret Node.
The RSA node secret is immediately removed.
5
Click Apply on the toolbar to send the current changes to the Nortel
SNAS 4050. Click Commit on the toolbar to save the changes permanently.
Importing sdconf.rec
The sdconf.rec file is a configuration file that contains critical RSA
ACE/Server information. Contact your RSA ACE/Server administrator to obtain
the file and make it available on the specified TFTP/FTP/SCP/SFTP server.
To import an sdconf.rec file, perform the following steps:
320818-A
1
Select the System > Servers > RSA Server Table tab.
2
Select an RSA server from the RSA Server Table.
Chapter 10 Configuring system settings 545
3
Select the Import sdconf.rec tab.
The Import sdconf.rec screen appears (see Figure 155).
Figure 155 Import sdconf.rec
Nortel Secure Network Access Switch 4050 User Guide
546 Chapter 10 Configuring system settings
4
Enter the importing information in the applicable fields. Table 112 describes
the Import sdconf.rec fields.
Table 112 Import sdconf.rec fields
Field
Description
Protocol
Specifies the protocol to be used. Options are tftp, ftp, scp,
sftp.
Host
Specifies the server host name or IP address.
Filename
Specifies the file name on the server.
Username
FTP user name, if applicable.
Password
FTP password, if applicable.
5
Click Apply on the toolbar to send the current changes to the Nortel
SNAS 4050 and import the sdconf.rec file. Click Commit on the toolbar to
save the changes permanently.
Configuring administrative settings using the SREM
To manage system administrative settings, choose from one of the following tasks:
•
•
•
•
320818-A
“Configuring SRS control settings using the SREM” on page 547
“Configuring Nortel SNAS 4050 host SSH keys using the SREM” on
page 548
“Managing RADIUS audit settings using the SREM” on page 554
“Managing RADIUS authentication of system users using the SREM” on
page 562
Chapter 10 Configuring system settings 547
Configuring SRS control settings using the SREM
To create and modify the TunnelGuard Software Requirement Set (SRS) rules,
you must use the SREM (see “TunnelGuard SRS Builder” on page 317). Before
you can access the Rule Builder utility in the SREM, you must enable support for
SRS administration.
To configure support for managing the SRS rules, perform the following steps:
1
Select the System > Administrative > SRS Control Settings tab.
The SRS Control Settings screen appears (see Figure 156).
Figure 156 SRS Control Settings
Nortel Secure Network Access Switch 4050 User Guide
548 Chapter 10 Configuring system settings
2
Enter the SRS Control information in the applicable fields. Table 115
describes the SRS Control Settings fields.
Table 113
Add SSH Key fields
Field
Description
SRS Port
Specifies the TCP port used for communication with the
SRS administration server. The default is port 4443.
Enabled
When checked, enables SRS administration, for creating
and managing SRS rules.
3
Click Apply on the toolbar to send the current changes to the Nortel
SNAS 4050. Click Commit on the toolbar to save the changes permanently.
Configuring Nortel SNAS 4050 host SSH keys using the
SREM
The Nortel SNAS 4050 functions as both SSH client (for importing and exporting
logs using SFTP) and SSH server for secure management communications
between the Nortel SNAS 4050 devices in a cluster.
Note: SCP is not supported.
The SSH host keys are a set of keys to be used by all hosts in the cluster in
accordance with the Single System Image (SSI) concept. As a result, connections
to the MIP always appear to an SSH client to be to the same host.
During initial setup, there is an option to generate the SSH host keys
automatically.
To generate and manage the SSH keys used by Nortel SNAS 4050 hosts in the
cluster, perform the following steps:
1
Select the System > Administrative > SSH Keys tab.
The SSH Keys screen appears.
2
320818-A
Select from one of the following tasks:
Chapter 10 Configuring system settings 549
•
•
“Showing SSH keys” on page 549
“Managing Nortel SNAS 4050 and known host SSH keys” on page 551
Showing SSH keys
To show or copy the existing SSH key, use the following steps:
1
Click the Show SSH Keys tab.
The Show SSH Keys screen appears (see Figure 157).
Figure 157 Show SSH Keys
2
To show the existing SSH key, click Show.
The keys display in the following formats:
•
RSA1 keys — the OpenSSH implementation, except that the line is
wrapped.
Nortel Secure Network Access Switch 4050 User Guide
550 Chapter 10 Configuring system settings
•
3
RSA and DSA keys — the SECSH Public Key File Format, as described
in Internet Draft draft-ietf-secsh-publickeyfile
To copy the existing SSH key, click Copy.
To fully conform to the OpenSSH implementation for RSA1 keys, you may
need to edit the output back into a single line for use in the key storage of an
SSH client.
320818-A
Chapter 10 Configuring system settings 551
Managing Nortel SNAS 4050 and known host SSH keys
You can paste public SSH keys from remote hosts as a convenience, so that you do
not get prompted to accept a new key during later use of SCP or SFTP for file or
data transfer.
To achieve strict “man in the middle” protection, verify the fingerprint before
applying the changes.
To import the public SSH key of a known remote host, use the following steps:
1
Click the Hosts tab.
The Hosts screen appears (see Figure 158).
Figure 158 SSH Keys – Hosts
Nortel Secure Network Access Switch 4050 User Guide
552 Chapter 10 Configuring system settings
2
To generate the Nortel SNAS 4050 host SSH key:
a
Enter the host information in applicable fields. Table 114 describes the
Hosts fields.
Table 114
Field
Description
SSH Key for IP Address
Specifies the IP address for which you are generating an
SSH key.
Hosts Table
Displays a list of hosts with known SSH keys.
b
3
4
320818-A
SSH Keys Hosts field
Click Generate SSH Keys.
To remove a known host SSH key:
a
Select the SSH key from the Hosts Table.
b
Click Delete.
Click Apply on the toolbar to send the current changes to the Nortel
SNAS 4050. Click Commit on the toolbar to save the changes permanently.
Chapter 10 Configuring system settings 553
Adding an SSH key for a known host using the SREM
You can paste public SSH keys from remote hosts as a convenience, so that you do
not get prompted to accept a new key during later use of SCP or SFTP for file or
data transfer.
To achieve strict “man in the middle” protection, verify the fingerprint before
applying the changes.
To add the public SSH key of a known remote host, use the following steps:
1
Click the Add SSH Key tab.
The Add SSH Key screen appears (see Figure 159).
Figure 159 Add SSH Key
Nortel Secure Network Access Switch 4050 User Guide
554 Chapter 10 Configuring system settings
2
Enter the remote host information in the applicable fields. Table 115 describes
the Add SSH Key fields.
Table 115
Add SSH Key fields
Field
Description
Host name or IP Address
Specifies the host whose SSH key you are adding. You can
provide a comma-separated list of names and
IP addresses for the host.
3
Click Paste to enter the contents of a downloaded SSH key file in the box
provided.
Valid formats are:
•
•
RSA1 keys — the OpenSSH implementation (native format or with the
line wrapped)
RSA and DSA keys — the SECSH Public Key File Format, as described
in Internet Draft draft-ietf-secsh-publickeyfile
4
Click Add.
5
Click Apply on the toolbar to send the current changes to the Nortel
SNAS 4050. Click Commit on the toolbar to save the changes permanently.
Managing RADIUS audit settings using the SREM
You can configure the Nortel SNAS 4050 cluster to include a RADIUS server to
receive log messages about commands executed in the CLI or the SREM, for audit
purposes.
About RADIUS auditing
An event is generated whenever a system user logs on, logs off, or issues a
command from a SREM session. The event contains information about user name
and session ID, as well as the name of executed commands. You can configure the
system to send the event to a RADIUS server for audit trail logging, in accordance
with RFC 2866 (RADIUS Accounting).
If auditing is enabled but no RADIUS server is configured, events will still be
generated to the event log and any configured syslog servers.
320818-A
Chapter 10 Configuring system settings 555
When you add an external RADIUS audit server to the configuration, the server is
automatically assigned an index number. You can add several RADIUS audit
servers, for backup purposes. Nortel SNAS 4050 auditing will be performed by an
available server with the lowest index number. You can control audit server usage
by reassigning index numbers (see “Managing RADIUS audit servers using the
SREM” on page 559).
For information about configuring a RADIUS accounting server to log portal user
sessions, see “Configuring RADIUS accounting using the SREM” on page 183.
About the vendor-specific attributes
The RADIUS audit server uses Vendor-Id and Vendor-Type attributes in
combination to identify the source of the audit information. The attributes are sent
to the RADIUS audit server together with the event log information.
Each vendor has a specific dictionary. The Vendor-Id specified for an attribute
identifies the dictionary the RADIUS server will use to retrieve the attribute value.
The Vendor-Type indicates the index number of the required entry in the
dictionary file.
The Internet Assigned Numbers Authority (IANA) has designated SMI Network
Management Private Enterprise Codes that can be assigned to the Vendor-Id
attribute (see http://www.iana.org/assignments/enterprise-numbers).
RFC 2866 describes usage of the Vendor-Type attribute.
Contact your RADIUS system administrator for information about the
vendor-specific attributes used by the external RADIUS audit server.
To simplify the task of finding audit entries in the RADIUS server log, do the
following:
1
In the RADIUS server dictionary, define a descriptive string (for example,
NSNAS-SSL-Audit-Trail).
2
Map this string to the Vendor-Type value.
Nortel Secure Network Access Switch 4050 User Guide
556 Chapter 10 Configuring system settings
Configuring RADIUS auditing
To configure the Nortel SNAS 4050 to support RADIUS auditing, choose from
one of the following tasks:
•
•
320818-A
“Configuring RADIUS audit settings using the SREM” on page 557
“Managing RADIUS audit servers using the SREM” on page 559
Chapter 10 Configuring system settings 557
Configuring RADIUS audit settings using the SREM
To configure RADIUS audit settings, perform the following steps:
1
Select the System > Administrative > Radius Audit > Configuration tab.
The RADIUS audit Configuration screen appears (see Figure 160).
Figure 160 RADIUS audit Configuration
2
Enter the Audit Configuration information in the applicable fields. Table 116
Nortel Secure Network Access Switch 4050 User Guide
558 Chapter 10 Configuring system settings
describes the Add Audit Configuration fields.
Table 116
Field
Description
Vendor ID
Specifies the vendor-specific attribute used by the RADIUS
audit server to identify event log information from the Nortel
SNAS 4050 cluster.
The default Vendor-Id is 1872 (Alteon).
Vendor Type
Specifies the Vendor-Type value used in combination with
the Vendor-Id to identify event log information from the
Nortel SNAS 4050 cluster.
The default Vendor-Type value is 2.
Audit Enabled
When checked, enables RADIUS auditing.
The default is disabled.
3
320818-A
Add Audit Configuration fields
Click Apply on the toolbar to send the current changes to the Nortel
SNAS 4050. Click Commit on the toolbar to save the changes permanently.
Chapter 10 Configuring system settings 559
Managing RADIUS audit servers using the SREM
To manage RADIUS audit servers, select the System > Administrative > Radius
Audit > Audit Servers tab. The Audit Server Table appears (see Figure 161),
displaying a list of available RADIUS audit servers.
Figure 161 Audit Servers
Select from the following tasks to manage the audit servers:
•
•
“Adding a new Audit Server” on page 560
“Removing an existing RADIUS audit server” on page 561
Nortel Secure Network Access Switch 4050 User Guide
560 Chapter 10 Configuring system settings
Adding a new Audit Server
To add a new RADIUS audit server, perform the following steps:
1
Select the System > Administrative > Radius Audit > Audit Servers tab.
The Audit Server Table appears (see Figure 161 on page 559).
2
Click Add.
The Add Audit Server dialog box appears (see Figure 162).
Figure 162 Add Audit Server
3
Enter the RADIUS audit server information in the fields provided. Table 117
describes the Add Audit Server fields.
Table 117
Add Audit Server fields
Field
Description
IP Address
Specifies the IP address of the RADIUS audit server.
Port
Specifies the TCP port number used for RADIUS auditing.
The default is 1813.
Secret Key
Specifies the password used to authenticate the Nortel
SNAS 4050 to the audit server.
4
Click Add.
The new audit server entry appears in the Audit Server Table.
5
320818-A
Click Apply on the toolbar to send the current changes to the Nortel
SNAS 4050. Click Commit on the toolbar to save the changes permanently.
Chapter 10 Configuring system settings 561
Removing an existing RADIUS audit server
To remove an existing RADIUS audit server, perform the following steps:
1
Select the System > Administrative > Radius Audit > Audit Servers tab.
The Audit Server Table appears (see Figure 161 on page 559).
2
Select an audit server entry to remove from the Audit Server Table.
3
Click Delete.
A dialog box appears, asking for confirmation.
4
Click Yes.
The audit server entry is immediately removed from the Audit Server Table.
5
Click Apply on the toolbar to send the current changes to the Nortel
SNAS 4050. Click Commit on the toolbar to save the changes permanently.
Nortel Secure Network Access Switch 4050 User Guide
562 Chapter 10 Configuring system settings
Managing RADIUS authentication of system users using the
SREM
You can configure the Nortel SNAS 4050 cluster to use an external RADIUS
server to authenticate system users. Authentication applies to both CLI and SREM
users.
The user name and password defined on the RADIUS server must be the same as
the user name and password defined on the Nortel SNAS 4050. When the user
logs on, the RADIUS server authenticates the password. The user group (admin,
oper, or certadmin) is picked up from the local definition of the user.
For more information about specifying user names, passwords, and group
assignments for Nortel SNAS 4050 system users, see “Managing system users and
groups” on page 353.
When you add an external RADIUS authentication server to the configuration, the
server is automatically assigned an index number. You can add several RADIUS
authentication servers, for backup purposes. Nortel SNAS 4050 authentication
will be performed by an available server with the lowest index number. You can
control authentication server usage by reassigning index numbers (see “Managing
RADIUS authentication servers using the SREM” on page 565).
To configure the Nortel SNAS 4050 to support RADIUS authentication of system
users, choose from one of the following tasks:
•
•
320818-A
“Configuring RADIUS authentication of system users using the SREM” on
page 563
“Managing RADIUS authentication servers using the SREM” on page 565
Chapter 10 Configuring system settings 563
Configuring RADIUS authentication of system users using the
SREM
To configure RADIUS authentication, perform the following steps:
1
Select the System > Administrative > Radius Authentication >
Configuration tab.
The RADIUS authentication Configuration screen appears (see Figure 163).
Figure 163 Radius Authentication Configuration
Nortel Secure Network Access Switch 4050 User Guide
564 Chapter 10 Configuring system settings
2
Enter the RADIUS authentication information in the applicable fields.
Table 118 describes the Radius Audit Configuration fields.
Table 118
Field
Description
Server Timeout
Specifies the timeout interval for a connection request to a
RADIUS server. At the end of the timeout period, if no
connection has been established, authentication will fail.
Enter a value to indicate the time interval in seconds (s),
minutes (m), or hours (h). If you do not specify a
measurement unit, seconds is assumed. The range is
1–10000 seconds. The default is 10 seconds.
Use Local Password as
Fallback
Specifies the desired fallback mode. Valid options are:
• on — if the RADIUS servers are unreachable, the local
passwords defined on the Nortel SNAS 4050 are used
as fallback
• off — if the RADIUS servers are unreachable, the
only way to access the system is to reinstall the
software (boot install)
When checked, the fallback mode is on.
The default is on.
Note: With the fallback mode set to on, unwanted access
to the Nortel SNAS 4050 is possible using a serial cable if
the network cable is disconnected and the local password
is known.
RADIUS Authentication
Enabled
When checked, enables RADIUS authentication of system
users. The default is disabled.
3
320818-A
Radius Authentication Configuration fields
Click Apply on the toolbar to send the current changes to the Nortel
SNAS 4050. Click Commit on the toolbar to save the changes permanently.
Chapter 10 Configuring system settings 565
Managing RADIUS authentication servers using the SREM
To manage RADIUS authentication servers used by the Nortel SNAS 4050, select
the System > Administrative > Radius Authentication > Radius Servers tab.
The Radius Server Table appears (see Figure 164).
Figure 164 Radius Server Table
Select from the following tasks to manage the RADIUS authentication servers:
•
•
“Adding a RADIUS authentication server” on page 566
“Removing an existing RADIUS server” on page 567
Nortel Secure Network Access Switch 4050 User Guide
566 Chapter 10 Configuring system settings
Adding a RADIUS authentication server
To add a new RADIUS authentication server, perform the following steps:
1
Select the System > Administrative > Radius Authentication > Radius
Servers tab.
The Radius Server Table appears (see Figure 164 on page 565).
2
Click Add.
The Add Radius Server dialog box appears (see Figure 165).
Figure 165 Add Radius Server
3
Enter the RADIUS server information in the applicable fields. Table 119
describes the Add Radius Server fields.
Table 119 Add Radius Server fields
Field
Description
IP Address
Specifies the IP address of the RADIUS authentication
server.
Port
Specifies the TCP port number used for RADIUS
authentication. The default is 1813.
Secret Key
Specifies the password used to authenticate the Nortel
SNAS 4050 to the authentication server.
4
Click Add.
The RADIUS server appears in the table.
5
320818-A
Click Apply on the toolbar to send the current changes to the Nortel
SNAS 4050. Click Commit on the toolbar to save the changes permanently.
Chapter 10 Configuring system settings 567
Removing an existing RADIUS server
To remove an existing RADIUS authentication server, perform the following
steps:
1
Select the System > Administrative > Radius Authentication > Radius
Servers tab.
The Radius Server Table appears (see Figure 164 on page 565).
2
Select the RADIUS server entry to remove from the Radius Server Table.
3
Click Delete.
A dialog box appears, asking for confirmation.
4
Click Yes.
The authentication server entry is immediately removed from the Radius
Server Table.
5
Click Apply on the toolbar to send the current changes to the Nortel
SNAS 4050. Click Commit on the toolbar to save the changes permanently.
Nortel Secure Network Access Switch 4050 User Guide
568 Chapter 10 Configuring system settings
320818-A
569
Chapter 11
Managing certificates
This chapter includes the following topics:
Topic
Page
Overview
570
Key and certificate formats
571
Creating certificates
573
Installing certificates and keys
573
Saving or exporting certificates and keys
574
Updating certificates
574
Managing private keys and certificates using the CLI
575
Roadmap of certificate management commands
576
Managing and viewing certificates and keys using the CLI
577
Generating and submitting a CSR using the CLI
579
Adding a certificate to the Nortel SNAS 4050 using the CLI
584
Adding a private key to the Nortel SNAS 4050 using the CLI
587
Importing certificates and keys into the Nortel SNAS 4050 using the CLI 588
Displaying or saving a certificate and key using the CLI
591
Exporting a certificate and key from the Nortel SNAS 4050 using the CLI 594
Generating a test certificate using the CLI
Managing private keys and certificates using the SREM
Creating a certificate using the SREM
596
597
599
Nortel Secure Network Access Switch 4050 User Guide
570 Chapter 11 Managing certificates
Topic
Page
Generating and submitting a CSR using the SREM
601
Importing a certificate or key using the SREM
603
Displaying or saving a certificate and key using the SREM
605
Exporting a certificate and key from the Nortel SNAS 4050 using the
SREM
607
Viewing certificate information using the SREM
610
Overview
To use the encryption capabilities of the Nortel SNAS 4050, you must add a key
and certificate that conforms to the X.509 standard.
The key and certificate apply to the cluster. It does not matter whether you connect
to the Management IP address (MIP) or Real IP address (RIP) of a Nortel
SNAS 4050 device in order to manage Secure Socket Layer (SSL) certificates.
When you add a key and certificate to one Nortel SNAS 4050 device in the
cluster, the information is automatically propagated to all other devices in the
cluster.
The Nortel SNAS 4050 can support the use of up to 1500 certificates. However,
only one server certificate can be mapped to a portal server at any one time. For
information about mapping a certificate to the portal server, see “Configuring SSL
settings using the CLI” on page 139 or “Configuring SSL settings using the
SREM” on page 176.
If you ran the quick setup wizard during initial setup, a test certificate has been
installed and mapped to the Nortel SNAS 4050 portal.
320818-A
Chapter 11 Managing certificates 571
You can install new certificates or import or renew existing certificates.
Note: The Nortel SNAS 4050 supports keys and certificates created by
using Apache-SSL, OpenSSL, or Stronghold SSL. However, for greater
security, Nortel recommends creating keys and generating certificate
signing requests from within the Nortel SNAS 4050 system using the
CLI or SREM. This way, the encrypted private key never leaves the
Nortel SNAS 4050 and is invisible to the user.
Key and certificate formats
The Nortel SNAS 4050 supports importing, saving, and exporting private keys
and certificates in a number of standard formats. Table 120 summarizes the
supported formats.
Table 120 Supported key and certificate formats (Sheet 1 of 2)
Format
Import/Add Export/Save Comment
PEM*
Yes
Yes
Encrypts the private key. Combines the private key and
certificate in the same file.
DER
Yes
Yes
Does not encrypt the private key. Allows you to store
the private key and certificate in separate files.
NET
Yes
Yes
Encrypts the private key. Allows you to store the
private key and certificate in separate files.
PKCS12
Yes
(also known as PFX)
Yes
Encrypts the private key. Combines the private key and
certificate in the same file. Most browsers allow
importing a combined key and certificate file in the
PKCS12 format.
PKCS7
Yes
No
Certificate only.
PKCS8
Yes
No
Key only (used in WebLogic).
MS IIS 4
Yes
No
Key only (proprietary format).
*You must use the PEM format when:
• you save keys and certificates by copying
• you add a key or certificate by pasting
Nortel Secure Network Access Switch 4050 User Guide
572 Chapter 11 Managing certificates
Table 120 Supported key and certificate formats (Sheet 2 of 2)
Format
Import/Add Export/Save Comment
Netscape Enterprise
Server
Yes
No
Key only (proprietary format). Requires conversion.
For information about the conversion tool, contact
Nortel Technical Support (see “How to get help” on
page 29).
iPlanet Server
Yes
No
Key only (proprietary format). Requires conversion.
For information about the conversion tool, contact
Nortel Technical Support (see “How to get help” on
page 29).
*You must use the PEM format when:
• you save keys and certificates by copying
• you add a key or certificate by pasting
320818-A
Chapter 11 Managing certificates 573
Creating certificates
The basic steps to create a new certificate are:
1
Generate a Certificate Signing Request (CSR) (see “Generating and
submitting a CSR using the CLI” on page 579 or “Generating and submitting
a CSR using the SREM” on page 601).
2
Send the CSR to a Certificate Authority (CA), such as Entrust or VeriSign, for
certification (see “Generating and submitting a CSR using the CLI” on
page 579 or “Generating and submitting a CSR using the SREM” on
page 601).
3
Install the signed certificate on the Nortel SNAS 4050 cluster (see “Installing
certificates and keys” on page 573).
4
Map the installed certificate to the Nortel SNAS 4050 portal server (see
“Configuring SSL settings using the CLI” on page 139 or “Configuring SSL
settings using the SREM” on page 176).
Installing certificates and keys
There are two ways to install a certificate and key in the Nortel SNAS 4050
cluster:
•
•
by pasting (see “Adding a certificate to the Nortel SNAS 4050 using the CLI”
on page 584)
by importing from a TFTP/FTP/SCP/SFTP server (see “Importing certificates
and keys into the Nortel SNAS 4050 using the CLI” on page 588 or
“Importing a certificate or key using the SREM” on page 603)
When you generate the CSR, the private key is created and stored in encrypted
form on the Nortel SNAS 4050 using the specified certificate number. After you
receive the certificate, which contains the corresponding public key, use the same
certificate number when you add the certificate to the Nortel SNAS 4050.
Otherwise, the private key and the public key in the certificate will not match.
If you do not generate a CSR but obtain the certificate by other means, you must
take additional steps to add a private key that corresponds to the public key of the
certificate (see “Adding a private key to the Nortel SNAS 4050 using the CLI” on
page 587).
Nortel Secure Network Access Switch 4050 User Guide
574 Chapter 11 Managing certificates
If you use the certificate index number of an installed certificate when adding a
new certificate, the installed certificate is overwritten.
After you have installed the certificate, map it to the Nortel SNAS 4050 portal
(see “Configuring SSL settings using the CLI” on page 139 or “Configuring SSL
settings using the SREM” on page 176).
Saving or exporting certificates and keys
You can extract copies of certificates and keys to save as backup or to install on
another device.
There are two ways to retrieve a certificate and key from the Nortel SNAS 4050
cluster:
•
•
by copying (see “Displaying or saving a certificate and key using the CLI” on
page 591 or “Displaying or saving a certificate and key using the SREM” on
page 605)
by exporting to a TFTP/FTP/SCP/SFTP server (see “Exporting a certificate
and key from the Nortel SNAS 4050 using the CLI” on page 594 or
“Exporting a certificate and key from the Nortel SNAS 4050 using the
SREM” on page 607)
The copy-and-paste method saves the certificate and key in PEM format.
The export method allows you to choose from a variety of file formats. Nortel
recommends using the PKCS12 format (also known as PFX). Most web browsers
accept importing a combined key and certificate file in the PKCS12 format. For
more information about the formats supported on the Nortel SNAS 4050, see
“Key and certificate formats” on page 571.
Updating certificates
To update or renew an existing certificate, do not replace the existing certificate by
using its certificate number when you generate the CSR or add the new certificate.
Rather, keep the existing certificate until you have verified that the new certificate
works as designed.
320818-A
Chapter 11 Managing certificates 575
The recommended steps to update an existing certificate are:
1
Check the certificate numbers currently in use to identify an unused certificate
number.
In the CLI, use the /cfg/cur cert command. In the SREM, use the
Certificates > Certificates screen to add a new certificate.
2
Create a new certificate, using an unused certificate number (see “Generating
and submitting a CSR using the CLI” on page 579 or “Generating and
submitting a CSR using the SREM” on page 601).
a
Generate a CSR.
b
Submit the CSR to a CA.
3
When you receive the new, signed certificate, add it to the Nortel SNAS 4050
(see “Installing certificates and keys” on page 573).
4
Map the new certificate to the portal server (see “Configuring SSL settings
using the CLI” on page 139 or “Configuring SSL settings using the SREM”
on page 176).
5
After testing to verify that the new certificate works as intended, delete the old
certificate.
In the CLI, use the /cfg/cert <old cert ID>/del command. In the
SREM, use the Certificates > Certificates screen to remove the old
certificate.
Managing private keys and certificates using the CLI
You can perform the following certificate management tasks in the CLI:
•
•
•
•
view, validate, and manage certificates and private keys (see “Managing and
viewing certificates and keys using the CLI” on page 577)
generate requests for signed certificates (see “Generating and submitting a
CSR using the CLI” on page 579)
add certificates by copy-and-paste (see “Adding a certificate to the Nortel
SNAS 4050 using the CLI” on page 584)
add private keys by copy-and-paste (see “Adding a private key to the Nortel
SNAS 4050 using the CLI” on page 587)
Nortel Secure Network Access Switch 4050 User Guide
576 Chapter 11 Managing certificates
•
•
•
•
import certificates and private keys (see “Importing certificates and keys into
the Nortel SNAS 4050 using the CLI” on page 588)
save certificates and private keys (see “Displaying or saving a certificate and
key using the CLI” on page 591)
export certificates and private keys (see “Exporting a certificate and key from
the Nortel SNAS 4050 using the CLI” on page 594)
create a self-signed certificate for testing purposes (see “Generating a test
certificate using the CLI” on page 596)
Roadmap of certificate management commands
The following roadmap lists the CLI commands to configure and manage server
certificates for the Nortel SNAS 4050 cluster. Use this list as a quick reference or
click on any entry for more information:
Command
Parameter
/cfg/cert <cert id>
name <name>
cert
key
gensigned server|client
request
sign
test
import
export
display [<pass phrase>]
show
info
subject
validate
keysize
keyinfo
del
320818-A
Chapter 11 Managing certificates 577
Managing and viewing certificates and keys using the CLI
To view basic information about all certificates configured for the Nortel
SNAS 4050 cluster, use the /info/certs command.
To manage private keys and certificates, access the Certificate menu by using the
following command:
/cfg/cert <cert id>
where cert id is an integer in the range 1–1500 representing an index number
that uniquely identifies the certificate in the system.
If you specify an unused certificate number, the certificate is created.
The Certificate menu displays.
The Certificate menu includes the following options:
/cfg/cert <cert ID>
followed by:
name <name>
Names or renames the certificate, as a mnemonic aid.
cert
Lets you paste the contents of a certificate file from a
text editor. For more information, see “Adding a
certificate to the Nortel SNAS 4050 using the CLI” on
page 584.
key
Lets you paste the contents of a key file from a text
editor. For more information, see “Adding a private key
to the Nortel SNAS 4050 using the CLI” on page 587.
revoke
Accesses the Revocation menu.
Not supported in Nortel Secure Network Access Switch
Software Release 1.0.
Nortel Secure Network Access Switch 4050 User Guide
578 Chapter 11 Managing certificates
/cfg/cert <cert ID>
followed by:
320818-A
gensigned
server|client
Generates a certificate that is signed using the private
key associated with the currently selected certificate.
You are prompted to provide the following parameters:
<country> <state or province> <locality>
<organization> <organizational unit> <common name>
<e-mail address> <validity period> <key size> <CA cert
true|false> <serial number> <pass phrase>
• server — generates a signed server certificate
provided with key use options that are appropriate
for server usage. Set the CA cert value to true if
you plan to issue your own chained server
certificates, generating them from the currently
generated server certificate.The CA cert value you
specify when generating a certificate translates into
the X509v3 Basic Constraints property in the
generated certificate. To view the properties of a
certificate available on the Nortel SNAS 4050, use
the /cfg/cert #/show command.
• client — not supported in Nortel Secure Network
Access Switch Software Release 1.0.
request
Generates a certificate signing request. For more
information, see “Generating and submitting a CSR
using the CLI” on page 579.
sign
Signs a CSR by using the private key associated with
the currently selected certificate. You are prompted to
paste in the contents of a CSR.
Client certificates are not supported in Nortel Secure
Network Access Switch Software Release 1.0.
test
Generates a self-signed certificate and private key for
testing purposes. For more information, see
“Generating a test certificate using the CLI” on
page 596.
import
Installs a private key and certificate by downloading it
from a TFTP/FTP/SCP/SFTP server. For more
information, see “Importing certificates and keys into
the Nortel SNAS 4050 using the CLI” on page 588.
export
Exports the current key and certificate to a TFTP/FTP/
SCP/SFTP server in a format you specify. For more
information, see “Exporting a certificate and key from
the Nortel SNAS 4050 using the CLI” on page 594.
Chapter 11 Managing certificates 579
/cfg/cert <cert ID>
followed by:
display [<pass
phrase>]
Displays the current key and certificate, in order to save
copies as backup or for export to another device. For
more information, see “Displaying or saving a
certificate and key using the CLI” on page 591.
The display command allows you to save private
keys and certificates in the PEM format. To save a
certificate and key in another format, use the /cfg/
cert #/export command.
show
Displays detailed information about the certificate,
excluding the certificate name.
info
Displays the serial number, the expiration date, and the
values specified for the subject part of the current
certificate.
subject
Displays detailed information about the subject part of
the current certificate.
For example:
C/countryName (2.5.4.6) = US
where:
• countryName is the mnemonic name
• 2.5.4.6 is the object identifier (OID)
• US is the value
validate
Validates that the private key matches the public key in
the current certificate.
keysize
Displays the key size of the private key in the current
certificate.
keyinfo
Displays information about how the private key
associated with the currently selected certificate is
protected. For the Nortel SNAS 4050, private keys are
protected by the cluster.
del
Removes the current certificate and private key.
Generating and submitting a CSR using the CLI
To prepare a CSR for submission to a CA, perform the following steps:
1
Access the Certificate menu by using the /cfg/cert <cert id>
command, where:
Nortel Secure Network Access Switch 4050 User Guide
580 Chapter 11 Managing certificates
•
•
2
to generate a CSR for a new certificate, <cert id> is an unused
certificate number
to generate a CSR to renew an existing certificate, <cert id> is the
existing certificate number
Prepare the CSR. Enter the following command:
/cfg/cert #/request
You are prompted to enter the certificate request information. Table 121
explains the required parameters. The combined length of the parameters
cannot exceed 225 bytes.
Table 121 CSR information
320818-A
Prompt
Description
Country Name (2 letter code):
The two-letter ISO code for the country where the web
server is located. For current information about ISO
country codes, see http://www.iana.org.
State or Province Name (full
name):
The name of the state or province where the head
office of the organization is located. Enter the full name
of the state or province.
Locality Name (e.g., city):
The name of the city where the head office of the
organization is located.
Organization Name (e.g.,
company):
The registered name of the organization. The
organization must own the domain name that appears
in the common name of the web server. Do not
abbreviate the organization name and do not use any
of the following characters:
<>~!@#$%^*/\()?
Organizational Unit Name (e.g.,
section):
The name of the department or group that uses the
secure web server.
Common Name (e.g., your
name or your server's
hostname):
The name of the web server as it appears in the URL.
The name must be the same as the domain name of
the web server that is requesting a certificate. If the
web server name does not match the common name in
the certificate, some browsers will refuse a secure
connection with your site. Do not enter the protocol
specifier (http://) or any port numbers or pathnames in
the common name. Wildcards (such as * or ?) and IP
address are not allowed.
E-mail Address:
The user’s e-mail address.
Chapter 11 Managing certificates 581
Table 121 CSR information
Prompt
Description
Subject alternative name (blank
or comma separated list of
URI:<uri>, DNS:<fqdn>,
IP:<ip-address>,
email:<email-address>):
Specifies alternative information for the subject if you
did not provide a Common Name or e-mail address.
The required information is a comma-separated list as
follows:
• URI:<uri>, a Uniform Resource Identifier
• DNS:<fqdn>, the fully qualified domain name
• IP:<ip-address>
• email:<email-address>
Generate new key pair (y/n) [y]:
Specifies whether you want to generate a new pair of
private and public keys. The default is y (yes).
If you are creating a CSR for a new certificate, accept
the option to generate a new key pair.
If a configured certificate is approaching its expiration
date and you want to renew it without replacing the
existing key, specify n (no). The CSR will be based on
the existing key for the specified certificate number.
Key size [1024]:
The length of the generated key, in bits. The default
value is 1024.
Request a CA certificate (y/n)
[n]:
Specifies whether to request a CA certificate to use for
client authentication. Request a CA certificate if you
plan to issue your own server certificates or client
certificates, generating them from the requested CA
certificate. The default is n (no).
Specify challenge password
(y/n) [n]:
Specifies a password to be used during manual
revocation of the certificate.
3
Generate the CSR.
After you have provided the required information, press Enter. The CSR is
generated and displayed on the screen.
4
Apply the changes.
The private key is created and stored in encrypted form on the Nortel
SNAS 4050 using the specified certificate number.
Nortel Secure Network Access Switch 4050 User Guide
582 Chapter 11 Managing certificates
Figure 166 shows sample output for the /cfg/cert #/request command.
For more information about the Certificate menu commands, see “Managing
and viewing certificates and keys using the CLI” on page 577.
Figure 166 Generating a CSR
>> Certificate 2# request
The combined length of the following parameters may not exceed 225
bytes.
Country Name (2 letter code): US
State or Province Name (full name): California
Locality Name (eg, city): City
Organization Name (eg, company): Test Company Inc.
Organizational Unit Name (eg, section): test dept
Common Name (eg, your name or your server's hostname):
www.dummyssltesting.com
Email Address: [email protected]
Subject alternative name (blank or comma separated list of
URI:<uri>, DNS:<fqdn>, IP:<ip-address>, email:<email-address>):
Generate new key pair (y/n) [y]:
Key size [1024]:
Request a CA certificate (y/n) [n]:
Specify challenge password (y/n) [n]:
-----BEGIN CERTIFICATE REQUEST----MIIB+jCCAWMCAQAwgZQxCzAJBgNVBAYTAlNFMRIwEAYDVQQIEwlTdG9ja2hvbG0xD
jAMBgNVBAcTBUtpc3RhMREwDwYDVQQKEwhCbHVldGFpbDENMAsGA1UECxMERG9jdT
EZMBcGA1UEAxMQd3d3LmJsdWV0YWlsLmNvbTEkMCIGCSqGSIb3DQEJARYVdG9yYmp
vcm5AYmx1ZXRhaWwuY29tMIGfMA0GCSqGSIb3DQEBAQUAA4GNADCBiQKBgQCX2rSY
81cgKJODuUreGF3ZnK7RvlRqSV/
TIMS4UerqXPKpTjfMAWDjBG77hjIAOOZOFQKFB5x/Zs9kNMBUmPBokA1/
GXghomOvBhMIJBZBiUVtJNGmv2sjeqNXxsUg5XfJiwV2LjUvw65EzCLpq5dhq6ZPE
x7tAgqB2Wgu8MolwQIDAQABoCUwIwYJKoZIhvcNAQkHMRYTFEEgY2hhbGxlbmdlIH
Bhc3N3b3JkMA0GCSqGSIb3DQEBBAUAA4GBACemSJr8Xuk9PQZPuIPV7iCDG+eWneU
3HH3F3DigW3MILCLNqweljKw5pZdAr9HbDwU+2iQGbTSH0nVeoqn4TJujq96XpIrb
iAFdE1tR7Lmf6oGdrwG8ypfRpp3PmId6lp+HJ2fUGliPYyNtd/
94AL6wW8un208+icCHq/S0yjz
-----END CERTIFICATE REQUEST----Use 'apply' to store the private key in the iSD until
the signed certificate is entered.
The private key will be lost unless you 'apply' or
save it elsewhere using 'export'.
>> Certificate 2# apply
Changes applied successfully.
320818-A
Chapter 11 Managing certificates 583
5
6
Save the CSR to a file.
a
Copy the entire CSR, including the -----BEGIN CERTIFICATE
REQUEST----- and -----END CERTIFICATE REQUEST----- lines,
and paste it into a text editor.
b
Save the file with a .csr extension. Nortel recommends using a file name
that indicates the server on which the certificate is to be used.
Save the private key to a file.
If you intend to use the same certificate number when you add the returned
certificate to the Nortel SNAS 4050, perform this step only if you want to
create a backup copy of the private key.
If you do not intend to use the same certificate number when you add the
returned certificate to the Nortel SNAS 4050, you must perform this step in
order to create the key file. When you add the returned certificate to the Nortel
SNAS 4050 using a different certificate number, you will have to associate the
private key with the new certificate by pasting or importing the contents of the
key file (see “Installing certificates and keys” on page 573).
7
a
Display the certificate and key (see “Displaying or saving a certificate and
key using the CLI” on page 591).
b
Copy the private key, including the -----BEGIN RSA PRIVATE
KEY----- and -----END RSA PRIVATE KEY----- lines, and paste it
into a text editor.
c
Save the text editor file with a .pem extension. Nortel recommends using
the same file name that you defined for the .csr file (see step 5), so the
connection between the two files is obvious.
Submit the CSR to a CA such as Entrust or VeriSign.
a
In a text editor, open the .csr file you created in step 5.
b
Copy the entire CSR, including the -----BEGIN CERTIFICATE
REQUEST----- and -----END CERTIFICATE REQUEST----- lines.
c
Use your web browser to access the CA web site and follow the online
instructions. The process for submitting the CSR varies with each CA.
When prompted, paste the CSR as required in the CA online request
process. If the CA requires you to identify a server software vendor whose
software you used to generate the CSR, specify Apache.
Nortel Secure Network Access Switch 4050 User Guide
584 Chapter 11 Managing certificates
8
The CA processes the CSR and returns a signed certificate. Create a backup
copy of the certificate (see “Displaying or saving a certificate and key using
the CLI” on page 591).
The certificate is ready to be added into the Nortel SNAS 4050 cluster (see
“Adding a certificate to the Nortel SNAS 4050 using the CLI” on page 584).
Adding a certificate to the Nortel SNAS 4050 using the CLI
The following steps describe how to install a certificate (and key, if applicable)
using the copy-and-paste method.
The certificate (and key, if applicable) must be in PEM format.
Note: Nortel recommends performing copy-and-paste operations using
a Telnet or SSH client to connect to the MIP. If you use a console
connection to connect to one of the Nortel SNAS 4050 devices in the
cluster, you may find that HyperTerminal under Microsoft Windows is
slow to complete copy-and-paste operations.
1
Access the Certificate menu by using the /cfg/cert <cert id>
command, where <cert id> is the certificate number.
If you obtained the certificate by using the /cfg/cert #/request
command to generate the CSR, specify the same certificate number as the
certificate number you used to generate the CSR. In this way, the private key
remains connected to the certificate number, and you do not need to perform
an additional step to add the private key.
If you obtained the certificate by means other than using the /cfg/cert #/
request command to generate the CSR, specify a certificate number not
used by any other configured certificate. If the private key and the certificate
are not contained in the same file, you will have to perform an additional step
to add the private key (see “Adding a private key to the Nortel SNAS 4050
using the CLI” on page 587).
To view basic information about configured certificates, use the /info/
certs command.
320818-A
Chapter 11 Managing certificates 585
To verify that the current certificate number is not in use by an installed
certificate, use the /cfg/cert #/show command.
2
Copy the certificate.
a
In a text editor, open the certificate file you received from the CA.
b
Copy the entire contents, including the -----BEGIN
CERTIFICATE----- and -----END CERTIFICATE----- lines.
If the certificate file contains the private key as well, also include the
entire contents of the key, including the -----BEGIN RSA PRIVATE
KEY----- and -----END RSA PRIVATE KEY----- lines.
3
Add the certificate.
a
Enter the following command:
/cfg/cert #/cert
4
b
Paste the certificate at the command prompt.
c
Press Enter to create a new line, and then enter an ellipsis (...) to
terminate.
d
If you are pasting in the private key at the same time, and if the key has
been password protected, you are prompted to enter the password phrase.
The password phrase required is the one specified when the key was
created or exported.
Apply the changes.
If you obtained the certificate by using the /cfg/cert #/request
command to generate the CSR and are using the same certificate number, the
certificate is now fully installed.
If you obtained the certificate by means other than using the /cfg/cert #/
request command to generate the CSR and are using a new certificate
number, you must now add the corresponding private key (see “Adding a
private key to the Nortel SNAS 4050 using the CLI” on page 587).
Nortel Secure Network Access Switch 4050 User Guide
586 Chapter 11 Managing certificates
Figure 167 shows sample output for the /cfg/cert #/cert command. For
more information about the Certificate menu commands, see “Managing and
viewing certificates and keys using the CLI” on page 577.
Note: Depending on the type of certificate the CA generates (registered
or chain), your certificate may be substantially different from the sample
output. Be sure to copy and paste the entire contents of the certificate
file.
Figure 167 Adding a certificate by pasting
>> Certificate 2# cert
Paste the certificate, press Enter to create a new line,
and then type "..." (without the quotation marks) to
terminate.
> -----BEGIN CERTIFICATE----> MIIDTDCCArWgAwIBAgIBADANBgkqhkiG9w0BAQQFADB9MQswCQYDVQQG
> EwJzZTEOMAwGA1UECBMFa2lzdGExEjAQBgNVBAcTCXN0b2NraG9sbTEM
> MA>oGA1UEChMDZG9jMQ0wCwYDVQQLEwRibHVlMRIwEAYDVQQDEwl3d3c
> uYS5jb20xGTAXBgkqhkiG9w0BCQEWCnR0dEBjY2MuZG4wHhcNMDAxMjI
> yMDkxOTI0WhcNMDExMjIyMDkxOTI0WjB9MQswCQYDVQQGEwJzZTEOMAw
> GA1UECBMFa2lzdGExEjAQBgNVBAcTCXN0b2NraG9sbTEMMAoGA1UEChM
> DZG9jMQ0wCwYDVQQLEwRibHVlMRIwEAYDVQQDEwl3d3cuYS5jb20xGTA
> XBgkqhkiG9w0BCQEWCnR0dEBjY2MuZG4wgZ8wDQYJKoZIhvcNAQEBBQA
> DgY0AMIGJAoGBALXym9cIVfHZUZFE1MFi+xefDviIEvilnJAQSSPITnZ
> a69fzGcL3vpQv0NLxNffs1jEw4RPDMKu2rQ9N02EiiJcrCHnaSNZPdwG
> oX39IkEUkANzm3mh2DlP1RfW4ejpNKsG5Tme/e1vFYWXeXXI1oRtdPIa
> VGxK8pvqBEHDXCcJlAgMBAAGjgdswgdgwHQYDVR0OBBYEFJBM3K0KB03
> fpCOVrQCC34hovwM8MIGoBgNVHSMEgaAwgZ2AFJBM3K0KB03fpCOVrQC
> C34hovwM8oYGBpH8wfTELMAkGA1UEBhMCc2UxDjAMBgNVBAgTBWtpc3R
> hMRIwEAYDVQQHEwlzdG9ja2hvbG0xDDAKBgNVBAoTA2RvYzENMAsGA1U
> ECxMEYmx1ZTESMBAGA1UEAxMJd3d3LmEuY29tMRkwFwYJKoZIhvcNAQk
> BFgp0dHRAY2NjLmRuggEAMAwGA1UdEwQFMAMBAf8wDQYJKoZIhvcNAQE
> EBQADgYEAm/GKwEyDKCm2qdPt8+pz1znSGNaRTxfK1R0mjtnDGFb0qk+
> Bv7d9YlX+1QTZhxnZZ4JXuWPJS36kAwiirVbOIaIforIVa+IUlo8HUjM
> vxzIqCYPiiDwBcBi3NsvjlFM7i24Q+lvDLE/Ko+x/YEnNukfp3SBXiJq
> Z8WZIvbTCyT4=
> -----END CERTIFICATE----> ...
Certificate added.
>> Certificate 2# apply
320818-A
Chapter 11 Managing certificates 587
Adding a private key to the Nortel SNAS 4050 using the CLI
1
Access the Certificate menu by using the /cfg/cert <cert id>
command, where <cert id> is the certificate number.
Use the same certificate number you used when pasting the certificate.
2
3
Copy the contents of the private key file.
a
Locate the file containing the private key. Make sure the key file
corresponds with the certificate file you received from the CA. The public
key contained in the certificate works in concert with the related private
key to handle SSL transactions.
b
In a text editor, open the key file.
c
Copy the entire contents, including the -----BEGIN RSA PRIVATE
KEY----- and -----END RSA PRIVATE KEY----- lines.
Add the private key.
a
Enter the following command:
/cfg/cert #/key
4
b
Paste the contents of the key file at the command prompt.
c
Press Enter to create a new line, and then enter an ellipsis (...) to
terminate.
d
If the key is password protected, you are prompted to enter the password
phrase. The password phrase required is the one you specified when
saving or exporting the private key.
Apply the changes.
The certificate and private key are now fully installed.
Nortel Secure Network Access Switch 4050 User Guide
588 Chapter 11 Managing certificates
Figure 168 shows sample output for the /cfg/cert #/key command. For
more information about the Certificate menu commands, see “Managing and
viewing certificates and keys using the CLI” on page 577.
Figure 168 Adding a private key by pasting
>> Certificate 2# key
Paste the key, press Enter to create a new line, and then
type "..."(without the quotation marks) to terminate.
> -----BEGIN RSA PRIVATE KEY----> Proc-Type: 4,ENCRYPTED
> DEK-Info: DES-EDE3-CBC,2C60C89FEB57A853
>
> MbbLDYlwdbNfXUGHFm10nfRlI+KTnx2Bdx750EaG8HSVV7KrtnsNF/Fs
> z1jFvO/jnKhZfs4zsVrsstrVlqfP1uatg19VyJSEug1ZcCamH59Dcy+U
> NocFWCzR56PHpyZKGXX66jS+6twYdiXQk58URIudkmGXGTYMvBRuVjV2
> 2ZRLyJk41Az5nA6HiDz6GGs6vkCaPFGm263KxmXjy/okNgSJl9QTqJfS
> q7Eh1cIslBReAE9HXGl0Eubb6gVJu+sRmGhS/yGx4vMx98wiMjL37gRt
> XBfDWlu6u0HOPeJxs6fH05fYzmnpwAHj592TDFdsJi5pmrY0NhAeXfuG
> 8mF/T9nEz02ZA8iQGJsaUPfkeBxbZS+umY/R65Okwt1k2RN4RlFnmRWq
> vhHMrHzJuegez/806YazHBv74sOg3KgETRH92z5yvwbgFwmffgb+hai0
> RlRtZgQ4A5kSAFYW37KDq6eJBsZ/m3Que1buMbh8tRxdGpo54+bGqu5b
> 12iLanLnRk57ENQGTgzxOD/1RZIJHqObCY7VDLkK7WZM/LPa0k+bTeAy
> smZa7fu7gvELJF0ivszs3nzm7zT1y0mJ0QX9u9eoW8wpASCAdCC2r2LZ
> t8o9+IWLSZWh5UCIr8qFKGiLrUIx8coIhxSpx/PqEV8KhSRV+0taq0N7
> pJa3TLmO3o80t5966VSFKc3Y35fx9Yk8G+RlSzo4CxooY4bCKsfchnJ9
> 57SJx5vUyh6jjztnuU4iAfeTVCUdF0LXd+NlQ7T7IMFsjjx9SZuuHPZT
> F0KD/WYLx7FfIFIBHDumu6scraYZOaWaJKI5Pw==
> -----END RSA PRIVATE KEY----> ...
Enter pass phrase:
Key added
>> Certificate 2# apply
Changes applied successfully.
Importing certificates and keys into the Nortel SNAS 4050
using the CLI
You can import certificates and private keys into the Nortel SNAS 4050 using
TFTP, FTP, SCP, or SFTP. For information about the formats supported for
import, see “Key and certificate formats” on page 571.
320818-A
Chapter 11 Managing certificates 589
To import a certificate and private key into the Nortel SNAS 4050, perform the
following steps.
1
Upload the certificate file and key file to the file exchange server.
Note: You can arrange to include your private key in the certificate file.
When the Nortel SNAS 4050 retrieves the specified certificate file from
the file exchange server, the Nortel SNAS 4050 software analyzes the
contents and automatically adds the private key, if present.
2
Access the Certificate menu by using the /cfg/cert <cert id>
command, where <cert id> is the certificate number.
To install a new certificate, specify an unused certificate number. To replace
an installed certificate, specify the installed certificate index number.
To view basic information about all configured certificates, use the /info/
certs command. To verify that the current certificate number is not in use by
an installed certificate, use the /cfg/cert #/show command.
3
Import the certificate. Enter the following command:
/cfg/cert #/import
You are prompted to enter the certificate and private key import information.
If the private key has been password protected, you are prompted for the
correct password phrase as well. Table 122 explains the required parameters.
Table 122 Certificate and key import information
Parameter
Description
Protocol
The file import protocol. The options are TFTP, FTP,
SCP, SFTP. The default is TFTP.
Server host name or IP address The host name or IP address of the file exchange
server.
File name
The name of the file on the file exchange server.
Nortel Secure Network Access Switch 4050 User Guide
590 Chapter 11 Managing certificates
Table 122 Certificate and key import information
Parameter
Description
[FTP user name and password]
For FTP, SCP, and SFTP, the user name and password
to access the file exchange server. The default is
anonymous.
For anonymous mode, the Nortel SNAS 4050 uses the
following string as the password (for logging purposes):
admin@<hostname>.isd.
[Pass phrase]
If the key is password protected, the password phrase
specified when the key was created or exported.
4
If the private key was not included in the certificate file, repeat step 3 on
page 589 to import the key file, then go to step 5.
5
Apply the changes.
The certificate and private key are now fully installed.
Figure 169 shows sample output for the /cfg/cert #/import command.
For more information about the Certificate menu commands, see “Managing
and viewing certificates and keys using the CLI” on page 577.
Figure 169 Adding a certificate and private key by importing
>> Certificate 3# import
Select protocol (tftp/ftp/scp/sftp) [tftp]: ftp
Enter host name or IP address of server: ftp.example.com
Enter filename on server: VIP_1.crt
Retrieving VIP_1.crt from 192.168.128.58
FTP User (anonymous):
Password:admin@hostname/IP.isd
received 2392 bytes
Enter pass phrase:
Key added.
Certificate added.
Use 'apply' to activate changes.
>> Certificate 3# apply
Changes applied successfully.
320818-A
Chapter 11 Managing certificates 591
Displaying or saving a certificate and key using the CLI
You can display the current certificate and private key and then save copies as
backup or for export to another device.
When you display the certificate and private key, you are prompted to protect it
with a password phrase. Nortel recommends adding a password phrase, because
this adds an extra layer of security.
Save the certificate by copying the certificate section and pasting it into a text
editor, then saving the text file with a .PEM extension. Similarly, save the private
key by copying the key section and pasting it into a text editor, then saving the text
file with a .PEM extension. You can also save both the certificate and the private
key in one file, with a .PEM extension.
To save a certificate and key in another format, use the /cfg/cert #/export
command (see “Exporting a certificate and key from the Nortel SNAS 4050 using
the CLI” on page 594).
To display the current certificate and key or save a copy, perform the following
steps.
1
Access the Certificate menu by using the /cfg/cert <cert id>
command, where <cert id> is the certificate number of the certificate you
wish to copy.
To view basic information about all configured certificates, use the /info/
certs command.
2
Display the private key and certificate. Enter the following command:
/cfg/cert #/display
3
When prompted, specify whether or not the key will be encrypted. The default
is yes.
4
When prompted, specify a password phrase if you wish to password protect
the private key.
If you specify a password phrase, the password phrase must be provided on all
occasions in future when the private key file is accessed (for example, when
adding, importing, or exporting private keys and certificates).
Nortel Secure Network Access Switch 4050 User Guide
592 Chapter 11 Managing certificates
5
Copy the private key, certificate, or both, as required.
For the private key, ensure that you include the -----BEGIN RSA PRIVATE
KEY----- and -----END RSA PRIVATE KEY----- lines.
For the certificate, ensure that you include the -----BEGIN
CERTIFICATE----- and -----END CERTIFICATE----- lines.
320818-A
6
Paste the private key, certificate, or both into a text editor.
7
Save the file with a .PEM extension.
Chapter 11 Managing certificates 593
Figure 170 shows sample output for the /cfg/cert #/display command.
For more information about the Certificate menu commands, see “Managing
and viewing certificates and keys using the CLI” on page 577.
Figure 170 Displaying a private key and certificate
>> Certificate 1# display
Encrypt private key (yes/no) [yes]:
Enter export pass phrase:
Reconfirm export pass phrase:
-----BEGIN RSA PRIVATE KEY----Proc-Type: 4,ENCRYPTED
DEK-Info: DES-EDE3-CBC,87A8DBDA4FD72948
UNmYDWMJ18ogSiPtHlXa9L2jMqMRA5xKq28cZGk2K64jg7dKaQ4Tvjo3ZnqiTDqLdwXrwJJhvdYgsA
vbPh4fZMjPKIeIMGL2cnD3kPWPXoToh02ZdTxiksUk2gDFc6mlr7OR796J0V9W1rtWuPOk8nGS/QGR
9drgUZguXWZRM68R9HJAonTU45cUeLOh/h2X168Bnt72lb4ZXeCsgiQ4VwhpW0nU/5itD8YiJlqNUS
HTJbPC24V34FtmpmMelht5CYXOtseI2MsasiHNmoEP7RXohLfW7t/utWCN8rh1kj9cKQWIc8b1Hgtl
+9AUGoVkRo9e4OYNk6Qek0S/Hr7Y4lif6dEnVimqM4MbTiKwoSd3hoWV809QObnB80tlueFNpjinm2
qCKPBTydUPWchRgKEAaYnmOYHhZnfS3/8qWHw+VDu9EQW2+KYKrU1GNO6s1SZQ8P97syGWyEcBhG8O
k4+dQ9+0uGAJl9+bic1u0Y7CxJ70hHrOxhujMEo5tJJnTe2p+E5BGMl6KZpkkgowc1D1FbyOy9qxfr
sBqsBAB97VgTGuJPhdhQGLqlag9VblBDYj2ljTNYZCdcx3ZkwCrdhMtviML5O3knyKvdZZqoS6H/Hq
dSHwRF0u/zeX+frBE+atlSi2f1RINBXa8TD/B/CI7LjZECrV2aed2i7HFEeP6VQC5jKQbq2k7nzss9
lvBtl1vV9jwFk/37dSY4tRe3ughKYB4hvWrGuvnnshbAJmzcOiYk0OV4zbOL5SFu1/P6qm49yiklcJ
1GhZS34hZVcx6GQvu9DUmLwAaVE4X2NwZxA5AlmUsw==
-----END RSA PRIVATE KEY---------BEGIN CERTIFICATE----MIIEajCCA9OgAwIBAgIBADANBgkqhkiG9w0BAQQFADCBvzELMAkGA1UEBhMCVVMxEzARBgNVBAgTCk
NhbGlmb3JuaWExEDAOBgNVBAcTB1Rlc3RpbmcxKDAmBgNVBAoTH1Rlc3QgSW5jLiAxIDE1OjAyOjQ5
IDIwMDUtMDgtMTIxEjAQBgNVBAsTCXRlc3QgZGVwdDEgMB4GA1UEAxMXd3d3LmR1bW15c3NsdGVzdG
luZy5jb20xKTAnBgkqhkiG9w0BCQEWGnRlc3RlckBkdW1teXNzbHRlc3RpbmcuY29tMB4XDTA1MDgx
MjIyMDI0OVoXDTA2MDgxMjIyMDI0OVowgb8xCzAJBgNVBAYTAlVTMRMwEQYDVQQIEwpDYWxpZm9ybm
lhMRAwDgYDVQQHEwdUZXN0aW5nMSgwJgYDVQQKEx9UZXN0IEluYy4gMSAxNTowMjo0OSAyMDA1LTA4
LTEyMRIwEAYDVQQLEwl0ZXN0IGRlcHQxIDAeBgNVBAMTF3d3dy5kdW1teXNzbHRlc3RpbmcuY29tMS
kwJwYJKoZIhvcNAQkBFhp0ZXN0ZXJAZHVtbXlzc2x0ZXN0aW5nLmNvbTCBnzANBgkqhkiG9w0BAQEF
AAOBjQAwgYkCgYEAsxrMJKkS3bpgPylTGUzoBA/H9CKrSMEpWxFOTYs262BYaFrk/jLMHwExmUfhyN
M9jugxv5sFG5duLL2bg4jfRawJnZsJ1CC3bY+n8sqPAv4f1Wy46DrYbS9cucOC5v4hu85DlV0oNAB8
8M3F7B6DN0Jwhub1N3nTv8zpT56keeECAwEAAaOCAXIwggFuMAwGA1UdEwQFMAMBAf8wEQYJYIZIAY
b4QgEBBAQDAgJEMDIGCWCGSAGG+EIBDQQlFiNBbHRlb24vTm9ydGVsIEdlbmVyYXRlZCBDZXJ0aWZp
Y2F0ZTAdBgNVHQ4EFgQU4fQWn5yi7hkDDWXud+2Pl8XWgn8wgewGA1UdIwSB5DCB4YAU4fQWn5yi7h
kDDWXud+2Pl8XWgn+hgcWkgcIwgb8xCzAJBgNVBAYTAlVTMRMwEQYDVQQIEwpDYWxpZm9ybmlhMRAw
DgYDVQQHEwdUZXN0aW5nMSgwJgYDVQQKEx9UZXN0IEluYy4gMSAxNTowMjo0OSAyMDA1LTA4LTEyMR
IwEAYDVQQLEwl0ZXN0IGRlcHQxIDAeBgNVBAMTF3d3dy5kdW1teXNzbHRlc3RpbmcuY29tMSkwJwYJ
KoZIhvcNAQkBFhp0ZXN0ZXJAZHVtbXlzc2x0ZXN0aW5nLmNvbYIBADAJBgNVHRIEAjAAMA0GCSqGSI
b3DQEBBAUAA4GBAHhnJNTeShcMqXVPbyZn5V9DRgZvSMOi+fHr7M7rMpEvYYwD5Idga6YCYmZxpcmx
TpPhFsUX5XRXHWNA/e3LzzpDqq0j82k6JrnpwqWLcWe6AeSCsrQF2lFsZy/r0HFQ12hFmRmKMpgElf
LzfJ2eg6oct9lYzUx4m/84Fd1QE7mb
-----END CERTIFICATE---->> Certificate 1#
Nortel Secure Network Access Switch 4050 User Guide
594 Chapter 11 Managing certificates
Exporting a certificate and key from the Nortel SNAS 4050
using the CLI
You can export certificate files and key files from the Nortel SNAS 4050 using
TFTP, FTP, SCP, or SFTP. For information about the formats supported for export,
see “Key and certificate formats” on page 571.
To export a certificate and key from the Nortel SNAS 4050, perform the following
steps.
1
Access the Certificate menu by using the /cfg/cert <cert id>
command, where <cert id> is the certificate number of the certificate you
wish to export.
To view basic information about all configured certificates, use the /info/
certs command.
2
Export the certificate. Enter the following command:
/cfg/cert #/export
You are prompted to enter the certificate and key export information. The file
is exported as soon as you have provided all the required information.
Table 123 explains the required parameters.
Table 123 Certificate and key export information
Parameter
Description
Protocol
The file export protocol. The options are TFTP, FTP,
SCP, SFTP. The default is TFTP.
Server host name or IP address The host name or IP address of the file exchange
server.
320818-A
Chapter 11 Managing certificates 595
Table 123 Certificate and key export information
Parameter
Description
Export format
The key and certificate format in which you want to
export the key and certificate. Valid options are:
• PEM
• DER
• NET
• PKCS12 (also known as PFX)
The PEM and PKCS12 formats always combine the
private key and certificate in the same file.
Nortel recommends using the PKCS12 format. Most
web browsers accept importing a combined key and
certificate file in the PKCS12 format.
The formats have different capabilities regarding
private key encryption and the ability to save the key
and certificate in separate files. For more information
about the formats, see “Key and certificate formats” on
page 571.
Export pass phrase
The password phrase to encrypt the private key.
Reconfirm export pass phrase
Re-enter the password phrase for confirmation.
Key and certificate file name
The name of the file on the file exchange server. If you
are using a format that saves the private key and
certificate in the same file, you are prompted for the
combined file name. If you are using a format that
saves the private key and certificate in separate files,
you are prompted separately for the key file name and
the certificate file name.
[FTP user name and password]
For FTP, SCP, and SFTP, the user name and password
to access the file exchange server. The default is
anonymous.
Nortel Secure Network Access Switch 4050 User Guide
596 Chapter 11 Managing certificates
Figure 171 shows sample output for the /cfg/cert #/export command.
For more information about the Certificate menu commands, see “Managing
and viewing certificates and keys using the CLI” on page 577.
Figure 171 Exporting a certificate and private key
>> Certificate 1# export
Select protocol (tftp/ftp/scp/sftp) [tftp]: ftp
Enter hostname or IP address of server: ftp.example.com
Select the desired export format, enter a pass phrase and
specify the name of the output file.
Enter export format (pem/der/net/pkcs12): pkcs12
Enter export pass phrase: <passphrase>
Reconfirm export pass phrase: <passphrase once again>
Enter name of combined key and certificate file on remote
host: cert.pfx
FTP User (anonymous):
Password:
sent 2392 bytes
Generating a test certificate using the CLI
You can generate a self-signed certificate and private key for testing purposes.
The certificate is generated immediately after you have provided all the required
information. However, the test certificate and key are not activated until you apply
the changes.
To generate a test certificate, perform the following steps:
1
Access the Certificate menu by using the /cfg/cert <cert id>
command, where <cert id> is an unused certificate number.
2
Generate the test certificate. Enter the following command:
/cfg/cert #/test
320818-A
Chapter 11 Managing certificates 597
You are prompted to enter the following parameters. The combined length of
the parameters cannot exceed 225 bytes
•
•
•
•
•
•
•
•
•
•
country name (2-letter code)
state or province name
locality name
organization name
organizational unit name
common name
e-mail address
subject alternative name
validity period — the default is 365 days
key size — the default is 1024 bits
For more information about the parameters, see Table 121 on page 580.
3
Apply the changes.
Managing private keys and certificates using the SREM
You can perform the following certificate management tasks in the SREM:
•
•
•
•
•
•
•
view existing certificates (see “Viewing certificates using the SREM” on
page 598)
create a new certificate (see “Creating a certificate using the SREM” on
page 599)
generate requests for signed certificates (see “Generating and submitting a
CSR using the SREM” on page 601)
import certificates and private keys (see “Importing a certificate or key using
the SREM” on page 603)
save certificates and private keys (see “Displaying or saving a certificate and
key using the SREM” on page 605)
export certificates and private keys (see “Exporting a certificate and key from
the Nortel SNAS 4050 using the SREM” on page 607)
view, validate, and manage certificates and private keys (see “Viewing
certificate information using the SREM” on page 610)
Nortel Secure Network Access Switch 4050 User Guide
598 Chapter 11 Managing certificates
Viewing certificates using the SREM
To view basic information about all certificates configured for the Nortel
SNAS 4050 cluster, select the Certificates > Certificates tab.
The Certificates screen appears (see Figure 172), with a list of all certificates
available on the Nortel SNA cluster.
Figure 172 Certificates screen
To remove an existing certificate, perform the following steps:
1
Select the certificate from the Certificates list.
2
Click Delete.
A confirmation dialog appears.
320818-A
Chapter 11 Managing certificates 599
3
Click Yes.
The certificate is removed from the Certificates list.
4
Click Apply on the toolbar to send the current changes to the Nortel
SNAS 4050. Click Commit on the toolbar to save the changes permanently.
Creating a certificate using the SREM
To create a certificate, perform the following steps:
1
Select the Certificates > Certificates tab.
The Certificates screen appears (see Figure 172 on page 598).
2
Click Add.
The Add a Certificate Component dialog box appears (see Figure 173).
Figure 173 Add a Certificate Component
3
Enter the certificate information in the applicable fields.
Table 124 describes the Add a Certificate Component fields.
Table 124 Add a Certificate Component fields
Field
Description
Index
An integer in the range 1 to 1500 that uniquely identifies
the certificate in the Nortel SNAS 4050 domain.
Name
Names the certificate, as a mnemonic aid.
4
Click Apply.
The new certificate appears in the Certificates list.
Nortel Secure Network Access Switch 4050 User Guide
600 Chapter 11 Managing certificates
5
Click Apply on the toolbar to send the current changes to the Nortel
SNAS 4050. Click Commit on the toolbar to save the changes permanently.
Before this certificate can be used, a certificate signing request (CSR) must be
generated, submitted to a CA, and imported into the Nortel SNAS 4050. For
details on this process, continue with “Generating and submitting a CSR using the
SREM” on page 601 and “Importing a certificate or key using the SREM” on
page 603.
320818-A
Chapter 11 Managing certificates 601
Generating and submitting a CSR using the SREM
To generate a CSR, perform the following steps:
1
Select the Certificates > certificate > CA Request tab.
The CA Request screen appears (see Figure 174).
Figure 174 CA Request screen
Nortel Secure Network Access Switch 4050 User Guide
602 Chapter 11 Managing certificates
2
Enter the certificate information in the applicable fields.
Table 125 describes the CA Request fields.
Table 125 CA Request fields
320818-A
Field
Description
Country
The two-letter ISO code for the country where the web
server is located. For current information about ISO
country codes, see http://www.iana.org.
State/Province
The name of the state or province where the head office of
the organization is located. Enter the full name of the state
or province.
Locality
The name of the city where the head office of the
organization is located.
Organization
The registered name of the organization. The organization
must own the domain name that appears in the common
name of the web server. Do not abbreviate the organization
name and do not use any of the following characters:
<>~!@#$%^*/\()?
Organization Unit
The name of the department or group that uses the secure
web server.
Common Name
The name of the web server as it appears in the URL. The
name must be the same as the domain name of the web
server that is requesting a certificate. If the web server
name does not match the common name in the certificate,
some browsers will refuse a secure connection with your
site. Do not enter the protocol specifier (http://) or any port
numbers or pathnames in the common name. Wildcards
(such as * or ?) and IP address are not allowed.
E-mail Address:
The user’s e-mail address.
Alternate Name
Provide the specified information if you did not provide a
Common Name or e-mail address. Enter a
comma-separated list of URI:<uri>, DNS:<fqdn>,
IP:<ip-address>, email:<email-address>).
Key Length
The length of the generated key, in bits. Available options
are:
• 512
• 1024
• 2048
• 4096
The default value is 1024.
Password
The password to be used during manual revocation of the
certificate.
Chapter 11 Managing certificates 603
3
Click Apply on the toolbar to send the information to the Nortel SNAS 4050.
Click Commit on the toolbar to generate the CSR.
If one or more of the CA Request field values are invalid, then an error
message appears describing the problem. If all field values are acceptable,
then the CSR output appears in the Output Request box.
The private key is created and stored in encrypted form on the Nortel
SNAS 4050 using the specified certificate number.
4
5
6
Save the CSR to a file.
a
Click Copy to copy the Output Request text.
b
Paste the CA request output into a text editor.
c
Save the file with a .csr extension. Nortel recommends using a file name
that indicates the server on which the certificate is to be used.
Submit the CSR to a CA such as Entrust or VeriSign.
a
In a text editor, open the .csr file you created in step 4.
b
Copy the entire CSR, including the -----BEGIN CERTIFICATE
REQUEST----- and -----END CERTIFICATE REQUEST----- lines.
c
Use your web browser to access the CA web site and follow the online
instructions. The process for submitting the CSR varies with each CA.
When prompted, paste the CSR as required in the CA online request
process. If the CA requires you to identify a server software vendor whose
software you used to generate the CSR, specify Apache.
The CA processes the CSR and returns a signed certificate. Create a backup
copy of the certificate.
The certificate is ready to be added into the Nortel SNAS 4050 cluster (see
“Importing a certificate or key using the SREM” on page 603).
Importing a certificate or key using the SREM
You can import certificates and private keys into the Nortel SNAS 4050 using
TFTP, FTP, SCP, or SFTP. For information about the formats supported for
import, see “Key and certificate formats” on page 571.
Nortel Secure Network Access Switch 4050 User Guide
604 Chapter 11 Managing certificates
To import a certificate and private key into the Nortel SNAS 4050, perform the
following steps.
1
Upload the certificate file and key file to the file exchange server.
Note: You can arrange to include your private key in the certificate file.
When the Nortel SNAS 4050 retrieves the specified certificate file from
the file exchange server, the Nortel SNAS 4050 software analyzes the
contents and automatically adds the private key, if present.
2
Select the Certificates > certificate > Import Certificate tab.
The Import Certificate screen appears (see Figure 175).
Figure 175 Import Certificate screen
320818-A
Chapter 11 Managing certificates 605
3
Enter the import information in the applicable fields.
Table 126 describes the Import Certificate fields.
Table 126 Import Certificate fields
Field
Description
Protocol
The file import protocol. The options are TFTP, FTP,
SCP, SFTP. The default is FTP.
Host
The host name or IP address of the file exchange
server.
Filename
The name of the file on the file exchange server.
Username
For FTP, SCP, and SFTP, the user name to access the
file exchange server.
For anonymous mode, the username is anonymous.
Password
For FTP, SCP, and SFTP, the password to access the
file exchange server.
For anonymous mode, the Nortel SNAS 4050 uses the
following string as the password (for logging purposes):
admin@<hostname>.isd.
Password phrase
If the key is password protected, the password phrase
specified when the key was created or exported.
4
Click Apply on the toolbar to import the certificate.
5
Click Commit on the toolbar to save the imported certificate on the Nortel
SNAS 4050.
The certificate and private key are now fully installed.
Displaying or saving a certificate and key using the SREM
You can display the current certificate and private key and then save copies as
backup or for export to another device.
When you display the certificate and private key, you have the option to protect it
with a password phrase. Nortel recommends adding a password phrase, because
this adds an extra layer of security.
Save the certificate and private key by copying and pasting into a text editor, then
saving the text file with a .PEM extension.
Nortel Secure Network Access Switch 4050 User Guide
606 Chapter 11 Managing certificates
To display the current certificate and key or save a copy, perform the following
steps:
1
Select the Certificates > certificate > Display Certificate tab.
The Display Certificate screen appears (see Figure 176).
Figure 176 Display Certificate screen
320818-A
Chapter 11 Managing certificates 607
2
If you want to encrypt the key, specify a password in the applicable fields.
If you specify a password phrase, the password phrase must be provided on all
occasions in future when the private key file is accessed (for example, when
adding, importing, or exporting private keys and certificates).
Table 127 describes the Display Certificate fields.
Table 127 Display Certificates fields
Field
Description
Private Key Password
Specifies the password phrase used to encrypt the
certificate.
Confirm
Confirms the password phrase used to encrypt the
certificate.
3
Click Display.
The private key and certificate are displayed in the text box.
4
Click Copy.
5
Paste the private key and certificate into a text editor.
6
Save the file with a .PEM extension.
To save a certificate and key in another format, use the Export Certificate screen
(see “Exporting a certificate and key from the Nortel SNAS 4050 using the
SREM” on page 607).
Exporting a certificate and key from the Nortel SNAS 4050
using the SREM
You can export certificate files and key files from the Nortel SNAS 4050 using
TFTP, FTP, SCP, or SFTP. For information about the formats supported for export,
see “Key and certificate formats” on page 571.
Nortel Secure Network Access Switch 4050 User Guide
608 Chapter 11 Managing certificates
To export a certificate and key from the Nortel SNAS 4050, perform the following
steps.
1
Select the Certificates > certificate > Export Certificate tab.
The Export Certificate screen appears (see Figure 177).
Figure 177 Export Certificate screen
320818-A
Chapter 11 Managing certificates 609
2
Enter the export information in the applicable fields.
Table 128 describes the Export Certificate fields.
Table 128 Export Certificate fields
Field
Description
Protocol
The file import protocol. The options are TFTP, FTP,
SCP, SFTP. The default is FTP.
Host
The host name or IP address of the file exchange
server.
Format
The key and certificate format in which you want to
export the key and certificate. Valid options are:
• PEM
• DER
• NET
• PKCS12 (also known as PFX)
The PEM and PKCS12 formats always combine the
private key and certificate in the same file.
Nortel recommends using the PKCS12 format. Most
web browsers accept importing a combined key and
certificate file in the PKCS12 format.
The formats have different capabilities regarding
private key encryption and the ability to save the key
and certificate in separate files. For more information
about the formats, see “Key and certificate formats” on
page 571.
Certificate File
The name of the certificate file on the file exchange
server.
Key File
The name of the key file on the file exchange server.
If you are using a format that saves the private key and
certificate in the same file, this field is not needed.
Username
For FTP, SCP, and SFTP, the user name to access the
file exchange server.
For anonymous mode, the username is anonymous.
Password
For FTP, SCP, and SFTP, the password to access the
file exchange server.
For anonymous mode, the Nortel SNAS 4050 uses the
following string as the password (for logging purposes):
admin@<hostname>.isd.
Password Phrase
The password phrase to encrypt the private key.
Nortel Secure Network Access Switch 4050 User Guide
610 Chapter 11 Managing certificates
3
Click Apply on the toolbar to export the certificate.
The certificate and private key are immediately exported to the specified host.
Viewing certificate information using the SREM
Certificate information is distributed over three screens. To view configuration
details, expiration dates, subject settings, or other details of a certificate, choose
from the following tasks:
•
•
•
“Viewing configuration details” on page 610
“Viewing general information” on page 612
“Viewing certificate subject settings” on page 614
Viewing configuration details
To view configuration details about a certificate on the Nortel SNAS 4050 cluster,
select the Certificates > certificate > Configuration tab.
320818-A
Chapter 11 Managing certificates 611
The Configuration screen appears (see Figure 172).
Figure 178 Certificate Configuration screen
Table 129 describes the certificate Configuration fields.
Table 129 Certificate Configuration fields
Field
Description
Index
An integer in the range 1 to 1500 that uniquely
identifies the certificate in the Nortel SNAS 4050
domain.
Certificate Name
Names or renames the certificate, as a mnemonic aid.
Key Info
Displays information about how the private key
associated with the currently selected certificate is
protected. For the Nortel SNAS 4050, private keys are
protected by the cluster.
Nortel Secure Network Access Switch 4050 User Guide
612 Chapter 11 Managing certificates
Table 129 Certificate Configuration fields
Field
Description
Key Size
Displays the key size of the private key in the current
certificate.
Key Status
Confirms whether the key and certificate match.
Details
Displays detailed information about the subject part of
the current certificate.
Viewing general information
To view basic information about a certificate on the Nortel SNAS 4050 cluster,
select the Certificates > certificate > Info tab.
320818-A
Chapter 11 Managing certificates 613
The Info screen appears (see Figure 179).
Figure 179 Info screen
Table 130 describes the Info fields.
Table 130 Info fields
Field
Description
Serial Number
The serial number of the certificate.
Expiration Time
The expiration time and date of the certificate.
Country
The two-letter ISO code for the country where the web
server is located. For current information about ISO
country codes, see http://www.iana.org.
State/Province
The name of the state or province where the head
office of the organization is located. Enter the full name
of the state or province.
Nortel Secure Network Access Switch 4050 User Guide
614 Chapter 11 Managing certificates
Table 130 Info fields
Field
Description
Locality
The name of the city where the head office of the
organization is located.
Organization
The registered name of the organization. The
organization must own the domain name that appears
in the common name of the web server. Do not
abbreviate the organization name and do not use any
of the following characters:
<>~!@#$%^*/\()?
Organization Unit
The name of the department or group that uses the
secure web server.
Common Name
The name of the web server as it appears in the URL.
The name must be the same as the domain name of
the web server that is requesting a certificate. If the
web server name does not match the common name in
the certificate, some browsers will refuse a secure
connection with your site. Do not enter the protocol
specifier (http://) or any port numbers or pathnames in
the common name. Wildcards (such as * or ?) and IP
address are not allowed.
Viewing certificate subject settings
To view subject settings for a certificate on the Nortel SNAS 4050 cluster, select
the Certificates > certificate > Subject tab.
320818-A
Chapter 11 Managing certificates 615
The Subject screen appears (see Figure 180).
Figure 180 Subject screen
Table 131 describes the Subject fields.
Table 131 Subject fields
Field
Description
Country
The two-letter ISO code for the country where the web
server is located. For current information about ISO
country codes, see http://www.iana.org.
State/Province
The name of the state or province where the head
office of the organization is located. Enter the full name
of the state or province.
Locality
The name of the city where the head office of the
organization is located.
Nortel Secure Network Access Switch 4050 User Guide
616 Chapter 11 Managing certificates
Table 131 Subject fields
320818-A
Field
Description
Organization
The registered name of the organization. The
organization must own the domain name that appears
in the common name of the web server. Do not
abbreviate the organization name and do not use any
of the following characters:
<>~!@#$%^*/\()?
Organization Unit
The name of the department or group that uses the
secure web server.
Common Name
The name of the web server as it appears in the URL.
The name must be the same as the domain name of
the web server that is requesting a certificate. If the
web server name does not match the common name in
the certificate, some browsers will refuse a secure
connection with your site. Do not enter the protocol
specifier (http://) or any port numbers or pathnames in
the common name. Wildcards (such as * or ?) and IP
address are not allowed.
Email Address
Specifies the user’s e-mail address.
617
Chapter 12
Configuring SNMP
This chapter includes the following topics:
Topic
Page
Configuring SNMP using the CLI
618
Roadmap of SNMP commands
619
Configuring SNMP settings using the CLI
620
Configuring the SNMP v2 MIB using the CLI
621
Configuring the SNMP community using the CLI
622
Configuring SNMPv3 users using the CLI
623
Configuring SNMP notification targets using the CLI
626
Configuring SNMP events using the CLI
627
Configuring SNMP settings using the SREM
631
Configuring SNMP using the SREM
632
Configuring SNMP targets using the SREM
634
Configuring SNMPv3 users using the SREM
640
Configuring SNMP events using the SREM
647
Nortel Secure Network Access Switch 4050 User Guide
618 Chapter 12 Configuring SNMP
Simple Network Management Protocol (SNMP) is a set of protocols for managing
complex networks. SNMP works by sending messages, called protocol data units
(PDU), to different parts of a network. The SNMP-compliant agents on the Nortel
SNAS 4050 devices store data about themselves in Management Information
Bases (MIB) and return this data to the SNMP requesters.
There is one SNMP agent on each Nortel SNAS 4050 device, and the agent listens
to the Real IP address (RIP) of that particular device. On the Nortel SNAS 4050
that currently holds the cluster Management IP address (MIP), the SNMP agent
also listens to the MIP.
The SNMP agent supports SNMP version 1, version 2c, and version 3.
Notification targets (the SNMP managers receiving trap messages sent by the
agent) can be configured to use SNMP v1, v2c, and v3. The default is SNMP v2c.
You can specify any number of notification targets on the Nortel SNAS 4050.
For information about the MIBs supported on the Nortel SNAS 4050, see
Appendix C, “Supported MIBs,” on page 875.
Configuring SNMP using the CLI
To configure SNMP for the Nortel SNA network, access the SNMP menu by
using the following command:
/cfg/sys/adm/snmp
From the SNMP menu, you can configure and manage the following:
•
•
•
•
•
320818-A
general settings for SNMP management of the cluster (see “Configuring
SNMP settings using the CLI” on page 620)
parameters in the standard SNMPv2 MIB (see “Configuring the SNMP v2
MIB using the CLI” on page 621)
monitor, control, and trap community names (see “Configuring the SNMP
community using the CLI” on page 622)
SNMPv3 users (see “Configuring SNMPv3 users using the CLI” on
page 623)
SNMP managers (see “Configuring SNMP notification targets using the CLI”
on page 626)
Chapter 12 Configuring SNMP 619
•
SNMP monitors and events (see “Configuring SNMP events using the CLI”
on page 627)
Roadmap of SNMP commands
The following roadmap lists the CLI commands to configure SNMP. Use this list
as a quick reference or click on any entry for more information:
Command
Parameter
/cfg/sys/adm/snmp
ena
dis
versions <v1|v2c|v3>
/cfg/sys/adm/snmp/snmpv2-mib
sysContact <contact>
snmpEnable disabled|enabled
/cfg/sys/adm/snmp/community
read <name>
write <name>
trap <name>
/cfg/sys/adm/snmp/users
<user ID>
name <name>
seclevel none|auth|priv
permission get|set|trap
authproto md5|sha
authpasswd <password>
privproto des|aes
privpasswd <password>
del
/cfg/sys/adm/snmp/target
<target ID>
ip <IPaddr>
port <port>
version v1|v2c|v3
del
Nortel Secure Network Access Switch 4050 User Guide
620 Chapter 12 Configuring SNMP
Command
Parameter
/cfg/sys/adm/snmp/event
addmonitor [<options>] -b <name>
<OID> <op> <value>
addmonitor [<options>] -t <name>
<OID> <value and event>
addmonitor [<options>] -x <name>
<OID> [present|absent| changed]
delmonitor <name>
addevent [-c <comment>] <name>
<notification> [<OID...>]
delevent <name>
list
Configuring SNMP settings using the CLI
To configure SNMP management of the Nortel SNAS 4050 cluster, use the
following command:
/cfg/sys/adm/snmp
The SNMP menu displays.
The SNMP menu includes the following options:
/cfg/sys/adm/snmp
followed by:
320818-A
ena
Enables network management using SNMP. The
default is enabled.
dis
Disables network management using SNMP.
Chapter 12 Configuring SNMP 621
/cfg/sys/adm/snmp
followed by:
versions <v1|v2c|v3>
Specifies the SNMP versions allowed. Enter one or
more of the following options:
• v1 — SNMP version 1
• v2c — SNMP version 2c
• v3 — SNMP version 3
To configure support for multiple versions, use a
comma to separate the entries.
The default is all versions (v1, v2c, v3).
snmpv2-mib
Accesses the SNMPv2-MIB menu, in order to
configure parameters in the standard SNMP v2 MIB for
the system (see “Configuring the SNMP v2 MIB using
the CLI” on page 621).
community
Accesses the SNMP Community menu, in order to
configure the community aspects of SNMP monitoring
(see “Configuring the SNMP community using the CLI”
on page 622).
users
Accesses the SNMP User menu, in order to manage
SNMPv3 users (see “Configuring SNMPv3 users using
the CLI” on page 623).
target
Accesses the Notification Target menu, in order to
configure the notification target aspects of SNMP
monitoring (see “Configuring SNMP notification targets
using the CLI” on page 626).
event
Accesses the Event menu, in order to create custom
monitoring definitions for the objects in the
DISMAN-EVENT-MIB (see “Configuring SNMP
notification targets using the CLI” on page 626).
Configuring the SNMP v2 MIB using the CLI
To configure parameters in the standard SNMPv2 MIB, use the following
command:
/cfg/sys/adm/snmp/snmpv2-mib
The SNMPv2-MIB menu displays.
Nortel Secure Network Access Switch 4050 User Guide
622 Chapter 12 Configuring SNMP
The SNMPv2-MIB menu includes the following options:
/cfg/sys/adm/snmp/snmpv2-mib
followed by:
sysContact <contact>
Designates a contact person for the managed Nortel
SNAS 4050 cluster.
• contact is a string specifying the designated
contact person’s name, together with information
about how to contact this person.
snmpEnable
disabled|enabled
Enables or disables generating authentication failure
traps. The default is disabled.
Configuring the SNMP community using the CLI
To configure the community aspects of SNMP monitoring, use the following
command:
/cfg/sys/adm/snmp/community
The SNMP Community menu displays.
The SNMP Community menu includes the following options:
/cfg/sys/adm/snmp/community
followed by:
320818-A
read <name>
Specifies the monitor community name that grants read
access to the MIB. If you do not specify a monitor
community name, read access is not granted.
The default monitor community name is public.
write <name>
Specifies the control community name that grants read
and write access to the MIB. If you do not specify a
control community name, neither read nor write access
is granted.
trap <name>
Specifies the trap community name that accompanies
trap messages sent to the SNMP manager. If you do
not specify a trap community name, the sending of trap
messages is disabled.
The default trap community name is trap.
Chapter 12 Configuring SNMP 623
Configuring SNMPv3 users using the CLI
The Nortel SNAS 4050 manages SNMPv3 users based on the User-based Security
Model (USM) for SNMP version 3. For more information about USM, see
RFC2274.
To manage SNMPv3 users in the Nortel SNAS 4050 configuration, use the
following command:
/cfg/sys/adm/snmp/users <user ID>
where user ID is an integer in the range 1 to 1023 that uniquely identifies the
SNMPv3 user in the Nortel SNAS 4050 cluster.
When you first create the user, you must enter the user ID. After you have created
the user, you can use either the ID or the name to access the user for configuration.
When you first create the user, you are prompted to enter the following
parameters:
•
•
user name — a string that uniquely identifies the USM user in the Nortel
SNAS 4050 cluster. The maximum length of the string is 255 characters.
After you have defined a name for the user, you can use either the user name
or the user ID to access the SNMP User menu.
security level — the degree of SNMP USM security. Valid options are:
• none — SNMP access is granted without authentication.
• auth — SNMP user must provide a verified password before SNMP
access is granted. You are later prompted to specify the required password
(auth password). SNMP information is transmitted in plain text.
• priv — SNMP user must provide a verified password before SNMP
access is granted, and all SNMP information is encrypted with the user’s
individual key. You are later prompted to specify the required password
(auth password) and encryption key (priv password).
The default is priv.
•
permission — the USM user’s privileges. Valid options are:
• get — USM user is authorized to perform SNMP get requests (read
access to the MIB).
Nortel Secure Network Access Switch 4050 User Guide
624 Chapter 12 Configuring SNMP
•
•
set — USM user is authorized to perform SNMP set requests (write
access to the MIB). Write access automatically implies read access as
well.
• trap — USM user is authorized to receive trap event messages and alarm
messages.
authentication protocol — the protocol to be used to authenticate the USM
user. Valid options are:
• md5
• sha
The default is md5.
•
•
auth password — a string of at least eight characters specifying the password
for USM user authentication. The password is required if the security level is
set to auth or priv.
privacy protocol — the protocol used for encryption. Valid options are:
• des
• aes
The default is des.
•
priv password — a string of at least eight characters specifying the USM
user’s individual encryption key. The password is required if the security level
is set to priv.
The SNMP User menu displays.
320818-A
Chapter 12 Configuring SNMP 625
The SNMP User menu includes the following options:
/cfg/sys/adm/snmp/users <user ID>
followed by:
name <name>
Names or renames the USM user. After you have
defined a name for the user, you can use either the
user name or the user ID to access the SNMP User
menu.
• name is a string that must be unique in the cluster.
The maximum length of the string is 255
characters.
seclevel
none|auth|priv
Specifies the degree of SNMP USM security. Valid
options are:
• none — SNMP access is granted without
authentication.
• auth — the SNMP user must provide a verified
password before SNMP access is granted. You are
later prompted to specify the required password
(auth password). SNMP information is transmitted
in plain text.
• priv — the SNMP user must provide a verified
password before SNMP access is granted, and all
SNMP information is encrypted with the user’s
individual key. You are later prompted to specify the
required password (auth password) and encryption
key (priv password).
The default is priv.
permission
get|set|trap
Specifies the USM user’s privileges. Valid options are:
• get — USM user is authorized to perform SNMP
get requests (read access to the MIB).
• set — USM user is authorized to perform SNMP
set requests (write access to the MIB). Write
access automatically implies read access as well.
• trap — USM user is authorized to receive trap
event messages and alarm messages.
Enter the desired permissions, separated by a
comma (,).
authproto md5|sha
Specifies the protocol to be used to authenticate the
USM user. Valid options are:
• md5
• sha
The default is md5.
Nortel Secure Network Access Switch 4050 User Guide
626 Chapter 12 Configuring SNMP
/cfg/sys/adm/snmp/users <user ID>
followed by:
authpasswd <password> Specifies the password for USM user authentication.
The password is required if the security level is set to
auth or priv.
• password is a string that must be at least eight
characters long.
privproto des|aes
Specifies the protocol used for encryption. Valid options
are:
• des
• aes
The default is des.
privpasswd <password> Specifies the USM user’s individual encryption key. The
password is required if the security level is set to priv.
• password is a string that must be at least eight
characters long.
del
Removes the USM user from the configuration.
Configuring SNMP notification targets using the CLI
SNMP managers function as the notification targets for SNMP monitoring.
To configure notification targets, use the following command:
/cfg/sys/adm/snmp/target <target ID>
where target ID is a positive integer that uniquely identifies the notification
target in the cluster.
The Notification Target menu displays.
320818-A
Chapter 12 Configuring SNMP 627
The Notification Target menu includes the following options:
/cfg/sys/adm/snmp/target <target ID>
followed by:
ip <IPaddr>
Specifies the IP address to which trap messages are
sent.
• IPaddr is the IP address of the SNMP manager.
port <port>
Specifies the TCP port used by the SNMP manager.
The default is port 162.
version v1|v2c|v3
Specifies the SNMP version used by the SNMP
manager. Valid options are:
• v1 — SNMP version 1
• v2c — SNMP version 2c
• v3 — SNMP version 3
The default is v2c.
del
Removes the current SNMP manager from the Nortel
SNAS 4050 configuration.
Configuring SNMP events using the CLI
The Nortel SNAS 4050 supports three kinds of SNMP monitors, as defined in the
DISMAN-EVENT-MIB:
•
•
•
boolean — checks the value of a monitored object identifier (OID) against a
specific value, and triggers an event if the result matches a specified
operation.
threshold — compares a monitored OID against a range of values, and
triggers events if the comparison determines that the OID value is rising too
quickly, falling too quickly, or falls outside certain boundaries
existence — checks the condition of a monitored OID to determine if it is
present, absent, or changed, and triggers an event if the result matches the
specified condition
To configure monitors and events defined in the DISMAN-EVENT-MIB, use the
following command:
/cfg/sys/adm/snmp/event
The event menu displays.
Nortel Secure Network Access Switch 4050 User Guide
628 Chapter 12 Configuring SNMP
The event menu includes the following options:
/cfg/sys/adm/snmp/event
followed by:
addmonitor
[<options>] -b <name>
<OID> <op> <value>
320818-A
Adds a boolean monitor and trigger as defined in the
DISMAN-EVENT-MIB.
Valid <options> are:
• -c <comment> — adds a comment
• -f <frequency> — the sampling interval, in
seconds. The default is 600 (10 minutes).
• -o <OID> — additional objects to send in the
event
• -e <EventName> — the name of a notification
event
• -d <OID> — the delta discontinuity OID
• -D timeTicks|timeStamp|dateAndTime
— the delta discontinuity type
Other parameters are:
• name — a unique name you assign to the monitor,
for identification
• OID — the object identifier (or symbolic name) to
monitor
• op — the operator. Valid options are:
!= (not equals), == (equals), <= (less than or equal
to), >= (greater than or equal to), < (less than), >
(greater than)
• value — an integer indicating the value against
which the operation will be performed
Chapter 12 Configuring SNMP 629
/cfg/sys/adm/snmp/event
followed by:
addmonitor
[<options>] -t <name>
<OID> <value and
event>
Adds a threshold monitor and trigger as defined in the
DISMAN-EVENT-MIB.
Valid <options> are:
• -c <comment> — adds a comment
• -f <frequency> — the sampling interval, in
seconds. The default is 600 (10 minutes).
• -o <OID> — additional objects to send in the
event
• -d <OID> — the delta discontinuity OID
• -D timeTicks|timeStamp|dateAndTime
— the delta discontinuity type
Other parameters are:
• name — a unique name you assign to the monitor,
for identification
• OID — the object identifier (or symbolic name) to
monitor
• value and event — a combination of an
integer and an event condition, where the integer
represents the event condition threshold that will
trigger notification. Valid combinations are:
<LowVal> FallingEvent
<HighVal> RisingEvent
<DeltaLowVal> DeltaFallingEvent
<DeltaHighVal> DeltaRisingEvent
Nortel Secure Network Access Switch 4050 User Guide
630 Chapter 12 Configuring SNMP
/cfg/sys/adm/snmp/event
followed by:
320818-A
addmonitor
[<options>] -x <name>
<OID>
[present|absent|
changed]
Adds an existence monitor and trigger as defined in the
DISMAN-EVENT-MIB.
Valid <options> are:
• -c <comment> — adds a comment
• -f <frequency> — the sampling interval, in
seconds. The default is 600 (10 minutes).
• -o <OID> — additional objects to send in the
event
• -e <EventName> — the name of a notification
event
• -d <OID> — the delta discontinuity OID
• -D timeTicks|timeStamp|dateAndTime
— the delta discontinuity type
Other parameters are:
• name — a unique name you assign to the monitor,
for identification
• OID — the object identifier (or symbolic name) to
monitor
• present|absent|changed — indicates
whether the object being monitored is present,
absent, or has changed
delmonitor <name>
Removes the specified monitor from the configuration.
addevent [-c
<comment>] <name>
<notification>
[<OID...>]
Adds a notification event as defined in the
DISMAN-EVENT-MIB.
• -c <comment> — adds a comment (optional)
• name — a unique name you assign to the event, for
identification
• notification — the OID (or symbolic name) of
the notification
• OID... — additional notification OIDs (optional)
delevent <name>
Removes the specified event from the configuration.
list
Displays configured monitors and events. For monitors,
displays the monitor name, OID, and type. For events,
displays the event name, notification OID, and
comment.
Chapter 12 Configuring SNMP 631
Configuring SNMP settings using the SREM
This section contains information about the following topics:
•
•
•
•
“Configuring SNMP using the SREM” on page 632
“Configuring SNMP targets using the SREM” on page 634
“Configuring SNMPv3 users using the SREM” on page 640
“Configuring SNMP events using the SREM” on page 647
Nortel Secure Network Access Switch 4050 User Guide
632 Chapter 12 Configuring SNMP
Configuring SNMP using the SREM
To configure SNMP, perform the following steps:
1
Select the System > Administrative > SNMP > Configuration tab.
The Configuration screen appears (see Figure 181).
Figure 181 SNMP Configuration
320818-A
Chapter 12 Configuring SNMP 633
2
Enter the SNMP Configuration information in the applicable fields. Table 132
describes the SNMP Configuration fields.
Table 132 SNMP Configuration fields
Field
Description
SONMP
When checked, enables support for SynOptics Network
Management Protocol (SONMP) network topology
information. The default is disabled (unchecked).
System Contact
Designates a contact person for the managed Nortel
SNAS 4050 cluster, together with information about how to
contact this person.
Authentication Traps
Enabled
When checked, enables generating authentication failure
traps. The default is disabled (unchecked).
SNMP Enabled
When checked, enables network management using
SNMP. The default is enabled.
Versions
Specifies the SNMP versions allowed. Check one or more
of the following options: v1 (SNMP version 1), v2c (SNMP
version 2c), v3 (SNMP version 3).
The default is all versions (v1, v2c, v3).
Read
Specifies the monitor community name that grants read
access to the MIB. If you do not specify a monitor
community name, read access is not granted. The default
monitor community name is public.
Write
Specifies the control community name that grants read and
write access to the MIB. If you do not specify a control
community name, neither read nor write access is granted.
Trap
Specifies the trap community name that accompanies trap
messages sent to the SNMP manager. If you do not specify
a trap community name, the sending of trap messages is
disabled. The default trap community name is trap.
3
Click Apply on the toolbar to send the current changes to the Nortel
SNAS 4050. Click Commit on the toolbar to save the changes permanently.
Nortel Secure Network Access Switch 4050 User Guide
634 Chapter 12 Configuring SNMP
Configuring SNMP targets using the SREM
SNMP managers function as the notification targets for SNMP monitoring.
To configure SNMP notification targets, choose from one of the following tasks:
•
•
•
320818-A
“Adding SNMP targets” on page 635
“Managing SNMP targets” on page 638
“Removing SNMP targets” on page 639
Chapter 12 Configuring SNMP 635
Adding SNMP targets
To add an SNMP target, perform the following steps:
1
Select the System > Administrative > SNMP > SNMP Targets > SNMP
Target Table tab.
The SNMP Target Table appears (see Figure 182).
Figure 182 SNMP Target Table
Nortel Secure Network Access Switch 4050 User Guide
636 Chapter 12 Configuring SNMP
2
Click Add.
The Add SNMP Target dialog box appears (see Figure 183).
Figure 183 Add SNMP Target
320818-A
Chapter 12 Configuring SNMP 637
3
Enter the SNMP target information in the applicable fields. Table 133
describes the SNMP Target fields.
Table 133 SNMP Target fields
Field
Description
Index
Specifies a unique integer to identify this SNMP target on
the Nortel SNAS 4050.
This field cannot be modified after an SNMP Target is
added.
IP Address
Specifies the IP address of the SNMP manager, to which
trap messages are sent.
Port
Specifies the TCP port number used by the SNMP
manager.
The default value is port 162.
Version
Specifies the SNMP version used by the SNMP manager.
The options are:
• v1 — use SNMPv1
• v2c — use SNMPv2c
• v3 — use SNMPv3
The default value is v2c.
SNMPv3 User
Specifies the USM user name.
A list of all current SNMPv3 users is provided to choose
from. To leave the association empty, select the
<No selection> option.
This field is only available if the SNMP version selected is
SNMPv3.
4
Click Apply.
The new target appears in the table.
5
Click Apply on the toolbar to send the current changes to the Nortel
SNAS 4050. Click Commit on the toolbar to save the changes permanently.
Nortel Secure Network Access Switch 4050 User Guide
638 Chapter 12 Configuring SNMP
Managing SNMP targets
To manage SNMP targets, perform the following steps:
1
Select the System > Administrative > SNMP > SNMP Targets > target >
Target Settings tab.
The Target Settings screen appears (see Figure 184).
Figure 184 Target Settings
320818-A
Chapter 12 Configuring SNMP 639
2
Modify the SNMP Target information in the applicable fields. Table 134
describes the SNMP Target fields.
Table 134 SNMP Target fields
Field
Description
Index
Specifies a unique integer to identify this SNMP target on
the Nortel SNAS 4050.
This field cannot be modified after an SNMP Target is
added.
IP Address
Specifies the IP address of the SNMP manager, to which
trap messages are sent.
Port
Specifies the TCP port number used by the SNMP
manager.
Version
Specifies the SNMP version used by the SNMP manager.
The options are:
• v1 — use SNMPv1
• v2c — use SNMPv2c
• v3 — use SNMPv3
SNMPv3 User
Specifies the USM user name.
A list of all current SNMPv3 users is provided to choose
from. To leave the association empty, select the <No
selection> option.
This field is only available if the SNMP version selected is
SNMPv3.
3
Click Apply on the toolbar to send the current changes to the Nortel
SNAS 4050. Click Commit on the toolbar to save the changes permanently.
Removing SNMP targets
To delete an existing SNMP target, perform the following steps:
1
Select the System > Administrative > SNMP > SNMP Targets > SNMP
Target Table tab.
The SNMP Target Table appears (see Figure 182 on page 635).
2
Select the SNMP target to remove from the SNMP Target Table.
3
Click Delete.
Nortel Secure Network Access Switch 4050 User Guide
640 Chapter 12 Configuring SNMP
A dialog box appears asking for confirmation.
4
Click Yes.
5
Click Apply on the toolbar to send the current changes to the Nortel
SNAS 4050. Click Commit on the toolbar to save the changes permanently.
Configuring SNMPv3 users using the SREM
The Nortel SNAS 4050 manages SNMPv3 users based on the User-based Security
Model (USM) for SNMP version 3. For more information about USM, see
RFC2274.
To configure SNMPv3 users, choose from one of the following tasks:
•
•
•
320818-A
“Adding SNMPv3 users” on page 641
“Managing SNMPv3 users” on page 644
“Removing SNMPv3 users” on page 646
Chapter 12 Configuring SNMP 641
Adding SNMPv3 users
To add an SNMPv3 user, perform the following steps:
1
Select the System > Administrative > SNMP > SNMPv3 Users > SNMPv3
User Table tab.
The SNMPv3 User Table appears (see Figure 185).
Figure 185 SNMPv3 User Table
Nortel Secure Network Access Switch 4050 User Guide
642 Chapter 12 Configuring SNMP
2
Click Add.
The Add SNMPv3 User dialog box appears (see Figure 186).
Figure 186 Add SNMPv3 User
320818-A
Chapter 12 Configuring SNMP 643
3
Enter the SNMPv3 User information in the applicable fields. Table 135
describes the SNMPv3 User fields.
Table 135 Add SNMPv3 User fields
Field
Description
Index
Specifies a unique integer in the range 1 to 1023 to identify
this SNMPv3 User on the Nortel SNAS 4050 cluster.
This field cannot be changed after an SNMPv3 user is
added.
Name
Specifies a name for the USM user. The name must be
unique in the cluster.
Security Level
Specifies the degree of SNMP USM security. Valid options
are:
• none — SNMP access is granted without
authentication.
• auth — the SNMP user must provide a verified
password before SNMP access is granted. You are
later prompted to specify the required password (auth
password). SNMP information is transmitted in plain
text.
• priv — the SNMP user must provide a verified
password before SNMP access is granted, and all
SNMP information is encrypted with the user’s
individual key. You are later prompted to specify the
required password (auth password) and encryption key
(priv password).
The default is priv.
Authentication Password
Specifies the password for USM user authentication. The
password is required if the security level is set to auth or
priv. The password must be at least eight characters long.
Privacy Password
Specifies the USM user’s individual encryption key. The
password is required if the security level is set to priv. The
password must be at least eight characters long.
Authentication Protocol
Specifies the protocol to be used to authenticate the USM
user. Valid options are:
• md5
• sha
The default is md5.
Privacy Protocol
Specifies the protocol used for encryption. Valid options
are:
• des
• aes
The default is des.
Nortel Secure Network Access Switch 4050 User Guide
644 Chapter 12 Configuring SNMP
4
Click Apply.
The new SNMPv3 user appears in the table.
5
Click Apply on the toolbar to send the current changes to the Nortel
SNAS 4050. Click Commit on the toolbar to save the changes permanently.
Managing SNMPv3 users
To manage SNMPv3 users, or configure permission sets for a new SNMPv3 user,
perform the following steps:
1
Select the System > Administrative > SNMP > SNMPv3 Users > user >
User Settings tab.
The User Settings screen appears (see Figure 187).
Figure 187 User Settings
320818-A
Chapter 12 Configuring SNMP 645
2
Modify SNMPv3 User information in the applicable fields, as required.
Table 135 describes the SNMPv3 User Settings fields.
Table 136 User Settings fields (Sheet 1 of 2)
Field
Description
Index
Specifies a unique integer in the range 1 to 1023 to identify
this SNMPv3 User on the Nortel SNAS 4050 cluster.
This field cannot be changed after an SNMPv3 user is
added.
Name
Specifies a name for the USM user. The name must be
unique in the cluster.
Security Level
Specifies the degree of SNMP USM security. Valid options
are:
• none — SNMP access is granted without
authentication.
• auth — the SNMP user must provide a verified
password before SNMP access is granted. You are
later prompted to specify the required password (auth
password). SNMP information is transmitted in plain
text.
• priv — the SNMP user must provide a verified
password before SNMP access is granted, and all
SNMP information is encrypted with the user’s
individual key. You are later prompted to specify the
required password (auth password) and encryption key
(priv password).
Permission
Specifies the USM user’s privileges. Valid options are:
• get — USM user is authorized to perform SNMP get
requests (read access to the MIB).
• set — USM user is authorized to perform SNMP set
requests (write access to the MIB). Write access
automatically implies read access as well.
• trap — USM user is authorized to receive trap event
messages and alarm messages.
New SNMPv3 users are not granted any priviledges
initially.
Authentication Password
Specifies the password for USM user authentication. The
password is required if the security level is set to auth or
priv. The password must be at least eight characters long.
Privacy Password
Specifies the USM user’s individual encryption key. The
password is required if the security level is set to priv. The
password must be at least eight characters long.
Nortel Secure Network Access Switch 4050 User Guide
646 Chapter 12 Configuring SNMP
Table 136 User Settings fields (Sheet 2 of 2)
Field
Description
Authentication Protocol
Specifies the protocol to be used to authenticate the USM
user. Valid options are:
• md5
• sha
Privacy Protocol
Specifies the protocol used for encryption. Valid options
are:
• des
• aes
3
Click Apply on the toolbar to send the current changes to the Nortel
SNAS 4050. Click Commit on the toolbar to save the changes permanently.
Removing SNMPv3 users
To delete an existing SNMPv3 user, perform the following steps:
1
Select the System > Administrative > SNMP > SNMPv3 Users > SNMPv3
User Table tab.
The SNMPv3 User Table appears (see Figure 185 on page 641).
2
Select a user from the SNMPv3 Users Table.
3
Click Delete.
A dialog box appears for confirmation.
320818-A
4
Click Yes.
5
Click Apply on the toolbar to send the current changes to the Nortel
SNAS 4050. Click Commit on the toolbar to save the changes permanently.
Chapter 12 Configuring SNMP 647
Configuring SNMP events using the SREM
SNMP events can be added to monitor values or give notification of specific
object identifiers (OID). There are two types of SNMP events to configure, as
described in the following sections:
•
•
“Managing monitor events” on page 647
“Managing notification events” on page 655
Managing monitor events
To manage monitor events, select from the following tasks:
•
•
•
“Adding monitor events” on page 648
“Viewing configuration details of monitor events” on page 649
“Removing monitor events” on page 650
Once monitor events are added, they cannot be modified. To change the settings of
an existing monitor, first remove that monitor and then create a new monitor with
the desired changes.
There are three different types of monitors that can be added to the Nortel SNA
solution. To view a description and list of related fields for each monitor type,
choose from the following sections:
•
•
•
“Boolean monitors” on page 650
“Threshold monitors” on page 652
“Existence monitors” on page 654
Nortel Secure Network Access Switch 4050 User Guide
648 Chapter 12 Configuring SNMP
Adding monitor events
To add monitor events, perform the following steps:
1
Select the System > Administrative > SNMP > Event > Monitor Table tab.
The Monitor Table appears (see Figure 188).
Figure 188 Monitor Table
320818-A
Chapter 12 Configuring SNMP 649
2
Click Add.
The Add a Monitor dialog box appears. Depending on the type of monitor
selected, the fields displayed on the Add a Monitor dialog will differ slightly
(see Figure 189 on page 651, Figure 191 on page 654, and Figure 190 on
page 652).
3
Enter the Monitor information in the applicable fields. Table 137 describes the
Add a Monitor fields.
Table 137 Add a Monitor fields
Field
Description
Monitor type
Specifies the type of monitor to add. The options are:
• Boolean
• Threshold
• Existence
4
Click Apply.
The monitor event appears in the table.
5
Click Apply on the toolbar to send the current changes to the Nortel
SNAS 4050. Click Commit on the toolbar to save the changes permanently.
Viewing configuration details of monitor events
To view the configuration settings of an existing monitor event, perform the
following steps:
1
Select the System > Administrative > SNMP > Event > Monitor Table tab.
The Monitor Table appears (see Figure 188 on page 648).
2
Select the monitor to view from the Monitor Table.
The Configuration sub-tab appears, displaying settings for the selected
monitor underneath the Monitor Table.
Monitor settings cannot be edited after the monitor is created. To change settings
for an existing monitor, that monitor must first be removed and then recreated
with the correct settings.
Nortel Secure Network Access Switch 4050 User Guide
650 Chapter 12 Configuring SNMP
Depending on the type of monitor selected, the fields displayed on the
Configuration tab will change. For descriptions of the displayed fields, refer to the
appropriate section:
•
•
•
“Boolean monitors” on page 650
“Threshold monitors” on page 652
“Existence monitors” on page 654
Removing monitor events
To delete a monitor event, perform the following steps:
1
Select the System > Administrative > SNMP > Event > Monitor Table tab.
The Monitor Table appears (see Figure 188).
2
Select the monitor event to be removed from the Monitor Table.
3
Click Delete.
A confirmation dialog box appears.
4
Click Yes.
5
Click Apply on the toolbar to send the current changes to the Nortel
SNAS 4050. Click Commit on the toolbar to save the changes permanently.
Boolean monitors
Boolean monitors check the value of a monitored OID against a specific value,
and trigger an event if the result matches the desired operation.
320818-A
Chapter 12 Configuring SNMP 651
Figure 189 Add a Monitor: Boolean
Fields used to add and configure a Boolean monitor are listed in Table 138.
Table 138 Boolean monitor fields (Sheet 1 of 2)
Field
Description
Name
Specifies the name of this monitor.
Monitor OID
Specifies the OID value being monitored.
Operation
Specifies the operation used to create the boolean value.
Must be one of the following operations:
• equals
• notEquals
• lessThanOrEquals
• greaterThanOrEquals
• lessThan
• greaterThan
OID Value
Specifies the OID used for comparison.
Trigger Event
Specifies the event that is triggered if a successful
comparison is made.
Comment
Specifies a comment for this monitor.
Frequency
Specifies the sampling interval, in seconds. The default
value is 600.
Additional OIDs in Event
Specifies any additional OIDs for this monitor to trigger.
Nortel Secure Network Access Switch 4050 User Guide
652 Chapter 12 Configuring SNMP
Table 138 Boolean monitor fields (Sheet 2 of 2)
Field
Description
Delta Discontinuity OID
Specifies an OID to monitor for discontinuity.
Delta Discontinuity OID type Specifies the type of discontinuity to monitor for. The
options are:
• timeTicks
• timeStamp
• dateAndTime
For details on adding a Boolean monitor, see “Adding monitor events” on
page 648.
Threshold monitors
Threshold monitors compare a monitored OID against a range of values, and
triggers events if the comparison determines that the OID value is rising too
quickly, falling too quickly, or outside of certain boundaries.
Figure 190 Add a Monitor: Threshold
320818-A
Chapter 12 Configuring SNMP 653
Fields used to add and configure a Threshold monitor are listed in Table 139.
Table 139 Threshold monitor fields
Field
Description
Name
Specifies the name of this monitor.
Monitor OID
Specifies the OID value being monitored.
Low Value
Specifies the lowest acceptable value, beyond which an
event is triggered.
Falling Event
Specifies the event triggered when an OID value is less
than the specified Low Value.
High Value
Specifies the highest acceptable value, beyond which an
event is triggered.
Rising Event
Specifies the event triggered when an OID value is greater
than the specified High Value.
Delta Low Value
Specifies the greatest acceptable drop in value, before an
event is triggered.
Delta Falling Event
Specifies the event triggered when an OID value
decreases by more than the specified Delta Low Value.
Delta High Value
Specifies the greatest acceptable increase in value, before
an event is triggered.
Delta Rising Event
Specifies the event triggered when an OID value increases
by more than the specified Delta High Value.
Comment
Specifies a comment for this monitor.
Frequency
Specifies the sampling interval, in seconds. The default
value is 600.
Additional OIDs in Event
Specifies any additional OIDs for this monitor to trigger.
Delta Discontinuity OID
Specifies an OID to monitor for discontinuity.
Delta Discontinuity OID type Specifies the type of discontinuity to monitor for. The
options are:
• timeTicks
• timeStamp
• dateAndTime
For details on adding a Threshold monitor, see “Adding monitor events” on
page 648.
Nortel Secure Network Access Switch 4050 User Guide
654 Chapter 12 Configuring SNMP
Existence monitors
Existence monitors check the condition of a monitored OID to see determine if it
is present, missing, or changed. Events are triggered if the result matches the
desired condition.
Figure 191 Add a Monitor: Existence
Fields used to add and configure an Existence monitor are listed in Table 140.
Table 140 Existence monitor fields (Sheet 1 of 2)
320818-A
Field
Description
Name
Specifies the name of this monitor.
Monitor OID
Specifies the OID value being monitored.
Condition
Specifies the OID condition that will trigger an event. Must
be one of the following conditions:
• present
• missing
• changed
Trigger Event
Specifies the event that is triggered if the condition matchs
for the specified OID.
Comment
Specifies a comment for this monitor.
Frequency
Specifies the sampling interval, in seconds. The default
value is 600.
Additional OIDs in Event
Specifies any additional OIDs for this monitor to trigger.
Chapter 12 Configuring SNMP 655
Table 140 Existence monitor fields (Sheet 2 of 2)
Field
Description
Delta Discontinuity OID
Specifies an OID to monitor for discontinuity.
Delta Discontinuity OID type Specifies the type of discontinuity to monitor for. The
options are:
• timeTicks
• timeStamp
• dateAndTime
For details on adding a Existence monitor, see “Adding monitor events” on
page 648.
Managing notification events
To manage notification events, select from the following tasks:
•
•
“Adding notification events” on page 656
“Removing notification events” on page 658
Once notification events are added, they cannot be modified. To change the
settings of an existing notification event, first remove that notification and then
create a new notification event with the desired changes.
Nortel Secure Network Access Switch 4050 User Guide
656 Chapter 12 Configuring SNMP
Adding notification events
To add notification events, perform the following steps:
1
Select the System > Administrative > SNMP > Event > Notification Table
tab.
The Notification Table screen appears (see Figure 192).
Figure 192 Notification Table
320818-A
Chapter 12 Configuring SNMP 657
2
Click Add.
The Add a Notification Event dialog box appears (see Figure 193).
Figure 193 Add a Notification Event
3
Enter the Notification information in the applicable fields. Table 141
describes the Add a Notification fields.
Table 141 Add a Notification Event fields
Field
Description
Name
Specifies the notification event name.
Notification OIDs
Specifies the OID(s) that trigger this notification event.
Comment
Specifies a commentfor this notification event.
4
Click Apply.
The notification event appears in the table.
5
Click Apply on the toolbar to send the current changes to the Nortel
SNAS 4050. Click Commit on the toolbar to save the changes permanently.
Nortel Secure Network Access Switch 4050 User Guide
658 Chapter 12 Configuring SNMP
Removing notification events
To delete a notification event, perform the following steps:
1
Select the System > Administrative > SNMP > Event > Notification Table
tab.
The Notification Table appears (see Figure 192 on page 656).
2
Select the notification event to be removed.
The Configuration subtab appears, displaying details for the selected
notification event.
3
Click Delete.
A dialog box appears for confirmation.
320818-A
4
In the confirmation dialog box, click Yes.
5
Click Apply on the toolbar to send the current changes to the Nortel
SNAS 4050. Click Commit on the toolbar to save the changes permanently.
659
Chapter 13
Viewing system information and
performance statistics
This chapter includes the following topics:
Topic
Page
Viewing system information and performance statistics using the CLI
660
Roadmap of information and statistics commands
660
Viewing system information using the CLI
661
Viewing alarm events using the CLI
666
Viewing log files using the CLI
667
Viewing AAA statistics using the CLI
667
Viewing all statistics using the CLI
670
Viewing system information and performance statistics using the SREM
670
Viewing local information using the SREM
670
Viewing cluster information using the SREM
672
Viewing AAA statistics using the SREM
698
Viewing Ethernet statistics using the SREM
716
You can view current status information and events for the cluster and for
individual Nortel SNAS 4050 hosts. You can view AAA performance statistics for
the Nortel SNAS 4050 cluster as a whole or for individual hosts in the cluster
since the system was started.
Nortel Secure Network Access Switch 4050 User Guide
660 Chapter 13 Viewing system information and performance statistics
Viewing system information and performance statistics
using the CLI
To view current information about system status and the system configuration,
access the Information menu by using the following command:
/info
To view performance statistics for the cluster and for individual Nortel
SNAS 4050 hosts, access the Statistics menu by using the following command:
/stats
Roadmap of information and statistics commands
The following roadmap lists the CLI commands to view information and statistics
for the cluster. Use this list as a quick reference or click on any entry for more
information:
Command
Parameter
/info
certs
sys
sonmp
licenses [<domain ID>]
kick <domain ID> <username>
domain [<domain ID>]
switch [<domainid>] [<switchid>]
dist [<hostid>]
ip <domain ID> <IPaddr>
mac <MACaddr>
sessions [<domain ID> [<switch ID>
[<username-prefix>]]]
contlist [<Exclude buffers+cache
from mem util: [yes/no]>]
320818-A
Chapter 13 Viewing system information and performance statistics 661
Command
Parameter
local
ethernet
ports
alarms
/info/events
download <protocol> <server>
<filename>
list
/info/logs
download <protocol> <server>
<filename>
total
/stats/aaa
isdhost <host ID> <domain ID>
dump
/stats/dump
Viewing system information using the CLI
To view current information about system status and the system configuration, use
the following command:
/info
The Information menu displays.
Nortel Secure Network Access Switch 4050 User Guide
662 Chapter 13 Viewing system information and performance statistics
The Information menu includes the following options:
/info
followed by:
320818-A
certs
Displays information about all installed certificates,
including the certificate name, serial number, expiration
date, key size, and subject information for each
certificate.
sys
Displays information about the current system
configuration, including:
• for each Nortel SNAS 4050 host in the cluster, the
Real IP address (RIP), network mask, default
gateway address, static routes, and port
configuration
• system settings such as date and time, DNS
settings, Access List, and administrative
applications
• NTP, DNS, syslog, audit, and other servers
For information about configuring the system, see
“Configuring system settings” on page 457.
sonmp
Displays SynOptics Network Management Protocol
(SONMP) network topology information, including the
IP address, MAC address, chassis type, and state of all
Nortel SNAS 4050 and SONMP-enabled network
devices in the system.
licenses
[<domain ID>]
Displays information about the global license pool and
current usage, by license type and domain. For the
Nortel SNAS 4050, SSL is the only type of license. To
restrict the display to a specific domain, enter the
domain ID as part of the command.
Note: With Nortel Secure Network Access Switch
Software Release 1.0, there is only one domain in the
system.
Chapter 13 Viewing system information and performance statistics 663
/info
followed by:
kick <domain ID>
<username>
Allows the operator to log the specified user out of an
Nortel SNAS 4050 session. You are prompted to enter
the following information:
• domain ID — the index number that identifies
the domain
• username — the user’s logon name
To log out multiple users, enter an asterisk when
prompted for the user name. The system displays a list
of the users currently logged on, by automatically
assigned index number. Enter the index numbers
corresponding to the users you wish to log out.
For example, to log out users corresponding to index
numbers 1, 2, 3, and 5, enter 1-3,5.
domain [<domain ID>]
Displays information about the domain configuration,
such as the portal Virtual IP address (pVIP),
TunnelGuard settings, authentication schemes, groups,
client filters, SSL settings, portal display, network
access devices, and SSH key. To restrict the display to
a specific domain, enter the domain ID as part of the
command.
Note: With Nortel Secure Network Access Switch
Software Release 1.0, there is only one domain in the
system.
switch [<domainid>]
[<switchid>]
Displays information about the network access devices
in a domain, by device. Information includes the switch
type, IP address, NSNA communication port, Red
VLAN ID, health check settings, SSH key, and switch
status. The information is a subset of information
displayed by the /info/domain command.
dist [<hostid>]
Displays information about the network access device
and pVIP distribution, by domain.
ip <domain ID>
<IPaddr>
Searches the session table based on the specified
IP address and displays information about the client
session. You are prompted to provide the domain ID
and the IP address. The information includes: the
domain ID; the switch ID and port (in slot/port format);
the client’s user name (MAC address for an IP Phone);
the client’s current IP address; the source MAC
address; the date the client logged on (time is reported
if logon was today); the client device type; the client’s
current VLAN membership; and the Nortel SNAS 4050
host IP address (RIP). The options for device type are
phone or dynamic PC (dn_pc).
The information is the same as that displayed by the
/info/mac command.
Nortel Secure Network Access Switch 4050 User Guide
664 Chapter 13 Viewing system information and performance statistics
/info
followed by:
mac <MACaddr>
Displays session information for a client based on a
specified MAC address. You are prompted to provide
the MAC address. The information includes: the
domain ID; the switch ID and port (in slot/port format);
the client’s user name (MAC address for an IP Phone);
the client’s current IP address; the source MAC
address; the date the client logged on (time is reported
if logon was today); the client device type; the client’s
current VLAN membership; and the Nortel SNAS 4050
host IP address (RIP). The options for device type are
phone or dynamic PC (dn_pc).
The information is the same as that displayed by the
/info/ip command.
sessions [<domain ID> Displays information about currently active sessions.
The information for each session includes: the
[<switch ID>
[<username-prefix>]]] domain ID; the switch ID and port (in slot/port format);
the client’s user name (MAC address for an IP Phone);
the client’s current IP address; the source MAC
address; the date the client logged on (time is reported
if logon was today); the client device type; the client’s
current VLAN membership; and the portal IP address
through which the client logged on. The options for
device type are phone or dynamic PC (dn_pc).
To restrict the the display to a specific domain, enter
the domain ID as part of the command. To restrict the
the display to sessions originating from a specific
network access device, enter the domain ID and
switch ID as part of the command. To restrict the
display to specific clients, enter the domain ID,
switch ID, and user name as part of the command. Use
an asterisk (*) after the user name input to specify it as
a prefix.
contlist [<Exclude
buffers+cache from
mem util: [yes/no]>]
320818-A
Displays information about the Nortel SNAS 4050
controllers in the cluster. Information includes the RIP,
CPU usage, memory usage, and operational status of
each device. An asterisk (*) in the MIP column
indicates which Nortel SNAS 4050 device in the cluster
is currently is control of the MIP. An asterisk (*) in the
Local column indicates the particular Nortel
SNAS 4050 device to which you have connected. To
exclude buffers and cache from the memory usage
reported, enter the command as:
/info/contlist yes. To include buffers and
cache in the memory usage reported, enter the
command as: /info/contlist no. The default is
to include buffers and cache (no).
Chapter 13 Viewing system information and performance statistics 665
/info
followed by:
local
Displays the current software version, hardware
platform, up time (since last boot), IP address, and
Ethernet MAC address for the particular Nortel
SNAS 4050 device to which you have connected. If you
have connected to the MIP, the information relates to
the Nortel SNAS 4050 device in the cluster that is
currently in control of the MIP.
ethernet
Displays statistics for the Ethernet network interface
card (NIC) on the particular Nortel SNAS 4050 device
to which you have connected. If you have connected to
the MIP, the information relates to the Nortel
SNAS 4050 device in the cluster that is currently in
control of the MIP.
• RX packets: the total number of received packets
• TX packets: the total number of transmitted packets
• errors: packets lost due to error
• dropped: error due to lack of resources
• overruns: error due to lack of resources
• frame: error due to malformed packets
• carrier: error due to lack of carrier
• collisions: number of packet collisions
• RX bytes: received packets in bytes
• TX packets: transmitted packets in bytes
Note: A non-zero collision value may indicate incorrect
configuration of Ethernet auto-negotiation. For more
information, see the autoneg command on page 473.
ports
Displays the status of the physical ports on the
Ethernet network interface card (NIC) on the particular
Nortel SNAS 4050 device to which you have
connected. If you have connected to the MIP, the
information displayed relates to the Nortel SNAS 4050
device in the cluster that is currently in control of the
MIP.
For each port, information includes link status (up/
down) and the Ethernet auto-negotiation setting (on/
off). If the link is up, the information also includes
current values for speed (10/100/1000) and duplex
mode (half/full). If the link is down and auto-negotiation
is set to off, the information includes the configured
values for speed and duplex mode.
Nortel Secure Network Access Switch 4050 User Guide
666 Chapter 13 Viewing system information and performance statistics
/info
followed by:
events
Accesses the Events menu, in order to view and
download active alarms and logged events (see
“Viewing alarm events using the CLI” on page 666).
logs
Accesses the Logs menu, in order to view and
download log files (see “Viewing log files using the CLI”
on page 667).
Viewing alarm events using the CLI
To view active alarms, use the following command:
/info/events
The Events menu displays.
The Events menu includes the following options:
/info/events
followed by:
320818-A
alarms
Displays all alarms in the active alarm list, by their main
attributes: severity level, alarm ID number, date and
time when triggered, alarm name, sender, and cause.
To alert the operator at system logon, a notice is
displayed if there are active alarms.
Alarms are also sent as syslog messages.
download <protocol>
<server> <filename>
Transmits the event log file from the Nortel SNAS 4050
cluster to a file on the specified TFTP/FTP/SFTP file
exchange server. You are prompted to provide the
following information:
• protocol is the export protocol. Options are
tftp|ftp|scp|sftp. The default is tftp.
• server is the host name or IP address of the
server.
• filename is the name of the destination log file
on the file exchange server.
Chapter 13 Viewing system information and performance statistics 667
Viewing log files using the CLI
To view and download log files, use the following command:
/info/logs
The Logs menu displays.
The Logs menu includes the following options:
/info/logs
followed by:
list
Displays a list of all log files.
download <protocol>
<server> <filename>
Transmits the log file from the Nortel SNAS 4050
cluster to a file on the specified TFTP/FTP/SFTP file
exchange server. You are prompted to provide the
following information:
• protocol is the export protocol. Options are
tftp|ftp|scp|sftp. The default is tftp.
• server is the host name or IP address of the
server.
• filename is the name of the destination log file
(*.log.x) on the file exchange server.
Viewing AAA statistics using the CLI
You can view authentication statistics for the Nortel SNAS 4050 cluster as a
whole or for one specific Nortel SNAS 4050 host in the cluster.
For each configured authentication method and authentication server, the
following information displays:
•
•
the number of authentication requests accepted and rejected
for external LDAP and RADIUS servers, the number of authentication
requests timed out
The external LDAP and RADIUS servers are listed by IP address and TCP
port number.
Nortel Secure Network Access Switch 4050 User Guide
668 Chapter 13 Viewing system information and performance statistics
The CLI reports statistics for all authentication methods configured in the cluster,
whether or not they have been included in the authentication order scheme (see
“Specifying authentication fallback order using the CLI” on page 267). If the
statistics for a particular authentication method are always a row of zeroes, this
might be because the method is not included in the authentication order scheme.
To view authentication statistics for the Nortel SNAS 4050 cluster or for
individual Nortel SNAS 4050 hosts, use the following command:
/stats/aaa
The AAA Statistics menu displays.
The AAA Statistics menu includes the following options:
/stats/aaa
followed by:
320818-A
total
Displays authentication statistics by domain for all
Nortel SNAS 4050 hosts in the cluster since the system
was started.
isdhost <host ID>
<domain ID>
Displays authentication statistics for the specified
Nortel SNAS 4050 host in the cluster since the system
was started. You are prompted to specify:
• <host ID> — the index number automatically
assigned to the Nortel SNAS 4050 host when you
performed the initial setup.
• <domain ID> — the index number automatically
assigned to the Nortel SNAS 4050 domain when
you created it. To view statistics for all domains,
enter 0.
Note: With Nortel Secure Network Access Switch
Software Release 1.0, there is only one domain in the
system.
dump
Dumps all authentication statistics in the CLI,
presenting them first by domain and then by Nortel
SNAS 4050 host. The display includes the number of
accepted and rejected requests for all configured
authentication methods, as well as the number of
accepted and rejected connections by license type
(SSL). In the case of the licenses statistics, the value
reported as Rejected refers to connections exceeding
the allowed number of concurrent users.
Chapter 13 Viewing system information and performance statistics 669
Figure 194 shows sample output for the /stats/aaa/dump command.
Figure 194 AAA statistics dump
>> Main# stats/aaa/dump
Collecting data, please wait...
AAA Statistics:
LDAP Servers
DOMAIN Accepted Rejected Timedout
-----------------------------------------------------10.0.0.1:389
1
0
0
0
RADIUS Servers
DOMAIN Accepted Rejected Timedout
-------------------------------------------------------192.168.0.1:1645
1
18
3
1
Local DB
DOMAIN Accepted Rejected
---------------------------------------------1
2
0
Licenses
DOMAIN Accepted Rejected
---------------------------------------------SSL
1
0
0
Local Auth Stats for host 1
LDAP Servers
DOMAIN Accepted Rejected Timedout
-----------------------------------------------------10.0.0.1:389
1
0
0
0
RADIUS Servers
DOMAIN Accepted Rejected Timedout
-------------------------------------------------------192.168.0.1:1645
1
14
3
0
Local DB
DOMAIN Accepted Rejected
---------------------------------------------1
0
0
Licenses
DOMAIN Accepted Rejected
---------------------------------------------SSL
1
0
0
Local Auth Stats for host 2
LDAP Servers
DOMAIN Accepted Rejected Timedout
------------------------------------------------------
Nortel Secure Network Access Switch 4050 User Guide
670 Chapter 13 Viewing system information and performance statistics
Viewing all statistics using the CLI
To view all available statistics for the Nortel SNAS 4050 cluster, use the following
command:
/stats/dump
Because the Nortel SNAS 4050 collects only AAA statistics, the /stats/dump
command is equivalent to the /stats/aaa/dump command.
Viewing system information and performance statistics
using the SREM
You can view configuration, status, and performance information for a Nortel
SNAS 4050 device or for the cluster as a whole.
•
•
•
•
To view configuration and status information for a particular Nortel
SNAS 4050 host, see “Viewing local information using the SREM” on
page 670.
To view configuration and status information for the Nortel SNAS 4050
cluster, see “Viewing cluster information using the SREM” on page 672.
To view AAA statistics, see “Viewing AAA statistics using the SREM” on
page 698.
To view Ethernet statistics for an interface, see “Viewing Ethernet statistics
using the SREM” on page 716.
Viewing local information using the SREM
To view information for the Nortel SNAS 4050 device to which you are
connected, select the Information tab. If you have connected to the MIP, the
information relates to the Nortel SNAS 4050 device in the cluster that is currently
in control of the MIP.
320818-A
Chapter 13 Viewing system information and performance statistics 671
The Information screen appears (see Figure 195).
Figure 195 Information screen
Table 142 describes the Information fields.
Table 142 Information fields
Field
Description
Version
The Nortel SNAS 4050 software version being used.
Up Time
The length of time that the Nortel SNAS 4050 has been
running.
IP Address
The Real IP address RIP) of the Nortel SNAS 4050
device.
MAC Address
The MAC address of the Nortel SNAS 4050 device.
Nortel Secure Network Access Switch 4050 User Guide
672 Chapter 13 Viewing system information and performance statistics
Viewing cluster information using the SREM
To view cluster information, select one of the following topics:
•
•
•
•
•
•
•
•
320818-A
“Viewing the controller list using the SREM” on page 673
“Viewing SONMP topology information using the SREM” on page 675
“Viewing switch distribution using the SREM” on page 677
“Viewing port information using the SREM” on page 678
“Viewing license information using the SREM” on page 680
“Viewing session details using the SREM” on page 684
“Viewing alarms using the SREM” on page 691
“Managing log files using the SREM” on page 695
Chapter 13 Viewing system information and performance statistics 673
Viewing the controller list using the SREM
To view information about all the Nortel SNAS 4050 devices in the cluster, select
the Information > Controller List tab.
The Controller List screen appears (see Figure 196).
Figure 196 Controller List screen
Nortel Secure Network Access Switch 4050 User Guide
674 Chapter 13 Viewing system information and performance statistics
Table 143 describes the Controller List fields.
Table 143 Controller List fields
320818-A
Field
Description
Auto Refresh
Specifies whether the information displayed is
automatically refreshed.
Interval
Specifies the interval in seconds before the screen is
automatically refreshed. Only applicable if Auto
Refresh is selected.
Logging
Specifies whether a log file is automatically created for
the Controller List.
If selected, you can click Browse to specify the log file
name and location.
Controller List
Displays information for all Nortel SNAS 4050
controllers in the cluster. Information includes the RIP,
CPU usage, memory usage, and operational status of
each device.
An asterisk (*) in the MIP column indicates which
Nortel SNAS 4050 device in the cluster is currently is
control of the MIP. An asterisk (*) in the Local column
indicates the particular Nortel SNAS 4050 device to
which you have connected.
Chapter 13 Viewing system information and performance statistics 675
Viewing SONMP topology information using the SREM
To view SynOptics Network Management Protocol (SONMP) network topology
information, select the Information > SONMP State tab.
The SONMP State screen appears (see Figure 197).
Figure 197 SONMP State screen
Nortel Secure Network Access Switch 4050 User Guide
676 Chapter 13 Viewing system information and performance statistics
Table 144 describes the SONMP State fields.
Table 144 SONMP State fields
320818-A
Field
Description
Auto Refresh
Specifies whether the information displayed is
automatically refreshed.
Interval
Specifies the interval in seconds before the screen is
automatically refreshed. Only applicable if Auto
Refresh is selected.
Logging
Specifies whether a log file is automatically created for
the SONMP state.
If selected, you can click Browse to specify the log file
name and location.
SONMP State Table
Displays information about the system topology,
including the IP address, MAC address, chassis type,
and state of all Nortel SNAS 4050 and
SONMP-enabled network devices in the system.
Chapter 13 Viewing system information and performance statistics 677
Viewing switch distribution using the SREM
To view current status information about network access devices in the cluster,
select the Information > Switch Distribution tab.
The Switch Distribution screen appears (see Figure 198).
Figure 198 Switch Distribution screen
Nortel Secure Network Access Switch 4050 User Guide
678 Chapter 13 Viewing system information and performance statistics
Table 145 describes the Switch Distribution fields.
Table 145 Switch Distribution fields
Field
Description
Switch Distribution
Displays information about the Nortel SNAS 4050
hosts in the cluster and the network access devices
they control.
Information for the Nortel SNAS 4050 host includes the
Real IP address (RIP), portal Virtual IP addresses
(pVIPs), operational status, and number of switches
under its control. For each network access device,
information includes the switch IP address and Nortel
SNA status.
Viewing port information using the SREM
You can view information about the status of the physical ports on the Ethernet
network interface card (NIC) on the particular Nortel SNAS 4050 device to which
you have connected. If you have connected to the MIP, the information displayed
relates to the Nortel SNAS 4050 device in the cluster that is currently in control of
the MIP.
320818-A
Chapter 13 Viewing system information and performance statistics 679
To view port information, select the Information > Port Information tab.
The Port Information screen appears (see Figure 199).
Figure 199 Port Information screen
Table 146 describes the Port Information fields.
Table 146 Port Information fields (Sheet 1 of 2)
Field
Description
Auto Refresh
Specifies whether the information displayed is
automatically refreshed.
Interval
Specifies the interval in seconds before the screen is
automatically refreshed. Only applicable if Auto
Refresh is selected.
Nortel Secure Network Access Switch 4050 User Guide
680 Chapter 13 Viewing system information and performance statistics
Table 146 Port Information fields (Sheet 2 of 2)
Field
Description
Logging
Specifies whether a log file is automatically created for
the active ports.
If selected, you can click Browse to specify the log file
name and location.
Port Status
For each port, information includes link status (up/
down) and the Ethernet auto-negotiation setting (on/
off). If the link is up, the information also includes
current values for speed (10/100/1000) and duplex
mode (half/full). If the link is down and auto-negotiation
is set to off, the information includes the configured
values for speed and duplex mode.
Viewing license information using the SREM
You can view information about license usage for the system as a whole or by
domain.
To view license information, select from the following tasks:
•
•
320818-A
“Viewing global license information” on page 681
“Viewing license information for a domain” on page 683
Chapter 13 Viewing system information and performance statistics 681
Viewing global license information
To view global license information, select the Information > Licenses > Global
Licenses tab.
The Global Licenses screen appears (see Figure 200).
Figure 200 Global Licenses screen
Nortel Secure Network Access Switch 4050 User Guide
682 Chapter 13 Viewing system information and performance statistics
Table 147 describes the Global Licenses fields.
Table 147 Global Licenses fields
320818-A
Field
Description
Auto Refresh
Specifies whether the information displayed is
automatically refreshed.
Interval
Specifies the interval in seconds before the screen is
automatically refreshed. Only applicable if Auto
Refresh is selected.
Logging
Specifies whether a log file is automatically created for
the global licenses.
If selected, you can click Browse to specify the log file
name and location.
State of Global Licenses
Displays information about the global license pool and
current usage, by license type and domain. For the
Nortel SNAS 4050, SSL is the only type of license.
Chapter 13 Viewing system information and performance statistics 683
Viewing license information for a domain
To view license usage by domain, select the Information > Licenses > Per
Domain Licenses tab.
The Per Domain Licenses screen appears (see Figure 201).
Figure 201 Per Domain Licenses screen
Nortel Secure Network Access Switch 4050 User Guide
684 Chapter 13 Viewing system information and performance statistics
Table 148 describes the Per Domain Licenses fields.
Table 148 Per Domain Licenses fields
Field
Description
Auto Refresh
Specifies whether the information displayed is
automatically refreshed.
Interval
Specifies the interval in seconds before the screen is
automatically refreshed. Only applicable if Auto
Refresh is selected.
Logging
Specifies whether a log file is automatically created for
the per domain licenses.
If selected, you can click Browse to specify the log file
name and location.
State of Licenses Per Domain
Displays information about current license usage in the
domain, by license type. For the Nortel SNAS 4050,
SSL is the only type of license.
Viewing session details using the SREM
You can view information about active sessions for all clients, or for an individual
or group of clients.
To view information about active sessions, select one of the following tasks:
•
•
•
•
320818-A
“Viewing active sessions using the SREM” on page 685
“Viewing details for a particular session” on page 687
“Ending active user sessions” on page 688
“Viewing the number of active sessions using the SREM” on page 690
Chapter 13 Viewing system information and performance statistics 685
Viewing active sessions using the SREM
To view details about active sessions, select the Information > Sessions >
Sessions tab.
The Sessions screen appears (see Figure 202).
Figure 202 Sessions screen
The Sessions list displays details for all active sessions.
To restrict the display to specific sessions, click Find or Filter to set match
criteria. Find and Filter use regular expressions to specify the pattern to match.
Only sessions that match the set criteria will appear in the list.
Nortel Secure Network Access Switch 4050 User Guide
686 Chapter 13 Viewing system information and performance statistics
Table 149 describes the Sessions parameters.
Table 149 Sessions parameters
320818-A
Parameter
Description
Domain ID
The domain ID of the domain in which the session is
occurring.
Switch ID
The switch ID of the network access device.
User Name
The client’s user name. For an IP Phone, the MAC
address displays.
Source IP
The client’s current IP address.
Source MAC Address
The MAC address for the client device.
VLAN ID
The client’s current VLAN membership.
Login Time
The time the client logged on. If logon was not today,
the date is reported.
Device Type
The client device type. Options are phone or
dynamic PC.
Port ID
The port on the network access device (in slot/port
format) being used for this session.
Portal IP
The portal IP address through which the client
logged on.
Chapter 13 Viewing system information and performance statistics 687
Viewing details for a particular session
To view details about active sessions, select the Information > Sessions >
session > Session Properties tab.
The Session Properties screen appears (see Figure 203).
Figure 203 Session Properties screen
The Session Properties screen displays details for all the selected session.
Nortel Secure Network Access Switch 4050 User Guide
688 Chapter 13 Viewing system information and performance statistics
Table 150 describes the Session Properties parameters.
Table 150 Sessions parameters
Parameter
Description
Domain ID
The domain ID of the domain in which the session is
occurring.
Switch ID
The switch ID of the network access device.
User Name
The client’s user name. For an IP Phone, the MAC
address displays.
Source IP
The client’s current IP address.
Source MAC Address
The MAC address for the client device.
VLAN ID
The client’s current VLAN membership.
Login Time
The time the client logged on. If logon was not today,
the date is reported.
Device Type
The client device type. Options are phone or
dynamic PC.
Port ID
The port on the network access device (in slot/port
format) being used for this session.
Portal IP
The portal IP address through which the client
logged on.
Ending active user sessions
It may be necessary to end active user sessions for a variety of reasons. To kick a
user off the Nortel SNAS 4050 device, perform the following steps:
1
To view details about active sessions, select the Information > Sessions >
session > KickOut User tab.
The KickOut User screen appears (see Figure 204).
320818-A
Chapter 13 Viewing system information and performance statistics 689
Figure 204 KickOut User screen
2
Ensure that information in the displayed fields specifies the user to kick out.
Table 151 describes the KickOut User fields.
Table 151 KickOut User fields
Field
Description
User Name
Specifies the user name.
Domain ID
Specifies which domain where the selected user resides in.
3
Click KickOut.
Nortel Secure Network Access Switch 4050 User Guide
690 Chapter 13 Viewing system information and performance statistics
Viewing the number of active sessions using the SREM
To view the number of active sessions, select the Information > Sessions >
Number of Sessions tab.
The Number of Sessions screen appears (see Figure 205).
Figure 205 Number of Sessions screen
Table 152 describes the Number of Sessions fields.
Table 152 Number of Sessions fields
Field
Description
Total Number of Active Sessions Displays the number of currently active sessions.
320818-A
Chapter 13 Viewing system information and performance statistics 691
Viewing alarms using the SREM
You can view system alarms that have been activated. You can also download the
alarms as a log file.
To alert the operator at system logon, a notice is displayed if there are active
alarms. Alarms are also sent as syslog messages.
To view system alarms, select from the following tasks:
•
•
“Viewing active alarms using the SREM” on page 692
“Downloading alarms using the SREM” on page 694
Nortel Secure Network Access Switch 4050 User Guide
692 Chapter 13 Viewing system information and performance statistics
Viewing active alarms using the SREM
To view the active alarms for the Nortel SNAS 4050 cluster, select the
Information > Alarms > Active Alarms tab.
The Active Alarms screen appears (see Figure 206).
Figure 206 Active Alarms screen
320818-A
Chapter 13 Viewing system information and performance statistics 693
Table 153 describes the Active Alarms fields.
Table 153 Active Alarms fields
Field
Description
Auto Refresh
Specifies whether the information displayed is
automatically refreshed.
Interval
Specifies the interval in seconds before the screen is
automatically refreshed. Only applicable if Auto
Refresh is selected.
Logging
Specifies whether a log file is automatically created for
the active alarms.
If selected, you can click Browse to specify the log file
name and location.
Active Alarms Table
Displays all alarms in the active alarm list, by their main
attributes: severity level, alarm ID number, date and
time when triggered, alarm name, sender, and cause.
Nortel Secure Network Access Switch 4050 User Guide
694 Chapter 13 Viewing system information and performance statistics
Downloading alarms using the SREM
To download an alarm as a logged event, select the Information > Alarms >
Download Alarms tab.
The Download Alarms screen appears (see Figure 207).
Figure 207 Download Alarms screen
320818-A
Chapter 13 Viewing system information and performance statistics 695
Table 154 describes the Download Alarms fields.
Table 154 Download Alarms fields
Field
Description
Protocol
The file export protocol. The options are TFTP, FTP,
SFTP. The default is FTP.
Host
The host name or IP address of the file exchange
server.
Filename
The name of the destination file on the file exchange
server.
Username
For FTP and SFTP, the user name to access the file
exchange server.
Password
For FTP and SFTP, the password to access the file
exchange server.
Managing log files using the SREM
To view and download log files, select from the following tasks:
•
•
“Viewing the log list using the SREM” on page 696
“Downloading log files using the SREM” on page 697
Nortel Secure Network Access Switch 4050 User Guide
696 Chapter 13 Viewing system information and performance statistics
Viewing the log list using the SREM
To view a list of all active logs, select the Information > Logs tab.
The Logs screen appears (see Figure 208), listing the names of all log files.
To delete a log file, select the file in the list and click Delete.
Figure 208 Logs screen
320818-A
Chapter 13 Viewing system information and performance statistics 697
Downloading log files using the SREM
On the Information > Logs tab, select the log file you wish to download.
The Download screen appears (see Figure 209).
Figure 209 Download screen
Table 154 describes the Download fields.
Table 155 Download fields (Sheet 1 of 2)
Field
Description
Protocol
The file export protocol. The options are TFTP, FTP,
SFTP. The default is FTP.
Host
The host name or IP address of the file exchange
server.
Nortel Secure Network Access Switch 4050 User Guide
698 Chapter 13 Viewing system information and performance statistics
Table 155 Download fields (Sheet 2 of 2)
Field
Description
Filename
The name of the destination log file on the file
exchange server.
Username
For FTP and SFTP, the user name to access the file
exchange server.
Password
For FTP and SFTP, the password to access the file
exchange server.
Viewing AAA statistics using the SREM
You can view authentication statistics for the Nortel SNAS 4050 cluster as a
whole or for one specific Nortel SNAS 4050 host in the cluster.
For each configured authentication method and authentication server, the
following information displays:
•
•
the number of authentication requests accepted and rejected
for external LDAP and RADIUS servers, the number of authentication
requests timed out
The external LDAP and RADIUS servers are listed by IP address and TCP
port number.
Statistics are reported for all authentication methods configured in the cluster,
whether or not they have been included in the authentication order scheme (see
“Specifying authentication fallback order using the SREM” on page 314). If the
statistics for a particular authentication method are always zeroes, this might be
because the method is not included in the authentication order scheme.
This section includes the following topics:
•
•
320818-A
Viewing Host statistics (see “Viewing AAA statistics for a host” on
page 699).
Viewing Domain statistics (see “Viewing AAA statistics for the domain” on
page 707).
Chapter 13 Viewing system information and performance statistics 699
Viewing AAA statistics for a host
To view AAA statistics for a particular Nortel SNAS 4050 host, perform the
following steps.
1
Expand the Statistics > AAA navigation tree components, and select Host
Statistics.
The Hosts table opens (see Figure 210).
Figure 210 The Hosts table
2
Select the host whose statistics you want to display. Do one of the following:
a
In the Statistics > AAA > Host Statistics > Hosts table, select the
desired host. Then, in the Statistics > AAA > Host Statistics > Hosts >
Domain Statistics table, select the desired domain.
Nortel Secure Network Access Switch 4050 User Guide
700 Chapter 13 Viewing system information and performance statistics
b
Expand the Statistics > AAA > Host Statistics > host navigation tree
components, and select the desired domain.
The License tab opens (see Figure 211 on page 701).
Depending on which authentication methods are configured for that host, some or
all of the following tabs may be available:
•
•
•
•
320818-A
License — see “Viewing License statistics” on page 701 for details about
license statistics.
Radius — see “Viewing RADIUS statistics” on page 702 for details about
RADIUS statistics.
Local DB — see “Viewing Local database statistics” on page 704 for details
about local database statistics.
LDAP — see “Viewing LDAP statistics” on page 705 for details about LDAP
statistics.
Chapter 13 Viewing system information and performance statistics 701
Viewing License statistics
To view License statistics, select the License tab.
The License statistics appear (see Figure 211).
Figure 211 License statistics
For a description of the fields, seeTable 156.
Table 156 License statistics (Sheet 1 of 2)
Field
Description
Auto Refresh
Enables or disables auto refresh of statistics.
Interval
Specifies the interval at which to auto refresh.
Logging
Enables or disables statistics logging in the specified
location.
Nortel Secure Network Access Switch 4050 User Guide
702 Chapter 13 Viewing system information and performance statistics
Table 156 License statistics (Sheet 2 of 2)
Field
Description
SSL Accepted
Displays the sum of accepted connections by license type.
For the Nortel SNAS 4050, SSL is the only type of license.
SSL Rejected
Displays the sum of connections rejected because they
exceeded the allowed number of concurrent users.
Viewing RADIUS statistics
To view RADIUS statistics, select the Radius tab.
The RADIUS statistics appear (see Figure 212).
Figure 212 RADIUS statistics
320818-A
Chapter 13 Viewing system information and performance statistics 703
For a description of the fields, seeTable 157.
Table 157 RADIUS statistics
Field
Description
Auto Refresh
Enables or disables auto refresh of statistics.
Interval
Specifies the interval at which to auto refresh.
Logging
Enables or disables statistics logging in the specified
location.
Server Statistics Table
Displays statistics for each RADIUS server.
The fields displayed are:
• IP Address/Port — Displays the RADIUS server IP
address and TCP port.
• Accepted — Displays the number of accepted requests
to the RADIUS server.
• Rejected — Displays the number of rejected requests
to the RADIUS server. Rejections occur, for example,
when a user submits an incorrect password.
• Timed Out — Displays the number of requests to the
RADIUS server that timed out.
Nortel Secure Network Access Switch 4050 User Guide
704 Chapter 13 Viewing system information and performance statistics
Viewing Local database statistics
To view Local database statistics, select the Local DB tab.
The Local DB statistics appear (see Figure 213 on page 704).
Figure 213 Local DB statistics
For a description of the fields, seeTable 158.
Table 158 Local DB statistics (Sheet 1 of 2)
320818-A
Field
Description
Auto Refresh
Enables or disables auto refresh of statistics.
Interval
Specifies the interval at which to auto refresh.
Logging
Enables or disables statistics logging in the specified
location.
Chapter 13 Viewing system information and performance statistics 705
Table 158 Local DB statistics (Sheet 2 of 2)
Field
Description
Accepted
Displays the number of accepted requests to the Local
database.
Rejected
Displays the number of rejected requests to the Local
database. Rejections occur, for example, when a user
submits an incorrect password.
Viewing LDAP statistics
To view LDAP statistics, select the LDAP tab.
The LDAP statistics appear (see Figure 214 on page 705).
Figure 214 LDAP statistics
Nortel Secure Network Access Switch 4050 User Guide
706 Chapter 13 Viewing system information and performance statistics
For a description of the fields, seeTable 159.
Table 159 LDAP statistics
320818-A
Field
Description
Auto Refresh
Enables or disables auto refresh of statistics.
Interval
Specifies the interval at which to auto refresh.
Logging
Enables or disables statistics logging in the specified
location.
Server Statistics Table
Specifies statistics for each LDAP server.
The information displayed includes:
• IP Address/Port — Displays theLDAP server IP address
and TCP port.
• Accepted — Displays the number of accepted requests
to the LDAP server.
• Rejected — Displays the number of rejected requests to
the LDAP server. Rejections occur, for example, when a
user submits an incorrect password.
• Timed Out — Displays the number of requests to the
LDAP server that timed out.
Chapter 13 Viewing system information and performance statistics 707
Viewing AAA statistics for the domain
To view statistics for the domain, perform the following steps:
1
Select the Statistics > AAA > Domain Statistics navigation tree component.
The Statistics table appears (see Figure 215 on page 707).
Figure 215 The Statistics table
2
In the navigation tree, expand Domain Statistics and select a domain.
Depending on the authentication methods configured for the domain, the
following tabs may be available:
•
•
•
License
Radius
Local DB
Nortel Secure Network Access Switch 4050 User Guide
708 Chapter 13 Viewing system information and performance statistics
•
LDAP
Select one of the following tasks:
•
•
•
•
320818-A
Viewing License statistics (see “Viewing License statistics” on page 709).
Viewing RADIUS statistics (see “Viewing RADIUS statistics” on page 711
Viewing Local DB statistics (see “Viewing Local database statistics” on
page 713).
Viewing LDAP statistics (see “Viewing LDAP statistics” on page 715).
Chapter 13 Viewing system information and performance statistics 709
Viewing License statistics
To view License statistics, select the License tab.
The License statistics appear (see Figure 216).
Figure 216 License statistics
For a description of the fields, seeTable 160.
Table 160 License statistics (Sheet 1 of 2)
Field
Description
Auto Refresh
Enables or disables auto refresh of statistics.
Interval
Specifies the interval at which to auto refresh.
Nortel Secure Network Access Switch 4050 User Guide
710 Chapter 13 Viewing system information and performance statistics
Table 160 License statistics (Sheet 2 of 2)
320818-A
Field
Description
Logging
Enables or disables statistics logging in the specified
location.
SSL Accepted
Displays the sum of accepted connections by license type.
For the Nortel SNAS 4050, SSL is the only type of license.
SSL Rejected
Displays the sum of connections rejected because they
exceeded the allowed number of concurrent users.
Chapter 13 Viewing system information and performance statistics 711
Viewing RADIUS statistics
To view RADIUS statistics, select the Radius tab.
The RADIUS statistics appear (see Figure 217).
Figure 217 RADIUS statistics
For a description of the fields, see Table 161.
Table 161 Viewing RADIUS Statistics (Sheet 1 of 2)
Field
Description
Auto Refresh
Enables or disables auto refresh of statistics.
Interval
Specifies the interval at which to auto refresh.
Nortel Secure Network Access Switch 4050 User Guide
712 Chapter 13 Viewing system information and performance statistics
Table 161 Viewing RADIUS Statistics (Sheet 2 of 2)
320818-A
Field
Description
Logging
Enables or disables statistics logging in the specified
location.
Server Statistics Table
Displays statistics for each RADIUS server.
The fields displayed are:
• IP Address/Port — Specifies the RADIUS server IP
address and TCP port.
• Accepted — Displays the number of accepted requests
to the RADIUS server.
• Rejected — Displays the number of rejected requests
to the RADIUS server. Rejections occur, for example,
when a user submits an incorrect password.
• Timed Out — Displays the number of requests to the
RADIUS server that timed out.
Chapter 13 Viewing system information and performance statistics 713
Viewing Local database statistics
To view Local database statistics, select the Local DB tab.
The Local DB statistics screen appears (see Figure 218).
Figure 218 Local DB statistics
For a description of the fields, seeTable 162.
Table 162 Local DB statistics (Sheet 1 of 2)
Field
Description
Auto Refresh
Enables or disables auto refresh of statistics.
Interval
Specifies the interval at which to auto refresh.
Nortel Secure Network Access Switch 4050 User Guide
714 Chapter 13 Viewing system information and performance statistics
Table 162 Local DB statistics (Sheet 2 of 2)
320818-A
Field
Description
Logging
Enables or disables statistics logging in the specified
location.
Accepted
Displays the number of accepted requests to the Local
database.
Rejected
Displays the number of rejected requests to the Local
database. Rejections occur, for example, when a user
submits an incorrect password.
Chapter 13 Viewing system information and performance statistics 715
Viewing LDAP statistics
To view LDAP statistics, select the LDAP tab.
The LDAP statistics appear (see Figure 219).
Figure 219 LDAP statistics
For a description of the fields, seeTable 163.
Table 163 Viewing LDAP Statistics (Sheet 1 of 2)
Field
Description
Auto Refresh
Enables or disables auto refresh of statistics.
Interval
Specifies the interval at which to auto refresh.
Nortel Secure Network Access Switch 4050 User Guide
716 Chapter 13 Viewing system information and performance statistics
Table 163 Viewing LDAP Statistics (Sheet 2 of 2)
Field
Description
Logging
Enables or disables statistics logging in the specified
location.
Server Statistics Table
Displays statistics for each LDAP server.
The information displayed includes:
• IP Address/Port — Displays theLDAP server IP
address and TCP port.
• Accepted — Displays the number of accepted requests
to the LDAP server.
• Rejected — Displays the number of rejected requests
to the LDAP server. Rejections occur, for example,
when a user submits an incorrect password.
• Timed Out — Displays the number of requests to the
LDAP server that timed out.
Viewing Ethernet statistics using the SREM
You can view statistics for the Ethernet network interface card (NIC) on the
particular Nortel SNAS 4050 device to which you have connected. If you have
connected to the MIP, the information relates to the Nortel SNAS 4050 device in
the cluster that is currently in control of the MIP.
320818-A
Chapter 13 Viewing system information and performance statistics 717
To view Ethernet interface statistics, perform the following steps:
1
Select the Statistics > Interfaces navigation tree component.
The Ethernet Interface Table appears (see Figure 220).
Figure 220 The Ethernet Interface table
2
From the Ethernet Interface Table, select an interface.
Select one of the following tasks:
•
•
Viewing Rx statistics (see “Viewing Rx statistics” on page 718)
Viewing Tx statistics (see “Viewing Tx statistics” on page 720)
Nortel Secure Network Access Switch 4050 User Guide
718 Chapter 13 Viewing system information and performance statistics
Viewing Rx statistics
To view Rx statistics for an interface, select the Rx Statistics tab.
The Rx Statistics screen appears (see Figure 221).
Figure 221 The Rx statistics screen
For a description of the fields seeTable 164.
Table 164 Viewing Rx statistics (Sheet 1 of 2)
320818-A
Field
Description
Auto Refresh
Enables or disables auto refresh of statistics.
Interval
Specifies the interval at which to auto refresh.
Chapter 13 Viewing system information and performance statistics 719
Table 164 Viewing Rx statistics (Sheet 2 of 2)
Field
Description
Logging
Enables or disables statistics logging in the specified
location.
Logging Type
There are three log types available for Rx statistics.
• Cumulative — Displays a cumulative count of packets
as they are received.
• Incremental — Displays the number of received
packets incrementally.
• Relative — Displays the number of packets received
since the last poll.
Rx Packets
Displays the total number of received packets.
Rx Bytes
Displays the total number of received packets in bytes.
Rx Errors
Displays number of packets lost due to error.
Rx Packets Dropped
Displays number of packets dropped due to lack of
resources.
Rx Overruns
Displays number of packet errors due to lack of resources.
Rx Frames
Displays number of errors due to malformed packets.
Nortel Secure Network Access Switch 4050 User Guide
720 Chapter 13 Viewing system information and performance statistics
Viewing Tx statistics
To view Tx statistics for an interface, select Tx Statistics tab.
The Tx statistics screen appears (see Figure 222).
Figure 222 The Tx statistics screen
For a description of the fields seeTable 165.
Table 165 Viewing Tx Statistics (Sheet 1 of 2)
320818-A
Field
Description
Auto Refresh
Enables or disables auto refresh of statistics.
Interval
Specifies the interval at which to auto refresh.
Chapter 13 Viewing system information and performance statistics 721
Table 165 Viewing Tx Statistics (Sheet 2 of 2)
Field
Description
Logging
Enables or disables statistics logging in the specified
location.
Logging Type
There are three log types available for Tx statistics.
• Cumulative — Displays a cumulative count of packets
as they are transmitted.
• Incremental — Displays the number of transmitted
incrementally.
• Relative — Displays the number of packets transmitted
since the last poll.
Tx Packets
Displays the total number of transmitted packets.
Tx Bytes
Displays the total number of transmitted packets in bytes.
Tx Errors
Displays number of packets lost due to error.
Tx Packets Dropped
Displays number of packets dropped due to lack of
resources.
Tx Overruns
Displays number of packet errors due to lack of resources.
Tx Carriers
Displays number of packet errors due to lack of carrier.
Tx Collisions
Displays number of packet collisions.
Note: A non-zero collision value may indicate incorrect
configuration of Ethernet auto-negotiation. For more
information, see “Configuring host ports using the SREM”
on page 520.
Nortel Secure Network Access Switch 4050 User Guide
722 Chapter 13 Viewing system information and performance statistics
320818-A
723
Chapter 14
Maintaining and managing the system
This chapter includes the following topics:
Topic
Page
Managing and maintaining the system using the CLI
724
Roadmap of maintenance and boot commands
725
Performing maintenance using the CLI
726
Backing up or restoring the configuration using the CLI
730
Managing Nortel SNAS 4050 devices using the CLI
733
Managing software for a Nortel SNAS 4050 device using the CLI
734
Managing and maintaining the system using the SREM
736
Performing maintenance using the SREM
736
Backing up or restoring the configuration using the SREM
742
Managing Nortel SNAS 4050 devices and software using the SREM
743
Downloading files using the SREM
752
Running Nortel SNAS 4050 diagnostics using the SREM
754
Nortel Secure Network Access Switch 4050 User Guide
724 Chapter 14 Maintaining and managing the system
You can perform the following activities to manage and maintain the system and
individual Nortel SNAS 4050 devices:
•
maintenance, in order to collect information for troubleshooting and technical
support purposes (see “Performing maintenance using the CLI” on page 726
or “Performing maintenance using the SREM” on page 736):
• Dump log file or system internal status information and send it to a file
exchange server.
• Check connectivity between the Nortel SNAS 4050 and all configured
gateways, routers, and servers.
• Start and stop tracing to log information about a client session. You can
limit the trace to specific features, such as SSL handshake; authentication
method, user name, group, and profile; DNS lookups; and the
TunnelGuard check.
You can use the trace feature as a debugging tool (for example, to find out
why authentication fails). For sample CLI outputs, see “Trace tools” on
page 845.
•
•
configuration backup and restore (see “Backing up or restoring the
configuration using the CLI” on page 730 or “Backing up or restoring the
configuration using the SREM” on page 742)
software and device management (see “Managing Nortel SNAS 4050 devices
using the CLI” on page 733 and “Managing software for a Nortel SNAS 4050
device using the CLI” on page 734, or “Managing Nortel SNAS 4050 devices
and software using the SREM” on page 743):
• Manage software versions and activate software upgrades.
• Shut down or reboot a particular Nortel SNAS 4050 device that has
become isolated from the cluster.
• Reset the configuration of a particular Nortel SNAS 4050 device back to
factory defaults.
Managing and maintaining the system using the CLI
To perform maintenance activities, access the Maintenance menu by using the
following command:
/maint
320818-A
Chapter 14 Maintaining and managing the system 725
To manage software versions and Nortel SNAS 4050 devices, connect to the
particular Nortel SNAS 4050 device using Telnet, SSH, or a console connection.
Do not connect to the Management IP address (MIP). Access the Boot menu by
using the following command:
/boot
Roadmap of maintenance and boot commands
The following roadmap lists the CLI commands to perform maintenance and
software and device management activities. Use this list as a quick reference or
click on any entry for more information:
Command
Parameter
/maint
dumplogs <protocol> <server>
<filename> <all-isds?>
dumpstats <protocol> <server>
<filename> <all-isds?>
chkcfg
starttrace <tags> <domain ID>
<output mode>
stoptrace
/cfg/ptcfg <protocol> <server>
<filename> <passphrase>
/cfg/gtcfg <protocol> <server>
<filename> <passphrase>
/cfg/dump [<passphrase>]
/boot
software
halt
reboot
delete
/boot/software
cur
activate <version>
Nortel Secure Network Access Switch 4050 User Guide
726 Chapter 14 Maintaining and managing the system
Command
Parameter
download <protocol> <server>
<filename>
del
Performing maintenance using the CLI
To check the applied configuration and to download log file and system status
information for technical support purposes, use the following command:
/maint
The Maintenance menu displays.
320818-A
Chapter 14 Maintaining and managing the system 727
The Maintenance menu includes the following options:
/maint
followed by:
dumplogs <protocol>
<server> <filename>
<all-isds?>
Collects system log file information and sends it to a file
on the specified file exchange server. The information
can then be used for technical support purposes. You
are prompted to provide the following parameters if you
do not specify them in the command:
• protocol is the export protocol. Options are
tftp|ftp|sftp. The default is tftp.
• server is the host name or IP address of the file
exchange server.
• filename is the name of the destination log file
on the file exchange server. The file is in gzip
compressed tar format.
• all-isds? specifies whether the information is
to be collected from all Nortel SNAS 4050 devices
in the cluster or only from the device to which you
are connected. Valid options are y (= yes, all) or n
(= no, single).
If you specify n (= no) and you are connected to the
MIP, information will be collected for the Nortel
SNAS 4050 device currently in control of the MIP.
• for FTP and SFTP, user name and password.
The file sent to the file exchange server does not
contain any sensitive information related to the system
configuration, such as private keys.
Nortel Secure Network Access Switch 4050 User Guide
728 Chapter 14 Maintaining and managing the system
/maint
followed by:
dumpstats <protocol>
<server> <filename>
<all-isds?>
Collects current system internal status information and
sends it to a file on the specified file exchange server.
The information can then be used for technical support
purposes. You are prompted to provide the following
parameters if you do not specify them in the command:
• protocol is the export protocol. Options are
tftp|ftp|sftp. The default is tftp.
• server is the host name or IP address of the file
exchange server.
• filename is the name of the destination file on
the file exchange server. The file is in gzip
compressed tar format.
• all-isds? specifies whether the information is
to be collected from all Nortel SNAS 4050 devices
in the cluster or only from the device to which you
are connected. Valid options are y (= yes, all) or n
(= no, single).
If you specify n (= no) and you are connected to the
MIP, information will be collected for the Nortel
SNAS 4050 device currently in control of the MIP.
• for FTP and SFTP, user name and password.
chkcfg
Checks if the Nortel SNAS 4050 is able to contact
gateways, routers, DNS servers, and authentication
servers in the system configuration. The command also
checks if the Nortel SNAS 4050 can connect to web
servers specified in group links. The CLI displays the
result of the connectivity check as well as the method
used for the check (for example, ping).
The following is sample output for the chkcfg
command:
Checking configuration from
192.168.128.210
Testing /cfg/sys/host 1/gateway:
192.168.128.3... ping ok
Testing /cfg/sys/dns/servers:
192.168.128.1... dns ok
Testing /cfg/vpn 1/aaa/group 1/
link 1:www.cnn.com:80... tcp ok
All tests completed successfully
320818-A
Chapter 14 Maintaining and managing the system 729
/maint
followed by:
starttrace <tags>
<domain ID> <output
mode>
Logs information pertaining to a client session.
You are prompted to provide the following information:
• tags — specifies the specific features or
subsystems to which you want to limit tracing. The
options are:
all — logs all information. The default is all.
aaa — logs authentication method, user name,
group, and extended profile
dns — logs failed DNS lookups made during the
session
ssl — logs information related to the SSL
handshake procedure (for example, the cipher
used)
tg — logs information related to the TunnelGuard
check (for example, TunnelGuard session status
and the SRS rule check result)
snas — logs operations and events of Nortel
SNA-controlled switches
Enter the desired tag or a comma-separated list of
tags (for example, enter aaa or aaa,dns). To
trace all features, press Enter to accept the default.
• domain ID — specifies the Nortel SNAS 4050
domain to which you want to limit tracing. The
default is all. To trace all domains, enter 0 or press
Enter.
Note: With Nortel Secure Network Access Switch
Software Release 1.0, there is only one domain in
the system.
• output mode — options are:
interactive — the information will be logged
directly in the CLI when a client authenticates to the
portal
tftp|ftp|sftp — the information will be
logged to a file exchange server. You are prompted
to provide the server information.
For sample output from the starttrace command,
see “Trace tools” on page 845.
stoptrace
Stops tracing. If you selected interactive mode for the
starttrace command and information has been
logged to the CLI, press Enter to redisplay the CLI
prompt.
Nortel Secure Network Access Switch 4050 User Guide
730 Chapter 14 Maintaining and managing the system
Backing up or restoring the configuration using the CLI
To save the system configuration to a file on a file exchange server, use the
following command:
/cfg/ptcfg <protocol> <server> <filename> <passphrase>
To restore the system configuration, use the following command:
/cfg/gtcfg <protocol> <server> <filename> <passphrase>
You can also dump the system configuration to the screen and then use
copy-and-paste to save it to a text file. To perform a configuration dump, use the
following command:
/cfg/dump [<passphrase>]
320818-A
Chapter 14 Maintaining and managing the system 731
Table 166 provides more information about the backup and restore commands on
the Configuration menu.
Table 166 Configuration menu backup and restore commands
/cfg
followed by:
ptcfg <protocol>
<server> <filename>
<passphrase>
Saves the current configuration, including private keys
and certificates, to a file on the specified file exchange
server. You can later use this file to restore the
configuration by using the gtcfg command. You are
prompted to provide the following information:
• protocol is the export protocol. Options are
tftp|ftp|scp|sftp. The default is tftp.
• server is the host name or IP address of the file
exchange server.
• filename is the name of the destination file on
the file exchange server.
• passphrase is a password phrase required to
protect the private keys in the configuration. If you
later restore the configuration using the gtcfg
command, you will be prompted for this password
phrase.
• for FTP, SCP, and SFTP, user name and password
Note: If you have fully separated the Administrator user
role from the Certificate Administrator user role, the
export passphrase defined by the Certificate
Administrator is used to protect the private keys in the
configuration, and this is transparent to the user. If you
later restore the configuration using the gtcfg
command, the Certificate Administrator must enter the
correct passphrase. For more information on
separating the Administrator user role from the
Certificate Administrator user role, see “Adding a new
user” on page 360.
Nortel Secure Network Access Switch 4050 User Guide
732 Chapter 14 Maintaining and managing the system
Table 166 Configuration menu backup and restore commands
/cfg
followed by:
320818-A
gtcfg <protocol>
<server> <filename>
<passphrase>
Restores a configuration, including private keys and
certificates, from a file on the specified file exchange
server. You are prompted to provide the following
information:
• protocol is the import protocol. Options are
tftp|ftp|scp|sftp. The default is tftp.
• server is the host name or IP address of the file
exchange server.
• filename is the name of the file on the file
exchange server.
• passphrase is the password phrase specified
when the configuration file was saved to the server
using the ptcfg command.
• for FTP, SCP, and SFTP, user name and password
Note: If you have fully separated the Administrator user
role from the Certificate Administrator user role, the
Certificate Administrator must enter the correct
passphrase. The Certificate Administrator defined the
passphrase using the /cfg/sys/user/
caphrase command (see page 358).
dump [<passphrase>]
Dumps the current configuration on screen in a format
that allows you to restore the configuration without
downloading the configuration to a file server.
You are prompted to specify if you wish to include
private keys in the configuration dump. If you do, then
you are prompted to provide a password phrase in
order to protect the private keys. The password phrase
you specify applies to all private keys. If you later
restore the configuration, you will be prompted for this
password phrase.
Save the configuration to a text file by performing a
copy-and-paste operation to a text editor. You can later
restore the configuration by using the global paste
command, at any command prompt in the CLI, to paste
the contents of the saved text file. On pasting, the
content is batch processed by the Nortel SNAS 4050.
To view the pending configuration changes resulting
from the batch processing, use the diff command. To
apply the configuration changes, use the apply
command.
Chapter 14 Maintaining and managing the system 733
Managing Nortel SNAS 4050 devices using the CLI
To manage Nortel SNAS 4050 software and devices, use the following command:
/boot
The Boot menu displays.
The Boot menu includes the following options:
/boot
followed by:
software
Accesses the Software Management menu, in order
to view, download, and activate software versions (see
“Managing software for a Nortel SNAS 4050 device
using the CLI” on page 734).
halt
Stops the Nortel SNAS 4050 device to which you are
connected (using Telnet, SSH, or a console
connection). If you have a Telnet or SSH connection to
the Management IP address (MIP), use the
/cfg/sys/host #/
halt command instead (see page 467).
Note: Always use the halt command before turning
off the device.
Nortel Secure Network Access Switch 4050 User Guide
734 Chapter 14 Maintaining and managing the system
/boot
followed by:
reboot
Reboots the Nortel SNAS 4050 device to which you are
connected (using Telnet, SSH, or a console
connection). If you have a Telnet or SSH connection to
the Management IP address (MIP), use the
/cfg/sys/host #/reboot command instead
(see page 468).
delete
Resets the Nortel SNAS 4050 device to which you are
connected (using Telnet, SSH, or a console
connection) to its factory default configuration. All IP
configuration is lost. The software itself remains intact.
After executing the delete command, you can only
access the device using a console connection. Log on
as the Admin user (user name: admin, password:
admin) to enter the Setup menu.
Note: If you receive a warning that the device you are
trying to delete has no contact with any other master
Nortel SNAS 4050 device in the cluster, also connect to
the MIP (using Telnet or SSH) and delete the Nortel
SNAS 4050 device from the cluster by using the
/cfg/sys/host #/delete command (see
page 468).
The /boot/delete command is primarily intended
for when you want to delete a Nortel SNAS 4050
device in one of the following situations :
• The device has become isolated from the cluster,
• The device has been physically removed from the
cluster without first performing the
/cfg/sys/host #/delete command.
In these situations, you must use the /boot/delete
command to present the Setup menu, from which you
can perform the new and join commands.
Managing software for a Nortel SNAS 4050 device using
the CLI
To view, download, and activate software versions for the Nortel SNAS 4050
device to which you are connected, use the following command:
/boot/software
The Software Management menu displays.
320818-A
Chapter 14 Maintaining and managing the system 735
The Software Management menu includes the following options:
/boot/software
followed by:
cur
Displays the status of the software versions on the
particular device to which are connected. The status
options are:
• permanent — the software version that is
currently operational
• old — the software version that preceded the
currently operational software version
• unpacked — the software upgrade package has
been downloaded but not yet activated
If you activate a software version indicated as either
unpacked or old, the status of that version is
propagated to permanent . The software status
change occurs after the Nortel SNAS 4050 device
performs a reboot.
activate <version>
Activates a downloaded software upgrade package that
the cur command indicates as unpacked. If serious
problems occur when the new software version runs,
you can switch back to the previous version by
activating the software version that the cur command
indicates as old.
The Nortel SNAS 4050 reboots when you confirm the
activate command.
Note: When you activate a software upgrade on a
Nortel SNAS 4050 device, all the Nortel SNAS 4050
devices in the cluster reboot. All active sessions are
lost.
Nortel Secure Network Access Switch 4050 User Guide
736 Chapter 14 Maintaining and managing the system
/boot/software
followed by:
download <protocol>
<server> <filename>
Downloads a new software package from the specified
file exchange server, in order to perform a minor or
major upgrade. You are prompted to provide the
following parameters if you do not specify them in the
command:
• protocol is the import protocol. Options are
tftp|ftp|scp|sftp. The default is tftp.
• server is the host name or IP address of the file
exchange server.
• filename is the name of the software upgrade
package. Software upgrade packages typically
have the .pkg file name extension.
• for FTP, SCP, and SFTP, user name and password
If you include a directory path and file name
(separated by a forward slash (/)) on the same line
as the FTP server host name or IP address when
you run the command, make sure you put the
combined directory path and file name string within
double quotation marks. For example:
>> Software Management# download
ftp 10.0.0.1 “pub/SSL-5.1.1upgrade_complete.pkg”
If you are using anonymous mode when
downloading the software package from an FTP
server, the Nortel SNAS 4050 uses the following
string as the password (for logging purposes):
admin@<hostname>.isd
del
Removes a software package that has been
downloaded but not yet activated (status is
unpacked). You cannot delete software versions with
any other status (see the cur command).
Managing and maintaining the system using the SREM
Performing maintenance using the SREM
To perform maintenance activities, choose from one of the following tasks:
•
•
320818-A
“Dumping logs and status information using the SREM” on page 737
“Starting and stopping a trace using the SREM” on page 738
Chapter 14 Maintaining and managing the system 737
•
•
“Backing up or restoring the configuration using the SREM” on page 742
“Checking configuration using the SREM” on page 741
Dumping logs and status information using the SREM
You can dump logs and statistics about the current internal status of the system to
a file exchange server. The information can then be used for technical support
purposes.
To dump logs or statistics, perform the following steps:
1
Select the System > Maintenance > Dumps tab.
The Dumps screen appears (see Figure 223).
Figure 223 Dumps
Nortel Secure Network Access Switch 4050 User Guide
738 Chapter 14 Maintaining and managing the system
2
Enter the Dump information in the applicable fields. Table 167 describes the
Dump fields.
Table 167 Dump fields
Field
Description
Dumplogs/Dumpstats
Specifies whether to dump logs or statistics.
Protocol
Specifies the export protocol. Options are FTP, TFTP,
SFTP. The default is FTP.
Hostname/IP Address
Specifies the host name or IP address of the file exchange
server.
Filename
Specifies the name of the destination file on the file
exchange server. The file is in gzip compressed tar format.
Collect info for all iSDs
Specifies whether the information is to be collected from all
Nortel SNAS 4050 devices in the cluster or only from the
device to which you are connected. The options are yes (=
all) or no (= single device). The default is no.
Username
Specifies the user name to access a file exchange server.
For FTP and SFTP.
Password
Specifies the password to access a file exchange server.
For FTP and SFTP.
3
Click Dump.
Starting and stopping a trace using the SREM
You can perform a trace to log information about a client session.
320818-A
Chapter 14 Maintaining and managing the system 739
To start or stop a trace, perform the following steps:
1
Select the System > Maintenance > Start/Stop Trace tab.
The Start/Stop Trace screen appears (see Figure 224).
Figure 224 Start/Stop Trace
Nortel Secure Network Access Switch 4050 User Guide
740 Chapter 14 Maintaining and managing the system
2
Enter the Trace information in the applicable fields. Table 168 describes the
Start/Stop Trace fields.
Table 168 Start/Stop Trace fields
320818-A
Field
Description
Trace type
Specifies the specific features or subsystems to which you
want to limit tracing. Options are:
• aaa — logs authentication method, user name, group,
and extended profile
• dns — logs failed DNS lookups made during the
session
• ssl — logs information related to the SSL handshake
procedure (for example, the cipher used)
• tg — logs information related to the TunnelGuard check
(for example, TunnelGuard session status and the SRS
rule check result)
• snas — logs operations and events of Nortel
SNA-controlled switches
To trace all available types, choose the Select all available
option.
Note: If listed, the following options are not supported in
Nortel Secure Network Access Switch
Software Release 1.0: pptp, upref, smb, ftp.
Domain
Specifies the Nortel SNAS 4050 domain to which you want
to limit tracing.
Protocol
Specifies the file export protocol. The options are TFTP,
FTP, SFTP. The default is TFTP.
Hostname
Specifies the hostname or IP address of the host where a
trace file is created.
Username
Specifies the user name to access a file exchange server.
For FTP and SFTP.
Password
Specifies the password to access a file exchange server.
For FTP and SFTP.
Remote Filename
Specifies the file name for the remote trace file.
3
To start the trace, click Start Trace.
4
To stop the trace, click Stop Trace.
Chapter 14 Maintaining and managing the system 741
Checking configuration using the SREM
You can check connectivity to verify that the Nortel SNAS 4050 is able to contact
gateways, routers, DNS servers, and authentication servers in the system
configuration. The command also checks if the Nortel SNAS 4050 can connect to
web servers specified in group links. The SREM displays the result of the
connectivity check as well as the method used for the check (for example, ping).
To check the configuration, perform the following steps:
1
Select the System > Maintenance > Check Configuration tab.
The Check Configuration screen appears (see Figure 225).
Figure 225 Check Configuration
2
Click Check Configuration.
3
When the check is complete, results are displayed on the screen.
Nortel Secure Network Access Switch 4050 User Guide
742 Chapter 14 Maintaining and managing the system
Backing up or restoring the configuration using the SREM
You can save the current configuration, including private keys and certificates, to a
file on the specified file exchange server as backup. You can later use this backup
file to restore the configuration.
To create a backup of your system or restore the configuration from an existing
backup, perform the following steps:
1
Select the System > Maintenance > Backup & Restore tab.
The Backup & Restore screen appears (see Figure 226).
Figure 226 Backup & Restore
320818-A
Chapter 14 Maintaining and managing the system 743
2
Enter the Backup/Restore information in the applicable fields. Table 169
describes the Backup & Restore fields.
Table 169 Backup & Restore fields
Field
Description
Backup/Restore
Specifies whether to back up or restore the configuration.
Protocol
Specifies the protocol to use to export or import the backup
file. The options are TFTP, FTP, SFTP. The default is TFTP.
Hostname
Specifies the host name or IP address of the file exchange
server.
Filename
Specifies the name of the backup file on the file exchange
server.
Private Key password
Specifies a password phrase used to protect the private
keys in the configuration.
Note: If you have fully separated the Administrator user
role from the Certificate Administrator user role, the export
passphrase defined by the Certificate Administrator is used
to protect the private keys in the configuration when
performing the backup, and this is transparent to the user.
If you later restore the configuration, the Certificate
Administrator must enter the correct passphrase. For more
information on separating the Administrator user role from
the Certificate Administrator user role, see “User rights and
group membership” on page 354.
Username
For FTP and SFTP, the user name to access the file
exchange server.
Password
For FTP and SFTP, the password to access the file
exchange server.
3
Click Apply on the toolbar to send the current changes to the Nortel
SNAS 4050. Click Commit on the toolbar to save the changes permanently.
Managing Nortel SNAS 4050 devices and software using
the SREM
To configure boot settings, choose from one of the following tasks:
•
•
“Managing software versions using the SREM” on page 744
“Downloading images using the SREM” on page 748
Nortel Secure Network Access Switch 4050 User Guide
744 Chapter 14 Maintaining and managing the system
•
“Rebooting or deleting a Nortel SNAS 4050 device using the SREM” on
page 750
Managing software versions using the SREM
To manage software images and perform upgrades on the Nortel SNAS 4050
device to which you are connected, select the System > Boot > Image List tab.
The Image List screen appears (see Figure 227), listing a history of the Nortel
SNAS 4050 software versions used on this device.
Figure 227 Image List
320818-A
Chapter 14 Maintaining and managing the system 745
Table 170 describes the Image List fields.
Table 170 Image List fields
Field
Description
Index
Displays the software version.
Name
Displays the name of the Nortel SNAS 4050 device.
Status
Displays the status of the software version on the particular
device to which are connected. The status options are:
• permanent — the software version that is currently
operational
• old — the software version that preceded the currently
operational software version
• unpacked — the software upgrade package has
been downloaded but not yet activated
If you activate a software version indicated as either
unpacked or old, the status of that version is
propagated to permanent . The software status change
occurs after the Nortel SNAS 4050 device performs a
reboot.
The following tasks are available from this screen:
•
•
•
“Viewing details of the active software image” on page 746
“Activating a software image” on page 747
“Removing an inactive software image” on page 748
Nortel Secure Network Access Switch 4050 User Guide
746 Chapter 14 Maintaining and managing the system
Viewing details of the active software image
To view the details of the currently active software image on the Nortel
SNAS 4050 device to which you are connected, perform the following steps:
1
Select the System > Boot > Image List tab.
The Image List screen appears (see Figure 227 on page 744).
2
Select the image with a Status of permanent from the Image List.
The Image screen appears, displaying information about the active image (see
Figure 228). For a description of each field that is displayed, see “Managing
software versions using the SREM” on page 744.
Figure 228 Image
320818-A
Chapter 14 Maintaining and managing the system 747
Activating a software image
To activate an old or unpacked software image on the Nortel SNAS 4050 device to
which you are connected, perform the following steps:
1
Select the System > Boot > Image List tab.
The Image List screen appears (see Figure 227 on page 744).
2
Select an image with a Status of either old or unpacked from the Image List.
The Image screen appears, displaying information about the selected image
(see Figure 229). For a description of each field that is displayed, see
“Managing software versions using the SREM” on page 744.
Figure 229 Image
3
Click Activate to make the selected image active.
A confirmation dialog box appears.
Nortel Secure Network Access Switch 4050 User Guide
748 Chapter 14 Maintaining and managing the system
4
When prompted, click Yes.
The Nortel SNAS 4050 reboots when you confirm the Activate command.
Note: When you activate a software upgrade on a Nortel SNAS 4050
device, all the Nortel SNAS 4050 devices in the cluster reboot. All active
sessions are lost.
Removing an inactive software image
To remove an inactive software images on the Nortel SNAS 4050 device to which
you are connected, perform the following steps:
1
Select the System > Boot > Image List tab.
The Image List screen appears (see Figure 227 on page 744).
2
Select an inactive image from the table.
Inactive images have a Status of old or unpacked in the Image List.
3
Click Delete.
A confirmation dialog box appears.
4
When prompted, click Yes.
The image is removed from the Image List
The active image cannot be removed from the Nortel SNAS 4050 device. To
remove the active image, you must first select another available image to activate
(see “Activating a software image” on page 747).
Downloading images using the SREM
Before you can perform a software upgrade, you must download the image file.
320818-A
Chapter 14 Maintaining and managing the system 749
To download an image from a file exchange server, perform the following steps:
1
Select the System > Boot > Download Image tab.
The Download Image screen appears (see Figure 230).
Figure 230 Download Image
Nortel Secure Network Access Switch 4050 User Guide
750 Chapter 14 Maintaining and managing the system
2
Enter the Download Image information in the applicable fields. Table 171
describes the Download Image fields.
Table 171 Download Image fields
Field
Description
Download Type
Specifies the import protocol. The options are TFTP, FTP,
SCP, SFTP. The default is TFTP.
Host
Specifies the host name or IP address of the file exchange
server.
Filename
Specifies the name of the software upgrade package.
Software upgrade packages typically have the .pkg file
name extension.
Username
For FTP, SCP, and SFTP, the user name to access the file
exchange server.
Password
For FTP, SCP, and SFTP, the password to access the file
exchange server.
If you are using anonymous mode when downloading the
software package from an FTP server, the Nortel
SNAS 4050 uses the following string as the password (for
logging purposes):
admin@<hostname>.isd
3
Click Apply on the toolbar to send the current changes to the Nortel
SNAS 4050. Click Commit on the toolbar to save the changes permanently.
Rebooting or deleting a Nortel SNAS 4050 device using the
SREM
You can shut down or reboot a Nortel SNAS 4050 device that has become isolated
from the cluster. You can reset a Nortel SNAS 4050 device to its factory default
configuration.
320818-A
Chapter 14 Maintaining and managing the system 751
To reboot, shut down, or reset the Nortel SNAS 4050 device to which you are
connected, perform the following steps:
1
Select the System > Boot > Reboot/Delete ISD Options tab.
The Reboot/Delete ISD Options screen appears (see Figure 231).
Figure 231 Reboot/Delete ISD Options
2
To reboot the Nortel SNAS 4050 device to which you are connected, click
Reboot. When prompted, click Yes.
3
To shut down the Nortel SNAS 4050 device to which you are connected, click
Halt. When prompted, click Yes.
Always use this command before turning off the device.
4
To reset the Nortel SNAS 4050 device to which you are connected, click
Delete. When prompted, click Yes.
Nortel Secure Network Access Switch 4050 User Guide
752 Chapter 14 Maintaining and managing the system
The command resets the device to its factory default configuration. All
IP configuration is lost. The software itself remains intact. After executing the
delete command, you can only access the device using a console connection
and performing the initial setup.
If you receive a warning that the device you are trying to delete has no contact
with any other master Nortel SNAS 4050 device in the cluster, also connect to
the MIP and delete the Nortel SNAS 4050 device from the cluster by using the
delete command on the System > Hosts screen.
The delete command on the Reboot/Delete ISD Options tab is primarily
intended for when you want to delete a Nortel SNAS 4050 device in one of
the following situations:
•
•
The device has become isolated from the cluster,
The device has been physically removed from the cluster without first
executing the delete command on the System > Hosts screen.
Downloading files using the SREM
To download files to the Nortel SNAS 4050 using the SREM, select the File
Download tab.
320818-A
Chapter 14 Maintaining and managing the system 753
The File Download screen appears (see Figure 232).
Figure 232 File Download screen
Table 172 describes the File Download fields.
Table 172 File Download fields
Field
Description
Download Type
The file download protocol. The options are FTP, SFTP,
and SCP. The default is SFTP.
Host Name
The host name or IP address of the file exchange
server.
Username
The user name and password to access the file
exchange server.
Password
The user name and password to access the file
exchange server.
Nortel Secure Network Access Switch 4050 User Guide
754 Chapter 14 Maintaining and managing the system
Table 172 File Download fields
Field
Description
Remote File Path
The remote path where the file resides.
Local Directory
The local directory used to save the downloaded file.
Running Nortel SNAS 4050 diagnostics using the SREM
To run basic diagnostics on the Nortel SNAS 4050, select the Diagnostics tab.
The Diagnostics screen appears (see Figure 233).
Figure 233 Diagnostics screen
320818-A
Chapter 14 Maintaining and managing the system 755
Table 173 describes the Diagnostics fields.
Table 173 Diagnostics fields
Field
Description
Operation
The diagnostic operation to perform. The options are:
• Ping — verify station-to-station connectivity across
the network.
• TraceRoute — identify the route used for
station-to-station connectivity across the network.
• NSLookup — find the IP address or host name of a
machine. In order to use this command, the Nortel
SNAS 4050 must be configured use a DNS server.
The default operation is Ping.
IP Address or Host Name
The IP address or Host name on which to perform the
diagnostic operation.
Nortel Secure Network Access Switch 4050 User Guide
756 Chapter 14 Maintaining and managing the system
320818-A
757
Chapter 15
Upgrading or reinstalling the software
This chapter includes the following topics:
Topic
Page
Upgrading the Nortel SNAS 4050
757
Performing minor and major release upgrades
758
Activating the software upgrade package
760
Reinstalling the software
763
Before you begin
763
Reinstalling the software from an external file server
765
Reinstalling the software from a CD
767
The Nortel SNAS 4050 software image is the executable code running on the
Nortel SNAS 4050. A version of the image ships with the Nortel SNAS 4050 and
is preinstalled on the device. As new versions of the image are released, you can
upgrade the software running on your Nortel SNAS 4050. In some cases, you may
need to reinstall the software on the Nortel SNAS 4050 in order to return the
device to its factory defaults.
Upgrading the Nortel SNAS 4050
There are two types of upgrades:
•
Minor release upgrade: This is typically a bug fix release. All configuration
data is retained. To perform a minor upgrade, connect to the Management IP
address (MIP) of the cluster you want to upgrade.
Nortel Secure Network Access Switch 4050 User Guide
758 Chapter 15 Upgrading or reinstalling the software
Major release upgrade: This kind of release may contain bug fixes as well as
feature enhancements. All configuration data is retained. To perform a major
upgrade, connect to the MIP of the cluster you want to upgrade.
Note: When you activate a software upgrade on a Nortel SNAS 4050
device, all the Nortel SNAS 4050 devices in the cluster reboot. All active
sessions are lost.
Upgrading the software on your Nortel SNAS 4050 requires the following:
1
Loading the new software upgrade package or install image onto a TFTP/
FTP/SCP/SFTP server on your network.
2
Downloading the new software from the TFTP/FTP/SCP/SFTP server to your
Nortel SNAS 4050.
3
Activating the software on the Nortel SNAS 4050.
Note: Before upgrading, check the accompanying release notes for any
specific actions to take for the particular software upgrade package or
install image.
Performing minor and major release upgrades
The following description applies to a minor or a major release upgrade.
To upgrade the Nortel SNAS 4050 you will need the following:
•
•
•
•
320818-A
Access to one of your Nortel SNAS 4050 devices through a remote
connection (Telnet or SSH), or a console connection.
The software upgrade package, loaded on a TFTP/FTP/SCP/SFTP server on
your network.
The host name or IP address of the TFTP/FTP/SCP/SFTP server. If you
choose to specify the host name, note that the DNS parameters must have
been configured. For more information, see “Configuring DNS servers and
settings using the CLI” on page 477.
The name of the software upgrade package (upgrade packages are identified
by the .pkg file name extension).
Chapter 15 Upgrading or reinstalling the software 759
The set of installed Nortel SNAS 4050 devices you are running in a cluster
cooperate to give you a single system view. Thus, to perform an upgrade, you only
need to connect to the MIP of the cluster. The upgrade will automatically be
executed on all the Nortel SNAS 4050 devices in operation at the time of the
upgrade. All configuration data is retained.
You can access the MIP by a Telnet or an SSH connection.
Note: Telnet and SSH connections to the Nortel SNAS 4050 are
disabled by default, after the initial setup has been performed. For more
information about enabling Telnet and SSH connections, see
“Configuring administrative settings using the CLI” on page 483.
When you have gained access to the Nortel SNAS 4050, use one of the following
methods to download the software upgrade package:
•
•
“Downloading the software image using the CLI” on page 759
“Downloading images using the SREM” on page 748
Downloading the software image using the CLI
To download the software upgrade package using the CLI, perform the following
steps:
1
Enter the following command at the Main menu prompt. Then select whether
to download the software upgrade package from a TFTP/FTP/SCP/SFTP
server.
For some TFTP servers, files larger than 16 MB may cause the upgrade to fail.
>> Main# boot/software/download
Select protocol (tftp/ftp/scp/sftp) [tftp]:ftp
2
Enter the host name or IP address of the server.
Enter hostname or IP address of server: <server host name or IP>
3
Enter the file name of the software upgrade package to download.
Nortel Secure Network Access Switch 4050 User Guide
760 Chapter 15 Upgrading or reinstalling the software
If needed, the file name can be prefixed with a search path to the directory on
the TFTP/FTP/SCP/SFTP server.
If you are using anonymous mode when downloading the software package
from an FTP server, the following string is used as the password (for logging
purposes):
admin@hostname/IP.isd.
Enter filename on server: <filename.pkg>
FTP User (anonymous): <username or press ENTER for anonymous mode>
Password: <password or press ENTER for default password in anonymous mode>
Received 28200364 bytes in 4.0 seconds
Unpacking...
ok
>> Software Management#
Activating the software upgrade package
The Nortel SNAS 4050 can hold up to two software versions simultaneously. To
view the current software status, use the /boot/software/cur command.
When a new version of the software is downloaded to the Nortel SNAS 4050, the
software package is decompressed automatically and marked as unpacked. After
you activate the unpacked software version (which causes the Nortel SNAS 4050
to reboot), the software version is marked as permanent. The software version
previously marked as permanent will then be marked as old.
For minor and major releases, the software upgrade occurs in synchronized
fashion among the set of Nortel SNAS 4050 devices in a cluster. If a Nortel
SNAS 4050 device in a cluster is not operational when the software is upgraded, it
will automatically pick up the new version when it is started.
Note: If more than one software upgrade has been performed on a
cluster while a Nortel SNAS 4050 device has been out of operation, the
software version currently in use in that cluster must be reinstalled on
that Nortel SNAS 4050 device. For more information about how to
perform a reinstall, see “Reinstalling the software” on page 763.
320818-A
Chapter 15 Upgrading or reinstalling the software 761
When you have downloaded the software upgrade package, you can inspect its
status with the /boot/software/cur command.
4
At the Software Management# prompt, enter the following command:
>> Software Management# cur
Version
Name
---------x.x
NSNAS
z.z
NSNAS
Status
-----unpacked
permanent
The downloaded software upgrade package is indicated with the status
unpacked. The software versions can be marked with one out of four
possible status values. The meaning of these status values are:
— unpacked means that the software upgrade package has been
downloaded and automatically decompressed.
— permanent means that the software is operational and will survive a
reboot of the system.
— old means the software version has been permanent but is not currently
operational. If a software version marked old is available, it is possible to
switch back to this version by activating it again.
— current means that a software version marked as old or unpacked has
been activated. As soon as the system has performed the necessary health
checks, the current status changes to permanent.
To activate the unpacked software upgrade package, use the /boot/
software/activate command.
Note: When you activate a software upgrade on a Nortel SNAS 4050
device, all the Nortel SNAS 4050 devices in the cluster reboot. All active
sessions are lost.
Nortel Secure Network Access Switch 4050 User Guide
762 Chapter 15 Upgrading or reinstalling the software
5
At the Software Management# prompt, enter:
>> Software Management# activate x.x
Confirm action 'activate'? [y/n]: y
Activate ok, relogin
out here>
Restarting system.
<you are logged
login:
Note: Activating the unpacked software upgrade package may cause the
command line interface (CLI) software to be upgraded as well.
Therefore, you will be logged out of the system, and will have to log in
again. Wait until the login prompt appears. This may take up to two
minutes, depending on your type of hardware platform and whether the
system reboots.
6
Log in again and verify the new software version:
>> Main# boot/software/cur
Version
Name
---------x.x
NSNAS
z.z
NSNAS
Status
-----permanent
old
In this example, version x.x is now operational and will survive a reboot of the
system, while the software version previously indicated as permanent is marked
as old.
Note: If you encounter serious problems while running the new
software version, you can revert to the previous software version (now
indicated as old). To do this, activate the software version indicated as
old. When you log in again after having activated the old software
version, its status is indicated as current for a short while. After about
one minute, when the system has performed the necessary health checks,
the current status is changed to permanent.
320818-A
Chapter 15 Upgrading or reinstalling the software 763
Reinstalling the software
If you are adding a Nortel SNAS 4050 device to an existing cluster, you may need
to reinstall the software on the new Nortel SNAS 4050 if the software versions on
the new Nortel SNAS 4050 and the existing Nortel SNAS 4050 cluster differ.
Otherwise, it is only in the case of serious malfunction that you might need to
reinstall the software, and this seldom occurs.
You must perform the reinstall using a console connection.
Reinstalling the software resets the Nortel SNAS 4050 to its factory default
configuration. The reinstall erases all other configuration data and current
software, including old software image versions or upgrade packages that may be
stored in the flash memory card or on the hard disk.
Before you begin
To reinstall the software on the Nortel SNAS 4050 from an external file server,
you require the following:
•
•
•
•
access to the Nortel SNAS 4050 using a console connection
an install image, loaded on a TFTP/FTP/SCP/SFTP server on your network
the IP address of the TFTP/FTP/SCP/SFTP server
the name of the install image
Nortel Secure Network Access Switch 4050 User Guide
764 Chapter 15 Upgrading or reinstalling the software
•
authorization to log on as the boot user
Note: A reinstall wipes out all configuration data, including network
settings. Before reinstalling the software on a Nortel SNAS 4050 device
with a working configuration, save all configuration data to a file on a
TFTP/FTP/SCP/SFTP server. If you use the ptcfg command in the CLI,
the saved configuration data will include installed keys and certificates.
You can later restore the configuration, including the installed keys and
certificates, by using the gtcfg command. (For more information about
these CLI commands, see “Backing up or restoring the configuration
using the CLI” on page 730. For information about using the SREM to
perform these functions, see “Backing up or restoring the configuration
using the SREM” on page 742.) If you want to make separate backup
copies of your keys and certificates, use the display or export
commands. (For more information about these commands, see “Saving
or exporting certificates and keys” on page 574. For information about
using the SREM to perform these functions, see “Displaying or saving a
certificate and key using the SREM” on page 605 or “Exporting a
certificate and key from the Nortel SNAS 4050 using the SREM” on
page 607.)
If a software CD was shipped with the Nortel SNAS 4050, you can also reinstall
the software from the CD (see “Reinstalling the software from a CD” on
page 767).
320818-A
Chapter 15 Upgrading or reinstalling the software 765
Reinstalling the software from an external file server
To reinstall the software image downloaded to an external file server, perform the
following steps:
1
Log on as the boot user. The password for the boot user is ForgetMe.
login: boot
Password: ForgetMe
*** Reinstall Upgrade Procedure ***
If you proceed beyond this point, the active network
configuration will be reset, requiring a reboot to
restore any current settings. However, no permanent
changes will be done until the boot image has been
downloaded.
Continue (y/n)? [y]:
Press Enter to accept the default (yes) and continue.
2
Specify the network port and IP network settings.
If the Nortel SNAS 4050 was previously configured for network access, the
previous settings are the suggested default values presented within square
brackets. To accept the suggested values, press Enter. If the Nortel
SNAS 4050 was not previously configured for network access, or you deleted
the Nortel SNAS 4050 from the cluster using the /boot/delete command,
no suggested values related to a previous configuration are presented within
square brackets; you must provide information about the network settings.
a
Specify the port for network connectivity.
b
If the core router attaches VLAN tag IDs to incoming packets, specify the
VLAN tag ID used.
c
Specify the host IP address for the device.
d
Specify the network mask.
Nortel Secure Network Access Switch 4050 User Guide
766 Chapter 15 Upgrading or reinstalling the software
e
Specify the default gateway IP address.
Select a network port (1-4, or i for info) [1]:
Enter VLAN tag id (or zero for no VLAN tag) [0]:
Enter IP address for this iSD [192.168.128.185]:
Enter network mask [255.255.255.0]:
Enter gateway IP address [192.168.128.1]:
3
Specify the download details:
a
protocol for the download method
b
server IP address
c
file name of the boot image
d
user name and password, if the server does not support anonymous logon.
The default is anonymous.
Select protocol (tftp/ftp/scp/sftp) [tftp]: <protocol>
Enter <protocol> server address: <IPaddr>
Enter file name of boot image: NSNAS-x.x.x-boot.img
Enter FTP Username [anonymous]:
Password:
Downloading boot image...
Installing new boot image...
Done
Note: For some TFTP servers, files larger than 16 MB may cause the
update to fail.
4
Wait for the Nortel SNAS 4050 to reboot on the newly installed boot image.
Restarting...
Restarting system.
Alteon WebSystems, Inc.
Booting...
0004004C
Login:
5
320818-A
Log on as the admin user to enter the Setup menu and perform the initial
setup of the Nortel SNAS 4050 device (see “Initial setup” on page 49).
Chapter 15 Upgrading or reinstalling the software 767
Reinstalling the software from a CD
To reinstall the software image from a CD, perform the following steps:
1
Boot the Nortel SNAS 4050 from the CD.
2
Log on as the root user (no password).
3
Run install-nsnas isd4050.
4
When the installation is complete, remove the CD and reboot.
Nortel Secure Network Access Switch 4050 User Guide
768 Chapter 15 Upgrading or reinstalling the software
320818-A
769
Chapter 16
The Command Line Interface
This chapter explains how to access the Nortel SNAS 4050 through the Command
Line Interface (CLI).
This chapter includes the following topics:
Topic
Page
Connecting to the Nortel SNAS 4050
770
Establishing a console connection
770
Establishing a Telnet connection
772
Establishing a connection using SSH
773
Accessing the Nortel SNAS 4050 cluster
775
CLI Main Menu or Setup
777
Command line history and editing
777
Idle timeout
777
The Nortel SNAS 4050 software provides means for accessing, configuring, and
viewing information and statistics about the Nortel SNAS 4050 configuration. By
using the built-in, text-based command line interface and menu system, you can
access and configure the Nortel SNAS 4050 or cluster either through a local
console connection (using a computer running terminal emulation software) or
through a remote session using a Telnet client or a Secure Shell (SSH) client.
Nortel Secure Network Access Switch 4050 User Guide
770 Chapter 16 The Command Line Interface
When using a Telnet or SSH client to connect to a cluster of Nortel SNAS 4050
devices, always connect to the Management IP address (MIP). Configuration
changes are automatically propagated to all members of the cluster. However, to
use the /boot/halt, /boot/reboot, or /boot/delete commands, connect to
the Real IP address (RIP) of the particular Nortel SNAS 4050 device on which
you want to perform these commands, or connect to that Nortel SNAS 4050 with a
console connection.
Connecting to the Nortel SNAS 4050
You can access the CLI in two ways:
•
•
using a console connection through the console port (see “Establishing a
console connection” on page 770)
using a Telnet connection or SSH connection over the network (see
“Establishing a Telnet connection” on page 772 or “Establishing a connection
using SSH” on page 773)
Establishing a console connection
Use a console connection to perform the initial setup and when reinstalling the
Nortel SNAS 4050 software as the boot user. You must also use a console
connection when logging in as root user for advanced troubleshooting purposes.
320818-A
Chapter 16 The Command Line Interface 771
Requirements
To establish a console connection with the Nortel SNAS 4050, you need the
following:
•
An ASCII terminal or a computer running terminal emulation software set to
the parameters shown in Table 174:
Table 174 Console configuration parameters
Parameter
Value
Baud rate
Data bits
Parity
Stop bits
Flow control
9600
8
None
1
None
•
A serial cable with a female DB-9 connector. For more specific information,
see the chapter about connecting to the Nortel SNAS 4050 in Nortel Secure
Network Access Switch 4050 Installation Guide (320846-A).
Procedure
1
Connect the terminal to the Console port using the correct serial cable.
When connecting to a Nortel SNAS 4050, use a serial cable with a female
DB-9 connector (shipped with the Nortel SNAS 4050).
2
Power on the terminal.
3
To establish the connection, press ENTER on your terminal.
You will next be required to log on by entering a user name and a password. For
more information on user accounts and default passwords, see “Accessing the
Nortel SNAS 4050 cluster” on page 775.
Nortel Secure Network Access Switch 4050 User Guide
772 Chapter 16 The Command Line Interface
Establishing a Telnet connection
A Telnet connection offers the convenience of accessing the Nortel SNAS 4050
cluster from any workstation connected to the network. Telnet access provides the
same options for user access and administrator access as those available through
the console port.
When you use a Telnet connection to access the Nortel SNAS 4050 from a
workstation connected to the network, the communication channel is not secure.
All data flowing back and forth between the Telnet client and the Nortel
SNAS 4050 is sent unencrypted (including the password), and there is no server
host authentication.
To configure the Nortel SNAS 4050 cluster for Telnet access, you need to have a
device with Telnet client software located on the same network as the Nortel
SNAS 4050 device or cluster. The Nortel SNAS 4050 must have a RIP and a MIP.
If you have already performed the initial setup by selecting new or join in the
Setup menu, the assignment of IP addresses is complete.
When you are making configuration changes to a cluster of Nortel SNAS 4050
devices using Telnet, Nortel recommends that you connect to the MIP. However, if
you want to halt or reboot a particular Nortel SNAS 4050 in a cluster, or reset all
configuration to the factory default settings, you must connect to the RIP (the IP
address of the particular Nortel SNAS 4050 device). To view the IP addresses of
all Nortel SNAS 4050 devices in a cluster, use the /info/contlist command
(see page 664).
Enabling and restricting Telnet access
Telnet access to the Nortel SNAS 4050 cluster is disabled by default, for security
reasons. However, depending on the severity of your security policy, you may
want to enable Telnet access. You may also restrict Telnet access to one or more
specific machines.
For more information on how to enable Telnet access, see the
/cfg/sys/adm/telnet command (see page 484). For more information on
how to restrict Telnet access to one or more specific machines, see “Configuring
the Access List using the CLI” on page 474.
320818-A
Chapter 16 The Command Line Interface 773
Running Telnet
Once the IP parameters on the Nortel SNAS 4050 are configured and Telnet
access is enabled, you can access the CLI using a Telnet connection. To establish a
Telnet connection with the Nortel SNAS 4050, run the Telnet program on your
workstation and issue the Telnet command, followed by the IP address of the
Nortel SNAS 4050.
telnet <IP address>
You will then be prompted to enter a valid user name and password. For more
information about different user accounts and default passwords, see “Accessing
the Nortel SNAS 4050 cluster” on page 775.
Establishing a connection using SSH
Using an SSH client to establish a connection over the network provides the
following security benefits:
•
•
•
server host authentication
encryption of passwords for user authentication
encryption of all traffic that is transmitted over the network when configuring
or collecting information from the Nortel SNAS 4050
Enabling and restricting SSH access
SSH access to the Nortel SNAS 4050 is disabled by default. However, depending
on the severity of your security policy, you may want to enable SSH access. You
may also restrict SSH access to one or more specific machines.
For more information on how to enable SSH access, see the /cfg/sys/adm/ssh
command (see page 484). For more information on how to restrict SSH access to
one or more specific machines, see “Configuring the Access List using the CLI”
on page 474.
Nortel Secure Network Access Switch 4050 User Guide
774 Chapter 16 The Command Line Interface
Running an SSH client
Connecting to the Nortel SNAS 4050 using an SSH client is similar to connecting
using Telnet: the IP parameters on the Nortel SNAS 4050 must be configured in
advance, and SSH access must be enabled. After you provide a valid user name
and password, the CLI in the Nortel SNAS 4050 is accessible the same way as
when using a Telnet client. However, since a secured and encrypted
communication channel is set up even before the user name and password is
transmitted, all traffic sent over the network while configuring or collecting
information from the Nortel SNAS 4050 is encrypted. For information about
different user accounts and default passwords, see “Accessing the Nortel
SNAS 4050 cluster” on page 775.
During the initial setup of the Nortel SNAS 4050 device or cluster, you are
provided with the choice to generate new SSH host keys. Nortel recommends that
you do so, in order to maintain a high level of security when connecting to the
Nortel SNAS 4050 using an SSH client. If you fear that your SSH host keys have
been compromised, you can create new host keys at any time by using the
/cfg/sys/adm/sshkeys/generate command. When reconnecting to the
Nortel SNAS 4050 after generating new host keys, your SSH client will display a
warning that the host identification (or host keys) has changed.
320818-A
Chapter 16 The Command Line Interface 775
Accessing the Nortel SNAS 4050 cluster
To enable better Nortel SNAS 4050 management and user accountability, there
are five categories of users who can access the Nortel SNAS 4050 cluster:
•
•
•
•
•
The Operator is granted read access only to the menus and information
appropriate to this user access level. The Operator cannot make any changes
to the configuration.
The Administrator can make any changes to the Nortel SNAS 4050
configuration. Thus, the Administrator has read and write access to all menus,
information, and configuration commands in the Nortel SNAS 4050 software.
A Certificate Administrator is a member of the certadmin group. A Certificate
Administrator has sufficient user rights to manage certificates and private
keys. By default, only the Administrator user is a member of the certadmin
group. To separate the Certificate Administrator user role from the
Administrator user role, the Administrator user can add a new user account to
the system, assign the new user to the certadmin group, and then remove
himself or herself from the certadmin group. For more information, see
“Adding a new user” on page 360.
The Boot user can perform a reinstallation only. For security reasons, it is
only possible to log on as the Boot user through the console port using
terminal emulation software. The default Boot user password is ForgetMe.
The Boot user password cannot be changed from the default.
The Root user is granted full access to the underlying Linux operating system.
For security reasons, it is only possible to log on as the Root user through the
console port using terminal emulation software. Reserve Root user access for
advanced troubleshooting purposes, under guidance from Nortel customer
support.
For more information, see “How to get help” on page 29.
Nortel Secure Network Access Switch 4050 User Guide
776 Chapter 16 The Command Line Interface
Access to the Nortel SNAS 4050 CLI and settings is controlled through the use of
four predefined user accounts and passwords. Once you are connected to the
Nortel SNAS 4050 by a console connection or remote connection (Telnet or SSH),
you are prompted to enter a user account name and the corresponding password.
Table 175 lists the default user accounts and passwords for each access level.
Note: The default Administrator user password can be changed during
the initial configuration (see “Initial setup” on page 49). However, the
default passwords for the Operator user, the Boot user, and the Root user
are used even after the initial configuration. Nortel therefore
recommends that you change the default Nortel SNAS 4050 passwords
for the Operator and Root user soon after the initial configuration, and as
regularly as required under your network security policies.
For more information about how to change a user account password, see
“Changing passwords” on page 366.
Table 175 User access levels
Default
Password
User Account
User Group
Access Level Description
oper
oper
The Operator is allowed read access to some of the
menus and information available in the CLI.
oper
admin
admin
oper
certadmin
The Administrator is allowed both read and write
access to all menus, information and configuration
commands.
The Administrator can add users to all groups in which
the Administrator himself or herself is a member. The
Administrator can delete a user from any of the other
three built-in groups.
admin
certadmin
By default, only the Administrator is a member of the
certadmin group.
Certadmin group rights are sufficient for administrating
certificates and keys on the Nortel SNAS 4050. A
certificate administrator user has no access to the SSL
Server menu, and only limited access to the System
menu.
boot
The boot user can only perform a reinstallation of the
software, and only via a console connection.
ForgetMe
root
The root user has full access to the underlying Linux
operating system, but only via a console connection.
ForgetMe
320818-A
Chapter 16 The Command Line Interface 777
CLI Main Menu or Setup
Once the Administrator user password is verified, you are given complete access
to the Nortel SNAS 4050. If the Nortel SNAS 4050 is still set to its factory default
configuration, the system will run Setup (see “Initial setup” on page 49), a utility
designed to help you through the first-time configuration process. If the Nortel
SNAS 4050 has already been configured, the Main menu of the CLI is displayed
instead.
Figure 234 shows the Main menu with administrator privileges.
Figure 234 Administrator Main Menu
[Main Menu]
info
stats
cfg
boot
maint
diff
apply
revert
paste
help
exit
-
Information Menu
Statistics Menu
Configuration Menu
Boot Menu
Maintenance Menu
Show pending config changes
[global command]
Apply pending config changes [global command]
Revert pending config changes [global command]
Restore saved config with key [global command]
Show command help menu
[global command]
Exit [global command, always available]
Command line history and editing
For a description of global commands, shortcuts, and command line editing
functions, see Appendix A, “CLI reference,” on page 803.
Idle timeout
The Nortel SNAS 4050 will disconnect your local console connection or remote
connection (Telnet or SSH) after 10 minutes of inactivity. This value can be
changed to a maximum value of 1 hour using the /cfg/sys/adm/clitimeout
command (see page 483).
Nortel Secure Network Access Switch 4050 User Guide
778 Chapter 16 The Command Line Interface
If you are automatically disconnected after the specified idle timeout interval, any
unapplied configuration changes are lost. Therefore, make sure to save your
configuration changes regularly by using the global apply command.
If you have unapplied configuration changes when you use the global exit
command to log out from the CLI, you will be prompted to use the global diff
command to view the pending configuration changes. After verifying the pending
configuration changes, you can either apply the changes or use the revert
command to remove them.
320818-A
779
Chapter 17
Configuration example
This chapter provides an example of a basic Nortel SNA configuration.
This chapter includes the following topics:
Topic
Page
Scenario
779
Steps
782
Configure the network DNS server
782
Configure the network DHCP server
783
Configure the network core router
789
Configure the Ethernet Routing Switch 8300 using the CLI
790
Configure the Ethernet Routing Switch 5510
793
Configure the Nortel SNAS 4050
795
Scenario
The basic Nortel SNA network in this example includes: one Nortel SNAS 4050
device; two edge switches (one Ethernet Routing Switch 8300 and one Ethernet
Routing Switch 5510) functioning as network access devices; an Ethernet Routing
Switch 8600 functioning as the core router; a BCM call server; a DNS server; a
DHCP server; and a remediation server. The edge switches function in Layer 2
mode.
Figure 235 on page 780 illustrates the network configuration.
Nortel Secure Network Access Switch 4050 User Guide
780 Chapter 17 Configuration example
Figure 235 Basic configuration
BCM
IP: 10.11.11.254/24
GW: 10.11.11.1
DNS
Server
IP: 10.20.20.2/24
GW: 10.20.20.1
Host IP: 10.40.40.2/24
Gateway: 10.40.40.1
MIP: 10.40.40.3
Portal: 10.40.40.100
VLAN 20
VLAN 50
1/23
1/1
NSNAS
1/7
VLAN 40
VLAN 30
1/11
1/31
Computer
1/48
1/16
1/48
DHCP
Server
IP: 10.30.30.2/24
GW: 10.30.30.1
1/47
Ethernet Routing
Switch 8600
10.200.200.10
Port 20
Port 3
Port 4
Port 5
Ethernet Routing
Switch 5510
10.200.200.20
Telephone
Ethernet Routing
Switch 8300
10.200.200.5
VLANs
1, 210, 220, 230, 240
Remediation
Server
IP: 10.120.120.2/24
GW: 10.120.120.1
1/17
VLANs
1, 110, 120, 130, 140
Computer
Computer
Telephone
Computer
Table 176 summarizes the devices connected in this environment and their
respective VLAN IDs and IP addresses.
Table 176 Network devices (Sheet 1 of 2)
Device/Service
VLAN ID
VLAN IP address
Device IP address
Ethernet Routing
Switch 8600 port
DNS
20
10.20.20.1
10.20.20.2
1/1
DHCP
30
10.30.30.1
10.30.30.2
1/11
320818-A
Chapter 17 Configuration example 781
Table 176 Network devices (Sheet 2 of 2)
Ethernet Routing
Switch 8600 port
Device/Service
VLAN ID
VLAN IP address
Device IP address
Nortel SNAS 4050
40
10.40.40.1
10.40.40.2 (RIP)
1/7
10.40.40.3 (MIP)
10.40.40.100 (pVIP)
Remediation server 120
10.120.120.1
10.120.120.2
1/31
Call server
10.11.11.1
10.11.11.254
1/23
50
Table 177 summarizes the VLANs for the Ethernet Routing Switch 8300.
Table 177 VLANs for the Ethernet Routing Switch 8300
VLAN
VLAN ID
Yellow subnet
Red
110
N/A
Yellow
120
10.120.120.0/24
Green
130
N/A
VoIP
140
N/A
Table 178 summarizes the VLANs for the Ethernet Routing Switch 5510.
Table 178 VLANs for the Ethernet Routing Switch 5510
VLAN
VLAN ID
Yellow subnet
Red
210
N/A
Yellow
220
10.120.120.0/24
Green
230
N/A
VoIP
240
N/A
Note: The management VLAN ID is the default (VLAN ID 1).
Nortel Secure Network Access Switch 4050 User Guide
782 Chapter 17 Configuration example
Steps
1
“Configure the network DNS server” on page 782
2
“Configure the network DHCP server” on page 783
3
“Configure the network core router” on page 789
4
“Configure the Ethernet Routing Switch 8300 using the CLI” on page 790
5
“Configure the Ethernet Routing Switch 5510” on page 793
6
“Adding the network access devices” on page 798
Configure the network DNS server
Create a forward lookup zone for the Nortel SNAS 4050 domain (see Figure 236).
In this example, a lookup zone called sac.com has been created.
Figure 236 DNS Forward Lookup configuration
320818-A
Chapter 17 Configuration example 783
Configure the network DHCP server
To configure a DHCP scope using the New Scope Wizard (Windows 2000 server):
1
Log in to the server using the administrator username and password.
2
Run the DHCP admin utility (Start > Programs > Administrative Tools >
DHCP).
3
Create a new DHCP scope (see Figure 237).
Figure 237 Creating a new DHCP scope
Nortel Secure Network Access Switch 4050 User Guide
784 Chapter 17 Configuration example
4
Enter a descriptive name to identify the new scope (see Figure 238).
In this example, you are creating a DHCP scope for the Red VLAN on the
Ethernet Routing Switch 8300. The scope start address for the VLAN is
10.110.110.5 and the end address is 10.110.110.25. The scope you create
must have a range of IP addresses that is large enough to accommodate all
endpoint devices in your network.
Figure 238 Naming the new DHCP scope
320818-A
Chapter 17 Configuration example 785
5
Specify the IP address range for the DHCP scope (see Figure 239).
Figure 239 Specifying the IP address range
Nortel Secure Network Access Switch 4050 User Guide
786 Chapter 17 Configuration example
6
Select the Yes, I want to configure these options now option button on the
Configure DHCP Options window (see Figure 240).
Figure 240 Choosing to configure additional options
320818-A
Chapter 17 Configuration example 787
7
Enter the IP address of the default gateway (see Figure 241).
Figure 241 Specifying the default gateway
Nortel Secure Network Access Switch 4050 User Guide
788 Chapter 17 Configuration example
8
Enter the IP address of the DNS server (see Figure 242).
Figure 242 Specifying the DNS server
Note: In this configuration example, the Nortel SNAS 4050 will
function as a captive portal. For the Red VLAN scope, the DNS server
must be the Nortel SNAS 4050 portal Virtual IP address (pVIP). For the
Yellow and Green VLAN scopes, enter the IP addresses for the regular
DNS servers in your network.
9
320818-A
Repeat step 3 on page 783 through step 8 on page 788 for each Red, Yellow,
and Green VLAN in the network.
Chapter 17 Configuration example 789
Figure 243 shows the DHCP scopes created for use in this example.
Figure 243 After all DHCP scopes have been created
Configure the network core router
There are no special requirements for the core router in a Nortel SNA network.
Refer to the regular documentation for the type of router used in your network.
1
Create the Red, Yellow, Green, VoIP, and Nortel SNAS 4050 management
VLANs.
Nortel Secure Network Access Switch 4050 User Guide
790 Chapter 17 Configuration example
2
Assign the VLAN port members.
Since the edge switches in this example are operating in Layer 2 mode, enable
802.1q tagging on the uplink ports to enable them to participate in multiple
VLANs, then add the ports to the applicable VLANs.
3
Create IP interfaces for the VLANs.
4
Since the edge switches are operating in Layer 2 mode, configure DHCP relay
agents for the Red, Yellow, Green, and VoIP VLANs.
Use the applicable show commands on the router to verify that DHCP relay
has been activated to reach the correct scope for each VLAN.
Configure the Ethernet Routing Switch 8300 using the CLI
The configuration procedure is based on the following assumptions:
•
•
•
•
•
You are starting with an installed switch that is not currently configured as
part of the network.
You have installed Software Release 2.2.8.
You have configured basic switch connectivity.
You have initialized the switch and it is ready to accept configuration.
You have configured devices as described to this point.
Steps
To configure the Ethernet Routing Switch 8300 for the Nortel SNA network,
perform the following steps:
320818-A
1
“Enabling SSH” on page 791
2
“Configuring the Nortel SNAS 4050 pVIP subnet” on page 791
3
“Creating port-based VLANs” on page 791
4
“Configuring the VoIP VLANs” on page 791
5
“Configuring the Red, Yellow, and Green VLANs” on page 791
6
“Configuring the NSNA uplink filter” on page 792
Chapter 17 Configuration example 791
7
“Configuring the NSNA ports” on page 792
8
“Enabling NSNA globally” on page 792
Enabling SSH
Passport-8310:5# config bootconfig flags ssh true
Passport-8310:5# config sys set ssh enable true
Passport-8310:5# config load-module 3DES /flash/P83C2280.IMG
Note: You have the option of using the AES encryption module, instead
of the 3DES module.
Configuring the Nortel SNAS 4050 pVIP subnet
Passport-8310:5# config nsna nsnas 10.40.40.0/24 add
Creating port-based VLANs
Passport-8310:5#
Passport-8310:5#
Passport-8310:5#
Passport-8310:5#
config
config
config
config
vlan
vlan
vlan
vlan
110
120
130
140
create
create
create
create
byport
byport
byport
byport
1
1
1
1
Configuring the VoIP VLANs
Passport-8310:5# config vlan 140 nsna color voip
Configuring the Red, Yellow, and Green VLANs
Passport-8310:5# config vlan 110 nsna color red filter-id
310
Passport-8310:5# config vlan 120 nsna color yellow filter-id
320 yellow-subnet-ip 10.120.120.0/24
Passport-8310:5# config vlan 130 nsna color green filter-id
330
Nortel Secure Network Access Switch 4050 User Guide
792 Chapter 17 Configuration example
Configuring the NSNA uplink filter
Passport-8310:6# config
"dhcp"
Passport-8310:6/config#
Passport-8310:6# config
precedence 1
Passport-8310:6# config
non-fragments
Passport-8310:6# config
any
Passport-8310:6# config
bootpd-dhcp
Passport-8310:6# config
permit
Passport-8310:6# config
"uplink"
filter acl 100 create ip acl-name
filter acl 100 ace 1 create
filter acl 100 ace 1 action fwd2cpu
filter acl 100 ace 1 ip ipfragment
filter acl 100 ace 1 protocol udp eq
filter acl 100 ace 1 port dst-port
filter acl 100 ace default action
filter acg 100 create 100 acg-name
Passport-8310:6# config ethernet <slot/port> filter create
100
Configuring the NSNA ports
Add the uplink port:
Passport-8310:6# config ethernet 1/48 nsna uplink
uplink-vlans 110,120,130,140
Add the client ports:
Passport-8310:5# config ethernet 1/16-1/17 nsna dynamic
Enabling NSNA globally
Passport-8310:5# config nsna state enable
320818-A
Chapter 17 Configuration example 793
Configure the Ethernet Routing Switch 5510
The following configuration example is based on the following assumptions:
•
•
•
•
•
You are starting with an installed switch that is not currently configured as
part of the network.
You have installed Software Release 4.3.
You have configured basic switch connectivity.
You have initialized the switch and it is ready to accept configuration.
You have configured devices as described to this point.
Steps
To configure the Ethernet Routing Switch 5510 for the Nortel SNA network,
perform the following steps:
1
“Setting the switch IP address” on page 793
2
“Configuring SSH” on page 794
3
“Configuring the Nortel SNAS 4050 pVIP subnet” on page 794
4
“Creating port-based VLANs” on page 794
5
“Configuring the VoIP VLANs” on page 794
6
“Configuring the Red, Yellow, and Green VLANs” on page 794
7
“Configuring the login domain controller filters” on page 795
8
“Configuring the NSNA ports” on page 795
9
“Enabling NSNA globally” on page 795
Setting the switch IP address
5510-48T(config)# ip address 10.200.200.20 netmask
255.255.255.0
5510-48T(config)# ip default-gateway 10.200.200.10
Nortel Secure Network Access Switch 4050 User Guide
794 Chapter 17 Configuration example
Configuring SSH
In this example, the assumption is that the Nortel SNAS 4050 public key has
already been uploaded to the TFTP server (10.20.20.20).
5510-48T(config)# ssh download-auth-key address 10.20.20.20
key-name sac_key.1.pub
5510-48T(config)# ssh
Configuring the Nortel SNAS 4050 pVIP subnet
5510-48T(config)# nsna nsnas 10.40.40.0/24
Creating port-based VLANs
5510-48T(config)#
5510-48T(config)#
5510-48T(config)#
5510-48T(config)#
vlan
vlan
vlan
vlan
create
create
create
create
210
220
230
240
type
type
type
type
port
port
port
port
Configuring the VoIP VLANs
5510-48T(config)#nsna vlan 240 color voip
Configuring the Red, Yellow, and Green VLANs
5510-48T(config)#nsna vlan 210 color red filter red
5510-48T(config)#nsna vlan 220 color yellow filter yellow
yellow-subnet 10.120.120.0/24
5510-48T(config)#nsna vlan 230 color green filter green
320818-A
Chapter 17 Configuration example 795
Configuring the login domain controller filters
Note: This step is optional.
The PC client must be able to access the login domain controller you
configure (that is, clients using the login domain controller must be able
to ping that controller).
5510-48T(config)# qos nsna classifier name RED dst-ip
10.200.2.12/32 ethertype 0x0800 drop-action disable block
wins-prim-sec eval-order 70
5510-48T(config)# qos nsna classifier name RED dst-ip
10.200.224.184/32 ethertype 0x0800 drop-action disable block
wins-prim-sec eval-order 71
Configuring the NSNA ports
Add the uplink port:
5510-48T(config)#interface fastEthernet 20
5510-48T(config-if)#nsna uplink vlans 210,220,230,240
5510-48T(config-if)#exit
Add the client ports:
5510-48T(config)#interface fastEthernet 3-5
5510-48T(config-if)#nsna dynamic voip-vlans 240
5510-48T(config-if)#exit
Enabling NSNA globally
5510-48T(config)#nsna enable
Configure the Nortel SNAS 4050
To configure the Nortel SNAS 4050, perform the following steps:
1
“Performing initial setup” on page 796
2
“Completing initial setup” on page 797
Nortel Secure Network Access Switch 4050 User Guide
796 Chapter 17 Configuration example
3
“Adding the network access devices” on page 798
4
“Mapping the VLANs” on page 800
5
“Enabling the network access devices” on page 801
Performing initial setup
Establish a serial console connection to the Nortel SNAS 4050 device. The Setup
utility launches automatically on startup.
Alteon iSD NSNAS
Hardware platform: 4050
Software version: x.x
------------------------------------------------------[Setup Menu]
join - Join an existing cluster
new
- Initialize host as a new installation
boot - Boot menu
info - Information menu
exit - Exit [global command, always available]
>> Setup# new
Setup will guide you through the initial configuration.
Enter port number for the management interface [1-4]: 1
Enter IP address for this machine (on management
interface): 10.40.40.2
Enter network mask [255.255.255.0]: <mask>
Enter VLAN tag id (or zero for no VLAN) [0]:
Setup a two armed configuration (yes/no) [no]:
Enter default gateway IP address (or blank to skip):
10.40.40.1
Enter the Management IP (MIP) address: 10.40.40.3
Making sure the MIP does not exist...ok
Trying to contact gateway...ok
Enter a timezone or 'select' [select]: America/Los_Angeles
Enter the current date (YYYY-MM-DD) [2005-05-02]:
Enter the current time (HH:MM:SS) [19:14:52]:
Enter NTP server address (or blank to skip):
Enter DNS server address (or blank to skip): 10.20.20.2
Generate new SSH host keys (yes/no) [yes]:
This may take a few seconds...ok
320818-A
Chapter 17 Configuration example 797
Enter a password for the "admin" user:
Re-enter to confirm:
Run NSNAS quick setup wizard [yes]:
Creating default networks under /cfg/domain 1/aaa/
network
Enter NSNAS Portal Virtual IP address(pvip): 10.40.40.100
Enter NSNAS Domain name: Domain1
Enter comma separated DNS search list
(eg company.com,intranet.company.com):
Create http to https redirect server [no]:
Use restricted (teardown/restricted) action for TunnelGuard
failure? [yes]:
Create default tunnel guard user [no]: yes
Using 'restricted' action for TunnelGuard failure.
User name: tg
User password: tg
Creating client filter 'tg_passed'.
Creating client filter 'tg_failed'.
Creating linkset 'tg_passed'.
Creating linkset 'tg_failed'.
Creating group 'tunnelguard' with secure access.
Creating extended profile, full access when tg_passed
Enter green vlan id [110]: 130
Creating extended profile, remediation access when
tg_failed
Enter yellow vlan id [120]:
Creating user 'tg' in group 'tunnelguard'.
Initializing system......ok
Setup successful. Relogin to configure.
Completing initial setup
Enable SSH for secure management communications (required for SREM):
>> Main# cfg/sys/adm/ssh on
Enable SRS administration:
>> Main# cfg/sys/adm/srsadmin/ena
Nortel Secure Network Access Switch 4050 User Guide
798 Chapter 17 Configuration example
Generate and activate the SSH key for communication with the network access
devices:
>> Main# cfg/domain 1/sshkey/generate
Generating new SSH key, this operation takes a few
seconds... done.
Apply to activate.
>> NSNAS SSH key# apply
Create a test SRS rule and specify it for the tunnelguard group:
>> Group 1# /cfg/domain 1/aaa/tg/quick
In the event that the TunnelGuard checks fails on a client,
the session can be teardown, or left in restricted mode
with limited access.
Which action do you want to use for TunnelGuard
failure? (teardown/restricted) [restricted]:
Do you want to create a tunnelguard test user? (yes/no)
[yes]: no
Using existing tg_passed filter
Using existing tg_failed filter
Using existing tg_passed linkset
Using existing tg_failed linkset
Adding test SRS rule srs-rule-test
This rule check for the presence of the file
C:\tunnelguard\tg.txt
Using existing tg_passed filter
Use 'diff' to view pending changes, and 'apply' to commit
>> TG#../group 1/tgsrs srs-rule-test
>> Group 1# apply
Adding the network access devices
This example adds the Ethernet Routing Switch 8300 manually, and uses the
quick switch wizard to add the Ethernet Routing Switch 5510. In both cases, the
example assumes that the switch is not reachable when it is added, and the switch
public SSH key is therefore not automatically retrieved by the Nortel SNAS 4050.
320818-A
Chapter 17 Configuration example 799
Adding the Ethernet Routing Switch 8300
Add the switch manually:
>> Main# cfg/domain 1/switch 1
Creating Switch 1
Enter name of the switch: Switch1_ERS8300
Enter the type of the switch (ERS8300/ERS5500): ERS8300
Enter IP address of the switch: 10.200.200.5
NSNA communication port[5000]:
Enter VLAN Id of the Red VLAN: 110
Entering: SSH Key menu
Enter username: rwa
Leaving: SSH Key menu
-----------------------------------------------------------[Switch 1 Menu]
name
- Set Switch name
type
- Set Type of the switch
ip
- Set IP address
port
- Set NSNA communication port
hlthchk
- Health check intervals for switch
vlan
- Vlan menu
rvid
- Set Red VLAN Id
sshkey
- SSH Key menu
reset
- Reset all the ports on a switch
ena
- Enable switch
dis
- Disable switch
delete
- Remove Switch
Error: Failed to retrieve host key
>> Switch 1# apply
Changes applied successfully.
Export the Nortel SNAS 4050 public SSH key to the Ethernet Routing
Switch 8300:
>> Switch 1# sshkey/export
Import the public SSH key from the switch:
>> SSH Key# import
Nortel Secure Network Access Switch 4050 User Guide
800 Chapter 17 Configuration example
Adding the Ethernet Routing Switch 5510
Use the quick switch wizard:
>> Main# cfg/domain 1/quick
Enter the type of the switch (ERS8300/ERS5500) [ERS8300]:
ERS55
IP address of Switch: 10.200.200.20
NSNA communication port[5000]:
Trying to retrieve fingerprint...failed.
Error: “Failed to retrieve host key”
Do you want to add ssh key? (yes/no) [no]:
Red vlan id of Switch: 210
Creating Switch 2
Use apply to activate the new Switch.
>> Domain 1#
Export the Nortel SNAS 4050 public SSH key to a TFTP server, for manual
retrieval by the Ethernet Routing Switch 5500:
>> Main# cfg/domain 1/sshkey/export tftp 10.20.20.20
sac_key.1.pub
Import the public SSH key from the switch:
>> Main# cfg/domain 1/switch 2/sshkey/import
Mapping the VLANs
This example assumes that the VLANs defined on the Ethernet Routing
Switch 8300 (Switch 1) will always be used exclusively by Switch 1, whereas the
VLAN IDs for the VLANs defined on the Ethernet Routing Switch 5510
(Switch 2) may be used by other edge switches added to the domain in future.
Therefore, the VLAN mappings for Switch 1 are made at the switch-level
command, while the VLAN mappings for Switch 2 are made at the domain level.
>>
>>
>>
>>
320818-A
Main# cfg/domain 1/switch 1/vlan/add yellow 120
Switch Vlan# add green 130
Switch Vlan# ../../vlan/add yellow 220
Domain Vlan# add green 230
Chapter 17 Configuration example 801
>> Domain Vlan# apply
Changes applied successfully.
Enabling the network access devices
>> Main# cfg/domain 1/switch 1/ena
>> Switch 1# ../switch 2/ena
>> Switch 2# apply
Changes applied successfully.
Nortel Secure Network Access Switch 4050 User Guide
802 Chapter 17 Configuration example
320818-A
803
Appendix A
CLI reference
The command line interface (CLI) allows you to view system information and
statistics. The Administrator can use the CLI for configuring the Nortel
SNAS 4050 system, software, and individual devices in the system.
This appendix includes the following topics:
Topic
Page
Using the CLI
804
Global commands
804
Command line history and editing
806
CLI shortcuts
807
Using slashes and spaces in commands
810
IP address and network mask formats
810
Variables
811
CLI Main Menu
812
CLI command reference
812
Information menu
814
Statistics menu
815
Configuration menu
816
Boot menu
835
Maintenance menu
836
Nortel Secure Network Access Switch 4050 User Guide
804 Appendix A CLI reference
Using the CLI
CLI commands are grouped into a series of menus and submenus (see “CLI Main
Menu” on page 812). Each menu contains a list of available commands and a
summary of each command function.
You can enter menu commands at the prompt that follows each menu.
Global commands
Basic commands are recognized throughout the menu hierarchy. Use the global
commands in Table 179 to obtain online help, navigate through menus, and apply
and save configuration changes.
Table 179 Global commands (Sheet 1 of 3)
Command
Action
help
Display a summary of the global commands.
help <command> Display help on a specific command in the command line interface.
.
Display the current menu.
print
Display the current menu.
..
Advance one level in the menu structure.
up
Advance one level in the menu structure.
/
Placed at the beginning of a command, returns to the Main menu. Placed within a
command string, the character separates multiple commands on the same line.
cd “<menu/
path>”
Display the menu indicated within quotation marks.
TIP: Type cd “/cfg/sys” at any prompt in the CLI to go to the System menu.
Also type /cfg/sys (no quotation marks) at any menu prompt to go to the System
menu.
pwd
Display the command path used to reach the current menu.
apply
Apply pending configuration changes.
diff
Show any pending configuration changes.
revert
Remove pending configuration changes between apply commands. TIP: Use
revert to restore configuration parameters set after the most recent apply
command.
320818-A
Appendix A CLI reference 805
Table 179 Global commands (Sheet 2 of 3)
Command
Action
paste
Restores a saved configuration that includes private keys. TIP: Before you paste the
configuration, you must provide the password phrase you specified when you
selected include the private keys in the configuration dump. For more information,
see the dump command in “Configuration menu” on page 816.
exit
Terminate the current session and log out. TIP: You are notified if there are unapplied
(pending) configuration changes when you execute the exit command. Pending
configuration changes are lost if you log out without executing the apply command.
quit
Terminate the current session and log out. TIP: You are notified if there are unapplied
(pending) configuration changes when you execute the quit command,. Pending
configuration chagnes are lost if you log out without executing the apply command.
Ctrl+^
Exit from the command line interface if the Nortel Secure Network Access
Switch 4050 has stopped responding. TIP: This command should be used only when
you are connected to a specific Nortel Secure Network Access Switch 4050 through
a console connection. Do not use this command when connected to the
Management IP of the cluster through a Telnet or SSH connection.
netstat
Show the current network status of the Nortel Secure Network Access Switch 4050.
The netstat command provides information about active TCP connections, the
state of all TCP/IP servers, and the sockets the servers use.
nslookup
Find the IP address or host name of a machine. TIP: To use the nslookup
command, the Nortel Secure Network Access Switch 4050 must be configured to
use a DNS server.
ping <IPaddr
or host name>
Verify station-to-station connectivity across the network. TIP: You can specify an
IP address or host name in the command. To specify host names, you must
configure the DNS parameters.
traceroute
<IPaddr or
host name>
Identify the route used for station-to-station connectivity across the network. TIP: You
can specify an IP address or host name of the target station in the command. To
specify host names, you must configure the DNS parameters.
cur
View all the current settings for the active menu.
curb
Obtain a summary of the current settings for the active menu.
dump
Dump the current configuration for the active menu. TIP: You can cut and paste the
dumped information into the CLI of another operator at the same menu level. In all
Statistics menus, the dump command provides statistics information for the active
menu.
lines <n>
Set the number of lines (n) that display on the screen at one time. TIP: The default
value is 24 lines. When used without a value, the current setting displays.
Nortel Secure Network Access Switch 4050 User Guide
806 Appendix A CLI reference
Table 179 Global commands (Sheet 3 of 3)
Command
Action
verbose <n>
Sets the level of information displayed on the screen:
0 = Quiet: Nothing appears except errors—not even prompts.
1 = Normal: Prompts and requested output are shown without menus.
2 = Verbose: Everything is shown.
TIP: The default level is 2. When used without a value, the current setting displays.
slist
Display a list of all open Admin user sessions.
Command line history and editing
You can use the CLI to retrieve and modify commands entered previously.
Table 180 lists options that are available globally at the command line.
Table 180 Command line history and editing options (Sheet 1 of 2)
Option
Description
history
Display a numbered list of the 10 most recent commands.
!!
Repeat the most recent command.
!<n>
Repeat the nth command shown on the history list.
pushd
Use pushd to bookmark your current position in the menu structure. TIP: After you
move to another level or command in the menu structure, you can return to the
bookmarked position by typing the popd command. The pushd command can be
combined with command stacking. For example:
>> Information# pushd "/cfg/ssl/server 1/ssl"
>> SSL Settings#
Execute the popd command to return immediately to the prompt where you issued
the pushd command–the Information prompt in this example.
oopd
Return to a position in the menu structure that was bookmarked using the pushd
command.
Ctrl+p
Recall previous command from the history list. TIP: You can also use the up arrow
key. You can use this command to regress through the last 10 commands. The
recalled command can be executed as is, or edited using the options in this table.
Ctrl+n
Recall next command from the history list. TIP: You can also use the down arrow key.
Use this command to proceed through the next 10 commands. The recalled
command can be executed as is, or edited using the options in this table.
Ctrl+a
Move cursor to the beginning of the command line.
Ctrl+e
Move cursor to the end of the command line.
320818-A
Appendix A CLI reference 807
Table 180 Command line history and editing options (Sheet 2 of 2)
Option
Description
Ctrl+b
Move the cursor back, one position to the left. You can also use the left arrow key.
Ctrl+f
Move the cursor forward, one position to the right. You can also use the right arrow
key.
Backspace
Erase one character to the left of the cursor position. You can also use the Delete
key.
Ctrl+d
Delete one character at the cursor position.
Ctrl+k
Kill (erase) all characters from the cursor position to the end of the command line.
Ctrl+l
Rewrite the most recent command.
Ctrl+c
Abort an on-going transaction. TIP: Press Ctrl+c when there is no on-going
transaction, in order to display the current menu.
Note: Pressing Ctrl+c does not abort screen output generated by the cur
command. Press q to abort the extensive screen output that may result from the cur
command.
Ctrl+u
Clear the entire line.
Other keys
Insert new characters at the cursor position.
CLI shortcuts
You can use the following CLI command shortcuts:
•
•
•
•
“Command stacking” on page 807
“Command abbreviation” on page 808
“Tab completion” on page 808
“Using a submenu name as a command argument” on page 809
Command stacking
To access a submenu and one of the related menu options, you can type multiple
commands, separated by forward slashes (/), on a single line.
For example, to access the list command in the NTP Servers menu from the
Main menu prompt, use the following keyboard shortcut:
>> Main# cfg/sys/time/ntp/list
Nortel Secure Network Access Switch 4050 User Guide
808 Appendix A CLI reference
You can also use command stacking to proceed one or more levels in the menu
system, and go directly to another submenu and one of the related menu options in
that submenu.
For example, to proceed two levels (from the NTP Servers menu to the System
menu) and then go to the DNS settings menu to access the DNS servers menu, use
the following command:
>> NTP Servers# ../../dns/servers
Command abbreviation
You can abbreviate most commands.
To abbreviate a command, type the first characters which distinguish the
command from the others in the same menu or submenu.
For example, you can abbreviate the following command:
>> Main# cfg/sys/time/ntp/list
to
>> Main# c/sy/t/n/l
Tab completion
The Tab key can be used in the following ways:
•
To search for CLI commands or options:
— At the menu prompt, type the first character of a command. TIP: You can
use additional characters to refine the search.
— Press Tab.
A list of commands that begin with the character you selected displays. If
only one command matches the character you typed, that command
displays on the command line when you press Tab. Press ENTER to
execute the command.
320818-A
Appendix A CLI reference 809
•
To display the active menu:
— Ensure that the command line is blank.
— At the menu prompt, press the Tab key.
Using a submenu name as a command argument
To display the properties related to a specific submenu, you can include the
submenu name as an argument to the cur command (at a menu prompt one level
up from the desired submenu information).
For example, to display system information at the Configuration menu prompt,
without descending into the System menu (/cfg/sys), use the following
command:
>> Configuration# cur sys
>> Configuration# cur sys
System:
Management IP (MIP) address = 192.168.128.211
iSD Host 1:
Type of the iSD = master
IP address = 192.168.128.213
License =
IPSEC user sessions: 250
Secure Service Partitioning
PortalGuard
TPS: unlimited
SSL user sessions: 250
Default gateway address = 192.168.128.3
Ports = 1 : 2
Hardware platform = 3070
Host Routes:
No items configured
Host Interface 1:
IP address = 192.168.128.213
Network mask = 255.255.255.0
VLAN tag id = 0
Mode = failover
Primary port = 0
Interface Ports:
1
Host Port 1:
Autonegotiation = on
Nortel Secure Network Access Switch 4050 User Guide
810 Appendix A CLI reference
If you use the cur command without the sys submenu argument, information
related to the Configuration menu and all submenus displays.
Using slashes and spaces in commands
To include a forward slash (/) or a space in a command string, place the string
containing the slash or space within double quotation marks before you execute
the command.
For example, to specify a directory path and file name on the same line as the ftp
command in the CLI, double quotation marks are required:
>> Software Management# download ftp 10.0.0.1 “pub/
SSL-5.1.1-upgrade_complete.pkg”
IP address and network mask formats
IP addresses and network masks can be expressed in different ways in the CLI.
IP addresses
IP addresses can be specified in the following ways:
•
•
Dotted decimal notation — specify the IP address as is: 10.0.0.1
According to the formats below:
• A.B.C.D = A.B.C.D, the equivalent of dotted decimal notation
• A.B.D = A.B.0.D — that is, 10.1.10 translates to 10.1.0.10
• A.D = A.0.0.D — that is, 10.1 translates to 10.0.0.1
• D = 0.0.0.D — that is, 10 translates to 0.0.0.10
Network masks
A network mask can be specified in dotted decimal notation or as number of bits.
Where the network mask is:
•
•
320818-A
255.0.0.0 it can also be expressed as 8
255.255.0.0 it can also be expressed as 16
Appendix A CLI reference 811
•
•
255.255.255.0 it can also be expressed as 24
255.255.255.255 it can also be expressed as 32
Variables
You can use variables in some commands and features in the Nortel SNAS 4050
software.
TIP: Variables included in links are URL encoded. Variables included in static
texts are not URL encoded.
Table 181 describes variables and their use.
Table 181 Variables
Variable
Use
<var:user>
Expands to the user name specified when the user logged on to the domain.
<var:password>
Expands to the password specified when the user logged on to the domain. .
<var:group>
Expands to the group to which the logged on user is a member.
<var:portal>
Expands to the Portal IP address. TIP: The variable can be included in redirect
URLs.
<var:domain>
Expands to the domain name specified for the authentication method of the logged
on user.
<var:method>
Expands to the access protocol used (http or https).
<var:sslsid>
Expands to the SSL session ID in binary format.
<md5:...>
Expands the variable or variables (for example, <md5:<user>:<password>>) and
computes an MD5 checksum which is Base 64 encoded. TIP: Can be used when
creating dynamic HTTP headers.
<base64:...>
Expands the variable or variables (for example, <base64:<user>:<password>>)
and encodes them using Base 64. TIP: Can be used when creating dynamic HTTP
headers.
<var:tgFailureReason> Expands to the TunnelGuard rule expression and the TunnelGuard rule comment
specified for the current SRS rule when a TunnelGuard check has failed.
<var:tgFailureDetail>
Expands to the software definition comment specified for the current SRS rule,
including additional failure details, when a TunnelGuard check has failed.
Operator-defined
variables
Custom variables can be created to retrieve the desired values from RADIUS and
LDAP databases.
Nortel Secure Network Access Switch 4050 User Guide
812 Appendix A CLI reference
CLI Main Menu
The Main menu appears after a successful connection and login. Figure 244
represents the Main menu as it appears when logged on as Administrator. Note
that some of the commands are not available when logged on as Operator.
Figure 244 CLI main menu
[Main Menu]
info
stats
cfg
boot
maint
diff
apply
revert
paste
help
exit
- Information menu
- Statistics menu
- Configuration menu
- Boot menu
- Maintenance menu
- Show pending config changes
[global command]
- Apply pending config changes [global command]
- Revert pending config changes [global command]
- Restore saved config with key [global command]
- Show command help
[global command]
- Exit [global command, always available]
CLI command reference
The following CLI menus are accessible from the Main menu:
•
•
•
•
320818-A
Information — provides submenus for displaying information about the
current status of the Nortel Secure Network Access Switch 4050. For the
Information menu commands, see “Information menu” on page 814.
Statistics — provides submenus for displaying Nortel SNAS 4050
performance statistics. For the Statistics menu commands, see “Statistics
menu” on page 815.
Configuration — provides submenus for configuring the Nortel SNAS 4050
cluster. Some of the commands in the Configuration menu are available only
when logged on as Administrator. For the Configuration menu commands,
see “Configuration menu” on page 816.
Boot — used for upgrading Nortel SNAS 4050 software and for rebooting
Nortel SNAS 4050 devices. The Boot menu is accessible only when logged
on as Administrator. For the Boot menu commands, see “Boot menu” on
page 835.
Appendix A CLI reference 813
•
Maintenance — used for sending technical support information to an external
file server. For the Maintenance menu commands, see “Maintenance menu”
on page 836.
Nortel Secure Network Access Switch 4050 User Guide
814 Appendix A CLI reference
Information menu
The Information menu contains commands used to display current information
about the Nortel SNAS 4050 system status and configuration. Table 182 lists the
Information commands in alphabetical order and provides cross-references to
more detailed information.
Table 182 Information menu commands (Sheet 1 of 2)
Command
Parameters/Submenus
/info
View current information
certs
about system status and
sys
the system configuration.
sonmp
licenses [<domain
ID>]
kick <domain ID>
<username>
domain [<domain ID>]
switch [<domainid>]
[<switchid>]
dist [<hostid>]
ip <domain ID>
<IPaddr>
mac <MACaddr>
sessions [<domain ID>
[<switch ID>
[<username-prefix>]]]
contlist [<Exclude
buffers+cache from
mem util: [yes/no]>]
local
ethernet
ports
events
logs
320818-A
Purpose
Usage
page 661
Appendix A CLI reference 815
Table 182 Information menu commands (Sheet 2 of 2)
Command
Parameters/Submenus
Purpose
Usage
/info/events
alarms
download <protocol>
<server> <filename>
View active alarms.
page 666
/info/logs
list
download <protocol>
<server> <filename>
View and download log
files.
page 667
Statistics menu
The Statistics menu contains commands used to view statistics for the Nortel
SNAS 4050 cluster and individual hosts. Table 183 lists the Statistics commands
in alphabetical order and provides cross-references to more detailed information.
Table 183 Statistics menu commands
Command
Parameters/Submenus
/stats
/stats/aaa
/stats/dump
total
isdhost <host ID>
<domain ID>
dump
Purpose
Usage
View performance
statistics for the cluster
and for individual Nortel
SNAS 4050 hosts.
page 660
page 668
View authentication
statistics for the Nortel
SNAS 4050 cluster or for
individual Nortel
SNAS 4050 hosts.
View all available
statistics for the Nortel
SNAS 4050 cluster.
page 670
Nortel Secure Network Access Switch 4050 User Guide
816 Appendix A CLI reference
Configuration menu
The Configuration menu contains commands used to configure the Nortel
SNAS 4050. Table 184 lists the configuration commands in alphabetical order and
provides cross-references to more detailed information.
Table 184 Configuration menu commands (Sheet 1 of 19)
Command
Parameters/Submenus
Purpose
/cfg/cert <cert ID>
name <name>
cert
key
revoke
gensigned
server|client
request
sign
test
import
export
display [<pass
phrase>]
show
info
subject
validate
keysize
keyinfo
del
Manage private keys and page 577
certificates and access
the Certificate menu.
320818-A
Usage
Appendix A CLI reference 817
Table 184 Configuration menu commands (Sheet 2 of 19)
Command
Parameters/Submenus
Purpose
Usage
/cfg/domain
<domain ID>
name <name>
pvips <IPaddr>
aaa
server
portal
linkset
switch
vlan
sshkey
dnscapt
httpredir
quick
adv
del
Configure the domain.
page 130
/cfg/domain #/aaa/auth
<auth ID>
type
radius|ldap|local
name <name>
display
radius|ldap|local
adv
del
Create and configure an
authentication method.
page 239
/cfg/domain #/aaa/
auth #/adv
groupauth <auth IDs>
secondauth <auth ID>
page 242
Configure the current
authentication scheme to
retrieve user group
information from a
different authentication
scheme.
/cfg/domain #/aaa/auth
<auth ID> (for LDAP)
Configure the Nortel
SNAS 4050 domain to
use an external LDAP
server for authentication.
page 249
Nortel Secure Network Access Switch 4050 User Guide
818 Appendix A CLI reference
Table 184 Configuration menu commands (Sheet 3 of 19)
Command
Parameters/Submenus
Purpose
Usage
/cfg/domain #/aaa/
auth #/ldap
servers
searchbase <DN>
groupattr <names>
userattr <names>
isdbinddn <DN>
isdbindpas
<password>
ldapmacro
enaldaps true|false
enauserpre
true|false
timeout <interval>
activedire
Modify settings for the
specific LDAP
configuration.
page 252
/cfg/domain #/aaa/
auth #/ldap/activedire
enaexpired
true|false
expiredgro <group>
Manage clients whose
passwords have expired
or who need to change
their passwords,
page 260
/cfg/domain #/aaa/
auth #/ldap/ldapmacro
Configure LDAP macros. page 258
list
del <index number>
add <variable name>
<LDAP attribute>
[<prefix>]
[<suffix>]
insert <index number>
<variable name>
move <index number>
<new index number>
/cfg/domain #/aaa/
auth #/ldap/servers
list
del <index number>
add <IPaddr> <port>
insert <index number>
<IPaddr>
move <index number>
<new index number>
/cfg/domain #/aaa/auth
<auth ID> (for local database)
320818-A
Manage the LDAP
servers used for client
authentication in the
domain.
page 256
Create the Local
authentication method.
page 261
Appendix A CLI reference 819
Table 184 Configuration menu commands (Sheet 4 of 19)
Command
Parameters/Submenus
Purpose
Usage
/cfg/domain #/aaa/
auth #/local
add <user name>
<password> <group>
passwd <user name>
<password>
groups <user name>
<desired group>
del <user name>
list
import <protocol>
<server> <filename>
<key>
export <protocol>
<server> <filename>
<key>
Manage client users and
their passwords in the
local database.
page 264
Configure the domain to
use an external RADIUS
server for authentication.
page 242
/cfg/domain #/aaa/auth
<auth ID> (for RADIUS)
/cfg/domain #/aaa/
auth #/radius
servers
vendorid <vendor ID>
vendortype <vendor
type>
domainid <domain ID>
domaintype <domain
type>
authproto pap|chapv2
timeout <interval>
sessiontim
Modify settings for the
specific RADIUS
configuration.
page 245
/cfg/domain #/aaa/
auth #/radius/servers
list
del <index number>
add <IPaddr> <port>
<shared secret>
insert <index number>
<IPaddr>
move <index number>
<new index number>
Manage the RADIUS
servers used for client
authentication in the
domain.
page 247
Nortel Secure Network Access Switch 4050 User Guide
820 Appendix A CLI reference
Table 184 Configuration menu commands (Sheet 5 of 19)
Command
Parameters/Submenus
Purpose
Usage
/cfg/domain #/aaa/
auth #/radius/
sessiontim
vendorid <vendor ID>
vendortype <vendor
type>
ena
dis
Configure the Nortel
SNAS 4050 for session
timeout.
page 249
/cfg/domain #/aaa/
authorder
<auth ID>[,<auth ID>]
Specify the authentication page 268
fallback order.
/cfg/domain #/aaa/
defgroup <group name>
Create a default group to page 208
which users are assigned
if they are not associated
with a specific group in
the authentication
database.
/cfg/domain #/aaa/
filter <filter ID>
name <name>
tg true|false|ignore
comment <comment>
del
Configure the client
filters, which determine
whether extended profile
data will be applied to a
user.
page 201
/cfg/domain #/aaa/
group <group ID>
Configure groups on the
name <name>
domain.
restrict
linkset
extend <profile ID>
tgsrs <SRS rule name>
comment <comment>
del
page 198
/cfg/domain #/aaa/
group #/extend
[<profile ID>]
filter <name>
vlan <ID|name>
access [<rule
number>]
linkset
del
320818-A
Configure the extended
profiles for a group.
page 203
Appendix A CLI reference 821
Table 184 Configuration menu commands (Sheet 6 of 19)
Command
Parameters/Submenus
Purpose
Usage
/cfg/domain #/aaa/
group #/extend #/
linkset
Map predefined linksets
list
to an extended profile.
del <index number>
add <linkset name>
insert <index number>
<linkset name>
move <index number>
<new index number>
page 206
/cfg/domain #/aaa/
group #/linkset
Map predefined linksets
list
to a group.
del <index number>
add <linkset name>
insert <index number>
<linkset name>
move <index number>
<new index number>
page 206
/cfg/domain #/aaa/
radacct
servers
vpnattribu
ena
dis
Configure the Nortel
SNAS 4050 to support
RADIUS accounting.
page 147
/cfg/domain #/aaa/
radacct/servers
list
del <index number>
add <IPaddr> <port>
<shared secret>
insert <index number>
<IPaddr>
move <index number>
<new index number>
Configure the Nortel
SNAS 4050 to use
external RADIUS
accounting servers.
page 147
/cfg/domain #/aaa/
radacct/vpnattribu
vendorid
vendortype
Configure vendor-specific page 149
attributes in order to
identify the Nortel
SNAS 4050 domain.
Nortel Secure Network Access Switch 4050 User Guide
822 Appendix A CLI reference
Table 184 Configuration menu commands (Sheet 7 of 19)
Command
Parameters/Submenus
Purpose
/cfg/domain #/aaa/tg
quick
recheck <interval>
heartbeat <interval>
hbretrycnt <count>
status-quo on|off
action
teardown|restricted
list
details on|off
loglevel
fatal|error|warning|
info|debug
Configure settings for the page 132
TunnelGuard host
integrity check and the
check result.
Configure settings for the page 134
SRS rule check using the
TunnelGuard quick setup
wizard.
/cfg/domain #/aaa/tg/
quick
/cfg/domain #/adv
Usage
interface <interface
ID>
log
/cfg/domain #/del
Map a backend interface page 145
to the domain and
configure logging options,
Remove the current
domain from the system
configuration.
page 129
/cfg/domain #/dnscapt
exclude
ena
dis
Configure the Nortel
SNAS 4050 portal as a
captive portal.
page 401
/cfg/domain #/dnscapt/
exclude
Create and manage the
list
Exclude List.
del <index name>
add <domain name>
insert <index number>
<domain name>
move <index number>
<new index number>
page 401
/cfg/domain #/
httpredir
port <port>
redir on|off
interface <interface
ID>
Configure the domain to
automatically redirect
HTTP requests to the
HTTPS server specified
for the domain.
page 144
320818-A
Appendix A CLI reference 823
Table 184 Configuration menu commands (Sheet 8 of 19)
Command
Parameters/Submenus
Purpose
Usage
/cfg/domain #/linkset
<linkset ID>
name <name>
text <text>
autorun true|false
link <index>
del
Create and configure a
linkset.
page 412
/cfg/domain #/
linkset #/link <index>
move <new index>
text <text>
type external|ftp
external
ftp
del
Create and configure the
links included in the
linkset.
page 414
/cfg/domain #/
linkset #/link #/
external/quick
Launch the wizard to
configure settings for a
link to an external web
page.
page 416
/cfg/domain #/
linkset #/link #/ftp/
quick
Launch the wizard to
page 416
configure settings for a
link to a directory on an
FTP file exchange server.
/cfg/domain #/portal
import <protocol>
<server> <filename>
restore
banner
redirect <URL>
logintext <text>
iconmode clean|fancy
linktext <text>
linkurl on|off
linkcols <columns>
linkwidth <width>
companynam
colors
content
lang
ieclear on|off
Modify the look and feel
of the portal page that
displays in the client’s
web browser.
page 406
Nortel Secure Network Access Switch 4050 User Guide
824 Appendix A CLI reference
Table 184 Configuration menu commands (Sheet 9 of 19)
Command
Parameters/Submenus
Purpose
Usage
/cfg/domain #/portal/
colors
color1 <code>
color2 <code>
color3 <code>
color4 <code>
theme
default|aqua|apple|
jeans|cinnamon|candy
Customize the colors
used for the portal
display.
page 409
/cfg/domain #/portal/
content
import <protocol>
<server> <filename>
export <protocol>
<server> <filename>
delete
available
ena
dis
Add custom content, such page 410
as Java applets, to the
portal.
/cfg/domain #/portal/
lang
setlang <code>
charset
list
Set the preferred
language for the portal
display.
page 405
Launch the quick switch
setup wizard to add
network access devices
to the domain.
page 75
Configure the portal
server used in the
domain.
page 135
/cfg/domain #/quick
/cfg/domain #/server
320818-A
port <port>
interface <interface
ID>
dnsname <name>
trace
ssl
adv
Appendix A CLI reference 825
Table 184 Configuration menu commands (Sheet 10 of 19)
Command
Parameters/Submenus
Purpose
Usage
/cfg/domain #/server/
adv/traflog
sysloghost <IPaddr>
udpport <port>
protocol
ssl2|ssl3|ssl23|tls1
priority debug|info|
notice
facility
auth|authpriv|daemon
|local0-7
ena
dis
Set up a syslog server to
receive UDP syslog
messages for all HTTP
requests handled by the
portal server.
page 143
/cfg/domain #/server/
ssl
Configure SSL-specific
cert <certificate
settings for the portal
index>
server.
cachesize <sessions>
cachettl <ttl>
cacerts <certificate
index>
cachain <certificate
index list>
protocol
ssl2|ssl3|ssl23|tls1
verify
none|optional|
required
ciphers <cipher list>
ena
dis
/cfg/domain #/server/
trace
ssldump
tcpdump
ping <host>
dnslookup <host>
traceroute <host>
page 136
Verify connectivity and
capture information about
SSL and TCP traffic
between clients and the
portal server.
/cfg/domain #/sshkey
generate
show
export
Generate, view, and
page 85
export the public SSH key
for the domain.
page 139
Nortel Secure Network Access Switch 4050 User Guide
826 Appendix A CLI reference
Table 184 Configuration menu commands (Sheet 11 of 19)
Command
Parameters/Submenus
Purpose
Usage
/cfg/domain #/switch
<switch ID>
name <name>
type ERS8300|ERS5500
ip <IPaddr>
port <port>
hlthchk
vlan
rvid <VLAN ID>
sshkey
reset
ena
dis
delete
Configure the network
access devices on the
domain.
page 80
/cfg/domain #/
switch #/dis
Stop communication
between the Nortel
SNAS 4050 and a
network access device.
page 90
/cfg/domain #/
switch #/ena
Restart communication
between the Nortel
SNAS 4050 and a
network access device.
page 91
/cfg/domain #/
switch #/hlthchk
interval <interval>
deadcnt <count>
sq-int <interval>
Configure the interval and page 89
dead count parameters
for the Nortel SNAS 4050
health checks and
status-quo mode.
/cfg/domain #/
switch #/sshkey
import
add
del
show
export
user <user>
Retrieve the public key for page 88
the network access
device and export the
public key for the domain.
/cfg/domain #/
switch #/vlan
add <name> <VLAN ID>
del <index>
list
Manage the VLAN
mappings for a specific
network access device .
320818-A
page 82
Appendix A CLI reference 827
Table 184 Configuration menu commands (Sheet 12 of 19)
Command
Parameters/Submenus
Purpose
Usage
/cfg/domain #/vlan
add <name> <VLAN ID>
del <index>
list
Manage the VLAN
mappings for all the
network access devices
in the domain.
page 82
/cfg/dump
[<passphrase>]
Perform a configuration
dump.
page 730
/cfg/gtcfg <protocol>
<server> <filename>
<passphrase>
Restore the system
configuration.
page 730
Manage the language
definition files in the
system.
page 403
/cfg/lang
import <protocol>
<server> <filename>
<code>
export <protocol>
<server> <filename>
list
vlist [<letter>]
del <code>
/cfg/ptcfg <protocol>
<server> <filename>
<passphrase>
page 730
Save the system
configuration to a file on a
file exchange server.
/cfg/quick
Create a domain using
the Nortel SNAS 4050
quick setup wizard.
page 123
View and configure
cluster-wide system
settings.
page 464
/cfg/sys
mip <IPaddr>
host <host ID>
routes
time
dns
rsa <server ID>
syslog
accesslist
adm
user
distrace
Nortel Secure Network Access Switch 4050 User Guide
828 Appendix A CLI reference
Table 184 Configuration menu commands (Sheet 13 of 19)
Command
Parameters/Submenus
Purpose
Usage
/cfg/sys/accesslist
list
del <index number>
add <IPaddr> <mask>
Manage the Access List
in order to control Telnet
and SSH access to the
Nortel SNAS 4050
cluster.
page 474
/cfg/sys/adm
snmp
sonmp on|off
clitimeout
<interval>
audit
auth
telnet on|off
ssh on|off
srsadmin
sshkeys
Configure administrative
settings for the system.
page 483
/cfg/sys/adm/audit
servers
vendorid
vendortype
ena
dis
Configure the Nortel
SNAS 4050 to support
RADIUS auditing.
page 489
/cfg/sys/adm/audit/
servers
list
del <index number>
add <IPaddr> <port>
<shared secret>
insert <index number>
<IPaddr>
move <index number>
<new index number>
Configure the Nortel
SNAS 4050 to use
external RADIUS audit
servers.
page 490
/cfg/sys/adm/auth
servers
timeout <interval>
fallback on|off
ena
dis
Configure the Nortel
page 492
SNAS 4050 to support
RADIUS authentication of
system users.
320818-A
Appendix A CLI reference 829
Table 184 Configuration menu commands (Sheet 14 of 19)
Command
Parameters/Submenus
Purpose
/cfg/sys/adm/auth/
servers
list
del <index number>
add <IPaddr> <port>
<shared secret>
insert <index number>
<IPaddr>
move <index number>
<new index number>
page 493
Configure the Nortel
SNAS 4050 to use
external RADIUS servers
to authenticate system
users.
/cfg/sys/adm/snmp
Usage
Configure SNMP for the
Nortel SNA network.
page 618
page 620
/cfg/sys/adm/snmp
ena
dis
versions <v1|v2c|v3>
snmpv2-mib
community
users
target
event
Configure SNMP
management of the
Nortel SNAS 4050
cluster.
/cfg/sys/adm/snmp/
community
read <name>
write <name>
trap <name>
Configure the community page 622
aspects of SNMP
monitoring.
Nortel Secure Network Access Switch 4050 User Guide
830 Appendix A CLI reference
Table 184 Configuration menu commands (Sheet 15 of 19)
Command
Parameters/Submenus
/cfg/sys/adm/snmp/
event
Configure monitors and
addmonitor
[<options>] -b <name> events defined in the
DISMAN-EVENT-MIB.
<OID> <op> <value>
addmonitor
[<options>] -t <name>
<OID> <value and
event>
addmonitor
[<options>] -x <name>
<OID>
[present|absent|
changed]
delmonitor <name>
addevent [-c
<comment>] <name>
<notification>
[<OID...>]
delevent <name>
list
/cfg/sys/adm/snmp/
snmpv2-mib
sysContact <contact>
snmpEnable
disabled|enabled
Configure parameters in
the standard SNMPv2
MIB.
page 621
/cfg/sys/adm/snmp/
target <target ID>
ip <IPaddr>
port <port>
version v1|v2c|v3
del
Configure notification
targets.
page 626
320818-A
Purpose
Usage
page 627
Appendix A CLI reference 831
Table 184 Configuration menu commands (Sheet 16 of 19)
Command
Parameters/Submenus
Purpose
Usage
/cfg/sys/adm/snmp/
users <user ID>
name <name>
seclevel
none|auth|priv
permission
get|set|trap
authproto md5|sha
authpasswd
<password>
privproto des|aes
privpasswd
<password>
del
Manage SNMPv3 users
in the Nortel SNAS 4050
configuration.
page 623
/cfg/sys/adm/srsadmin
port <port>
ena
dis
Configure support for
page 485
managing the SRS rules.
/cfg/sys/adm/sshkeys
generate
show
knownhosts
Generate and view the
SSH keys used by all
hosts in the cluster for
secure management
communications.
page 486
/cfg/sys/adm/sshkeys/
knownhosts
list
del <index number>
add
import <IPaddr>
Manage the public SSH
keys of known remote
hosts.
page 487
/cfg/sys/dns
servers
cachesize <entries>
retransmit
<interval>
count <count>
ttl <ttl>
health <interval>
hdown <count>
hup <count>
Configure DNS settings
for the cluster.
page 477
Nortel Secure Network Access Switch 4050 User Guide
832 Appendix A CLI reference
Table 184 Configuration menu commands (Sheet 17 of 19)
Command
Parameters/Submenus
/cfg/sys/dns/servers
Configure the cluster to
list
use external DNS
del <index number>
servers.
add <IPaddr>
insert <index number>
<IPaddr>
move <index number>
<new index number>
/cfg/sys/host #/
interface #/ports
list
del <port>
add <port>
View and manage the
ports assigned to an
interface.
/cfg/sys/host #/
interface #/routes
list
del <index number>
add <IPaddr> <mask>
<gateway>
Manage static routes for a page 471
particular interface.
/cfg/sys/host #/
interface
<interface ID>
ip <IPaddr>
netmask <mask>
gateway <IPaddr>
routes
vlanid <tag>
mode
failover|trunking
ports
primary <port>
delete
Configure an IP interface page 469
and assign physical ports
on a particular Nortel
SNAS 4050 host,
/cfg/sys/host #/port
<port>
autoneg on|off
speed <speed>
mode full|half
Configure the connection page 472
properties for a port.
/cfg/sys/host #/routes
320818-A
Purpose
Usage
page 479
page 473
Manage static routes for a page 471
particular Nortel
SNAS 4050 host when
more than one interface is
configured.
Appendix A CLI reference 833
Table 184 Configuration menu commands (Sheet 18 of 19)
Command
Parameters/Submenus
Purpose
Usage
/cfg/sys/host
<host ID>
ip <IPaddr>
sysName <name>
sysLocatio
<location>
license <key>
gateway <IPaddr>
routes
interface <interface
number>
port
ports
hwplatform
halt
reboot
delete
Configure basic TCP/IP
page 465
properties for a particular
Nortel SNAS 4050 device
in the cluster,
Manage static routes on a page 471
cluster-wide level when
more than one interface is
configured.
/cfg/sys/routes
Configure the symbolic
page 480
name for the RSA server
and import the sdconf.rec
configuration file.
/cfg/sys/rsa
rsaname <name>
import <protocol>
<server> <filename>
[<FTP user name> <FTP
password>]
rmnodesecr
del
/cfg/sys/syslog
Configure syslog servers page 481
list
for the cluster.
del <index number>
add <IPaddr>
<facility>
insert <index number>
<IPaddr> <facility>
move <index number>
<new index number>
Nortel Secure Network Access Switch 4050 User Guide
834 Appendix A CLI reference
Table 184 Configuration menu commands (Sheet 19 of 19)
Command
Parameters/Submenus
Purpose
Usage
/cfg/sys/time
date <date>
time <time>
tzone
ntp
Configure date and time
settings for the cluster.
page 475
/cfg/sys/time/ntp
list
del <index number>
add <IPaddr>
Manage NTP servers
used by the system.
page 476
/cfg/sys/user
password <old
password> <new
password> <confirm
new password>
expire <time>
list
del <username>
add <username>
edit <username>
caphrase
Change the password for page 356
the currently logged on
user and add or delete
user accounts.
/cfg/sys/user/edit
<username>
password <own
password> <user
password> <confirm
user password>
groups
cur
Set or change the login
password for a specified
user and view and
manage group
assignments.
page 359
/cfg/sys/user/edit
<username>/groups
list
del <group index>
add
admin|oper|certadmin
Set or change a user’s
group assignment.
page 360
320818-A
Appendix A CLI reference 835
Boot menu
The Boot menu contains commands for management of Nortel SNAS 4050
software and devices. Table 185 lists the boot commands in alphabetical order and
provides cross-references to more detailed information. .
Table 185 Boot menu commands
Command
Parameters/Submenus
Purpose
Usage
/boot
software
halt
reboot
delete
Manage Nortel
page 733
SNAS 4050 software and
devices.
/boot/software
cur
activate <version>
download <protocol>
<server> <filename>
del
page 734
View, download, and
activate software versions
for the Nortel SNAS 4050
device to which you are
connected.
Nortel Secure Network Access Switch 4050 User Guide
836 Appendix A CLI reference
Maintenance menu
The Maintenance menu contains commands used to perform maintenance and
management activities for the system and individual Nortel SNAS 4050 devices.
Table 186 lists the Maintenance commands and provides a cross-reference to
more detailed information.
Table 186 Maintenance menu commands
Command
Parameters/Submenus
Purpose
/maint
dumplogs <protocol>
<server> <filename>
<all-isds?>
dumpstats <protocol>
<server> <filename>
<all-isds?>
chkcfg
starttrace <tags>
<domain ID> <output
mode>
stoptrace
Check the applied
page 726
configuration and
download log file and
system status information
for technical support
purposes.
320818-A
Usage
837
Chapter 18
Troubleshooting
This chapter includes the following topics:
Topic
Page
Troubleshooting tips
837
Trace tools
845
System diagnostics
847
Troubleshooting tips
This chapter provides troubleshooting tips for the following problems:
•
•
•
•
•
•
Cannot connect to the Nortel SNAS 4050 using Telnet or SSH (page 838)
Cannot add the Nortel SNAS 4050 to a cluster (page 841)
Cannot contact the MIP (page 841)
The Nortel SNAS 4050 stops responding (page 843).
A user password is lost (page 844).
A user fails to connect to the Nortel SNAS 4050 domain (page 845).
Nortel Secure Network Access Switch 4050 User Guide
838 Chapter 18 Troubleshooting
Cannot connect to the Nortel SNAS 4050 using Telnet or
SSH
Verify the current configuration
Connect with a console connection and check that Telnet or SSH access to the
Nortel SNAS 4050 is enabled. By default, remote connections to the Nortel
SNAS 4050 are disabled for security reasons. Enter the command /cfg/sys/
adm/cur to see whether remote access is enabled for Telnet or SSH.
>> Main# /cfg/sys/adm/cur
Collecting data, please wait...
Administrative Applications:
CLI idle timeout = 1h
Telnet CLI access = off
SSH CLI access = off
Enable Telnet or SSH access
If your security policy affords enabling remote connections to the Nortel
SNAS 4050, enter the command /cfg/sys/adm/telnet to enable Telnet
access, or the command /cfg/sys/adm/ssh to enable SSH access. Apply your
configuration changes.
>> Main# /cfg/sys/adm/ssh
Current value: off
Allow SSH CLI access (on/off): on
>> Administrative Applications# apply
Changes applied successfully.
Check the Access List
If you find that Telnet or SSH access is enabled but you still cannot connect to the
Nortel SNAS 4050 using a Telnet or SSH client, check whether any hosts have
been added to the Access List. Enter the command /cfg/sys/accesslist/
list to view the current Access List.
>> Main# /cfg/sys/accesslist/list
1: 192.168.128.78, 255.255.255.0
320818-A
Chapter 18 Troubleshooting 839
When Telnet or SSH access is enabled, only those hosts listed in the Access List
are allowed to access the Nortel SNAS 4050 over the network. If no hosts have
been added to the Access List, this means that any host is allowed to access the
Nortel SNAS 4050 over the network (assuming that Telnet or SSH access is
enabled).
If there are entries in the Access List but your host is not listed, use the /cfg/
sys/accesslist/add command to add the required host to the Access List.
Check the IP address configuration
If your host is allowed to access the Nortel SNAS 4050 over the network
according to the Access List, check that you have configured the correct IP
addresses on the Nortel SNAS 4050.
Nortel Secure Network Access Switch 4050 User Guide
840 Chapter 18 Troubleshooting
Ensure that you ping the host IP address (RIP) of the Nortel SNAS 4050, and not
the Management IP address (MIP) of the cluster in which the Nortel SNAS 4050
is a member. Enter the command /cfg/cur sys to view IP address information
for all Nortel SNAS 4050 devices in the cluster.
>> # /cfg/cur sys
System:
Management IP (MIP) address = 192.168.128.211
iSD Host 1:
Type of the iSD = master
IP address = 10.1.82.145
License =
IPSEC user sessions: 10
TPS: unlimited
SSL user sessions: 10
Default gateway address = 10.1.82.2
Ports = 1 : 2
Hardware platform = 200
Host Routes:
No items configured
Host Interface 1:
IP address = 192.168.128.210
Network mask = 255.255.255.0
VLAN tag id = 0
Mode = failover
Primary port = 0
Interface Ports:
1
Host Port 1:
If the IP address assigned to the Nortel SNAS 4050 is correct, you may have a
routing problem. Try to run traceroute (a global command available at any
menu prompt) or the tcpdump command (or some other network analysis tool) to
locate the problem. For more information about the tcpdump command, see
“Tracing SSL traffic using the CLI” on page 136.
If this does not help you to solve the problem, contact Nortel for technical support.
See “How to get help” on page 29.
320818-A
Chapter 18 Troubleshooting 841
Cannot add the Nortel SNAS 4050 to a cluster
When you try to add a Nortel SNAS 4050 device to a cluster by selecting join in
the Setup menu, you may receive an error message stating that the system is
running an incompatible software version.
The incompatible software version referred to in the error message is the software
that is running on the Nortel SNAS 4050 device you are trying to add to the
cluster. This error message is displayed whenever the Nortel SNAS 4050 you are
trying to add has a different software version from the Nortel SNAS 4050 device
already in the cluster. In this situation, do one of the following:
•
Adjust the software version on the Nortel SNAS 4050 device you are trying to
add to the cluster, to synchronize it with the software version running on the
Nortel SNAS 4050 device already in the cluster. You can verify software
versions by typing the command /boot/software/cur. The active
software version is indicated as permanent.
To adjust the software version on the Nortel SNAS 4050 device you want to
add to the cluster, you must either upgrade to a newer software version or
revert to an older software version. In either case, perform the steps described
in “Reinstalling the software” on page 763. After you adjust the software
version, log on as the Administrator user and select join from the Setup
menu.
•
Upgrade the software version running on the Nortel SNAS 4050 device in the
cluster to the same version as running on the Nortel SNAS 4050 you want to
add to the cluster. Perform the steps described in “Performing minor and
major release upgrades” on page 758. Then add the Nortel SNAS 4050 device
by selecting join from the Setup menu.
Cannot contact the MIP
When you try to add a Nortel SNAS 4050 to a cluster by selecting join in the
Setup menu, you may receive an error message stating that the system is unable to
contact the Management IP address (MIP).
Nortel Secure Network Access Switch 4050 User Guide
842 Chapter 18 Troubleshooting
The problem may be that there are existing entries in the Access List. When Telnet
or SSH access is enabled, only those hosts listed in the Access List are allowed to
access the Nortel SNAS 4050 over the network. If no hosts have been added to the
Access List, this means that any host is allowed to access the Nortel SNAS 4050
over the network (assuming that Telnet or SSH access is enabled).
If the Access List contains entries, add the Interface 1 IP addresses of both Nortel
SNAS 4050 devices as well as the MIP to the Access List before you attempt the
join.
Check the Access List
On the existing Nortel SNAS 4050 device in the cluster, check whether any hosts
have been added to the Access List. Enter the command /cfg/sys/
accesslist/list to view the current Access List.
>> Main# /cfg/sys/accesslist/list
1: 192.168.128.78, 255.255.255.0
Add Interface 1 IP addresses and the MIP to the Access List
Use the /cfg/cur sys command to view the Host Interface 1 IP address for the
existing Nortel SNAS 4050. Then use the /cfg/sys/accesslist/add
command to add this IP address, the Interface 1 IP address you intend to use for
the new Nortel SNAS 4050, and the MIP to the Access List.
>> Main# /cfg/sys/accesslist/add
Enter network address: <IP address>
Enter netmask: <network mask>
Try again to add the Nortel SNAS 4050 to the cluster using the join command in
the Setup menu.
320818-A
Chapter 18 Troubleshooting 843
The Nortel SNAS 4050 stops responding
Telnet or SSH connection to the MIP
When you are connected to a cluster of Nortel SNAS 4050 devices through a
Telnet or SSH connection to the MIP, your connection to the cluster can be
maintained as long as at least one Nortel SNAS 4050 device in the cluster is up
and running. However, if the particular Nortel SNAS 4050 that currently is in
control of the MIP stops responding while you are connected, you must close
down your Telnet or SSH connection and reconnect to the MIP.
After you reconnect, use the /info/contlis command to view the operational
status of all Nortel SNAS 4050 devices in the cluster. If the operational status of
one of the Nortel SNAS 4050 devices is indicated as down, reboot that machine:
On the Nortel SNAS 4050 device, press the Power button on the back panel to turn
the machine off, wait until the fan comes to a standstill, and then press the Power
button again to turn the machine on.
Log on as the Administrator user when the logon prompt appears and check the
operational status again.
Console connection
If you are connected to a particular Nortel SNAS 4050 device through a console
connection and the device stops responding, press the key combination Ctrl+^,
then press Enter. This takes you back to the login prompt. Log on as the
Administrator user and check the operational status of the Nortel SNAS 4050.
Enter the command /info/contlist to view the operational status of the
device.
If the operational status of the Nortel SNAS 4050 is indicated as down, try
rebooting the device by typing the command /boot/reboot. You will be asked
to confirm your action before the actual reboot is performed. Log on as the
Administrator user and again use the /info/contlist command to check if the
operational status of the Nortel SNAS 4050 is now up.
Nortel Secure Network Access Switch 4050 User Guide
844 Chapter 18 Troubleshooting
If the operational status of the Nortel SNAS 4050 is still down, reboot the
machine. On the device, press the Power button on the back panel to turn the
machine off, wait until the fan comes to a standstill, and then press the Power
button again to turn the machine on. Log on as the Administrator user when the
login prompt appears.
A user password is lost
There are four types of system user passwords:
•
•
•
•
“Administrator user password” on page 844
“Operator user password” on page 844
“Root user password” on page 844
“Boot user password” on page 845
Administrator user password
If you have lost the Administrator user password the only way to regain access to
the Nortel SNAS 4050 as the Administrator user is to reinstall the software, using
a console connection as the Boot user.
For more information, see “Reinstalling the software” on page 763.
Operator user password
If you have lost the Operator user password, log on as the Administrator user and
define a new Operator user password. Only the Administrator user can change the
Operator user password.
For more information, see “Changing another user’s password” on page 367.
Root user password
If you have lost the Root user password, log on as the Administrator user and
define a new Root user password. Only the Administrator user can change the
Root user password. For more information, see “Changing another user’s
password” on page 367.
320818-A
Chapter 18 Troubleshooting 845
Boot user password
The default Boot user password cannot be changed, and can therefore never really
be lost. If you have forgotten the Boot user password, see “Accessing the Nortel
SNAS 4050 cluster” on page 775.
The reason the Boot user password cannot be changed is that, if you lost both the
Administrator password and the Boot user password, the Nortel SNAS 4050
would be rendered completely inaccessible to all users except the Operator, who
does not have rights to make configuration changes.
The fact that the Boot user password cannot be changed is not a security concern.
The Boot user can only access the Nortel SNAS 4050 with a console connection
using a serial cable, and it is assumed that the Nortel SNAS 4050 device is set up
in a server room with restricted access.
A user fails to connect to the Nortel SNAS 4050 domain
The following are common reasons why a user may have difficulty authenticating
to the Nortel SNAS 4050 domain or why a client connection cannot be
established.
•
•
•
The user name or password is wrong.
The configured authentication server cannot be reached.
The group name retrieved from the authentication server does not exist on the
Nortel SNAS 4050.
Trace tools
Use the /maint/starttrace command to trace the different steps involved in a
specific process, such as authorization.
>> Main# maint/starttrace
Enter tags (list of all,aaa,dns,ssl,tg,snas) [all]:
aaa,ssl
Enter Domain (or 0 for all Domains) [0]:
Output mode (interactive/tftp/ftp/sftp) [interactive]:
Nortel Secure Network Access Switch 4050 User Guide
846 Chapter 18 Troubleshooting
For more information about the starttrace command, the tags you can specify
for the trace, and the available output modes, see “Performing maintenance using
the CLI” on page 726.
Table 187 shows sample output for the various tags.
Table 187 Sample output for the trace command
Tag
Description
Sample output
aaa
Logs authentication
method, user
name, group, and
profile
>> Maintenance#
12:54:08.875111: Trace started
12:54:28.834571 10.1.82.145 (1) aaa: "local user db Accept
1:john with groups ["trusted"]"
12:54:28.835144 10.1.82.145 (1) aaa: "final groups for
user: john groups: trusted:<base> "
12:54:29.917926 10.1.82.145 (1) aaa: "new groups for user:
john groups: trusted:<base> "
dns
Logs failed DNS
lookups made
during a session
>> Maintenance#
13:00:09.868682 10.1.82.145 (1) dns: "Failed to lookup
www.example.com in DNS (DNS domain name does not exist)"
ssl
Logs information
related to the SSL
handshake
procedure (for
example, the cipher
used)
>> Maintenance#
13:15:55.985432: Trace started
13:16:26.808831 10.1.82.145 (1) ssl: "SSL accept done,
cipher is RC4-MD5"
13:16:28.802199 10.1.82.145 (1) ssl: "SSL accept done,
cipher is RC4-MD5"
13:16:29.012856 10.1.82.145 (1) ssl: "SSL accept done,
cipher is RC4-MD5"
tg
Logs information
related to a
TunnelGuard check
(for example, SRS
rule check result)
>> Maintenance#
13:27:50.715545: Trace started
13:27:54.976137 10.1.82.145 (1) tg: "ssl user
john[192.168.128.19] - starting tunnelguard ssl session"
13:28:17.204049 10.1.82.145 (1) tg: "ssl user
john[192.168.128.19] - agent authentication ok"
13:28:18.807447 10.1.82.145 (1) tg: "user
john[192.168.128.19] - SRS checks ok, open session"
To disable tracing, press Enter to display the Maintenance menu prompt, then
enter stoptrace.
320818-A
Chapter 18 Troubleshooting 847
System diagnostics
The following are useful diagnostic display commands. For more information
about the commands, use the alphabetical listings in Appendix A, “CLI
reference,” on page 803 to cross-reference to where the commands are described
in more detail in this guide.
To view diagnostic information in the SREM, see “Running Nortel SNAS 4050
diagnostics using the SREM” on page 754.
Installed certificates
To view the currently installed certificates, enter the following command:
>> Main# /info/certs
To view detailed information about a specific certificate, access the Certificate
menu and specify the desired certificate by its index number:
>> Main# /cfg/cert
Enter certificate number: (1-) <certificate number by
index>
>> Certificate 1# show
Network diagnostics
To check if the Nortel SNAS 4050 is able to contact configured network access
devices, routers, DNS servers, authentication servers, and IP addresses or domain
names specified in group links, use the following command:
>> Main# /maint/chkcfg
The screen output provides information about each configured network element
and shows whether the network test was successful or not. The method used to
check the connection (for example, ping) is also displayed.
Nortel Secure Network Access Switch 4050 User Guide
848 Chapter 18 Troubleshooting
To check network settings for a specific Nortel SNAS 4050, access the Cluster
Host menu by typing the following commands:
>> Main# /cfg/sys/host <host by index number>
>> Cluster Host 1# cur
To check general network settings related to the cluster to which you have
connected, enter the following command:
>> Main# /cfg/sys/cur
The screen output provides information about the MIP, DNS servers, Nortel
SNAS 4050 hosts in the cluster, syslog servers, and NTP servers.
To check if the Nortel SNAS 4050 is getting network traffic, enter the following
command:
>> Main# /stats/dump
The screen output provides information about currently active request sessions,
total completed request sessions, and SSL statistics for configured virtual SSL
servers.
To check statistics for the local Ethernet network interface card, enter the
following command:
>> Main# /info/ethernet
The screen output provides information about the total number of received and
transmitted packets, the number of errors when receiving and transmitting
packets, and the type of error (such as dropped packets, overrun packets,
malformed packets, packet collisions, and lack of carrier).
To check if a virtual server (on the Nortel SNAS 4050) is working, enter the
following command at any menu prompt:
>> Main# ping <IP address of virtual server>
320818-A
Chapter 18 Troubleshooting 849
To capture and analyze TCP traffic between clients and the virtual SSL server,
enter the following command:
>> Main# /cfg/domain 1/server/trace/tcpdump
To capture and analyze decrypted SSL traffic sent between clients and the portal
server, enter the following command:
>> Main# /cfg/domain 1/server/trace/ssldump
Active alarms and the events log file
To view an alarm that has been triggered and is active, enter the following
command:
>> Main# /info/events/alarms
To save the events log file to an FTP/TFTP/SFTP server, enter the following
command:
>> Main# /info/events/download
You must provide the IP address or host name of the FTP/TFTP/SFTP server, as
well as a file name. After the events log file has been saved, connect to the FTP/
TFTP/SFTP server and examine the contents of the file.
Error log files
If you have configured the Nortel SNAS 4050 to use a syslog server, the Nortel
SNAS 4050 sends log messages to the specified syslog server. For information
about configuring a UNIX Syslog daemon, see the Syslog manpages under UNIX.
For information about configuring the Nortel SNAS 4050 to use a syslog server,
see “Configuring syslog servers using the CLI” on page 481.
You can also use the /maint/dumplogs command. The command collects
system log file information from the Nortel SNAS 4050 to which you are
connected (or, optionally, all Nortel SNAS 4050 devices in the cluster) and sends
the information to a file in the gzip compressed tar format on the TFTP/FTP/SFTP
Nortel Secure Network Access Switch 4050 User Guide
850 Chapter 18 Troubleshooting
server you specify. The information can then be used for technical support
purposes. The file sent to the TFTP/FTP/SFTP server does not contain any
sensitive information related to the system configuration, such as certificates or
private keys.
320818-A
851
Appendix B
Syslog messages
This appendix contains a list of the syslog messages that are sent from the Nortel
SNAS 4050 to a syslog server, when a syslog server has been added to the system
configuration. For more information about adding a syslog server to the system
configuration, see “Configuring syslog servers using the CLI” on page 481 or
“Configuring servers using the SREM” on page 534.
The syslog messages are presented in two ways:
•
•
“Syslog messages by message type” on page 851
“Syslog messages in alphabetical order” on page 865
Syslog messages by message type
The following types of messages occur:
•
•
•
•
•
•
operating system (OS) (see page 852)
system control (see page 853)
traffic processing (see page 857)
start-up (see page 860)
AAA (see page 861)
NSNAS (see page 863)
Nortel Secure Network Access Switch 4050 User Guide
852 Appendix B Syslog messages
Operating system (OS) messages
There are three categories of operating system (OS) system messages:
•
•
•
EMERG (see Table 188 on page 852)
CRITICAL (see Table 189 on page 852)
ERROR (see Table 190 on page 853)
Table 188 lists the EMERG operating system messages.
Table 188 Operating system messages — EMERG
Message
Category
Explanation/Action
Root filesystem corrupt
EMERG
The system cannot boot, but stops with a single-user
prompt. fsck failed. Reinstall in order to recover.
Config filesystem corrupt beyond
repair
EMERG
The system cannot boot, but stops with a single-user
prompt. Reinstall in order to recover.
Failed to write to config filesystem
EMERG
Probable hardware error. Reinstall.
Table 189 lists the operating system CRITICAL messages.
Table 189 Operating system messages — CRITICAL
Message
Category
Explanation/Action
Config filesystem re-initialized reinstall required
CRITICAL
Reinstall.
Application filesystem corrupt reinstall required
CRITICAL
Reinstall.
320818-A
Appendix B Syslog messages 853
Table 190 lists the operating system EMERG messages.
Table 190 Operating system messages — ERROR
Message
Category
Explanation/Action
Config filesystem corrupt
ERROR
Possible loss of configuration. Followed by the
message:
Config filesystem re-initialized reinstall required
or
Config filesystem restored from
backup.
Missing files in config filesystem
ERROR
Possible loss of configuration. Followed by the
message:
Config filesystem re-initialized reinstall required
or
Config filesystem restored from
backup.
Logs filesystem re-initialized
ERROR
Loss of logs.
Root filesystem repaired - rebooting
ERROR
fsck found and fixed errors. Probably OK.
Config filesystem restored from
backup
ERROR
Loss of recent configuration changes.
Rebooting to revert to permanent OS
version
ERROR
Happens after Config filesystem
re-initialized - reinstall required
or Config filesystem restored from
backup if software upgrade is in progress (in other
words, if failure at first boot on new OS version).
System Control Process messages
There are three categories of System Control Process messages:
•
•
•
INFO (see Table 191 on page 854)
ALARM (see Table 193 on page 855)
EVENT (see Table 194 on page 856)
Events and alarms are stored in the event log file. You can access the event log file
by using the /info/events/download command. You can view active alarms
by using the /info/events/alarms command. For more information, see
“Viewing system information and performance statistics” on page 659.
Nortel Secure Network Access Switch 4050 User Guide
854 Appendix B Syslog messages
Table 191 lists the System Control Process INFO messages.
Table 191 System control process messages — INFO
Message
Category
Explanation/Action
System started [isdssl-<version>]
INFO
Sent whenever the system control process has been
(re)started.
About alarm messages
Alarms are sent at a syslog level corresponding to the alarm severity shown in
Table 192.
Table 192 Alarm severity and syslog level correspondence
Alarm severity
Syslog level
CRITICAL
ALERT
MAJOR
CRITICAL
MINOR
ERROR
WARNING
WARNING
*
ERROR
Alarms are formatted according to the following pattern:
Id: <alarm sequence number>
Severity: <severity>
Name: <name of alarm>
Time. <date and time of the alarm>
Sender: <sender, e.g. system or the Nortel SNAS 4050 device’s IP address>
Cause: <cause of the alarm>
Extra: <additional information about the alarm>
When an alarm is cleared, one of the following messages is sent:
•
•
320818-A
Alarm Cleared Name=“<Name>” Id= “<ID>” Sender=“<Sender>”
Alarm Cleared Id=“<ID>”
Appendix B Syslog messages 855
Table 193 lists the System Control Process ALARM messages. To simplify
finding the alarm messages, the name parameter is listed first.
Table 193 System Control Process messages — ALARM
Message
Category
Explanation/Action
Name: isd_down
Sender: <IP>
Cause: down
Extra:
Severity: critical
ALARM
A member of the Nortel SNAS 4050 cluster is
down. This alarm is only sent if the cluster
contains more than one Nortel SNAS 4050.
Name: single_master
Sender: system
Cause: down
Extra:
Severity: warning
ALARM
Only one master Nortel SNAS 4050 in the
cluster is up and running.
Name: log_open_failed
Sender: <IP>, event
Cause and Extra are explanations of the
fault.
Severity: major
ALARM
The event log (where all events and alarms
are stored) could not be opened.
Name:
make_software_release_permanent_failed
Sender: <IP>
Cause: file_error | not_installed
Extra: “Detailed info”
Severity: critical
ALARM
Failed to make a new software release
permanent after being activated. The system
automatically reverts to the previous version.
ALARM
Name: copy_software_release_failed
Sender: <IP>
Cause: copy_failed | bad_release_package |
no_release_package | unpack_failed
Extra: “Detailed info”
Severity: critical
A Nortel SNAS 4050 failed to install a
software release while trying to install the
same version as all other Nortel SNAS 4050
devices in the cluster. The failing Nortel
SNAS 4050 tries to catch up with the other
cluster members, because it was not up and
running when the new software version was
installed.
Name: license
ALARM
Sender: license_server
Cause: license_not_loaded
Extra: “All iSDs do not have the same license
loaded”
Severity: warning
All Nortel SNAS 4050 devices in the cluster
do not have a license containing the same set
of licensed features. Check loaded licenses
using the /cfg/sys/cur command.
Name: license
Sender: <IP>
Cause: license_expire_soon
Extra: “Expires: <TIME>”
Severity: warning
The (demo) license loaded to the local Nortel
SNAS 4050 expires within 7 days. Check
loaded licenses using the /cfg/sys/cur
command.
ALARM
Nortel Secure Network Access Switch 4050 User Guide
856 Appendix B Syslog messages
About event messages
Events are sent at the NOTICE syslog level. Event messages are formatted
according to the following pattern:
Name: <Name>
Sender: <Sender>
Extra: <Extra>
Table 194 lists the System Control Process EVENT messages.
Table 194 System Control Process messages — EVENT
Message
Category
Explanation/Action
Name: partitioned_network
Sender and Extra is lower level information.
EVENT
Indicates that a Nortel SNAS 4050 is
recovering from a partitioned network
situation.
Name: ssi_mipishere
Sender: ssi
Extra: <IP>
EVENT
Indicates that the Management IP address
(MIP) is now located at the Nortel SNAS 4050
with the <IP> host IP address.
Name: software_configuration_changed
Sender: system
Extra: software release version <VSN>
<Status>
EVENT
Indicates that release <VSN> (version)
software status is <Status> (unpacked/
installed/permanent).
Name: software_release_copying
Sender: <IP>
Extra: copy software release <VSN> from
other cluster member
EVENT
Indicates that <IP> is copying the release
<VSN> from another cluster member.
Name: software_release_rebooting
Sender: <IP>
Extra: reboot with release version <VSN>
EVENT
Indicates that a Nortel SNAS 4050 (<IP>) is
rebooting on a new release (in other words, a
Nortel SNAS 4050 that was not up and
running during the normal installation is now
catching up).
Name: audit
Sender: CLI
Extra: Start <session> <details> Update
<session> <details> Stop <session>
<details>
EVENT
Sent when a CLI system administrator enters,
exits, or updates the CLI if audit logging is
enabled using the /cfg/sys/adm/
audit/ena command.
Name: license_expired
Sender = <IP>
EVENT
Indicates that the demo license loaded to host
<IP> has expired. Check the loaded licenses
with /cfg/sys/cur.
320818-A
Appendix B Syslog messages 857
Traffic Processing Subsystem messages
There are four categories of Traffic Processing Subsystem messages:
•
•
•
•
CRITICAL (see Table 195 on page 857)
ERROR (see Table 196 on page 857)
WARNING (see Table 197 on page 859)
INFO (see Table 198 on page 860)
Table 195 lists the Traffic Processing CRITICAL messages.
Table 195 Traffic Processing messages — CRITICAL
Message
Category
Explanation/Action
DNS alarm: all dns servers are DOWN
CRITICAL
All DNS servers are down. The Nortel
SNAS 4050 cannot perform any DNS
lookups.
Table 196 lists the Traffic Processing ERROR messages.
Table 196 Traffic Processing messages — ERROR (Sheet 1 of 3)
Message
Category
Explanation/Action
internal error: <no>
ERROR
An internal error occurred. Contact support
with as much information as possible to
reproduce this message.
javascript error: <reason> for: <host><path> ERROR
JavaScript parsing error encountered when
parsing content from <host><path>. The
problem could be in the Nortel SNAS 4050
JavaScript parser, but most likely it is a syntax
error in the JavaScript on the page.
vbscript error: <reason> for: <host><path>
ERROR
VBScript parsing error encountered when
parsing content from <host><path>. The
problem could be in the Nortel SNAS 4050
VBScript parser, but most likely it is a syntax
error in the VBScript on the page.
jscript.encode error: <reason>
ERROR
Problem encountered when parsing an
encoded JavaScript. The problem could be in
the Nortel SNAS 4050 JavaScript parser, or it
could be a problem on the processed page.
Nortel Secure Network Access Switch 4050 User Guide
858 Appendix B Syslog messages
Table 196 Traffic Processing messages — ERROR (Sheet 2 of 3)
Message
Category
Explanation/Action
css error: <reason>
ERROR
Problem encountered when parsing a style
sheet. The problem could be in the Nortel
SNAS 4050 css parser, or it could be a
problem on the processed page.
Failed to syslog traffic :<reason> -- disabling ERROR
traf log
Problem occurred when the Nortel
SNAS 4050 tried to send traffic logging syslog
messages. Traffic syslogging was disabled as
a result.
www_authenticate: bad credentials
ERROR
The browser sent a malformed
WWW-Authenticate: credentials header. Most
likely a broken client.
http error: <reason>, Request=”<method>
<host><path>”
ERROR
A problem was encountered when parsing the
HTTP traffic. The problem indicates either a
non-standard client/server or that the Nortel
SNAS 4050 HTTP parser is out of sync
because of an earlier non-standard
transaction from the client or server on this
TCP stream.
http header warning cli: <reason>
(<header>)
ERROR
The client sent a bad HTTP header.
http header warning srv: <reason>
(<header>)
ERROR
The server sent a bad HTTP header.
failed to parse Set-Cookie <header>
ERROR
The Nortel SNAS 4050 got a malformed
Set-Cookie header from the backend web
server.
Bad IP:PORT data <line> in hc script
ERROR
Bad ip:port found in health check script.
Reconfigure the health script. (Normally, the
CLI captures this type of problem earlier.)
Bad regexp (<expr>) in health check
ERROR
Bad regular expression found in health check
script. Reconfigure the health script.
(Normally, the CLI captures this type of
problem earlier.)
Bad script op found <script op>
ERROR
Bad script operation found in health check
script. Reconfigure the health script.
(Normally, the CLI captures this type of
problem earlier.)
Connect failed: <reason>
ERROR
Connect to backend server failed with
<reason>
html error: <reason>
ERROR
Error encountered when parsing HTML.
Probably non-standard HTML.
320818-A
Appendix B Syslog messages 859
Table 196 Traffic Processing messages — ERROR (Sheet 3 of 3)
Message
Category
Explanation/Action
socks error: <reason>
ERROR
Error encountered when parsing the socks
traffic from the client. Probably a
non-standard socks client.
socks request: socks version <version>
rejected
ERROR
Socks request of version <version> received
and rejected. Most likely a non-standard
socks client.
Failed to log to CLI :<reason> -- disabling
CLI log
ERROR
Failed to send troubleshooting log to CLI.
Disabling CLI troubleshooting log.
Can't bind to local address: <ip>:<port>:
<reason>
ERROR
Problem encountered when trying to set up
virtual server on <ip>:<port>.
Ignoring DNS packet was not from any of the ERROR
defined names server <ip>:<port>
Nortel SNAS 4050 received reply for
non-configured DNS server.
Table 197 lists the Traffic Processing WARNING messages.
Table 197 Traffic Processing messages — WARNING
Message
Category
Explanation/Action
DNS alarm: all dns servers are DOWN
WARNING
All DNS servers are down. The Nortel
SNAS 4050 cannot perform any DNS
lookups.
TPS license limit (<limit>) exceeded
WARNING
The transactions per second (TPS) limit has
been exceeded.
No PortalGuard license loaded: domain <id> WARNING
*will* use portal authentication
The PortalGuard license has not been loaded
on the Nortel SNAS 4050 but /cfg/
domain #/server/portal/
authenticate is set to off.
No Secure Service Partitioning loaded:
server <id> *will not* use interface <n>
WARNING
The Secure Service Partitioning license has
not been loaded on the Nortel SNAS 4050 but
the server is configured to use a specific
interface.
License expired
WARNING
The loaded (demo) license on the Nortel
SNAS 4050 has expired. The Nortel
SNAS 4050 now uses the default license.
Server <id> uses default interface (interface
<n> not configured)
WARNING
A specific interface is configured to be used
by the server but this interface is not
configured on the Nortel SNAS 4050.
IPSEC server <id> uses default interface
(interface <n> not configured)
WARNING
A specific interface is configured to be used
by the IPsec server but this interface is not
configured on the Nortel SNAS 4050.
Nortel Secure Network Access Switch 4050 User Guide
860 Appendix B Syslog messages
Table 198 lists the Traffic Processing INFO messages.
Table 198 Traffic Processing messages — INFO
Message
Category
Explanation/Action
gzip error: <reason>
INFO
Problem encountered when processing
compressed content.
gzip warning: <reason>
INFO
Problem encountered when processing
compressed content.
accept() turned off (<nr>) too many fds
INFO
The Nortel SNAS 4050 has temporarily
stopped accepting new connections. This
happens when the Nortel SNAS 4050 is
overloaded. The Nortel SNAS 4050 will start
accepting connections once it has finished
processing its current sessions.
No cert supplied by backend server
INFO
No certificate supplied by backend server
when doing SSL connect. Session terminated
to backend server.
No CN supplied in server cert <subject>
INFO
No CN found in the subject of the certificate
supplied by the backend server.
Bad CN supplied in server cert <subject>
INFO
Malformed CN found in subject of the
certificate supplied by the backend server.
DNS alarm: dns server(s) are UP
INFO
At least one DNS server is now up.
HC: backend <ip>:<port> is down
INFO
Backend health check detected backend
<ip>:<port> to be down.
HC: backend <ip>:<port> is up again
INFO
Backend health check detected backend
<ip>:<port> to be up.
Start-up messages
The Traffic Processing Subsystem Start-up messages include the INFO category
only.
320818-A
Appendix B Syslog messages 861
Table 199 lists the Start-up INFO messages.
Table 199 Start-up messages — INFO
Message
Category
Explanation/Action
Loaded <ip>:<port>
INFO
Initializing virtual server <ip>:<port>.
Since we use clicerts, force adjust totalcache INFO
size to : <size> per server that use clicerts
Generated if the size of the SSL session
cache has been modified.
No TPS license limit
INFO
Unlimited TPS license used.
Found <size> meg of phys mem
INFO
Amount of physical memory found on system.
AAA subsystem messages
There are two categories of Authentication, Authorization, and Accounting
(AAA) subsystem messages:
•
•
ERROR (see Table 200 on page 861)
INFO (see Table 201 on page 862)
Table 200 lists the AAA ERROR messages.
Table 200 AAA messages — ERROR
Message
Category
Explanation/Action
LDAP backend(s) unreachable
Domain=\”<id>\” AuthId=\”<authid>\”
ERROR
Indicates LDAP server(s) cannot be reached
when a user tries to log in to the portal.
Nortel Secure Network Access Switch 4050 User Guide
862 Appendix B Syslog messages
Table 201 lists the AAA INFO messages. INFO messages are generated only if
the CLI command /cfg/domain #/adv/log is enabled.
Table 201 AAA messages — INFO (Sheet 1 of 2)
Log value
contains...
Message
Category
NSNAS LoginSucceeded
Domain=”<id>” Method=<“ssl”>
SrcIp=”<ip>” User=”<user>”
Groups=”<groups>”
INFO
Logon to the Nortel SNAS 4050 domain
succeeded. The client’s access method,
IP address, user name, and group
membership is shown.
NSNAS LoginSucceeded
Domain=”<id>” Method=<”ssl”>
SrcIp=”<ip>” User=”<user>”
Groups=”<groups>” TunIP=”<inner
tunnel ip>”
INFO
Logon to the Nortel SNAS 4050 domain
succeeded. The client’s access method,
IP address, user name and group
membership is shown as well as the IP
address allocated to the connection
between the Nortel SNAS 4050 and the
destination address (inner tunnel).
NSNAS AddressAssigned
Domain=”<id>” Method=<”ssl”>
SrcIp=”<ip>” User=”<user>”
TunIP=”<inner tunnel ip>”
INFO
Source IP address for the connection
between the Nortel SNAS 4050 and the
destination address (inner tunnel) has
been allocated.
NSNAS LoginFailed Domain=”<id>”
Method=<”ssl”> SrcIp=”<ip>”
[User=”<user>”] Error=<error>
INFO
Logon to the Nortel SNAS 4050 domain
failed. The client’s access method, IP
address, and user name is shown.
NSNAS Logout Domain=”<id>”
SrcIp=”<ip>” User=”<user>”
INFO
The client’s access method, IP address,
has logged out from the Nortel
SNAS 4050 domain.
portal
PORTAL Domain=”<id>”
User=”<user>” Proto=”<proto>”
Host=”<host>” Share=”<share>”
Path=”<path>”
INFO
The client has successfully accessed the
specified folder/directory on the specified
file server requested from the portal’s
Files tab.
http
HTTP Domain=”<id>” Host=”<host>”
User=”<user>” SrcIP=”<ip>”
Request=”<method> <host> <path>”
INFO
The user has successfully accessed the
specified web server requested from the
portal.
HTTP NotLoggedIn Domain=”<id>”
Host=”<host>” SrcIP=”<ip>”
Request=”<method> <host> <path>”
INFO
The user was not logged on to the
specified web server requested from the
portal.
login
320818-A
Appendix B Syslog messages 863
Table 201 AAA messages — INFO (Sheet 2 of 2)
Log value
contains...
reject
Message
Category
HTTP Rejected Domain=”<id>”
Host=”<host>” User=”<user>”
SrcIP=”<ip>” Request=”<method>
<host> <path>”
INFO
The client failed to access the specified
web server requested from the portal.
PORTAL Rejected Domain=”<id>”
User=”<user>” Proto=”<proto>”
Host=”<host>” Share=”<share>”
Path=”<path>”
INFO
The client failed to access the specified
folder/directory on the specified file
server requested from the portal’s Files
tab.
SOCKS Rejected Domain=”<id>”
User=”<user>” SrcIP=”<ip>”
Request=”<request>”
INFO
The client failed to perform an operation
by using one of the features available
under the portal’s Advanced tab.
NSNAS subsystem messages
There are two categories of NSNAS subsystem messages:
•
•
ERROR (see Table 202 on page 864)
INFO (see Table 203 on page 864)
Nortel Secure Network Access Switch 4050 User Guide
864 Appendix B Syslog messages
Table 202 lists the NSNAS ERROR messages.
Table 202 NSNAS — ERROR
Message
Category
Explanation/Action
Domain:1, Switch: <switchID> ERROR cmd
timeout for cmd :<commandID>
ERROR
An internal command between the specified
switch and the Nortel SNAS 4050 timed out.
Check connectivity between the switch and
the Nortel SNAS 4050.
Table 203 lists the NSNAS INFO messages.
Table 203 NSNAS — INFO (Sheet 1 of 2)
Message
Category
Explanation/Action
[A:B:C:D] NSNA portup
INFO
Domain A, switch B, unit C, port D Ethernet
link is up.
[A:B:C:D] NSNA portdown
INFO
Domain A, switch B, unit C, port D Ethernet
link is down.
LoginSucceeded Domain=”1”
INFO
SrcIp=”<IPaddr>” Method=”ssl”
User=”<user>” Groups=”<group>/<profile>/ ”
On Domain 1, user “<user>” with IP : ”<IP>”
and belonging to group “<group>/<profile>/”
has logged in.
transferring user <user> on
Switch=”1:<switchID>(<IPaddr>)”,
Port=”<unit/port>” to
Vlan=”<vlan>(<vlanID>)”
INFO
Client device on Domain 1, Switch <switchID>
(switch IP address <IPaddr> ), Unit <unit>,
Port <port> is being moved to the VLAN
named <vlan> with VLAN ID <vlanID>.
switch controller:switch [1:<switchID>] –
Modified
INFO
The CLI configuration of Domain 1, Switch
<switchID> has been modified.
switch controller:switch [1:<switchID>] –
Disconnected
INFO
Switch <switchID> of Domain 1 has
disconnected from the NSNAS.
switch controller:switch [1:<switchID>] –
Added
INFO
Switch <switchID> has been added to Domain
1.
switch controller:switch [1:<switchID>] Deleted
INFO
Switch <switchID> has been deleted from
Domain 1.
320818-A
Appendix B Syslog messages 865
Table 203 NSNAS — INFO (Sheet 2 of 2)
Message
Category
Explanation/Action
tunnelguard: user <username>[<pVIP>] –
SRS check failed, restrictingSRS – <SRS
rule> <comment> – <item> – <reason>
INFO
TunnelGuard applet report: The user with user
name <username>, logged on to the Nortel
SNAS 4050 portal with portal Virtual IP
address <pVIP>, has failed the SRS rule
check, and access is restricted in accordance
with the behavior configured for SRS rule
failure. To identify the rule, the message
includes the <SRS rule> name and additional
<comment> information defined for the rule.
The message also includes the element of the
SRS rule (<item>) that failed and the
<reason> (for example, file not found).
tunnelguard: user <username>[<pVIP>] –
SRS checks ok, open session
INFO
TunnelGuard applet report: The user with user
name <username>, logged on to the Nortel
SNAS 4050 portal with portal Virtual IP
address <pVIP>, has passed the SRS rule
check and is authorized to start a session in a
Green VLAN.
Syslog messages in alphabetical order
Table 204 lists the syslog messages in alphabetical order.
Table 204 Syslog messages in alphabetical order (Sheet 1 of 10)
Message
Severity
Type
Explanation
[A:B:C:D] NSNA portdown
INFO
NSNAS
Domain A, switch B, unit C, port D Ethernet
link is down.
[A:B:C:D] NSNA portup
INFO
NSNAS
Domain A, switch B, unit C, port D Ethernet
link is up.
accept() turned off (<nr>) too
many fds
INFO
Traffic
Processing
The Nortel SNAS 4050 has temporarily
stopped accepting new connections. This
will happen when the Nortel SNAS 4050 is
overloaded. It will start accepting
connections once it has finished
processing its current sessions.
Application filesystem corrupt reinstall required
CRITICAL
OS
Reinstall.
Nortel Secure Network Access Switch 4050 User Guide
866 Appendix B Syslog messages
Table 204 Syslog messages in alphabetical order (Sheet 2 of 10)
Message
Severity
Type
Explanation
audit
EVENT
System
Control
Sent when a CLI system administrator
enters, enters, exits or updates the CLI if
audit logging is enabled using the /cfg/
sys/adm/audit/ena command.
Bad CN supplied in server cert
<subject>
INFO
Traffic
Processing
Malformed CN found in subject of the
certificate supplied by the backend server.
Bad IP:PORT data <line> in hc
script
ERROR
Traffic
Processing
Bad ip:port found in health check script.
Please reconfigure the health script. This
should normally be captured earlier by the
CLI.
Bad regexp (<expr>) in health
check
ERROR
Traffic
Processing
Bad regular expression found in health
check script. Please reconfigure. This
should normally be captured earlier by the
CLI.
Bad script op found <script op>
ERROR
Traffic
Processing
Bad script operation found in health check
script. Please reconfigure. This should
normally be captured earlier by the CLI.
Bad string found <string>
ERROR
Traffic
Processing
Bad load balancing string encountered.
This is normally verified by the CLI.
Can't bind to local address:
<ip>:<port>: <reason>
ERROR
Traffic
Processing
Problem encountered when trying to set up
virtual server on <ip>:<port>.
Config filesystem corrupt
ERROR
OS
Possible loss of configuration. Followed by
the message Config filesystem re-initialized
- reinstall required or Config filesystem
restored from backup.
Config filesystem corrupt beyond
repair
EMERG
OS
The system cannot boot, but stops with a
single-user prompt. Reinstall in order to
recover.
Config filesystem re-initialized reinstall required
CRITICAL
OS
Reinstall.
Config filesystem restored from
backup
ERROR
OS
Loss of recent configuration changes.
Connect failed: <reason>
ERROR
Traffic
Processing
Connect to backend server failed with
<reason>.
320818-A
Appendix B Syslog messages 867
Table 204 Syslog messages in alphabetical order (Sheet 3 of 10)
Message
Severity
Type
Explanation
copy_software_release_failed
ALARM
(CRITICAL)
System
Control
A Nortel SNAS 4050 failed to install a
software release while trying to install the
same version as all other Nortel
SNAS 4050 devices in the cluster. The
failing Nortel SNAS 4050 tries to catch up
with the other cluster members as it was
not up and running when the new software
version was installed.
css error: <reason>
ERROR
Traffic
Processing
Problem encountered when parsing an
style sheet. It may be a problem with the
css parser in the Nortel SNAS 4050 or it
could be a problem on the processed page.
DNS alarm: all dns servers are
DOWN
CRITICAL
Traffic
Processing
All DNS servers are down. The Nortel
SNAS 4050 cannot perform any DNS
lookups.
DNS alarm: dns server(s) are UP
INFO
Traffic
Processing
At least one DNS server is now up.
Domain:1, Switch: <switchID>
ERROR cmd timeout for cmd
:<commandID>
ERROR
NSNAS
An internal command between the
specified switch and the Nortel SNAS 4050
timed out. Check connectivity between the
switch and the Nortel SNAS 4050.
ERROR
failed to locate corresponding
portal for portal authenticated http
server
Traffic
Processing
Portal authentication has been configured
for an http server, but no portal using the
same xnet domain can be found. Make
sure that there is a portal running using the
same xnet id.
Failed to log to CLI :<reason> -disabling CLI log
ERROR
Traffic
Processing
Failed to send troubleshooting log to CLI.
Disabling CLI troubleshooting log.
failed to parse Set-Cookie
<header>
ERROR
Traffic
Processing
The Nortel SNAS 4050 got a malformed
Set-Cookie header from the backend web
server.
Failed to syslog traffic :<reason>
-- disabling traf log
ERROR
Traffic
Processing
Problem occurred when the Nortel
SNAS 4050 tried to send traffic logging
syslog messages. Traffic syslogging was
disabled as a result.
Failed to write to config filesystem EMERG
OS
Probable hardware error. Reinstall.
Found <size> meg of phys mem
INFO
Start-up
Amount of physical memory found on
system.
gzip error: <reason>
INFO
Traffic
Processing
Problem encountered when processing
compressed content.
Nortel Secure Network Access Switch 4050 User Guide
868 Appendix B Syslog messages
Table 204 Syslog messages in alphabetical order (Sheet 4 of 10)
Message
Severity
Type
Explanation
gzip warning: <reason>
INFO
Traffic
Processing
Problem encountered when processing
compressed content.
HC: backend <ip>:<port> is down INFO
Traffic
Processing
Backend health check detected backend
<ip>:<port> to be down.
HC: backend <ip>:<port> is up
again
INFO
Traffic
Processing
Backend health check detected backend
<ip>:<port> to be up.
html error: <reason>
ERROR
Traffic
Processing
Error encountered when parsing HTML.
Probably non-standard HTML.
http error: <reason>,
Request=”<method>
<host><path>”
ERROR
Traffic
Processing
A problem was encountered when parsing
the HTTP traffic. This is either an indication
of a non-standard client/server or an
indication that the Nortel SNAS 4050’s
HTTP parser has gotten out of sync due to
an earlier non-standard transaction from
the client or server on this TCP stream.
http header warning cli: <reason> ERROR
(<header>)
Traffic
Processing
The client sent a bad HTTP header.
http header warning srv:
<reason> (<header>)
Traffic
Processing
The server sent a bad HTTP header.
INFO
HTTP NotLoggedIn
Domain=”<id>” Host=”<host>”
SrcIP=”<ip>” Request=”<method>
<host> <path>”
AAA
The user was not logged on to the specified
web server requested from the Portal.
HTTP Rejected Domain=”<id>”
INFO
Host=”<host>” User=”<user>”
SrcIP=”<ip>” Request=”<method>
<host> <path>”
AAA
The user failed to access the specified web
server requested from the Portal.
HTTP Domain=”<id>”
INFO
Host=”<host>” User=”<user>”
SrcIP=”<ip>” Request=”<method>
<host> <path>”
AAA
The user has successfully accessed the
specified web server requested from the
Portal.
Ignoring DNS packet was not from ERROR
any of the defined namesserver
<ip>:<port>
Traffic
Processing
Nortel SNAS 4050 received reply for
non-configured DNS server.
internal error: <no>
ERROR
Traffic
Processing
An internal error occurred. Please contact
support with as much information as
possible to reproduce this message.
IPSEC server <id> uses default
interface (interface <n> not
configured)
WARNING
Traffic
Processing
A specific interface is configured to be used
by the IPsec server but this interface is not
configured on the Nortel SNAS 4050.
320818-A
ERROR
Appendix B Syslog messages 869
Table 204 Syslog messages in alphabetical order (Sheet 5 of 10)
Message
Severity
Type
Explanation
isd_down
ALARM
(CRITICAL)
System
Control
A member of the Nortel SNAS 4050 cluster
is down. This alarm is only sent if the
cluster contains more than one Nortel
SNAS 4050.
javascript error: <reason> for:
<host><path>
ERROR
Traffic
Processing
JavaScript parsing error encountered when
parsing content from <host><path>. This
could be a problem in the Nortel
SNAS 4050 JavaScript parser, but most
likely a syntactical error in the JavaScript
on that page.
jscript.encode error: <reason>
ERROR
Traffic
Processing
Problem encountered when parsing an
encoded JavaScript. It may be a problem
with the JavaScript parser in the Nortel
SNAS 4050 or it could be a problem on the
processed page.
LDAP backend(s) unreachable
Domain=\”<id>\”
AuthId=\”<authid>\”
ERROR
AAA
Shown if LDAP server(s) cannot be
reached when a user tries to login to the
Portal.
license
ALARM
(WARNING)
System
Control
One or several Nortel SNAS 4050 devices
in the cluster do not have the same SSL
Nortel SNAS 4050 license (with reference
to number of concurrent users).
license
ALARM
(WARNING)
System
Control
The (demo) license loaded to the local
Nortel SNAS 4050 expires within 7 days.
Check loaded licenses using the /cfg/
sys/cur command.
license_expired
EVENT
System
Control
Indicates that the the demo license at host
<IP> has expired. Check the loaded
licenses with /cfg/sys/cur.
License expired
WARNING
Traffic
Processing
The loaded (demo) license on the Nortel
SNAS 4050 has expired. The Nortel
SNAS 4050 now uses the default license.
Loaded <ip>:<port>
INFO
Start-up
Initializing virtual server <ip>:<port>.
log_open_failed
ALARM
(MAJOR)
System
Control
The event log (where all events and alarms
are stored) could not be opened.
LoginSucceeded Domain=”1”
INFO
SrcIp=”<IPaddr>” Method=”ssl”
User=”<user>” Groups=”<group>/
<profile>/
NSNAS
On Domain 1, user “<user>” with IP : ”<IP>”
and belonging to group “<group>/<profile>/
” has logged in.
Logs filesystem re-initialized
OS
Loss of logs.
ERROR
Nortel Secure Network Access Switch 4050 User Guide
870 Appendix B Syslog messages
Table 204 Syslog messages in alphabetical order (Sheet 6 of 10)
Message
Type
Explanation
make_software_release_permane ALARM
nt_failed
(CRITICAL)
System
Control
Failed to make a new software release
permanent after being activated. The
system will automatically revert to the
previous version.
Missing files in config filesystem
ERROR
OS
Possible loss of configuration. Followed by
the message “Config filesystem
re-initialized - reinstall required” or “Config
filesystem restored from backup”.
No cert supplied by backend
server
INFO
Traffic
Processing
No certificate supplied by backend server
when doing SSL connect. Session
terminated to backend server.
No CN supplied in server cert
<subject>
INFO
Traffic
Processing
No CN found in the subject of the certificate
supplied by the backend server.
No more than <nr> backend
supported
INFO
Start-up
Generated when more than the maximum
allowed backend servers have been
configured.
No PortalGuard license loaded:
Domain <id> *will* use portal
authentication
WARNING
Traffic
Processing
The PortalGuard license has not been
loaded on the Nortel SNAS 4050 but
No Secure Service Partitioning
loaded: server <id> *will not* use
interface <n>
WARNING
Traffic
Processing
The Secure Service Partitioning license
has not been loaded on the Nortel
SNAS 4050 but the server is configured to
use a specific interface.
No TPS license limit
INFO
Start-up
Unlimited TPS license used.
NSNAS AddressAssigned
Domain=”<id>” Method=<”ssl”>
SrcIp=”<ip>” User=”<user>”
TunIP=”<inner tunnel ip>”
INFO
AAA
Source IP address for the connection
between the Nortel SNAS 4050 and the
destination address (inner tunnel) has been
allocated.
NSNAS LoginFailed
Domain=”<id>” Method=<”ssl”>
SrcIp=”<ip>” [User=”<user>”]
Error=<error>
INFO
AAA
Logon to the Nortel SNAS 4050 domain
failed. The client’s access method, IP
address, and user name is shown.
NSNAS LoginSucceeded
Domain=”<id>” Method=<”ssl”>
SrcIp=”<ip>” User=”<user>”
Groups=”<groups>”
INFO
AAA
Login to the Nortel SNAS 4050 domain
succeeded. The client’s access method, IP
address, user name and group
membership is shown.
320818-A
Severity
/cfg/domain #/server/portal/
authenticate is set to off.
Appendix B Syslog messages 871
Table 204 Syslog messages in alphabetical order (Sheet 7 of 10)
Message
Severity
Type
Explanation
NSNAS LoginSucceeded
Domain=”<id>” Method=<”ssl”>
SrcIp=”<ip>” User=”<user>”
Groups=”<groups>”
TunIP=”<inner tunnel ip>”
INFO
AAA
Login to the Nortel SNAS 4050 domain
succeeded. The client’s access method,
client IP address, user name and group
membership is shown as well as the IP
address allocated to the connection
between the Nortel SNAS 4050 and the
destination address (inner tunnel).
NSNAS Logout Domain=”<id>”
SrcIp=”<ip>” User=”<user>”
INFO
AAA
Client has logged out from the Nortel
SNAS 4050 domain.
partitioned_network
EVENT
System
Control
Sent to indicate that a Nortel SNAS 4050 is
recovering from a partitioned network
situation.
PORTAL Rejected Domain=”<id>” INFO
User=”<user>” Proto=”<proto>”
Host=”<host>” Share=”<share>”
Path=”<path>”
AAA
The remote user failed to access the
specified folder/directory on the specified
file server requested from the Portal’s Files
tab.
PORTAL Domain=”<id>”
User=”<user>” Proto=”<proto>”
Host=”<host>” Share=”<share>”
Path=”<path>”
INFO
AAA
The remote user has successfully
accessed the specified folder/directory on
the specified file server requested from the
Portal’s Files tab.
Rebooting to revert to permanent
OS version
ERROR
OS
Happens after “Config filesystem
re-initialized - reinstall required” or “Config
filesystem restored from backup” if
software upgrade is in progress (i.e. if
failure at first boot on new OS version).
reload cert config done
INFO
Config
Reload
Certificate reloading done.
reload cert config start
INFO
Config
Reload
Starting reloading of certificates.
reload configuration done
INFO
Config
Reload
Virtual server configuration reloading done.
reload configuration network down INFO
Config
Reload
Accepting new sessions are temporarily
put on hold.
reload configuration network up
INFO
Config
Reload
Resuming accepting new sessions after
loading new configuration.
reload configuration start
INFO
Config
Reload
Virtual server configuration reloading start.
Root filesystem corrupt
EMERG
OS
The system cannot boot, but stops with a
single-user prompt. fsck failed. Reinstall in
order to recover.
Nortel Secure Network Access Switch 4050 User Guide
872 Appendix B Syslog messages
Table 204 Syslog messages in alphabetical order (Sheet 8 of 10)
Message
Severity
Type
Explanation
Root filesystem repaired rebooting
ERROR
OS
fsck found and fixed errors. Probably OK.
Server <id> uses default interface WARNING
(interface <n> not configured)
Traffic
Processing
A specific interface is configured to be used
by the server but this interface is not
configured on the Nortel SNAS 4050.
Set CSWIFT as default
INFO
Start-up
Using CSWIFT SSL hardware acceleration.
Since we use clicerts, force adjust INFO
totalcache size to : <size> per
server that use clicerts
Start-up
Generated if the size of the SSL session
cache has been modified.
single_master
ALARM
(WARNING)
System
Control
Only one master Nortel SNAS 4050 in the
cluster is up and running.
socks error: <reason>
ERROR
Traffic
Processing
Error encountered when parsing the socks
traffic from the client. Probably a
non-standard socks client.
SOCKS Rejected Domain=”<id>”
User=”<user>” SrcIP=”<ip>”
Request=”<request>”
INFO
AAA
The client failed to perform an operation by
using one of the features available under
the portal’s Advanced tab.
socks request: socks version
<version> rejected
ERROR
Traffic
Processing
Socks request of version <version>
received and rejected. Most likely a
non-standard socks client.
SOCKS Domain=”<id>”
User=”<user>” SrcIP=”<ip>”
Request=”<request>”
INFO
AAA
The client has successfully performed an
operation by using one of the features
available under the portal’s Advanced tab.
software_configuration_changed
EVENT
System
Control
Indicates that release <VSN> (version) has
been <Status> (unpacked/installed/
permanent).
software_release_copying
EVENT
System
Control
Indicates that <IP> is copying the release
<VSN> from another cluster member.
software_release_rebooting
EVENT
System
Control
Indicates that a Nortel SNAS 4050 (<IP>)
is rebooting on a new release (in other
words, a Nortel SNAS 4050 that was not up
and running during the normal installation
is now catching up).
ssi_mipishere
EVENT
System
Control
Tells that the MIP (management IP
address) is now located at the Nortel
SNAS 4050 with the <IP> host IP address.
switch controller:switch
[1:<switchID>] – Added
INFO
NSNAS
Switch <switchID> has been added to
Domain 1.
switch controller:switch
[1:<switchID>] - Deleted
INFO
NSNAS
Switch <switchID> has been deleted from
Domain 1.
320818-A
Appendix B Syslog messages 873
Table 204 Syslog messages in alphabetical order (Sheet 9 of 10)
Message
Severity
Type
Explanation
switch controller:switch
[1:<switchID>] – Disconnected
INFO
NSNAS
Switch <switchID> of Domain 1 has
disconnected from the NSNAS.
switch controller:switch
[1:<switchID>] – Modified
INFO
NSNAS
The CLI configuration of Domain 1, Switch
<switchID> has been modified.
System started [isdssl-<version>]
INFO
System
Control
Sent whenever the system control process
has been (re)started.
The private key and certificate
don't match for <server nr>
ERROR
Traffic
Processing
Key and certificate does not match for
server #. The certificate has to be changed.
TPS license limit (<limit>)
exceeded
WARNING
Traffic
Processing
The transactions per second (TPS) limit
has been exceeded.
TPS license limit: <limit>
INFO
Start-up
TPS limit set to <limit>.
INFO
transferring user <user> on
Switch=”1:<switchID>(<IPaddr>)”,
Port=”<unit/port>” to
Vlan=”<vlan>(<vlanID>)
NSNAS
Client device on Domain 1, Switch
<switchID> (switch IP address <IPaddr> ),
Unit <unit>, Port <port> is being moved to
the VLAN named <vlan> with VLAN ID
<vlanID>.
INFO
tunnelguard: user
<username>[<pVIP>] – SRS
check failed, restrictingSRS –
<SRS rule> <comment> – <item>
– <reason>
NSNAS
TunnelGuard applet report: The user with
user name <username>, logged on to the
Nortel SNAS 4050 portal with portal Virtual
IP address <pVIP>, has failed the SRS rule
check, and access is restricted in
accordance with the behavior configured
for SRS rule failure. To identify the rule, the
message includes the <SRS rule> name
and additional <comment> information
defined for the rule. The message also
includes the element of the SRS rule
(<item>) that failed and the <reason> (for
example, file not found).
tunnelguard: user
<username>[<pVIP>] – SRS
checks ok, open session
NSNAS
TunnelGuard applet report: The user with
user name <username>, logged on to the
Nortel SNAS 4050 portal with portal Virtual
IP address <pVIP>, has passed the SRS
rule check and is authorized to start a
session in a Green VLAN.
Unable to find client private key for ERROR
<server #>
Traffic
Processing
Key for doing sslconnect is not valid.
Please reconfigure.
ERROR
Traffic
Processing
Certificate for doing sslconnect is not valid.
Please reconfigure.
Unable to use client private key for ERROR
<server #>
Traffic
Processing
Key for doing sslconnect is not valid.
Please reconfigure.
Unable to use client certificate for
<server #>
INFO
Nortel Secure Network Access Switch 4050 User Guide
874 Appendix B Syslog messages
Table 204 Syslog messages in alphabetical order (Sheet 10 of 10)
Message
Severity
Type
Explanation
Unable to use the certificate for
<server nr>
ERROR
Traffic
Processing
Unsuitable certificate configured for server
#.
unknown WWW-Authenticate
method, closing
ERROR
Traffic
Processing
Backend server sent unknown HTTP
authentication method.
vbscript error: <reason> for:
<host><path>
ERROR
Traffic
Processing
VBScript parsing error encountered when
parsing content from <host><path>. This
could be a problem in the Nortel
SNAS 4050 VBScript parser, but most
likely a syntactical error in the VBScript on
that page.
www_authenticate: bad
credentials
ERROR
Traffic
Processing
The browser sent a malformed
WWW-Authenticate: credentials header.
Most likely a broken client.
320818-A
875
Appendix C
Supported MIBs
This appendix describes the Management Information Bases (MIB) and traps
supported by the Nortel SNAS 4050.
•
•
“Supported MIBs” on page 875
“Supported traps” on page 879
For detailed information about the MIB definitions currently implemented for the
SNMP agent, do the following:
1
Go to www.nortel.com/support.
2
Navigate to the Nortel SNAS 4050 Software page.
3
Download the tar.gz file for the Nortel SNAS 4050 MIBs.
4
Unzip the .tar file in order to access the file ALTEON-SAC-CAP.mib.
ALTEON-SAC-CAP.mib contains an AGENT-CAPABILITIES statement,
which formally specifies which MIBs are implemented.
For information about configuring the SNMP agent in a cluster, see “Configuring
SNMP” on page 617.
Supported MIBs
The following MIBs are supported by the Nortel SNAS 4050:
•
•
•
•
ALTEON-ISD-PLATFORM-MIB
ALTEON-ISD-SSL-MIB
ALTEON-ROOT-MIB
ALTEON-SAC-CAP
Nortel Secure Network Access Switch 4050 User Guide
876 Appendix C Supported MIBs
•
•
•
•
•
•
•
•
•
•
•
•
•
•
•
•
•
•
•
ALTEON-SSL-VPN-MIB
ANAifType-MIB
DISMAN-EVENT-MIB
ENTITY-MIB
IF-MIB
IP-FORWARD-MIB
IP-MIB
NORTEL-SECURE-ACCESS-SWITCH-MIB
S5-ROOT-MIB
S5-TCS-MIB
SNMP-FRAMEWORK-MIB
SNMP-MPD-MIB
SNMP-NOTIFICATION-MIB
SNMP-TARGET-MIB
SNMP-USER-BASED-SM-MIB
SNMPv2-MIB
SNMP-VIEW-BASED-ACM-MIB
SYNOPTICS-ROOT-MIB
5-ETH-MULTISEG-TOPOLOGY-MIB
Table 205 provides more information about some of the MIBs supported by the
Nortel SNAS 4050.
Table 205 Supported MIBs (Sheet 1 of 3)
MIB
Description
ALTEON-ISD-PLATFORM-MIB
Contains the following groups and objects:
• isdClusterGroup
• isdResourceGroup
• isdAlarmGroup
• isdBasicNotificatioObjectsGroup
• isdEventNotificationGroup
• isdAlarmNotificationGroup
320818-A
Appendix C Supported MIBs 877
Table 205 Supported MIBs (Sheet 2 of 3)
MIB
Description
ALTEON-ISD-SSL-MIB
Contains objects for monitoring the SSL gateways. The following
groups are implemented:
• sslBasicGroup
• sslEventGroup
ALTEON-SSL-VPN-MIB
The following group is implemented:
• vpnBasicGroup
DISMAN-EVENT-MIB
The MIB module for defining event triggers and actions. The
following groups are implemented:
• dismanEventResourceGroup
• dismanEventTriggerGroup
• dismanEventObjectsGroup
• dismanEventEventGroup
• dismanEventNotificationObjectGroup
ENTITY-MIB
The following groups are implemented:
• entityPhysicalGroup
• entityPhysical2Group
• entityGeneralGroup
• entityNotificationsGroup
Write access to snmpTargetParamsTable is turned off in VACM.
IF-MIB
The following groups are implemented:
• ifPacketGroup
• ifStackGroup
Limitations
The agent does not implement the following objects:
• ifType
• ifSpeed
• ifLastChange
• ifInUnknownProtos
• ifOutNUnicast
IP-FORWARD-MIB
The following group is implemented:
• ipCidrRouteGroup
IP-MIB
The following groups are implemented:
• ipGroup
• icmpGroup
Nortel Secure Network Access Switch 4050 User Guide
878 Appendix C Supported MIBs
Table 205 Supported MIBs (Sheet 3 of 3)
MIB
Description
NORTEL-SECURE-ACCESS-SWITCHMIB
Contains objects for monitoring the Nortel SNAS 4050 devices.
The following groups are implemented:
• snasBasicGroup
• snasEventGroup
SNMP-FRAMEWORK-MIB
The following group is implemented:
• snmpEngineGroup
SNMP-MPD-MIB
The following group is implemented:
• snmpMPDGroup
SNMP-NOTIFICATION-MIB
The following group is implemented:
• snmpNotifyGroup
Write access to all objects in this MIB is turned off in VACM.
SNMP-TARGET-MIB
The SNMP-TARGET-MIB contains information about where to
send traps. You can configure and view trap information from the
CLI, using the /cfg/sys/adm/snmp/target command
(see “Configuring SNMP notification targets using the CLI” on
page 626), or from the SREM (see “Configuring SNMP targets
using the SREM” on page 634).
The following groups are implemented:
• snmpTargetCommandResponderGroup
• snmpTargetBasicGroup
• snmpTargetResponseGroup
Write access to snmpTargetParamsTable is turned off in VACM.
SNMP-USER-BASED-SM-MIB
The following group is implemented:
• usmMIBBasicGroup
Write access to all objects in this MIB is turned off in VACM.
SNMPv2-MIB
A standard MIB implemented by all agents. The following groups
are implemented:
• snmpGroup
• snmpSetGroup
• systemGroup
• snmpBasicNotificationsGroup
• snmpCommunityGroup
SNMP-VIEW-BASED-ACM-MIB
The following group is implemented:
• vacmBasicGroup
Write access to all objects in this MIB is turned off in VACM.
320818-A
Appendix C Supported MIBs 879
Supported traps
Table 206 describes the traps supported by the Nortel SNAS 4050.
Table 206 Supported traps
Trap Name
Description
authenticationFailure
Sent when the SNMP agent receives an SNMP message which is not
properly authenticated. This trap is disabled by default. To enable the
trap through SNMP, set snmpEnableAuthenTraps to enabled or
use the CLI command /cfg/sys/adm/snmp/snmpv2-mib/
snmpenable.
Defined in SNMPv2-MIB.
coldStart
Sent when the Nortel SNAS 4050 reboots.
Defined in SNMPv2-MIB.
isdAlarmCleared
Sent when an alarm is cleared.
isdDown
Signifies that a Nortel SNAS 4050 device in the cluster is down and
out of service.
isdLicense
Sent when the Nortel SNAS 4050 devices in the cluster have different
licenses and when a demo license has seven days left before
expiration.
Defined in ALTEON-ISD-PLATFORM-MIB.
isdLicenseExpired
Sent when a license has expired.
isdMipMigration
Signals that the master IP has migrated to another Nortel
SNAS 4050.
isdSingleMaster
Signifies that only one master Nortel SNAS 4050 in the cluster is up
and operational. Only having one master in a cluster means that the
fault tolerance level is severely degraded — if the last master fails, the
system cannot be reconfigured.
linkDown
Sent when the agent detects that one of the links (interfaces) has
gone down.
Defined in IF-MIB.
linkUp
Sent when the agent detects that one of the links (interfaces) has
gone up.
Defined in IF-MIB.
Nortel Secure Network Access Switch 4050 User Guide
880 Appendix C Supported MIBs
320818-A
881
Appendix D
Supported ciphers
The Nortel SNAS 4050 supports SSL version 2.0, SSL version 3.0, and TLS
version 1.0. The Nortel SNAS 4050 supports all ciphers covered in these versions
of SSL, except the IDEA and FORTEZZA ciphers and ciphers using DH or DSS
authentication.
Table 207 Supported ciphers
Cipher name
SSL protocol
Key Exchange Algorithm, Encryption
Authentication
Algorithm
MAC Digest
Algorithm
DHE-RSA-AES256-SHA
SSLv3
DH, RSA
AES (256)
SHA1
AES256-SHA
SSLv3
RSA, RSA
AES (256)
SHA1
EDH-RSA-DES-CBC3-SHA
SSLv3
DH, RSA
3DES (168)
SHA1
DES-CBC3-SHA
SSLv3
RSA, RSA
3DES (168)
SHA1
DES-CBC3-MD5
SSLv2
RSA, RSA
3DES (168)
MD5
DHE-RSA-AES128-SHA
SSLv3
DH, RSA
AES (128)
SHA1
AES128-SHA
SSLv3
RSA, RSA
AES (128)
SHA1
RC4-SHA
SSLv3
RSA, RSA
RC4 (128)
SHA1
RC4-MD5
SSLv3
RSA, RSA
RC4 (128)
MD5
RC2-CBC-MD5
SSLv2
RSA, RSA
RC2 (128)
MD5
RC4-MD5
SSLv2
RSA, RSA
RC4 (128)
MD5
RC4-64-MD5
SSLv2
RSA, RSA
RC4 (64)
MD5
EXP1024-RC4-SHA
SSLv3
RSA(1024), RSA
RC4 (56)
SHA1
EXPORT
EXP1024-DES-CBC-SHA
SSLv3
RSA (1024), RSA
DES (56)
SHA1
EXPORT
EXP1024-RC2-CBC-MD5
SSLv3
RSA (1024), RSA
RC2 (56)
MD5
EXPORT
EXP1024-RC4-MD5
SSLv3
RSA (1024), RSA
RC4 (56)
MD5
EXPORT
Nortel Secure Network Access Switch 4050 User Guide
882 Appendix D Supported ciphers
Table 207 Supported ciphers
Cipher name
SSL protocol
Key Exchange Algorithm, Encryption
Authentication
Algorithm
MAC Digest
Algorithm
EDH-RSA-DES-CBC-SHA
SSLv3
DH, RSA
DES (56)
SHA1
DES-CBC-SHA
SSLv3
RSA, RSA
DES (56)
SHA1
DES-CBC-MD5
SSLv2
RSA, RSA
DES (56)
MD5
EXP-EDH-RSA-DES-CBC-SH
A
SSLv3
DH (512), RSA
DES (40)
SHA1
EXPORT
EXP-DES-CBC-SHA
SSLv3
RSA (512), RSA
DES (40)
SHA1
EXPORT
EXP-RC2-CBC-MD5
SSLv3
RSA (512), RSA
RC2 (40)
MD5
EXPORT
EXP-RC4-MD5
SSLv3
RSA (512), RSA
RC4 (40)
MD5
EXPORT
EXP-RC2-CBC-MD5
SSLv2
RSA (512), RSA
RC2 (40)
MD5
EXPORT
EXP-RC4-MD5
SSLv2
RSA (512), RSA
RC4 (40)
MD5
EXPORT
ADH-AES256-SHA
SSLv3
DH, NONE
AES (256)
SHA1
ADH-DES-CBC3-SHA
SSLv3
DH, NONE
3DES (168)
SHA1
ADH-AES128-SHA
SSLv3
DH, NONE
AES (128)
SHA1
ADH-RC4-MD5
SSLv3
DH, None
RC4 (128)
MD5
ADH-DES-CBC-SHA
SSLv3
DH, NONE
DES (56)
SHA1
EXP-ADH-DES-CBC-SHA
SSLv3
DH (512), None
DES (40)
SHA1
EXPORT
EXP-ADH-RC4-MD5
SSLv3
DH (512), None
RC4 (40)
MD5
EXPORT
320818-A
883
Appendix E
Adding User Preferences attribute to Active
Directory
For the remote user to be able to store user preferences on the Nortel SNAS 4050,
you need to add the isdUserPrefs attribute to Active Directory. This attribute will
contain an opaque data structure, containing various information that the user may
have saved during a Portal session.
This description is based on Windows 2000 Server and Windows Server 2003.
Make sure that your account is a member of the Schema Administrators group.
Install All Administrative Tools
(Windows 2000 Server)
1
Open the Control Panel and double-click Add/Remove Programs.
2
Select Windows 2000 Administrative Tools and click Change.
3
Click Next and select Install All Administrative Tools.
4
Follow the instructions on how to proceed with the installation.
Register the Schema Management dll
(Windows Server 2003)
1
Click Start and select Run.
2
In the Open field, enter regsvr32 schmmgmt.dll.
Note that there is a space between regsvr32 and schmmgmt.dll.
3
Click OK.
This command will register schmmgmt.dll on your computer.
Nortel Secure Network Access Switch 4050 User Guide
884 Appendix E Adding User Preferences attribute to Active Directory
Add the Active Directory Schema Snap-in
(Windows 2000 Server and Windows Server 2003)
1
Click Start and select Run.
2
On Windows 2000 Server, enter mmc in the Open field.
On Windows Server 2003, enter mmc /a instead.
Note that there is a space between mmc and /a.
3
Click OK.
The Console window displays.
4
320818-A
On the File (Console) menu, select Add/Remove Snap-in.
Appendix E Adding User Preferences attribute to Active Directory 885
The Add/Remove Snap-in window displays.
5
Click Add.
The Add Standalone Snap-in window displays.
6
Under Snap-in, select Active Directory Schema and click Add.
Active Directory Schema is added to the Add/Remove Snap-in window.
7
Click Close to close the Add Standalone Snap-in window.
The Add/Remove Snap-in window redisplays.
Nortel Secure Network Access Switch 4050 User Guide
886 Appendix E Adding User Preferences attribute to Active Directory
8
Click OK.
The Console window redisplays.
9
To save the console (including the Schema snap-in), go to the File (Console)
menu and select Save.
The Save As windows displays.
10 Save the console in the Windows\System 32 root folder.
As file name, enter schmmgmt.msc.
11 Click Save.
Create a shortcut to the console window
1
Right-click Start, and select Open all Users.
2
Double-click the Programs and Administrative Tools folders.
3
On the File menu, point to New, and then select Shortcut.
The Create Shortcut Wizard displays.
4
In the Type the location of the item field, type schmmgmt.msc.
5
Click Next.
The Select a Title for the Program page displays.
6
In the Type a name for this shortcut field, type Active Directory
Schema.
7
Click Finish.
Permit write operations to the schema
(Windows 2000 Server)
To allow a domain controller to write to the schema, you must set a registry entry
that permits schema updates.
320818-A
1
In the Console window, on the left pane, right-click Active Directory Schema.
2
Select Operations Master.
Appendix E Adding User Preferences attribute to Active Directory 887
3
Select the check box The Schema may be modified on this Domain
Controller.
4
Click OK.
Create a new attribute
(Windows 2000 Server and Windows Server 2003)
To create the isdUserPrefs attribute, proceed as follows:
1
In the Console window, on the left pane, expand Active Directory Schema by
clicking the plus (+) sign.
The Attributes and Classes folders display.
2
Right-click Attributes, point to New and select Attribute.
You receive a warning that creating schema objects is a permanent operation
and cannot be undone.
3
Click Continue.
The Create New Attribute window displays.
4
Create the isdUserPrefs attribute as shown below:
5
Click OK.
Nortel Secure Network Access Switch 4050 User Guide
888 Appendix E Adding User Preferences attribute to Active Directory
Create the new class
To create the nortelSSLOffload class, proceed as follows:
1
In the Console window, right-click Classes, point to New and select Class.
You will now receive a warning that creating schema classes is a permanent
operation and cannot be undone.
2
Click Continue.
The Create New Schema Class window displays.
3
Create the nortelSSLOffload class as shown below:
4
Click OK.
Add isdUserPrefs attribute to nortelSSLOffload class
1
In the Console window, on the left pane, expand Classes.
2
Select the nortelSSLOffload class.
3
Right-click and select Properties.
The Properties window displays.
4
320818-A
Select the Attributes tab and click Add.
Appendix E Adding User Preferences attribute to Active Directory 889
5
Add the isdUserPrefs attribute as optional.
6
On the Default Security (Security) tab, set read/write permissions for the
group that should have permission to write user preferences to the attribute.
7
Click OK.
Add the nortelSSLOffload Class to the User Class
1
In the Console window, on the left pane, expand Classes and select user.
2
Right-click and select Properties.
The Properties window is displayed.
3
Select the Relationship tab.
4
Next to Auxiliary Classes, click Add Class (Add).
Nortel Secure Network Access Switch 4050 User Guide
890 Appendix E Adding User Preferences attribute to Active Directory
5
Add the nortelSSLOffload class as an auxiliary class as shown below:
6
Click OK.
Once you have enabled the User Preferences feature on the Nortel
SNAS 4050 (using the CLI command /cfg/domain #/aaa/auth #/
ldap/enauserpre or the BBI setting User Preferences under VPN
Gateways>Authentication>Auth Servers (LDAP)>Modify) the remote
user should now be able to store user preferences in Active Directory.
320818-A
891
Appendix F
Configuring DHCP to auto-configure IP Phones
The DHCP server and the IP Phone 2002, IP Phone 2004, and IP Phone 2007 can
be configured so that the IP Phone automatically obtains its configuration data
from the DHCP server. This feature reduces the administrative overhead
associated with bringing a large number of IP Phones online.
In addition, the DHCP server and the IP Phone can be configured so that the
IP Phone can use the Auto VLAN Discovery feature, which allows the IP Phone
to discover the Phone VLAN ID.
This appendix explains how to:
•
•
configure the IP Phone to obtain its configuration data from a Windows 2000
Server DHCP server
retrieve VLAN information required to take advantage of the Auto VLAN
Discovery feature
This appendix is not intended to be a primer on how to set up a DHCP server. The
reader is assumed to have a working knowledge of Windows 2000 Server DHCP
servers. The appendix also does not describe the process used by the IP Phone to
interact with the DHCP server or to boot itself into the Phone VLAN.
Note: It is assumed that the necessary DHCP scopes defining the range
of addresses and lease duration have been created.
To take advantage of the Auto VLAN Discovery feature, two VLANs are
required: one for the phone to boot into initially, in order to communicate with the
DHCP server and learn the appropriate phone VLAN ID, and the second for the
Phone VLAN itself.
Nortel Secure Network Access Switch 4050 User Guide
892 Appendix F Configuring DHCP to auto-configure IP Phones
For information on the minimum firmware versions required to support IP Phones
in the Nortel SNA solution, see Release Notes for the Nortel Secure Network
Access Solution, Software Release 1.0 (320850-A).
Configuring IP Phone auto-configuration
To configure Windows 2000 Server DHCP to auto-configure the IP Phones,
perform the following steps:
1
Create DHCP options (see “Creating the DHCP options” on page 892)
•
•
2
Call Server Information
VLAN Information for auto-discovery of the IP Phone VLAN ID
Configure the DHCP options (see “Configuring the Call Server Information
and VLAN Information options” on page 896)
Repeat this step for the data (or boot) VLAN and the Phone VLAN.
3
Set up the IP Phone (see “Setting up the IP Phone” on page 899)
Creating the DHCP options
1
On the Windows 2000 Server Start menu, select Programs > Administrative
Tools > DHCP.
The DHCP Management Console opens (see Figure 245 on page 893).
320818-A
Appendix F Configuring DHCP to auto-configure IP Phones 893
Figure 245 The DHCP Management Console
2
Select the DHCP server you want to configure.
Note: When you expand the DHCP server navigation tree component,
the scopes for that particular server are listed below the server name and
IP address.
3
From the DHCP Management Console toolbar, select Action > Set
Predefined Options.
Nortel Secure Network Access Switch 4050 User Guide
894 Appendix F Configuring DHCP to auto-configure IP Phones
The Predefined Options and Values dialog box opens (see Figure 246).
Figure 246 The Predefined Options and Values dialog box
4
Click Add.
The Option Type dialog box opens (see Figure 247 on page 895).
320818-A
Appendix F Configuring DHCP to auto-configure IP Phones 895
Figure 247 The Option Type dialog box
5
Create the DHCP option for the call server information.
a
In the Option Type dialog box, enter the required information (see
Table 208).
Table 208 Option Type dialog box field values for Call Server Information
Field
Value
Name
Call Server Information
Data type
String
Code
128 (Call Server configuration)
Description
Comments (Optional)
b
6
Click OK.
Create the DHCP option for the auto-discovery of VLAN ID information:
a
In the Predefined Options and Values dialog box, click Add.
The Option Type dialog box opens (see Figure 247 on page 895).
Nortel Secure Network Access Switch 4050 User Guide
896 Appendix F Configuring DHCP to auto-configure IP Phones
b
In the Option Type dialog box, enter the required information (see
Table 209).
Table 209 Option Type dialog box field values for VLAN Information
Field
Value
Name
VLAN Information
Data type
String
Code
191
Description
Comments (Optional)
c
7
Click OK.
In the Predefined Options and Values dialog box, click OK, to return to the
DCHP Management Console.
Configuring the Call Server Information and VLAN
Information options
For the Auto VLAN Discovery feature, you must configure the options for both
the data (or boot) VLAN and the Phone VLAN. Configure the option for the data
(or boot) VLAN first, then repeat the steps to configure the option for the Phone
VLAN.
To configure the options, perform the following steps.
1
In the DHCP Management Console, expand the required VLAN:
•
•
2
320818-A
first, the data (or boot) VLAN used with the IP Phone
when you repeat the steps, the Phone VLAN
Right-click Scope Options, and select Configure Options.
Appendix F Configuring DHCP to auto-configure IP Phones 897
The Scope Options dialog box displays (see Figure 248).
Figure 248 The Scope Options dialog box
3
Using the scroll bar, scroll down the list to find the two DHCP options just
created.
Nortel Secure Network Access Switch 4050 User Guide
898 Appendix F Configuring DHCP to auto-configure IP Phones
4
Configure Call Server Information:
a
Select the check box beside 128 Call Server Information.
b
In the String value field, enter the following string:
Nortel-i2004-A,iii.iii.iii.iii:ppppp,aaa,rrr;iii.iii.iii.iii:ppppp,aaa,rrr.
Note: The Nortel IP Phone 2002, IP Phone 2004, and IP Phone 2007
use the same signature. Therefore, the string value for Call Server
Information is the same for all these IP Phones.
Table 210 describes the parameters.
Table 210 Call Server Information string parameter values
Parameter
Description
A
The hardware revision of the IP Phone
iii.iii.iii.iii
The IP Address of the Call Server (S1 or S2)